Leaderboard


Popular Content
Showing content with the highest reputation on 02/18/2024 in all areas
-
Old school internal sensors failed early, and always. SeeLevel is awesome, imo. We used them in our boat, too, when we upgraded our system, based onbl their reliability in our camper. As everyone has noted, including @Jason Fosterthey still have to rely on sending through the wall. You said you rarely use the black tank. Change that up, and do follow @Mike and Carol practices. DON'T dump that black tank when only a bit full. Do add calgon, or borax mixed with warm water first, and drive it around to the next camp site. (The old school ice in the tank has never worked for us, in used rentals that we've delivered.) If you follow Mike and Carol's procedures, several times, with a mostly full tank ( you can see it, on visual inspection), you have a bad sensor , imo. Contact SeeLevel. Replacing the sensor with a poop pyramid, or unclean tank walls, will yield the same results. So, do try to clean it up first, imo.7 points
-
Generally, when these sensors malfunction, it is because of residue sticking to the sensors interfering with their function. I would fill the tank completely with water and let it sit full for a few days to help soften the residue, then use a wand style tank flush inserted into the toilet from the top to direct the pressurized flow toward the sensor. If this doesn't work, find a kid with a really small arm.... lol.5 points
-
Let me be clear. The Truma is AMAZING. Keep it. My Truma will supply hot water forever as long as I have a water supply and gas to keep it running. I've had the others and was not impressed. There is a reason why Truma costs a lot of money to buy and fix. They work. There are four ways I can winterize my Oliver: 1. Traditional: Shut off valve and drain Truma. Then circulate water system with antifreeze. (RV specific) 2. Lazy: Keep the trailer camp ready: Water tanks full, Truma on, and Gas heat set to 55. 3. Lazy 2: Same as 2, only drain Truma water heater. 4. Super Lazy: Put my trailer in a heated shop. The Truma water heater is the easiest to winterize because it only takes three steps: Turn power off, turn water supply off, drop yellow drain lever. Done.5 points
-
I just ran across and decided to follow a web site that's been ongoing for 23 years according to the introduction. It has a wealth of information about everything RV. Numerous articles are posted each week by actual RVers about every topic that's relevant. My reason for posting this here is because the first search I did was simply for "Oliver" and found that four articles they've posted over the past few years popped up. Thought it was worth sharing. https://www.rvtravel.com/?s=Oliver4 points
-
If the previous owners were not diligent with their black tank maintenance, you may be dealing with their deposits that have become a part of the tank. Yuck. As Jason suggested I would add before filling the tank I would throw in a detergent pod and some liquid Calgon water softener. Also, drive around a bit to get some agitation. If you’re going to leave it sit for a while you might try some Happy Camper, we add it whenever we’re home and our trailer is going to sit for a month or two. After every dump we add a laundry detergent pod (whatever is cheap) and some Calgon water softener. We usually dump at our destination, driving with some level of fullness in the black tank. The only time we dump before we leave is if we’re going to a location where we won’t be able to dump. When dumping, I always fill the tank to 80% or so and then do a couple of additional fills/flushes until what comes out is clear. Good luck! Mike4 points
-
Just came across this during an internet search: This was an old post on another forum, and I'm sure you probably want to use someone local, but it will likely be much cheaper to have it installed if you remove the water heater and take it to a Truma dealer.
 4 points
 -
I am aware that some owners use the Hughes Autoformers, even in combo with one of their Power Watchdog surge protectors. Although designed for easy use outside at the shore power post, they can be installed inside an RV which is what I decided to do. Without going into much detail, the Autoformers (available in 30A and 50A models) boost voltage when drops occur, as well as provide surge/spike protection. Surprisingly enough, a ‘search’ of this Forum did not show many results for these Autoformers. As a cost saving measure and matter of convenience, I passed on their Internal Hardwire Mounting Kit and simply made use of a new 10’ 30A RV extension cord. I did however, opt for their Mounting Bracket due to space limitations and ease of removal for service needs. Upon disconnecting all power sources, I proceeded with removal of the exterior street side Furrion 30A Twist Lock male plug. Although I never experienced any problems in the past, I did find the ‘white’ neutral wire connection loose, probably from vibration. You’ve heard it before and now again, routinely check your wiring connections! I then opened up the Automatic Transfer Relay and disconnected the individual wire ends of the stock 10 AWG Boat Cable. I was pleased to find my unit had the Wago Lever-Nuts wire connectors! The clamp connector was loosened and cable removed, all 24” of it. Note: I opted for the front 30A convenience plug for generator use, thus the stated ‘relay’. The female plug end of the aforementioned 30A RV extension cord was cut off, measuring ~35” of cable length below the red plug and subsequently connected it to the Furrion Twist Lock plug. I used the removed cable to gauge how far to strip back the outer cable cover and individual wire ends. Again, pleased to find that the individual wire inserts on the Furrion were color-coded to ensure proper wiring. If you forget to position the neoprene gasket prior to connecting the wires, just know it can be ‘gently’ fitted over the Furrion’s cap and base. The mounting screws were then aligned with the gasket and hull holes for reattachment. The installed female plug extension was laid out and connected to the remaining length of the male plug extension; the end of which was then fed into the relay to mark where to make another cut. For clarification, the cable right of the red plugs is the whip on the Autoformer, the left is the excess length to be trimmed. As before, the former cable was used to gauge necessary wire stripping. The cut length measured ~38” of cable below the red plug and subsequently attached to respective Wago connectors/ground. The cable clamp was then tightened and lid placed back on the relay. By connecting the two red plug ends, the circuit loop is restored to the original configuration, but now longer and modular. The connected cables can now to tucked away when bypassing the Autoformer. Note: the final position and orientation of the Autoformer will differ from this pic. The plug ends can now be disconnected from each other and connected to the Autoformer, as necessary, to bring it into play. These pics show the final position and orientation. Note: the ‘yellow’ light on the Autoformer indicates it is boosting, I have known for some time my storage facility voltage fluctuates and just another reason for this install. The above two pics shows a mockup of the Autoformer, which still needs to be properly mounted. I will update this post when undertaking that task.
3 points
-
TYVM. We will arrive at the mothership with these in the truck:
3 points
-
I’m a retired wildlife biologist, been up close and personal with many critters much more dangerous than buffalo!3 points
-
You definitely want to submit a service ticket to Oliver, and provide everything you have shared. support@olivertraveltrailers.com You will get an immediate response back with a ticket. Oliver will follow up pretty quickly on Monday.3 points
-
I was thinking of using a round plastic bottle as a starting point. Just looking for a heavy duty one of the right size. Nice job on yours! GJ3 points
-
The explanation I've gotten is that any "crud" (lets call it) ... on the inside walls of the black tank can inhibit the sensor (your picture shows it) ability to read the content level inside the tank. We use ours toilet freely as needed. Occasionally while we have full hook-ups... I'll use a dedicated black tank hose and give the black tank a good flushing. This helps break off any crud and flush it away before it becomes a permanent part of our black tank. In addition, occasionally when I know we are going to be towing for several hours, I will first drain the tank... and then partially refill the black tank with fresh water and some Dawn dish washing detergent. As we are driving along this solution sloshs back and forth and cleans the inside of the black tank. If the tank hasn't been properly maintained it is possible that it could take a while to really get it clean again. All this said those sensors are not the most accurate things in the world... but they should be much closer than yours appears to be. Ours (for example) will read about 85% when it's really full.3 points
-
Disclaimer: I've never had to replace one of these devices but there is interesting information on this site: SeeLevel Tanks Sensor3 points
-
2 days after picking up our 2022, Hull #1045, while camped at David Crockett State Park, we were plugged into shore power. I pulled up the phone app for Lithonics to check our batteries. They were down to 70%+/-. We were plugged into shore power at Oliver and at David Crockett. We confirmed there was shore power. Call Oliver and they had me check the inverter breaker located on the front wall, street side. It is right next to the actual inverter, which should be off. The breaker had tripped and there was no charging of the batteries. I reset the breaker and we were good. This happened twice more on another trip, and a new breaker was awaiting our arrival home. So with the breaker tripped, there was no charging of the batteries. Check your inverter breaker.3 points
-
After routing wires and an Ethernet cable under the vanity into the closet for the Starlink system, it was time to finish up the “Cubby Mod”. Used some available 3/16” plywood from another project to fashion a shelf and bulkhead to help organize storage. Rattle-canned a white enamel coating and - poof! One and done: Added 2 extra layers of insulation while in there. Cheers!
3 points
-
I think I got it precisely backwards. I think I need this instead.
2 points
-
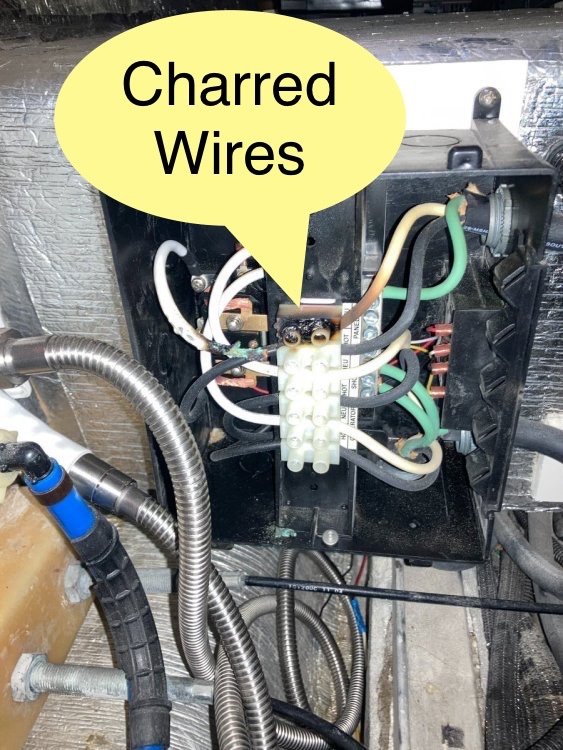
As a safety check as you contact Oliver. There have been a few of those under the dinette transfer switches that failed due to loose wiring connections inside and had thus melted internal wiring. Transfer relay wires can wiggle loose and cause the switch to toggle back and forth when power is applied. To check, you would need to disconnect from shore power and generator, then open the transfer switch box to check if its connections are tight and no smoked wiring.
2 points
-
The story behind the cow and calf above is: I had been fishing the stream right behind my Ollie (stream is visible in the pic and this is my campsite). I was still some distance from camp but walking back via a dirt road when approximately 400 yards in front of me I saw something come out of the woods that was large, black and had fur! Due to the distance and the heavy shade I simply could not tell exactly what this critter was but, I knew that it had crossed to the stream side of the road and was between me and camp. I could hear it but given the vegetation I only caught short glimpses of that black fur. I felt a bit foolish carrying the bear spray in my hand and yelling "hey Bear" when I finally, got to within about 75 yards I saw the calf and figured that if this black critter was a bear then this calf would have already been dinner! Well, Mom and calf seemed to like my camp and hung around for a 1/2 hour or so, but, Mom left me a very nice "present" just outside the door. 🤠💩 Watch where you step and don't get between Mom and baby. Bill2 points
-
And other critters too.
2 points
-
Those things are notoriously bad tempered. Glad you got away with it.2 points
-
Assuming there are no leaks, an air bubble can cause the pump to run. Opening and closing the sink faucet can allow the air to escape. If opening/closing the faucet does not work, then check the strainer by the pump. OFTEN as in very often, poly shreds from OEM install will plug this strainer. Plugged or partially plugged strainer can cause low water pressure or in severe instances no water flow. Worth a check. GJ2 points
-
If you hear clicking like the batteries are trying to charge and then it shuts off and resets everything, then you will have two issues. One is grounding. Looks like someone already mentioned the required grounding plug. The other is the charge controller is pulling too much power. It has to be reset.2 points
-
Good reading info! One item to make sure is that all other loads, such as water heater, A/C, microwave are OFF. This will allow you to adjust the charge setting to a level consistent with a max RUNNING (Not surge) amps of your generator. It would do that if your grounding plug (Technically a grounded neutral plug) is defective. If there are other RV's in the area, ask to momently borrow their Grounded neutral plug for a quick test. Geronimo John PS: The fancy one displayed above is nothing but a regular 120V plug with a jumper wire inside it from the ground wire terminal to the neutral terminal. Most of us buy a $5 plug and make our own.2 points
-
I do not have the type of Xantrex inverter/charger you have so I am not an expert. But what I have read on this Forum for quite awhile now is that it looks to me like you need to change the charger current setting. Tom and Doreen and rich.dev in the posts above explains what setting to change. if you have cell phone service where you are, I would download the app now and try changing the charger current setting as they suggest. Then try the generator again with the EMS turned on. Hopefully that will work. Do NOT forget to put the setting back to here it was when you are hooked up to shore power. Write down the existing setting before changing it so you do not forget the initial setting. If all else false, contat Xantrex (or Oliver) on Monday. Good luck and let us know how you make out.2 points
-
It does sound like the generator cannot supply enough power to satisfy the amount of current needed to charge the batteries. The breaker setting is a good place to start as mentioned above. There is also another setting, #24 (charger current) that allows you to adjust the amount of current allowed to charge your batteries. For lithium batteries I believe the setting is 150 amps. You can try changing that value to something lower ( as a test ) to see if that helps, you can try something really low like 10 amps as a test.2 points
-
You should have a breaker for the inverter under the street side bed on the wheel well, looks like this. Some suggestions... 1) Did you check if the ground bonding plug is seated properly in your generator? 2) Are you running your 3500W generator on gas or propane. Because it generates only approx. 2800 continuous running watts on propane, which at 120V is approx. 23A, which should still be enough power to run your trailer without changing the Xantrex settings. Try changing the Xantrex AC input settings from the factory 25A to 20A, that would be #28 setting in the Xantrex "FXC Control" app. This setting is set to 25A at the facory because the breaker size for the inverter is 25A and the main power supply is 30A which is greater than the breaker size. When you connect to a generator or house receptical that supplies a lower amps, you need to adjust setting #28 down to match the current incoming power supply. Your smaller generator could have messed it up. 3) Like @topgun2 suggested, take a rubber mallet and tap the transfer switch box 4) If you trust your generator turn off the EMS and see if it works.
2 points
-
I don't think that's it because our inverter works and the breaker was not tripped. I think it has something to do with the transfer relay. When the generator is plugged in the The transfer relay keeps trying to switch back and forth and no charging is happening2 points
-
With lithium, you need to change a Xantrex setting before trying to use a small generator. The Oliver's converter (charger) will try to draw more power than the small generator can produce. So, stick with the 3500W genny for now. Also, are these inverter-type generators? Industrial jobsite generators may not produce "clean" power. If the power is drifting in and out of spec, the Oliver's electrical management system may start rejecting/accepting that power. That could be the cause of the clicking. Are you getting error codes on the display in the attic? Next, is the 3500W inverter-type generator producing electricity when not connected to the trailer? Test it with any handy electrical device. If not, the generator's circuit breaker might have tripped. If the generator is producing power, look next to the connection between the trailer and genny. As @topgun2 mentioned, some generators (inc. Honda) require a grounding plug inserted into one the the genny 15A outlets before connecting to an Oliver. If the plug isn't present the EMS will cut the power and the display in the attic will show an error code. The clicking under the dinette might be the transfer switch if you have the optional shore line connector on the front right side of your hitch near the propane tanks. What happens if you plug into the optional front shore line connector instead of the one on the driver's side? When connected to the generator does your microwave have power?2 points
-
I assume that you have the Oliver installed Electrical Management System/Surge Protector? If yes - what does the system's readout indicate? Do you have or need a grounding plug on your generator? What percentage are the batteries currently at? Bill2 points
-
SeaDawg is correct. You don’t want the old outside vents open, dirt and bugs would be the least of your worries. Rain and water spray when washing etc. would end up inside of the trailer. These compressor fridges are not sealed around the backside like the absorption fridges are. Even absorption fridges (my Dometic wasn’t) aren’t sealed underneath, remove the lower grill from a trailer with an absorption fridge and look under the fridge. Mine was open all the way to the front of the fridge. The compressor fridge has to have plenty of air circulation behind to vent heat from the condenser coil. Without proper ventilation not only will the compressor run a lot but, the excess heat will eventually damage the compressor by causing the motor to run hotter. Without proper ventilation the heat cannot be removed from the condenser coil which will cause high head pressure in the compressor itself which will cause the motor to work harder drawing higher amps thus overheating the motor. Sort of a vicious circle situation. During normal running there isn’t a whole lot of heat to deal with, not like the absorption fridges so venting to the inside of the trailer is not really noticeable. The installation manual usually has a specification for the minimum square inches of open area for ventilation. That spec should be followed fairly closely.2 points
-
Yep - #2 not #1. Or, you could ask the campground where you have the reservation if they could move you or if the site you have reserved also has a 30 amp plug at the pedestal - many do. Bill1 point
-
I used SS ones, but if I had to do it over I would use aluminum or THESE in size M5x25. I found the SS ones were tough to bulge/seat propery, but I think it was because of the homemade tool I used!1 point
-
Glad you got it working and a big THANKS to all that got on board trying to help a fellow owner - that is what "family" is all about. Again, sorry I had to run earlier but you were in good hands with all that came to your aid. Bill1 point
-
Flushing the tank will not improve a sensor mounted on the outside of the tank. But checking the connections and maybe cleaning off dust from the sensor may. GJ1 point
-
Yes, and yes. Water quality and pressure vary widely from campground to campground.1 point
-
If anyone has this project in mind and wants to use the same material I used - send me a PM and I'll see if I have any "extra" laying around that I could bring to the Rally. Bill1 point
-
Thanks This actually gives me some options when and if we need to move to the compressor fridge. I actually asked Phil back in October, 2021 if we could get a compressor fridge in our 2022 and the answer was no. Funny how that changed for the 2023 models.1 point
-
Is there a diagram you can show me on this? I pretty much have this down and thank you all. I just don't understand the "Aosheng Recteanglular Dishy cable adapter to Rj45" part. I have the rectangular dish, I have my dish mounted to the awning. Just want to have everything looking clean and this looks like the solution. Thank you all again.1 point
-
Yes to both. IMO the water pressure regulator is important as you never know what water pressure is going to be at a campground.1 point
-
‘What if’ the local residents disapprove of your site selection!
1 point
-
In all fairness, @John Dorrer, the compressor fridges, like home fridges, do need room to breathe. Just not to the outside, as @mountainoliver explained. Just like your home fridge. We installed "rails" or "ledges" epoxied to the cavity sides, and kept the fridge off the floor. Bonus, I have a nice shallow drawer under the fridge, where I keep flat pans, BBQ tools, flashlights, some miscellaneous items. It's open to the base of the fridge. We allowed twice the recommended venting in our install, but if we ever got caught in high temps, I can crack the drawer open a few inches, and double it again. (Not likely for us, as we chase cool weather, but who knows?) Thanks for your thoughts. They actually helped a lot in furthering discussions.1 point
-
I think I'd call the Lakeland truma center, and check on price. You could probably have a fun camping trip, and still be less. If not, I'd check with a local dealer on price to install a traditional 6 gallon (will require changing out the access door, as vents are different), or a different brand instantaneous, if you love it. I think the whole swap was about that price, when we went from a 6 gallon to the Girard instantaneous, though it was years ago. With most 6 gallons, you can run the heater on "free" campground electricity, if you're plugged in. I'm really sorry for your experience, so far. But, I'd encourage you to look into options for service and replacement. Every newbie makes mistakes. Don't be too hard on yourself. You'll not likely do it again.1 point
-
We have the Truma Aquago water heater in our Hull #1291. I am impressed by its performance so far. That said, the $1K quote just to replace the plastic tank confirms my concern that Truma repairs are remarkably expensive. You can't buy parts, as all work must be done by an authorized Truma repair center. That is why I have determined that, should our Truma Aquago ever develop an issue that requires repair by a Truma service center, I will replace it with a RecPro or a Fogatti. Right now, the RecPro is $410: https://www.recpro.com/rv-tankless-water-heater-on-demand-hot-water-heater/ The Fogatti is $500: https://www.amazon.com/FOGATTI-Controller-InstaShower-Optimized-Performance/dp/B093Z6HQX4 Even if you need to hire a plumber to install a replacement tankless RV water heater, your total bill may not reach $1K. And, you will then have a brand new water heater. Going forward, I believe you can get parts for both the RecPro and the Fogatti, so anyone can do repairs.1 point
-
Being way up north, I always drain the Truma Water Heater, then shut of the valve to the Truma and add the RV antifreeze to the system. I use 2 gallons of antifreeze (have a compost toilet so do not add anything to the black tank) and use the procedure that Oliver University teaches us on how to winterize the system. The winterizing procedure only takes a hour or so and is the best insurance you can buy.1 point
-
I forgot a couple of pics of the material used: AND rough measurements - 4" front to back 1 3/4" top down to the sides 2 5/8" from the back to the apex of the curve at the front on the sides.
1 point
-
When we added our BB Lithium batteries a couple of years ago I also replaced the PD4045 45 Amp charger that was installed in our Hull #050 back in 2014. I have been satisfied that it is doing a good job for us. When the BB’s voltage drops and it is in bulk mode our Blue Sky IPN Pro indicates it is delivering 43+ amps to the batteries.1 point
-
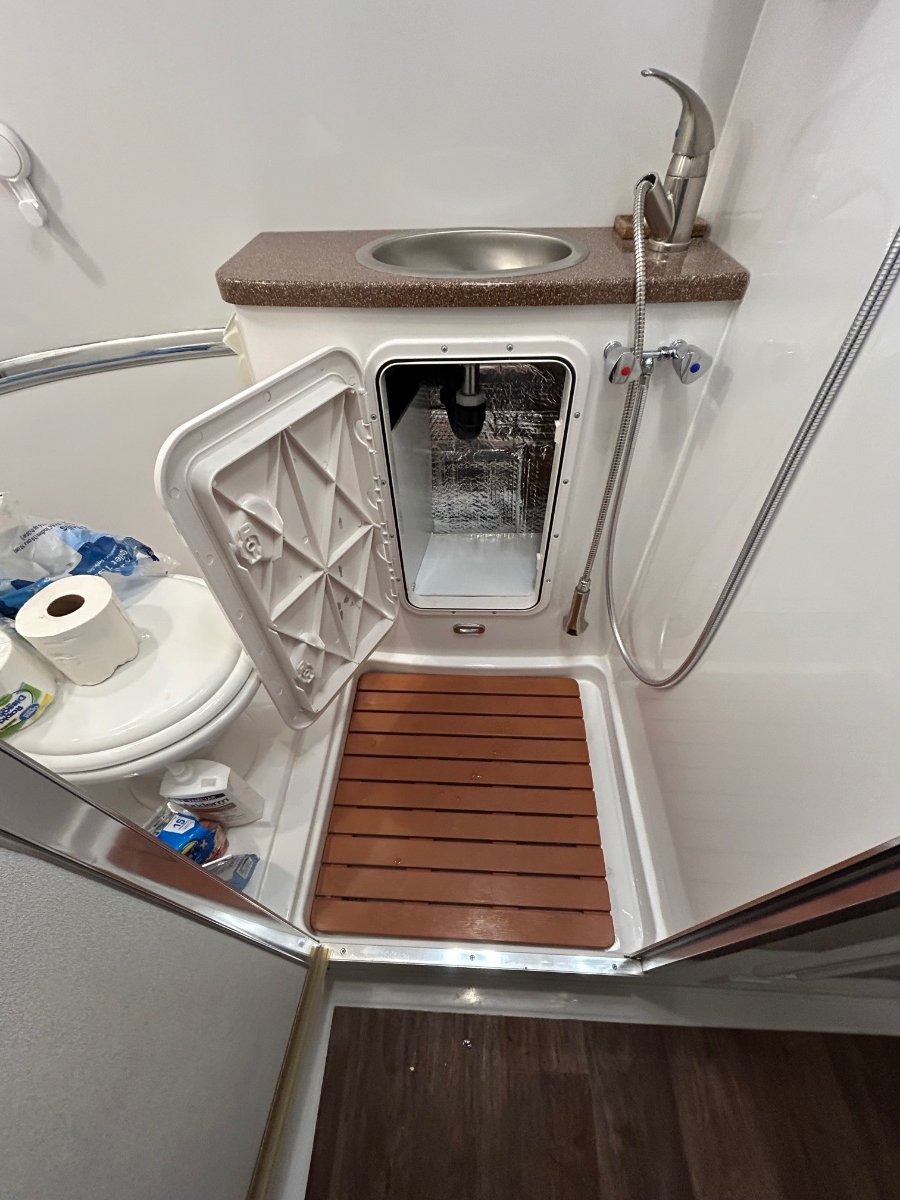
The Truma has a small plastic water tank that circulates the heated water. When winterizing, you have to shut the water supply valve to the water heater off. This is located under the street side bed. On the outside, there is a big yellow lever you have to pull down on the Truma after releasing the pressure. You drop it down as far as it will go and then remove the filter. There is a convenient sized hole to the right of the water heater to put that in. The water will then drain out completely. If, however, you don't do that and it freezes, the tank will crack. That is what you are seeing in the video. As far as I know, only a Truma authorized dealer can fix that for you.1 point
-
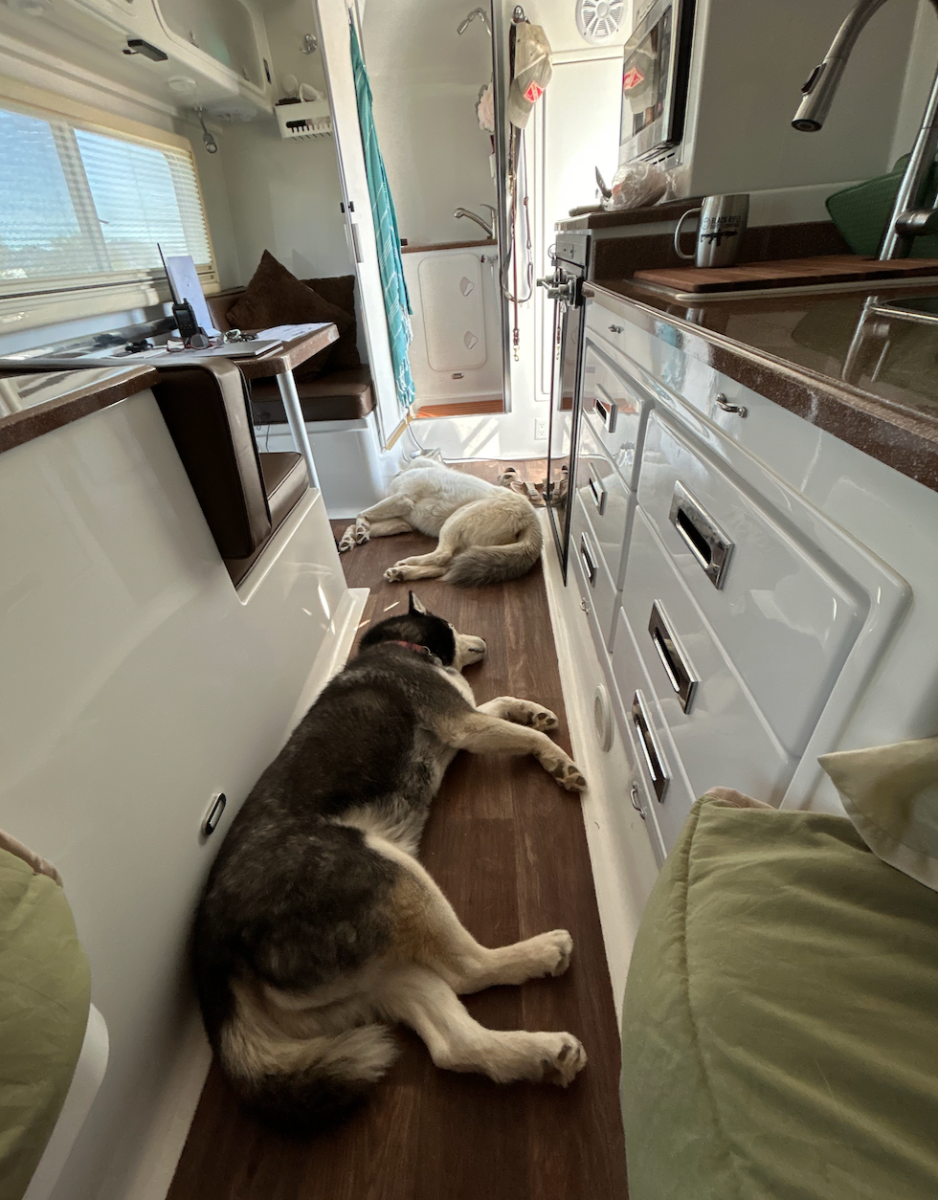
HA! Couldn't resist quoting you on this one, JD! Magnus (4 years next month), the white one hails from Colorado Springs, Oscar's pedigree, OTOH, totally unknown to us. Doesn't matter, IMO, he's a rescue about 10 years, also 65lbs, but he's still able to jump up to his rack (with the help of the table top on top of the rack rails). Plenty of room for all 4 of us because the "boys" usually curl up into little "Husky Doughnuts": But then again, sometimes we need to deal with serious "Dog Logs" in the passageway: HA! OMG, we love traveling with these two Knuckleheads! Cheers!
1 point
-
what xantrex setting changes do you do to run the generator? I have a Wen 22501 point
-
I talked with a Honda rep this past week regarding the 3200. They used stronger magnets and a higher rpm to get the output numbers. The fuel burn is very impressive, it could run forever on 6 gallons of gas. I might give it a try if it drops below $2.6k.1 point


-
Recent Achievements
-


")


")


")


