Leaderboard


Popular Content
Showing content with the highest reputation on 03/01/2024 in all areas
-
I’m not planning on doing any serious winter camping, but just in case I get caught in a cold front, this is my attempt at improving the insulation behind the garage.
 5 points
 -
If you are looking to buy a new Oliver Travel Trailer here are some things to consider. With the implementation of the new dealer network you now have several new options available to you that previously did not exist when you could only go to Hohenwald to buy a trailer. There are two ways to approach the first step. If you live a long way from Hohenwald and don’t want to have to drive that far to see the trailers you should check the Link on the Oliver page that will show you where all the current dealers that will be selling Oliver’s are located. There are currently 18 different locations spread across the United States. There are future plans to add new dealers here and in Canada. With the information on the locations of the dealers, if one is close to you and you want to do business with them that is perfectly fine. If one is no closer to you than Hohenwald you may choose to contact the sales team there. When contacting Hohenwald a member of the sales team will take your personal information and work with you to get you the exact trailer you want in the shortest time possible. They can take an order from you and get you into a queue to have the trailer of your dreams built for you. The current wait time after ordering is around four months. If you live in a state that does not have any dealers, they will see if there is a trailer already built and available at one of their dealers. If so, you could have your new trailer in a matter of days rather than months. Even if there is not one that is just like you desire, if a dealer has a trailer on order that is still early in its build, Oliver will work with that dealer to attempt to have the build altered to be what you want. Doing it this way will still get you a trailer much quicker than starting your build from scratch. If you live in a state that has dealers, Oliver’s agreement with those dealers is that you will be referred to them. Another option that was not previously available to you is that if you already own an RV of some sort and want to trade it in, many of the dealers might be able to do that whereas in Hohenwald, that was not and will not ever be an option. You can also buy a trailer through a dealer, do all the paperwork there and still pick it up in Hohenwald if you want to. And, as always, you are free to buy a trailer and take delivery in Hohenwald if you so choose. Both of these options are a good choice if you want to do a plant tour prior to pickup. At some relatively near future point (certainly this year) their plan is to have all sales conducted through the dealer network. The rumor that they will stop working on trailers older than two years or out of warranty is patently false. Service will continue to be done in Hohenwald. The rumor was started by a fired service employee. He and his wife propagated this rumor as well as other false information about the Oliver TT after he was terminated. It was posted both here and on the various FB pages. He has been terminated there as well and the false statements have been removed. As always, the Oliver sales staff will still be available to assist you and the dealers with any questions and issues. If none of this works for you, my suggestion is to take the list of dealers from the website and call each of them and tell them what you are looking for to see if they have one is stock that would suit your needs.3 points
-
Indeed! I don't think it did much, but any is better than none. John3 points
-
Until late 2022, I agree. But, once Oliver started offering the Truma Varioheat option on Elite IIs, a return air vent in the bath was added. Then, Oliver began installing return air vents in the top and bottom of the closet area. I call this attention to "the benefits of proper return air placement."3 points
-
Amarillo TX at Oasis RV Park. Picture from yesterday morning (Amarillo by morning?) 74 forecast for this afternoon...gotta love it! John
3 points
-
Made a few cable crimps today, in between a full day of working on the TV. More pics to follow after the TV new battery installation. The first one shows the 4/0 cable and lug on a length of cable I purchased recently (looks way better after the heat shrink). I'm not installing 4/0 cable soon but wanted to work the new tool 🤣! The 4/0 die when crimped did not hold the 4/0 cable. It will depend on the lug, its thickness, etc. and often you will use one size smaller to finish. Got all my truck battery terminals fixed today. The second pic shows a 2 AWG cable that will connect TV battery to the power panel (the fuse panel that delivers 12VDC to ALL vehicle circuits). The OEM cable is 4 AWG, but I had a length of 2 AWG in a parts drawer, so I made this second cable! Love working on this stuff!
3 points
-
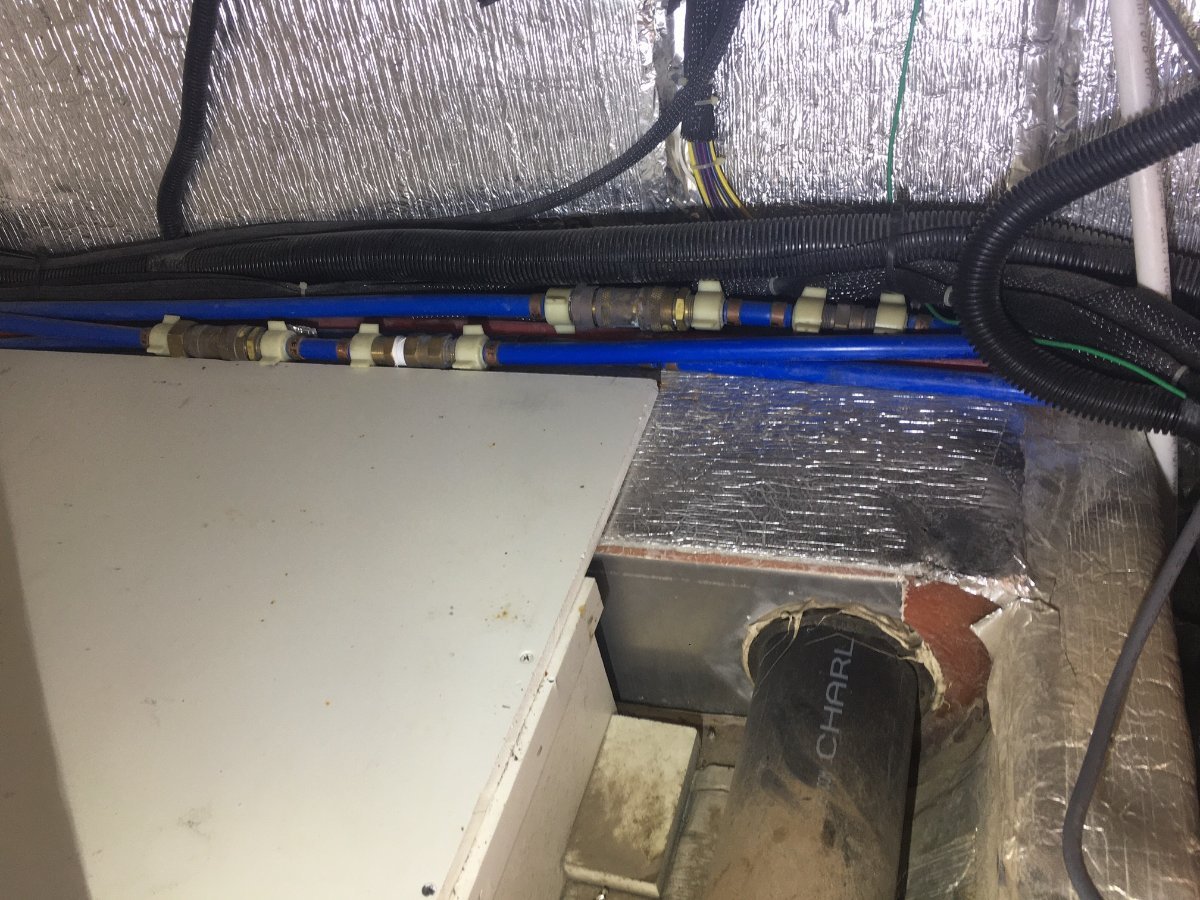
My interest in this mod is two fold. First, to create more even heat distribution within the cabin area. Second, to keep the basement above freezing as we like to camp in the early Spring and Fall. I think Oliver has overlooked the benefits of proper return air placement and what it can do to increase cabin comfort and durability of the plumbing systems between the hulls. As for between the hulls, yes, there is reflectix insulation on the floor of the outer hull, but it is also mostly an unconditioned dead air space and it gets cold down there! Especially the rear corners where there is a lot of vulnerable plumbing. The beauty of placing the return air ducts far from the furnace is that it turns this under floor space into a giant plenum where conditioned cabin air flows from the return grilles back to the furnace warming the entire area, not to mention more evenly heating the cabin itself. My test showed a dramatic increase in temperature below by moving the vents further away from the furnace. There was definitely more air flow from the vent on the same side as the furnace. But that's not surprising and could be adjusted for if one was so inclined. Just remember that your furnace has a minimum cold air return volume requirement, it's in your owner's manual. I think if you have properly sized return air vents, then outside air being sucked in through the drainage scuppers wouldn't be a issue, but this needs to be tested. This is also a simple passive setup, no fans or other support needed for it to work. I will say that if I was out in extreme cold for long periods, I might need to employ other measures. Time will tell. Now that I have these sensors, I can keep track better of what's going on between the hulls. I'll also probably add a 4" return vent in the bathroom on the side of the vanity under the TP holder. Not a lot of flat wall real estate in the E1 to place a vent but I think I can just fit one in there. More testing to do, but may have to wait until next winter unless some Arctic blast hits us again. Cheers. Dave3 points
-
I finally got around to purchasing some temperature sensors so I could experiment with different cold air return locations. The original 6x10 grille (45 cu. in. free air flow) was installed right next to the furnace in my front dinette seat (Elite 1). I never understood this decision and wonder if anyone knows why Oliver put it there. It is within inches of the furnace and two supply outlets. This is not desirable for even heating and does nothing to create air flow below between the hulls, which would help keep that area warmer in colder temps. My experiment showed much better results than I anticipated. First I sealed off the OEM return with tape. Then I cut two 6" holes in some cardboard and replaced those with the rear curb and street side fiberglass seat panels. I then placed sensors on the floor of the basement down with the plumbing on each side under those holes. I placed the third sensor under the sink. When I turned on the furnace, there was very positive intake through the 6" holes, which by the way, provide a bit more free air flow than the OEM grille (~56sq.in. for 2, 6" round versus 45 sq.in. for 6x10 OEM grille, which actually has 5x9" free air flow). I brought the interior temps up from 58* to 68* in about 10-15 minutes. You can see the temperature difference in the pic below; and this is with the return air holes cut in at seat level, not at floor level and as far to the rear as I would want them! I also noticed a big improvement in heat distribution throughout the trailer, although in our small elite1, heat was never a problem in the cabin. So, before I start cutting holes in my trailer, I ask if there is something I'm missing here, and why didn't Oliver do this to begin with. It seems like a very simple way to markedly improve the performance of an already stellar trailer. Any comments appreciated! Thanks. Dave
2 points
-
I don’t know the answer but I would rather test my batteries when I could be present, at least some of the time. It does get cloudy in Southern CA from time to time, I’d check the forecast! The fridge uses very little propane but can drain batteries in the right circumstances. Good luck! Mike2 points
-
@Mike and Carol - pretty tough to beat that view, eh, Mike? Spectacular in our book…,2 points
-
Our Hull #1291 did not come with return air vents in the closet. I installed them, one top and one bottom. Our experience has been that before the addition of those vents, the closet stayed about 20 degrees colder than the main cabin when camping in cold weather and running the furnace with the closet door closed. After the vents were added, the closet temps stay just a degree or two below those in the main cabin. Convection of heated cabin air, between the bottom and top closet vents, explains the difference.2 points
-
I'm presently in need of some new 4/0 cables. But, given that I only need as few as 2 or as many as 4, and have never needed cable crimpers of wire cutters in this size before, it is simply cheaper to purchase the cables ready made. However, THAT doesn't stop me from being VERY jealous. 🤑 Bill2 points
-
That's one heck of a foot warmer! Looks a bit like the "donut" but maybe more like a "long John". 🤪 Bill2 points
-
We stayed at Monte Bello during our last visit to Taos, what a great area to visit.
2 points
-
Where's Ollie? Well, the short story is D and her sister are enrolled for a weaving class in Taos today through Sunday. So we came up yesterday afternoon and are staying at Monte Bello park just north of Taos near the base of Wheeler Peak (13,161") NM's highest: Since the 2 "Knuckleheads" and I will be backcountry skiing to Williams Lake at some point, we decided to bring an extra POV for the 2-hour trip here from home which will give the girls flexibility in their to/from commute. We're the only party in the park - imbibing on some random adult beverages at sunset (above) and a Husky "Donut" (below): Yet the same room but different view - Wheeler Pk at sunrise: Morning coffee with 3 humans and 2 canines - cozy, but it doesn't feel crowded: 26F last night the furnace kept OTT occupants at a cozy 66F - screenshot of the Easy Touch App: Cheers, All - from Taos, NM!
2 points
-
Haha 6’2” and 220lbs, I was all scratched up from going in like a contortionist! Next project will be to relocate the one furnace duct from under the curb side bed to under the street side bed, and the return vent to the front dinette.2 points
-
Tasmania has been great. Summer temperatures here in Hobart are between 70-75 every day with a breeze. I drove up north to the Bass Strait to meet a Facebook friend. Greener there. The Midlands was dry and warmer. Our son lives in Hobart and bought a house here. We're spending time with our granddaughter. Great times. Seven weeks this visit. We will be back. Driving on the left is easier than I imagined. Just look right when at a roundabout! John2 points
-
Finally had the time to watch the 2nd video, another really nice one chock full of great features, details and quality not seen on the NA campers. The mechanical rooms alone are mind boggling. Both campers seem flush with quality and nice design, IMHO. Regarding China, it is worth pointing out many items stamped with made in USA are really foreign made parts assembled in the US, more than most people might realize. There certainly is a lot of cheaply made items from there but I have also experienced some state of the art products made in China. Not here to carry water for China by any means but they are capable of very high quality products at least some of the time. I have seen some of their road building engineering that would blow anyones mind. Regardless thanks for sharing the vids very interesting campers.2 points
-
Steve, I'm sure that's true for most of the cheaper stickies, but Titanium Caravans and Zone RV are built in Australia.2 points
-
Remember, those prices do not include shipping to the US, import fees, etc. Before ordering the Oliver, we were working with the sole US importer of Kimberley Kampers, which happened to be in my home town, and were looking at the mid-size Kimberly Kruiser S3. And this was just before COVID and the Suez Canal blockage. It was a $90k trailer with about $8k of shipping and other fees. Eight moths later, it was $15-20k in shipping, and due to supply chain problems, the price jumped to $140k. Out the door with taxes was going to end up north of $175k. For the small percentage of the time we'd use it off-road far enough to need its features (air suspension, water purification, solar out the wazoo) we couldn't remotely justify it over the Oliver. One of our previous forum members, @donthompson moved to the bigger Kimberley Kruiser T3. https://olivertraveltrailers.com/forums/topic/6211-a-second-new-direction-kimberley-t3-kruiser/#comment-65745 Note that a lot of the Australian campers are being built in China these days. And then "assembled" in Australia (or in the US in the case of the Series Black, that used to come from Australia.) Buyer beware!2 points
-
I was curious, too, @routlaw. I looked up the 19' zone Peregrine (first one.) It listed at $139k AUD, which at today's rate is around $90k USD. Pretty good price, imo, for all they got. We've had two wonderful camping trips in Australia. The variety of outstanding campers and features available there are amazing. But, they also have some run of the mill stickies available for those who don't or can't spend up. The base price includes solar and lithium, but other options can drive it up. Wait list (looks like sold only in Australia) is around 10 months. https://www.zonerv.com.au/off-road-caravans/peregrine/?hsCtaTracking=55468c5f-b426-4ed6-bad7-449500fda63d|2569a05d-413c-4476-b34e-6c897aded12e2 points
-
I'm not @SeaDawg of course, but I can chime in @dewdev since my name was used. You just start typing the @ symbol followed by the name you want, and it will show up in a drop-down menu to select. The name is then tagged when used and the forum member will be notified which is a great feature.2 points
-
Rivernerd, So is warm cabin air leaking in to the closet from around the door as a result of the reduced closet pressure from the returns in there? Or is one of the vents a supply? Just trying to figure your setup out. Don't see how two returns would warm the space. Glad it's working though! Dave1 point
-
@jd1923 thanks so much for the offer! It will be a couple of weeks before I get another chance to go out to the storage yard to get any idea of exactly what I'll need. I'll let you know what is going on just as soon as I know. Bill1 point
-
When I needed a short-as-possible 4/0 cable to attach the new shunt, I found the shortest I could buy was 1 foot. Another thing you can do when making your own is to offset the angle of the lug (can't buy these). Notice the pic of the 2 AWG cable above, where one lug is 90 degrees to the other. I built it that way because one side mounts vertically to the battery post and the other side mounts horizontally to the power distribution box. Also check out the pic of my short cable above. I mounted the lugs 180 degrees to each other that gave me a 3/4" lift to mount on the shunt. @topgun2 since Twist and our hull 113 are cousins, send me a PM if you want me to make you a couple custom 4/0 cables, at cost to your specs.1 point
-
Yes 3M thinsulate 600L. The reflectix on the inside of the bottom outside hull is pretty much useless as far as I’m concerned. Reflectix is a radiant barrier and an air gap is required to allow the reflective surface to reflect radiant heat, like between the 2 top hulls, ie. top outside hull, gap, then reflectix on outside of top inside hull. However, with the huge open spaces between the 2 bottom hulls and the reflectix on the inside of the bottom outer hull the R value of the reflectix is approx. 1 maybe 1.5. I have added Thinsulate everywhere within reach on the inside of the bottom outside hull, including the battery and garage doors.1 point
-
@John Welte I am very jealous, some of the most beautiful beaches around Esperance, absolutely breathtaking, crystal clear water, and snowy white beaches! Being from Canada that’s about the only thing I can relate to…the “snowy white”!😜1 point
-
Agreed, I always see one Amp number, the net of -A being used and +A from any charging source. It would be nice to read Amps in and out individually. We have an old shunt as part of the Blue Sky solar charger installation. So, if I was good at reading their panel, I imagine it reads solar charge data alone. You can install multiple shuts to segregate systems for this purpose. I installed a Victron SmartShunt at the battery ground, so this reading is a net IN and OUT Amps. The pic shows an afternoon reading, shore power unplugged, solar has the batteries fully charged. There is a net +0.75A of the incoming solar, less the outside courtesy lights (we leave them on 24x7 to deter rodents), electronics and other parasitic draw.
1 point
-
I understand though perhaps 60 degrees is too high a temp for the basement areas. I'd like it to be 45 degrees below overnight when we set the interior to 65. You wrote "Especially the rear corners where there is a lot of vulnerable plumbing." For sure, check out this picture. These are the Fresh, City and outdoor shower plumbing lines. In the worse possible location along the back outer wall and check out the large brass backflow preventers. The brass as a conductor will allow these lines to freeze more quickly. They should be better insulated, a 12V wire heat wrap added, or just heat the basement as you are doing! I have one of our Ruuvi temp sensors sitting down in this area.
1 point
-
Yes, and they fit a lot of stuff in a small camper, even a dry bath.1 point
-
Another vote for the hydraulic crimper with dies. The quality of the crimp is outstanding and far surpasses results you can get with a stab crimper. Really, there is no comparison, particularly in applications which might be wet or corrosive. Coupled with quality lugs properly sized for the wire, adhesive shrink tubing like that made by Anchor and you will get really professional results. I have used mine to rewire a number of boats that live in saltwater and am very impressed with the results ... particularly when coupled with tinned multi-strand wire like that market by Anchor. Available at West Marine and other marine supply outlets. Expensive components but you will not use all that many and the results are as good as a professional shop will provide.1 point
-
Recently, I received the best of battery cable tools! I did not have these tools when I added the Victron SmartShunt (to start this thread), so the hack saw and crimper/vise worked for one shorty cable. I'm working on my truck this week, adding a tuner and gauges set, new starter batteries and all new battery terminals. These tools will be in use very soon and again with a future LiFePO4 upgrade! These are the tools I purchased but I didn't want to pay these prices! I wanted a die-based hydraulic crimper. The "Dieless" crimpers create a triangular-shaped crimp vs. the hexagon shaped crimp dies. Klein Tools 63035 Cable Cutter, Utility Cable Cutter Cuts MCM Copper and 350 MCM Aluminum Cable, with Shear-Type Hook Jaws, 16-Inch Handles - Wire Cutters - Amazon.com TEMCo Industrial Hydraulic Cable Lug Crimper TH0005 V2.0 (11 US TON) 10 AWG to 600 MCM Electrical Terminal Cable Wire Tool Kit with 32 Die Sets - Amazon.com The 16" Klien cutter cuts cables up to 4/0 AWG like butter. When I looked at Amazon 3-4 weeks ago it was $90. Today at $68 is a good price. I found an eBay auction, where the seller had 4 of them at $52 ea. I bought one and the next day all 4 were gone! Found the TEMCo TH0005 on eBay too, a "used-once" set. Seller had it on a 7-day auction, opening bid was $69. I contacted the Seller to see if he would offer a good buy-it-now price. I thought he would come back at $100 or something. He changed the auction to buy-it-now at the same $69 price, OMG! I bought it in a heartbeat. Paid for it on Sunday, shipped on Monday and received it Wednesday (yesterday). eBay can be this or that, often gets a bad rep. I started with eBay as a Seller 23 years ago and have sold 100s of old car parts, used sporting goods, etc. I buy used USA made tools very often on eBay. With a little time and patience, I saved over $150 on just these two items. Check 'em out!
1 point
-
No. We have the Lithium Pro Package, which includes 390 Ah capacity (3 Lithionics 130Ah). The Lithionics have Battery Management Systems (BMS) which will automatically turn them off if they reach about 10% State of Charge, protecting them from overdischage. For many years I used 12V deep cycle AGM batteries to power my CPAP machine on wilderness river trips. I had to monitor them closely to avoid discharge below 50%, to avoid damaging them. Now I use LiFePO4 batteries with built-in BMS on wilderness river trips. They are much lighter weight and yet provide a greater discharge range. That experience persuaded us to spend the extra $$$ on the Lithionics package for our Hull #1291.1 point
-
You can do that with what you already have.1 point
-
Thank you, Bill. This makes so much sense! When I upgrade to LI, I really only need to change the configuration on the Blue Sky solar charger set for LI batteries. Given 90% of the time we are not plugged in, and live in sunny Arizona, any LI upgrade will get to 100% by solar on most days. Yes! 😊 The LI upgrade at $2K will be enough and I can wait on other related upgrades, e.g. the PD charger and the 2KW Xantrex inverter, until one fails. Thanks again.1 point
-
1 point
-
I'd guess that if hull #117 doesn't have it (and it doesn't) then yours will not have it either! Depending on your intended use - don't forget that the old charger will still work with LI - it simply will not get the LI's to full. That is another benefit of having the solar - because - it will get the LI's to 100% There fore, unless you really have to have them at 100%, there is not necessarily a rush to get a new charger. Bill1 point
-
Same thing here, and we have the lithium enabled Xantrex converter/inverter. Every few months it trips the 20A GFCI in the garage. No specific environmental changes that I can infer, it's just sitting there. Nothing else plugged into that circuit, either. Now I've added a small green LED nightlight on that circuit that I can see in the security camera. Every once in a while I check in to make sure it's still on.1 point
-
We have hull #676 with the Norcold 3-way refrigerator and usually have no problems. We do freeze blue ice to take with us to keep lunch cold. The only time we have had problems with the refrigerator cooling is when we are parked in the sun with very higer temps (90+). To solve that I added to fans in the upper vent to pull air up through the refrigerator as @dhaig mentioned. I also used the same fans as he mentions. For wiring I just connected to 12 volts and ground wires below and open the lower vent to turn it on or off. I have thought about wiring it up to the panel on the wall at the door, but so far I don't turn it on or off that much so I haven't bothered.
1 point
-
@Nancy_D, we have a Norcold 3-way refrigerator and use it to freeze the blue freezer bricks. We typically use 6 bricks, in 2 groups of three and rotate the groups as needed to refreeze them. Typically this is a daily rotation. We have added supplemental fans mounted at the rear of our Norcold refrigerator, which make a significant improvement in the cooling capabilities of the Norcold refrigerator, especially when outdoor temperatures are high. If you encounter problems with you refrigerator, I recommend use considering the Beech Lane Refrigerator Fans The freezer bricks always refreeze overnight. I don't know exactly how long they take to refreeze, which will vary somewhat depending on the outside temperature and activity opening the door.1 point
-
Our Norcold 3-way will freeze things. Shelf work for you.1 point
-
Just came across this during an internet search: This was an old post on another forum, and I'm sure you probably want to use someone local, but it will likely be much cheaper to have it installed if you remove the water heater and take it to a Truma dealer.
1 point
-
In my experience, many systems will have a "safety cutout" somewhere around 10.6 to 12v. Furnace won't work. 3way fridge won't work. To protect the battery. I've actually never seen a battety at 3v. Good on you that you brought it back. We have brought back batteries at 10 and 10.5 v. They were fairly new, which probably helped.1 point
-
When out in the wild, if you need to run your batteries less than 50% (lead-acid, AGM or whatever), just use the power you need for the night. An occasional down to 40% or less will not kill your batteries. Please just ENJOY your travels! I have an old 1992 Lexus SC400, an amazing rear wheel drive luxury sports car, a DR HT, with a brand new battery. It is an old car, and sometimes if I or Chris do not close the doors completely, an interior light will be on overnight. I have often found this car, 2-3 days later, with the battery discharged down to 3V, DEAD! Then I charge it slowly over the next 1-2 days, and all is good! Drove it again today, even though this has occurred 4 times. We all get hung up on what is BEST, but your batteries will be fine! Just try to enjoy your outing, without the anxiety.1 point
-
Smart move. You can still get significant tax credits. We haven't had a power bill in nine years since installing solar. (Just the connection/grid fees). My home system paid for itself a few years ago. I encourage all my friends to install rooftop solar, and many have.1 point
-
Agm, and fla batteries really do best when not fully discharged to 50 per cent limits, and fully charged daily. I think that's why our solar has given us "extra life" on both the boat and trailer batteries. Lithium is much more forgiving on deep discharge, and only occasionally brought back to 100 per cent. Lithium, in my experience, actually likes hanging out somewhere in the 75 to 80 per cent zone, which is a slow death for lead acid batteries. Different chemistry, different quirks.1 point
-
We got 7 years out of the original AGM’s that came in Hull #050. At home it was always plugged in and on the road the solar took care of it, always returning them to full charge everyday. I would never turn any of the chargers off.1 point
-
Sunday 11FEB24, sunrise snap at Pancho Villa SP near Las Palomas, Old Mexico... ...walking the Knuckleheads at sunrise: Colder than anticipated last night - the Solo Stove came in handy: Cheers! A & D
1 point
-
I believe we referred to the D-18 as a “Bug Smasher”. Aircraft from the days of real planes.1 point
-
We were fortunate to see a great pilot do an airshow with a Beech 18 a few years ago, with a serious smoke system. 🙂 A Lady that flew Beech 18 aircraft for years taught me how make taildragger landings in a Luscombe, still using her method today. 🙂1 point


-
Recent Achievements
-


")


")


