Leaderboard


Popular Content
Showing content with the highest reputation on 03/08/2024 in Posts
-
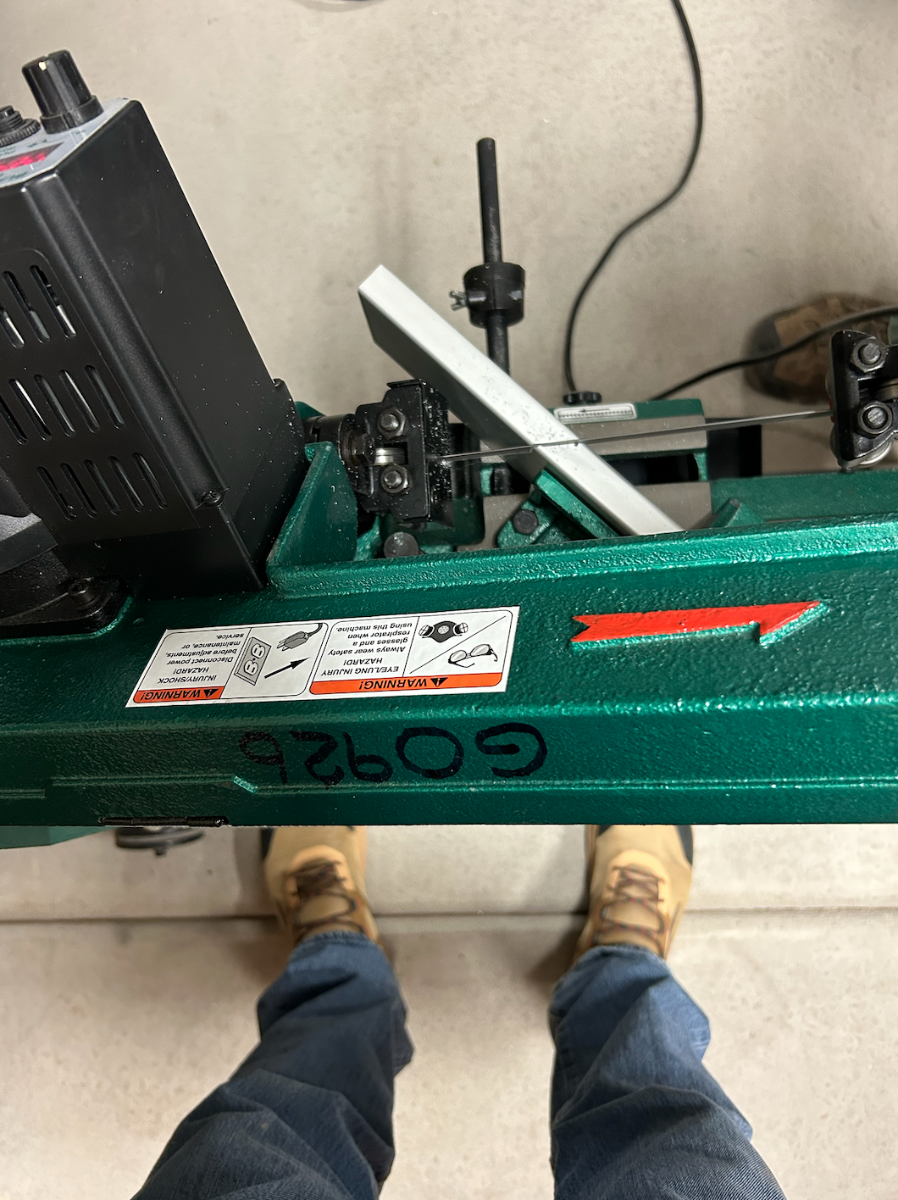
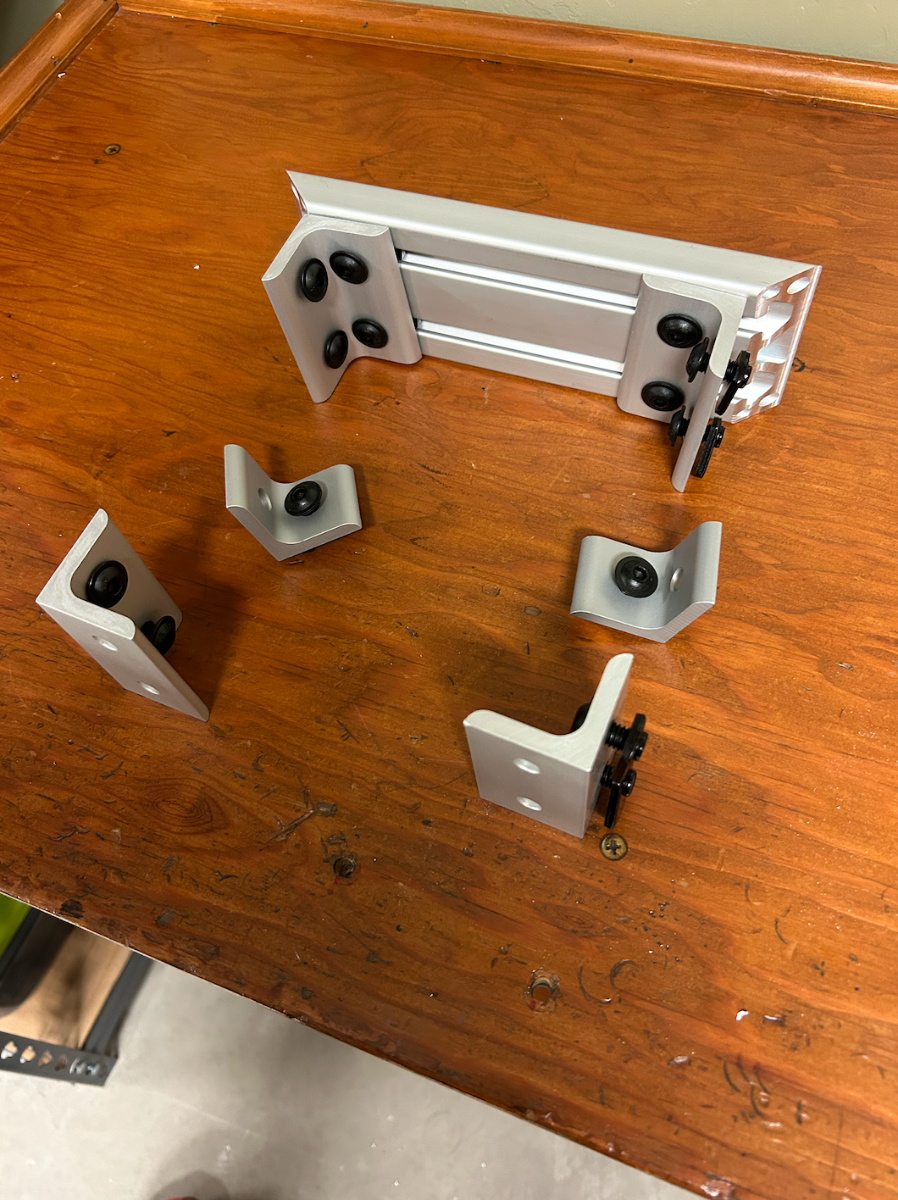
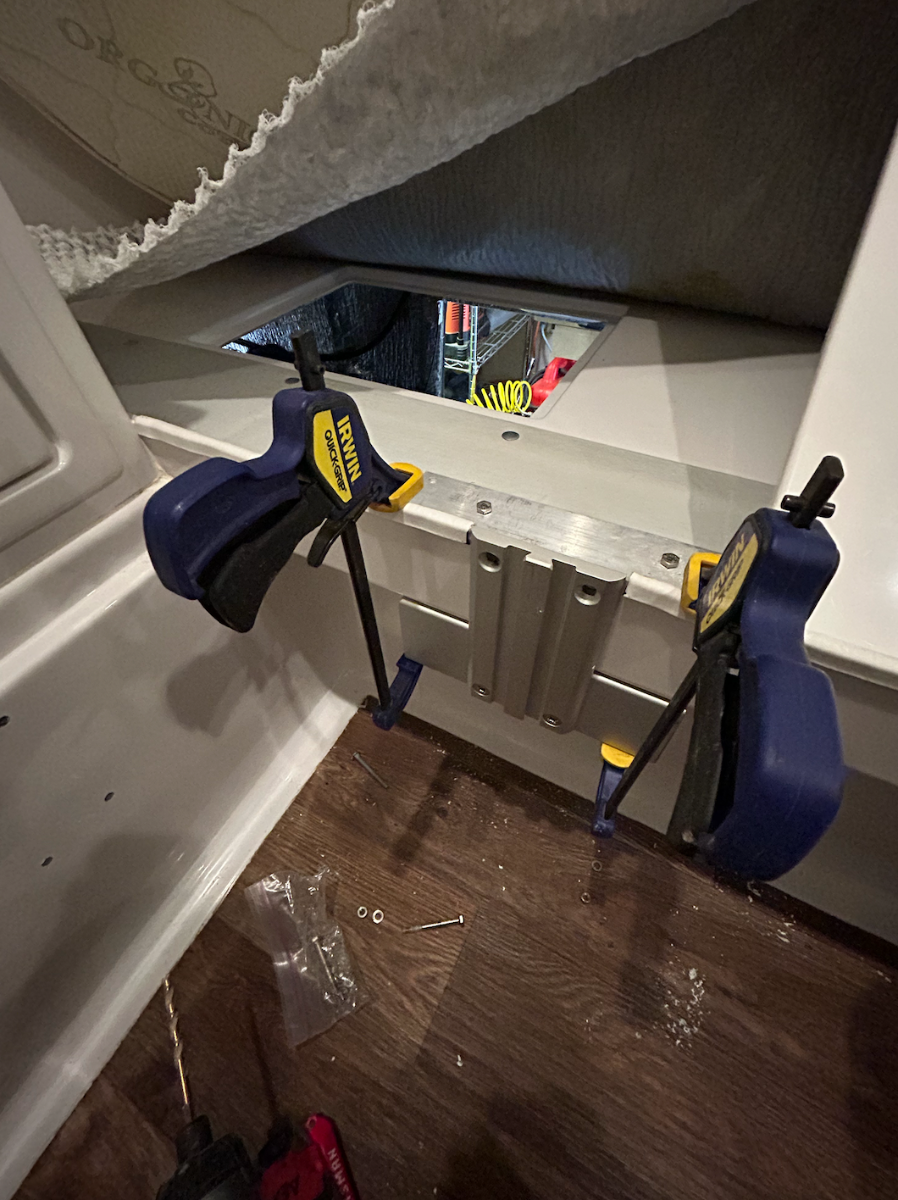
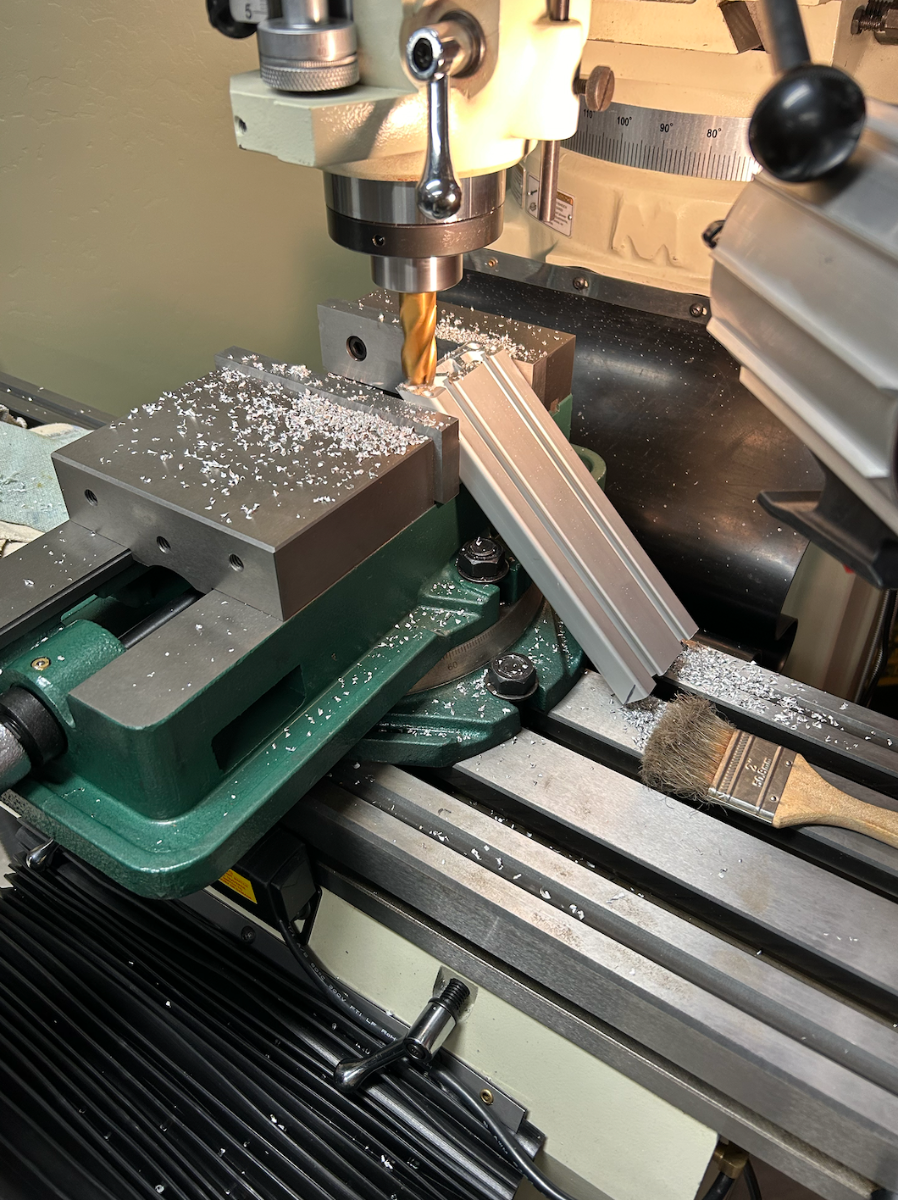
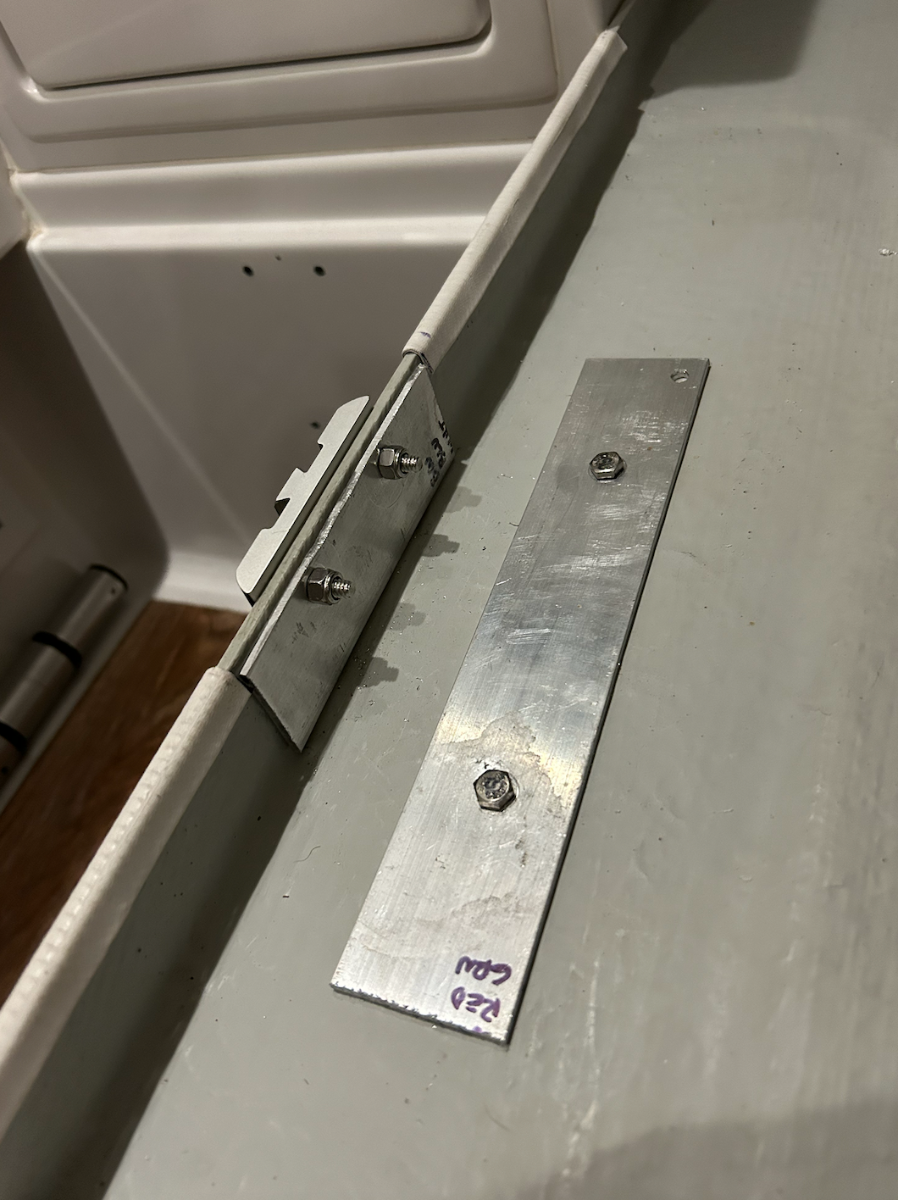
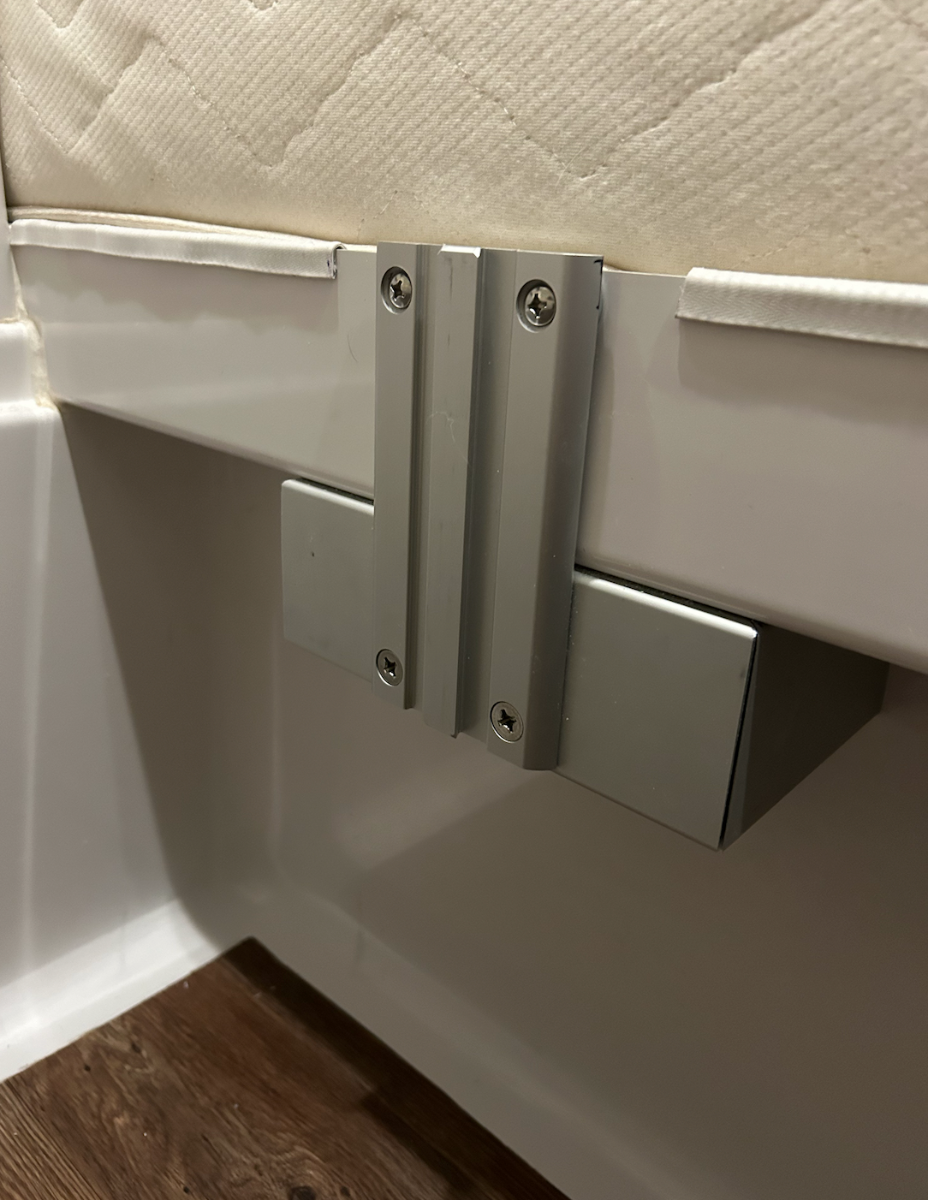
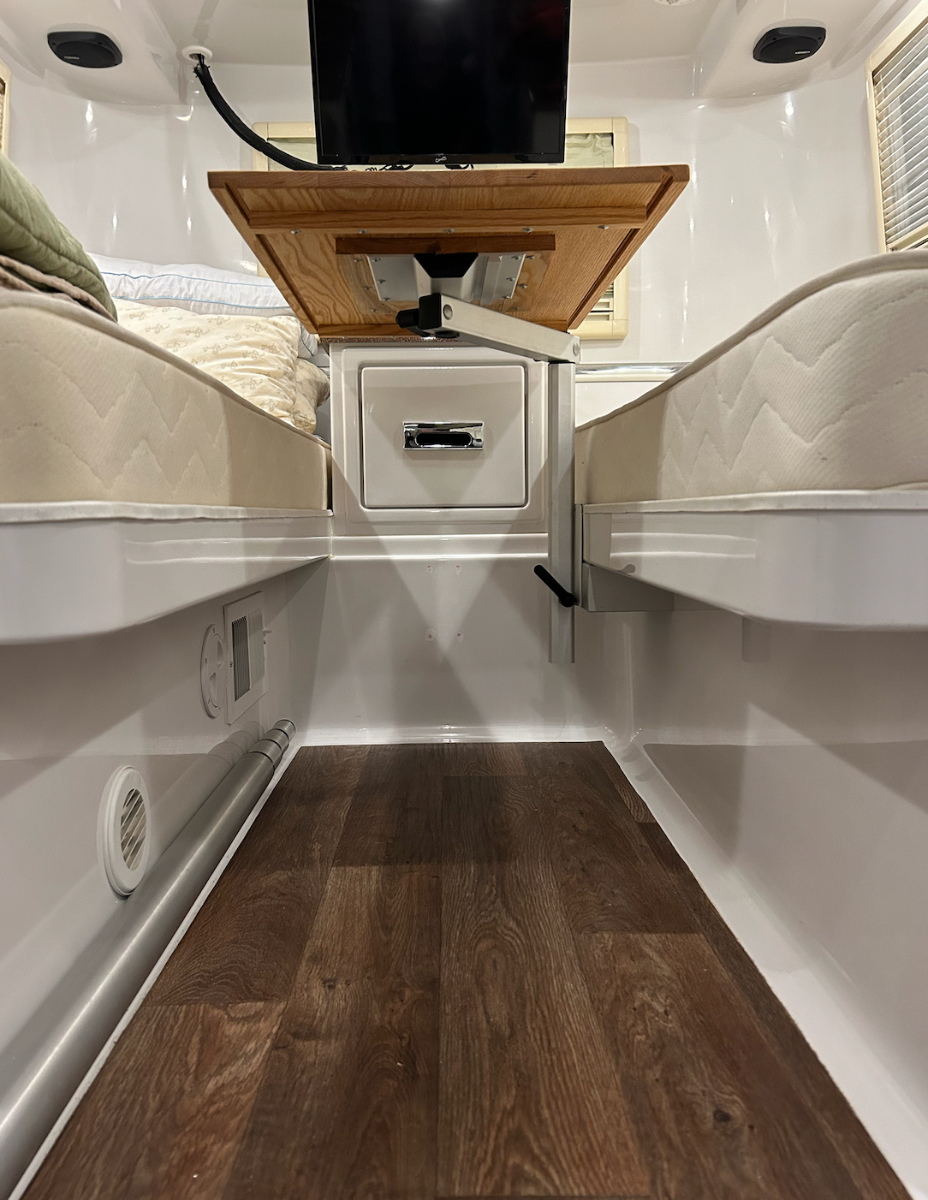
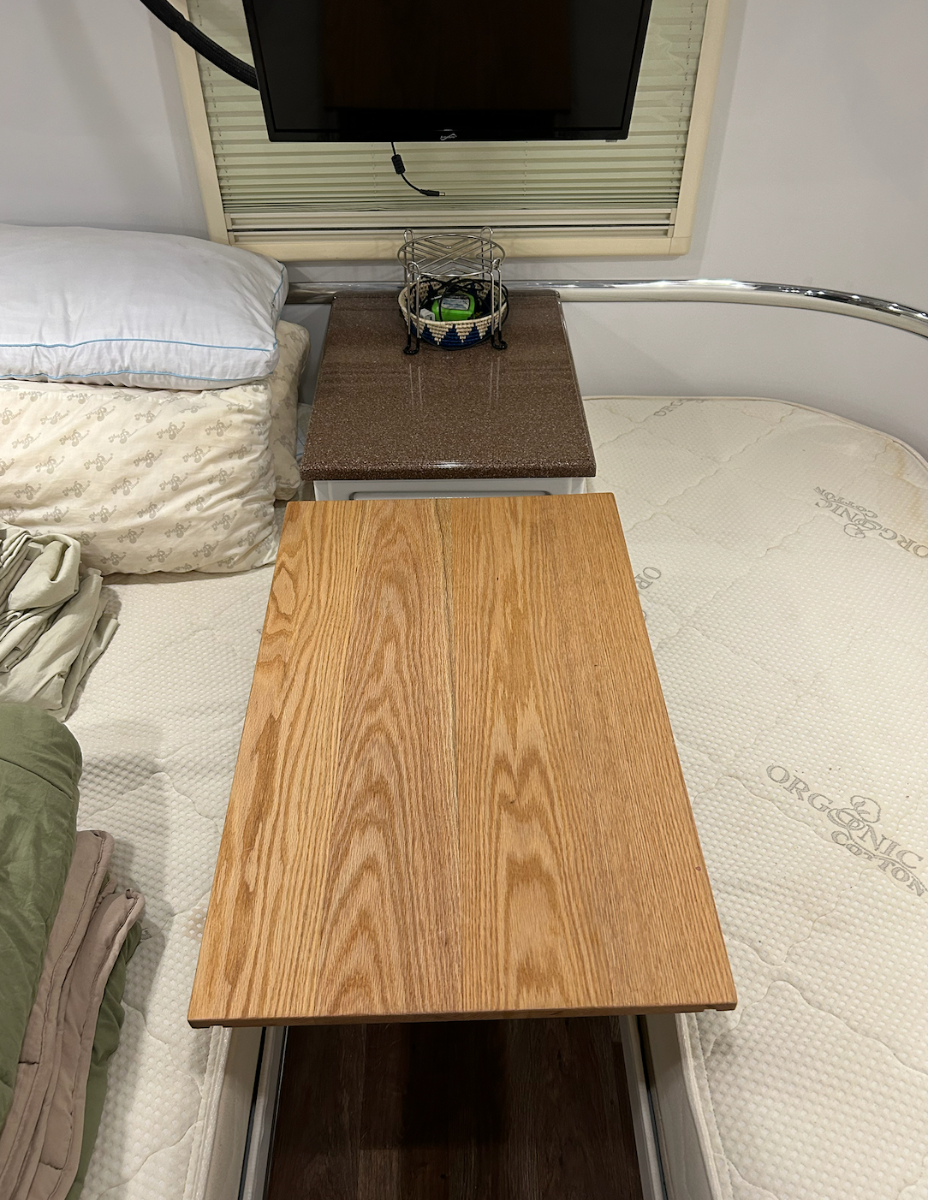
Lagun Table Project Update: Moved the table mount from night stand to street side bed rail using @Overland's detailed instructions: Been wanting to finish this up since building the Lagun Table top last spring!!! Used a bandsaw to rough cut the four 45-degree ends - then finished them with an end cut bit on the mill: Assembled finished parts and checked fitment on PORT side bed rail: Used three 1/8" aluminum backing plates behind each of the mounting points: View from underneath: Completed new mounting area: Now we've got nightstand drawer access with table in place - whereas before, the mount was just below the drawer making it impossible to gain access to the drawer with the table mounted there: One and done - D approves and is happy, mission success! Many thanks to @Overland for developing the initial design for this great mod! Cheers, All!
 8 points
 -
Thought I'd wrap up this discussion with some more test data. It's been around freezing here the past few nights so I wanted to verify past results and include a baseline test with the original OEM setup with just the return by the furnace. Pretty much all original results (OEM return blocked, and two 6" returns added at the rear of trailer) were confirmed, with some minor variances, with curbside rear temps increasing on average 15 degrees, street side rear temps increasing on average 20 degrees, and the under sink area increasing on average 12 degrees. Floor temps at the rear of the trailer increased 14 degrees. These increases were from a cold start in the morning. To start, all under floor areas were about 5-6 degrees warmer than the outside temps, and 11+ degrees colder than the inside temps (I keep a small space heater running in the trailer in the winter). Interestingly, when I put the heating system back in its OEM configuration, and closed off my 6" test returns, this showed only 3 degree temperature increases in the rear curb and street side areas. So not so great there! Under the sink, however, had similar gains (12 degrees). So I think some return air must travel in through the spaces between the cabinet drawers and back to the area under the sink. In my 2015 E1, the cabinet box is open in the back so return air can pass through to that area. All this may not apply to some of the newer trailers, but there are a lot of older ones out there that could benefit from this mod if you travel when it's cold out. Just how cold one can go I can't say yet, but this mod will certainly help a lot and is very simple to implement. The E1 will be different than the E2 as the furnace locations are different among other things. The same principles will apply however, with high pressure (cabin) moving to low pressure (under floor), and the returns will just be located in different areas. Preferably, but not always, as far away from the furnace and supply outlets as is practical (depending what path you want the return air to travel). Thanks. Now I have some big holes to drill out...yikes! 🤯 Dave5 points
-
I have a question about some of the mods that add return air vents between the cabin and inter-hull spaces. Or those who open cabinet doors to warm the cabinet contents. Isn't the primary cabin insulation supposed to be the dead air space between the hulls? By creating vents that breach the inner hull, or opening overhead cabinets in cold weather, aren't you effectively removing that dead air space and becoming a single-hull unit, at just as far as insulation goes? I know my upper cabinets get cold, but I figure that is part of what's keeping my cabin warm. (The closet, OTOH, does appear to be a sealed space within the inner hull, so I don't see a problem venting that to the main cabin. Same with the bathroom. I can see adding a return vent back into the main cabin, but not between the hulls.)4 points
-
Thanks for sharing this. I wonder if a USA made 4-leaf spring would solve the issue. Less stiff than the 5-leaf and USA made, or whether USA made 5-leaf is the safest way to go. If the USA 4-leaf is possibly better than the Chinese 5-leaf. Looking forward to hearing more when you get the USA springs installed.4 points
-
How about an individually adjustable pneumatic airbag type suspension for Ollie? No axles - lighter, smoother ride - less damage to OTT and components, no more broken leaf springs, more ground clearance by adjusting air pressure, enhanced braking, and "drum roll" please.... no more zerks! ...screenshot taken from an earlier thread on "Aussie Quality RVs": ....just say'n
3 points
-
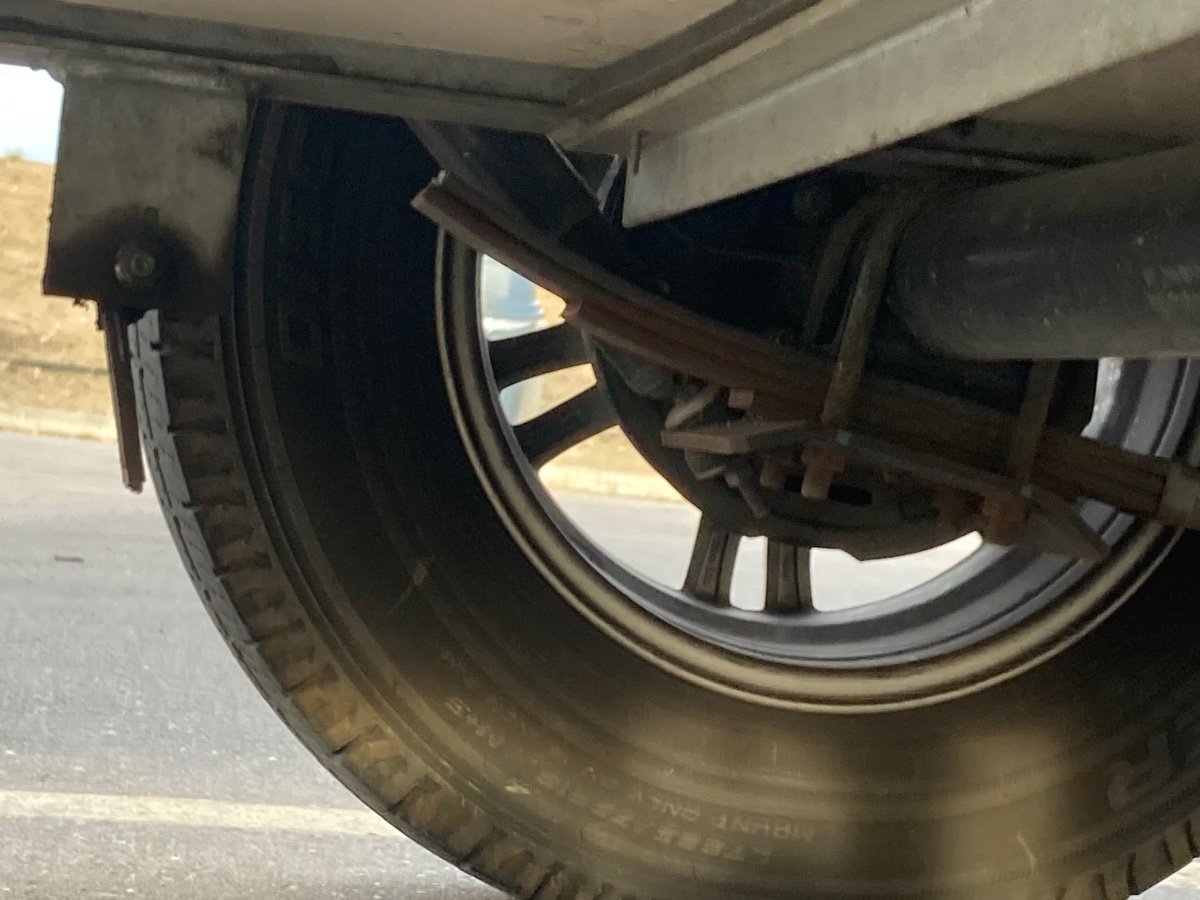
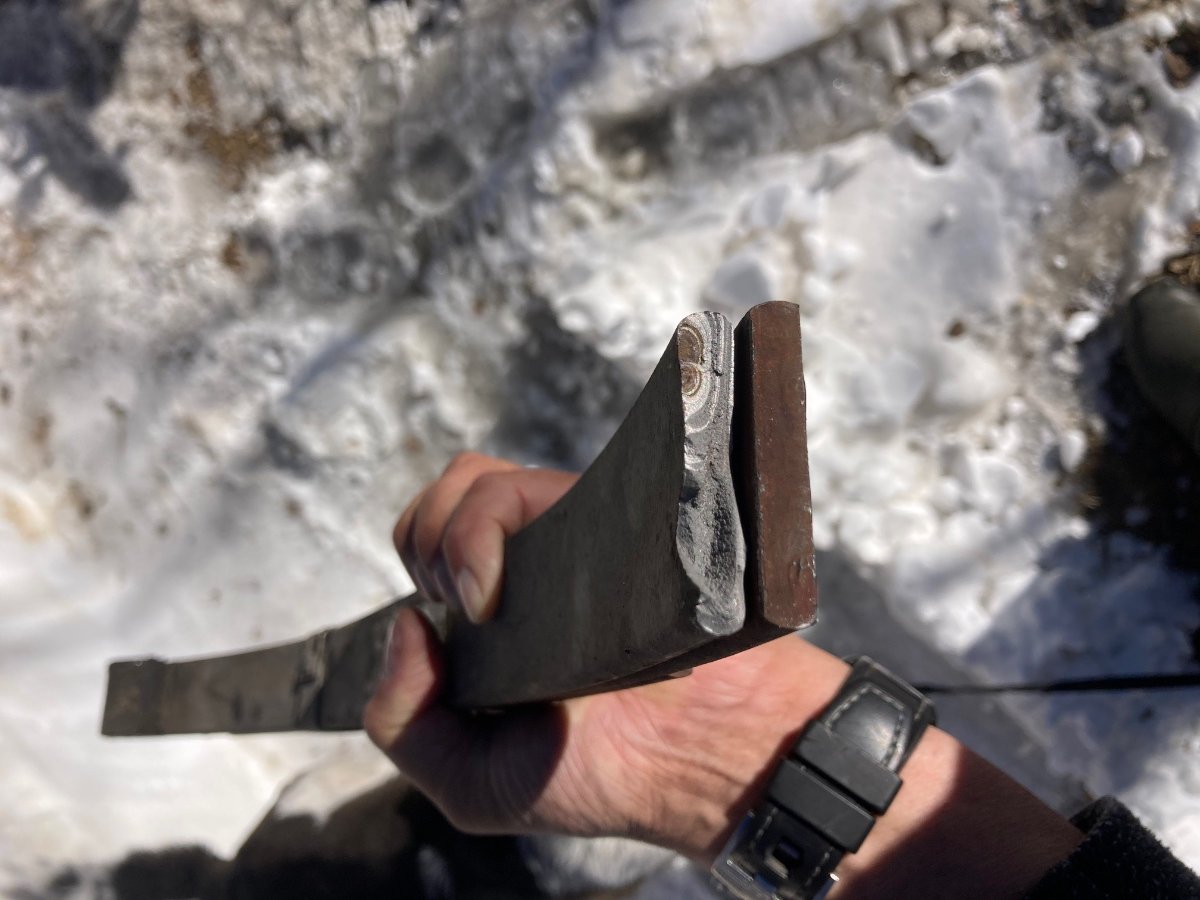
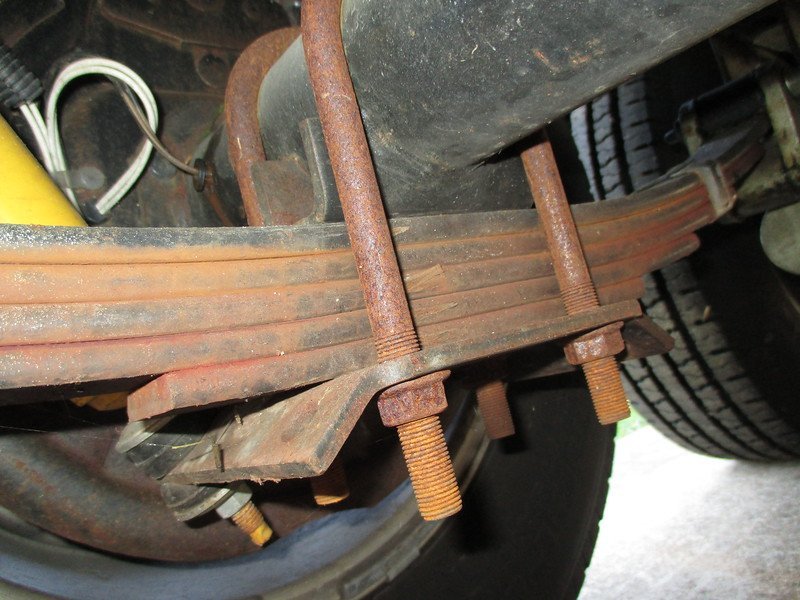
Checked under ours today. I inspected all 4 leaf springs and was happy to see all four, in 8 locations front and back, were as straight as can be. Straight meaning an equal symmetrical arc front to back, no sag of the main leaf on the ends, as the example clearly seen on the right side of this picture. It appears that our Oliver sits a good 1-2" taller without the leaf bends shown here. This doesn't mean they cannot fail in the future, but the leaf will likely bend some at this location prior to failure. Looking at the cross-section of the steel in the leaf that had failed, it does not look to have been hardened properly. Our Oliver has lived life in the SW and our leaf springs only have very light surface rust. Given this inspection, I will drop replacement leaf springs to the bottom of my to-do list. Though I'm still very interested in this supplier, and the installation and road test of @Mountainman198 and others here.2 points
-
Some of it, yes. But, directing more warmed air between the hulls is intended to keep the plumbing from freezing. I choose to protect the plumbing, at the cost of burning more propane to keep the cabin warm.2 points
-
Learned a long time ago - we don't sell guns, ammo, and TOOLS!2 points
-
Well done super clean finish and install! 👍🏻2 points
-
I'm getting cold just reading this! We left the cold 25 years ago and we're not going back. When we have a northern destination in mind, we'll make late spring/summer travel plans. Mostly we camp anytime but summer in the great southwest, so the Oliver works fine. Blow the water out of the lines each time we get home after a winter trip. Will fix the ducts at some point, so the bathroom and closet aren't 15 degrees colder than the open cabin, but she mainly works for our needs. Please do continue to share! 😊2 points
-
Art, please let me know when you are done working on things... Have a garage sale on your shop equipment... I'll be up in a heartbeat!!! Great project, great workshop and best wishes to you, my friend!2 points
-
Just installed the replacement Furrion shore power receptacle. It does appear to be wired with 8/3 AWG cable, the same black rubber insulated cable that I noted when installing the EMS in our Oliver. Not that you would need any for this task, but this is the cable: 10 Feet 8/3 SOOW Cable Cord Wire - 8 Gauge 8 AWG 3 Conductor 600V Portable Power Extension Cord Cable with Ultra Flexible CPD Insulation Jacket: Amazon.com: Tools & Home Improvement Replacement is truly straight-forward. They even mark the back of the unit with black, white, green circles to make wiring simple. Make sure you place the gasket and rear cover on the cable prior to wiring. I cut the wires back about 3/4" so that the connections would hold to clean copper (just enough length to do so). Oh cr@p, what happened to the warning labels!?! I swear there was one above the outlet and another inside the cover, wt. WARNING - possibility of bodily harm if you somehow position a body part between this receptacle and a power source! Instead, please use the power source without involving the manufacturer's product. WARNING - Those who admit to reading this may be held liable! 🤣 The shiniest new part (and 2 SF) of our Oliver!
2 points
-
I would start with the dust in the switch scenario mentioned by @Steph and Dud B and @Tom and Doreen. That would be an easy fix. Pop the panel, blow it out with some compressed air and slather the terminals with dielectric grease for good measure. If it is still flickering, dig deeper.2 points
-
When we were in the early build stage of our Hull #050 back in late 2013, I asked Jim Oliver what he suggested for axles for our new Elite II. We were coming from a 2008 Elite that had a 5200 pound axle with five leaf spring packs under it. He quickly said that he would want the same ones we had on our first trailer. So that's what we went with. The plan at that time was to use 2 x 3500 pound axles with four leaf spring packs on the regular production Elite II's. With the exception of a few trailers built in 2015 with the 5200 pound setup for the reason stated previously by @rideandfly this has been the standard on all production units since the first 2014 models rolled off the line and continued that way through model year 2021. The 2022 to current Elite II models saw a change in their axles. The Elite's axle remained the same as they had always been but, In an effort to streamline production and simplify their inventory, the decision was made to use the same size axles on both the Elite and Elite II trailers. All trailers delivered since 2022 have been supplied with two 5200 pound axles with the Dexter Nev-R- Lube hubs on them. However, they stuck with the 3500 pound 4-Leaf spring packs that have always accompanied the 3500 pound axles rather than the 5-Leaf spring packs that are standard on the 5200 pound axles. Their reasoning is that the stiffer springs would cause a rougher ride and could lead to drawers coming open or cabinet doors opening up while under tow. This why the GVWR remains at 7000 pounds. In addition, Oliver has also changed from 16" wheels with LT tires to 15" wheels with ST tires. There has been some recent owner interest in obtaining the Dexter Nev-R- Lube hubs. This requires a complete axle swap as they are not compatible with the axles all the older trailers (pre-2022) are equipped with. If you are contemplating ditching the OEM 3500 pound axles for the new setups with the higher rated axles, be aware of this spring issue. I can personally attest to knowing of at least 10 spring failures on the 4-Leaf spring packs on both the older trailers and a few that have recently been delivered over the past year or so. All of these springs have broken in exactly the same place. Also, I have never heard of a single failure in any of the trailers that are equipped with the 5200 pound axle with the 5-Leaf spring pack. This includes all the Elites ever built and, to my knowledge, none of the Elites II’s that were originally built with the 5200 pound axles and the 5-Leaf spring packs. My predication is that the 4-Leaf spring packs will continue to fail no matter which axle they are installed with. My advice is if you are changing out your four leaf springs for any reason, consider a stiffer spring that the originals and to purchase and carry with you at least one extra spring pack. If you’re going to Alaska carry two sets. One owner was up around the Arctic Circle when he discovered his were broken. Not the ideal locale for a FUBAR.2 points
-
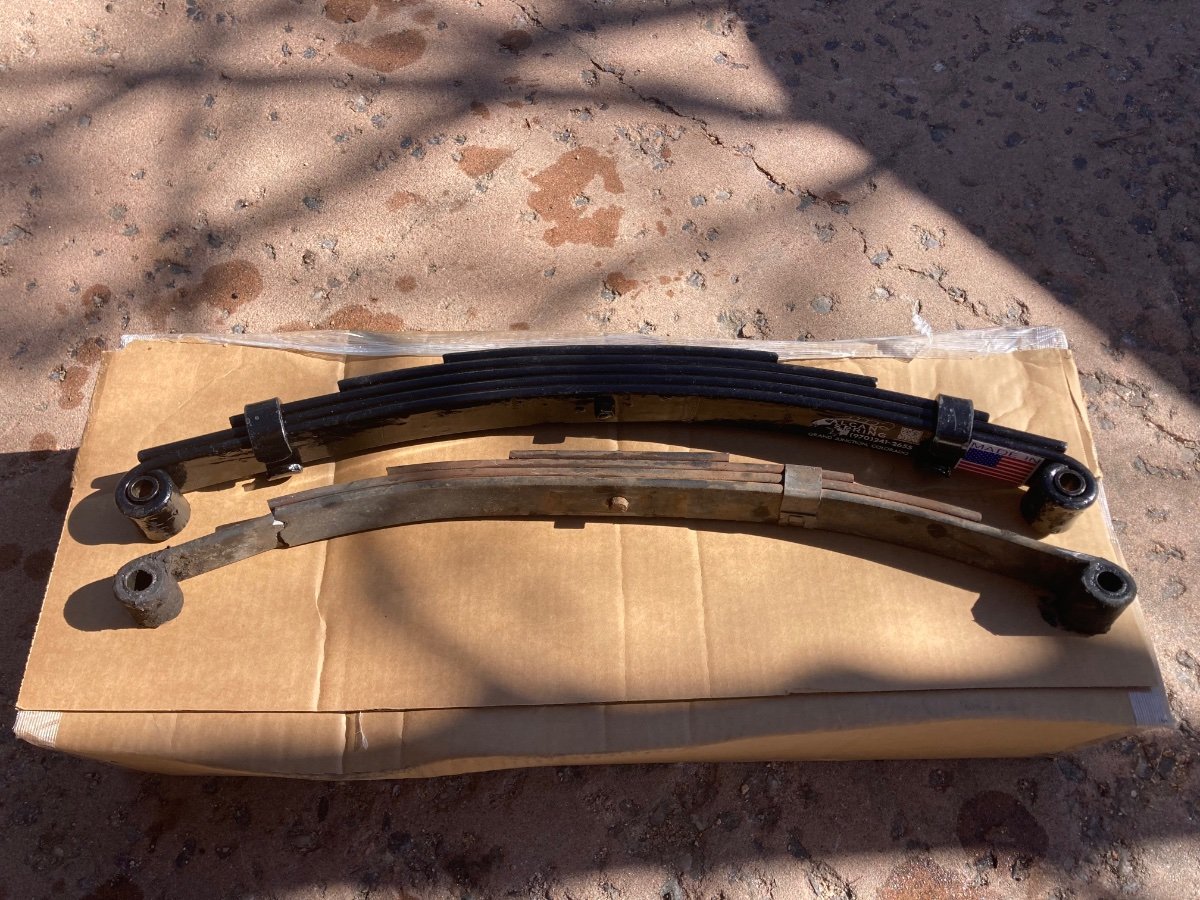
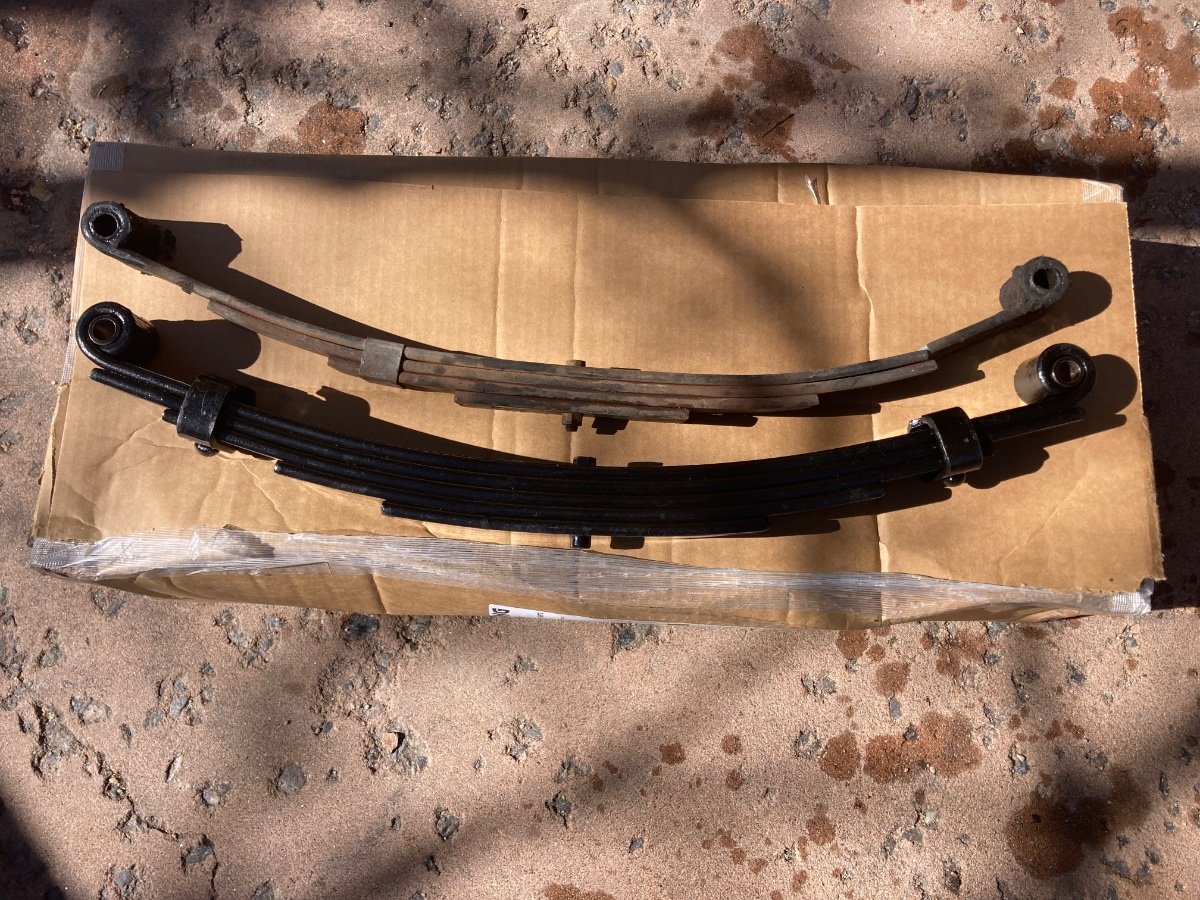
My new springs arrived today. I confirmed measurements are correct and that they are the same size as what my E2 had when it shopped from the factory. Should be a direct bolt-in. Here are the specs on the new springs: -Made in USA with USA sourced 5160 spring steel -Bronze eye bushings vs. plastic -2,750lb rating/ea vs. 1,750 (will not change gvwr as axles/bearings remain determining factor) -5 leaves vs, 4 -second leaf extends underneath eye on each end (protecting common break area) -steel, bolted spring keepers (one each end) vs a single, sheet metal band -width = 1.75" -drop = 3” -length (eye-to-eye) = 25.25” The company I sourced them from is ALCAN. They are known for durable offroading springs and have been building custom springs for rock crawlers and overlanding vehicles for decades. Attached below is their contact info. Ask for Mike and tell him you are interested in the 1.75” wide trailer springs like he sold to Lance from Colorado. I will report back when I have them installed, but that may not be for a couple months until after the snow melts up here in the Rockies
2 points
-
On the way home from the SW this year, I had the pleasure of experiencing a broken LR leaf spring while underway. It broke in the usual place (see pic). Fortunately the broken spring was noticed quickly and I found a safe place to overnight and perform the repair the next day. Unfortunately, I was not carrying a spare spring. After finding a pair of springs locally and installing them I made it home the next day. What I found when inspecting my broken spring was what appeared to be a defect in the steel (see pic). In no way do I blame Oliver for this failure as the trailer spring market is monopolized by Springs made of Chinese steel and Oliver, like all other manufacturers source from the same pool of components. In fact, after opening a service ticket, Mike was extremely helpful in getting me the specs and info I needed. I decided that once I got the trailer home I would replace all four springs with the best springs I could find. Preferably from a US company, made in the US and with US made 5160 spring steel. What I did not appreciate was that there did not appear to be any trailer parts sources which met this criteria. This was not proving to be a simple task. Everything I could find in the RV aftermarket was sourced from China. No exceptions. The only good news I found was that Chinese springs are cheap ($35-55ea). I remembered a Spring Company from my offroading days and gave them a call. They had a set of four springs which fit the measurements provided by Oliver Service and were made in the US with US 5160 spring steel. Cost is $150/ea spring but since I had already spent a fair amount of $ upgrading to stainless lugnuts and US made Timken bearings this did not prevent me from placing the order for a set of four springs and new ubolts. New springs should be here later this week. I will update with pics once I get the springs and also once I install and of course again after towing a few thousand miles.
1 point
-
Hey All, We recently sold our 2021 E2. Sad to let it go as we really loved it and had done months of comfy camping in it. The reason we decided to go another way was strictly due to what, in our experience, was a lack of capacity, when not winterized, in winter conditions. We do the majority of our camping in those conditions and after extensive modifications and testing, we were unable to keep all pex lines from freezing. We just returned from a 10 day trip with our new rig where temps were consistently in single digits with lots of wind. Warm showers and no problems. Not the same finishing build quality but the drivability and functionality in cold is top of list for us. Very different animal with it's own pros and cons. The reason Im writing today is to make sure it is OK for me to keep active in the forum. I've been super impressed with the depth of knowledge and kind communications and can find no better resource for working through complex issues. I'd be appreciative if I could continue to monitor and occasionally interact. I've tried to update our status/profile but have not yet been able to do so. Any suggestions would be welcome. All the best to you all. Gerry1 point
-
The table resides in the closet (inboard side) when not in use. We have two inserts with foam cushions (that we haven’t yet used) to fill the gap between bunks. When stacked on the curbside bed, they make a nice countertop extension.1 point
-
Awesome job 👍1 point
-
Good luck with the drilling, Dave :) John1 point
-
Is the signal transmitter intergraded within the camera body or are they separate? When I first purchased Twist I installed a camera just above the license plate bracket in the tire cover. Since the signal transmitter was separate I was able to move it forward until I finally got a great signal in the cab of the truck - I now have that transmitter in the "dog house". The "problem" with the camera's location is that when it rains it is subject to a bunch of road mist making it fairly useless and because of the low angle I can only see the vehicle that is directly behind me. However, this location is great for backing into tight campsites. Bill1 point
-
It seems that the only suspension component on 2022+ Elite IIs that limits the GVWR to 7K lbs. is the 4-leaf springs. The bearings on each 5200 lb. axle should be rated to 5200 lbs., like the axle is. It stands to reason that replacing all four of those 4-leaf springs with heavier duty "Made in America" 5-leaf springs could enable an 8000 lb. GVWR (2Kx4=8K) , at least in practical application. Do any of you engineer types out there disagree with this analysis? That said, I don't plan to increase the load on our Hull #1291 even if we upgrade to the 5-leaf springs, because we tow with a 2019 Tundra. The low Tundra payload capacity is our real limitation, not the trailer GVWR. But, I like to overbuild, so a beefier suspension than is absolutely necessary appeals to me.1 point
-
This was the case with ours, fiberglass dust had gotten into the panel switches; the blue indicator LED would flicker along with the cabin lights in our case.1 point
-
Most of the sleuthing will have to wait until we get home. Dust may be a culprit, we had gusts to 70mph, blowing talc fine dust at Mesquite Springs, DVNP. Getting rained on at the moment.🤷♂️1 point
-
I am sure there are other US Spring manufacturers that use US made 5160 spring steel. I encourage people to do their own research and let the group know if you find other sources. In my week-long search I found only two manufacturers that returned my inquiries. I knew previously of ALCAN and their offroad spring Creds and they had the springs in stock so I went with them. St. Louis Spring also replied to my inquiry but required that I purchase a new replacement spring of the specs I wanted and send it to them to replicate. I have included their response below in case there are owners local to St. Louis and for whom this requirement would not be such a obstacle. Note in their response they also recommend adding a fifth leaf. Best of luck in your own sourcing. Please post any concrete updates on places which meet the "made in USA with USA 51560 steel" criteria. It is always good to have multiiple sources from which to choose. Also, perhaps Oliver may wish to follow this path for suspension on future trailers. Our legwork may help facilitate this as a future upgrade, placing Oliver even farther up the quality metric amongst the pool of RV mediocrity. As far as running a set of 8,000 springs vs. 7,000 I am prepared to run even lower tire pressures to smooth out the ride in order to avoid the roadside PITA of a broken spring, instead having a potential trade-off of quicker tire wear and lower towing mpg. I was lucky that my issue was noticed at a Love's with a newly built, adjacent RV Stop RV park which featured large, newly poured cement pads, new luxury showers, power and quiet sleep. Also, a local, Good-Ole Boy RV shop/contractor who had the pair of springs to get me home and did not bend me over the cash register. Your mileage may vary should this happen to you. I am doing everything I can to make sure I do not end up in this predicament again. At minimum, I recommend buying a spare spring (or two) to carry with you on every trip. Ironically, ScubaRX and I had this exact discussion not more than two weeks earlier (after meeting another E2 owner in Quartzsite who had broken a spring) and I was planning to order a pair of springs to carry as spares once I got home...UGH. Best wishes, Lance Spring Team <springteam@saintlouisspring.com> Fri, Mar 1, 9:06 AM (6 days ago) to me We can definitely makes this for you and would be made here with American steel, however we would need a sample to duplicate and a lot of times on these travel trailers we make them heavier by adding a leaf to each. Thanks The Spring Team St. Louis Spring Company Tel: 314-533-2132 Email: springteam@saintlouisspring.com Web: https://saintlouisspring.com1 point
-
Larry: This really is significant. It appears that the heat treatment was not consistant across the cross section of the spring. This would set up the spring to have force concetrations and/or embrittlement fractures. I have been contemplating various ideas to stiffen up our OE2 suspension, and the higher rating for the spring rate with a small air bag may be a step in that right direction I think. Once you have a chance to install, if they work out as hoped, I am thinking that there will be a significant number of us that will want to replace ours. With commitment for a lot of sets, it becomes possible to negotiate a group purchase at discount. Paid in advance of the production run with an option to pick up at the factory or shipped to owners desires address with additional cost. I know more than a few of us could be in their fine city later this summer. Do they have a facility suitable for installation on our trailers? The would be helpful for those of us on the road. Your thoughts? GJ PS: I OFTEN take posts of significance and turn them into a condensed word document. Hope you don't mind, but my version is attached. I find it handy having an electronic copy for down the road, and having the info you posted is GOLDEN! Made in USA leaf springs (6 FEB 2024).docx
1 point
-
John, Our 2015 LE2 #75 has 5200 pound axles and springs. Understand at the time Oliver ran out of 3500 pound axles, so Legacy Elite axles/springs were installed on our Ollie. 99% highway use with no spring issues. Here's the springs on our Ollie:
1 point
-
Yes to the first part..... I would think "not" for the second part. Lots of steel there.1 point
-
Per the video, the Zone 19 footer checks in loaded at 7,000 pounds. Our OE2's typically are about 6,000 pounds. I bet much of the Zone's extra weight is the suspension. Somehow could we get air bags under our's? That alone would make a huge difference. Has OTT considered such an option? is it even possible with the small space we have between the frame and the Dexter axle system?1 point
-
…or this, see around time stamp 15:20. The Aussies know how to make a quality trailer!1 point
-
Keep in mind that four wheel alignment becomes a periodic maintenance requirement with independent suspension. There's always trade offs so depending on your style of camping. Also there are a lot of other possible fail points with that system. It's a very complex system. I wander what the cost of a conversion would be? Edit: PS - The beauty of the current suspension is you can pick up replacement parts rather cheap, albeit not lifetime quality, at any local farm store and be back on the road in hours. The high end suspension would likely require sourcing parts long distance that would have at least a few days lead time. I think I would be hard pressed to consider this type of upgrade.1 point
-
If you're on shore power and your converter is working correctly (batteries stay charged, etc.) when this happens that lowers the odds it's a voltage problem, but it would still help to get a voltage reading when your furnace kicks in. You could use either a multimeter or a volts readout from a monitor in your cabin (not sure what monitors your year trailer had). Other options would include a bad connection, with the furnace observation being just a coincidence. First thing I would look at would be the switch. The contacts may be worn or oxidized, or you could have dust in there. Do the lights function correctly when switched on/off? No flickering or delay after you flip the switch?1 point
-
4x6VDC AGMs, on shore power at the time. Batteries are in good shape.1 point
-
I bought my first combustible gas detector 25 years ago after I watched a Washington Natural Gas investigator use one to find a natural gas leak near one of our water heaters. Like you, I am a DIYer. I like to use the tools the pros use.1 point
-
Since they blink off when the furnace cuts in, I suspect the latter. What type of batteries do you have and what's their voltage when the furnace is running?1 point
-
Agreed. That is why I also installed a vent on the aisle side of the front dinette seat, to allow more return air from the front of the main cabin back through the underbelly area to the furnace. See photo below.
1 point
-
There are pros and cons with the Oliver. It's a company that only makes one type of product (Elite 2 is just a stretched Elite 1). Yes there are cool options, but it's basically one product. If it fits your style, you're in luck. If not, there are many other RVs, and many companies that offer multiple products. Many of us have made minor or major modifications, but ultimately your camping style has to match the trailer. For most of us, it's a match made in heaven.1 point
-
My husband Scott & I picked up our Ollie this past Monday. We decided to name her Pearl. She is now part of a growing family…. We have “Dug” (our Kioti tractor) and “Moe” (our John Deere rider) 😉 We’ve never owned a travel trailer before so there is a TON to learn. I love the resources that are on this site and really appreciate the advice that all of you give on a regular basis. We will hopefully feel more confident as time goes by. The only question that I have so far is an electrical one. We are storing Pearl at a storage facility that only offers a 110v outlet. They had an adaptor that they said would work, but it tripped the GFI on their outlet pole within seconds each time we tried to plug in. I”m guessing that maybe we just need a different type of adaptor? Have a great day! Scott & Cindy1 point
-
Welcome! There is an option on the Xantrex app under "Settings" that allows you to change the input Amp draw. When plugged in here at home, I set mine to 15 Amps, and have never tripped a circuit breaker. I'd tell you the exact steps, but mine is not plugged in, so the Xantrex app can't currently see the settings. But the name of the setting is something like "Grid Load" or similar. It is likely set at 30 Amps. Just remember to change it back when you go to a campground with 30 Amp supply.1 point
-
This has been discussed before, but I am not sure if there is a thread dedicated to the topic. I am in the process of working with Jason to convince him to do this before delivery. He states that Dexter does not recommend the mod, which is odd, to say the least. Axle lift: Dexter makes simple no-weld spring-over kits for $60 MSRP per axle. I have never read anything about them not recommending this mod. ... Welding is not necessary, though it is recommended. I do not see why it would be needed since the kit ties into the existing bracket using spacers. If I have this done locally or do it myself (easy) I understand that it will might affect my axle warranty. Will it affect other parts of the Oliver warranty? Negative consequences: It will increase the CG by raising the cabin about 4 inches. I can live with that - it is already supremely stable. 4 inch spacer blocks under the three jacks will be needed, or I can cut off the pads and fabricate bolt-on extension tubes. I prefer blocks, to keep the jacks higher off the ground for clearance, the front one mainly. Mudflaps will be required (though they should be installed by the factory on the standard trailer). Aerodynamic drag will increase. The steps will be higher off the ground when deployed, making entry a little harder. Brake wires might need to be cut and extended using waterproof (heat shrink) splices. Bump stops need to be installed to prevent over-travel. I am still researching this, I am not sure they are really needed. On my utility trailer I have not seen any problems. Neutral ones: The lift is very easily reversed if a new owner wanted to lower the ride height. The lower shock mounting plates can be relocated to the top of the axles, so the original shocks can be retained. The coupler and ball height will be increased (OK for my tall heavy duty truck, probably an issue with smaller tow vehicles). Positive ones: The steps will be higher off the ground (more ground clearance when stowed). The departure angle and clearance under front jack will be greatly improved, reducing risk of dragging, expensive damage and a possible tow bill. Clearance under the springs is improved (less hardware is hanging down, the ubolt nuts are now located up high. Cost is minimal ($120 plus labor) and can be done by any shop or skilled owner. It would by far be best to do this when upgrading the shackle bolts. It will look cool. This is important, LOL. I can understand Oliver not wanting to do this for liability reasons, but it is definitely a mod that some customers would greatly appreciate. Please discuss. Would you order a trailer with this as a factory option, for say $500? John Davies Spokane WA1 point
-
There were three reasons that it didn't work - 1) they said the stability was questionable just moving it around the factory, 2) because of my hitch config, the trailer already travels nose down a bit even with a 4" rise on my hitch, and 3) it looked totally silly. I also think that a lift would make the trailer more difficult to level - not a huge deal, but you'd have to carry some extra blocks I think. Also an extra step to get in and out. That was a 4", maybe 5" lift, so obviously something lower would mitigate all of the above.
1 point
-
John, it’s been a while since I had the springs made but I believe they were around $75 a piece. No I didn’t add or modify anything else, but the boat and trl combined were under 3,000 lbs. If i remember correctly Overland had Oliver do the spring over conversion, and for whatever reason it didn’t work out, so they changed it back to stock. Steve1 point
-
I agree with Raspy on the above. I don't think you want to fiddle with the spring rate much and one of the reasons I've not looked further into the Lippert or MorRyde systems is concern over what that might do to stability. The truth is that however much gravel and dirt each of us sees, we still do 90% of our travel on the highway and safety there trumps anything else. I've read a few cases over on Expedition portal where guys who have bought Australian campers or US ones with offroad suspensions have had to go back and add big sway bars to eliminate the sway on highways. I've also noticed that most of my suspension woes come from poor paved roads and not gravel/dirt. On gravel, and especially dirt, you're traveling at slow enough speeds that the bigger bumps are taken just by the trailer tilting back and forth. I've seen no need for a long travel suspension anywhere that I'm willing to risk taking the trailer*. Same goes for clearance. I've hit the steps once, but haven't scraped the bumper yet. The primary issue off pavement for me is vibration. On the other hand, big dips, potholes and bumps on a poorly paved road often take you by surprise and you can't slow down quickly enough to make them not hurt. And wow have I had some moments of hurt, even on interstates. Much, much worse than anything I've experienced off pavement. *Frankly, while those Australian suspension systems look amazing, I've come to really question the need. Long travel suspensions are either for absorbing big high speed whoops, like a Baja truck, or for rock crawling. On a trailer you don't need a rock crawling suspension because you have no traction to gain. And if you're traveling on gravel fast enough to need a Baja suspension, you're just going way too fast.1 point
-
Bringing back an old thread, I am tired of my u bolts smashing into the frame, that is really hard on the parts...Any new comments or ideas about extra lift and especially additional travel?? I want longer travel for gravel, but also for dealing with 6 inch deep potholes on the road.... I hit one a few days ago at speed. My 200 shrugged it off but the trailer gave a terrific BAAA-BAAAANG. That is yet another reason to run lower tire pressures in the trailer.... I am now down to 42 psi. John Davies Spokane WA
1 point
-
Their independent suspension solution is well regarded from what I’ve read. I just can’t get past depending on those rubber straps - I have an old Soloflex machine and I know from experience that when their rubber straps break it isn’t a gradual thing but immediate and visually there’s no warning. Of course, the rubber compound could be different and reliable but I just think I’d be constantly nervous about it. With air bags I can envision carrying a spare but I don’t know if spares of those rubber blocks are reasonable to carry. Maybe if I could see one in person I’d be more comfortable with it.1 point
-
Interesting but I’m more interested in the Lippert centerpoint suspension. You get the same lift plus a better ride on gravel. It’s on my list for some day. Though the price in the Correct Track is certainly more palatable.1 point
-
Updating an older thread, how about the Correct Track? This gives you two inches lift with no mods to existing suspension other than extending the brake wires.... A skilled owner can do it at home. https://www.etrailer.com/Trailer-Suspension/Lippert-Components/LC87220.html As a bolt on kit, I would be happier if the brackets were welded at the top to prevent any looseness. I would still like a little height to improve the departure angle. The alignment capabilities are secondary and not likely to be needed. Two inches lift is not great, but it is better than none. John Davies Spokane WA1 point
-
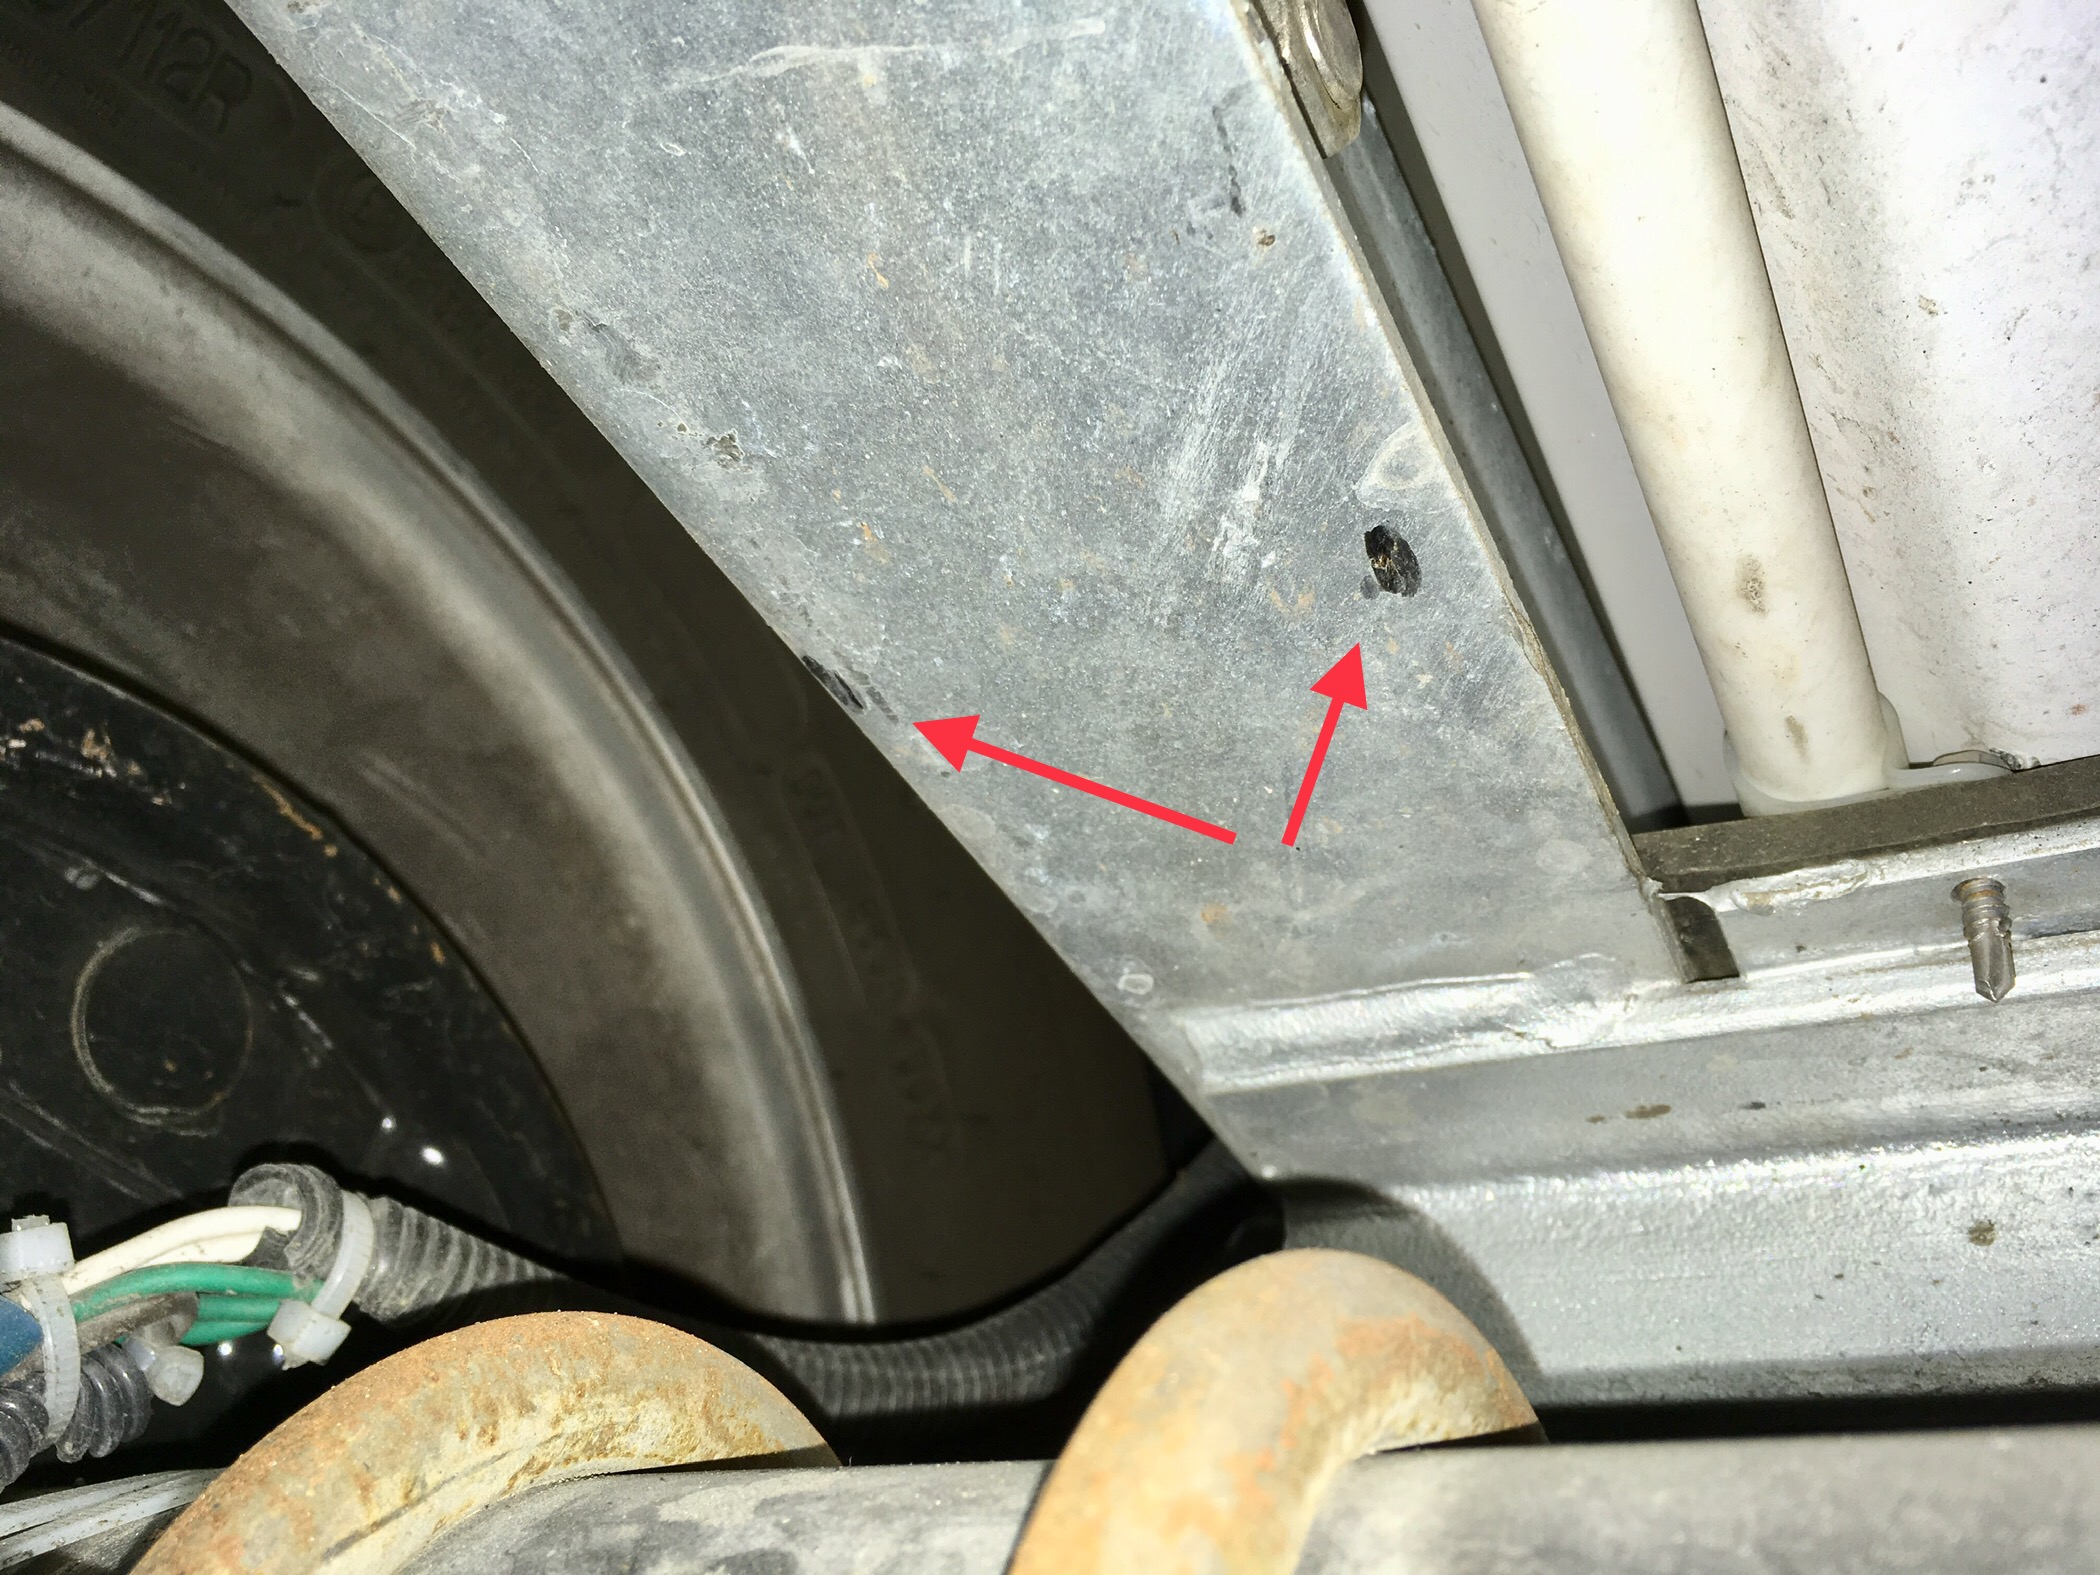
Randy - OOPS! Sorry about that. I'm guessing that those (your arrows) are the tops of the two shocks. Bill1 point
-
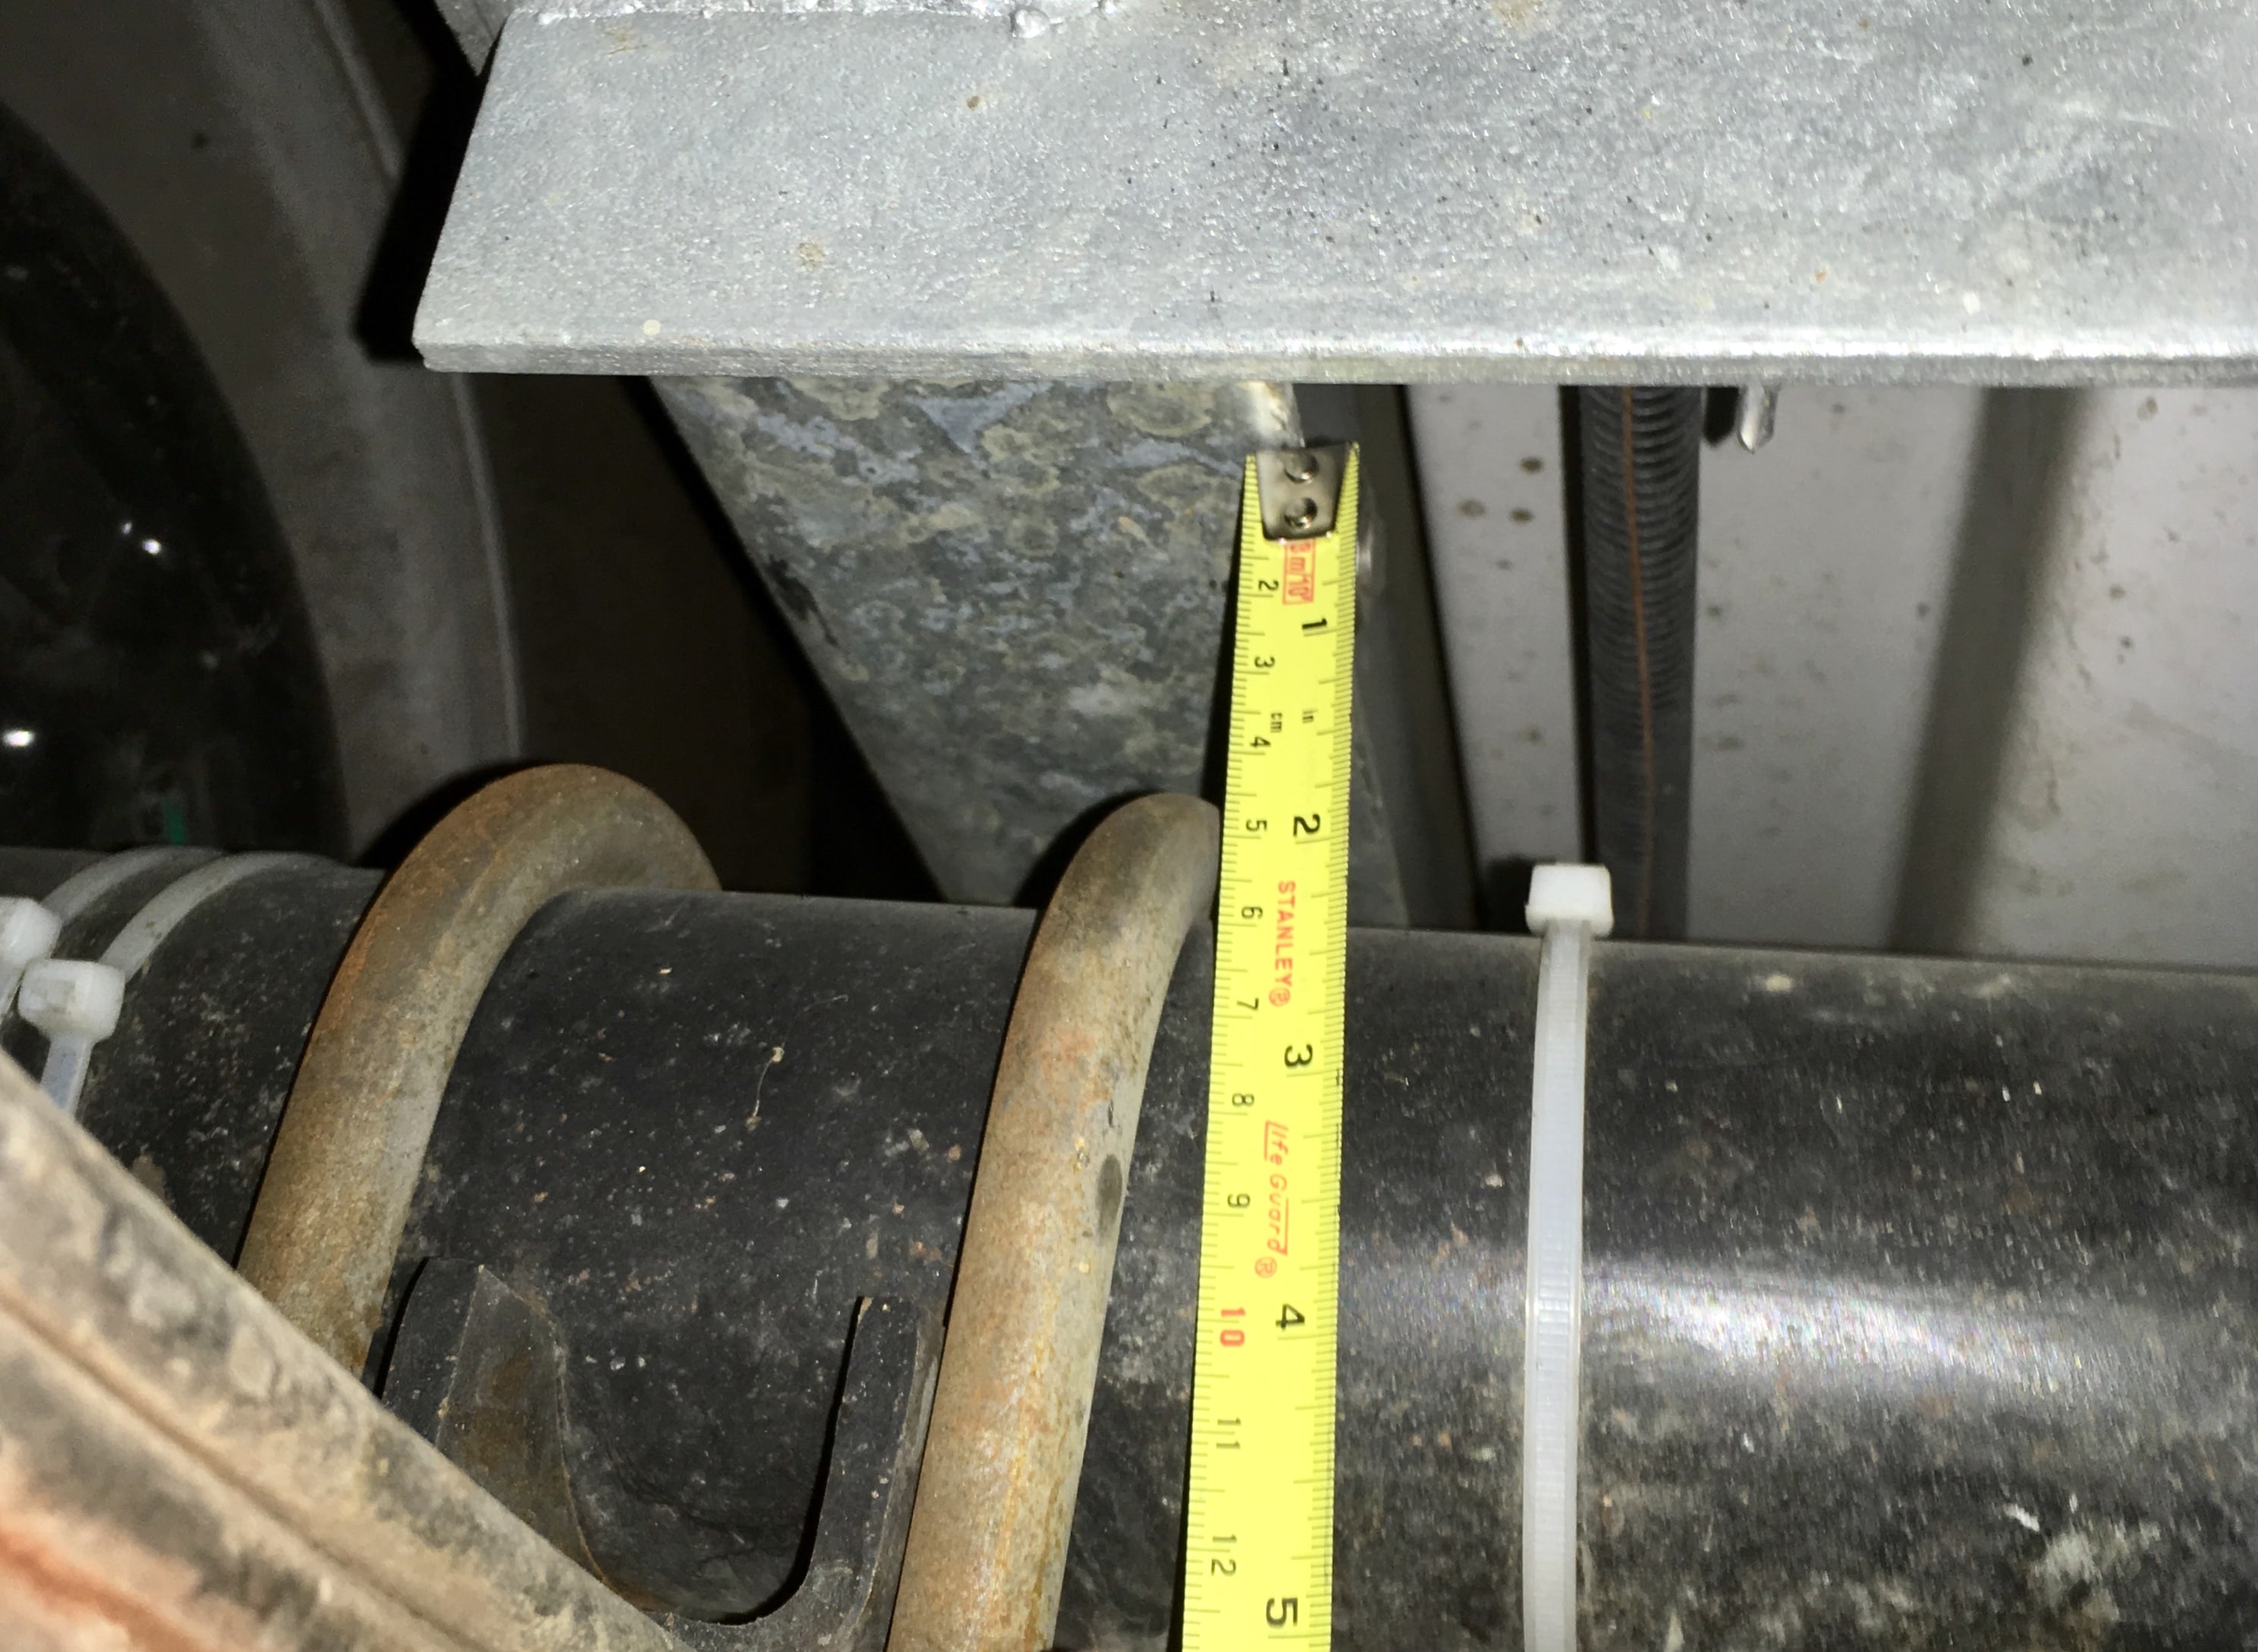
Reed, For us, the mod is less about difficult terrain than is is about rough roads and potential water crossings. The Oliver's suspension is set up for the highway, and if you're going onto gravel, you have to take it really slowly to avoid bottoming out. With just 2" of compression travel, really slowly. We're into this trailer for the long haul, so anything we can do to ensure it's durability, we'll do. As far as water goes, we want to keep it out. And you can't even get into some national parks without going through a water crossing. The current clearances, by my measurements, are 18.5" to the weeps, and 23.5" to anything obviously important. Of course, those clearances go to zero when you dip that long overhang, furnace and all, into the water on exit. Another potential advantage is that the lift kit provide opportunities for under frame storage, like an additional spare, or the storage drawers that Jim Oliver has on his own (lifted) trailer. In fact, I may be mistaken but I've seen enough photos of the original stripper pole Olivers to wonder if at one point they all came from the factory with an overslung suspension.1 point
-
John, thanks for starting the topic. I've requested this modification on ours as well, so at least two of us are pushing for it. A few notes: I don't know how much additional stress this mod would put on the spring mounts, but intuitively they seem a bit marginal to me anyway. I would want to strengthen those with perhaps an extra plate welded to them. My wife and I paid special attention when we were there a few weeks ago to the steps and what it would be like when we raised the trailer. Our verdict was that if we didn't lift the trailer that we'd want the single step anyway, for clearance, so we'd need a small step stool regardless. It is quite a step down, though getting in isn't a problem. The brake wire issue is 'easily' solved with hydraulic disk brakes. That's also on our list. I think that the bump stops are important. You can think of the lift in two ways - as just a lift, or as a way to get extra suspension travel. We feel very strongly that the suspension needs more travel if you're going on rough roads. As it is, a pothole or bump at even moderate speed is going to bang the axle on the frame, and hard. So to us, one of the main advantages of a lift is the ability to fit a bump stop of some sort. I think that you would want to weld an extra angle across where the stops are mounted to distribute the impact load. I'm not sure about reusing the same shocks due to the added compression travel. You may find that your shocks are your bump stops and that would be an expensive and inconvenient discovery to say the least. You might consider the need for a sway bar with the lift. The only way to know for sure if it's needed it to try it and see, but you might at least want to keep that potential need in mind. I'm talking with a local machine shop to see what they can do in that regard, and also about the possibility of just manufacturing an entirely new subframe to replace Oliver's. Personally, I think that Oliver would do well to offer all of the above as a "high clearance suspension package". I'd pay for it.1 point


-
Recent Achievements
-


")


")


