Leaderboard


Popular Content
Showing content with the highest reputation on 04/13/2024 in Posts
-
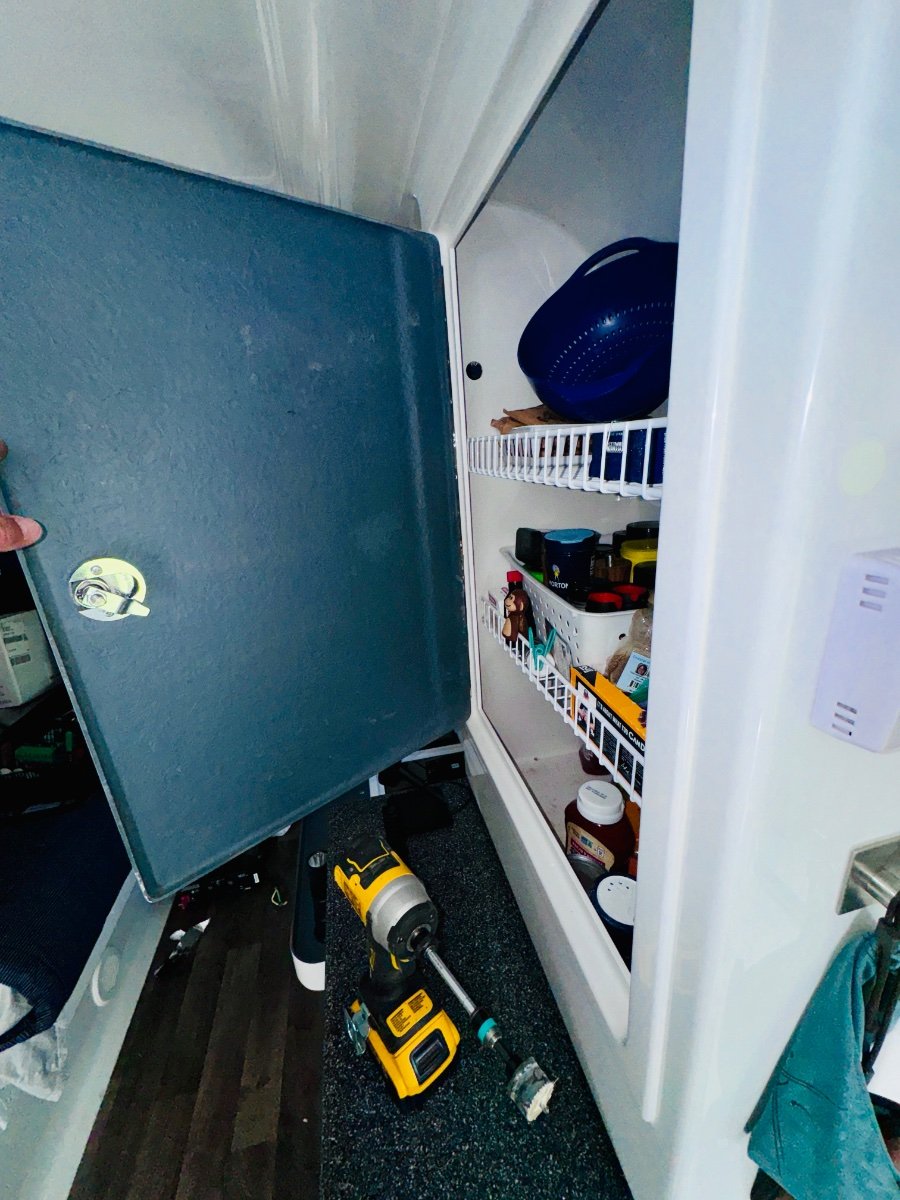
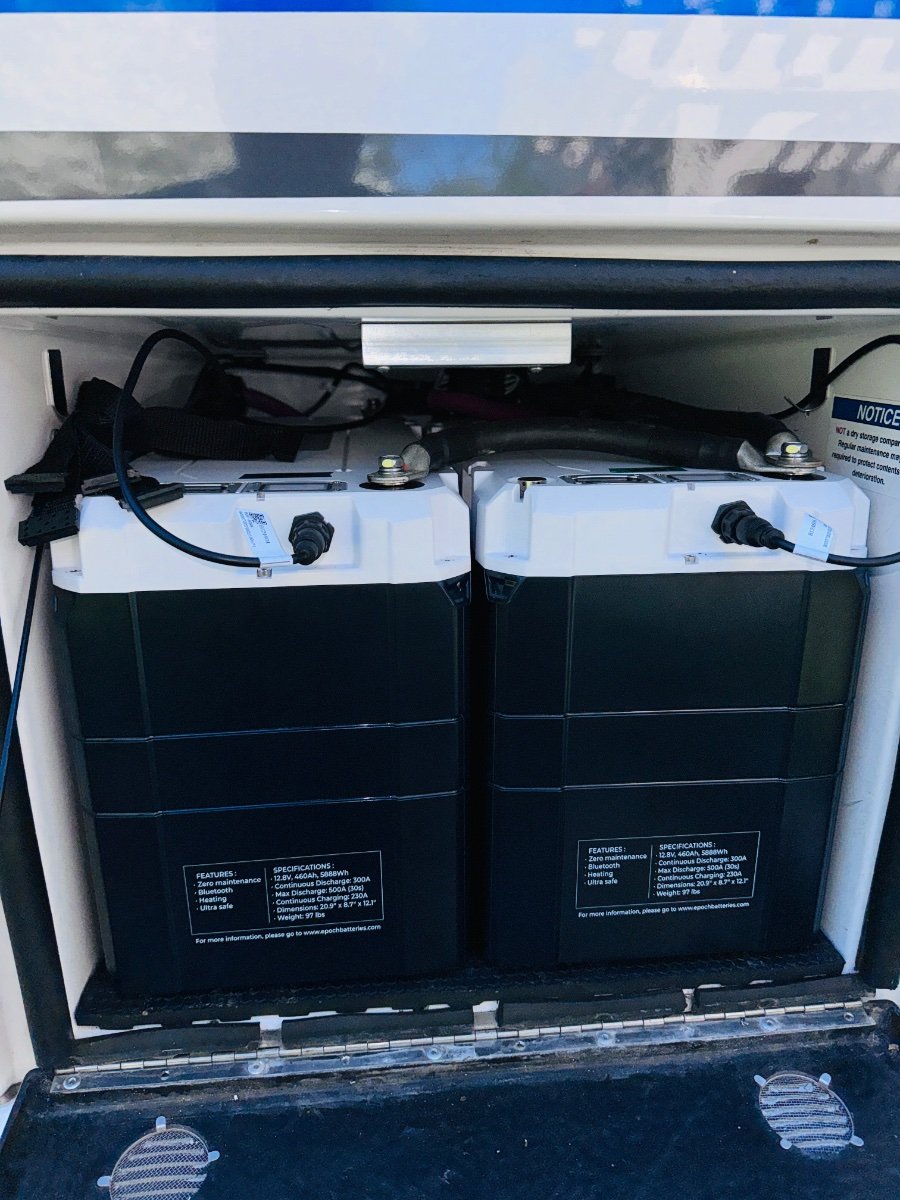
Removed: Old Xantrex inverter, transfer switch including ac legs IN/OUT, charger from PD4000, Trojan batteries, Battery tray Mods: Wired Outlet and microwave circuit directly to breaker, mounted pos and neg bus bars using Star board (heavy), Pulled all wires from battery compartment except 4/0 pos and neg, ran wires for Epoch battery remote battery on/off switch and external battery level indicator, COM port from battery to MP2, Re-used all electrical wire (Used some new lugs and heat shrink), removed 10/3 main shore AC from EMS to PD4000Installed: POS and Neg bus bar, (2) Epoch 460 ah batteries, battery wire zip tie holders Waiting on MP2 stand to give lateral support since it will be mounted horizontally. May still bond starboard to fiberglass wall to fixate MP2 but it weighs 49lbs so I want the extra support from stand. We shall see if it fits with some modified aluminum support for feet.
 5 points
 -
Packed to the gills. I felt like a German mechanic changing a water pump connecting batteries but I am happy with the result. No maintenance and they have remote monitoring and shut offs so they shouldn’t need to come out.
5 points
-
I like to use t-nuts and machine screws with my initial installation of equipment. Mossey5 points
-
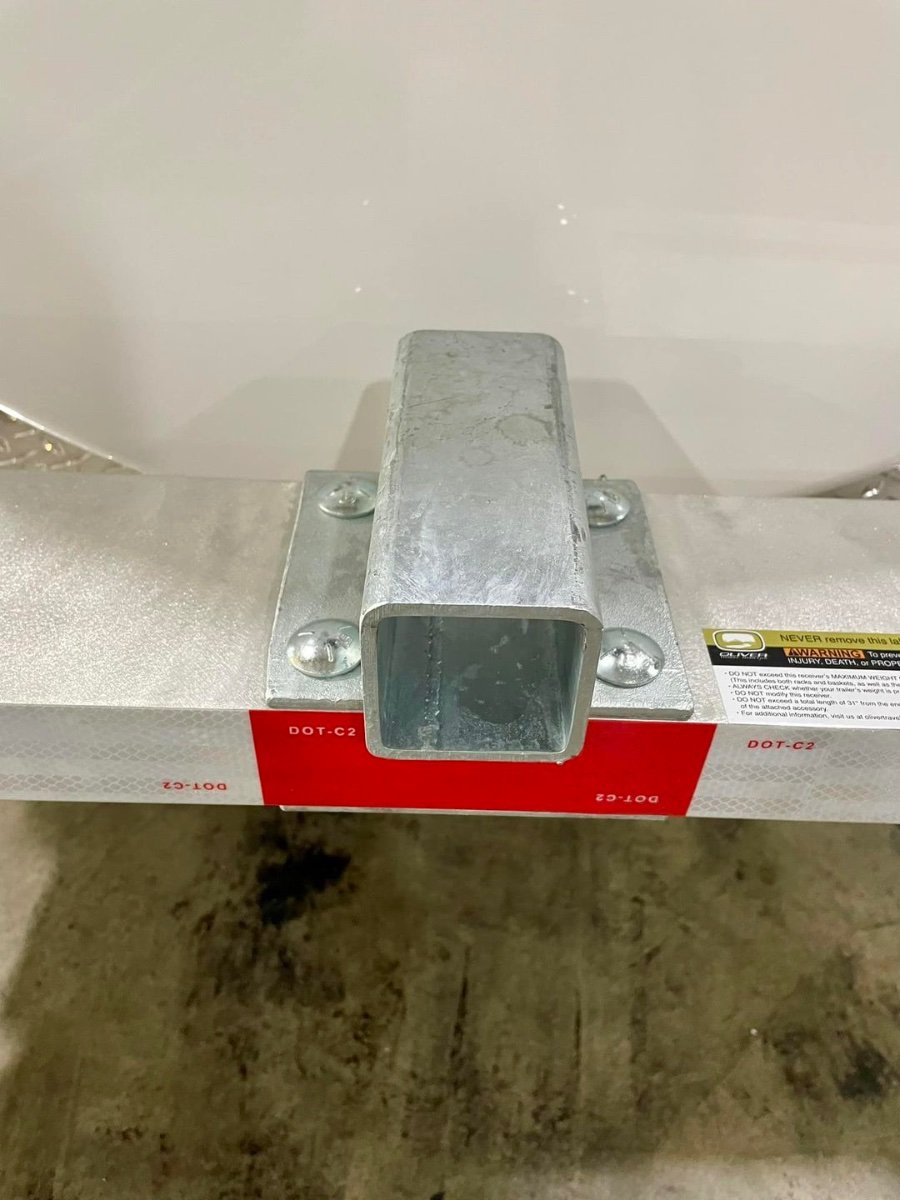
Yes, the new Olivers do come with a 2” receiver.
5 points
-
Very good choice with Epoch batteries, I mean, if Will Prowse gives it a thumbs up it must be good!😊 HERE’S the Review by Will Prowse4 points
-
This is what I used with the DC-DC converter setup. Expanded PVC Foam Board, White, 3/4" (0.75", 19MM) Thick, 12" W x 36" L https://www.amazon.com/gp/product/B09K2YR21N/ref=ppx_yo_dt_b_asin_title_o02_s00?ie=UTF8&th=1 I used the 3/4" thick instead of 1/2" thick so I could have a few more threads on the screws holding things.4 points
-
At the eclipse meet up I was asked about tightening the stabilizer rear jacks. i use blue threadlocker to help with bolt retention. Spec: 3/4” Leveling Jack flange bolt nuts (43 ft-lbs). Bolt locations shown for rear. inside : outside:
3 points
-
Trainman: Good idea on blowing out the assembly for plastic shards removal. Also, please update both your signature line and profile to include you hull number. Thanks. Imelda! Good post. Thank you. "Slowly over an hour": What were your thoughts for the slow injection process? I was thinking of just disconnecting the hose and dunk it and the faucet head into a small bucket of vinegar? But then you are using industrial strength vinegar..... All: FYI COSTCO also sells 1.3 gallon jugs of 5% Vinegar. But it's no where as strong as Imelda's 30% cleaning and industrial vinegar. The PH scale is not linear! The acetic acid in the industrial version literally will eat many metals. If using this for decalcification the mixing ratios are drastically different than the 50/50 generally posted for run of the mill COSTCO or other commercial grocery store brands. The 30% stuff will blind immediately and burn as well. No kidding here. Specifically per OSHA: "This material is considered hazardous by the OSHA Hazard Communication Standard (29 CFR 1910.1200). SIGNAL WORD: DANGER GHS HAZARD PICTOGRAMS: Hazard Statements: Causes severe skin burns and eye damage. Precautionary Statements: Do not breathe mists, vapors, spray." GJ .
3 points
-
I think the material is the same as the trim boards mentioned above which is also available is sheets Mossey3 points
-
@Geronimo John look inside the rear bumper. There is a rubber seal around the sewer pipe where it goes into the lower left rear of the trailer that will become dislocated and permit dust intrusion. Reposition the seal and place a clamp around the sewer pipe to keep the seal from slipping back out of the hole. I used a Stainless steel Banjo TC-331 just snug. Not tight.
3 points
-
Hey Art, Nothing wrong with hanging out in a cow pasture shooting the bull. 😄2 points
-
Home Depot and Lowes carry Azec brand pvc board and trim boards which is exactly like the material Oliver uses, not cheap but strong and lite. Used in areas subject to moisture and water exposure.2 points
-
Summary: Check under your kitchen sink I walked up to an Oliver at a campground one time to introduce myself. I noticed water running down the curb side rear stabilizer. After exchanging greetings I brought the leak to the attention of the owner. After looking under the curb side bunk and finding nothing I suggested that he look under the kitchen sink for the source of the leak. Upon removal of the drawers he found water soaked plywood caused by a loose coupling on the kitchen sink drain trap. Since then I have tried to check mine occasionally to ensure that it is tight and to look around for any other problems. Today I found that the quarter turn stop on the hot water was not completely open. It had probably been like that since we took delivery. Anyway, I opened it and improved the hot water flow at the sink. Occasionally remove your (kitchen) drawers and check on stuff down there -tightness of the drain coupling -quarter turn stops fully open -refrigerator plug plugged in -hose weight located between back of drawers and rear of cabinet carcass -hose not twisted -any sign of moisture -anything rubbing against something -and especially that blue clip on the faucet hose assembly. There was an owner that heard water running underneath her sink when she turned the faucet on. Turns out that blue clip was missing and the hose had completely separated. We have a 2018 OEII, hull 313. Some of this stuff has probably changed. The round port was added after production to access a loose clamp on the exit end of the fresh tank overflow hose. It sure is useful for checking below the cabinets. There is a plumbing vent under the back right corner of the range. It is supposed to let air in and not let grey tank smells out. If you are smelling something foul (grey tank odors, not black tank odors) and you can’t locate a leak you might have a bad plumbing vent.
2 points
-
I like the Nova Kool R5810. Has a larger freezer and other benefits. Ken (Mountain Oliver) installed one and I put together with his ideas and edits the attached DYI guide for install. There is a good amount of info here in the forum threads as well. GJ Nova Kool R5810 Installation (7 MARCH 2023 Version).docx NOTE:: I edited the attachment to correct several typos and some minor clarifications. No significant changes otherwise.2 points
-
I still have the outside upper vent on my 2023 with the 12V Isotherm fridge, but no more outside upper vent on the 2024s though. My 2023 ..and a 2024
2 points
-
Long time ago, John D. stated that he would not go beyond 15,000 miles on the OEM Dexter bearings. I asked how long with annual service the replacement Timken's would likely run and i recall 60,000 miles. For sure we get what we pay for..... GJ2 points
-
I don’t think Oliver uses Starboard because I believe SeaDawg once mentioned that Starboard only excepts mechanical fasteners. I bought a piece Starboard to make attic access panels at HD and I think it resembles cutting board material more than anything else. This is the same trim board material that I have used with success, but I use JB Weld. I do believe the attaching to a horizontal surface is pretty straightforward, it’s the vertical placement that much more difficult. I have had pretty good success with 2 pieces of all thread joined with a coupling nut used as a spreader between the walls of the area under the beds or seats. Mossey2 points
-
I think the new Ollies come with a 2". The label says 150 pound limit.2 points
-
Thanks @rich.dev for the attached links. As was mentioned above, I also would advise against mounting a tray or box by the 1.25" receiver. There's a lot of dynamic load with an extended cargo tray, or bike rack for that matter. The single point Oliver hitch allows a lot of movement side to side and up and down. The two point mount used by those of us that installed boxes or trays inherently provides a high level of stability as well as a direct mount to the trailer main frame rails. Also the 2" sockets at those locations allow you to use a heavy wall 2" square tube which substantially increases the strength of those connections. Even mounted by the 2" tubes, you still use the hitch pins Oliver used to secure the bike rack mounting frame. This still allows the tray or box to be quickly removed for installing a bike rack or service needs. All this having been said, I still believe you should limit the total weight mounted to the back to the maximum that Oliver recommends. The tray or box mounted doesn't extend much farther from the bumper than a double bike rack would, so the loads should be somewhat similar to those exerted by two bikes mounted on the Oliver mount. But again the cargo box is mounted directly with two points that are extremely stable and secure. Just my thoughts. Edit: Additional thoughts. Regardless of your method of mounting a cargo box, clearance for the lid to open without hitting the spare tire cover must be considered. Also if you make the mounting tubes extend far enough into the frame sockets, you will be able to slide the box back far enough to remove the spare tire without completely removing the box from the trailer. This was very important to me because complete removal requires two people and sliding it back enough for tire access can be done by one person.2 points
-
There have been threads on this forum discussing the weight limitations of racks (bike, cargo, etc.) on the back of an Oliver. As I recall, the limitations result from the increased dynamic load exerted by anything cantilevered off the back of the trailer, far aft of the rear axle. These limitations, in turn, prompted Oliver to limit the bike rack mount to 1-1/4". I recommend you carefully consider what you want to carry behind the trailer, and how that will impact the longevity of the aluminum frame.2 points
-
Don't know how many of y'all ever rode in the OTT under tow, but I've done it a few times just to check what needs attending to. I try to convince my bride to keep the speed down -- with little success...😜 FWIW, I rode in the back for the last several miles yesterday on our way back from the eclipse adventure.... From a qualitative perspective, the ride was interestingly noisy, solid/stiff - but not like a buckboard.... It was not appreciably different than the ride I took before changing out the springs. Don't think it would comfortable for more than a few miles, IMO. I checked the torque settings for each of the U-bolt nuts after logging 1,895 miles on the new springs over the last 9 days - all good, no more stretch. Probably a good idea to keep doing so every 5k miles or at least annually. Not to highjack this thread, but: Regarding frame cross member welds - visually inspected all yesterday and photographed each weld to set a baseline for our records. All good. I'm suspecting that the broken welds reported in a parallel thread could be caused by an inexperienced welder at the factory and not a design flaw. I also suspect that Oliver engineers designed the frame to withstand "normal" usage (that may be difficult to define, however). Like other owners, we routinely, yet carefully, travel over unpaved and unimproved roads with a full fresh (empty black/gray) tank without issue - I believe this practice is within the design limitations of the trailer. We'll definitely keep inspecting the cross members after such trips... Thoughts?2 points
-
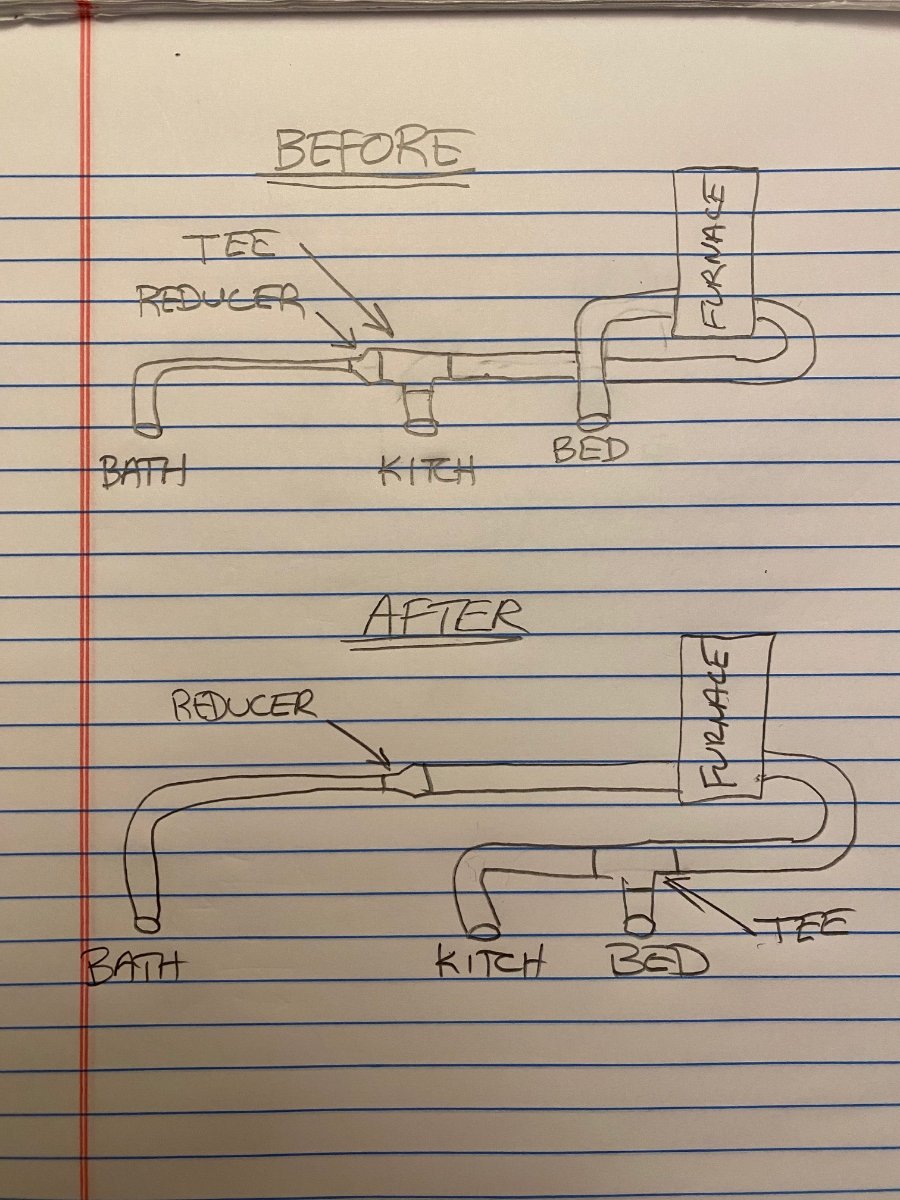
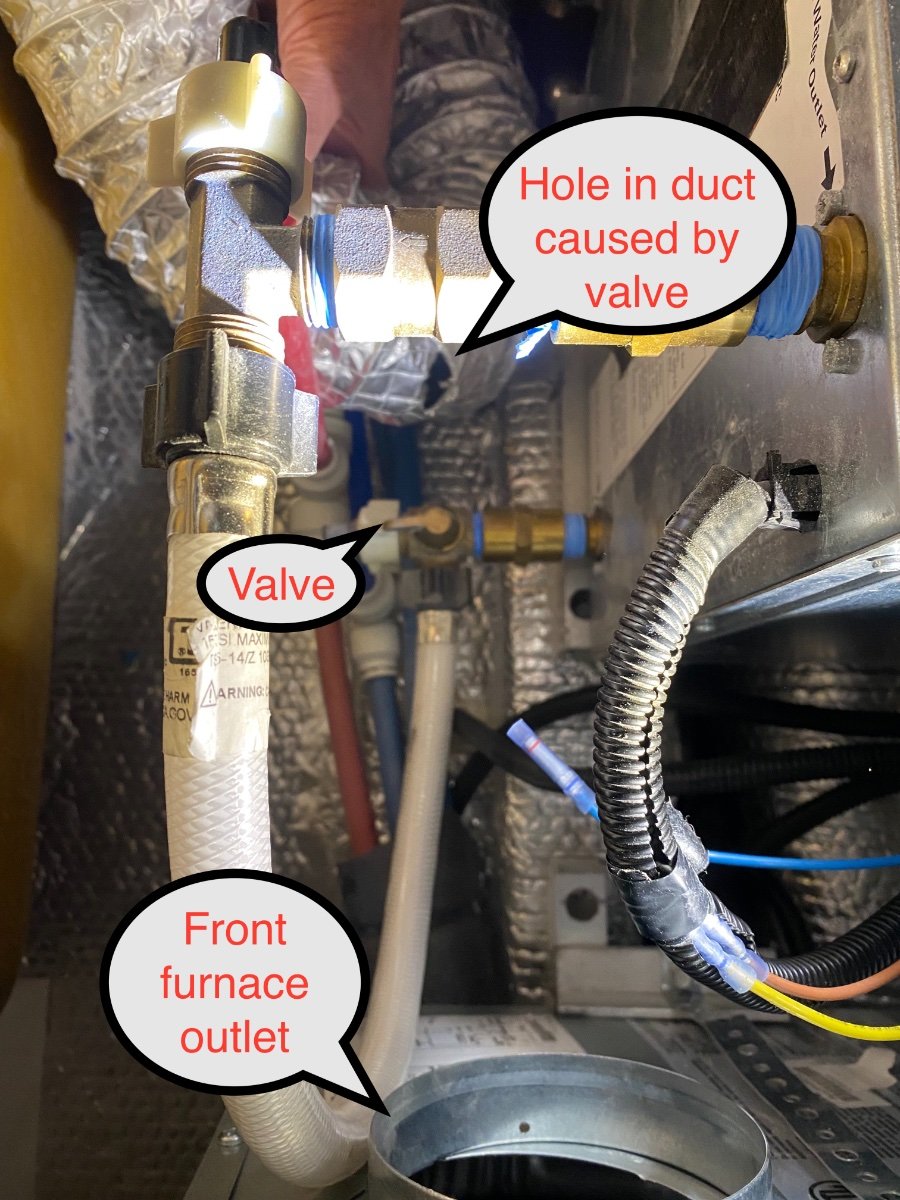
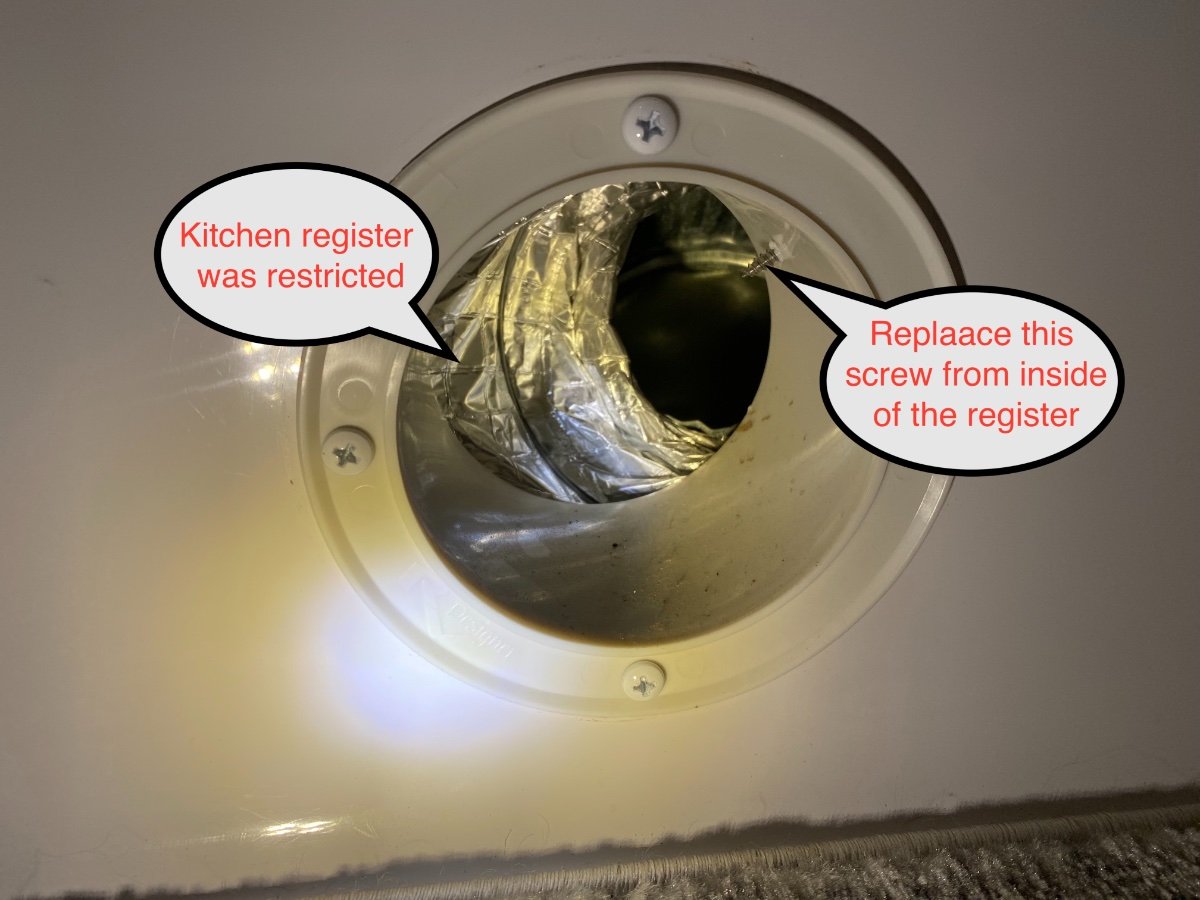
Like others, we’ve been disappointed with the lack heating in the bathroom. In our Oliver, even the kitchen had minimal air flow and hot air was blasting under the bed. When I took a closer look at the duct routing from the furnace, the problems became obvious. There were two 4” ducts coming out of the furnace, one from the front outlet facing towards the registers, and the other from the rear outlet facing away from the registers. The front outlet was connected to the bedroom register with one 900 bend. It had the shortest run with the least turns, and twice as much air flow as the other two combined. The rear furnace outlet was connected to the kitchen register after making a 1800 u-turn. From there it was Tee’d and reduced to 3” to feed the bathroom. The 3” duct then takes a long and torturous path to reach the bathroom. The resistance from over 2800 of turns, and the longer run, resulted in much lower air flow to both the kitchen and the bathroom. I also found a hole from where the duct had been rubbing on the hot water valve, and the kitchen had a restrictively tight bend at the register. Fortunately this was a relatively easy fix, and the results were significant. Our 2022 Elite II has the Dometic furnace, but I suspect that other furnace brands could have similar ducting issues and it might be worth taking a look. The sketch shows how the duct routing was modified for better balance to all three registers. The bedroom and kitchen registers now feed from the high resistance u-turn at the rear furnace outlet. The bathroom has its own feed from the front outlet giving it the minimal number of turns possible. This modification involved moving the Tee which is under the kitchen cabinet. There is an access port under the forward kitchen drawers to reach the Tee and kitchen register, and it’s best to pull them right out of the access port to work on them. The 3” bathroom reducer stays in place and it gets a new duct directly to the front furnace outlet. The bedroom/kitchen gets connected to the rear furnace outlet. Rather than using flexible duct to make the 1800 u-turn, I used two 900 rigid fittings for less flow resistance. All of the parts needed for this modification are readily available at hardware stores. They usually sell duct by the foot, I bought 5’. Use sheet metal screws and foil duct tape for the connections to make sure they don't come apart. The kitchen register can be screwed together from the inside of the register rather than trying to do it from under the cabinet. I used an anemometer before and after the modification to measure flow, and a on-line calculator was used to get Cubic Feet per Minute (CFM): Before After Bedroom - 4” 100.7 53.2 Kitchen - 4" 39.3 65 Bathroom - 3" 11.8 30.2 Total 151.8 148.5 Cheers, Geoff
1 point
-
GJ - Just remember to add 'Air-Down' to your step-by-step before leaving the 'Barn', if you do 'air-up' once in. I'm following this thread, with great interest and maybe I should have joined the discussion about 9 pages ago. Our (2) rear leaves broke on the 'eye leaf' at the point where the leaf below the eye ended. I believe I saw some similar break points on other pics posted above. We were in the NWT/TUK area so resources were limited. We cobbled together 2 new but different LS's to get us back down to Whitehorse, YT. Image a horse with two worn shoes in fronts, with a loafer & tennis shoe on the rears... But it tracked & pulled straight. OKAY, maybe not that bad, we can smile but not yet laugh about it now. We had all 4 LS's replaced by 'Jacob Industries' (HIGHLY RECOMMEND IF YOU NEED WORK DONE...) the go-to suspension business in Whitehorse YT, last summer to get us home. So we'll probably not be replacing LS's unless we break another on our return adventure to AK this summer. And yes, we now carry 2 (the fronts) LS with new brass bushings if we needed. Our new LS's had some differences in length from what we had from the build, they are rated at 1830 lbs. The ride home from Whitehorse was slow and not 'stiff' at all, but by this time we were on pavement. There is a lot more that ScubaRX & I found out about LS's that are compatible with the the LE2, in research & discussion. Starting with 'where does Oliver source them from' to that sources part numbers & spec's. Even on some of the supposed same universal PN's from different suppliers sometimes there are slight/negligible differences in the A B C D measurements that make it less that totally consistent by supposedly the 'same industry PN' across suppliers. And that was just the 4 leaver's. I have spreadsheets, but this thread is way beyond that point, by going with ALCAN. I actually like the idea of going with 5 leaves, not for load increase (which we will not do), but the fact that the first leaf below the eye, extends to the eye. Snow maybe Wed, after the melt we'll pull SNYSDUP out of the nesting box, and start loading him up, Cause "WE ARE GOING CAMPING". B-Out,
1 point
-
HDPE Marine Board from Buyplastic.com. 12x27x1. It is heavy and expensive but turned out to be very well suited for this install. $57.00 PC-11 Epoxy adhesive paste. 1 lb in 2 cans. from Amazon.com1 point
-
No idea, but "westbound I-40 near Santa Rosa" you must be back home now! Right on - back in pocket Thursday afternoon after about 1,875 miles over 9 days. No biggie, like @ScubaRx mentioned- most of that time was hanging out in a cow pasture.1 point
-
Very nice work Mike and I am talking about the write up and installation. Keep us posted with your progress. Is the stand for the MP2 a Victron product? I haven’t seen it before. Mossey1 point
-
@SeaDawg: Respectfully request to split this thread off to a "Screen Door Protection Modification" thread. We took SeaDawg's advice and fabricated a Lexan protective barrier on the screen door mounting it with Velcro. $17 Lexan sheet 18" x 24" at Lowe's and about 3 feet of white 3/4" Velcro - easy peasy. Much better than the $80+ Campco option - and no screws! Magnus will be impressed this weekend when we plan on trying it out up in Eagle Nest, NM. We gotta escape from this heat wave... Cheers!
1 point
-
What a smart dog. Our labs have never damaged the screen. They love to lay at the screen door. That is amazing.1 point
-
@rich.dev, thank you! I had not seen photos of the 2024 model.1 point
-
Our Ollie has an aluminum panel replacing the lower screen. After replacing the screen several times, the previous owners tired of the wash, rinse and repeat cycle. Like us, they have a high prey drive pointing dog. On our old Airstream that came with a see through pet barrier, I added an easy to remove bar that kept the door from being pushed open by the wildhair. I should probably do the same for the Ollie.
1 point
-
Actually I believe they all extended the end square aluminum tubing as supports.
1 point
-
Same here, brother! Couldn't agree more, David! We should all invest in something like one of these unless already owned... ...just one last blow to the horse! HA!
1 point
-
I always Assumed that Oliver used epoxy. It matches so well with the existing fiberglass epoxy that they use in the shell. They must use tons of the epoxy. When I installed my DC-DC charger setup. I used JB weld. I sand the fiberglass surface and mating Marine board with 60 grit sandpaper. I then roughly cross hatched both surfaces with either a angle grinder with .060 cutoff wheel, or used a dremel. I just wanted to make sure it was going to get the best possible adherence. Oliver's joints have been known to fail. I have had 2 joints fail of what Oliver did at the factory. I don't know if JB weld it any better than their epoxy, but the failed parts had smooth surfaces. It sure can't hurt to give the surface more to adhere to.1 point
-
Lucky guy. You can still see the buttons on that micro remote................1 point
-
Thanks Bill. I had missed it by speed reading while looking at his excellent pictures. Every one of them are perfect. What they highlighted to me (beyond the message of fixing the likely vent problem) is just how much dust my Ollie has between the hulls where the majority of our MEP resides. it certainly did not come from the factory that way. Likely the dust is from the air vents for the curb side and lots of dusty camping roads. It can't be good for the MEP systems. Looking forward to having to replaced the Dometic absorption refrigerator and sealing up the refer vents. That should help on the dust issue. Left would be the Suburban furnace grill used to provide cooling and combustion air to the furnace. Maybe a bolder catcher filter there. Plus about three days with a strong vacuum with 20 feet of hose. GJ1 point
-
I believe once you have torqued the nuts 2-3 times and get to "no more stretch" you should trust the installation that they're good and you're done. The U-bolts need to be well seated, but they are not a maintenance item and once set will stay put for years, decades even.1 point
-
I guess I have mixed emotions on this. I love the quality of the trailer. However, I live in Northern Minnesota and there are no dealers close to me. I bought a barely traveled 2021 LE2 last summer in Texas. I did visit the factory before making my decision on purchasing an Oliver and was going to go the new route until the one I purchased became available. Phil mentioned the biggest downside was no warranty. I have no regrets and still won't no matter what happens. I look at it this way. Many of the systems are not proprietary to Oliver. A Truma water heater can get serviced at a Truma dealer and they'll be familiar with it. I had a mixing tank crack on my Truma water heater and a local dealer installed a new one, I would have done it myself but, the warranty through Truma didn't apply if I did not have a dealer install it ($500 labor above the water heater cost). Dealers may not understand the entire Oliver but they'll likely understand a problem I may encounter. I would also think that some dealers are familiar with servicing solar systems, inverters, and charge controllers. It seems like Oliver may be trying to get away from that kind of work and stick to Oliver specific items only, or at least until a full transition to the dealer network happens. For the benefits of all owners, I hope they decide to keep doing all service work! With the recent discussion on springs, I will be checking mine when I get it out of storage next week and will replace them myself if necessary. I typically work on and fix most things myself as it helps me understand things not to mention the fact that I like to do that kind of stuff. Not everyone can and I understand that. Hopefully their internal discussion will bring some kind of positive compromise for all. Either way, I'm not selling mine any time soon.1 point
-
I agree. Just find a mobile RV company and build a relationship with them and also with one of the new dealers. We are 6+ hours from Hohenwald and loved stopping in late February on our way to Texas. We also have a relationship with a dealer in Indianapolis that worked on our truck camper and did a Norcold warranty repair on our Oliver fridge. I have options in the works and haven't seen the sky falling yet🙃1 point
-
Thanks for the confirmation of Oliver Travel Trailers' continued dedication to Oliver customers, past, present, and future. "Transition" is a common event in the life cycle of businesses as they mature and grow. With OTT's strong heritage and dedication to building a quality travel trailer that, with proper care, will last a lifetime, you have brought value to the market and joy to many individuals and families throughout the nation. I wish you and all employees of OTT all the best as your company evolves into the future.1 point
-
Our Oliver being our first and last travel trailer I cannot comment on service from other RV dealers. I have heard from some on here and have friends that have SOB and hear their stories. I understand that Oliver's decision to move all their service (except for major repairs) to the new dealer network has made people very nervous about their new experience. I can do some of the normal DIY stuff but I get nervous when working with the electrical items yet. I am getting a new inverter in a couple weeks. Oliver offered to walk me thru installing it myself but I did not feel confident so off to the factory we go, about 10 hours for me. I do plan to pick their brains a bunch around the inverter and use. My opinion only - I think it would be good for all of us if Oliver went forward with the idea of training service at the new dealer network. Gives us options when we are on the road and need some service. I also think many here would feel better if Oliver continued to offer service at the factory. It could be a limited amount of appointments instead of their current service model if resources are an issue. After reading threads here for over four years I can see where Oliver has heard from Owners and have made changes/upgrades over the years. I believe that same will hold true in this instance. I think owners will post about their good experiences and not so good experiences and then we as owners can make more informed choices pertaining to where to get service. I am sure Oliver will be monitoring this as it moves forward and take necessary steps to correct and improve these experiences. We would like the choice to go to the factory for service if possible. I get to see the new toys they are offering in person, I get a reason to go try out some Tennessee State Parks and make a mini vacation out of it. All that on top of the quality of service I have received at the factory. I don't think I am going to consider throwing away our investment and retirement plans just yet.1 point
-
Which reminds me of a "trick" I learned a number of years ago for a fridge in storage. After all contents of the fridge are removed and the fridge cleaned and dried, place some crumpled newspaper in both the fridge and freezer - it only takes 6 or 7 sheets. AS Patriot says - leave the fridge door cracked. When its time to get the Ollie out of storage, simply remove the newspaper, turn on the fridge and stock it. There will not be that funky fridge smell at all. Bill
1 point
-
I've been out of pocket for about a week while moving into a new home so just now catching up. It seems that change is hard for a lot of people. I can understand that. However, one thing hasn't changed. Oliver still builds great trailers. They have legendary quality and service. I don't see that changing. So, the service department in Hohenwald is shuttering for minor repairs. Does that change the quality of the trailer we own? Or does it just take away a fringe benefit? As I understand it, they will still take service calls and will handle major repairs but are handing off the minor repairs to local service centers. This really isn't any different than what I have already experienced. I have had a few problems since taking delivery, and it was handled this way without issue. I think we trust OTT to remain the legend it has always been.1 point
-
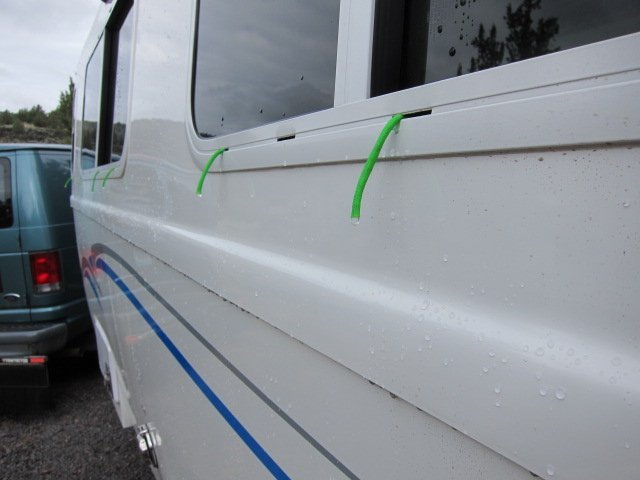
This has always been a problem for me. Just how do you get those things out? It would seem you have to lift up and remove the glass but I can't do that either.... John, I also am in Portland and store my Ollie outside uncovered. Wish I had a cover but that's another story. In the winter, I keep the trailer plugged in with one of those oil filled radiators going inside at its lowest setting. I leave the bathroom window open a crack, unless I know a big freeze is coming. And also have my shades closed, though you may want to try leaving them open an inch or two for ventilation. I also always have some short pieces of paracord stuffed in the weep holes of the windows to aid water drainage out of the track. This was talked about a while back and it really helps keep the tracks dry. Those narrow weep holes do not drain water very effectively, but the paracord sucks the water out like a lantern wick. Some folks use pipe cleaners, but I have lots of paracord so use that with great success. Keeping those tracks clean is also important as Topgun2 mentioned. It's one of my least favorite maintenance jobs! Still trying to figure out an effective way to do it. With all of the above procedures employed, I have never had a mold issue. As for getting the mold out, maybe a distilled white vinegar/water solution as an alternative to bleach? Hopefully someone will have a solid idea. Good luck, Dave .picasa.ini
1 point
-
Best of luck with your decision, Zodd. We were fortunate enough to have gone through the same decision when service was running strong. Service is what sold us ours...period. We're all hoping for a good outcome concerning Oliver and us both. When the dust settles we'll see and keep hoping until then. We're so happy with our 2022 E2 and have no reservations with our decision. But at $25ooo more for one now and having to get service elsewhere?...I can feel your pain. If this forum goes on, as strong as it is, someone will find a few good repair facilities across the country (some have already shared their experiences here on the forum) that we can all benefit from and help each other on this wonderful forum . I feel so fortunate having the moderators (ya'll don't get paid nearly enough...lol) and membership to draw help from! Hang in there! Blessings, John & Wendy1 point
-
Battery replacement is not unique to Oliver travel trailers. Although it would be best if listed Oliver dealers were actually ready to service Olivers, dealer service (including service provided by Oliver in Hohenwald) is usually much more expensive than independent service. For "generic" RV issues, like batteries, it is not necessary to find dealer service. I would advise Paul Polk to find a Batteries Plus location in LA and ask them to replace his AGM batteries. Batteries Plus does installation.1 point
-
https://www.roboutlawphotography.com/oliver#1 Hey folks thanks for all the help and interest, try clicking on the link above which should provide two thumbnails you can use either your cursor keys or click on each image to view the next. Anyway this should give you a better idea of my cracked frame, it's not terrible at this point but bad enough.1 point
-
Yep, 35 PSI is the minimum, according to the Michelin spec e the tires on most of our trailers. Being a doubting engineer, I never go with min or max. So not 35 and certainly not 80!!! The next step up is 40, since these tables generally have 5 PSI increments. 40 PSI is a VERY GOOD number, per the spec, and would be the lowest I would run. Me and GJ are going with our friend's 42 PSI recommendation. Go with 40 PSI, go with 45, 50 will not do damage, but greater than these numbers will, I promise! BTW, we in the know hope our friend is doing well. He has not checked into the OTT Forum for a while. God Bless @John E Davies1 point
-
Our 2022 Elite II has the Truma Varioheat furnace. The Truma ducting is smaller, more substantial and, from what I can see in the photos, better installed. In addition to the mods detailed above, I recommend you consider adding a return air vent from the bath to the underside of the front dinette seat. Our Truma Varioheat system came with that additional return air vent. It really helps the flow of heated air.
1 point
-
I concur. That is why I added 4" return air vents in the closet and under the front dinette seat. (Our Hull #1291 came with a return air vent in the bathroom.) The return air vent under the front dinette seat is particularly important, because it channels more warm air through the "basement" of the street side of the trailer, and ultimately back to the furnace on the curb side. This is important not only for furnace airflow balance, but to help keep the tanks and plumbing in the "basement" from freezing. In my opinion, Oliver should install such return air vents in all new trailers. It would add little to production costs, yet would make Olivers a much better "4-Season trailer," as Oliver aggressively advertises.1 point
-
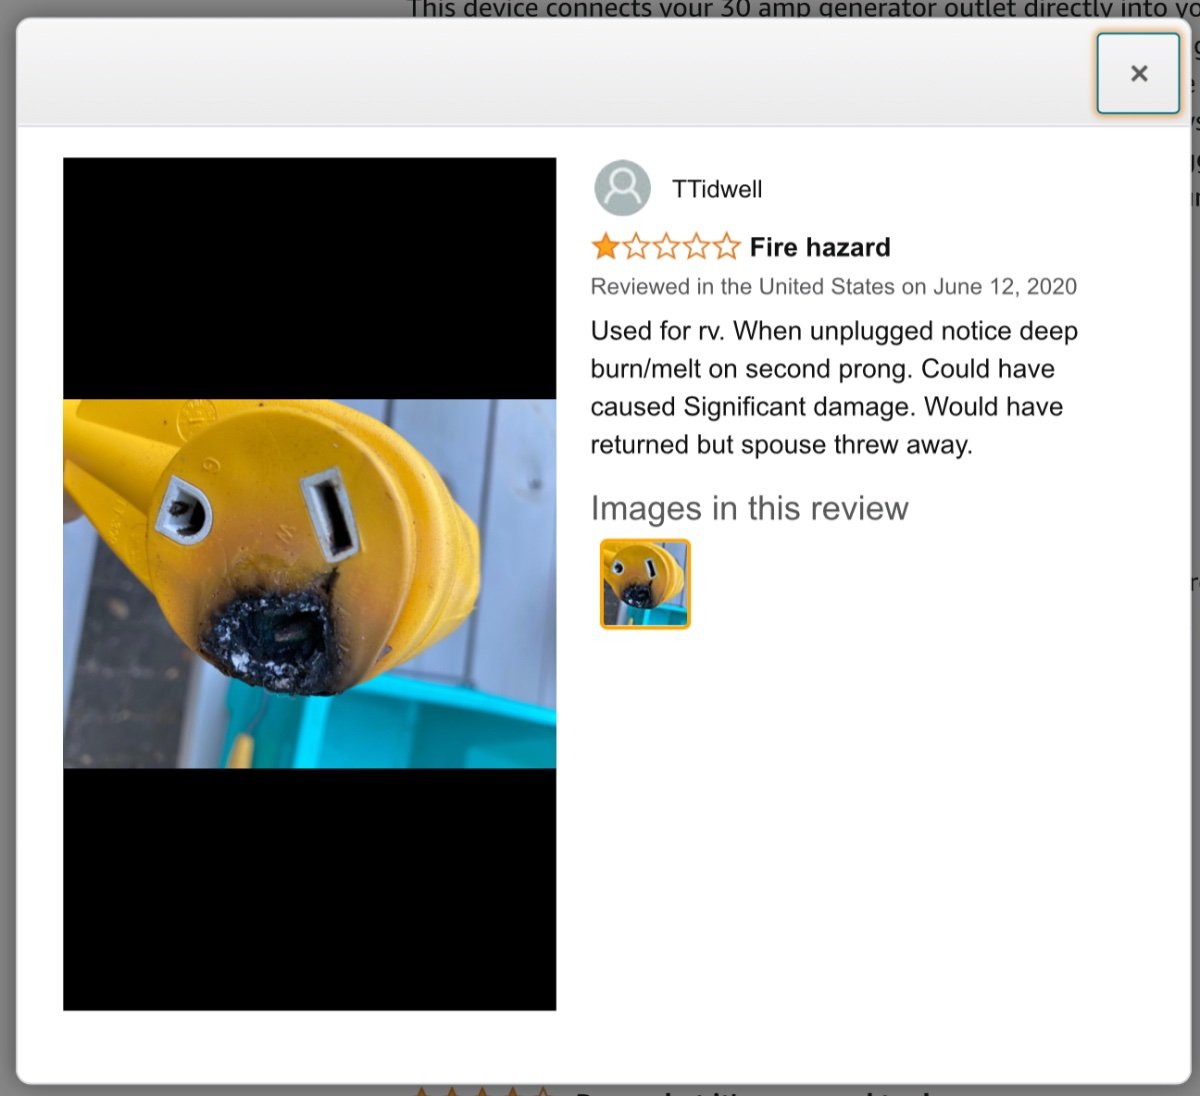
Another big caution about cheap power adapters and high amp circuits. They are cheap for a couple of reasons, they use smaller gauge poor quality wire (sometimes copper plated aluminum) and the pins in the socket and plug are substandard - they are undersized and weak, so they bend and you get a poor contact. Poof! Camco makes decent RV accessories and I have bought a lot of them, but I won't buy anything electrical. Look for a good marine part like Marinco, and expect to pay double or more. Kristie, you probably don’t want that to happen to your Ford inverter connection… John Davies Spokane WA
1 point


-
Recent Achievements
-


")


")


")


