Leaderboard


Popular Content
Showing content with the highest reputation on 05/13/2024 in all areas
-
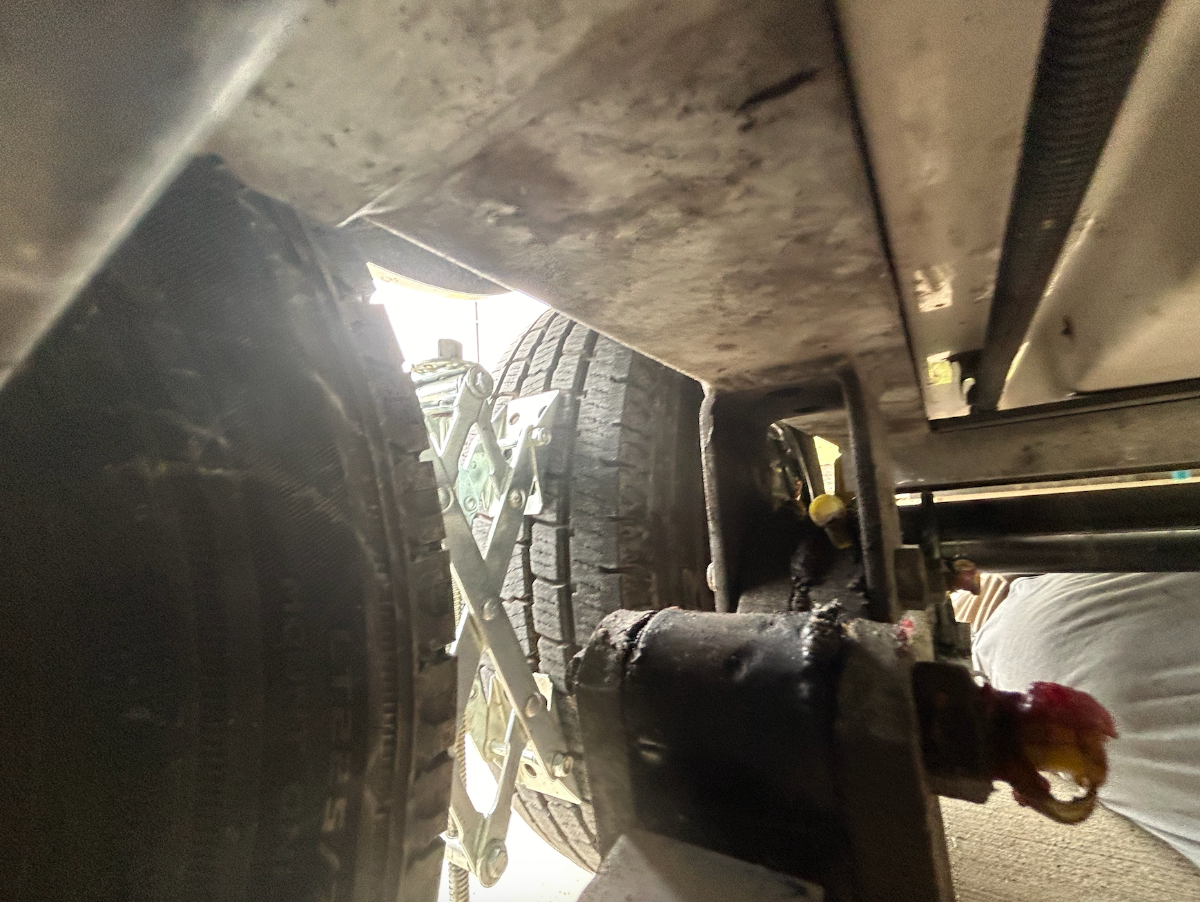
There are two more Zerks fittings in the center EZ-Flex mount on the frame - one facing fore, one aft, here's a couple pix to orient your perspective: Above pic show the forward facing Zerk... Above pic show aft facing Zerk... FYI: There's 8 zerks per side on our 2017 OTT...
 4 points
 -
To the people freaking out over the Dexter spring. If your spring is indeed defective it will fail very quickly, I have 3 of the original springs with over 80,000 miles on them, 1 failed, it took approximately 2 hrs for me to change it, when they do fail it’s generally not a catastrophic event, the remaining spring eye and shock will hold the axle in place. You will need to replace it asap however since the remaining spring is carrying more weight. Personally I’m sticking with the original design, e trl can overnight replacement parts anywhere in the USA. I to would prefer to buy USA made parts and will go with Stl spring next time, I forgot about them when my original spring failed.4 points
-
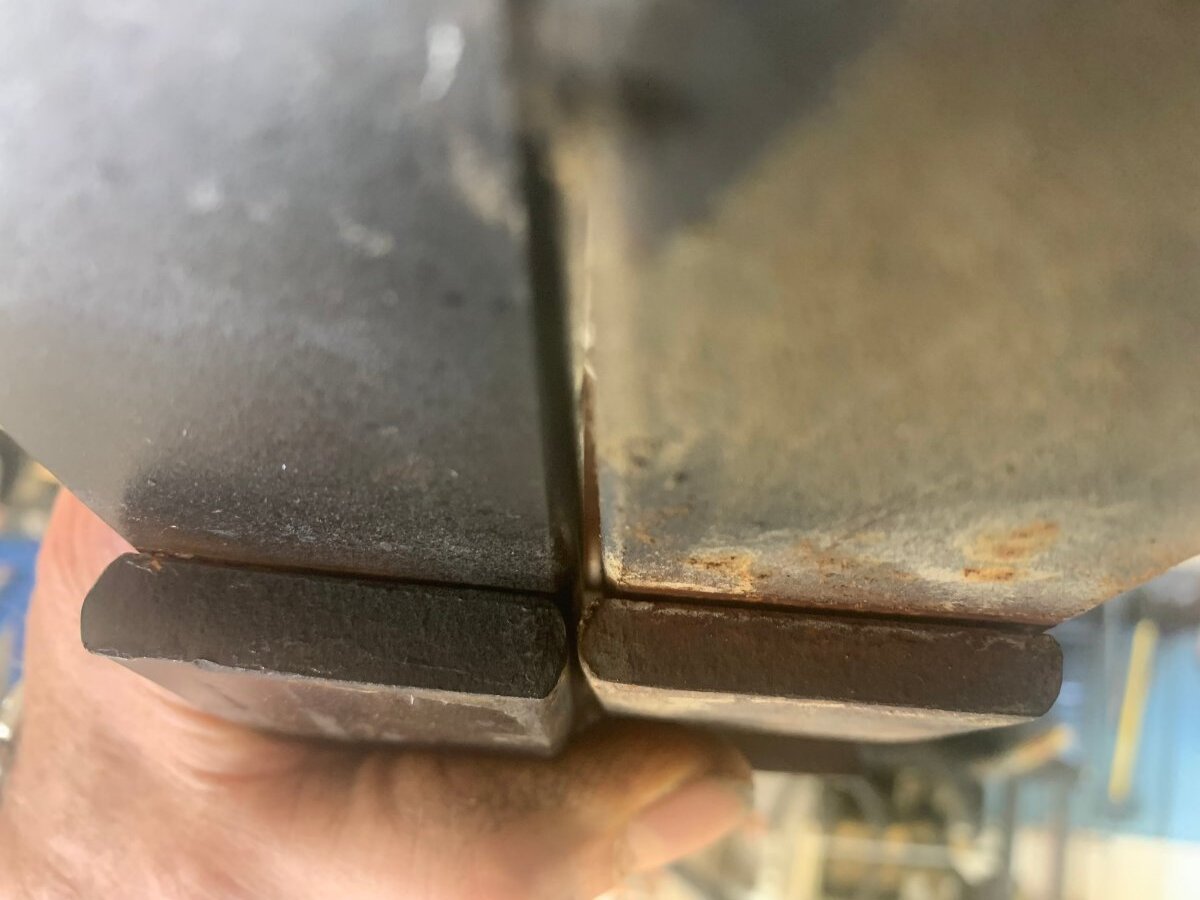
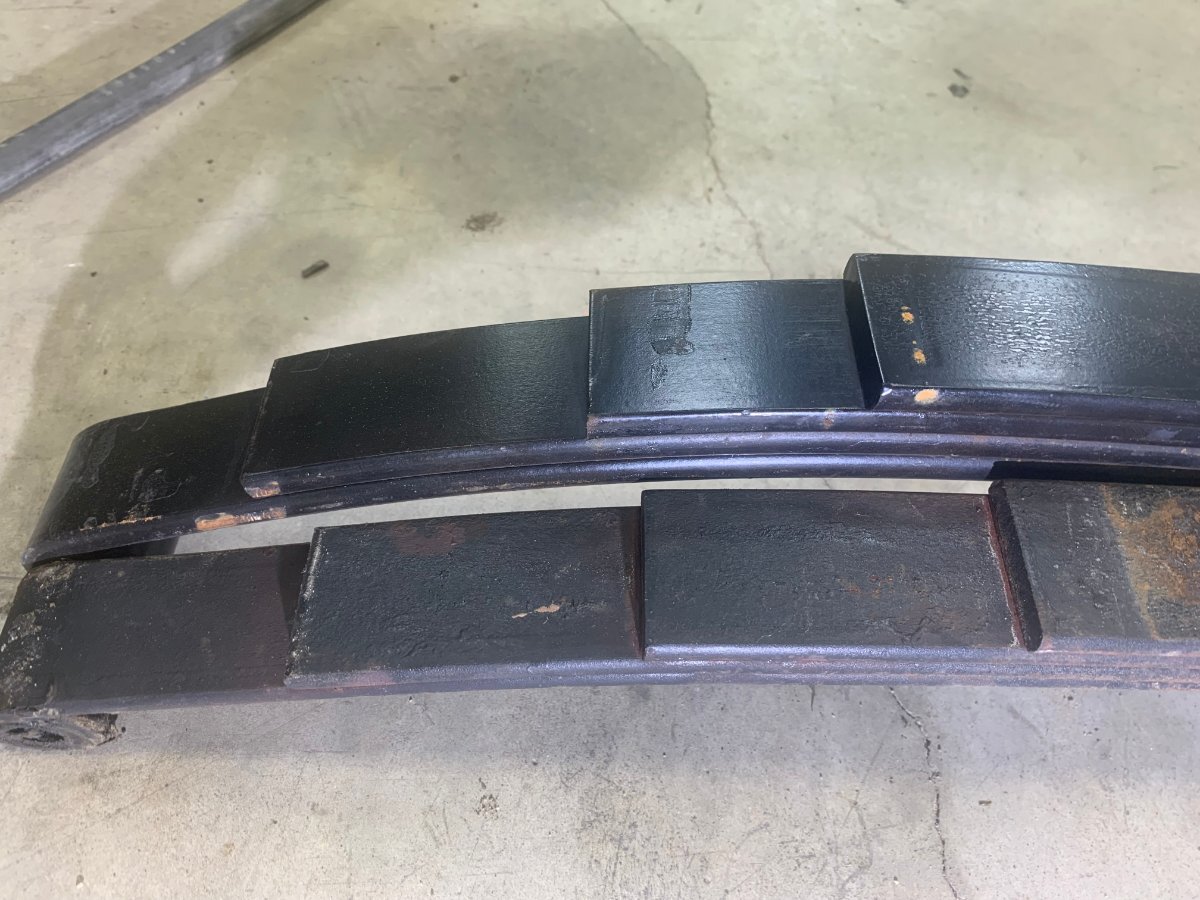
Absolutely correct, Steve. We did the same procedure by drilling-out our spring plates for the 9/16" U-bolts. Not only are the U-bolts beefier, but the Alcan-provided nuts are 50% longer than those on the standard Dexter axle made with sub-standard Chinese spring steel leafs. More thread contact between bolt and nut = mo betta. This was one of the main decision points in going with Alcan versus Dexter spring packs for our application. Dexter's 5-pack springs are designed in the same fashion as the 1750# 4-packs - with the 4th longest leaf extending to only about 3.5" from either eyelet. This is the traditional break failure point that Steve's referring to in his description above. With the Alcan design, that 4th spring fills the gap by extending to the point where the 5th leaf starts curving for the eyelet. Another feature of the Alcans, previously discussed but adding here for clarity, is the larger walled bronze bushing - 3/16" versus 1/16" for the Dexters that had bronze bushings. This thicker walled bushing creates an even larger diameter eyelet = mo betta. Please note that the current Dexter 1750# 4-spring packs w/D52 axles are fixed with plastic bushings. I observed this first-hand last week when replacing our D35s for the D52s. Serious NOTE: Owners with the newer Dexters should determine if their axles are equipped with either bronze or plastic/nylon bushings. Why, you ask? If a rig's running gear is fixed with an axle kit using spring packs with plastic bushings and using Dexter EZ-flex wet bolts, the bushings will likely not last a season. The petroleum-based grease used for the wet bolts can decompose plastic bushings. Not good, IMO. The pic below shows Alcan's extended 4th leaf right to the curvature point of the 5th spring's eyelet - a robust design feature not found in either the 4- or 5-pack Dexter Chinese-made spring kits (FYI, the traditional breaking point with the Dexter 4-packs is about where the end of the 3rd spring is located, see below pic): Comment on Shocks: If one assumes that OTTs are "under sprung" - i.e., not heavy enough leaf springs, then the constant expansion/contraction rate that the Monroe's experience is very high. IMO, this wears out the shocks much sooner - and which were never designed for an "under sprung" suspension to begin with. Using heavier-duty shocks on the same running gear may last a bit longer but shock failure will occur sooner than if they were mounted on running gear of heavier design. The Alcan option may just allow our shocks to last their designed lifespan... who knows? Let's get some miles on these babies and find out! 'nuf said.
4 points
-
Greetings, My wife and I are the new owners of hull #962 (LEII), we bought it from Coach and JoJo last fall. We are coming to the Oliver family after being long time truck campers. Having a TC gave us the flexibility to also tow a trailer for toys and the like. Last summer we decided to change direction and sold the trailer, toys, TC, and pick-up. All summer long I watched the classifieds and waited. Back in Oct we drove to Missouri to look at a 2023 LEII but passed on it. Not long after Coach and JoJo posted their '22 LEII for sale. They had recently completed the Truma A/C conversion and as many of you know, Coach knows how to trick out a closet. So, we couldn't pass it up. This forum is amazing, both in terms of educational information and give and take between members. I enjoy going down some of the rabbit holes you all have created 😉 We look FWD to many years of Oliver ownership and the memories that come with it. Cheers! Craig and MaryLou3 points
-
Steve: That's been my experience for defective springs as well. They go south quick. From materials sciences, most often for under rated springs that get over loaded, it takes more time for the overloaded alloy grain boundaries to propagate cracks sufficient for destructive deformation to occur. In such circumstances, the failure will generally occur at the highest point of stress concentrators, and that is usually at the end of the shorter section above the longest section. Just as we have seen in the pictures. Good thoughts. thanks GJ +++++++++++++++++++++++++++++++++++++++++++++++++++++++++++++ For some others: I have been stating that the 1750's are under rated for the load and for how we use our trailers. By this I mean that this spring does not have enough steel to earn a higher rating. It is not give license to believe that the Chinese were in bed with Dexter and they fraudulently conspired to spoof the rating data to increase sales. It only means that there is not enough steel at 11 or 12 pounds to do the job of a more stout spring that we seem to agree we need for our trailer weights and how we use them. GJ3 points
-
Referring back to your previous comment shown above, the (Dexter) “4-leaf spring packs” have the known failure rate.3 points
-
Welcome, welcome, welcome! You won't find a nicer and more supportive group of folks. Enjoy your new Ollie!3 points
-
Around the year 2000 in took a broken 50 year old boat trl spring to St. Louis spring, with the request of 1 inch additional arch in the design, they made 4 of them to my exact specs, very happy with the results.3 points
-
I too was concerned, so before proceeding I crawled into the basement and there is just under a 1'x 3'x 1/4" backer plate that the approximately 1' spare tire mounting plate is through bolted to with 4 - 1/2" bolts. Since the spare tire does not rest on the bumper box when hung on mounting plate (there is a couple inch gap between the tire and the box), the addition of the bike rack actually adds back the support of the Oliver cover by resting on the bumper box. In addition, I added the two ratchet tie down straps to absorb any stress of the assembly pulling away from the camper even though I didn't detect any movement when pulling on the rack. The weight is now being carried by three points (the massive mounting plate, the rack resting on the bumper box, and the angled ratchet straps). We stay on good roads when we travel, but I will still be checking everything regularly. I will update my post after a few trips to report what I experience. Thanks, Joe/7693 points
-
So, two members have purchased the Dexter brand 2400 LB springs and more than 10 of us have purchase the Alcan product, rated at 2750 LBS. When I upgrade, it's Alcan for sure! It's not that everything made in China is bad, just literally millions of MADE IN CHINA products are of extremely poor quality (go ahead and take your chance on your $100K investment). The marketing slogan is Better-Faster-Cheaper though they often forget the first word is BETTER! When give choice, I will NEVER purchase from the CCP and will pay hundreds more for first choice MADE IN USA and second choice ANYTHING BUT CHINA. I need a bumper sticker that SCREAMS this sediment. I believe I also wrote this on page 6, or maybe it was page 9, no 12! I'll bet this thread hits 20 pages... The design of the Alcan has the second leaf fully extended to the full length of the main leaf. @ScubaRx just wrote it clearly in B&W, @MAX Burner mentioned it at least twice and I wrote of it before. No brainer, this is the cause of failure. Good ol' Dexter can make a heavier spring, but not a better one. EOF3 points
-
D and I can attest to how quiet the Houghton unit operates. We did a side-by-side comparison last summer - first running the Dometic in "Zone-5 Afterburner" (its only mode) and attempting to converse inside with little luck. We then moved into John's unit a few yards away with his Houghton running - OMG, a significant drop in db level and we could actually communicate normally... My subjective appraisal as it is... Just say'n.3 points
-
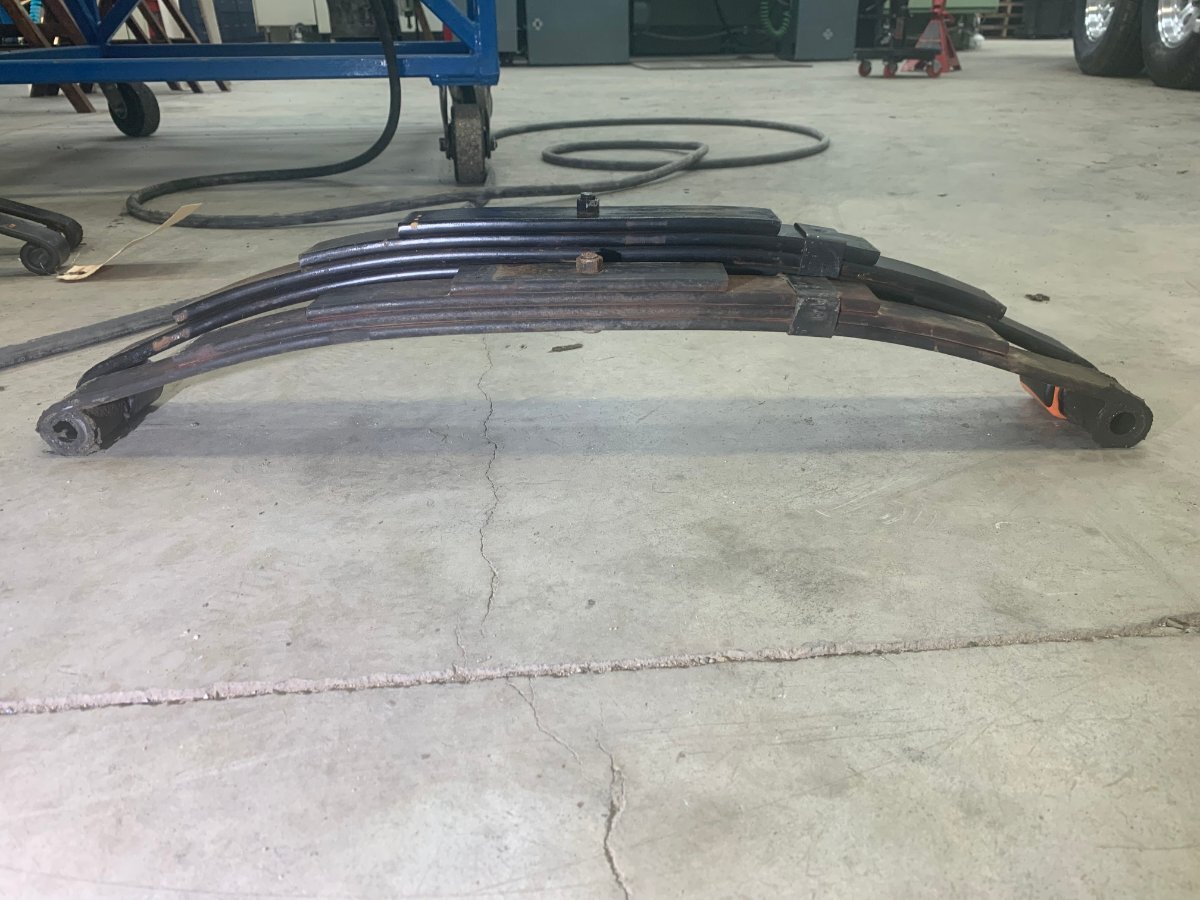
For anyone desiring the quality and design of the Alcan branded springs, be aware that they do NOT make a spring rated at only 2400 pounds for either a 3500 pound or a 5200 pound axle. Their only spring is a 2750 pound rated pack. Every spring that I have seen broken has been the fifth leaf at the point where the fourth leaf ends. The best design feature of the Alcan's is that the fourth leaf extends out to where the spring eye starts to form at the end of the fifth leaf. This dramatically increases the strength of the fifth leaf and virtually negates the possibility of a break occurring at the tradition failure point. This one attribute convinced me that these are the best designed springs available. I was not interested in a lighter duty 2000 or 2400 pound spring pack, so the 2750 rating was perfect. The spring pictured here has the same potential for breakage as the OEMs and would not be my choice.3 points
-
Heavy but nice backup and works seamlessly with all their solar panels. 30 amp plug in back. 3600 watt inverter. 4kWh backup expandable to 20kWh. Lockable mount. The one drawback to installing the MP2 the way I did was that it has to be on for power to pass through (shore or gen) so I haven't figured out yet if the Yeti can only be supplemental power outdoors, etc or if there is a workaround so it can actually be main power backup. Best, M
2 points
-
Yea, don't mess with that Crazy Horse guy.... I've heard he will ride a pony 20 miles just to get one of Art's Beers! He just doesn't run out of feistiness! Geronimo John peeking back out from under the covers.2 points
-
In recognition of 16 pages of “fun”, perhaps everyone should go back and read through the entire Post. And with that said, don’t tread on Crazy Horse!2 points
-
So you want to keep it up. Ok, I warned you. So now the nice studious GJ has left the ring. _______________________________________________________________________________________ Punching back is his evil twin. My handle has been Crazy Horse (CH) for 30 years. So, after 16 pages of "fun", why would any owner now order out a 4-leaf 1750 spring? Maybe order out a 2,000-pounder or more if their needs so dictate. Maybe even think about a US made 2000 to 2400 four or if they like stiff rides a 5 leaf as that really smart nice guy suggested. But not a 1750 of any leaves.... But to answer your bolded statement above: Because this group is smarter than that to do so. Now you have to agree with that one! 🙂 Crazy Horse (CH)2 points
-
GJ Update: "Properly quoted the "Every spring that I have seen broken has been the fifth leaf..." to the proper source = ScubaRx. Sorry for my error. GJ ScubaRX: Interesting that you are just now reporting the failure of the 5 leaf springs. Here I thought you were the hatchet man for the 4-leaf springs! LOL. Me thinks you have typo's in your post. 🙂 CJ
2 points
-
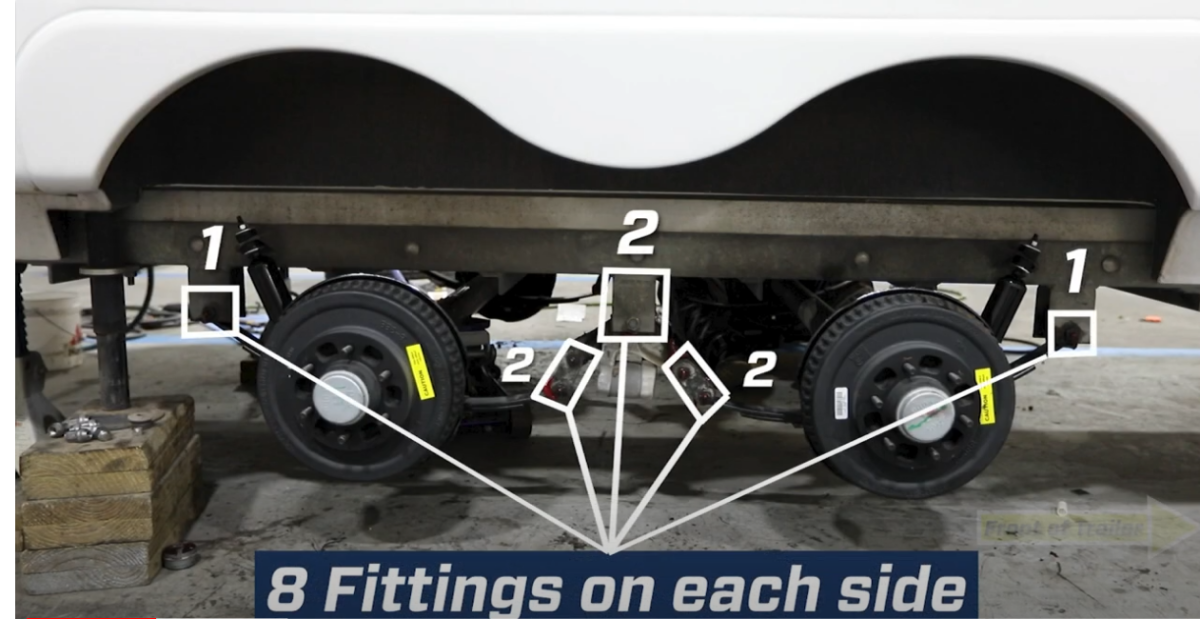
Mike just sent me this. Great pic. Not sure what manual that is in. I could not find it.
2 points
-
Welcome Craig and MaryLou! MAX Burner is so right about all the info found in this wonderful forum. Happy Trails, Wendy & John2 points
-
Bill, I found this picture and post from John E Davies, the picture shows the position of the rubber strips. Not sure if jd's is the same, but looking at this picture from John, there's a rubber strip lenghtwise on the front of the box between the 2 gussets/L brackets (probably the 3/8" thick), and the 1/4" thick one diagonal in the back. Below is the picture and HERE'S the link to that post.2 points
-
@CW. Craig/MaryLou - congrats on your new acquisition of Hull #962! @Coach and JoJo have passed along a wonderful example of an OTT to y'all, and you can make your mark on it by participating in these forums. As you already know, there's a huge compendium of information and experience from thousands of forum participants that await your searches for operating procedures, fixes, upgrades, and modifications. Welcome to the Oliver Family and we all look forward to your descriptions of "next adventures"! Cheers!2 points
-
Craig and MaryLou, congratulations on your Oliver and welcome to the group! You’ve got many adventures ahead. Carol and I are both graduates of Leavenworth High School. Carol was born and raised in Leavenworth and we go back often to visit family. Small world! Mike2 points
-
Excellent point! 👏2 points
-
Paul: Thanks for your post. You basically shrunk down into a few sentences about 15 pages of posts. Really good to see your pictures showing how the 2400-pound springs have achieved their rating. Priceless. After all the negative vibes I have received from being "The Lone Dissenting Target" on this topic, it's nice to see some positive vibes for a change. In my research, and subsequent purchase, I learned that these springs do come with nylon bushing inserts as stated above. A few weeks ago when I ordered the 2400's, I also purchased brass bushing inserts. I'll switch them out in July when I install my springs. I apologize for not mentioning this earlier. But as you can sense, I was buried by "Confirmation Bias". Hopefully OTT will step in and give us their fleet recommendation on the 1750 topic. Way overdue. GJ2 points
-
If'n that crick comes up much more, yo're liable to get yer feathers wet.2 points
-
The original U-Bolts on my 2014 EII were 1/2" in diameter with a round top bend for a 3" axle. These were for my original Dexter five-leaf spring packs and 5200 pound axles. The U-Bolts you will receive will be 9/16". They would not fit through my mounting plate as it was originally drilled. I drilled out the holes to 19/32" and they fit perfectly.2 points
-
I been following this topic and it got me to look at my springs and sure enough 1,750 pound four leaf springs were failing. I was leaning to ALCAN five leaf for replacement but when Geromimo John came up with the Dexter 2400 pound rated 4-leaf I decided that would be a better fit. My thinking is keep the ride as soft as I can but have springs strong enough not to distort them from the load that the Oliver puts on them. So this bumps the 7000 pound rating to 9600 pound rating and I think this should be sufficient for them to carry the load with out distorting the springs. I included a pic of the 2400# spring next to the worst 1750# spring. This is the differences in thickness of the leafs. The individual leafs are longer. I didn't think to measure the height before I started the job but when I had one side installed I measured from side to side and there was 1-1/2 inches difference at the wheel wells.
2 points
-
What you have had is Li-ion NMC. Lithium but very different than LFP technology. GZ first LiFePo4 solar generator was the Pro 4000.2 points
-
@HDRider FWIW there are 16 zerks on my 2022 #1047. There are two on each side where suspension attaches to frame that are easy to miss.1 point
-
Welcome to the family! Let the adventures begin 🙂1 point
-
I have a folding 100 watt solar panel with an on board CC. I have always thought that a CC mounted in the Ollie would be a better solution if I needed to place the solar panels further away from the batteries due to line loss. This would provide a higher voltage at the CC in the RV. Which led me to think a 3 position battery switch would be needed if I did mount the CC in the Ollie and wanted to supply 12V's to power an electric cooler. I can plug into my solar port now because it is wired straight to the batteries. Mossey1 point
-
I use the solar accessory plug which is near my 2019 battery compartment for several 12v accessories. It has a SAE connection that is wired through a fuse to the trailer batteries. While its SAE connector it set for zamp panels it works for anything you wish. Just pay attention to polarity as the zamp connecters are reversed from normal SAE. Adapters can be made from that SAE plug to your fridge. Zamp Solar Port On Oliver EII - Note : Top Pin is ( + ) Terminal Bottom is ( - )1 point
-
You are correct, Generation 3 uses RJ45 connectors and I have confirmed that everything must be shielded. While I am thinking about it, for others ....... I first tried a hole drill on the outside connection but had good success with a router blade for my Dremel, very easy. One other thing for those considering this. I want my Starlink to be powered by 12 V and there is now a relatively inexpensive device that means you don't have to cobble together different devices -- https://www.trioflatmount.com/shop/p/gen3-12vconversion, the company claims it used 4.5 amps. So, all my stuff is due today so I will see if I can get it to work, thanks for answering.1 point
-
1 point
-
Another reason for Oliver to change their suspension system maybe? Just saying.1 point
-
Greetings! I was reading some great instructions for installing Starlink inlet ports on the outside of an Oliver. However, it was a pity that the installations required cutting and splicing the Starlink cable. That’s a discouraging and challenging proposition, so I just signed up to this Forum to share how I did mine without cutting the cable. My method was risk free, super easy and with quality results. The wiring is all plug-in with about $35 worth of Amazon parts. The router and modem is ideally located in the Oliver’s attic where there is an AC outlet and good WIFI broadcasting. Sorry to those if I've duplicated some of their installation methods, I guess great minds just think alike. I’ve provided a list of 3 Amazon parts, and recommended a few tools that are worth owning anyway: Furrion Mini TV/SAT Inlet #FTVINB-PS, $11.30 Penglin #PL252, RJ45 CAT6 female to female panel mount connector, two for $14.99 Juxinice 10’ long shielded RJ45 Cat-6 cable with a 90 degree angle connector, $9.69 Neiko #10194a step drill bit, or similar, $10.99 Generic brand 14’ fiberglass fish rod, or other Amazon options under $20 It’s a good idea to first test the parts by running an internet speed test both before and after plugging-in the new cable and connector between your dishy and router/modem. You can use any internet speed test such as Ookla or the Starlink App, and the speeds should be about the same unless the new cable or connector is faulty. Start your installation by unscrewing and removing the coax connector from the new Furrion fitting, then enlarge the hole with a step drill bit to accept the Penglin connector. This is the exact same Furrion fitting that Oliver uses for the outside Cable and Satellite TV connections, so you could use one of the existing ones if you don’t need the the satellite or cable connection. Find a relatively flat surface next to the existing Furrion cable/satellite TV fittings to install the new Furrion fitting (with the installed Penglin connector). Unscrew the storage compartment liner so that it can be pulled back to access the area where the connector will pass through. Using a step drill, make a hole big enough for the Penglin coupler to pass through into the storage compartment, and drill large enough holes so that the Furrion mounting screws will hold without chipping the fiberglass. The photo shows where I mounted mine, but it gives an illusion of being crooked and unevenly spaced??? With the storage compartment liner pulled back, the AC drain tube can be seen running down between the trailer walls. This is a good guide to fish the new Juxinice cable up into the Oliver’s attic compartment. The recommended fish rod makes this easy and you will have to unscrew and pull back the attic side panel for access. The 90 degree end of the new Juxinice cable will be plugged into the back of the Penguin connector and other end into the Starlink modem in the attic. That’s it! Replace the panels and your done. The Starlink Dishy cable will plug into the outside of the new connector and the Furrion fitting keeps everything dry when it’s unplugged. Don’t worry about the rumored proprietary Starlink wiring, this is just a pass-though connection and the internal color coding of the individual wires does not matter. I was a beta tester for Starlink when it first came out, and I still use the original Gen-1 round dishy at home and when traveling with the Oliver. We used to run the dishy cable though the outdoor compartment door, and we kept the router and modern under the bed close to the AC outlet. This was always kinking the cable, interfering with the compartment seal, and generally in the way. The quick disconnect was really worth doing, and wifey is happy that she doesn’t have to crawl under the bed to pull the cable though anymore. Watch for a future post on how to conveniently mount and store a Dishy pipe mast. Cheers and good luck, Geoff & Tanya
1 point
-
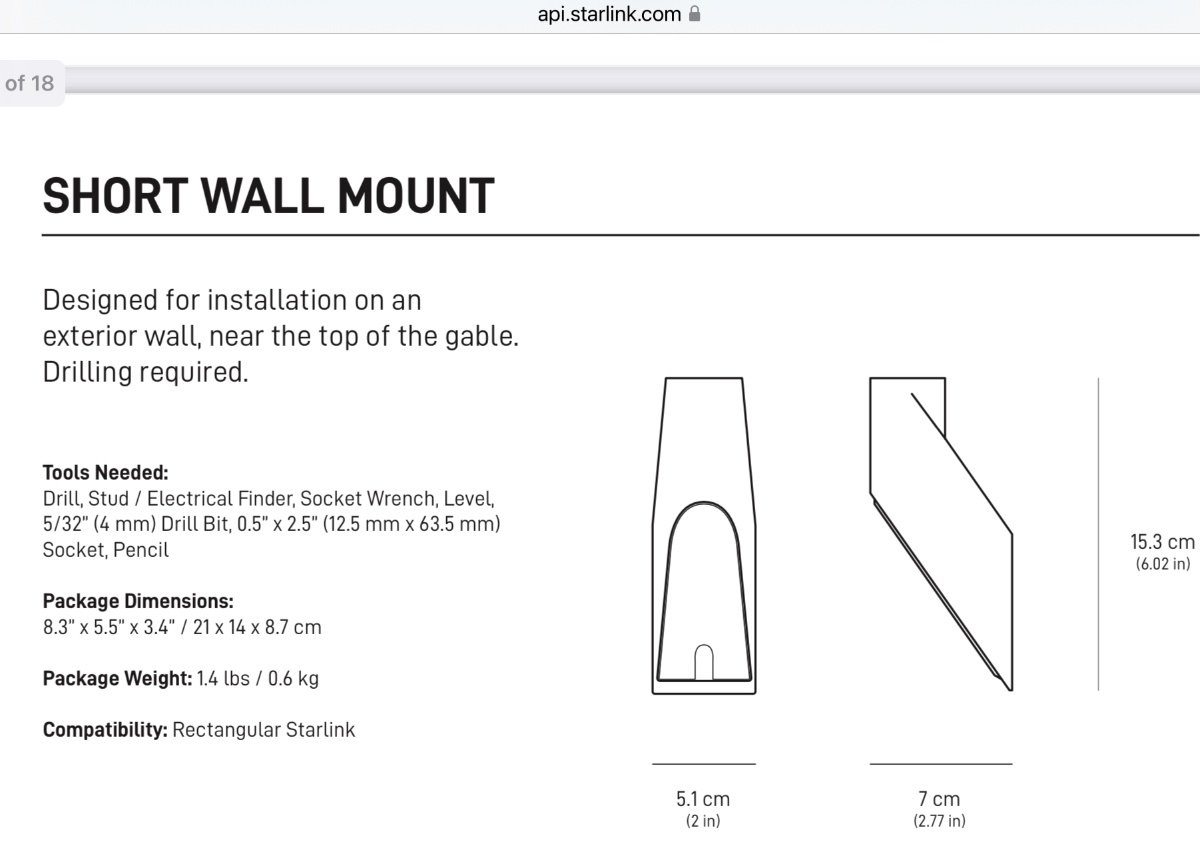
That’s a Starlink Short Wall Mount that you have to buy extra ($60) via the “SHOP” button on the Starlink app, As is the Cable Routing Kit ($32 — which I incorrectly called the House Mounting Kit) which includes two grommets (which I incorrectly called the Starlink Plug) and the correct size paddle bit as well as some other stuff. You can also buy a 150 foot cable ($130) through the “SHOP” button on the app instead of using the 75’ cable that comes with the Starlink. You will have plenty of room to coil up 150’ of cable inside the spare tire. When I get the fiberglass work done making a cable holder on the inside of the tire cover my plan is for it to be large enough to accommodate the longer cable just in case I decide I want to use one in the future
1 point
-
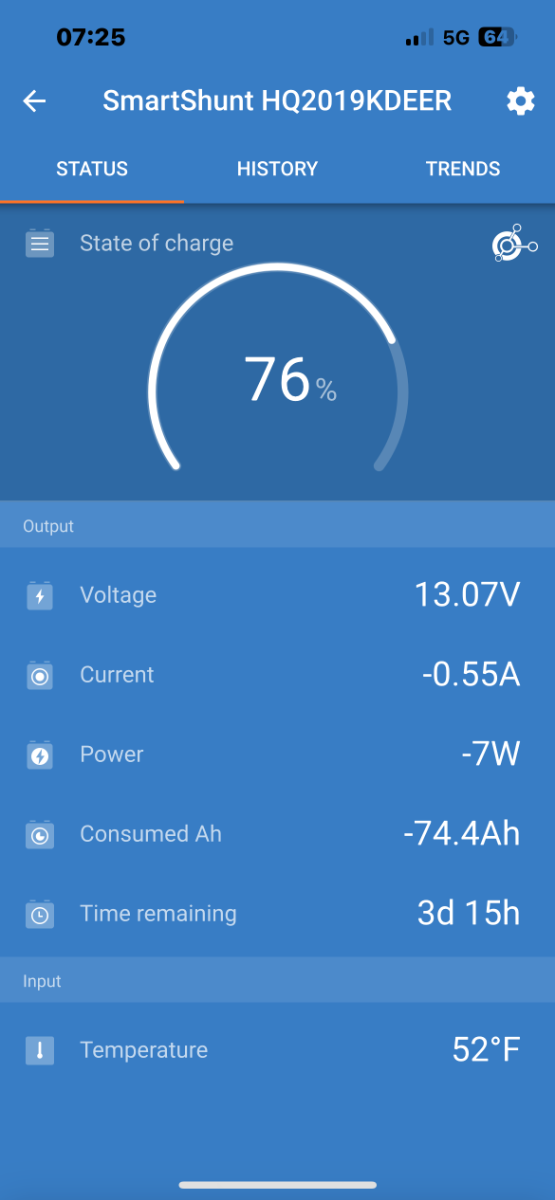
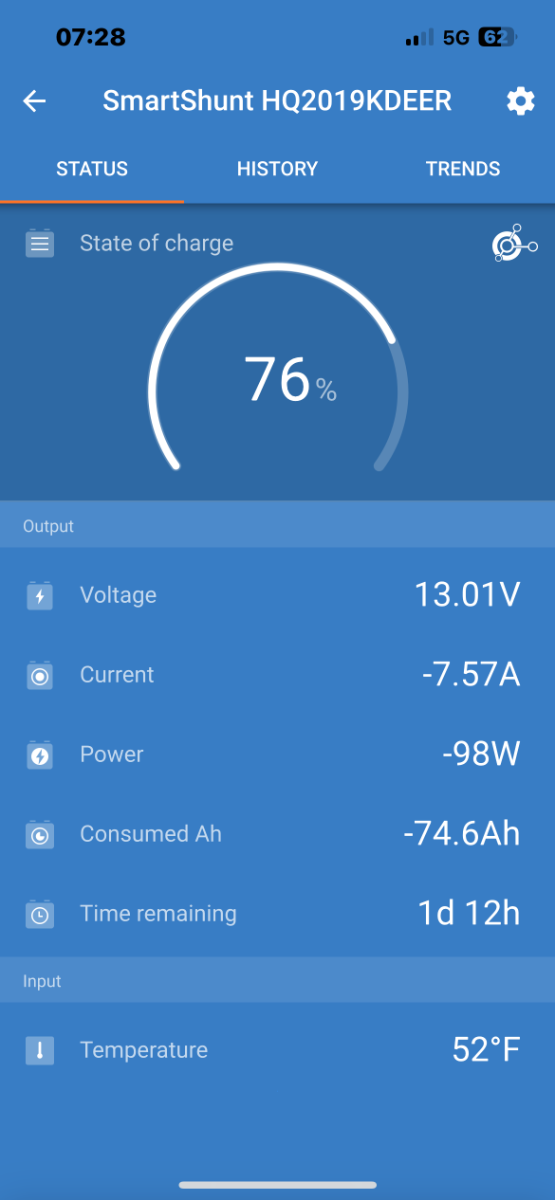
We don't have nearly the experience with Starlink as @Snackchaser, in fact we're still in our "personal beta testing mode." As I'm writing this, our SL is being powered by our 2kw inverter at our boondock location in North Texas. So let's try measuring the actual SL energy usage.... Condition 1: Our Victron SmartShunt reads our current values at 76% SOC, current draw is -0.55A, power usage -7W (with all electrical components off except for Fridge in GAS mode, Microwave LED clock on, SL off, and normal phantom draw). It's wall-to-wall sunshine now at about 0725 - solar modules are adding about 2.80A/36W into the BB's. Condition 2: Same background current draw as in Condition 1, but we energized the 2KW inverter. This bumped up the current draw to 1.08A and power usage to -14W. So, roughly, the inverter itself draws 0.53A or 12.7Amp-Hrs daily - just idling with no AC appliances being energized. Good to know number, IMO. Condition 3: All the same as above, except we energized the Starlink system. Current draw now up to -7.57A and power at -98W. The SL literature notes the unit will draw approx. 65W of power. Clearly, in our configuration, it's really more like 84W and pulling 6.5A. Without the SL energized, our phantom current draw is usually around 0.15 - 0.45A/-2 to 7W that's with the Fridge in the GAS mode and MicroWave in LED clock mode, and Smoke/LPG/CO2 detectors and various Victron components drawing a few 10ths of Ampere's. We're not that sad about the SL power consumption, however we're preparing to convert it over to a 12vDC system after this trip to save even more battery bank energy while boondocking. More on that upgrade later. Here are the screenshots of the 3 test conditions, FYI: Condition 1: Condition 2: Condition 3: If your "RV-style" of on the road needs reliable access to the internet like our's does (due to D's work requirements) the Starlink system is a viable option, IMO. It's been Uber-fast in cloudy/rainy conditions both day/night. Here's a screenshot of a speed test from this morning: More info to share later... Cheers!
1 point
-
Totally get y'all's concerns. The key requirement for us was to get the Dishy off the ground and still be able to use it without the OTT. The EZ Pole and mount is robust - 4 nested aluminum tubes. High wind conditions would require striking the colors, lowering the dish to the 6.5-foot position and thus keeping it off the ground. FYI, in snowy conditions, the user can select the snow melt mode (more energy) via the SL app to keep accumulation at check and maintain high signal strength. There are flat mounts available for SL that we've studied - but once its flat-mounted on the roof, you're committed to that application - we wanted flexibility to use SL if we were tent camping, for example. As noted, we're also interested in a 12vDC conversion and shortening the proprietary CAT6 SL cable to save a bit of energy - but that's down the line. We want to log some more trips in the current mode first so we're better able to make an informed decision on what best meets our needs. Guys.... Beware, there are some scary rabbit holes one could fall into when researching the RV-applicable mods for SL kits... Many hours spent crawling through these tunnels. HA!1 point
-
Anyone who buys a used trailer has to think about aged gear, and, gee, what did the previous owner do, or not do, for maintenence and care. And, did they do mods with safety in mind, and a background to do them? I'd offer mine (2008) up as an example. We've done most of our own mods. Dc fridge, pulled and reinstalled windows, 400 watts solar on an elite. Installed our own replacement Houghton ac, and maxxair dome plus bath fan. Among others... We have the skills, and my retired husband was licensed. But, hey, we have probably 150k miles on our little Elite. No odometer. You'd have to trust us on that "meticulously " maintained thing (which it is, but who knows, except looking at our service log.) And, of course, our history of comments here. Most Ollie owners take good care of their trailers. A few here have purchased used trailers with less than stellar maintenance, and have had to do a lot of work. Most seem happy. As far as axles, most things can be vetted via visual inspection. And/or replaced. Mine will likely never go up for sale. Btw. But, when we're gone, if my daughter doesn't want to camp anymore, maybe. We've (daughter and I) already had this conversation. Worst thing for any vehicle, or trailer, imo , is to sit, unused. If you can't use it, sell it, imo.1 point
-
I was thinking about that today. I now remember that Truma drew up a different duct plan, etc., for the Oliver Legacy Elite II installations. I would guess that's what creates the prohibitive price. The furnace in my 2008 Elite is not ducted, so that's quite likely the difference.1 point
-
@SeaDawg: Concur, 100%!1 point
-
Thanks Chris, I was not present for that portion of the rally Q&A. 👍🏻👍🏻1 point
-
At that point, it's pencil selling time. Add it up. What you can do, what you cannot. What you love and need. Add it all up, put your beloved trailer up for sale if you decide to go forward. I can't offer a lot of advice in that scenario, as my husband and I do most mods. As we get older, and it gets harder to do, that attitude is about to change, imo. .1 point
-
2020 - Dual awnings, street side is manual. Truma water heater. I like the control switches better than the new ones. Mostly comes down to needing/wanting Lithionics grade batteries and a turn-key solution. The Truma AC is a given, just trying to figure out whether to have them do other items while there for the AC upgrade. Labor and parts cost have gone up on the Xantrex components since I got quoted last year, but no unexpected. No price increase on the Lithionics...yet. Apparently they've done a number of the full Lithionics upgrades, so there is demand. I guess I could look at Airstream pricing and feeling good about the total cost. 😉. Also think if one wants to do the Lithionics, I'd do them sooner than later, not knowing what the impact of the Winnebago buyout of Lithionics will do.1 point
-
If that "loaded" package gets you the Truma varioHeat, that's likely a big plus1 also. (Dometic ac is still standard. Quieter Truma is an upgrade.) Since 2022 (I think) they've added the neverlube axle, as standard. subject of some debate. We love our dc danfoss/secop fridge, but we liked both our 3way fridges, too, until they quit working. (I can fit a lot more fresh food in my truckfridge, self-installed, and live with the smaller freezer quite well.) We installed that electric fridge in early 2018, and I will say I'm extremely happy with its performance and reliability, now in our 6th season. Do you have an electric or manual awning on your 2020? I love our manual awning. New trailers get the electric. I think the new solar package includes slightly more wattage, and some victron gear, and an mppt controller? New owners could speak to the specifics. We like the victron components we've installed on our boat, but have been completely happy with BlueSky in our trailer, primarily because of their superlative customer service. We still have agm batteries, (2 x 10⁵ ah 12v) supplemented with a Honda 1000 generator, and 400 watts fixed solar, up to 200 watts portable. We spent 152 days boondocking one year during covid, with a dc danfoss/secop compressor fridge, and that setup worked for us. (Note, power misers otherwise, and rarely camp where we need a/c. My particular setup wouldn't work for those who need a/c) Then, you get a new warranty with a new trailer. That's got some value, as well. How long do you plan to keep camping? What do you think you're "missing", and how many of the upgrades are you qualified to do yourself, or with the help of a skilled friend? For example, our truckfridge costs about $1k today. Labor free (ours), and most materials we already had. Miscellaneous materials probably under $250.1 point
-
I am not using cable to connect my TV to the router. I am using WiFi. My setup is very simple. Starlink provides WiFi access to TV and phones. For Netflix, I am using Netflix app in the TV itself to stream. For anything else, I am using my iPhone and connect it to the existing HDMI port in the back of the TV. This way, I can also get audio out to all speakers if I select "Optical" audio input at the Furrion. Please let me know if you have any questions. Hope this helps.1 point
-
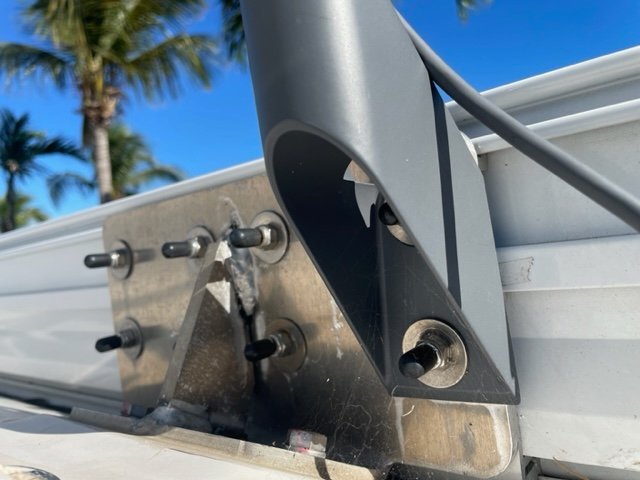
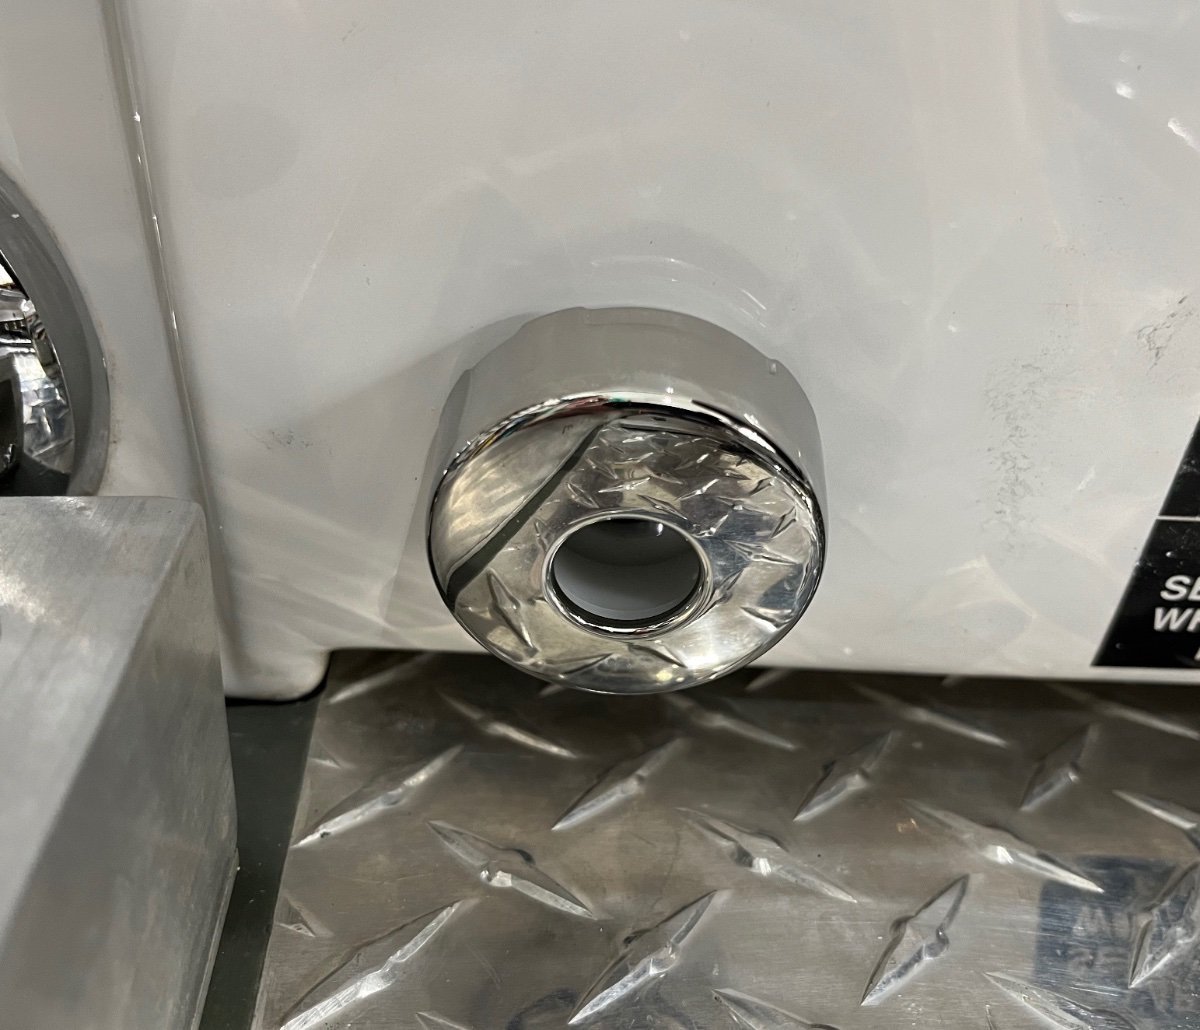
The Ollie bracket is structural aluminum, probably 6061T6 or similar, the same stuff used in the frame and steps. You can tell by how very thick the plates are and by the welds, they are big and sloppy looking compared to steel welds. Those particular welds are a little nasty, but they are fine in terms of strength. I suspect your Starlink mount is powder coated aluminum. You could email SL to ask. But since you didn’t have to disturb the coating (drill new holes) it should be fine. The shipping weight is 1.4 pounds, it can’t be a steel part: From your pics it appears that you live in a dry climate. If you lived in a wet one, I would recommend sealing the bracket really well. Corrosion can occur even when the materials are similar. I can’t tell from the images, it appears that the tube is wide open at the bottom. If not you need to drill a drain hole. Nice mod, I quite like it. It is clean and highly professional looking. John Davies Spokane WA
1 point
-
Nice writeup, thanks for posting all the pics! Cracked or broken gelcoat is due to an undersized hole or not heavily countersinking it before driving in the screw. Both are due to sloppy work….. Another option for access is to remove either of the two round red reflectors that are just above the ends of the sewer compartment. They aren't very visible anyway. I ran wires for my rear bike rack aux lighting that way. Some of the factory wiring is a little unsightly, isn’t it?😢 John Davies Spokane WA
1 point
-
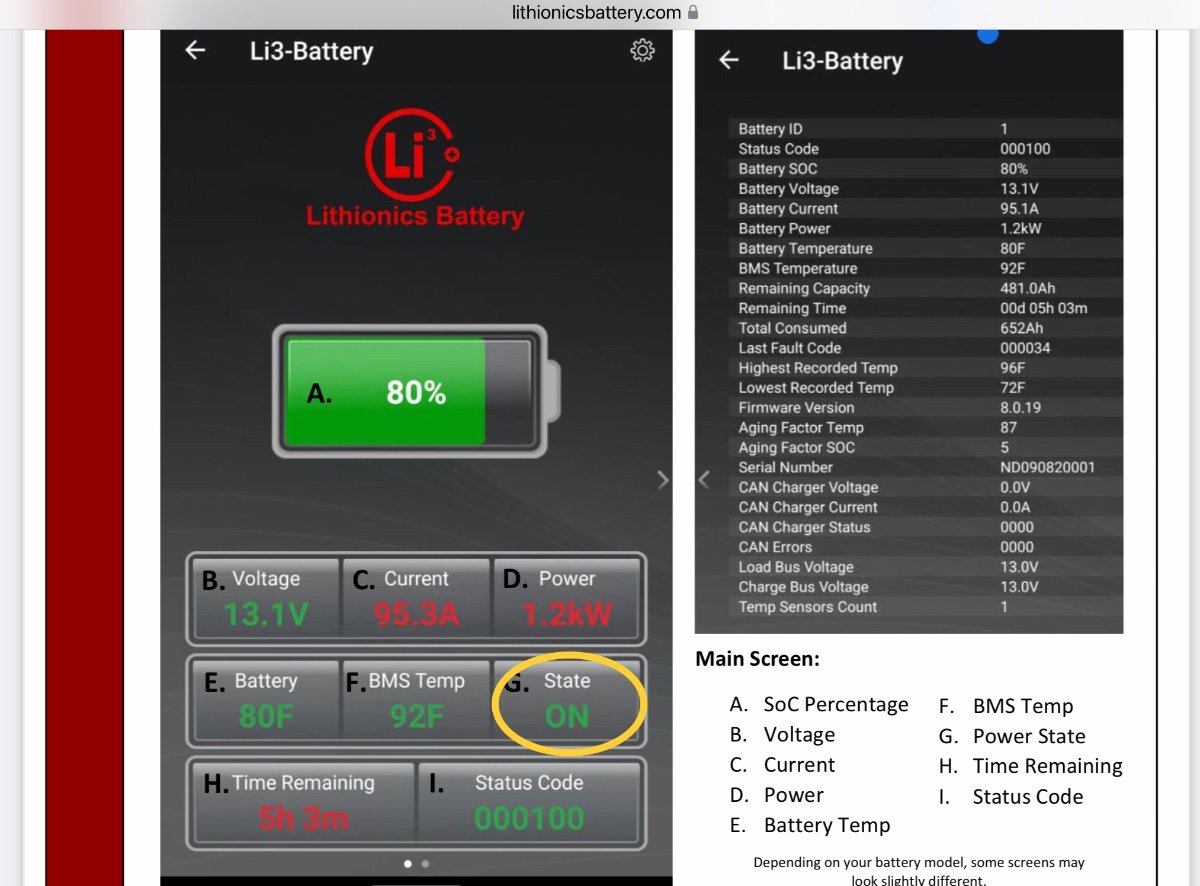
Would the battery on/off state show on the app like the picture below? Does the picture below show the status of 1 battery or a battery bank? Or would the app show on even if only 1 of 2 or 3 batteries is on? I do not have Lithionics batteries, but I am trying to understand them a little better? Mossey
1 point


-
Recent Achievements
-


")


