Leaderboard


Popular Content
Showing content with the highest reputation on 07/03/2024 in all areas
-
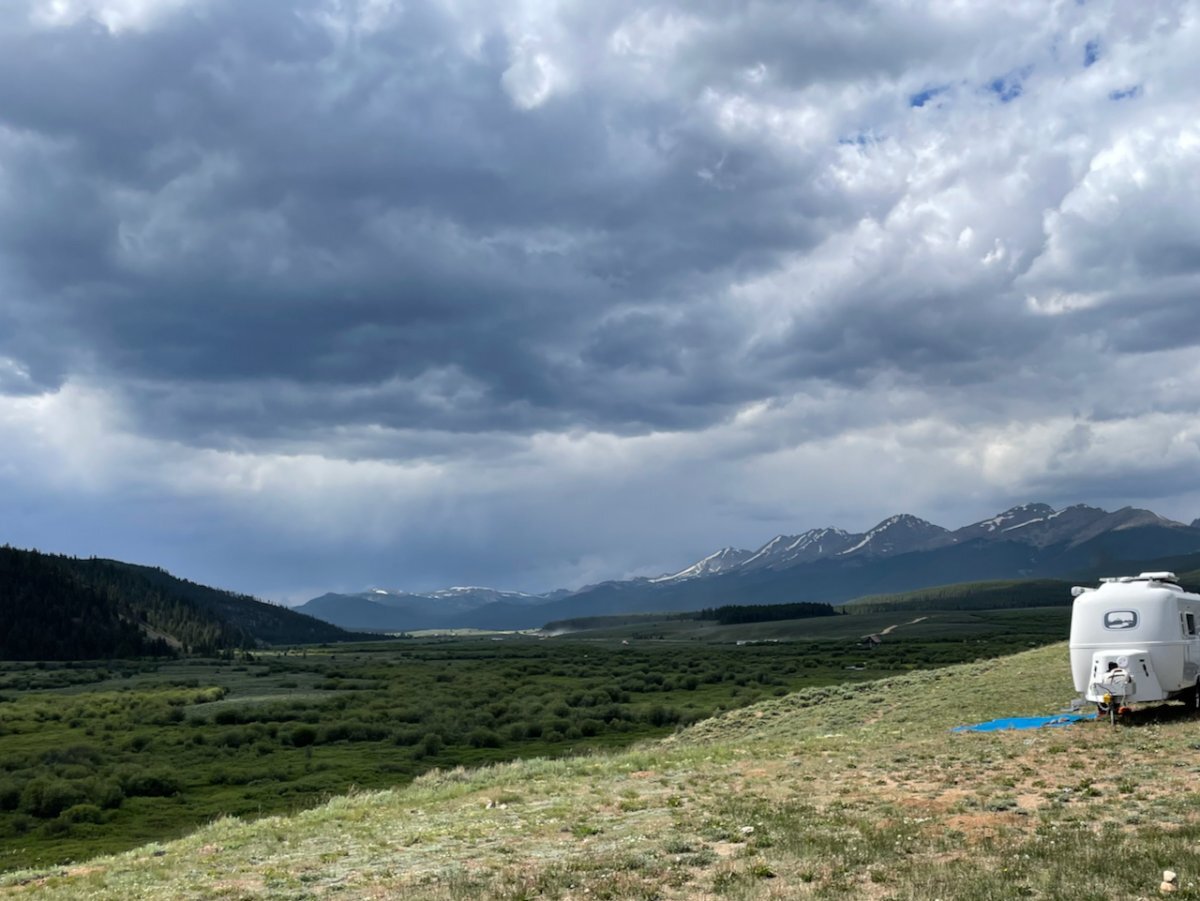
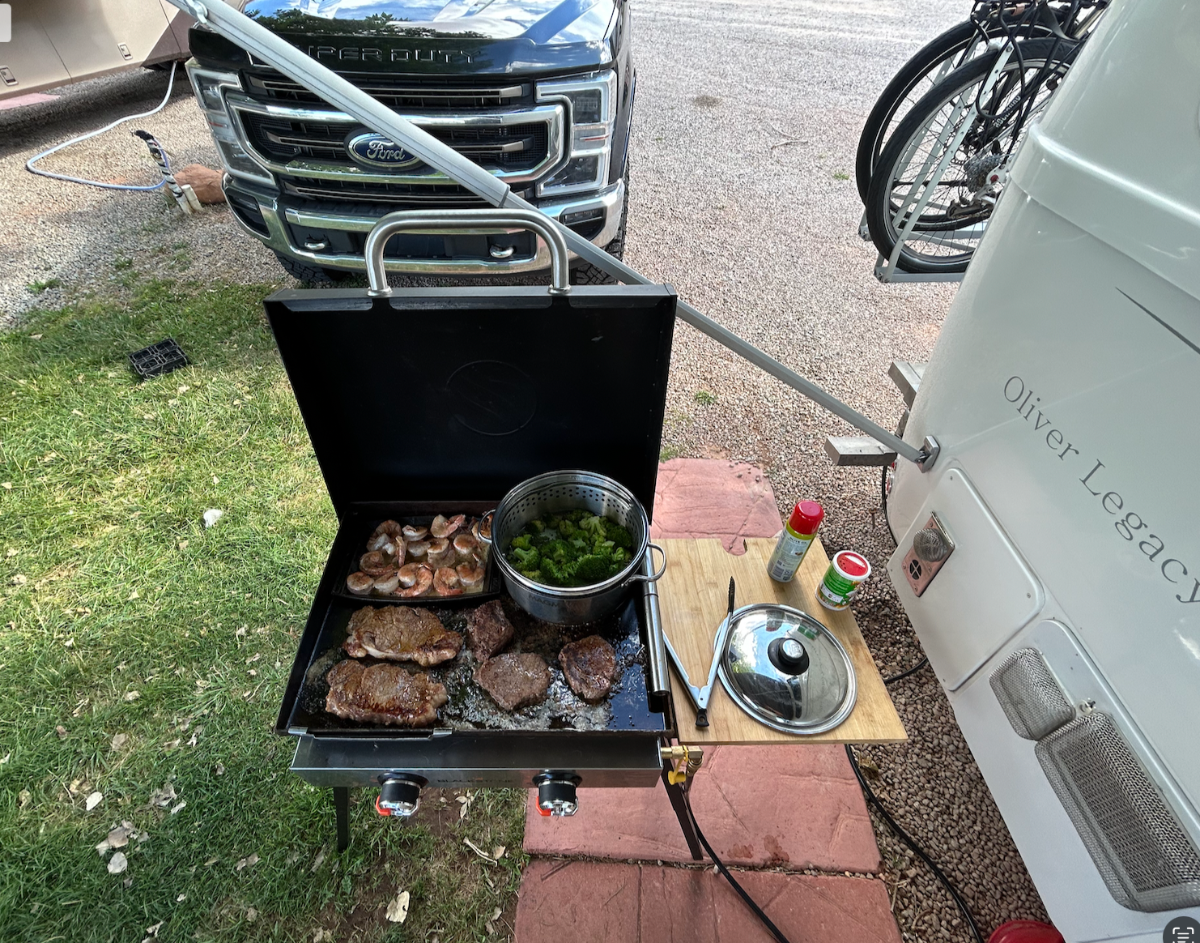
Happy 4th of July to Everyone! Gunnison NF, Colorado -- dispersed camping with weather
 6 points
 -
Moose and Elk have been spotted by other people a week or so ago, but I haven't seen them yet. I watch, especially during morning and evening hours. Lots of deer including newborn spotted fawns. Lots of birds, though not as many raptors as I expected. I haven't had any issues with bugs -- I suspect because I'm perched on an open ridge overlooking the river, and the wind blows steadily. In the forest areas, it's a different story.4 points
-
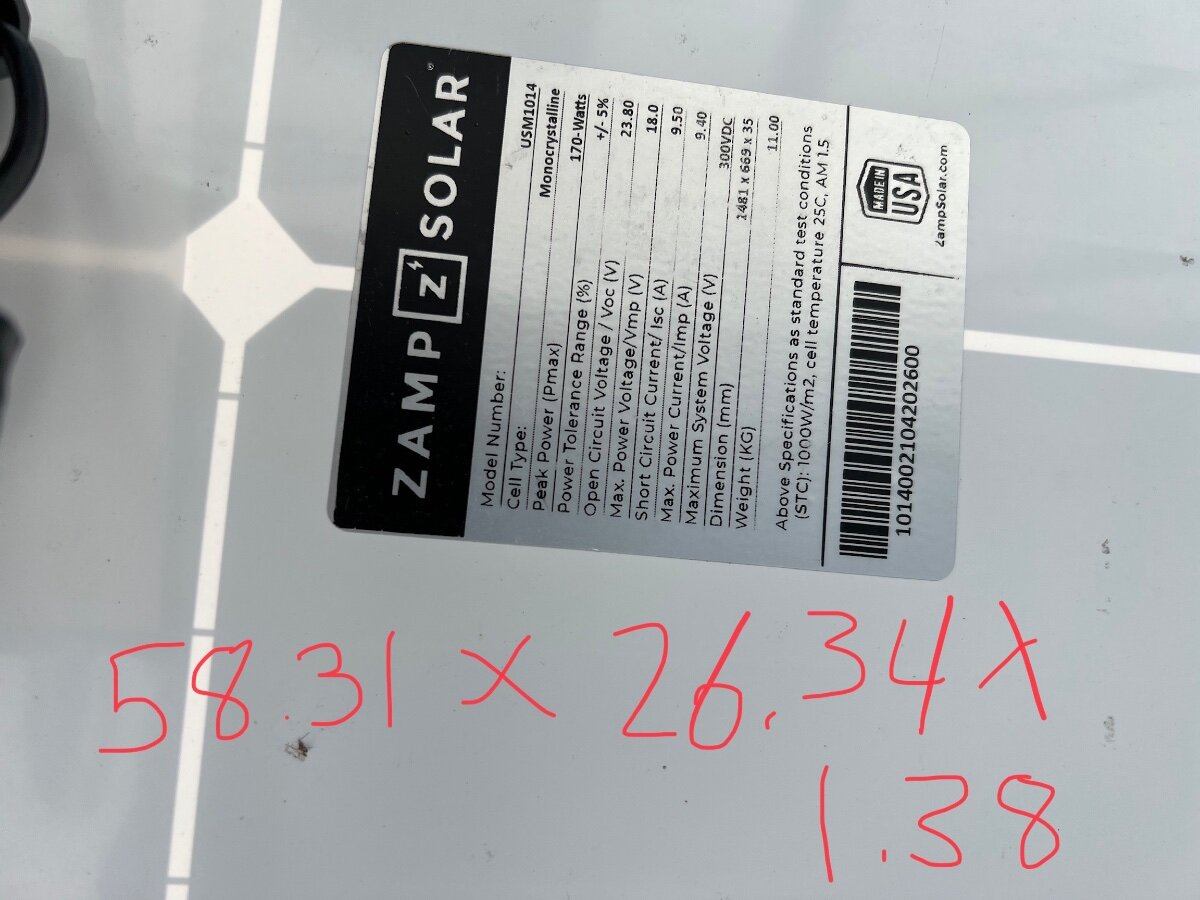
All of you were lots of help! I disappeared for awhile because, honestly, I needed to back up and learn some basics to even understand some of the terms y’all used. @Steve and MA, that was exactly the info I needed for our rooftop panels; I copied that to Renogy. @mossemi, I wasn’t able to easily access the specs for the rooftop panels without removing the panels - and I didn’t want to do that! @rich.dev, I, too, don’t know why Renogy thought they needed the specs of the rooftop panels.🤔 Their website did reveal, however, that it is no problem connecting two 100 watt suitcases and having the controller on only one. As @SeaDawg and many others have stated, yep, the polarity on our Zamp port was reversed, and we used an adapter. @jd1923, figuring all this out was quite a challenge, so thanks for the encouragement saying we have a GREAT setup. In the end, we have the option of using either one or both of our Renogy 100 watt suitcases. I am grateful to @Geronimo John who originally (on a different thread) suggested we purchase two 100w suitcases rather than one heavy and bulky 200w suitcase. Time to go boondock!3 points
-
If you have not visited it already, tour Black Canyon of the Gunnison NP. Breath taking!2 points
-
Be sure to check road conditions -- Route 50 closed in sections (bridge work) and also some local flooding last week. I will keep my eyes peeled for Olivers on the road!2 points
-
In our retrofit install of the tf130, we sealed both vents. (We had both.) We added insulation to the vents, and the sides of the cavity, still leaving an airgap around the fridge. Made sure we had more than 24 square inches of venting, to the interior. No more screening necessary to keep mud daubers out. We've never had an overtemp issue in ours. Normally run the fridge on 5 or so. But, we don't camp in 95 or 100+ degree weather, either. I leave that to younger, more heat tolerant folks. We do keep plenty of cold sink foods/beverages in the fridge. All fridges seem to work better when loaded, vs empty/lightly loaded. As someone else suggested, all the cold comes from the tiny freezer. I think the temp sensor is within the wall of the freezer, as well. There are some air slots at the back. Maybe move your fan from center to left, and try to draw more cool air from the freezer? You could also have a faulty thermostat. Isotherm sells a kit which includes a sensor in the fridge cavity, as well. Many boater use it. I think Overland installed it for his, maybe. I'll see what I find. The other suggestions of shading the fridge side are good. Wondering if you have a true 24 square inches of interior venting?2 points
-
Thank you. I think I will wait to try that for a time when I have caulk on hand to repair -- but I've been curious about that space.2 points
-
@Boudicca908Pry off the 4 plastic caps, remove the screws, cut the caulk around the insert using a plastic razor blade. If you intend to remove the insert be sure you have everything on hand to replace it. Keep in mind that the caulk will need to cure for a certain time before it can be wetted. I have taped a piece of plastic over the hole in order to use the shower before I replaced the insert.2 points
-
There are 2 issues. First when you open the door, the cold drops out. You learn to know what you need, open, grab, and close,🙃 Fact of life. The small fan will be a benefit in either a compressor fridge or absorbsion fridge. It circulates air in the fridge, and will have "Zero" negative affect. In our truck camper, we built a shade to provide shade over the 2 vents. 2023 LE2 has one (1) vent and the 2024 LE2 has none as it vents to the interior. Earlier models have the absorbsion fridge and 2 vents. Suggest that you add 2 computer fans behind the upper vent screen if you have a LE2 2023 or earlier. Someone will have to assist with how to wire. The fan I installed in our truck camper behind the upper vent, along with the battery operated fan in the fridge made a huge difference. One learns to park to lessen the sum exposure to the curb side of the trailer. A shade over the vents all will help.2 points
-
@jd1923, the op reports that he has an isotherm/dc danfoss compressor fridge. 2016s like yours had 3ways as original equipment. Have ypu upgraded yours? @DunnYet, we've never used a fan in our truckfridge (similar to your isotherm. Same interior, same compressor.) Try without it. Your isotherm vents to the interior of the trailer, not exterior. Is anything blocking interior venting? Any ice buildup in the shoebox freezer?2 points
-
Exactly! They guide my 4 AM forays to check the plumbing and I sleep with my 👀 closed, so they do bother my sleeping habits.😉 Mossey2 points
-
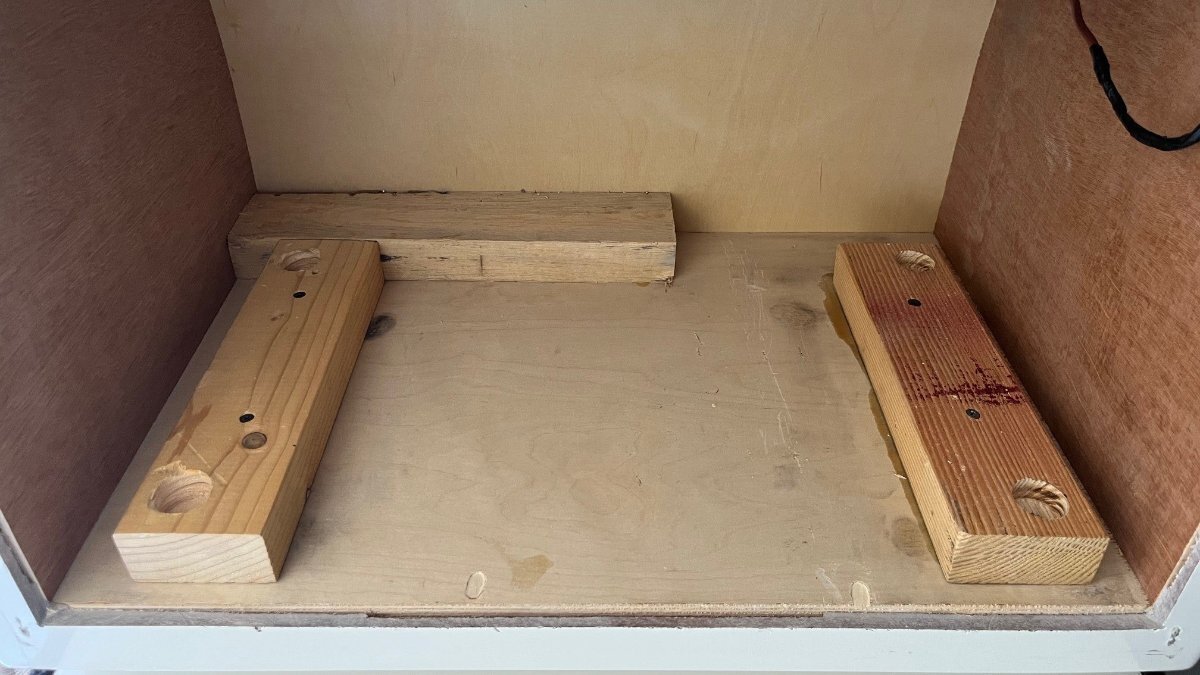
Got everything done today on the air fryer installation. I put quarter-round along the base and 3M 3350 to seal all the edges and seams. Found a decent piece of angle aluminum as a trim piece to make the bottom opening look better and remounted the faceplate.
2 points
-
You can find some that have a mounting plate => [Upgraded Version] 12V USB Outlet Qidoe 78W 3 Port USB C 12V Outlet Dual PD 30W & 18W USB A Port with Voltmeter Lengthened Aluminum Body Switch Waterproof USB Car Charger Socket for Car Boat Marine RV https://a.co/d/07mCzHx6 The most I have seen using the ones I installed to charge an iPad is 4.5 amp or around 52 watts. I really just wanted USB-C connections since everything has switched over to that and to be able to fast charge my phone, iPad, etc. Of course the MacBook can charge easily from 50w as well. But I am not an electrician and routinely do things that are above my experience level so I will be the first to say don’t do what I do without doing your own homework.2 points
-
Each year prior to heading out to the Rockies to fish for a couple of months, I treat several changes of cloths with THIS STUFF. It lasts through washings and helps keep the bugs off for about 6 weeks. Have a great trip! Bill2 points
-
They replace the existing socket. Check under your dinette seat and you can easily see what to do. I have a picture of mine (have not upgraded yet). You only need to pull two spade terminals (blue wire +) and then there is a threaded ring. To get to the one over the bed, you will have to pull the rubber liner in the cabinet. The picture shows the ones in our older hull have screws left and right. The ones Mike shows above do not have these. I may have to patch the screw holes or perhaps there is a trim ring on mine that could just stay. There are many models of these depending on your needs. The one @rideadeuce linked above has a 65W USB-C required for iPads. If you are only charging phones, 65W may be overkill (I do not know if extra wattage can hurt a phone). This one has two 20W USB-C posts and a USB3: Amazon.com: USB C Car Charger Socket – Newest 58W Lengthened RV USB Outlet 12V Socket Dual 20W PD3.0 USB-C and 18W QC3.0 Car USB Port with Button Power Switch for Boat Marine Motorcycle : Cell Phones & Accessories This is a most simple install. A good way to get started and soon you will do more complicated tasks!
2 points
-
New to us Oliver Legacy Elite II (2023) Hull #1364. Have spent the weekend in the Texas Hlll Country updating my knowledge of Oliver systems from our two year journey with LE I Hull #1030 (2022). Only two problems so far. Giving each issue it’s own topic for future search help. In this topic - our problems with the Isothem fridge. We can’t keep it in the safe zone consistently. We have SensorPush sensors in the main compartment as well as the freezer - the freezer seems to work great but the fridge hovers at the top of the safe zone for much of the day. Recovery after opening the door also seems to take longer than our old tri-fuel fridge. Here is the full scenario: (1) Shore power 30 Amp all tests good. No issues with any other systems (AC/ lighting / etc) (2) We have a fridge fan that we moved over from our LE I tri fuel. It’s located in the center of the fridge space and operating correctly. (3) Weekend food load - not a lot but not empty. (4) Confirmed that the vent cover is in place on the exterior vent opening. Have read everything I can find searching the forums. It does not appear that the previous owners did any extra insulation on the exterior wall, should I get some reflective blanket material and put that in covering from the upper vent to the lower access panel? Fins and back side of the fridge look clean, so I don’t think there is an issue with buildup on the coils. Appreciate any advice on how to improve the operation on the fridge. I don’t want to have to haul a backup fridge if I don’t need to.1 point
-
Glad you like it. Good job on the insulation. I'm sure it's helpful. I probably would have used stainless vents, to be the same as ours. I do love our air fryers, at home. Mini convection oven, without the he whole downstairs heat.1 point
-
@jd1923 - We absolutely count on at least one feast daily; if there's others around we'll do an AM and PM food fest! HA!1 point
-
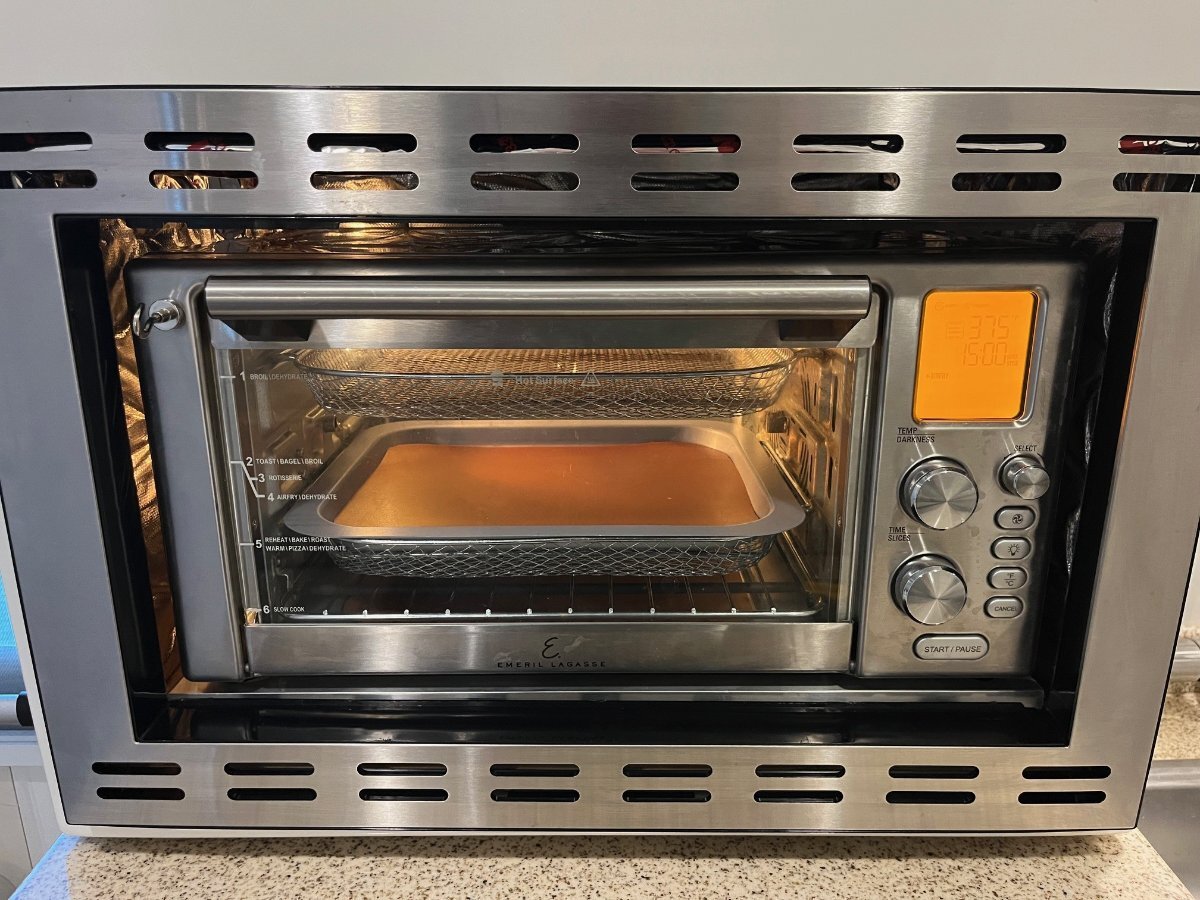
Ran a valid test today. Had to wait 24 hours for the glue to set on the vents. Cooked hash brown patties for our breakfast today. The Emeril was set on air fryer, 380 degrees for 21 minutes. The vents were just warm to the touch, not hot. The RUUVi sensor mounted above the Dometic thermostat on the right upper outer wall of the oven went up just one degree, kicked the A/C on. The cabinet facing, in front just above the oven, was a little warmer than the vents, yet I could still rest the back of my hand on it NP. The kitchen cabinet above was not hot at all due to the heat insulation wrap installed. I'd say this mod passed the test! 😂 We can now have crispy air-fried foods on the road, no setup time dragging a heavy oven out of storage, no extra time cleaning up. This way, we will likely use it daily when camping, like the larger Emeril we have in our home kitchen. Anybody else interested in this oven? Check out the Amazon used price at $80! They also list a "very good" one for $85, that is new but not in original packaging: Amazon.com: Emeril Lagasse Everyday 360 Air Fryer, 360° Quick Cook Technology, XL capacity,12 Pre-Set Cooking Functions including Bake, Rotisserie. Broil, Pizza, Slow Cook, Toaster and Much More, Stainless Steel : Home & Kitchen
1 point
-
@Ronbrink it would be interesting to see if the reboot changes the voltage readings. I still do not believe that such a reboot requires days waiting. When you test after the reboot, connect a quality multimeter at your batteries as a third measurement. I'm guessing the Victron shunt is over-estimating voltage, that the 12.3 may be the better number because the 1400W A/C load (12A) should cause a voltage drop. Less likely, it could be the other way around, the 12.3 being a bad reading. Yes, these numbers SHOULD be the same within 0.01V, given the heavy gauge and short distance of the battery cables to the inverter.1 point
-
So ...seal the interior slot above the fridge, remove the blocking cover, and fan force out vent through the exterior vent. Sounds like a do-able project. We have both awnings so will come up with a different switch placement. May just put a switch through the (to be blocked) vents above the fridge, that way we can turn it on when we turn on the fridge and turn it off when doing the shutdown process. Thanks very much!!1 point
-
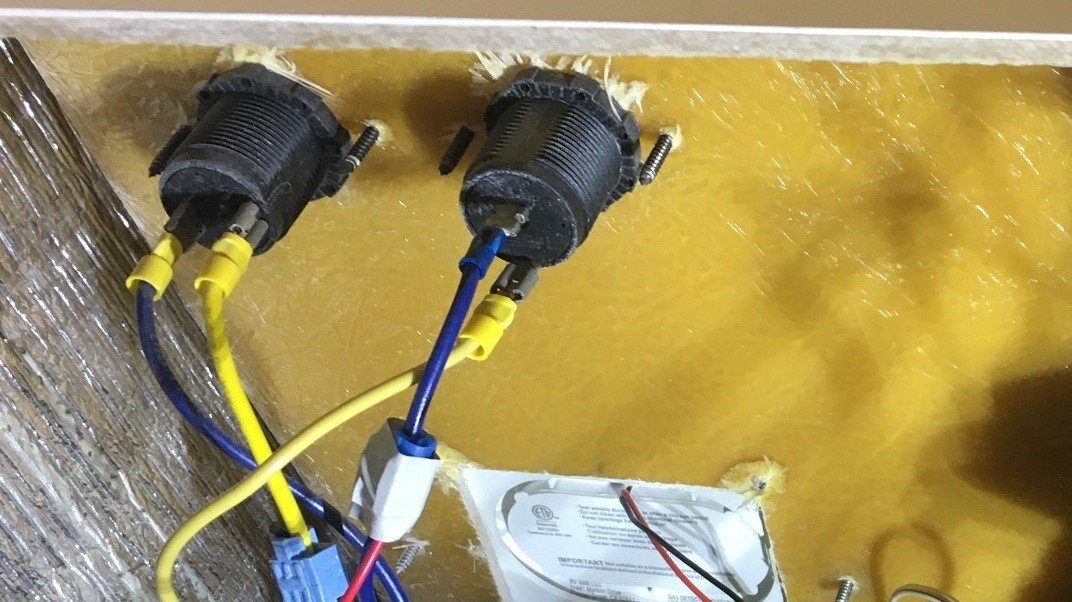
Our upper vent (2022 LE2) had a slot and a mobile RV guy said it should be sealed and he fixed it, and I confirmed with Oliver. The fan would be installed right on the backside of the Oliver cover. Don't have our trailer at home, so I can't check it. If you only have one awning, there is a switch for a street side awning that could be used for the fan (s).1 point
-
I lowered the LBCO from 12.1V to 11.5V and that did indeed allow extended use of the A/C via inverter without fear of a sysrem shutdown, That said, I am currently conducting ‘hard reboot’ of my Xantrex 2000W Freedom XC in hopes of resolve of my “inverter misperceives DC voltage” issue. Thanks for your post, definitely an effective “workaround” and solution you presented,1 point
-
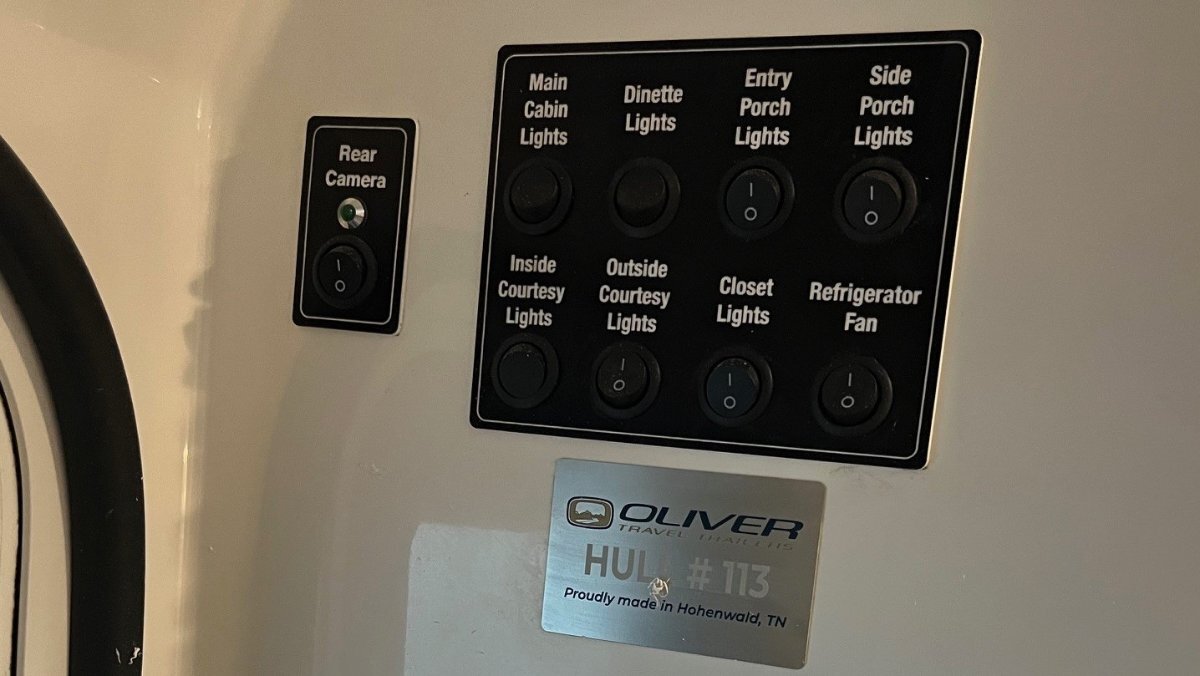
This is informative and I get it about the freezer door. I believe I remember reading a post from @HDRider about replacing a broken door hinge. This is what @SeaDawg was pointing to. If your airflow is limited it could act this way. If you find your Isotherm fridge works well at elevation and cool nights, then the fridge is likely OK. Very good work! When you get home, maybe add a cooling fan like others have mentioned on our forum. My older hull has an OEM external fan and ON/OFF switch (see pic). Never seen a switch label like this in another RV.
1 point
-
No obstructions in the interior vent - I took out the external vent cover and could see clearly into the interior of the trailer. There is a small amount of frost in the interior freezer, but not so much that we cannot get the ice cube trays in and out. The interior fan is just to circulate the air inside the refrigerator compartment - to keep the temp at a common level. Reduces air stratification where the cold air ends up at the bottom and the warmer air at the top. We did the first couple of days in the driveway without it and the temps where less stable. However, in the interest of science wil pull it out over the next day and see what happens Yes to small freezer - two ice cube trays is it. The freezer works great, it's just useless for any food. Given the other posts on the forum about breaking off the tabs, I don't want Rebecca to be even more annoyed with me and the trailer fridge by breaking the tabs while removing the door. Will try this in a safe space between trips. The tri fuel fridge is the thing we miss most about the LE I Hull #1030. Well, that and the ability to park in two parking spaces in a parking lot. Finding a place to park in downtown Durango today was an experience.... ----- Now - for updates from the road. We traveled from northern NM to north of Durango today, with the ambient dropping into the 70s for the last half of the day. The fridge performed better in the lower ambient temps. While traveling through NM the interior of the trailer (also being monitored with a sensor push sensor mounted above the bathroom door) was pretty much in the low 90's. Once into elevation in Colorado it dropped to the low 80's. Could this just be a design capacity issue? If it's venting into an interior that's already 90 degrees, is that causing a lack of cooling? Also - could I be picking up extra heat being transmitted through the exterior shell into the refrigerator compartment? High winds everywhere we have camped this trip have prevented the use of the awning, so no shade on the curb side of the trailer when stopped. Unfortunately, I don't have an extra sensor push sensor to monitor the compartment temp behind the fridge. Would some type of reflective barrier over the inside of the exterior wall help?1 point
-
I used a mirror to locate them on the panel and then used my cell phone camera to take some pictures, lots of pictures in fact, until I got some that were readable and threw the bad ones away. Mossey1 point
-
Beautiful rig that you're going to love! Congrats!!!1 point
-
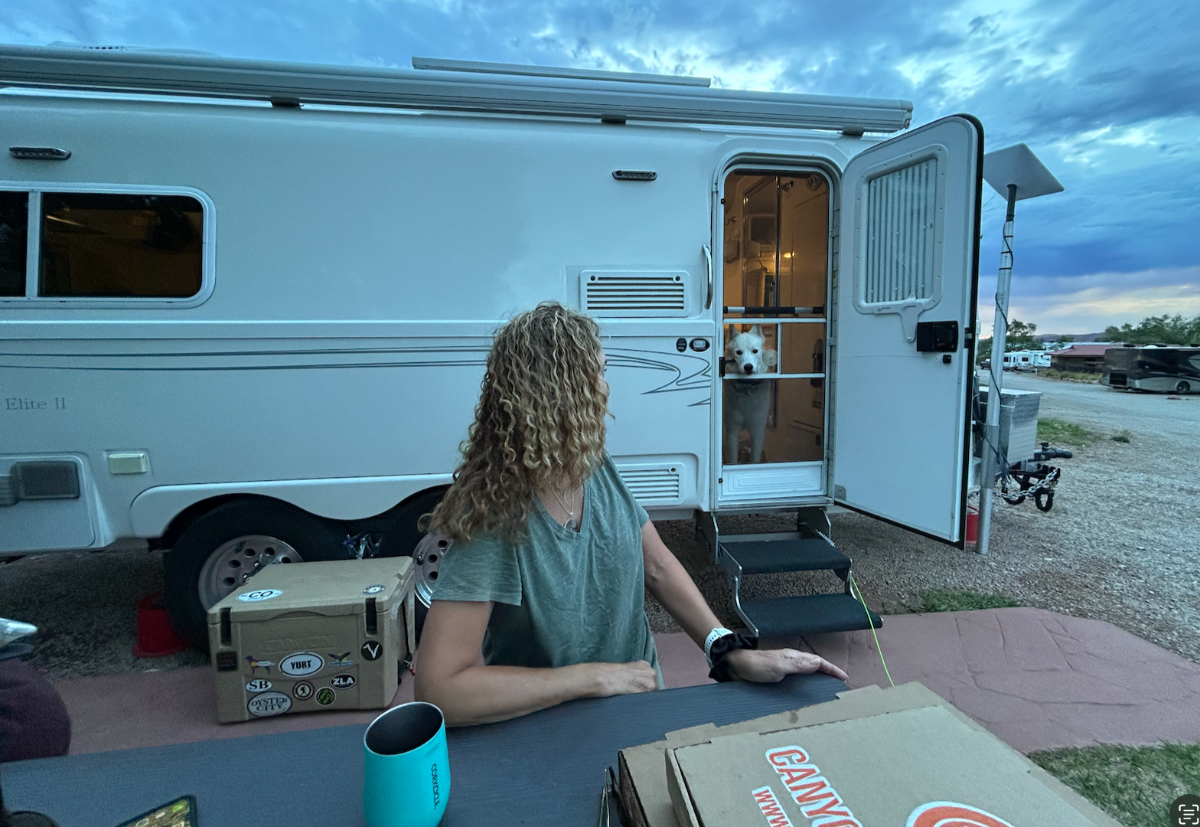
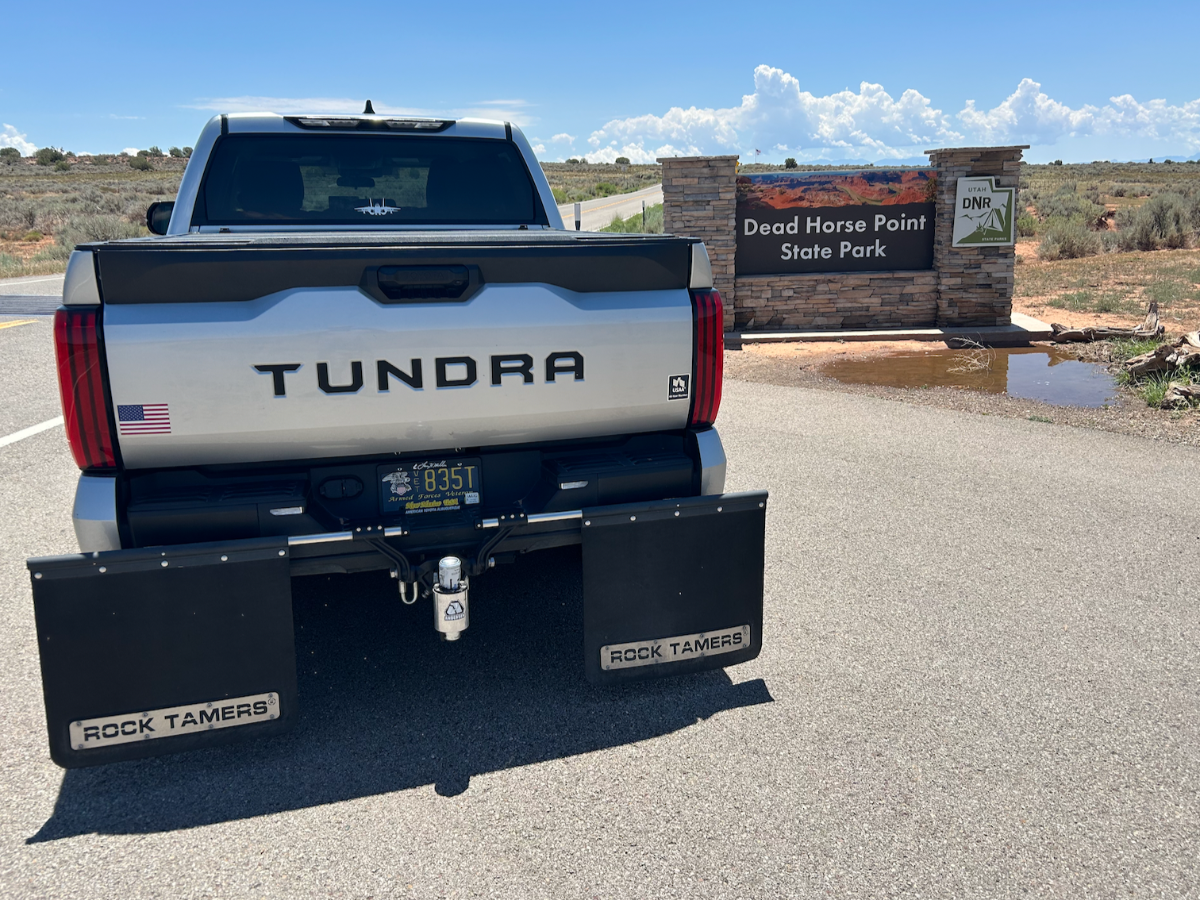
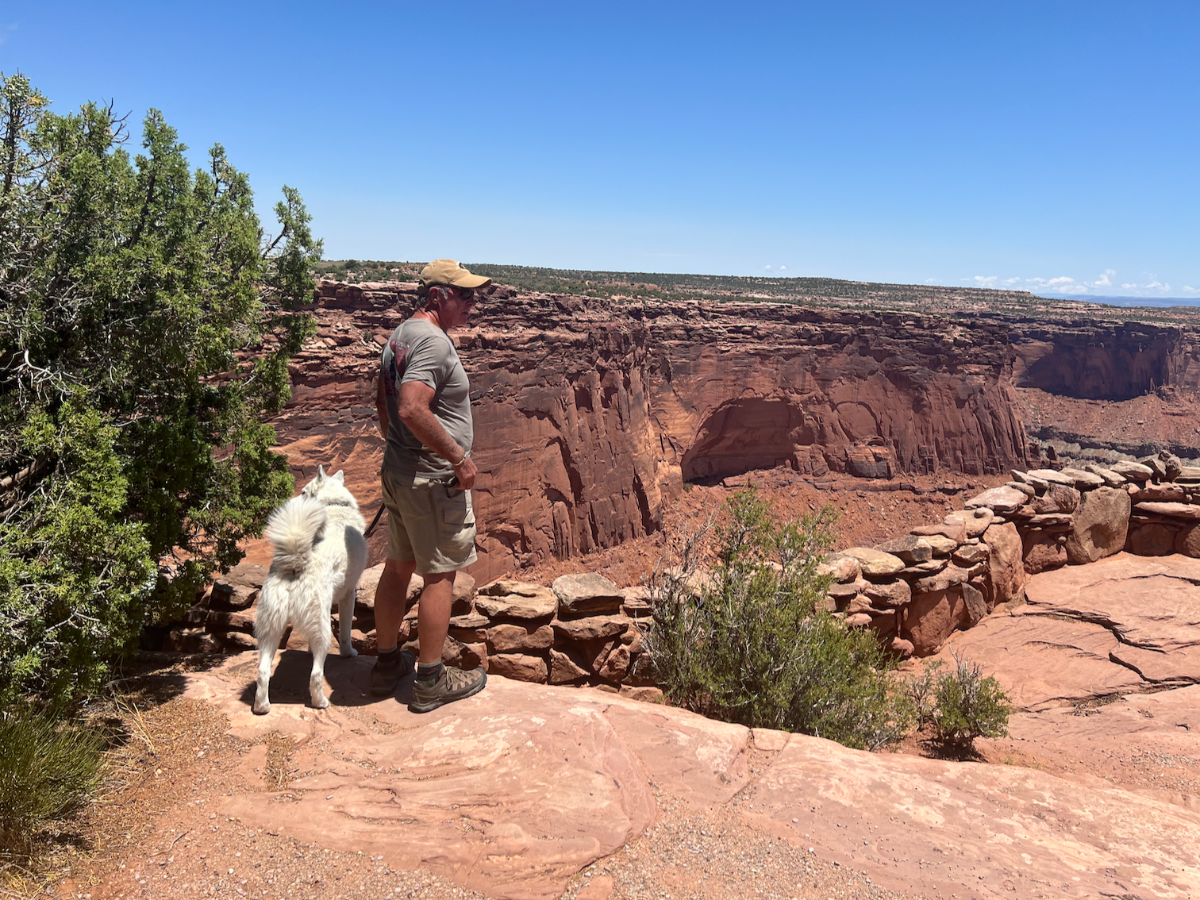
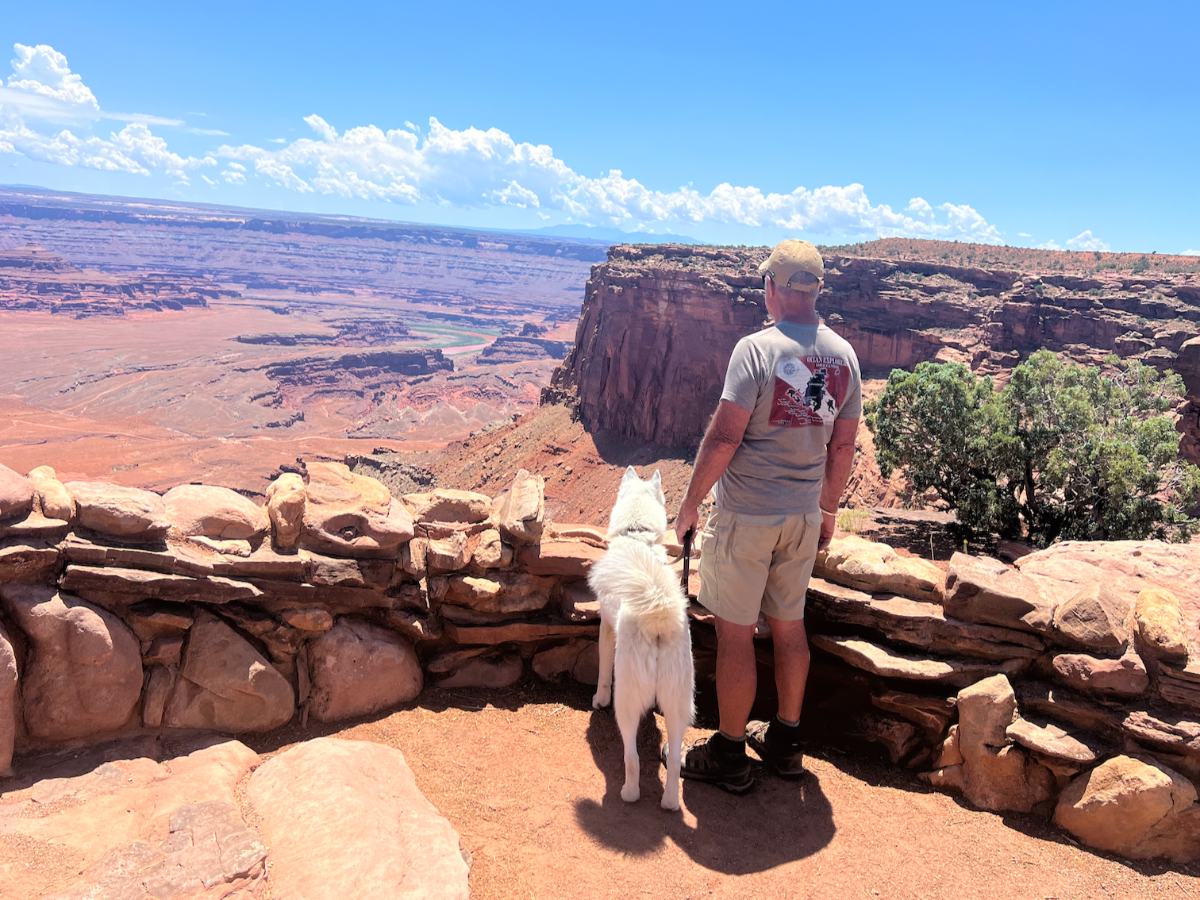
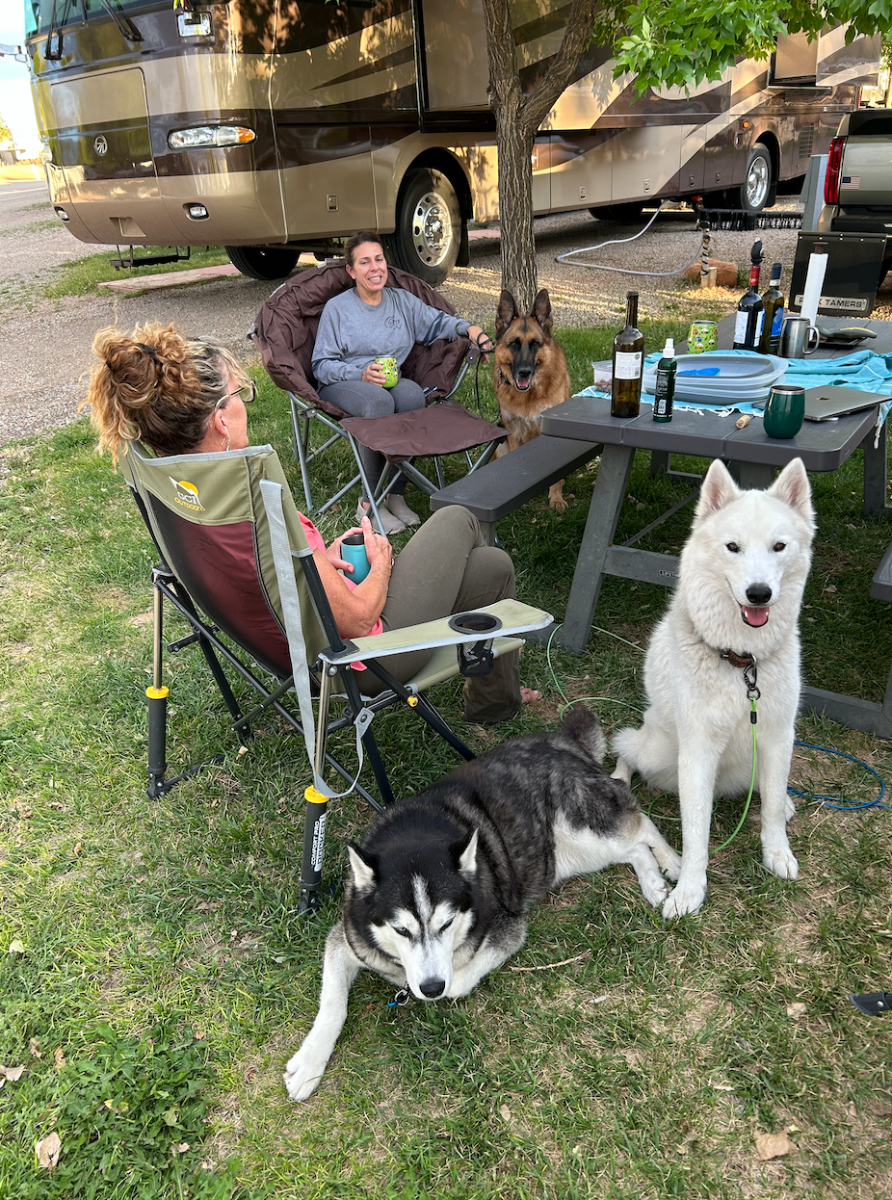
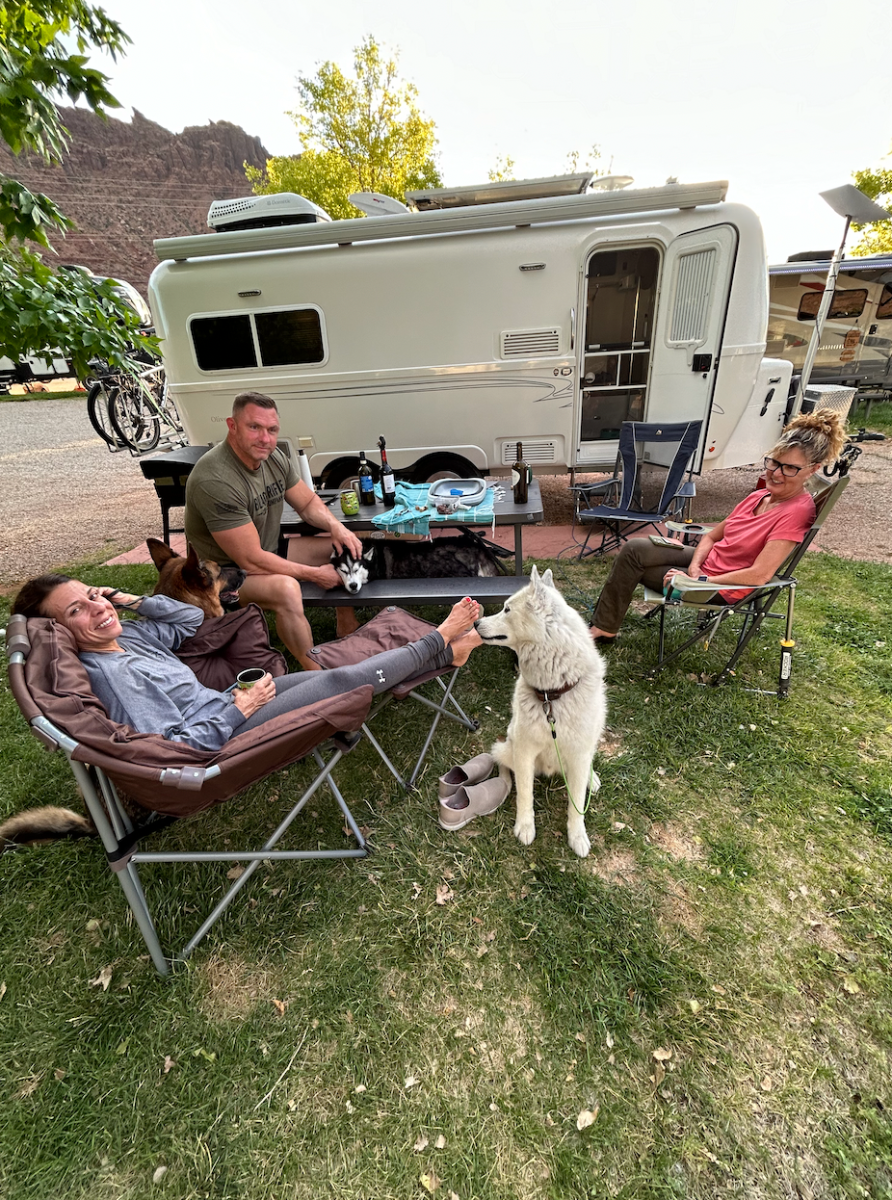
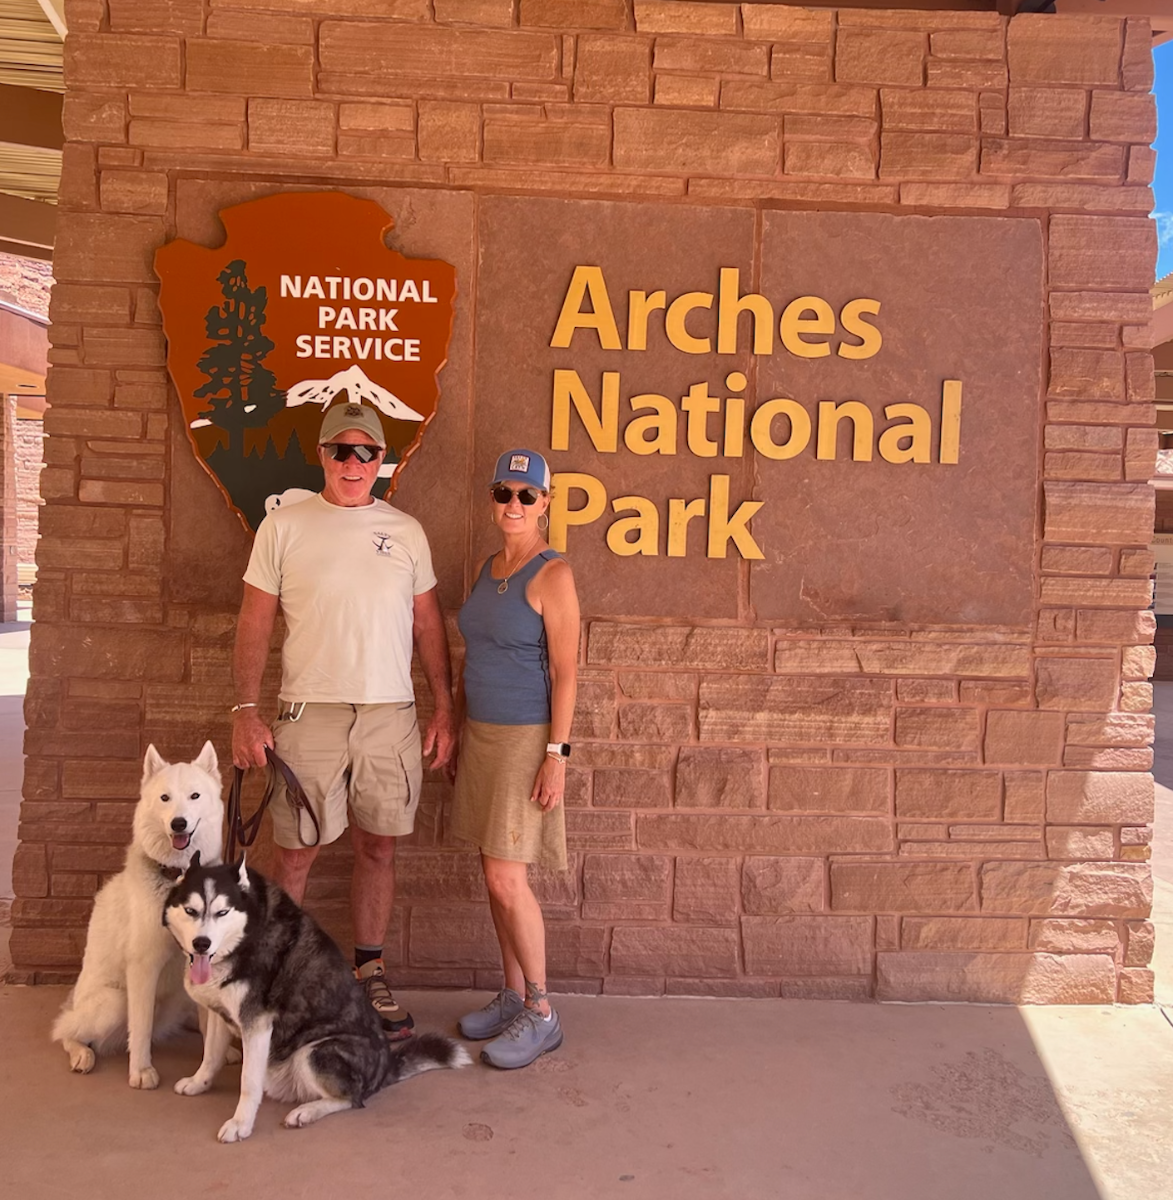
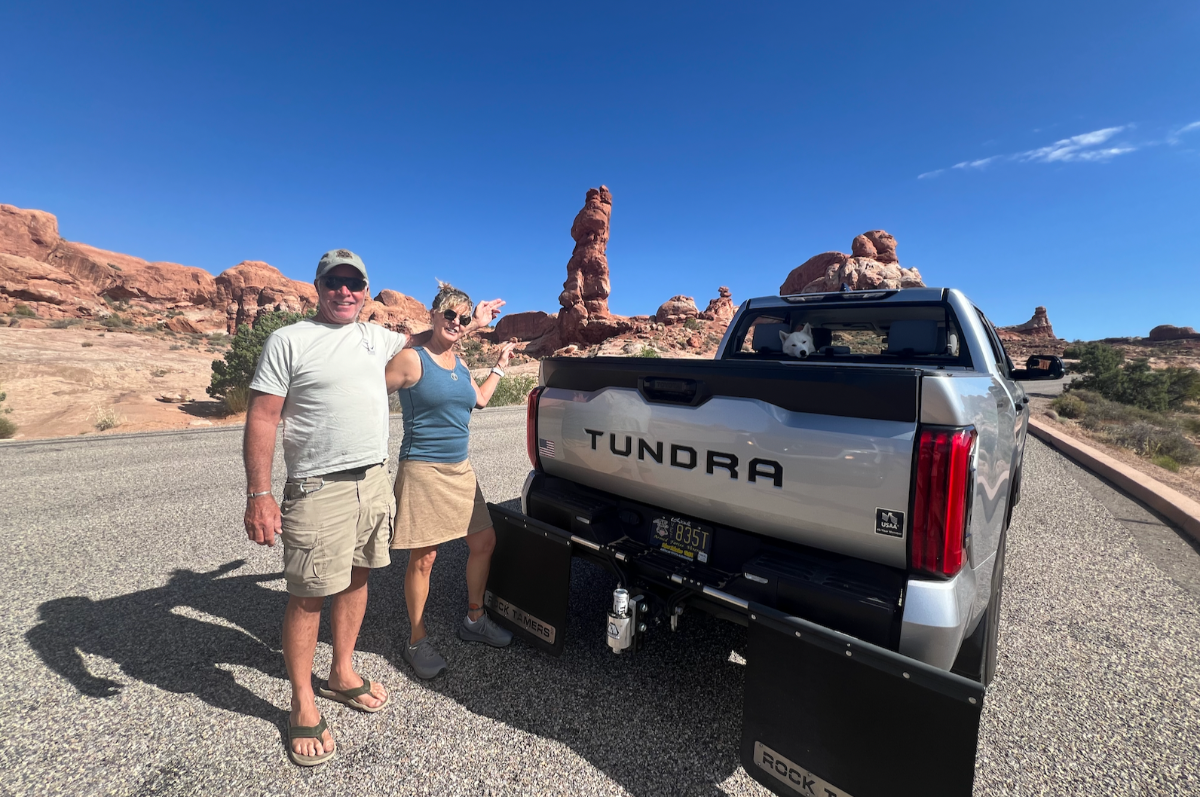
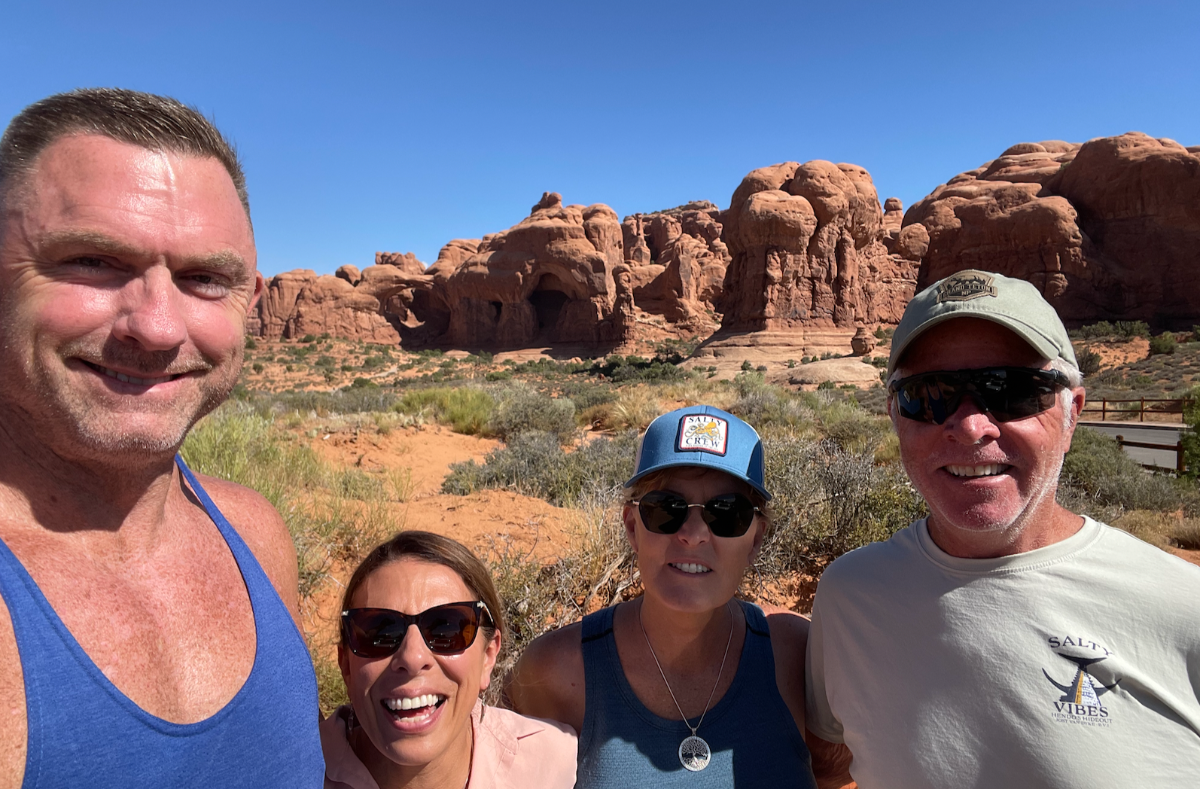
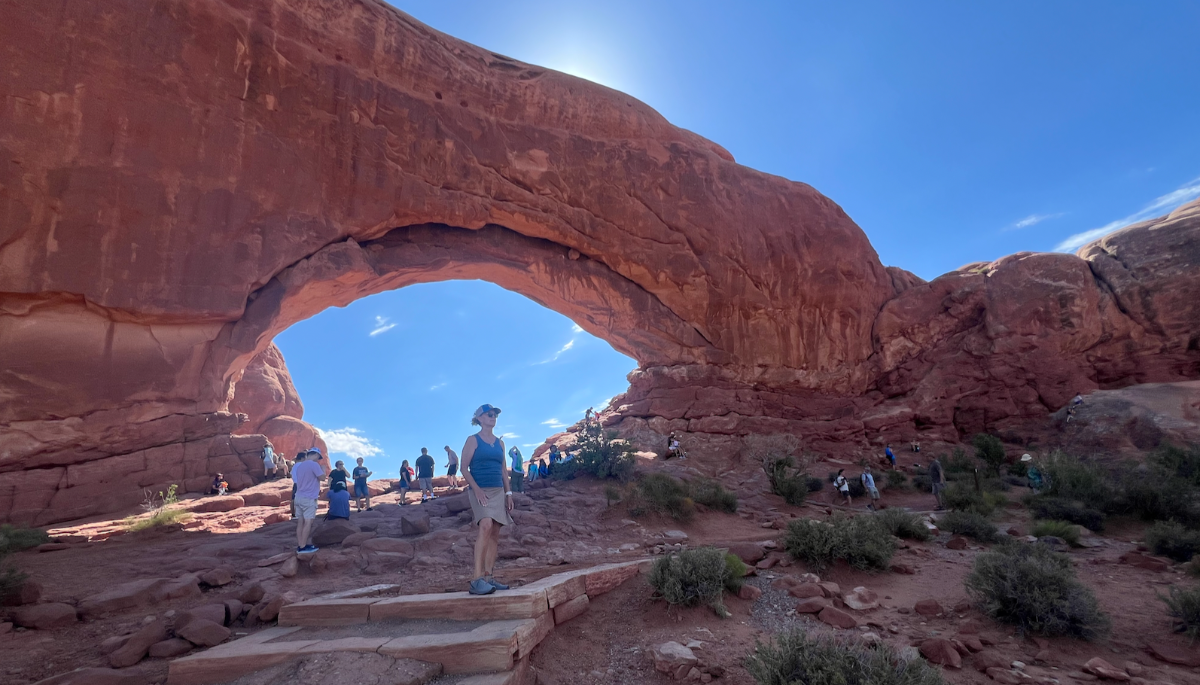
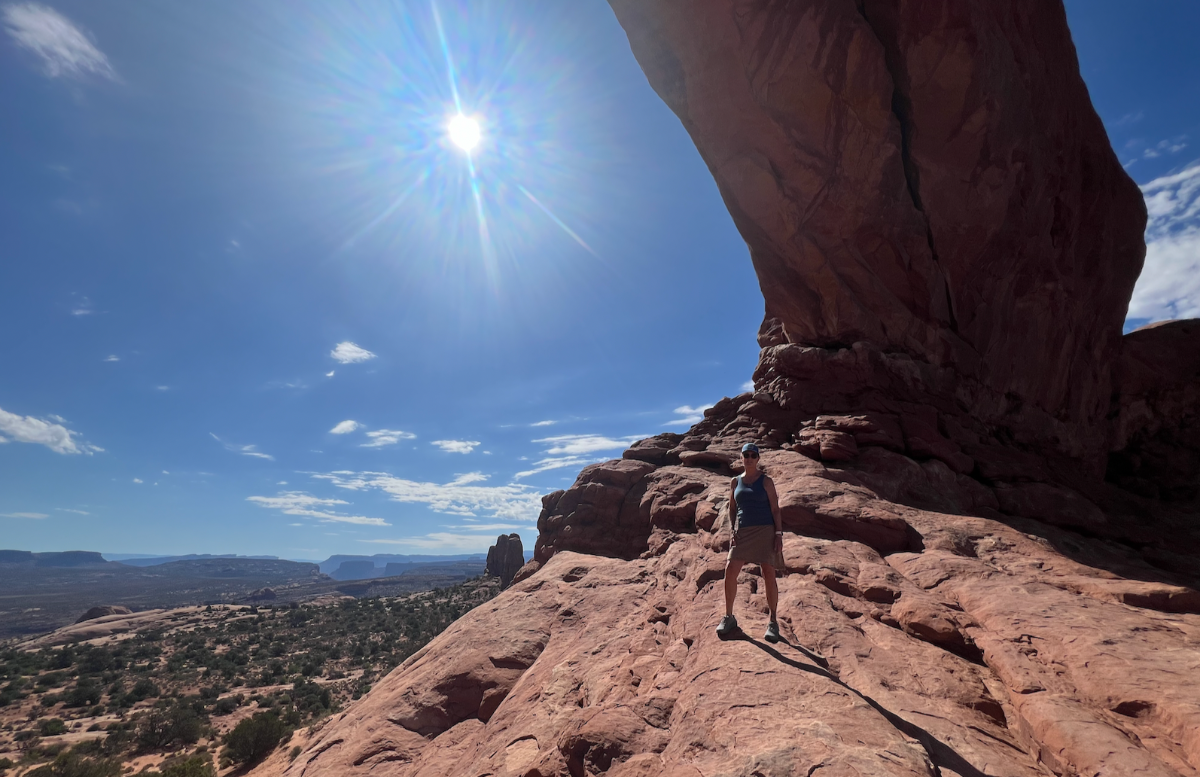
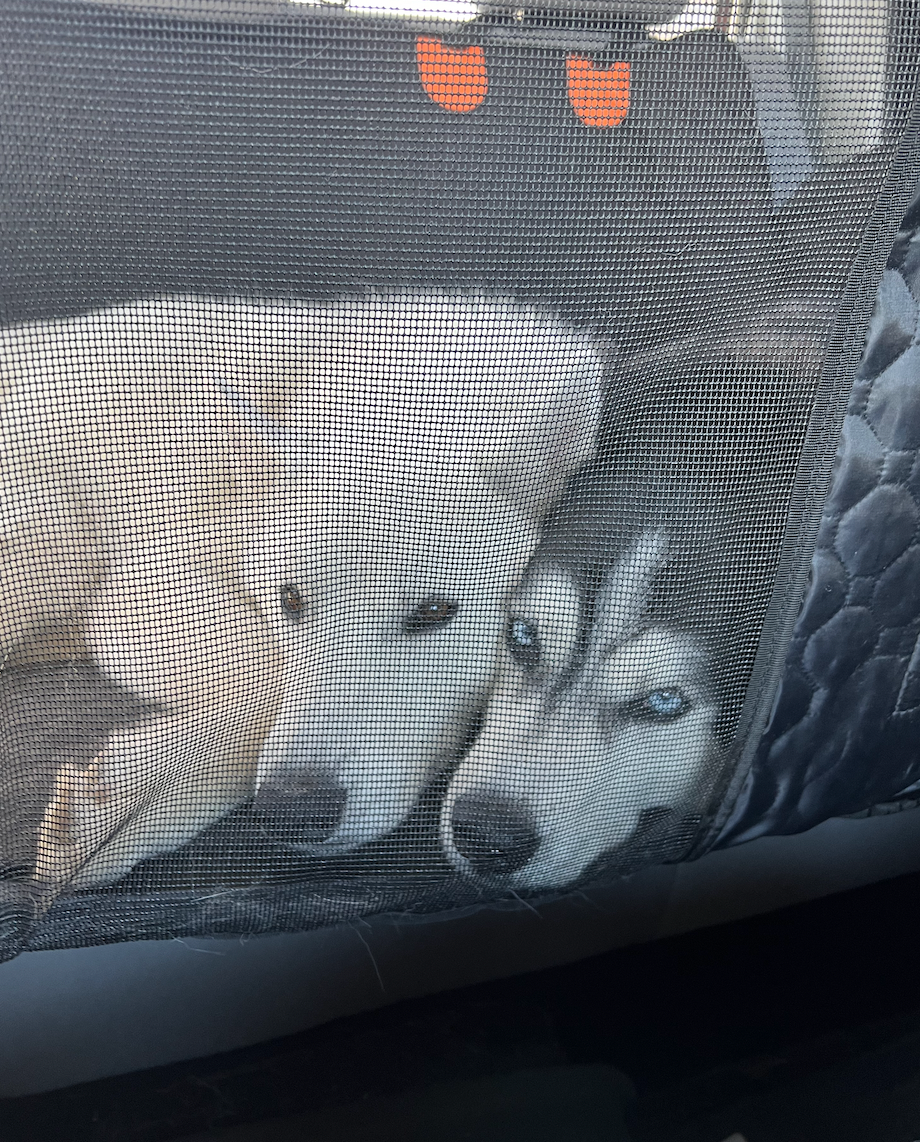
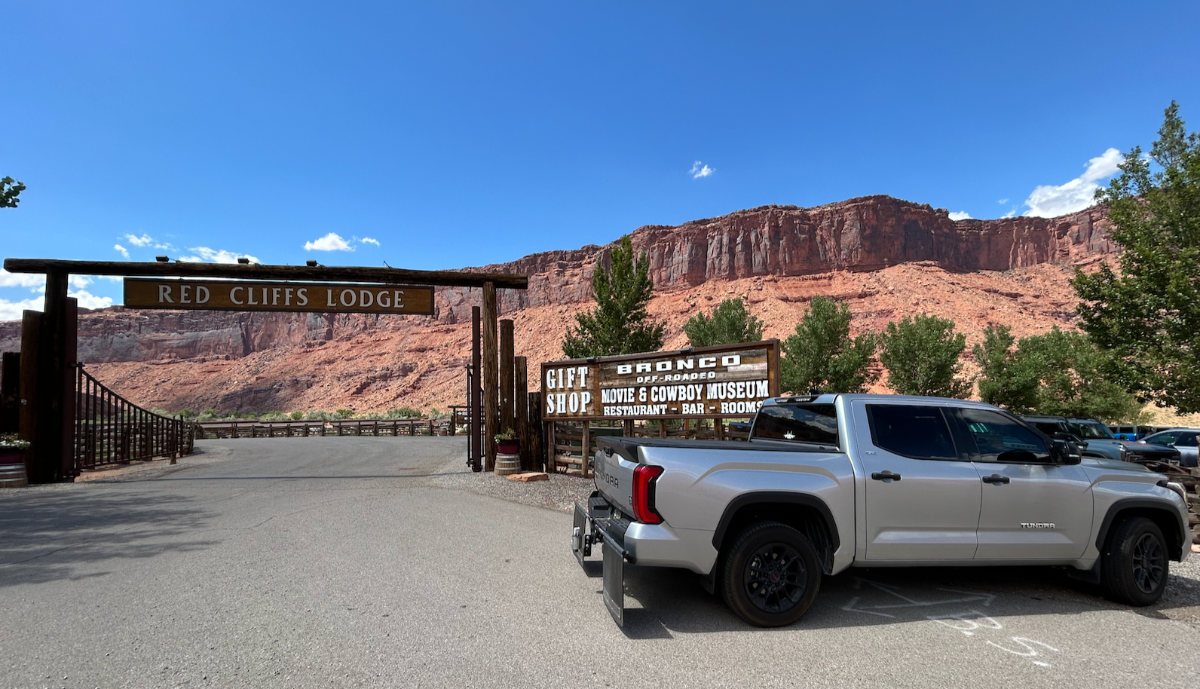
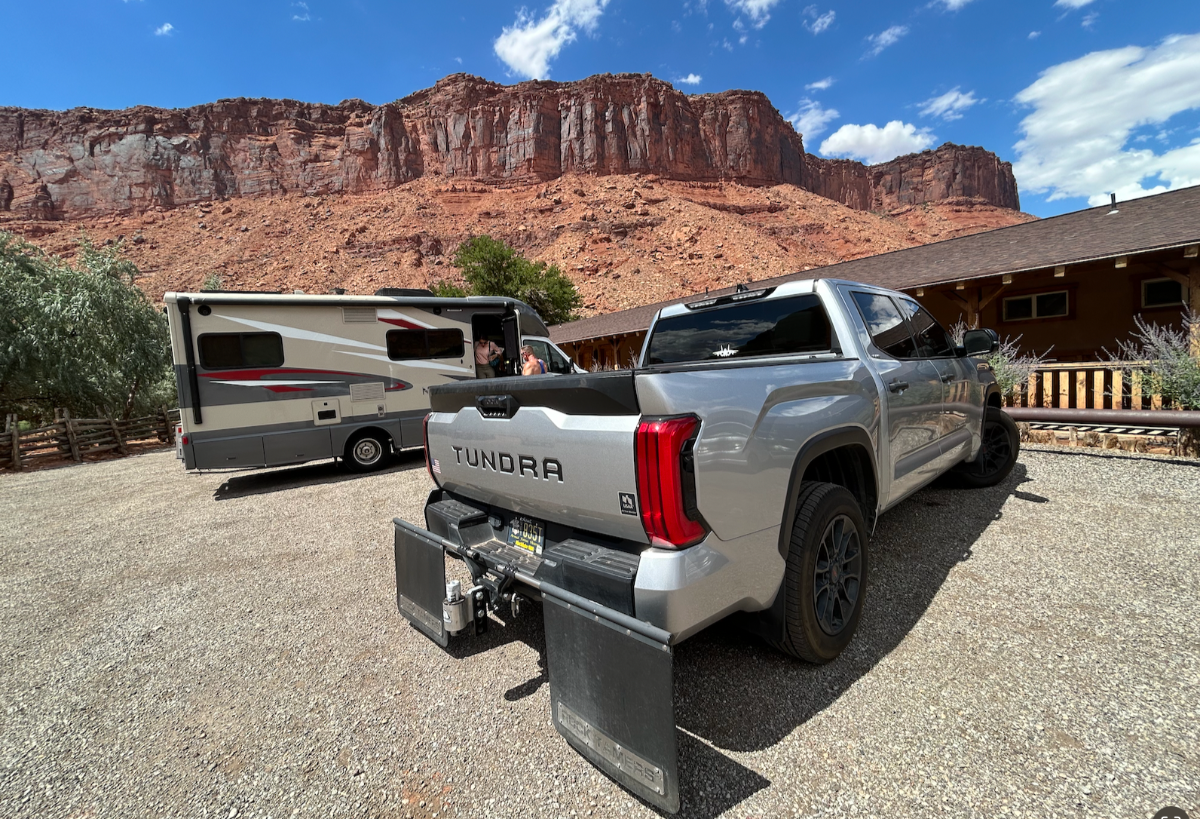
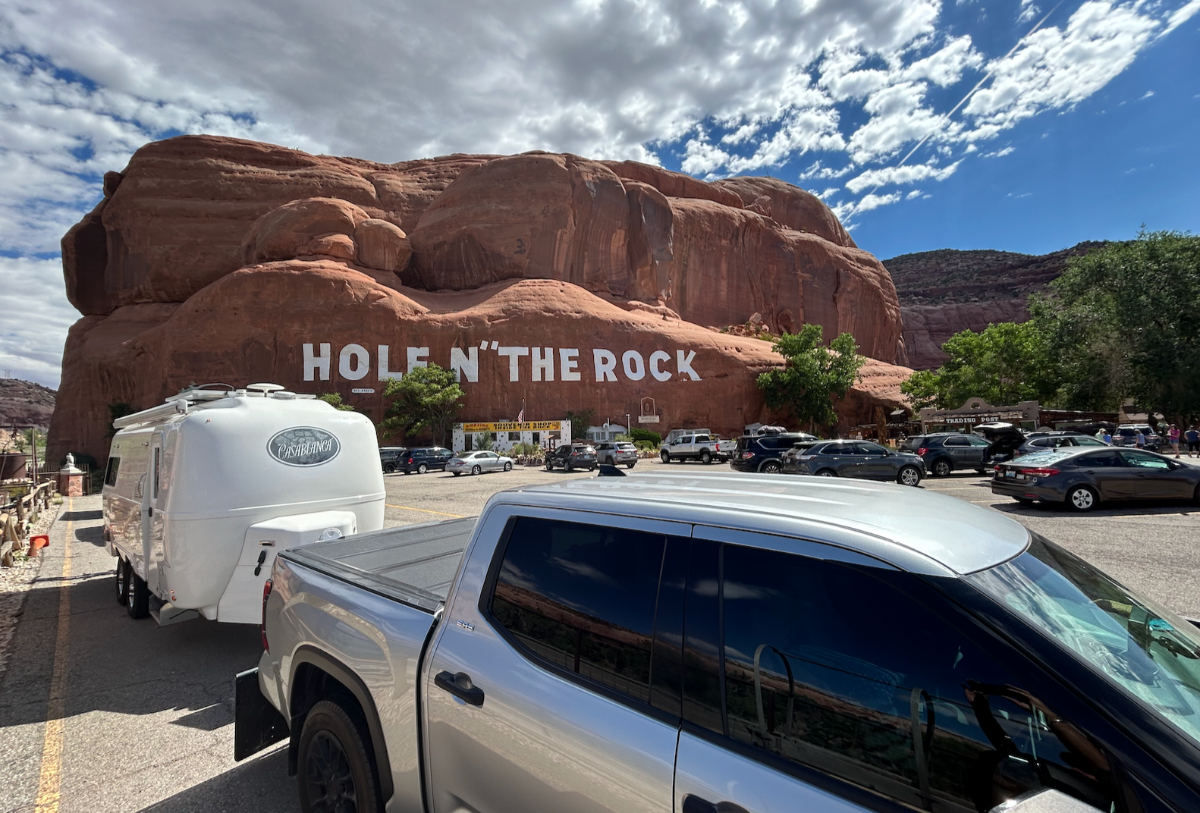
Final Travel Summary -- Day-18, Monday, 01JUL24: 2,424.4 Odometer miles, 12.7MPG (from Tundra computer). But actual consumed gallons from re-fueling receipts was 163.8 gallons or 14.8MPG. Not sure of the reason for the discrepancy. Anyhow: Moab, UT: We linked-up with our friends from NM last Thursday here at Spanish Trails campground for a weekend of sightseeing, hiking, and general frivolity... Our original plan was to tour Arches Nat'l Park on Friday, then hit Dead Horse SP and Canyonlands NP Saturday. But... there weren't any "timed entry reservations" available for us on Friday for Arches so we switched the plan for those two days. NOTE: For those of you planning to visit Arches - the NP Service is requiring visitors to obtain a $2 timed entry reservation online that assigns a 60-minute window for entry in addition to the park entry fee (or Senior/Military Lifetime NP Pass). Our timed reservation was for 9-10AM on Saturday. This keeps the traffic flow through the park manageable in both directions. It actually worked out real well - just we wish we knew about it in advance. So, onward to Deadhorse SP... Magnus wants mom to let him out so he can get out and go exploring - Oscar wanted to stay back at Casablanca: Magnus in his "explorer" mode: Deadhorse entry gate - beautiful weather for sightseeing with our friends: Very cool vistas here at Deadhorse: Twisty Colorado River below: Back at the Campground, the Knuckleheads and their buddy, Heinrich are re-united - do we plan around our puppies? Ah, YES! 2-legged and 4-legged friends loving to camp out together... Getting ready for dad to throw together some evening kibble for everyone: Noth'n wrong with a little "surf and turf": Fast forward to Arches NP: For our style of sightseeing - Arches was the favorite: Notice a puppy head out the window and a tail out the back: Just having a great time: Arches everywhere: Walking up to the Big Window: Under the arch: Just amazing sights here: Back in the Tundra and headed to Red Cliffs Lodge near Moab on the CO River, Knuckleheads sharing the cool AC from their puppy hammock in the back seat: Very cool place where dozens of westerns were produced - with an interesting museum capturing pix of many of the movies made there: Red cliffs above the CO River: We've driven by the "Hole in the Wall" dozens of times over the years on US-191, but on the way home, we took a few minutes and actually walked through the "Tour of the 5,000 sqft House" inside the rock! Got home safe and sound around 5pm - unpacked Casablanca and realized how nice it is to "come home." Cheers, All! A & D
1 point
-
Have you tried one of THESE fridge fans? I've used one of these for years due to the fact that our RV fridges are subject to a bunch of factors that simply are not present with our fridges at home. The fan helps to more evenly distribute the air and, thus, evens out the temps throughout the fridge. Bill1 point
-
Two years ago I installed the "Gas Stop" devices on both my propane tanks. Given that my Oliver was 7 years old at the time I thought that it would also be prudent to install new "pig tail" propane hoses at the same time. At the end of the camping season last year I suspected that I had a small propane leak but since I was placing the Ollie into storage for the winter I didn't investigate the possible leak any further. However, I did purchase a propane leak detector - exactly like the one that Rivernerd mention in THIS THREAD. While attending the Annual Owner's Rally this year, my suspicion of the leak returned. So, today was the day to get serious about finding it. After getting the propane tanks in place and attaching the pig tails I opened the valve on what I thought was the offending tank. Sure enough, I not only smelled it but I even heard it! Obviously, the main brass fitting at the end of the pig tail was the problem (i.e. the fitting that screws directly into the regulator). So, I took that apart, cleaned it up, wrapped yellow Teflon gas specific tape on it and reinstalled. That solved the main smell and certainly the "hissing" issues, but, I still thought that I could smell a leak. Out comes the "bubble test" (i.e. a little dish soap in water sprayed onto the offending area and look for bubbles). Well, sure enough, there was a small leak in the brass reducer between the end of the pig tail and the main brass fitting that I had just repaired. OK, take it apart again, new tape all around, reinstall and using the "bubble test" I thought I had this issue nailed. Sure enough - no bubbles! Great, but maybe my nose was just getting to used to that wonderful propane smell. Maybe I was just imagining it - surely I had fixed everything that there was to be fixed AND there were no bubbles. Just to be sure I used the "test" feature on the Gas Stop devices. Yep - the needle in the little gauge was slowly dropping. I bubble tested again but had the same test result - no bubbles. Being a bit slow witted it was only at this point that I remember my purchase of the propane leak detector (thanks again Rivernerd). I got it out, read the directions and proceeded to "sniff". My repaired connections didn't set off any alarms. But, the connection from the pig tail to the large knob that screws onto the propane tank gave off a "faint" reading (actually a beeping noise on the detector). Sure enough - even though this was a "factory" installed item and I've never had one of these leak in over 25 years of dealing with propane tanks and pig tails, this was the final source of the leaking. I'm still surprised that the "bubble test" didn't show this leak but the "Smart Sensor" picked it up right away. There are a number of these types of sensors available currently on Amazon - both models that are priced higher and lower than the Smart Sensor (HERE). But, as Rivernerd said, "Not only is it worth the peace of mind, but even if only used once, it is less expensive than a motel stay!". Bill1 point
-
We're home now but I ran ours overnight just to see. I only put a gallon of water in the bottom, and nothing in the freezer. I placed two RUUVi sensors, one in a basket in the freezer and another on the center shelf in the fridge. They read 12 and 47 F the next morning. Maybe this is common with RV fridges, and most people do not notice. Though my test was not valid without food and running longer. We traveled 3 weeks Apr-May, and it got water bottles pretty cold during the day while we were out and certainly cold when left overnight. Thanks for bringing this to my attention. I will measure temps next time out. Given you're still traveling and need a quick fix... Not being familiar with the Isotherm, does it have a small freezer in the top of the fridge like most models? What if you remove the freezer compartment door? And maybe the door shelf in front of it. The cool would sink to the bottom and the warmth from below would rise and perhaps signal the thermostat to keep the compressor running longer. You would lose a freezer but perhaps get a colder fridge. It might be worth a try, and you could always reinstall the parts later.1 point
-
For anyone interested in purchasing one, Home Depot has the Maxxfan with LED on sale for $73 at the moment. MaxxFan Dome Plus with 12-Volt Fan and LED Light1 point
-
This is our first time using the forum. I hope this response appears as we are replying to all. We appreciate your responses regarding the seat cushions. We impulsively moved forward with washing the smallest seat cushion to test out washing on delicate with cold water and letting it air dry. I have to say, the shrinkage was not too bad. However, as SeaDawg mentioned, it was rough getting the foam into the narrow opening of the cover. We feared we would damage the zipper, and then getting the cover to look nice and neat and not wonky was a challenge! The batting that raps around the foam is difficult to keep in tact. If we continue with this method of cleaning we will consider the plastic idea to slip the foam and batting into the cover. We are divided in how we should move forward. jd1923, thank you for the link for the sunbrella cushions. You certainly opened our eyes to having covers with a fabric such as sunbrella. As our Oliver ages, we may consider new cushions with a sunbrella type of fabric custom made for us. Since our Oliver is only a couple years old, we will consider the automotive upholstery cleaner, and see how that does. {We do not have offensive stains or anythihng, just want to freshen the cushions up.). Thank you for all your suggestions. You have been very helpful : )1 point
-
This is my thought on the Oliver seat cushions. Our Oliver is 8+ years old and cleaning is not enough as the foam has lost its cushion. We also have the twin beds, so we're only talking the dinette. These are the best and most expensive I found on Amazon and btw Chris' nickname is Red! Amazon.com: RSH DECOR: Deep Seating Cushion with Pillow Back | 24” x 24” Seat | Sunbrella Performance Fabric | Water and Fade-Resistant | Outdoor Chair Cushion Set for Patio Furniture | Canvas Burgundy : Patio, Lawn & Garden1 point
-
Thank for the additional information and pictures. I think you’re right, a good first project to build a little confidence.1 point
-
Is it just me or is there something extremely satisfying about that sound of yet another mosquito being fried when hit with the "tennis racquet"?1 point
-
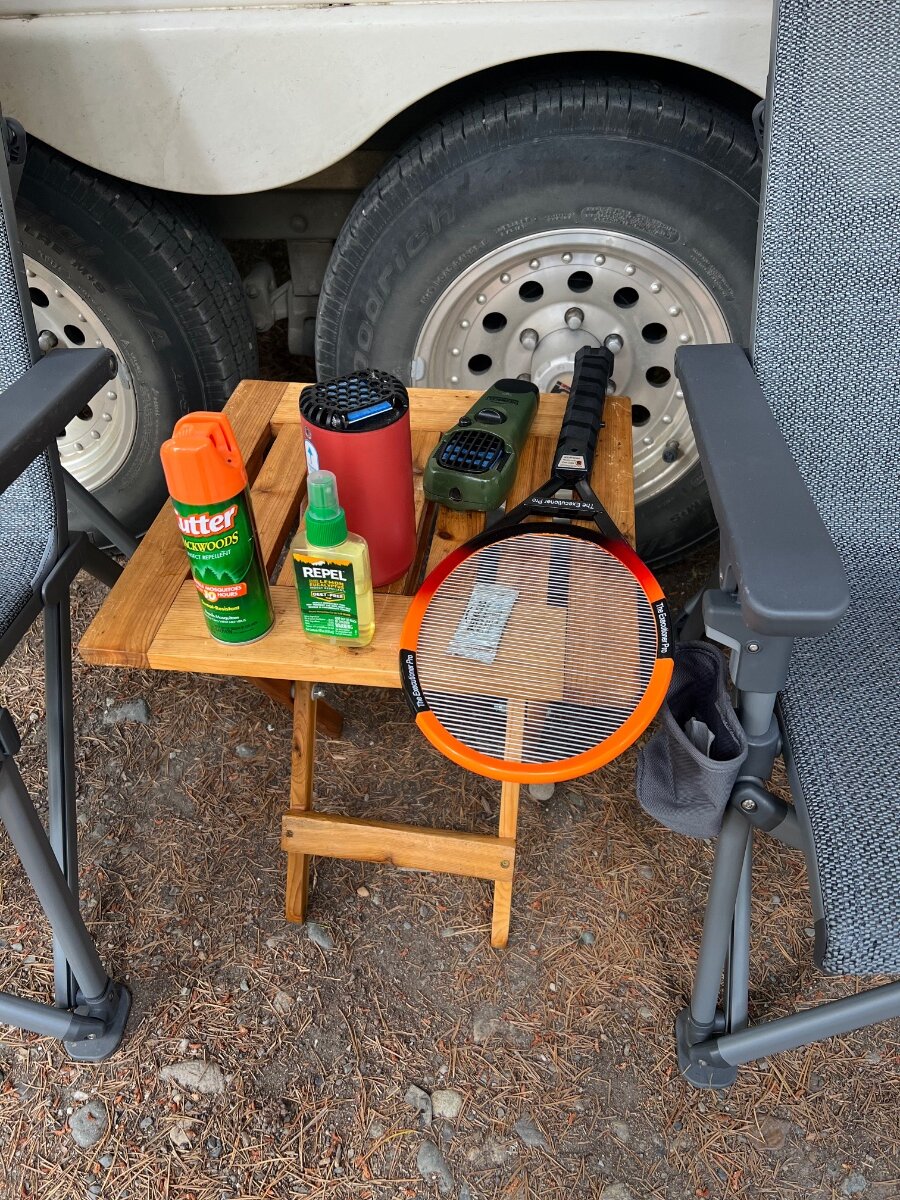
Another mosquito magnet here. The campground at Watson Lake, Yukon Territory was the worse for mosquitoes. This was my setup. The older, dark green Thermacell I set on the right side of the steps going into the Oliver and never had a mosquito get inside. The Repel spray works great if you have to leave the Thermacell shield of protection to go for a walk or otherwise leave the campsite. The severity of the mosquitoes depends on the weather. When we went to Alaska in 2016 they weren’t that bad except in wet, rainy heavily wooded campgrounds, but it pays to be prepared.
1 point
-
I would be hesitant to machine wash and a dryer may cause them to shrink. I suggest you try an automotive fabric upholstery cleaning product or one of those steam cleaners with an upholstery attachment.1 point
-
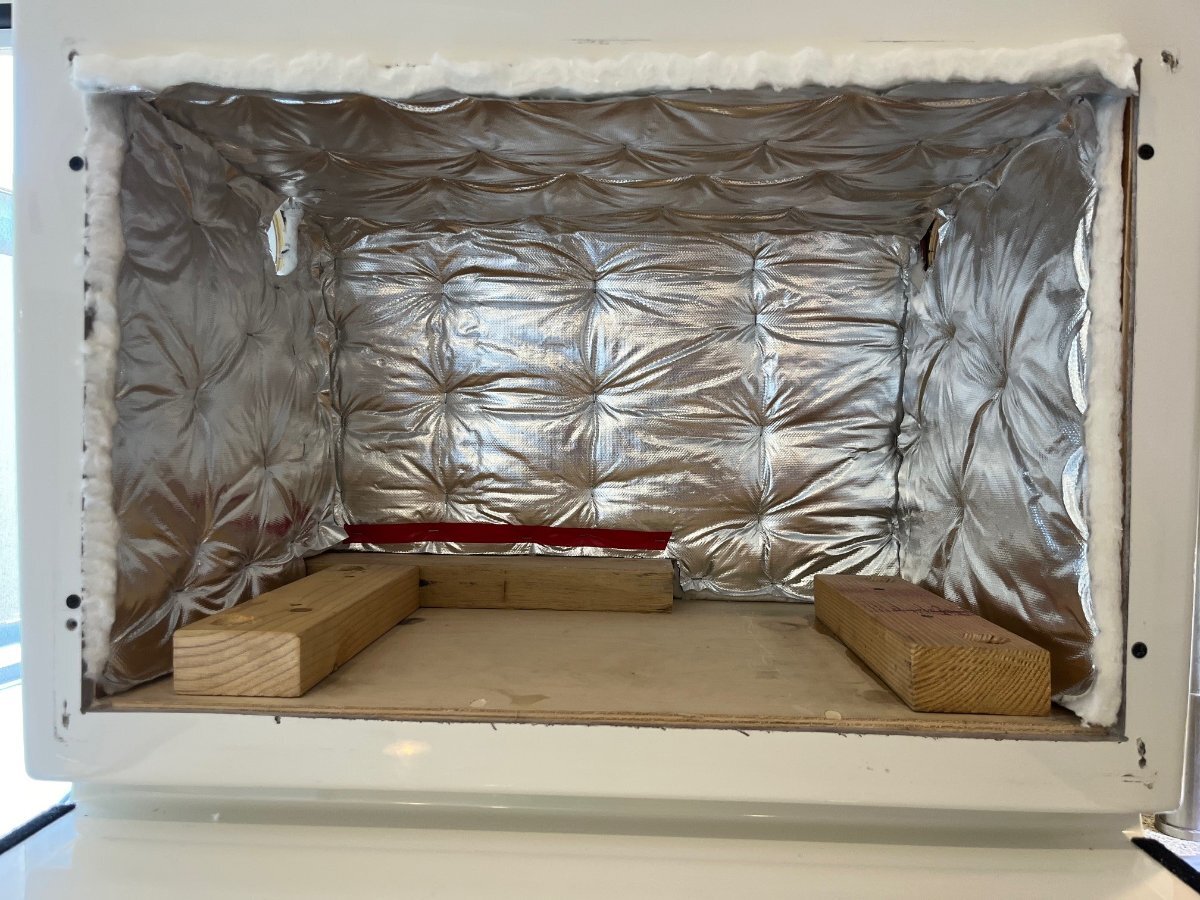
I was putting off the work of insulating the opening. I had never done such a task or worked with ceramic insulation before. Turns out this material worked well: Amazon.com: CeraTex 3180 Blanket with Aluminum Foil Facing, 8 LB Density, 1/2" x 24" x 60" (5'), 2300°F High Temperature Insulation for Kiln Stove Furnace Glass Fusing Pizza Oven : Arts, Crafts & Sewing After cutting the main section, top and rear in one piece, I used 3M spray adhesive to get it started and it worked better than I had expected. I finished with a power staple gun with 3/8" staples to secure it. I was afraid that the staple gun would pierce the foil layer of the insulation, so at first I used some electrical tape to help and then realized it was unnecessary (red tape at bottom). Then I cut the two side pieces which had a curved rear, following the curve of the Oliver upper shell. I placed these in position and used a Sharpie to mark the vent holes and cut these out with scissors. Glued and stapled the left side and went without glue on the RH side, since the thermostat cable is behind that one and I may need to service that with an A/C upgrade. Really happy in how it turned out, which is often the case after days of contemplation! I have one trim piece to fabricate which will hide the 2x4s below the oven and then remount the bezel from the original microwave, and she's done! Last step and pics tomorrow.
1 point
-
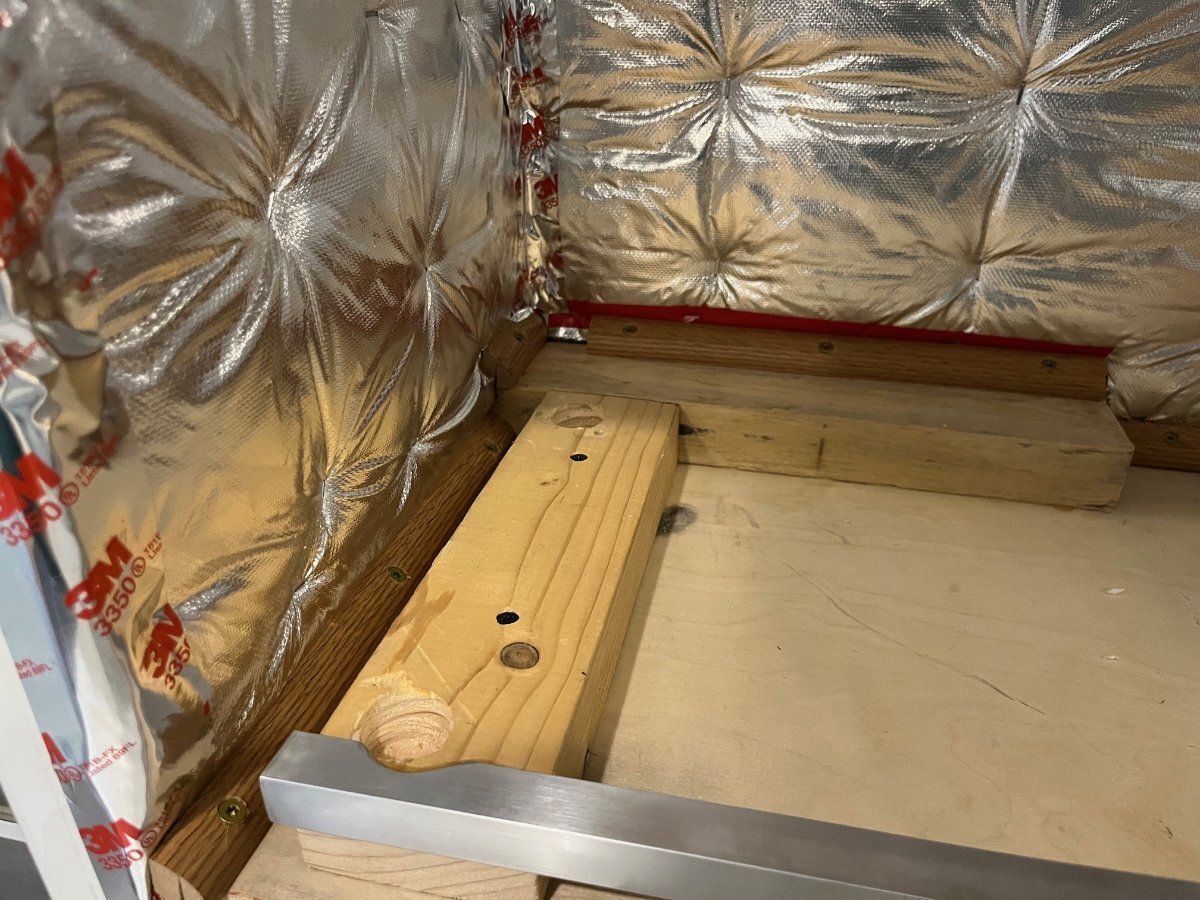
First step was to center the Emeril Air fryer. It needed to be raised about 3/4" or more, so I set it on two 2x4s with cutouts, hole drilled to hold the legs. This gave me the lift I need and a way to secure the oven. When I got the mount ready, I merely used some wood glue below and was able to then move the oven a little to get it exactly square. The next day after the glue had set, I added a couple wood screws to secure (the 2x4 in the rear was part of the original microwave installation).
1 point
-
We didn’t like the Tocha upgrade option, finding them too flimsy. So we ordered our trailer with the standard mattresses, and ordered KTT mattresses (the prior upgrade option) directly from the manufacturer. We like them better than our extra firm coil spring mattress at home. And like David, we have the AB Lifestyle custom mattress pad and sheets. Again, nicer than our home bed. I guess we need to upgrade our bedding at home, spend more nights in Curiosity! 😁1 point
-
Good information,again. Nan, perhaps I didn’t introduce ourselves to you. We are only Oliver owner wannabes right now but are doing our research here on the forum to learn more about Oliver TT. Thank you so much for your kindness, though. And thanks for all the other great information, friends. I’m sure we only have a zillion more questions 🤣1 point
-
Mother Neff State Park is a nice little Texas State Park just south of Waco. The land was donated to the state of Texas by the mother of Governor Pat Neff 100 years or so ago. It was the first state park in Texas. We stop here often.
1 point
-
Found this little roadside park and free campground on iOverlander while driving across Kansas on US36. The sign in the park says overnights are welcome… and free, unless you need electricity, then it is $15/nt using the self-pay box. There is potable water available. While it is next to the highway, overnight was extremely quiet. Awoke to two deer grazing near the trailer and the sound of songbirds. Highly recommend this spot if you are on US36 near Kensington, KS. For a moment I felt transported back in time to the 1930s/40s when roadside camping on US highways was commonly practiced by Families making their was across the Country. US36 takes you past the geographic center-point of the US and not too far from the worlds largest ball of Sisal twine (my cat was pawing at the window to get out and try his best to play with it).
1 point
-
We have used Campendium for years at no cost. Recently, Chris paid for an account for additional benefits. Last thing you need is a pass from some app/website to get into another! Looks like the common scheme to get new accounts by linking prospects to some other service. Like the 100s of reseller websites that sell your going through them to buy insurance!!! Buyer beware and stay away! OMG, this world could do without prostitutes and the marketing profession which is far WORSE! At least with the prostitute, you know what you are buying!1 point
-
We’ve been up and down the Moki many times over the past 30 years. It’s not nearly as bad as a sharp stick in the eye.1 point
-
Yes Green River Lakes. Link to what? Be glad to just not certain what you are referring to in this case for a link. FYI the area is located north of Pinedale, WY and while not that far via miles it is a slow go due to two hours of dirt road driving towing. Beartooth Publishing here in Bozeman produces an excellent weather proof GPS map of the "Winds" well worth the money. I'm sure you could purchase via them directly or probably Amazon. Gaia and Alltrails are also very good resources.1 point
-
Flathead Lake State Park, West Unit looking east at the Park: http://stateparks.mt.gov/west-shore/ EDIT 04/20/20: I misnamed this park and have corrected the description. The water is crystalline clear. There are no sites at water level, you have to hike down. John Davies Spokane WA
1 point
-
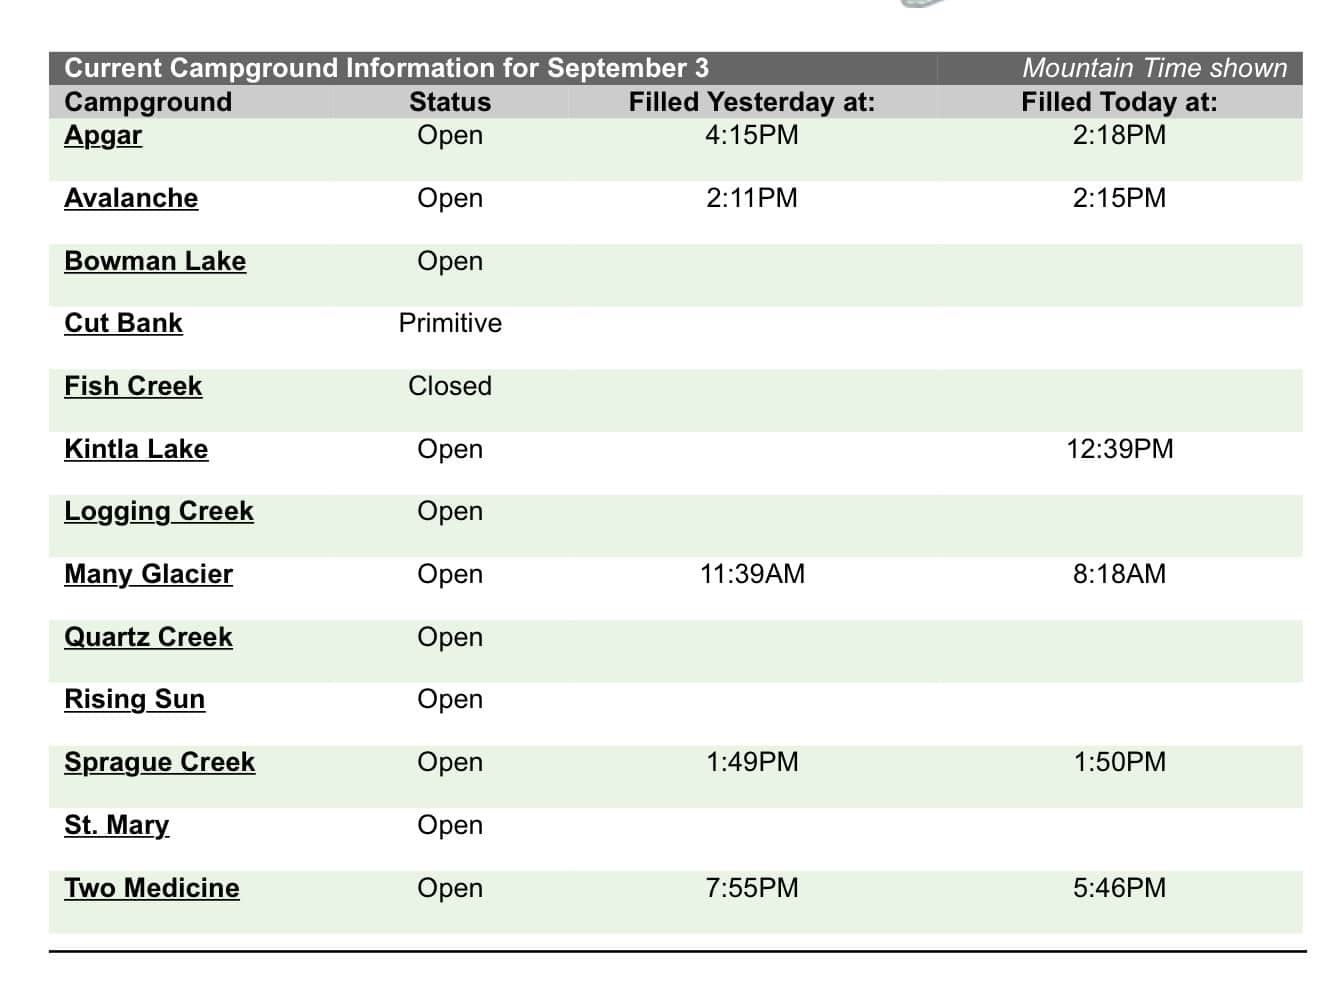
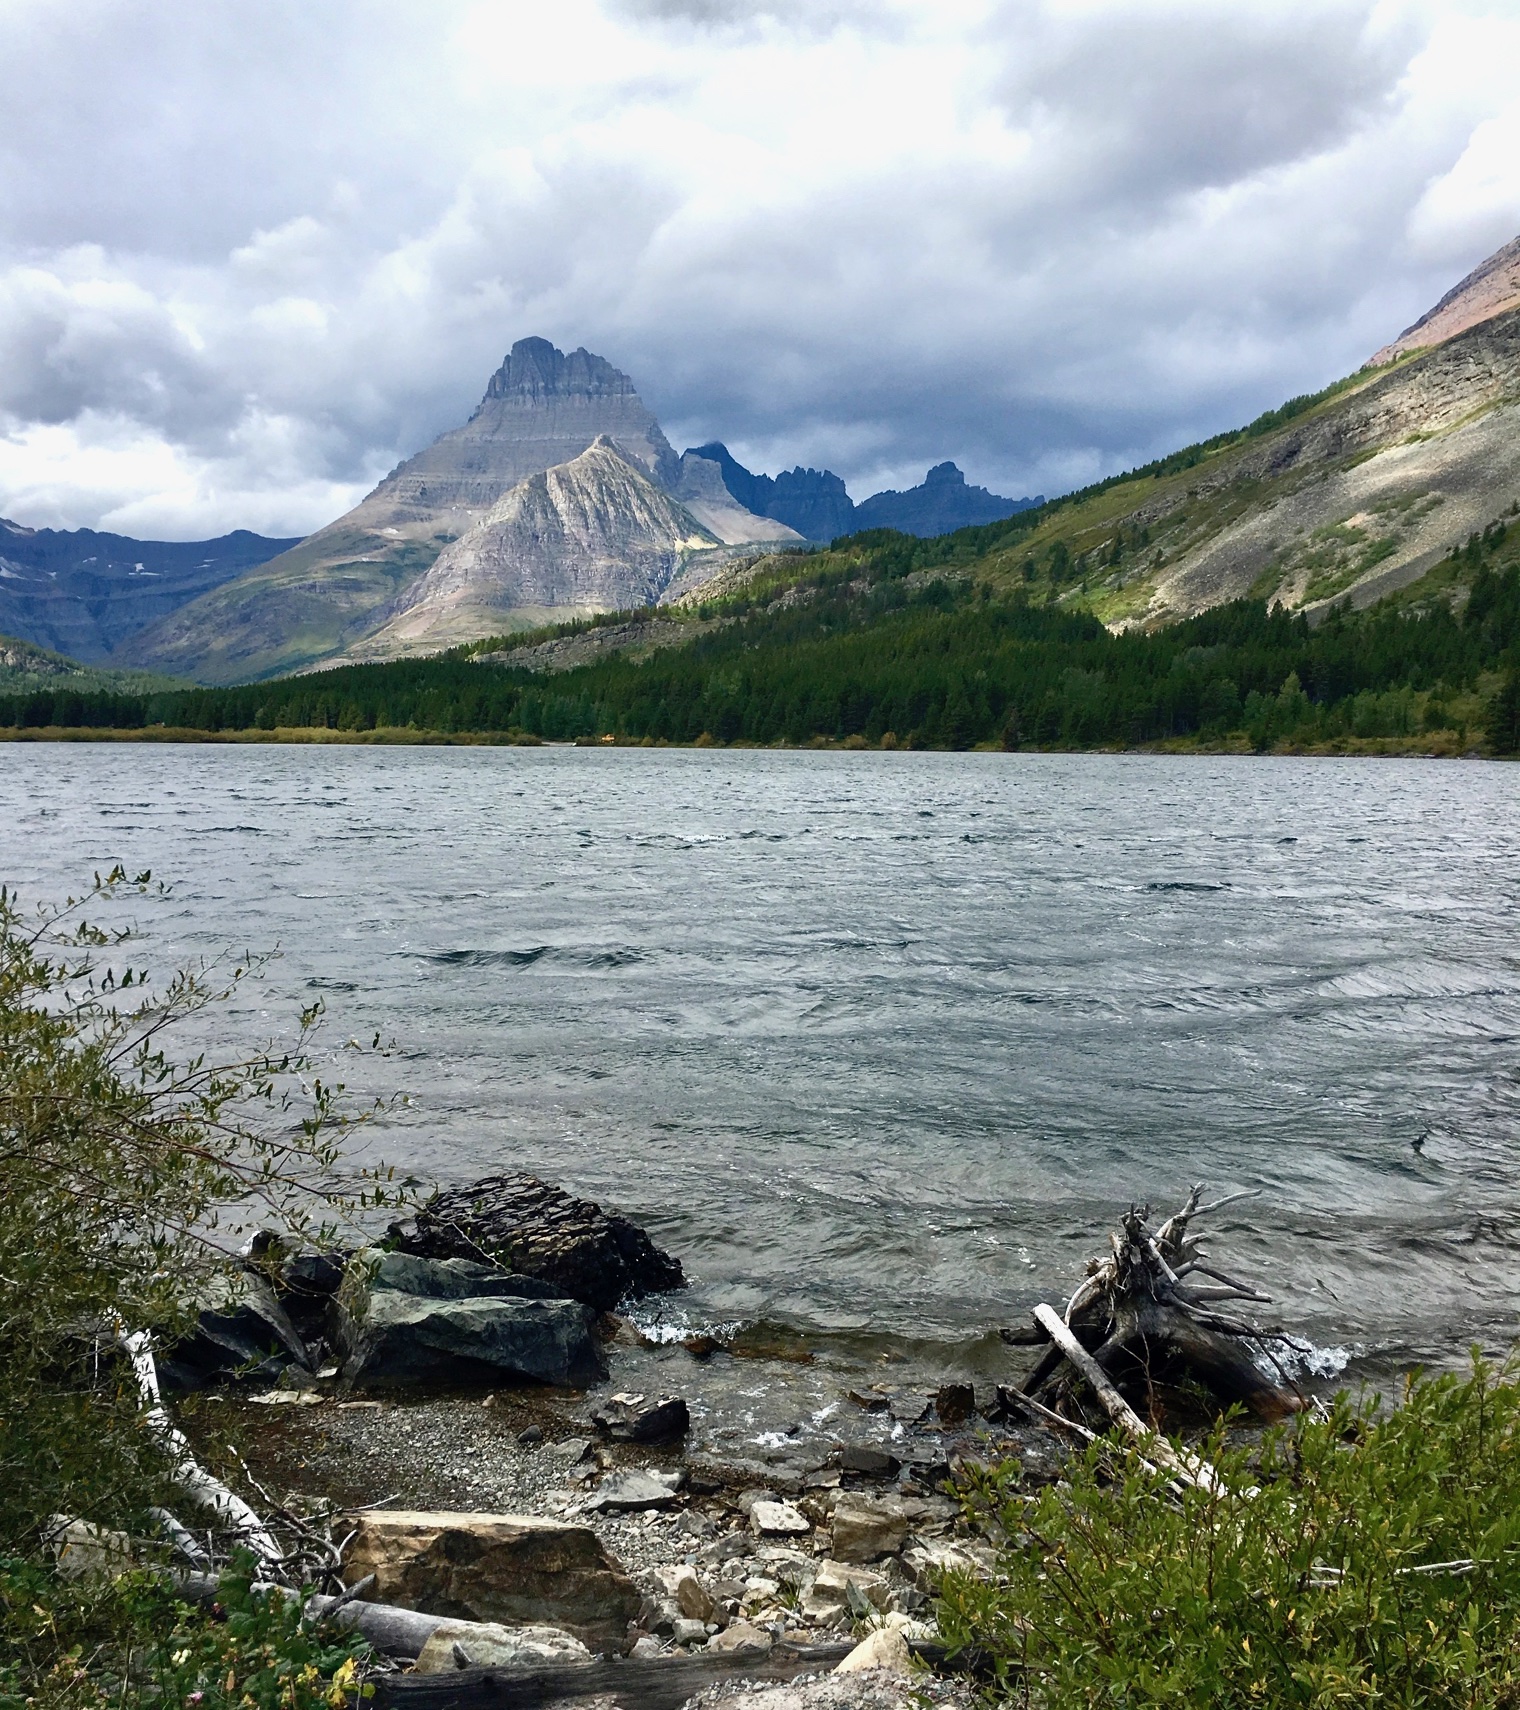
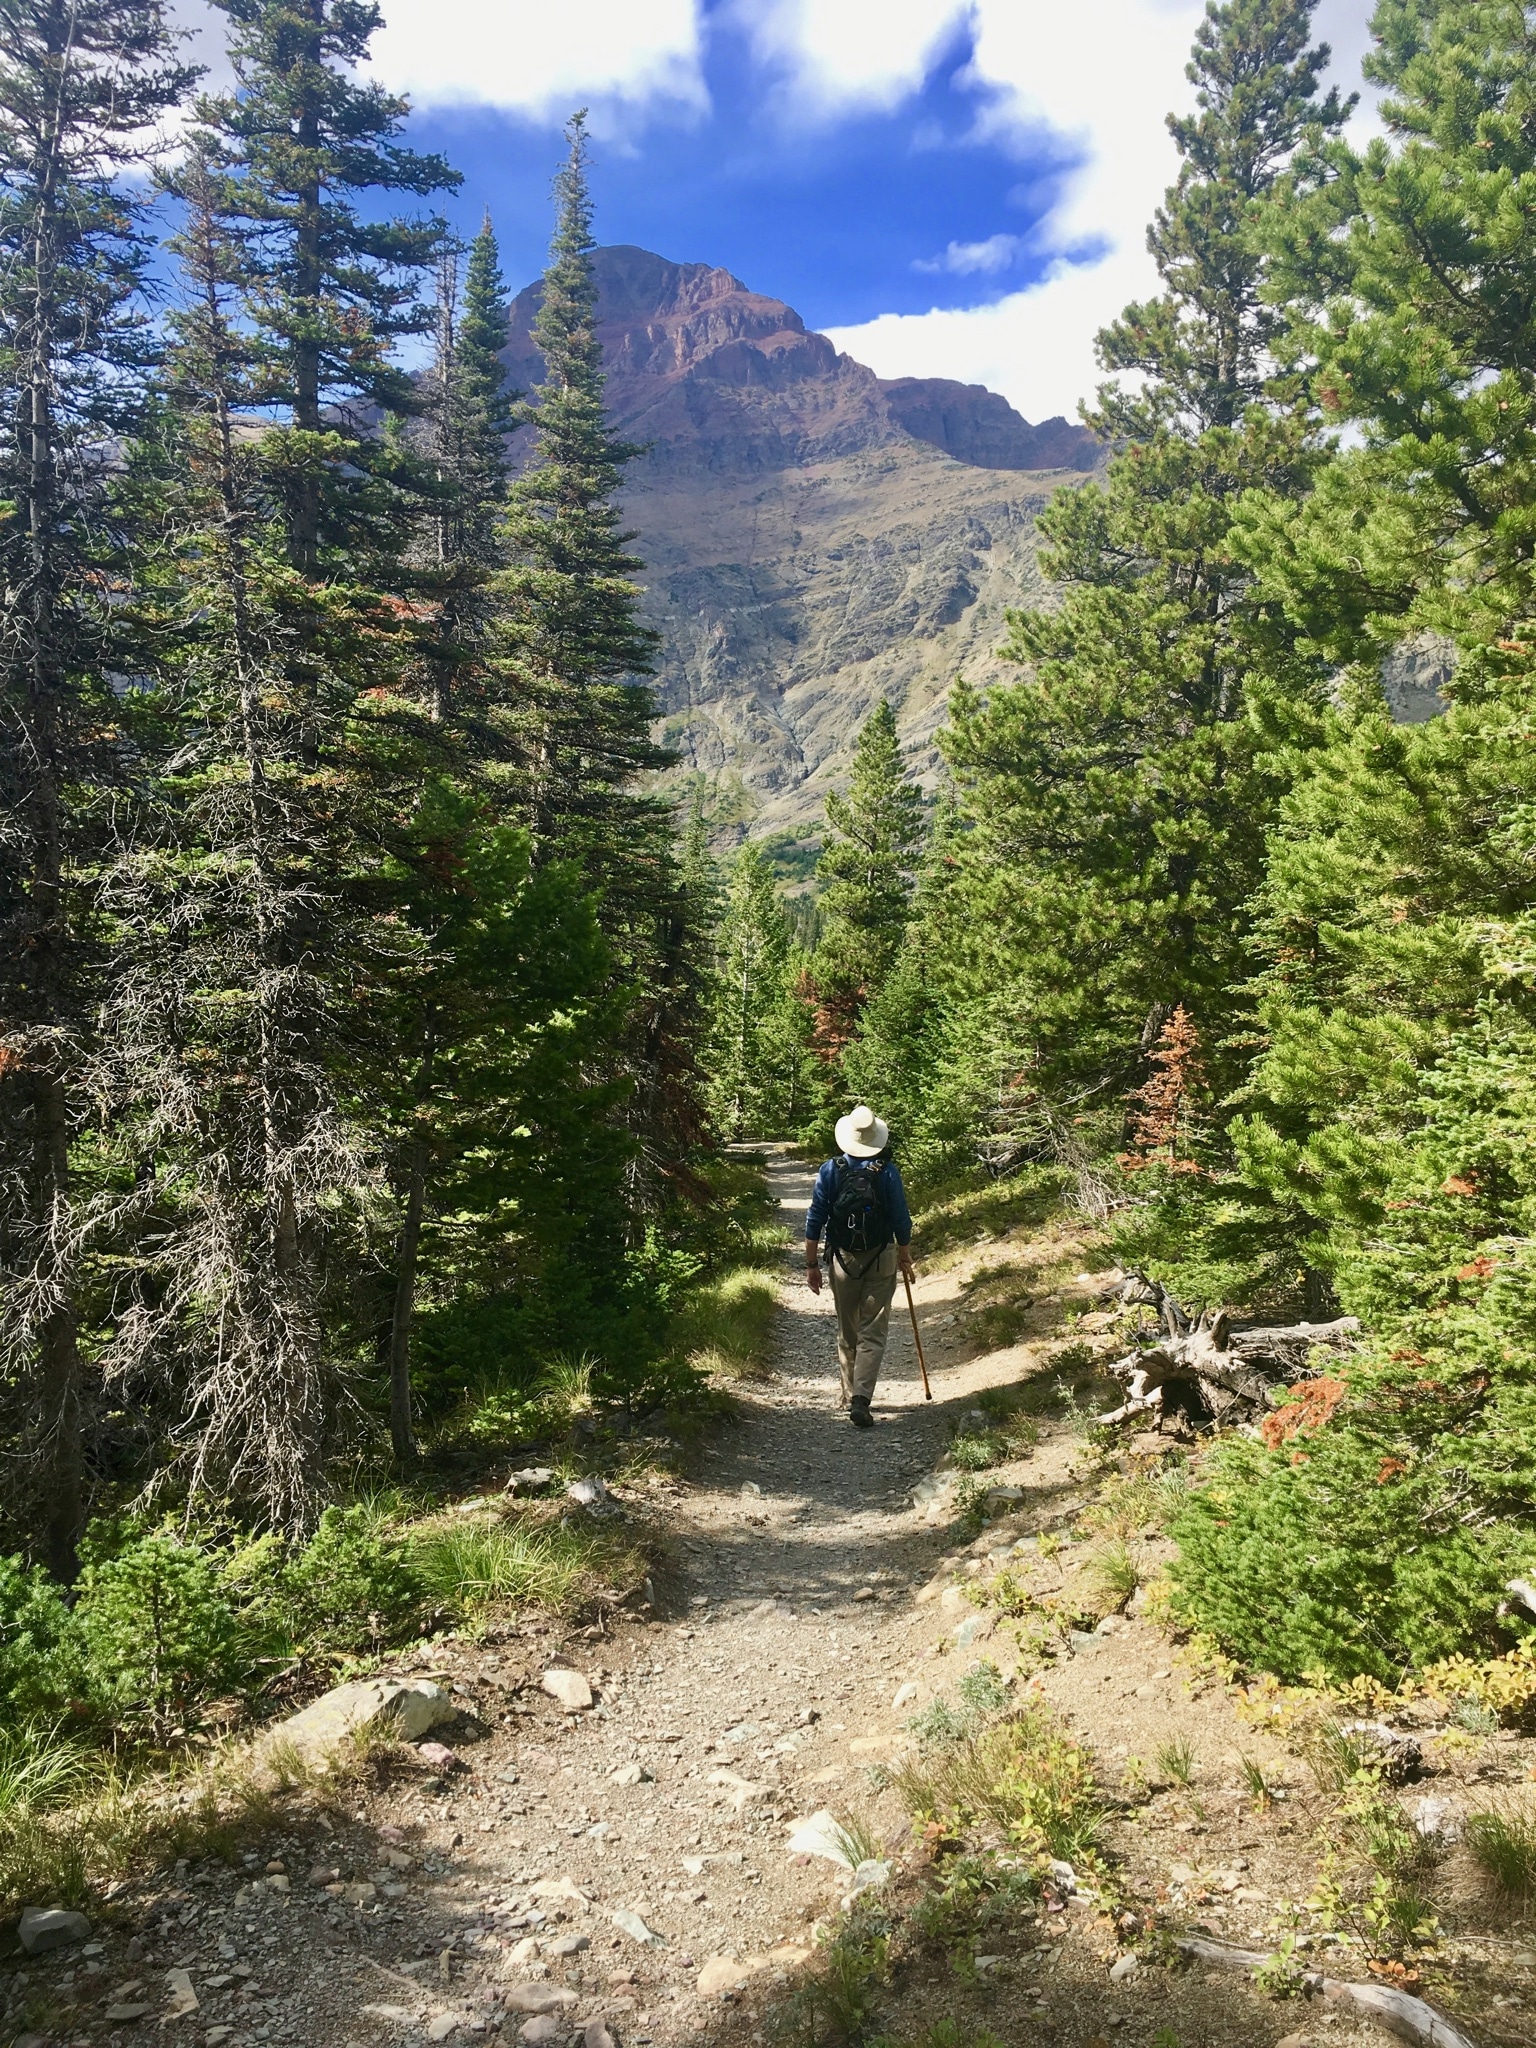
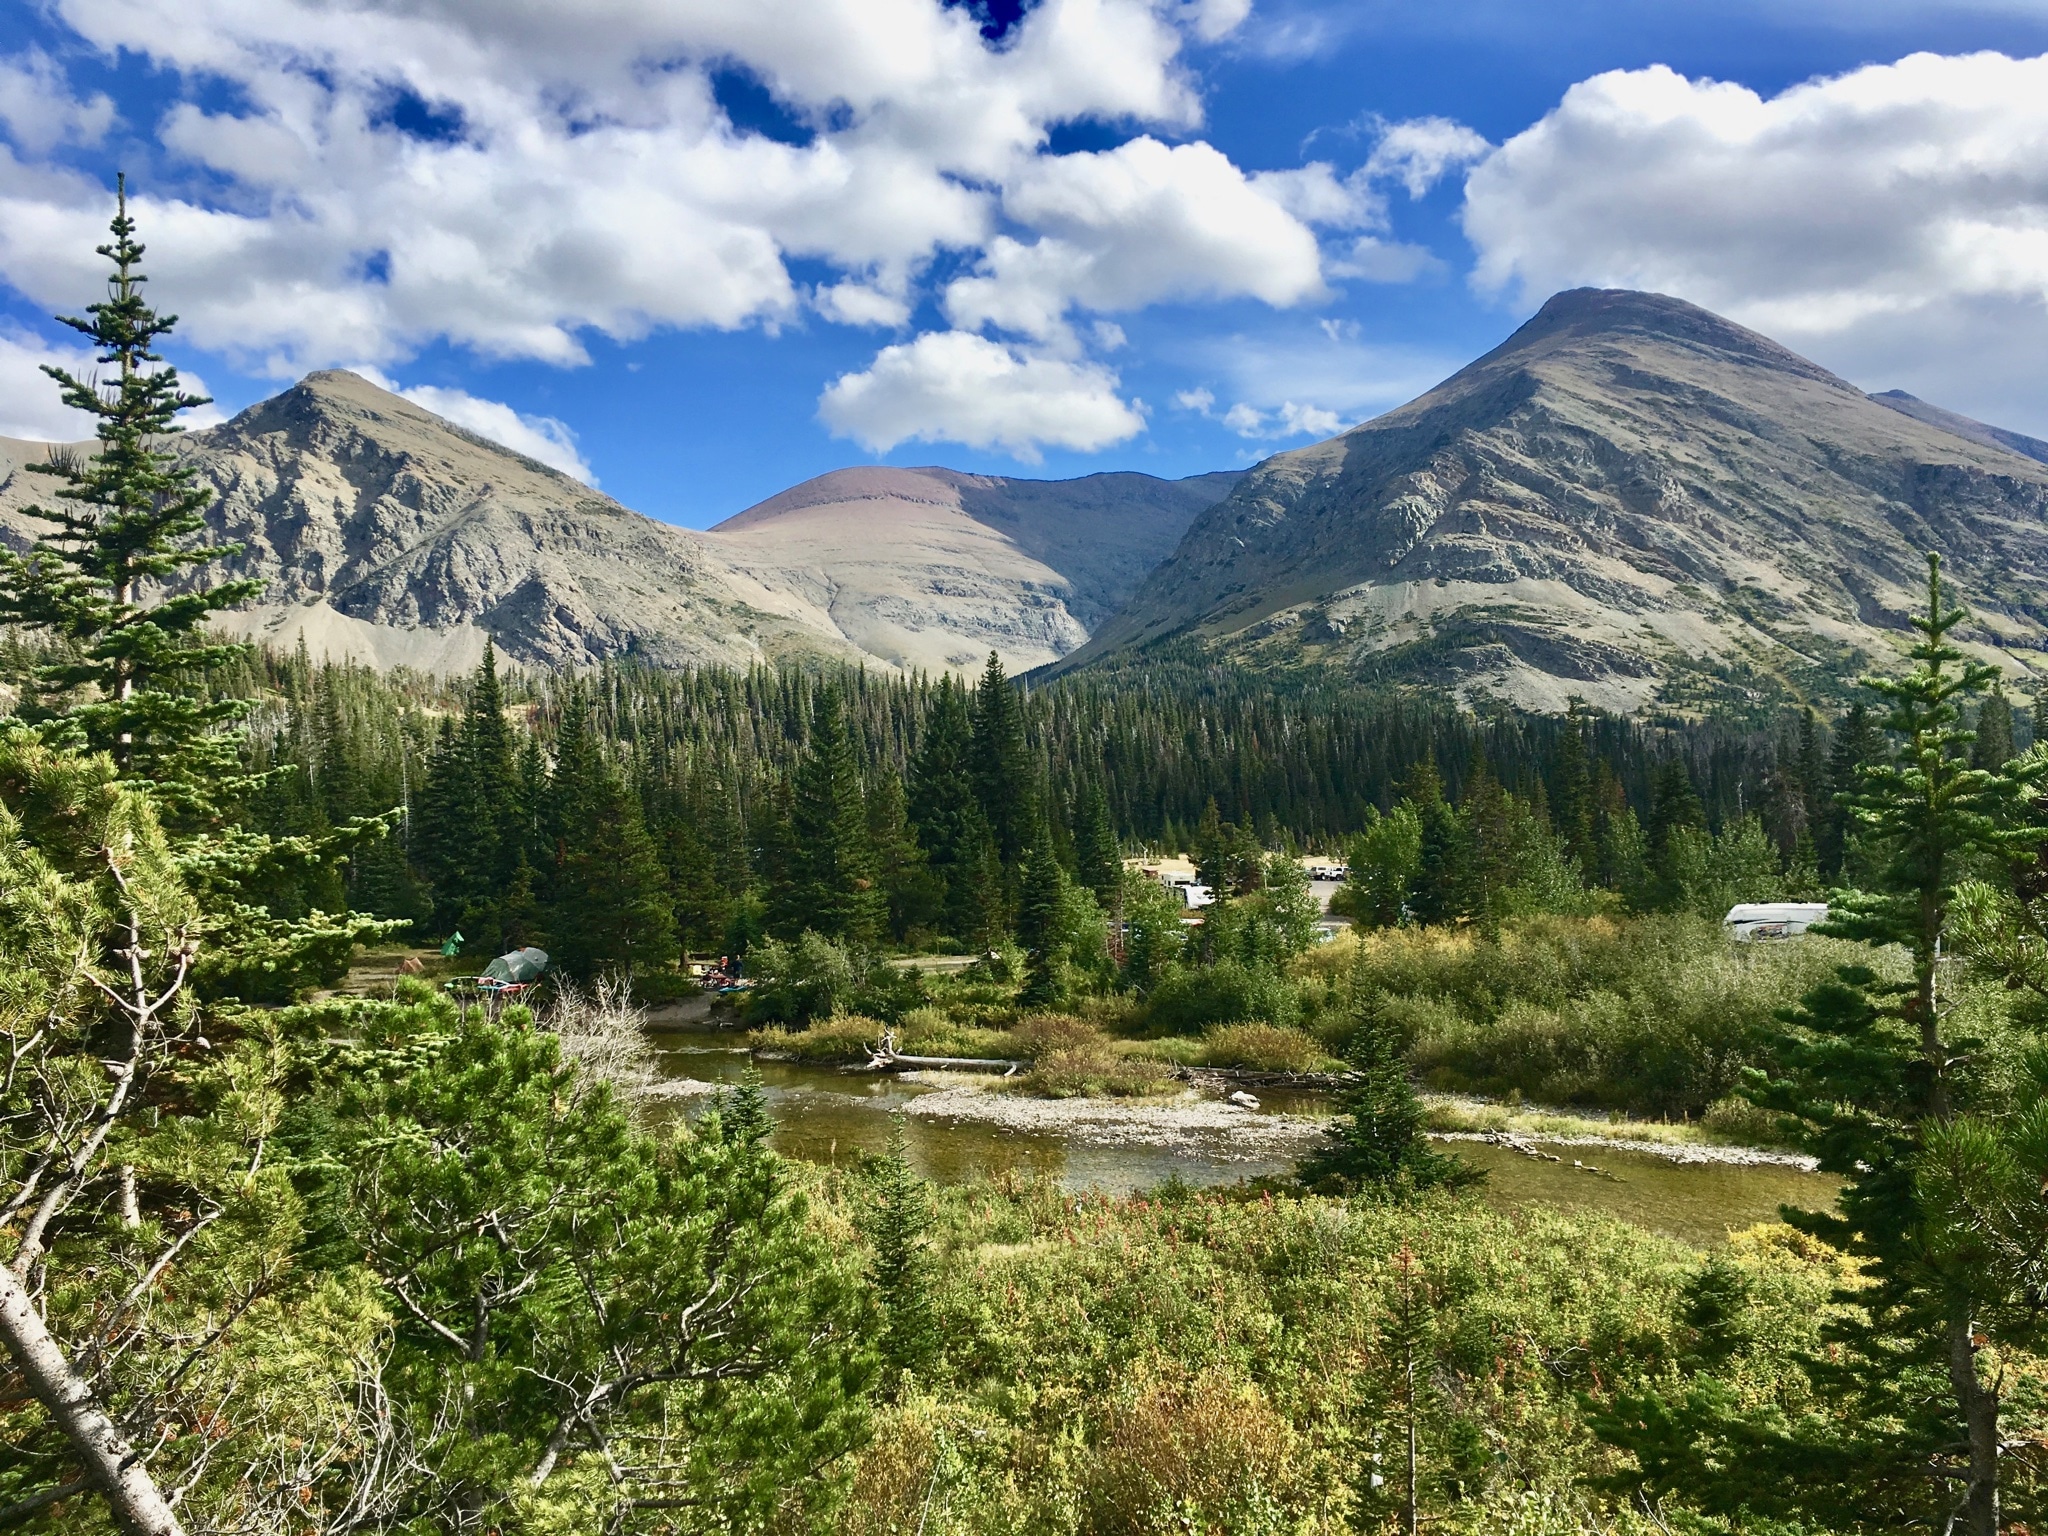
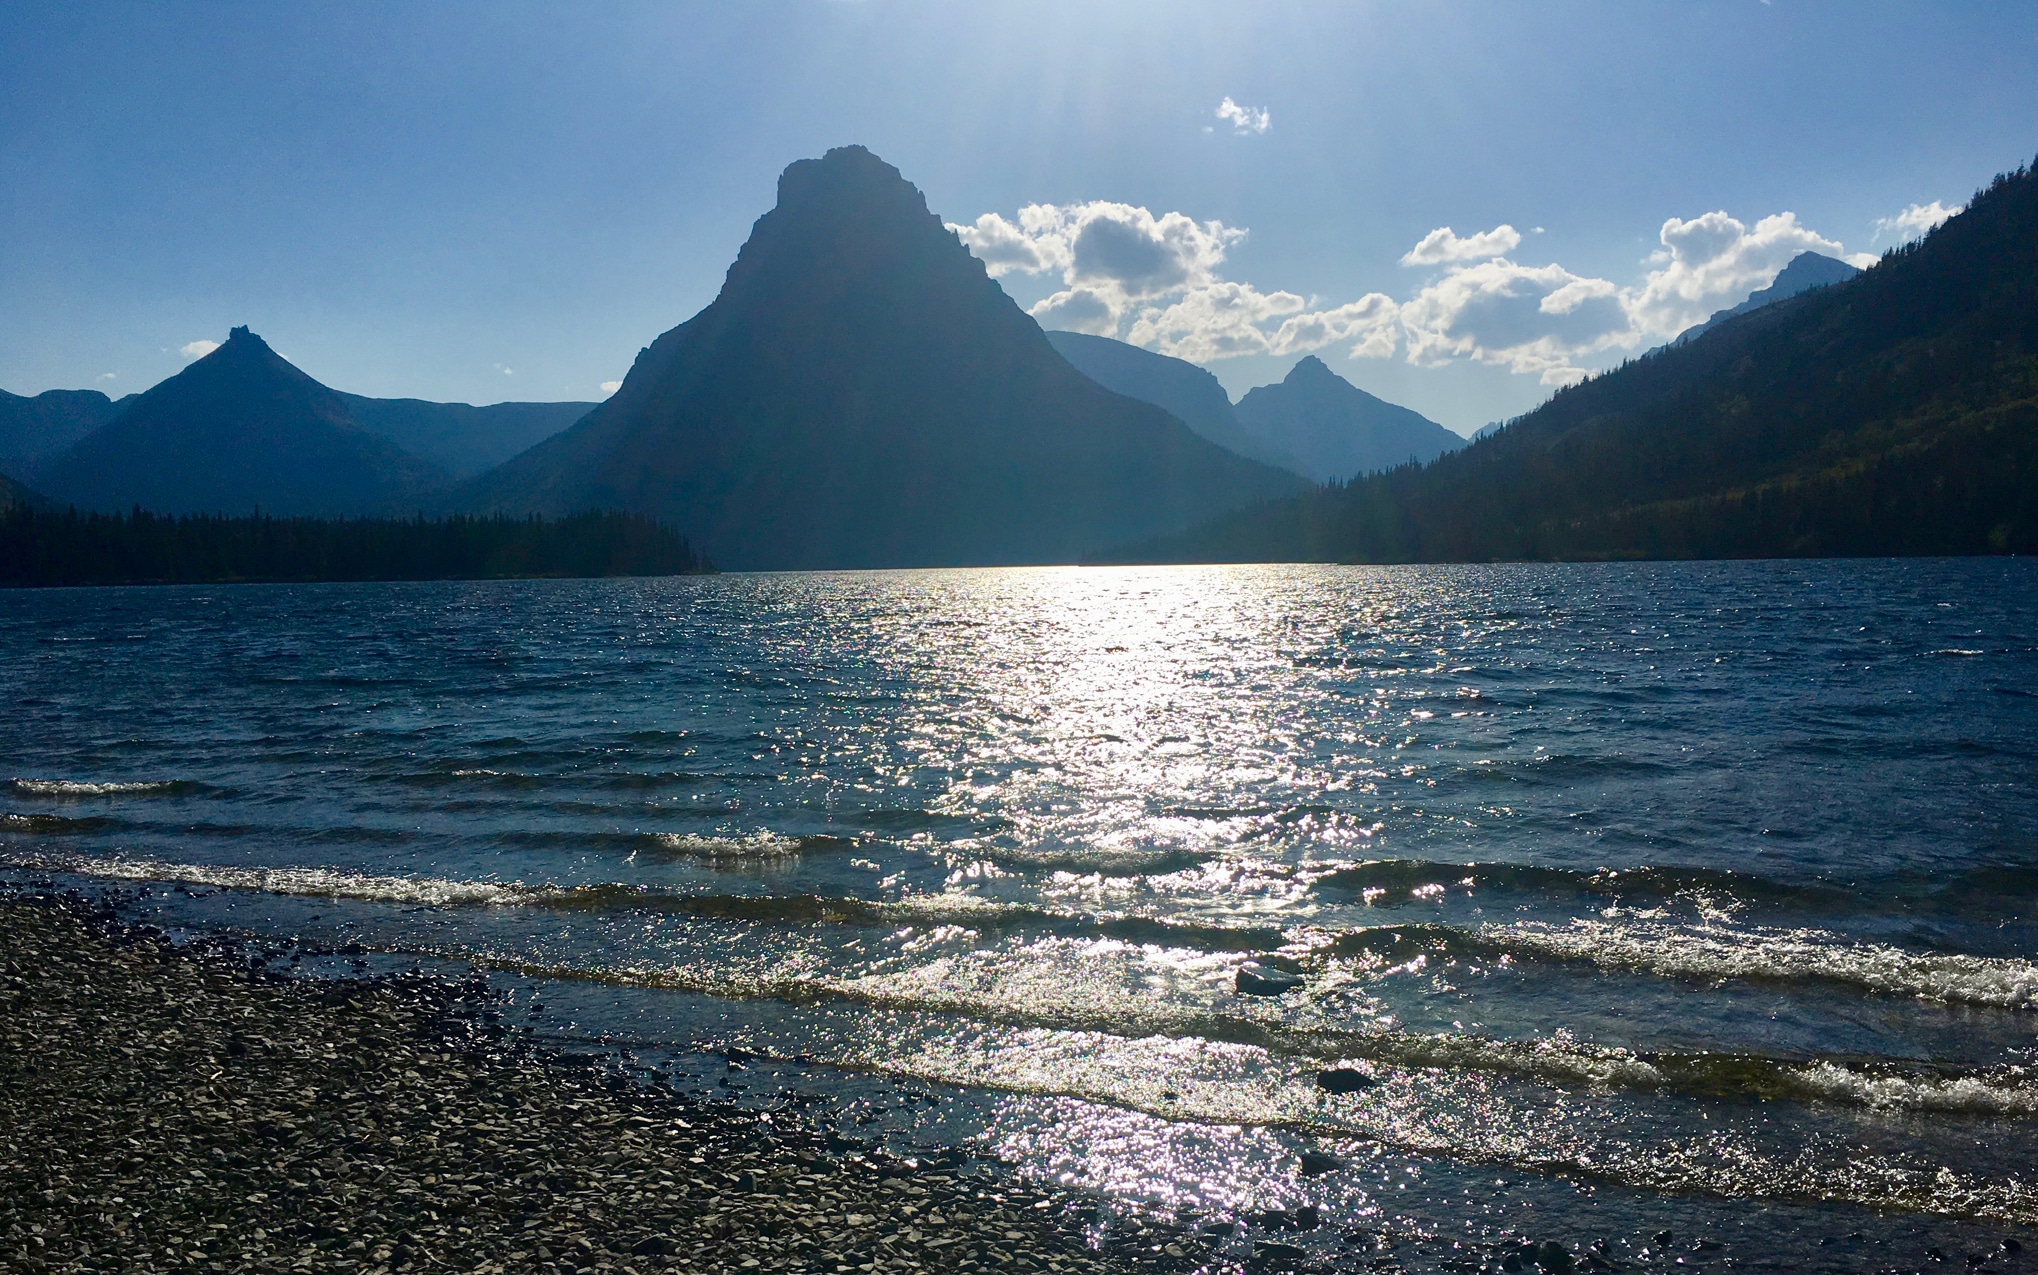
It is smart to check the park website as often as possible, the campgrounds fill up fast; Two Medicine Campground and vicinity: The lighting changes dramatically minute by minute, and the mountains are either shadowed or lit up brightly. It is really hard to get good pics due to the variations....
1 point


.thumb.jpg.e34bf01ef7f7d5e99ad31856d45afbeb.jpg)


-
Recent Achievements
-
")


")


")


