Leaderboard


Popular Content
Showing content with the highest reputation on 08/15/2024 in Posts
-
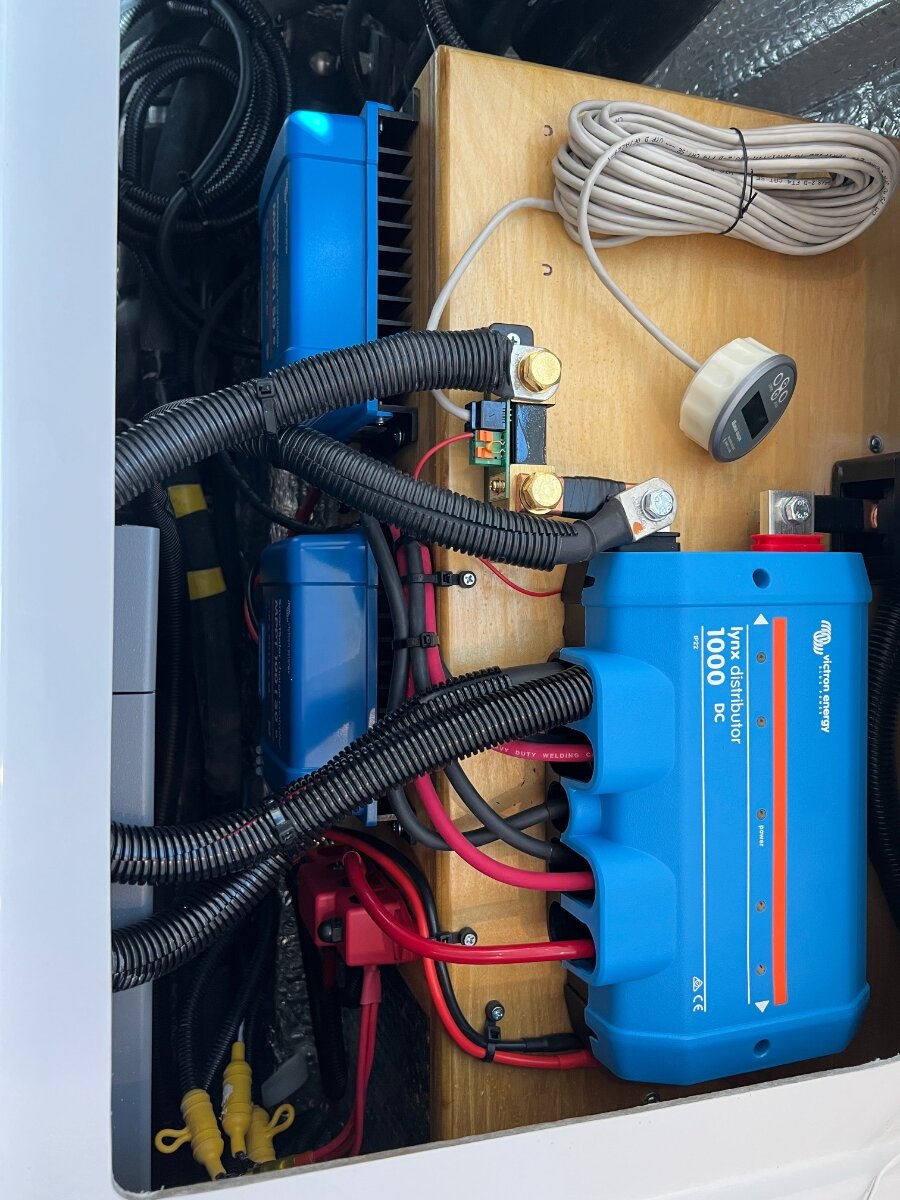
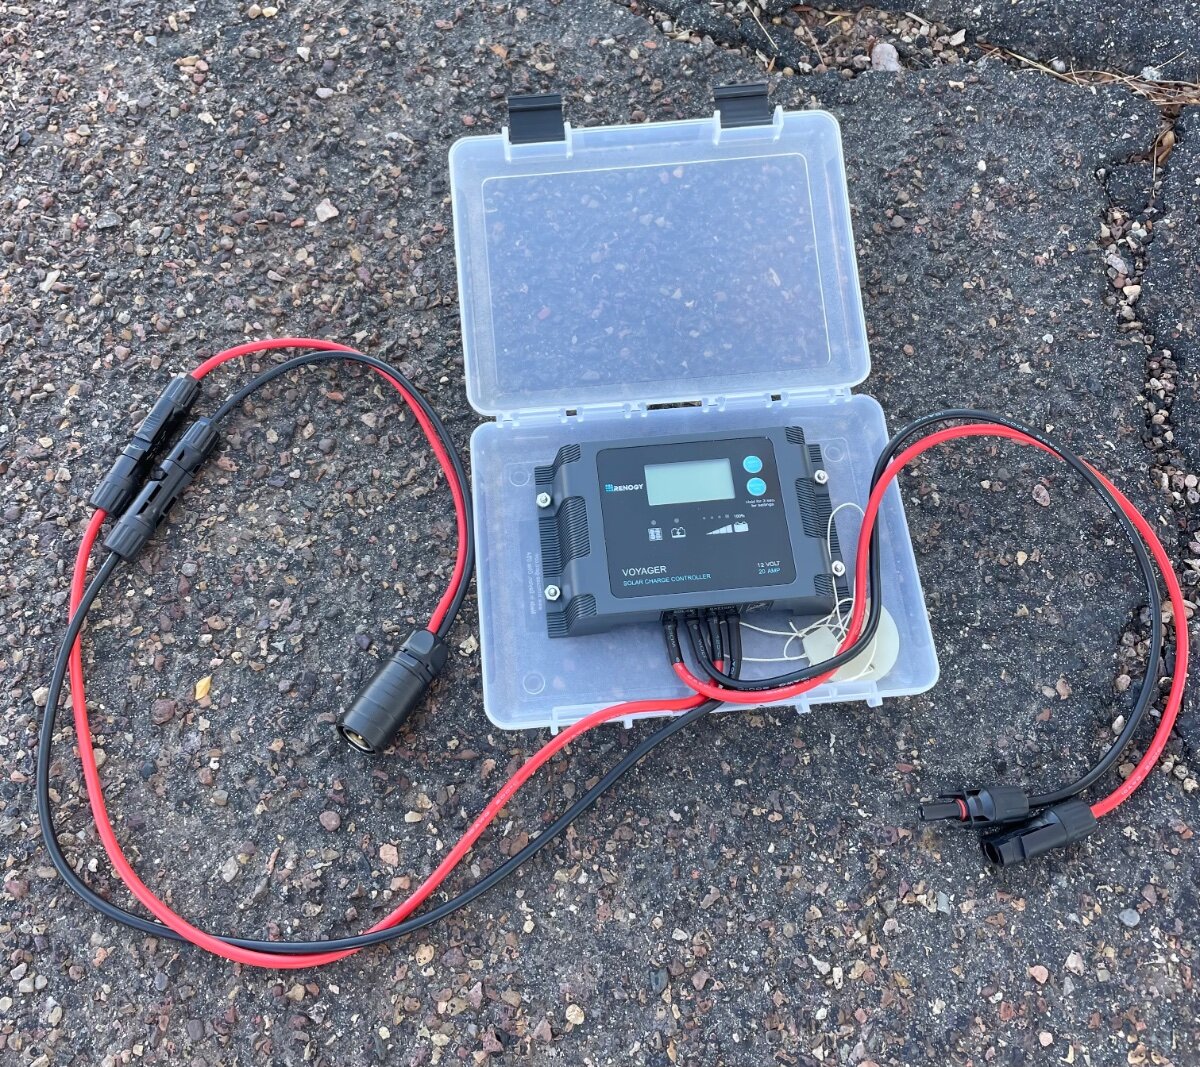
I have done some rather extensive mods to the electrical in my trailer. I have 2 SCCs that are both run through a Victron Lynx distributor. One SCC is for the roof solar (600 watts) and the second is fed from the zamp solar port on the side. The advantage of having the SCC in the trailer as opposed to on the solar panel is that you can run small gauge wires since the amperage is relatively low coming out of the panel. When panels are run in series the Amps aren’t ramped up until after the SCC. Using smaller gauge wire makes it easy to locate your portable panels away from the trailer which may be in the shade. I just use cheap landscape wire which is easy to roll up an store away.
 6 points
 -
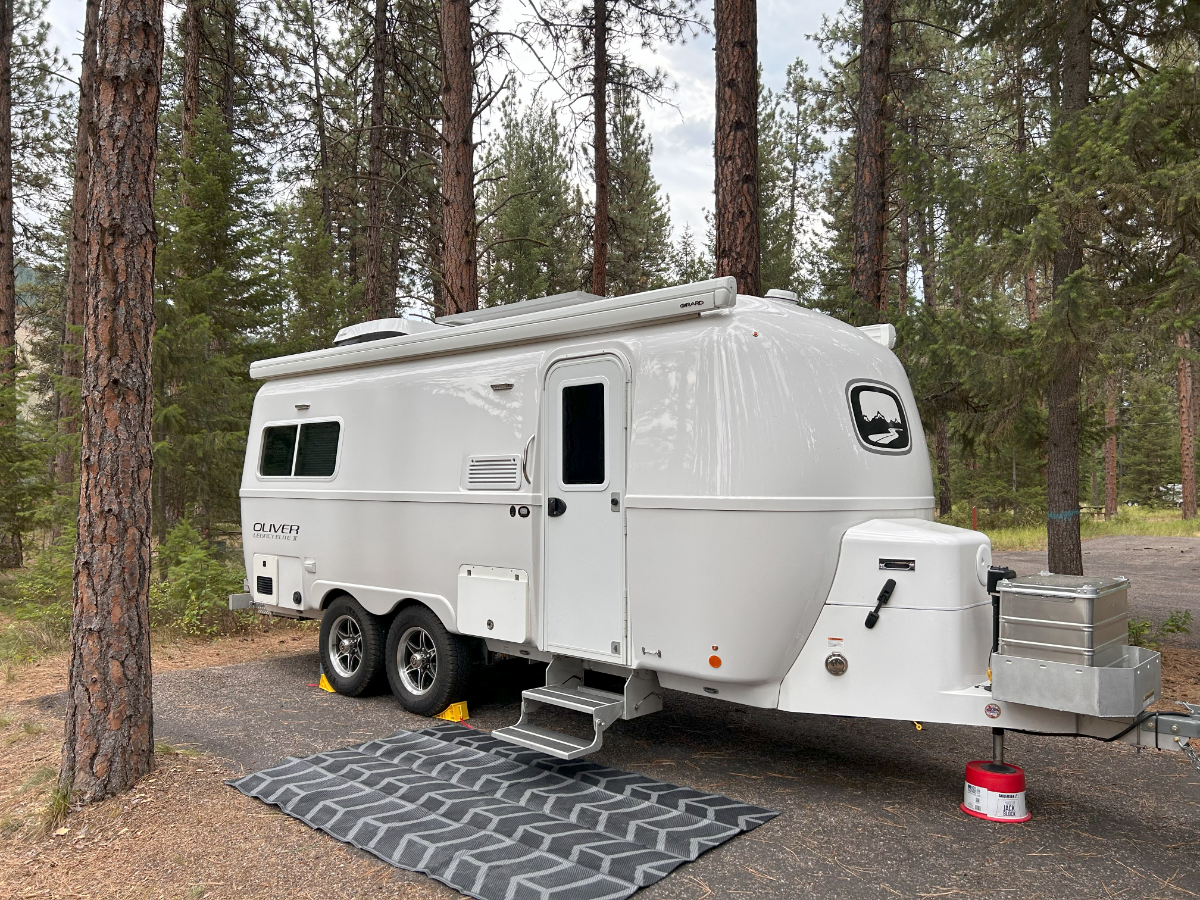
I have been on this forum for many years as my wife and I researched, learned, and awaited when it made sense for us to join the clan of Oliver ownership. First, I want to thank this group for all you have shared and knowledge over the years. My wife and I were introduced to Oliver a few years back. Like many of you once we saw the quality, community, and how Oliver conducts themselves we had a hardtime accepting anything we saw in other places. We have camped with our kids as they grew up and camped in many different ways including car camping, tent camping, yurt camping, popup camping, teardrop, and renting a few different types of TT. We thought it would be a few more years before we jump into Oliver ownership since we still have one at home for 2 more years. But all the stars aligned this summer and we decided to pull the trigger. We are now the owners of hull #1305 after working with @Snake River Idaho who were great to work with and had a wonderful trailer they had decided to part ways with (such great people to work with and a great reflection on the Oliver community). We just got home from a one-week trip to bring her back home. There is certainly a lot that goes into anyone making this decision. For us, we had heard stories on this forum about health issues making it hard or impossible to do things like this. We have also been personally close to a number of these stories with quite a few of them happening recently. So since we found ourselves in a place financially to do it we decided we were not going to wait any longer even though we have to account for a 3rd sleeper for 2 more years (which on the week trip home she did wonderfully on via the dinette setup each night). The trip home was wonderful. Despite spending a few years learning and researching, doing it for real still had me learning and trying to figure things out. We did have a few minor events on the trip home we had to figure out like the overly sensitive LP/CO2 sensor that woke us up in the middle of the night the first two nights. Or that leather cushions on fiberglass don't stay in place and slide right off (does anyone have a remedy for this?). But we got to experience things on the trip home we have always wanted to but never had before like Bannack State Park Ghost Town one of the most well-preserved ghost towns in Montana and a beautiful sunset in the middle of nowhere outside Dillion MT. Or the Atomic Museum (way cooler and more educational than my wife, I, or our girls expected) outside Arco Idaho along with Craters of the Moon (meeting up with some friends who just happened to be passing through). Not to mention and most importantly having some dedicated time with our youngest laughing, talking and playing games (she is in the final two years of High School and missing her older sisters so getting her away from all the teenage struggles and into a quiet place allowing her to connect with mom and dad and nature and history was wonderful!). We did the showering in the Oliver and I have to say it was easier than I thought. I am 6 foot 1 and while tight it worked great. We had a couple of nights when all our girls were able to come meet up with us and we spent those nights in the Ollie playing games, and eating dinner while watching the Olympics. I have to give a shout-out to @Foy_Mirna for his lagoon table as it was a major win for those nights being able to get all 5 of us around the table again (I expected it to feel more cramped with 5 in the trailer but it did not)! Towing the trailer was also a great experience. I am glad because my wife towed pretty much the entire trip given I was on a business trip the day before pick up and lost my wallet so no driver's license for me. We live in North Idaho so going up and down mountains will be a thing for us no matter what direction we head. It and the truck did great up and down passes, construction zones, and passing semi-trucks. We even had a day driving where we saw 20 MPH wind gusts and my wife did not even realize how windy it was until I told her. My wife did great (she even backed us into a camp spot on the last night and did great!). We head out on the next trip in a week and are very excited! Thanks for letting me learn and take part in this community over the last few years. We hope to see some of you on the road in the coming years.
5 points
-
Agree. I choose to allow my external shore power portable EMS take the “sacrificial” ⚡️spike, surge or lighting strike ⚡️vs replacing my Oliver onboard EMS several thousand miles from home potentially interrupting a planned trip. No overthink needed here. 🤔😄 Onward!5 points
-
The Hughes Watchdog EPO is a great unit. One thing to consider if you're also using a Hughes Autoformer is that the EPO unit should be installed downstream of the Autoformer. If not, when voltage drops to 104 volts the EPO will cut off power completely and and the Autoformer won't be able to do it's job of boosting voltage 10% and keeping it at a safe level. Ask me how I know!😄3 points
-
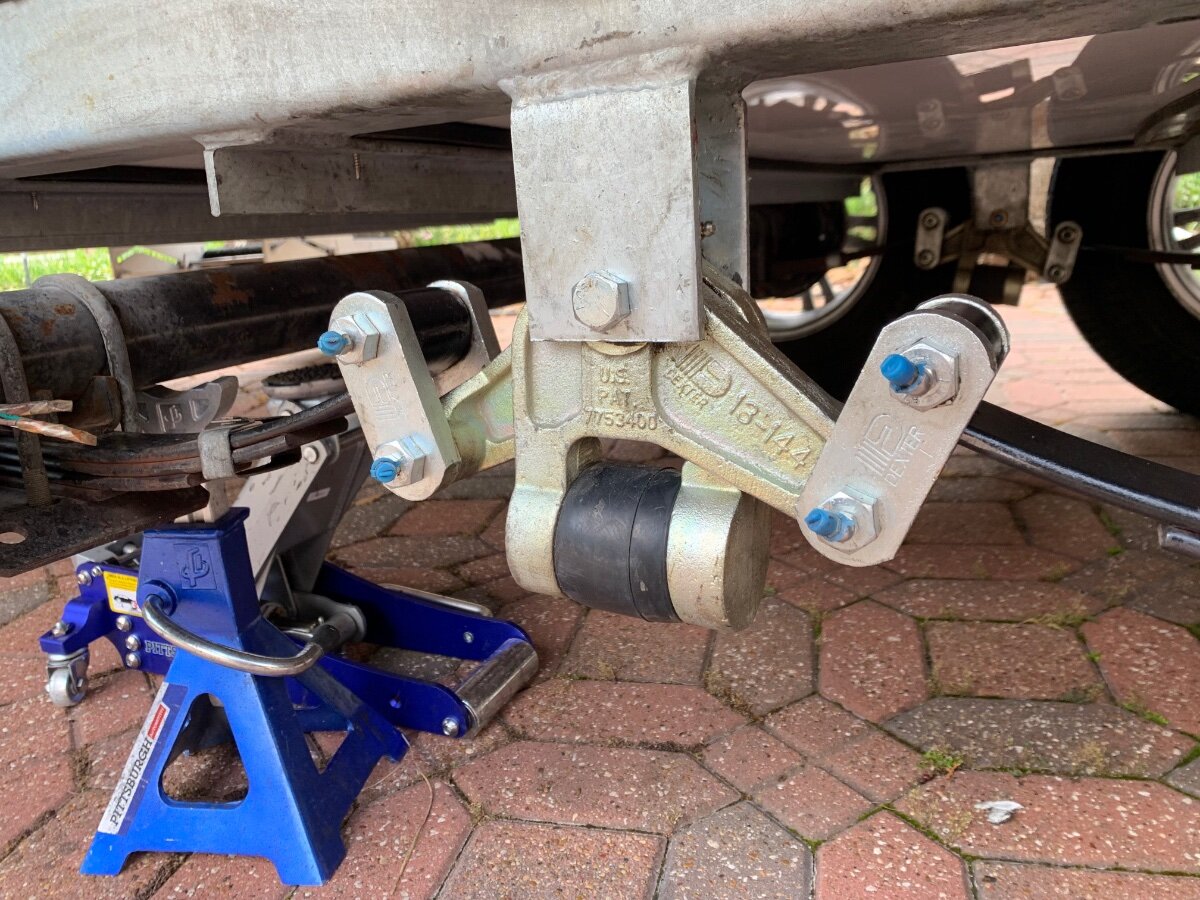
Q1 -- Oh boy! Maybe that's why the service department couldn't answer that question. This is good to know; I might need to buy 2 different tools as well as 2 different size replacement zerks. Grainger's will be on my to-do list. Q2 -- Thanks. I thought I should ask, since I've encountered a case where one threaded thing screwed into another threaded thing can be opposite hand. Since I don't have the tool to get them off, I used my caliper to measure the one front zerk, and took the caliper to the local hardware store. It was my lucky day! The hardware guy turns out to be a machinist. He thinks it's 8mm but suggested that I come by with the Oliver tomorrow morning, on my way south, and he will help me determine the size and thread, and find the right tool. Or tools. I do have caps I purchased, and they make a huge difference. Thanks for the photo too; I like the look of those 45 degree angled zerk fittings. I can imagine it's a LOT easier to get the grease gun fitting on there with those. Oh good -- thanks! I'm learning! Many thanks to all for the help. I'll be at the hardware tomorrow, but likely not in a place where I can work on the zerks until a few days later. I'll follow up from there.
3 points
-
That's nuts that Dexter would mix SAE and metric sizes on the same suspension, but Ron knows his stuff and has given you all the info you need. It could be that there was one size for the outers and another for the E-Z Flex on the inners which was an add-on component. I just took a look at mine and inner to outer Zerks appear somewhat different. Both took either a 5/16" (.3125") or 8mm (.3150") wrench, since they are close. All you need is an 8mm open-end/box-end combo wrench. Because of the bolt/wrench size you can't tell if the threads are metric or SAE without removing them. To buy extras, remove one at the end and one at the E-Z flex. I use brake line (aka flare nut) wrenches for these, because I have them. They are the safest for soft bleed nipples used in hydraulic brake systems and work well for Zerks too. Unnecessary, but this is a nice tool to have for $9 for the two most common sizes today: Utoolmart Flare Nut Wrench, 8mm x 10mm Metric Double Open End, 1Pcs - Amazon.com3 points
-
If the Xantrex inverter is turned on and the trailer is connected to shore power, the inverter will kick in if shore power goes out. There's even a setting in the Xantrex that controls the delay before power transfers to the inverter. I learned this while researching the various settings. It could be very useful for people with critical electrical equipment.3 points
-
I've given this installation some thought, since it is on my radar to add one soon, now that I've upgraded to 600AH LiFePO4 with only 340W rooftop solar. @FLYnGATOR If you need time to do this right, maybe the alligator clips will work for this trip. You could connect them in a way sneaking the end connector outside the door, allowing the door to be locked for your trip. For the permanent installation, you could go "through the battery hatch." However, this way the wires would need length to open/close the door and would forever be in the way every time you open the hatch. Instead, you could drill into the body below the battery bay (this my plan), either left or right of the battery bay, depending on the nearest location to your internal OTT installed buses, in the basement opening under the streetside bed or rear dinette hatch (see pictures). Your much newer hull will look somewhat different, but you will have OTT OEM positive and negative buses to wire the red/black. The first picture shows the positive B+ bus (6 AWG red wires in and note the three yellow fuses that power the stabilizer jacks). Connect the red wire of the Zamp connector here. The wires from the Zamp connector do NOT have to be wired directly to the batteries! I would crimp a large eyelet and (on mine) piggyback mount it to the large bolt center of picture, left of the breaker. The cable coming in from the right comes from the batteries, goes through the breaker to the B+ bus. The cable leaving the left side powers the 12VDC fuse panel. This is an excellent mount, no extra wires in the battery bay and no weather on your connections. For the black wire, connect it to the B- bus. In our hull OTT uses all yellow-colored cables. The second picture show this bus. Note the large 6 AWG yellow cable coming from the left. This comes from my main battery connection. You can mount the black wire anywhere on this bus, but on mine, I would pick the empty slot right at this large cable for least resistance. In our hull the positive B+ bus is under the streetside bed. So, I will find a good entry point behind and below the battery bay. When I decide on location, I will drill an 1/8" hole from the inside and then go outside and drill the larger hole required. This allows for best positioning. Our B- terminal is under the rear dinette seat, so I will add length to that wire for sure. Use 10 AWG wire for any extensions, color doesn't really matter as long as you keep +/- polarity correct. You could even switch the polarity it you do not want to use the Zamp/SAE reversing connector, but they do that so when unplugged it's more difficult to touch the B+. I might switch mine, to go without, since the exterior terminal has a protection cap anyway (warning! only do this if you have some electrical background). For the exterior install of the Zamp terminal, I suggest drilling ONLY ONE main hole for the wires to pass through alone. I would NOT drill any of the 4 1/8" mounting holes for the screws which have a tendency to crack from use, being so close to the main hole, and from age. Use 3M VHB 4950 tape instead. Cut it into shape to cover the complete mounting flange. Use rubbing alcohol (90% pure preferred) on all matting surfaces. Some owners would not like the look of the 4 screw holes without little shiny chromed screws showing. Instead, you would see 1/8" white tape behind the openings. I suggest after installation, use a fine tip black Sharpy on the tape showing after installation so they better blend in. The cheap screws will cause rust over time. You could replace the screws with SS screws, but the cracking issues would still be present. IMHO, it's just a cleaner installation, and I promise the 3M VHB is stronger than screw mounted. It also creates a tight water seal, given the tape is properly applied around the full circumference. I plan to add a suitcase WITHOUT built-in solar controllers and run the Zamp port to a main internal SC, managing the suitcase AND the roof-mounted panels together. This will likely require me to upgrade the current 25A SC to a Victron 50A SC, but as you can learn from the movie, it has advantages. Another thought I had was to remove the RV-park cable TV port by the streetside rear bumper, using that hole instead of drilling another. We never use this connection, and the rear location makes very good sense in ease of access to the sun in 3 directions with shorter cables. I hope I gave you and other Forum Members a lot to think about in working this upgrade! Thanks to @rich.dev! The move he supplied above was very helpful in my thinking this through completely. The guy on the movie sure is a geek, though he demonstrates 8 configuration options nicely. 😂
3 points
-
Took Ollie on a local camping trip to Bandit's Roost ACE NC for a test camping trip with the new tow vehicle. The rig is working great! 🙂3 points
-
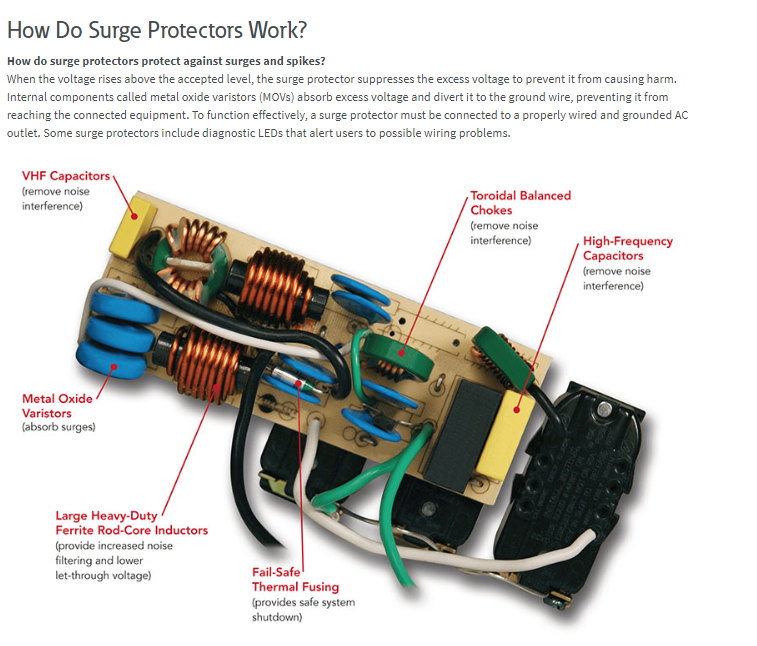
Full credit to the Eaton Corporation for the below graphic. My post addresses a bit of the technical side as to why some owners like double protection and use an additional surge protector at the utility source. As indicated in the Eaton Corporation graphic, there are six components in better surge protectors designed for RV use. Most of them act as filters to block noise and surges. One, the Metal Oxide Varistors (Blue disks below) work differently. They actually absorb voltage spikes. And they do it very well. However, over time they take a lot of "hits" and in the process of absorbing the excess energy they degrade. As they degrade their effectiveness declines. These components generally are not serviceable. So if a spike gets absorbed by a surge protector at the pole, it extends the life of the much more expensive surge protector in our trailers. Additionally, the Metal Oxide Varistors in any surge protector can only absorb a limited amount. Lets say that your camp ground has a tremendous spike heading your way. The Chokes and Inductors of your power pole will "knock down" the spike as much as they can. What gets by then hits the surge protector in the trailer. This one knocks the spike down further. It also gives us an error code that we can see inside the trailer allowing us to take action (hopefully) before the next spike hits us. As is evident, it is for sure belts AND suspenders, and for many locations is highly recommended. Hope this helps, GJ
3 points
-
I think either of your two options is acceptable and I have used both methods on different trailers. With two separate charge controllers you get less expense and system redundancy in case one solar system goes down. I suppose you could argue that using only one charge controller would be a “cleaner” installation, I don’t really think so however. One other thing to consider, if you run only one charge controller, solar panel outputs need to be very similar or you won’t get full charging from the higher power panels. There are great videos available on YouTube explaining mismatched solar panels. Happy Trails.2 points
-
I am trying to take everything in to account for the change. Atmos AC was installed mid July and cabin humidity never was outside the 40-60% range until I installed the fridge and closed the vents. Ambient humidity was 89% last night. Cabin humidity drops to 40-60% during the day. I will start experimenting, I suspect the balancing act of fresh air, AC usage and a dehumidifier maybe will just be different than before. I had the same setup for almost 7 Years and did not have to think about anything. I have made a lot of changes so I will have to make some adjustments.2 points
-
Thanks. This picture says it all, a few cans of Parts Cleaner are introduced to my suspension friends!
2 points
-
The top 3 portable EMS surge protectors are Southwire Surge Guard, Hughes Watchdog EPO, and Progressive. I can only speak for the Hughes Watchdog. It has the EPO feature which will shut off power to the trailer if there is an issue, and turn back on when all is well at the post. It also has Bluetooth so you can see the current status. https://rvelectricity.com/2018/09/23/rvelectricity-can-i-add-a-second-surge-protector/2 points
-
Thanks @FLYnGATOR for getting me thinking of this now. I've had the beds out for weeks now, doing my inverter install, so why not install the exterior solar port now and buy my solar suitcase anytime. The port and wiring are small $$$. Reading all this, you are very likely to use the alligator clips for your upcoming trip because you want to take time to think through your permanent installation. I read some old posts searching for 'Zamp' and 'SAE' and 'polarity' and found a post from @johnwen regarding replacing the (cheap quality) Zamp port with an Anderson Powerpole connector: External Zamp connector - General Discussion - Oliver Owner Forums (olivertraveltrailers.com) Note his comment on how OTT installed this NOT being wired directly to the batteries as I had suggested above. Thanks John, for these connectors look to provide a more secure connection. I found this quickly on Amazon, but it was not easy to find authentic Anderson products: Amazon.com: Powerwerx PanelPole1, Panel Mount Housing for a Single Anderson Powerpole Connector with a Weather Tight Cover : Patio, Lawn & Garden Also looked further into my idea on using the rear TV cable opening (see pic). I'm going this way for sure, no drilling into the side body. Will run 10 AWG wires under the rear trunk floor, follow the sewer pipe up to the B+ and further to the B- buses. I may have to drill the main hole a bit larger. FYI, the square cable TV terminal is 2x2" and the 4 screw holes are in a 1 3/4" diameter. This cable and the port above are likely all I will need to connect panels that do not have the built-in SC, but I'll wait on the cable until purchase of the suitcase of choice to determine the proper connector. Amazon.com: OCHIKI 20FT 10AWG Solar Panel Extension Cable Fit for Anderson Adapter, Waterproof Female and Male Solar Connector, Solar Charging Cable Wire for Portable Power Station Solar Generators : Patio, Lawn & Garden With a 20 ft 10 AWG cable you can position the suitcase easily to the curb or streetside or to the rear. Thanks again. I'll make a new post when I work my actual install.2 points
-
Mike Sokol would be a great addition for the Annual Oliver Rally speaking on topics we all run into. He is big on Southwires Surge Guard, but has stated that Hughes Watchdog EMS with EPO and the Progressive are all great portable EMS surge protectors. I get Mike's daily newsletter, access to his many articles, and I follow his Facebook site.2 points
-
That's the way to do it. And when you're looking to purchase a surge protector there are two things you should be must concerned with- the "joules" rating which is how much energy it can absorb before failure (the higher the number the better) and how easy it is to replace the surge unit when it is all used up and fails. Some are user replaceable, some need to be sent back to the manufacturer, and some are throw away.2 points
-
@Boudicca908 Alternatively, one can take their zerks to most any hardware store and use a convenient thread gauge (SAE/Metric) to determine thread size, then order online or purchase at a retail store exactly what is needed. Grainger’s offers stainless steel zerks and protective caps; no worry of rust and corrosions, or road grime with the two. As a side note, once the thread size is determined also get a matching nut to ‘thread test’ the other zerks as removed; if the nut doesn’t easily thread on then a different thread size zerk will be needed in that instance.
2 points
-
Amazon has scores of surge protectors to choose from. And as apparent from the above posts, each owner has their concerns in mind for their use. So, for a pedestal power pole used as a supplemental protection, my concern is spikes and RF noise. Not sustained voltages beyond standard as MountainOliver sadly experienced. For the purpose of voltage noise and spikes, having a plug-in type with lots of joules capacity is the goal. Keeping it light, simple and inexpensive is the idea from my minimalist perspective. If those are your goals, then this one seems to fit bill and costs a LOT less than most others at the 8,000+ joules rating:
2 points
-
I do the same with the exact same tester. Once I know the plug is wired correctly I plug in and trust the onboard surge protector made by the same company.2 points
-
So far I've made it my practice to test the plug prior to connecting the camper and rely on the onboard progressive unit to do it's job. I can see the interest some have in protecting the hard wired device, and have purchased a portable device but just haven't put it to use. I purchased a Progressive Industries circuit tester before getting the Oliver. I leave it in the same tote that I store the shore power cord in. Step one - Test the power supply. Step two - If good, drag out the cord and connect. Circuit Tester
2 points
-
I concur with StillGame. I carry a 30A PowerWatchdog unit, which I plug into the campsite pedestal, then connect a 30A power cord to the PowerWatchdog. It saved me once from a bad power connection at the pedestal. Cheaper and easier to replace, if necessary, than the onboard EMS.
2 points
-
I experienced an issue with the factory installed surge protector that damaged my compressor fridge control board. A couple of years ago we were in a campground which was experiencing extreme voltage spikes. The voltage was spiking to nearly 200 volts then dropping back to a normal 120ish then several minutes later spiking back to near 200. We were not at the camper during much of this and as soon as I realized what was happening I disconnected from shore power and operated on 12 volts for the rest of our stay. The problem is that the surge protector interrupts the incoming power but then reconnects the power. This situation is both good and bad. It’s good because it automatically reconnects the power somewhat seamlessly. The bad is because it reconnects power somewhat seamlessly. By the power turning off and on fairly rapidly the compressor control board was rapidly and repeatedly switching between DC and AC supply. Be aware that some electrical or electronic equipment can be damaged by repeated on/off cycles. So, based on this one probably rare occurrence I might be inclined to search for an additional layer of protection. I am leaning towards a boost transformer based product like the 30 amp Hughes surge protector. The boost transformer will increase the voltage if it sags and will absorb the voltage if it increases too much along with the normal surge absorbing solid state devices. I’m still looking into this option as there may be other alternatives out there that are better. Anyway, just a thought. As a side note: I contacted the Progressive Industries folks with a question about the large difference between the amp reading on the remote readout and my clamp meter. They didn’t know the answer nor did they really care to try to figure it out but, they sent me both of the internal circuit boards and the sensor coil. Basically all of the internals of the surge protector free no questions asked. I did tell them that the unit is seven years old but that didn’t seem to matter. So even after seven years they still sent out free parts to rebuild the surge protector……not bad.2 points
-
One more consideration. Replacing an external unit is a lot easier than the cost and time to replace the onboard unit.2 points
-
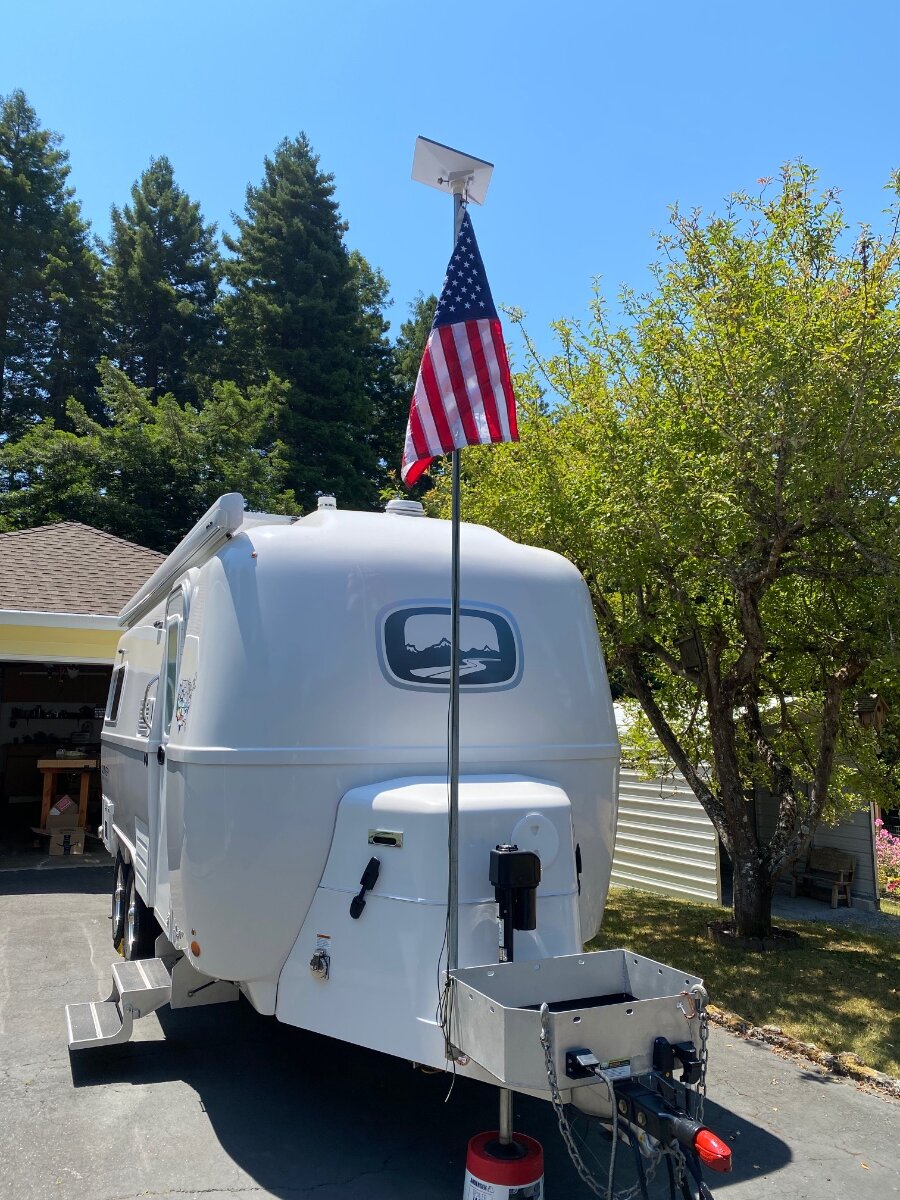
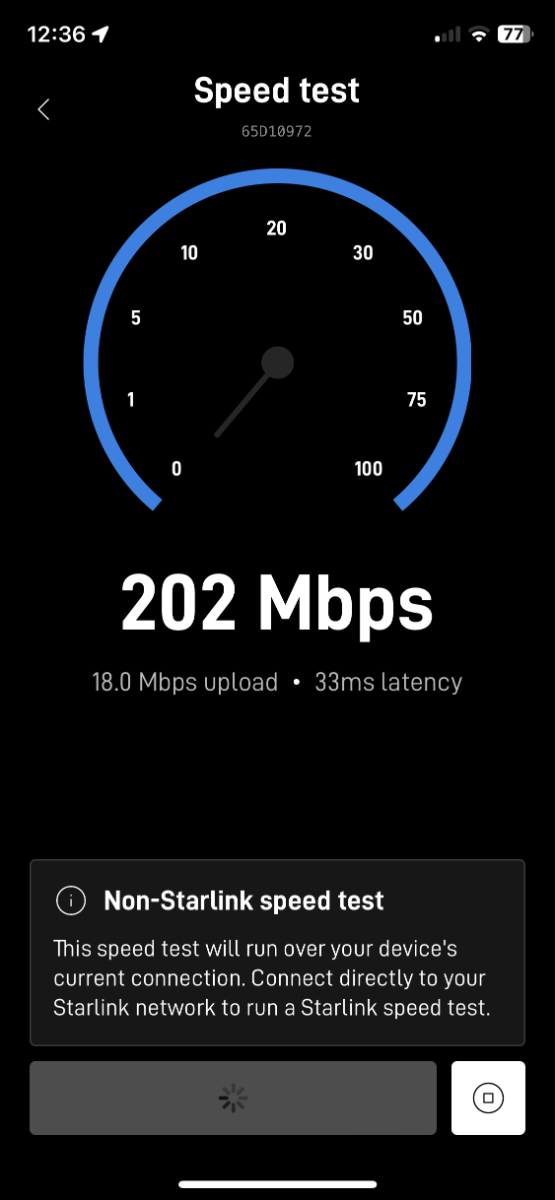
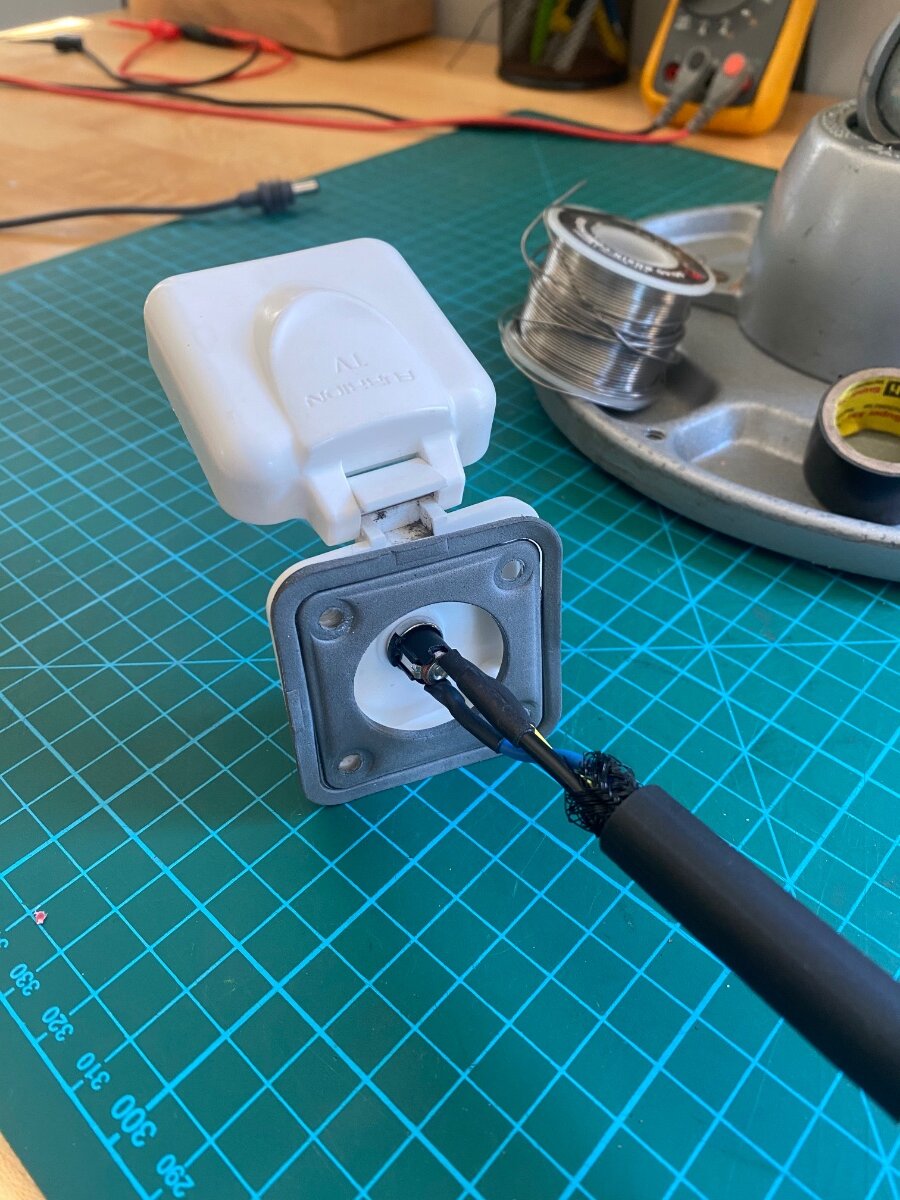
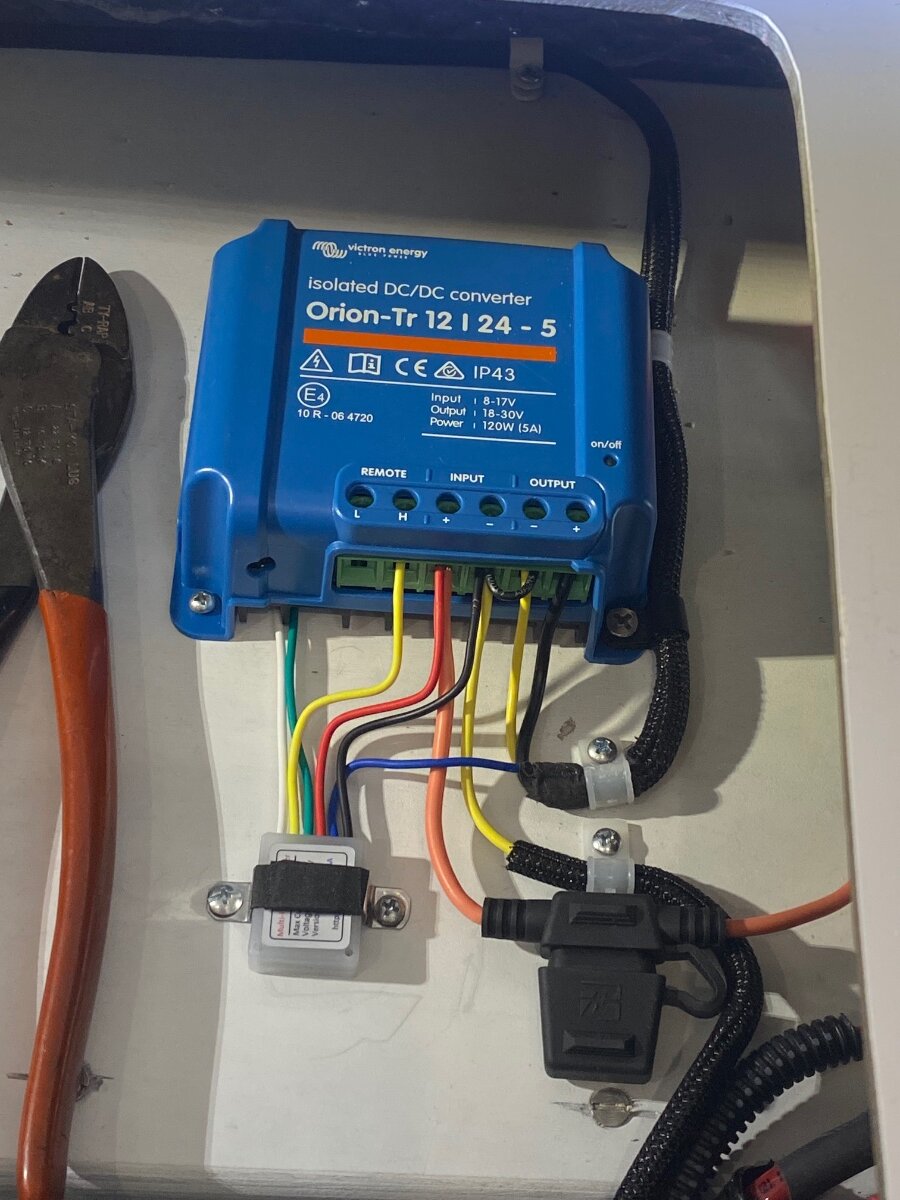
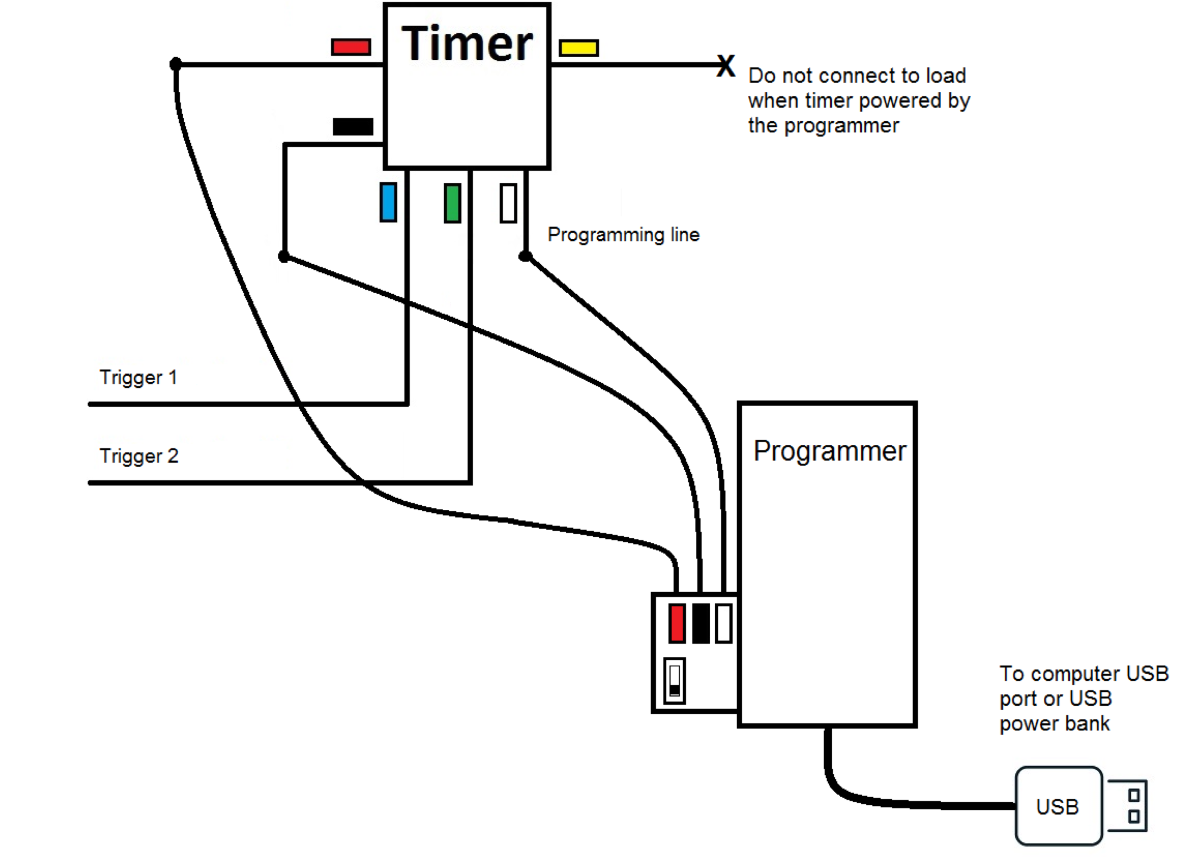
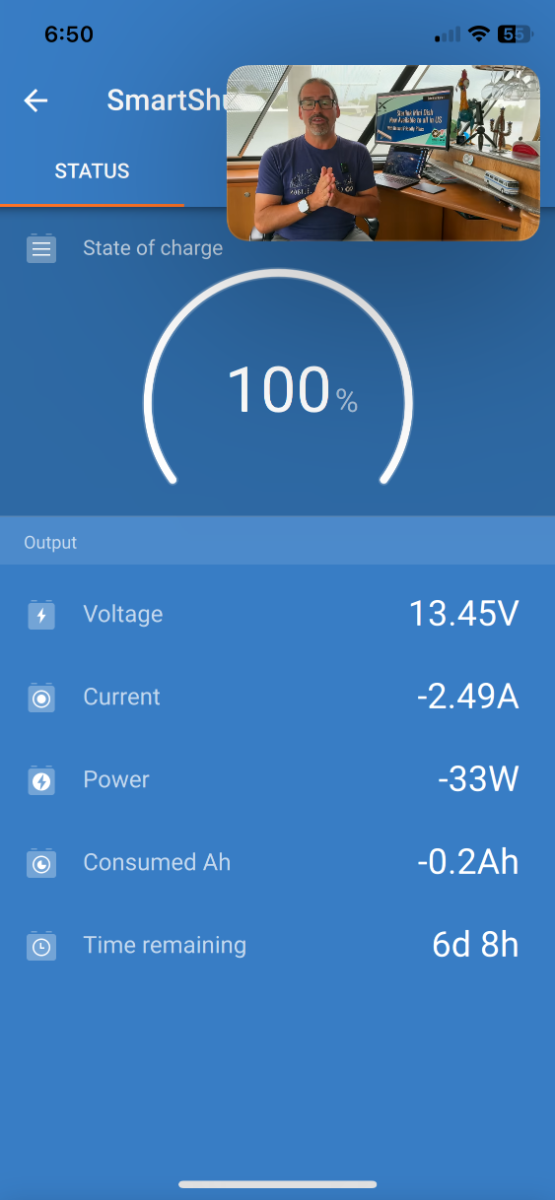
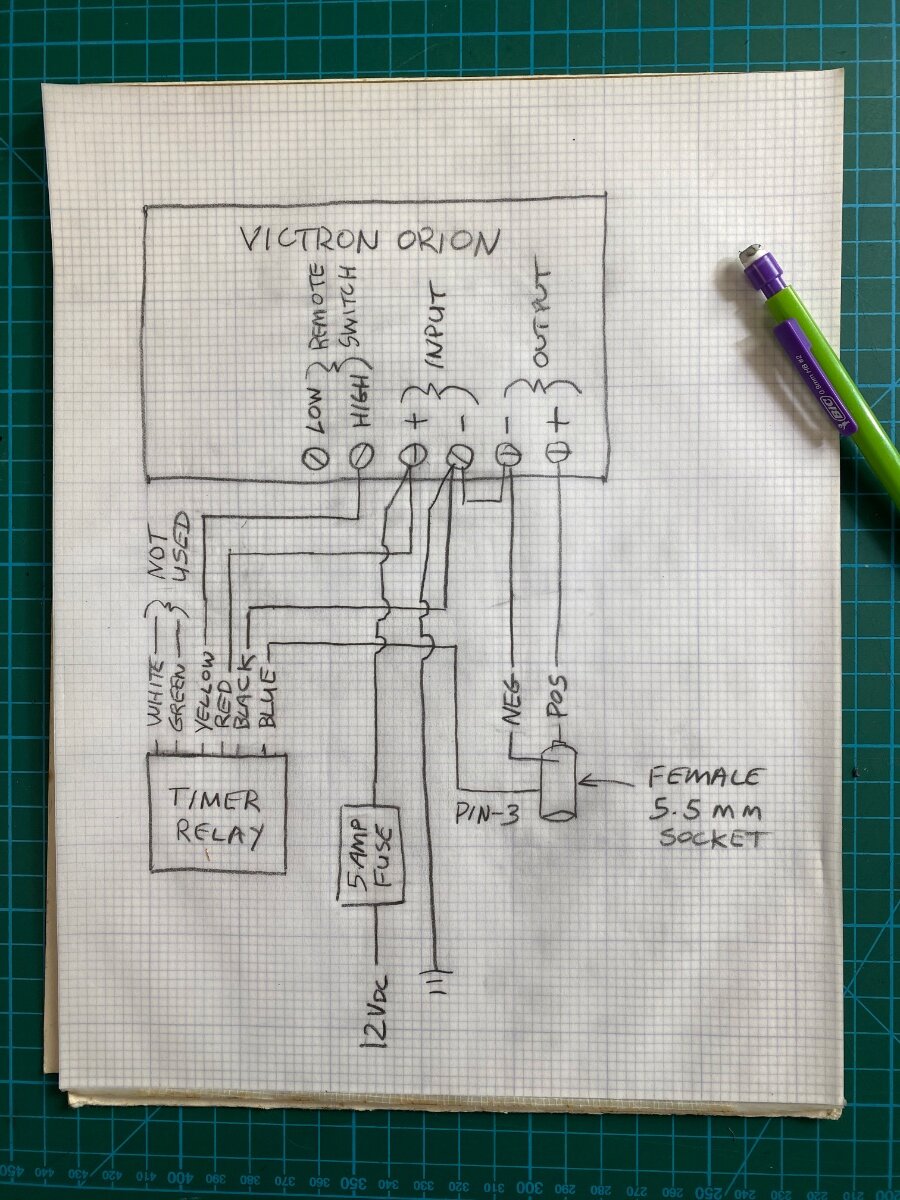
After lugging around my old heavy Gen-1 Starlink for a few years, I was thrilled to get the new Starlink Mini. It’s small and light, and the router is built into the dishy. It speed tested at 202 Mbps, a very respectable speed, although not as fast as the Gen-3 which typically runs over 300 Mbps. The Mini comes with a 50’ x ~1/8” diameter power cord that has 5.5 mm barrel connectors on each end. It also comes with a 120 volt AC wall transformer that puts out 30 volts dc (vdc.) The Mini is rated to run on 12 to 48 volts vdc, and 25 to 40 watts. It peaks at 60 watts with snow melt on. The 12 Vdc rating is an attractive feature, particularly for Boondockers who don’t have inverters. However, when I first hooked it up to the Oliver’s 12 Vdc battery… it would’t work?? After some investigation, it turns out that it’s not so simple and I’ll try to explain why: Given that the AC transformer puts out 30 volts, and the power is about 40 watts, then it would be drawing 1.3 amps per Ohms law (40w/30v = 1.3 amps.) With the same calculation at 12 volts, the amperage increases to 3.3 amps. The resistance of the long thin power cord can’t handle this higher amperage and the resulting voltage drop puts it below the minimum 12 volts operating range. In fact, I did some bench testing and found it would only work at voltages over 18 volts. There are solutions to this issue including cutting the cable shorter, using a larger gauge cable, or increasing the voltage. Without a better option, I chose to increase the voltage. I looked at cheapie power converters that would probably work, but I wanted something more robust and higher quality. I found a Victron Orion TR 12/24-5, isolated, DC to DC Converter, and it was perfect for the job. It has a 12 Vdc (+/-) input and an adjustable output of 20 to 30 Vdc at 5 amps. Standby power is under 80 mA, and it has remote on/off switching capability. It comes factory set at 24 Vdc, but I adjusted it to 30 Vdc output with the potentiometer on the front. To connect the Mini to the trailer’s 12 Vdc power system, I installed a 5.5 mm female panel mount socket into the Satellite TV inlet. I removed the Coax connector and the 5.5 mm socket and nut fits perfectly in it’s place. Oliver conveniently labeled it “Satellite.” If you need the satellite TV, then install a third “Furrion” inlet as I did for my old starlink RJ45 connector. I mounted the Victron under the rear seat on the street side. The socket wiring was sheathed and routed along the ceiling of the outside storage garage. There are a number of options to pick-up 12 volts in that area, I took power off one of the circuit breakers. I ran the negative wire to the ground bus under the rear dinette seat. The Mini comes with both a snap-in kick-stand and a 2” pole mount, and they’re both necessary for optimum RV use. I prefer having it on a pole, but we often have to move the dishy away from the trailer for a clear sky view. That’s why it’s a bad idea to shorten the cord. It also has an RJ45 port that I suppose is for hardwiring without WIFI, but I probably won’t ever use that feature. I built-up some PVC fittings on my 10’ Electrical Metallic Tubing (EMT) mast to fit the Mini’s pole adapter. (See the post for Tacky Starlink Dishy Mast). A little sanding was involved, and the starlink mount uses a thumb screw to hold it in place. It’s better to turn the Victron off when not in use, so I recommend using the remote switching feature with a switch installed in an easily accessible location. I’m too forgetful to switch the Victron off every time, so I came up with a way to turn it on & off when the Mini’s power cord is plugged in & out. Read on if your interested in that part of the installation: The “three pin” 5.5 mm female socket sold by Amazon has a built-in switch that’s designed for appliances that use either batteries or a 120v transformer supply. When the transformer is plugged in, the pin-3 switch opens to disconnect the batteries. This is opposite of what’s needed for the Victron remote switch, but it can be used to trigger a digital relay and it’s actually easier than it sounds. Amazon carries fun little programable 5 &10 amp timer/relays for under $20. I already had the 10 amp version in the Oliver for a hot water recirculation pump timer, and it works great! The 5 amp is adequate for this application, and you will also need the $20 dollar re-usable Bluetooth programer. They use 50 μA of idle current, which is nothing, and they can be programed for delay-on, delay-off, flashers, dimmers, duck decoys, and more. But for our application, we’re just interested in the trigger functions, specifically the “ground-open” trigger. Before installation, the relay has to be programed from a smart phone or computer. It’ links by WiFi to flash the program into the relays memory. Use wire nuts to connect the timer and programer together, and power them from a USB port. Follow the well written and simple programing instructions using the settings shown in the screenshot below. The relay requires a timing function, so I arbitrarily used function #12, which is “delay-on.” I set it randomly to 1.5 seconds. The trigger is programed to use the “Trig Blue” set at #5, which corresponds to the blue wire used as a “grounded trigger.” The green wire trigger is disabled. My wiring sketch shows that the timer is powered with 12 volts from the Victron’s positive and negative inputs. The relay’s yellow output wire feeds the positive side of the Victron’s remote switch (the negative side is not connected). The Victron’s output feeds the 5.5 mm power socket, and the blue trigger wire goes to the 5.5mm socket’s pin-3. Use a continuity tester to identify pin-3, it’s normally shorted to the negative lead of the socket and it “opens” when the male connecter is plugged in. The socket barrel is negative, or ground, and the center pin is positive 12 vdc. There is one other step to make this work. This Victron model is “Isolated,” meaning that the input and output “negative” terminals are isolated from each other. It needs to be “non-isolated” because the timer is grounded to the Victron input, and the socket is grounded to the output, and the trigger needs continuity between the two. So remove the jumper wire that comes on the Victron’s remote switch, and use it to jump across the two negative terminals. Victron support confirmed that shorting the grounds is not a problem, it just un-isolates it. This works satisfyingly well! I checked out the power draw with the solar turned off, and while streaming a video. It was 2 amps, 27 watts (after subtracting the parasite load). That’s a huge improvement over my previous Starlink, and I don’t have to worry about running the inverter and draining down the batteries anymore. I hope someone finds this useful Cheers! Geoff
1 point
-
Working on adding Suitcase Solar, one without built-in SC, in the range of 220W to 400W. I need to upgrade our MPPT SC to handle additional solar amperage. We have 340W rooftop Zamp panels and a Blue Sky MPPT 25A SC and this system has worked flawlessly during 14 months of our ownership. Recently upgraded to 600AH Epoch LiFePO4 and Victron 3KVA MP2 inverter. We boondock more than camp on shore power. Want to be able to run A/C on inverter occasionally during afternoon hours. The common route would be to replace the Blue Sky system with a higher amperage MPPT SC. If we add 220W in solar a 50A SC would work. If we go with the beastly 400W suitcase, it would just be over the 50A spec and would have to go to 70A. Upgrade would be a Victron product. Here's where I would like opinions. I can scrap the Blue Sky but had another thought. What if I left the OEM install as-is, been working fine for 8 years, and just added another MPPT SC for the suitcase. It would just be off when suitcase not attached. This would be a redundant system so if one was to fail the other independent system would not be affected.I'm not into fancy integration. No Victron Lynx or Cerbo or Victron displays in our hull. I will just use the VictronConnect app as I do for the SmartShunt BM and VE.bus connection to the MP2. I am not interested in any Wi-Fi connections for remote monitoring, Bluetooth range is fine. If I go to an independent system, all I need is 10 AWG cabling, Anderson PowerPole connectors, a fuse/breaker and smaller 30A MPPT SC would do for much less money. My understanding is two MPPT SCs can work in parallel just like the SC and DC converter on shore power can charge simultaneously. This model is $260 less than the 70A version. What do you think? Amazon.com: Victron Energy SmartSolar MPPT Solar Charge Controller (Bluetooth) - Charge Controllers for Solar Panels - 100V, 30 amp, 12/24-Volt : Patio, Lawn & Garden1 point
-
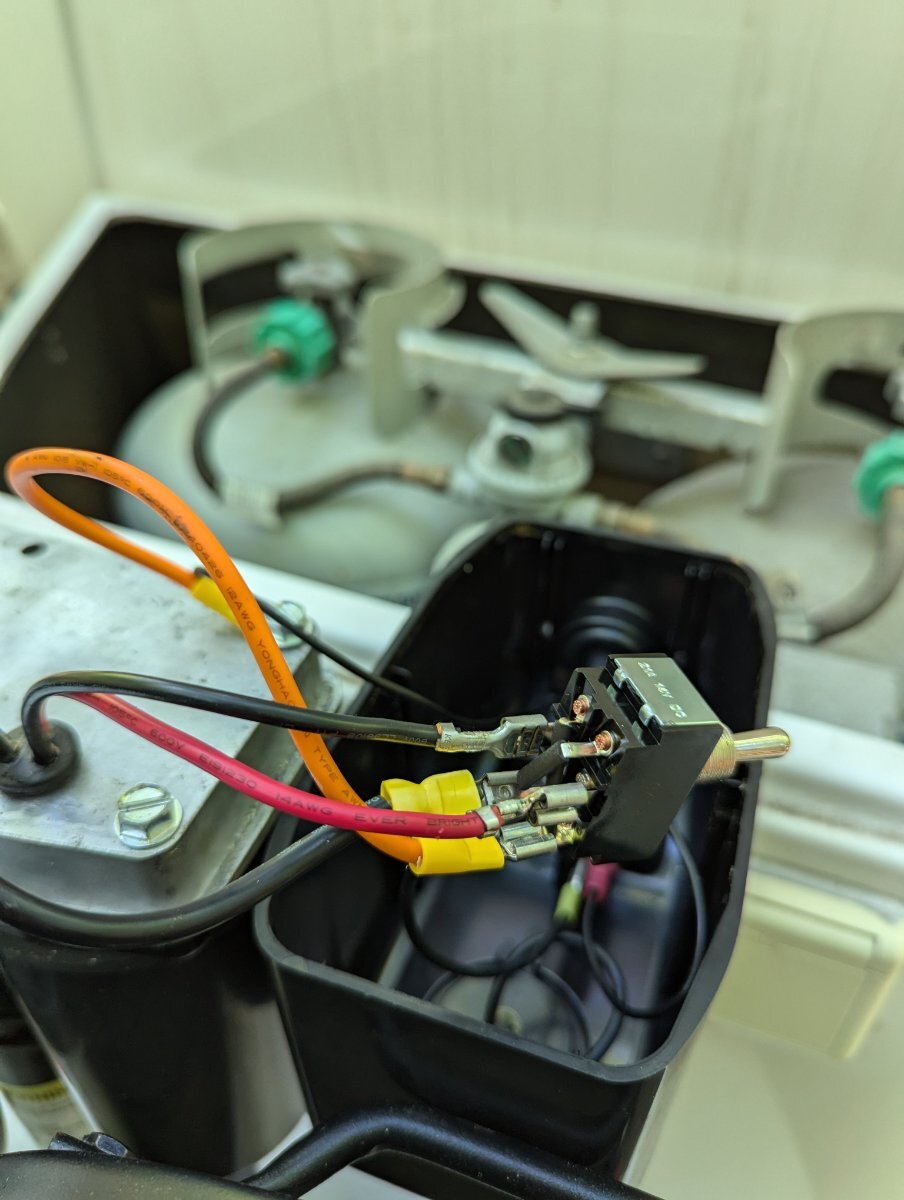
My tongue jack toggle switch stopped working in the up position this weekend. So I was not able to raise my camper. Luckily the bottom half of the switch stilled worked, so I could lower it. As an FYI: If you switch the red and black wires around it reverses the action of the switch so the down position becomes the upward movement. I was able to rewire it back and forth to get my camper hooked up using the motor. Having the inline fuse right there to cut the power off/on while switching back and forth was convenient. (obviously it could be done manually with the crank as well but then I would not have had anything to post). 🙂
1 point
-
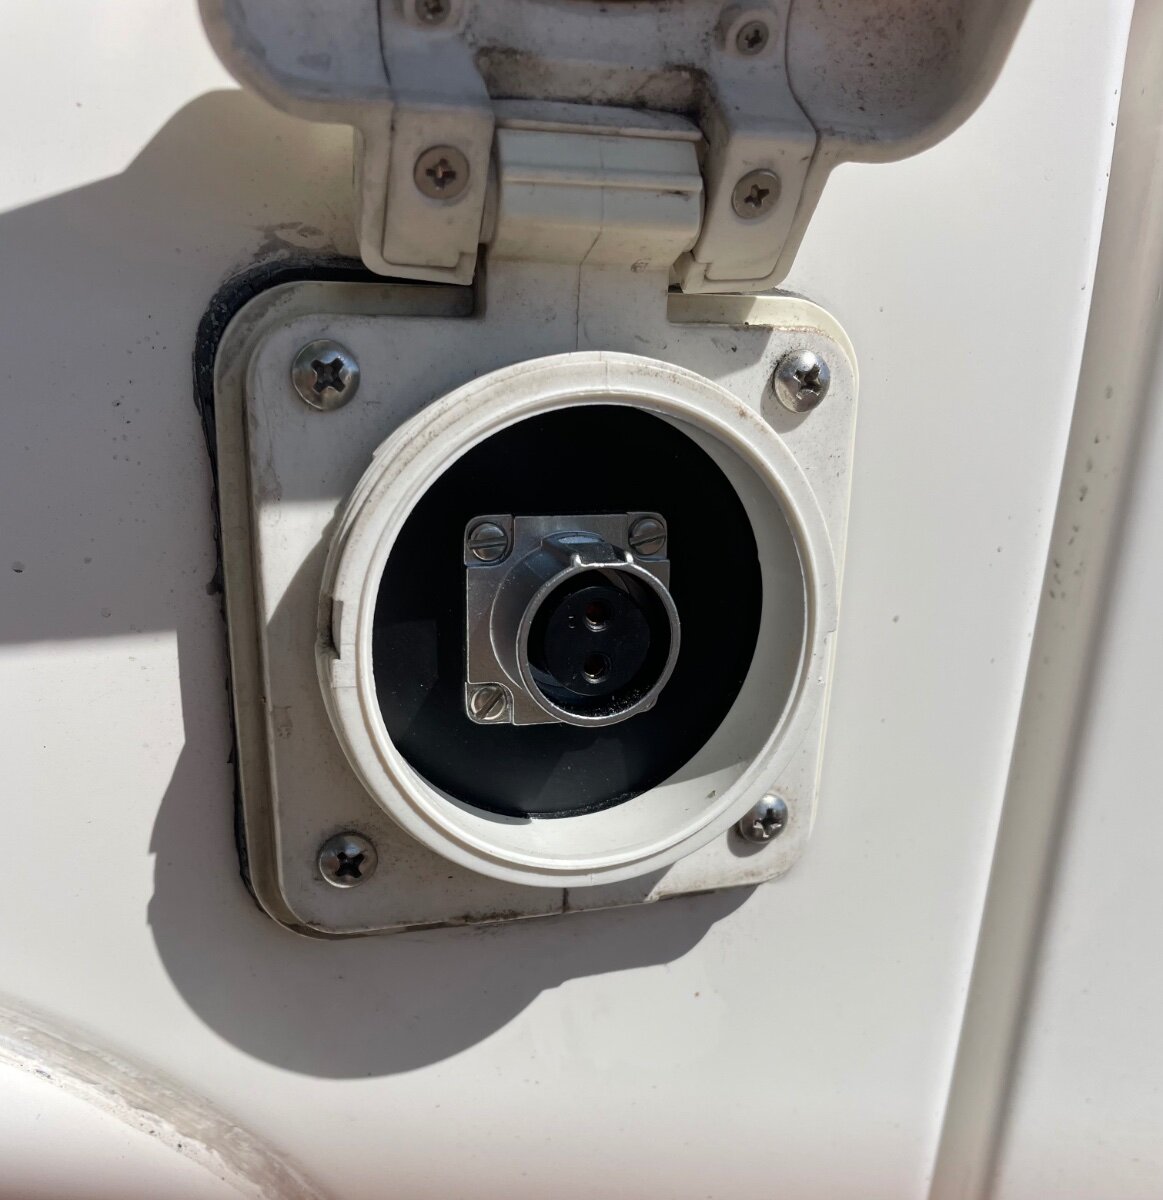
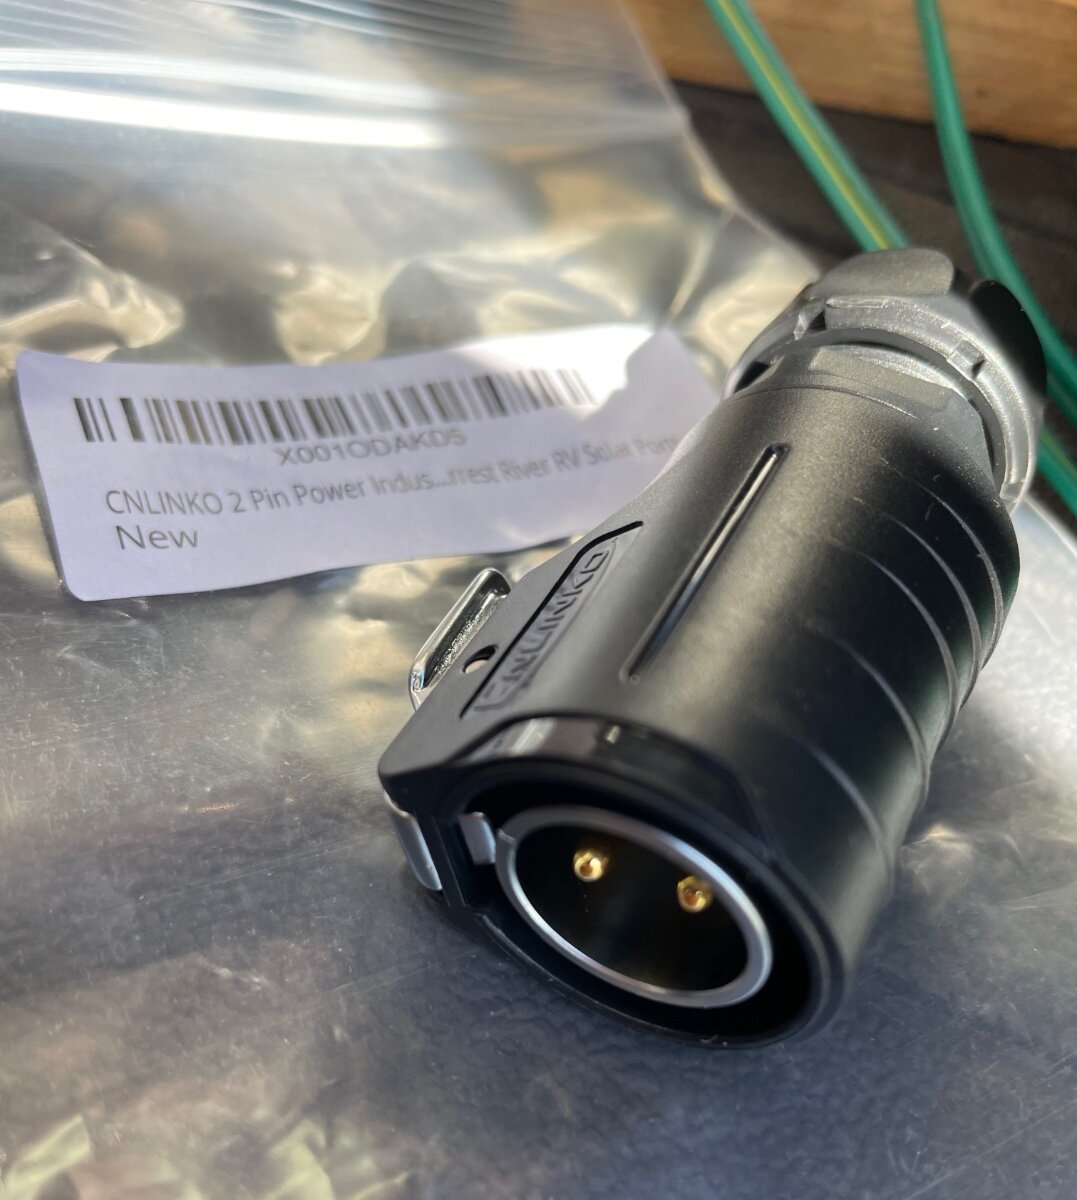
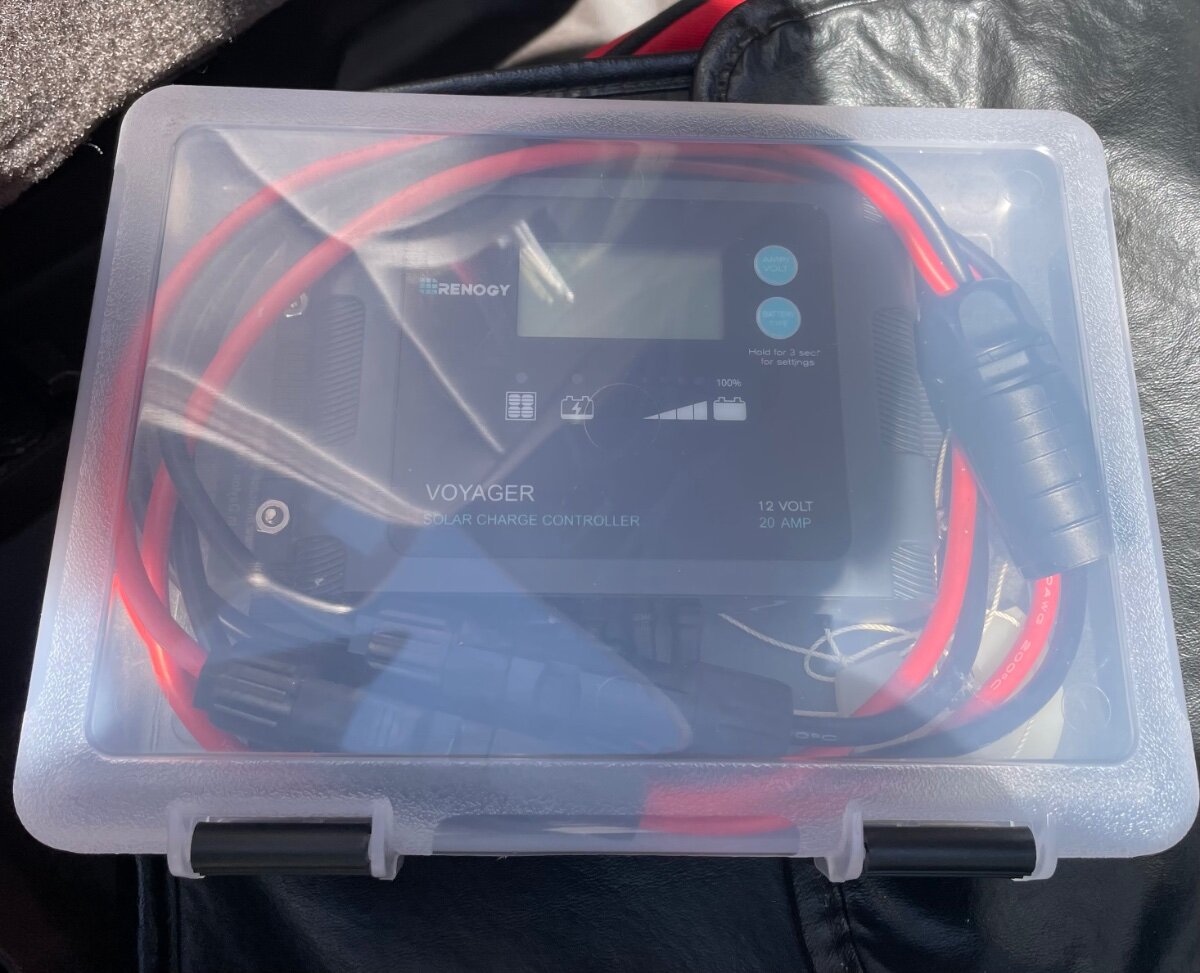
John, that’s approximately what I do for my suitcase solar. I wasn’t real pleased with the SAE plug being used for repeated connection disconnection so I added a secure two prong Cnlinko socket to the outside of the trailer. The Cnlinko plugs have a stainless latch that secures the connection.The Cnlinko socket is connected through a 10 amp fuse directly to the shunt for the Blue Sky solar controller. The Blue Sky IPN Pro remote displays all of the battery input information such as roof mounted solar, shore power battery charger, and the suitcase solar panels. I removed the solar controller that came with the suitcase panels and plug it in to the trailer and then plug the panels into the controller using the generic solar plugs. This allows a little bit higher voltage from the panels to travel the long distance from the panels to the controller. The wires from the controller are only about two feet long so less loss. All wiring is #10. The box that the controller is in is not waterproof so I just set it on top of the tire under the fender skirt. This idea was originally developed by John Davies.
1 point
-
It has not been my experience in 4 years of ownership. Annually or often after a really long trip, I go through and check all the fasteners I can find and snug them down as needed. I prefer medium strength blue locktite where applicable. We have always run 55 psi in our tires since the day we took delivery of XPLOR in June of 2020.1 point
-
After nine years our kitchen cabinet drawers and glides have all but come apart. Am in the process as we speak of rebuilding all of them now but otherwise no can't think of anything coming loose to speak of and make no mistake we have seen our share of rough backcountry gravel roads. As @jd1923 suggested you might want to look into your tire pressure. We run ours at 45 PSI and lower if its rough gravel roads. More on the kitchen cabinet drawers in a later post.1 point
-
Our solar suitcase system has evolved over the years. Using a solar suitcase panel is about using storage space efficiently for transport and ease of use with the panel or panels. Use three 12' sections combined of 10/2 solar panel cable when Ollie is parked in the shade when reaching out from the shade to sunshine. Normally we can get away with using one Renogy 100W solar suitcase, but we only use one 100AH Battleborn Lithium battery and don't have a 12V/120V inverter. See around 6A charge with a PMW controller mounted close to the battery on a good solar day. Have seen around 11A charge with two 100W solar suitcases, using a MPPT solar controller mounted close to the battery with solar panels connected in series using 36" of 10/2 cable. Posted this in other threads. Originally installed a 10A Furrion solar port that was OK with one 100W solar panel, but wanted a 20A solar port for a higher capacity port. Since I already drilled the hole in Ollie for the Furrion port, decided to modify the Furrion port by installing a Zamp 20A port in the existing Furrion port. Also drilled four through holes to mount the Furrion port with an interior backing plate and locknuts to reduce the stress on the fiberglass. Furrion Solar port installation: Modifided Furrion Solar port by installing 20A Zamp port in the Furrion port:1 point
-
Glad to hear you found your Oliver! Sounds like a great trip home. We’ll see you out there! Mike1 point
-
I will update after some of your suggestions. Doesn’t make sense to me either. But definitely changed dramatically after install.1 point
-
I do the same with the exact same tester. Once I know the plug is wired correctly I plug in and trust the onboard surge protector made by the same company And me……great minds think alike! 😊1 point
-
Good morning, Mike. Thank you for commenting and for the welcome. I appreciate the suggestion to PM fellow owners for additional discussion. We are currently looking to purchase new and hope to begin the adventure early next spring.1 point
-
Hi Mike, welcome! There are lots of mentors on the forum. You can post your question and you’ll get lots of replies and then you can feel free to PM fellow owners for more information or just to discuss further. Are you looking to buy new or used? We’ve been visiting National and State Parks here and need to expand up to Canada. Good luck as you start your journey! Mike1 point
-
Thanks!!!! We were given those walking sticks by some very nice folks at the first Ollie rally at Guntersville SP AL! Like the sticks so much going to use golf club whipping (thin black nylon string) wrapping the bottom of each stick to keep the tips in good condition.1 point
-
I used to think that a pole mounted surge protector was overkill until I sat in on a Mike Sokol presentation at the Florida RV show in January. Someone in the crowd asked if a surge protector was necessary at the pole because he already had EMS on board and Mike answered that the benefit of a second surge protector at the pole would extend the life of the on board EMS. He further explained that all surge protectors have a life span and every surge takes time away from that, so he suggested that the one at the pole would be sacrificed to save the on board EMS. This made sense to me so I started using a Southwire Surge Guard. Mossey1 point
-
Q1 - A word of caution, my 2020 OLEll had two different thread size zerks; specifically 1/4-28 and M6x1mm. Other than a couple of 90° at EZ-Flex top, I choose to replace the stock straight ones with 45° angle zerks to ease servicing. I ordered mine from Grainger’s. Q2 - Turn counter clockwise (left) to loosen, clockwise (right) to tighten. Q3 - An adjustable wrench will have too much play and you will end up rounding the bolt head. Use the appropriate box end wrench, based on the thread type as to whether a Standard or Metric wrench is needed. Likewise a proper socket may suffice, but I like being able to see the zerk when removing.1 point
-
Hey Mike and welcome to the forum. I have to say that you are making the right choice for extensive exploration, as the Oliver will open doors that most other campers will not. The size and overall design are most conducive to state and national parks that often have size limits. Coming from a boating background you will very much appreciate the design of the Oliver as it lends itself more to a fiberglass boat design than a traditional stick built camper. Once you own an Oliver the rest just never measure up in quality and construction. There's a lot of discussion about tow vehicles, and for many reasons. I personally come from a background of towing larger trailers, horses and other livestock and equipment haulers, so I'm in the camp of get as much truck as you can afford. Lighter trucks that are properly equipped can be satisfactory, but come with the need to be more precise in loading and also limitations due to weight distribution needs, etc. With a heavy duty truck the Oliver is just something you hook up and tow with little complexity. Even adding extra gear in the truck has little effect and no cause for worry. As far as mentoring, I recommend your choice of YouTube camping channels. One that I highly recommend is one of the longest running camping channels on YouTube, Sean and Kristy's channel, https://www.youtube.com/@LongLongHoneymoon . They have covered everything imaginable from getting started, avoiding common problems, planning trips to understanding the dynamic of living in close quarters for extended trips. They even have great playlists that help you learn about specific topics over several videos. I hope you do make the leap to Oliver traveling, we love ours and can't wait for our next voyage. There is a Facebook page just for Olivers for sale that is a good place to find a used one if that interests you. https://www.facebook.com/groups/OliverforSale . Otherwise I highly recommend going to the factory if that's possible for you and taking the tour. It will lock you in on the quality and value of the Oliver campers and you will meet some of the best people in the RV manufacturing industry. Good luck with your journey and please participate on the forum to seek out answers to your questions.1 point
-
It is a good idea to use a high quality EMS Surge protector at the power pole. Surge Guard, Hughes Watchdog 30amp with EPO, or the Progressive are around $350+/- and they will stop low or high surges, and other issues that can damage our Oliver's, including lightening strikes and ground issues. See the link in my earlier response.1 point
-
To actually check the wiring, it's much easier to just pull the head unit out of the wall. Remove four screws behind a pop off trim ring and just pull it out. If it's like mine there's not enough wire to set the unit down on the bed so you'll need something on the bed to support it while you check the rear connections. While you're back there, make sure everything else is plugged in securely. Also make sure the previous owner was not using that area for an easily forgotten hidey hole.1 point
-
The question I have at this point of your troubleshooting is, have you verified that there is a HDMI plugged into the DVD player. The reason for 2 HDMI cables near the tv from an Oliver historical point is for a third video source for the tv. The first video source is the coax cable, the second video source is the DVD player in the stereo system and the third video source could be a stand alone DVD player, a VCR, a Roku/Fire stick device or a game console that would be placed in the attic above the tv. When I switch between the video sources, I have to change the signal source setting on the tv to match the input device. You may have input choices such as HDMI1 or HDMI2 or antenna or cable. Good luck, Mossey1 point
-
Good advice posted above! We had an older Furrion unit (Hull #75) when the Furrion's DVD player starter acting up. Ours was out of warranty. Eventually found an RV surplus dealer on Ebay that had an exact replacement new unit on the shelf.1 point
-
That rules out the tv DVD player. I would verify the tv wiring first as it’s easier to get to. Next compare the tv wiring to the stereo wiring, which should be accessible through a port hole in the upper street side cabinet. I’m not familiar with your equipment, but the video signal is probably a HDMI cable. Mossey1 point
-
Forgot to add the picture
1 point
-
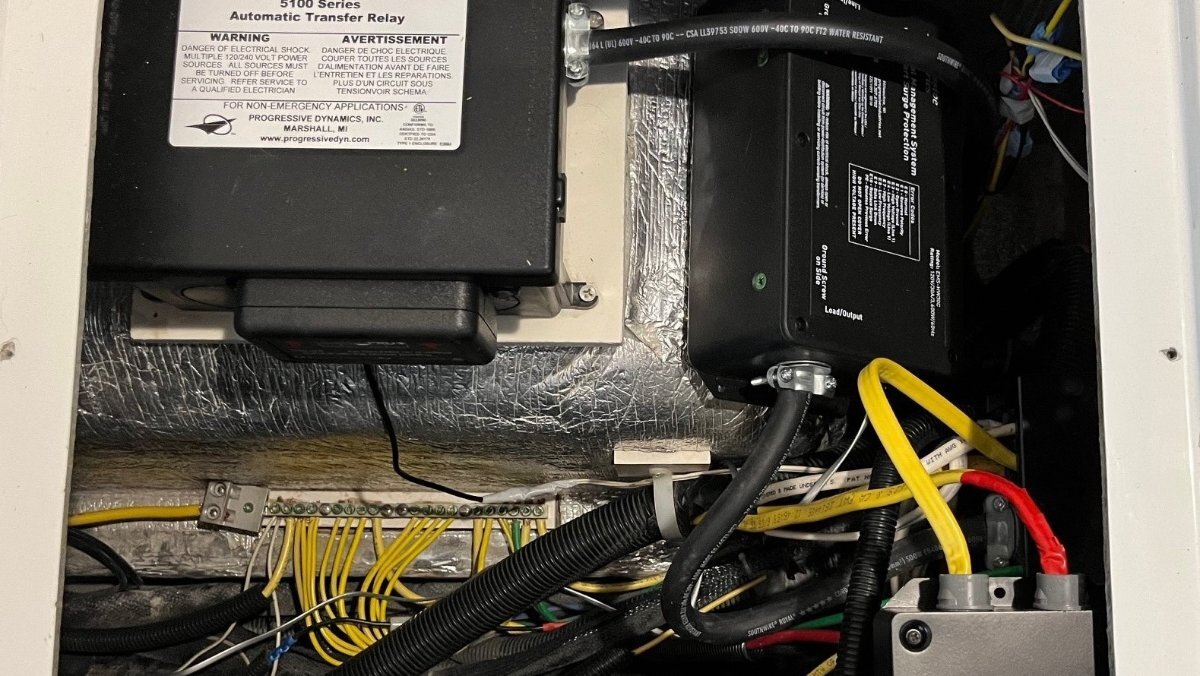
I posted my Hughes Autoformer install yesterday in Ollie Modifications, it may be of interest if you.
1 point
-
I am a belt and suspenders guy so I think I will get one. No special hurry but I would value knowing what brand you have. I am looking at this one. https://www.progressiveindustries.net/ems-pt30x
1 point
-
Newshoes, Having had fiberglass RV's in the past before owning an Ollie, I've used many different brands and types of covers. These are "semi-custom" Horse Trailer covers, made with a "sunbrella" fabric that I've now used for four and a half years with great success from National/ Estrella. So far no rips or tears. They have a five year warranty. You can order them with squared, rounded, or tri-angled front/nose. The one I ordered, I believe it was the 20'-23' model, has a two foot tri-angled front on it that fit the Ollie just fine. https://www.nationalrvcovers.com/horse-trailer-covers.html. The cost was a bit under $500.00. Well worth the price! I've been very happy with it. It's tall enough to just cover the tires and still stay off the ground. Plenty of tie-downs to keep it snug in the wind, and weighs about 40lbs. Fits well over the A/C unit, Max-fan, and my King-dome. The tri-angular front allows it to fit around the propane tanks and the front motorized jack and still stay "snug". Don't forget the spare tire in your measurements. They are a "semi-customized, stock" item, so you're not paying for a fully customized unit and the bigger bucks. So far, knock on wood, it has stood up well to the southwestern elements (wind, sun, rain, snow, etc.) where other brands have not. If you check in the "Oliver University" section of the website you'll find the detailed dimensions of your trailer. It's a good fit. Sorry, but, I haven't figured out how to send pictures yet or I would. Best, Bob1 point
-
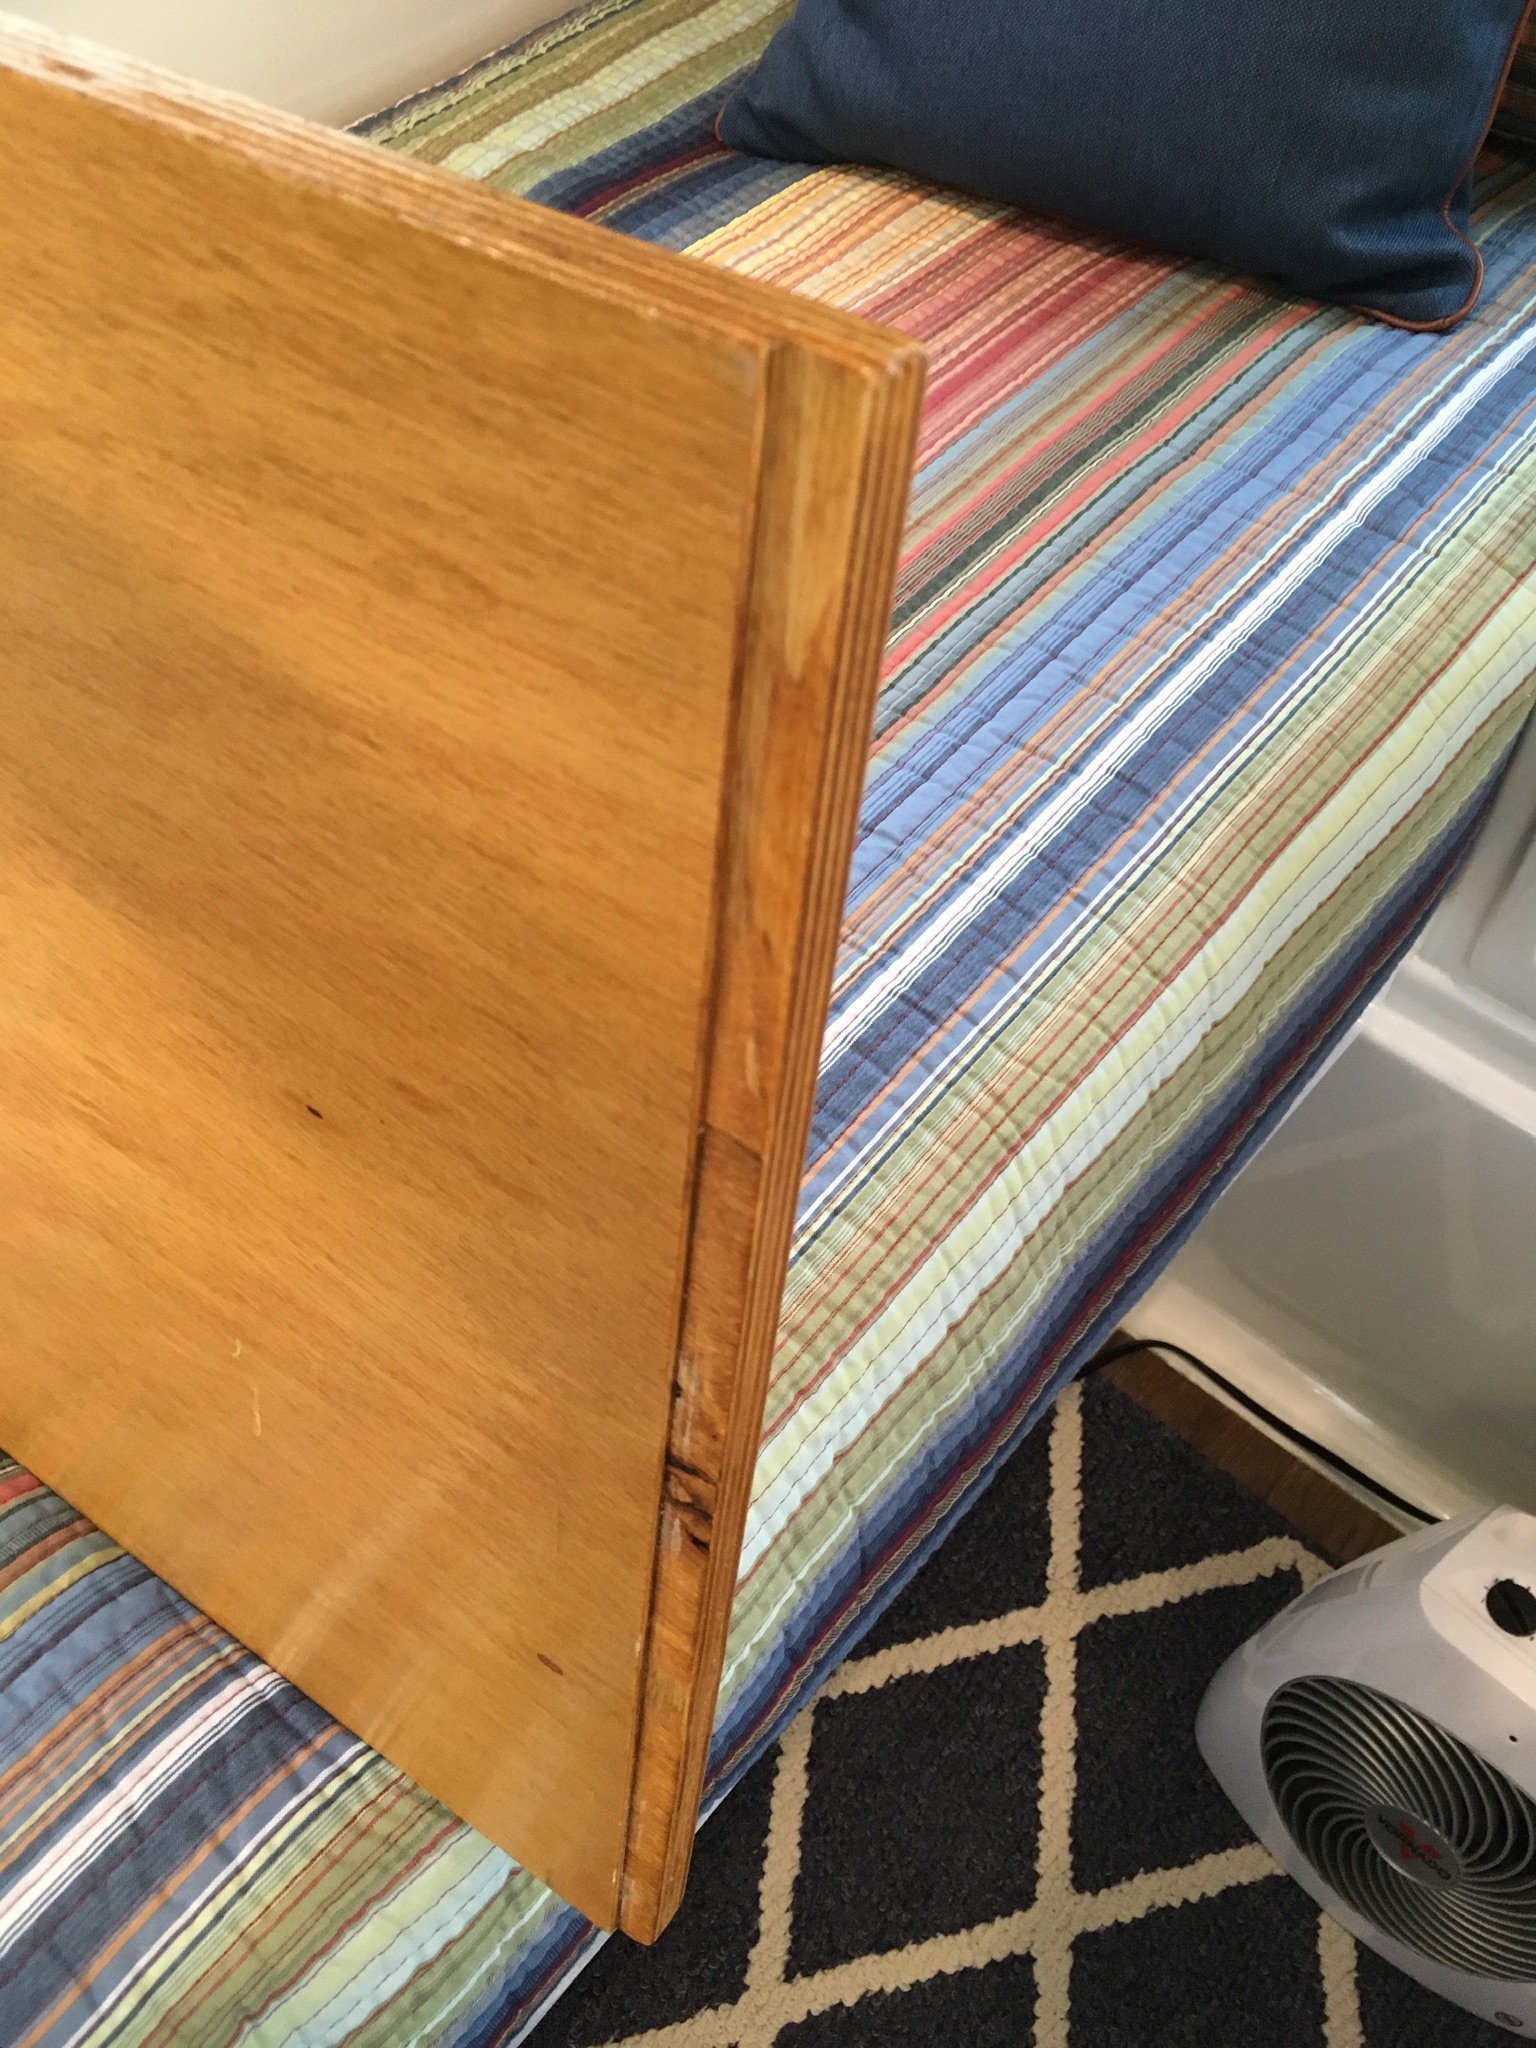
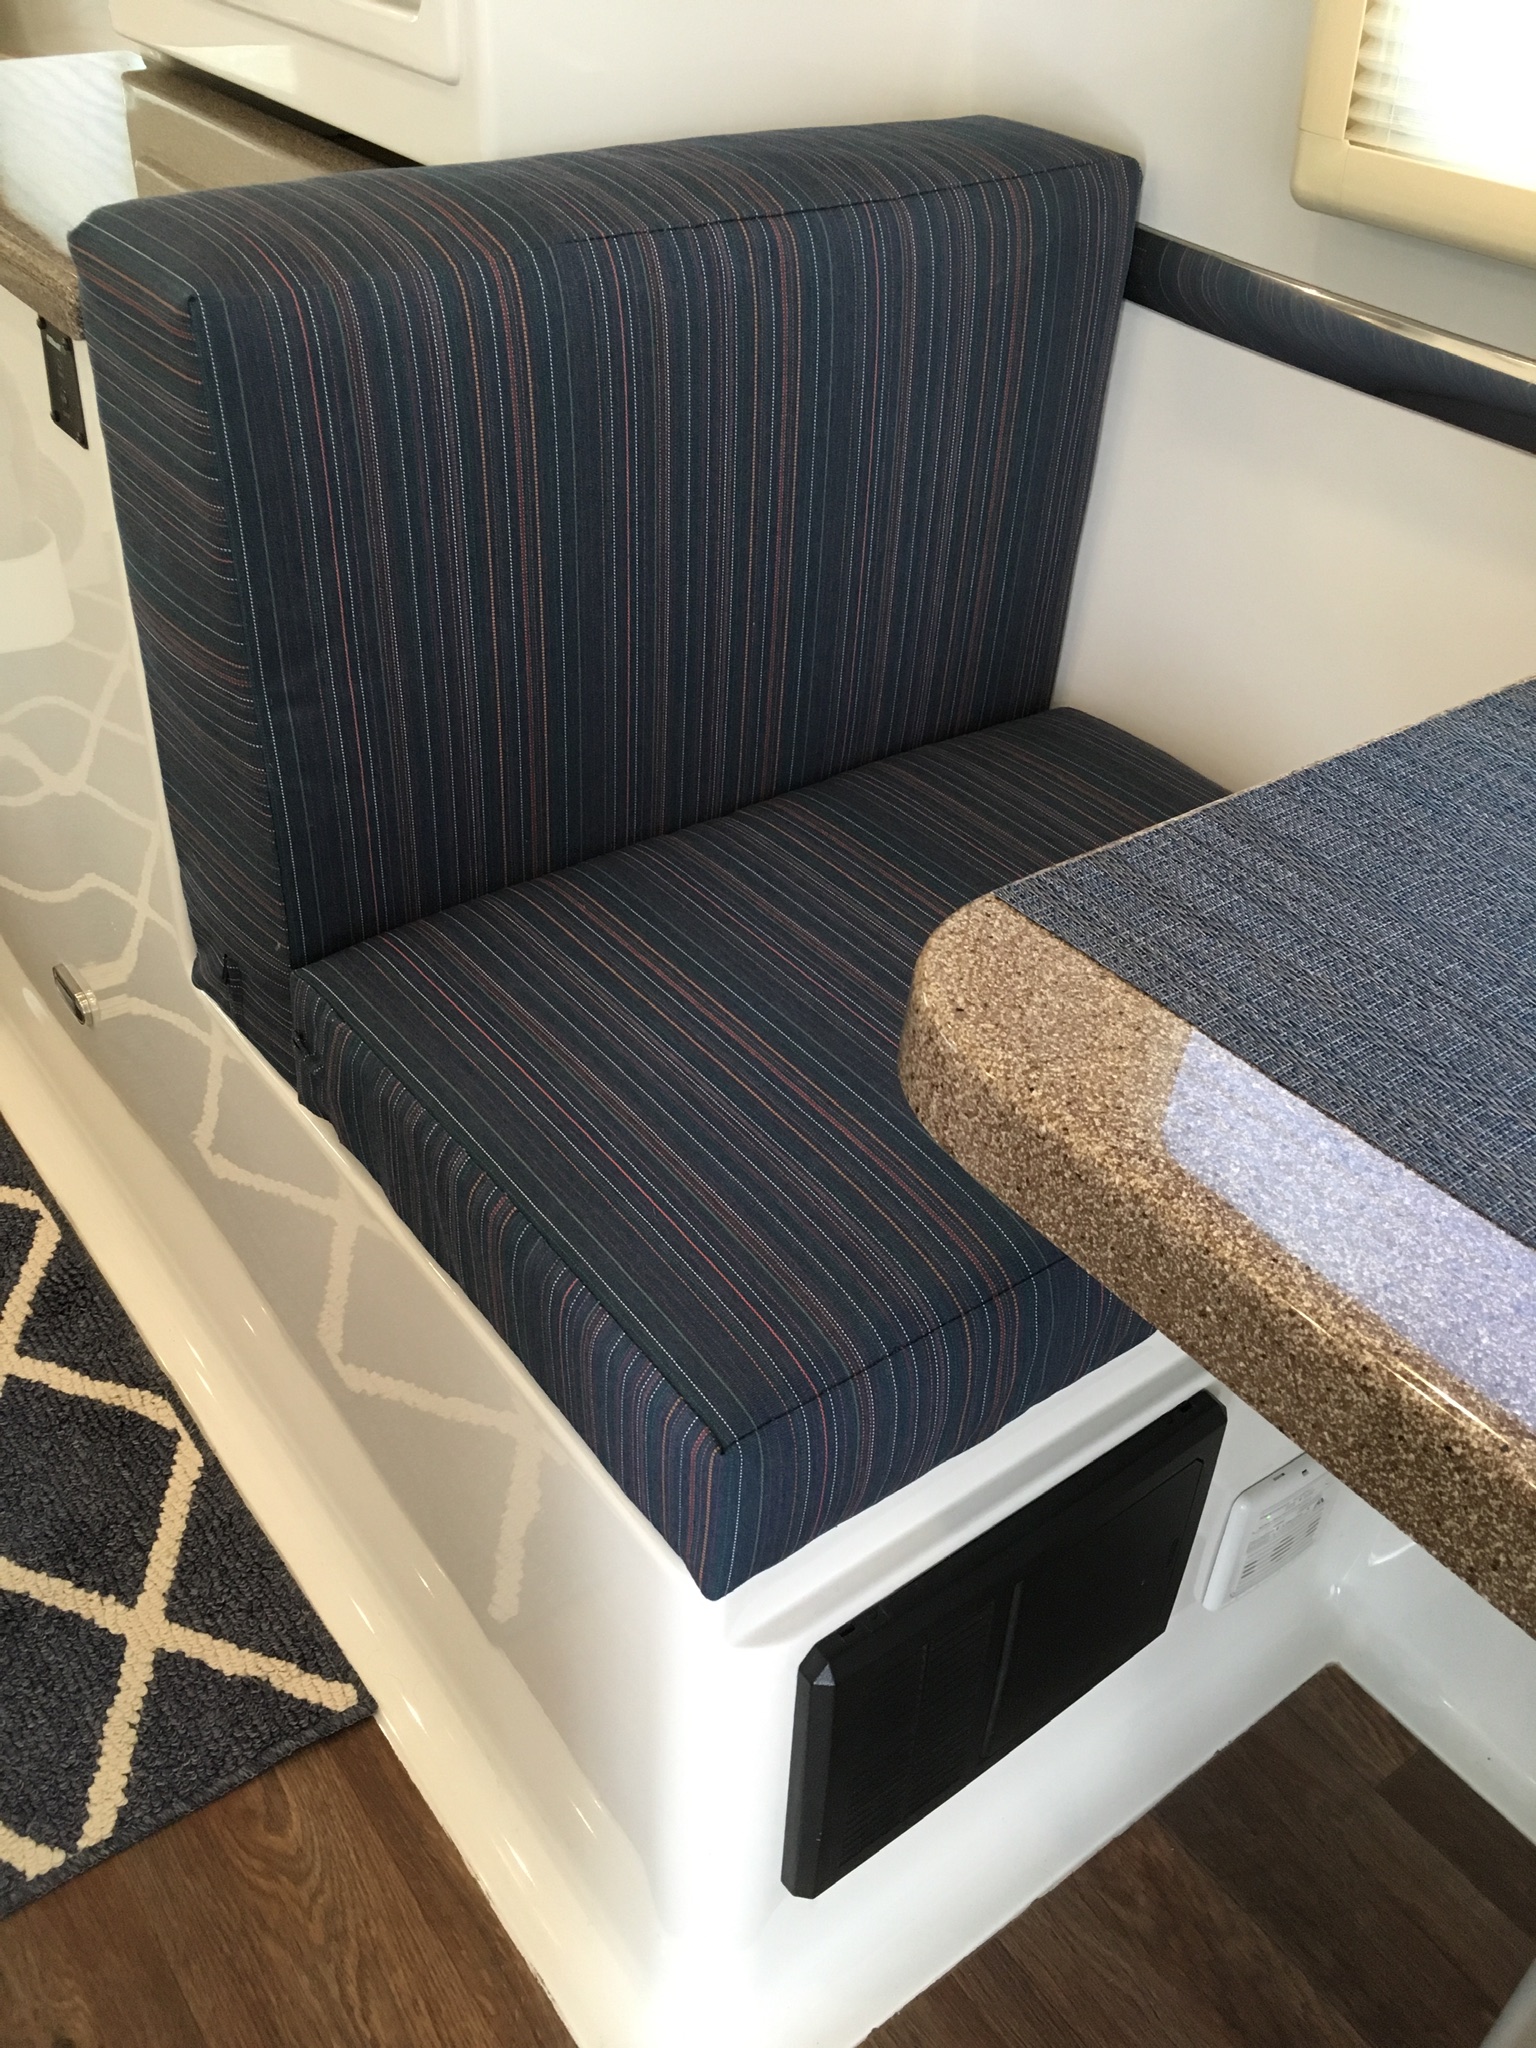
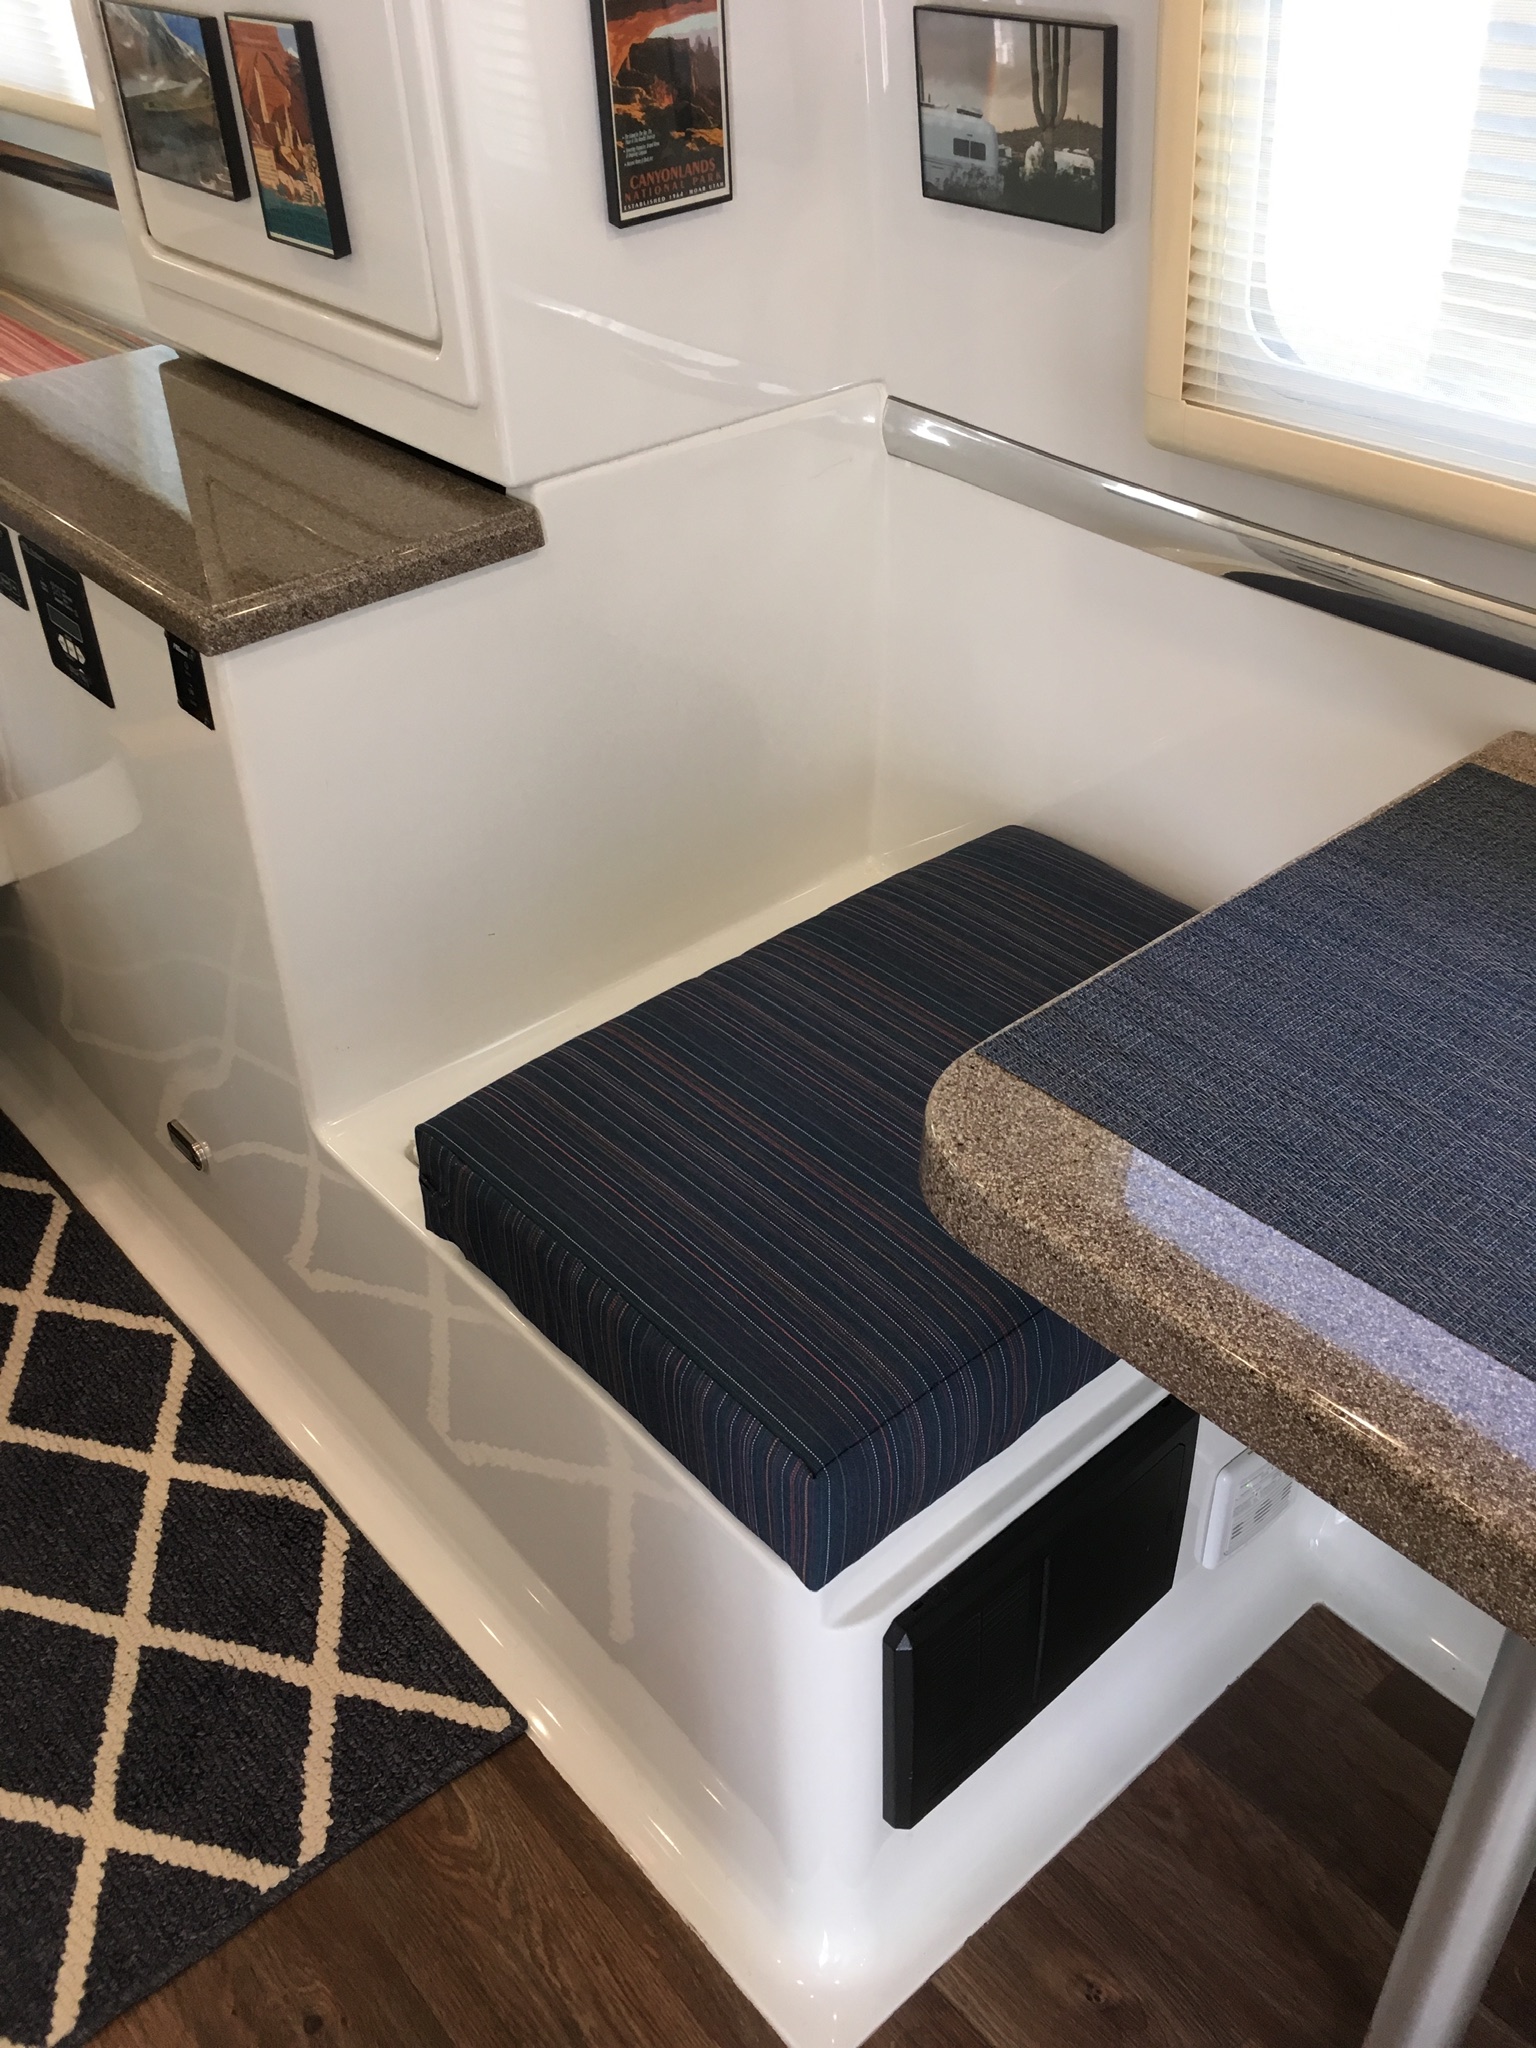
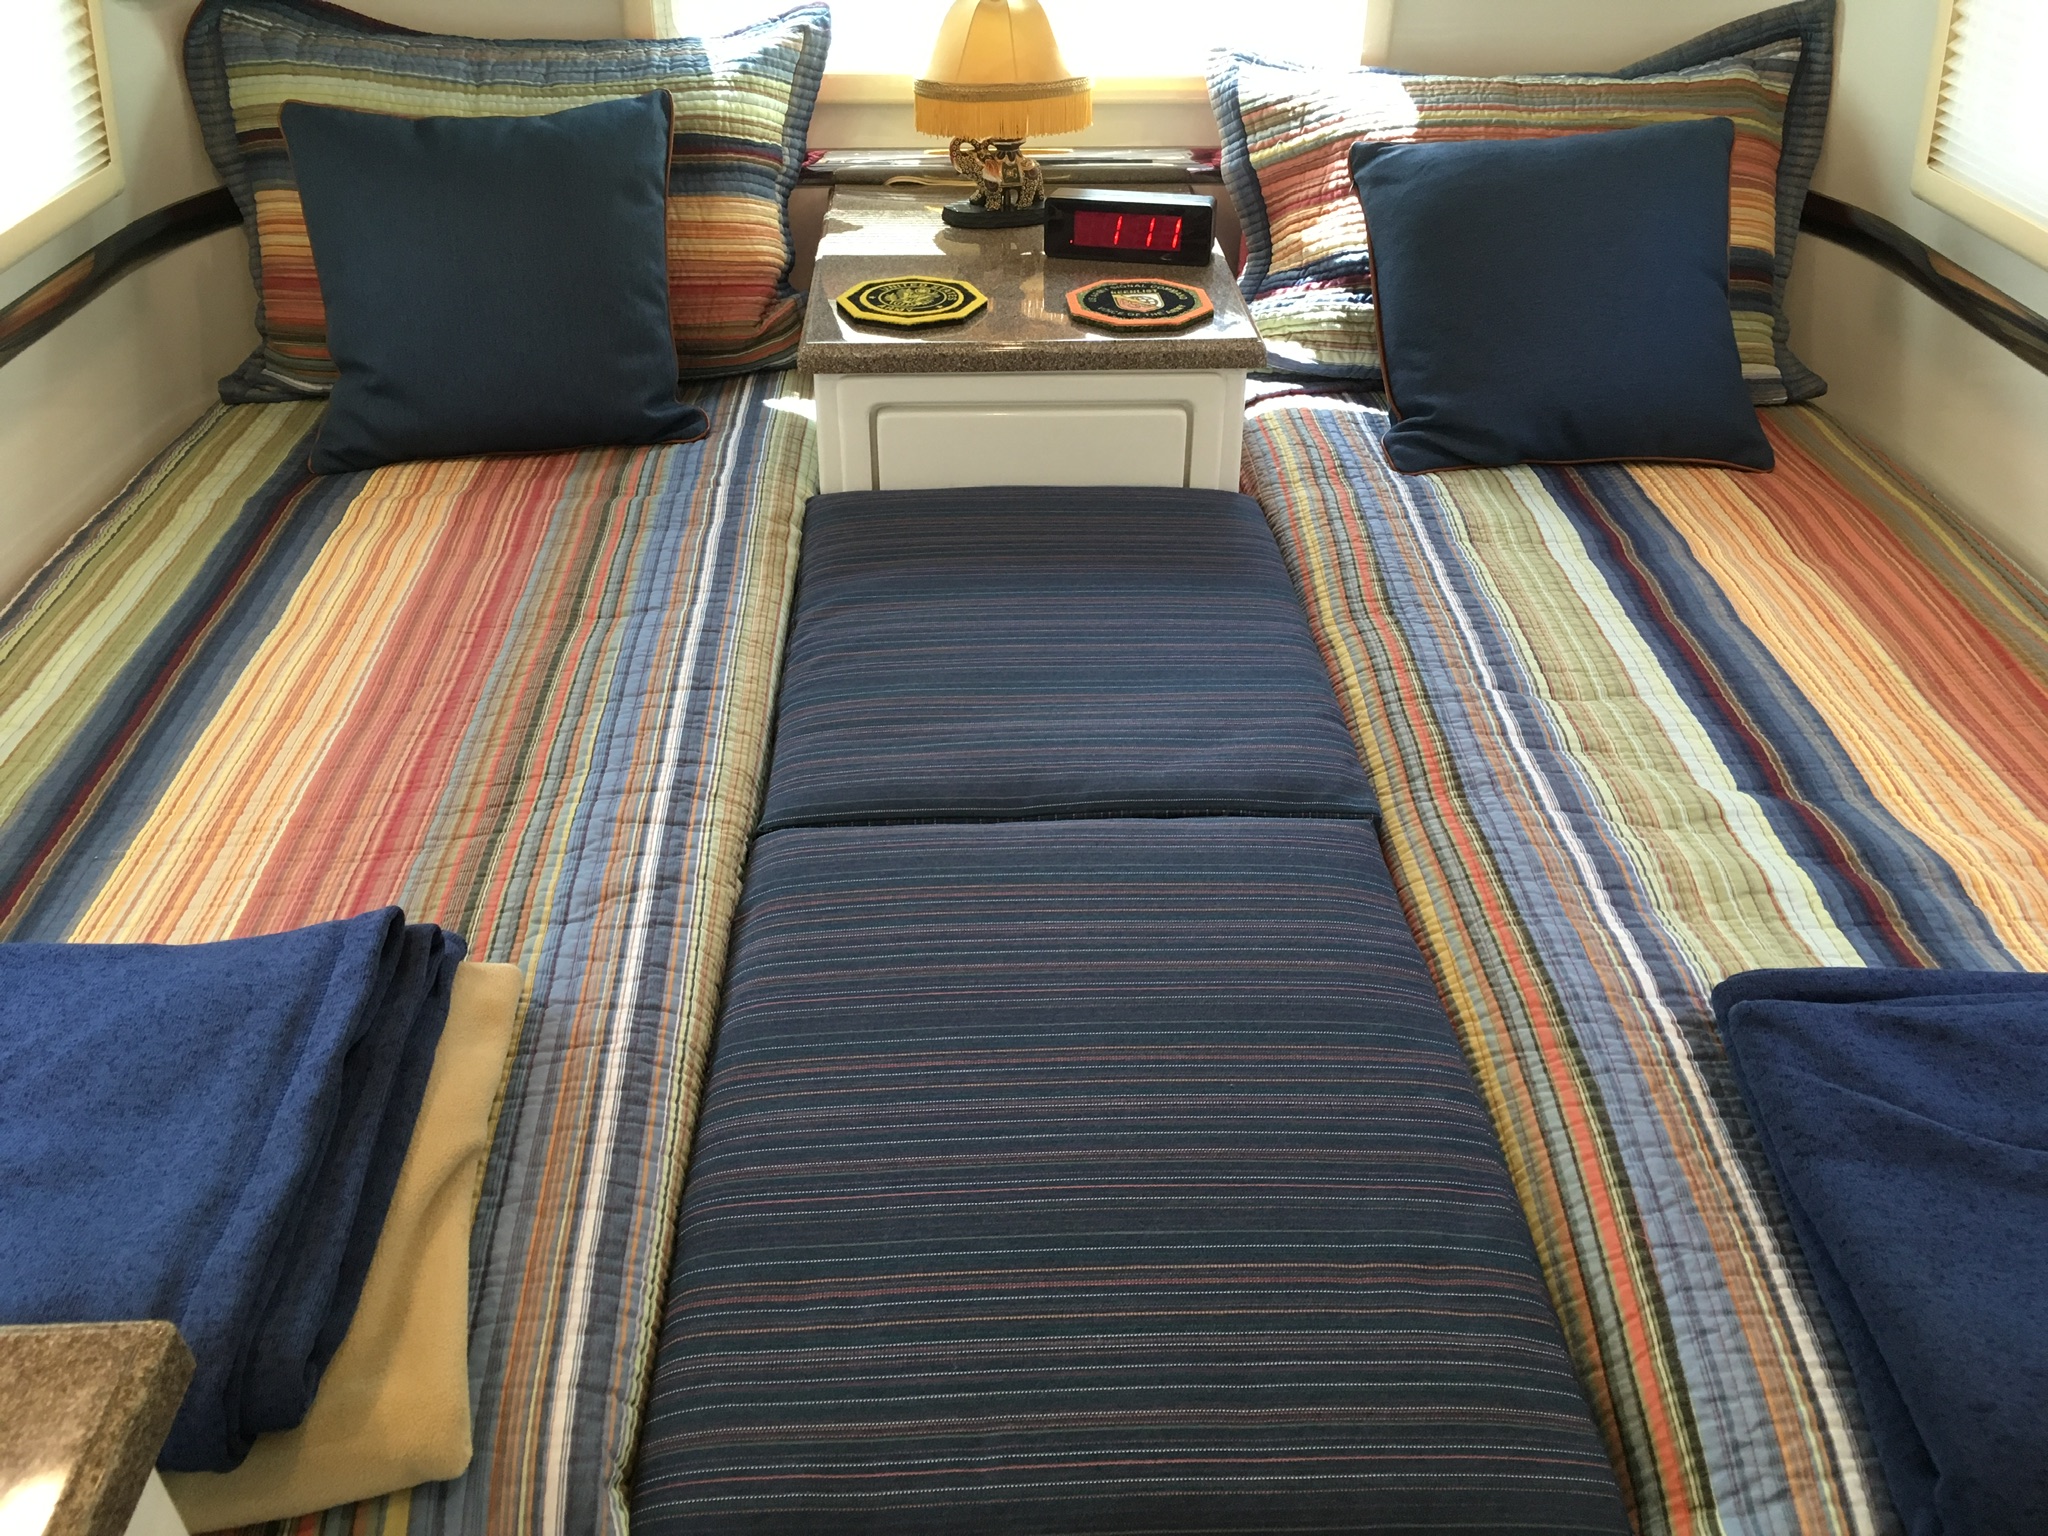
We have the twin bed version of the LEII. After the first year we realized that we were so used to sleeping together that it would be nice to be able to occasionally convert the twin beds to a double bed. I made some plywood pieces to span the gap between the twin beds and we bought some foam to sit on the plywood and create a double bed. We went with this for a year+. The problem was storing the foam when we were in the twin bed mode. So, we measured and discussed and this is what we came up with to eliminate the extra foam. We are leaving tomorrow for a month or so to go up to South Dakota so we’ll see how it works. Here is the gap between the twin beds. It measures 18” X 51”. It’s actually 50” from the nightstand to where the curve starts on the bed frames. Here is the same gap with the plywood. There are three pieces measuring 19” X 17”. It’s 3/4” plywood. The plywood stores easily under the mattresses when not in use. I cut a 1/2” X 1/8” recess on the short side of the plywood so that when placed on the fiberglass mattress frame is locks in place and won’t slide. In order to eliminate the extra foam that required a place to store we reconfigured the dinette cushions. We had new cushions made that included a larger back cushion that measures 25” X 19” and is 6” thick. In the dinette it sits on the fiberglass, not the bottom cushion. The new bottom cushion is smaller, 25” X 17” and butts up against the back cushion. The larger back cushions sit on the plywood when in double bed mode. Here are the new dinette cushions. Notice the back cushion does not sit on the bottom cushion. Here’s a shot with the cushion removed to make the double bed. Here are the cushions on the plywood. We were a little concerned that the dinette seats wouldn’t be as comfortable with the thicker back, but sitting in the driveway the last few days it seems okay. Also, we wondered if the bottom cushion would stay put without the back cushion sitting on top of it. We’ll see how it works out this next month on the road. Mike
1 point


.thumb.jpg.e34bf01ef7f7d5e99ad31856d45afbeb.jpg)


-
Recent Achievements
-


")


")


")

