Leaderboard


Popular Content
Showing content with the highest reputation on 09/18/2024 in all areas
-
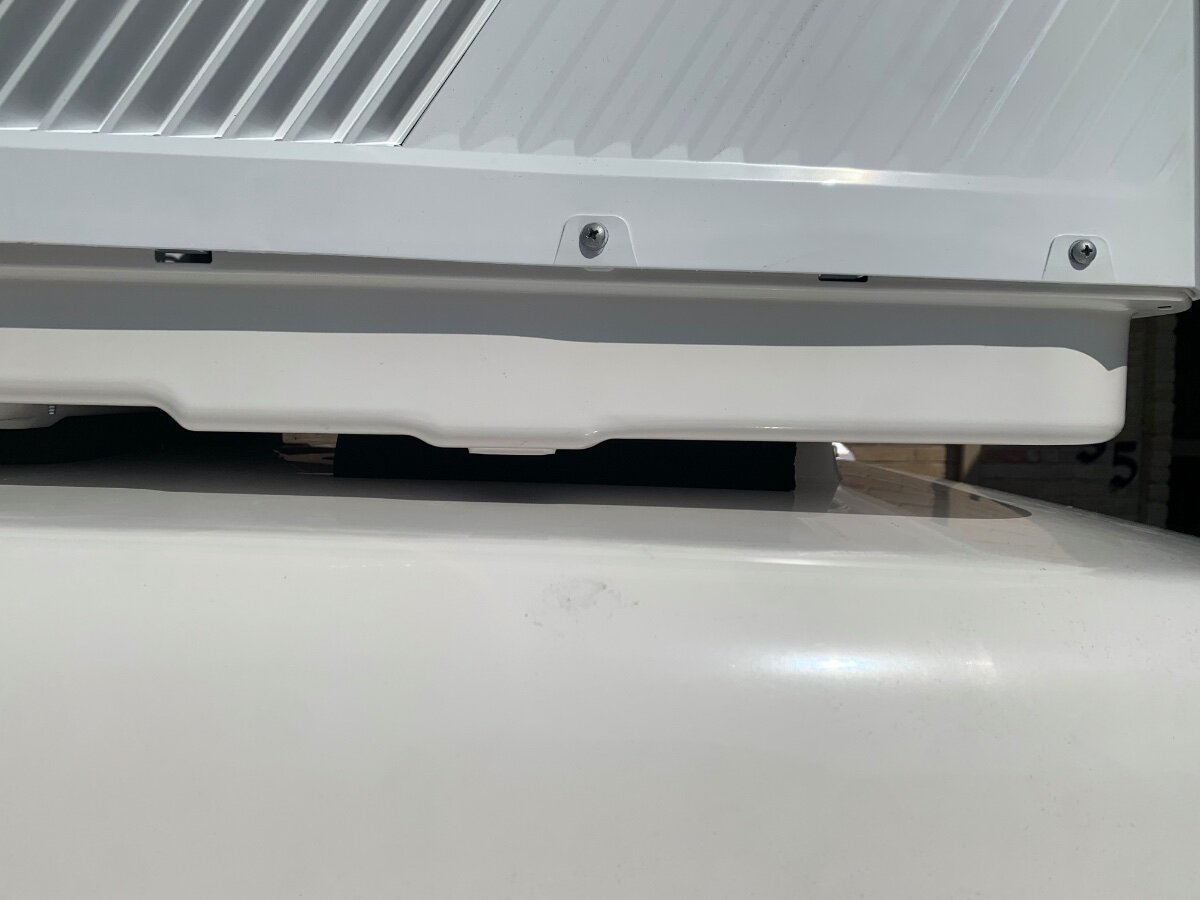
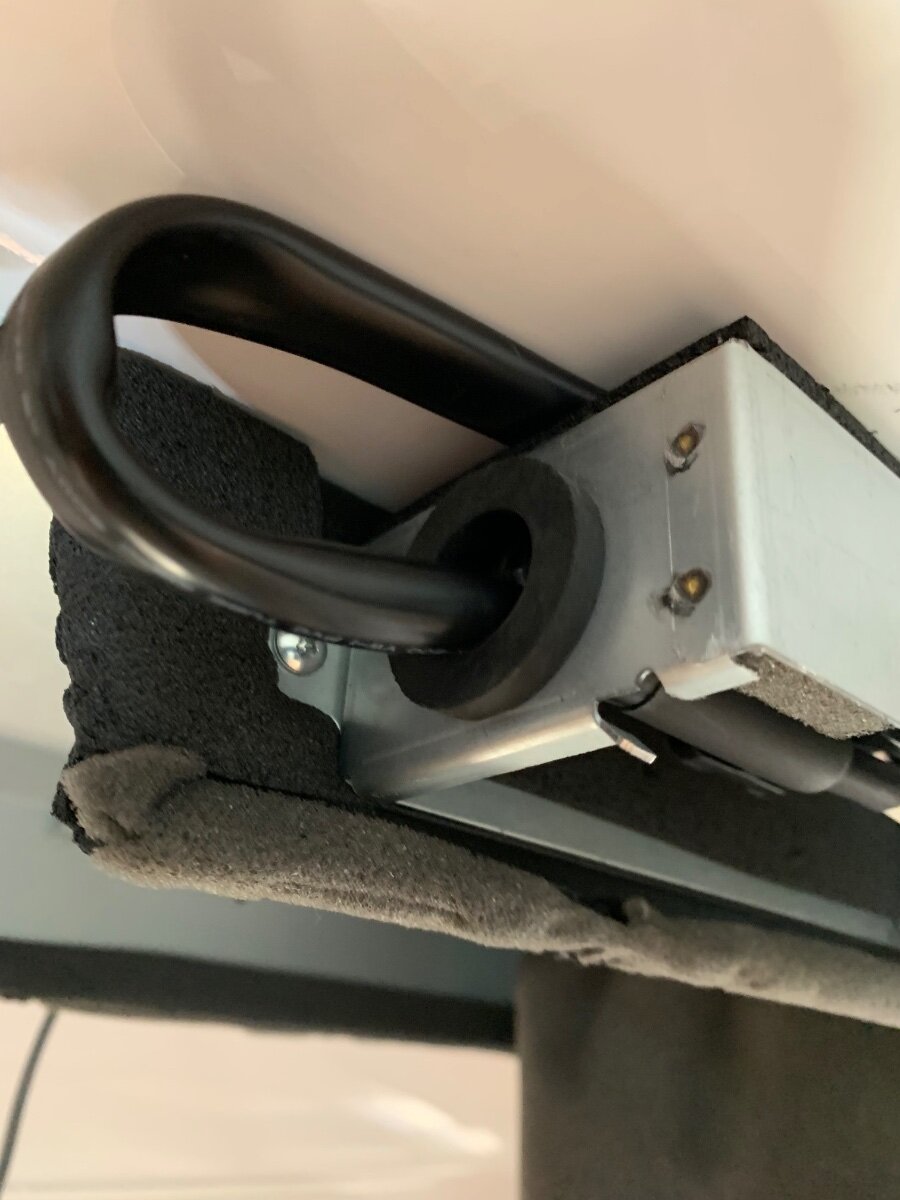
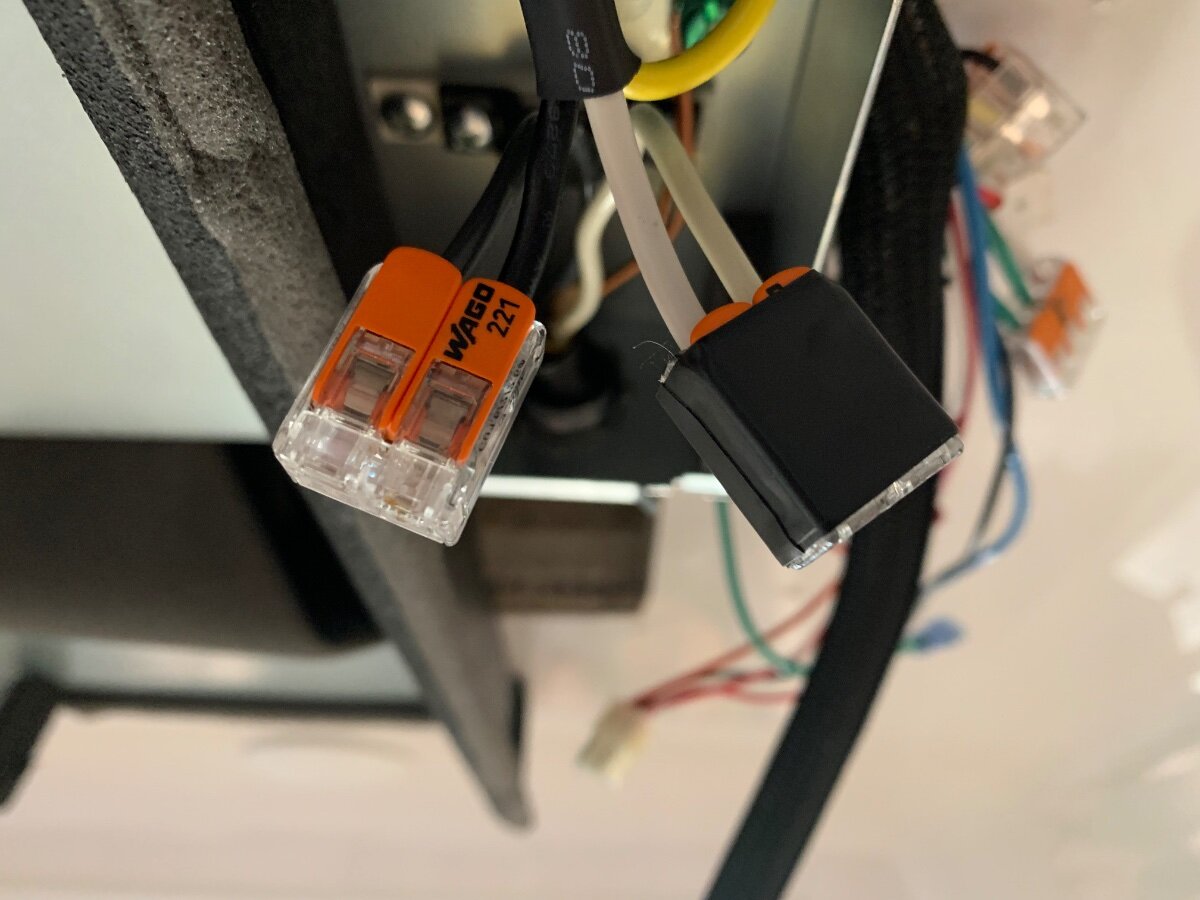
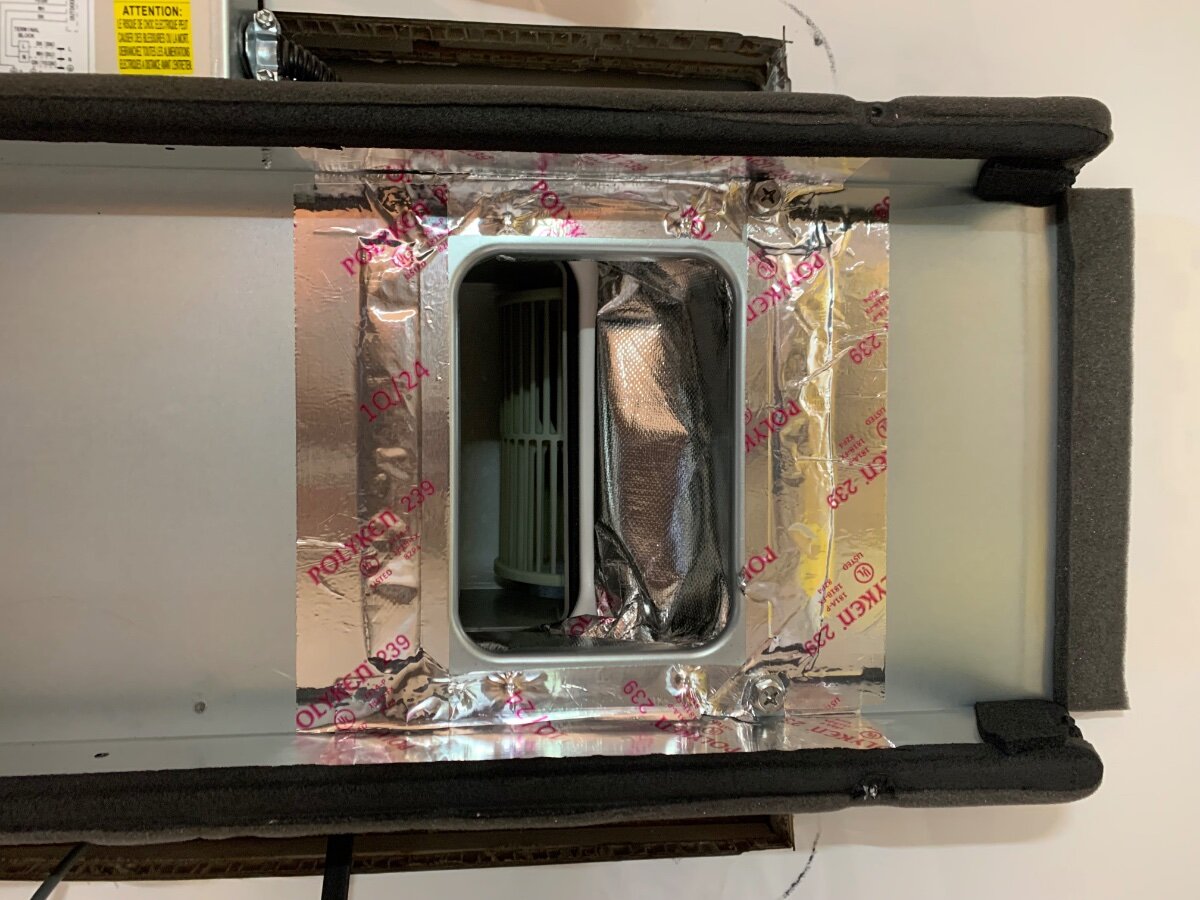
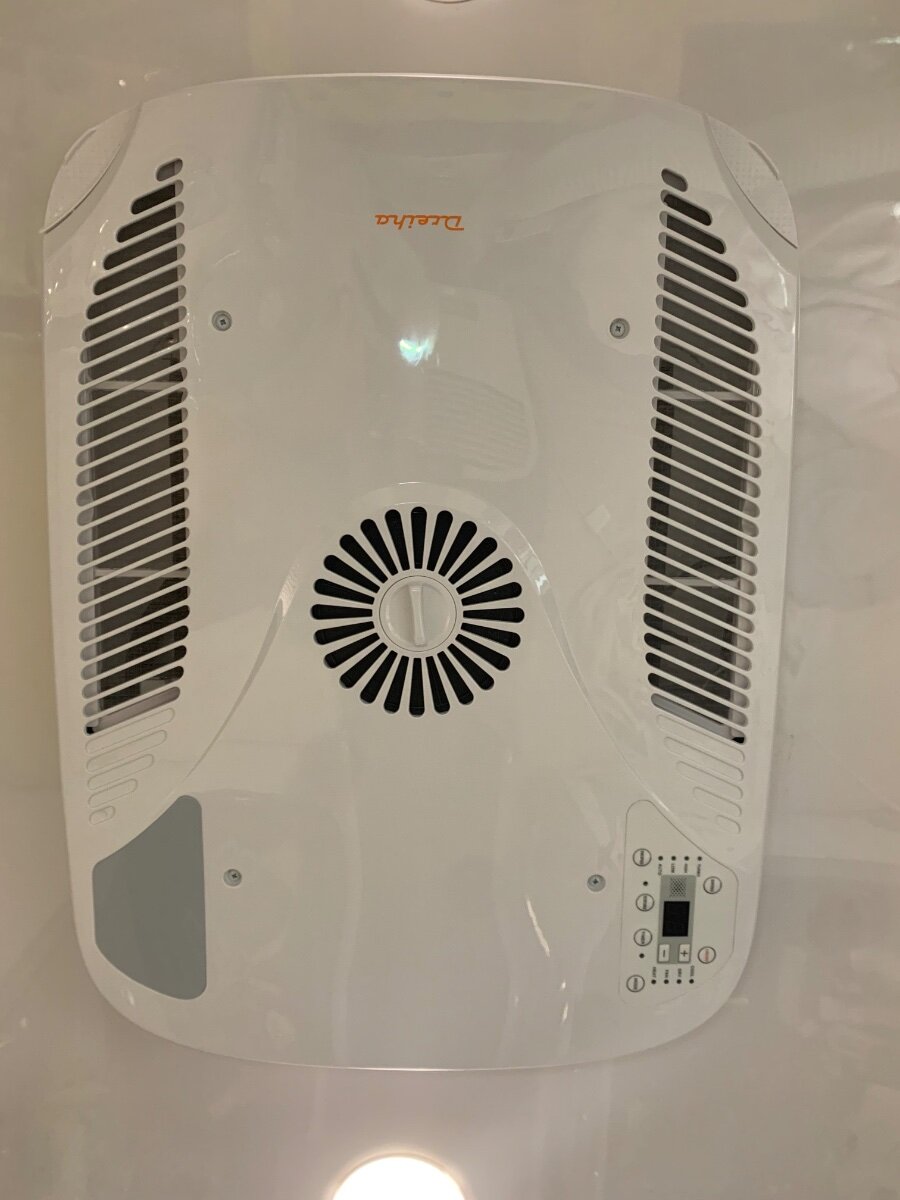
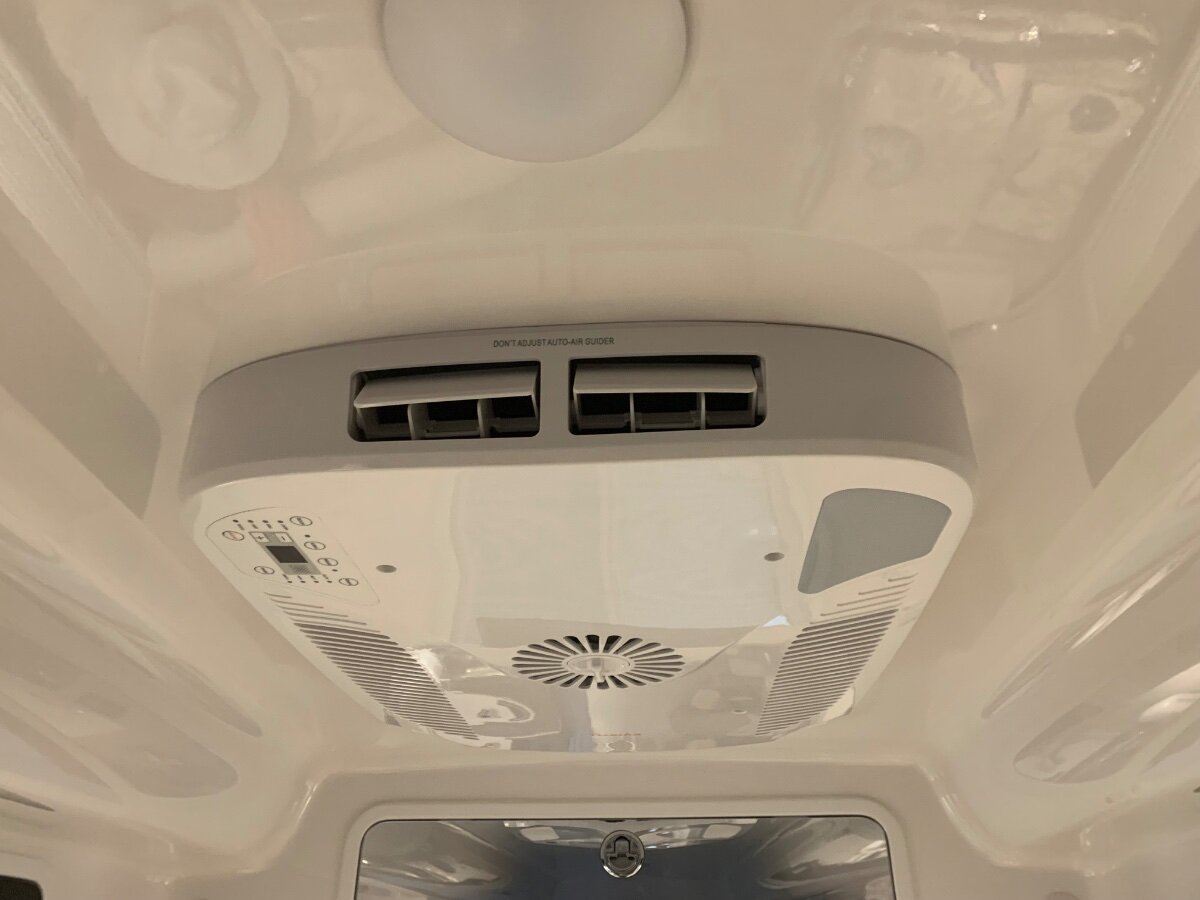
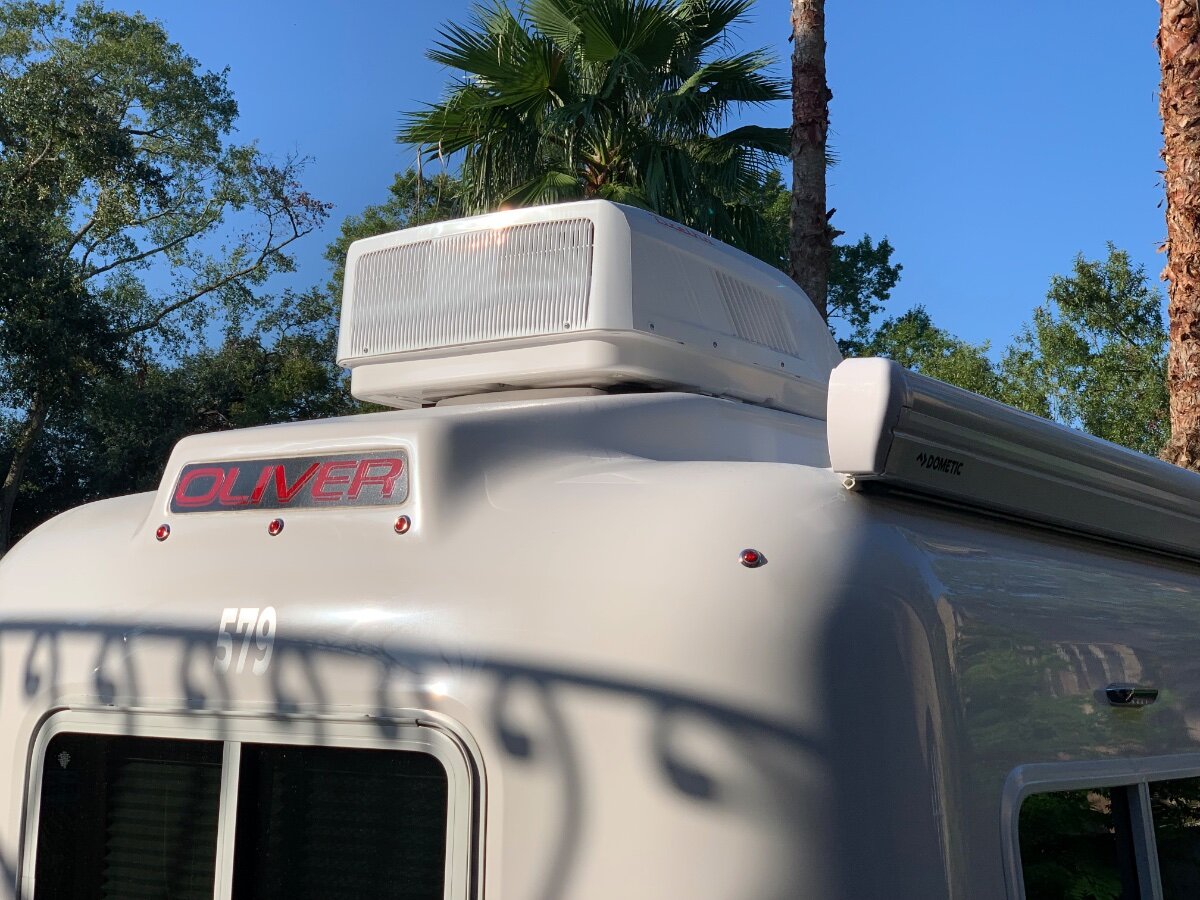
This long awaited swap-mod is now checked off my to-do list! Like many, I tolerated the noisy Dometic Penguin ll long enough; so glad I was finally able to take decisive action with this install. After a couple years of mulling over the various replacement models being marketed, a unit emerged that caught my attention; the newly available Atmos 4.4 seemingly met all of my expectations. I will forego the removal of the Dometic, here is how I proceeded forward: First and foremost, all AC and DC power sources were turned OFF! Scaffolding and equipment/supplies were then staged for Dometic ‘liftoff’ and subsequent Atmos ‘lunar landing’ (only appropriate since I live a couple miles from the NASA Mission Control Center in Houston). Roof area in need of cleaning. Notice the raised fiberglass landing on my year model and that the former condensate drain tube was simply disconnected rather than cutoff. Roof area throughly cleaned and prepped. I decided to adhere the square self-adhesive foam roof seal directly onto the fiberglass and then apply non-leveling Dicor around the cutout perimeter to further ensure the best seal possible. In positioning the foam seal, care was taken to center it as evenly possible, thereby allowing about 1/4-3/8” of exposed fiberglass to lay a bead of the Dicor and finger smooth to finish. Interior view of the Atmos being positioned over the roof cutout. Note the use of the mounting bolts as a guide, as recommended by SDG. Because the ‘rough cut’ edges of the layers of fiberglass (inner and outer hulls, and spacial filler) were inconsistent, I used the foam seal as a reference to accurately center and align the unit; distances measured to each respective bolt. Initially, installation instructions were followed by adhering the supplied straight piece of self-adhesive foam onto the bottom of the unit as a rear support, but it did not make contact with the roof due to relief of the aforementioned fiberglass landing. Alternatively, the foam piece was cut in half and each adhered onto the fiberglass, in like manner as the square seal, along the outer edges of said landing. This adaptation proved very effective in application and purpose, as the last of the next three pics demonstrates. Now that the exterior unit is properly positioned and supported, it’s back inside to further installation. As a side note, I made use of a portable a/c to buffer the heat and humidity of the day! Although my son helped with the heavy lifting and positioning, I cut him loose and completed the remaining tasks solo. Before proceeding, I used foil tape to treat the end of the aforementioned condensate drain tube and secure it to the side. Next the installation of the fabric air plate duct subassembly was started (provided Dreiha Atmos 4.4 Manual details the process). Note I used foil tape on both the upper (at Atmos bottom) and lower (at mounting frame) duct plates, even though most installs viewed applied to the mounting frame plate only. Between the upper and lower duct plate installs, the ceiling assembly mounting frame was bolted in place and hand torqued using a screwdriver only (torque specified in Manual). The AC power connection was very straightforward. The ceiling assembly’s junction box cover was removed, a strain relief fitting installed at one end (the other end had a preinstalled protector) and respective wires routed inside. I reused the Wago Lever-Nuts from the Dometic install, but first tinned the stranded wires of the Atmos lead for optimum assurance in application; electrical tape was used to further secure the Wago connectors. Ground wires were secured per the Manual. The junction box cover was then replaced, DC thermostat wire bundle loom wrapped and tucked away for future use, and ceiling grille fastened in place. . I’m very pleased with this mod, quality of the Atmos and ease of installation! I should mention that SDG preinstalled a SoftStartRV. I will provide an update once the furnace wiring and thermostat mount is completed. A special shoutout to @rideadeuce for forging the way with his install of an Atmos!
 5 points
 -
It turns the water pump on/off. That way, if you're in the bathroom and forgot to turn the pump on, you don't have to walk back to the control panel in the main cabin.5 points
-
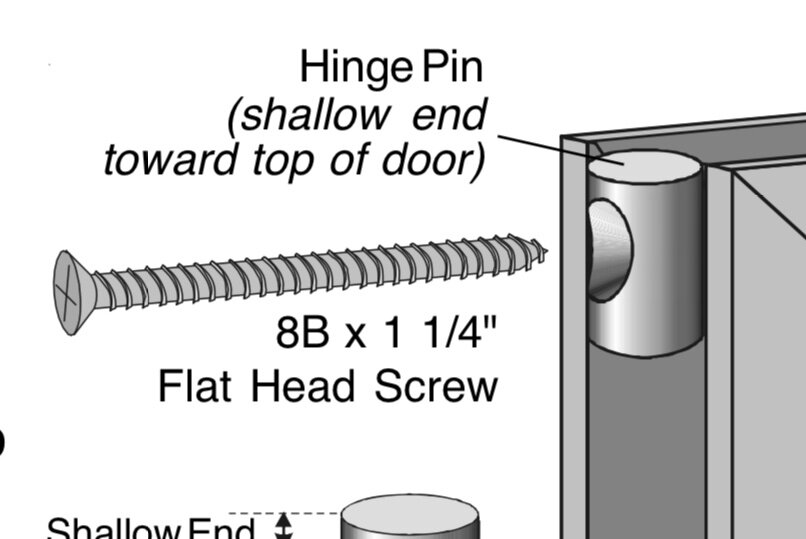
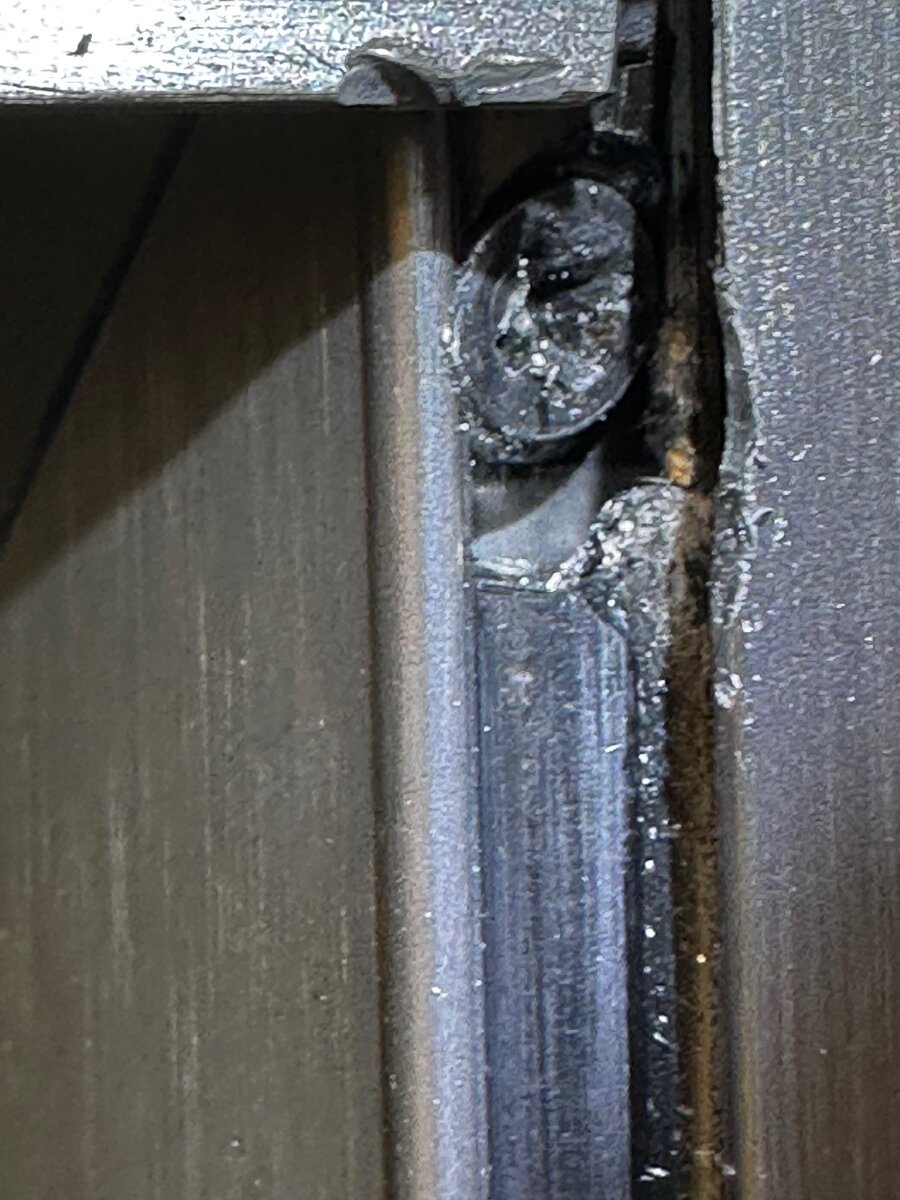
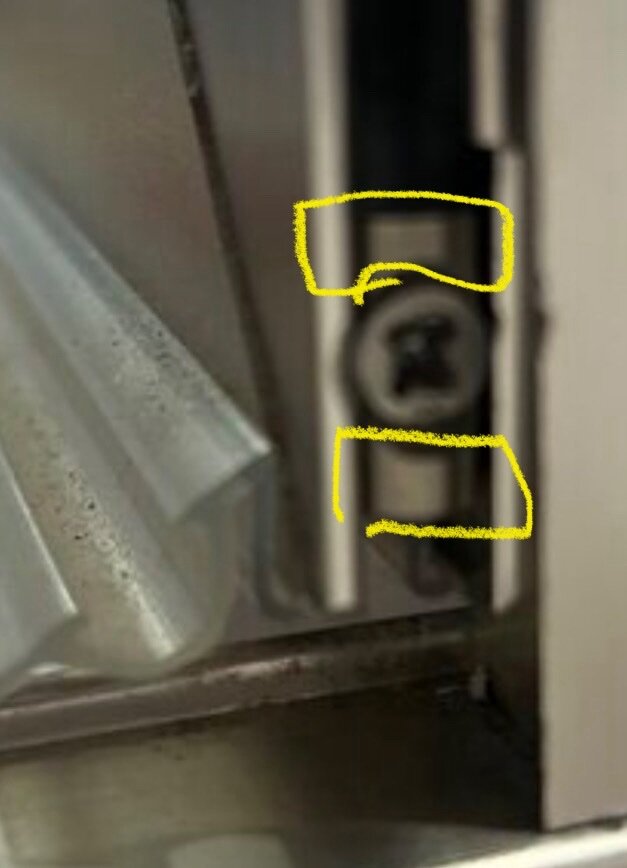
Here’s the failure: top hinge lins have worn away on the lower side of the pin. This causes door to drop and stick. Another owner put 2 BBs in that space, but new hinge pins are the fix. below pix is with door lifted and you see the space that has ground away.
3 points
-
We really like our 2020 OLEll and continue to really enjoy it. And we truly believe it’s the best TT made, and it has served us very well. However at the price today for a 24/25 model we would not likely be a player at today’s retail prices. This where I think the preowned market is good. The higher the price for a new Oliver, hopefully will help hold steady the prices in the preowned market. I am really glad we purchased when we did and still feel like when the time comes we will do just fine with resale. A well kept, throughly documented and well maintained Oliver will still likely bring a decent price. Good luck @roguebooks selling your E1, I hope it moves quickly for you.
3 points
-
This doesn't solve the problem. But this past weekend, I got to see the modification that @Ollie-Haus made on his 2023. It is a 5"+ length of 1x1x1 aluminum Z-bar, painted white, and adhered to the trailer with double-sided tape. https://www.mcmaster.com/7062T15/ I'm going to do the same, but before mounting the shield, I will cover the lens with amber Lamin-X film (that I bought before getting the trailer but have yet to apply...) It makes a huge difference, and even while still a cool white, it is less objectionable than just covered with Lamin-X like the trailer beside us had. It was great to compare the two, which is what convinced me to do both!
3 points
-
Its one part of whats called a 3 WAY switch. Just like in your house where you can turn a light on/off from opposite sides of the room... this allows you to turn the water pump on from either the wall above dinette OR from the bathroom.2 points
-
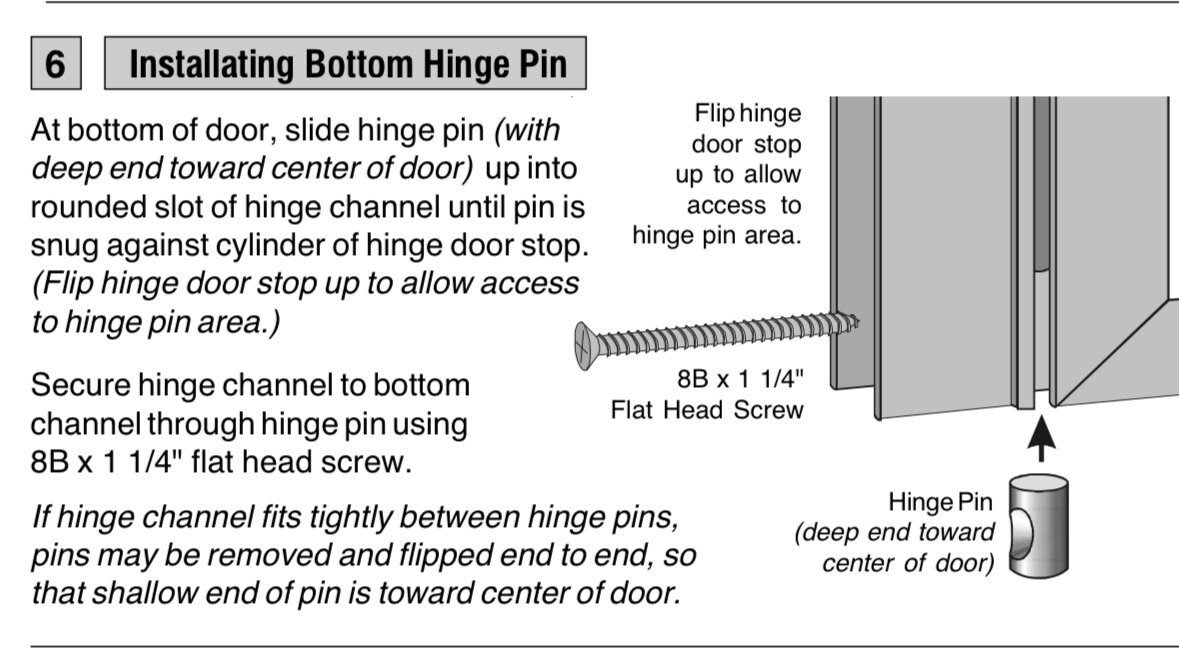
@Galway Girl Thanks for posting the door assembly instructions! @Corvus @Jps190 @SNY SD UP When I read the door installation instructions, there does not seem to be a wrong way to insert the hinge pins. They suggest putting the long portion of the pin toward the middle of the door, but then state that the hinge pins may be installed with the short end toward the middle of the door if the hinge channel is too tight between the hinge pins. It does seem that the hinge pins would last longer with the long portion placed toward the center of the door. Mossey
2 points
-
I am glad I don’t have to think about it. 👍🏻😊2 points
-
GA RV Pros 210 Shamrock Industrial Blvd Tyrone GA 30290 Very nice workshop. Very quick service, we picked it up the next day. Their rate was $180 per hour.2 points
-
@Patriot I can’t help but think that these MSRP markdowns to a lower NO HAGGLE PRICE as anything more than a marketing gimmick!2 points
-
I think I hit the perfect storm. Drawing the batteries down by running the AC off the inverter and then plugging the trailer onto 30amp to recharge the batteries, all in 85°+ heat. The inverter was hot and the fan was constantly running, tripped the breaker. All seems to be back to normal.2 points
-
This won't be helpful for anyone with an OE I but on used pricing for the OE II, here is a plot of asking prices since early 2023, mostly from RV Trader. I stopped updating this about 2 months ago after we bought ours. FWIW.
2 points
-
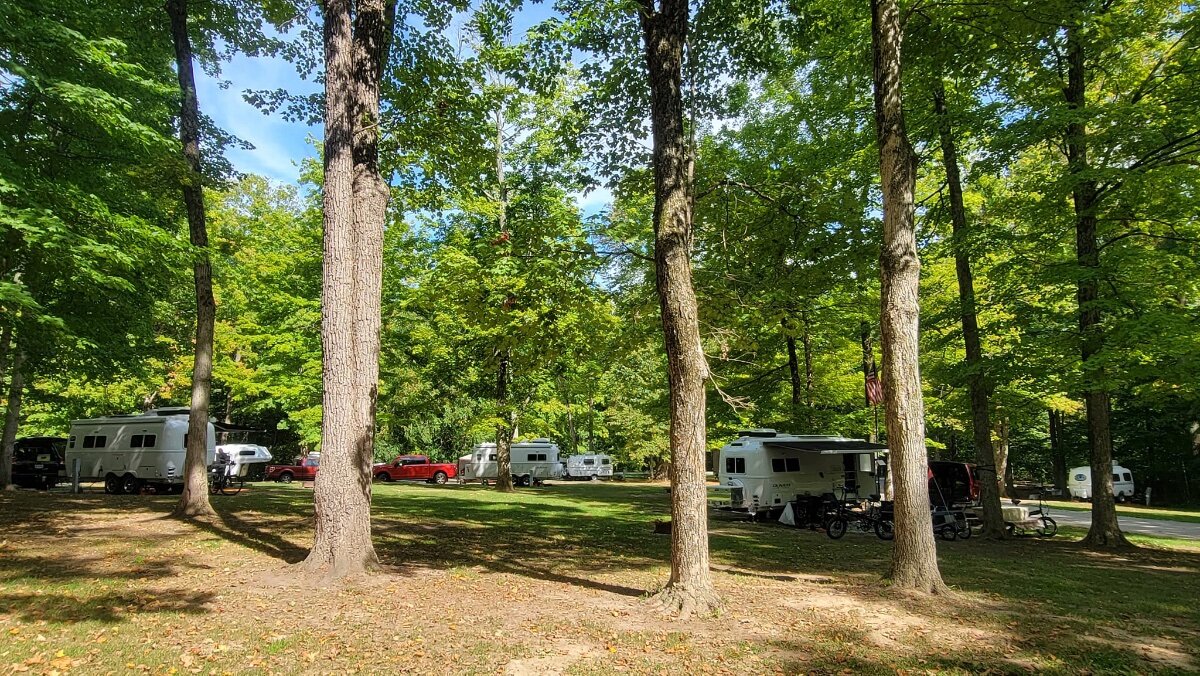
Three of the six Olivers in attendance at the 2024 Ohio Fall Annual Egg Rally, held at Cowan Lake State Park, in southwest Ohio. @Ollie-Haus @csevel Matt & Sue Jones, Deb and me, the folks with the micro-truck at the Oliver Rally, who I've *again* forgotten their name, and an unknown E1 that pulled in but was not found while riding around. Plus a couple who spent about an hour looking at our trailer and talking to Claudia, who have found a 2019 EII and are considering buying it. A fun time, and beautiful weather.
2 points
-
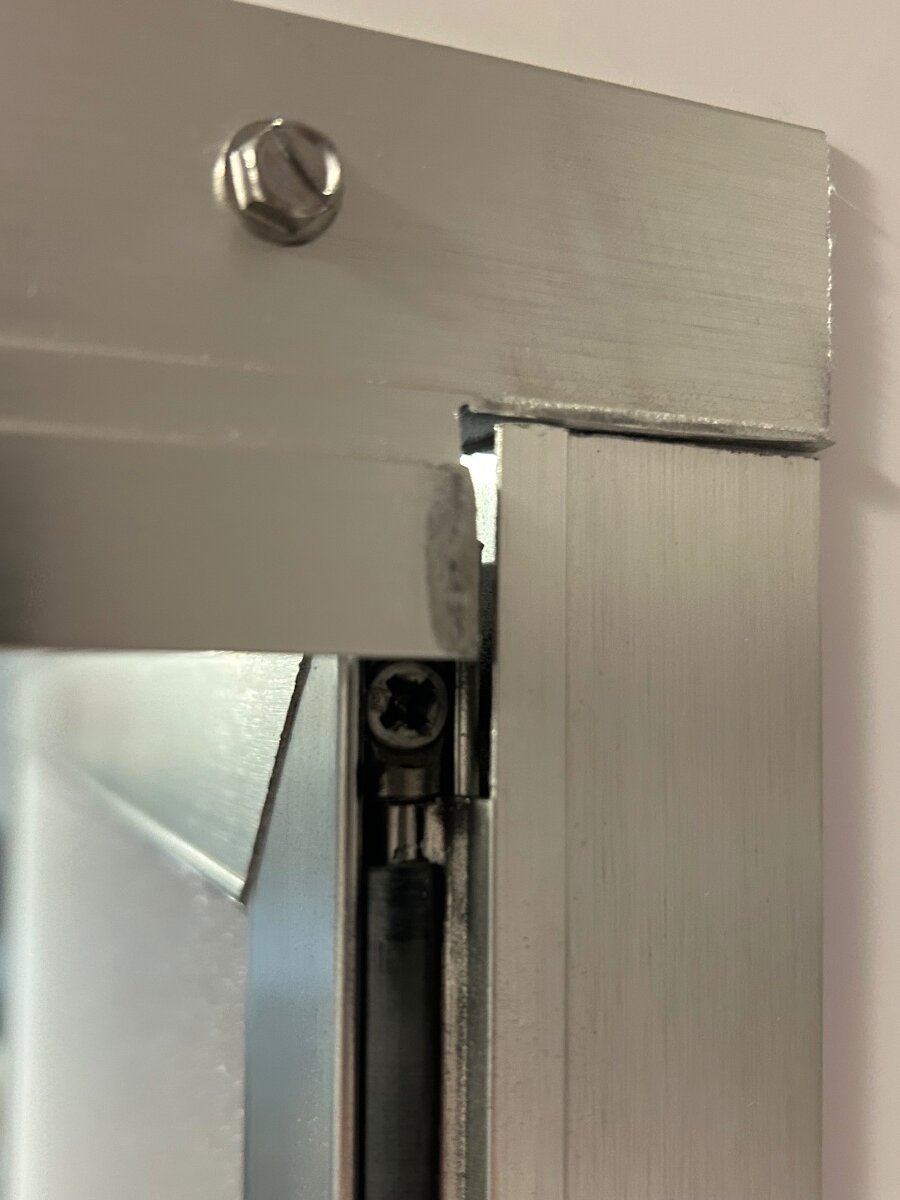
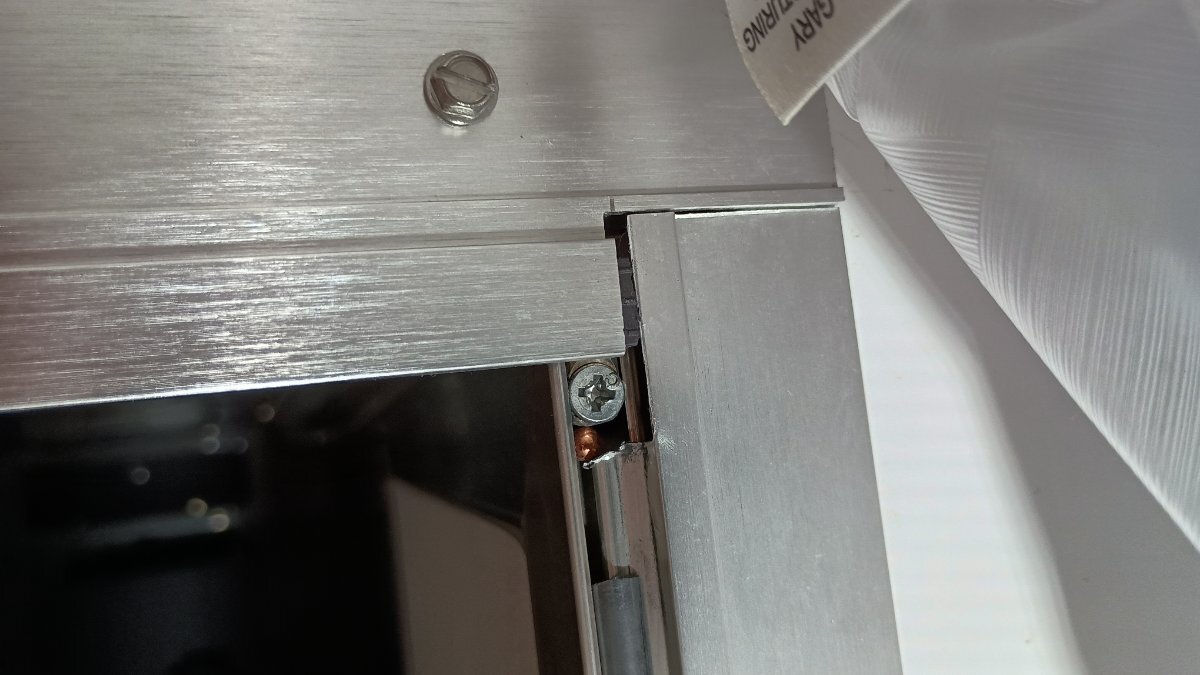
I placed a plastic cap under the bottom off the hinge. This temp fix holds the door up to cleat the threshold. i wonder what the bottom of that hinge is supposed to have under it? Is there a pin/bushing missing on mine? Anyone that can show a pix of a functioning bottom door hinge area would be a help I have a ticket open for this..
2 points
-
Pricing used older Oliver’s should be pretty straight forward. When we ordered ours in 2015 the base price was $46K-ish. With options (not as many available as today) ours was just over $50K. That’s where I would start if/when I decide to sell. I would add some for the lithium upgrade and a few other mods that have been done. Factor in the age of tires and general condition of the trailer and you might add or subtract some. For example, ours has a new inverter, new shocks, springs, bearings brakes and tires, and a fairly recent ceramic coating. Those are all adds. In other words, I’d want what I’ve put into it and it would still be a bargain for someone interested in a used trailer. Mike2 points
-
both Hi all, Interesting discussion that comes right at the tail of my yesterday mod. Frankly I didn't even know that there were courtesy and porch lights on the street side - but I'm just a newbie here. What I did know was that the porch and courtesy lights were really a problem for both me and Jill because of brightness. So - I decided to put dimmers on them. They work great! And I did just go check and I DO have street side as well and they both dim full range. I have to say that the wiring I came up against in the Ollie is what I would expect to see in a 60's piece of equipment. It also explains why I have had intermittent main cabin lights. (I have hull #1491). Someone in the factory must have pulled out the spade lugs from the switches several times and the retention weakened. I also found only one wire for both sides. I think I will do the Lamin-x on the street side. With the lower intensity and amber light it shouldn't bother anyone and could help if I want to walk around Carlotta.1 point
-
Yes, I am satisfied with the 390 Ah of Lithionics LiFePO4 batteries in our 2022 Elite II. I got educated about batteries and solar panels more than 20 years ago when I needed to power a CPAP machine on wilderness river trips. At that time, the best batteries commercially available were AGMs, which are sealed but are lead/acid based. I replaced them every 3 years to avoid failure on a long remote river trip. I studied lithiums for years, and finally "bit the bullet" and bought some to power my CPAP when prices came down about 5 years ago. So, when ordering our Oliver, I was persuaded that the significant upcharge for the lithium package, given our plans to boondock, made sense for us. Your recent posts on this thread suggest you have resolved your current issue by cleaning the terminals on your 6V AGMs. But, depending on how "fresh" your AGMs were when installed in your 2021 Elite II, you likely have between a few months and 4 years of remaining life, as lead/acid chemistry only lasts between 3 and 7 years from date of manufacture. And, deep discharge (like you have just experienced) shortens the life of any AGM battery. In your shoes, I would carefully study the recent posts by helpful Oliver owners on this forum who have installed Epoch LiFePO4 batteries, including those in the thread listed above by jd1923, and make an informed decision about whether the lithium upgrade makes sense for you. Every time we boondock, we are grateful we "bit the bullet" for the Lithium Pro package on our Elite II.1 point
-
This could be the reason for the new redesign of the bath door. All good info!1 point
-
I have been able to clear the code 20 this way: Disconnect shore power Turn off the inverter remote (button out) Turn off my three Lithionic batteries, and wait a couple minutes Turn on batteries Turn on inverter (push button in) Wait for remote to connect (60 seconds) If all is good, then connect shore power. Just because this was worked for me a few times doesn't mean it will continue, so I'm keeping my fingers crossed. The inverter spirits are unpredictable.1 point
-
We had the same issue with our 2019 over time. The dealer in Denver replaced the pins while our trailer was in for another issue. That did fix the door.1 point
-
Thanks for sharing this info. Very interesting. I recently saw a video from some financial guy who said... If you're going to buy a boat or RV, just think of it as putting the money in a big pile and setting it on fire. And for many RV's I would agree. Nice to see that Oliver owners are not in that category. That being said.... As far as Donna is concerned, we will be making our LE2 (hull #145) a true Legacy and leave it to our son after we are gone. When you add up purchase price, maintenance, upgrades, etc. there is a whole bunch of money we won't be getting back, BUT... Just owning our trailer is a joy. And, now that we are both retired and have a new TV, we'll be looking forward to more trips. Happy Camping Everyone! Scotty1 point
-
My Pins are correct. Whilst on one of our many 'Shake-Down Runs', for lack of a real explanation as to how we shattered our bathroom door mirror. Gorilla Tape was our friend for the remainder of the trip. Later when it came time to remove the door, I opted to remove it by unscrewing the channel where it attaches to the rear facing dinette wall, so I did not remove at the 'pins'. Removal & installation was quite easy. This might be a way that would be easy for you to make repairs. IDK. B~OUT1 point
-
I just looked at my hinge pins and they appear to be installed opposite of those directions also. john1 point
-
Thank you for posting the assembly instructions. What stands out to me is the instructions say to insert the deep end of the hinge pin toward the center of the door. Both of mine have the shallow end toward the center of the door. Maybe the deep end acts as a buffer (bushing?) to prevent it from wearing away the hinge door stop. The weight of the door is mostly supported by the top end of the hinge door stop where the hinge pin rest and that is where mine is damaged. Judging from the photos it looks like Patriot's hinge pins were put in correctly or they are different. Your hull and mine are closer in production than Patriots. Do you know if Oliver buys these doors as a kit and assembles them or buys them already assembled? If the former it might explain some inconsistencies in assembly.1 point
-
From the company that makes the door: KstlKD_HingePin_982.pdf Excerpt below of bottom. It appears my hinge pins have worn away the silencers sleeve so it now drops the door down. once I get confirmation of what’s happening I’ll update. craig
1 point
-
I think there are a few reasons for that, including the market being depressed in general, the number of Ollie's built and available for sale continues to increase, and you can now purchase from dealers without any wait time and also finance at the same time. I'm sure in the past many paid a premium for used instead of waiting for a custom build.1 point
-
Thanks @Patriot In my door those pieces above and below the screw (in yellow area on your pix) are missing. tried loosening, lifting and tightening to no avail. I think something fell off or wore away
1 point
-
Glad our old hull has the left/right switches. I find we rarely if ever use the street-side light. If all else fails, just pull the light, remove and tape wire to disable the one side.1 point
-
I just took a look at my door and it doe not have a bushing under the hinge. It appears that the screw at the top and the screw at the bottom of the door are adjustment screws. My initial thought is if you loosen both top and bottom screws then retighten both screws while lifting the door up slightly in the process to achieve the clearance you need at the bottom lip of the door to get it to clear and close properly. Please let us know what you learn from service. Bottom-
1 point
-
Love it or hate it, I have seen a number of Olivers sold on FB -https://www.facebook.com/groups/OliverforSale Used Oliver’s for sale here will also give you a general idea of what price range you should consider listing your Oliver as equipped. The other positive comment I will add is that I have seen a lot of Oliver owners get answers to questions with in short order on the Oliver FB page fairly quickly I might add. A huge thanks to @John Dorrer, Ruth Meilstrup and the Admin team and FB members, who all try and do a really fantastic job of going above and beyond helping out folks who are seeking knowledge or need immediate help with an issue be it large or small. Seems to me that is really what it’s all about just in a kind and decent way helping each other. The other real gain is the connections and friendships made with other Oliver owners. Win win here! 👍🏻🇺🇸😊 Cheers and Happy Travels! Patriot🇺🇸🇺🇸1 point
-
Checked batteries. Terminals were corroded. Cleaned with baking soda and water. Scraped away a bit. Removed nuts and cleaned. When I checked what was going on inside Oliver, lights were steady and solar monitor read 13.6 v. Reattached shore power and it seemed to be charging. Will let you know later if that was the only problem. Thanks for your posts. This hopefully will be the end of my problem. Charlie1 point
-
I've attached a simplified electrical schematic for my 2021 Oliver Legacy Elite II. This schematic will be "basically correct" for most Oliver models. The numbering and amperage ratings shown for the breakers and fuses matches the numbering scheme in my Oliver Owner's Manual. I made this diagram because my Zamp solar charge controller stopped charging the house battery, and I couldn't find a good electrical diagram online, and the Oliver Owner's Manual didn't provide a decent line drawing. So, I made this one. (my specific Zamp issue turned out to be caused by a badly corroded terminal on breaker B1 ... which by the way, any auto parts store will have a replacement for this thermal-type breaker). I also realized I didn't understand how the AC and DC systems work together, so I made a single diagram showing both systems. Often a simple diagram can be used to trace a myriad of symptoms back to a common component such as a breaker, fuse, or even the house battery. Or, to answer a simple question like "why does the inverter run when I'm connected to shore power"? (the answer is, it has to because the inverter is supplying power to the 25A sub-main that feeds all your AC loads except the refrigerator! And the inverter gets its power either from the house battery, or from shore power, or from the aux (generator) input). I hope people find this schematic to be helpful. OliverSimpleElectricalv2.pdf1 point
-
I couldn't find a way to adjust the door without removing it so I looked for something to place at the top of the hinge to raise the door and reduce the grinding on the hinge. There were some BBs on my bench and so I inserted one between the top of the hinge and the stop bar. Now the door swings and closes very easily. Maybe not the a permanent fix but it was easy and hopefully it will last until a better solution comes along. Photo of BB placed above hinge.
1 point
-
Pricing?!? I always cringe when I see used Oliver TT's priced at what IMHO.... is way too low. Wasn't long ago that you could sell an Oliver that was 4-5 years old for close to what you paid for it. I would get out my build sheet and compare what those options are going for today plus the base. Also consider what options are no longer available. Mirror cabinet doors... Lonseal Floor anyone? I would start at 5% below what I paid and make further discounts from there, if needed. You can then compare what it would cost to have a "new" Oliver vs. your used one. Plus get it now instead of waiting. There are a LOT of folks out there that would LOVE to have a six year old Oliver at the "discount" that you paid in 2018. My opinion only and I would love to hear what your experience is after it sells. Good Luck. Scotty1 point
-
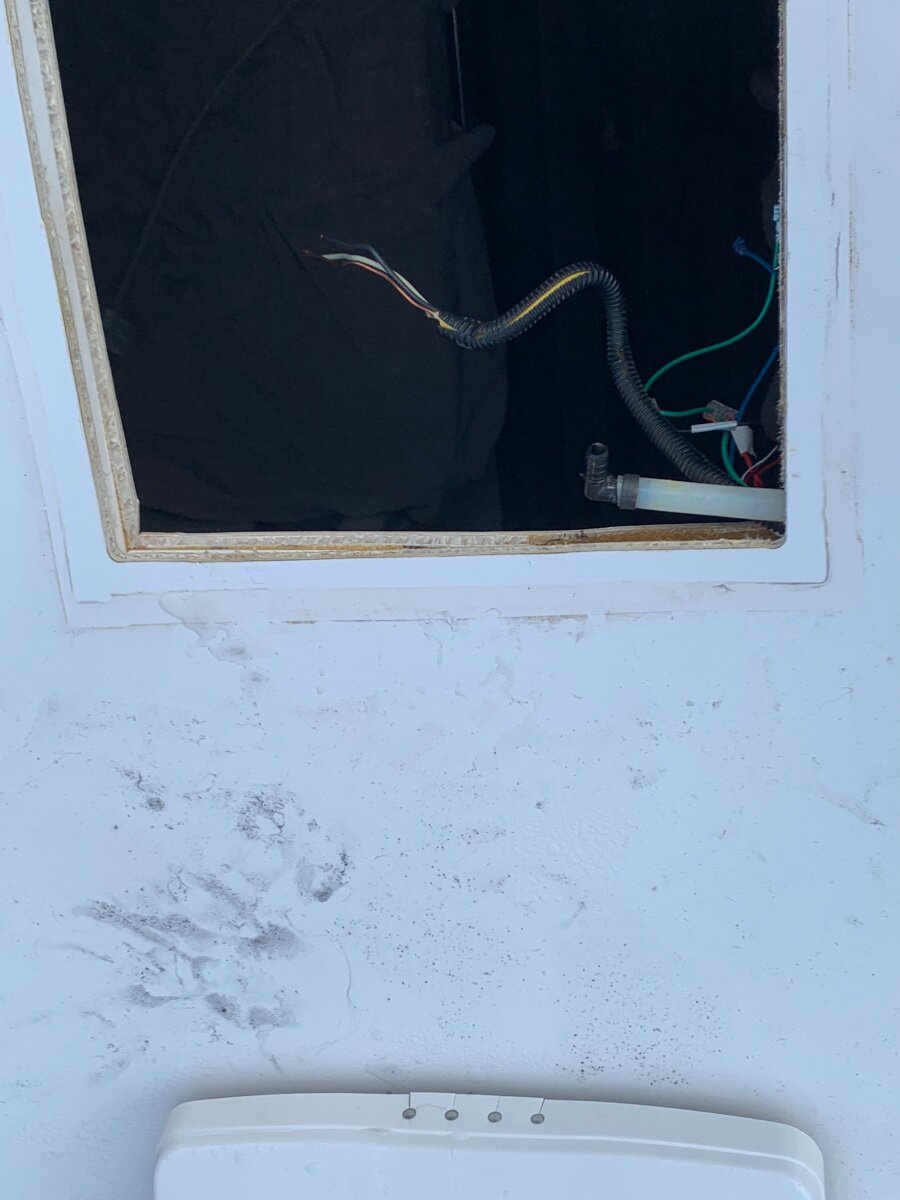
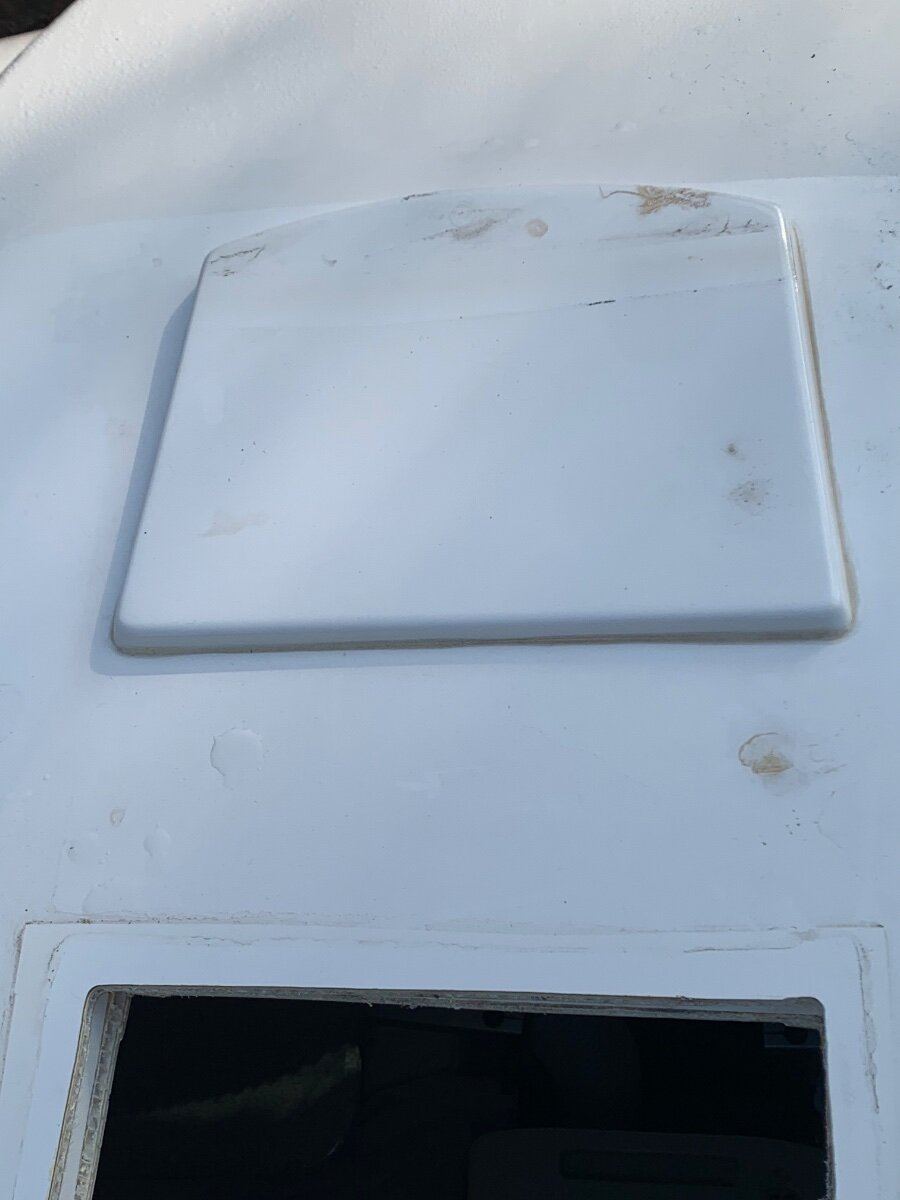
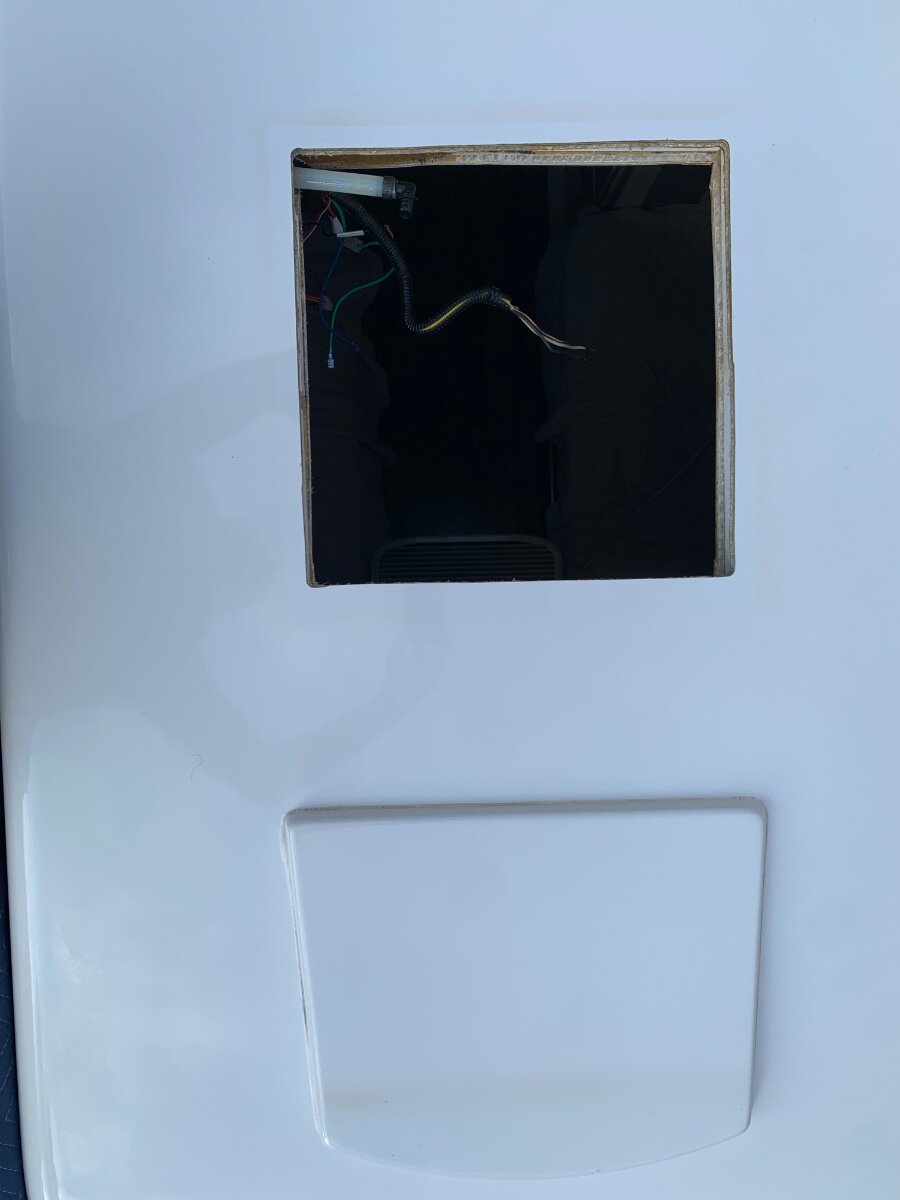
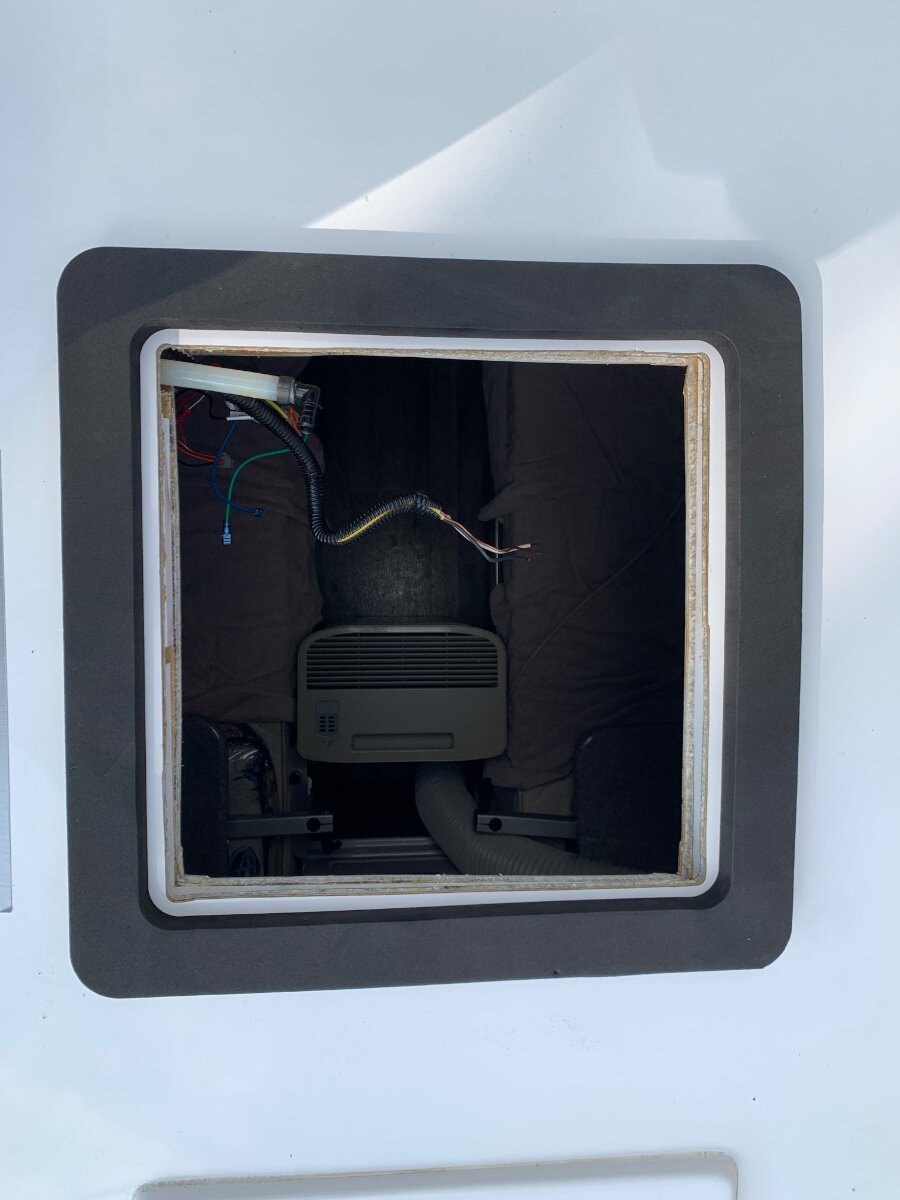
We acquired hull 752 this spring and I’ll follow this thread. I’ve been thinking to use it portable but I’m not willing to put any holes in for antennas. I think that until I resolve this quandary , I’ll feed it in thought the bathroom window. One of my intentions is to (finally) set up Winlink AC0DH1 point
-
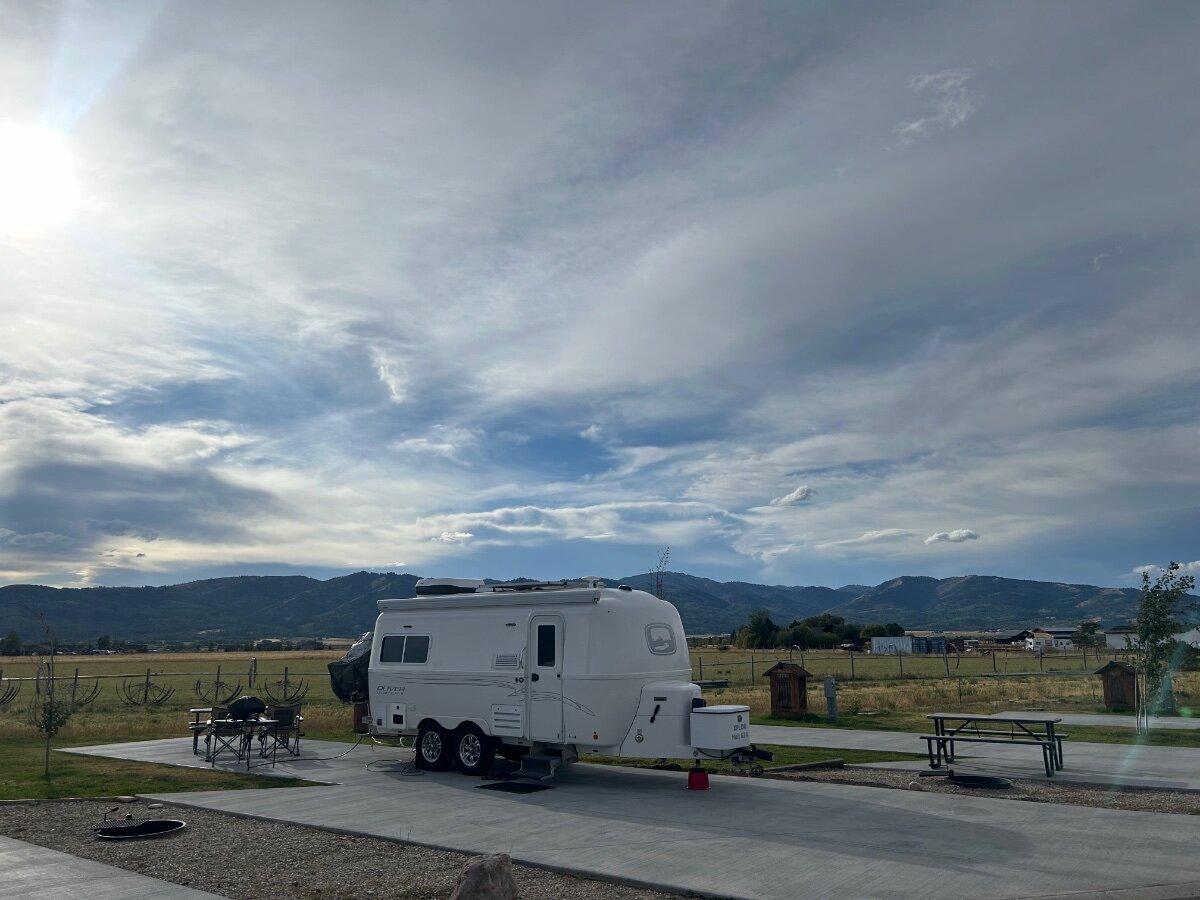
After a great nights rest at Teton Valley Resort here in Idaho, this morning we headed up to the Grand Tetons. Such a beautiful NP! We really enjoyed the scenic drive over Teton Pass. Soooo glad we have the diesel engine brake, as I rarely used our truck brakes at all. Ford nailed it with the 6.7 10 speed and diesel engine brake. After hiking up and around Jenny Lake a few hours we headed into Jackson Hole for lunch and of course hit a few T shirt shops and just walk around town. We walked into the Million Dollar Saloon which was kind of neat to see. We landed for lunch at place called “Hatch” Needless to say after a light breakfast we were both ravenous and the food was really fresh and delicious. We have 3 more nights here and plan to spend a lot more time touring and hiking in the Tetons before heading to Yellowstone. The temps are perfect! No AC needed at night as our low this morning was 49 and mid 70’s during the day. As you can tell by the park road entrance pic, it was not very crowded when we arrived, which is just the way we like it. Cheers and Safe Travels! Teton Valley Resort…nice digs and we are enjoying our stay here. It’s not very busy at all. The kinda road we like to see inside a NP. Less crowds, less people, less traffic on the road less traveled. We really enjoyed the cooler temps while hiking around Jenny Lake. Lunch at the Hatch… wow factor for the foodies we are. We were both hungry after our morning hike. The Elk Antler Arch… Our Beast of Burden doing Tremor things… The Beautiful Tetons are really amazing.
1 point
-
Does "everything fine" when plugged into shore power mean both 12 volt DC and 120 volt AC are working? What goes crazy when unplugged? Since you were boondocking for 9 days, then you were running on your batteries. What was the state of charge from day to day? There are a lot of helpful and experienced folks on this forum. Someone is bound to respond if you provide additional details about your coach (type of batteries and inverter/charger) and the troubleshooting steps you've already tried.1 point
-
I happened to find our Ollie on CraigsList but saw several good leads on RVTrader. I had alerts set up on both sites for several months so I had a good idea of what the typical asking prices were, how quickly they sold and could also see when the prices were reduced. We sold our Minnie Winnie through RVTrader in just 2 weeks, but it's a little pricey, CraigsList is free. There are a lot of on-line scammers out there, just be careful to only deal with someone that you can actually meet in person. Good luck!1 point
-
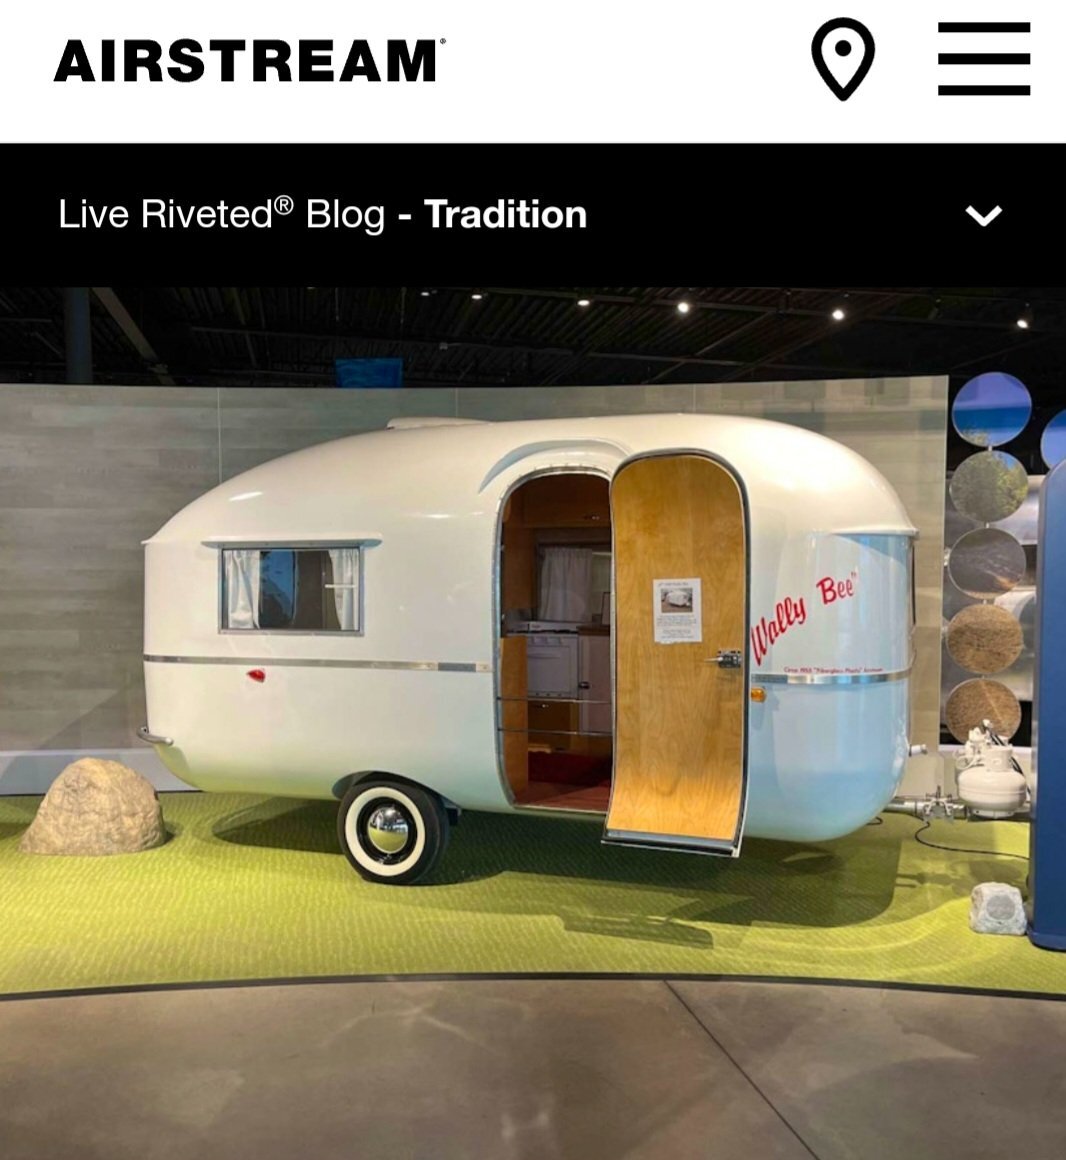
And, then, there was the Wally Bee. Looks a bit like a UK fiberglass trailer of its time but, hey, it's very cool. Aluminum was cheaper, back in the day. Fiberglass was a newer, expensive process https://www.airstream.com/blog/airstreams-foray-into-fiberglass/
1 point
-
I use this very small Mr. Coffee machine. For travel it sits in the sink along with other items. At less than 10" tall, it could go elsewhere though. Works great. Doubles as a water heater if on shore power. GJ
1 point
-
You guys are great! It is really fun to see how important the morning joe is for everyone. (Or matcha, or tea, or….). I got into making quality shots several years ago, and I’m sure Jill now considers that in me she has a fully automatic machine. I home roast my beans too, but I’m kind of a rank amateur at that. There are a lot of great ideas here and some things I’ve never seen before, such as the Cafelat Rocket. It seems like things break down into machines with pods and those without. In order to get an espresso type of extraction, I think I need pressure, either from a machine or from leverage. Although the Aeropress provides very good coffee, I’m not sure it is concentrated enough to be compared to a shot extracted at 9 bars. I’d love some input on that though. I don’t think I want to deal with a wand to steam the milk, and I think there are a range of alternatives that will both heat and aerate the milk, so I can put that on the back burner (ha). A comment on the Moka pot. I had never used one until it showed up as THE WAY to make something similar to espresso in an AirBnb that we rented in Sardinia last year. I was amazed at the results! It is neither espresso nor dripped or percolated coffee, but it is rich and good (but we didn’t find the code to keep it from being messy)! It also seems like having an induction kettle is the way to go for general purpose water heating and tea making. (We try to make hibiscus tea regularly and can keep it in the fridge for a few days. I also appreciate the ideas for storage and locating kitchen things in the Ollie – thanks again to everyone for diving into this conversation! I’m still mulling over the great inputs and probably leaning toward the rocket, but haven’t made a decision. So much fun!1 point
-
Since our trailer is Hull 505 Galway Girl we love Irish Coffee made with a melitta #4 pour over system.
1 point


.thumb.jpg.e34bf01ef7f7d5e99ad31856d45afbeb.jpg)


-
Recent Achievements
-


")


")


")


