Leaderboard


Popular Content
Showing content with the highest reputation on 04/23/2025 in all areas
-
My wife and I were lounging in our camper one night when a white Tesla backed into the lot next to us. A middle aged dude with a huge belly got out and started walking around talking to his phone which he kept pointed at himself. He mounted it on a tripod and removed this horrendous looking world war something tent out of his frunk. After 30 minutes of huffing, puffing, resting and more puffing, he got it set up. He then started cooking this amazing smelling food which he proceeded to eat in front of his phone talking animatedly between bites. I swear the dude looked like Alfred Hitchcock sporting a bright Hawaiian style shirt, some shorts stolen from Al Borland and knee high socks. I would have expected deck shoes or penny loafers but he preferred purple Crocs. His car made noises and flashed like a Christmas tree and other than the awesome food smells, he was completely annoying. I don't know why I'm telling this story. All this talk about EVs and camping I guess.6 points
-
My latest project. The weather hasn’t cooperated enough to get time to get much done before heading to Alabama, but I’ve made a start. 12V DC and 115V AC outlets hidden behind the drop down table. Not wired yet, so I’ll see if I can get that done. Im still planning on a 12V DC Anderson outlet down low on the front of the propane cover for the truck fridge, and a 115V AC outlet on the street side But those will be after the rally. I definitely need the 12V before an eight day no services outing in the Adirondacks in June Stop and see us in Curiosity on site G23
 3 points
 -
Robert, I currently power the National Luna fridge in the back of my Land Cruiser using a Bluetti E70 power station. The CD power connection for the fridge is an Anderson Powerpole plug, and I use an adapter to go from the other end of that power line to the cigarette outlet on the Bluetti. This setup works great for short trips, or longer ones where I can plug into AC at a camp site and use the AC power port on the fridge. But when half the fridge is set to freezer, I only get about 24 hours out of it before the fridge shuts down from low power. Solar helps, but in June in the Adirondacks we will be in full shade for 6-8 days. So I need to use the Oliver's 640 A/h of power, instead. As a temporary fix, I use an Anderson to Anderson extension cord, the Anderson to cigarette adaptor, and a cigarette outlet to alligator clip adaptor directly to the batteries on the trailer. Quite a Mickey Mouse setup, and prone to poor connections. As a permanent fix, I will remove the front tray and drill a hole in the front of the propane housing, and install an Anderson Powerpole outlet. I will tie into the existing front jack's constant 12V DC with a fused line to the new outlet. Then I can power the fridge directly from that outlet using the Anderson to Anderson extension cord I already have. This will also work if the Bluetti is low when parked overnight, such as at a Cracker Barrel. Of course the best fix would be to put solar on the roof of the Land Cruiser, and install a large LiFeP04 battery in there with all the associated bits, for a much longer power reserve. But I already have the huge battery bank in the trailer, and this little project is just a few dollars instead of hundreds for adding power in the truck, let alone eating away at the cargo capacity and volume of the truck. Hopefully, that answered your question.3 points
-
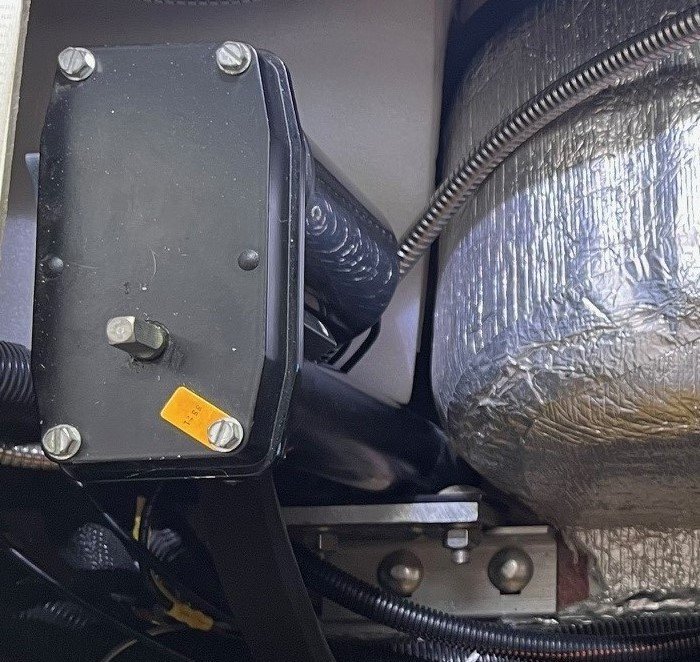
Dan, it's good you noticed this before it got worse. Check out my picture. The two carriage bolts, shiny round heads faced up, go straight down through the frame. Get under your Oliver just behind the wheel well and tighten the two large nuts. If there is a split-ring washer that has lost its spring, replace it. If not use some blue Locktite (not red). Then check the other side as well. Edit: If you find the main jack mounting bolts are tight which is highly possible, then the head of the jack has slipped up off the post. In this case, remove the head (2-3 Allen screws), check the post for vertical markings from it slipping to be certain of cause. Then remount head. Age of your hull, having it out would be a good time to do thorough maintenance. I'm the only one that has worked the complete service and if you will do so, let me know and I will supply the link. In the meantime, do not use your stabilizer jacks.
2 points
-
With our previous RV we kept loading the fire ring and LP tank when camping and when we got home we carried up to our deck (son Adam always did that task for me). After our first Oliver camping trip, having our fire ring in the front generator basket, I decided to leave it there, replace the regulator with a new line to the quick connect. We bought a second fire ring for the deck and left the extra tank up there. I also upgraded the lava rock. I can't stand the cheap/light stuff they include. These are heavier, but all I do is move it a few feet down and plug it in. They conduct the heat and make the fire ring warmer, always on the low fuel setting, and they look far better. https://www.amazon.com/dp/B07F2C7WVN?th=11 point
-
Understood, I’m one to fully protect important outlets, especially with my fridge. Potential power disruptions from a wet/compromised 12v circuit is hard on a compressor and the unit in general IMO.1 point
-
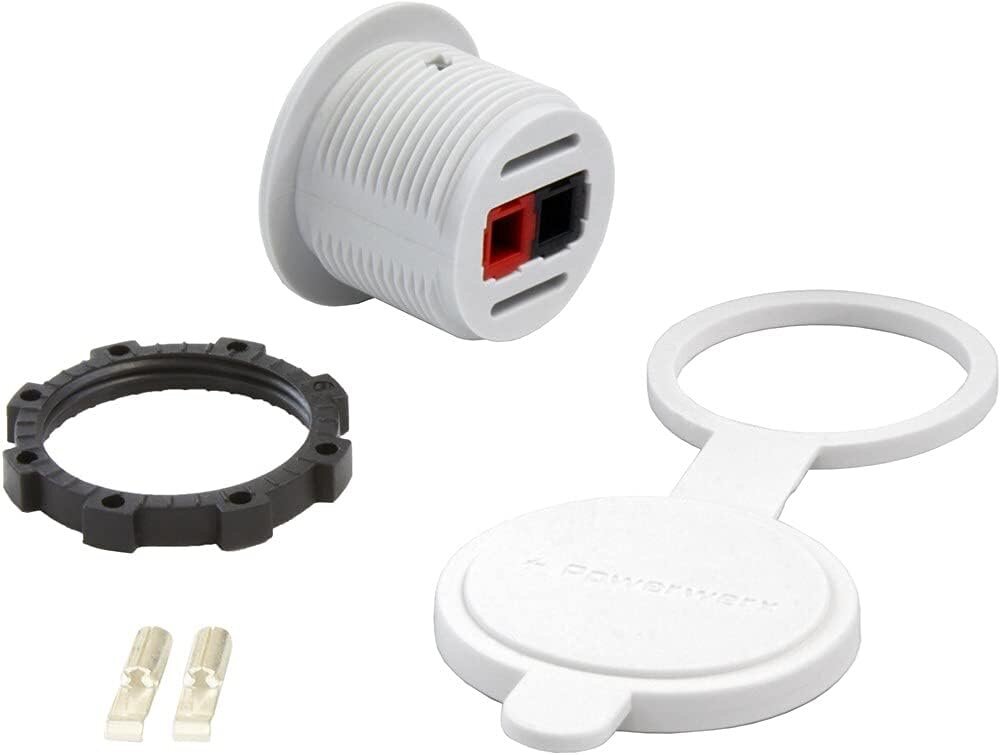
Ron, I have the linked PowerWerx outlet with cover. This, and having the front tray directly in front of the outlet will protect it during travel. For static use, I'm not too concerned about moisture problems. I know of many off-roaders that have uncapped large Anderson outlets that see extremes of water and mud without problems. I'll use heat-shrink and liquid electrical tape on the back side. https://www.amazon.com/Powerwerx-PanelPole1-White-Anderson-Powerpole-Connector/dp/B097QDRCZ4/?_encoding=UTF8&pd_rd_w=S89In&content-id=amzn1.sym.255b3518-6e7f-495c-8611-30a58648072e%3Aamzn1.symc.a68f4ca3-28dc-4388-a2cf-24672c480d8f&pf_rd_p=255b3518-6e7f-495c-8611-30a58648072e&pf_rd_r=HFMQYHNB03JBF42Z0SQ0&pd_rd_wg=y6sNl&pd_rd_r=56524771-83d9-4578-ad45-7bab707b31a6&ref_=pd_hp_d_atf_ci_mcx_mr_ca_hp_atf_d
1 point
-
Yes - more than can be counted here. It all depends on how many Ah you want/need, how much money you want/can spend, how many "features" you want/desire, etc. All of this requires a bit of homework but is really not all that difficult. Measurements for the existing tray can be found here on the Forum as well as a number of threads showing what other owners have done and how they did it. Bill1 point
-
This is most excellent, if you want to understand why lithium batteries are so cool. "You have just sold your first-born into slavery, remortgaged the house, and bought yourself a lithium-ion battery! Now you want to know how to take care of your precious new purchase: How to best charge lithium-iron batteries, how to discharge them, and how to get the maximum life out of your lithium-ion batteries. This article will explain the do’s and don’ts." How to Find Happiness With LiFePO4 (Lithium-Ion) Batteries John Davies Spokane WA EDIT: That is a pdf that doesn't print well. I made a Pages doc out of it, that can be printed and added to your Ollie records, if you like. JD How to Find Happiness With LiFePO4 (Lithium-Ion) Batteries - Solacity .pages EDIT 05/16/23. Thanks to Jim and Francis for converting the article to a PDF: How to Find Happiness With LiFePO4 (Lithium-Ion) Batteries1 point
-
I simply disconnected the power wire at the 7 pin connector and bent it back. I was experiencing intermittent trailer brake disconnect messages on my dash and part of my trouble shooting (while camping in Colorado) was to open up the 7 pin connector and check the trailer brake wire. While doing that I took care of the charging wire. There are other threads on the trailer brake disconnect issue. BLUF, it was the wire inside the axle that connected the brake pairs, it had frayed and was shorting the connection. This has happened to several Oliver’s owners with early hull numbers. Mike1 point
-
I simply isolate one of the onboard propane tanks and connect an extension hose directly to it for use of my outdoor fire pit; primarily the street side tank accessible via the screw port whereby the entire cover doesn’t require removal.
1 point
-
John looking forward to meeting you at the Rally. I’ve really enjoyed many, many, many of your replies/posts on the Forum.1 point
-
Well you learn something everyday! Thanks Geoff, for the clarification! So, now if I understand this correctly, the standard regulator, as installed in the Oliver or the grill we have on our deck, runs at 10 PSI. High-pressure regulators, seem most are adjustable, run up to 30 PSI (using fine-thread connections). It appears you need high pressure to operate a burner effectively when outdoors in the elements. Do I have this right? The thing I'm not liking is carrying an extra LP tank, storing it and extra hoses, lugging it it in and out of the truck, even if it is a smaller 5# tank. Also, how long could 5# of LP possibly feed a high-pressure 2-burner cooktop? Then when you go to fill LP you have to bring out the little tank again and ask the attendant to partially fill 2-3 tanks. Seems like a chronic hassle, especially if you cook with the burned regularly. Could a Tee-fitting be installed off your secondary on-board LP tank, connect it to a 0-30 PSI regulator (adjustable through the doghouse hatch) and run a line to a second quick disconnect side-by-side to the OTT installed connection? There are different styles of quick connects that could be used, so not to mix up the low/high pressure connections which would otherwise be dangerous. It may be a bit of work, but for a few hours in installation effort and for about the same $$ in parts, it makes sense to use the onboard 60# of LP and once and for all eliminate the ongoing hassles cited above. Just a thought, though I may add a burner one day! Would help in fair weather camping when we don't have a fore. Maybe a big single like this beast: https://www.amazon.com/dp/B0DF71PPC71 point
-
I went back to my earlier post to check what parts I listed. Oops, I listed the stem piece twice and missed the hose with adjustable regulator: https://a.co/d/dW8QaTY The gage on your Costco tank is for the tank level, the gage on the hose/regulator is for pressure adjustment. Happy cooking!1 point
-
You should still be under warranty Rolind. Start a ticket with Oliver...they've probably seen this a few times. Best of luck, John1 point
-
The leg/cap rotates freely within the socket.1 point
-
An interesting and entertaining opinionated thread. 😄
1 point
-
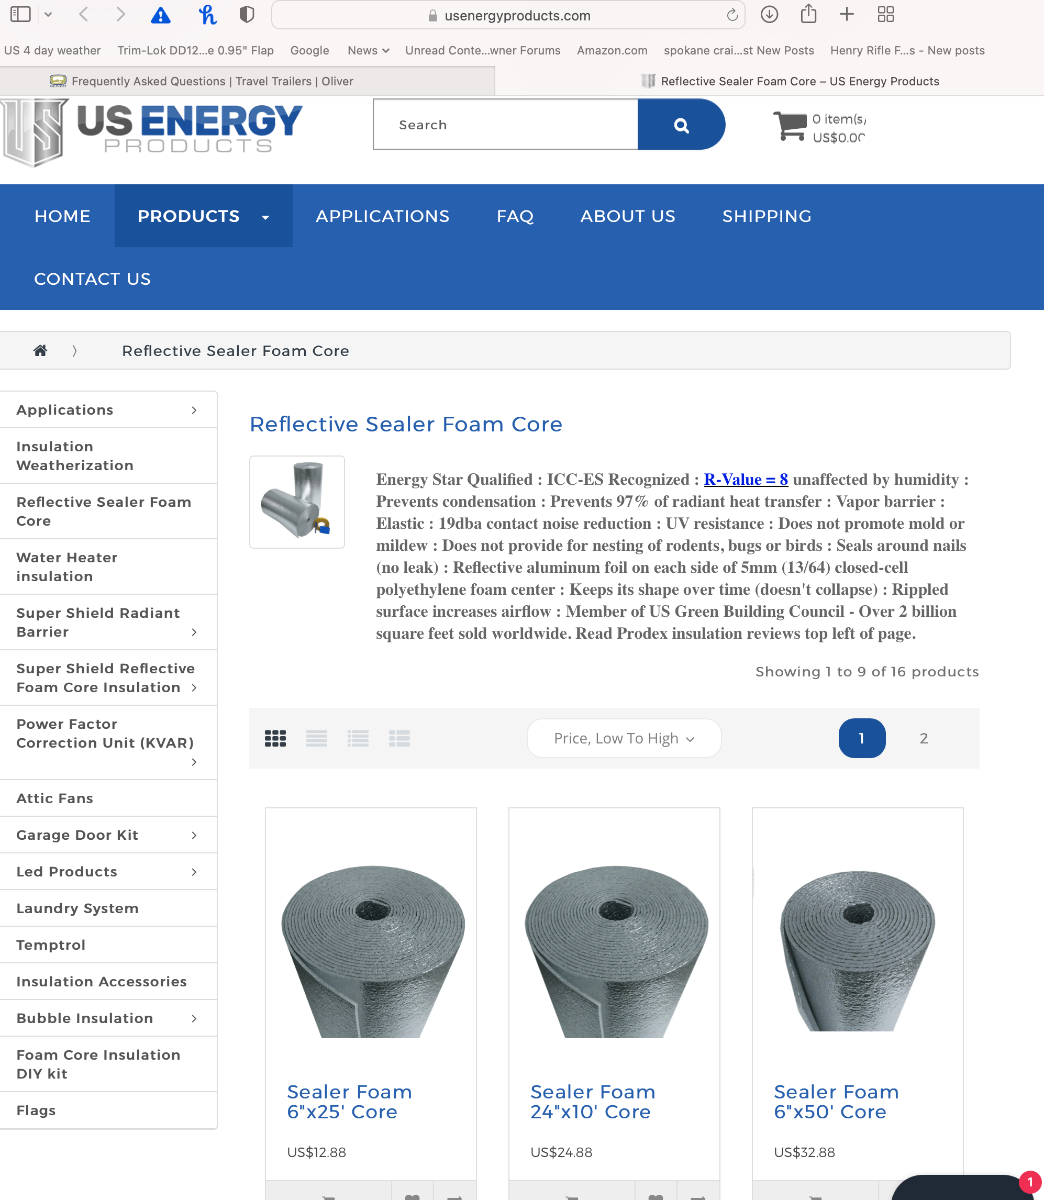
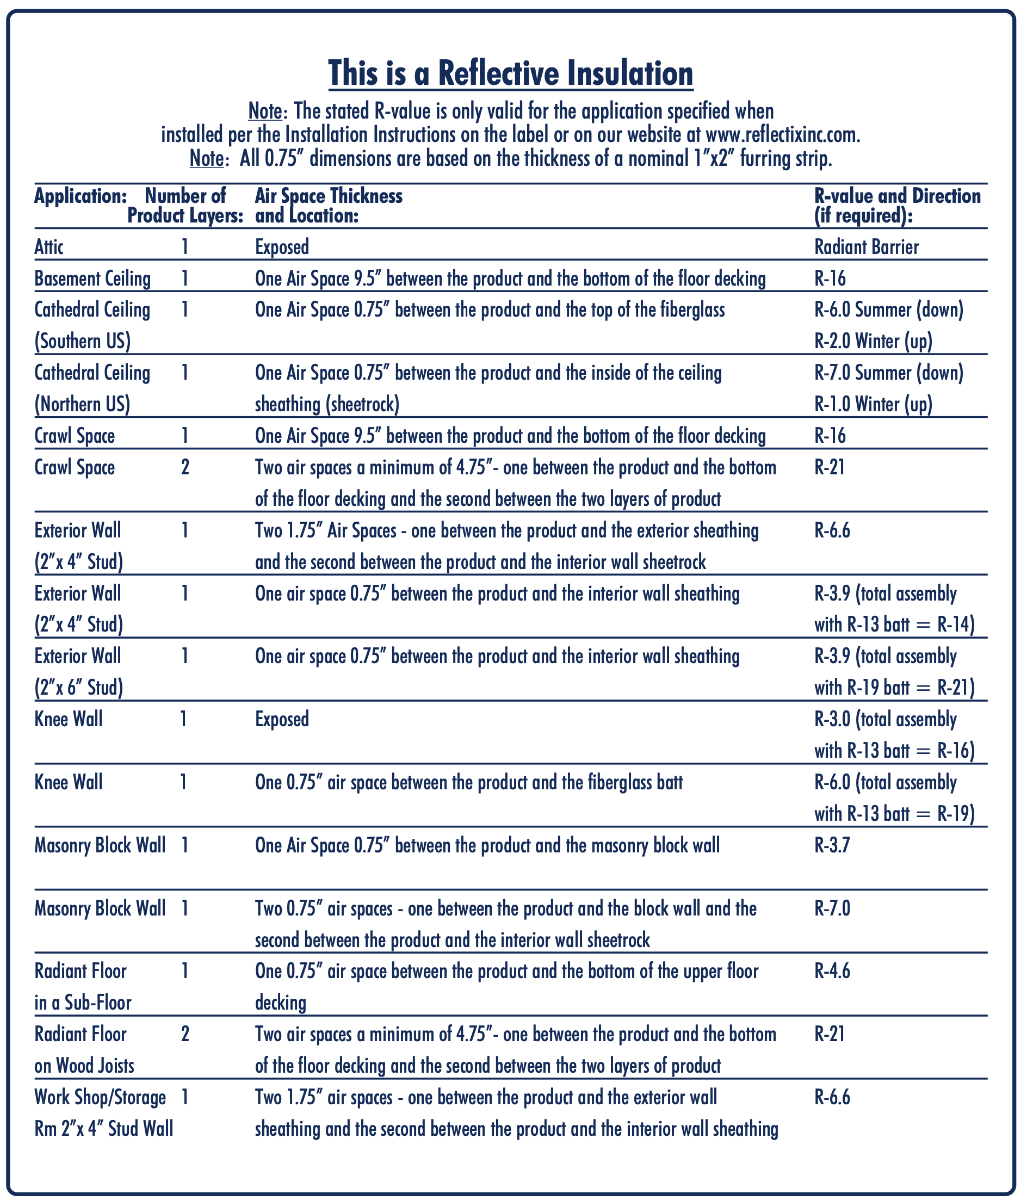
I was perusing the FAQ section here: ... https://olivertraveltrailers.com/travel-trailers/frequently-asked-questions/. and read their "What kind of insulation" statement ( I added the bold: "There are three ways to transfer heat: Conduction (through a solid material), Convection (through air space) and Radiant (reflective heat transmission.) The Oliver uses materials and construction techniques to take advantage of all three. The fiberglass hulls provide conductive insulation while the built in air gap between the inner and outer hull provide convective protection just like you would find in a double sided insulated cup. The Oliver is fully insulated between the exterior and interior shells with an insulated double-sided radiant barrier, which is best described as follows: "Reflective aluminum foil on each side of a 5mm (13/64 inch) polyethylene bubble center." "*Polyethylene Bubble + Radiant barrier + Vapor Barrier + Air Gap Barrier". This unique material provides a combination of radiant, convective and conductive protection. The foil radiates heat back into the camper in the winter or away from the camper in the summer. The foam insulation is infused with billions of tiny air bubbles that provide convective protection while the foam itself provides conductive protection. At only 13/64" thick this powerful product provides an R16 insulation rating. You would need approximately 4 3/4" of standard fiberglass batt insulation to equal this performance. The insulation we use serves as a radiant, vapor and air barrier making camping in any temperature a pleasurable experience." I don't know the brand they use, but I searched for that description, which seems to be cut and pasted directly with quotes from here, which states R8: ... https://www.usenergyproducts.com/collections/reflective-sealer-foam-core-1 Oliver says it has an R16 value, that manufacturer says R8, and I have a really hard time accepting either figure, since Reflectix has this VERY confusing chart: That chart says you need 9.5" gap to get to R16! And a thin Cathedral ceiling with 0.75" gap in a Northern winter is just R1. Basically a single layer of Reflectix with NO air gap has an R1 value. ;( and sticking another layer directly on top of an existing one doesn't do anything at all to increase it. The physical gap is the key, and the bigger the better. I think the Oliver description is misleading in the extreme, I hesitate to call it BS, but I really doubt the combined R16 value for the little 1 inch gap between inner and outer hulls. And they don't mention all the areas that do NOT have a protective gap against extreme temperatures, like the over and under storage cabinets, battery box and rear cargo area. Those spaces ARE the gap, they do keep the heat or cold out of the cabin, sort of, but it is also why they get so darned cold or hot inside. So your water valves freeze or your batteries overheat. I have been adding 1 inch slabs of Dow Corning R5 rigid foam board ... The Pink Stuff ... into those areas wherever I can reach, especially near water lines that run along the inside of the outer wall.. Any comments? John Davies Spokane WA
1 point
-
I believe previously they used foil bubble wrap, but more recently (as of five years ago it seems) they're using Protex AD10 10mm 1/5” R22 insulation. This was taken from the following long video playlist with nerdy construction details. The bottom outer is wrapped, and the upper inner. Additionally for (all - some?) of the trailer there is an internal honeycomb material that is spray and fabric fiberglassed. This will have some R value due to those dead air pockets. As an engineer type I've thought about this design, it's interesting. Conventionally in a structure you want a single vaporbarrier with two climate zones. But having the double hull they have three, in trailer, in wall, and outside. This means that the between hull space is it's own climate and can potentially have condensation issues of it's own. This is why they added the drain holes along both sides. Normally that would be a poor design, but if you think about it, it's not much different from your attic or crawlspace. Both need air vents (ridge/soffet vents and foundation vents) to prevent humidity buildup, but also provide an insulation 'barrier zone'. In summer my roof will get to 100+ degrees, but I measure less than that in the attic. If I had a Protex barrier glued between the rafters, it should be roughly air temperature, which in a sense buffers the temperature from the roof which acts like a heat sink. For comparison consider, of all things, the James Webb Telescope design with it's five layers sun shield Now the inner space is heat conducting air and not insulation vacuum, but I'd think at least that should provide some buffering of the temperature gradient. Additionally, since the ducted heating runs along the water pipes below, during the winter at least that waste head isn't wasted - it goes into warming up the inner wall. And during the summer months, the outer takes the brutal heating from the sun which should be a lot of radiative, and the double foil deals with that. tl/dr ... basically I think it's possible it comes to some pretty high insulation R value given all these factors, maybe even R22. A test would be something like putting a trailer in some hot desert and seeing how long it takes to warm up an insulated box which is pressed/taped against the wall. It would give you a rough idea at least, should be pretty good I'd think.1 point
-
When I was addressing this issue of connections for griddle and grilles, the forum offered me the link to this wonderful company called PROPANE GEAR, and so I pass it on to you. With this company, I was able to obtain the correct hardware to use a grille, as well as my Blackstone 17 inch griddle, connecting to propane tanks. They provide great service, and my orders were received in a timely fashion. https://propanegear.com/1 point
-
The Oliver is still a great camper BUT - you ain't no "newbie" no more! Bill1 point
-
Welcome to the forum and congrats on your new Oliver. Lots of great info on here as well as Oliver University. Safe Travels! 🇺🇸1 point
-
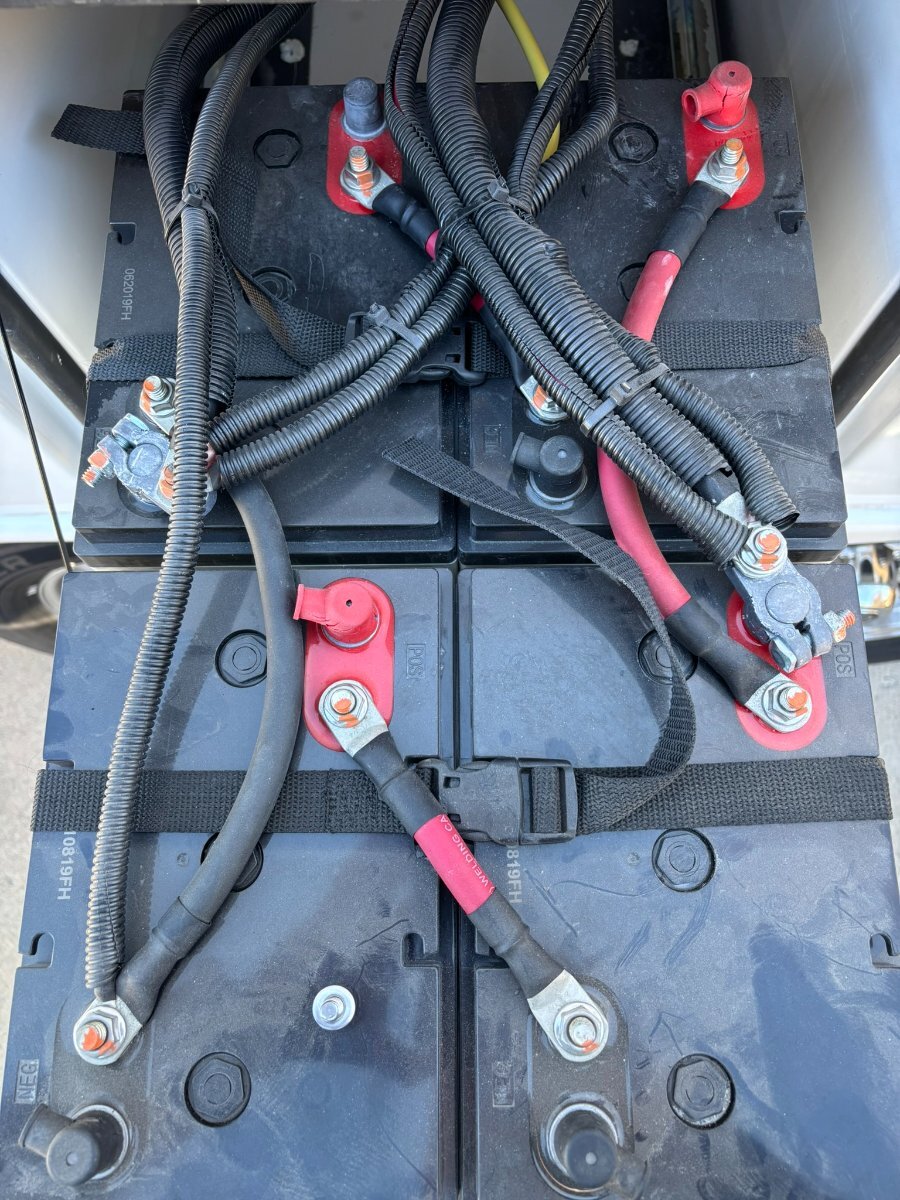
Thought I would follow-up with photos of my finished install. BIG, BIG thanks to @Derek B and especially to @jd1923 for sharing their photos and offering info to help! I don't think I could have done this without you! I would say my install is more "DIY amature" compared to their professsional work because I did not reconfigure the 6g wires inside the trailer on bus bars. This would be best, but I just didn't feel comfortable enough in my level of skill and also didn't really want to spend the time - so my battery compartment is messy compared to theirs but everything works. I wanted to install a manual disconnect switch and this turned out to be a needed extension in my case if I wanted to avoid replacing the main negative cable with a longer one. There was no extra lenght to be pulled through from inside, so the cable was too short to reach far enough forward in the battery tray (without packing the batteries together in the back requiring shorter jumpers to be ordered as well). The switch is connected by re-using one of the short red jumpers and I put black gorilla tap around it to mark it as negative. The switch provided a large/long connection post to stack the multiple neg wires. I did have to use a drill and dremel tool to slightly enlarge the terminal connector holes on the neg 6ga wires as they were slightly too small to fit on the post of the switch (a professional would have replaced these terminal ends with the correct size). I was going to secure the switch to the battery with 3M VBR tape but decided to let it simply sit on a piece of rubberized foam. This allows it to shift slightly as the stiff wires bend to close the drawer. The OEM bolt on the main + terminal had to be replaced with a slightly longer one to accomodate the stack. I have a bit of concern that the stacked terminal connections could be more prone to loosen with vibration over time so I will be checking on this periodically (they were stacked by Oliver's original configuration without a problem) I can easily reach the disconnect switch without pulling out the tray. It was very easy to program my Xantrex 2000 inverter/charger and my Zamp solar controller as they both have settings for LifePo4. My total cost was $1725 ($1698 for the two batteries, $25 for the switch and $2 for the longer terminal bolt) and I'm loaded with 600aH of lithium power. I have SOC and detailed charging/discharging data available in the Epoch app on my phone via bluetooth. Really appreciate the info/help/advice available in this group! Hope this might be valuable to anybody else with similar OEM equipment considering a DIY lithium replacement upgrade. Here are photos of before/after -- not a professional install but it works... IMG_1478.HEIC
1 point
-
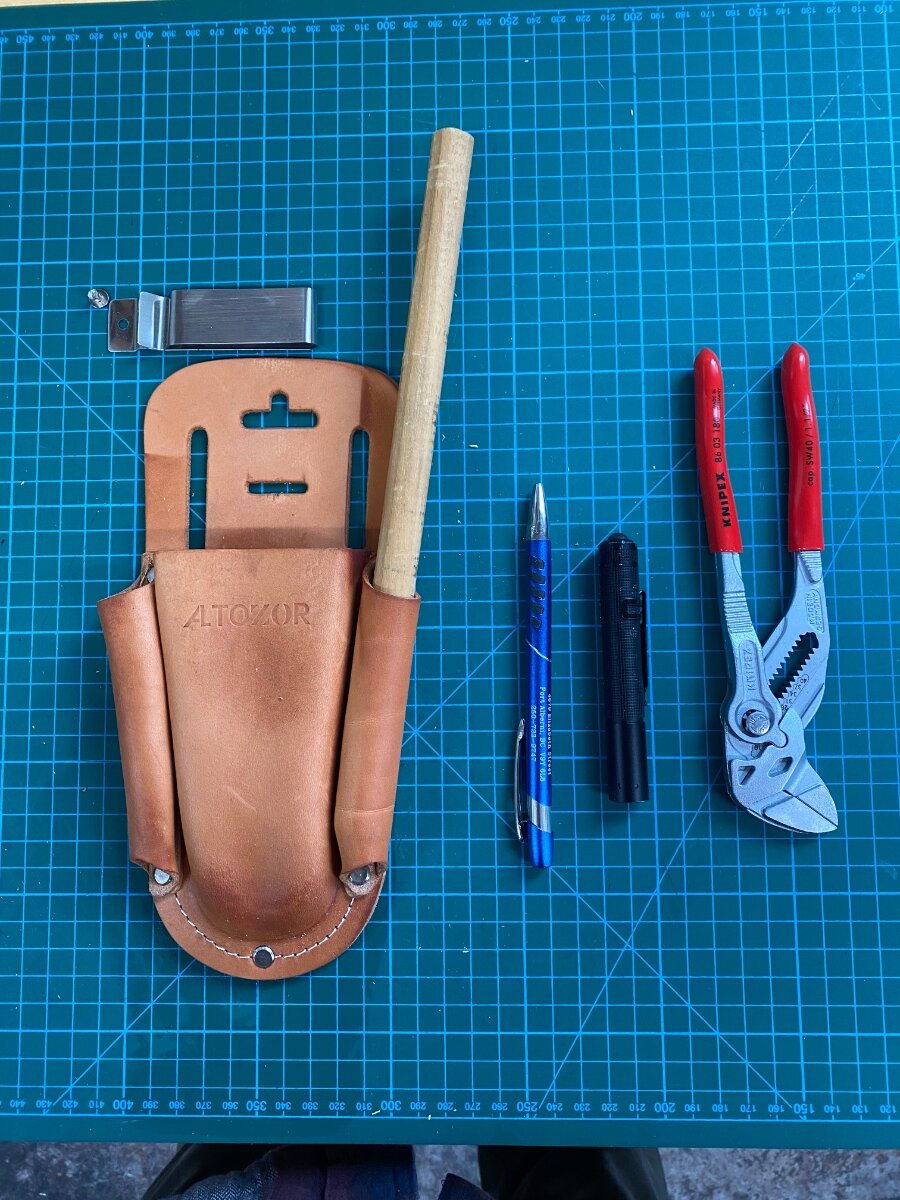
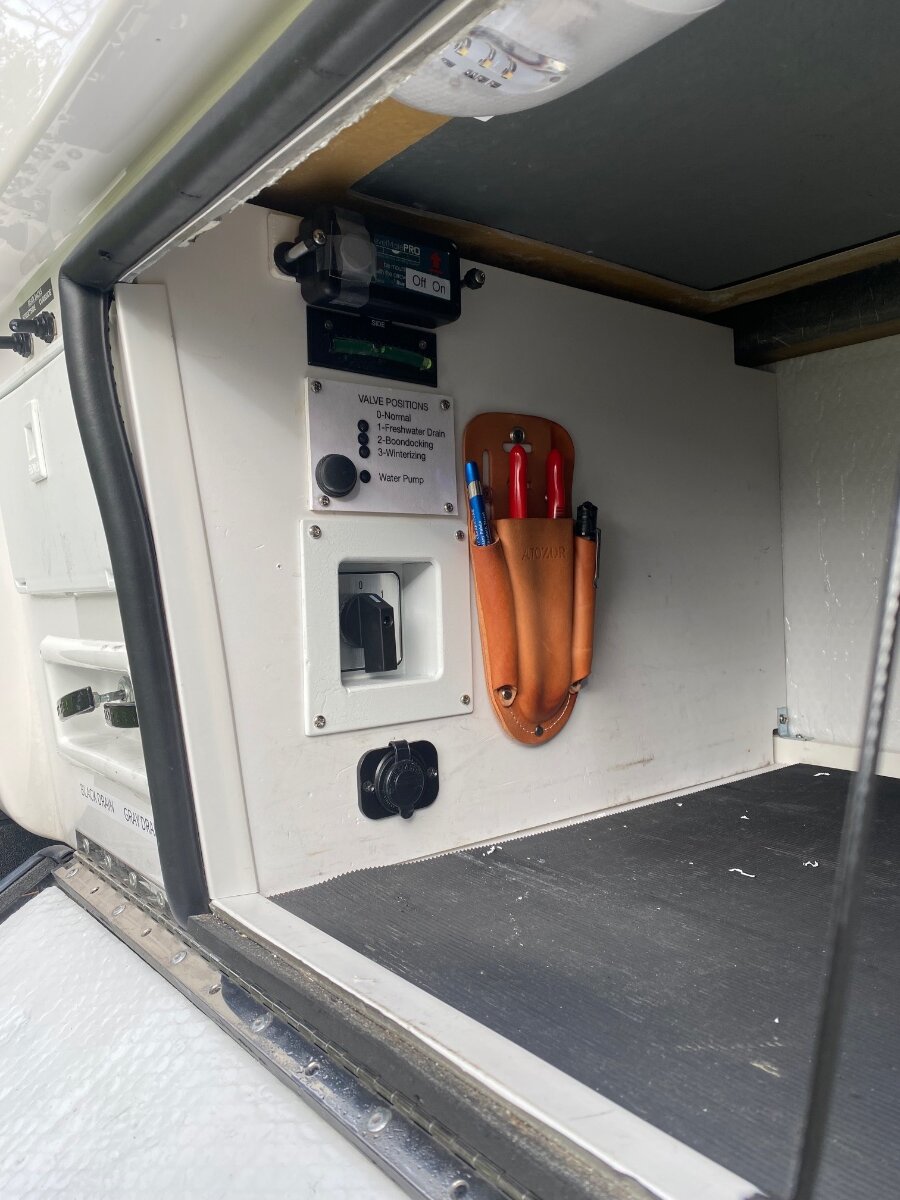
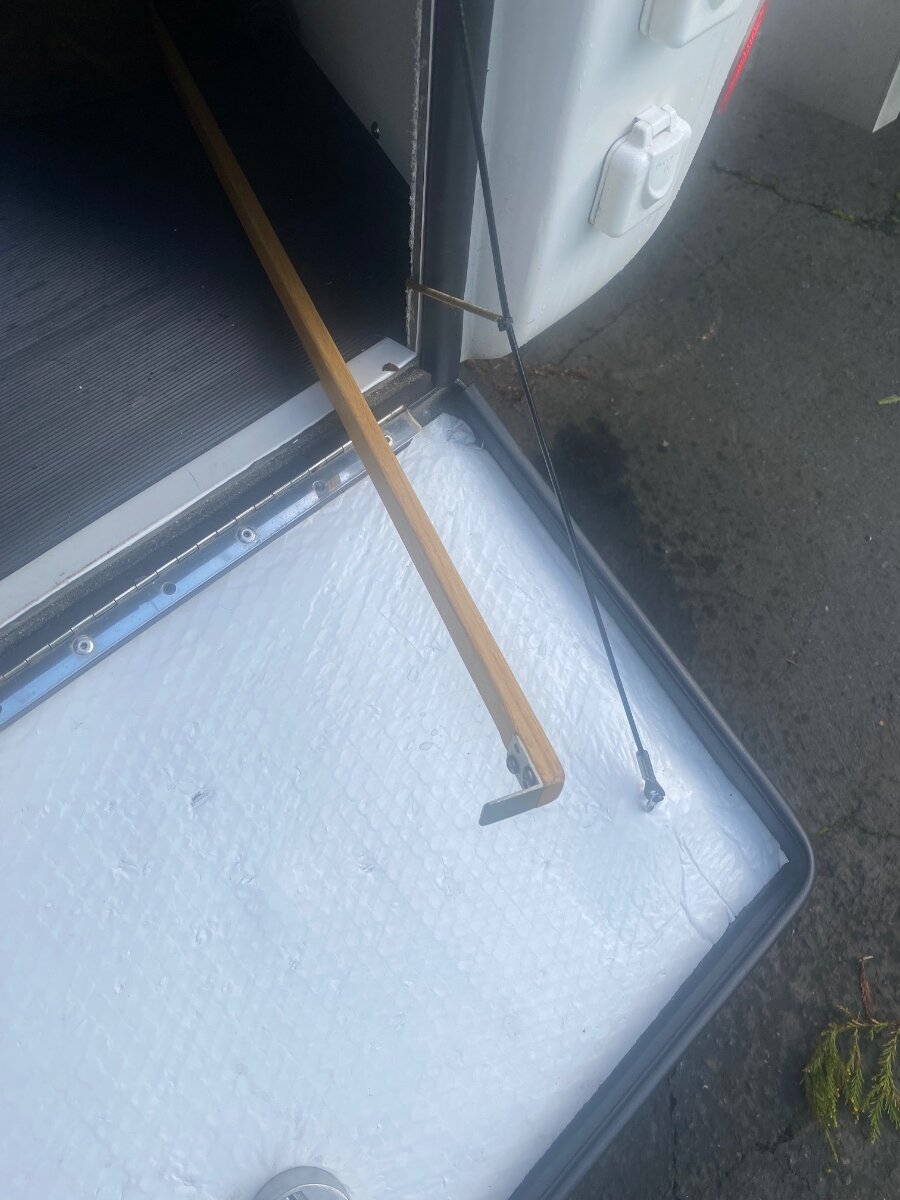
When doing hook-ups or departures from camp, I regularly find myself in need of water pump pliers to tighten and loosen water lines. . . which means digging out the tool box to find them. So I decided to mount a dedicated pair in the outdoor garage where they will be close at hand when needed. After looking at various options for storing the pliers, I settled on a small leather tool pouch from Amazon. It was low profile, could be easily mounted on the wall, and it didn’t take up precious garage floor space. The pouch also had pockets for a small flashlight and pen, which also can also be elusive items when signing in after dark. The tool pouch had a belt clip that was removed, and I stretched one of the pockets to fit my LED penlight. The leather is easily stretched by soaking it in water for about 60 seconds and using a dowel or other cylindrical object to expand the pocket. The leather is quickly dried in an oven at 130 degrees to hold the new shape. I chose a 7” Knipex Plier Wrench for my kit because of its high quality. They aren’t cheap, but the Oliver is deserving, and they are a pleasure to use. There are many excellent choices available for pliers, flashlights and pens. I just used what I already had on hand. Some folks might also be interested in my handy tool for stashing and retrieving things from the unreachable depths of the garage. This is simply a sanded length of 1/2” x 3/4” moulding with an aluminum angle screwed onto one end as a hook to pull things out. Oh, and notice the spring to pull the garage door suspension cable out of the way so it doesn’t get pinched in the seal like mine does. Hope you find this useful! Cheers! Geoff
1 point
-
Something important to me in determining this layout was an easy disconnect. I did not want a kill switch. Instead I needed the main B- cable, the long run back to the inverter, to be at the outer edge of the battery bay. With this layout, I can just open the battery tray to remove the closest bolt, hence removing the system ground. The B+ terminals are further in so there is little chance of me hitting them with the 1/2" wrench required to disconnect the batteries (see pic above).1 point
-
I installed a 460Ah LFP battery bank (SOB) and the ATS @jd1923 mentioned to enable use of my Xantrex Freedom XC 2000W inverter to run the former DPll 11K; a three hour run time would drop the SOC to 50%. I have since replaced the DPll with an Atmos 4.4 15K, but have not had much experience regarding inverter run times, but hopeful the higher efficiency of the upgrade will provide an increase.1 point
-
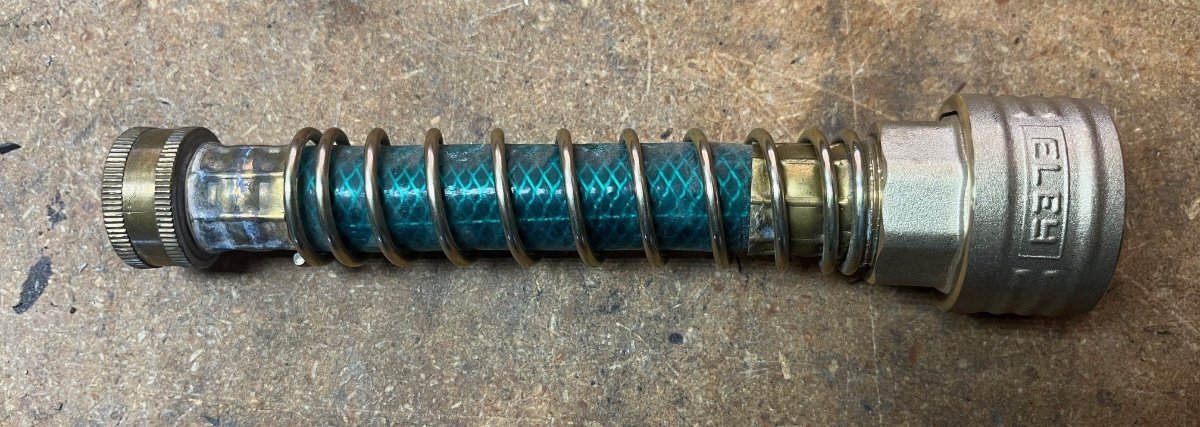
I made this fitting for quick campground connections. It should work well.
1 point
-
Yep. Hence the use of a key word: "Most" owners as Dometic Peguine II SADLY greatly out numbers the much nicer Truma units. Good that you clarified the nuance. I have to wonder if needing such a large, and expensive generator or two smaller ones was considered in OTT's decision? Was this made clear to all new and prospective owners? Regardless I thank you for making this distinction very clear. Well done. Thank you! John1 point
-
UNLESS you have the Truma Aventa air conditioner. Since Truma will not allow installation of a Micro Air Easy Start in its units, you must have 3kw to start and run the Truma Aventa AC unit with an inverter/generator. That is why we carry two 2kw dual fuel Champion inverter generators with a Paralink kit. When running on propane, the two units generate about 3060 watts combined, which is barely enough to run the Truma Aventa AC. So, with the Truma Aventa AC, the EU3200 would not be "overkill;" it would be necessary to run the air conditioner.1 point
-
John is correct. We don't generally stay in a campground but the ones that we have, had "No Vehicle Idling" signs posted. Even if you ignore the signs, your neighbors will likely call you out on it after a short time. On the other hand, it should be fine during "generator hours" if the campground has such an area. That reminds me of the old "smoking" sections that used to be in restaurants or other establishments.1 point
-
In principle, this fact concerned me. Like many others accustomed to having lead/acid batteries recharged by the tow vehicle alternator, I was concerned that the three 130Ah Lithionics G31 batteries included with our 2022 Elite II would get discharged during long driving days (when we run the absorption fridge on DC power), even though we have 380 watts of solar on the roof. So, I determined to follow John Davies' excellent posts referenced above and install a Redarc DC to DC charger IF our lithium battery state of charge seems low after long driving days. In actual practice, I am not yet concerned enough to invest the time and $$$$ in a DC to DC charger. We drove our Hull #1291 from Hohenwald back to central Idaho in the middle of last November. Some days were overcast. The daytime temps were consistently above freezing, and all night time temps were below freezing. We ran our absorption fridge on DC power while on the road, but switched to propane at night. Our battery state of charge never got below 85%, even on cloudy days, and quickly recovered to 100% once reconnected to shore power at a campsite. But, the DC power draw from the fridge during those cold temps, with the trailer cabin unheated during the day, was doubtless minimal. I plan to gather more data as we travel with Hull #1291 this spring and summer. An uncooled cabin may get pretty warm when on the road on hot summer days, requiring much greater DC power draw to keep the fridge at set temps. That should better inform the DC to DC charger decision.1 point
-
1 point
-
Newer technology widows, properly sealed and installed, can have an r value of 5 maybe 6. My windows don't feel hot in the sun, even on the west and south sides. There's some really thin metallic layer in there, that blocks uv and heat, but barely changes visibility. Can't speak to the cold, as I live in Florida. I'd "guess" my Ollie double panes are much lower r value. The shades help. And, some hardy cold weather campers use reflectix to increase it. I have, in Alaska, with crappy single pane windows. Dual purpose-- let's me sleep at night, with the midnight sun.1 point
-
When we were building our sips home, LEED standards required insulating every solid wood component (headers, lvls, posts, etc) as a thermal break. We used reflectix. My LEED advisor said it added only r1, but it helped with sealing the structure. The firring strip interstitial space took the rvalue to maybe 6? If I remember correctly. An inch air gap between two layers of reflectix type insulation may help more. I don't know. Rvalues require testing, but not within my capability. I don't have any of your current insulation in my 2008 trailer, just air gaps, and I've been good into the high teens, if it warms above freezing daytime. I'm not a serious cold weather camper, so it works for me. Slideouts have always been problematic for us, in motorhomes. They leak cold or hot air, and allow the mosquitoes in, as well.1 point
-
I agree that the R16 claim is "aggressive" marketing. If it were true, then an Oliver wall would outperform a sheathed 2x4 stud wall filled with R13 fiberglass batt insulation and drywalled on the inside. I seriously doubt that. Is there a way to scientifically test the R value of an Oliver double-hull-with-interior-insulation sandwich? Dow Corning pink foam insulation board offgasses highly toxic fumes if burned. Get out of Mouse ASAP in the event of fire.1 point
-
Most theoretical values hit a wall in real-world applications because they rarely get installed optimally. Even so, R16 does seem a bit far-fetched. The real question: is the Oliver insulation any better than a standard RV with aluminum studs and fiberglass/styrofoam/luan sandwich walls and roof? I'll know pretty soon. Had a few of those "stickie" trailers. This summer will be an Ollie. I know that our last fifth wheel radiated a lot of heat through the slideout walls, which I think were thinner than the "main" walls, and the cabinets/compartments in those slides were always cooler or hotter than the cabin interior. Comparisons with the Ollie will be interesting.1 point
-
Or Amazon delivery drone...1 point
-
NO, No, No! Think of it as a "dumb waiter" so that the pizza and beer delivery person can simply drop it off and you can access dinner and beverage directly from the interior. No more opening the door, no more running out into the rain for the essentials of life.😁1 point
-
My thoughts are yes, definitely. I suspect that in a few years RVs will be designed with lithium batteries located in inside compartments or under the floor like electric cars, vented to the inside. There will be no need to access them routinely…. It will be time to get rid of that sliding tray too. IMHO. John Davies Spokane WA1 point
-
Thank you John, that answered several questions I had on my list to track down and a whole bunch more on top of that. Now the thread about venting the battery box is making sense as to why it should be considered important. From that article, it sounds like the battery box would be better off sealed to the outside, vented to the interior to be allowed to be maintained at the TT's interior temp (assuming it stays between 32-86F) Your Thoughts?1 point


.thumb.JPG.dd838cdb3df463dab6a16861fa23a319.JPG)

-
Recent Achievements
-


")

")

")


")
.thumb.jpg.e34bf01ef7f7d5e99ad31856d45afbeb.jpg)


