Leaderboard


.thumb.jpg.e34bf01ef7f7d5e99ad31856d45afbeb.jpg)
Popular Content
Showing content with the highest reputation on 07/27/2025 in all areas
-
I plan to call Alcan this week to check status on our special order Dexter axles (the 50.00" length that only a few older hulls have). I'll be installing them myself and based on one failure I read about here, I plan to open all 4 wheel assemblies to make sure they were assembled correctly! I will look for markings/part #s on the Nev-R Lube bearings to see if they are marked Timken and hopefully find a part number. I will determine what kind of job it would be to change a bearing. They key to the correct bearing press/puller is to have the correct diameter spacers to match the bearing diameter. We should all have a couple of new bearings on hand! I also will compare increase in brake shoe surface area, going from 10" to 12" brakes. It will be well into August by the time I get this work started, let alone finished. I will write up a NEW and complete installation post with these particulars when I get finished. Now that this thread is about to be 28 pages! EDIT - Wow, my post just made this thread 28 pages! Thanks Ken, for being partner to our humiliation! (Lance too) 🤣3 points
-
Good idea! My son has one of those. I don’t have too much experience but an oscillating tool should work well to square new corners and where a jigsaw would not fit.3 points
-
Mark, If it’s within your budget, and you travel and camp enough to justify the cost, I would highly recommend considering a Starlink Mini. A 💯 game changer for sure. Not ever thinking about CG WiFi or unsecure cell phone hot spots is no longer in our travel plan. Having a secure means to send email and txts or just surf the net for destinations along the way, or pay our energy or light bill back home is worth it to us. Our MINI It also serves as a home back up should we ever loose internet. Streaming TV is here to stay and with tech racing forward at light speed it’s only getting better. I learned at the 2026 Oliver Rally we may see a dedicated internal wiring/SL plug in the 26 YM. All the mini needs is a dedicated outlet to plug into and your on!3 points
-
The bearing installation tools that I have seen have a bunch of different diameter/different length tubes and a couple of thick discs one being threaded and a forcing screw. I believe the kit is all that’s needed to draw out the old bearing and to then press in the new one. Or so the YouTube videos that I’ve seen seem to show. Anyway, yes I’d carry a complete hub/drum assembly and two or three extra bearings. Also don’t forget to have several of the single use lock nuts on hand. The tru arc snap rings are reusable and pretty standard items.2 points
-
Yes, I posted a while back that a friend replaced his Dexter Nev R Lube bearings in his work trailer with Timken's that he bought from Summit. If I remember right they were used in several older Chrysler vehicles and he paid a little more than this, so I'd be wary at that price, especially from Amazon where counterfeit bearings are common . Personally, I would still carry a spare hub with a new bearing installed, because unless you plan on carrying a large enough bearing press with you you're not going to be able to change them yourself on the road. 3 sets of new bearings and one new hub would be the way I'd travel with these axles.2 points
-
They're the Vise Grip of the power tool world. Can't believe you don't own one!2 points
-
Donna and Scott — We plan on attending the pot luck and BBQ dinner, but I can’t figure out how to post it on the Google docs document. The app the site suggested will not download. Perhaps it’s my antique iPad. I think this is the same problem I encountered months ago when I tried to enter that info. We are No. 16 in the Texas Oliver Rally list. John Goodspeed and Marianne Odom. Thanks, and we’re looking forward to seeing y’all again..2 points
-
I used my Fein oscillating multi-tool to easily make cut outs for additional receptacle outlets.2 points
-
We carry the Honda 3200 and it will run our Truma fine. It does require a grounding plug which I leave attached to the gen. If you have the Truma soft start installed, you can run the 3200 in echo mode for better fuel efficiency.2 points
-
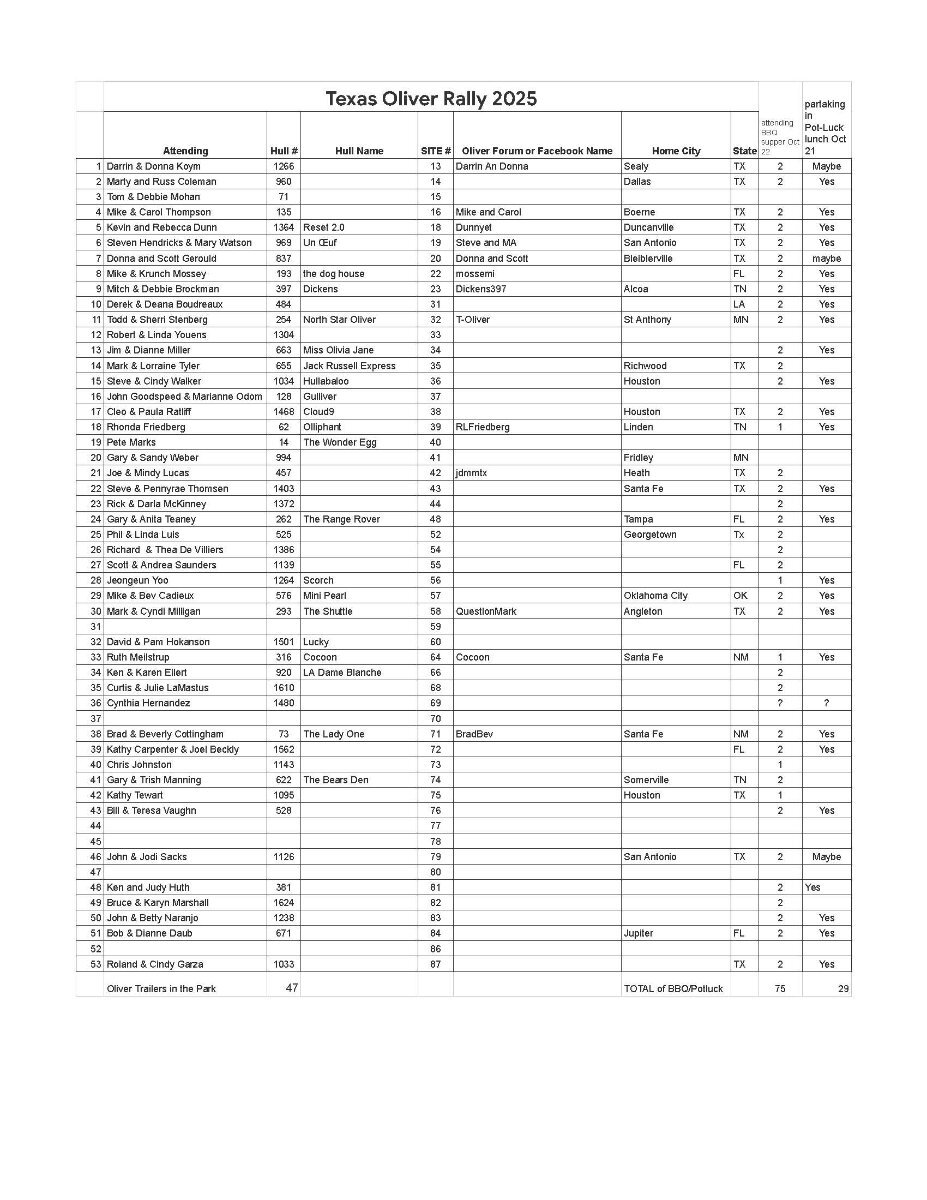
I have attached the updated list for those attending the Rally. Please review and let me know if I need to change anything. Looking forward to seeing everyone in October.
 2 points
 -
We are thrilled to announce the 2026 Oliver Rally will be held at the stunning Lake Guntersville State Park in Alabama from October 21 to October 25, 2026! Get ready for another unforgettable gathering of Oliver Travel Trailer owners and enthusiasts as we come together to celebrate community, adventure, and the great outdoors. This annual event is your opportunity to connect with fellow Ollie owners, exchange travel stories, learn helpful tips, and enjoy the camaraderie that makes the Oliver family so special. Location: Lake Guntersville State Park, Alabama Breathtaking lake views, hiking trails, wildlife, and top-notch camping facilities await! Dates: Wednesday, October 28 – Sunday, November 1, 2026 Wednesday, October 21 - Sunday, October 25, 2026 What to Expect: Welcome Reception & Meet-and-Greet Educational Workshops Vendor Exhibits & Product Demonstrations Group Activities, Games & Outdoor Adventures Evening Campfires & Entertainment Raffle Prizes, Giveaways & More! Whether you're a seasoned rally-goer or attending for the first time, there's something for everyone at the 2026 Oliver Rally. We can’t wait to make new memories and celebrate our shared love of travel, craftsmanship, and community. Registration details and event schedule coming soon – stay tuned! Until then, mark your calendars and start planning your route to Lake Guntersville — we’ll see you there!
1 point
-
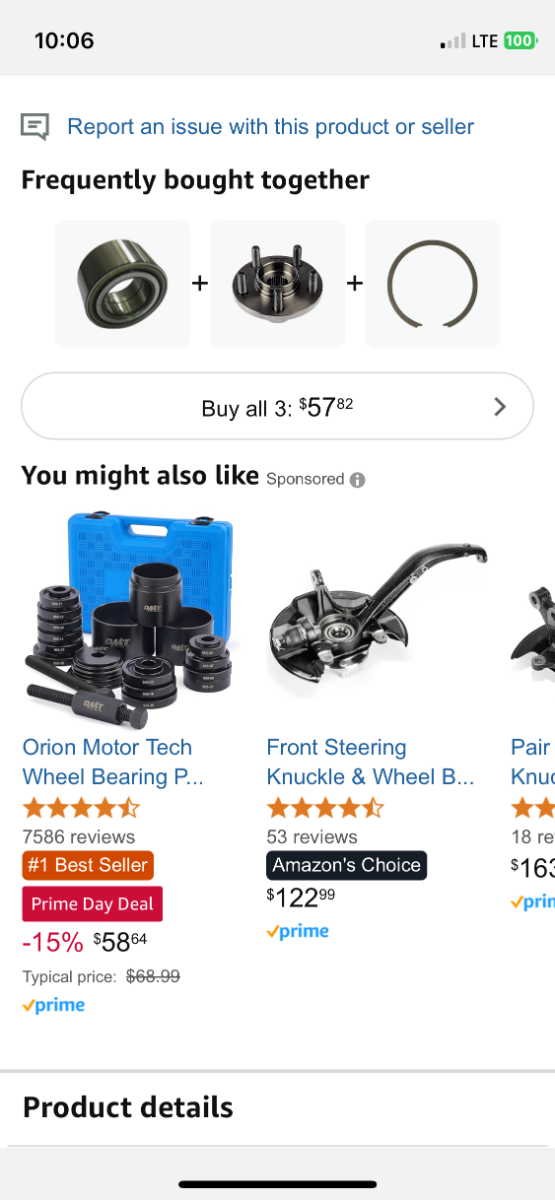
Good point, depending on the tool as Ken mentioned. I'll know soon enough when I receive shipment of our axles. I looked at a few pics online, like this one from eTrailer. It appears the Nev-R Lube hub and drum are integrated one part. Swapping this part would mean bring the shoe adjusters in for the new drum and you will have to go through break-in adjustments. Also not fun! I would prefer to carry a proper hand tool with correct spacers and two spare bearings kits vs. carrying two hole hub-drum assemblies. These would be pretty heavy and take a bit of space in the truck toolbox! It appears this is a $650 part, so with tax over $1,400 to carry two with you! The Timken bearing kits on eTrailer are $228 plus tax and include a new nut, washer and snap-rings, $500 OTD for two kits. Not certain these are the right components, but as close as I could find today. Again, I would verify when I have a drum off one of our new axles! Agreed with @CRM, don't trust a $38 Amazon Chinese knock-off! (And I could not find one on Summit.) https://www.etrailer.com/Trailer-Bearings-Races-Seals-Caps/Dexter/31-73-3.html https://www.etrailer.com/Trailer-Hubs-and-Drums/Dexter/8-388-80UC3.html1 point
-
That's OTT for ya! I would think yours would look closer to mine since our 2016 was actually built fall of 2015 when you check the label dates on all components. But there is also some distance between #70 and #113.1 point
-
Amazing how different each Oliver is from year to year. On my 2015 #70 it doesn't even look remotely like any of these pics.1 point
-
The missing battery mysteriously showed up 24 hours later. I talked extensively with Geoffrey at Epoch technical, a very kind and informative person, and he gave a few ideas as to what the cause was. As you said, another device could have hooked up to it at the campground so I'll attach password protection. He said Apple Air Tags can adversely affect the app...we don't have Apple products but I'm sure many at the campground do. Also we boondock very often and don't use our inverter all that much so I believe Geoff said a capacitor (in the battery?) could have lost it's charge and that could simulate a short and cause the BMS to shut it down. I did not uninstall and reinstall the app but Jeff said to do that as a first step if it happens again. Also Geoffrey suggested to run the inverter a little more often (a few minutes a day) to charge the capacitors. 3 days now and all is still good :)1 point
-
You are correct! The intake air comes from the cabin as well, meaning that all of the air being circulated around the refrigerator is quite a bit cooler than any model using outside air until the outside temperatures reach about 78° and contributing to refrigerator efficiency. Mossey1 point
-
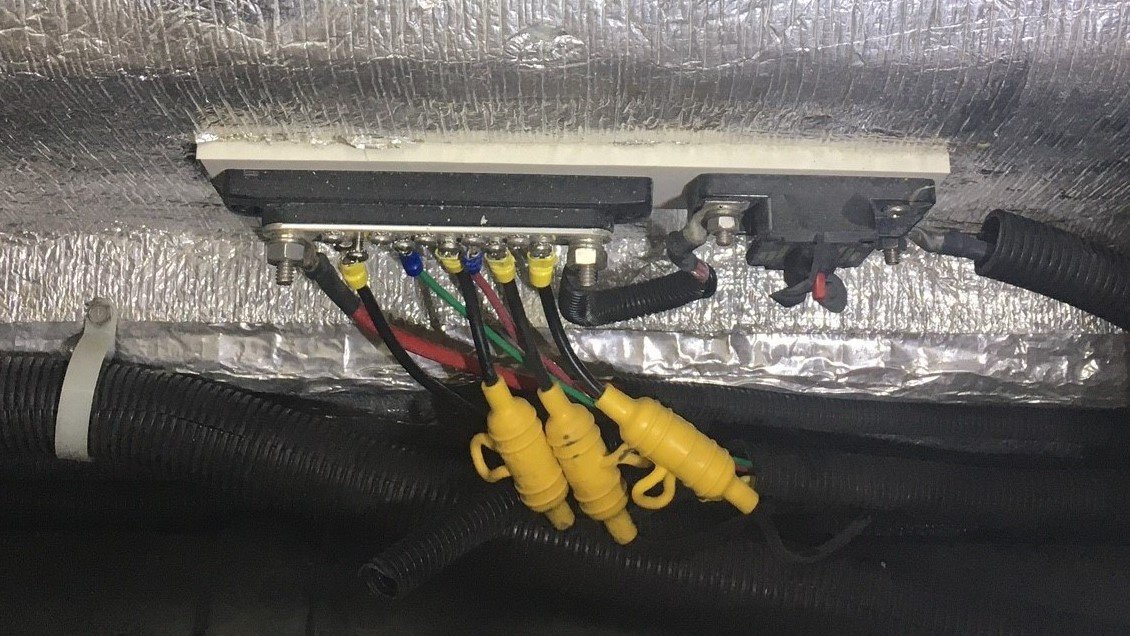
Should be. The trick is finding it since every old Oliver seems to be somewhat different. First thing I suggest is to text you test for voltage at your 7-blade connector to see that it is powered and which blade connects to the Black charge wire. Later after disconnecting the wire, you want to see that the same blade is no longer powered. This is the only true means to know you got the correct wire disconnected. Some have reported seeing the cable split under the bathroom vanity, so perhaps you can see where the black wire branches from there. I got lucky to find mine at the +bus under the streetside bed. Notice in the picture, the black wire at the left side of the bus where I have the screw loosened. I removed all the wiring to this bus, shortened the 3 fused + connections to the stabilizer jacks, added a more substantial + bus under the rear dinette seat for easy access. I was able to sort out all the wiring, no extra cables to the batteries, etc. In doing this, I've learned what almost every wire is for in the basement areas of Hull #113! 🤣
1 point
-
Okay, risking banishment from the planet and the inevitable public humiliation, my one and only update on my recent axle and spring upgrade. We are in the midst of a 3 1/2 month western trip. Granted a good deal of the trip was planned around a visit to Grand Junction Colorado we have made a complete trip out of that one appointment. I firmly believe that Oliver’s decision to change axles from the 3500 pound version to the 5200 pound version is one of the best decisions made. Nothing like extra capacity. Also the heavier springs are also a great benefit. I have noticed reduced rocking during travel. My original springs had relaxed quite a bit because I had only about an inch or less of clearance between the U bolts and the frame. There is now around an inch and a half to two inches of clearance which is probably a little more than what was originally there. I have done a little research on the Nev R Lube Dexter axles with very limited cell service so more research to come. The bearings used for the 5200 pound axles are also used for the 6000 pound axles. So there is a little bit of extra capacity there. I also found out (not totally confirmed yet) that the bearings are also used for front and/or rear axles in several smaller cars. I also found out (not totally confirmed yet) that the Timken bearing used is a standard Set 49 bearing sold at every auto parts store for a fraction of what Dexter charges. The bearings are fairly easy to replace using a standard automotive wheel bearing press kit. So can be done on the road if needed. The bearing press is available at Harbor Freight and Amazon and I’m sure dozens of other places as well. Of course all the above information is to be confirmed once we get home in August sometime. Others are more than welcome to join in the research.
1 point
-
John Godspeed, I have added your participation to BbQ and potluck on the form. You have to download the Google Sheets app on your phone to download the list. Here is the link to try again. https://docs.google.com/spreadsheets/d/1JPSsJth_EGWro75oJLbW6lk0SA1eYLZr5-prV1QHM-0/edit?usp=drivesdk See you there🙂1 point
-
1 point
-
We saw an Oliver today (7-26) heading north between the southern entrance to Yellowstone and the northern entrance to the Tetons.1 point
-
I've used epoxy before, but it's rather permanent and overkill IMHO. I've had great results from ACE construction glue. There are plenty of inexpensive and high strength construction glues that would be more than adequate. These come in caulking tubes that require a cheap caulking gun for super easy application. It's tacky enough that clamping is not required, just push it firmly in place and prop the board up so it doesn't slip. It appears they originally used this type of construction glue from your photo. I've also had original glue failures, and I believe it was caused from glue application on dusty surfaces, and it looks like yours was barely touching both surfaces. There is a surprising amount of dust on the interior surfaces, so be sure to clean surfaces before using glue. Also, I think you could just add more glue to that surface and save yourself a lot of scraping of the old glue. Cheers! Geoff1 point
-
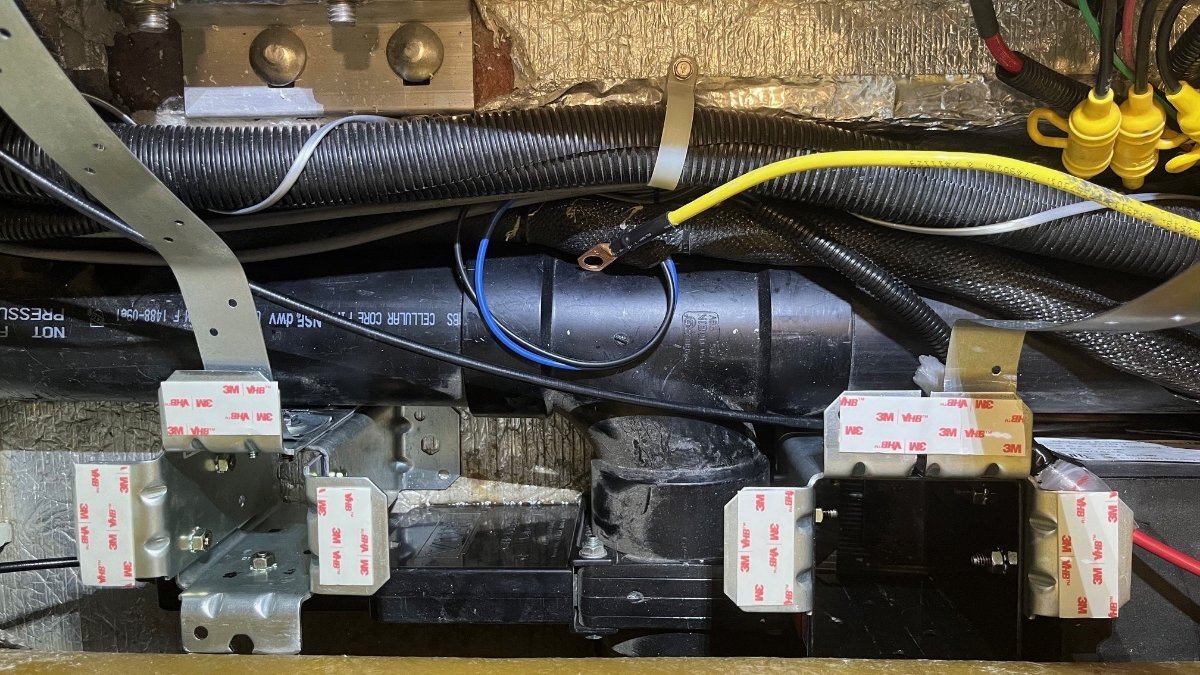
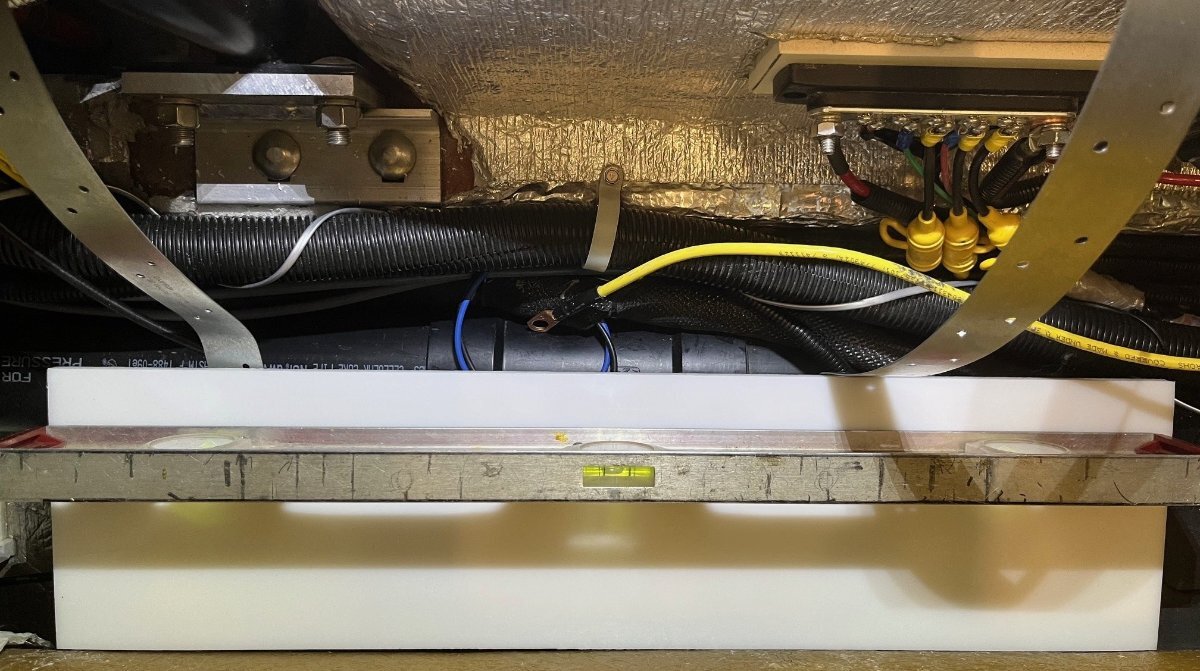
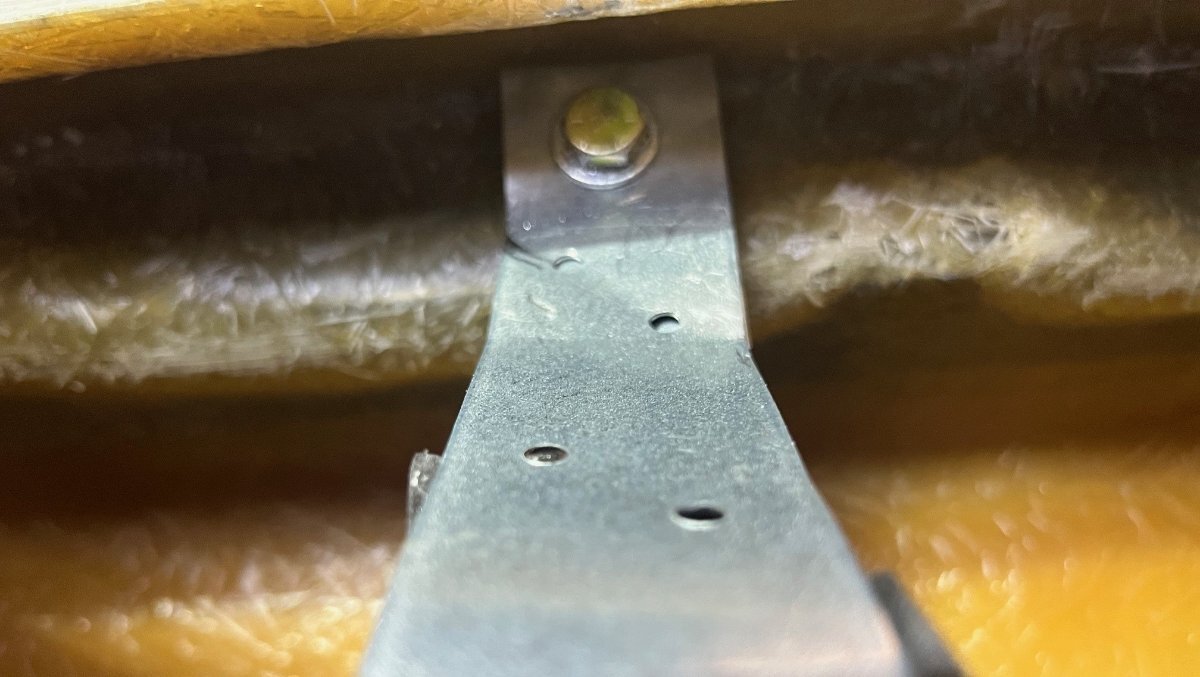
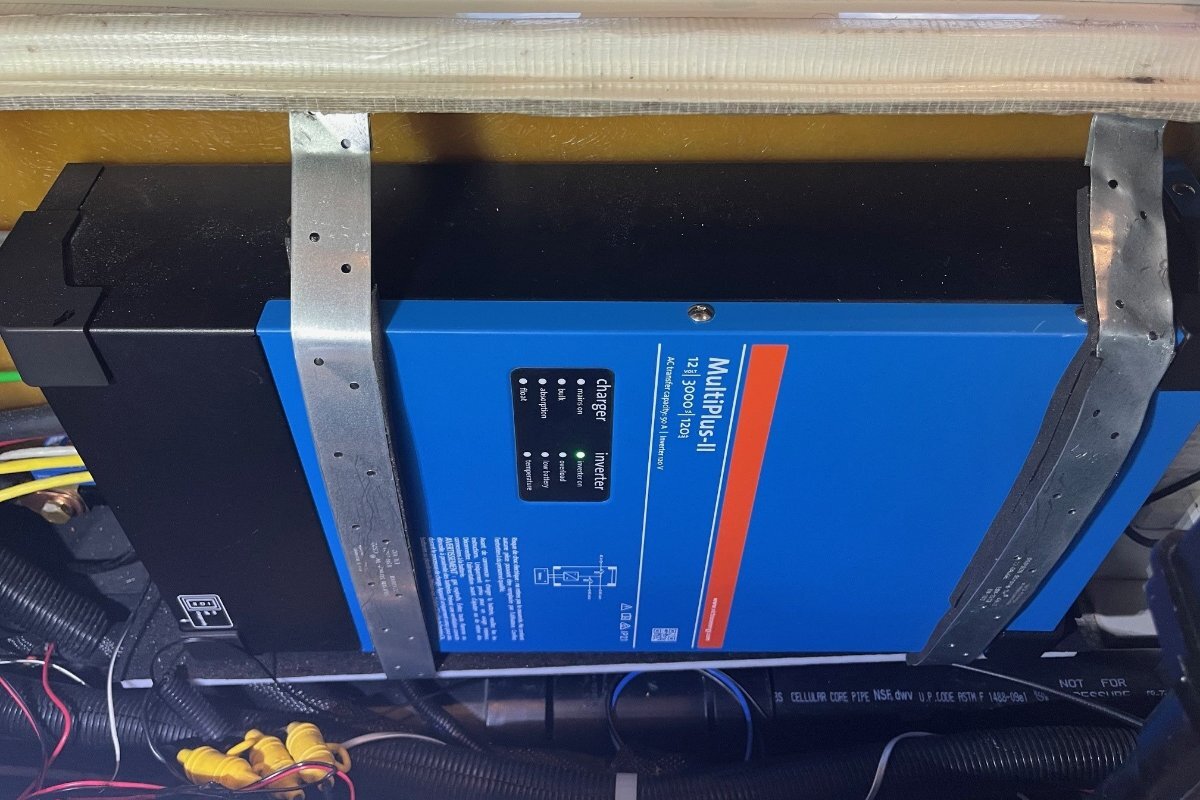
Question is Tom, would additional adhesive work, when it did not work the first time? (Can I say, what a lame glue job OTT! 🤣) When I installed our Victron inverter, I had seen installations on this forum using a vertical mounting board and adhesives which made me worry. That's a lot of weight to to be glued to a wall of a travel trailer! I decided to build a shelf sitting on the floor below and after the inverter was in place, I used anchors and strapping to hold it against the wall (see pics). You should see if you can move the inverter up and out of the way and see if building a floor-mounted shelf would work in your hull. Pull the battery ground or turn a shut-off switch before moving or removing your inverter. In the meantime if you must travel, stuff some insulation on both sides of the inverter to keep it from moving!
1 point
-
I drilled one 4" hole and five 3" holes for closet/bathroom vents and to vent an oven that replaced our microwave. I just used a new high-quality standard hole saw, likely it was carbide steel, not diamond. I did not bother to tape using a hole-saw. It really doesn't help anything. I do tape when using a jigsaw since the base can cause surface marring. In some places the fiberglass is thin, like the 1/8" stated at the pantry. In some places it's double-layered and a plug about 3/4" could be removed. Use a low-speed and a clutch setting on your drill since large hole saws will catch when very slightly off angle. The clutch will save your wrist and the work surface since it will slip when catching vs. jumping. It's late July, so summer is here another 6 weeks and it's hot everywhere. Our weather has been a little cooler for a few days now, but I'm working a brake job this weekend regardless with my son on his '97 T100. We don't have the choice to wait for cooler weather! Two weeks ago, it was my truck and my garage was 105F in the afternoons, fortunately without your humidity. A floor fan helped, lot's of water and electrolytes! Working in the Oliver? NP, just turn on the A/C! I installed my new inverter/charger and moved all the wiring that was under the streetside bed to under the rear dinette seat during July 2024. It was 100+ in my garage and a cool 75F inside the Oliver! 🤣1 point
-
Towing a trailer safely—especially one over 3,000 lbs—requires more than just hitching it up and driving off. One of the most critical components in trailer safety is the brake controller, which synchronizes the trailer’s electric brakes with your tow vehicle. 1. What is a Trailer Brake Controller? A brake controller is an electronic device installed in the tow vehicle's cabin that sends a signal to the trailer’s electric or electric-over-hydraulic brakes. This allows the trailer to brake in proportion to the tow vehicle, improving stability, stopping distance, and overall safety. There are two main types: Time-Delayed Controllers: Apply a preset amount of braking power after a delay when the vehicle brakes are applied. Proportional (Inertia-Based) Controllers: Use a motion sensor to apply the same amount of braking force as the tow vehicle in real time. For smoother, safer towing—especially on varied terrain—a proportional controller is highly recommended. 2. Proper Setup of Trailer Brakes Brake Gain Adjustment "Gain" is how much braking power the controller sends to the trailer. Start with a gain setting of about 5.0 (mid-range). Perform a slow-speed test (around 20 mph) in a safe area: Manually activate the trailer brakes using the controller lever. The trailer should slow the vehicle slightly without locking up its wheels. Increase gain if the trailer doesn’t brake enough; decrease if it jerks or skids. TIP: Re-adjust gain if your trailer load changes significantly (e.g., adding water or cargo) 3. Safety & Maintenance Tips Brake Sync Check: Ensure braking feels smooth and proportional. If it’s jerky or the trailer pushes/pulls, adjust the gain or inspect brake components. Manual Override Lever: Know its location—it can be used independently in emergencies (e.g., trailer sway). Inspect Brake Pads/Shoes: Just like your vehicle, trailer brakes wear and need regular checks. Pre-Trip Check: Ensure the brake controller is powered, brakes engage, and lights/signals work. Breakaway Cable & Battery: Confirm the cable is securely attached to the tow vehicle (not the hitch). Make sure the camper’s battery is charged so the breakaway system works in an emergency. Tip: 2026 models include a dedicated breakaway battery pack—test it before each trip to ensure it's functional. 4. Final Reminders for Safe Towing Always stay within your vehicle's towing capacity (check owner's manual). Distribute weight evenly in the trailer, with 10–15% on the hitch. Use a weight-distribution hitch as needed. Drive cautiously—slow, wide turns and extended stopping distances are critical. Tow Smart. Tow Safe.1 point
-
There's definitely a lot of cool places to see enroute from NM to the White Mtns of AZ! We had a blast traveling with @Geronimo John and meeting @jd1923 and his lovely wife and wonderful chef, Chris, and their puppy, Charlie! Above -- a couple Olivers, and a couple knucklehead huskies at the Very Large Array west of Socorro, NM at 6,800' Above: Close-up of one of the 27 VLA radio telescopes (90-foot diameter) that look deep into the Milkyway in the radio frequency spectrum. Definitely worth the time spent to visit this place. Above: Looking for @jd1923.... Above: AH! They can run, but they can't hide from us! Typical afternoon monsoon weather in the White Mtns... Above: Beautiful campground in the Whites... Lots of elk and turkey: A couple knuckleheads trying to figure out what to do with those big 4-legged friends... Above shows a nice flock of Rio Grande Turkeys at about 8,750' enroute to our campsite... Above -- Hannigan Meadow Lodge on AZ Hwy 191 at 9k' -- absolutely fantastic! All in all -- it was a wonderful 5-day, 635-ish mile run from Placitas, NM... Thanks, @jd1923 and @Geronimo John! Plan this one for 2026! Best, A & D (...and the boys - WOOF!) (PS: A couple Olivers preparing for dinner and adult bevs -- note @Geronimo John's ice maker on the table!)
1 point
-
This is our experience as well with a Houghton 3400 Air Conditioner/heat pump and a Yamaha 2400W inverter generator. We don't have a soft start and the generator doesn't have enough power to run our AC. We just run the AC off the batteries when we don't have shore power (which is rare) and then use the generator to charge up the batteries.1 point
-
Not sure why you are flipping the AC breaker. We have a 2022 LE2 with Lithonics lithium batteries, Xantrex 3000, and solar. We start the Honda 2200i, install the bonding plug, connect the 30 amp to the Oliver, plug into 30amp/110 dog bone and plug into the generator. Never had an issue. Maybe I'm not doing it correctly. When you refer to AC breaker, are you referring to the inverter breaker. If not, where is this breaker? Thanks for your onsite.1 point
-
I agree with you. I never turn off the main 30 amp breaker prior to starting the generator. I can’t see any reason to do that as we don’t turn it off prior to plugging it into a power post. As far as misplacing or losing your bonding ground plug, I leave mine permanently in the generator. There’s no reason to remove it. If I were to remove mine, I wouldn’t be able to find it five minutes later much less on the next camping trip.1 point
-
fYI, justed looked at my axle , i have 6 leaf spring on my 5033 lb. Axle. LEI. July 2022.. just thought i would it out there for LEI owners.. ( very few of us,😁).. All my welds look good also.1 point
-
Just sizing things up if there ever comes a time to beef up axles, springs and brakes. Thanks for your input, much appreciated!1 point
-
Please correct me of I am wrong, but the suspension arrives to Oliver as an assembly and is rated as the assembly (springs plus axles) and given the lower of the two of axle rating or spring rating. It appears you have D52 (5200lb) axles with 3500 lb springs which as an assembly are correctly rated at 3500 lbs.1 point
-
I can’t help with the hole locations, but you should buy this wonderful crimping tool. https://www.homedepot.com/p/SharkBite-3-8-in-1-in-PEX-Clamp-Tool-UC961/202688118 Use the appropriate diameter stainless steel crimp rings. They are easy to install, and what is more important, they are easy to remove. A crimped copper ring requires cutting or chiseling off. The stainless rings pop off with the twist of a flat tipped screwdriver. https://www.homedepot.com/p/SharkBite-1-2-in-PEX-Barb-Stainless-Steel-Clamp-10-Pack-UC953A/202032891?MERCH=REC-_-plpsearch_multi-_-NA-_-202032891-_-N My hand strength is low and I have to have help for the 1” size, I just slip a couple of steel pipes over the tool’s handles. Once you try this system you will never go back to the stupid copper ones. You can tell your wife that you need this stuff to repair your house plumbing too.... it would also work on irrigation lines, but the parts are kind of pricey for that application. I used mine a while ago to install hot and cold water lines and valves for a bidet toilet seat, it worked great and made my wife very happy indeed! I have never had a clamp fail, but if you are repairing a joint that will be forever hidden, like inside a wall, you can double up (install two clamps instead of one) per connection, and you will not ever worry about a possible failure. John Davies Spokane WA1 point
-
Hi Susan. You may already know this but the valves and fittings you use to configure the trailer for boon docking and winterizing are underneath the bed on the curbside of the trailer. You'll need to remove the mattress or cushions covering the banco and expose the plumbing underneath. We do our own winterizing and we boon dock frequently so we're aware of the valves and the plumbing in that area. It's also where the Truma and furnace are located so they're accessible as well. (In our case we discovered the leaks in the valves after we had to replace a faulty Truma. I'd left that part of the hull open, periodically checking the plumbing the Truma tech had worked on. His work was fine, the leaks were in the fittings.) So now I'm doing what topgun2 recommends , and thanks for that advice TG2, looking and feeling for anything damp. I did not know about the scuppers so I'm on to that now too. Every day something new. It's good to be alive.1 point
-
A major water leak will be obvious when water starts coming out of the scupper holes in the bottom of the Oliver (those are the little silver metal things on the bottom that "open" towards the bumper). Minor water leaks are a bit more difficult to find. Every now and then I simply run my hand over virtually any "floor" between the hulls that I can reach. If I feel dampness - I investigate further. Bill1 point
-
The closest we have have come to an Oliver in the last year is meeting a couple last week in Holland, Michigan several days ago who are from Kansas and own an Oliver but flew to Holland and left their Ollie behind. Now in central Michigan and not an Oliver to be seen. Heading to Lake Huron side in a day. Maybe we will get lucky there!0 points


-
Recent Achievements
-


")


")


")

