Leaderboard


Popular Content
Showing content with the highest reputation on 03/14/2021 in all areas
-
We recently stayed at Licon Dairy, south of El Paso through harvest hosts.. glad we did, and would recommend it. They’ve got great cheese and other goodies and were great folks.6 points
-
The price of postage stamps too... And today’s music.... And those damn kids on my lawn... And I’m cold!!! 😆4 points
-
I just purchase the (current) receiver from Oliver and installed it myself. It is the same receiver that you can see on Oliver's web site pictures. They sent me a sticker with the 150 lbs limit. The receiver is a 1-1/4" unit.3 points
-
Sure is, I’m a dusty guy.. And I’ve enjoyed cleaning the Mangrove dust from Florida, the red dust from New Mexico, and what seems like about a half pound of the state of Arizona from the inside of our Ollie. It means I’m on the move, and happy for it. I just think, and it is after all only my opinion, that Oliver could deliver trailers without quite as much fiberglass dust....3 points
-
I feel like a "High School Custodian" with all the Keys I now carry. I try to group them, Drive time, Setup, day-to-day camping. Maggie has dups in case I cannot find my Prevagen...3 points
-
I’m glad its a no no to talk politics on this forum. I’d have plenty to say about the rise in fuel cost since January2 points
-
If you aren't taking your Oliver at least once every two months you are missing out . . . . .2 points
-
In over 50 years of camping in travel trailers I have never known anyone to have a propane tank taken.2 points
-
A simple theft deterrent for us is to break down camp and put every thing away if we are going to leave for some time. Some will argue that it makes it more inviting for theft. It has been in my experience that if your in the area were there is other campers and they see your camp stored away they will pay more attention to your camp while your gone. For us it is important to at least say hello to fellow campers, most campers will look out for each other. It has worked well for us. Then again we are in changing times.2 points
-
On the bright side... Maybe the rising fuel prices will thin out the hoards of travelers out there and I can get a reservation somewhere!😳.... I miss spontaneous travel!...Planning is not one of my strong suits... And sticking to an itinerary just seems anti-retirement 😂.... Ok... back to my Positivity training.....Ohmmmmmm🧘♂️2 points
-
If you visit any of the winery’s or distillery’s you will definitely have to stay the night. Taste testing🤪2 points
-
We just joined Harvest Hosts this morning. We used discount code MARCH which dropped the annual membership to a one time new member price of $67.15. The regular price is $79 annually. It will be interesting to see how this works out for us. Using it once or twice will likely pay for itself and it surely will beat a Walmart or Cracker Barrel parking lot. Happy Travels!2 points
-
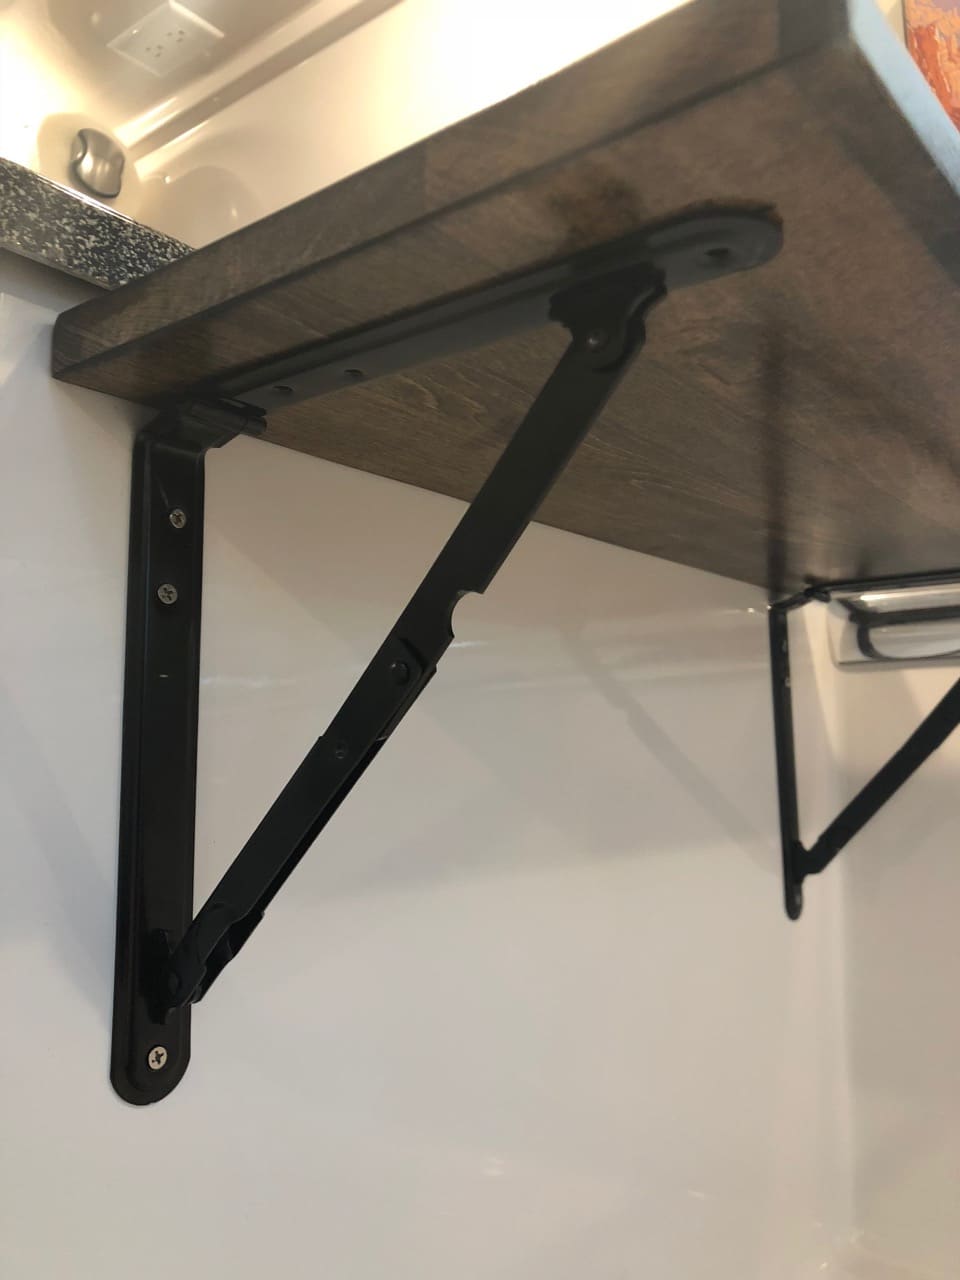
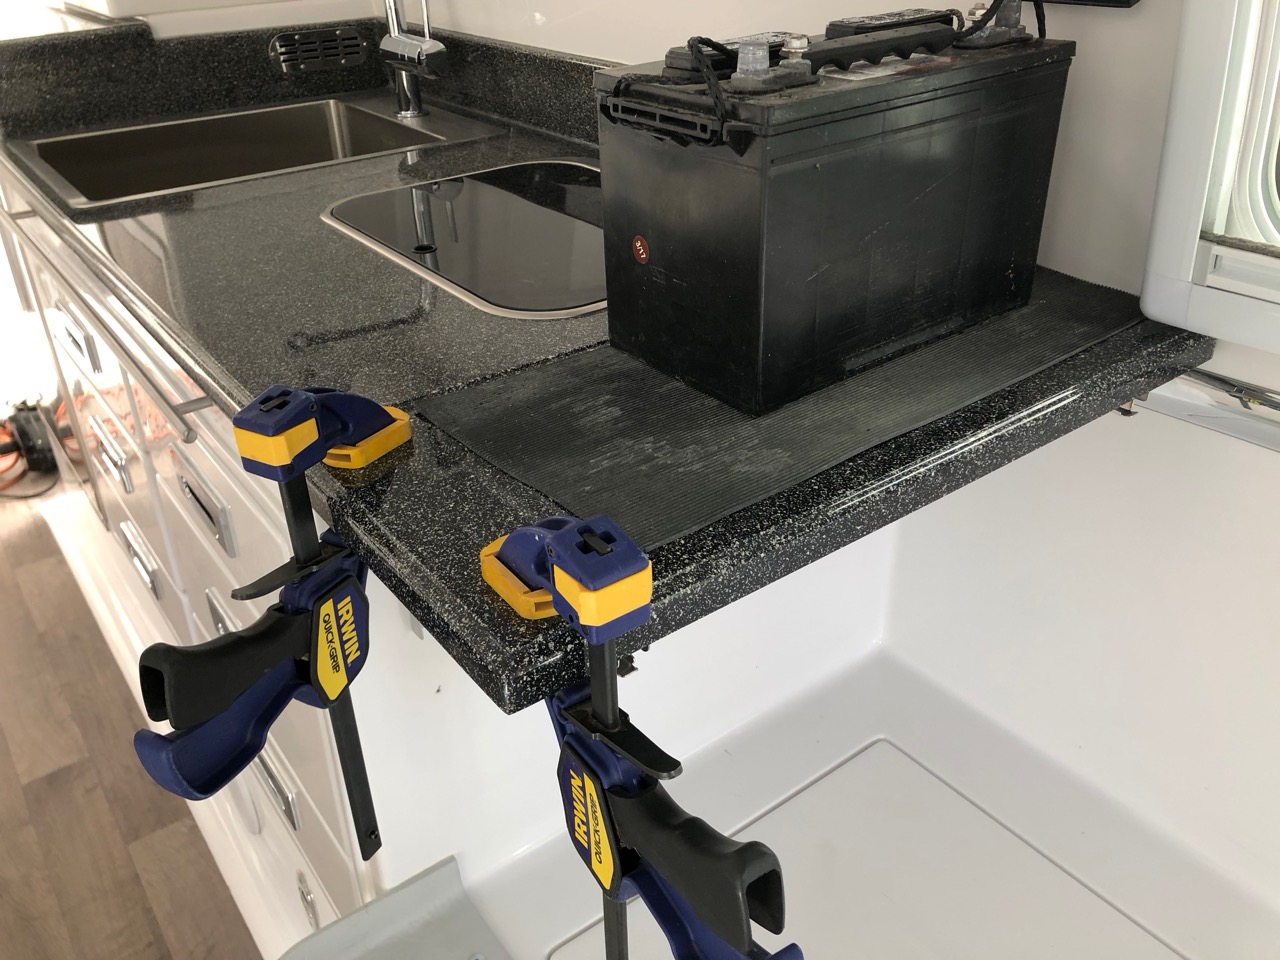
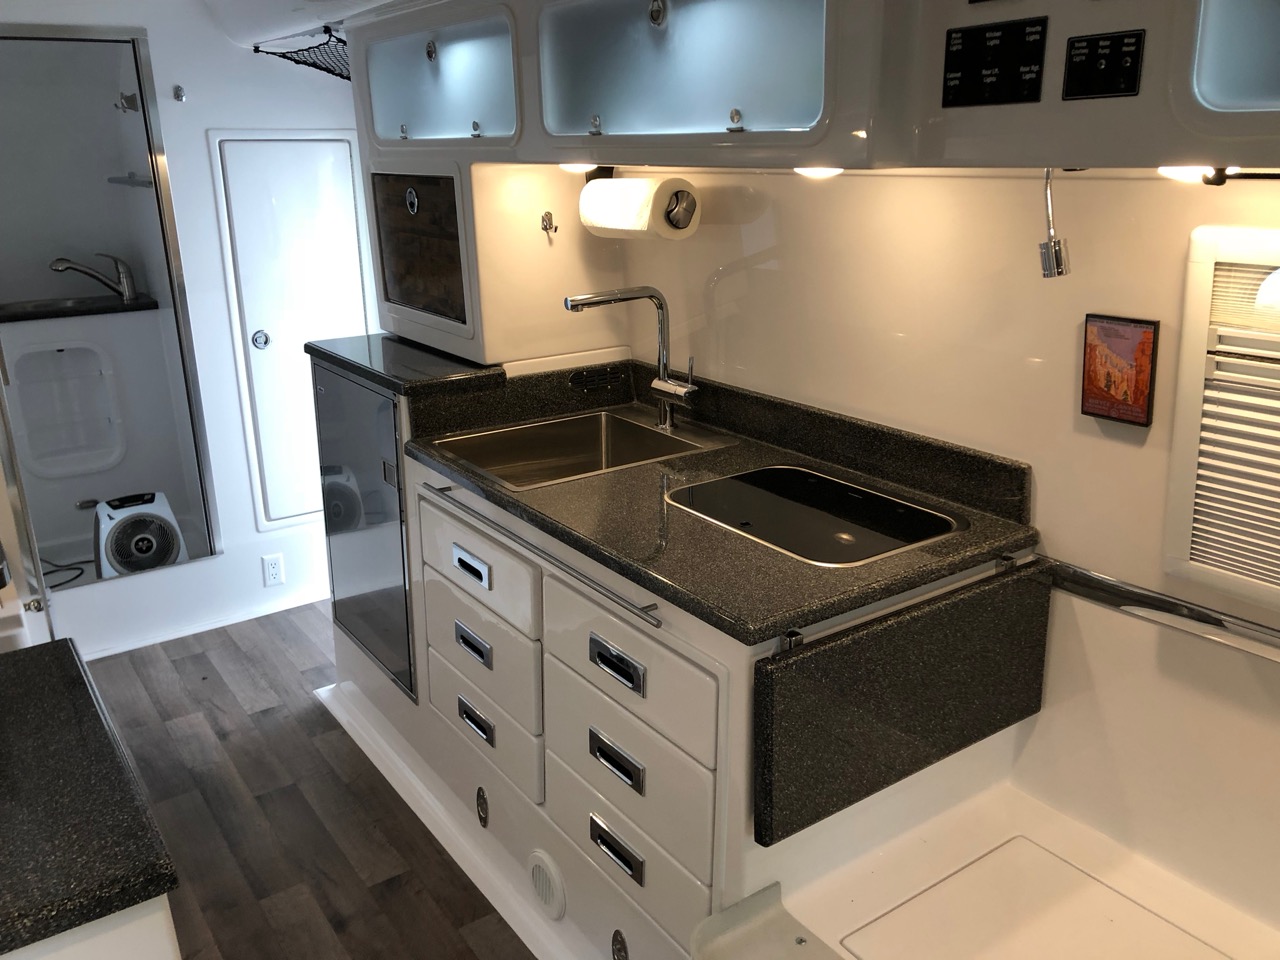
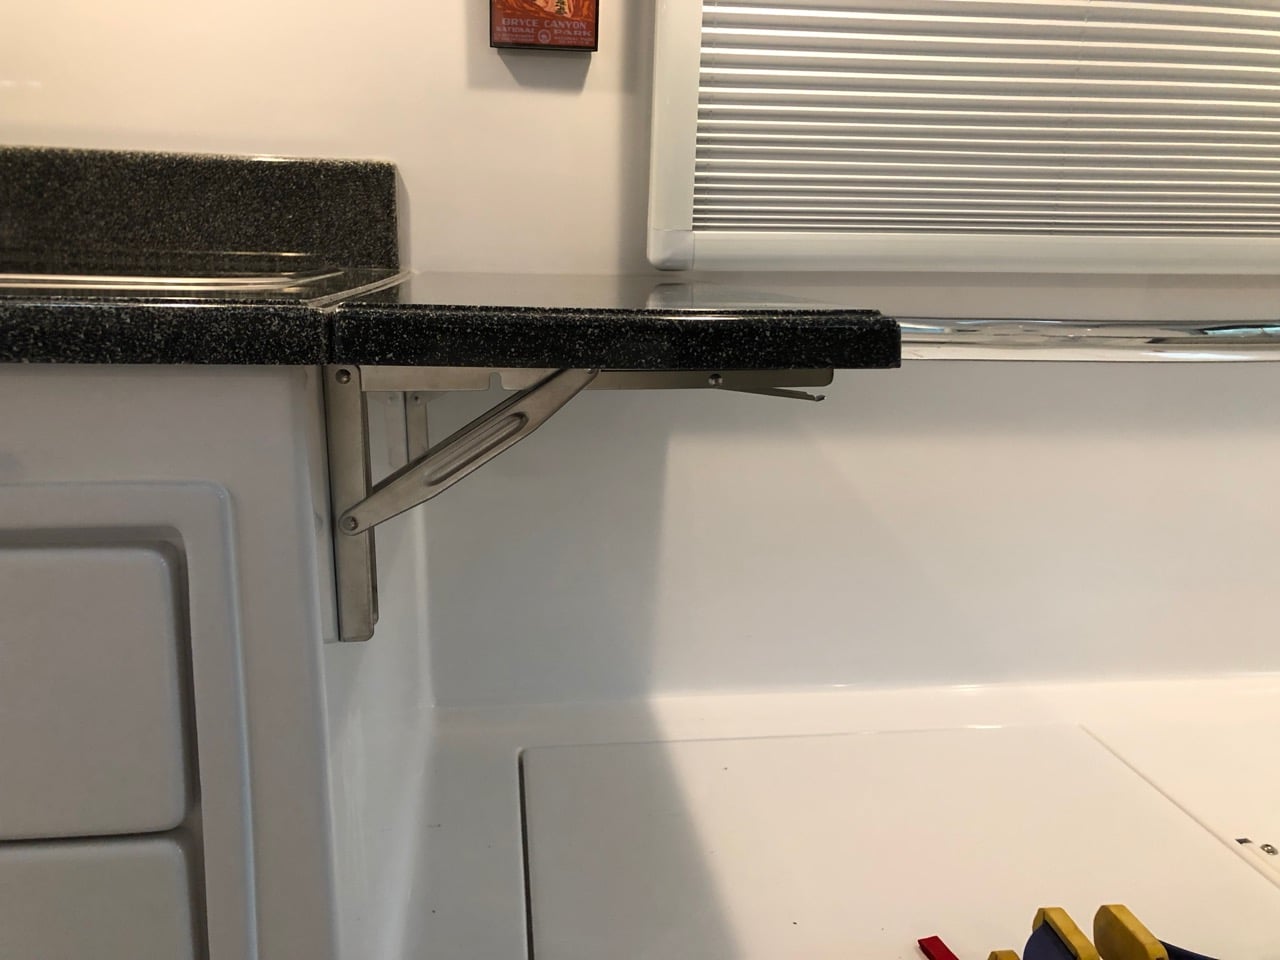
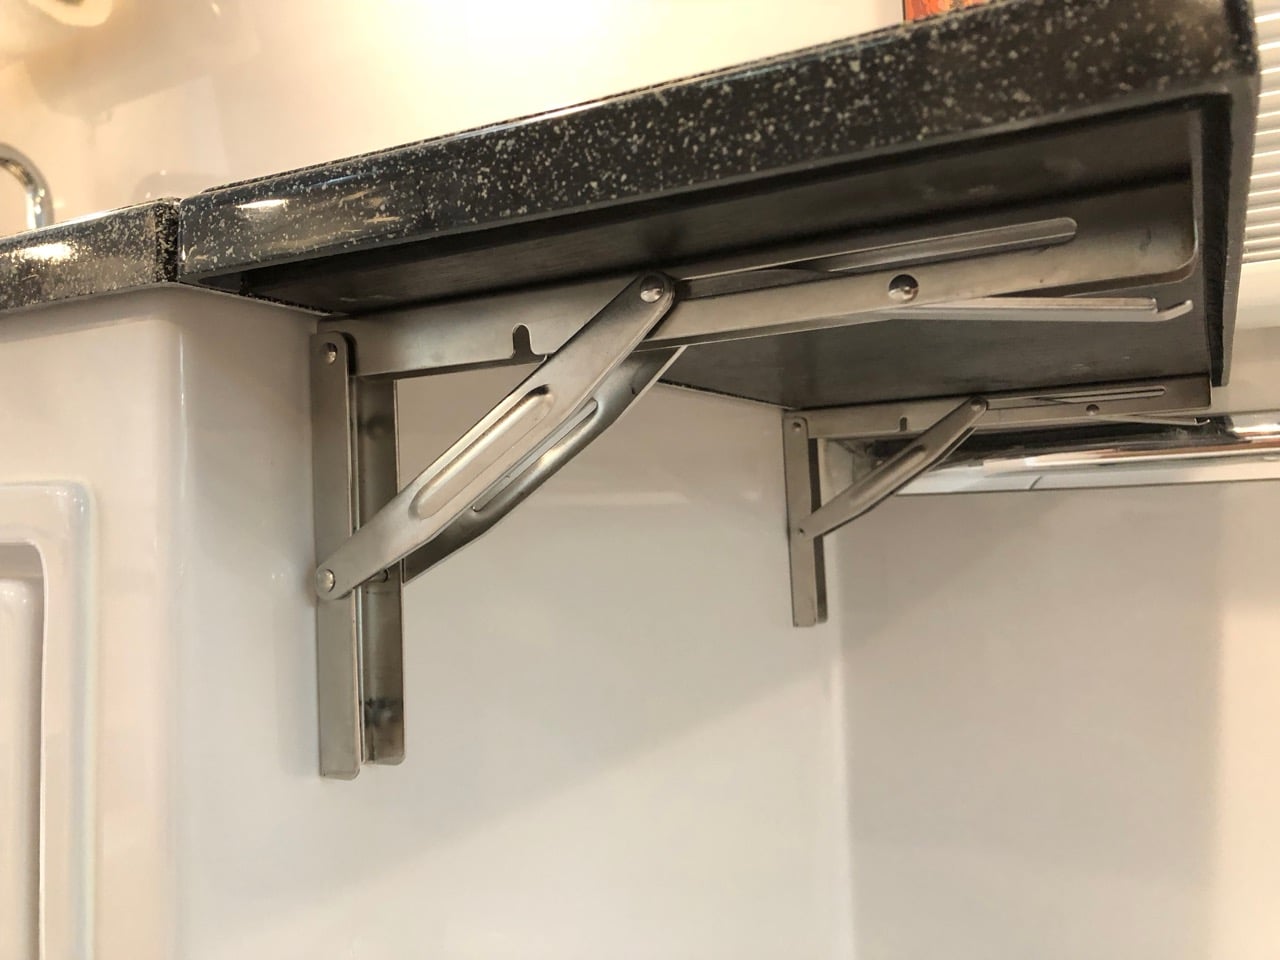
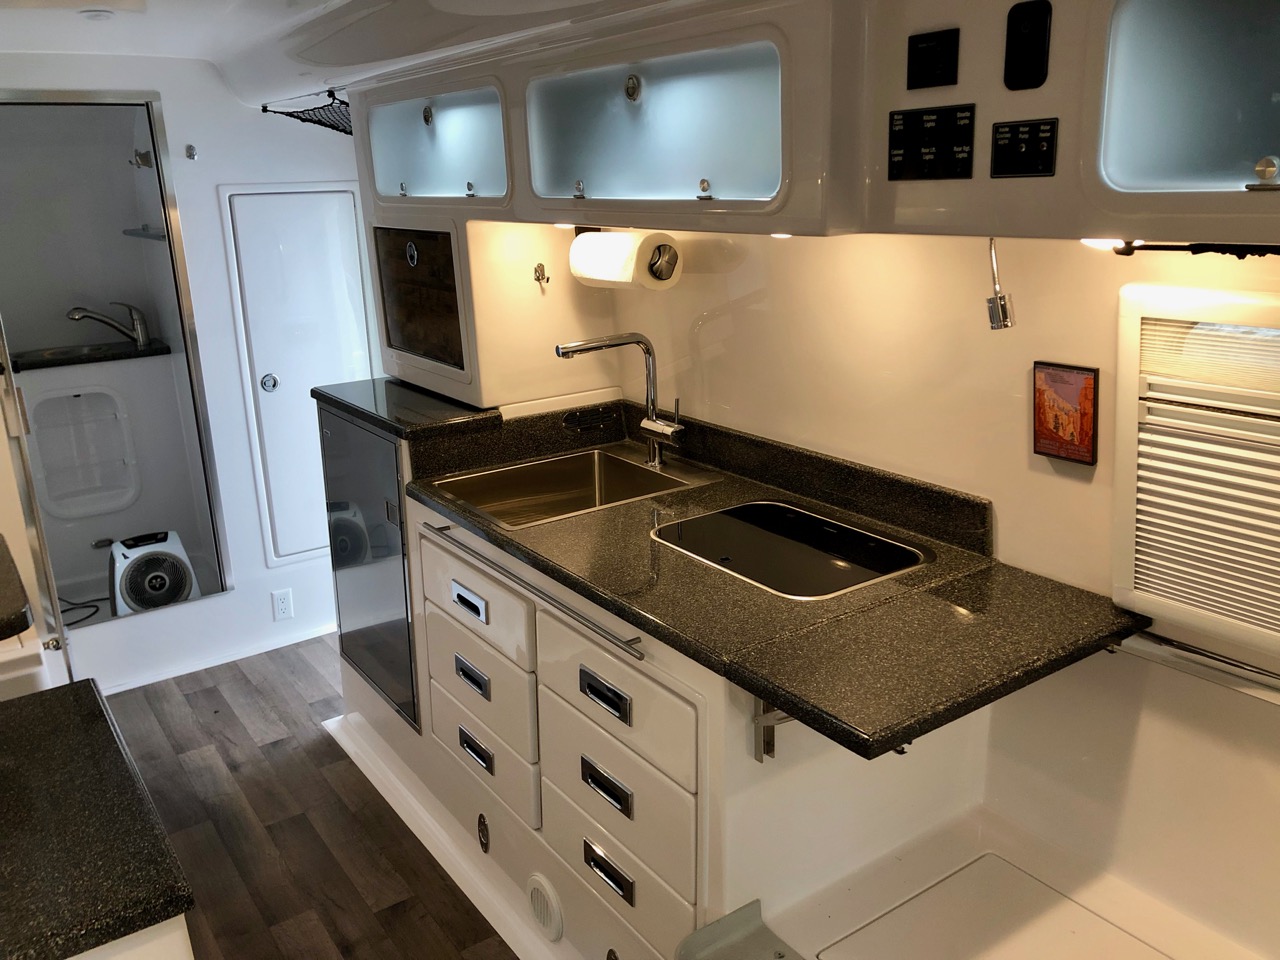
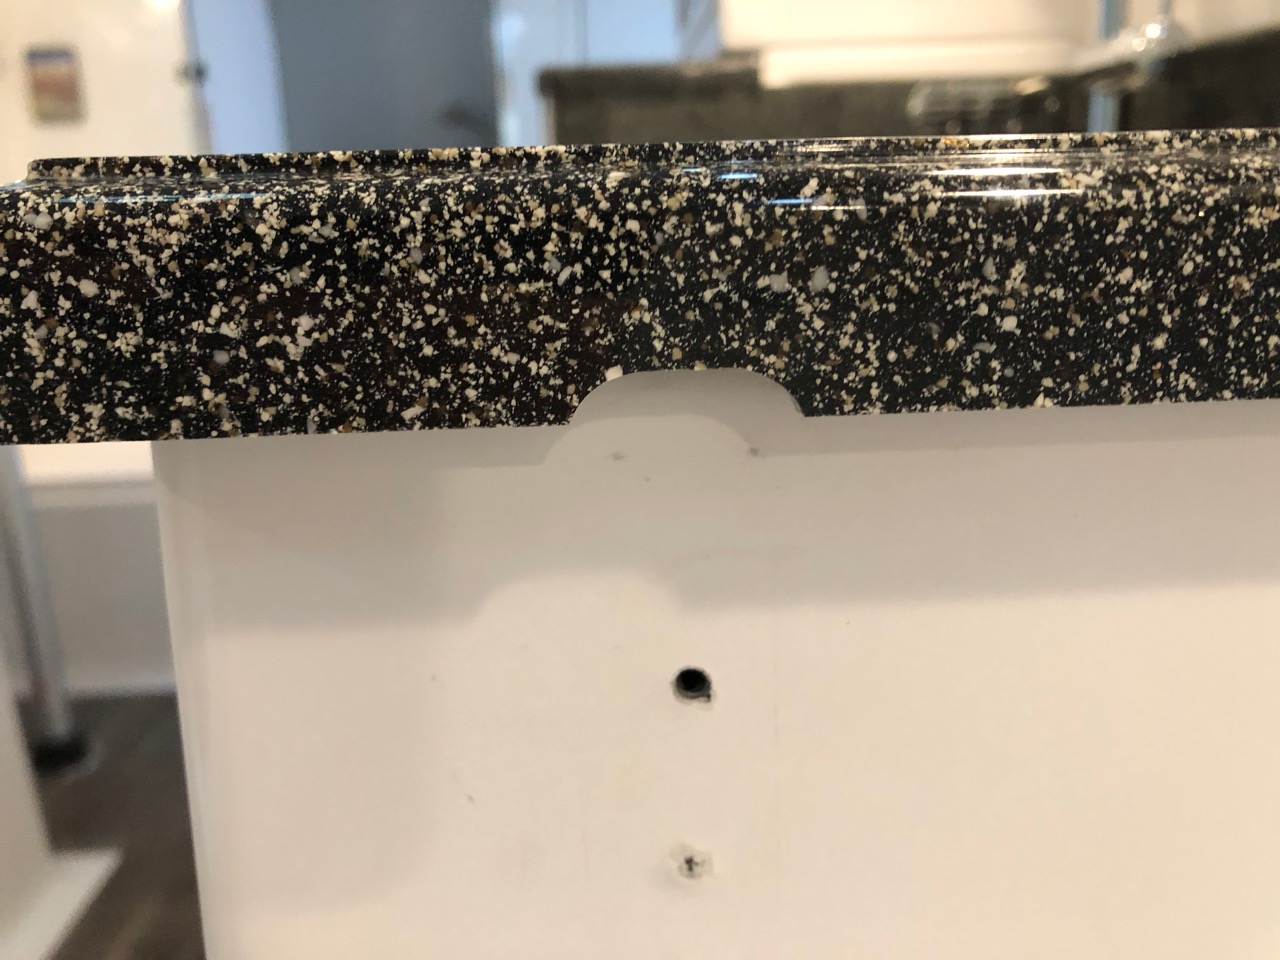
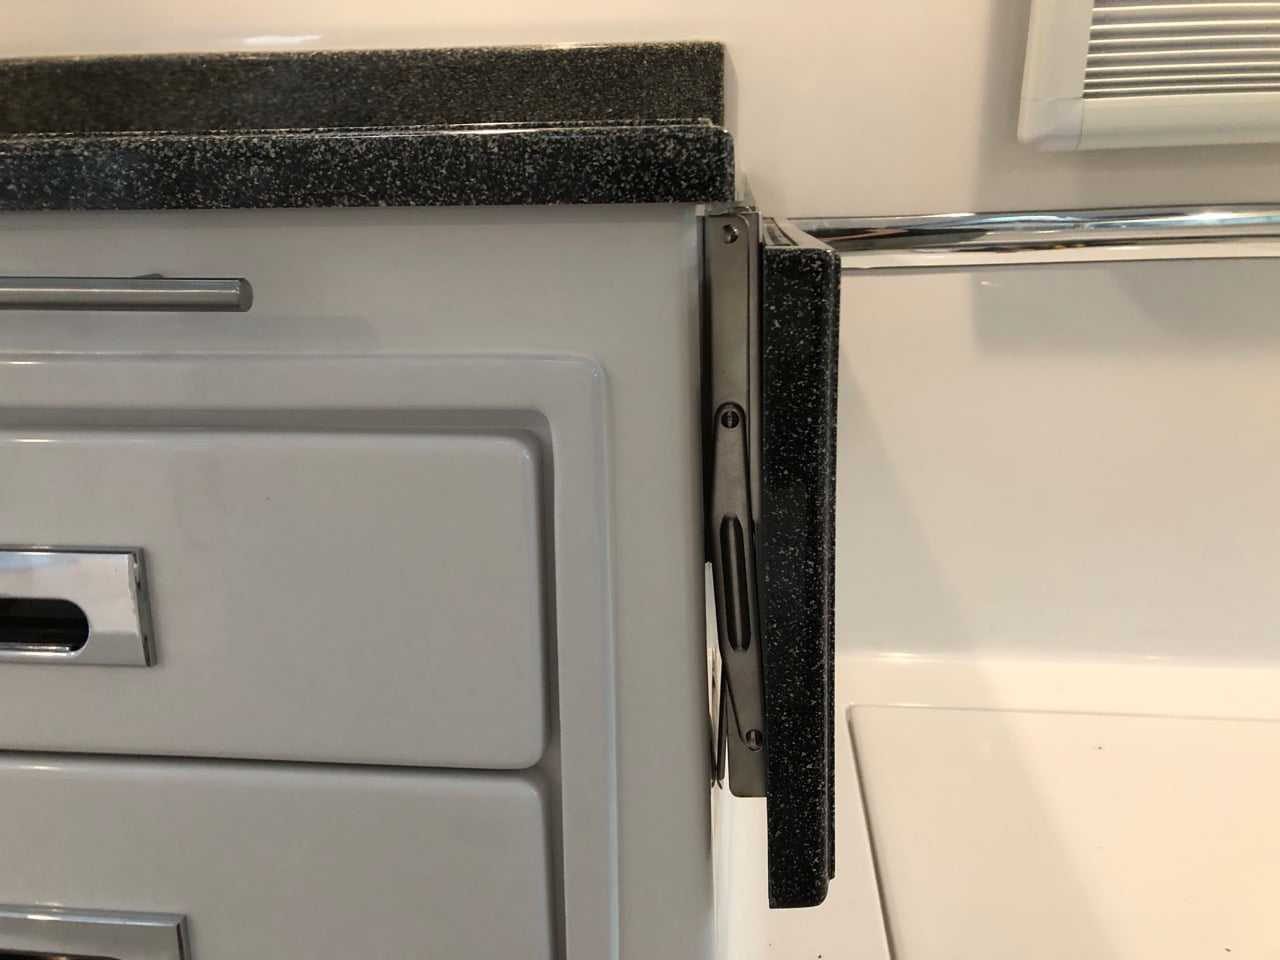
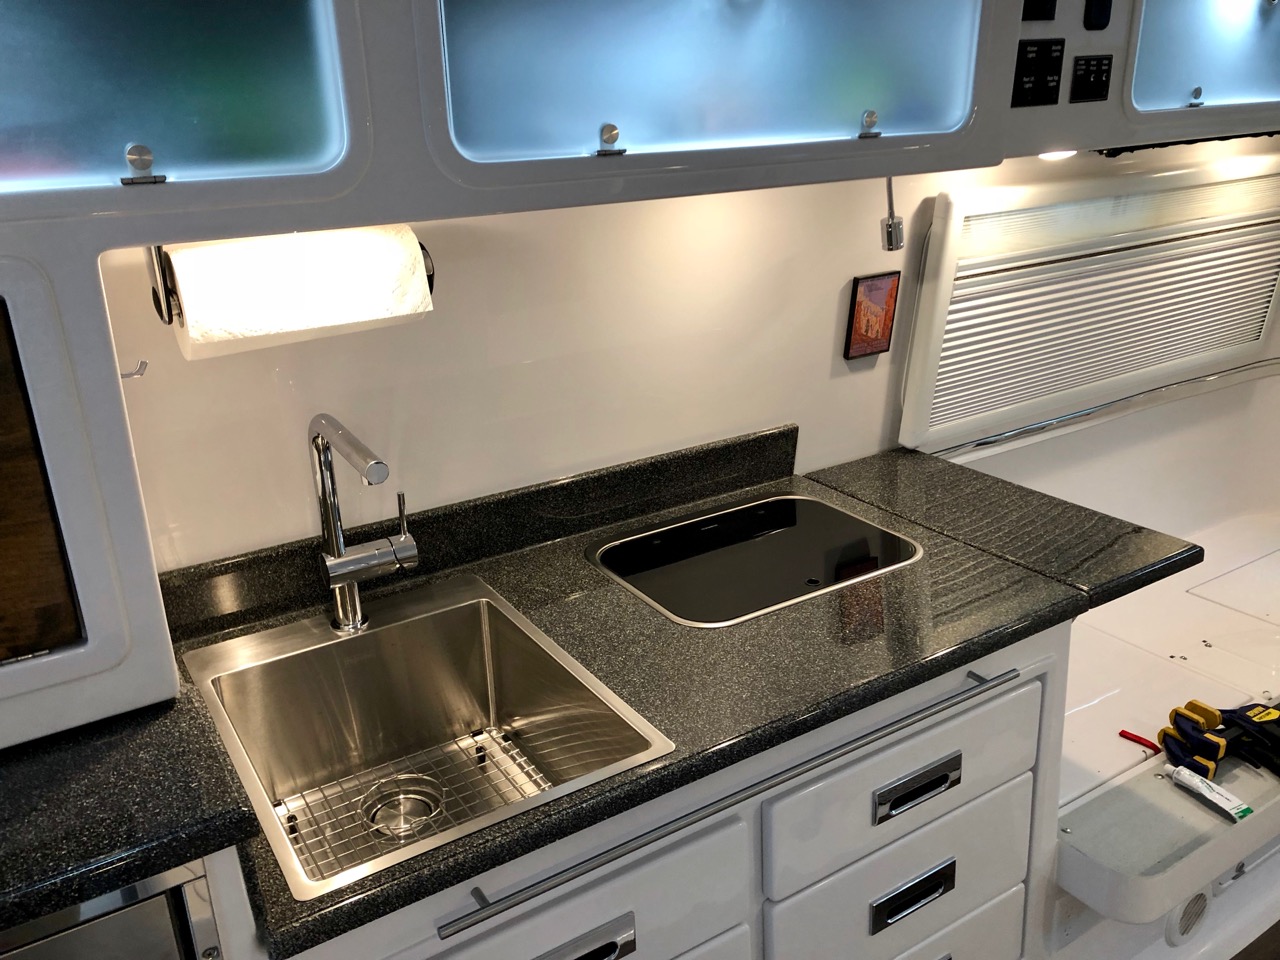
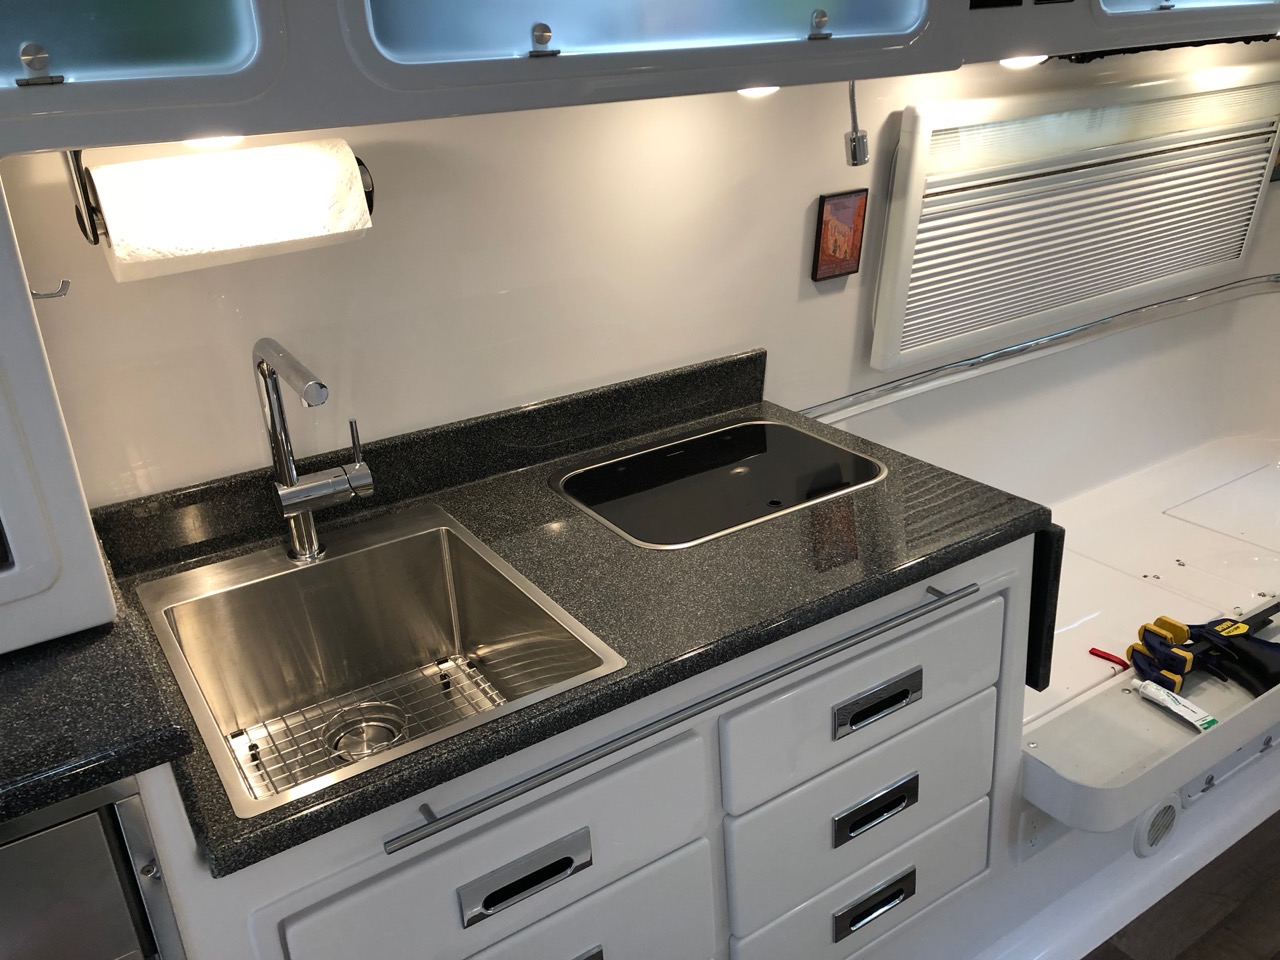
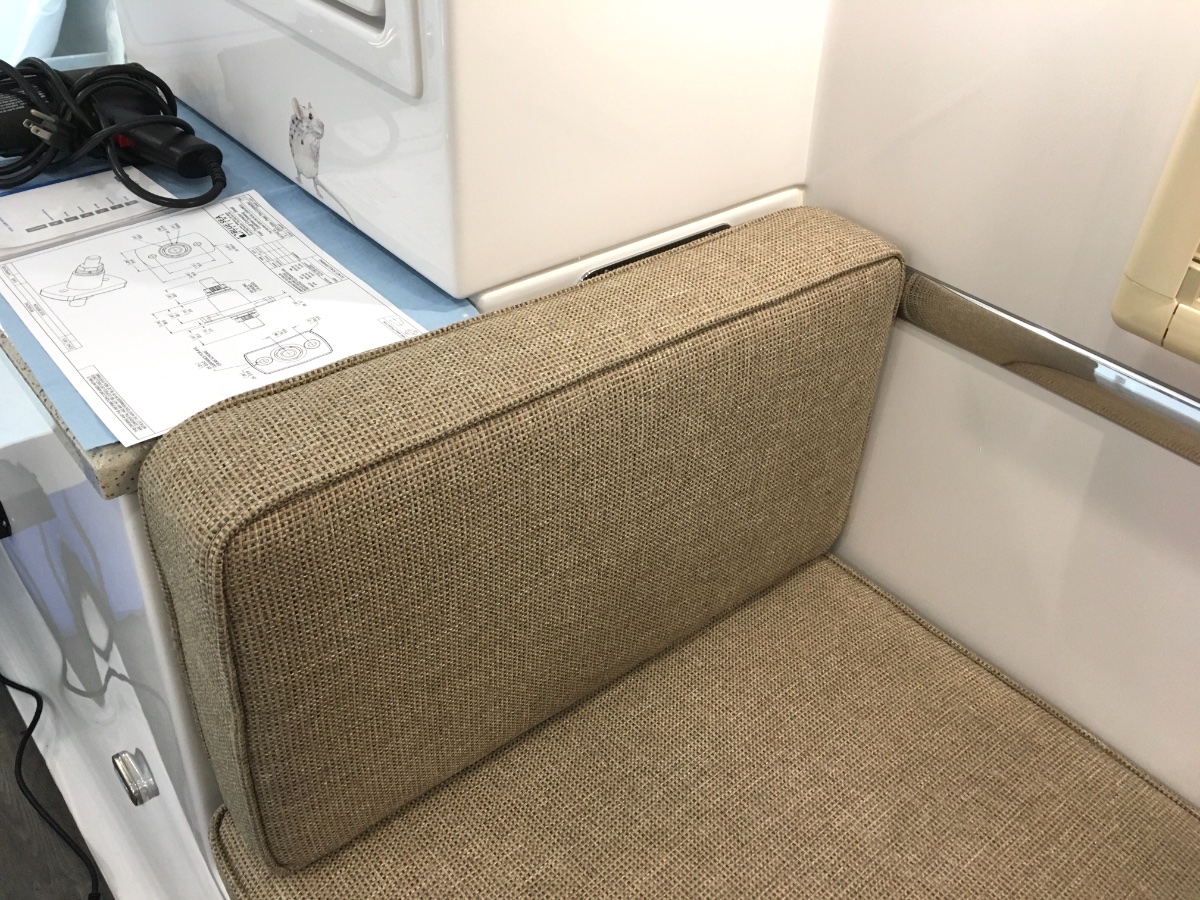
One of the things I asked Oliver to do for me was to install a 12" counter extension to the right of the cooktop that could be folded down when not in use. I figured we could use the extra counter space, plus I wanted a buffer between the cooktop and beds for splatter. This is what they came up with - This was perfectly fine and exactly what I was expecting, and we've really enjoyed using it. The only thing I didn't really like was that the hardware was finicky and just didn't work well. And the top ended up about 9" rather than 12", so it was a little small. And we had asked if they could make a piece of fiber granite to match, but they'd have to make a new mould for it so that wasn't going to happen. It also would have been nice if the extension were flush to the counter. So maybe a lot of problems. But we were happy with it nonetheless. But one day when I was running some wires through the pantry, I had removed the countertop beneath for access and just naturally set it down on top of the counter extension. Well, it fit perfectly; and thus, a new project was added to the list. I asked Oliver if they would sell me an extra top and picked it up when I got my trailer out of service a few weeks ago. I believe they charged $150 for it. Since I was redoing the top, I figured I'd search for better hardware as well. I found several options, but the ones that stood out were these from Amarine. They're super heavy duty and stainless steel. They work much better than what we had, and look nicer to boot. The only problem was that they were about a half inch too long for the countertop, so they'd have to be cut to size. But worth the trouble, so I ground the ends off a half inch. If you don't want to go through that trouble, my second choice was these, which are small enough to fit without modification. I cut a ½" piece of plywood that I could screw into to use as the base for the top. A ½" sheet will sit flush to the lip of the counter, which is what I wanted, but to make the countertop flush to the existing counter, it meant the hinges had to be high enough that I had to grind out a small notch for each hinge to clear. No big deal - btw, a Dremel with a small sanding cylinder works really well on the fiberglass, and leaves a smooth edge and no chipping whatsoever. Wear a mask. Here are the notches - The brackets are easy, just mark the holes, drill, and screw. I used ¾" #10 stainless on the bottom legs and ¼" #8's on the top. And 3M 4200 along each leg and on each screw going into the fiberglass to prevent it from backing out over time. Since none of the surfaces in the trailer are perfectly 90°, I needed to shim something to make the counter level. I considered grinding down the latch that holds the brackets at 90°, but that would have been difficult and if I ground off too much, I'd have to buy another bracket. Instead, I decided to shim between the plywood and fiber granite and then glue the top to the plywood with more 3M 4200, which I'm using so much that I've started referring to it around the house now as Snowball Glue. It's only about ⅛" max to shim - I used some stainless washers that I had lying about and just glued them down in each of the corners. I found that the top was a bit warped, so I had to weigh it down while the glue set - See, I knew lead acid batteries still had a use. I let it sit overnight and in the morning, I had what's in the photo above. Cool. BTW, if you want to do this and have mattresses, then you'll want to check their thickness to make sure the extension will clear when folded. Measure down 12" from the bottom lip of the counter. If your mattress is below that, you're good. If you have cushions, then no problem, but you'll need to move one of the back ones out of the way when raising or lowering the top. More pics -
 1 point
 -
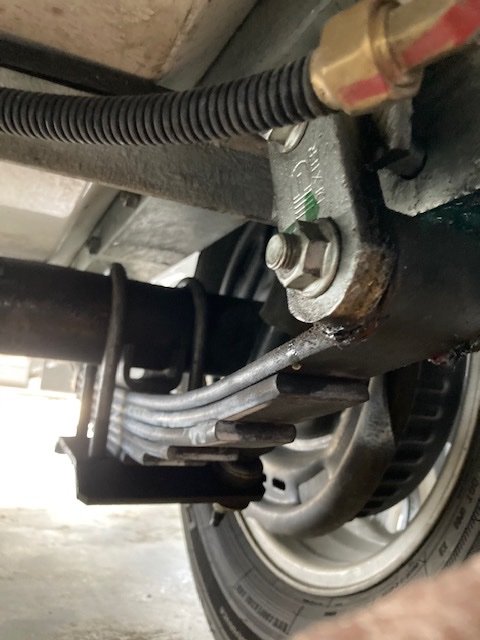
Quick question for other Newer Elite 1 owners out there: Have you looked at your suspension and noted the distance between the upper u-bolts and the frame of the trailer? When looking at mine, I measure about 1/2" between the u-bolt and the trailer on ours with the trailer empty. Does this sound correct to the other "experts" out there? I noticed where the u-bolts have hit a few times but with the trailer only having 3k highway miles on it , I am not sure it will be indicative of future wear when boon docking more. The picture I had on this computer was from when we first got the trailer and I am not sure if the springs have sagged a little since then as the pic has the gap appearing a little more that the 1/2" we have on both sides now.
1 point
-
Did a search on the forums but didn’t find anything. Anyone have a recommendation for a DIY gel coat repair kit for fixing some minor gel coat scratches? A few encounters with campground tree branches have left some minor scratches. Not huge gouges, just a little too deep to buff out. A few kits available on Amazon. Just looking for recommendations on a good kit that works and has a good white color match with the Ollie.1 point
-
Hello from East Tennessee, My wife and I are picking up our new Oliver Elite II next week and thought this would be a good time to introduce ourselves. I have been retired from state parks for a few years now and my better half is planning to work a little while longer. We are new to RV camping, so we plan to start with some short trips and eventually work up to traveling across the country. I grew up in Middle TN, so I am proud to know that our new Oliver camper is a Tennessee made product. I have found this forum to be a great source for information, and I look forward to meeting other Oliver owners in our travels. Alan & Judy Strawberry Plains, TN1 point
-
That does seem low, it is worse than my LE2. I wonder if simply installing longer custom shackles would help the LE? (They would make it worse on an LE2.) I just do not understand why these are made with so little clearance there.... whacking an unseen pothole at speed will really wake you up inside the truck, it makes a horrible bang. John Davies Spokane WA1 point
-
Meg - First and most important - Welcome! I do not have a shower curtain in my Elite II. Given the smooth walls of the Ollie, it is very easy to simply use a squeegee and/or a synthetic towel to dry the shower after use - about a two minute job. The Easy Start allows you to run the air conditioner off a small generator (2000 watts). If you are going to seriously boondock in hot climates then the Easy Start is something you should seriously consider unless you want to have a generator of at least 3500 watts. No, the microwave is not "permanent" and since Oliver doesn't give you a credit for it if you chose to not have it then I think you might as well get it. However, if you are certain that you really don't want it then the "finished" cabinet is very nice for either a small toaster oven or small microwave or for additional storage that is already fairly limited in the Elite I. Bill1 point
-
Fall creek falls is about 2.5 hours from Hohenwald. It's one of the Tennessee resort campgrounds. Beautiful trails. Golf course. Amphitheater. With over 200 campsites, it's not the quiet, unknown spot, though.1 point
-
What about disconnecting at the positive battery terminals and then using one of these plugged into shore power?1 point
-
John, excellent mod. You continue to show how quality work needs to be done. Unfortunately i dont have the skills nor the equipment to do the work but your detailed photos can allow a qualified individual to do the work1 point
-
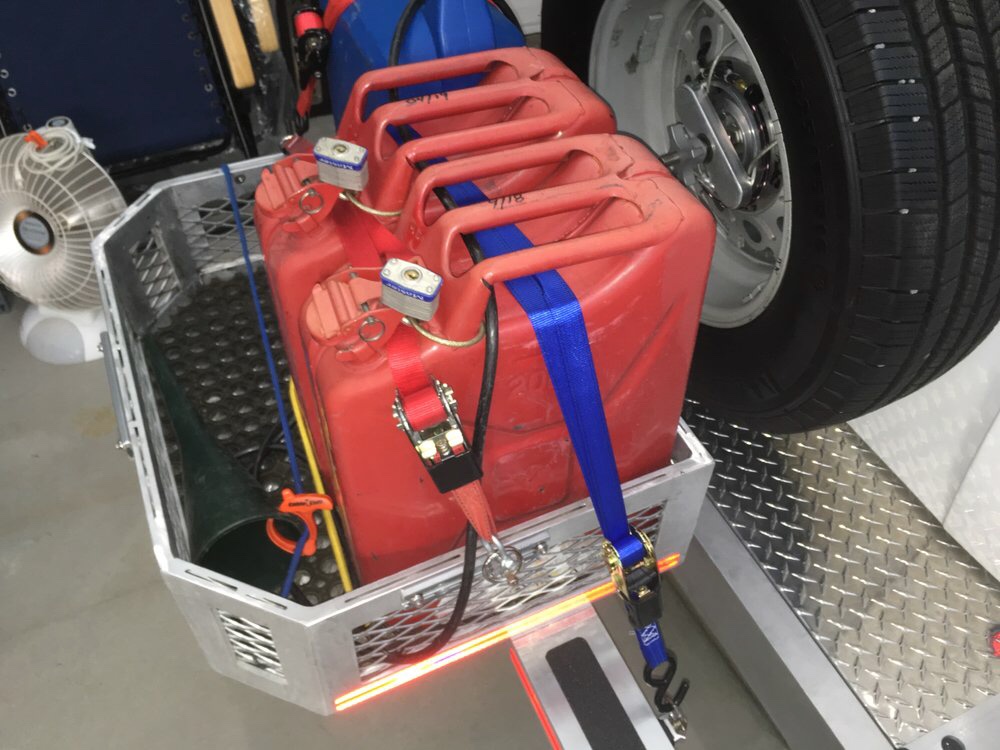
Have you actually seen bed tanks that are rated for gasoline? I never have, and even the under bed models are few and far between for gas trucks, due to our harsh emissions laws. There are three auxiliary tanks for my Land Cruiser 200 - a 12 gal over the spare, and a 24 gal and 40 gal which replace the spare tire. All of those are Australian imports, and they start at $2000 plus a full days labor. The bigger tanks require a new rear bumper to carry the spare tire, plus suspension and tire upgrade to carry the extra weight. As much as I would love to increase my capacity by 163%, I won’t be buying one any time soon. I have been down that “Overland vehicle prep” rabbit hole before. It is a great way to lose a whole lot of money, at resale, or if the vehicle gets totaled and the insurance company baulks at paying for all the extra accessories, even if you declared them. https://longrangeamerica.com/prod/tlc200ra-40g/ This is why I carry 10 gallons of gas on the back of the Ollie...... Only once have I come reeeeealy close to running dry - “Cruising Range 2 Miles” - and it was comforting to know I could syphon a can into the truck to get me to a station. John Davies Spokane WA
1 point
-
While not exactly northeast of town - don't forget about Merewether Lewis Campground at: 35.52354514962594, -87.45430386645957 There is water available here at the restroom but no electric or dump. It is very quiet and the old Trace is near. Obviously there is also the "old" Oliver sale office where both water and electric are available, but, there is a little highway noise: 35.56355003025139, -87.51889642291667 Bill1 point
-
I've run into the same issue. I've been looking too and found tanks that can be added to the truck bed but I just wouldn't do that. If you do find anything Frank please post it. I'll do the same.1 point
-
Not to sound cavalier, but fluctuating fuel costs are something I accept. We bought the Oliver to travel, enjoy and camp! 😊 - Patriot1 point
-
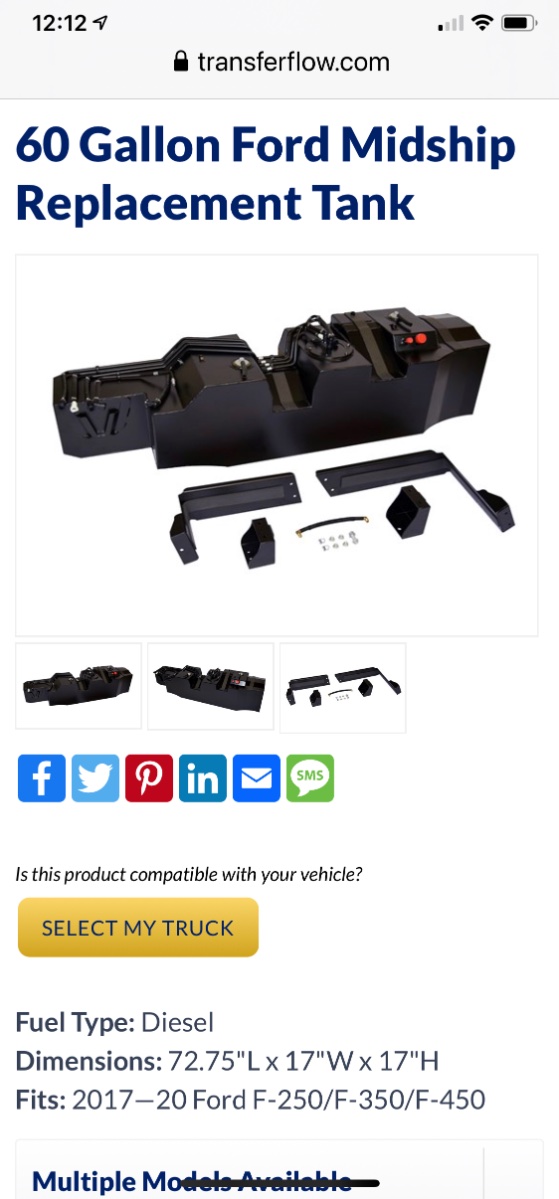
👍 Range is my bigger fuel concern that causes my anxiety when towing, not cost. I wish I could find a big 50 or 60 gallon chassis mount gas tank kit for an upgrade for my gas F-250, but all the aftermarket larger tanks I’ve found so far like this one state they are just for the diesel versions of the truck. Haven’t found one yet for the gas versions of the F-250.
1 point
-
As Mike mentioned and I agree LP tank theft is not a big issue, and likely will never be if you secure your tanks. For a 5 minute mod why not? We always make it a point when the opportunity presents, to kindly great our camping neighbors and say hello. As for RV theft...very rare, so no worries here.1 point
-
I have two thoughts..... and you will be upset. Every time you want to adjust the pressure, you will have to empty out the gear in front of that access opening. I carry my generator on that side, secured with a cable lock to the seat bracket. With my extended lines, I let them lie on top of it, along with the pump and gauges. (I don’t even have to drop the lower gate to get to them.) So your valve location is going to be either a very minor hassle or else a really big inconvenience, depending on what you normally have stored there. Next, and this is important, the bags ride inside the coil springs, unlike with a leaf spring setup, so Firestone recommends keeping air in them at all times to prevent damage from pinching. It is an unfortunate risk with this design. If one of my lines leaks and I do not catch it right away, I may have one wrecked bag to replace. But I would notice the truck leaning to that side, so hopefully I could repair the leak ASAP before any damage occurs. With both lines teed together, both bags will deflate and you will have no visual way of knowing it. Then you will have to fix two trashed bags, because you will have driven on them too long. You might not even know they have failed until your next trip, when you try to increase the pressure. The first problem might make you mutter bad words every single time you have to struggle to get access. The second problem will really make you swear, if you experience a leak and have to have them both changed. My recommendation is to take it back, and get it corrected. At the very least have an extension added at the current valve location, but ideally it would have two hoses from two bags with no added joints anywhere. If he does add splices they MUST be located where they are easy to access and to troubleshoot (spray with soapy water to look for leaks). For a pickup truck, a single valve located in the rear bumper would be just OK, but not if there was a heavy camper installed, because you could not level it side to side.... IMHO a good tech should have known that this would be a bad installation for an SUV with coil springs, but at the very least he should have asked you. So he failed twice. Darn it.... I am really sorry that I did not make these comments earlier.😢 John Davies Spokane WA1 point
-
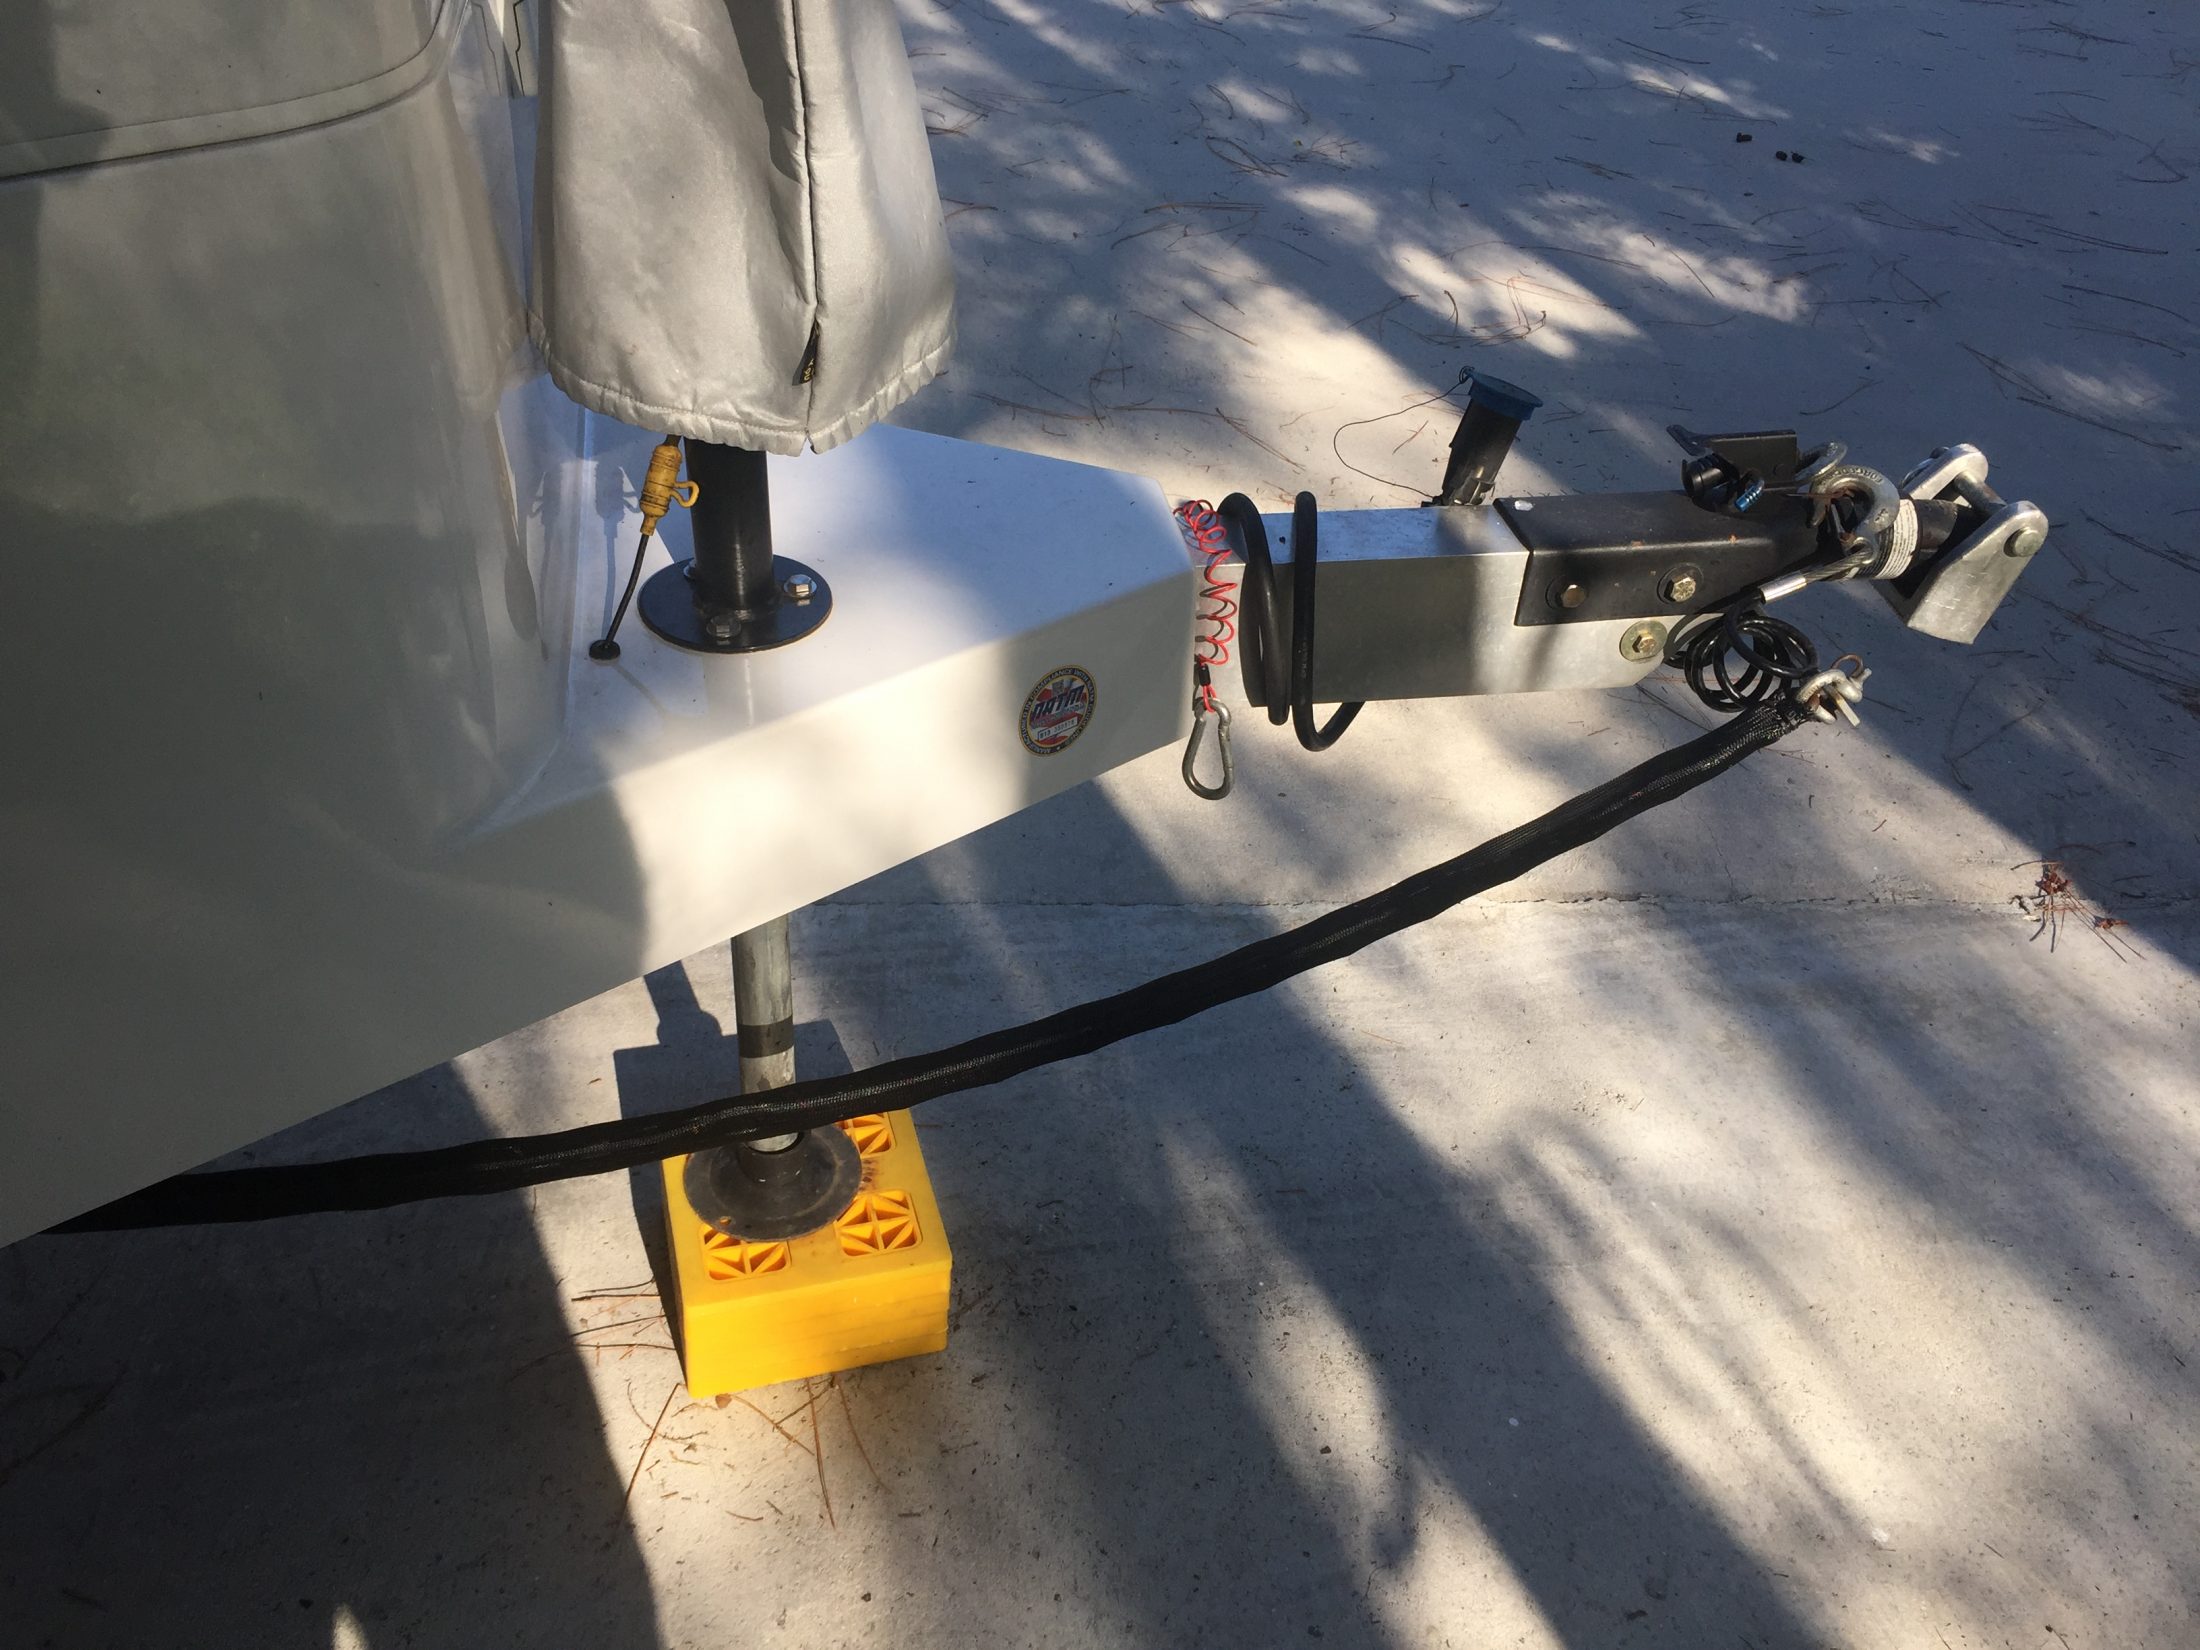
I got tired of seeing my Anderson hitch chains looking rusted and I knew paint was only going to be temporary solution. I considered replacing the chains with plastic/rubberized covered chains but found a lower cost option. I used Techflex Flexo Clean Cut 1 1/2-Inch Braided Cable Sleeve, in black - 10 Feet. Amazon sells it for $8 - https://www.amazon.com/gp/product/B007VT09LS/ref=ppx_yo_dt_b_asin_title_o02_s01?ie=UTF8&psc=1 The 10 foot length is perfect to cover both chains in my case. It cuts clean with scissors and the ends can be burnished with a lighter. You can still see through the braiding to make sure you have no twisted in the chain and it only took a few minutes to put on over the chains. I used tie-straps braided through the last chain links on both ends to hold them in place.
1 point
-
Simple? Open your word editing software - Word - then come back to the Forum and right click on the song you want. In the pop-up window left click on "Copy video URL. Back over to Word and right click then click on "paste". Not "simple" but it will get you all the links to the songs you really want. Bill1 point
-
Okay - deal. Just let me know when you need it 🙂1 point
-
I wish there was a way to give you two thumbs up for this one John! I'm right there with you!1 point
-
Crap! Now I've got something else to worry about!😇1 point
-
Just add a big 62 gallon tank like I did recently. Now I bitch about having to put my credit card into the slot twice to fill the tank! 🙂 But deep down I hope that retirement planner app that I'm using isn't lying about our chances to outlive our money. 😬1 point
-
Sounds like your yamaha's tank might be a little bigger than our honda's. What we normally do is run the generator in the morning , maybe a half hour to 45 minutes, thrpugh boost and the high end of absorb, figuring we get the most bang for the buck (and noise) and hope the solar will take care if the rest. If it's still not charged by the time the sun is getting lower, we'll run it again for awhile in the evening. The solar does the most effective job at the low end of the ramp down , to take the batteries to 100 per cent, even on some cloudy days. How long it will take is really a matter of how much power you've used, so I can't answer that for you. But, we only two 105 ah agm batteries, and try to not run below 75%. I'd think you could surely get several days of charging, maybe a week, if you're conservative with consumption, with one tank.1 point
-
We have reservations in Section F. Looking forward to seeing everyone! Safe Travels! David & Kathy1 point
-
Yup... me too.. crazy amount of dust down below... no need of it. If I’d taken the trailer home after picking it up I’d have been able to do a real clean up... blast out with compressed air, fans, vac.. whatever it would take.. but we will have been on the road almost 5 months before that happens. What I wonder about is impact on the inverter and or furnace that are likely sucking the stuff into themselves1 point
-
Fuel cost doesn’t really factor into our travel plans. It’s tiny compared to the other expenses of this Oliver addiction. 🙂 The amortized per mile cost of the Ollie itself, the new truck, all the camping gear, meals, campground costs, buying bottles of wine at Harvest Host overnight stops, etc. are by far the bigger expenses. $3 per gallon gas would cost me about $270 for a 1,000 mile trip (I get about 11 mpg, so about 90 gallons for a 1,000 mile trip). At $4 a gallon it would be about $360 in gas for the same 1,000 mile trip. That extra $90 over a 4 day trip isn’t going to make that much of a difference compared to everything else.1 point
-
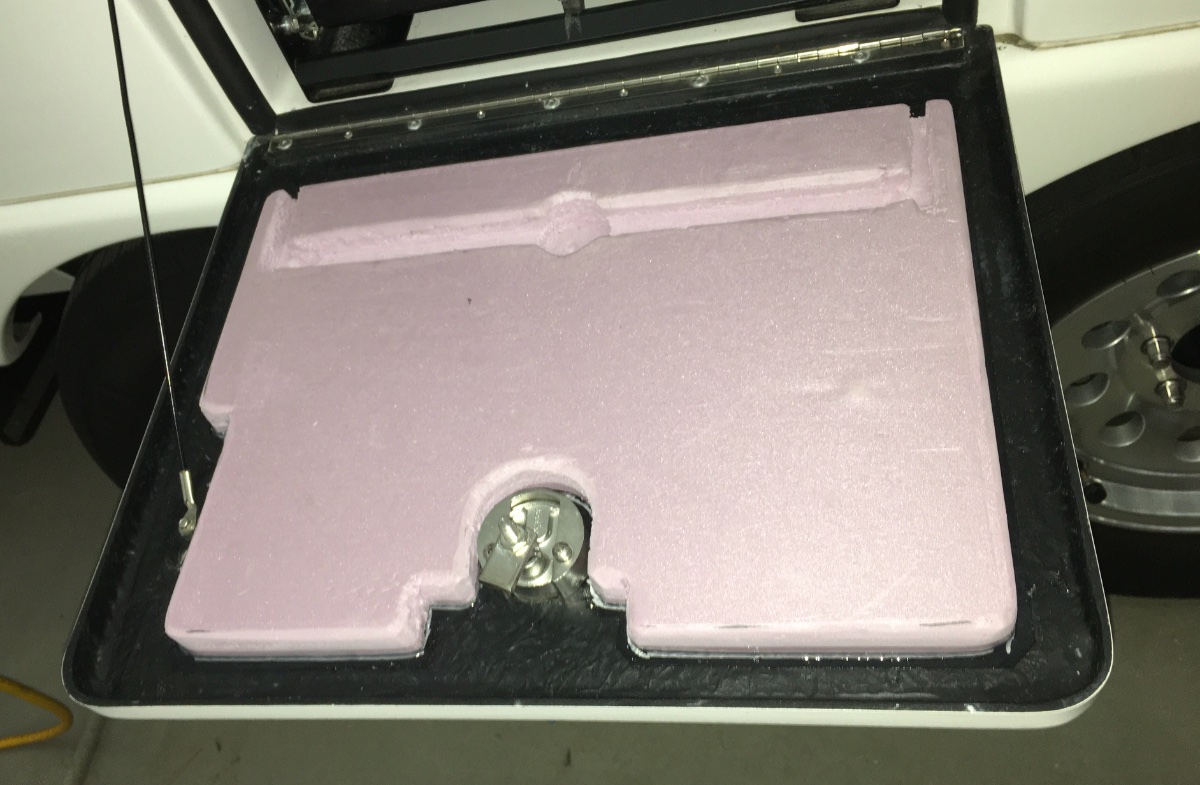
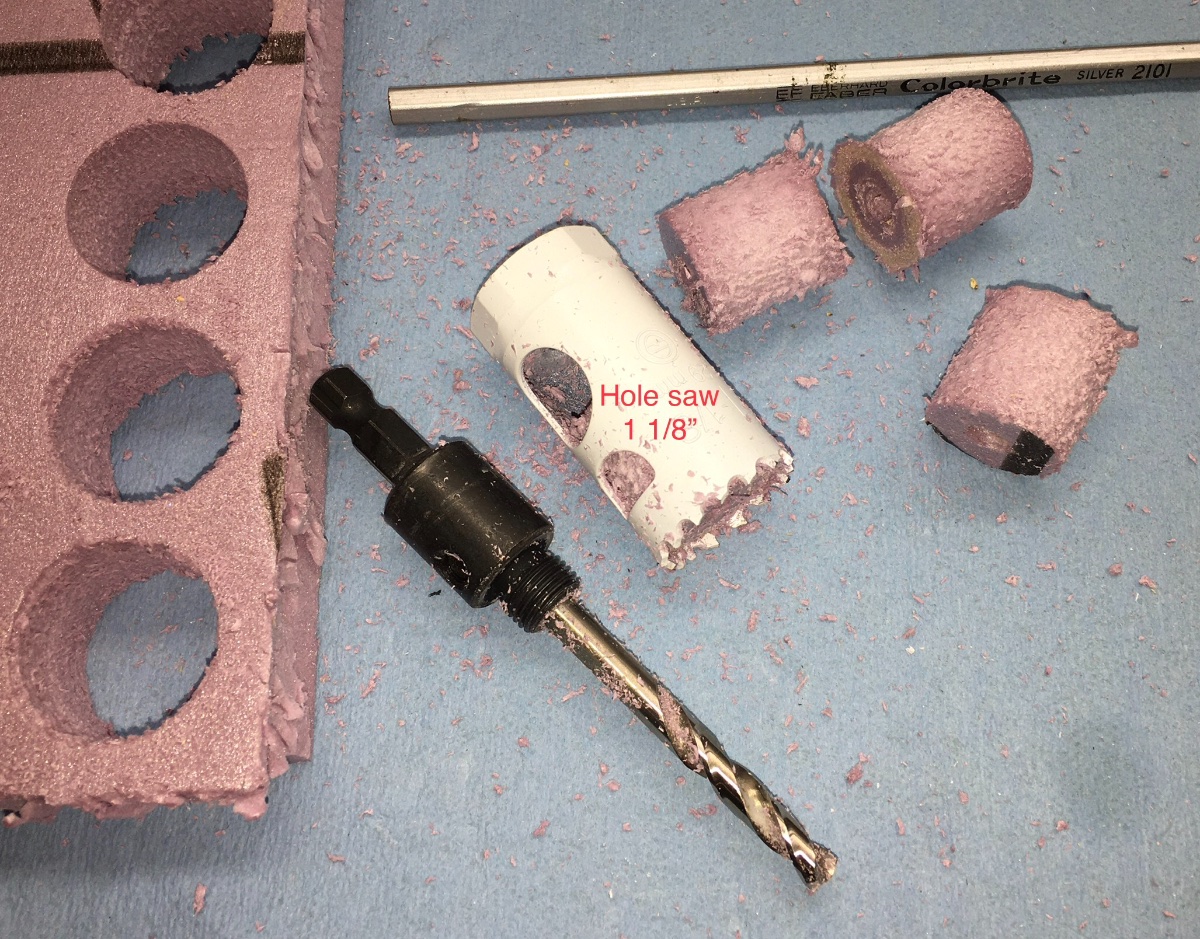
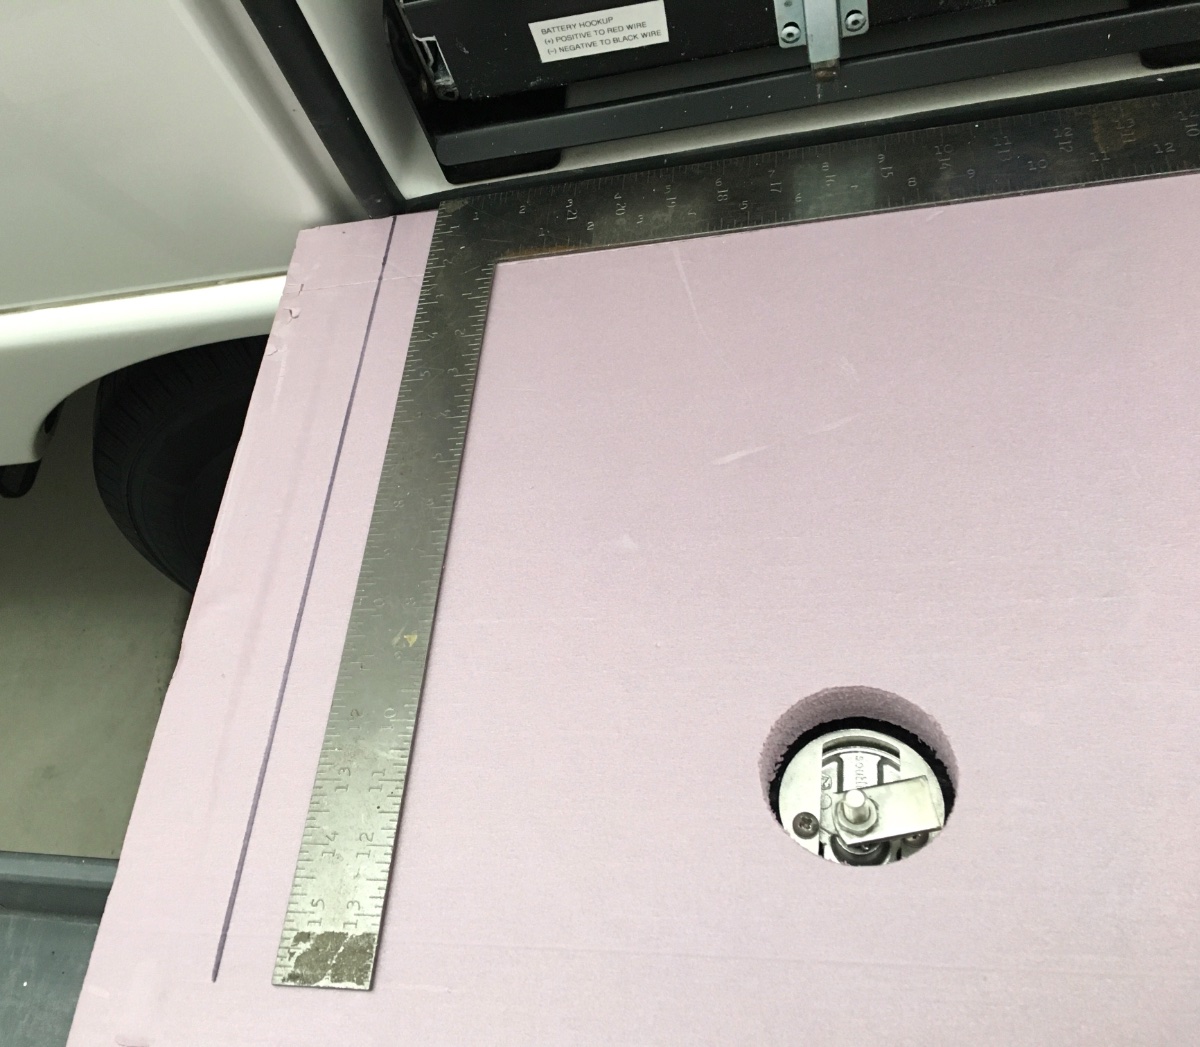
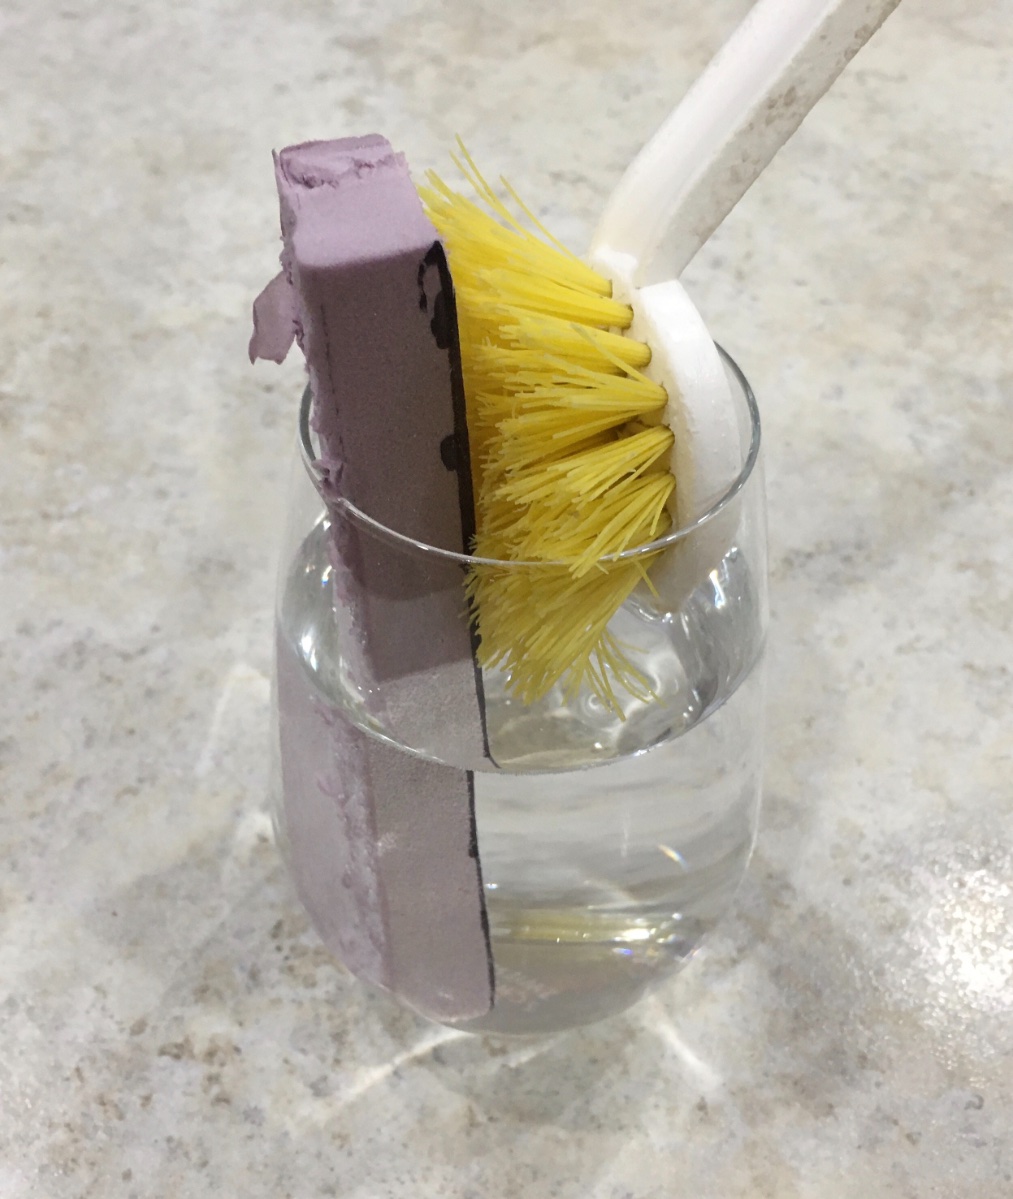
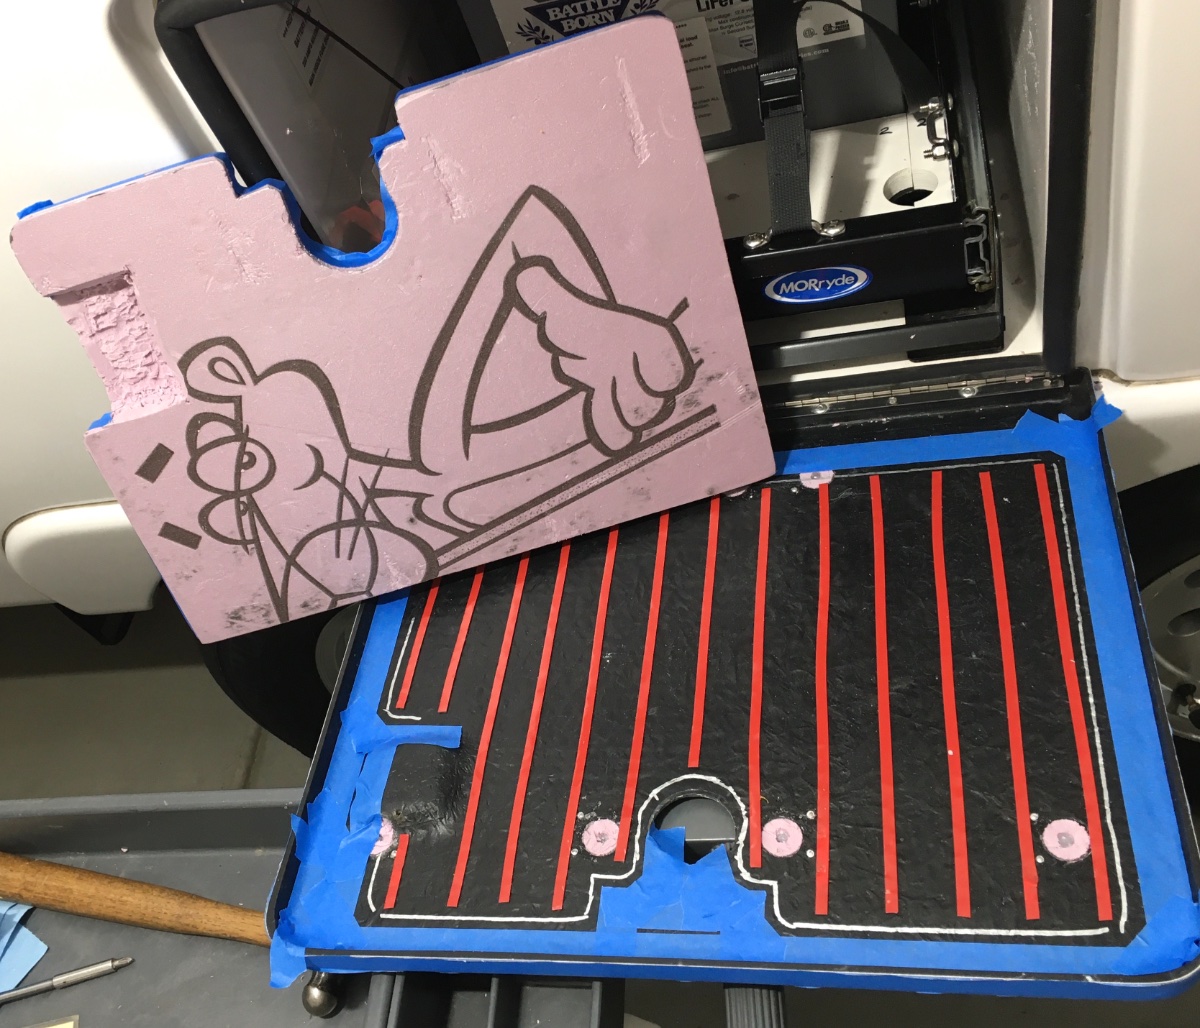
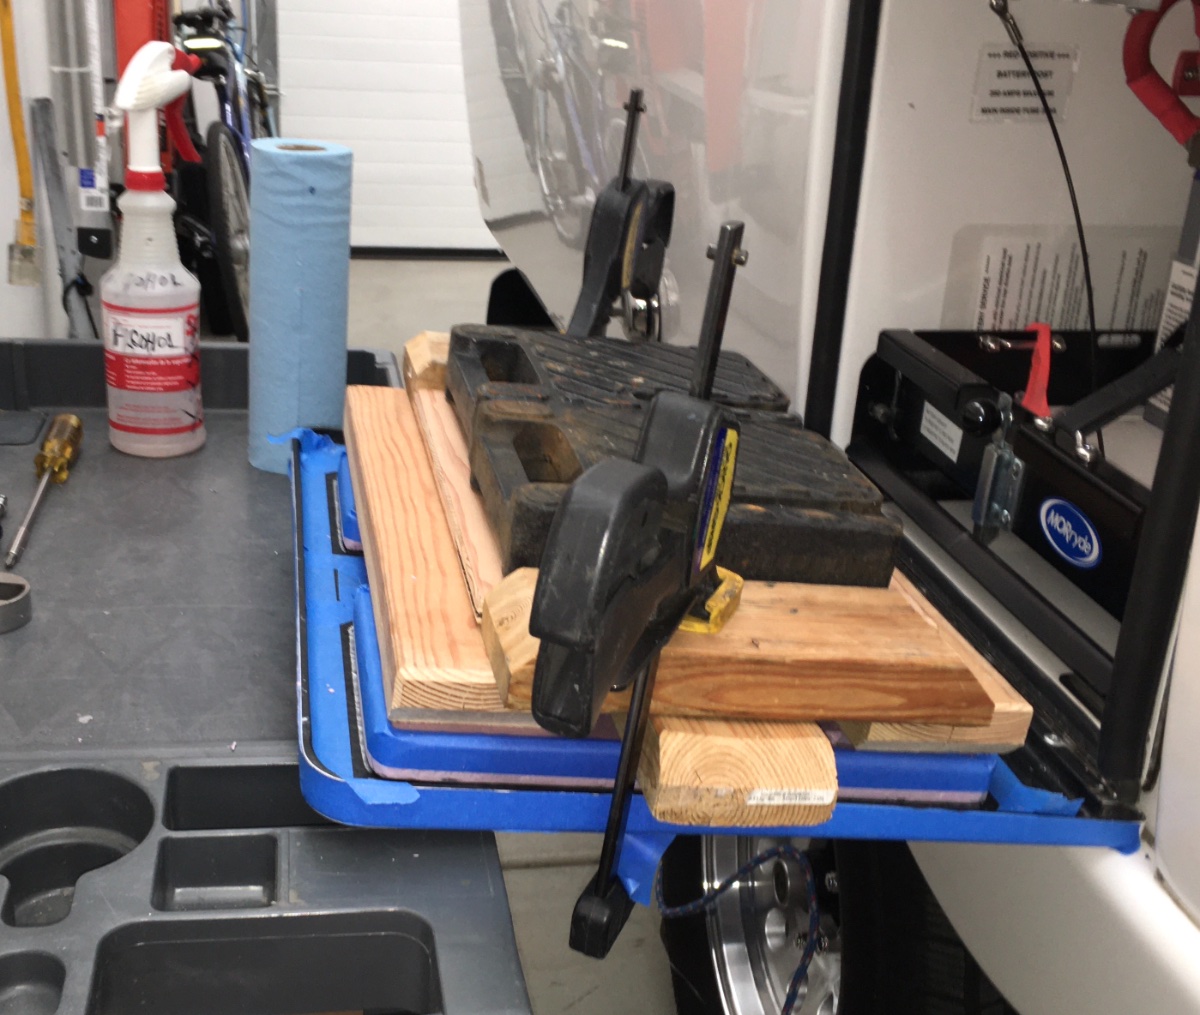
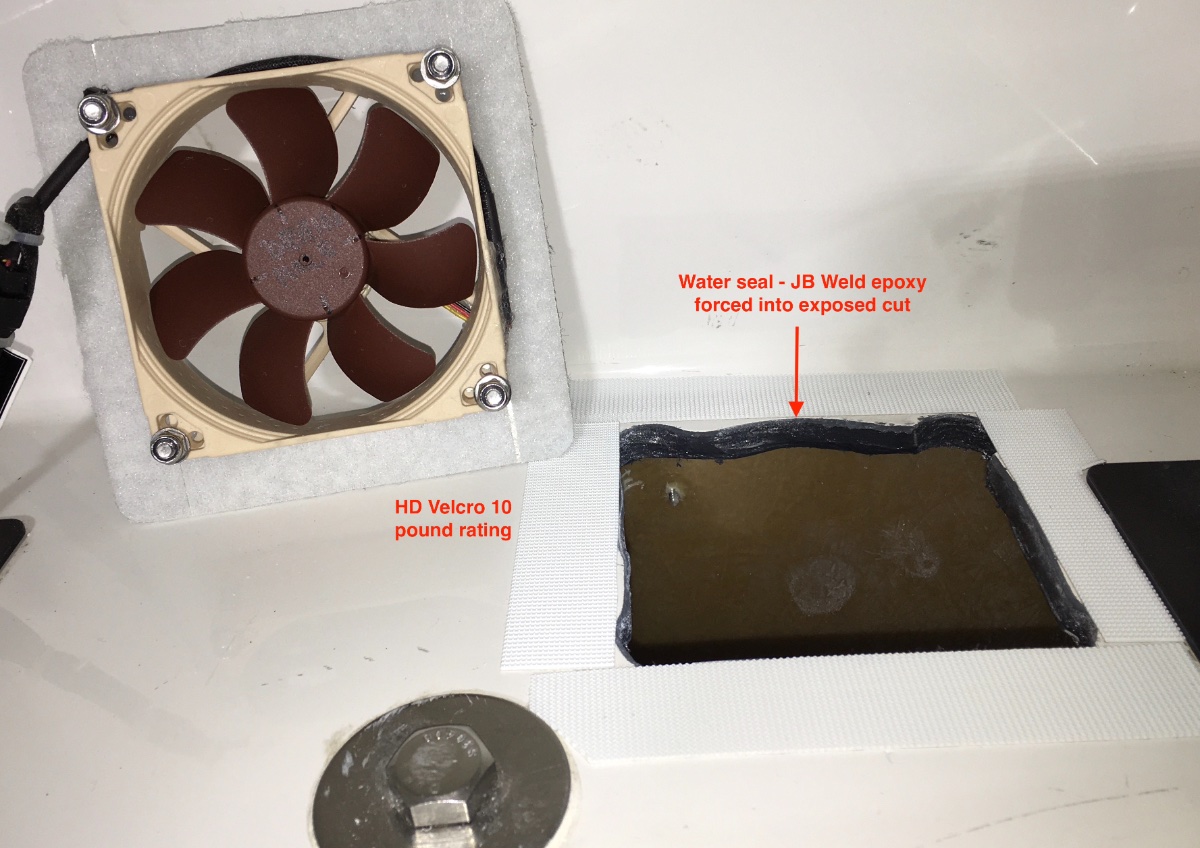
Battery door - plug holes and add insulation. This did not work out well, I am not very satisfied with the results, but I will post pics anyway. Maybe somebody can suggest a better solution. 1/2" foam board would be much easier to fit, but the insulation value is not so good. The material is Dow Corning rigid foam board, 1 inch thick, which weighs essentially zero pounds. This stuff is incredibly light. $20 for a 4' x 8 ' sheet at Home Depot. It is fire retardant, which is important. For comparison, this is R-5 (insulating value) whereas a typical foil/ air bubble sheet, which is used extensively in an Ollie, is R-1. https://www.homedepot.com/p/Owens-Corning-FOAMULAR-150-1-in-x-4-ft-x-8-ft-R-5-Scored-Square-Edge-Rigid-Foam-Board-Insulation-Sheathing-20WE/207179253 It can be cut easily with a VERY sharp razor knife, and rough edges can be rapidly sanded smooth and contoured with a bench top belt sander and coarse 80 gr belt. WEAR A MASK. BTW it is indeed completely waterproof, I soaked a piece for 12 hours to make sure. I had to wedge it in place, it pops out like a cork otherwise: Cut four hole plugs to seal off the existing openings. (My door has 8 holes, yours may vary.) Cut them in half: Glue them into the holes with clear RTV sealant, some will squirt out through the front Perko vents. Remove that excess with alcohol and paper towels: Wait at least a full day and then trim off the excess foam and sealant flush with a razor blade: SUPPORT the door with something, a 30 inch high rolling work table fit perfectly, and it gave me a nice place to put tools and materials... Remove the support cable. Cut the foam. This is pure trial and error, because it has to fit past the rubber seals, and also have extra material removed to clear the battery tray and knob, and the support cable, and the lumps and bumps on the door itself. Take your time, trim a little, test the fit, trim some more. It should fit as closely as possible, for maximum insulation value, yet allow the door to close easily without stressing it. I used a router bit in a drill press to carefully carve out areas that needed clearance. Be sure to allow some room for rivet tails! When you are satisfied with the fit, clean and smooth the parts and use 3 M VHB tape to secure it to the door. I used 1/4" wide tape placed vertically, so any water leaking past the rubber seal will drain straight down. Add some weight and go take a long break: Remove any weights or clamps. Seal the edges with clear RTV sealant. Use tape as shown to leave clean lines. Reattach the support cable. BTW when trimmed as shown in the top pic, the airflow from the fan underneath the tray is not blocked. EDIT: Leave several small gaps in the sealant at the inside (bottom edge when closed) so moisture can drain out. John Davies Spokane WA
1 point
-
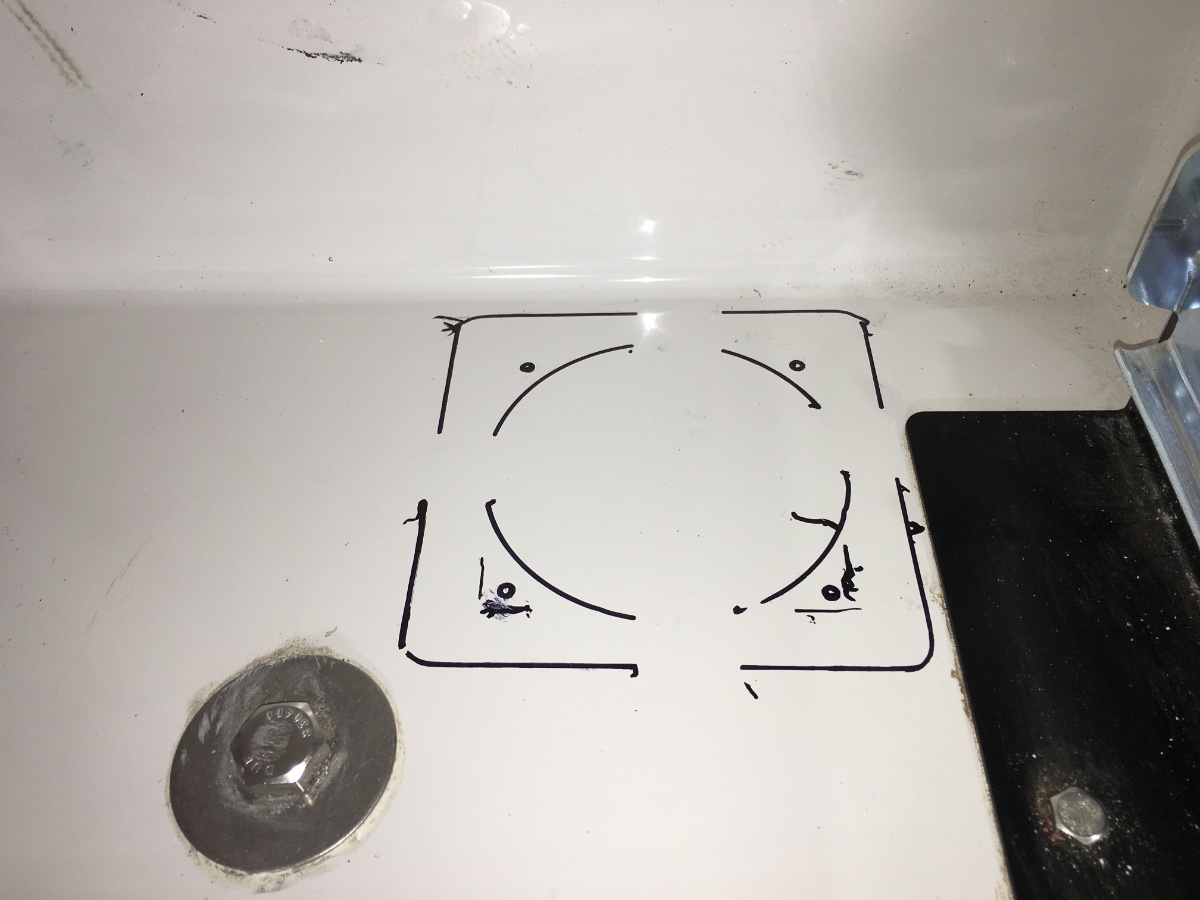
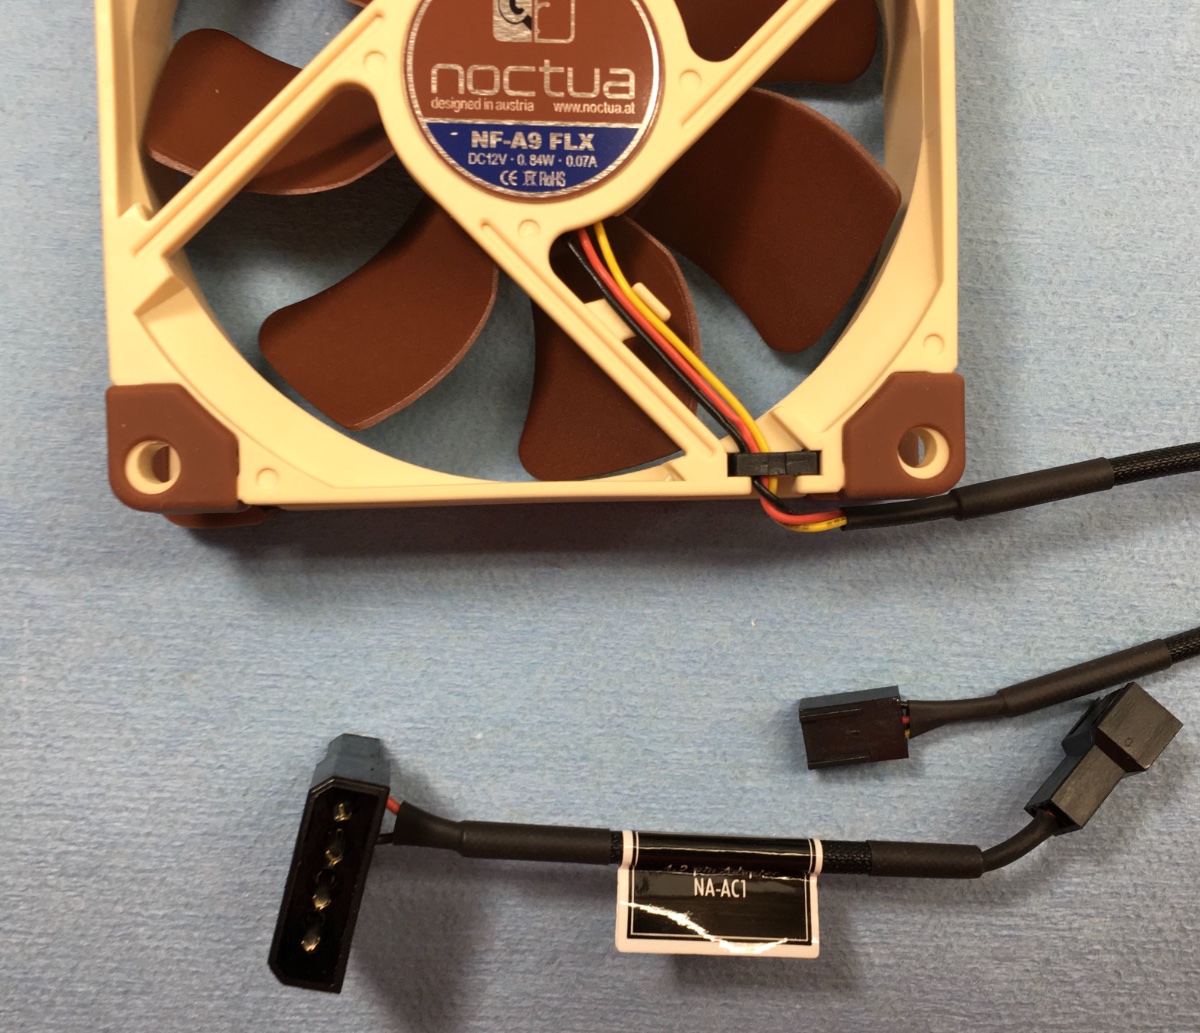
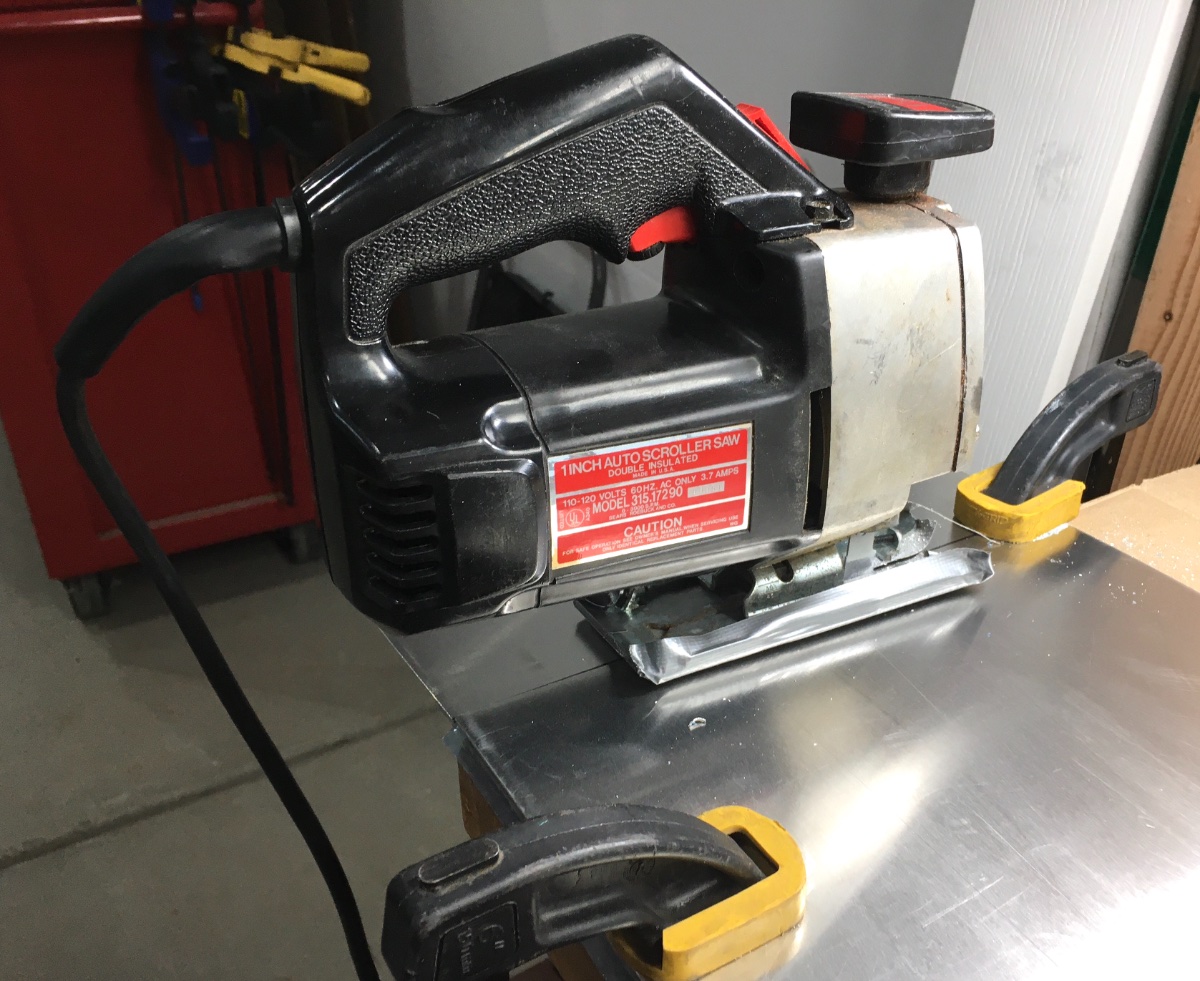
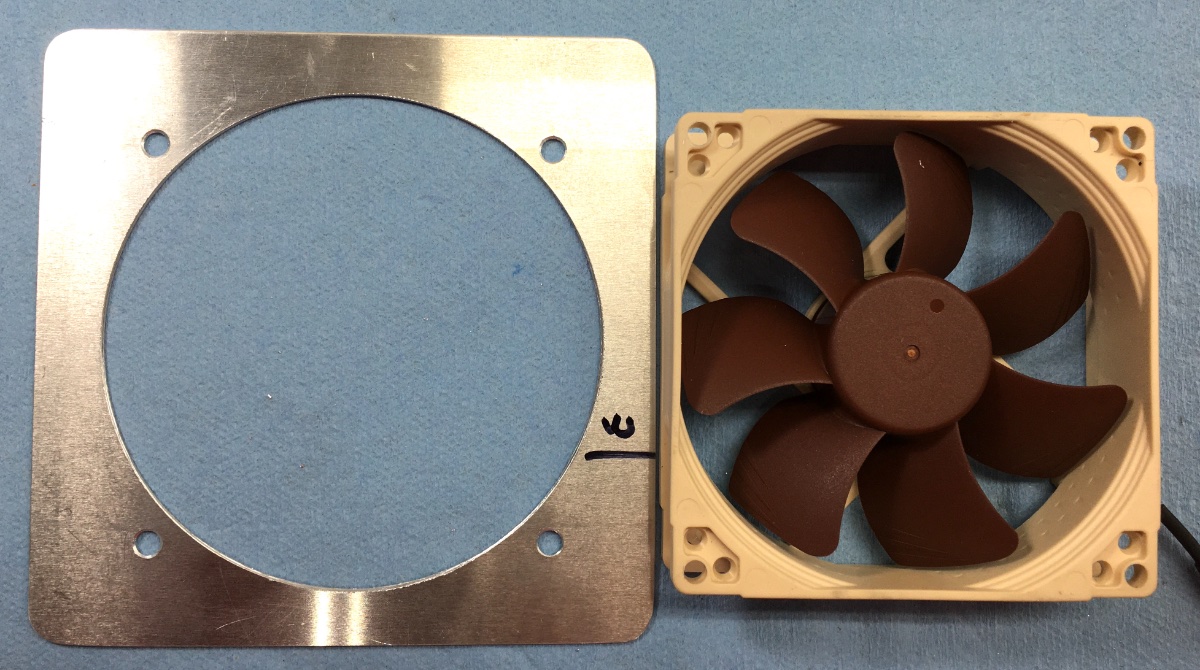
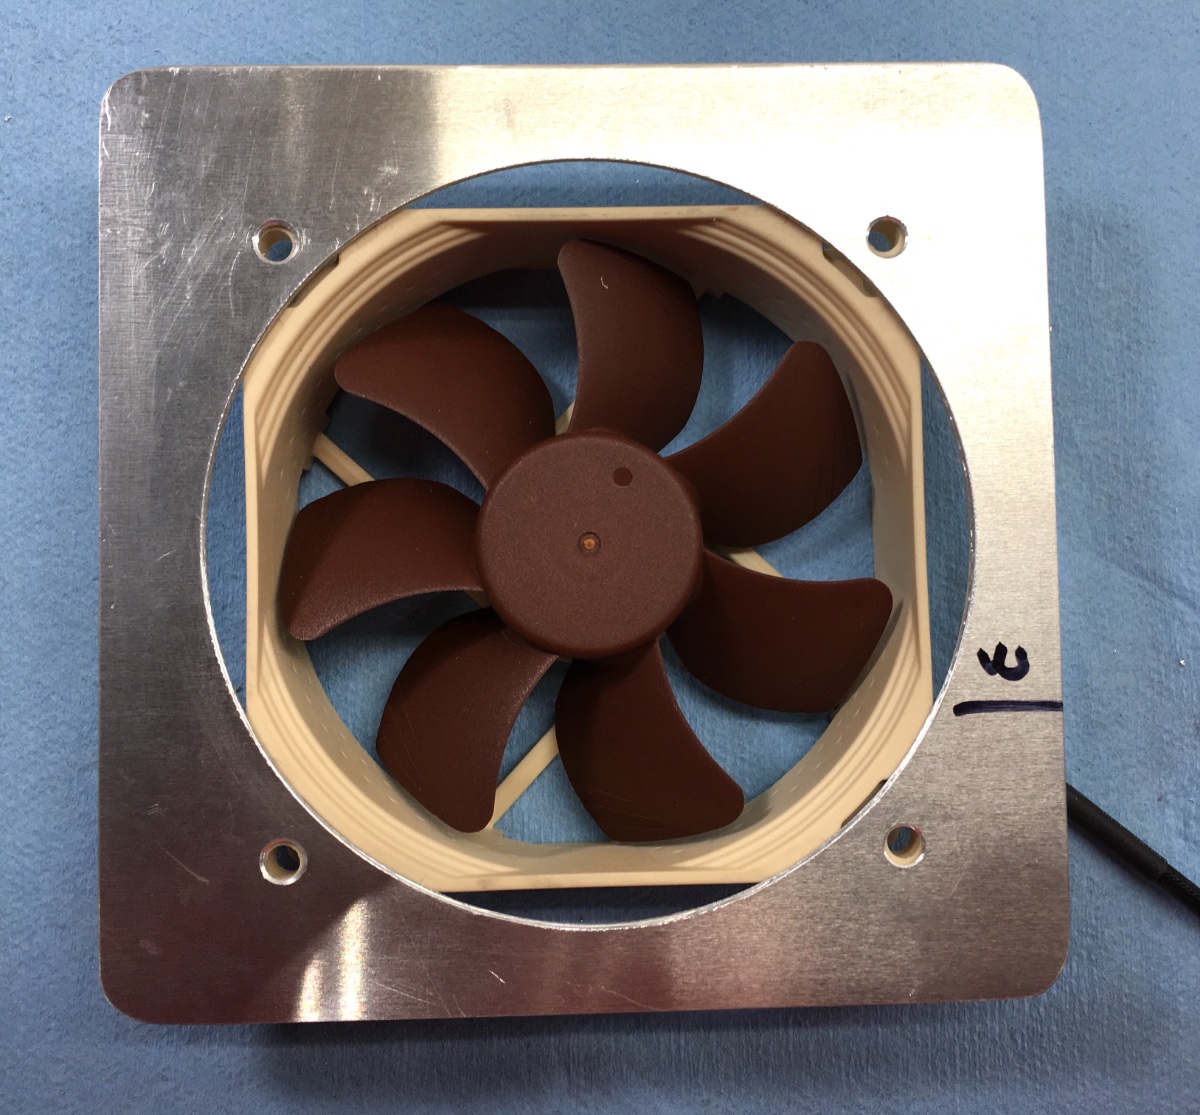
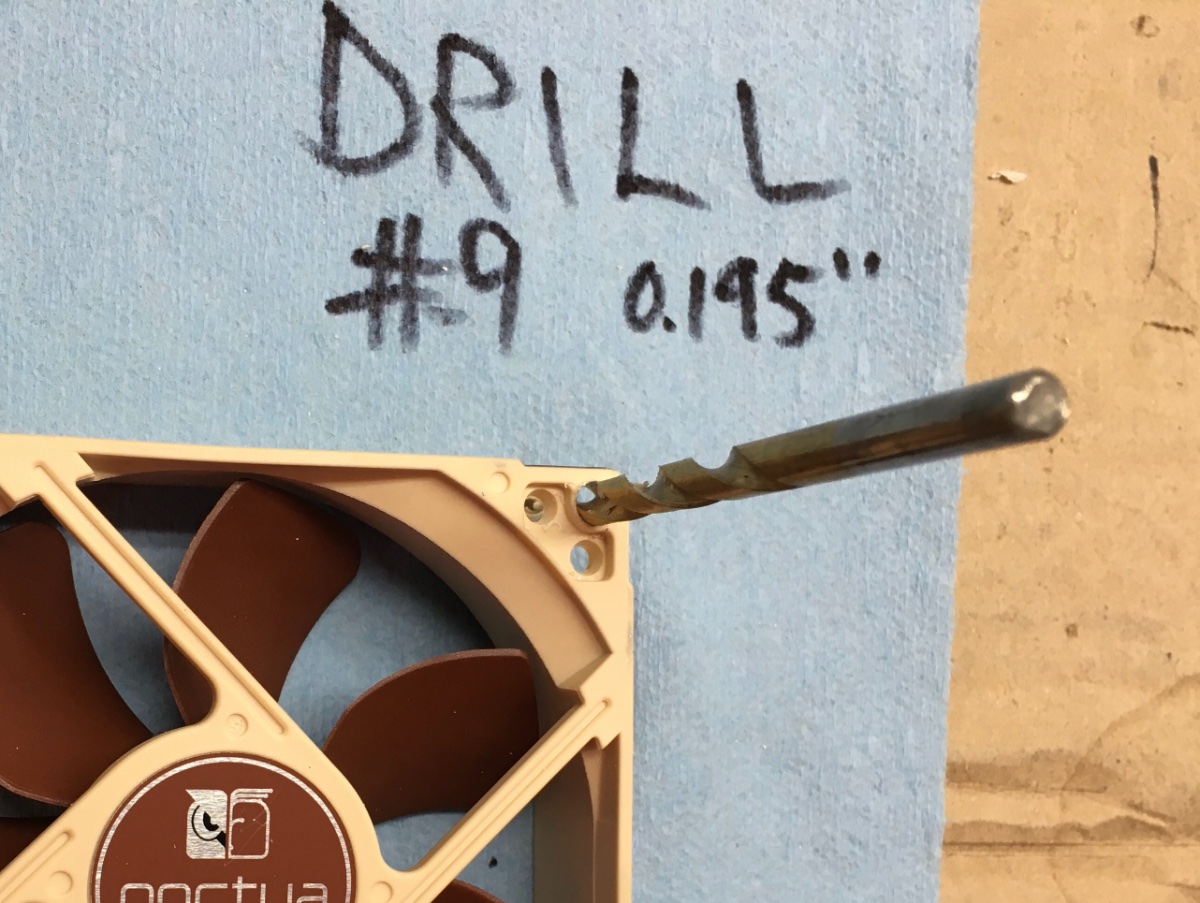
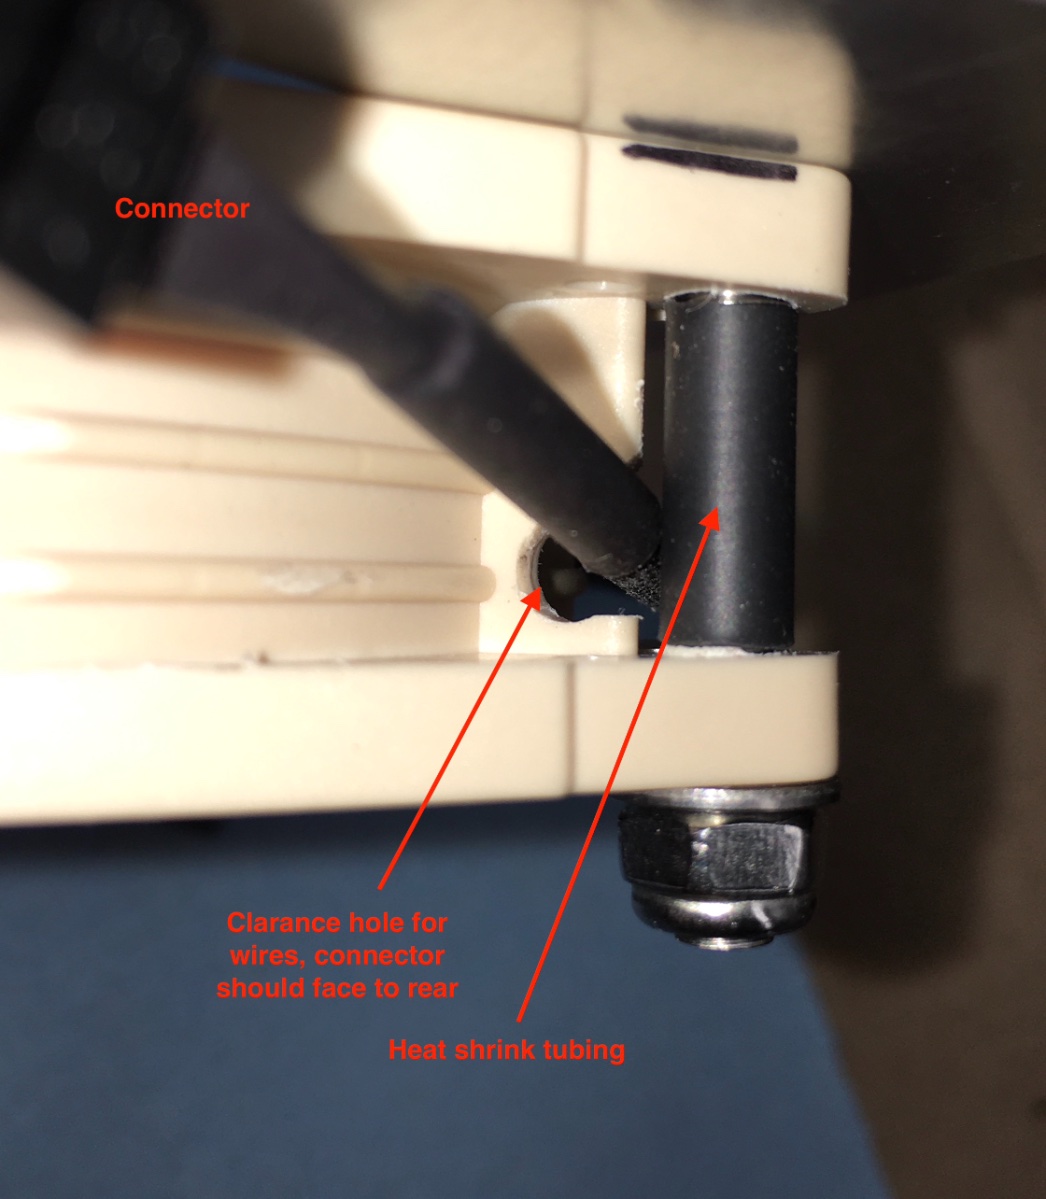
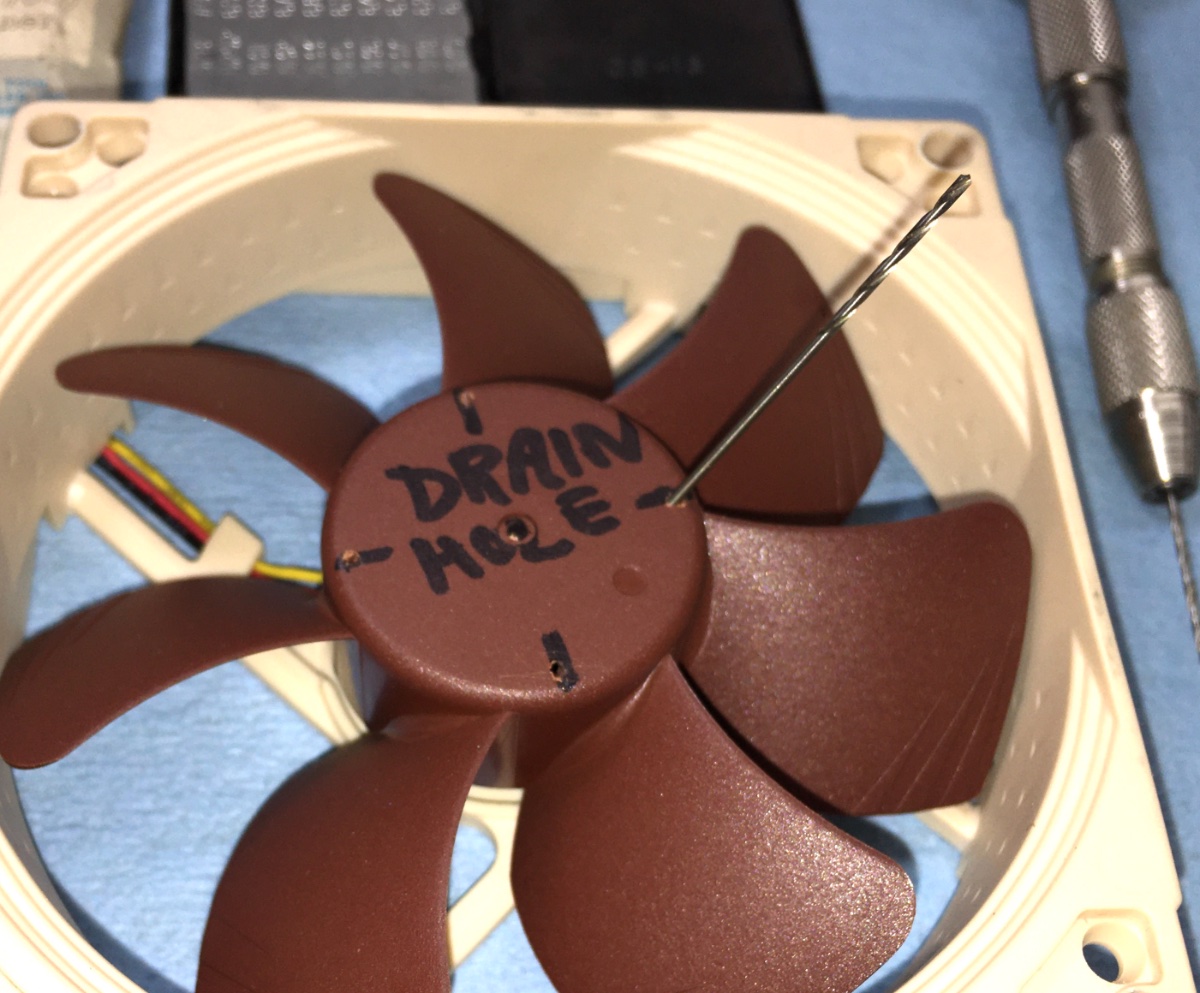
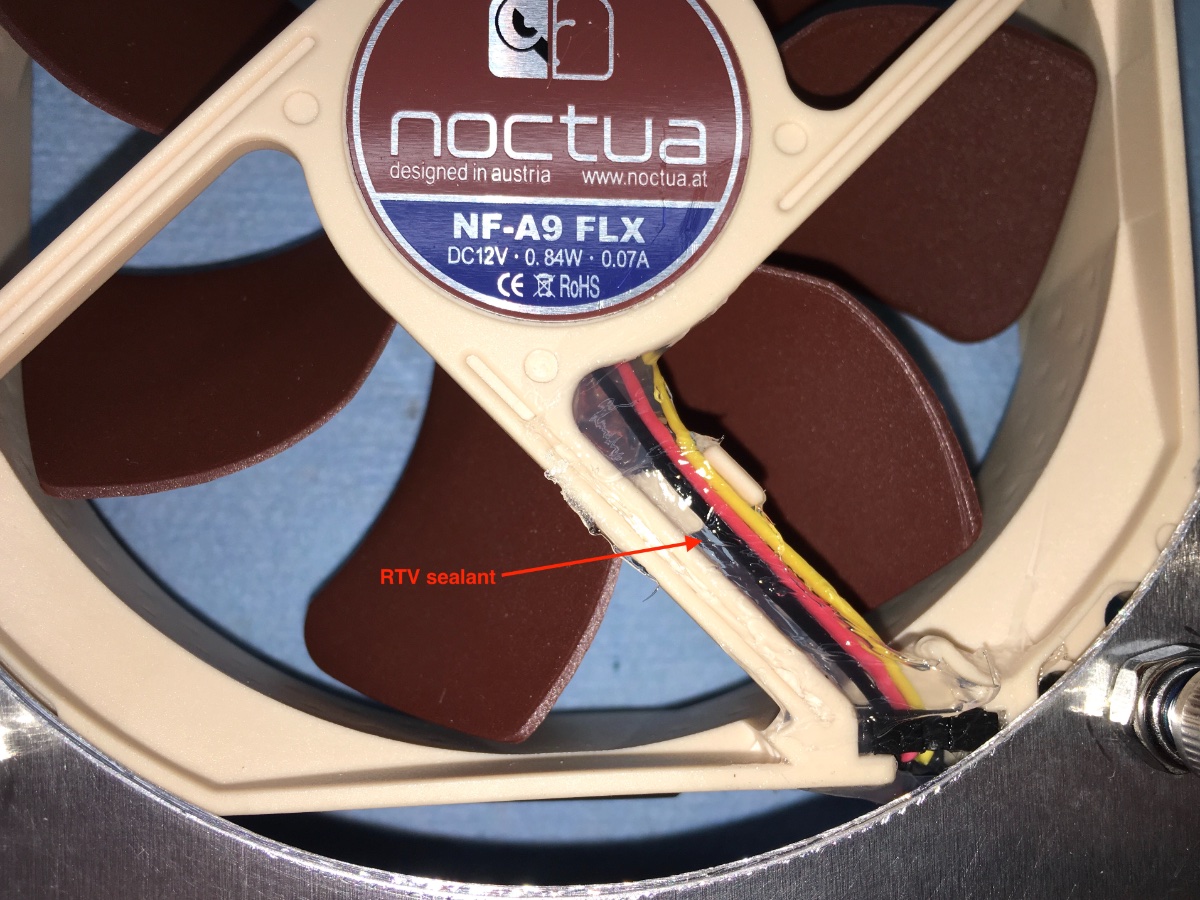
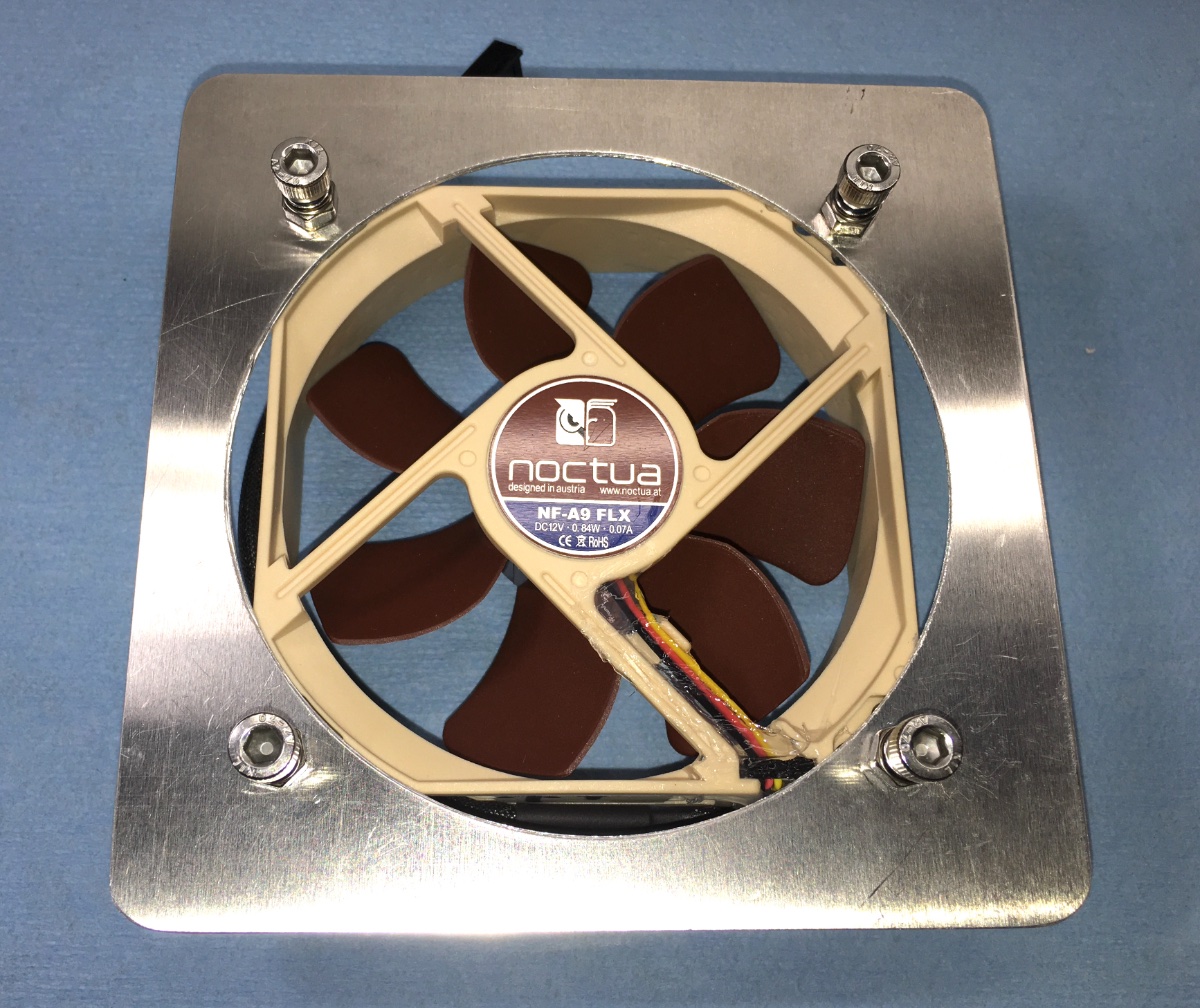
Battery box cooling fan. This one is high quality and well regarded. It has sealed ball bearings and uses just 70 milliamps (0.07 amps), so it can run as long as needed. Flow rate is 38 cfm on high, they supply two dropping resistor harnesses if you want to slow it down to reduce the sound level. It is pretty quiet, though a light sleeper on that side of the trailer might want to turn it off at night. But it is “white noise” which sometimes you do want..... Noctua Fan I really wanted the fan to go in the bottom at the rear wall, so it was centered between the two electronics compartments. The problem is that the floor of the box is not fiberglass honeycomb as I thought, rather it has a hard (6061?) 1/8" aluminum diamond plate bonded in the center! So cutting a large opening was a challenge. If you have access to a scroll saw (pivoting head) it is easy enough. Otherwise, choose to locate the fan at the bottom edge of the rear wall instead! That is thin (1/'8") fiberglass. Screws are 5mm, and are double nutted so that the heads will stick up enough to use as "grab handles", for servicing: John Davies Spokane WA
1 point
-
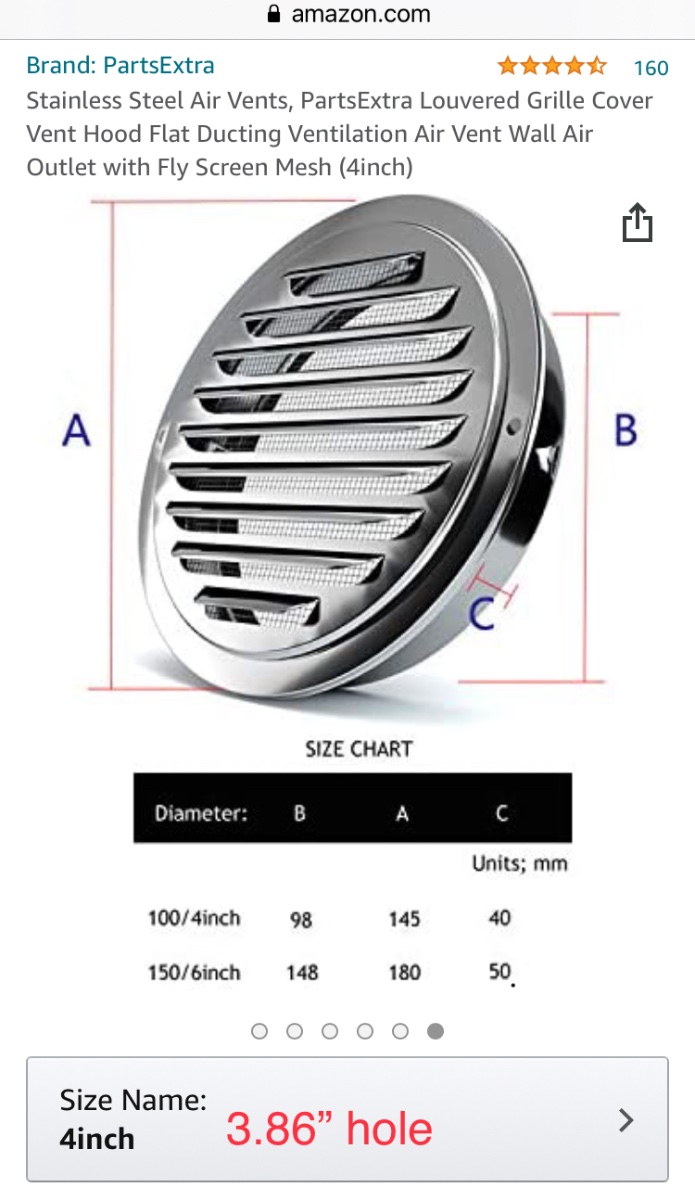
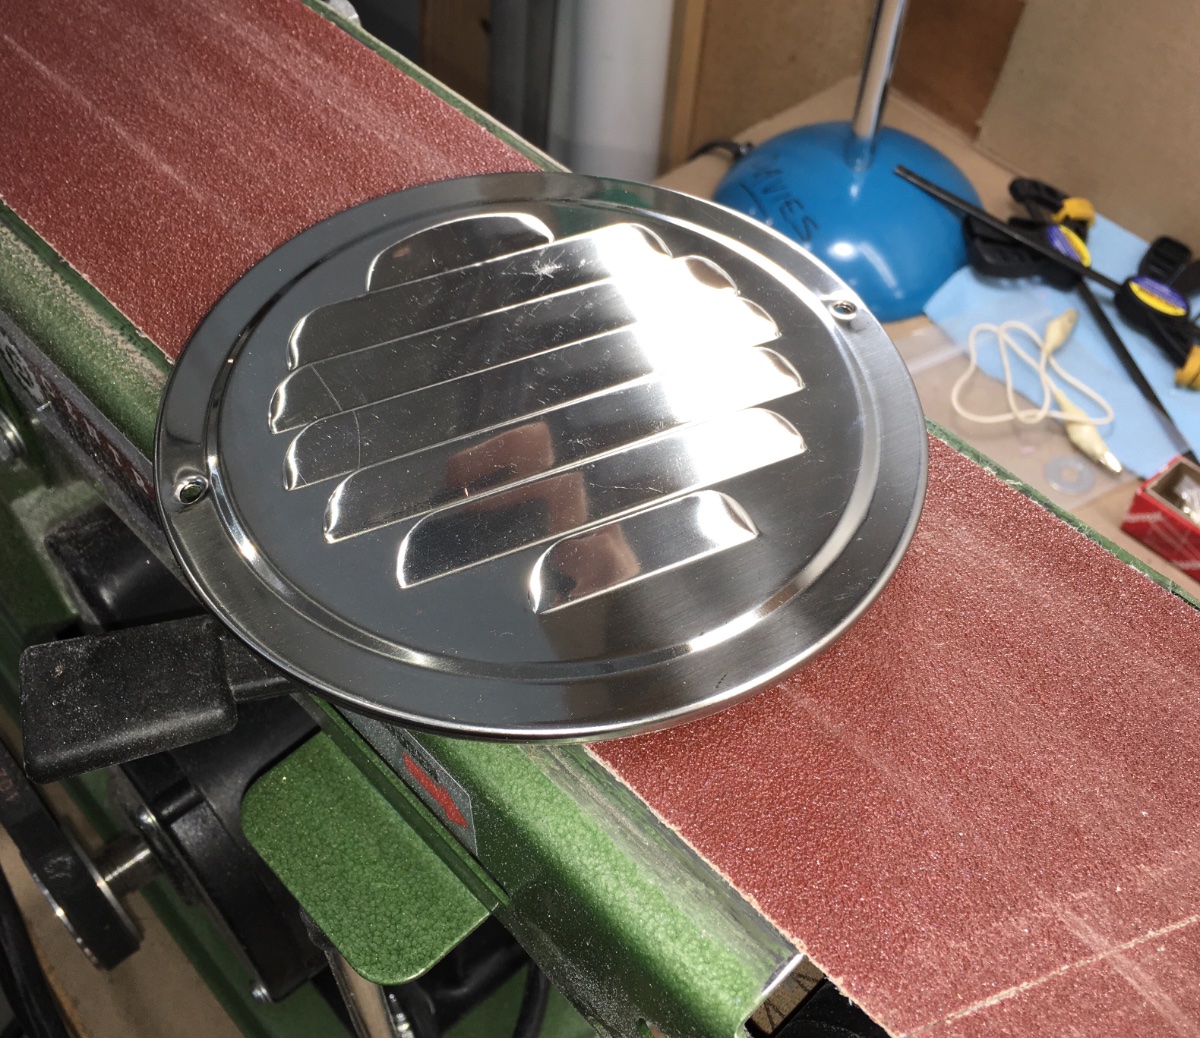
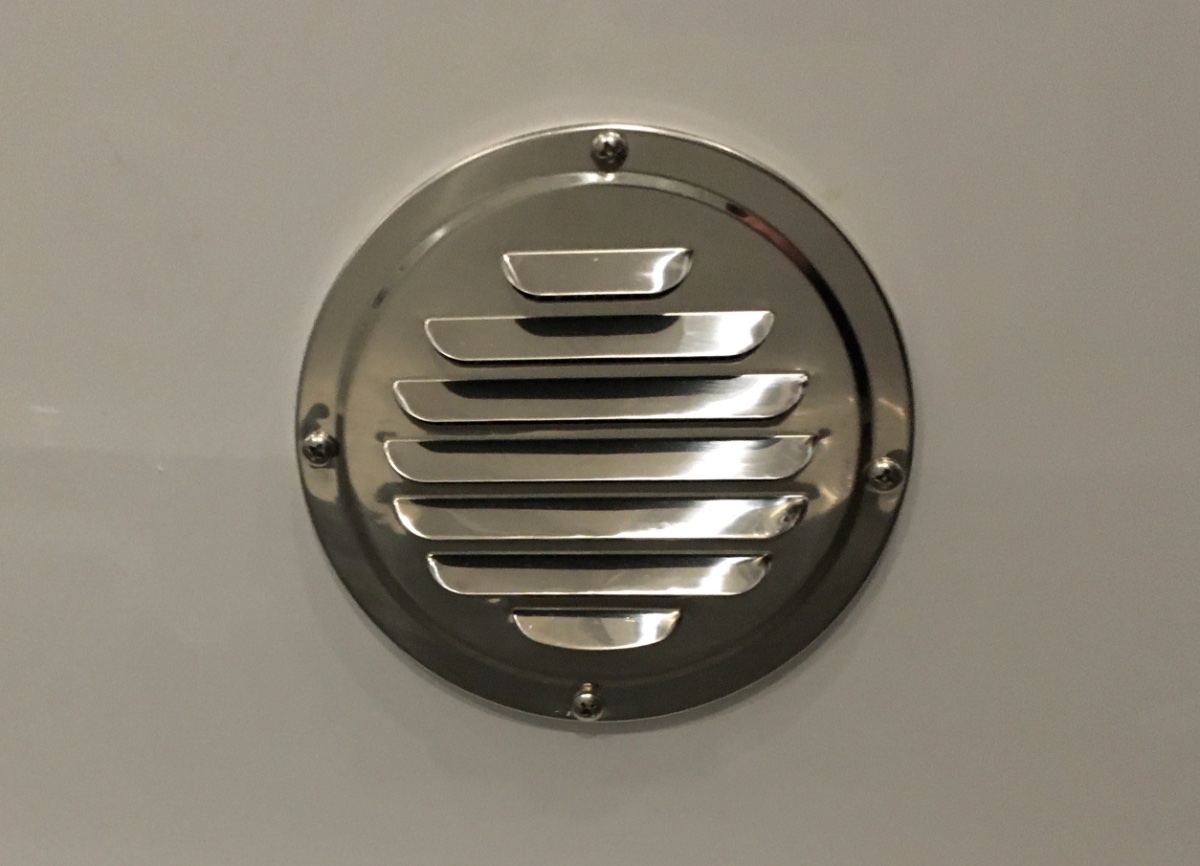
Battery box intake vents. Originally I wanted aluminum louvered vents, so I could paint them white to blend in, but the ones I bought turned out to be way too flimsy. They would have been destroyed by a wayward kick. I ended up with these and am fairly satisfied. They are sturdy and very pretty. Unfortunately they need trimming and the addition of two more mounting holes, so they would pull down tight and flat. Drilling stainless is possible, a drill press makes it less frustrating. It requires a lot of pressure on the bit. Use a 4" hole saw or a jigsaw to cut the holes in the fiberglass. I placed one under the rear bed and one under the rear dinette seat, centered front to back and up/ down. The center is approximately 9 " off the floor. Even though sanded smooth, the edge was pretty dangerous, so I used 1/4" split loom to protect fingers. I added a blob of silicone on each protruding screw tip. In the future I plan to add third vent at the bottom of the closet door opening. John Davies Spokane WA
1 point
-
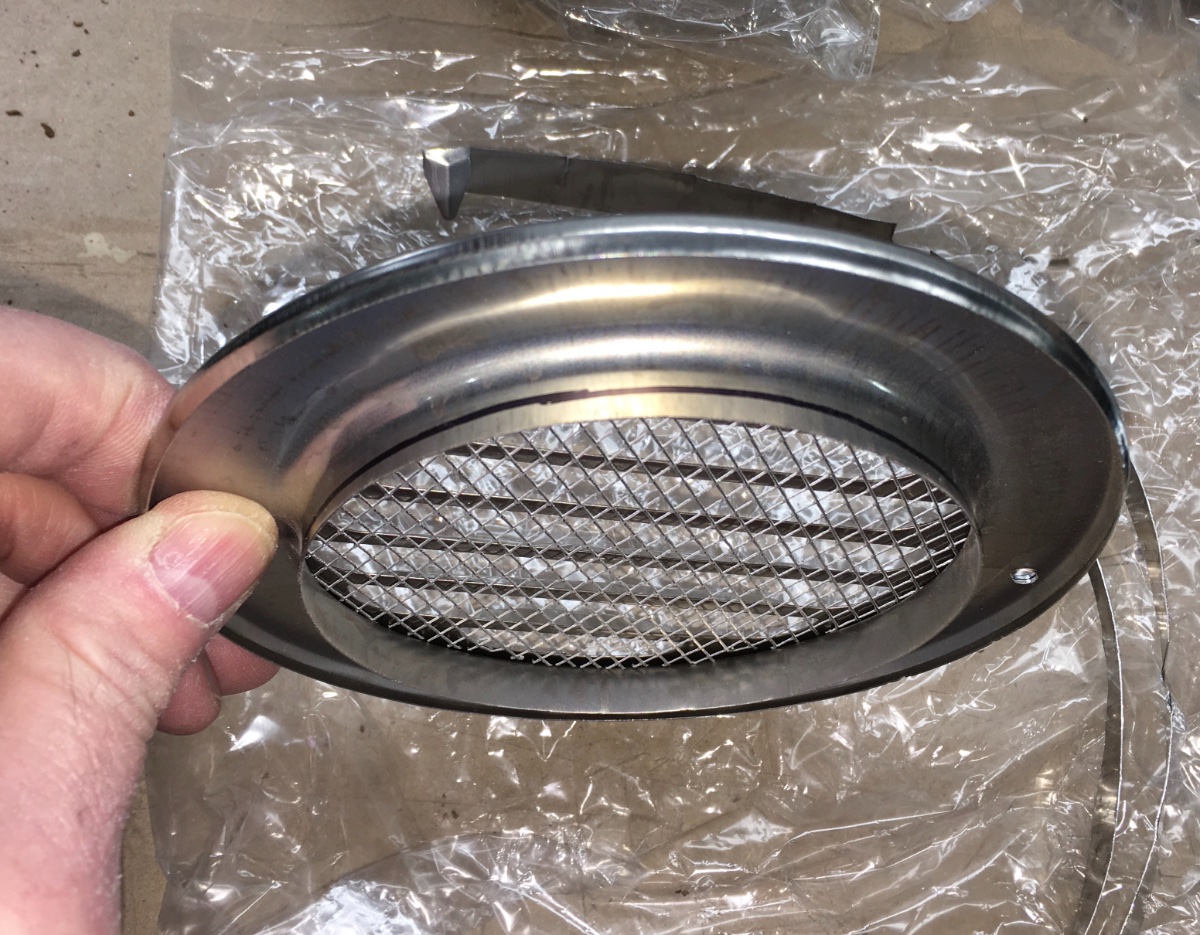
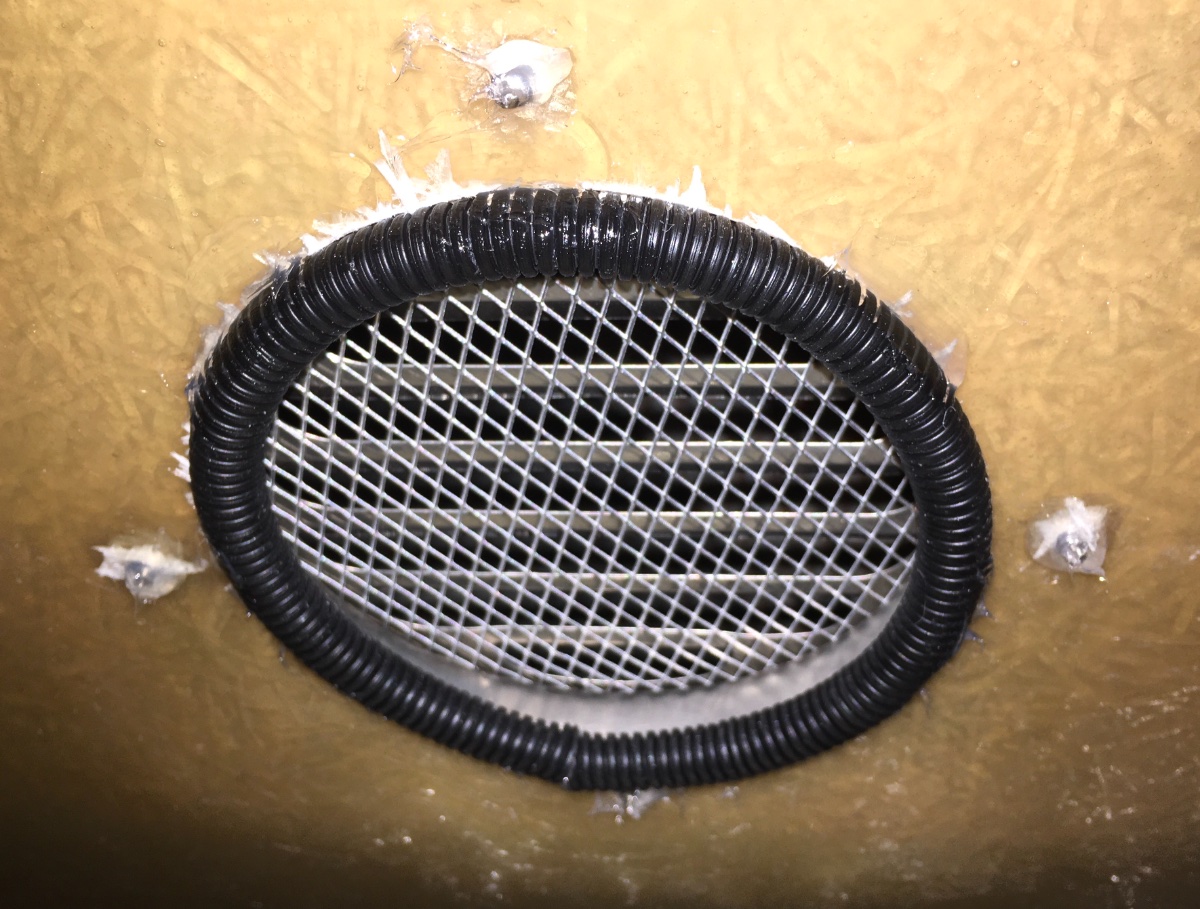
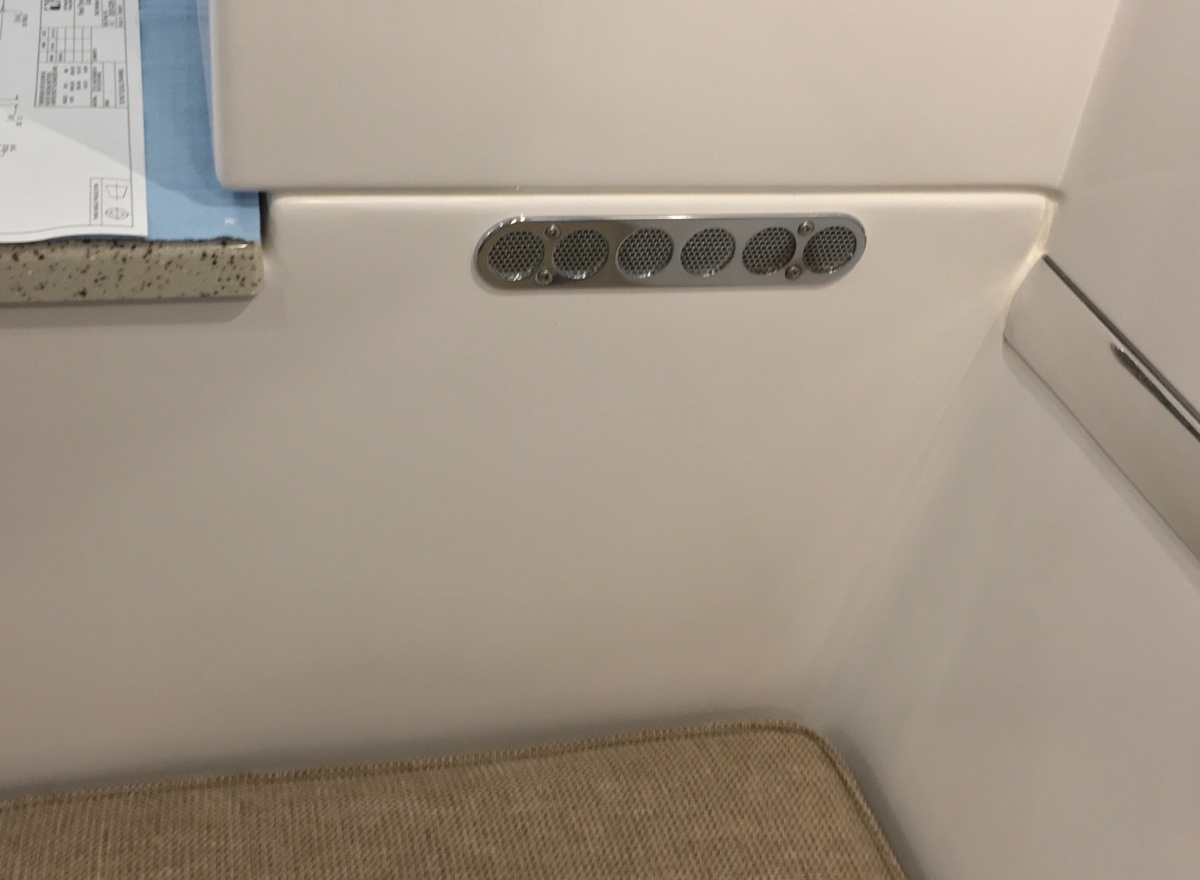
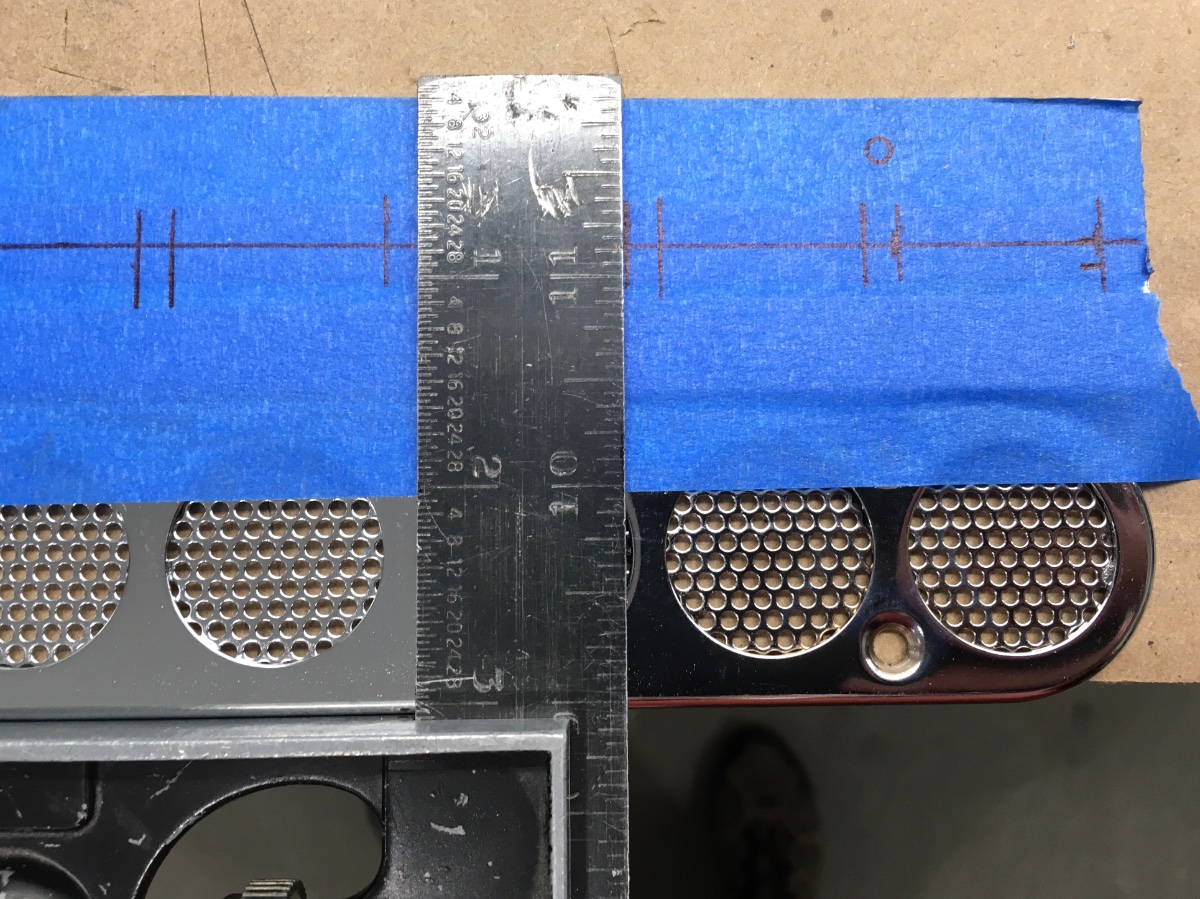
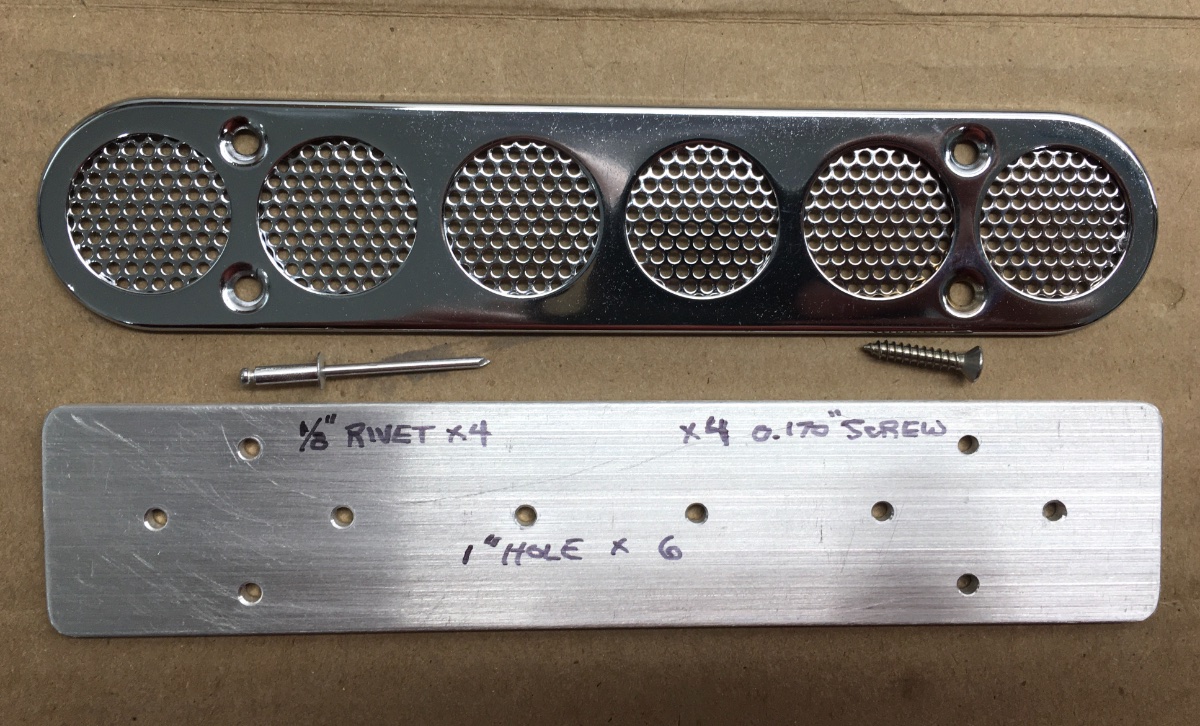
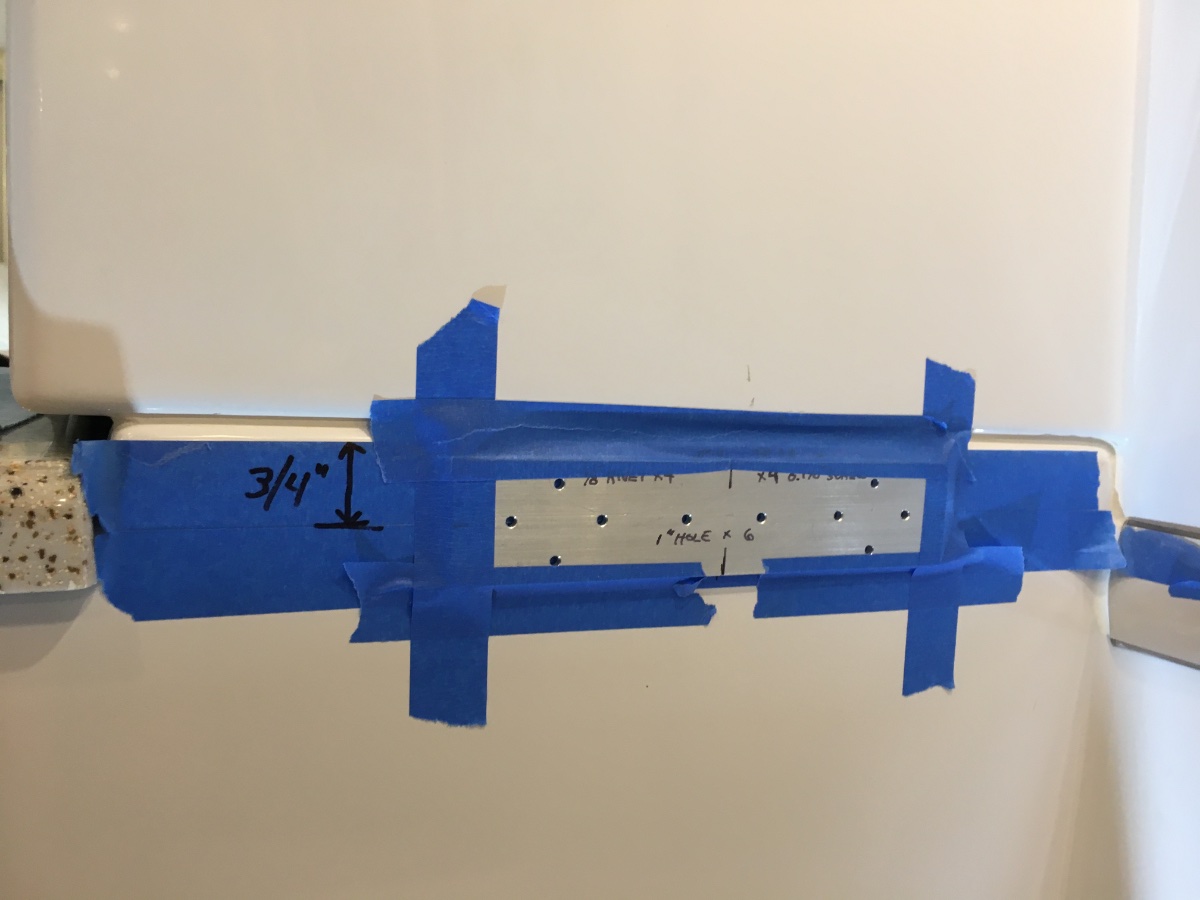
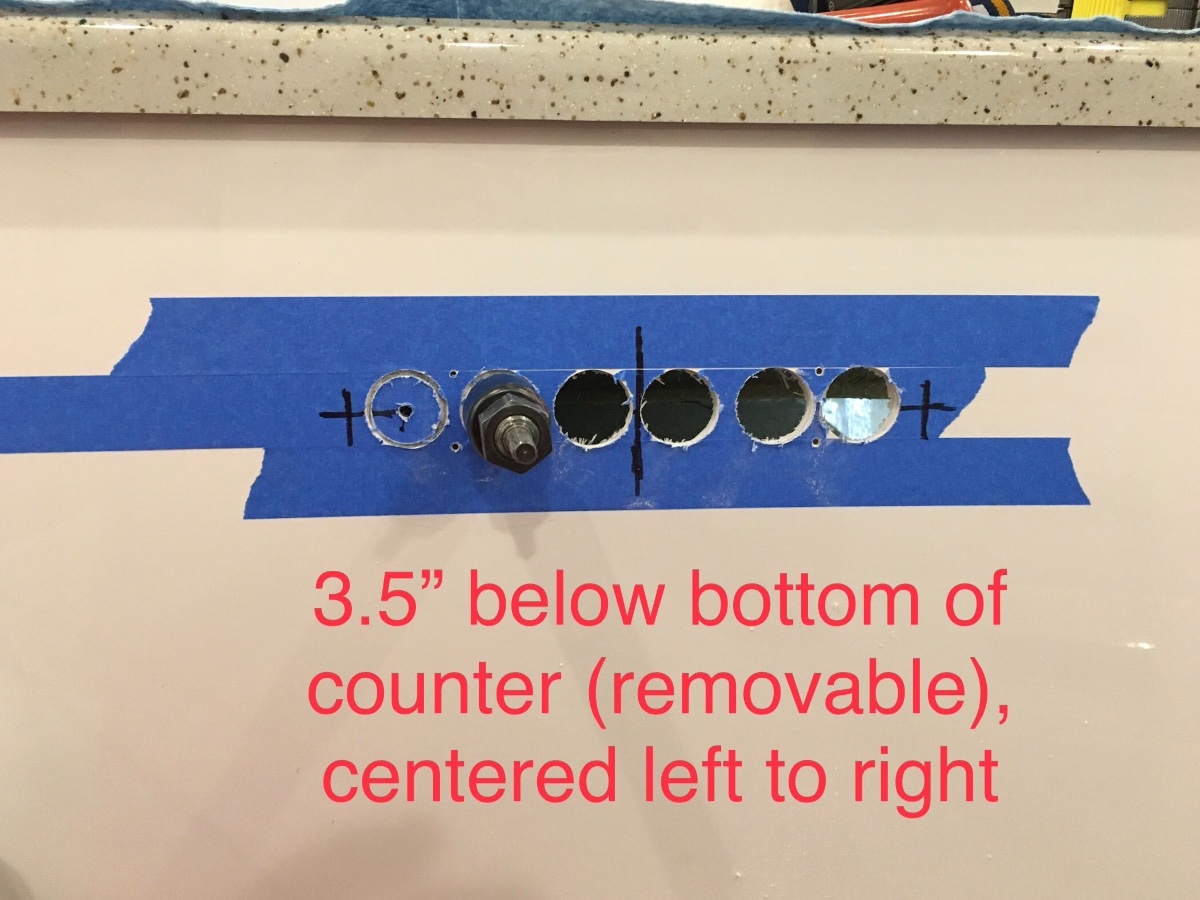
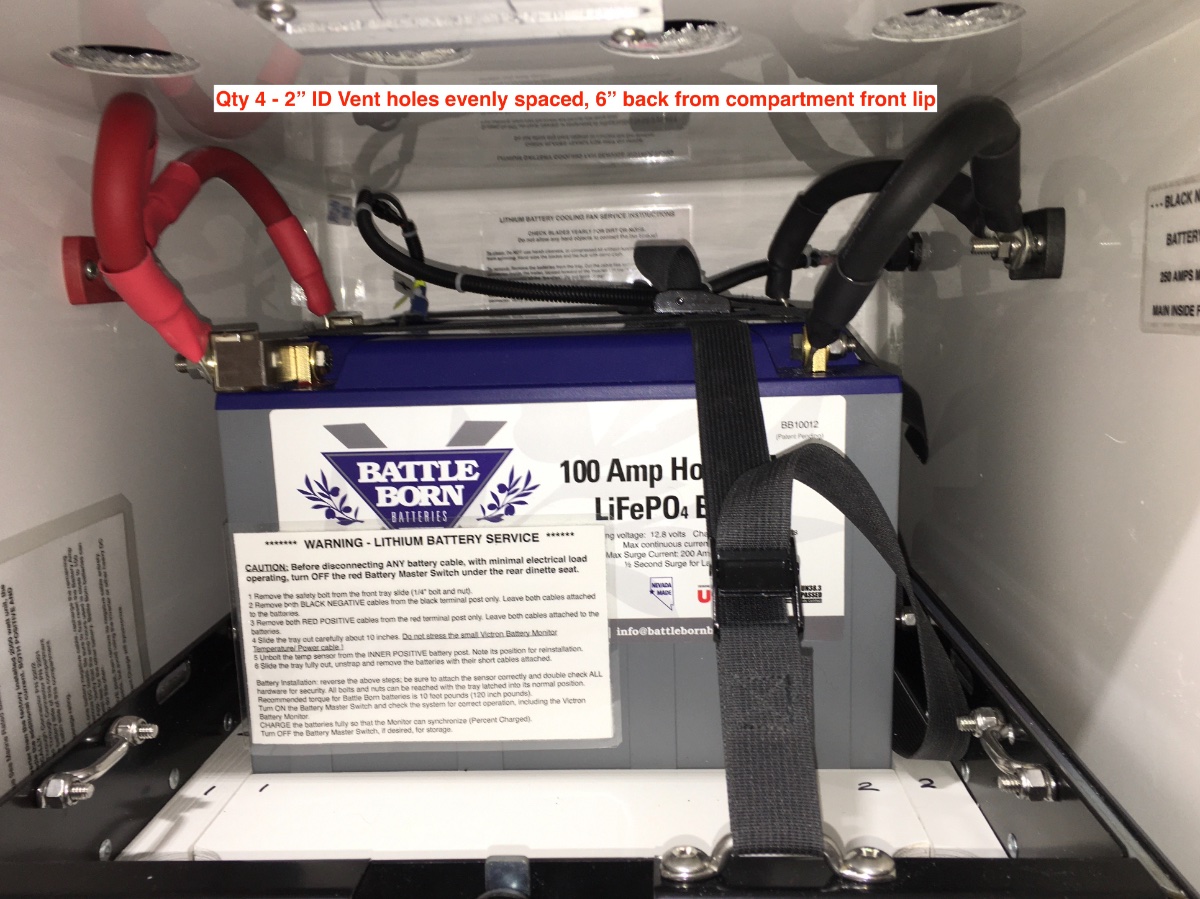
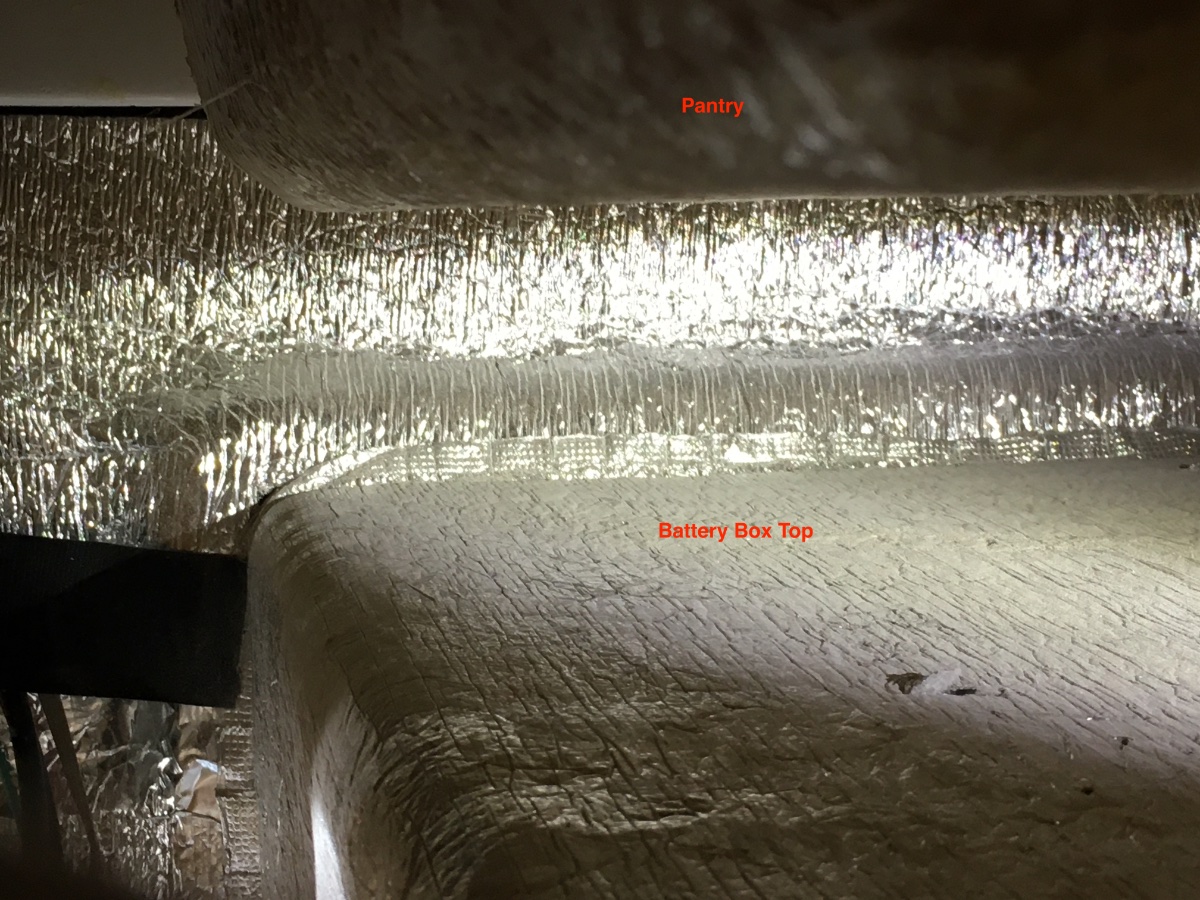
Battery box exhaust vents. Qty 3 - Perko 51840 Chrome plated brass (same part used on the battery door factory vents) ... https://www.go2marine.com/perko-ventilator-vent Make a template - there are a lot of holes to drill: The 4 mounting holes can be sized for 1/8" rivets (not recommended) or number 6 sheet metal screws. Choose the correct size for your fasteners! I chose screws. The front and back vents go here: You will be staring at these for a long time, so be very sure the holes are perfectly straight, measure thrice, cut once. Don't use a bubble level, measure up to the joining line. Here is the reason you can't position it higher: Deburr the holes CAREFULLY with 80 grit sandpaper (wear gloves or you will drive glass shards into your fingers), do not scratch the surrounding gelcoat!!!! Install the Perko cover. Repeat these steps for the rear wall. The optional factory granite countertop keeps the seat cushion slightly away from the wall in this position. If yours does not have the optional ones, the front vent will be blocked with the cushion as shown here.. Here is a view inside the compartment, looking back at the INSIDE of the rear vent. Notice you cannot position it higher or the screws will not clear the top: The third vent goes in the center of the inside wall, directly below the pantry shelf. Having three vents means that one blocked vent (a pillow for example) will not significantly affect the airflow. Finally, there need to be holes in the TOP of the battery box, to let air out from that space. Since I mounted a fan in the bottom, at the very back, I chose to place them in front, so air would move below and across the batteries, leaving no "still air" pockets. All other openings in the box should be sealed with heavy aluminum tape or a similar product. There is plenty of space on top of the box for air movement: John Davies Spokane WA
1 point
-
I wrestled with this after replacing my AGM’s with Lithium’s. I also store under cover, so solar isn’t a factor. I also didn’t want to leave the charger on long term. I turned everything off I could and unplugged what I could and still had about 1 AH draw. So, I was leaving the charger off and every few days I’d stop by and turn it on for a while to put some charge into the batteries. That got old pretty fast. Now, I just turn the batteries off. I think we should be out camping! Mike1 point
-
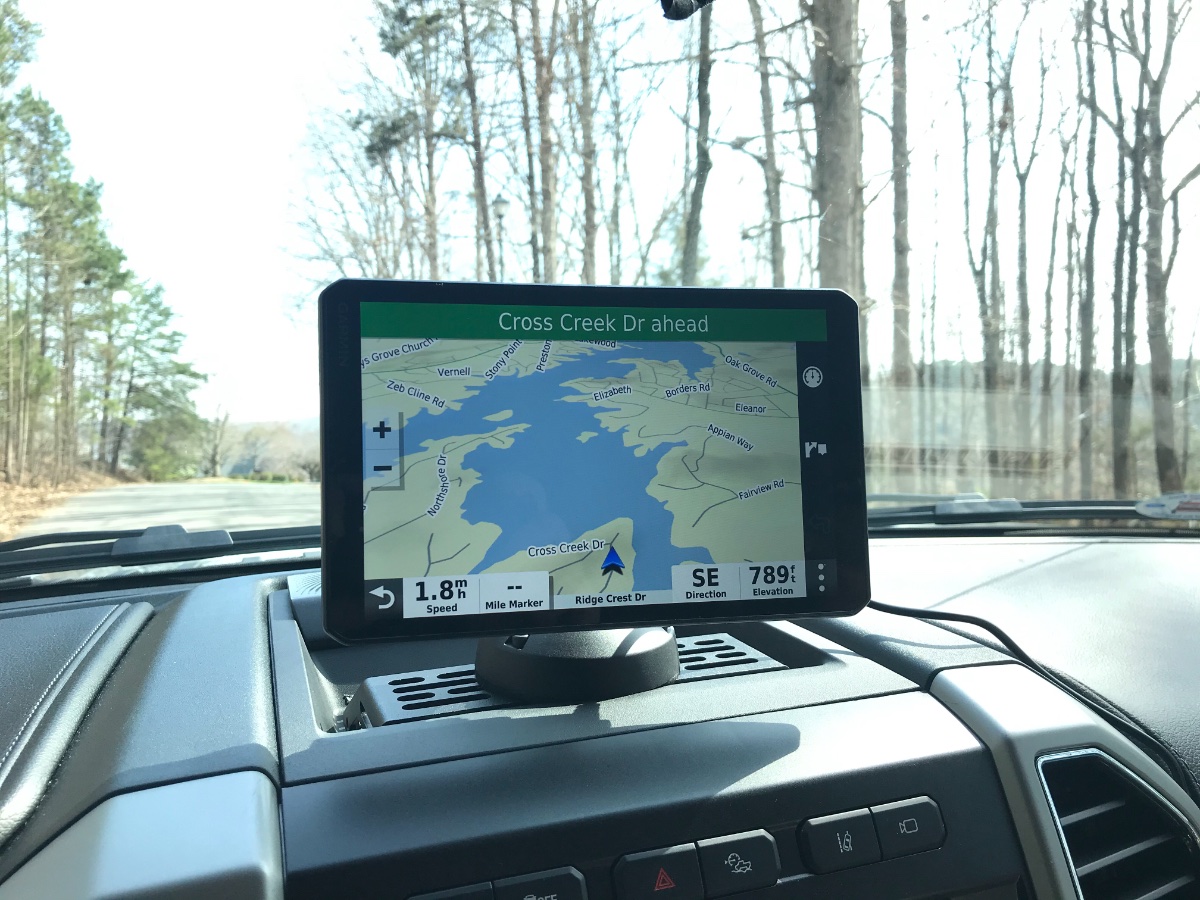
Decided to install the BuiltRight mounting bracket on our F250 dash today so we could mount our 890RV gps. We decided to go with a little different approach on mounting location after mocking up a few different locations. We settled on dead center. Surprisingly there is no line of sight hinderance for me in this location due to the cab height. The screen is very accessible and we are really happy with the location. After a drive around our neighborhood and secondary roads I can report a solid mount and no screen bounce. Still have room for the Ollie rear view cam on the w/s. vid- A few photos....
1 point
-
the state of minnesota is developing a new campground on superiors north shore. please see link: Split Rock Lighthouse getting new 'drive-in' campground as area gets new mountain bike trails (msn.com) 10-q dan1 point
-
As I prepared and was planning my two month fly fishing trip to Wyoming for this summer, I found out that I could not get reservations in one of my favorite campgrounds. This particular campground had always been a bit of a problem in that it only has eight sites and only four of those are reserveable. A day or two later I found out about a "free" reservation service available at Wanderinglabs.com. I went to that site, opened an account, filled out a form stating the campground, camp site and the dates I wanted to reserve and then waited. This morning - some four weeks later - I received an email stating that reservations were now available for exactly what I wanted. I clicked on the link to Recreation.gov and got the site reserved. Simple as that! All without having to check back every day to see if something had become open. This service is free unless you want to pay for "premium service" (more frequent checking for openings) or if you want to "donate" because of the amount of time they saved you from having to do this checking yourself. Bill1 point
-
We booked "2 HOBOS" into space D-3 last week. BTW: The young lady that took our reservation said that they have "unofficially" blocked off several spots down in the normal Oliver trailer area for folks attending this years NOT Oliver Travel Trailer (NOTT) rally. Looking forward to seeing other owners again.
1 point
-
Zefan00n will be at site D-08 with Hull 707 (Heart-a-Lee). Our first stop along the way to visit our son in Denver- the first long distance voyage in our new OE II. Very much looking forward to meeting OOO (other ollie owners)! Arriving on the 13th, leaving on the 17th.1 point
-
Just booked site G10. Look forward to seeing all the Olivers again!1 point
-
Oth, moving from site to site would allow you to learn about hooking up, backing up, and leveling, while you're still in learning mode. It's up to you.1 point


.thumb.JPG.dd838cdb3df463dab6a16861fa23a319.JPG)


.jpg.6bdb1b8e606e111222001c424c09c5a5.jpg)
.thumb.JPG.c11094a6a8c73946473572dfe3e34685.JPG)

-
Recent Achievements
-


")


")


")


