Leaderboard


Popular Content
Showing content with the highest reputation on 10/01/2022 in all areas
-
We just got power back after a 48 hours outage due to Ian. We’ve been gone a month and I have some catching up to do. Details to follow. Mossey7 points
-
How can you help? At this point, I know many of you have open hearts and open arms, and are itching to hitch up and try to go help. Please, weigh the circumstances. There may be no place for you, and no way to get close. Affected areas are patrolled, and accessible only by legitimate residents and owners returning to the heartbreak. Or, as a volunteer with a legitimate known organization. This storm was huge, and affected many areas beyond devastated Fort Myers/Charlotte Harbor area--through central and northeast Florida, South Carolina, especially Charleston. You may be able to help, close to home. Resist giving to telemarketers and Facebook page solicitations, many of which will be, sadly, fake. It happens every time. Red cross, and the Salvation Army, were prepared, and already on the scenes. As are other local and national organizations. Red cross, and Salvation Army, are always my top choices, as they've been so helpful and use donations and volunteers wisely. If you go, as a legitimate volunteer, with family, or a legit organization, with a place to stay, take everything you need for at least two or three weeks with you. Water (even some hospitals here don't have water, today), food, hygeine supplies, clothing, generator and gas, power bricks etc. Hopefully, more that you can share, with others. Many areas will not have power for days, or even weeks. Supply chains may have survival basics only, to share. The least who can afford it are often those who lose it all. Uninsured. Renters. Mobile home owners. Seniors on limited income in older, lower elevation homes. Many have not just lost their homes, and all their possessions, but their jobs, as well, as their place of employment was destroyed. Please consider donating to those who do it best, and help the most, like the Red Cross and Salvation Army . If you have a background in mental health support, I know the red cross can use your assistance. These are trying times for many. They also use volunteers in many other ways. Thank you. https://www.wcjb.com/2022/09/29/how-help-those-impacted-by-hurricane-ian/5 points
-
Thanks for the info. But you may be overthinking it 🙂. First I assume you mean track width (side to side) and not wheelbase? Wheelbase is the distance between front and rear axle centerlines on a vehicle. Track width is the distance between the right side and left side wheels. And notice that you can use what’s referred to as the small angle approximation, where at small angles near 0 degrees, the SIN and TANGENT values are basically approximately equal to the angle, normally when the angle is measured in radians, but works close enough in degrees also with the Oliver width as the adjacent leg of the triangle, as evidenced in your chart. Even at 5 degrees, the elevation is 5.86”, only a little over a 1/2 degree of difference using the small angle approximation method, especially since the Lego type leveling blocks stack up in 1” increments. So I’ve just been using the Lego blocks as a “ degree”. I put my iPhone on the main aluminum tongue beam of the trailer at the front and use the Clinometer app. One degree out of level side to side means I will use one block, 2 degrees and I’ll use two blocks, etc. Once the trailer is leveled to within 1/2 degree that’s usually very comfortable as a “level” trailer, and is well within the limits for the absorption type refrigerators. 1/2 degree within level is waaay better than most folks that I’ve observed camping 🙂. And we are usually 1/2 a degree up at the front when camped to help drain the tanks.5 points
-
I was using the bubble level on the front jack but everytime we'd be sitting in the trailer and say to each other, "boy, it feels like we're leaning." Go check the level and it's right on, so I pulled out my carpenter's leval and put it on the floor of the trailer and it was off by quite a bit. I wiggled the bubble level on the front jack and bingo, it agreed with the carpenter's level. Take home: the front jack level is a waste of time. My solution is a LevelMatePRO. You initially have to level the trailer using whatever method works, then mount the sending device on the trailer, I fastened it to the inside of the front wall of the closet so it's close enough to the truck that it can be seen by the bluetooth phone-app while I'm still in the driver's seat. I put out my anderson curved levelers and drive up on them until my LevelMate indicates i'm level. It works great. The only issue I've had is having to change the batteries is a pain since it's easier to do it on the table (IE removing it from the mounting location) then trying to do it in the back of a dark closet and risk dropping the screws and batteries, so I have to dismount and remount it every so often. It has an automatic shut-off but I've found I can extend the battery life significantly if I just turn it on when I need it and shut it off when we're done leveling. Additionally, when we first pull into a site, I turn the unit on and drive around or back and forth until I find an appropriate location that is mostly (if not completely) level to start with since it gives real-time feedback, sometimes I don't even need to pull out the levelers. Sometimes just moving 8-10 inches forward or back will result in it going from being 1-2 inches off to being within1/4 inch... I love living in the 21st Century!!!! albert https://www.amazon.com/LogicBlue-Technology-LevelMatePRO-Wireless-Leveling/dp/B01FGGSWPW?th=14 points
-
We’re keeping you all on the east coast and in Florida in our prayers! Mike4 points
-
Being only 60 miles further west of Patriot here in western North Carolina, we hardly got any rain at all. Seven inches were originally predicted for us but as of right now we have only received .23 inches with hardly any wind. The "luck of the draw" and the whims of Mother Nature I suppose. Even so, one's heart does go out to all those that are having the misfortune of being in the path of the storm and it is so heartening to hear that both SeaDawg and Mossemi are OK. Only hope that others of our Family of Olivers have also weathered the storm. Bill3 points
-
This small level has worked well for a few years, believe there was an adhesive on the bottom. Used a 1' spirit level to check it a few weeks ago, still working fine. https://www.amazon.com/Johnson-Level-Tool-125-Cross/dp/B000LDETSU/ref=psdc_4989299011_t3_B01N704G45 https://www.johnsonlevel.com/News/SpiritLevelInformation3 points
-
No phone required……. https://olivertraveltrailers.com/forums/topic/2082-how-to-install-a-big-bubble-level-no-drilling/ John Davies Spokane WA3 points
-
That’s some interesting leveling data. I’ve been using the little bubble level on the front jack since May 2016. I do need to adjust it every so often. I always have the front a little high so water drains from the shower a little better. We’re probably never perfectly level side to side, but it’s never enough to be concerned about. Mike3 points
-
We use 2 x 6 cutoffs, a pocket level, and, sometimes, a half empty water bottle on its side, on the tongue, as the bullet level on the tongue jack is often wrong. Before we disconnect from the truck, I step inside and see if it "feels " good. If it does, we're good. I can definitely see other methods, like the Bluetooth leveling system, to be extremely helpful for newbies or single handers. Worth their weight in gold, if traveling solo, imo.3 points
-
Good idea. Another approach with those bluetooth leveler devices is to use something like the curved Anderson leveling wedges and drive onto it on the clearly low side until the device reads as level (or close enough that you can finish the job with the trailer jacks).3 points
-
My guess is that if Oliver offers it as an option, the folks at Tochta already have the patterns for the Oliver trailers. I'd check with them.2 points
-
I agree with John Davies. I use the LEVEL MASTER level too. I however attached it to the front of my basket instead of the trailer body. With it mounted on the front of the basket, I can actually see it in my truck's backup up camera making side-to-side leveling a one-person operation when backing up onto the Anderson leveler if necessary. I do normally have my wife with me so she can chalk the Andersons when I "suggest" she do so. (Learned early on that you don't TELL your wife to do anything unless you want cold beans for dinner that night.) I sealed my leveler as did John per his suggestion . Never had a problem. Only time I ever used a 4 foot level was when I originally leveled the trailer when mounting the Camco leveler on my basket.2 points
-
I also like the front a bit higher. In addition to water drainage in shower, I sleep head forward and like it to be higher than my feet. It also helps me keep the refrigerator door from getting away from me and swinging back to the entrance area. That can break the door hinges if it lock out too many times. Thanks for the tip. GJ2 points
-
Indeed. For about $1.50 each get several (Similar to these). I stuck one on the tongue like Rideandfly, one by the Ollie's door and another one right under the bath window. I thought about getting bigger bubble levels like John Davies but I simply didn't like the look and since I always get out of the truck to take a look around the area I'm pulling into anyway, these smaller levels don't really cause me any more work. Having said this - I do have my "eye" (read that I've got a price set on Camel, Camel, Camel) for a LevelMatePro like AlbertANDTerri have, but, I'll need to get a decent smart phone first 😏. Bill p.s. they do sell those simple bubble levels with a white base that matches the Ollie better versus the black base.2 points
-
Mossey, Well welcome back and yes you were missed! Hopefully you did not have any extensive damage from Ian. So far here in Western NC we are just having lots of rain and wind. We hope you had a great trip and look forward to hearing about your adventures! David & Kathy2 points
-
I just freeze stuff in freezer baggies, flat. Use a pan that fits the freezer. For my freezer, just baggie between two cookie sheets. They do look nice, though. I sometimes freeze lemon juice or other things in an old ice cube tray. It all works. When I was a child, we'd freeze corn and other veggies in 1 lb butter cartons, in thin baggies, tied off. No zip locks in those days . When frozen, remove the big rectangular cubes, and re-use the carton forms. Same idea. But, pretty much free. Very stackable.2 points
-
Are there any factory equipped Truma Olivers out there yet? Would like to hear how it performs. The Houghton gets good reviews. Mike2 points
-
OK folks, I have heard many people asking when/if they can upgrade their current air conditioner with a Truma Aventa Eco and, until now, it hasn't been possible. I am just passing this along. I have no idea IF an Oliver is eligible but from what I can see, it seems like Truma is willing to install at one of their service centers. This is not an endorsement, just passing it along. Brian
 1 point
 -
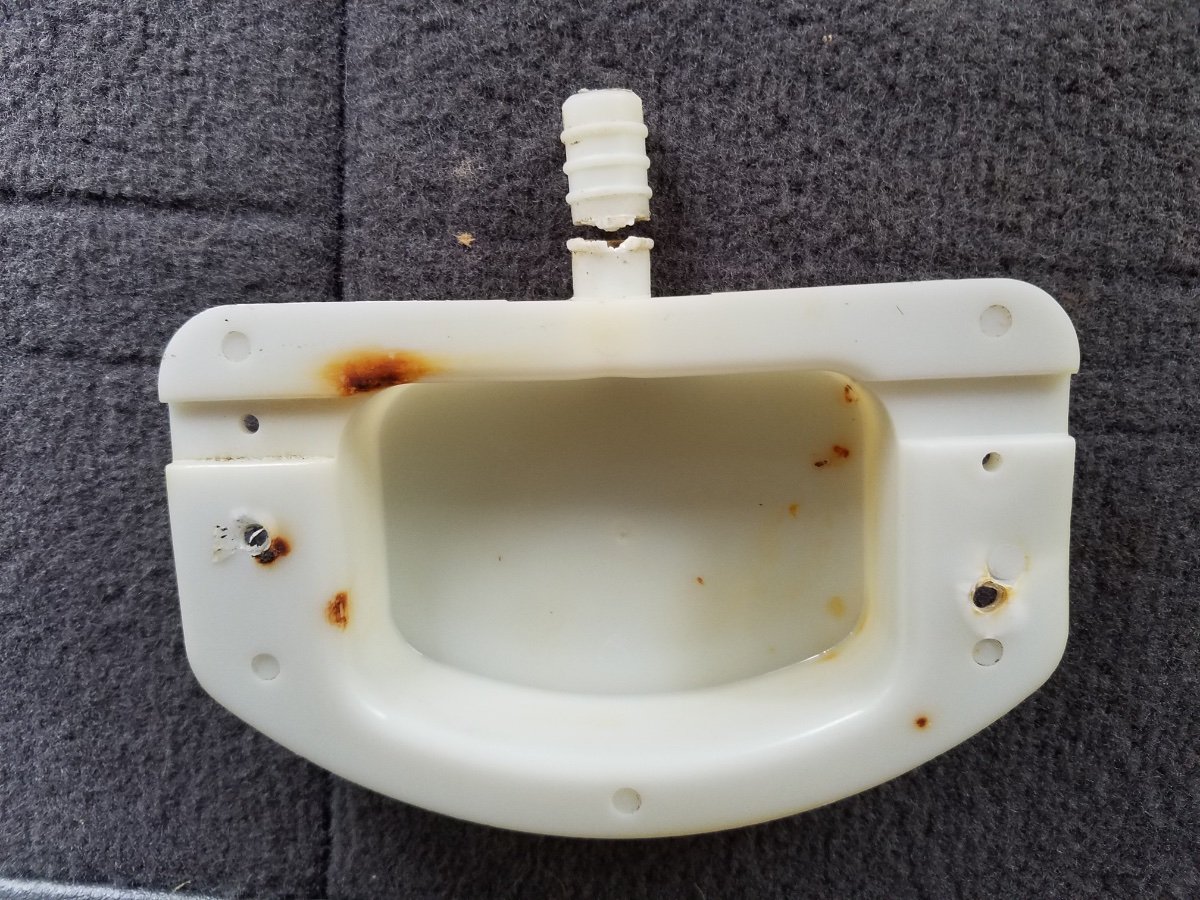
While camping in Arkansas in May of 2019, I found a fair amount of water running off the rear curbside roof while the AC was running. I figured out that if the lowest point of the Ollie was the curbside, then the condensate water rain off the curbside roof. If the low point was the street side, the condensate drained through the internal drain tube and out under the Ollie as it should. That allowed us to manage the condensate water drainage as needed. When I finally got around to troubleshooting the actual problem I found out Oliver had installed a Dometic accessory drain kit which consisted of 2 white plastic cups and vinyl tubing and 4 screws and 3 or 4 hose clamps. There is an accessory cup on both sides off the AC unit that receive the condensate from the steel drain pan built into the the base of the AC. The drain kit tubing connects the accessory drain cups to Oliver’s internal drain tubing. I could see the internal drain pan after pulling the AC shroud and a few other parts off. Without the accessory drain kit the condensate would exit the drain pan and onto the roof through a drain hole on each side. So RV's with the Dometic AC but without the accessory drain kit would experience water running off the roof under normal conditions while running the AC. Some Oliver owners on the forum have replaced their Dometic AC's and report that the condensate runs off the roof and down the low side of the trailer because there wasn’t a option to connect the new AC to the internal Oliver drain system. After an initial inspection of the drain system, I leveled the Ollie side to side and front to back and began adding water to the condensate drain pan. The result was that some water ran off the roof on the curbside and some drained through the Oliver internal drain on the street side. That result caused me to consider that perhaps there was a blockage in the curbside drain tube, so I disconnected the curbside tubing at the tee fitting that separates the accessory cups and used a can of compressed air to verify the tube was clear and it was. Then I lowered the curbside side and plugged that tube and then added water to the main drain which resulted in water leaking onto the roof. The accessory drain cup and tubing connection is not really visible with the AC unit mounted but it did seem to me the water was leaking from that connection. So I ordered this kit and a second AC mounting gasket because the kit comes with one and two are required to raise the AC unit high enough to allow clearance for the drain cups. I then sat on the repair parts for months waiting for an opportunity to obtain access to an air conditioned shop a friend has access to. That happened this month and the repair is complete and the drains work as they should. It did require removing the AC and flipping it onto it’s back to remove and replace the old gaskets and drain cups and that did make the broken cup connector visible. Here are few pictures for everyone that stayed awake during this dissertation. This last picture makes the original break visible by the discoloration on the bottom and sides of the connector. The lighter portion of the break was on top and still connected when we flipped it over and snapped it off completely. Mossey
1 point
-
On deliver day for my Elite I, they told me the pressure was set at 70psi. I checked and it is. I'm still determining what I need and want to carry and getting organized after a few trips. Will camp this week at Mt Pisgah and be without hookups for the first time. Then I plan to go weigh and reevaluate all this info.1 point
-
My 2020 LE II came with a factory installed bubble level installed on the upper left wall inside the rear storage garage. When unhitching, I first use the tongue jack bubble level along with Anderson levelers to get close. Then I go to the rear and fine-tune the port to starboard leveling using the stabilizing jacks while observing the factory installed bubble level. I will note that I didn't discover this factory installed bubble level in the storage garage until months and several trips had passed after picking up my LE II.1 point
-
1 point
-
I bought a LevelMate Pro+ for when we get our Oliver. On a whim, I mounted it in our 5x8 squaredrop. After careful leveling and setting zero, I used it camping, it was easy as pie to use. In fact, I didn’t need to level the trailer at all. Until I opened the door and it swung wide open. Using the level, it was off 1-1/4” left to right. I guess the tint size of the trailer is too hard for the LevelMate to figure out. 🤷♂️1 point
-
Our bubble in the front jack works, and the doesn't, and sometimes even disappears and comes back. I don't depend on it.1 point
-
@SeaDawg I don’t find that to be an issue, silicone bakeware is completely nonporous, it does not absorb odors/flavor from what you have cooked. I have found that it does at times add a bit more baking time than metal pans but not much.1 point
-
@SeaDawg Yes, it all works. I freeze many things. Olive oil and fresh basil is great frozen into cubes (ice cube size) then just drop them in the pan when you need some fresh basil. So many things you can freeze to make eating on the road so easy. The nice thing about the Souper Cubes is they are silicone so they release much easier than in plastic and you can bake in them too, multi purpose. I’ve baked mini loaves in them for camping, zucchini and banana bread. They can be used in a convection oven as well. “Souper” great product!1 point
-
No, it isn't. $899, list, current offer, $599. Thats an expensive dogbone to leave out in the open. In comparison, my 9.5k Houghton ac was $995, two years ago, $100 more today, no soft start required, and super quiet. . A companion genset might not be that much more, and provide extra power for other appliances. It is a very interesting concept, and might be the ticket for some folks. Thanks for the information, and welcome to the forum.1 point
-
These are fantastic!! Freeze soup, stews, sauces and more in perfect portions for your camping trip! Fit several quick meals in your Ollie’s freezer.😋1 point
-
Good idea!1 point
-
I apologize for the new-guy oops of posting a commercial link in my first post. To Steve’s point, it sounds like you currently have a Honda 2000, which can not support the momentary surge of the Truma AC compressor and adding the OTT installed EasyStart is not an option. Even installing one on your own, which is fairly simple, it appears it would possibly void the Truma warranty (this seems to be the case with many RV AC manufacturers). A possible solution, specifically to bbrault’s concern of not wanting to upgrade to a new generator, is the aforementioned external soft start. Without the link this time 😉, it is called a SoftStartUp. You can see my previous description. I have no affiliation of any kind with the company, just trying to help someone out based on personal experience with the product and a similar solution based on a similar need. The cost isn’t cheap, but would allow continued use of the Honda 2000, which is what we currently use as well.1 point
-
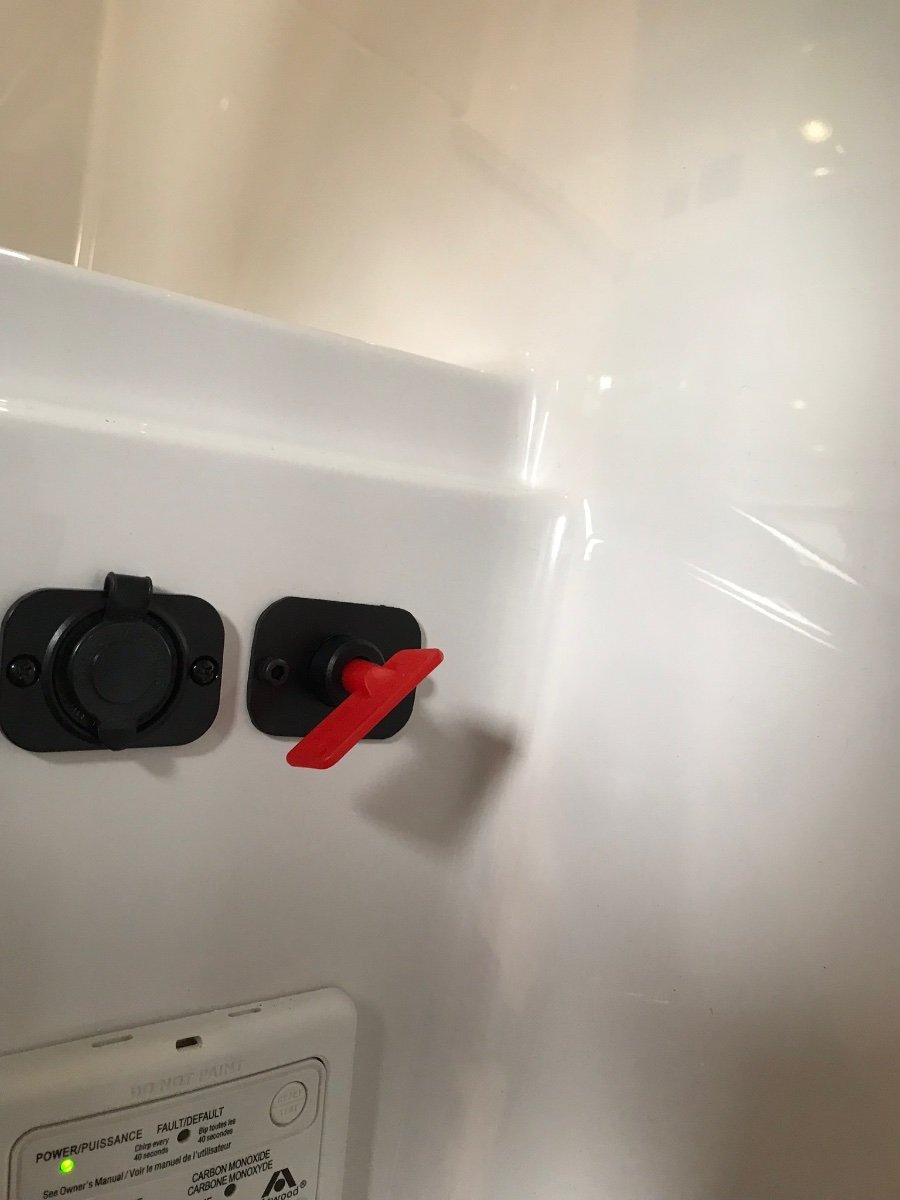
A couple of years ago I added a master switch to disable all of the leveling jacks as a theft deterrent. It’s probably difficult to move the trailer with all three jacks firmly lifting the trailer a bit. I moved the USB charging outlet from under the dinette and used that location for the leveling jack switch.
1 point
-
1 point
-
Opps! It’s updated now….2014, Elite 2, #55. Yes…..the on-line manual says the unit is shipped in the Lead Acid mode, but somehow this one was not. Guess the Tech should check?1 point
-
1 point
-
I am glad this solved your problem. For anyone else considering using a vacuum in the future remember that they are not designed to vacuum Gas and I would be very careful of anything that may have a motor that can ignite them..... Safety First. Happy Trails. Dan1 point
-
The questionnaire alsos implies that Austin will be an installation center.1 point
-
The ones in the showrooms have them and they are super quiet. I think they will freeze you out if that is what you were after. For all those considering, the Truma (US Version) does not have a heat pump. I am not sure what the Dometic Penguin has but I really enjoyed having the heat pump in our Dometics in the Airstream for those evenings where it wasn’t cold enough for the furnace. That being said, I am getting the Truma. Brian1 point
-
Thank you for posting this! I have signed up submitting my name and email as well, and we’ll see if we make the cut! 😊1 point
-
Interesting. There aren’t any service centers in Texas, just a mobile service out of Austin. Looks like the only service centers are in Florida and Indiana. Mike1 point
-
Thank you! I just submitted my name and email. Andrew1 point
-
New video! Oliver Camp Chairs!1 point
-
I just spoke to Dick, one of the owners at KTT, he said if you are having issues and are unhappy to call them and they will get you information on how to get the covers repaired or replaced. Brian1 point
-
@MAG, I'd like to thank you, for helping others in the future to avoid perils that you avoided, by design or chance. Changing out batteries with solar panels is not the same as swapping out car batteries. As you well know now. Thank you so much for helping others. Your honest questions and feedback will undoubtedly help others in days to come. Please keep us all posted on your progress. We're all rooting for you.1 point
-
Thank you Topgun2 and Seadawg, for the advice to get in touch with ScubaRx! Perfect! He thinks there is a good chance no damage was done, and worst case the fix will be inexpensive. Turns out that he helped my husband with Solar system issues 8 years ago when we first got our Ollie. It was like an unexpected meeting up with an old friend! It's amazing to have so much support, I am so grateful.1 point
-
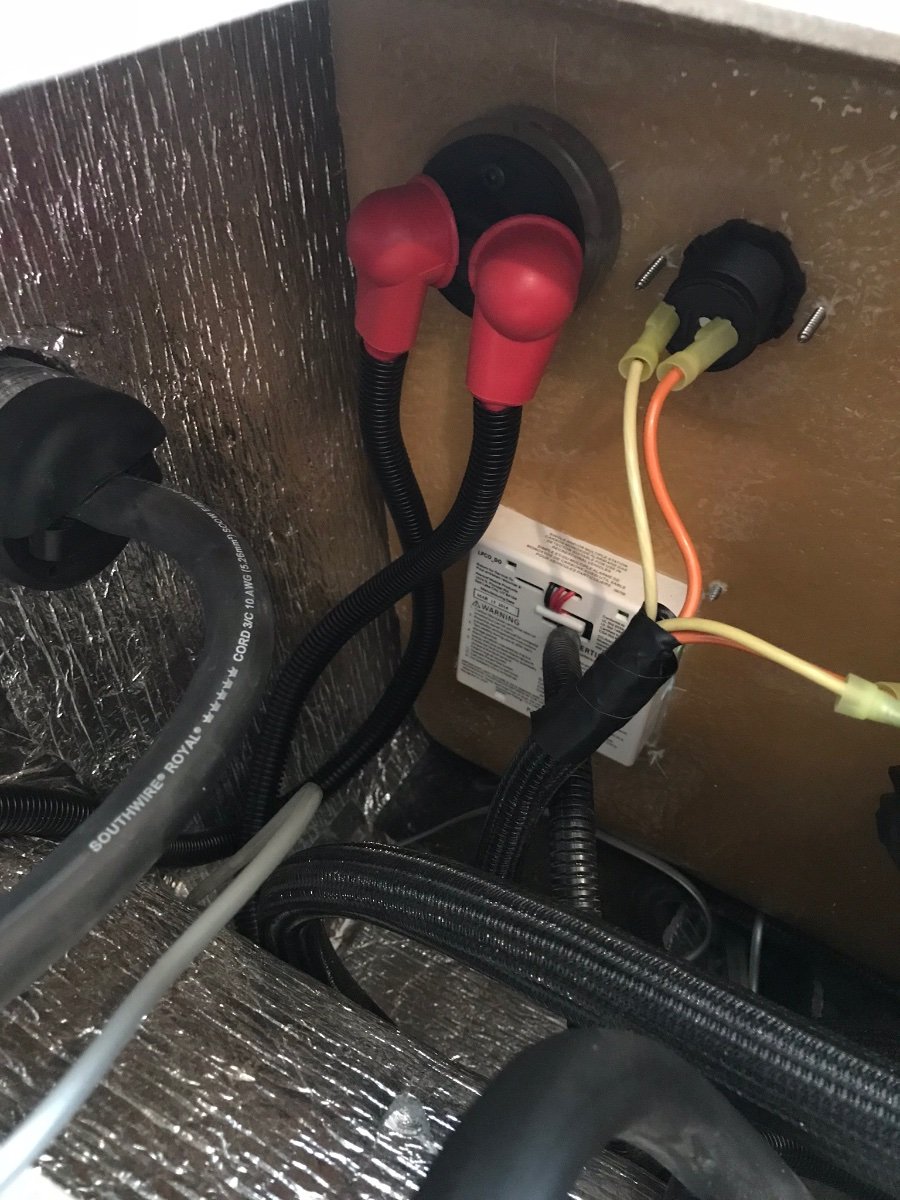
Here's wiring diagram for your solar boost. If you don't have the manual, you can download it and the manual for the ipn pro remote, so that you can read along when you talk with Steve and Ryan. See the red (+) fused (circuit breaker) line coming from the panels to the controller, along with the black (-)? I believe those are the wires coming from your panels, in wire loom. In the middle, the red/+ and black/- go to the batteries. The skinny black wire on the left in your photo is likely your temperature sensor running to the battery, and the little flat grey cable under it that looks like a phone cord runs to your ipn pro remote where you reprogram the unit, and see your readouts inside the Oliver. (It's a communication cable, basically) If you turned that switch/circuit breaker off before you removed the batteries, I suspect you'll be fine. Even if you didn't, and you didn't see any sparks, and you kept the red and black wire ends separated, and not touching any other wires or metal, you're probably still fine. I'm not nearly as versed as others in your trailer, and its specific wiring, but at least maybe you can relax a little til you talk with someone who is. Hope is not lost.
1 point
-
I see the red /positive wire running to the controller from the 30 amp breaker/switch, so yes, I'd think so. I'd leave your panels covered,and 110 disconnected, till you can discuss with Scubarx/Steve. He's your best resource on here.1 point
-
Scubarx never stops improving his trailer, and he's got the skills and tools to do it. So, today his will look very different from 2014, but I'm sure he remembers how those first ones were equipped. He worked very closely with Oliver on his #50, the first out after the hiatus.1 point
-
We have used our Houghton extensively this summer in the hot NC climate as well as on several camping trips. First, I run our Houghton off of the Lithium batteries (as Minnesota Oli mentioned above) all the time. I also run it off of a small 2400W generator with no issues - and no Soft Start. I have very little experience with the original Demonic AC that came with the Ollie because after trying unsuccessfully to run the AC and sleep (or think or talk for that matter), the Houghton was virtually my first (and in hindsight still the best) upgrade / mod. I talked to Houghton a while back about the cycling and they said it is working as designed (4 minute cycles when close to the set temp). I have the proprietary formula they use and they asked me not to share it publicly, but if anyone wants it PM me and I'll find it. I typically put the AC on 60F and it cools quicker without the cycling. Then when it's close to the temp I want I back it off and let it maintain with the cycles. The dehumidifier works amazingly well too. Actually, both the AC or the dehumidifier set low (like 60F) take out tons of water very quickly. Water does run off of the roof with the Houghton, so I just used some EZ gutters to divert the water to the back - rather than running down the sides and/or and getting into the window tracks, etc. It has a heat pump that I haven't used yet, and I'll likely stick with the gas furnace for heat and only use the Houghton heat as a backup. So far I give the Houghton a 10 out of 10 when compared to the competition.1 point
-
OK Gang, I hope I’m not occurring as a pain in the rear, but now my furnace won’t fire up. It was working fine before the generator got hooked up. I’ve checked the fuse. I’ve got plenty of gas. The stove and hot water work fine. When I turn the thermostat off, then back on, the fan comes on for a minute then shuts off. What do you think?1 point


.thumb.JPG.dd838cdb3df463dab6a16861fa23a319.JPG)


-
Recent Achievements
-


")


")


")


