Leaderboard


Popular Content
Showing content with the highest reputation on 05/30/2023 in all areas
-
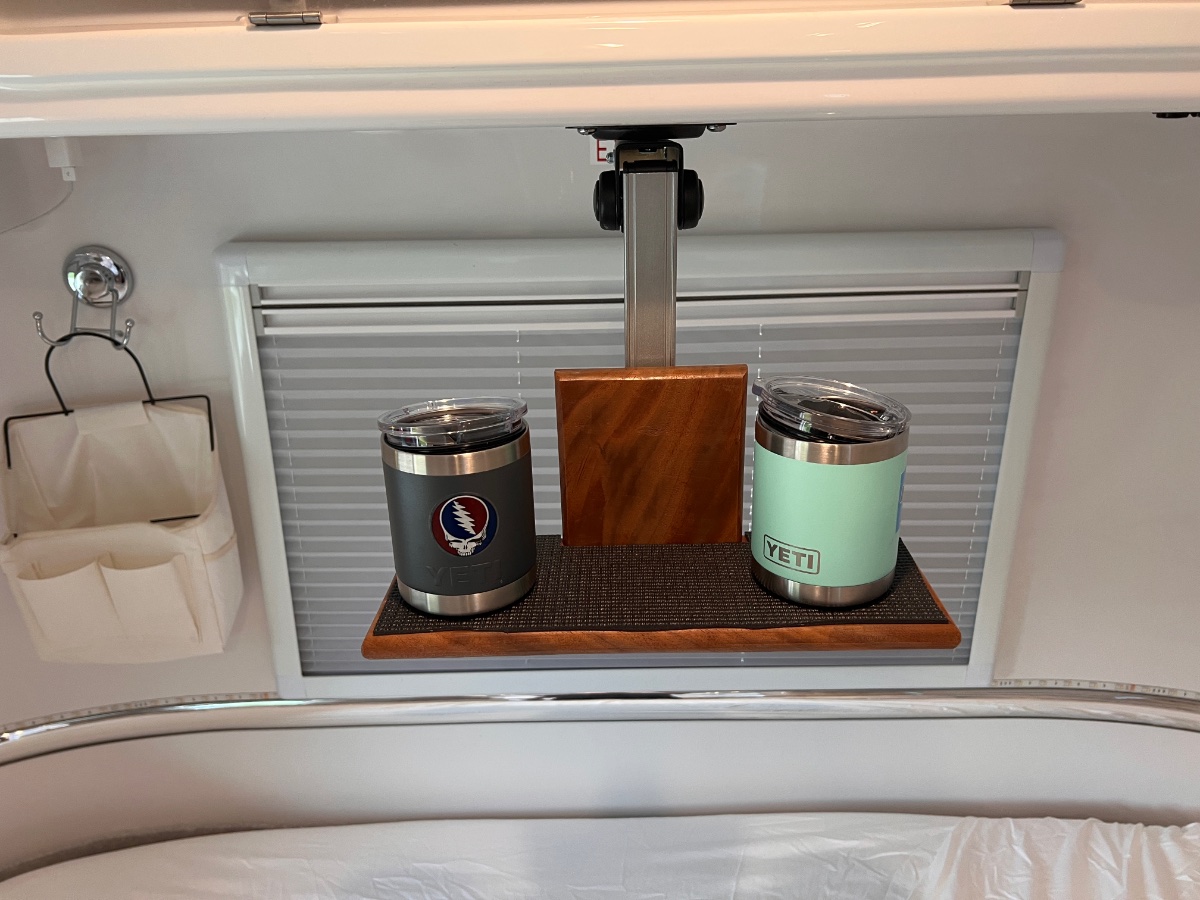
Here’s a quick little modification for those who don’t use the TV. I took ours out and repurposed the fold down mount by adding a small shelf to hold our coffee in the morning.
 5 points
 -
As I mentioned in a previous post, we were not able to get in to camp there but I highly recommend, as an alternative, Mt View RV Campground in ARCO, ID. This makes a good basecamp to explore the area. View campground details HERE. That being said, just north of there in MACKAY, ID there is a gem of a campground at the MACKAY RESERVOIR - the Joe T, Fallini Campground. Reservoir Campground Info HERE. There are some beautiful drives and hikes in the area going north along the Salmon river. We camped there for a week in our AS and look forward to going back.
4 points
-
The vast majority of times we have seen this it is a simple matter of the auto adjusters are way out of adjustment. They need to be adjusted on both sides of the trailer to the same point. I would certainly spend the time checking them out before changing out a brake controller. GJ4 points
-
One of these is not like the other. John Davies Spokane WA
3 points
-
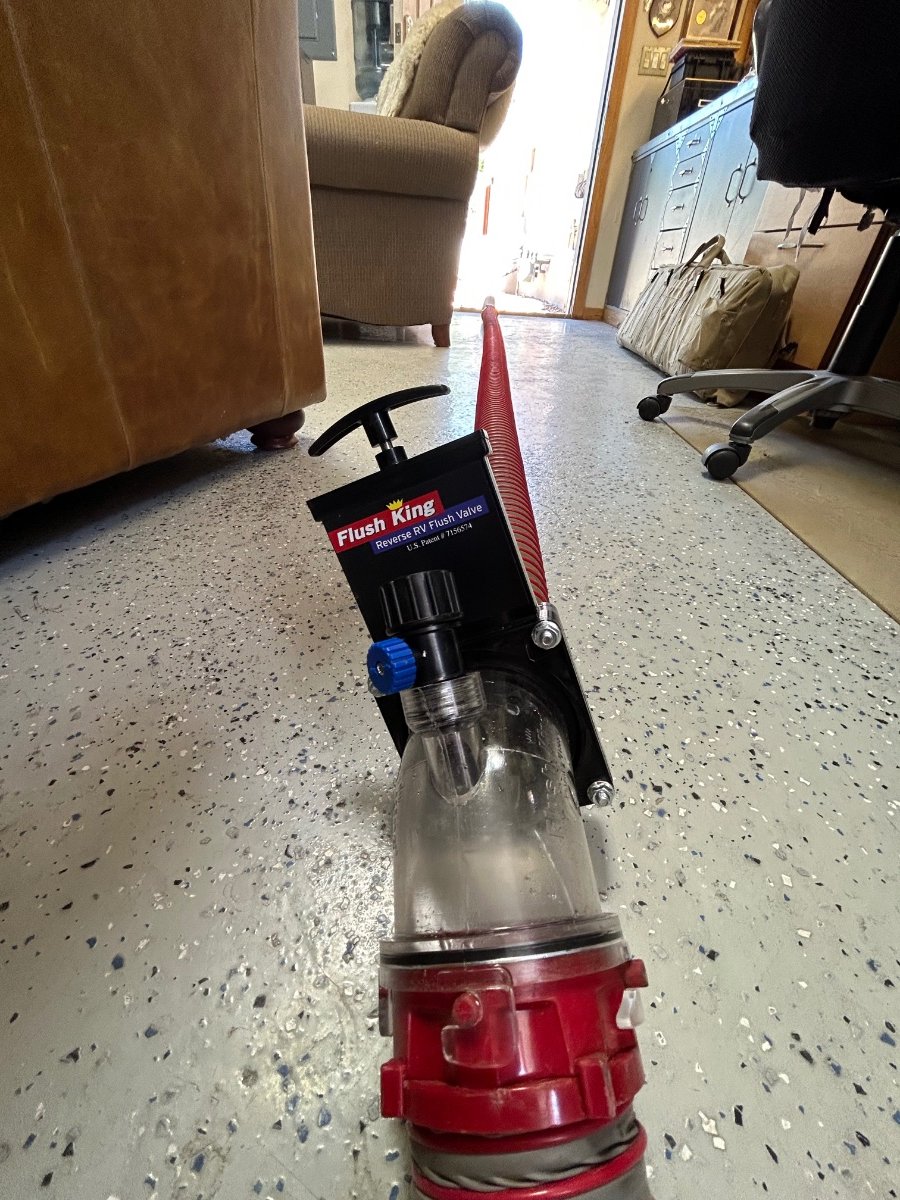
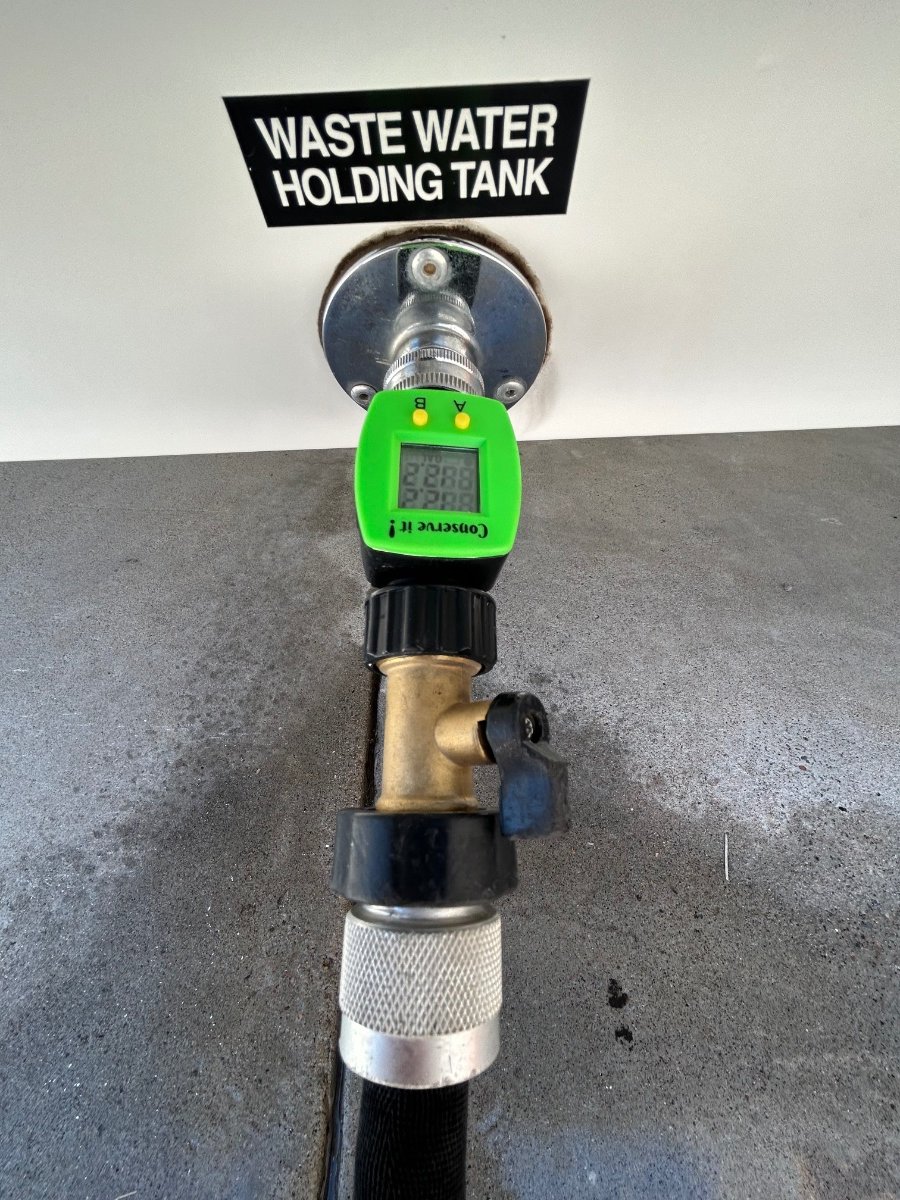
IMO, this post "sort of" fits the thread, and would fit others just as loosely, but we picked this one anyway because the posts were well thought-out and germane to what follows... 1. A few weeks ago, we ordered and received a "Flush-King" gate valve assembly to aid in determining the quality of the black water tank flushing operation. There's other assemblies available that provide the same function, but this one seemed to better fit the OTT dump system. Since our first stage dump hose stays permanently connect to the OTT dump exhaust flange, it's a simple procedure to place the Flush-King between the first and second stage hoses. Final phase dump hoses connect to the downstream end of the FK and then over to our dump station. The FK has a ball-valved garden hose attachment that is upstream from its gate valve (see above pic). We didn't believe this attachment was necessary for Casablanca since the OTT has the "Waste Water Holding Tank" fill attachment discussed ad nausium in several threads. The FK located close to the Ollie makes it convenient for us to observe the color of the waste because of the 30+ foot distance to our dump/septic connection - in other words, we no longer need to run back and forth from the dump connection to the trailer to control dump valves, water flow, tank fill progress, etc. 2. We attached a digital flow meter to the waste water holding tank fill inlet to monitor the amount of water flowing into the tank - also monitoring the See Level gauge for comparison, so as not to over fill the tank. The See Level digital readout closely agreed with the digital flow meter as the tank was filled - this added a level confidence with the See Level system. Upstream from the flow meter we attached a brass ball valve to control the fresh water flow from outside the RV and provide an additional safety check for potential interior check valve failure and subsequent back-flow of effluent into our fragile fresh water system. 3. The waste water system took 3 flushes (54 gallons) to observe clear discharge at the FK assembly. The discharge was clear and without debris when complete. We filled the waste tank with 2 gallons of fresh water to keep from drying out until our next adventure. Any thoughts of other steps that we're missing or have omitted? Cheers - even though this is a "S**TY" job...
3 points
-
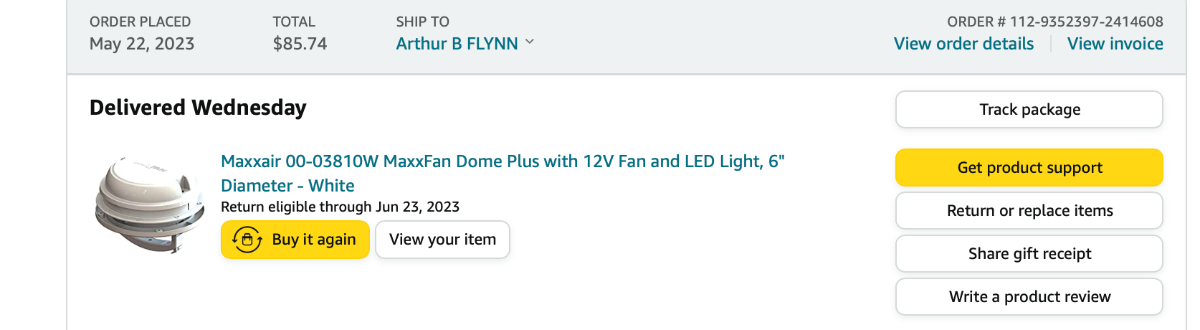
Here's the model number from our Amazon order receipt: The unit comes with a 6" extension sleeve. You will need to trim the sleeve to your roof thickness. Our OTT roof thickness at the 6" diameter vent hole is 2 1/4". We placed the 6" sleeve inside the hole, allowed 3/4" to protrude inside for the trim piece/LED housing, and marked the exact thickness so as to determine how much needed to be trimmed. The length of the sleeve needed was 2 7/8". We used clear silicone around the upper sleeve circumference and roof vent hole for additional waterproofing. Fitment was good - especially considering that the fan hole location is not flat, being slightly curved - be very careful when torquing both the upper housing screws and the decorative trim piece/LED housing screws because one could (IMO) crack the housings if over-torqued. The housings will "bend" slightly to match the interior concave curvature of the ceiling and the exterior convex curvature of the roof. We washed Casablanca after the install and heavily watered the area around the new vent for several minutes - no leaks detected/dry as a bone in the head. Hope this helps, brother! Cheers... PS: 1. The old Ventline unit is spoken for by another member and will be shipped today. 2. This model MAXXAIR has the conveniently accessible inline fuse that @SeaDawg mentioned above, FYI.
3 points
-
We've had the maxxair for a few years now, with the led light ring. Best upgrade. (Our decade old ventline was leaking.) We installed the maxxair with butyl tape. Trimmed the outside with marine caulk. Love it, as you do. Love, love the light. Our handle release is more difficult than the old ventline, but we can live with that. It's a two hand operation. The fan is higher cfm. And very, very quiet. Highly recommend it.3 points
-
When returning home from the Oregon Coast this April, my wife and I boondocked at a Harvest Host site. That cold evening, we tried to heat water for hot drinks in the microwave using the inverter, but it shut down after just a few seconds. We were surprised and disappointed, because our Lithium Pro Package with Xantrex Freedom XC Pro 3000 watt inverter should enable us to use the microwave on inverted power for at least a few minutes. It had been a cloudy day so we got minimal solar recharge, and with our Nordcold fridge running on DC while on the road, our battery State of Charge was down to about 74%. When we submitted a service ticket, Jason Essary confirmed that we should be able to run the microwave on inverted power at 74% State of Charge (SOC), and much lower, down to 25-30% SOC. With Jason's helpful guidance, I then spent dozens of hours trying to troubleshoot the electrical system, both on the DC and the AC sides. The inverter/charger was charging as designed, and would run 120V appliances that pull up to 1100-1200 watts (including the Truma air conditioner, which pulls 1100 watts with the compressor running), but loads greater than 1400 watts (like the microwave or a space heater on a high setting) caused the inverter to shut down. Nothing we tried solved the problem, including replacement of the Optifuse 300A inverter breaker, which Oliver sent to me under warranty. I also spoke with a Xantrex customer service rep (after45 minutes on eternahold) who assured me the problem could not be with the inverter, so it must be in the trailer wiring. Jason then authorized me to engage an RV service tech at Oliver's expense to try to find a solution. But that was right before I had planned to use the trailer boondocking at the Lochsa River the week of May 15. I decided to engage a tech after I returned home. But while camping (and running the Lochsa river during the day) I happened to mention the inverter issue to another RVer. He asked me if my inverter is a Xantrex. Yup. He then told me he had been advised by an RV service tech to do a "hard reboot" of his Xantrex inverter to resolve a similar issue. He explained that this involves disconnecting both the positive and negative DC cables from the inverter, and leaving it at least overnight, then reconnecting. I determined to give it a try after I returned home, as it would be relatively easy to do. To my surprise, the "hard reboot" solved the problem. My tests have confirmed that we can now run the microwave on full power (1540 watts) for 4 minutes or more at a time, at SOC levels down to 35%. So, the Xantrex customer service guy was wrong--the problem was with the inverter. And, the solution was relatively easy to implement: turn off all batteries, and ensure that shore power is disconnected (so there is no power to the DC cables), then disconnect the DC cables from the inverter and leave at least overnight. I left mine disconnected for 3 days. Then reconnect, and turn the batteries back on. If your Xantrex inverter is not performing up to spec, try a hard reboot.2 points
-
Yet another example of OTT Service stepping up and doing the right thing. Simply can't get any better than that. Bill2 points
-
You may want to inspect the coils on the A/C. Not likely they are the source of your smells, as your trailer appears to have had only a few actual years use. But worth a check to make sure that critters didn't make a home in it. Likewise for the furnace, hot water heater and bathroom vent fan. GJ2 points
-
When we had a gray water leak that left water on the lower hull, we had a slight odor in the trailer. I opened the hatches and placed a fan under the bath side dinette seat and blew air all day, first toward the back of the trailer then toward the front. It dried everything out well and the odor went away too. Stick your head in the seat opening and see if that is what you are smelling. Also, put some water in your black tank with your toilet additive to see if your surprises will loosen up over time. Mike2 points
-
O' ye of little faith! 😁2 points
-
Craters of the Moon is one of our favorite spots. Located right in the middle of a vast (and recent) volcanic flow, this park is unique! A couple of considerations. First, number of sites are limited and, of those available, many will not handle a 20+ trailer. If possible, get a reservation. If not, get there early and be prepared to move on if needed. Secondly, this place can get HOT! Temps commonly push 100 in summer months and there is really no shade. For that reason we tend to limit our visits to the shoulder seasons. Take in the visitors center and some of the local hikes. The topography brings to mind the big island of Hawaii or Newberry Crater near Bend, OR. Morning and evening hikes are best to avoid heat. Bring a sunhat, lots of water and good, solid hiking boots ... this is not a padded forest floor! Many campgrounds are somewhat forgetable ... this is NOT the case with Craters of the Moon.2 points
-
Thanks for the details, Art! The flow meter is a clever idea. I have an inexpensive macerator pump arriving today, so that I can more efficiently clean the system at home. I've wondered how many times the tank needed flushed to be reasonably clean. I'm getting a clear 45° connector, too, so now I'll be able to observe when it is clear.2 points
-
We have a 2019 Ram 1500 and it came with air suspension. It has 2 off settings, normal, Aero, and Exit. It automatically adjusts to the weight of the tongue. We also use the off road setting when we are at a dump station to tip the Ollie so we can drain the grey tank faster. We also find that when we stay at HH or campsites where we stay hooked, we can level the trailer front to back very quickly. The newer Ram have eliminated the 5 settings in favor of just 3, but still auto levels the TV.2 points
-
We rode through Craters of the Moon during our annual "Spine-of-the-Rockies" Tour (MCycle ride) last AUG - absolutely beautiful geology. We'll go back with Casablanca, for sure. Very special destination, IMO.2 points
-
(...not to highjack the thread) But, HA - this comment cracks us up! We get the "camping withdrawals" after 7-10 days of being home, too! We find ourselves occasionally sharing a cold one while sitting at the dinette table, the shades down, and imagining we're at some of our fav camping sites... (from inside w/shades down - same view, right?)2 points
-
Looks good we’ll add it to our list! Thank you! Patriot🇺🇸2 points
-
Brian, Thanks! This is on our list of CGs to visit.2 points
-
Thanks! I do a little bit of woodworking so this was a piece of scrap mahogany I had sitting in a pile. It really makes coffee in bed easier. I covered the surface with some liner I use for tool drawers so the cups don’t slide around. 😀2 points
-
We had something similar that when we were braking the tires were skidding. We had a mobile RV tech come out and check our brakes. Turned out our brake controller was set too high. Once we lowered it the skidding stopped.2 points
-
There's actually not much you can do with the auto adjusting Dexter brakes. You can back them off, but the auto adjuster will just put them back to where they were. However, you might be able to lower your brake controller power setting to eliminate the skidding. Our 2022 was dragging one brake as you describe and I was able to lower the brake controller setting enough to stop the skidding, but still have enough braking power overall. Our Ollie's brakes are very strong and require a lower setting than our previous trailers.2 points
-
The fuse is accessible without disassembling, which is another nice feature in ours. Less than $100, on etrailer. https://www.etrailer.com/RV-Vents-and-Fans/MAXXAIR/MA00-03810W.html?feed=npn&utm_source=google&utm_medium=cpc&utm_campaign=Google | Shop - RV Vents and Fans&adgroupid=81219729010&campaignid=417623777&creative=404001548849&device=m&devicemodel=&feeditemid=&keyword=&loc_interest_ms=&loc_physical_ms=1026083&matchtype=&network=g&placement=&position=&gclid=Cj0KCQjwmtGjBhDhARIsAEqfDEeBTUCRhW2dwZMF-AYYM2dLpNLgnV17aD5HcsrVq-qdF5xP-juVaNIaAirSEALw_wcB2 points
-
Wow. Great idea! And, it's quite beautiful. Did you build it yourself? Nice work! (Many of us do not use the television. I honestly wish Oliver would take it out of standard options, and make it an option. We have only used the TV a few times, in 16 seasons. If and when it dies, it will not be replaced.)2 points
-
The LED is surprisingly bright - 50 to 60 watt equivalent? I'll check the box it came in for the model number.... MAXXFAN Dome Plus w/LED - WHITE. Cheers!2 points
-
You completely cheated when knowing what to search for. You participated a lot in that thread. Oh sure, everything is easy if you have the answer. LoL 😂2 points
-
Nice work! We never watch our TV, we are too busy sightseeing! 👍🏻👍🏻👍🏻2 points
-
I went with black Sumo springs. I like them, altho it stiffened my unloaded ride. Inexpensive and easy to install. Stable towing my E2, - 2017 TRD Tundra.2 points
-
I can personally attest that driving the 40 mile washboard gravel road into Chico Culture with 80psi in the Oliver tires is both stupid and detrimental to the Oliver. I'm not completely convinced that it didn't slightly alter the earth's orbit around the sun as well.2 points
-
Mike, Nice job!2 points
-
I’ll either do that or put a hose through the bath window. I’ll probably fix it when we get home this weekend.2 points
-
It looks like an ordinary 1/2" MPT x 1/2" MPT check valve to me. Pull the part and verify pipe diameter to be sure. But, I'll bet the Pex pipe that connects to the valve is 1/2", so odds are high that the fitting is 1/2". A brass version offered by Valterra (which would be an upgrade from the plastic one Oliver installed) is available from Amazon for under $10: https://www.amazon.com/Valterra-P23415LF-Lead-Free-Check-Valve/dp/B00HJ6P0Z8/ref=sr_1_5?gclid=CjwKCAjwwL6aBhBlEiwADycBICgly1OwtJDY5Q9FclIA3jCEEmcXbufHEPlR1A_rkK51r41DjwB-PRoCqMkQAvD_BwE&hvadid=616862894778&hvdev=c&hvlocphy=9029558&hvnetw=g&hvqmt=b&hvrand=2988426038172399198&hvtargid=kwd-315243267828&hydadcr=24633_13611805&keywords=1%2F2+inch+check+valves&qid=1666189161&qu=eyJxc2MiOiIyLjMwIiwicXNhIjoiMS44NSIsInFzcCI6IjEuNDYifQ%3D%3D&sr=8-5 Camping World sells the same fitting: https://www.campingworld.com/12-brass-check-valve-x-mpt-95194.html You may be able to find a Camping World, or even just an RV supply store, on your route that would have it in stock. Good luck!2 points
-
Take it apart again, go to an Ace Hardware store and they should be able to match up the seal for a dollar or two at most. Buy a spare for your kit. Alternatively, if you are near a larger city, an RV parts supply store … If that doesn’t work, ask Oliver for the make and part number of the valve, you most likely can find it at an online vendor to at least see if their price is acceptable (it does seem very excessive unless it includes overnight shipping and hand delivery to your campsite 😬). I suspect it is a special RV part, most common types have female threads Take pics please. Good luck. What a sh**y project😬 John Davies Spokane WA
2 points
-
@Hokieman Did you go to VA Tech? My father and two of my brothers went there. I broke tradition and went to Embry-Riddle in Daytona Beach. It wasn’t near as cold in the winters! We did our second factory visit last week (we live less than 2 hours away) and scoped out ML State Park. Very nice and quiet indeed. Looks like @topgun2 has actually camped there. When we pick up, our plan is: First night at the factory, second night at Amber Falls winery (Harvest Host), third night at MLSP and fourth night at Mouse Tail Landing SP, TN. That should be a good shakedown before heading the remaining 1.5 hours to home. Brian
2 points
-
OK. This is now on my list the next trip west! Mike2 points
-
I have had the same experiences with the Toyota V-8's and 3.5 twin turbo's. The new twin turbo's are amazing. GREAT fuel economy when not towing. Good fuel economy towing IF you keep your foot out of the turbo's. I typically get 13+ to 14 MPG running 65 MPH on the interstates. But if I get in a hurry and start seeing much turbo boost on the gauges, the MPG drops off at what seems to be an exponential decline. It would be interesting to see a side by side TFL test of the Ford 350 vs 3.5 Ecoboost and the Toyota 5.7 and the 3.5 Twin turbo with the same loads running a mixed flat land/mountain course. Not to compare the Ford/Toyota, but rather their respective V8 vs TT V6's towing 7,000 horse trailers. JPR NOTE: Why a 7,000 pound horse trailer? I think that combination with less frontal surface area, but more weight would be a nice match for our OE2's with better aero and less weight. Just a SWAG on my part. OR maybe OTT could loan TFL Two Ollies for advertisement purposes! GJ1 point
-
@Billsarvis I added a rear mount cargo carrier to our LEII. A bike rack could easily be mounted in the same manner. See: Regards, Don1 point
-
I've successfully used this method from the attic down between studs on the interior of our house. I believe the wire chase in the rear of the Oliver is too tight with wires for this to work.1 point
-
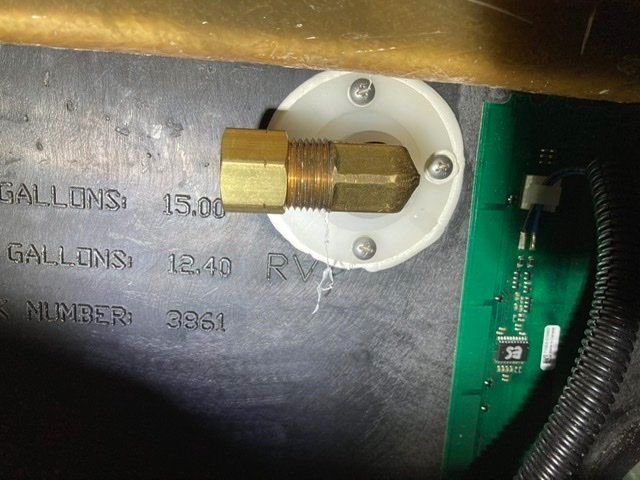
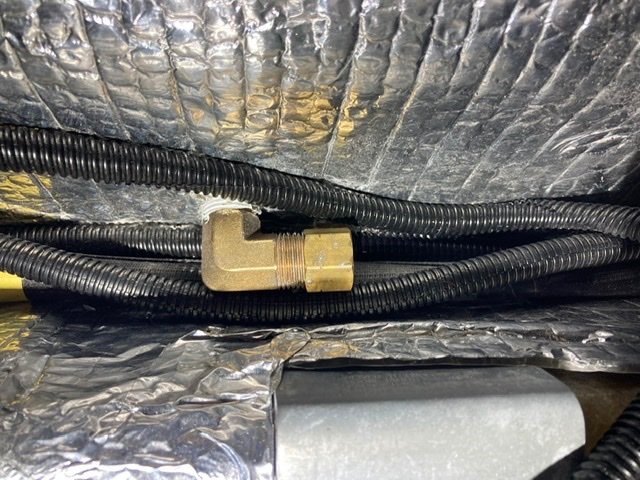
Apparently Oliver has changed this arrangement up more than once. My trailer does not have any check valves on the black tank, just a simple brass elbow, possibly connected to a spray nozzle. Connected to it is a white pex line that goes up under the sink in the head, attached to a brass vacuum break valve. I think it also has a brass check valve. Then it loops back down to the flush inlet on the side, also a simple brass elbow. Since I have a Natures Head, this line is not used. The heavy brass valves were not secured, and rattled around under the sink. I removed all of it and capped off the elbows, stored it away. While I was under the sink, I easily removed the toilet water supply line and valve, also not used. Now I do not have to winterize that line. I don’t have a pic of the vacuum breaker valve but I can get one if you are interested. This vacuum break arrangement is not shown in the 2021 or 2022 Elite II owners manual plumbing diagram, but it is shown in the Elite diagram.
1 point
-
Your plan is excellent, go camping, but stay in the area a few days just in case you need a part, or, go back to the factory if necessary. When I picked up, they had no factory campground, so I booked 3 nights at David Crockett, Oliver paid for the 1st night. I was traveling solo, because my wife couldn’t get off work, so I spent 2 days checking everything, everywhere I could crawl, or climb. All was working well, so I got bored and headed home early, dry camping a few nights at Harvest Hosts.1 point
-
Brian and Brandelyne: I tried googling Duvall in the Smokies. It looks like Duvall in the Smokies is now called Buddy Bear in the Smokies RV Campground.1 point
-
Nice job and write up. I also will add this to the list.1 point
-
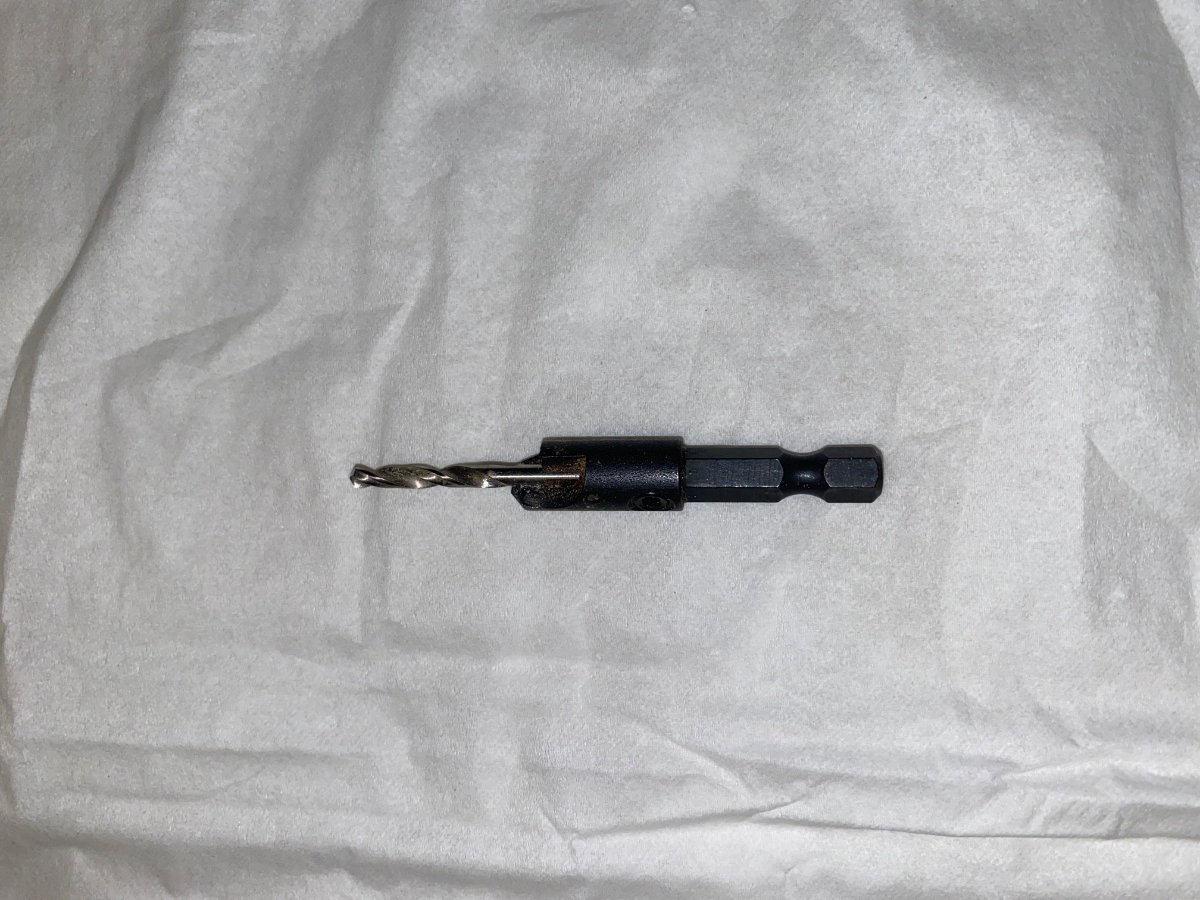
Here’s a picture of the type of countersinking bit I used first on the fiberglass to clean up/chamfer the gel coat surface. This one has a small enough diameter drill bit (1/8”) to fit through the original hole, so only the chamfered section of the bit touched the fiberglass to create the chamfered edge on the gel coat layer. Then after chamfering I used a 1/4” bit to open up the clearance hole through the fiberglass.
1 point
-
👍🏻 Yep. I have the same. One of the best campfire accessories ever invented!
1 point
-
I will try this the next time we dump! Still learning….!1 point
-
Correct. It's disconnected because the lithiums can absorb power way faster than the vehicle alternator can handle. (My probably over-simplistic understanding of the engineering.)1 point
-
Not with the lithium packages.1 point
-
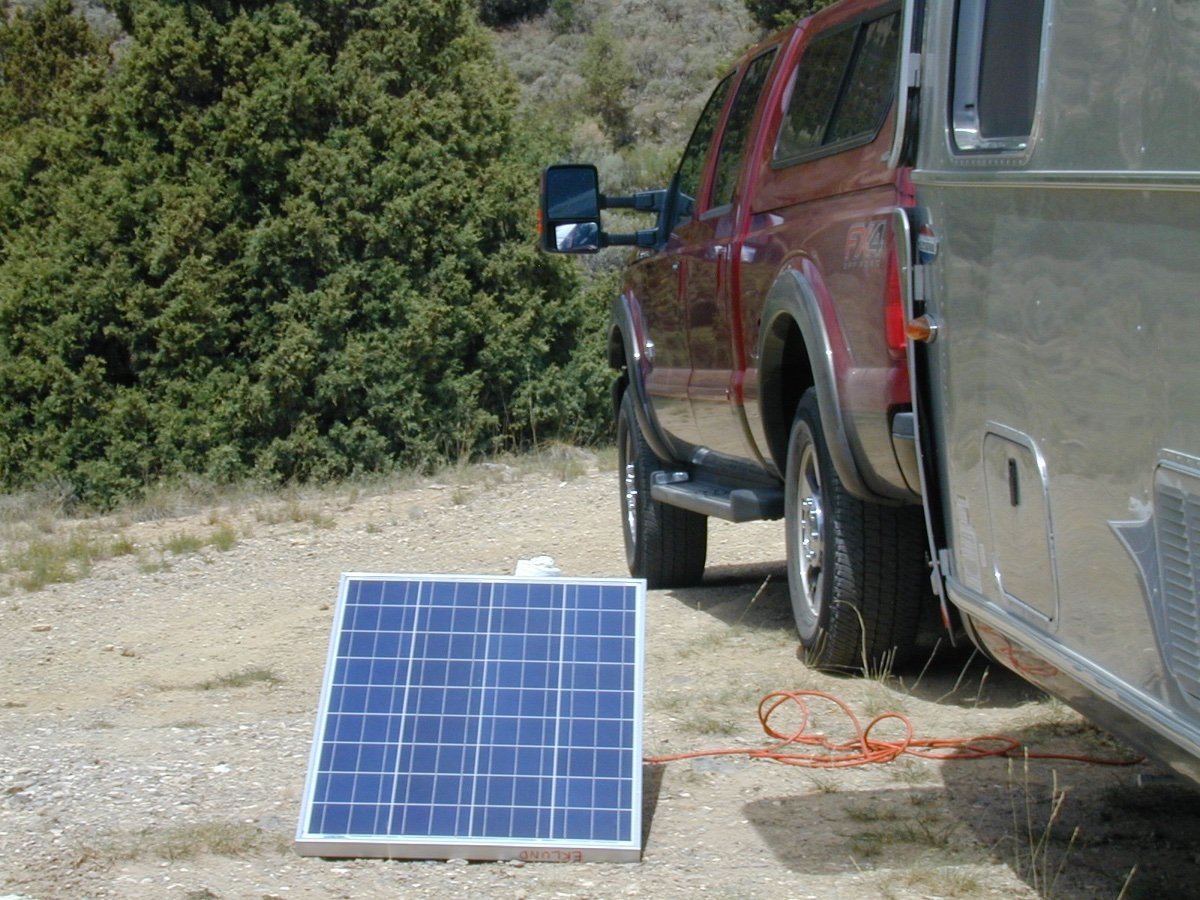
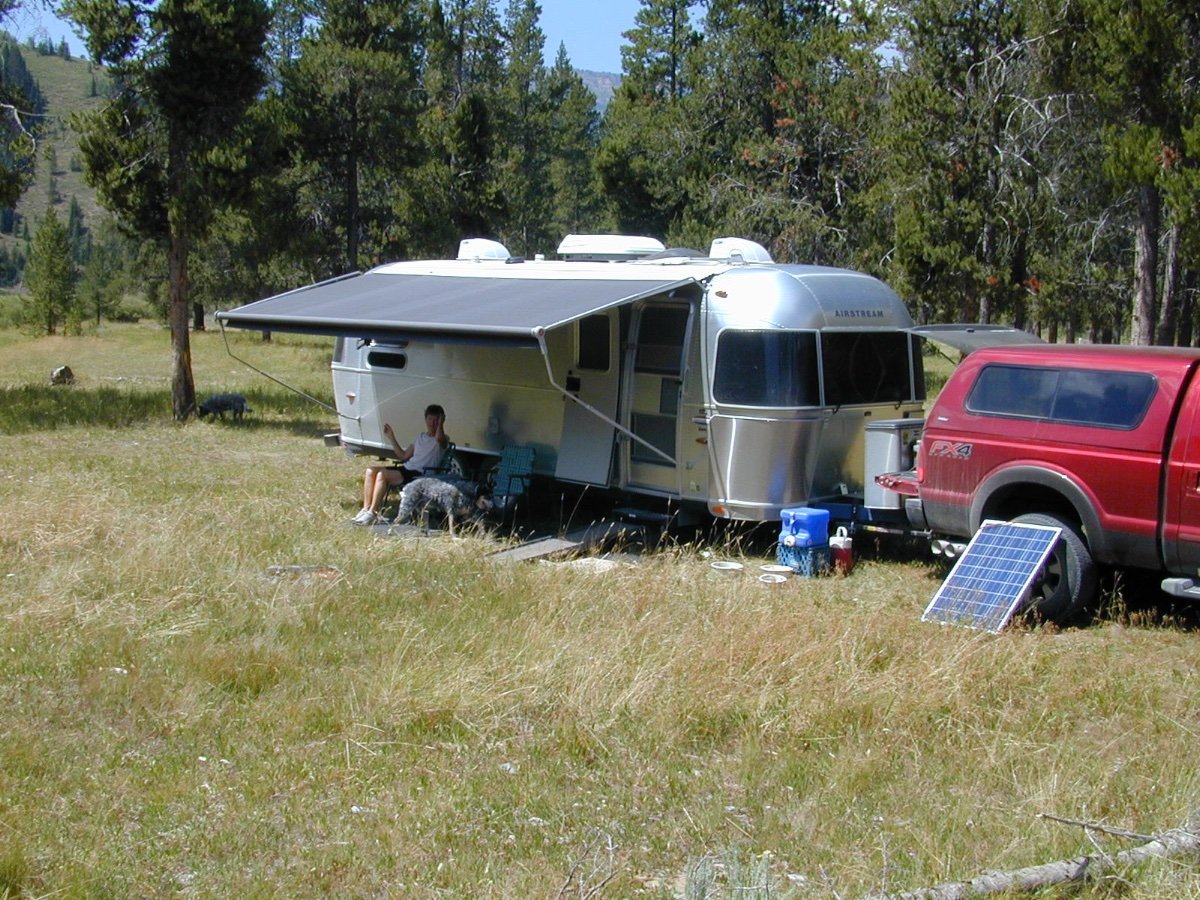
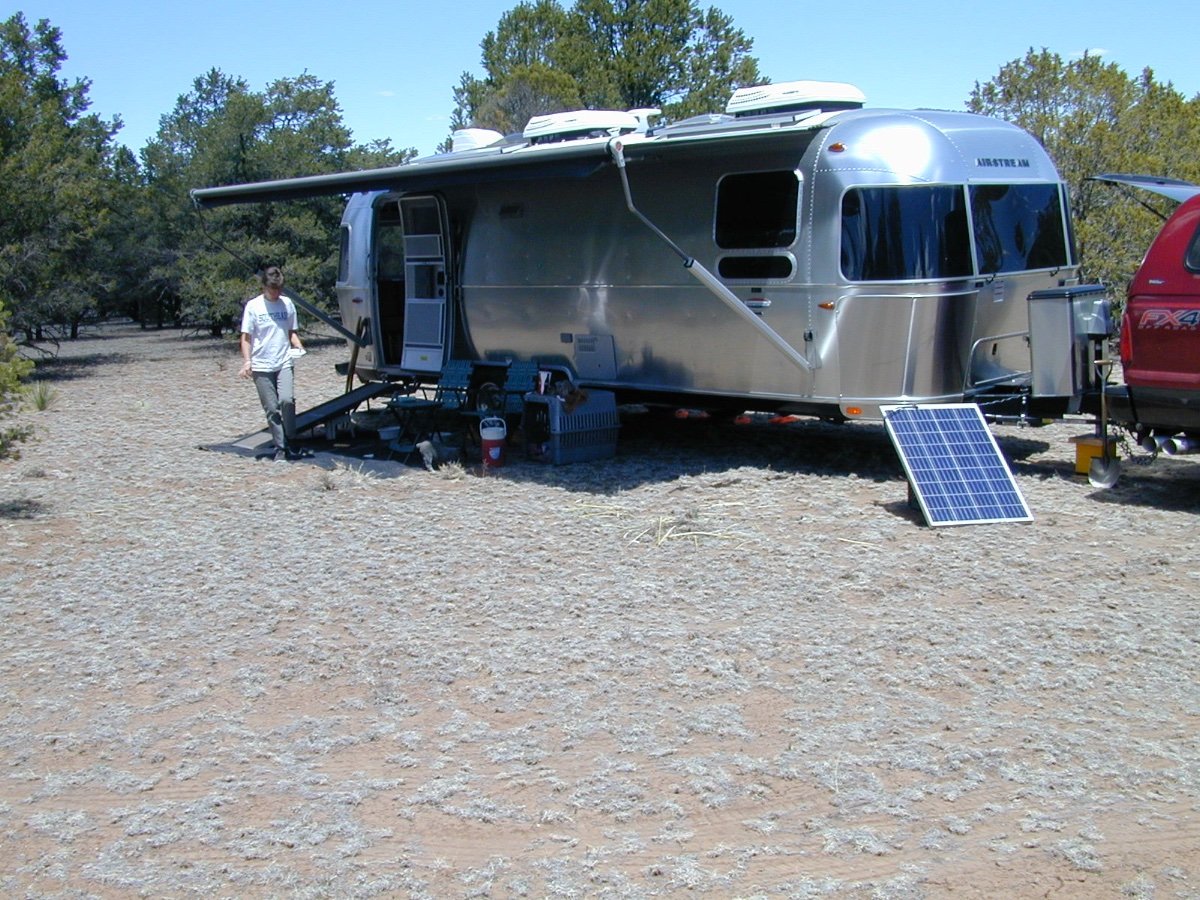
We found inexpensive Costco $99 100 watt panels an easy upgrade to Solar Power when Boondocking. When purchasing our last Airstream, a cousin to the Oliver, we had two 80watt panels installed on the roof and a pair a AGM Interstate batteries that have worked perfectly since 2016. Five years is nothing. We had factory Solar on a 2006 and the AGM Batteries were fine when we sold it in 2014. The Solar Panel sold at Costco cost $99 and come with the Controller and Wiring directly to my AGM Batteries. I wire the + on one battery positive terminal and the - on the negative battery terminal. I am not an Electrician, but it works and made sense to run the wiring among both batteries. It worked in 2019 and still working when the portable panel is brought out, plugged into the, already set up connection from Airstream with connecting plug on the external Battery Box. The controller is wired within the battery compartment. I put the controller into a plastic bag, and seal it from water, dust and vibration against the batteries. We did this in our 2014 Airstream that had NO Solar. It was expensive to add by the Dealer. For $99, wired up the 100 Watt panel and... never had any 12 volt problems and kept fully charged with plugging in the Solar Panel once parked. The panel I would move with the Sun when sitting around the trailer. When hiking... set it with some idea of the direction of the Sun. (Yes... we are not City Slickers lost without Common Sense.) Two Panels.... 200 watts for $200. The Costco Panels are heavy duty standard panels... and the included Controller makes it all... WORK. I show some examples of how a Milk Crate with some rocks in it works. You can also make a portable stand. I use the milk crates to store a five gallon water jug in the back of the tow vehicle. The Solar Panel has a + and a -. You have to keep that in mind when wiring onto the Controller. It has a Green Light diode glowing for fully charged and a Yellow when charging. The wires seem thin, but obviously work from the Controller to each battery terminal. I can have the trailer in the RV Garage and have a long cord for the Solar Panel, lean it into the Sun... and Presto... charging. Also charging using the electrical outlet. Write your name in Magic Marker on ALL SIDES and the BACK of the panel. The panel is of no value, without the Controller for a Thief. We often park Off the Grid and hike from the campsite. The tow vehicle is attached... only for convenience. This works. Your inside monitoring system will show the charge and the Controller will be glowing yellow when the batteries need... some.... Zap. This is not for those using AC, Television and 110 volt appliances. Boondocking. We have not used our AC's. Our televisions. Works great for 12v radio. Spend $100 or $1200 for a roof panel setup... and if you double your panels... $200 for saving $1000 and more? I may be old... but even anyone older than 14 years old can figure this one out. I used an orange extension cord the first time for the older Airstream. Used the Male and Female plug for wiring and fifteen feet of orange cord attached to the panel. It worked. Someone may have more to add. I am not complaining. It is my hard saved money... and you may feel the same. Cousin Airstream may be different... but we all share a common thread. Using our trailers to the best of our ability.
1 point
-
Beautiful captured shots of the area!!!!!!!!!!!!1 point
-
I do not care for the Delorme atlases, I find them to be WAY less useful (recreationally) than the Benchmark ones. Unfortunately there are only 13 western states available. I have all of them except for Texas and Alaska. https://www.benchmarkmaps.com/atlases However, they are a great tool for research and a final backup in case my electronic devices fail. I use 1/4” stick-on colored dots to mark points of interest and major turns. My iPad Mini 4 has a number of camping and nav apps on it. I have tried most and deleted many.... The one I most recommend is GAIA Premium ($40 annually) since the Layers function lets you add just about any kind of info, like Forest Service MVUM (Motor Vehicle Use Map) data, which will tell you where you can and cannot drive. I can’t stress enough how important this is. GAIA is OTH pretty rotten for simple road navigation. The other app I use all the time is Pocket Earth Pro. The basic app is free, the Pro upgrade is $5 and adds topographic maps. For just driving away from urban areas where your cell phone is dead, it is wonderful. The graphics are very pretty and the thing that sold it for me is the user adjustable font size. You can make the city and town labels almost any size you want, and they are dynamic. When you zoom out they get bigger too, so older eyes can easily read them. All other similar map apps I have tried do not have this feature. Map downloads are quick and simple and you can use the app anywhere in the world. GAIA is for really hard core users, Pocket Earth will be useful for anybody. Try it out, see if you agree. https://pocketearth.com/ That said, for routing on normal roads I use a Garmin RV gps. It is way better than the factory nav systems I have seen. Plus the maps are free and updated quarterly. My 2013 Toyota maps are pretty lame, and they cannot be updated without a very expensive trip to the dealer. John Davies Spokane WA1 point


-
Recent Achievements
-


