Leaderboard


Popular Content
Showing content with the highest reputation on 06/07/2023 in all areas
-
We picked up our used but well loved Oliver on Sunday, spending the night at Camp Roadrunner, Mark and Sally’s place in Central Oregon. The Trailer was spotlessly cleaned, and ready for us to take possession. Mark spent all afternoon ensuring that we knew and understood the systems, and care and feeding of the Roadrunner. Thank you Mark and Sally! The following day we started towards Northeast Oregon, spending the night in the Ochoco mountains, making it a short travel day. We’re home at Fort Sagebrush today, thrilled with our Ollie. Next on the agenda is taking it to Oregon DMV to get the title and registration in our name. I do need to add another flat 4 trailer connection to the truck to accommodate the lights on the caboose storage box. We are thrilled!😊
 10 points
 -
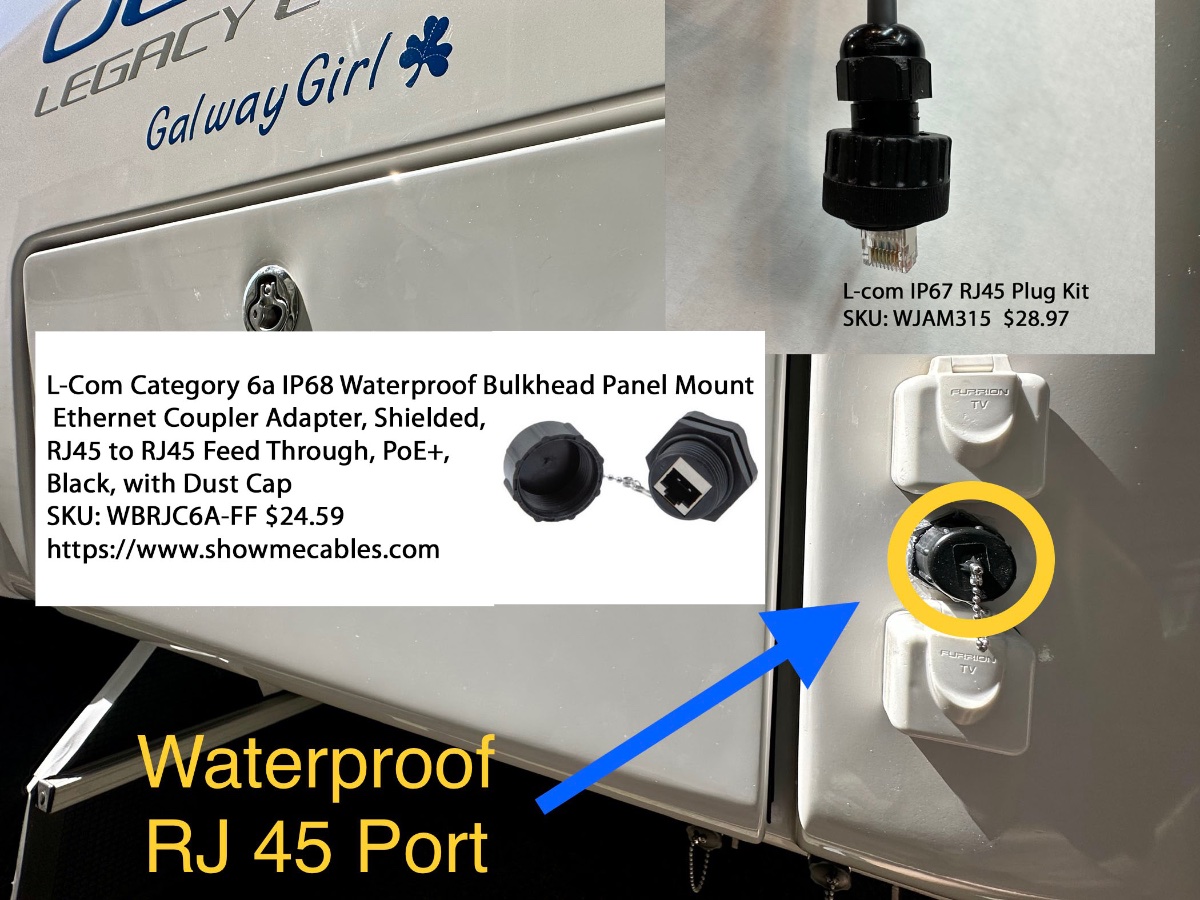
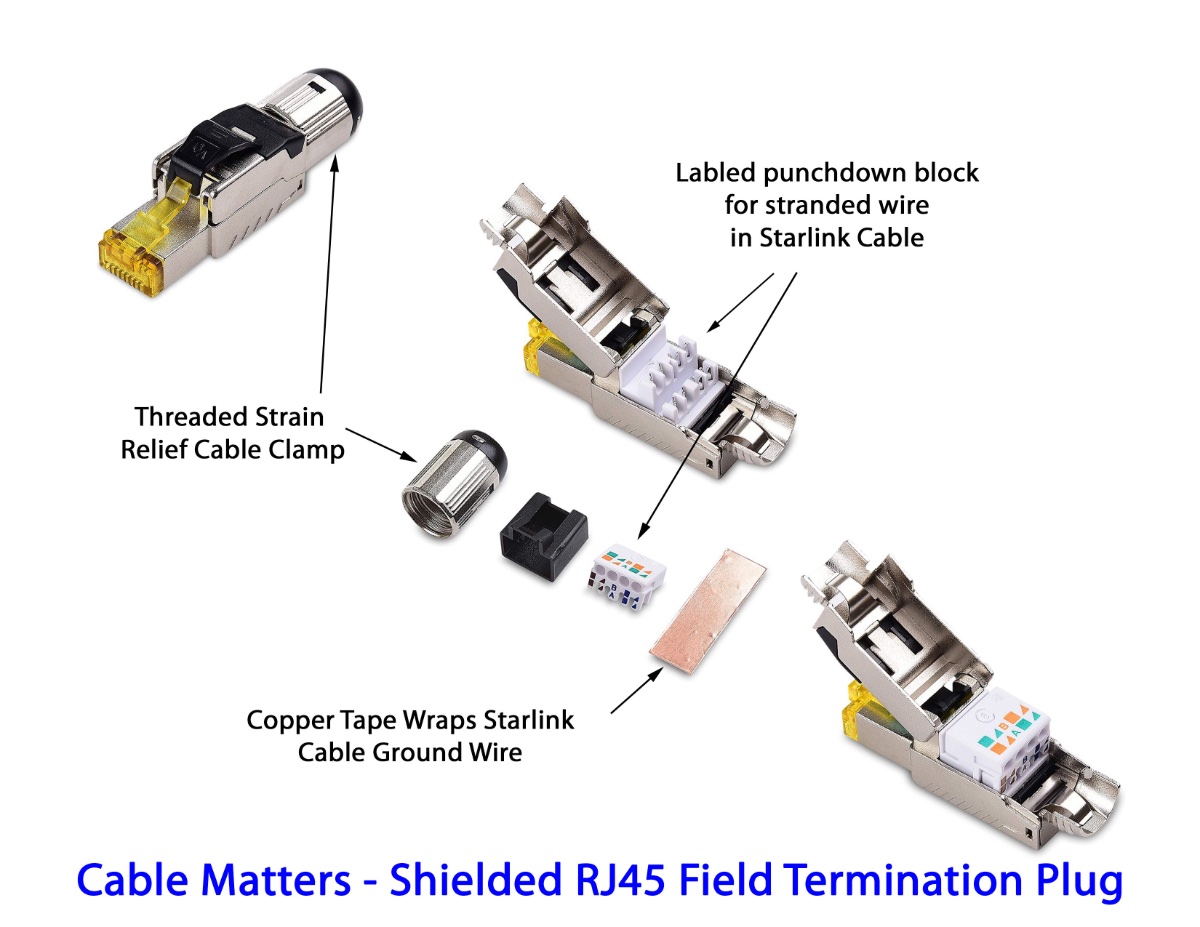
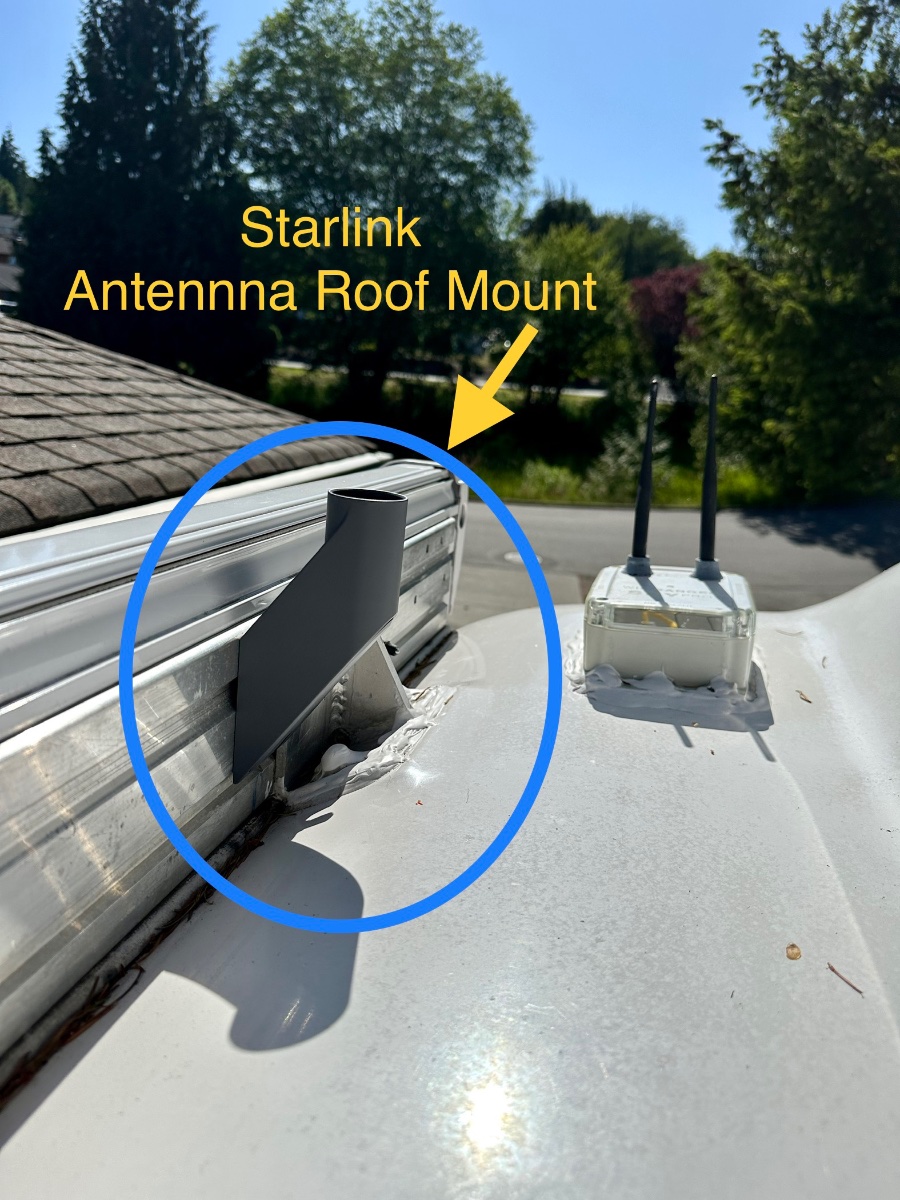
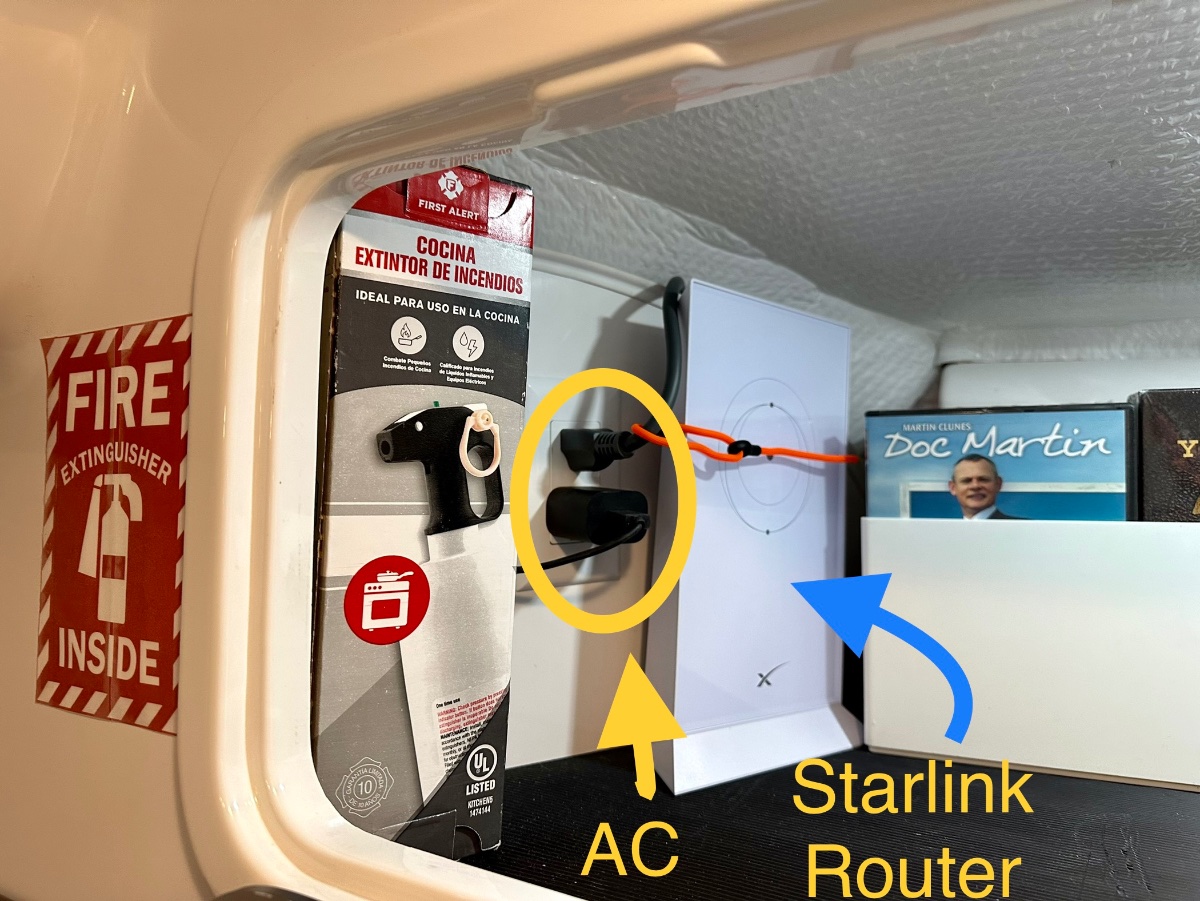
After looking at the forum I found a couple posts on installing Starlink. I decided to add another to the mix. Pre-Installation Starlink Test: In testing the system before a full installation I found that the Starlink Router could be plugged into curb side Oliver outlets and then the router could sit on it's back on top of the tire under the wheel well. This provided 58dB of signal outside the trailer and about 78 dB inside. So if you don't want to hassle with mounting the router, drilling holes etc. you could just find a weatherproof box/cover for the router and leave it outside. (Signal strength and bandwidth drops a bit but not really very much.) Read on if you want to do a more complete installation. 1) Roof Mount: (This is just a way to mount the antenna up high.) I bought the Starlink short roof mount adapter. Our hull 505 had the Dometic Awning, so I could not simply bolt directly to the mounting bolts from the awning brackets as they are at odd angles. I used 1/2" long x 3/8" diameter Self Tapping Bolts. I drilled holes, then drove in the self tappers into the mounting rail making sure to use washer/spacers to keep it from penetrating the back of the awning box. I used blue loctite on those tapped bolts. This mounting position will be perfect in those cases where we have clear sky and want the antenna up high. I'll continue to carry the ground mount for portability uses. I don't plan to drive with the antenna on the roof. 2) Mounting the Router - In the Rear Attic and Running Cable into Basement I mounted the router inside the rear attic cabinet. It's held in place by a simple orange strapping tie that feeds through a hook-eye behind the router. This is a good spot for the Router as it's close to a 110V outlet, and easy to run the cables under and behind the back of the cabinet over to the right side then down to the basement area. To make the cable run to the basement I needed to remove a couple panels: (NOTE: DISCONNECT FROM CURB POWER and make sure Inverters are OFFLINE BEFORE ATTEMPTING) 1) Street side attic panel (2 bolts) tip it down flat to gain access to the street side rear of the cabinet. 2) Basement rear dress panel covering the back the basement. (2 phillips screws). For my installation I ran the cable beside the existing AC drain tube on the street side rear of the trailer. I pushed the cable snake down beside that tube, and then at the bottom in the basement attached and I pulled up a length of pull line from the basement area. I attached the pull line to the end of the Starlink cable (the end that plugs onto the dish) and then pulled the Starlink Cable down into the basement. I tested the Starlink at this point before cutting the cable to get a baseline of speed for comparison after I cut the cable and attached RJ45 network connectors and the thru hull port. After testing I looped up about 3 extra feet of cable in the basement and then cut the cable for installation of the RJ 45 connector that would feed the back side of the thru-hull RJ45 plug. 3) Install new RJ45 male plug on cable in basement: Pro TIP: Use metal field termination plugs for the Starlink cable cut ends if possible/ Trying to use the typical plastic RJ45 connectors is a real hassle as the conductors in the starlink cable which stranded and thicker than normal. I spent well over an hour trying to get my shielded/plastic RJ45's to work. I finally said let's try a real metal coupler. In the picture below is the plug I bought from "Cable Matters" on Amazon $6 ea. They feature a clearly labeled punch down block, a threaded strain relief clamp and copper foil tape that is used to wrap the ground (or drain) wire around the cable shaft where it enters the connector. This is the connector I used on the inside of the trailer connecting the Router to the Thru Hull plug. 4) Install the Thru Hull Connector and connector for Cable to Dish I purchased an L-Com IP68 (waterproof) through hull connector specifically designed for shielded PoE Connections. I also purchased a matching L-Com connector kit for the cut end of the Starlink cable. This matching plug screws onto the outside connector for a waterproof sealed connection. I placed the connector mid line between the two existing connectors leaving both the Cable and Satellite COAX's in place. The new bulkhead coupler fits exactly between those two connectors, but I would suggest shifting UP 3/16" from center to allow the bottom door to fully open. (It's the 'satellite coax' in my case which I never use.) Hope this is useful to any new Starlink owners. More detail is in our blog here: Adding Starlink to Galway Girl Craig Hull 505 - Galway Girl
6 points
-
If the smoke forecast gets so bad that should we would ever need to place filters in our windows, our traveling adventure is temporarily over. We are likely headed back to Blueberry Hill and parking the Oliver until it clears and blows over. Just me. Patriot🇺🇸4 points
-
Question #1 - kind of yes in that while the basics are known, it depends on the person that is doing the explaining of the basics to denote the importance of each part. Question #2 - as with most things in life it is highly likely that "only drought-like conditions" is not the "only" cause. Full explanations of the causes of wildfires are more than a Forum such as this can cover. Certainly there are "root" factors that will tend to be most common for the majority of these fires - global warming (perhaps a debate in and of itself), drought, forest mis-management, water mis-management, arson, etc.. But, the interaction of these factors plus a bunch more can go on and on. For more info - just Google it. Bill4 points
-
I "think" when I checked with our Costco, they would mount if I brought in the tires and rims, but they can't accomodate the trailer. That was five years ago, or so, and I haven't checked back since. I've had that "bring in the rims and we'll mount your new tires thing" done at Sam's and Walmart, for the boat trailer and other small trailers . We take the Oliver to a local independent tire shop. He sells good tires, does a nice job at a fair price. Quality ST tires have come a long way. We have run on ST tires for 150k miles, and 16 seasons. No reason for us to change upnow, imo.4 points
-
Good afternoon, I wanted to post some pictures of my closet renovation (thanks to coach and jojo.) I have been getting our Ollie ready for a big trip out West this July. Going to the Rally was awesome and really gave us some great ideas! Matt and I loved meeting all of you. the drinking glass holder is going in the left overhead cabinet above the table.
3 points
-
Take the fan off, clean the two screens and check for corrosion on the power receptacle connector. If it is corroded, email NH and they will send you at no cost TWO fan assemblies with housings and with the much better potting (waterproof material). If you have an air compressor, you can use a blow gun with a needle type ball inflator. Insert the needle into the hose joint and blow, it should pop right off. I haven’t heard of this before, please add info and a picture to this thread. https://olivertraveltrailers.com/forums/topic/1978-nature039s-head-composting-toilet-installation-in-an-oliver-big-thread/ John Davies Spokane WA
3 points
-
After careful adjustment, the next step is to determine the total power going to the four brake magnets. I can think of two ways to do this: 1. IF YOU HAVE SOLAR: Disconnect from TV. Shut off everything in the trailer and note the residual amp draw. Go to the street side bed area and locate the power connection for the emergency activation of the brakes. Using your solar control system, check and record the amp draw causes by parasitic draws (Smoke and propane detectors, stereo, tv etc. Record this amp draw. Should be very low. Pull the break-away and check your solar system control and determine the amp draw. Subtract the two numbers and you will have the power going to your brakes "locked up". It should be right around 12 amps. Reinsert the break away pin to conserve power and avoid overhheating the magnets. If the increased power draw is less than about 12 amps, it likely will be around 3, 6 or 9 amps thereby indicating you have one or more magnets with a problem. If it is near 12 amps, the issue is not with the trailer end of the system. I would then take it to a trailer brake pro, not a RV shop. 2. If you don't have solar, than I would connect Ollie to your TV and having a partner to activate the brakes: Measure the total amperage going to the brakes. Requires a clamp on amp meter. Should read between 11 and 12 amps. This will tell you if one or more of your brakes are not getting the power it needs to fully activate. If low: Test the power going to each side. Should be half of the above (around 6 amps) and equal side to side. If not: Test each of the four lines going into the brake assembly to figure out which one is the problem. If found, determine if it is: Broken/corroded connection, bad ground to that magnet, or a bad magnet. As above, knowing the amp draw at various places allow you to figure out where the problem is. If none of the above works.... get professional help before replacing your controller. Ask prospective shops if they have a plug in testers that connects up to your 7-pin at the TV bumper to diagnose TV brake controller and wiring. Finding a bad connection there would be a lot cheaper than a new controller installation. Hope this helps. GJ3 points
-
The thing I notice the most between the low setting and the night mode is the compressor seems to start softer and run at a lower level. The low rumble sound of the compressor is much reduced in the night mode. Honestly once the camper is cooled to a comfortable level, the night mode seems to be very effective at maintaining the temperature and humidity level we like throughout the day. Also based on my experimenting with my generator and running the AC, the Truma on night mode never draws more than 1800 watts on the Gen's onboard meter and seems to have very little serge when the compressor cycles on. I really like these design characteristics. I am a little jealous of the those who have switched from the Dometic unit as I have nothing to compare to. Oh the dilemma of only knowing luxury! 😆3 points
-
Brian - three bolts, all with their own washers and nuts. I drilled up through the fiberglass, then through the bottom of the box. I had the box clamped to the tongue. The hardware is stainless steel with neoprene washers on the aluminum. Mike2 points
-
That is irritating, has anyone asked for a wiring diagram? If both left and right light wires are run to the switch, you could simply disconnect and secure the left side wire. The light wouldn’t ever function, but if you never use that side, it wouldn’t matter. If they are wired in series (just one wire at the switch) then you would have to get creative. Or live with the situation. I never use my street side light anyway…. and I have independent control. John Davies Spokane WA2 points
-
Thank you all for your help. I will keep my Truma appointment due to the things you have said. Once I have used it for a while, I will post a review.2 points
-
Ah those industrious Carolina Wrens strike again! 😄 Congrats on your new Truma, you’re gonna love it. I gave some thought about screening the holes. The Truma base is molded or formed with a robust tough black styrofoam material likely for weight reduction. Not saying you can’t mod a screen as anything is possible. There are multiple air intakes and it would be an ambitious undertaking to screen all areas in my observation. With the Truma under a 2 year factory warranty I opted not to modify the air intake holes with any mesh screening that could possibly reduce air intake and potentially void the warranty. The custom cover is easy on and easy off. Patriot🇺🇸
2 points
-
@MobileJoy We have only had our Truma Aventa since our install on May 8th. We have had to use it approximately 2 weeks during our last 18 day trip. So far we are extremely happy with the quiet super cooling performance. We only run ours on low most of the time it really works well cooling the Ollie down fast. We opted for the CP plus panel which incorporates our Truma AquaGo, which is a back up to the remote. So far it’s a great set up. It was also important to us that Oliver did the install and supports the Truma product line. Another thought is you could possibly wait until the Dometic Freshjet has owner/user time in the field reviews and becomes a “proven” product or go with the already proven Truma. A bird in the hand is worth two in the bush. All the best in your decision. Patriot🇺🇸2 points
-
So you can turn the porch lights on or off on both the curb and street side, but you can’t turn on one side or the other individually. Now we have to figure out how turn the lights on either side or both sides together. I’ll see if I can find a wiring diagram for a 2022 LE2 and work on a plan. Off the top of my head I would say that a SPDT switch would be a simple solution if you would be satisfied with the ability to operate one side at a time. Mossey2 points
-
Once you get it apart I would clean the fitting and inside the hose end really well with rubbing alcohol, let it dry and then spray both with a little shot of silicone spray lubricant, the kind that dries, to make them come apart easily in the future. This lubricant will not cause the material to swell and seize up like petroleum lubricants will do.2 points
-
We are at the Oliver rally in ME and we found out that the older Oliver’s had two switches for the porch lights. On for the street side and one for the curbside lights. The newer Oliver’s not sure on the 2023s have only one switch for both sides. It is annoying not only to us but it’s a common complaint of most people that you can’t shut off the street side porch lights. When in a camp ground most of the time all they are good for is to blind your neighbor.2 points
-
or maybe using a heat gun on low, but I'd be real apprehensive about using the heat gun2 points
-
Congratulations! Hope to see you out on the road - Mike2 points
-
Hi @SeaDawg and @Geronimo John The units in the US are either 13500 or 15000 btu If you go to the beginning of this thread, there are spec sheets that I posted which I got from my tech.2 points
-
Years ago, in the Black Hills, we witnessed the start of a fire in a farmer's field. The first fire engine was just arriving. An hour or two later, on our way back to the campground, the same fire was spreading fast into the hills. There was an air tanker working the fire. The next morning, ash was falling in our campground and we bugged out. For us in the Northeast, this is a slightly alarming anomaly. Can't imagine living where this has become commonplace.2 points
-
Our personal experience: Several of us installed maceration pumps in our Elites, back in the day. Paul rebuilt the first one when it failed (🫣) , installed a new one a year later, and we removed it a year later. Out of the two pumps, I think we got three, maybe three and a half years. Then, we gave it up and went back to a good quality black hose. Probably will work better for you, since you're not bouncing it down the road in the small space of the bumper compartment. Flush it out well with fresh water, when finished, obviously. Btw, not had a problem dumping in our septic, over the years. And, many/most rv dumps are either septic or pump-outs vaults. The maceration pump is very helpful, though, if the tank is a great distance from parking pad. That was the original reason for our pump. When we built the new house, we put a dump port by the parking pad.2 points
-
Exactly right on! MAX's "hard rule" on towing anything - DON'T SKIMP ON RUNNING GEAR. Period.2 points
-
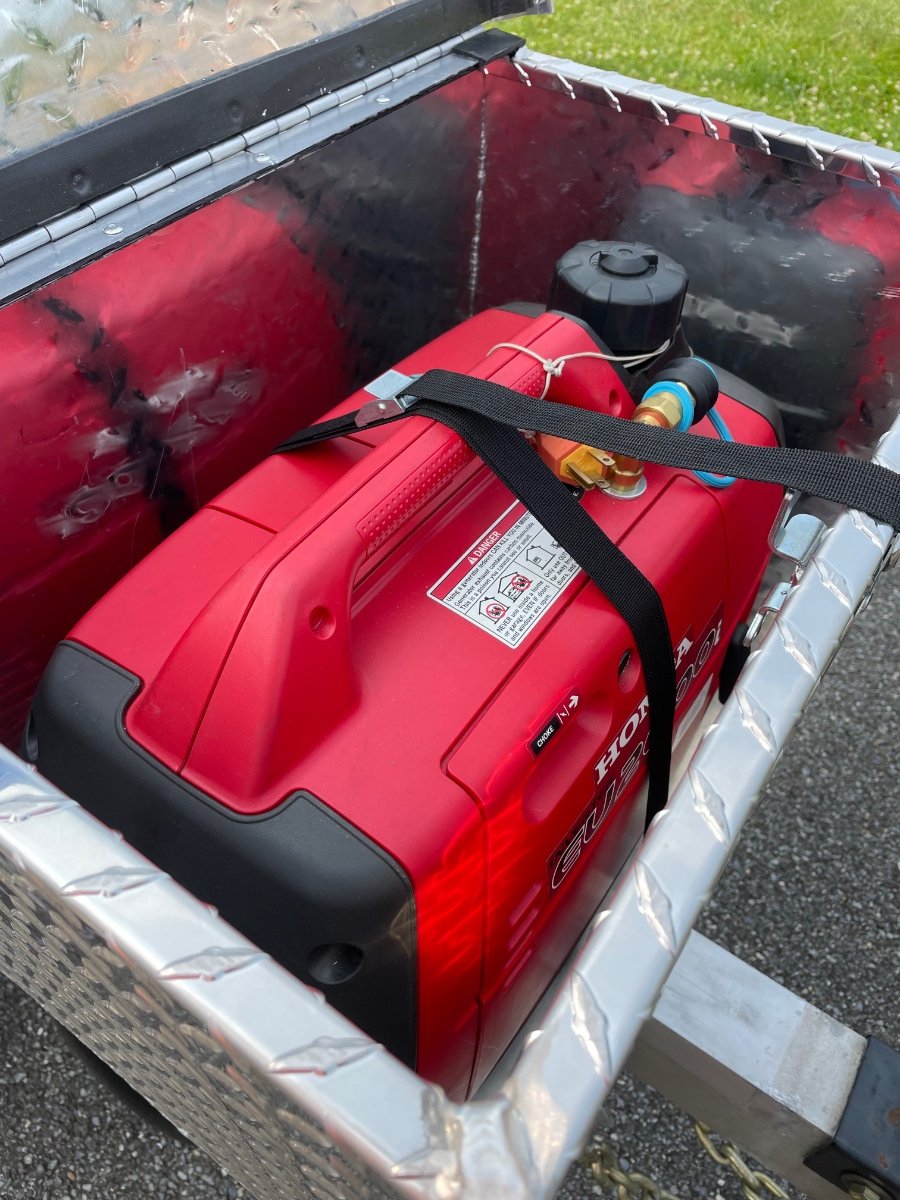
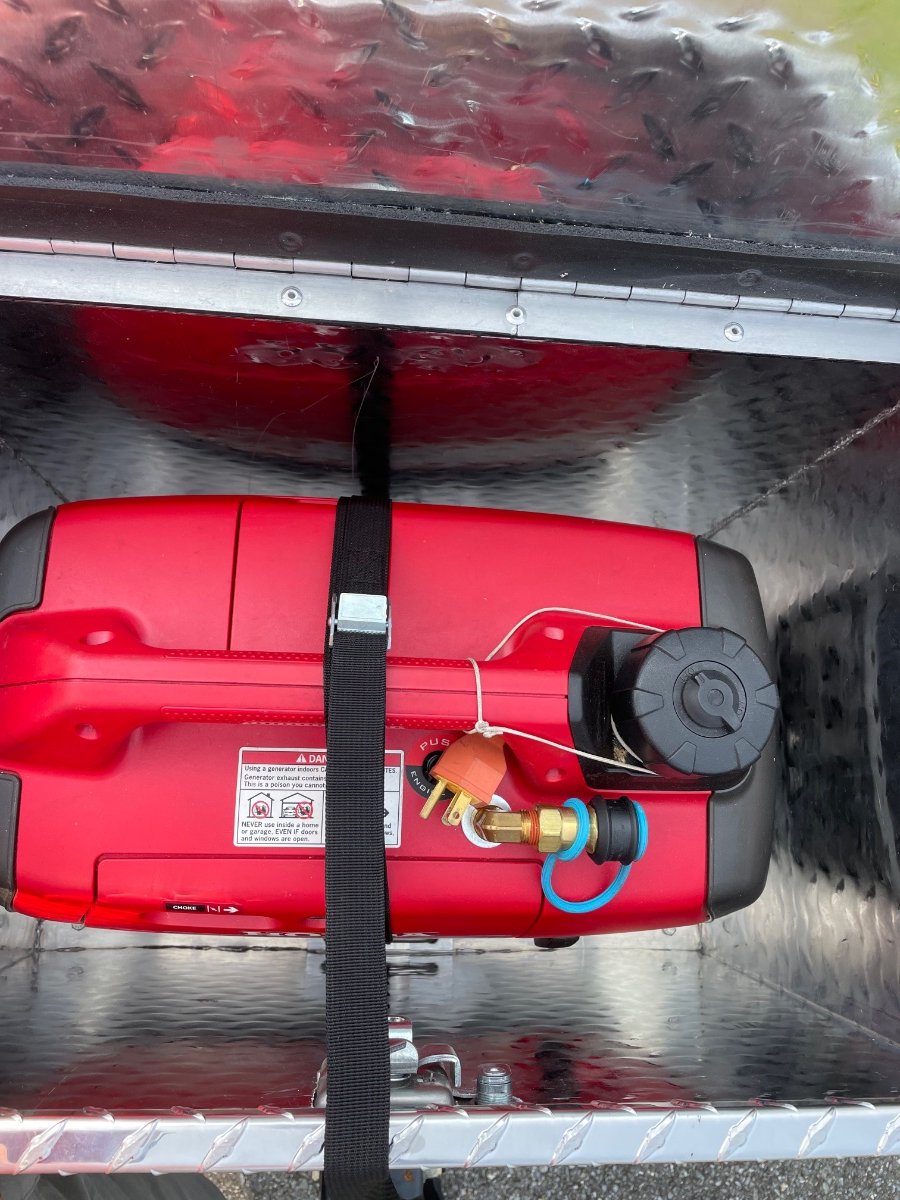
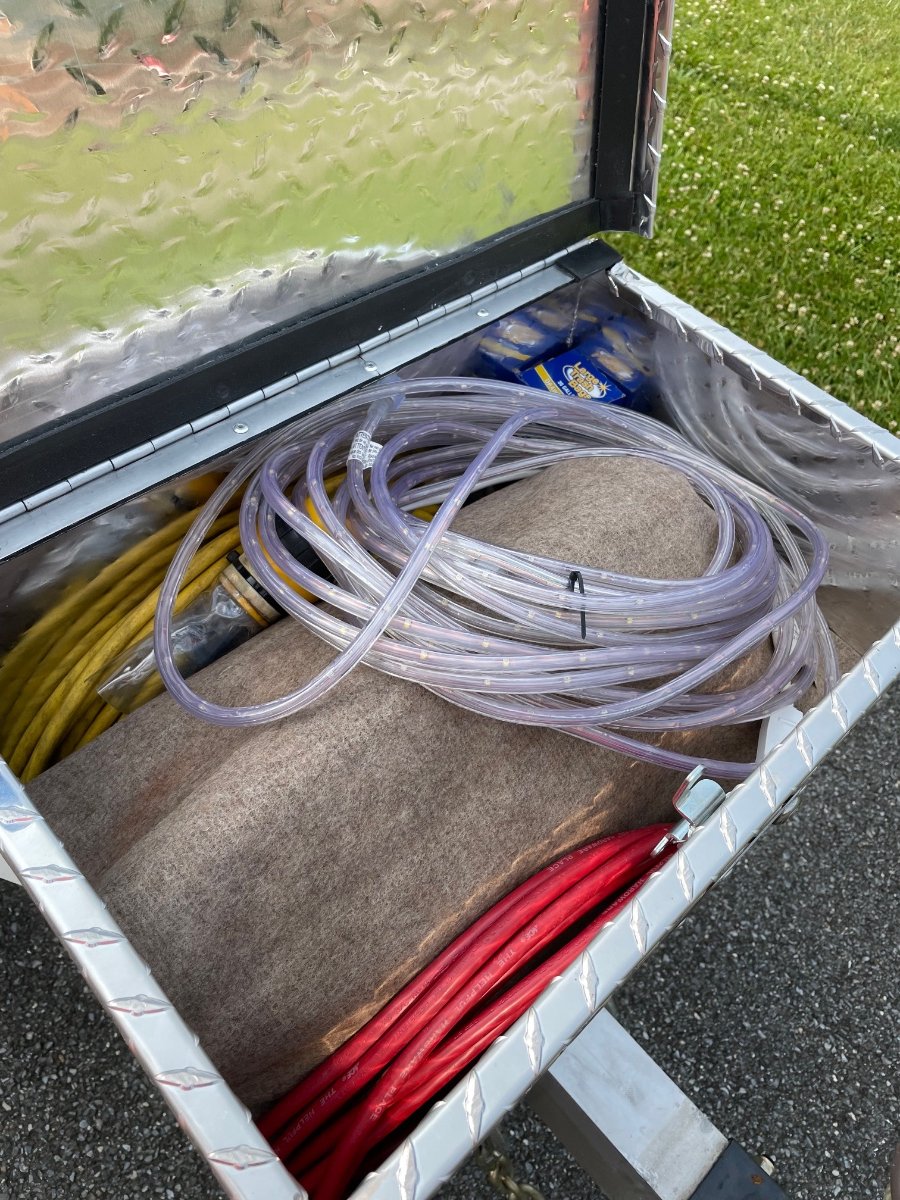
The trip that we just returned from last night was a month long road test to make sure that the box was weatherproof before I put the generator in. So as requested, I put the generator in the box this morning. The nylon strap that KSH supplied seems more than sufficient to hold the generator solidly in place. The original strap anchors that were welded inside the box may not have been sufficiently strong enough to hold the generator. I removed them because they were in the way of using the original Oliver supplied basket anchoring u bolts. If I were to buy this box again, I’d ask that the welded in strap anchors not be used. There is enough space for my extension cords and rope lights (pack rat deterrent) as well. I draped a piece of indoor/outdoor carpet over the generator to prevent any damage from the cords, etc. I’m very pleased with the results! The extra plus is that the generator box is about six inches narrower (front to back) and eight inches total narrower (side to side). This gives me a little tighter turning radius and a little less worry while backing up. I’m also saving about 15-18 pounds on the tongue. I would have liked to use a “store bought” triangular shaped aluminum tongue box but I never could find one of reasonable size that my generator could fit into.
2 points
-
Hi @MobileJoy I won’t have the fresh jet installed for several weeks. So I can’t say either way what would be best. I live in California, so traveling to Tennessee, for the truma is not feasible. That’s why I was looking at the Houghton. The fresh jet is a new option that I hadn’t known about. But it looks good on paper. I guess I’m going to be the test case! Once it is installed, I can do a video on it and run a decibel meter if that would be helpful for folks. But right now it’s all speculation on my part. it sounds like both truma and the fresh jet have strong reviews so either one is probably a good choice. But we will see 🙂2 points
-
Don't be nervous. Given the size of the Oliver, there are numerous places that one can camp. Yes, if you plan to be in and around popular places at the height of the "busy" season, you will want to make arrangements well ahead of time. But, for all "normal" camping there are still plenty of places to kick back and relax. Bill2 points
-
OK, so the tech said drainage lines up. I have ordered the unit so it will be ready when they get to me. So excited!!2 points
-
Hi all, I spoke with the tech regarding the Dometic Fresh Jet and here is what I know so far: -The quoted price does NOT include the interior duct feature - but you don't need it because you can use your existing one -There is no need to cut the fiberglass because it uses the same footprint. -There is no remote or heat pump on the US option at this time. -He *thinks* the drainage will be the same, but I asked him to confirm this with the company rep. He was supposed to call me back on this Friday but I did not hear back, so I have another call in today. I will update when I know. I am still in their queue for a couple more weeks, but I am planning to go with the Fresh Jet and use the existing thermostat. It will save me a lot of money and be the simplest change. I will continue to keep folks posted. I did tell him there are a number of interested people wanting to see how this goes. Thanks! Mary2 points
-
Yes, I guess there are trade offs for sure. We are really enjoying the Truma and how quickly it will cool our Ollie down. I ordered a custom made cover for the Truma as I could not find one anywhere on line. It’s due in mid week. I will post up a pic for fitment when it arrives. The design of the rear vents on the Truma are 💯 bird nest condo move in friendly. 😄 Here in Western NC we need to keep it covered when ever we are not traveling. Patriot🇺🇸
2 points
-
We have found the dehumidify mode works really well! And we also have learned that running our Truma on low it gets colder than a meat locker. We prefer cooler sleeping temps. I don’t see us ever running it in high.🥶 With the (IR function) of the remote it does require it to be directly pointed at the sensor for sure. We learned from the Truma tech at the rally that it’s important to touch the send button on the remote when you touch a different setting. Ahhh the learning curves of the new Truma! The more you learn the better it gets! One thing for sure, it keeps the interior very cool at a very quiet sound decibel. Sleep mode is even quieter if that’s possible. Patriot🇺🇸2 points
-
That's what I was initially looking at, based on the reputation. But I got to looking at reviews on various sites, and found that they fail just as fast as the cheap pumps. I figured I can get three times the life from three $70 pumps as one $220 pump.1 point
-
Welcome, and congrats. Looks great with your truck, too!1 point
-
Neat install! The Truma rep at the Rally mentioned to us that we needed to point the IR remote directly at the little round flashing IR receiver on the Truma for it to receive the signal. So the Truma IR remote does not need to be pointed directly at the unit? Good stuff! @Ollie-Haus1 point
-
Regarding the remote controls for both the Truma AC and the Fantastic Fan, I wanted to mount the remote holders in a location that was easy to reach, especially while working in the kitchen, that you can operate while in the wall mount without removing them. This location works perfectly every time and is easily reached while working at the sink/stove. I mounted them with two sided tape.
1 point
-
It might pull off from the other end easier, clip all the wire ties to leave the wire in the bathroom then pull the toilet with the hose still attached and deal with it outside which will give you more room to work... that may make it easier to get off too1 point
-
RE: ST vs LT: Here in SW Idaho, both Les Schwab and Commercial Tire are happy to sell LT tires for the trailer. For what it's worth, the guy at a local Commercial Tire store (a regional chain that serves SW Idaho) mentioned that ST tires stand up better to scrubbing when making a tight turn with the trailer. He said that LT tires, by virtue of stiffer sidewalls, suffer more wear from scrubbing. Most of the wear that I observe on our OEM tires appear to be on the outside of the tread, consistent with scrubbing (I do not believe it is from under-inflation). That said, when needed I will likely replace our tires with LTs, for the reasons that John mentioned earlier, and for peace of mind when highway driving under high-temperature conditions).1 point
-
I had a similar switch on a very old second hand ragged out BMW that failed. It was backward. Being a poor college kid, I found a switch the same size that was not. Mounted it upside down and used some black shoe polish to "Erase" the upside down on/off lettering. Cost me 50 cents. I was shocked at the price as for 50 cents I could buy almost two gallons of leaded gas!1 point
-
Mountainoliver, I may not be the only member who is curious about your light. It has a Victorian vibe. 😀 Can you elaborate? And I really like that stout cross support. Excellent! John Davies Spokane WA
1 point
-
@Steve Morris Steve - not that I know of. I told the Truma rep, Dave, at the rally what I had found with respect to using the remote AND the CP Plus and he confirmed, you can only set the de-humidification mode using the remote. I have since put in a ticket with Truma to potentially add this feature to the CP Plus. Some there were surprised to learn you could not do this but they confirmed it, called me back and said they would open a ticket. As I explained to them, we go to the added expense of getting all Truma components and so we could use them from ONE panel and find that all features are not available. I also told them their remote was NOT user friendly, had a poor display and eats batteries for breakfast. They did not disagree with my statements. What I normally do, is set my a/c via the CP Plus then go to the remote, slide down the cover and hit the "Raindrop" button. You have to ensure that you see both the "Snowflake" and the "Raindrop" on the screen. You also have to be pointed directly at the A/C and watch the green light. If you have doubts that it "took" the command, there is a re-transmit button on the remote that will send the setting again (it looks like a wifi signal). Hope this helps! Cheers, Brian1 point
-
Looks good Steve - I don't think it will be common to run across dump stations underwater. This looks like a good home solution but it would have to pack neatly into a kit to consider it cleared for travel. Nice work and nice write up. Brian1 point
-
@Roadlotus, does this price include the new interior unit/Adu, as well? I usually see Dometic units priced separately, since many can be used with a ducted system. If so, that's a great price. (The Houghton we bought included both units in the quoted price.) @Patriot, I'm curious about the fiberglass work necessary for your Truma upgrade. It seems as though all the rooftop units and vents these days are sized for the standard 14 x 14 opening. What did Oliver have to do for the Truma? When we installed our Houghton, we had to file and square up a jagged corner or two, but that was it.1 point
-
Living in SW Montana summer fires have become a major issue here and it's not always the fires within our state. As often as not it has been fires from as far away as CA, OR, WA, NV & ID. Typically the prevailing winds are southwest to northeast this time of year but it can also change to dead west but this past week or so we had AQI's of over 150 on most days due to the fires in Canada especially Alberta. Unusual jet stream for this time of the year. Our valley is surrounded by mountains yet we could not see any of them due to the smoke, well maybe the Bridgers were slightly detectable on a few days in the mornings. And it's only May! This was a first in almost half a century of living here. Every single county within the state was on air quality alerts, and this is the 4th largest state just behind CA in size. Had planned on going out for a short night or two this past week but what was the point? Nothing to see out there. So yes fires do change when and where we camp. The sad part is there seems to be no end in sight looking into the distant future. It is worth noting today was much better with AQI of mid 40's with all mountain ranges visible. How long this clear spell last is anyone's guess. In conclusion I really feel for the folks who travel long distances to see the beauty of the west only to be met with smoke filled skies and no hope of even seeing these majestic landscapes. Safe travels.1 point
-
Just about finished installing the cargo box we ordered from Amazon. FYI: Used 6 each, 1 1/4" self-tapping screws with lock washers over a 1/8" x 2" x 18" aluminum band across the back (port/stbd) to distribute the load. Used a shorter 8" piece (fore/aft) in the center. A single screw with a fender washer was used for the forward-most position over the A-frame where a spacer was used under the box. We're using the box to secure items such as OTT 30A Furrion power cord & adapters, surge protector, fresh water hose/filter, plastic "Leggo" blocks, wheel chocks, torque wrench, Magnus' cable lanyard, and there's room left over. Thanks to @John E Davies, @ScubaRx, @Ollie-Haus and others for their suggestions and recommendations... We also think this idea will be a game changer for better access to items needed for set-up. Beats the "deep knee squat - bending over drill" to pull boxes out of the rear storage compartment! HA! IMG_7354.HEIC IMG_7353.HEIC
1 point
-
I posted some pictures years ago when I installed my box but I can’t find the thread. Part of my box is on the fiberglass and part is over the aluminum tongue. I used a piece of a workout mat (square puzzle like pieces) on top of the aluminum to make the mounting surface even. Then, I simply drilled three holes through the box and through the fiberglass and used some stainless steel bolts to secure the box. I have a piece of yoga mat on the bottom of the box to cover the bolt heads. I’ll try to find some pictures. Here’s a shot of the bolts, the placement was determined by the configuration of the tongue underneath. A blurry shot from underneath the tongue. It doesn’t look like much but it has been very stable over the last 5 years or so.
1 point
-
I've had this box on the tongue of my utility trailer for about 8 years. It's actually a very nice box. Gas strut still works and the lock works fine if you need it. I purchased mine at Tractor Supply. They usually have them in stock at their stores.1 point
-
@Brian and Brandelyne As promised, I did check the air flow and the air flow is equal on both sides. Patriot🇺🇸1 point
-
@Brian and Brandelyne I will be checking air flow in our new Truma after the install next week while at Oliver and will post up if I learn anything helpful. Thanks for the info. Patriot🇺🇸1 point
-
I had a fellow Oliver owner give me plugs that he cut from a piece of fiberglass he had. They fit perfectly into the ventilation holes from the inside. Then, I cut a section from a yoga mat and used contact cement to stick it to the inside of the battery compartment door. You could use any moisture resistant material to cut plugs out of. Mike1 point
-
Don’t try it without one of these. Read my posts in this thread
1 point
-
If this is the Dura kitchen faucet / sprayer that I believe it is, the replacement is about $20 with free amazon prime shipping/free returns. If it's the Scandvik model we have in the older trailers, the replacement head for their similar model is over $40, direct from Scandvik. The Oliver website lists 1 year warranty for the faucet, but Dura shows "limited lifetime warranty" on their catalog that I downloaded. It's always worth asking, imo. There are several listings on Amazon, with dimensions, so you should be able to verify that it's the right one. Their listing says it fits all Dura pullouts. https://www.amazon.com/Dura-Faucet-DF-RK850-CP-Designer-Replacement/dp/B009Y05M8M/ref=pd_lpo_263_t_2/138-7547063-1507704?_encoding=UTF8&pd_rd_i=B009Y05M8M&pd_rd_r=76c0b342-1688-4245-a196-7f1203fb3d09&pd_rd_w=W9QrM&pd_rd_wg=P3Gbp&pf_rd_p=7b36d496-f366-4631-94d3-61b87b52511b&pf_rd_r=P6GTRJNQF23D5KTP45F3&psc=1&refRID=P6GTRJNQF23D5KTP45F3 Sherry
1 point


-
Recent Achievements
-


")


")


")


