Leaderboard


Popular Content
Showing content with the highest reputation on 06/28/2023 in all areas
-
What's to not trust? A green 18 years old kid entrusted with a lug wrench - what could go wrong?😆 Bill4 points
-
One of the most beautiful, yet sad tunes ever written. Ashokan Farewell, the haunting melody in Ken Burns’ The Civil War.3 points
-
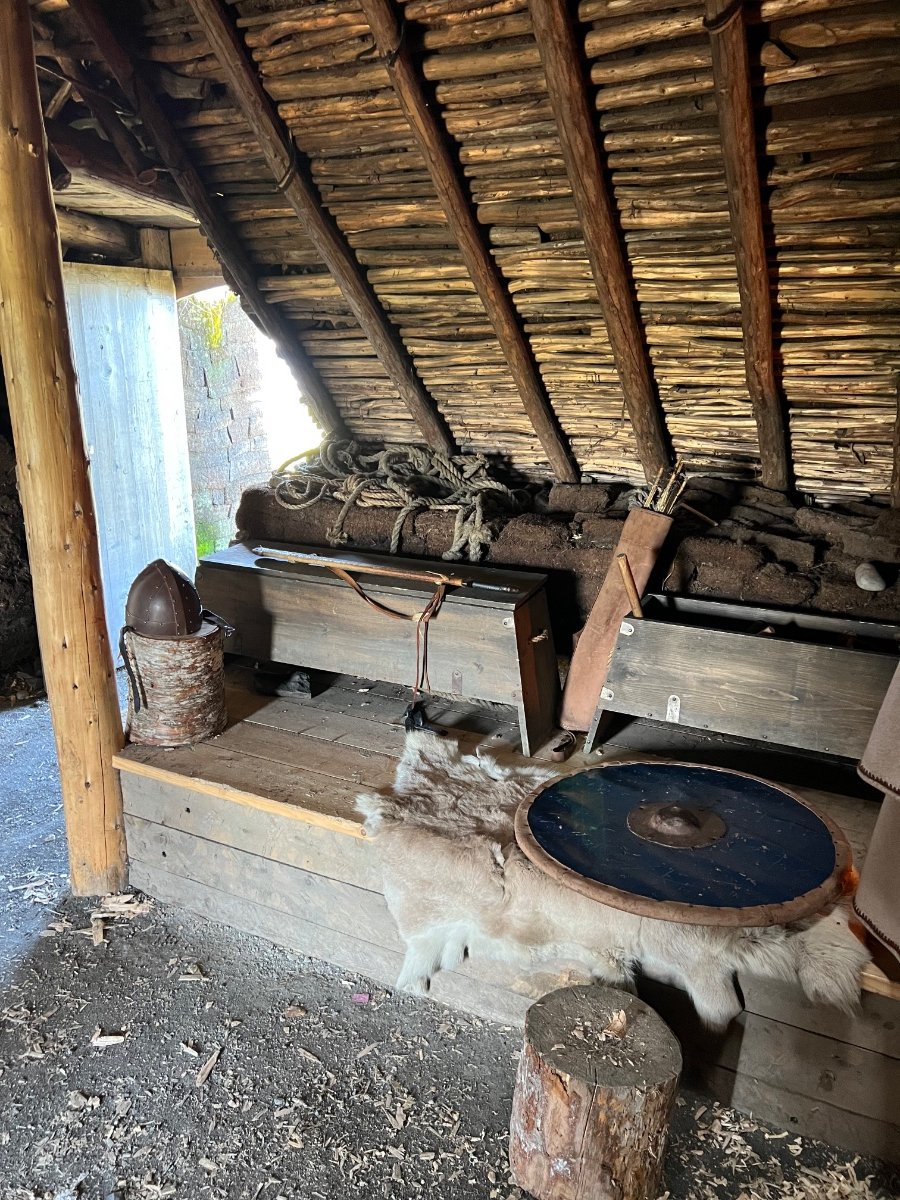
Did your "Inner Viking" come out when you were there? The docents told me I could try on some of the items in that room. Soooooo. . .
 3 points
 -
True, no matter what brand or single/dual/tri fuel genset you buy. Plus, most of the old school "contactor " type generators have a total harmonic distortion so high that it can kill electronics and circuit boards. Something to check on any cheaper brand you look into. Under 5 per cent is most like clean household power supply. A friend of mine lost power for a day awhile ago, and I loaned him my Honda to run his fridge, on an extension cord, so he wouldn't lose his food. Now he wants a bigger generator for backup. He saw a cheap big open frame contractor type genset at a big box store, and sent me a photo. My response: Not only would his neighbors hate him, because of the noise, but THD was up to 25 per cent (of course not listed in specifications. ) He's going to keep looking, naturally. Most inverter gensets, even many of the cheap ones, like my spare Westinghouse, have decent decibel ratings, and decent thd ratings. If they don't, give a pass.3 points
-
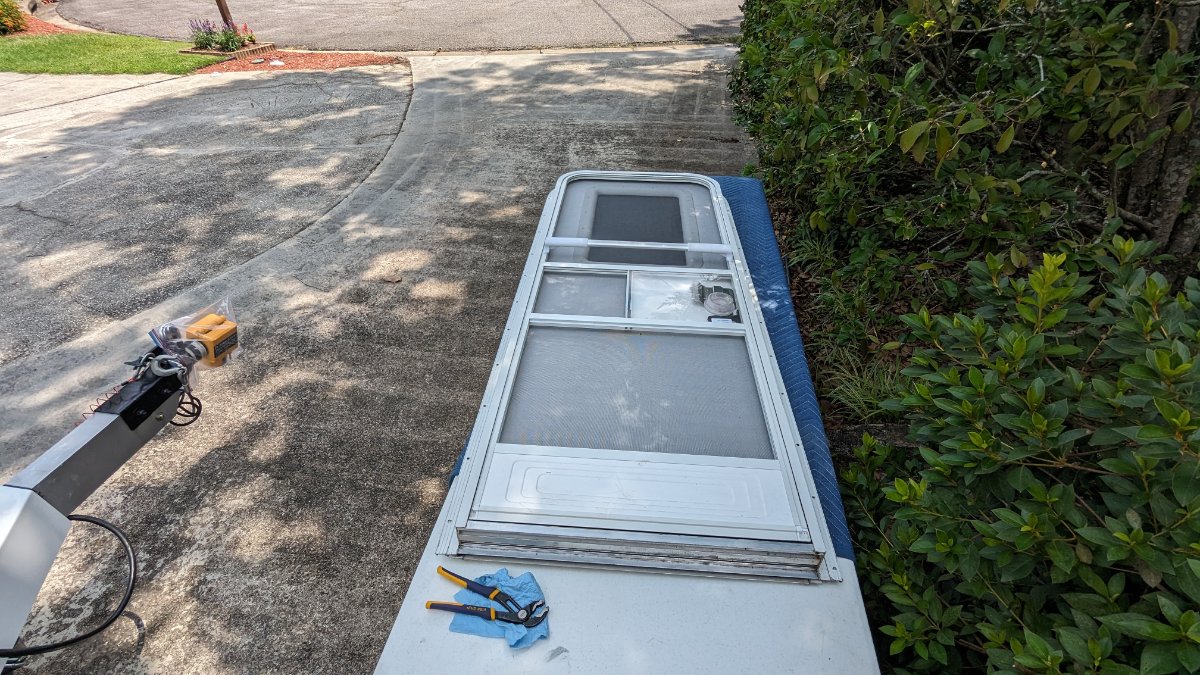
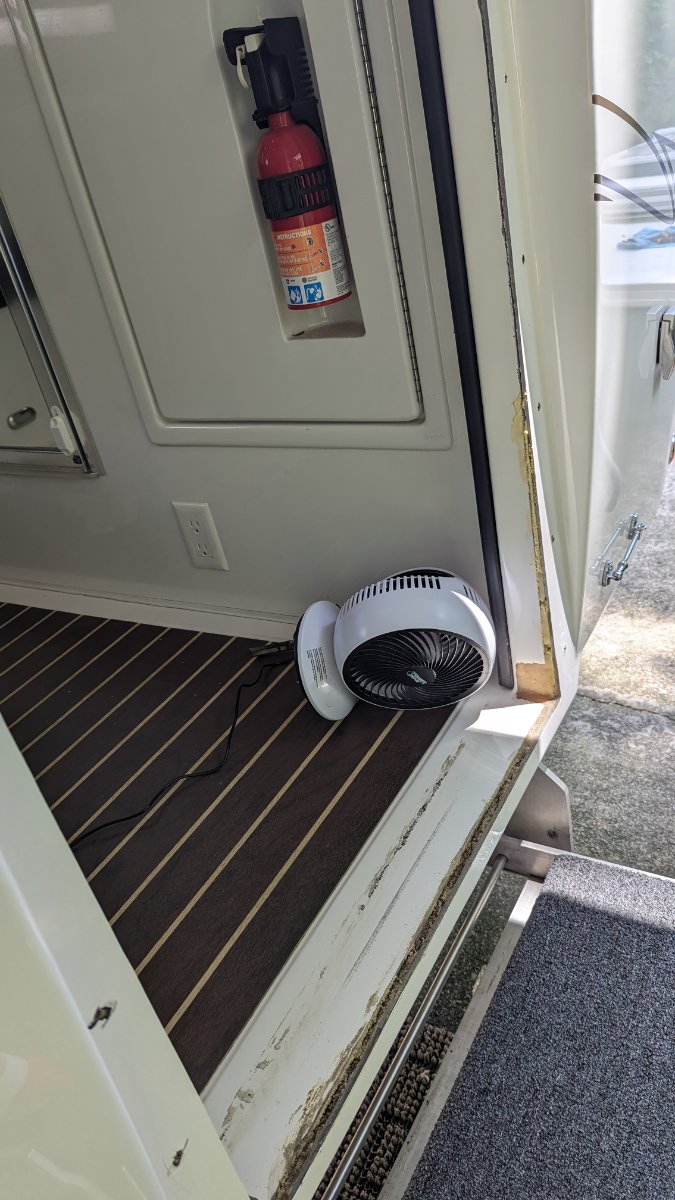
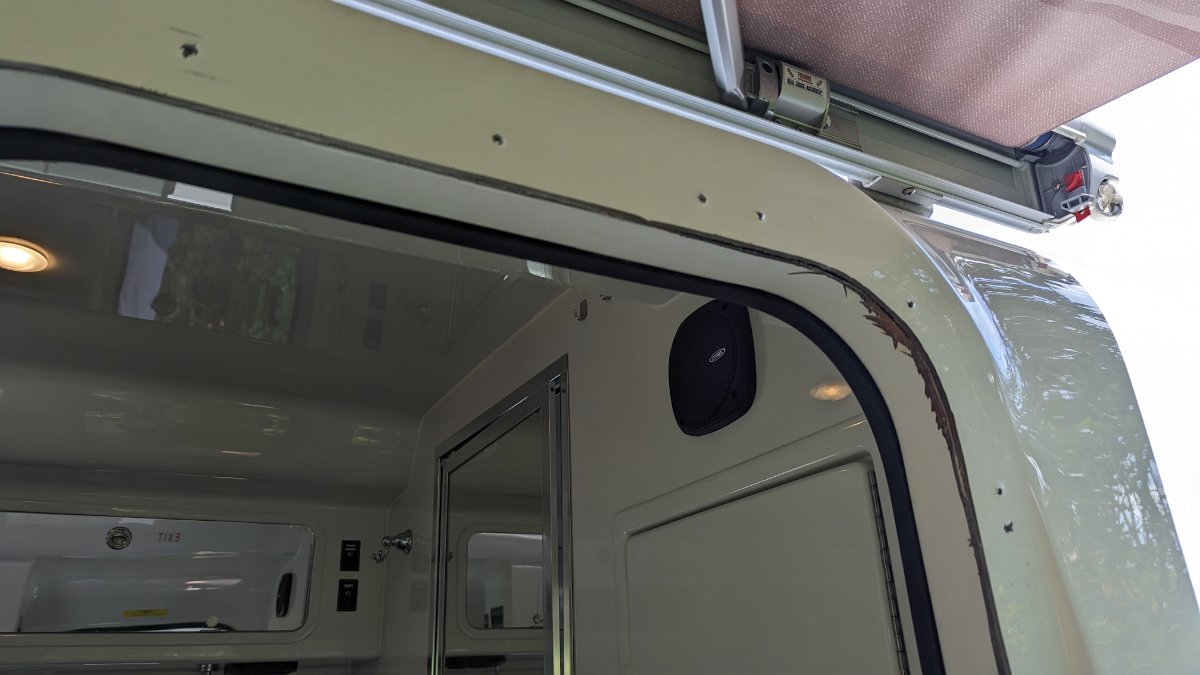
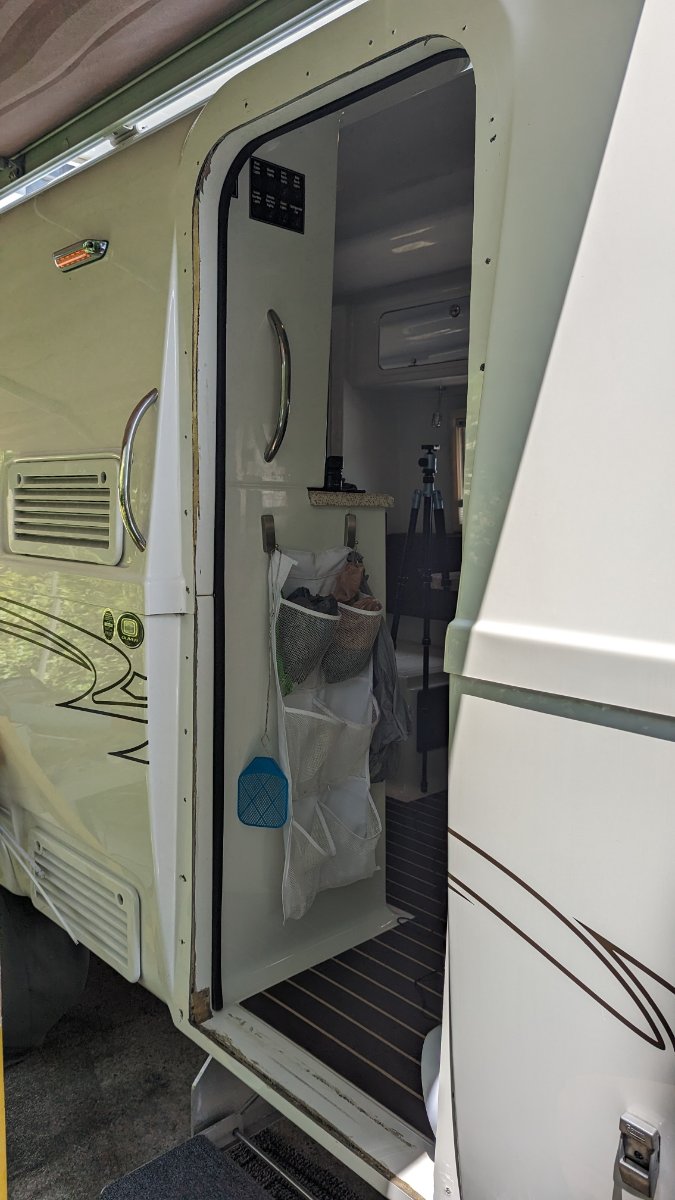
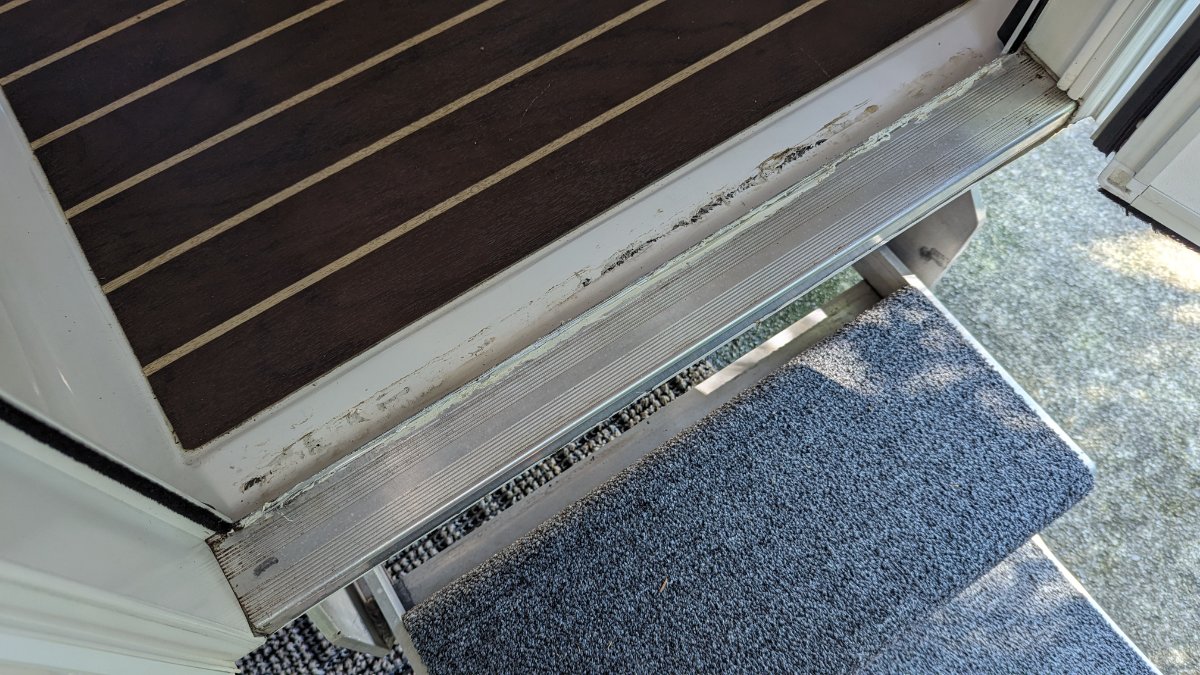
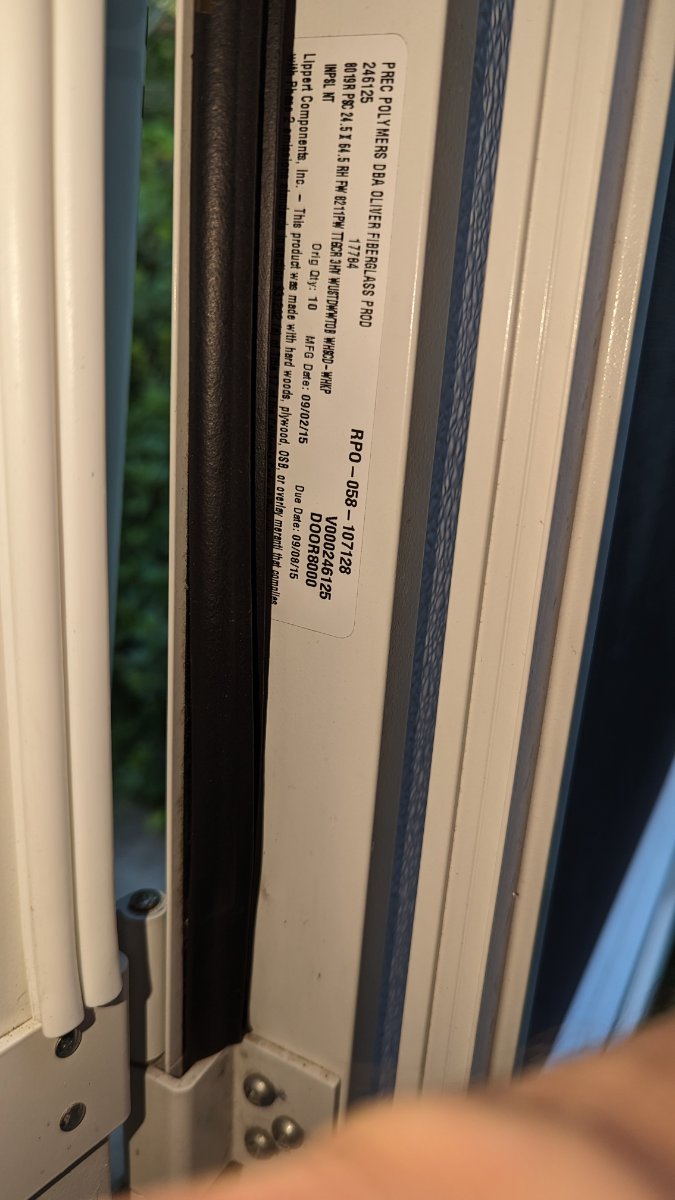
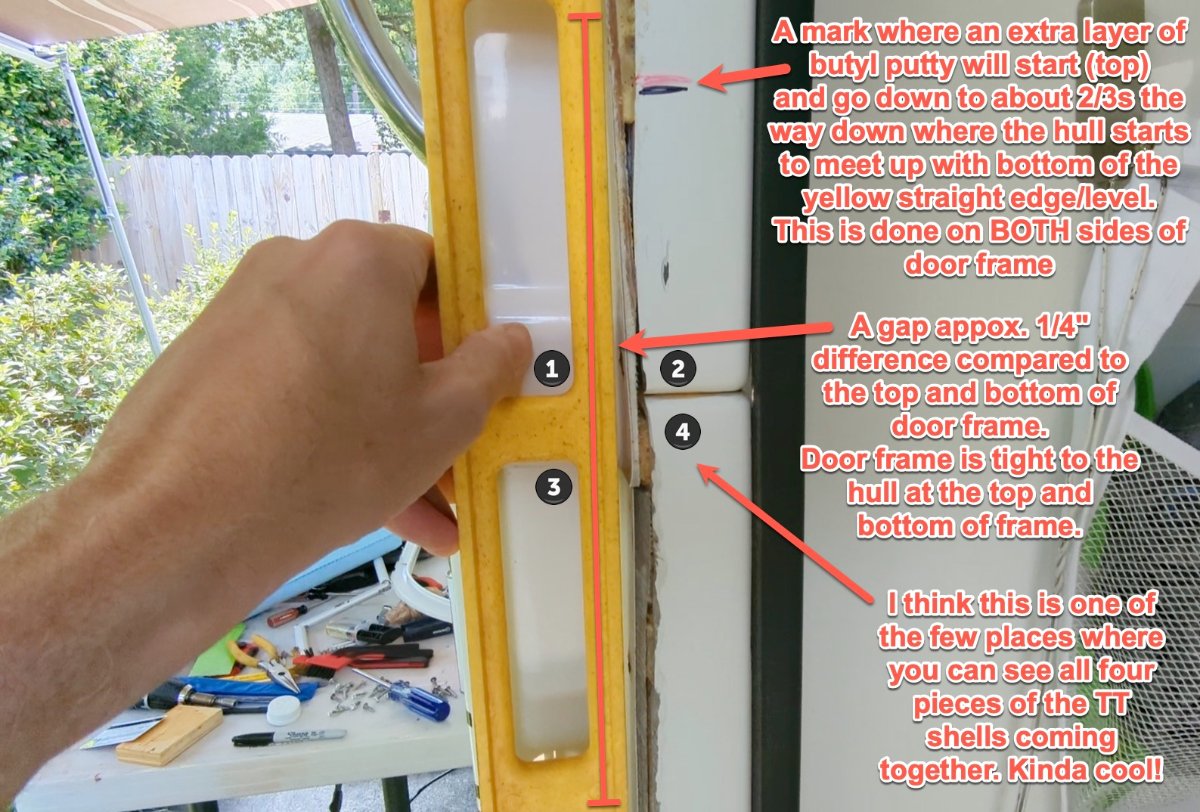
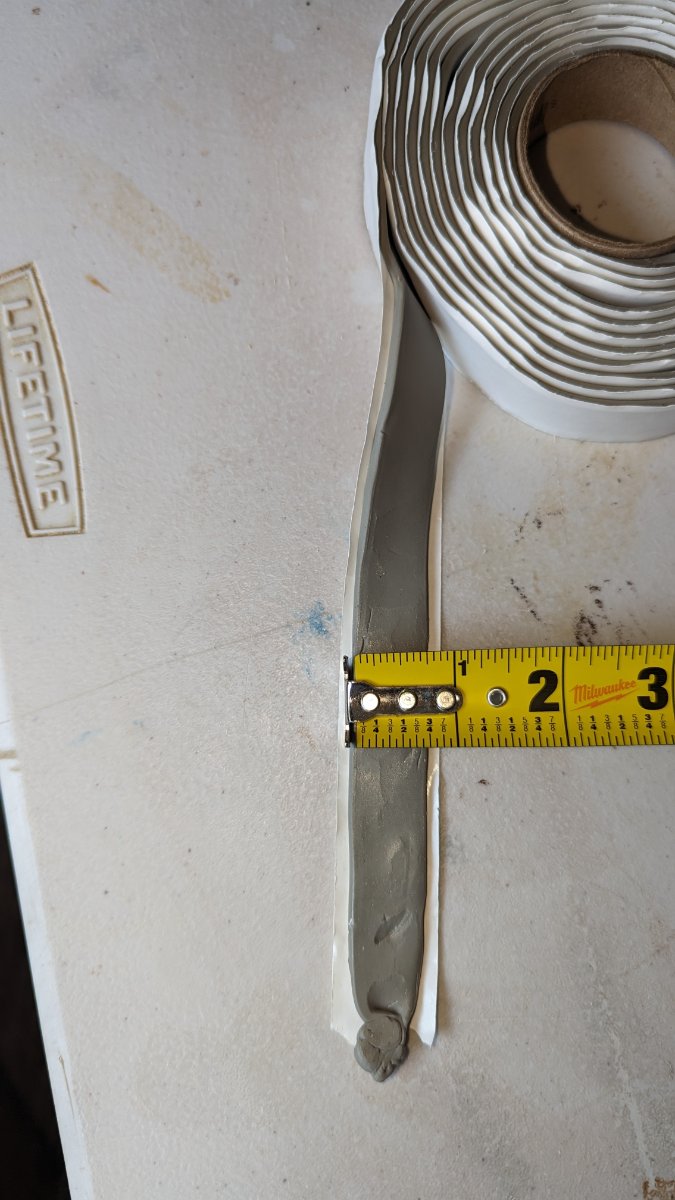
Well, after a year or more of using towels to soak up rain water, I finally got the nerve up to take off the walk-in Lippert door from the trailer. The sealant putty behind the door frame, where the screws go in, had failed and leaked bad. This was an easy job! It only took me three hours and most of that time was prep-work and clean-up of old butyl tape (putty). I have a bunch of video clips to put together to make a YouTube video of the process, but I'm finding it difficult to organize everything. I need to re-shoot a better intro. I'm still learning. Anyways, the door & frame came off WAY TOO EASY. It appears that someone before me attempted to repair the leaks (left & right sides), but they did not cleaned off all the original butyl sealant/putty. Don't be lazy. Clean everything like new. Also, I used two layers of butyl tape in the middle area of the door frame, on the left and right sides of the door frame, due to the distance between the yellow straight edge (see picture) and the curved pieces of hull and where they meet up. I used a plastic scraper to take off the heaviest of old butyl tape from the hull and the door frame itself. I then used 3M adhesive removal and a rag to get the surfaces perfectly clean. (Wear gloves) Everything went back together quick and easy, no issues at all. I waited 18 hours before performing a leak test, to ensure all putty had warmed up in the sun and "squished" around as needed. I've done a heavy, heavy leak test and it's gone through one heavy, blowing rain storm and another lighter rain since completion, all without a single drop inside. YAY ME! You don't know how happy I was to see that I did it better than the last guy. The original putty(s) looked really bad and it did look like someone attempted to address the issue before I purchased the trailer. What a crappy job they did. Shaking my head. Also, in those middle sections of the hull, where I doubled up the putty, I noticed that old putty was not even remotely "squished" in by the door frame, indicating there was air gabs between the putty and the frame, or the hull. THIS WAS NOT A DIFFICULT JOB. I should have done it sooner! Many of the screw holes were too large for the screws used. Really, there were about 10 of the 23 screws which could have been removed by hand or simply pulled straight out of the holes. I Epoxied the worst of the holes and re-drilled. I also added a handful of new self-tapping screws to ensure the door frame snugged up tight to the trailer where needed (not in the middle sections of the left & right door frame). Remember, the door frame will not really "bend" towards the hull due to the door frame itself being so stout and with right-angles, hence the need for doubling up the putty in the middle, where the hull was too far way from door frame's edge, where the screw holes are located. As some of you know already, this door, I think, is custom made for Oliver, as my door did say Lippert, but the sticker essentially said, made for Oliver, mine was from a lot of 10 doors. I looked on the Lippert web site and I did not find the same dimensions of doors as Oliver uses, or I'm measuring wrong. The fan in the attached picture is where I was drying up the spray foam between the floor and the outer hull. Oliver used foam as a filler, likely to reduce movement, but my foam was soaking wet with rain water, so it sat and dried while I worked on everything else. Again, if your door leaks, but is not damaged and does not need replacing, this is a super easy job, and likely if you did need a new door and might be able to have it shipped from Oliver, it would still be easy. I say that because someone on Facebook just mentioned their door got damaged in a wind storm recently. This is a one-person job too, unless someone wants to help clean up old putty from the hull or door. That would save a lot of time.
2 points
-
What size Butyl Tape did you use? Great post. Thank you for taking the time to do so. GJ2 points
-
I never trust the tire shops. I re-torque the lug nuts after everytime they do tires work. I also recheck pressures. I have had lugs stripped out from over torque. I have lost a custom lug nuts at $18 a piece because they didn't even torque them. Over inflation on my TV and TT tires are the norm. Most times they inflate the cars just fine.2 points
-
Steve, I just check the rules in the rewards brochure. It says that to be eligible the showing has to be arranged by Oliver and both parties must confirm with Oliver. I did what you did, thinking that would be my second showing, no luck. Here are the rules, in case you don't have them.
2 points
-
Yes we have 15” Goodyear Endurance on our 2023.2 points
-
As several above owners have hinted, Champion has many generators and the one you want is their inverter generator. Their hammer mill older technology will get your head on a pole at most boondock sites and RV parks. GJ2 points
-
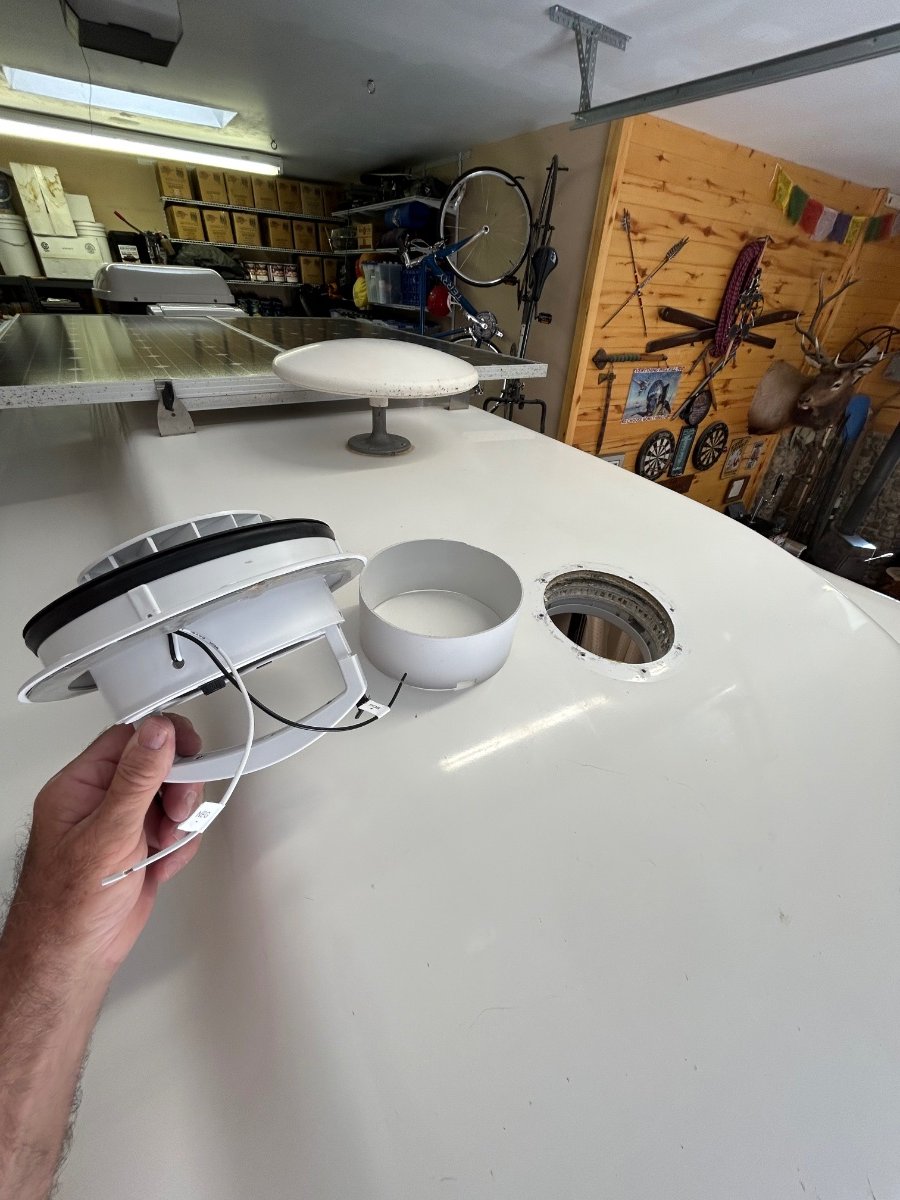
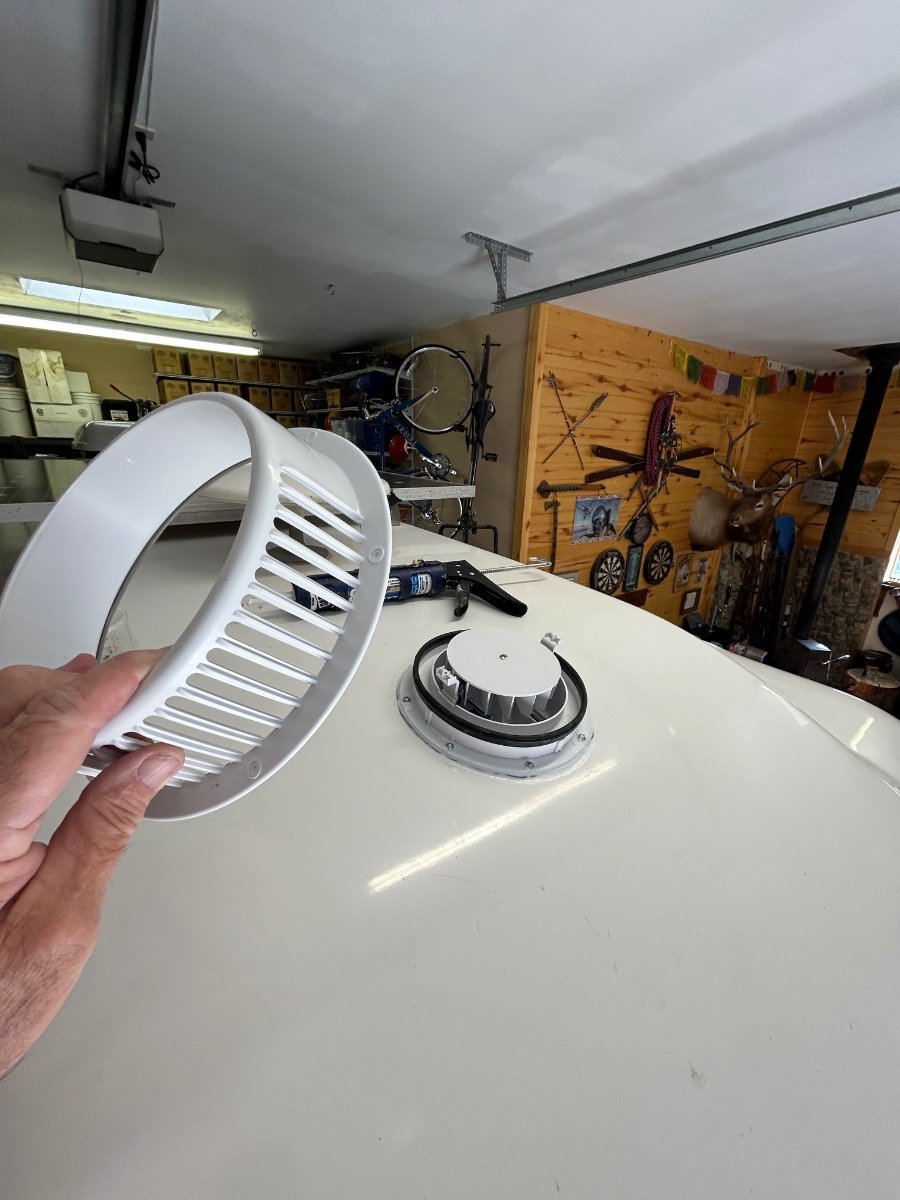
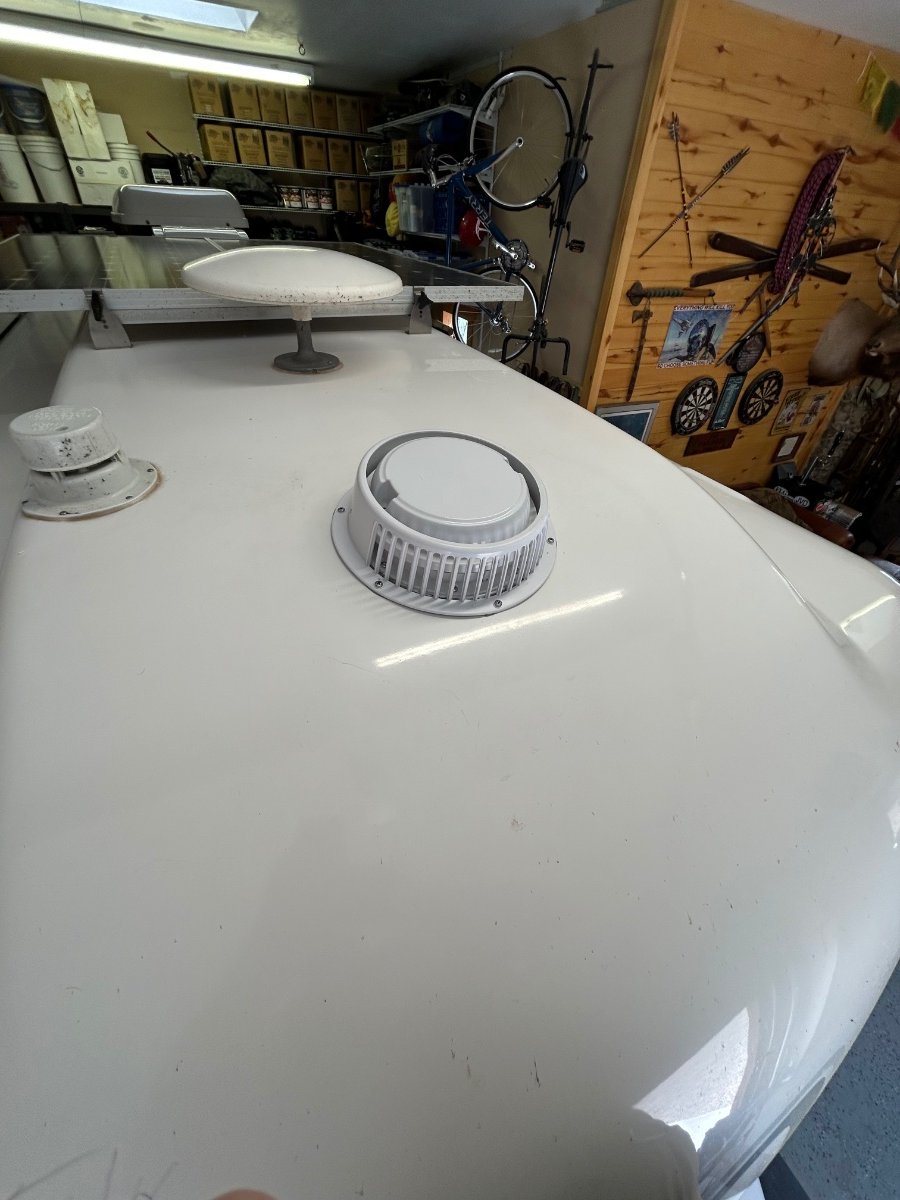
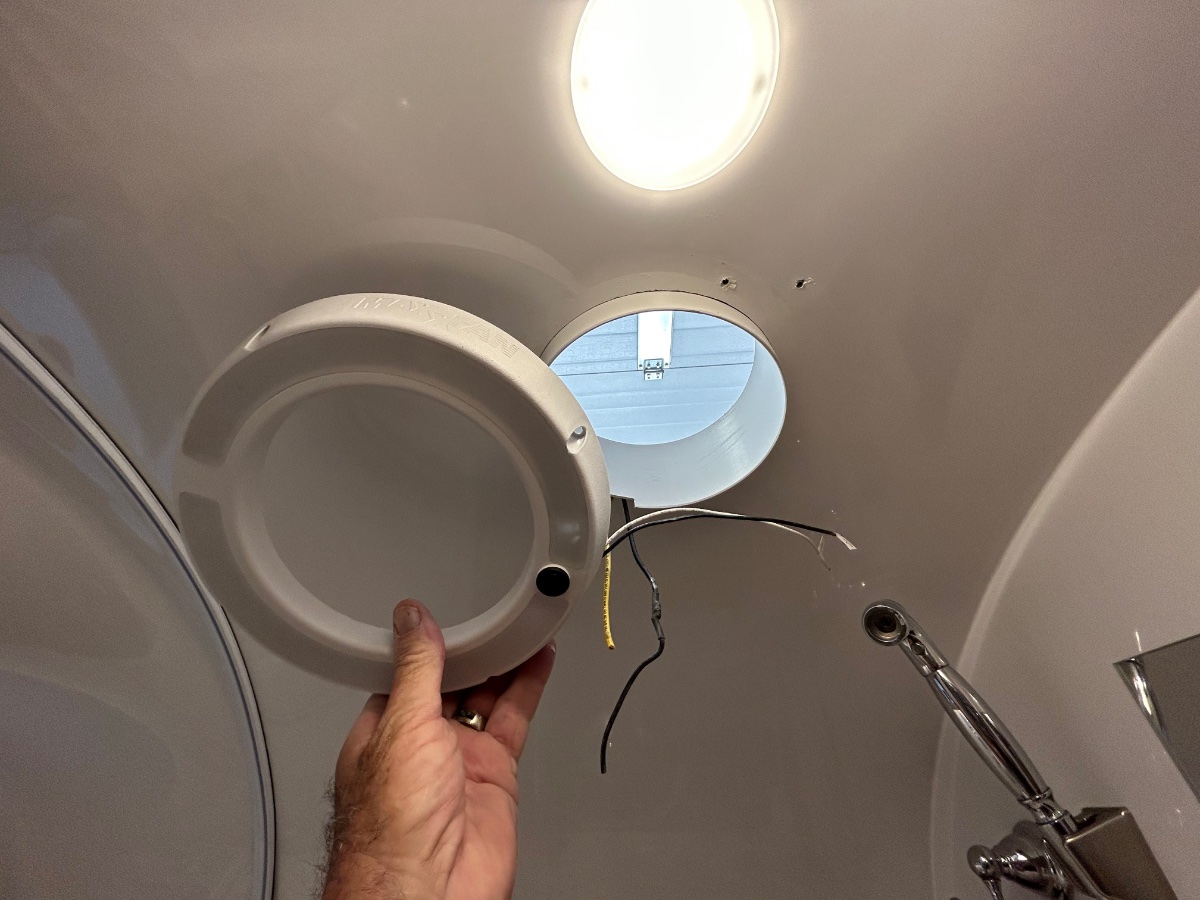
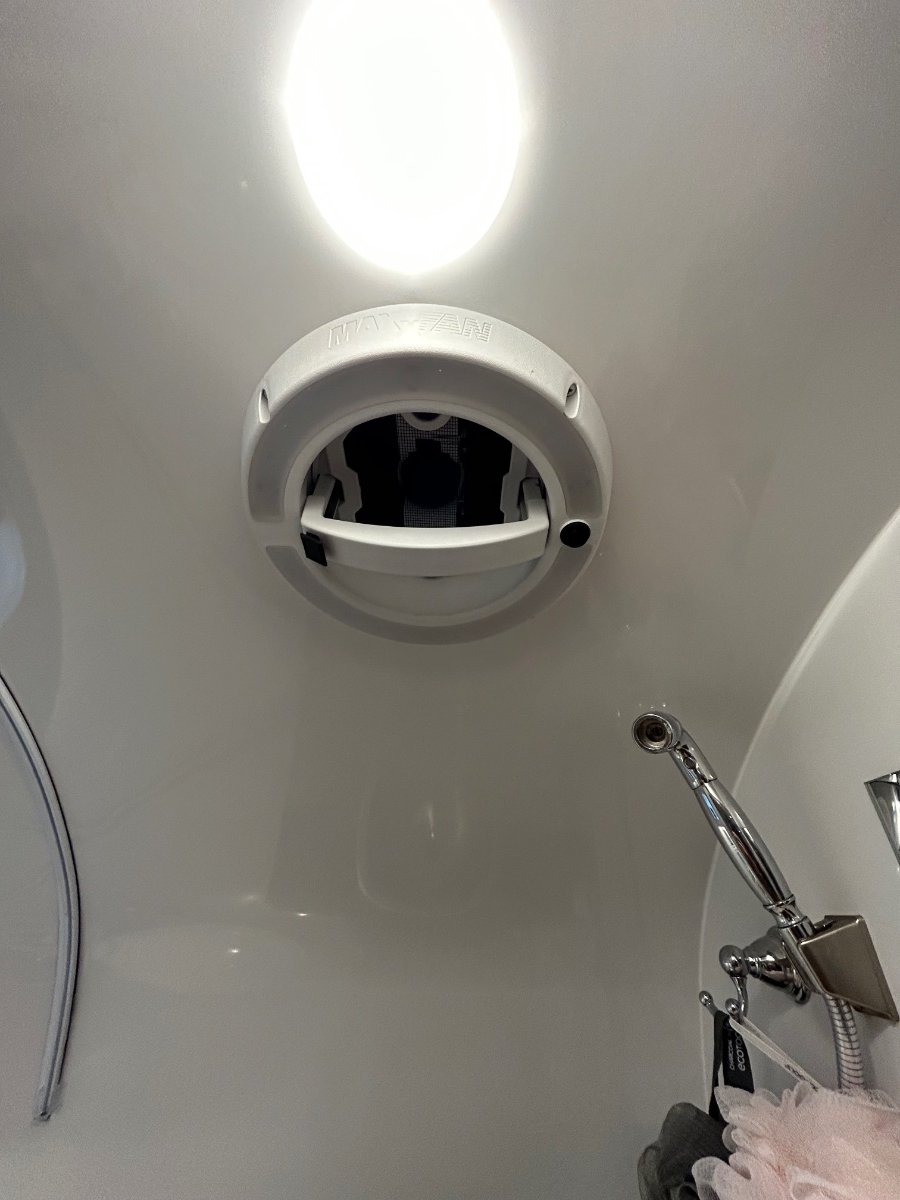
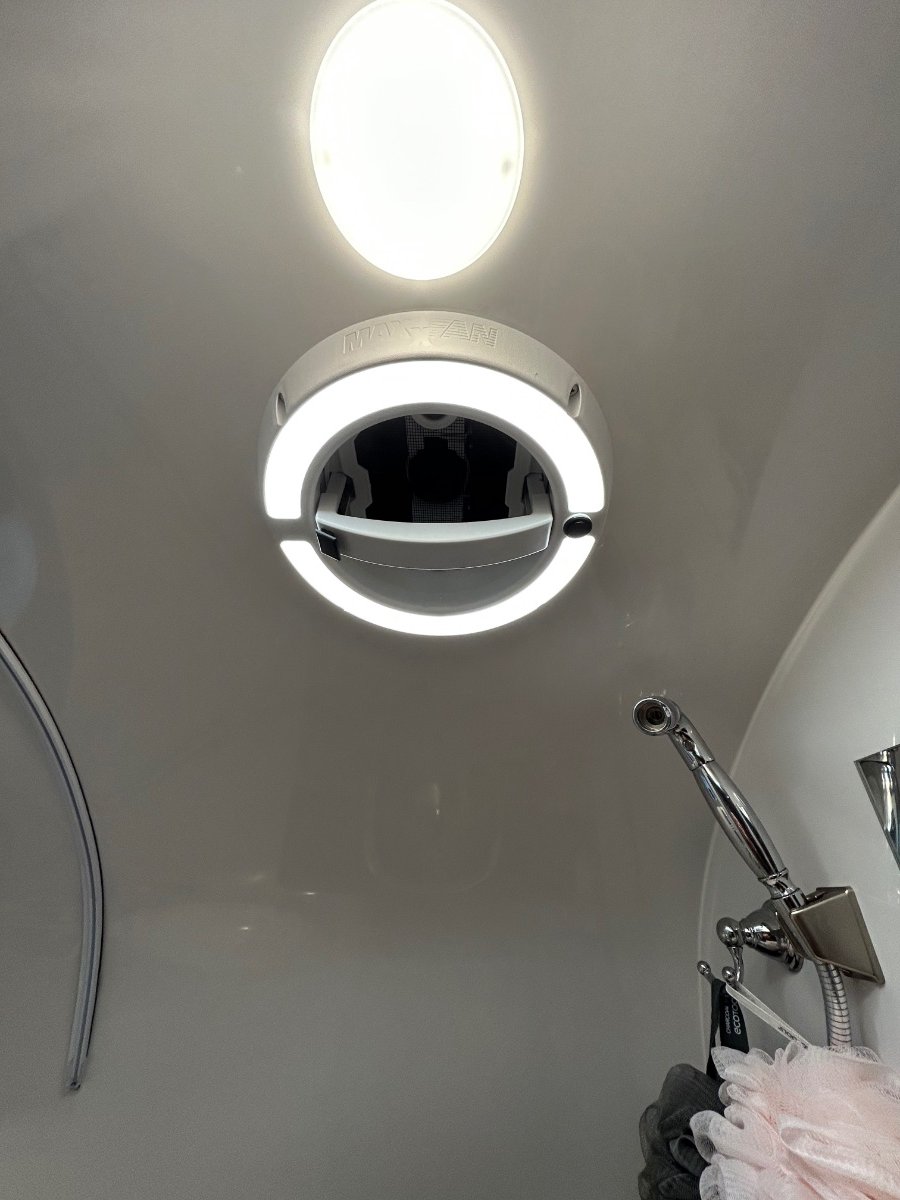
Ok... I love these forums! Nothing like great ideas shared by a group of common minded OTT owners. I'm thinking I stole this one from a comment that @SeaDawg mentioned a while back regarding his "LED-lit" Shower Fan. Well, Diane read his post and thought it would be a good upgrade - so, the new MAXXAIR w/LED unit arrived yesterday via Amazon (Happy Wife - Happy Life category). This would be the short story of its installation... First off, the original VANAIR Ventline fan assembly operated perfectly - no leaks, no bearing wobble, smooth actuation, but alas, no LED. It's the exact unit we had in our previous SOBs. BTW: Its up for grabs - a "freebee", I'll cover any CONUS shipping costs for anyone needing a Ventline. There was major brain cramping involved to plot-out a list of instructions for the R&R drill, especially the Removal phase. The first "R" was straight forward - using a plastic "razor" scrapper to remove the butyl tape from the gelcoat. Cleaned gelcoat with a fresh microfiber cloth doused with an ounce of rubbing alcohol. 2. Filled original mounting holes with clear silicone, they will be further sealed with the butyl tape attached to the new fan housing. 3. Cut-to-fit the included plastic sleeve that fits between the top flange and bottom (shower side) trim piece. Applied clear silicone around circumference of plastic sleeve and upper gelcoat. BTW - the OTT factory fan hole was exactly the correct diameter - no additional cutting was needed (WHEW!). 4. Mounted new assembly up top, carefully pre-drilled/chamfered 8 new holes in exterior gelcoat. Lightly torqued-in stainless screws enough to "push" butyl tape out from flange. Trimmed tape and applied clear silicone around perimeter of flange. 5. Rain guard: The new unit included a "rain-guard" which may be helpful if operating the fan in a heavy downpour. Applied butyl tape on the RG flange and carefully pre-drilled/chamfered 6 new holes for the RG. Trimmed tape after torquing screws in and then applied clear silicone around perimeter of RG. Attached fan cap with the provided 2 white screws. 6. Applied clear silicone to the trim piece groove where plastic sleeve seats. Carefully pre-drilled/chamfered 4 new holes for the trim. Connected 12vDC power to fan motor and LED - used solder and heat-shrink for connections. Tucked wires inside trim piece and mounted it with 4 screws. 7. Unlike the Ventline unit, the MAXXAIR has a locking mechanism when depressed allows the fan lid to open/raise. Its raises/lowers smoothly. Fan and LED each have separate switches. And as, I believe, @Patriot has recently said, "Let there be light!" One and done... Happy Wife.
1 point
-
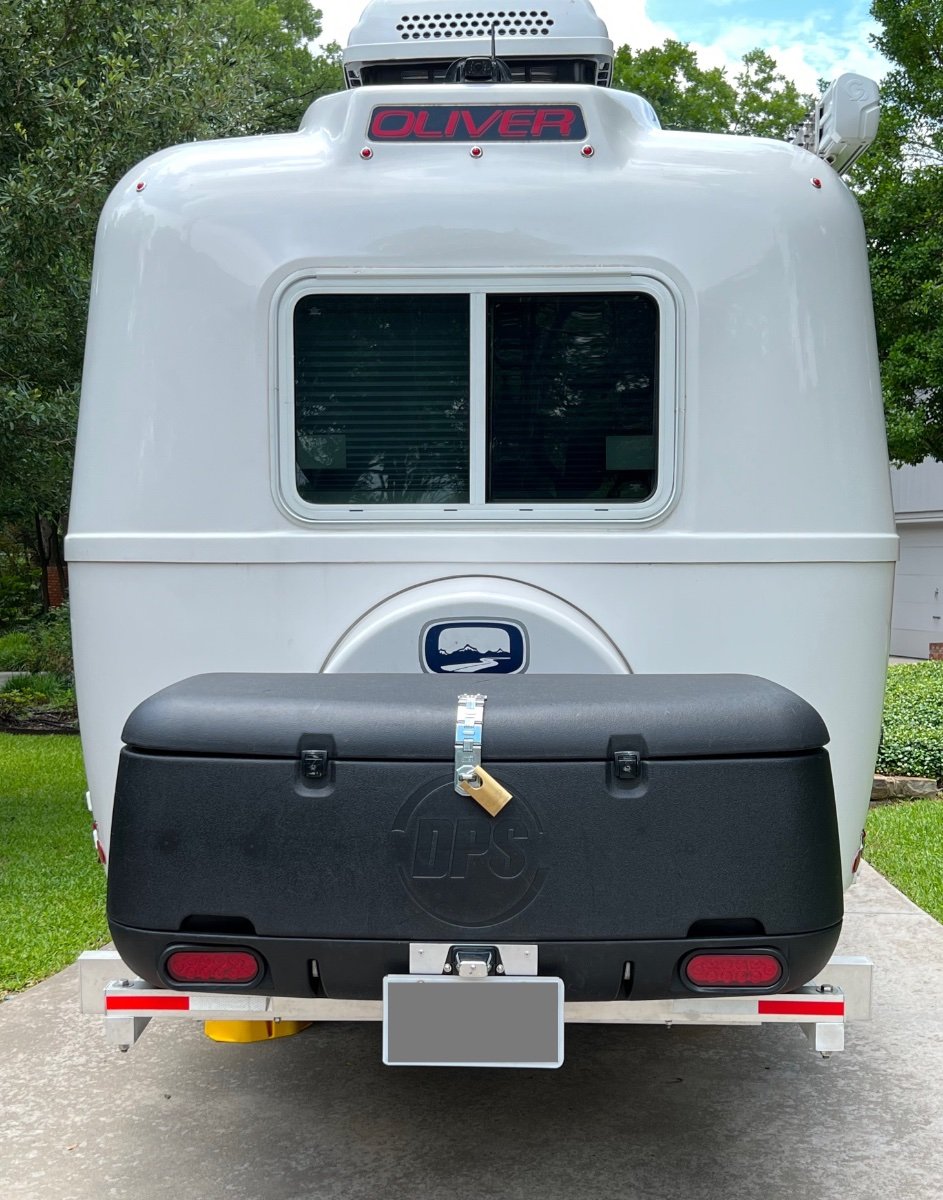
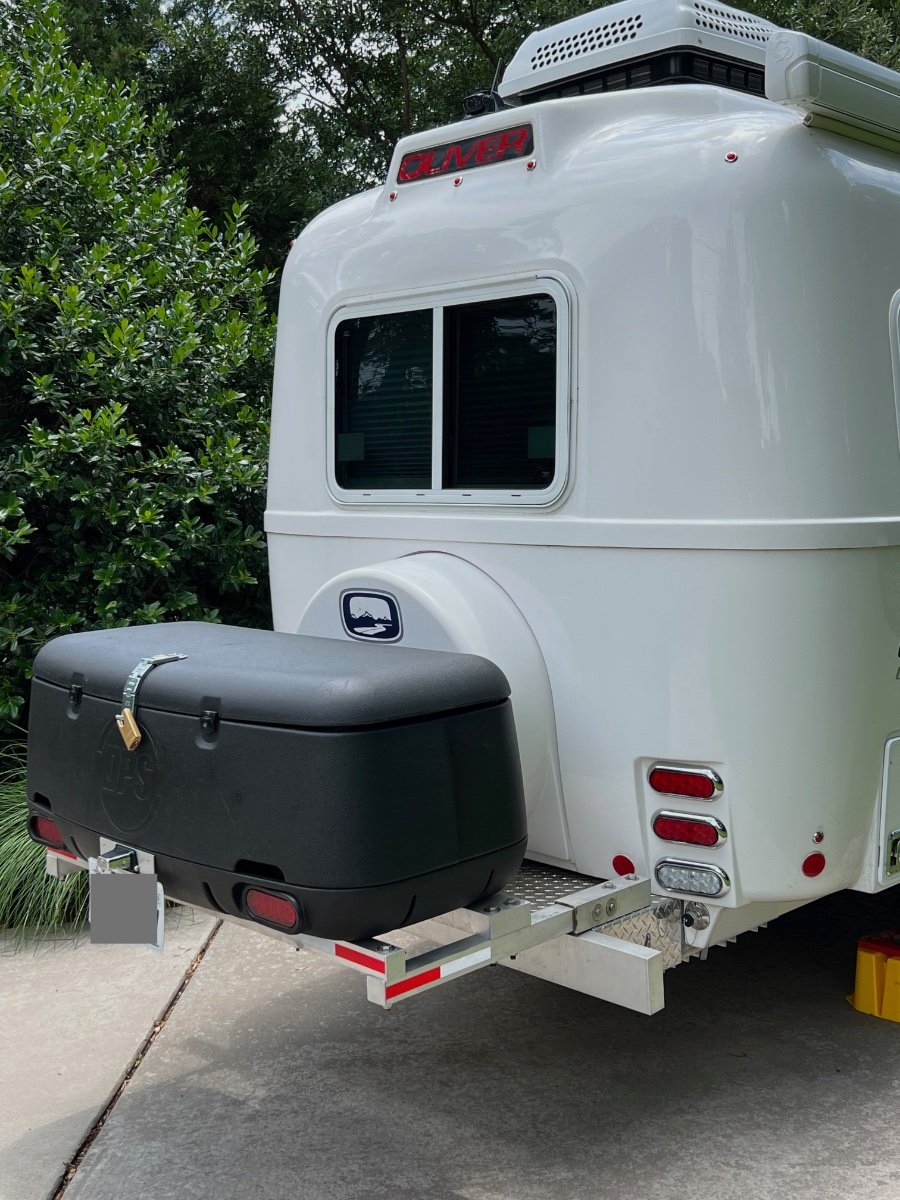
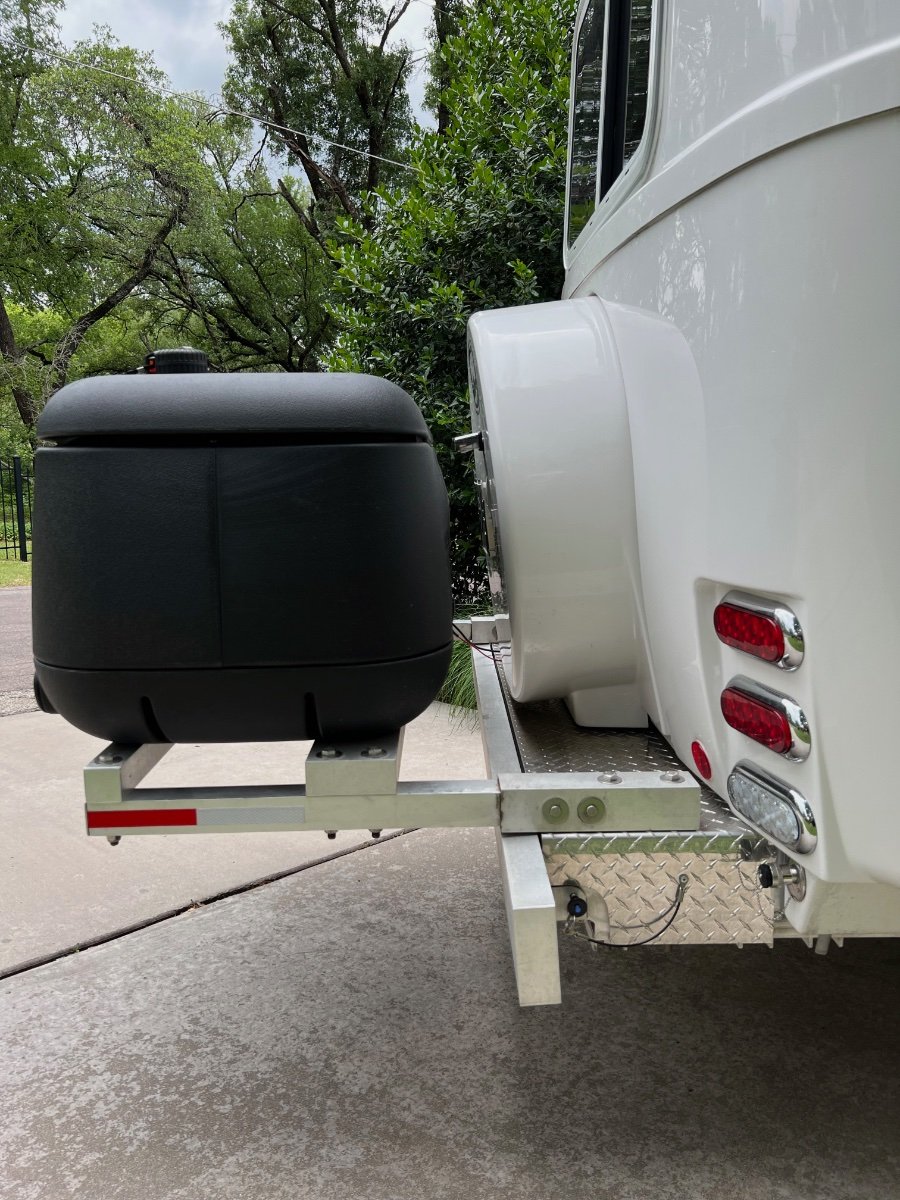
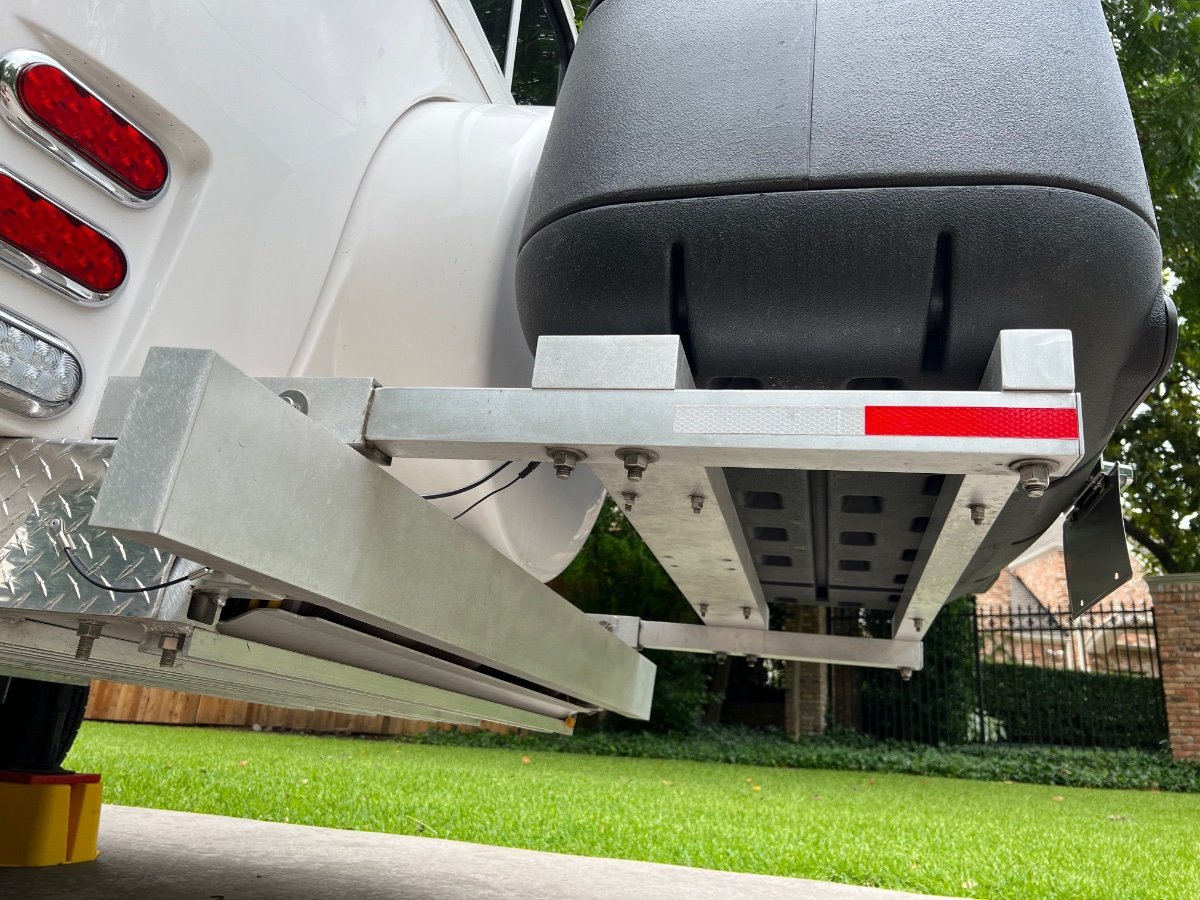
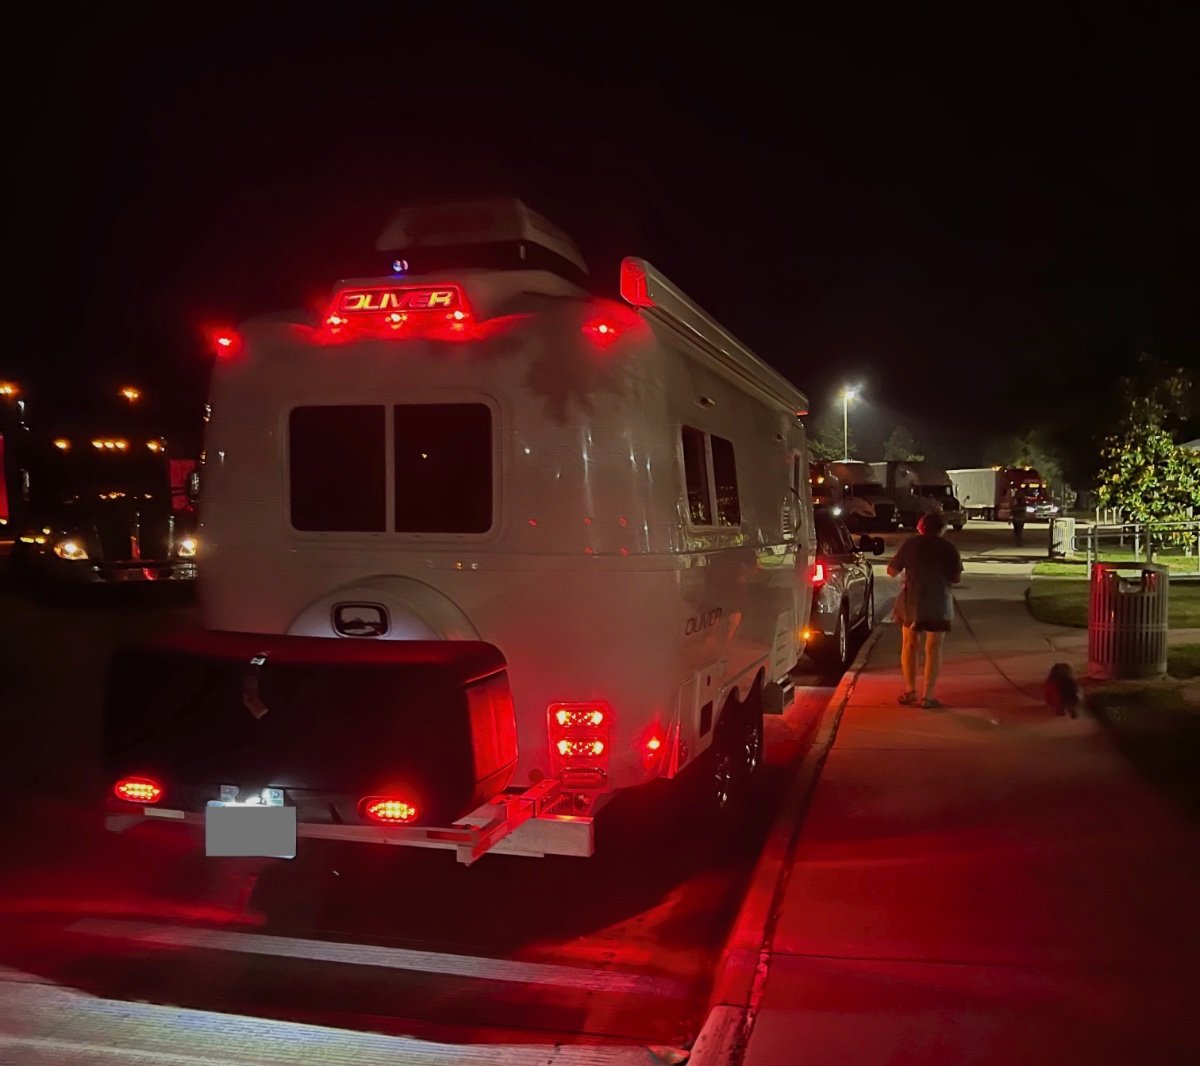
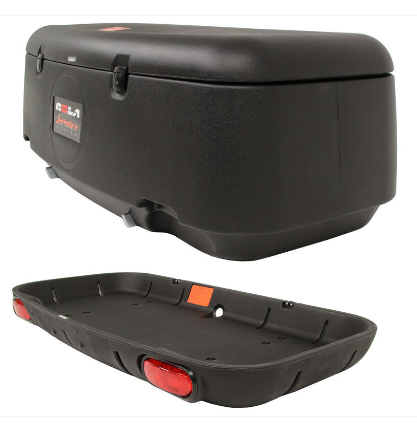
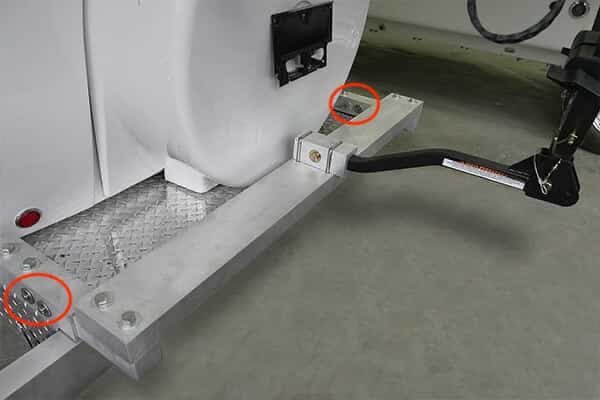
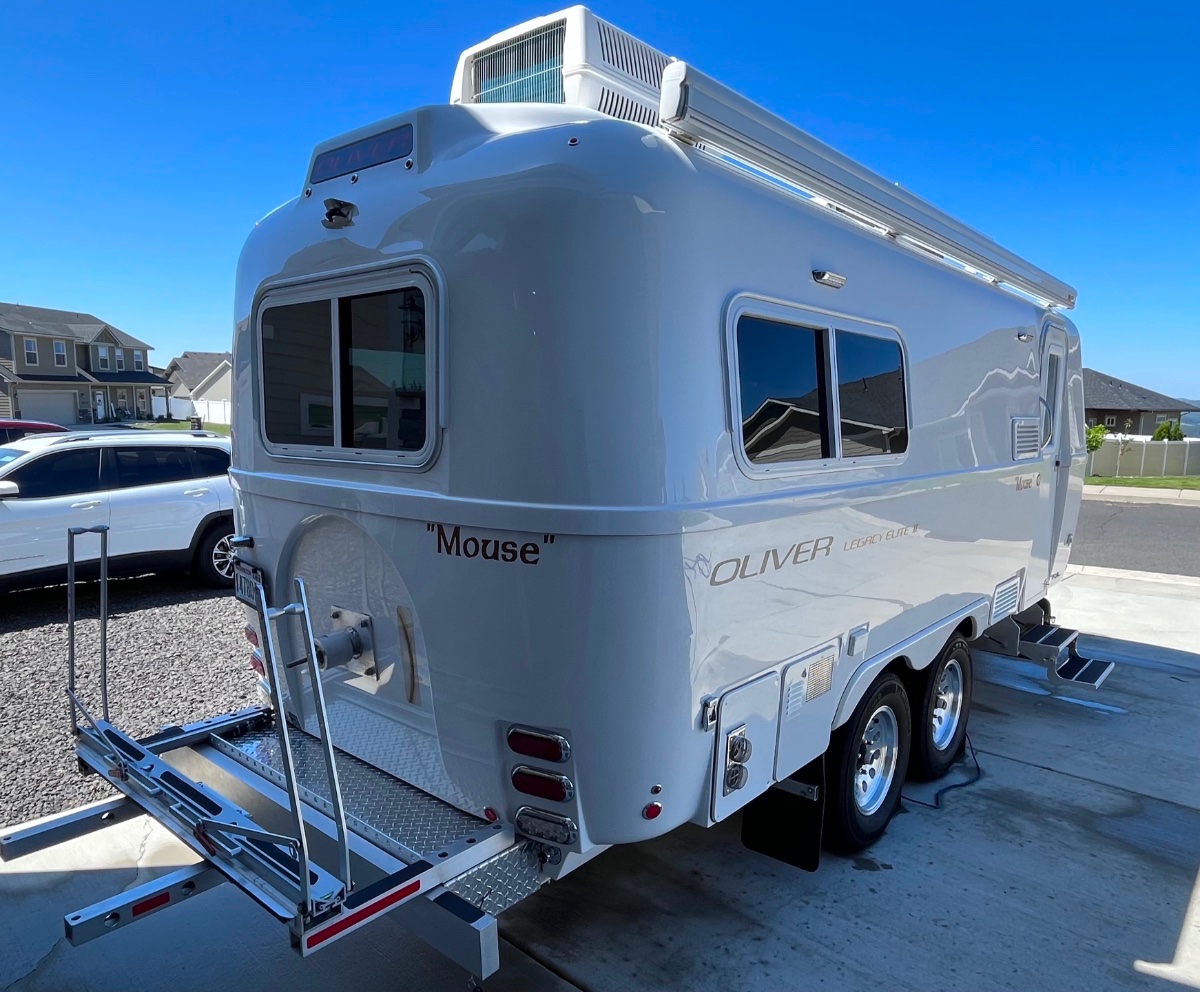
Summary I have installed a rear mounted cargo carrier, with lights, to our 2022 Oliver Legacy Elite II (LEII) travel trailer. We recently completed a two week, ~2000 mile trip, using the cargo carrier, which performed flawlessly. Below are photos of the installed cargo carrier, which are followed by a detailed description of its installation. Storage Constraints Prior to ordering our Oliver Legacy Elite II (LEII) travel trailer I knew we would need additional storage space on the trailer. We are using a 2014 BMW X5 35d (diesel) as our tow vehicle, rather than a pickup truck. Thus, we could not plan to use the pickup bed for supplemental storage. We also needed to stay within the tow vehicle's cargo capacity of 1100 lbs and maximum tongue weight of 600 lbs.. Expecting a tongue weight of approximately 500 lbs. plus two occupants at approximately 300 lbs, we could only accommodate a maximum of 300 lbs. of other cargo. The available payload will be partially used by our camera gear, which must be protected from exposure to moisture. A tongue mounted cargo carrier was not viable, given the tongue weight limit for the tow vehicle. Storage Requirements I anticipated needing additional storage space for the following items: Champion Dual Fuel Generator- 2500 watt (~45 lbs.) (too large for basement storage) Napoleon TravelQ™ 285 Portable Propane Gas Grill and hose (~35 lbs.) (too large for basement storage) Anderson Ultimate Leveling kit (~25 lbs) Harbor Freight rubber chocks (4) (~20 lbs.) Camco Stabilizer Jack Supports (3) (~10 lbs.) Miscellaneous accessories All of these items can tolerate some exposure to moisture, which is likely when stored in any external cargo carrier. A closed and reasonably secure cargo carrier was needed. Searching the owners' forum, I found examples of rear cargo carriers/bike racks and found several examples, including: Oliver's original bike rack design using twin receivers and extending approximately 3 feet beyond the rear bumper; Various rear mounted metal cargo boxes, including custom designs; Rear mounting of an Oliver tongue cargo box by John E. Davies. I also looked extensively at aluminum cargo boxes from various manufacturers, trying to find options which could accommodate the cargo items listed above. I already owned a cargo carrier which we had used on the BMW X5 tow vehicle. This carrier has a heavy steel swing-away frame which mounts to a standard 2" receiver. Mounted on the steel frame are a polypropylene tray and an enclosed container with 13.5 cubic foot capacity. The tray and enclosed container interlock. This cargo carrier also is equipped with fully functional lights (running, brake, turn, flasher). Interlocking pins on the enclosed container mate with the tray. Locking latches secure the container to the tray. Solution Approach I decided to re-use the polypropylene tray and enclosed cargo container, but not the heavy steel frame. Instead, I would use a design similar to the original Oliver bike rack. I ordered the current optional Oliver bike rack when we placed our LEII order, planning to utilize some, but not all, of its components. The current Oliver rear hitch (photo below) utilizes twin receivers that are 11" long, constructed to receive 2" x 2" X 0.25" (wall thickness) T6061 aluminum square tube support arms, which are 17 inches long. The receivers are each mounted to the LEII frame by two long 0.5" diameter stainless steel bolts and nuts. The other components of the rack are a 2" x 5" x 0.25" T6061 aluminum cross-member, 51-1/8" long (with end caps), and a 1-1/4" receiver for connecting a bike rack. I planned to use the twin receivers, and the cross-member, but not the support arms, nor the 1-1/4" receiver. Instead, I would replace the 17" long original support arms with longer equivalents, whose length was to be determined. I would utilize the original 2" x 5" x 0.25" T6061 aluminum cross-member and add another cross member, this one 2" x 2" x 0.25" T6061 aluminum, also 51-1/8" inches long with end caps. The cross members would be bolted to the support arms, in the same manner as on the Oliver rear hitch. The tray and enclosed container from my existing cargo carrier would be mounted to the cross-members. Note the clevis pins circled in the photo below, there are two 0.50" diameter horizontal clevis pins securing the support arms in their receivers. Each clevis pin has a washer on either side of the receiver. Removing the clevis pins permits the support arms to be pulled to the rear, enabling removal of the spare tire cover and spare tire without dismount the support arms. Solution Model A critical dimension to be determined was the length of the 2" x 2" x 0.25" support arms. The new support arms need to be long enough to: Support the polypropylene tray and enclosed cargo box and attach using the molded mounting holes in the tray; Allow the lid of the enclosed cargo box to open without striking the spare tire cover; Permit removal of the spare tire cover and spare tire without removing the cargo carrier and support frame; Permit access to waste water hoses stored behind the bumper; Minimize the additional length of the cargo carrier and support frame to the LEII's length. I fabricated 2" x 2" wooden support arms, approximately 40" long. Using woodworking equipment, I cut slots into one end of each support arm to fit around the bolts holding the twin receivers to the frame. I also drilled horizontal holes for the clevis pins which retain the support arms in the receivers. Positioning the Cargo Carrier on the Cross-members The wooden support arms were inserted into the twin receivers and secured with the clevis pins. Then the 2" x 5" x 51.125" T6061 cross-member was placed across the support arms near the bumper. The additional 2" x 2" x 51.125" wooden cross-member, was also placed across the support arms, but further from the bumper. Clamps were used to hold the cross-members in place on the support arms. The polypropylene tray and enclosed container, latched together, were positioned on the cross-members, centering both to the trailer's width. I opened the lid of the enclosed container and adjusted the spacing (fore and aft) between the lid and the spare tire cover to ensure they did not contact each other. Once I had located the joined tray and enclosed container in what appeared to be a desirable position, I adjusted the positions of the cross-members fore and aft to establish alignment with the mounting holes in the tray. The 2" x 5" cross-member engages two mounting holes on each side of the tray. The 2" x 2" cross- member engages only one mounting hole on each side of the base of the tray. Six 5/16" carriage bolts will fasten the tray to the cross-members. Only four carriage bolts attached the tray to its original steel support frame. I used a mason's string stretched across the width of the tray with weights on either end to aid in aligning the mounting holes in the tray with the positions of the cross-members. I also used carpenter's squares to verify the cross-members were perpendicular to the support arms. Another check of squareness was made by measuring the distance from the trailer bumper to the cross-members. Once I was satisfied with the position of the tray and enclosed container on the support structure, I marked the locations for the holes to be drilled for the six mounting bolts to secure the tray to the cross-members. The tray overhangs the rear cross-member at the rear. With the cargo carrier tray and enclosed container in place on the clamped cross-members, I wanted to determine if the spare tire cover could be removed without removing the entire cargo carrier and support assembly. I found I could remove the clevis pins and pull the support arms aft approximately 7 inches out of the twin receivers and enable removal of the spare tire cover. With the tray and enclosed container positioned on the cross-members, I could now determine the required length of the support arms, which is 33.75 inches. The location of the rear cross-member determines the length of the support arms. After locating the mounting position of the tray and enclosed container I marked all key positions and hole locations on the wooden support arms and wooden rear cross-member. I cut the wooden support arms to the desired final length. Material Sourcing and Machining The required T6061 aluminum components required are: 2" x 2" x 0.25" x 33.75", square tube, quantity 2 (support arms), cost= $110.18 2" x 2" x 0.25" x 51.125", square tube, quantity 1 (cross-member), cost= to $99.08 2" x 12" x 0.125", flat bar, quantity 1 (to be cut into 2" squares for end caps on the support arms and rear cross-member), cost= $6.86 Sales tax= $17.83 No shipping charge. I picked up the materials at the local Metal Supermarkets warehouse Total cost= a $233.95 The above T6061 aluminum components, cut to specified length, were obtained from: Stainless steel bolts and nyloc nuts were obtained from: I was referred by Metal Supermarkets to a local machine shop: When I received the materials I took them and my wooden mockups of the support arms and cross-member to Air & Earth. I also took one of the original support arms. I discussed the machining needed: to cut the slots in one end of the support arms and to drill the needed 0.50 diameter holes for the clevis pins and mounting bolts. I also asked them to cut the 2" x 0.125" flat bar into 2" x 2" squares. I did not ask them to drill the smaller holes for mounting the cargo tray to the cross-members. I was quoted $220 and turnaround of the job within a week. They did an excellent job within the promised timeframe. Finishing and Assembly of the Support Structure After Air & Earth completed the requested machining, I performed the following finishing steps, which included: Rounding the edges of the 2" x 2" square tubing on the slotted end to be inserted into the receivers. I used a 3" wide belt sander with 100 grit sanding belts to round the corners of approximately 12" of the tube which would be inserted into the receivers . The original Oliver support arms also had the corners rounded to more easily slide within the receivers. Several trial fittings were required to verify smooth insertion and removal to/from the receivers. The support arms and the rear cross-member were sanded with an orbital sander using 200 grit disks. This sanding removed markings on the tubes and made the surface textured, similar to the Oliver rear hitch components. The support arms were inserted into their receivers and fastened with the clevis pins. The cross members were aligned with the mounting holes on the support arms and bolted into place. The cargo tray was positioned on the 2" x 5" cross-member at the previously determined mounting position and holes drilled to mount the cargo tray. Holes were then drilled in the 2" x 2" rear cross-member. Carriage bolts, flat washers and double jamb nuts were used to secure the cargo tray to the cross-members. Once all test fittings of the support assembly were completed, lithium grease was applied to the ends of the support arms which are inserted into the receivers. 2" x 2" x 0.125" caps were attached to the open ends of the support arms and the rear cross-member, similar to the end caps used by Oliver. These were attached to the square tubing using JB Weld epoxy. Cargo Carrier Lighting The cargo carrier partially blocks visibility to the taillights of the trailer, which is most noticeable when viewed from close behind the trailer. At a distance the taillights are largely visible. The cargo tray is fitted with two LED light fixtures and a wiring harness with a 4-pin flat connector. A corresponding 4-pin flat connector was installed on the LEII to integrate the lighting on the cargo carrier with the trailer lighting. Details of the installation of the 4-pin connector in the trailer are covered in a separate article. The lights on the cargo carrier ensure the trailer is quite visible from behind. A license plate mount was added to the cargo carrier tray, since the license plate mount on the spare tire cover is blocked by the cargo carrier. Lighting for the license plate mount is provided by adding a Y connector to the license plate light cable under the spare tire cover and adding an extension cable routed to the cargo tray mounted license plate mount. I also added reflective tape to the support frame members. I used the following reflective tape: https://www.amazon.com/gp/your-account/order-history/ref=ppx_yo2ov_dt_b_search?opt=ab&search=reflective Conclusion This addition to our trailer provides significant benefits, with no significant disadvantages. It does add approximately two feet to the length of the trailer. Besides the additional storage space, the cargo carrier and its load slightly reduces the tongue weight. I measured the tongue weight, using a Sherline scale, at 450 lbs., with no water onboard. Tongue weight seems sufficient, as no swaying or other handling issues have been observed. This project had a successful outcome due largely to the information I was able to glean from the Oliver Owners Forum. I hope this information is useful to others on the forum. Comments and suggestions welcome. Regards, Don
1 point
-
It's this stuff here, Dicor BT-1834-1 1/8" x 3/4" x 30' Butyl Seal Tape Here's my YouTube comparison on the two sealant tapes I had on-hand.1 point
-
Nice work @Wayfinder all good pointers!1 point
-
Thanks for the great DIY write-up Max Burner, this will help immensely! We will be doing the same procedure with the Maxxfan LED model, after our Ventline sucked the flimsy foam gasket into the fan blades. The plastic film backing on that gasket had lost its adhesion, wrapped around the fan spindle, and bound up the motor. Just the excuse I needed to do this upgrade!1 point
-
And, Bosker is STILL embarrassed for you.🥰1 point
-
FYI, John Davies Spokane WA
1 point
-
And/or: https://olivertraveltrailers.com/rewards-program/submit-activity/1 point
-
https://olivertraveltrailers.com/my-account/ Then “Submit Rewards Activity “1 point
-
Thanks to all for the examples of calculations -- We have to be mindful that some people's Olivers might have different tires (am I right, that they had to switch during tight supply chain issues?)....1 point
-
The OE II has tires rated for 2040 (8,160 for four tires) each at 65 PSI. The trailer is 5,000 dry. Loaded maybe you get up over 6,000 pounds. Max is 7,000, right? At 7,000 (85% tire load capacity) pounds would be 55 PSI (85% of 65 PSI). 6,000 would be 50 PSI. We are saying the same thing. I take my old Jeep in for service and the guy airs my tires up to 80 PSI when my Jeep only weighs 3,000 pounds. Rough ride!1 point
-
Nice job. Very informative.1 point
-
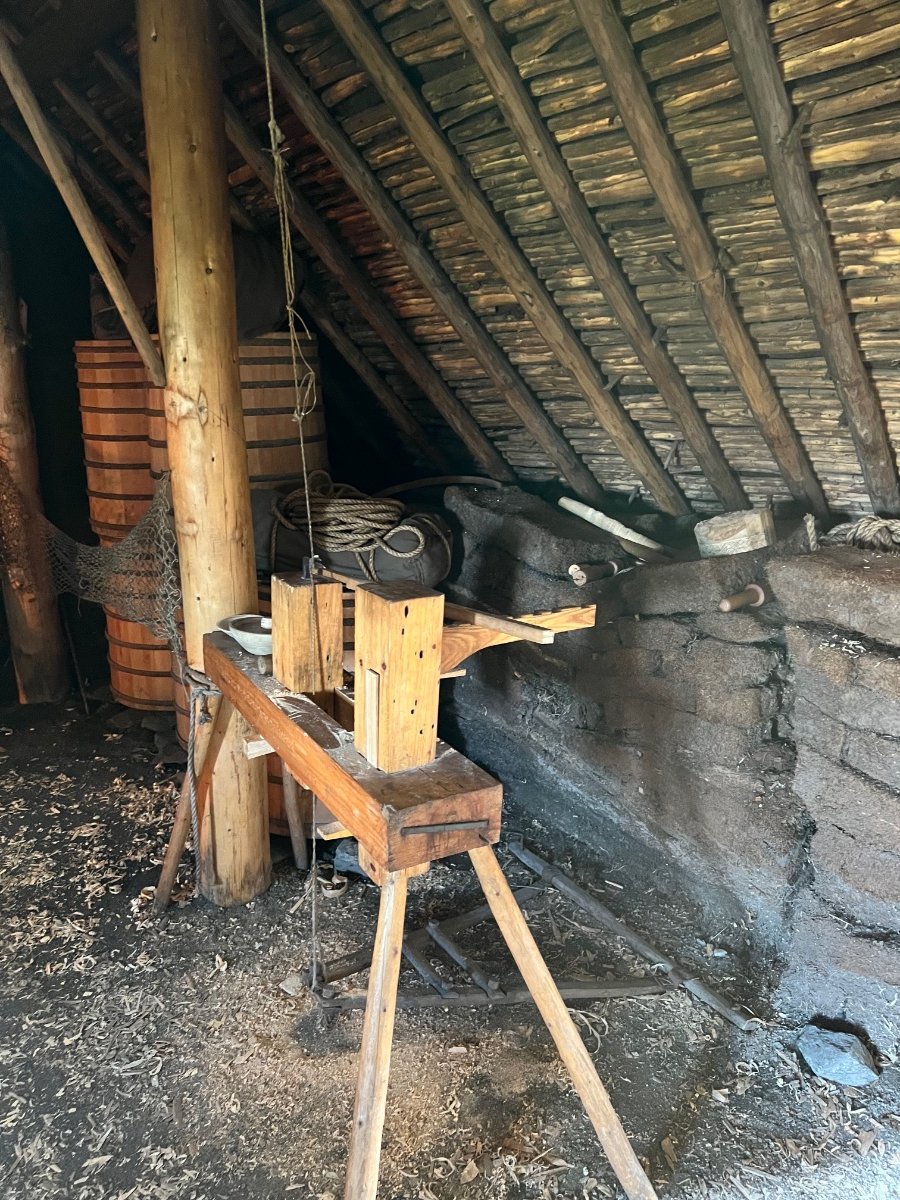
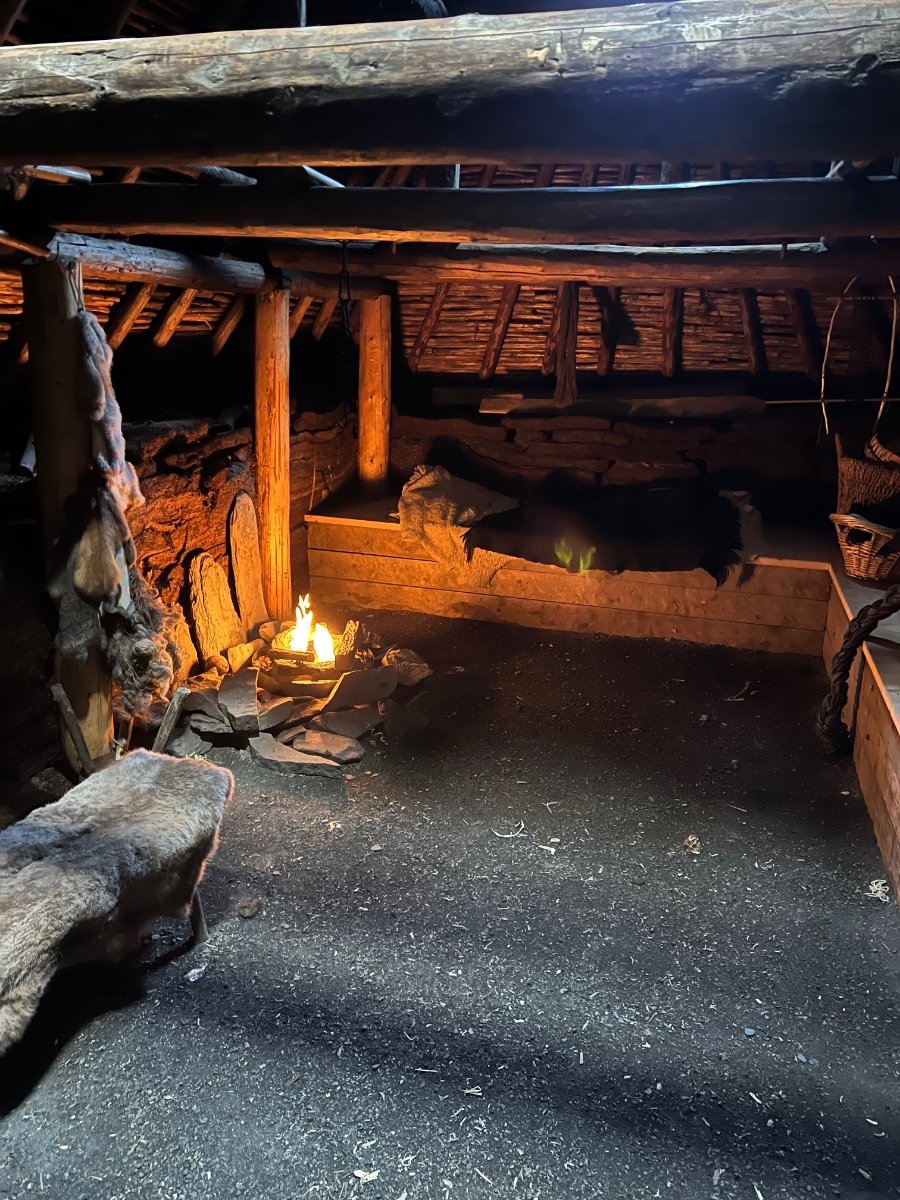
I agree, cracks me up when I see a potholes ahead sign when you spent the last hour avoiding them. We spent today at L’ANSE AUX MEADOWS Here is the view from the Viking village
1 point
-
That is why I ultimately invested in a second Champion Dual Fuel 2200 watt generator and a splitter so I could run both from one 5-gallon propane tank. The lower output on propane requires the second inverter/generator to run our Truma AC (which has no easy start installed).1 point
-
Great week at Lakeport on my favorite site #24. First trip out this Summer and the Oliver performed flawlessly!
1 point
-
Also, a TPMS will let you know right away what your pressures are!1 point
-
Regarding the installation/attachment of a "gutter guard" or any other adhesive attached items. It was my understanding that if you have had a ceramic coating applied to your Oliver adhesives/stickers/decals will not remain attached very well. This was told to me by the company that applied my ceramic coating. Is this a common understanding?1 point
-
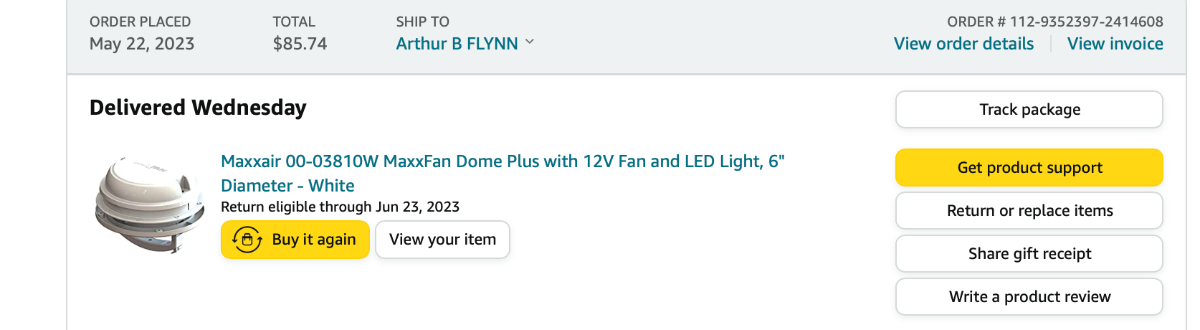
Here's the model number from our Amazon order receipt: The unit comes with a 6" extension sleeve. You will need to trim the sleeve to your roof thickness. Our OTT roof thickness at the 6" diameter vent hole is 2 1/4". We placed the 6" sleeve inside the hole, allowed 3/4" to protrude inside for the trim piece/LED housing, and marked the exact thickness so as to determine how much needed to be trimmed. The length of the sleeve needed was 2 7/8". We used clear silicone around the upper sleeve circumference and roof vent hole for additional waterproofing. Fitment was good - especially considering that the fan hole location is not flat, being slightly curved - be very careful when torquing both the upper housing screws and the decorative trim piece/LED housing screws because one could (IMO) crack the housings if over-torqued. The housings will "bend" slightly to match the interior concave curvature of the ceiling and the exterior convex curvature of the roof. We washed Casablanca after the install and heavily watered the area around the new vent for several minutes - no leaks detected/dry as a bone in the head. Hope this helps, brother! Cheers... PS: 1. The old Ventline unit is spoken for by another member and will be shipped today. 2. This model MAXXAIR has the conveniently accessible inline fuse that @SeaDawg mentioned above, FYI.
1 point
-
The fuse is accessible without disassembling, which is another nice feature in ours. Less than $100, on etrailer. https://www.etrailer.com/RV-Vents-and-Fans/MAXXAIR/MA00-03810W.html?feed=npn&utm_source=google&utm_medium=cpc&utm_campaign=Google | Shop - RV Vents and Fans&adgroupid=81219729010&campaignid=417623777&creative=404001548849&device=m&devicemodel=&feeditemid=&keyword=&loc_interest_ms=&loc_physical_ms=1026083&matchtype=&network=g&placement=&position=&gclid=Cj0KCQjwmtGjBhDhARIsAEqfDEeBTUCRhW2dwZMF-AYYM2dLpNLgnV17aD5HcsrVq-qdF5xP-juVaNIaAirSEALw_wcB1 point
-
The LED is surprisingly bright - 50 to 60 watt equivalent? I'll check the box it came in for the model number.... MAXXFAN Dome Plus w/LED - WHITE. Cheers!1 point
-
We've had the maxxair for a few years now, with the led light ring. Best upgrade. (Our decade old ventline was leaking.) We installed the maxxair with butyl tape. Trimmed the outside with marine caulk. Love it, as you do. Love, love the light. Our handle release is more difficult than the old ventline, but we can live with that. It's a two hand operation. The fan is higher cfm. And very, very quiet. Highly recommend it.1 point
-
Correction! Saw this Champion 2500 on Amazon yesterday at $414 and today it’s at $399. I have found the reason for the price change, it’s a different generator. The generator priced at $414 is dual fuel and the one priced at $399 is gas only. Sorry for the misleading post! Gasoline only. https://www.amazon.com/Champion-Power-Equipment-200961-Ultralight/dp/B08L47G374/ref=sr_1_3?crid=2UTQ1DDM03KCO&keywords=Champion%2B2500%2Bwatt%2Bgenerator&qid=1688037717&sprefix=champion%2B2500%2Bwatt%2Bgenerator%2B%2Caps%2C101&sr=8-3&th=1 The dual fuel model is here. https://www.amazon.com/Champion-Power-Equipment-200961-Ultralight/dp/B08L45W2V9/ref=sr_1_3?crid=2UTQ1DDM03KCO&keywords=Champion+2500+watt+generator&qid=1688037717&sprefix=champion+2500+watt+generator+%2Caps%2C101&sr=8-3 Mossey0 points
-
is lost.... somewhere!0 points


-
Recent Achievements
-


")


")