Leaderboard


Popular Content
Showing content with the highest reputation on 07/26/2023 in all areas
-
I would bet you could buy an unventilated door from Oliver and change it out yourself. I believe it would put Oliver in legal jeopardy to eliminate battery box venting which is required by code as it is conceivable someone could switch from lithium back to wet cell, thereby putting themselves in danger from unvented gas given off by owner servicable wet cell batteries. I once had the pleasure of having a battery explode next to me in my early days - believe me when I say it left a lasting impression. lt would be quite easy to patch the existing vent holes if you so desired or even to make a new door yourself if you have basic fibreglass layup skills. In fact the durability of fibreglass and the relative ease of making fibreglass repairs as opposed to aluminum skin repairs was one of the big reasons we went with Oliver as opposed to Airstream. Although we have lithium batteries which require little maintenance, it is still nice to be able to easily inspect connections and turn off batteries as needed. After years of fighting to service batteries deeply burried in the nastiest little spots to be found on most trailers and boats, that little battery door has become one of my absolute favorite features on our Oliver.5 points
-
https://www.pellandent.com/RV-Window-Seal Match the profile of your window seal to a profile on the Pelland Enterprises web page, link above.4 points
-
Welcome Eric! We moved from a 16’ Basecamp X to our LE2. We also loved our Basecamp but…. First, we needed a little more room and although it seems silly, we were tired of setting up and tearing down the bed. We developed early filiform corrosion on our airstream about 2-3 years after new. I arrested it with corrosion X and T9 but it always worried us. It is nice to not be quite so paranoid about hail damaging the exterior skin. The airstream was not spec’ed out like I would expect. No battery monitoring system (BMV-712) and a poor solar charge controller. Lastly, I would search Airforums for posts from Ray Eklund. He owns an LE 2 and a heavily modified Airstream and his insight was instrumental in us exploring and eventually purchasing an Oliver. We have found our Oliver to be what we hoped our Airstream would have been4 points
-
We had a Bambi 16, and loved it except for the single axle. After visiting our Airstream dealer, a 23 Globetrotter twin was our expected purchase, but in doing our due diligence, the Oliver name kept showing up on, of all places, the Airstream forum! As fate would have it, we were pulling into our camping destination with our Bambi, and lo & behold, there was on Elite II in the campground. The owner kindly allowed us to gawk at his Ollie. That took the shine off of buying another Airstream. We were giddy with excitement from our fortuitous tour, and remain so, a year and a half after picking up hull 997. I’ll always have a soft spot for Airstream campers, they are pretty good, but they are not comparable to an Oliver. If you can make the size of the Oliver work for you, they are wonderful, from conceptualization through execution.4 points
-
Aluminum trailers were practical and profitable to manufacture before fiberglass resins were invented, mostly because the skilled WW2 work force was ready and waiting for new jobs other than production line fighters and bombers, and there were vast quantities of surplus aircraft grade sheet aluminum gathering dust in warehouses... remember that this was a time when tens of thousands of lovely “useless” warbirds were being shredded to make pots and pans. ;( I used to work with an old guy who was one of those WW2 riveters, his sheet metal skills were pure magic and a delight to watch. He always got assigned the tough repair jobs because of his speed and quality workmanship. All those old craftsmen have long left the workforce. Bless their souls… I am actually amazed that thin fragile aluminum trailer shells remain acceptable to consumers and to insurance companies. Other than classy looks they have ZERO practical benefits. How -/:;()$&@ loud it must be inside during a serious hailstorm! https://beantrailer.com/read-this-before-you-buy-an-aluminum-trailer/ Sledgehammer vs Bean trailer and a stick and staple trailer Let’s not get into how AS management screwed up a wonderful glass trailer… https://www.rvtravel.com/the-airstream-nest-failure-a-closer-look/ I hope AS doesn’t buy the struggling Escape company. It is probably not very wise for me to say this, since there are a fair number of ex-AS owners here, but whenever I see a shiny new one I think to myself, “that guy has way more money than sense.” God bless Olivers, long may they reign! MAX burner, how about starting an Oliver hail damage poll in a new thread? John Davies Spokane WA3 points
-
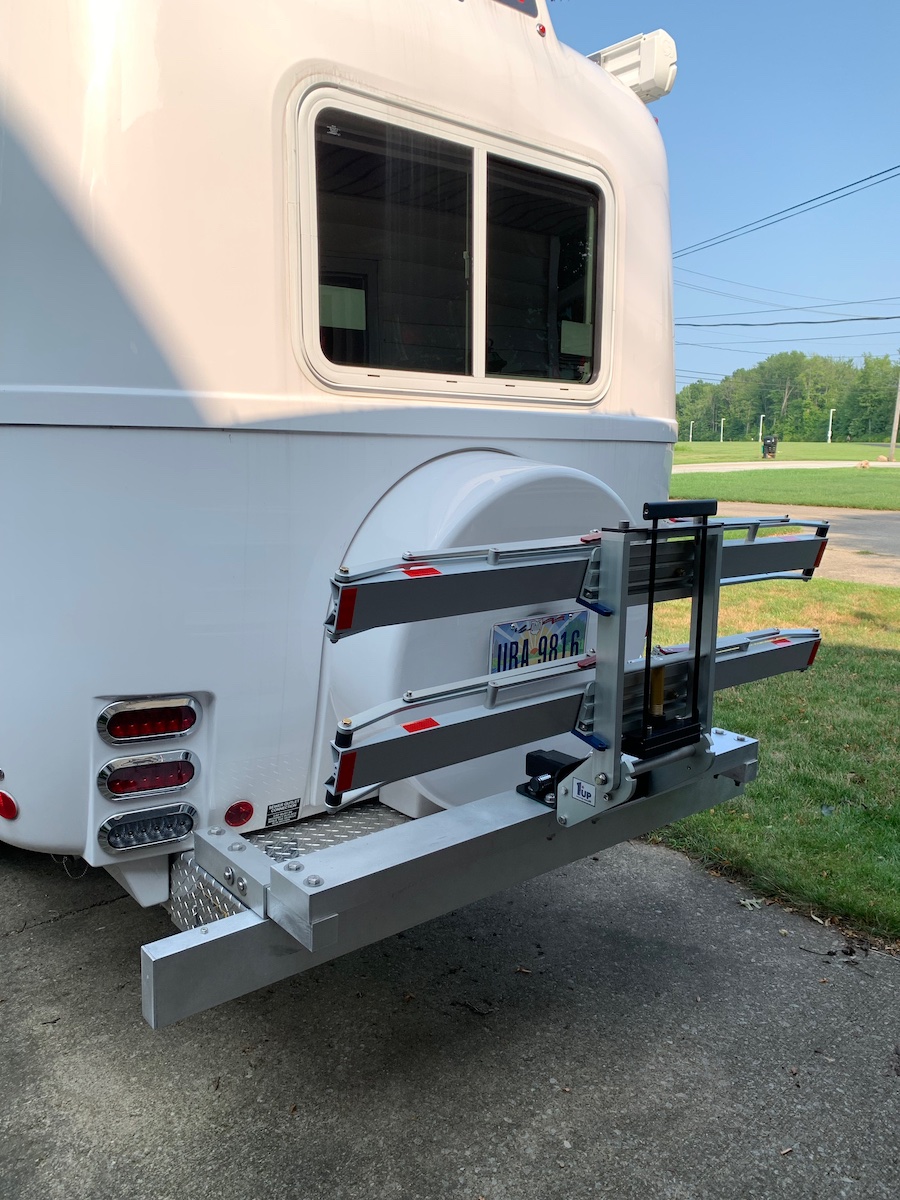
Thinking outside of the box, why not take advantage of the spare tire assembly. If I recall there is a massive bolt that holds the rim in place. That would make an elevated starting point for securing an upper structurall bike support. Make it a "Z" shape and get an even higher up safety point. Fix it to the bumper area and also at the spare tire mount. Extend it up and then out. Sorry for the crude crayola drawing, but best I can do on the road. GJ
 2 points
 -
I forgot to take photos with the bikes on the rack. Here it is empty. The bikes seemed very solid watching on the rear view camera.
2 points
-
We had ours replaced in march when we had our yearly maintenance done. We had a chose of white or black. Chose the black and we love it. I believe it was cheaper than other places. Elizabeth2 points
-
@Jim and Chris Neuman: Excellent comment. We haven't experienced a bad hail storm in the Ollie yet, but several in the AS. Damage repair is significant on aluminum panels. We travel with AS friends and as recent as last month on a road trip from ABQ area to DEN for a concert - our friends (departed 3 hours after us), hit a nasty patch of golfball-size hail on I-25 in the vicinity between Wagon Mound and Maxwell. We came through the same area earlier when only heavy rain squalls were passing. Their 2022 Titan and 2022 25-foot FB Flying Cloud did not fair well: Similar damage done to their Titan: Through-and-through hits in sky-lights, roof vents destroyed, but remarkably - the solar modules appear undamaged. USAA is still considering the hail-caused damage as a complete loss - our friends are still waiting to hear the insurance outcome. Has anyone experienced heavy hail with the OTT? Just wondering how it handled it...
2 points
-
There has been discussion about this on the forum and some folks have replaced their white molding with black. Someone who has done it should have the supplier, or a quick inquiry to Oliver service should also help. This is part of our periodic maintenance, 3 or 4 times a year they all come out and into a bucket. Window tracks are cleaned and clean molding put back. Looks like the previous owner wasn’t much into maintenance or preventive maintenance!2 points
-
Hello Eric, We previously owned a AS Nest and we loved it for short getaways but quickly found it to be too small for longer trips. We decided to go larger and put a deposit down on a 20fb Flying Cloud. A few days after we placed our deposit an Oliver Elite II came up for sale very close to our home. Once we actually went and looked at the Oliver we were immediately sold, I fell in love with the white clean interior and the quality was noticeably superior to the AS. We cancelled our order for the Airstream and bought the Oliver. Zero regrets!2 points
-
Hello Eric, welcome to the forum. Although there’s nothing inherently wrong with your idea, I don’t think Oliver would ever make the changes you suggested, but if you thought your idea would make your personal ownership experience better, there’s nothing to stop you from doing it yourself. Good Luck and keep thinking outside the box.2 points
-
I am so very happy for you! Another score for Mike (and Jason) at Oliver. They are amazing.2 points
-
Done. Let me know if I missed other posts that should "travel."2 points
-
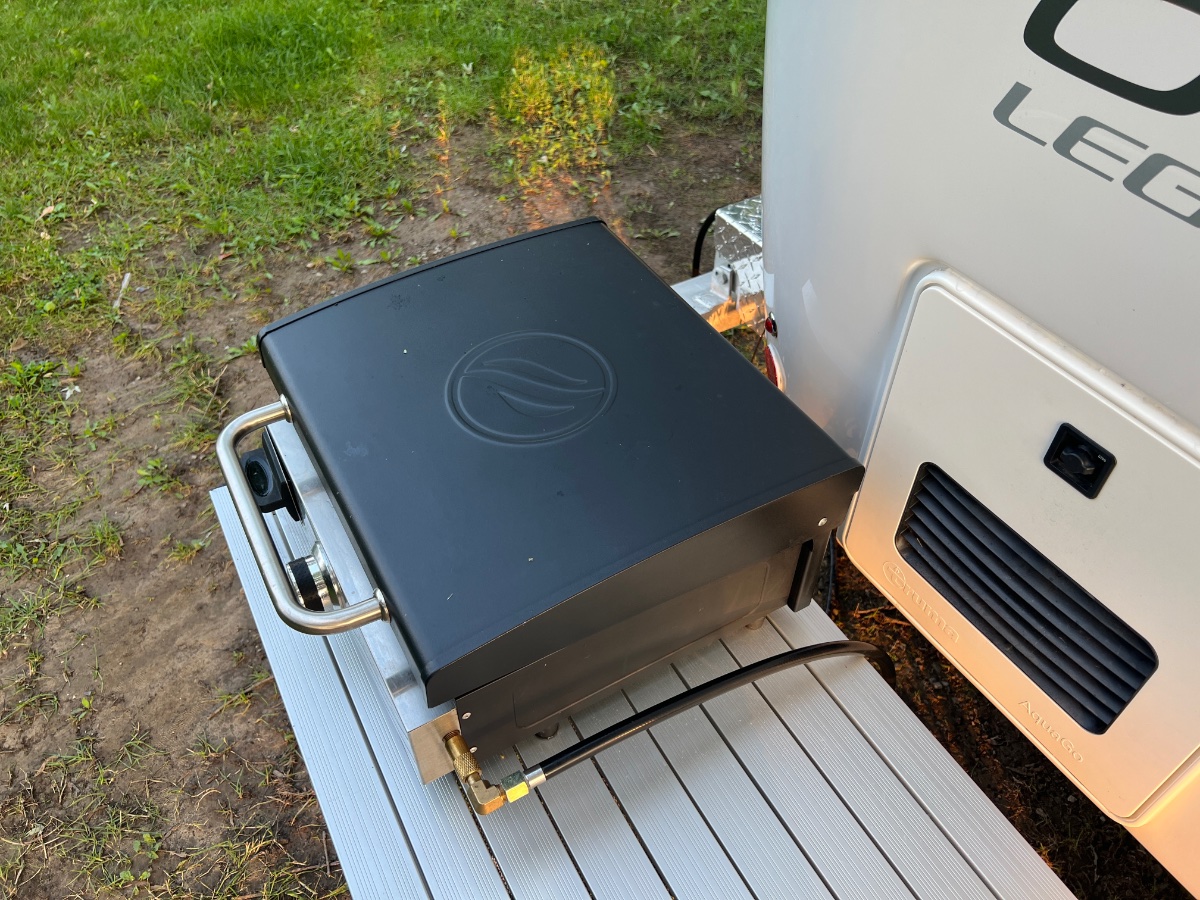
Seems like there should be a gasket in there. I don’t use the small cylinders, camping I put the Blackstone on the trailer QC and at home I use a 20lb tank. Maybe someone who uses the cylinders can comment. Mike2 points
-
I tried earlier today and they weren't open for business. So I called Mike and asked him for guidance with the issue. He suggested he'd call Riverwood and figure out what is going on, and get back to me and -- THANKS MIKE! -- Riverwood has a replacement Truma Water Heater being shipped out today or tomorrow. This is EXCELLENT news and I want to credit Mike and Oliver's care. Also, I will be posting a followup in my other thread regarding my solution to the Blackstone Griddle problem (it was easy to fix, but not obvious). Thank you to everyone here for all the help and encouragement. I'm hoping that by next week I'll be able to use my Oliver for boondocking, as I intended.2 points
-
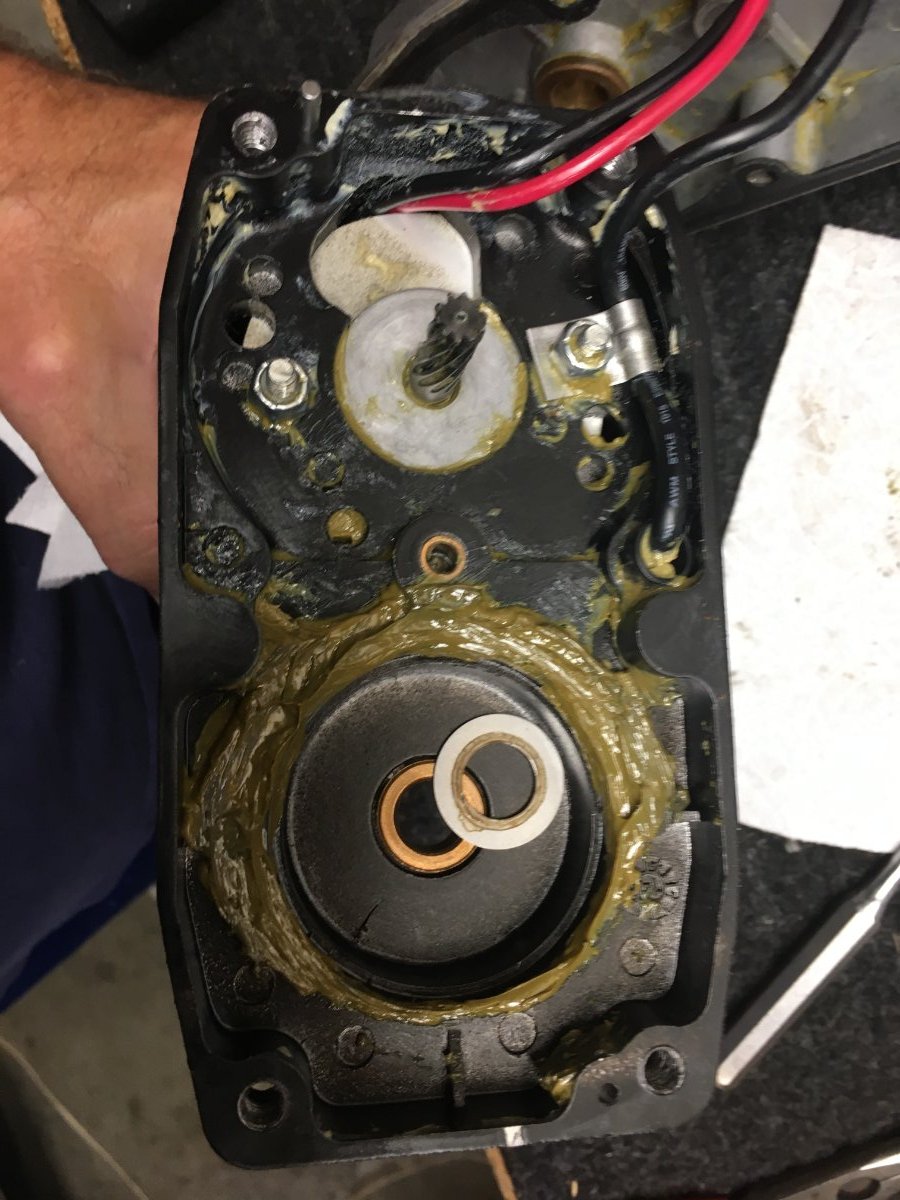
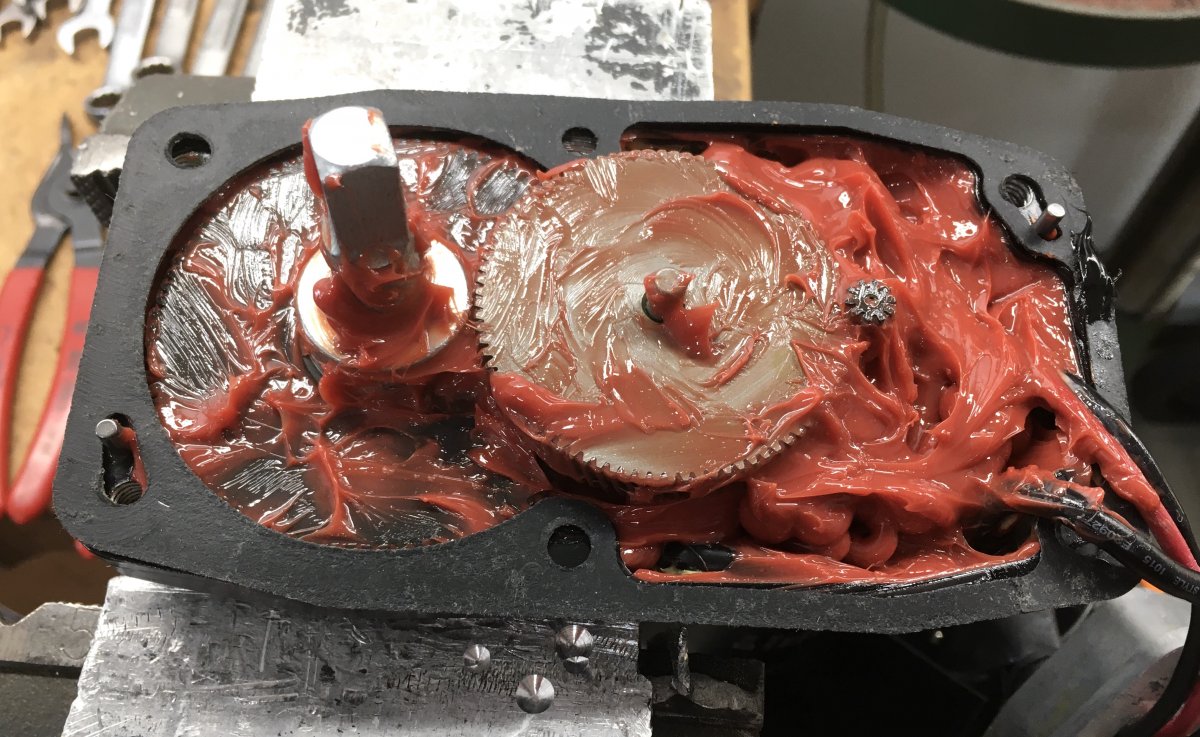
Doesn't she look pretty! It did not look like this when I pulled the head! It's hard to do this work without getting the wheel bearing grease here and there. So, take advantage of that. I pushed and rubbed the grease in every nook-n-cranny, every piece of plastic and metal and the grease removes the dirt and corrosion. Kept rubbing with clean paper towels and this is the end result. When I started this, there was a full 1/4" up-n-down play in the main shaft. By packing grease under the drive gear, there is now no play at all - hope this lasts! I need to mount the head and clean the main jack post. I'll get back in a day or two to show that. When the head is mounted, I'll spray a little Super Clean on the head, brush it some, and hose it off to remove any remaining grease.
2 points
-
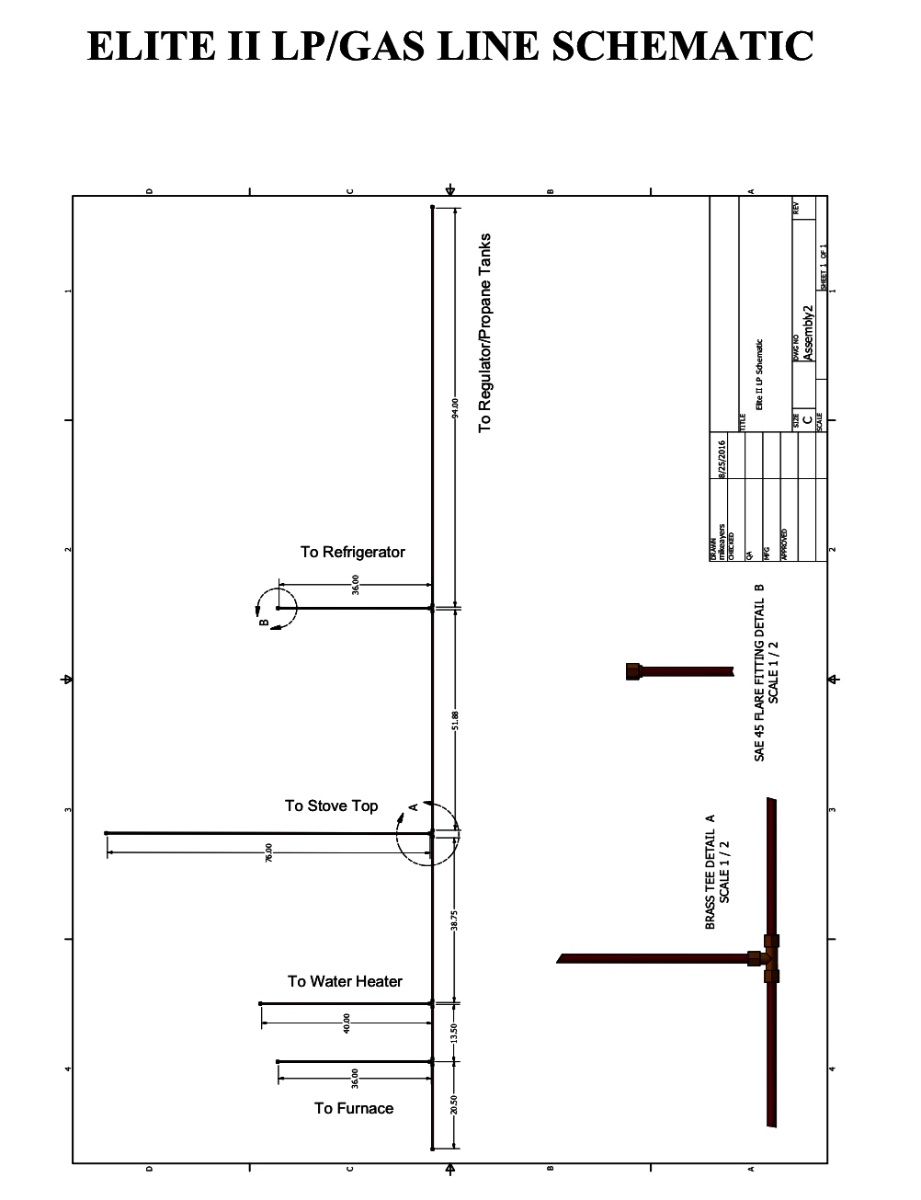
I agree that it would be nice to have diagrams for every model year, but that’s not the case. I’m lucky because my 2017 LE2 has a great manual, available in the Oliver University and after downloading it to my iCloud, it’s almost always accessible. I would suggest to anyone that didn’t get one with their Oliver delivery or hasn’t been able to get the information that is available in a model specific format, to go ahead a look at other model years because the information could be the same or similar enough to guide you through the problem or repair you are working on. If you have an original refrigerator that Oliver installed and it runs on propane, the schematic below from 2017 may be of interest. You can probably verify the propane line running from the propane box in front to the rear bumper by looking for the copper tubing below and outside of the trailer on the curb side. And if you have an outside access panel at the bottom of your refrigerator, the penetration of the gas line is probably visible coming through the floor. Mossey
2 points
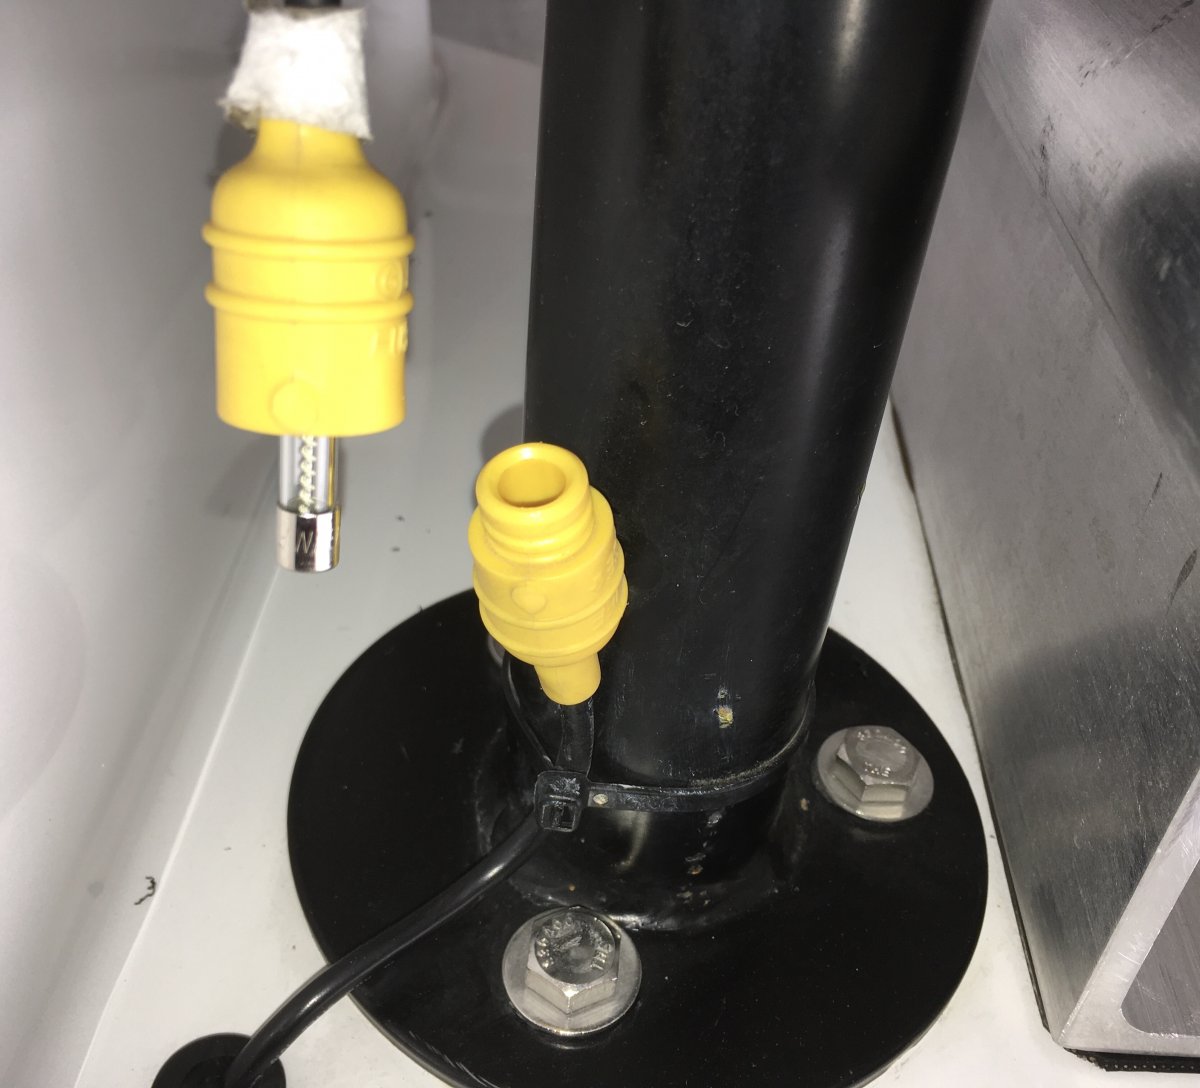
-
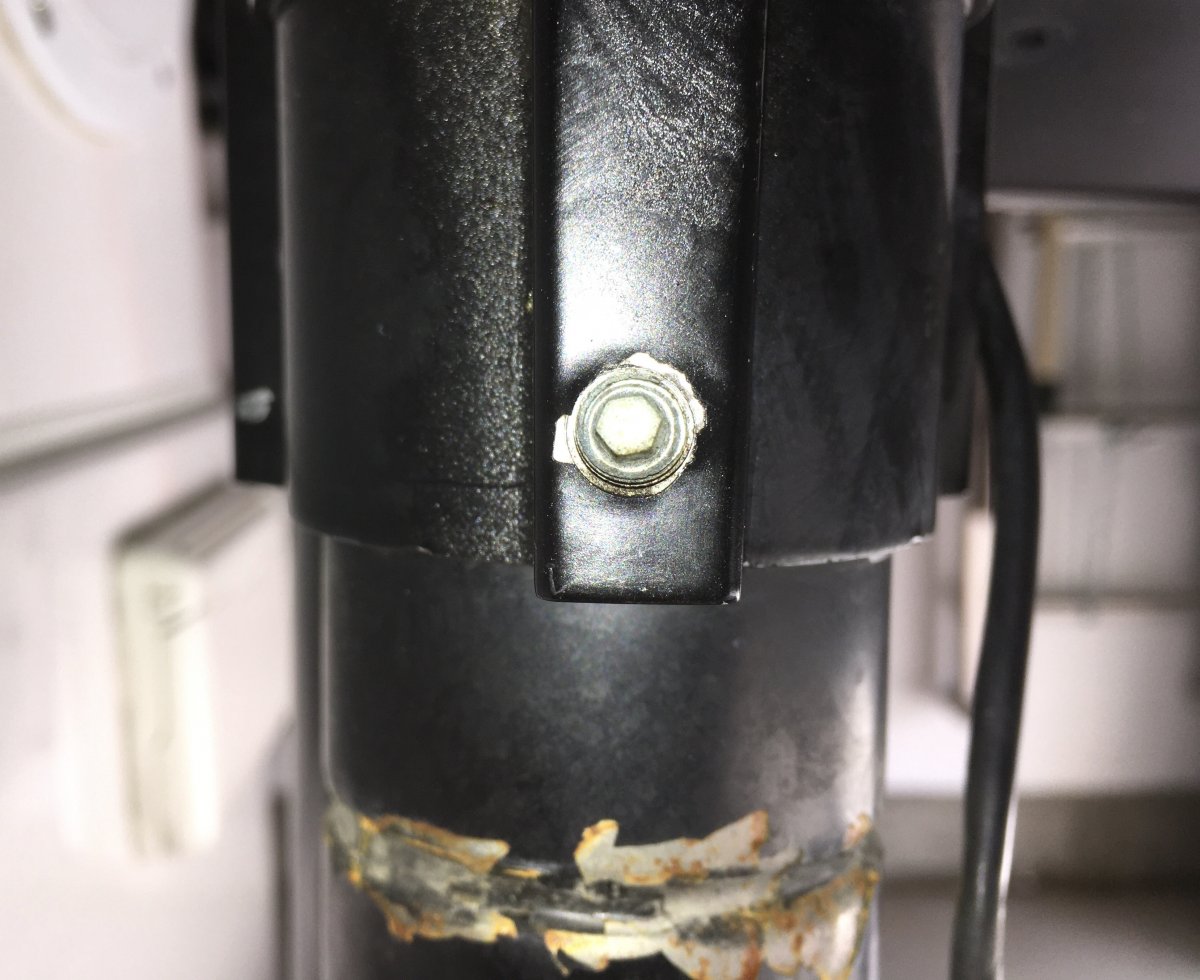
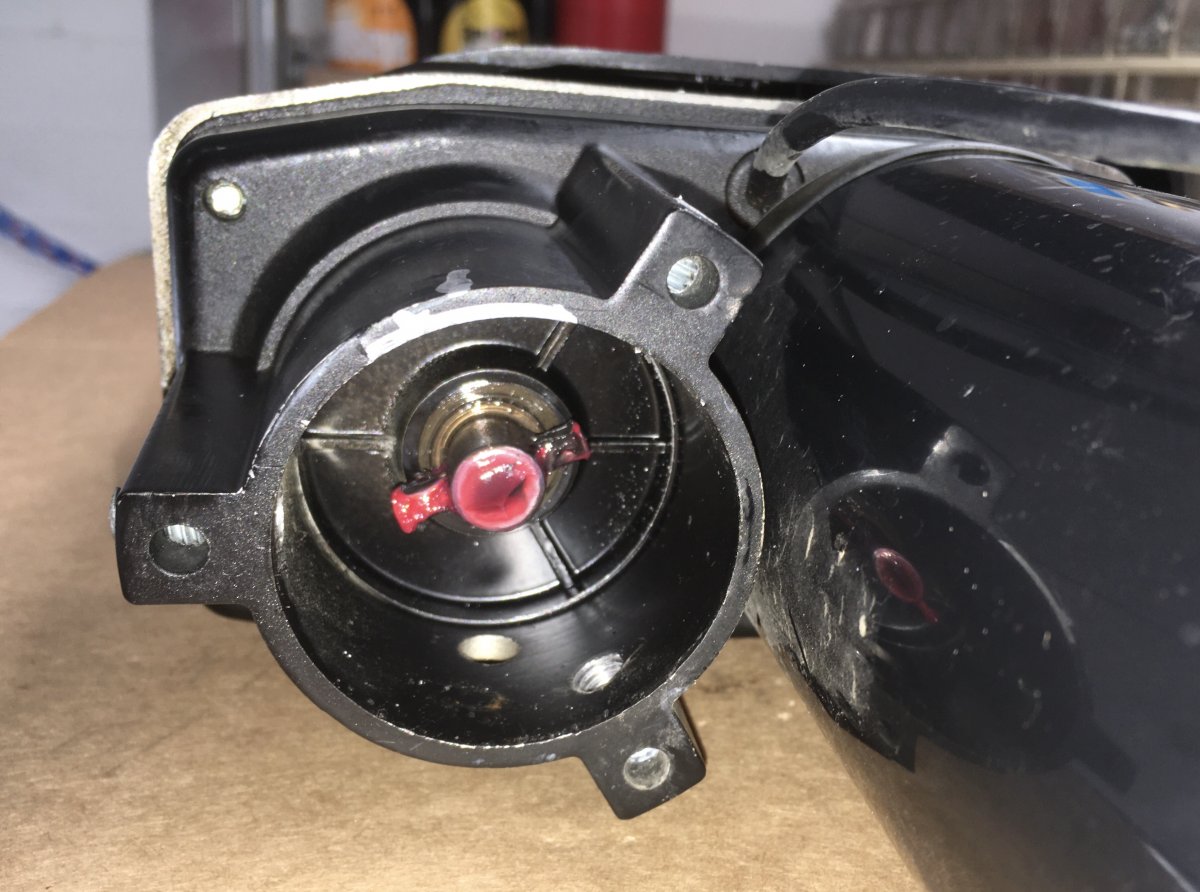
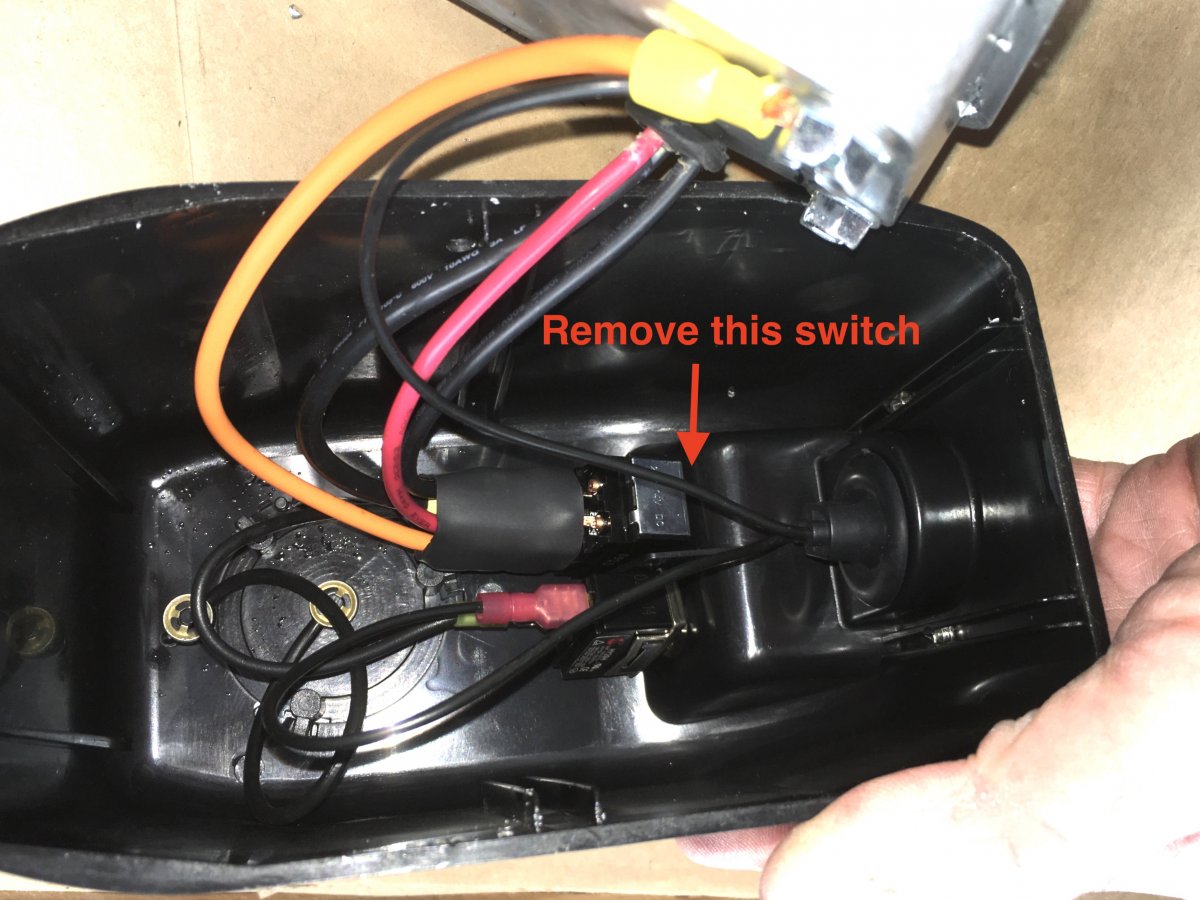
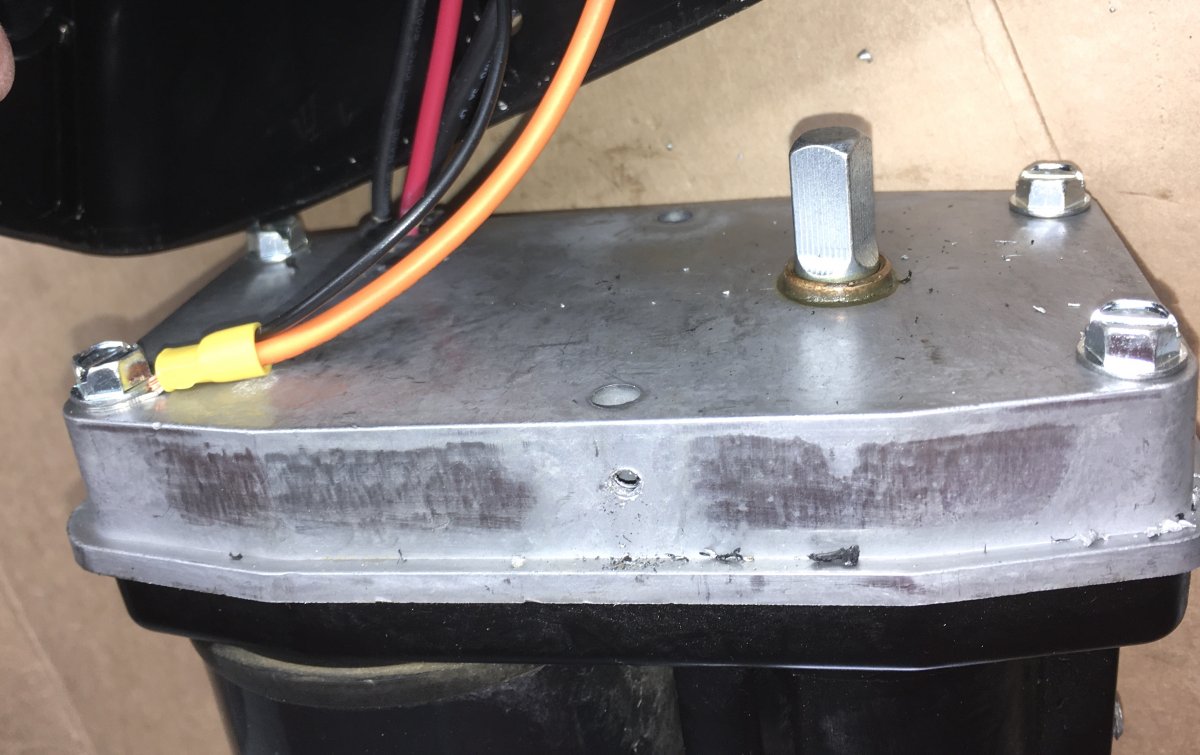
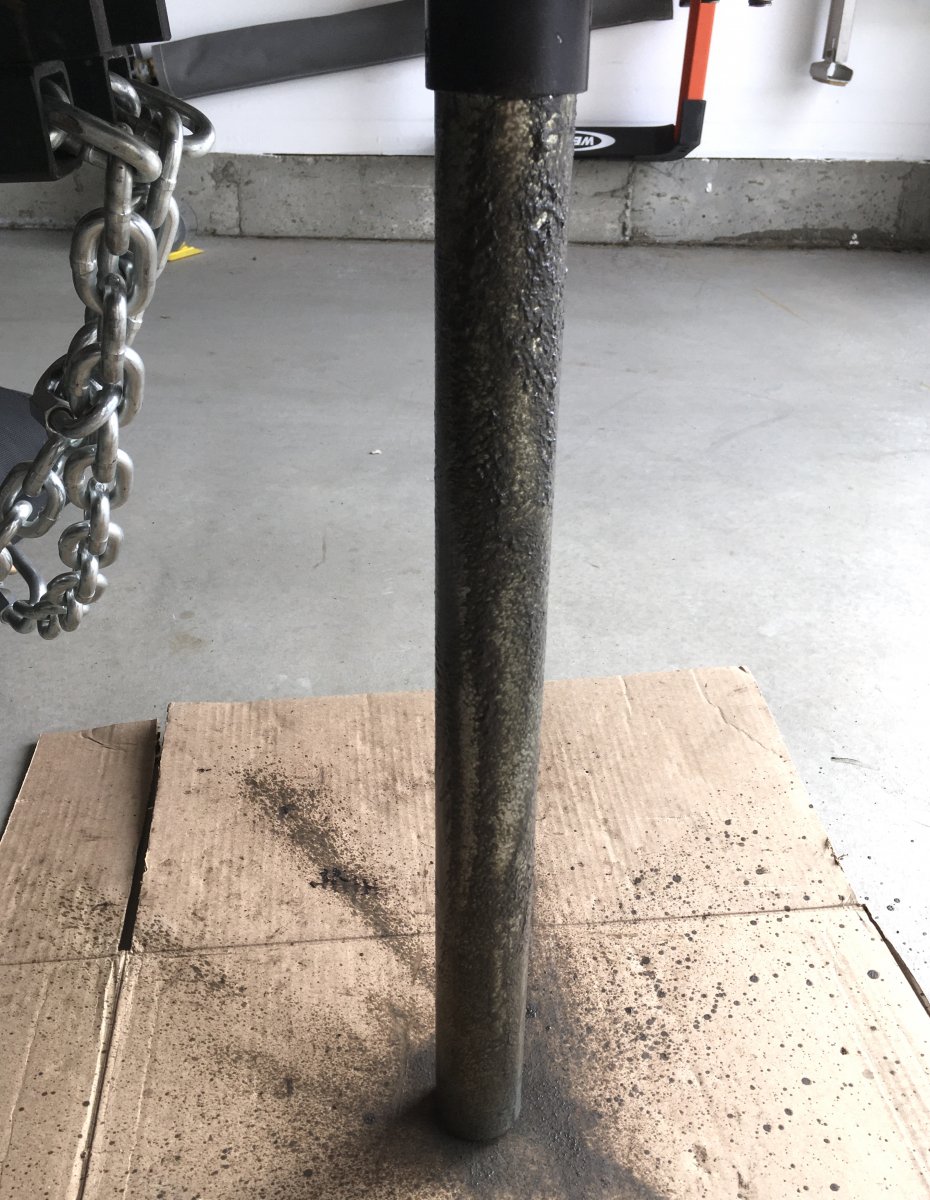
EDIT 04/14/22: ... https://olivertraveltrailers.com/forums/topic/6781-how-to-service-your-rear-electric-jacks/ I have never opened up a jack, they are all starting to get a little loud so I decided to service the front one. I don't remember them being this loud when new: .... Oliver Tongue Jack Operating Sound Here is the manufacturer page: ... https://olivertraveltrailers.com/wp-content/uploads/oliver-university/Component_Manuals/Stabilizing_Jacks/vip3000_Electric_Jack_Manual.pdf The rear jacks are similar to the tongue jack, except they do not have the plastic cover with light and switches. For the tongue jack only, can open up the gearbox area without removing the head, but you are supposed to lube the drive pin where it connects to the vertical tube, so you might as well unbolt the top and take it to a workbench. Unplug the 30 amp slo-blow fuse inside the waterproof holder. Cut any tie wraps. This is the 12 volt power wire, the ground happens through the jack body and trailer frame. NOTE: there is another fuse in back under the street side bed, I am not sure why there are two fuses. Can anyone comment? Use an Allen wrench and unscrew the three countersunk set screws a couple of turns - they are spaced along the base of the head unit. Lift the head off and set it aside. Here is the drive coupling down inside the tube, with the factory lube. It looks fine. Here is the head socket, showing the pin that fits down into that coupling: FYI it is possible to drive the pin out. There is a 1/4" access hole in the side of the cavity. I did not want to disturb it, for fear of damaging the plastic bearing support behind to it. You need to get some slack in the wires so you can slide the cover assembly out of the way. Remove the rubber boot/ nut that holds the Up/ Down switch into the cover, pull it in and let it dangle: Remove the yellow ground wire and pry out the rubber grommet that contains the three wires. Slide it up toward the switches. This will allow the gearbox cover to slide upwards. Remove the other three bolts. CAREFULLY wiggle the lid and pull it off. John Davies Spokane WA
1 point
-
I placed an order for two Southco locking compression latches, 7L279, from Great Lakes Skipper. They're on sale for about $13 cheaper than buying them on Amazon which are also supplied by Great Lakes Skipper. It measures out to be the same as on my 2021 LE2 but the key looks to be a little more substantial. Still not going to keep a serious thief out but I do like the key much better than the original stamped ones. We'll see...
1 point
-
The top of the sewer compartment is non structural, if you plan to make a zee bracket you will also have to beef up the top of the diamond plate. The top of the bike rack crossbar would be fine, is that what you meant? The diamond plate surface is better, so you can remove the rack assembly without disturbing the support device. The fewer tools needed, the better. Of course your bracket will block access to the tire for servicing, but you can add a 36” extension hose with Schrader valve to help that. Of course you guys know all this would be a lot easier with that pesky cover off. Here is a 6061T6 2x2x1/4” reinforcing tie down angle pop riveted with 1/4” rivets at 4 “ spacing. The holes are 1/2” and accept 3/8” stainless carabiners. John Davies Spokane WA
1 point
-
Hi everyone my name is Eric (first time posting on this forum), I am researching Oliver travel trailers and going away from airstream (25fbt international). One of the items I am requesting from my salesman Josh is eliminating the vents in the door of the batteries since I would go with lithium for a cleaner look. My thought is for security why not eliminate the outside battery door altogether and move it to the inside of the trailer. Any thoughts from Oliver owners on the feasibility of this idea ? Have a good day Eric1 point
-
After a leak in one of our rear windows, I found wayfinder's weephole video and that solved the problem. I also tried to clean our white ones, and ended up ordering the new black seal from pelland and replaced all of ours. I definitely like the black better than the white after the switch! I can remember where I saw it, but someone mentioned using a PVC pipe cutter to cut the seals - that worked great and gave a straight edge. FWIW, when I reinstalled, I started at the bottom of the window, pushed it as flush as I could, then worked my way up to the top of the window, then cut.1 point
-
I had a plastic bra installed on mine, similar to the one on my car. I drive to ski areas every weekend throughout the winter so it takes a beating from sand on the road.1 point
-
Steve, any of the racks that clamp the tires, like 1-Up and Kuat, have a deadly flaw, an Achilles heel (other than the fender clearance issue). If a tire goes flat, the bike will start to flop around. The larger the tire, the more it will loosen, for example fat tire bike vs road bike…. At the very least you should strap the two bikes to each other so that they can provide mutual support. For a single bike that is not an option.You need some sort of secondary straps. Do you do anything about your plate? It is hidden with the rack up or down. In some states you might get you a ticket. 1-Up makes a relocation kit. Or you can just use heavy nylon cable ties. OTH when I first got “Mouse”, the lady at the Sales office who does the temp trip permits was absent, so I towed 4000 miles with no plate or permit, and nobody mentioned it. John Davies Spokane WA
1 point
-
Hi Eric, welcome aboard. We started looking at Olivers about the same time they started showing up as a topic on Air Forums. We’ve had two Airstreams, a ‘98 Safari 25’ 6 sleeper, and a ‘12 Flying Cloud 25’ FB. Even though the AS trailers are well made, I believe the OTTs are much better. What got us to finally make the move was difficulty getting the Airstream into the RV barn. With an off camber incline, and only 6” clearance on each side of the door, not to forget snow and ice… it was nerve wracking. No regrets.1 point
-
It would take quite a bit of it, but for agm and Lithium users, very little maintenance required. For the very few who still buy lead acid flooded batteries, it's another story. The compartment would still require venting, at least for agm/fla. Agm will vent if a bad cell, overcharged, etc, and a vent is legally required for those two types. In my 2008 Elite, the battery compartment is right under my head, so of course, I'm always "on top" of the situation. (Pun intended. 😀 ) That positioning of the battery compartment would mean crawling under the bed, or taking the bed apart. That would be a no go, for us. But under the pantry,,slide tray into the aisle, would be great for e2 owners, imo as a ps, major servicing the fridge requires the entire aisle, or removing it. It's not, imo, that big a deal.1 point
-
And it might be difficult to service them because the slide-out might take the entire width of the 'hall' in the E2. Also, I'd personally prefer to do service on a battery outside rather than inside my trailer.1 point
-
Time to reassemble the jack. You want to get ample grease under the main drive gear. There is a spacing between the washers on the underside and I made sure this groove was packed. Then I thought the housing area under this gear should be filled with grease. Don't forget the washer which you can see in a picture above. The first time I pushed it in, it did not sound right. So, I added a heaping tablespoon more grease and the second time I could hear the correct swoosh sound, with excess grease coming out around the edges. I made sure every tooth on all 3 gears were greased and applied some on top.
1 point
-
The bushings were not worn, but have an odd loose fit, that you would not see in auto applications, like in a water or oil pump. The only worn part I observed was the motor drive gear. See the pic. The relay gear contacts this drive gear at the top portion. It appears the bottom of this gear has cut into the drive gear some, might be some of the noise and the only way to replace this would be to purchase a new motor. It's good enough for now.
1 point
-
You should notice from the pics (previous post), that I took my rebuild another step and punched out the cross-pin that holds the main drive gear into the housing. The picture shows the punch, the pin, gear and housing. Note the hole, that you would drive a punch through to remove the pin The pin can be punched either direction, as both ends are tapered. I was worried at first, trying to eyeball the thinner side, not! John previously mentioned the black metal powder/shavings in the grease. Top of the gear was old and hard; bottom of the gear was soft, well used and rich of burnt metal.1 point
-
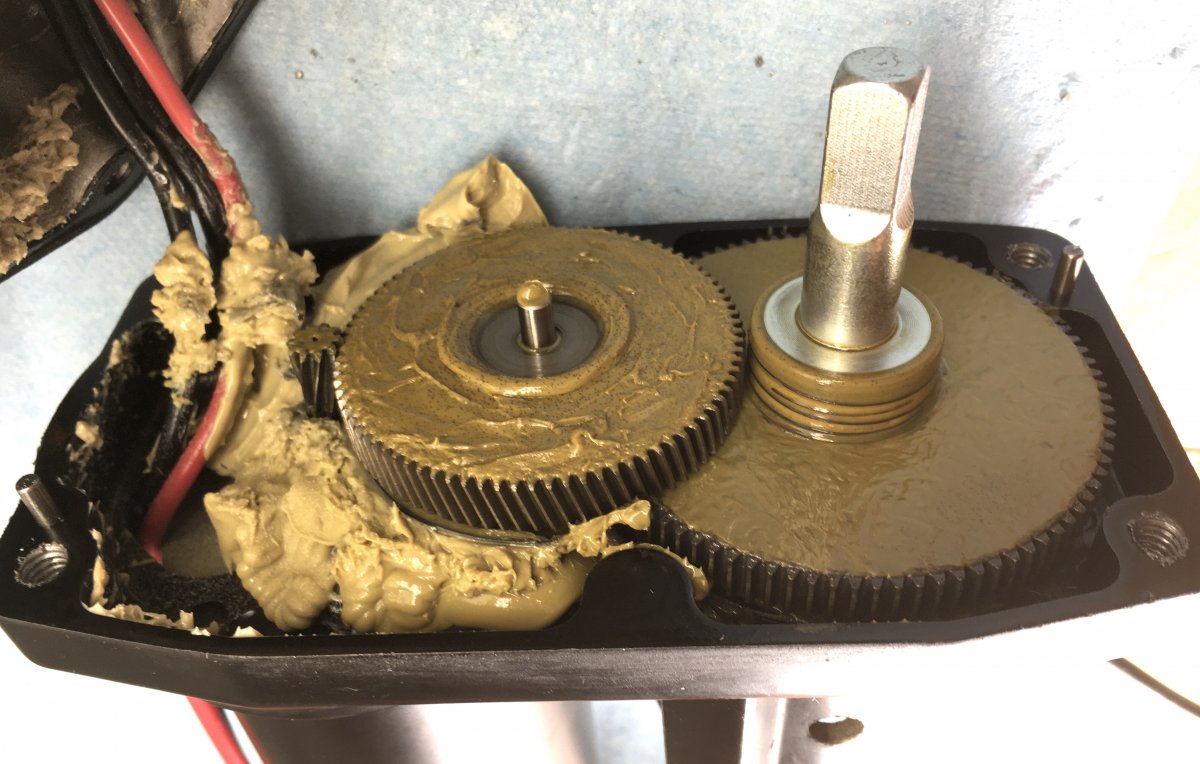
Well at least another member opened this old thread, this year of 2023, before I did, and I thank you. After reading everything here, I jacked the front up high of our Oliver, and placed it on a jack stand. I started pulling the cover off the VIP3000 Power Jack and then remembered from JD's post, that I should first remove the power head. You want to pull the head, using the 5/32" Allen key, and work the maintenance on your shop workbench. First thing I noticed is that the main driveshaft had a 1/4" play up and down, that cannot be good! Then I stripped down the parts, looking carefully at the gears and bushings. Let me show you a few pics first. I do not have the pic when I first opened the top casing, but of the insides. But, like John wrote, the old brown grease is "cr@p." Not his words exactly, but to quote one of our lovely forum members. Thanks 😉
1 point
-
If you have need for a sump pump, a 12V pump can be installed and two 6V batteries can be used in series or two 12V can be used in parallel, maintained with a battery trickle charger for when power is on or off.1 point
-
...more pix from Eagle Nest, Red River, Cimmarron, NM weekend "beat the heat" adventure: Above Eagle Nest Lake State Park boat ramp. Lunch stop adjacent to the Cimarron River - awesome fly-fishing. Above, Cimarron River... Magnus is ready to hit the road.... Great being out and about with the Casablanca, but not another Ollie spotted... Be safe out there... Best, A & D
1 point
-
Eagle Nest Lake State Park, NM... Where's Magnus? He's love'n the 60F temps (so are we for that matter)! His FAV spot - right under the Ollie steps! Red River, NM - 8,600' near Eagle Nest - great weekend romp! He's spent... Oh, well... charge up his batteries and go again in the morning. Cheers, A&D
1 point
-
We always check to see who is at the Opry or if there are any performances at the Ryman. There are also music related museums in Nashville. A trip to the Jack Daniels distillery is interesting. Mike1 point
-
Stop on by sometime, you can take a look, I do not plan on opening it up myself for quite a while. John Davies Spokane WA1 point
-
Our water pump quit working once. When I checked it I noticed that there was a wire lose that goes to the pump. On mine, there are two red wires that connect to the pump. Make sure they are both still connected. They can work lose if you are on bumpy roads. Mike1 point
-
Thanks, John. I went out of got some PB Blaster. I also dropped Jason from OTT a note to see if had any tips. In case anyone comes to this tread having the same issue as I did, I wanted to add Jason's comments for information. Im not sure which tip worked more (John or Jason) but eventually one helped to loosen it. Thought it was still very difficult (it took two hours to do the two back jacks!!) Anyway, Jason said that some of the guys use Red Loctite when closing those Allen screws. So the only thing that will loosen the loctite is heat. He said put a flame around it for a short time. I did that, I also heated the allen key and left it in the screw to help things along. But I got there eventually by using both the PB Blaster and the flame. Thanks again to Jason and John!1 point
-
We also have a small collection of PB products in the garage. They are, overall, pretty great products. Sherry1 point
-
PB Is good stuff - I had a swingarm that just laughed at IT however.....but the saw eventually won...1 point
-
I agree with The Shackelfords that the WD-40 Specialist Dry Lube PTFE Spray would be a good selection. I found it at Home Depot in a large 10 OZ can for less than $7. This lube is dust and dirt resistant. It is my go to lube for bike chains, table saws and other equipment that tends to gather gunk when in use.1 point
-
Any of those teflon (PTFE) sprays would probably be OK, some RV owners swear by them. But the white particles do not really bond to the steel, they tend to flake off and fall away under any real side force. I have not personally tried this type, but their big advantage is they are not very messy, unlike the black moly lubes which are pretty nasty. Why don't you try that product and report back? Be sure to degrease the tubes first, I don't think it will mix with the existing grease. Thanks. John Davies Spokane WA1 point
-
John, I took all three of my jacks apart about six months after I purchased our 2017 LEII. I took mine apart because one jack was (is) very loud running in either direction. The grease used in the gearboxes in mine is a white lithium type. I didn’t think there was quite enough used so, I ordered a can of white lithium and added much more. What was factory installed was soft but just skimpy IMHO. The extra grease sadly didn’t change the sound so I’m no longer concerned that the gears may be running dry.1 point
-
I don’t know what more I can add. The fact that these jacks come from the manufacturer with grease on the tubes indicates to me that some sort of lube is needed. They do sometimes have a severe side load if your are parked on a slope. I would use an industrial dry lube (spray moly) but that was my very last resort, it is extremely messy and any overspray drifting onto the frame or gelcoat might be hard to get off. I use a similar product (Lock-Eze) on locks and it is truly messy and stains your hands very badly... I have not yet checked that glop I sprayed on, I will do so soon and report back. EDIT, after 24 hrs the fork lift rail lube is still a nasty gooey mess. I was under the impression that it would dry, but it is way too gross for a place where an owner might get it on his hands or clothing. I am going to flush it all away with solvent. I think I will just leave the tubes dry. John Davies Spokane WA1 point
-
I can't answer that, Jason told me that the service department uses white grease on it. Sometimes it gets a pretty heavy side load, I think it would benefit from something slippery between the two sleeves. There is a lot of chatter about this on RV forums but nobody seems to have discovered a wonder lubricant. Maybe dry is best.... John Davies Spokane WA1 point
-
I wanted to try a new lubricant on the vertical sliding tubes. Oliver Service uses a plain lithium grease. I wanted something that would not attract dust and turn into grinding compound. I tried this specialty lubricant: CRC Forklift Inner Slide Lubricant I extended the tube, took off the foot and degreased it. I used the spray tube to inject some lube up into the joint between the two parts. I then sprayed the visible part: I have to say that it was not what I expected, it is quite thick and gloppy. I will see how it does after waiting overnight. If it remains sticky I may try a dry Moly lube. I will report back on how it does, or does not ;( EDIT, after 24 hrs the fork lift rail lube is still a nasty gooey mess. I was under the impression that it would dry, but it is way too gross for a place where an owner might get it on his hands or clothing. I am going to flush it all away with solvent. I think I will just leave the tubes dry. John Davies Spokane WW
1 point
-
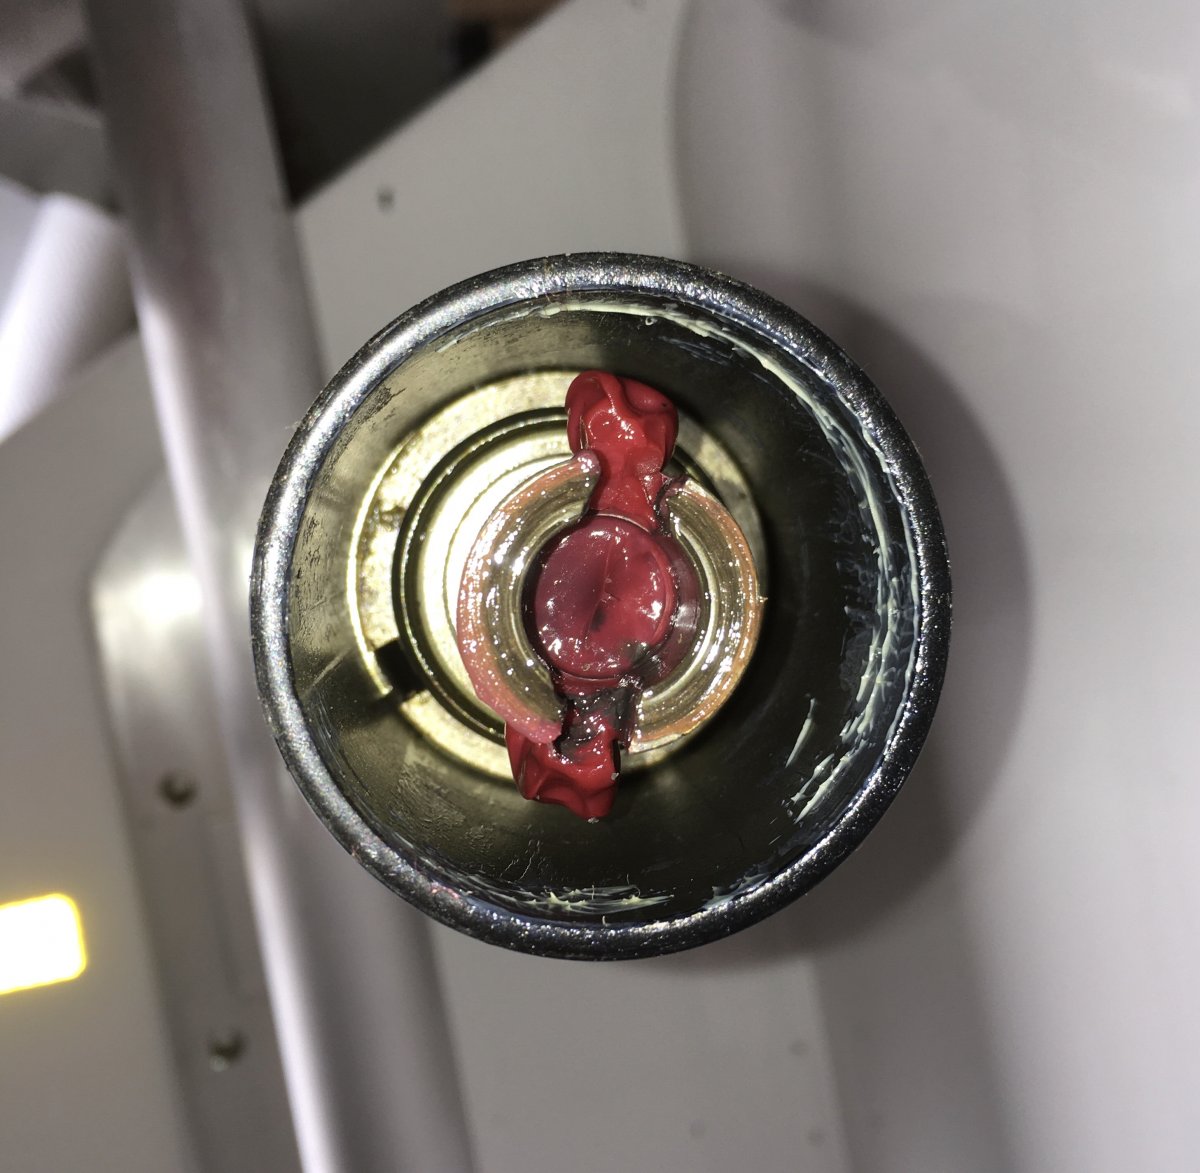
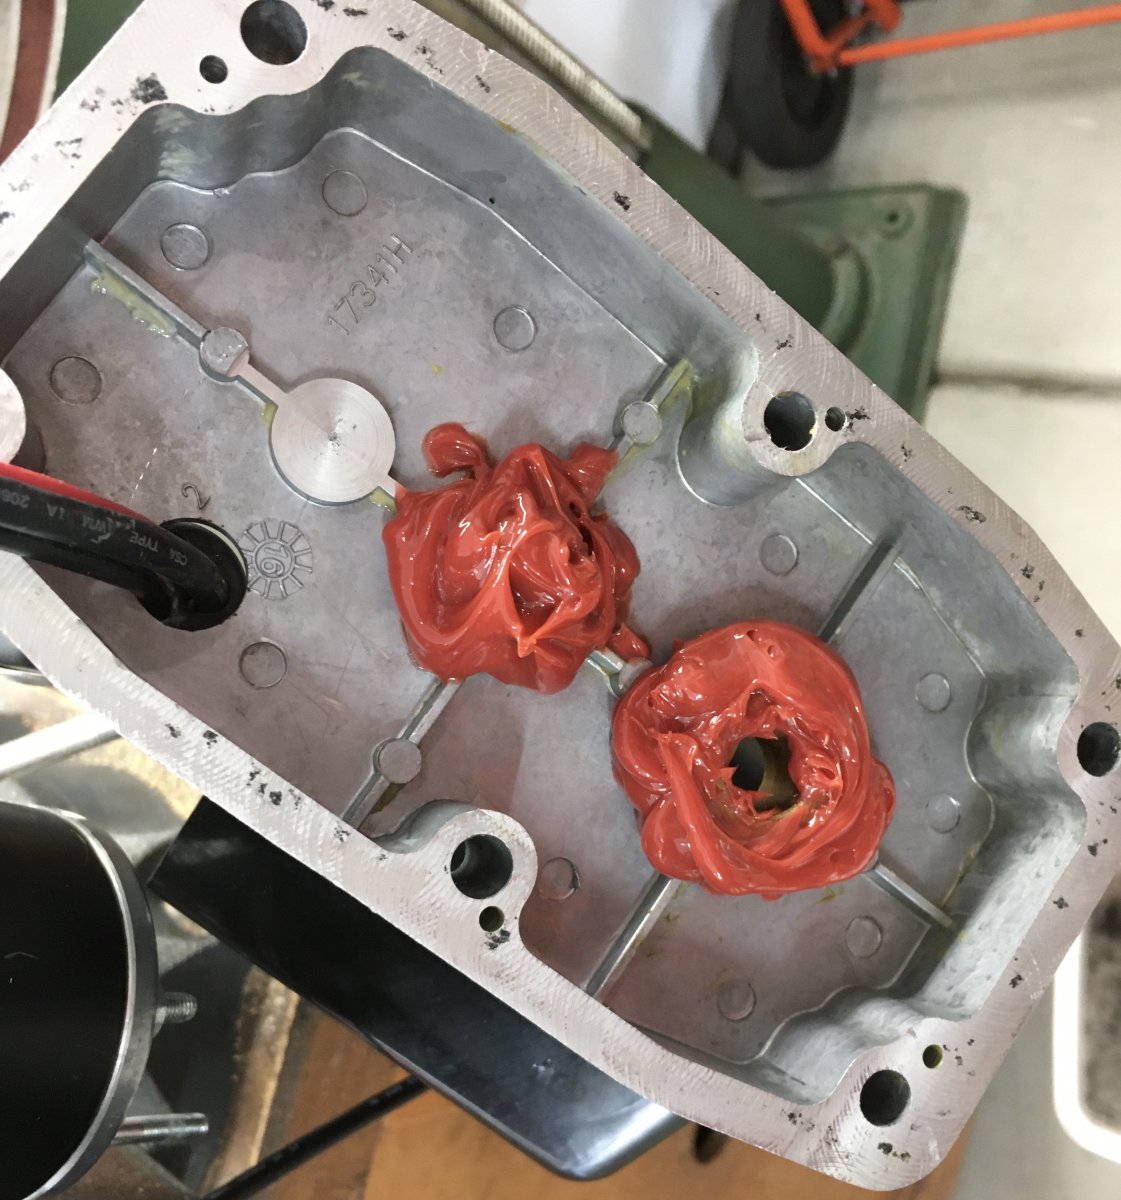
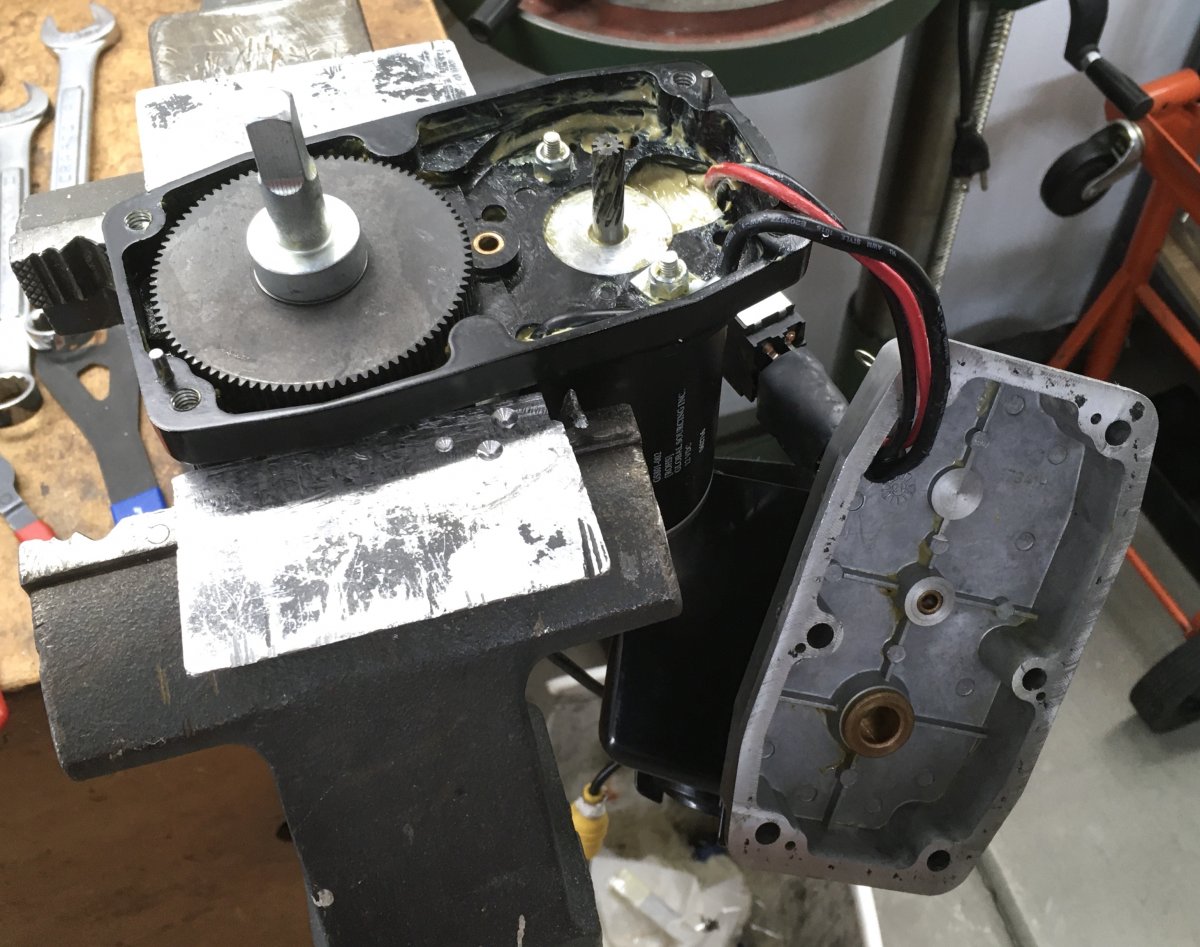
I used Redline CV-2 grease. It should flow better than the thick OEM glop. This big syringe made it easy to inject grease where I wanted it. EDIT: Redline CV-2 Magic Grease Big syringe Fill up the lower case. Be sure to get grease under the big driven gear: Fully surround the two upper bearings. There is no need to fill the entire upper cavity. I added a small amount of black silicone RTV sealer to the torn area of the gasket. Reassemble the gearbox. Clean the old grease from the slotted coupler and add some new: Reinstall the head unit to the tube. Make sure the pin engages the slot! Secure the three Allen screws, connect the wire and secure it with black nylon ties. Function check the jack. I was disappointed to discover that there was no change in the sound. level..... darn it. John Davies Spokane WA
1 point
-
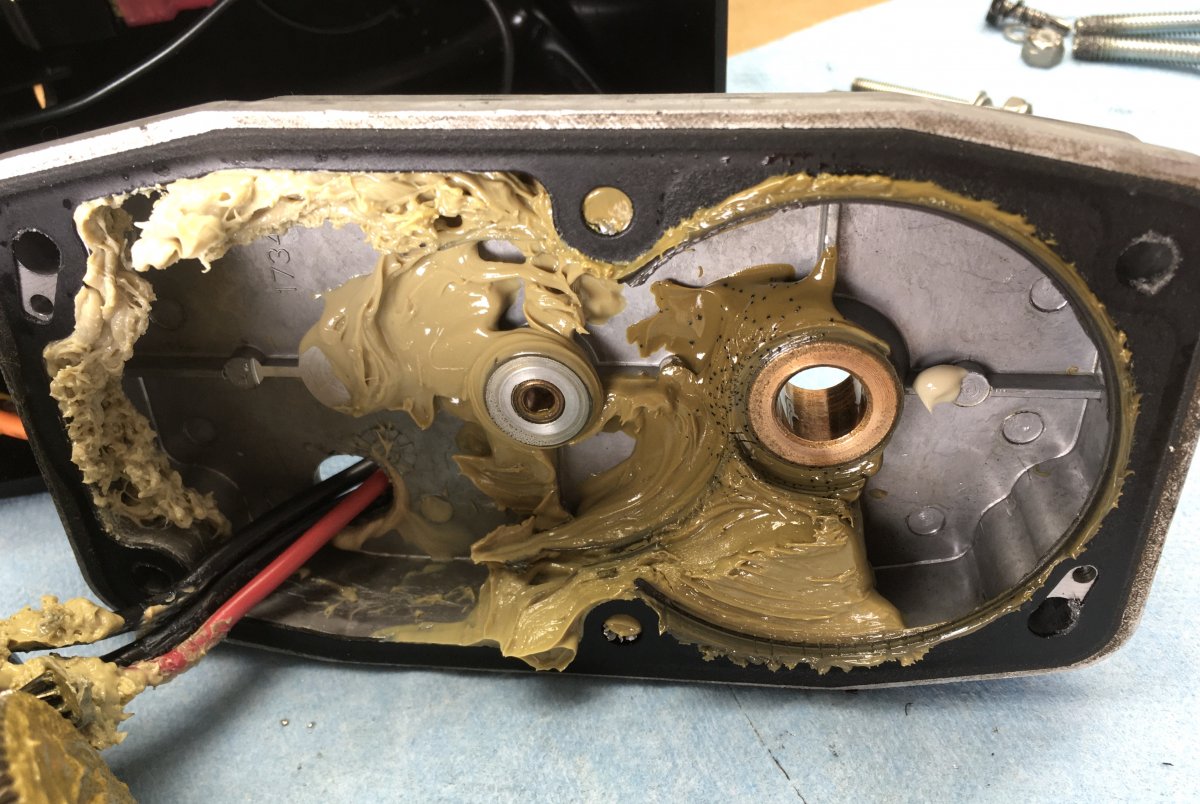
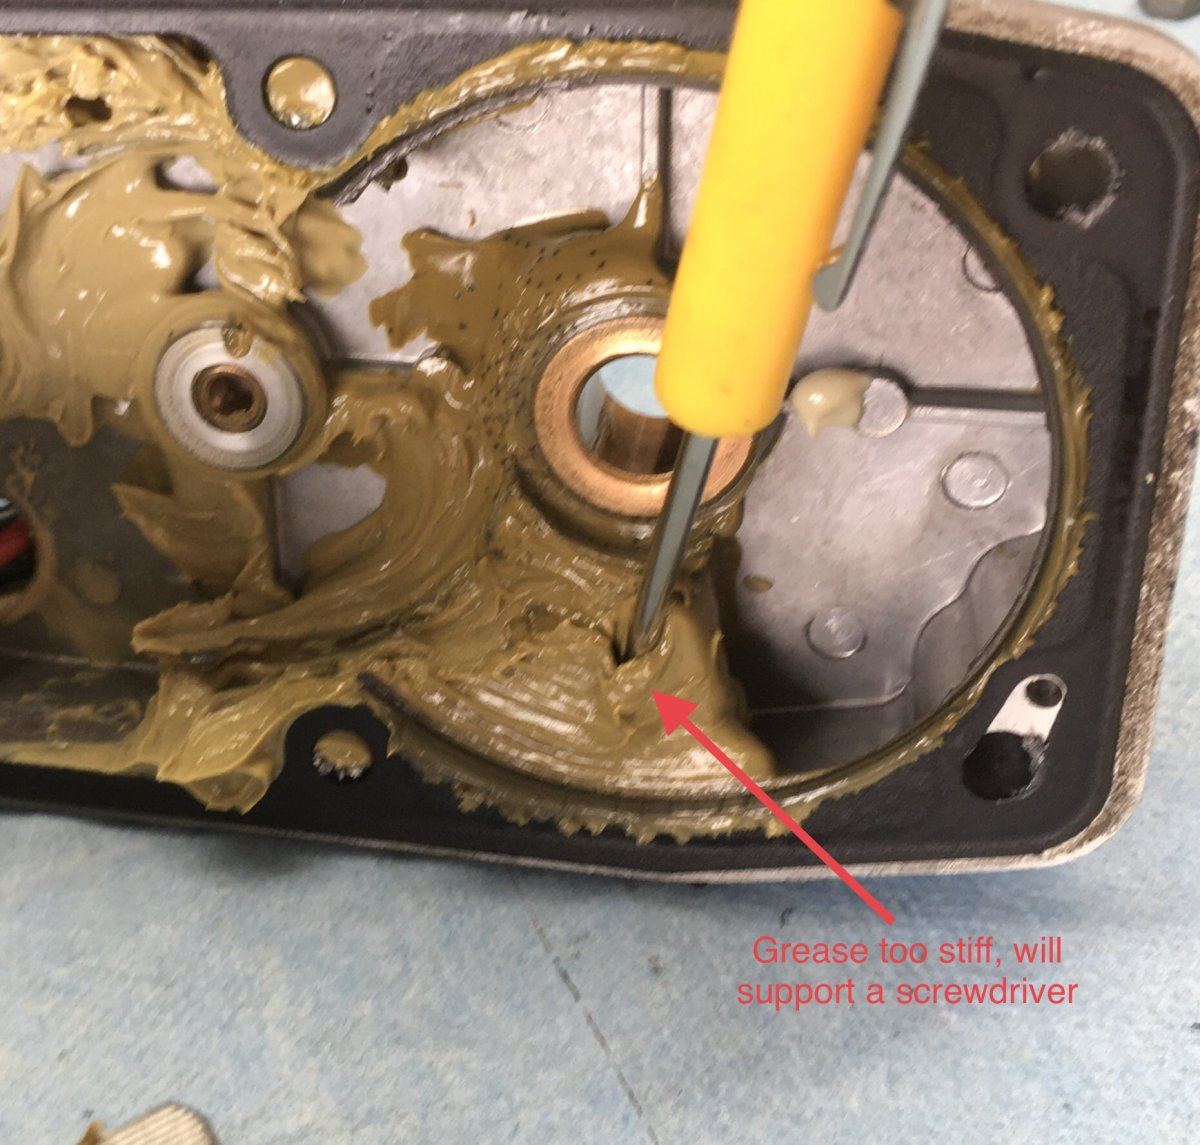
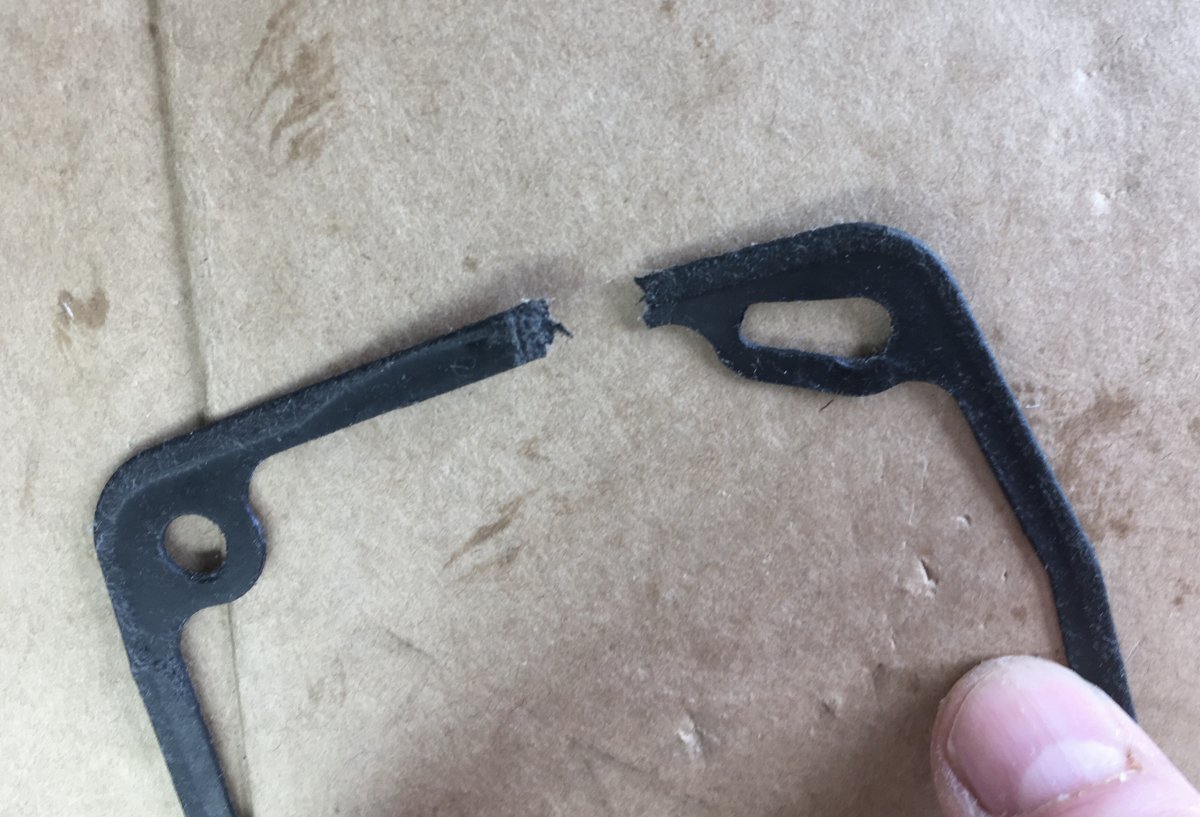
Here is the inside lower part. The grease is not contaminated by water entry, but it has completely vanished from the gear teeth where it is most needed. This is the top portion. There is not nearly enough grease around the main shaft bearing, water could enter here. Note the black streaks and speckles. That is metal contamination from the gears.: The grease is so thick that it will support a small screwdriver: Because the grease looked so bad I decided to remove as much as I could rather than just adding more.... I wiped out most of it with paper towels, then used brake cleaner to flush the rest. I was careful not to get any down into the motor. I blew the parts dry with compressed air. The plastic parts do not appear to have been affected by the solvent. I was sure to get as much out around the lower drive shaft as possible, I did not remove the cross pin. I tried to work around the gasket but it tore: I moved the gearbox to my bench vise to hold it steady for reassembly: John Davies Spokane WA
1 point


-
Recent Achievements
-


")


")


