Leaderboard


Popular Content
Showing content with the highest reputation on 09/23/2023 in all areas
-
We camped at New River State Park NC this week. Very nice campground and great area to visit: View from Mount Jefferson:5 points
-
Make sure both valves (hot and cold) for the outside shower are turned off. If they are left open it allows cold water and hot water to mix in the plumbing system.3 points
-
Here's a close-up of JD's favorite part - the self-adjuster! It appears to be a good design (perhaps not). The spring is very straight and evenly stretched. I disassembled one brake assembly completely, lot's of work and some cussing will be involved in getting these back together! Good maintenance would include applying some silicone grease (I use Napa Sil-Glyde) on the shoe contact points and inside the adjuster. This is a good product for all automotive brake systems. I have a full set of drum brake tools, from back in the day when my '67 Buicks had drums all the way around. A tool to compress the shoe pin springs and another to stretch the springs.
 3 points
 -
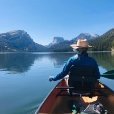
Wonderful WX here in Almont CO right along side the Gunnison River - phenomenal fly fishing... Currently mid-60's, no wind and wall-to-wall sunshine! Magnus and D got their bike ride in this AM - 3+ miles at 8,100'MSL.
3 points
-
Snapaction mini circuit breaker, at2, 15 amp, type 2. Remote reset. Technically, not a fuse, but a circuit breaker. https://www.snapaction.net/ Not surprised NAPA didn't have one. The 07092 isn't a part number. It's the manufacturer zip code.
3 points
-
Glad that was it. It’s one of those collective knowledge items that you get from this forum. I don’t think it’s actually documented anywhere in any of the instruction manuals.2 points
-
As John D. said above, I would start at the back of the GFI plug and trace backwards for power. You obviously have a functioning 120v system, just no power beyond the GFI, which will effect all other outlets. Likely a loose connection or a bad GFI. GFI's are very prone to failure. If you can eliminate any other problem, meaning you have 120 volts to the wires connecting to the back of the GFI, than letting Oliver service know they will probably send you out and new GFI promptly. If you don't have power at the wires on the back of the GFI, you will need to check at the next connection back that those wires connect to until you find the loose connection. Best approach is to fill out a trouble ticket. This allows the chain of management at Oliver service to monitor the progress and problems/solutions found. Regarding Oliver not willing to troubleshoot the 120v system, it sounds like some confusion has occurred. They will not troubleshoot beyond the shore connection, but the absolutely will troubleshoot from the shore connection to the internal systems of the camper.2 points
-
support@olivertraveltrailers.com Start a ticket as others stated. They have always been responsive. Whether it is Jason, Mike, or Hannah, I have always gotten support on electrical issues. Go under the front dinette and check the backside of the GFIC outlet for loose wire(s). Good Luck and please share the fix.2 points
-
Our gfci shorted out and had to be replaced once on a Canadian trip. If you can't reset a gfci, there is either: no power to the circuit, possibly a loose connection, a bad ground, or a bad gfci that requires replacement. Does your gfci have any indicator light on it? If you have some indicator light, then you likely have power. Please complete your profile, or at least tell us what model/year trailer, power package etc., so that others can help you better. Do open a service ticket, with complete information and a phone number so someone can help you at Oliver service.2 points
-
Unable to find a previous thread about what books you listen to on the road, I'm starting another. Please share any audio books you recommend to help make those long days on the road fly by. Here are some of our favorites, most of which were suggested by fellow Ollie owners. (Thank you!) Ordinary Heroes The Boys in the Boat A Man Called Ove Michener's Alaska (especially if you're going there) A River Runs Through It Beartown Girl with a Dragon Tattoo The Way I Heard It The Extraordinary Life of Sam Hell The 100-Year-Old Man Who Climbed Out the Window and Disappeared Floating Twigs Where the Crawdads Sing1 point
-
The Airstream sold today. We had a lot of fun with our Desert Tortoise, but it was sad to see it go.1 point
-
Unfortunately, my ASA Voyager rearview camera developed a leak which cause moisture to collect inside the housing. This, in turn, caused the camera view to be "foggy" and/or virtually non-usable. Via email I contacted ASA's customer relations area and they advised me to send the camera in to be examined. I removed it from the Ollie, boxed it up and put it in the mail 6 days ago. Today, I received a new camera via FedEx. That is what I call great service!. Unfortunately, ASA didn't include a tech in the package to do the re-install! However, that process has got to be a bunch easier than getting the old one off the Oliver in the first place.😊 Like Oliver, these guys take Service to the point it should be and this makes what could have been a very disappointing situation into an almost pleasant one. Bill1 point
-
I have been a regular browser of the forum as a guest for quite some time now. I don't own a travel trailer or any sort of RV. I do, however, dream of travelling with an Oliver trailer and seeing all there is to see in Canada and the USA. My wife wonders why I visit the forum. As I see it, lots of people buy lottery tickets and dream of what they will do if they win. I skip the ticket buying and go straight to the forum to dream about hitting the road with an Ollie in tow! Given the significant number of people visiting the forum as a guest, I might not be the only one who enjoys the forum for this reason. Yesterday I acted on Bill's invitation and I am now a registered user of the forum. I may, from time to time, be able to contribute to the discussions. I am very familiar with national parks in Canada, having lived and worked in them for many years. Perhaps I may be able to provide a bit of trip planning advice to someone considering a trip north of the 49th parallel? Despite my chosen user name, Oliver ownership, for me, is not likely to happen "someday soon".1 point
-
See my reply to your other post about the camera. The wiring can be accessed via the attic. You will need to remove the two self tapping screws/bolts at the bottom of the left (curbside) panel and pull down the insulation. You should be able to locate where the wires from the camera come through the roof. Follow those wires about a foot to 18 inches and you should come to the pin connector I mention in the other post. Bill1 point
-
Chris - Hopefully its not too late - but - I'd email ASA (assuming that this is the camera you are talking about) and tell then that your camera has a moisture leak. Chances are they will tell you to send it in (with a return authorization number). They will "test" it for the failure you told them about and if it has really failed they will send you a new camera. This process takes right around 7 business days including the shipping time. Good luck! Bill p.s. unless you cut the wiring then the camera is connected to the power wiring via a "pin connector". Simply depress the latch on the side of the connector and pull it apart. The new camera will simply plug right back into that connector. Then just follow the instructions above to get the new camera to "pair" with the monitor.1 point
-
During all of your investigation, did you check the state of charge on the Lithonics app for each battery and the Xantrex app for the volts?1 point
-
My 2018 F150 SuperCab, 6.5 ft bed, Coyote 5.0L V8 has pulled up over the Rocky Mts several times without having to lose any speed at all. The RPMs may rev high in the 3500-4000 range for a brief time, but that is well under the red line. While towing my 2008 Elite, I always put the drive train in the "Tow-Haul" mode, which locks out the 9th and 10th gears on the 10 speed transmission. "Tow-Haul" mode greatly reduces transmission gear hunting and reduces stress on the transmission. Non towing MPG is around 23 at posted highway speeds and 14.0 while towing at 65MPH. (My truck is short enough to fit inside my garage)1 point
-
So, the last picture shows how clean the brake master reservoir looked after service. The first thing I do is get the truck on jack stands (it was already up for suspension work and trans service). You can bleed brakes with wheels on, but I prefer to take it straight on and then it only takes a few minutes. The fluid in my master cylinder reservoir was BLACK with clumps of junk in the bottom, and same in the calipers. I drained the calipers when off the vehicle, bleed valves open, using a Channel Lock to compress both cylinders. Removed the reservoir and cleaned it inside. There was a pin punched in place to hold the reservoir to the master. I filled a little tub with full strength Super Clean ($10/gal at Walmart), let it soak overnight and next day shook the reservoir hard until everything came loose and clean. To bleed the brakes, you need a container (I use an empty handle-bottle of Vodka!) and an 18" length of clear hose, that fits the bleed valve. Clear so you can see air bubbles and the color of the fluid. Some say bleed the furthest wheel first, but it really doesn't matter. Some of you with modern ABS systems may need additional service, but only if you have any ABS issues. You can open the bleeder valve and just pump the brake pedal hard a few pumps (hose connected into bottle). Make sure you keep an eye on the reservoir, and never let it empty. The last bleed, your partner needs to pump the brakes 2-3 times hard, hold them down and do not let go, then you open the bleed valve and close it. She can now let her foot off the brakes (that would be my wife Chris). Your brakes will be much improved and safe in the mountains. Do yourself a favor, pop your hood today and look at your brake fluid. If you see anything but clean clear fluid, schedule this maintenance! 😊1 point
-
Just a brief hello as I prepare to be without power for about a month. Won't be able to participate in the forum as much, unless I manage from my phone. Black Hills SD, Devils Tower WY, Wapiti campground (west of Cody), West Yellowstone MT, and someplace in the Grand Tetons WY before turning south and east. Many heartfelt thanks to all the great members here for your help, encouragement and advice as I begin this next segment of the journey. I'm thrilled!1 point
-
Any simple continuity tester would tell you if it is blown. touch the 2 blades and if no tone then blown.1 point
-
I’ll try … it’s the black one. (The blue one was provided in my spare fuse kit from OTT.) I tried a local hardware as well as NAPA, neither carry it or know about it. It’s in the fuse box, with all the other fuses. I don’t believe it’s blown, but I want to understand how it differs from the other fuses, and how to gauge when it is blown.
1 point
-
Ronbrink, you did quite a job! I'll post my pictures soon, the before and after. Bill thank you for your note. I'm hoping mine will perform properly. I still cannot get my head around how shoes can get too tight, as they can only go so far. I'll add a little silicone brake grease to the adjuster pistons and where the shoes contact the backing plate. JD, yep the limited travel is obvious since the leaf springs appear to have minimal arc! They should be longer and taller. It would be nice if OTT would upgrade this and position the wheels a little further from each other. Not worried about warranty on a $24 part. Usually when I replace shocks it's from a used vehicle recently purchased and I buy new shocks for any that test bad.1 point
-
SOLVED! I had to turn off all breakers, turn off and disconnect from main 30amp power supply, then reset everything… and it worked! But I do have a question: There are (2) fuses in the aft dinette’s fuse box, for receptacles (?) — labeled #9 & 10 (2022 Elite II) — they are solid black — how can you tell if they are blown, when you can’t see through them?1 point
-
Thanks, @Patriot - we've been getting a lot of similar complements on 'Ol Glory this trip. Your's is looking great also 🇱🇷! - great minds think alike! HA!1 point
-
And, this is the case with thousands of these brakes. Yes, it is unfortunate when they do not work as designed. Yes, they are much more complicated as compared to the manual adjusting kind, but, for many people who do not or will not adjust their own brakes, the automatic ones generally do the job. Bill1 point
-
Way to fly our great country’s only flag Max! 🇺🇸🇺🇸🇺🇸🇺🇸 Looking great, enjoy!! Onward! Patriot🇺🇸1 point
-
Sounds like you’re gonna DIY the bearing overhaul! Did the same last May, went with the Timkens as well, from Summit Racing. The CRC degreaser and brake cleaners I used worked great along with a parts cleaning brush and drip pan. I also ordered a brass drift punch for use in driving out the races and the Red Line CV-2 grease that John E Davies highly recommends. I found placing paper towels under the spindle prior to installing the bearings useful in keeping grease off the underlying brake components. Since the wheels are off and grease likely leaked from the rear seals, take time to throughly cleanup residuals and wash the tires. If you haven’t done so already, now would be a good time the replace the grease zerks with the angled variety. Many install 90°, but I choose 45° from Grainger’s. Good luck with your endeavor!
1 point
-
I ended up changing my reservation from Bakers Hole (dry camping) to Rainbow Point, Gallatin NF in MT. This gained an electrical connection (no water connection, but I already winterized). Driving in, the rain turned to sleet. I’ll be happy using my space heater in the morning! I have weak cell service here, so no photos to share today, but I’ll try to post some later. This NF cg seems nice, but a warning: the road in was severely washboarded — slow going. I think I was going about 5 mph; no contents out of place when I landed. There’s a lake, and footpaths to access it from each cg loop.1 point
-
IMG_9671.mov We hiked around Bear Lake it is beautiful. We also hiked Sprague Lake. I may do a little trout fishing.
1 point
-
Rereading you're post,,with edits, I'd say 90 per cent, bad gfci, and a simple repair. Best of luck. Let us know how it works out.1 point
-
Shooting in the dark here but if your microwave is working your inverter is working. Possibly your GFCI outlet is at fault, hard to say. Oliver service will definitely help you, they're some of the best in the industry, try them again.1 point
-
We are camping in the in Colorado Rockies as I write this post. I can’t begin to express how happy we are towing our LE2 with our F350 6.7 PS Diesel. You can get by with a half ton towing the E1 for sure. As our LE2, we prefer a 1 ton to get the job done for many more reasons than I care to write. Safety and long haul comfort is at the top of our list. We just could not pass up the Cabelas in Lonetree Colorado yesterday.😊 Patriot🇺🇸
1 point
-
Since you did not fill in the information about your trailer, it would be really helpful if you told us which model trailer you have, what year it is, what kind of batteries, solar?, generator? Without much info to go on, I'm confused. You're camping with no hookups but somehow expected there to be 120 volts available from your outlets? You state that the microwave and A/C will run. The only place they can get power (in your situation) is from the batteries, through the inverter and only if your trailer has the Lithium battery package. Further you state that you "Called Oliver service and [they] would not help me, no tech support for anything 120v." This does not sound right. Who did you talk to?1 point
-
For your Elite I, you don't need a "big truck". I would highly recommend a Mid Sized Pickup like the GMC Canyon or the Chevy Colorado with the 2.7L I-4 Turbo DOHC VVT DI with Active Fuel Management engine. This engine is standard in the GMC and the high end option the Colorado. https://pickuptrucktalk.com/2023/05/2023-gmc-canyon-vs-chevy-colorado-spec-by-spec-comparison/ There are some owners that use this small truck (or its diesel predecessor) to tow the larger Elite II. All report success towing the 2000+ pound heavier trailer. But, that "success" is dependent on what your expectations are of a good towing experience. To me, it's being able to carry anything I desire and still be able to power up a 12,000 foot pass at the legal speed limit and coast down the other side never having to touch the brakes, using only the exhaust brake and downshifting. This is easy East of the Mississippi River where the highest point you can drive to is 6400 feet. Compare that to the highest paved road in North America, Mount Evans Road in Colorado that rises to a height of 14,130 feet. Since you hail from Montana, I'm sure you're all too familiar with navigating the western highways. We've owned 5 different tow vehicles including a 1500, 2500 and now a 3500. I've towed with all of them - a lot. For me, I could have my choice as we own both a GMC Canyon with the 2.8L diesel and a Silverado 3500HD 6.6L diesel but anything smaller than our 3500 is too small for our Elite II. We get better towing fuel mileage with it than with any of the others.1 point
-
We have a GMC diesel Canyon and we love it. Will pull our elite II at hi-way speed up and over every thing we’ve been over. Been over the smokies Aderondaks in NY and the Whites of NH with no problem. on Average we get about 24MPG and 19MPG while towing. The small truck fits in my garage and it’s my everyday driver.1 point
-
@Skipster, little dab, without blind in place? That might just work Oliver caulked in one of our loose blinds, and I didn't know it til I tried to remove it for cleaning. I'm pretty strong for my size, but it wound up taking two of us, and a knife, to get the blind out. 🤷1 point
-
Our fix is a dab of goop on the upper and lower trac they can be snapped out easy enough but still stay in place on a rough road1 point
-
I haven’t used the Meguiar’s, but wholeheartedly agree with your choice of Woody. Just used it yesterday.1 point
-
I think that's another really good soap. (Woody ultrapine) Follow directions. It's great, if not over poured.1 point
-
We’ve been traveling from south Texas to Tennessee and arrived in the Memphis area this afternoon. We’re at a military campground on Midsouth Naval Base just north of Memphis. It’s small, but somehow there’s an Oliver parked right next to us. The spot we are in was occupied by another Oliver last night. Small world. Our neighbors just picked up their trailer yesterday, Mike and Barb - Hull 1428.
1 point
-
My Tire Minder TPMS sensors come with a nut that is tightened by the little wrench. If you try to unscrew the TPMS sensors without first loosening the nut with the little wrench and then spinning the nut toward the wheel, the TPMS sensors will not budge. This is a theft-deterrent measure--Tire Minder figures a casual thief won't have one of the little wrenches, but you will keep the one they supplied. If yours are Tire Minders, try loosening the nut first, then spinning it toward the wheel. A Tire Minder TPMS sensor will then twist off with just counterclockwise hand pressure.1 point
-
Yesterday, after an eventful unhitching in a spot with what seemed like an 8 degree incline (with lots of “help” from a neighbor) we settled in for a relaxing afternoon. Put chairs out, little table out, extended the awning. We went out for a walk and when we walked back to our site, I noticed the 1/4” gap between our fully extended awning and a tree. I am glad I didn’t buy lottery tickets yesterday as I used up all my luck on the awning. Having our site setup checklist is great. Using it, even better! 😅
0 points


-
Recent Achievements
-


")


")


")


