Leaderboard


Popular Content
Showing content with the highest reputation on 11/08/2023 in Posts
-
Saw this and thought I would pass it along. https://rvbusiness.com/oliver-travel-trailers-eyes-dealer-partners-at-rvda-convention/?fbclid=IwAR3SAb78_qsR304mIaapK5yIZUoVkhparHLrhdqZbT69pPTLL3JHzUNjpGo Happy Camping! Patriot🇺🇸3 points
-
I also agree with the points made above. However, in my case when the trailer was being towed home from delivery by Oliver, I checked the torque on all nuts. My wrench slipped on one of them and that was enough to deform the skin. I was unable to get the wrench back on that nut while on that trip. To get it off, a socket had to be hammered onto the nut. At the time that this happened, I didn't realize the nut had a skin and thought the nut itself was deformed. I figured it out when I got home and decided right then to replace the nuts.3 points
-
No heat strip in our 2022 Dometic A/C. Hull 1150. Wish there was.2 points
-
We have a 2019 EII and ours is activated with the wall control and shows as another option to select just like the A/C or furnace. It's nice to have another heat option (especially if you're running low on propane) and we sometimes use it in conjunction with an electric heater that we plug in next to the closet. We, of course, use our furnace when it's really cold outside to keep us as well as the trailer components warm.2 points
-
Our 3,000 watt inverter does not have converter (Charging) capacity. The 60 amp PD does this separately on the older trailers. The Inverter is located in the aft bed basement. The Converter is part of the fuse/circuit breaker panel located in the rear dinette basement. I understand that the newer trailers have a combo Inverter/Converter unit. Personally, I like having them separate. If I smoke in one of them, then I still have something. If I smoke the smarts in a combo unit.......maybe not so "enlightening". On the other hand though, I really like the updated power panel and breaker setup of the newer Ollies. 🙂 GJ2 points
-
Just put in the order. Cost about $100 with shipping to Connecticut. Ordered in black for longevity. Any of these sort of plastic or vinyl bits that are on the outside of a vehicle can be treated with 303 which is an aerospace UV protector similar but better than armor-all. I'm thinking the black will never show the fungus stains. Thanks much for pointing me in the right direction.2 points
-
We can run our Dometic A/C with our 2000W Honda generator but it's my understanding that a 3000W generator is needed to run the Truma A/C because it doesn't have the soft-start feature.2 points
-
Ditto to this. I had this exact problem on one car that we owned. The stainless cover of the lug nuts split and the base metal underneath corroded and swelled to the point that a socket would not fit on properly. They were a huge pain the a** to remove. Several had to be cut off.2 points
-
I'm going to disagree that the cracks are merely cosmetic. In the parts of the country where we get snow and rain, water and ice melting chemicals get between the steel core and the stainless steel covers. The steel core rusts and bulges the covers. Now a socket won't go over the stainless cover or fit correctly, even if you pick a bigger socket. Since the core can turn to a rusty mush, the cover falls off and you're left with a vaguely hex shaped nut that doesn't fit any tools in your box. Your best attack is taking an undersized impact socket and hammering in onto the rusted, undersized, nut. I've also used a pneumatic chisel and a plasma torch to cut them away. I hope you have a full set of tools on the side of the road if you have a flat tire and bulged lug nuts. Cracks in the stainless cover exacerbate this problem. My opinion is from 25 years of teaching high school shop, including auto mechanics. 16 year old kids that bring their cars into the shop are usually driving rusty hand-me-down cars. GM vehicles come to mind as consistently having an issue with these type of lug nuts. I think I had to replace all the nuts on my kids Honda Element for the same reason too. In the SW you'll probably never have an issue, but for anyplace with regular snow and moisture, in the long term they're a bad idea. It's not just a cosmetic problem for many of us.2 points
-
I completed the install of my signal booster. I swapped out my Tireminder TPMSAPP6 for a TST550 b/c I wanted a display that would tell me at a glance what was going on if I had a warning - I didn't want to have to fuss with my cell phone if there was a possible emergency. The signal booster works the same way on both units, and I T-Tap'd it into wires #2 & 3 on the Rear Camera switch, as per @ScubaRx's post above. I threaded the wires through the path used by my microwave plug (had to pull it out to access that path) and placed the booster in the closet above the microwave, so no need to drill new access holes. It now turns off and on with the rear camera, as hoped, and works well!! Thanks to all for your advice! Geoff
 1 point
 -
@xmavrick it’s been a while, just wondering if you installed the shut off valves?1 point
-
FYI: We added a heat strip in our previous camper's non-ducted Coleman Mach 8 AC unit - easy install and we loved it. Dometic Penguin II has a heat strip kit also (from Amazon) that may work for your unit - best to double check with Dometic or OTT Factory to be sure. Definitely worth examining, IMO. Our Hull #226 has a heat strip installed before we bought it and came in very handy last weekend with morning temps in the Hi 30's - Lo 40F's, FYI. We control the Dometic with a Breeze Air Touch Screen thermostat - it's 100% compatible with the furnace and AC unit, we've got it set to cycle between the two for ease of maintaining internal temps where we like it... Cheers!
1 point
-
Some years ago, we visited the Custer area and stayed in a commercial CG on the outskirts of Custer City. While there, we had two credit card purchases that seemed somewhat “unusual”, but not enough so that I stopped the process. After we left the area, we received a call from the fraud department of our bank alerting us to a few significant purchases made in England. 😳 We locked that card, requested a new issue, and used cash on the remainder of the trip. I suspect the merchants in England had to eat the loss. It could have been a coincidence that it happened after leaving there, but I don’t know. Don’t let a merchant take your card out of your sight, and don’t allow a merchant to use a device you don’t recognize. The first incident is what occurred at the CG, the second was at a famous tourist attraction. Caveat emptor.1 point
-
No heat pump in our Truma.😔 In our AS we had a ducted Dometic AC with heat pump, so the heat pump being part of the AC pumped heat through the ducts. It was good to use down to approx. 42 deg. Fahrenheit, and I loved it.1 point
-
JD: Spot on from the guy that has been there and done that! Thanks for your caution and taking the time to remind the new guys. IMHO, the removal process as JD has documented in his posts is a PITA. With advent and now widespread installation of Litho's with suitcase/rooftop solar, the capability of our DC systems is to the point that we can seriously consider removing and replacing the frig with an inverter frig. Even though I have a huge supply of JD's service parts from his efforts, I likely will be adding to it and passing them along to another OTT or SOB (MaxBurner Term) :-). Until I have the time to do so, I do recommend adding supplemental twin fan exhausters as I have posted (and others with other fan units). By increasing the airflow/heat exchange you are lowering the temperature and alleviating some of the risk of these three-way gas fired refers. Once again, IMHO, this is just another reason to ensure your propane and smoke detectors are replaced early (For sure no later than 5 years service). GJ1 point
-
VERY nice drawing. Better than the OEM ones. Thanks for reprinting it for us, and thank you to the owner that created it. OTT: You may want to consider using this one!1 point
-
The Truma Aventa (13.5K BTU) definitely cools better than the Dometic Penguin (11K BTU). Having done the upgrade I have experienced both. The Truma lowers temperature much more rapidly and maintains it easily. Because of the higher BTUs, it does not run as long, leading to somewhat higher humidity. There is a Dehumidify Mode that will drastically lower the humidity (and temperature). It works very well. The Penguin ran longer, but humidity could still get pretty high under some circumstances. Both machines use Oliver's internal condensate drain plumbing. The downside of the Truma is its price. Carleton, if you're going new, I suggest ordering the Truma package. It will cost less than upgrading the AC post sale, plus you get Truma's on-demand water heater (AquaGo). Both the Dometic FreshJet and the Houghton RecPro cost considerably less, but Oliver will not install them at this time. The big reason to go with something other than the Penguin is reducing noise. It is quite loud.1 point
-
That is correct. The Truma Aventa 13.5 BTU AC requires a 3000W gen. Presently per the Truma rep I spoke with a soft start is not available. The rep also said Truma is supposedly looking at a soft start solution.1 point
-
rich.dev thank you so much for the diagram. Better than the one that is on basement cover. jd1923, here is a picture of the deck plates on the Curb side. The forward deck plate is a 6" and the aft deck plate is a 8" which replaced a 4" deck plate that I had a hard time getting my arm any farther than my elbow. I bought the deck plates from West Marine. I like the lift handle. You lift the handle and twist the 90 degrees, and the deck plate comes right off. The deck plate are not water proof, but it really doesn't matter inside the the cabin. The only thing I didn't like was the color was off white. They said it was "white", but as you see they are not pure white. I can reach all 4 configuration valves from the forward deck plate. From the aft deck plate I can reach the hot water shutoff, the fresh water drain, and 2 of the configuration valves. Note that you have to change all of the valves by feel, but I have no problems reaching, finding and turning the valves.
1 point
-
I contacted RV Save about their products. Below is their response. GJ +++++++++++++++++++++++++++++++++++++++ From: customerservice rvsafealarm.com <customerservice@rvsafealarm.com> Sent: Monday, November 6, 2023 7:05 AM Subject: RE: RV Safe CO/Propane Detector Good morning, Thank you for liking our product! We will be keeping both the Propane and the Carbon Monoxide / Propane combo. Nothing is scheduled to change. Regards, RV Safe LLC 11441 Markon Drive Garden Grove, CA 92841 714-934-85121 point
-
Keep an eye on the OTT "For Sale" section of our forum. If you find one you like, check out the owner's posts. It is amazing what you can learn about the history of their trailer as a result, and about the owner's skills as well. To you above list of upgrades if purchasing an Older OEII, I would add upgrading the Invertor to 3,000 watts, a Victron Orion DC-DC 12-12 30 amp charging system, and of course a 350 amp BlueSeas Master Switch and Victron 712 Smart Shunt to your list. Maybe adding solar or at least a solar suit case or two if it does not have solar already. Each of these efforts have been done by many owners and how to do DYI documentation here is off the charts helpful. To do the project listed, you will need normal tools, plus assorted hand power tools, a hole saw of the proper size, dedicated cable cutter, and a hydraulic lug crimp for starters. First spend some time with your used Ollie and try to understand all of the systems before doing any DYI mod. Please take the time to really study each project and look at all the different ways of doing each of them well before buying anything. Questions? First search the web. Then Google search the web. You'll get more items to digest as their search engine seems to be better than ours. If you still have questions then ask them on one of the threads for that mod. Just know that there may be several threads for a given topic, and each of us posters generally like our way the best....but some times the other thread has a better. And most importantly, looking at them all you likely will come up with an even BETTER way for that DYI effort. With our new Houghton A/C and 3 ea Battleborn 100Ah batteries and 3,000 watt inverter we can run our A/C for almost three hours in hot conditions. We routinely charge our BB's with a Progressive Dynamics 60 amp charger. When we need to run longer and do not have shore power, our Honda EU2200i generator works great. Some owners have the older Honda 2,000 w inverter and it is equally successful. However, some other brands of 2K generators will not pull the load. Lots of posts on this topic! IMHO, only for special needs situation is there a need for a super expensive and heavy 3,000 watt generator.... On the other hand, if you are Full Timing, and you discover some gold nuggets, then the Honda 3000 watt inverter generator would be the best on the market. Then you have a lot of power flexibility. I recall a recent post about this generator and that it fits in our front aluminum basket. GJ GJ1 point
-
We’ve camped in 100+ temps often, normally when we’re trying to get out of south Texas to cooler areas. The old Dometic in our trailer does fine keeping the interior cool, although it is a bit noisy. Texas heat usually includes a fair amount of humidity. Western Slope in CO will have significantly less humidity. We camp there often since our son and family live in Durango. Mike1 point
-
Our previous Dometic Noise Maker A/C, and current Houghton are both 13,500 BTU. Both were used over the past five years at Tinker AFB, OKC OK. in 108 degree full sun conditions. Both of these A/C's were cycling which tells me that they had a bit of spare capability in them. Note that I did keep the sun side window shades drawn, and had the awning extended about 3' for some wall shading. Did not go beyond this distance due to local thermals passing by occasionally. If you buy a used Ollie, plan on replacing the Dometic Penguin II A/C. New OTT offers a much better A/C now. GJ1 point
-
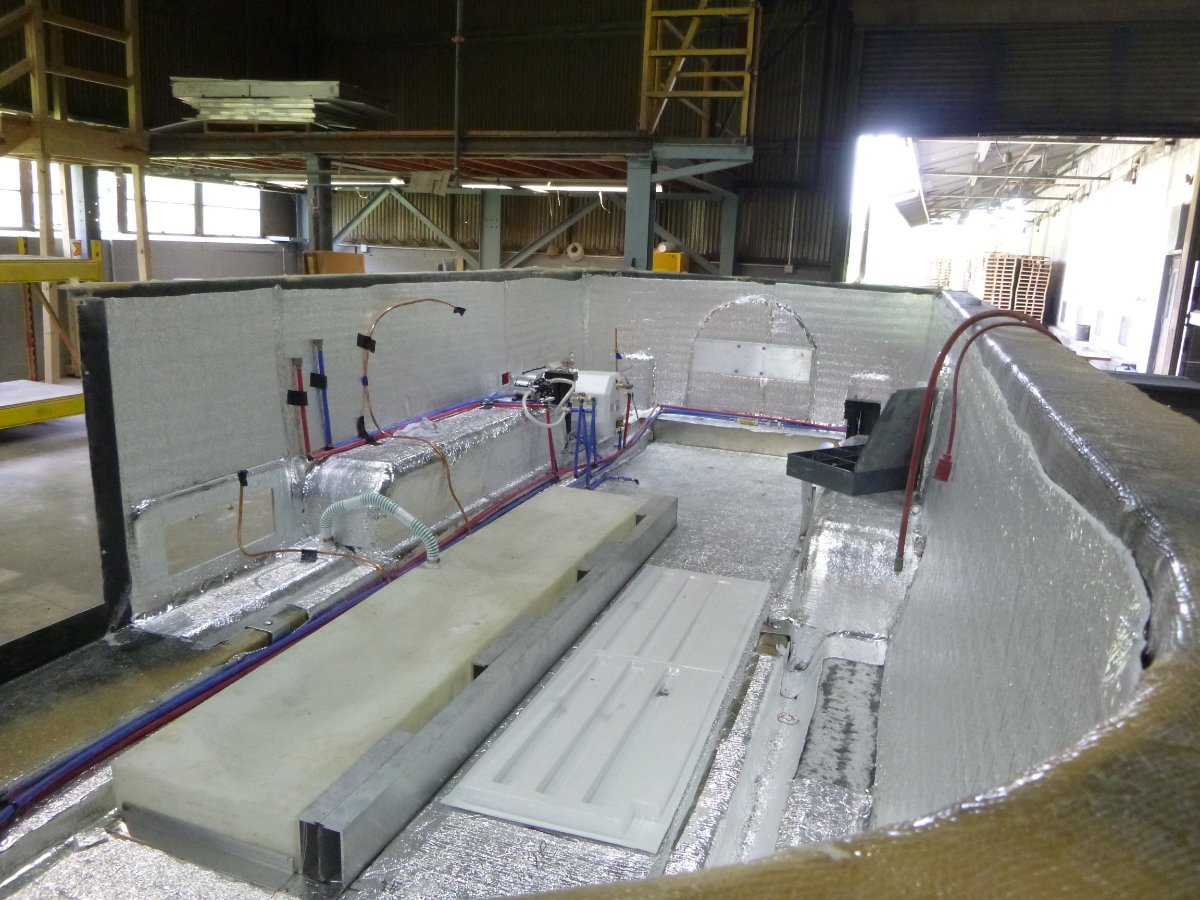
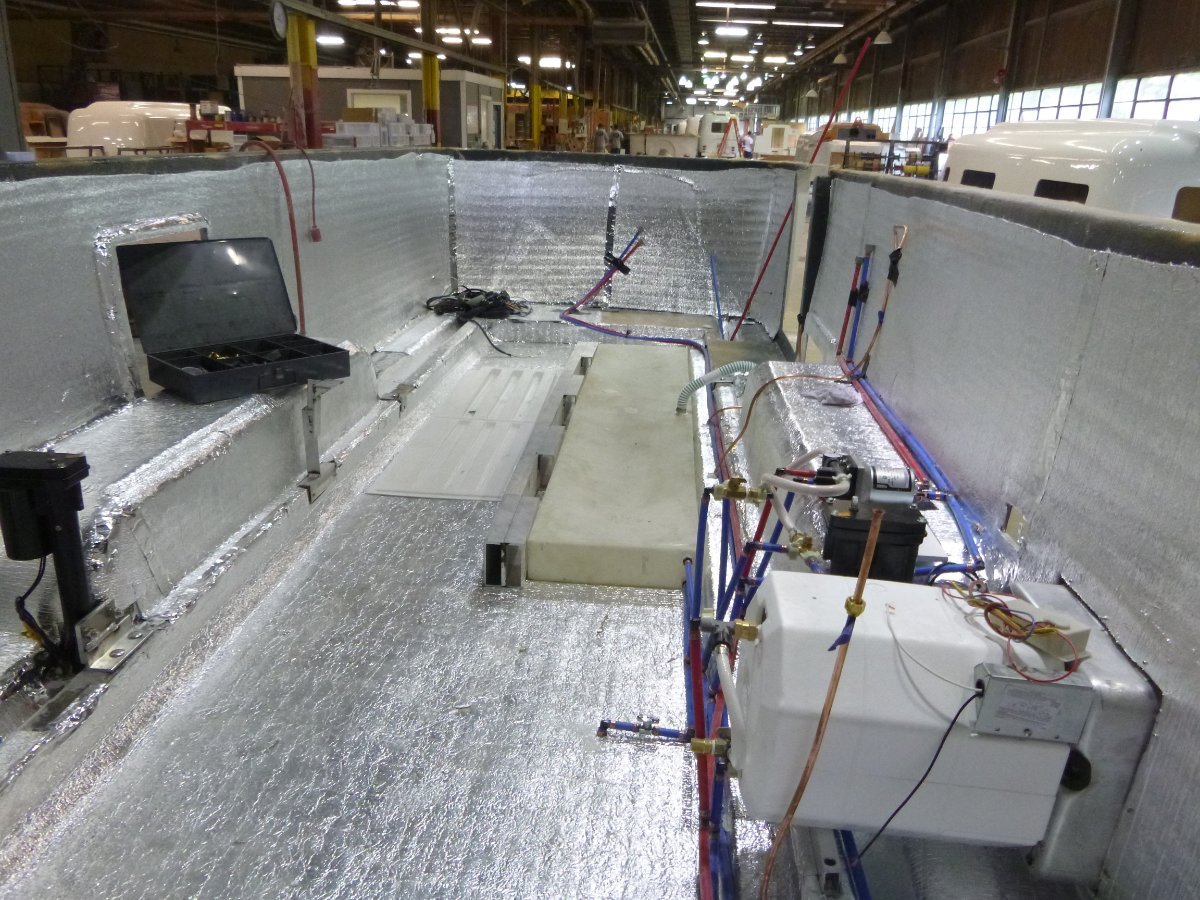
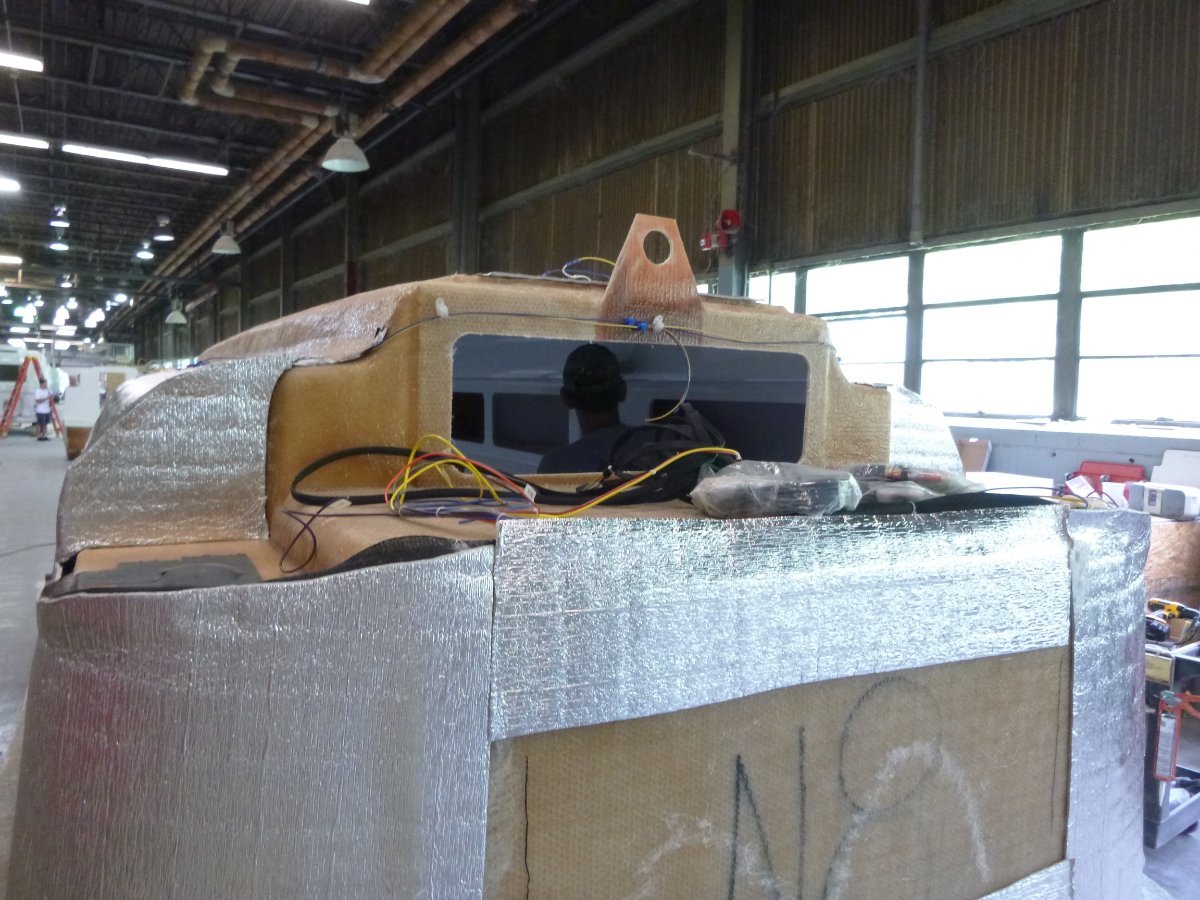
Actually the stuff that Oliver has used for insulation has been similar to Reflectix but instead of being basically "bubble wrap" in between the foil it is a foam composite of some sort. Here are a few pictures which show how and where this is applied to the shells prior to them being joined together. Bill
1 point
-
The young mule deer are out. There was one little buck and six does and fawns.
1 point
-
The RV Safe combo propane & CO detectors seem to have been "upgraded" to just Propane. See updated response from MFG Below. GJ My understanding is that CO is lighter than air and Propane is not. So optimal mounting placement of their previous combo unit is not feasible. As such, maybe use a Smoke/CO high in the back of Ollie and the Propane low up front actually would be a better practice. I have sent an E-mail to RV Safe asking them to confirm or comment on the above. More upon their update DONE. 🙂 GJ1 point
-
Although I use CV-2 grease on lots of things, I recommend staying with the Barker OEM grease (Mobil SHC Mobility SHC PM 460. I purchased it from Amazon. Reason is that to convert to CV-2 can be a true PITA to get it all.... and I do not recommend mixing greases. Here are items I recommend you have: Items Needed: · Cans of CRC Green (NOT RED) due to plastics · New Gaskets: Barker MFG Model Number 32453 https://www.barkermfg.com/ Gasket part # 29306 (3 Each). They sent me some at no charge. Be sure to tell them you are an Oliver owner! · Grease: Mobil SHC Mobilith SHC PM 460 (Amazon Prime). · Silver Paint Marker · Black Nylon Ties · 2 OZ Syringe (Optional) · 5/32” Allen Wrench · 5/16” and 3/8” sockets for ¼” Drive Ratchet While you are servicing the jacks, be sure to also check their mounting bolts. Attached are summaries on "how to" that I downloaded. Cuddo's to John Davies for the original posts, and others for some of the edits. GJ VIP 3000 Front Jack Service.docx VIP 3000 Rear Jack Mounting Bolts.docx VIP 3000 REAR Jack Service.docx1 point
-
I suspect you are experiencing the RF shielding the Oliver between hull insulation provides.1 point
-
You tie. But you've had yours longer: 1958 MGA 1500 Roadster If I had a bigger barn, I could have won, though. But my younger brother ended up with my Dad's 1923 Ford Model T, which Dad had since the '50s. Now, if we go back to "What Was Your First Car?" though, I usually come out ahead in those. But that's a completely different thread than OTT Service. 😉
1 point
-
Same here. I had a similar concern to what many have over the description given on the website when ordering. Upon receipt I was happy to see that the seat on the new solid SS nuts was that of the expanded, continuous style (like a bulge acorn) and not the scalloped style of a regular acorn. I see no reason why these lug nuts would not seat and perform the same as the OEM lug nuts. The only issue I had during installation was that the new nuts are larger, forcing me to buy a larger 6-pt socket for my torque wrench and breaker bar.1 point
-
When I had my Oliver serviced on Oct 20th, Oliver had no concerns about the SS lugs I mentioned I was using. I feel sure if there was a safety issue or concern service would have thrown a caution flag. All good. All said its just nice to have options. I prefer SS over chrome plated. Glad to hear your results and hopefully you will never have an issue with the OEM set cracking/peeling off. 👍🏻1 point
-
Could you please share a picture of your "deck plates" install. I already purchased 12V motorized ball-valve switches and DPDT toggle switches, my install not yet started, though the thought of a simple access panel really makes sense! I'm interested in seeing your installation, though with the motorized valves, I will only have to drill 2-3 1/2" holes for the toggle switches. I'm upgrading the water pump too for more GPM and adding a couple of .75L accumulators so the pump cycles less often vs. every time you use the water. Looking at adding a dual canister water filter system too. I'll post my installation, in a mods thread, likely before or after Christmas when I have a few weeks off!1 point
-
I have this saved from a post…can’t remember exactly who from and when, but if it will help I can send you the pdf
1 point
-
I too found it necessary to hook up the signal booster to my Tiretraker to prevent "lost signal "alarms. I attached a 12 volt male cigarette lighter plug to the signal booster and when I tow, I plug it into a receptacle in the rear of my vehicle and secure it to the side with a piece of velcro tape. It is easy to remove and store when not towing. This approach should work in any of the cigarette lighter ports in the Oliver as well and only takes a few minutes to set up. No trailer wiring involved.
1 point
-
Per a previous post and very solid recommendation by @ScubaRx I ordered and installed these SS lugs last June. I carry a torque wrench and I too check torque specs while traveling. On our most recent 42 day 6000 mile trip out west all lugs maintained their proper torque setting. https://www.ebay.com/itm/1449656854341 point
-
The nice thing about Battleborn is they will package all necessary components of the system and will program everything at the factory and send it to you as a package for install. I upgraded from lead acid to two 270ah batteries, Victron 3000 watt inverter and dongle (for cell phone connection) Victron Battery Monitor and solar charge controller. It all works great and we have a lot of battery capacity which comes in handy when you are camping off the grid or under trees for several days. The 2 batteries fit in the battery compartment with the tray removed.1 point
-
Your extensive shop tooling, exceptional craftmanship, and willingness to spend the time certainly resulted in the most elegant install I have seen. But even if I had your shop and the time to invest, it would have been impossible for me to even consider trying replicating your skills. The much lower tech approach requires common tools plus a hydraulic cable crimper and hole saws to get the job done. But we all marvel at your and John D's amazing mods. They serve to elevate our thinking. GJ1 point
-
On our recent 6000 mile 42 day trip this Atlas served us extremely well along with our Garmin 890RV.
1 point
-
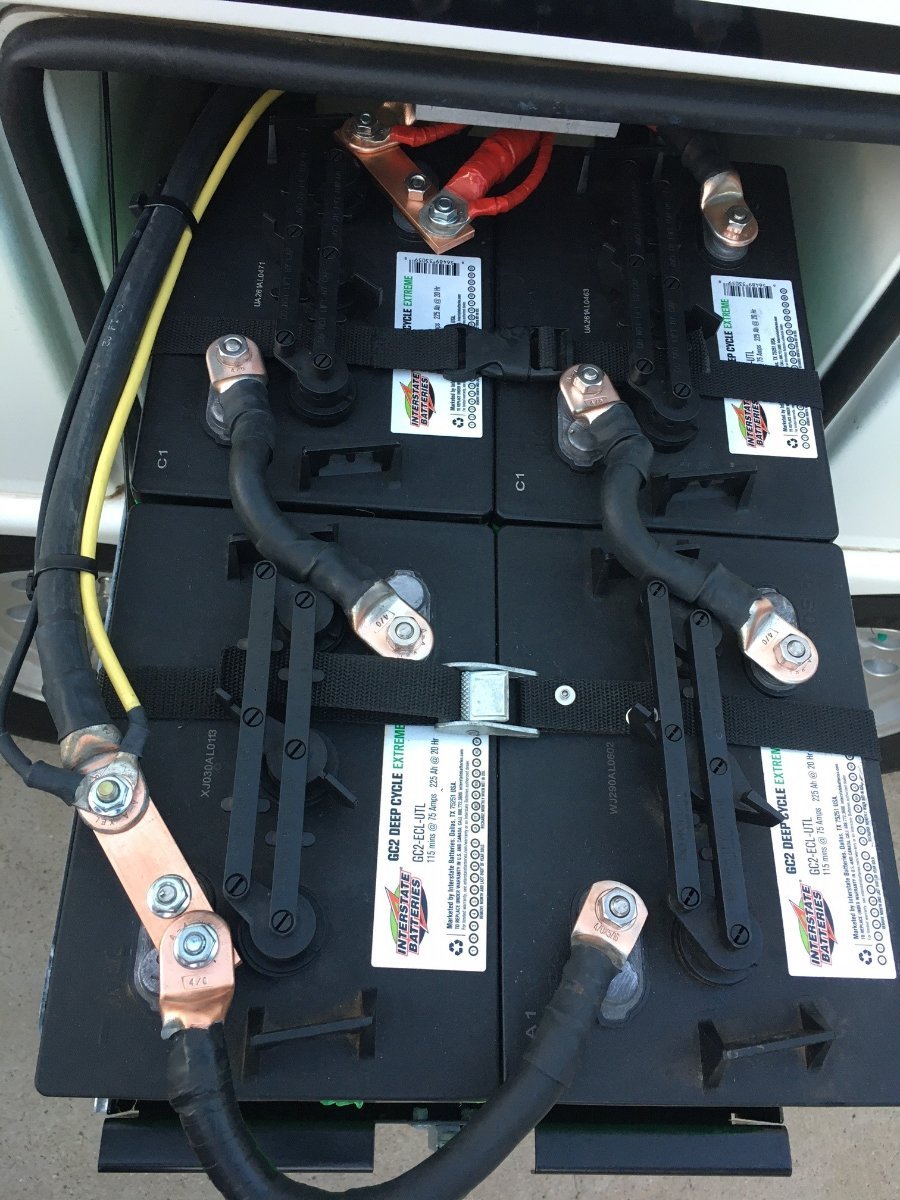
There are at least 22.5 opinions about how many BB's to pack into an OEII, and how to hook them up. One nice, but expensive and time consuming to do idea floated and done by several owners is to clean out as much as possible wiring from the battery compartment. I figured that since LifePO4 batteries are pretty much maintenance free, I would not go that route. My DYI install considerations were: Ease of installation and inspection. Leave space for a master cut off switch Minimize changes to existing wiring Use as much existing wiring as possible. In the battery box, install three Battleborns, the Smart Shunt and a Master Cutoff Switch (350 Amp BlueSeas) To do this I also used two terminal blocks (Red and Black) and some poly cutting board. When all said and done, the master cut off switch had about 1/4" clearance. Here is a picture. it shows two heavy duty straps. 'll be adding a third this summer. As you can see, there is no room for a 4th battery. One important consideration of any layout is keeping all the connections easily visible for both mechanical and thermal check-up every once in a blue moon. For the thermal check, I use the John Davies recommended IR detector that works well with wheel bearing and brake checks at road stops. GJ
1 point
-
Another look at this trailer can be seen HERE. With a "powered axle" the base price is $125,000. With no "powered axle" the base price is $105,000. Bill1 point
-
Wow that is so much better than what you started with. I like your solutions far better than the previous owner's method. And the extremely clean and proper connections are very well thought out considering the objective and the budget considerations. I think a lot of folks tried to help, but as you stated it truly falls on the owner to make the hard choices. You obviously had a mental picture of where you needed to end up. Often when trouble shooting folks start making assumptions and end up way off course. I think you went about working the problem in a very logical and practical way. Now the question remains, have all your objectives been met? I'm guessing you are much closer. Well done. 👍1 point
-
Was REALLY, really hoping to get some help on this thread! Asked about the grommets, no comments. Asked about the additional wires, the 8GA wires, two + red ones and two grounds, a yellow and a black, yet no comment again. OK, I'll figure it out for myself, like most things in life. So many times, people ask for help, when with a little testing or research we are able to and can figure out so many things for ourselves. (I tell my PM students that almost every day!) Going to finish and close this post. Grommets epoxied into place, not my idea of the best solution, but it is the OTT design. Got rid of what was referred previously as an elegant solution, perhaps, but battery posts mounted too high is NOT a good idea, not near an adequate solution. As another great Greek once said 🤣, "Give me a lever long enough and a fulcrum on which to place it, and I shall move the world." (Archimedes). You do not want the lever to pull you battery posts out of the casing. I am not interested in elegant solutions, as KISS, Keep It Simple Silly, is a long-lived and currently viable design philosophy. Most of you will not like my solution, fear may engage your mind. I found 100 varied electrical bus solutions for this need, ranging from $40 to $200 on Amazon and professional sites. Why? I just bought a piece of copper. Copper is about the best affordable conductor. For $20 taxed and delivered, I received a 1" wide, 1/4" thick, 8" bar of 99.9% pure copper. I guarantee any manufactured bus you would buy would have more resistance than this copper. Decided to mount the + connections on the left side, so they would not be stressed into the corner like the previous install (as @John E Davies had warned of earlier). Like it or not, here it is. So, we're done here. Thanks for reading and I would certainly appreciate your comments! 🙂
1 point
-
Here is the information that I have for for the windows: For the 3 large windows, Pelland Enterprises in Arnold, Ca. phone number: 209-795-9330 - I bought 17'. The Item code is H109-376-19 and the description says 1/2" Glass Vinyl Seal, Black sold by the foot at $5.17 a foot for a total of $87.89. For the escape window: I bought from Steele Rubber Products. Steelerubber.com The PN number is 70-3825-255 I do not remember how much I paid for it, but I think I ordered 10' . I also ordered this in black. I hope this helps someone.1 point
-
This is Dolly. She loves camping and knows how to relax after a day of camping!😂
1 point
-
The terminal post fuse is there to protect the wire(s) between there and the main 250 amp fuse. Otherwise a big cable could short out and cause problems. The factory wires are completely unprotected (electrically speaking). As delivered mine were not wrapped with plastic split loom and were wearing on the top edge of the steel battery tray. The insulation was about 1/3 gone. 😳 The tray sits on fiberglass, which won’t in itself conduct electricity, but the center bolt is attached to the aluminum floor support and then to the main frame. The floor has an aluminum “core” so anything attached to it (with rivets or bolts) will conduct through that path. John Davies Spokane WA1 point
-
We don't have factory mounted solar panels or inverter on our Ollie. Use a 100W solar suitcase with one 100AH BattleBorn Lithium battery with 20A solar charge control, shunt, and battery monitor in the battery tray.1 point
-
My install is similar to John’s. 2 BB 100aH with room for a third. After a lot of camping I’m not sure I need the third.
1 point
-
Yes they fit very nicely.
1 point
-
No, but you can easily add shutoffs if you want.1 point


-
Recent Achievements
-


")


")


