Leaderboard


Popular Content
Showing content with the highest reputation on 11/20/2023 in all areas
-
We’ve had a few small scratches on the inside of our cabinet doors from the cabinet contents rubbing against the door, so we installed a clear self-adhesive removable protective film on the backs of the cabinet doors. This prevents future damage and didn’t change the appearance of the doors. When shopping shelf liners and static cling window decals we also found there were lots of products that might work to both protect the inner side of the cabinet door and give them a different look. We went a step further and added a patterned static cling vinyl as well. The textured static cling vinyl we used didn't stick well directly to the cabinet doors, but it clings to the shelf liner. Time and seasons will tell how well it sticks. There are so many products available, some with bright colors and patterns and some more subtle. Since it was just installed this week we can’t speak to its durability, so we're not offering specific product recommendations. Your tastes are probably different than ours anyway. A self-adhesive liner with color or pattern could be used as a single layer if you find something you like. The vinyl material is easy to apply when the hardware is removed with the doors are laid on a flat clean work surface. We went for a subtle change to the original look, but we might do something with color in the future.
 3 points
 -
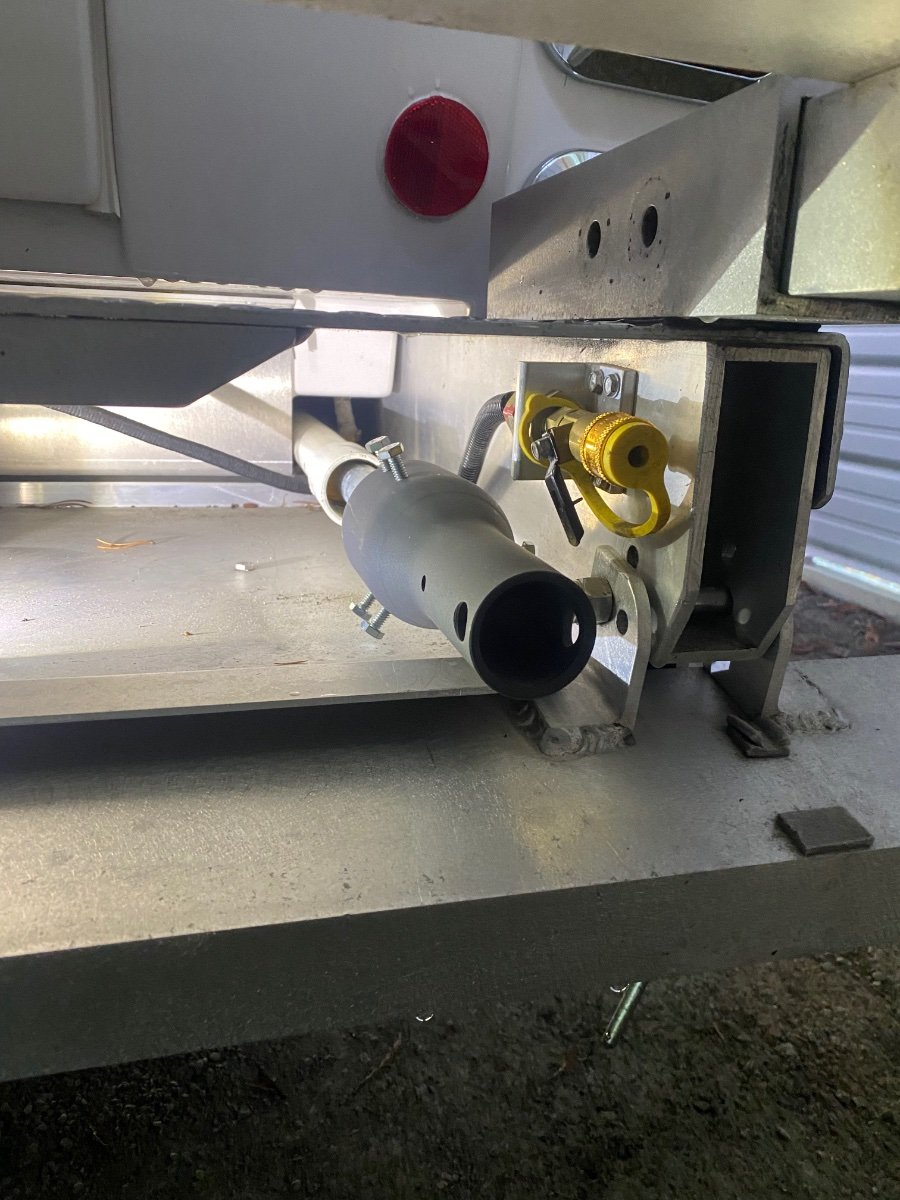
Check your rear gas valve. It sure appears to be partially open and may be leaking a little. Between the facts of propane being heavier than air and that you have a cap on the quick-connect fitting, it probably will not collect in the basement. You'll know it the first time the water heater or the furnace lights if it has.3 points
-
Loveland/Fort Collins Colorado We have twice used Nathan RV Service and Repair. He moved from Fort Collins to Weldona. Oliver recommended him. He has twice done maintainence on our Oliver.The first time he replaced the flooring. This time he replace the Automatic Transfer Switch which had failed. He is thorough and price was quite reasonable. He took plenty of time when we picked it up to answer our questions. He loves working on Olivers.. he said they make the best campers! Hope this helps someone. Linda OEII #1113 points
-
Welcome to the forum and being a new Oliver owner from another Maine owner, who purchased used myself.. Be sure to call the Oliver company and tell them you have bought your trailer, so they can register you on their owner's list and to keep you apprised of any Oliver news and Oliver issues.3 points
-
Aloha all, I picked up my smaller Ollie in April 2021, having retired the previous year, and have enjoyed it immensely, dragging it from our Virginia home to Utah where I stayed for the month of May 2022 in various state & National Park campgrounds. As a newbie to trailer camping, I developed a checklist I relied upon to ensure everything was in order prior to departing a campsite. I've only just joined this forum, and at the risk of seeming presumptuous, I'm sharing this 2 page checklist as an attachment (I hope) for anyone to use/alter/or add to. I found that relying upon it, even after becoming reasonably comfortable with the departure process, typically reminded me of something I forgot to do. Hopefully it's helpful. Safe travels ! PREPARING TRAILER FOR TOWING.docx2 points
-
After ~5 wonderful years with our Ollie and many adventures around the United States and Canada, we are moving on to a new phase of travel in our lives (overseas, cruises, etc.). So our much loved Hull #461 has been sold to a new owner. This forum has been great for support and sharing among the Oliver owners community, and a thank you to all for the great discussions and information shared over the years. We are definitely going to miss our Ollie, but she is going to a good home with a new owner that is very knowledgeable about trailers in general and also Olivers specifically, and I expect he will be joining this forum (he might already be a guest member). Thanks again to all. I'll still hang around/lurk here on the forums, and safe travels to everyone. Frank2 points
-
We had the same issue when we first had our trailer. We use barkeepers friend for this issue at the suggestion of Jason at Oliver and others on this forum and the issue has resolved. We still use bar keepers friend if the issue returns.2 points
-
Congrats from #685 down around the corner in Damariscotta Mills!2 points
-
Ollietime wrote: I 'm confused, I received my Starlink kit a few days ago and the cable connectors are proprietary, not RJ45. Interesting? I have the original Gen-1 round dishy with the latest Starlink Gen-3 router. Both have RJ45 connectors? But admittedly, I’ve never looked at the Gen-2 rectangular dishy. So I looked on-line and sure enough the Gen-2 has a different connector. Thanks for that comment! No worries though, my installation should still be a good option because Amazon sells the “Aosheng Rectangular Dishy Cable Adapter to RJ45” for $35. It’s not waterproof, but that looks easy enough to address. I’d just use a longer RJ45 cable than the one supplied, and I'd put it under the trailer out of the rain and off the ground. Maybe in a Tupperware box thats notched for the cables. It wouldn't be absolutely watertight, but neither are the other plug-in options. It still beats cutting the Cable. Cheers!2 points
-
Yes, there is more to the story. It seems that for vehicles that get used more often than RV's the movement of the tire causes some distribution of the chemicals in the rubber. Whereas when a tire stays static there is (obviously) no movement and/or flex. In turn, this allows the surface of the tire to degrade faster than it "normally" would which eventually leads to cracking which leads to ..... When I put Twist into winter storage I first slightly elevate the tires from the gravel base by rolling the trailer onto pressure treated lumber that is covered in plastic sheeting. This helps keep moisture away from the tires. Then I cover each wheel with a tire cover and, finally, I place a 2 x 8 sheet of treated plywood over the covers. This keeps rain, snow, weed wackers and the like from damaging the covers. Perhaps a bit overkill, but, it makes me happy knowing that I've done all that I can think of to protect things while getting the most time out of them. Bill
2 points
-
@Frank C: So sorry to see you "Moving-on..." But new life chapters are always exciting times - you will be sorely missed. Your posts have been very informative and useful for us as new OTT owners! Enjoy those new overseas and cruising adventures... Stay safe and keep us posted when able. Best regards, A & D2 points
-
My typo. I have edited my quoted post. The main battery cable to Inverter should be 4/0. This will allow for reuse for either 2,000 or 3,000 watt inverters. Also be sure to add a second auto transfer switch dedicated to the A/C. See John Davies post on this topic for info. Doing so allows you full capability of a 3,000 watt converter to power up the A/C and most other loads.2 points
-
Our 2018 readout is mounted on the street side wall, to the right of the pantry, above the Fresh/Gray/Black/LP sensor readout.2 points
-
Take care Frank. Thank you for all your insightful posts and comments since you joined us back in November of 2018. I wish you all the best in your future endeavors.2 points
-
Well... last trip out the fan lift mechanism exploded. That gets your attention real quick. Got the part and just re-installed. Wanted to pass along a tip that I did not see here or in the instructions. That spring that attaches to the lifting arm is curiously absent from the instructions that I got with the new part. Ordered it from RV Products directly and they said it would be 3 weeks to arrive but it came in 2 weeks. OK.. here goes. The part of the spring that gets bolted onto the mechanism goes in the hole on top and the same side as the post that turns the bar to raise. That's the hole closest to the hinge when installed. Mine was blown up so I didn't have a reference. Lots of fun... only had to go up on the roof about a dozen times. But no falls and nothing broken. Happy Camping Everyone, Scotty2 points
-
jd1923 - Given the amount of electronic "stuff" in the Oliver, I simply chose to have this system installed at the time of birth. It has worked perfectly over the past years, but, I've never really looked to see exactly how it is installed (with the exception of that remote readout). Unfortunately, Twist is in off-site storage or I'd get some pics for ya. Note that the readout was initially installed under the street side bed. This meant that in order to see what it was trying to tell me, I'd have to lift that bed! Be careful as to where you decide to mount it - the flashing (as it scrolls through its various screens) will make you think that you are trying to sleep in a cheap hotel if you mount it just about anywhere out in the open part of the cabin. However, you will want it in a place where you can see it easily as you plug into shore power. I moved mine from under that bed to inside the pantry - it is high up on the rear wall of the pantry. All I do is open the pantry door and I can see the readout from the entrance door, yet, it is not in the way of storage inside the pantry and, when the door is shut that flashing red display can't be reflecting off the interior of the cabin. Bill2 points
-
I listed it on RV Trader and also the Oliver Trailers for Sale Facebook page. All of the legitimate potential buyer leads, and the eventual buyer, were from RV Trader inquires about the trailer. The Facebook page generated a lot of comments and likes but no actual buyer leads.1 point
-
Best business card in the world… <Insert Name> Retirement Specialist Work is None of My Business Humor aside, welcome to the group, and thanks for the checklist!1 point
-
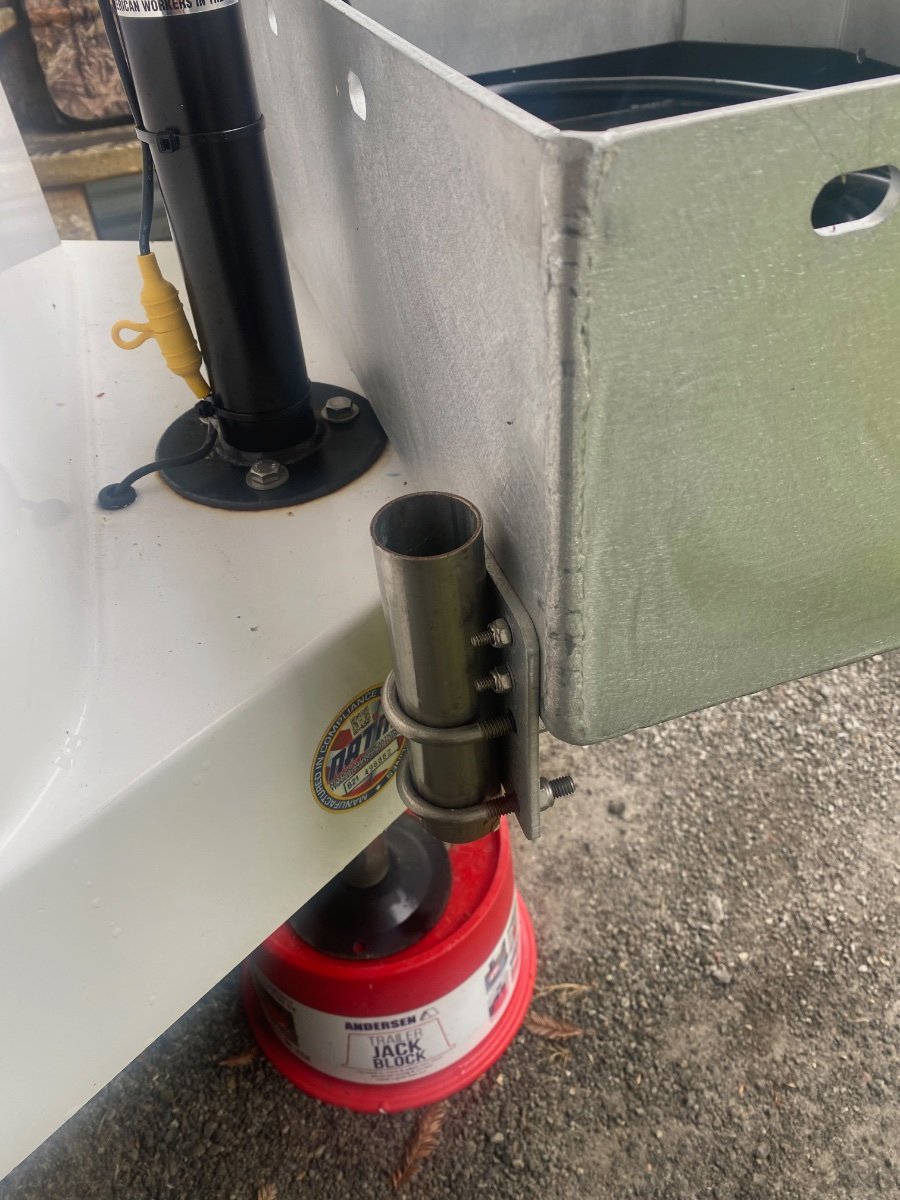
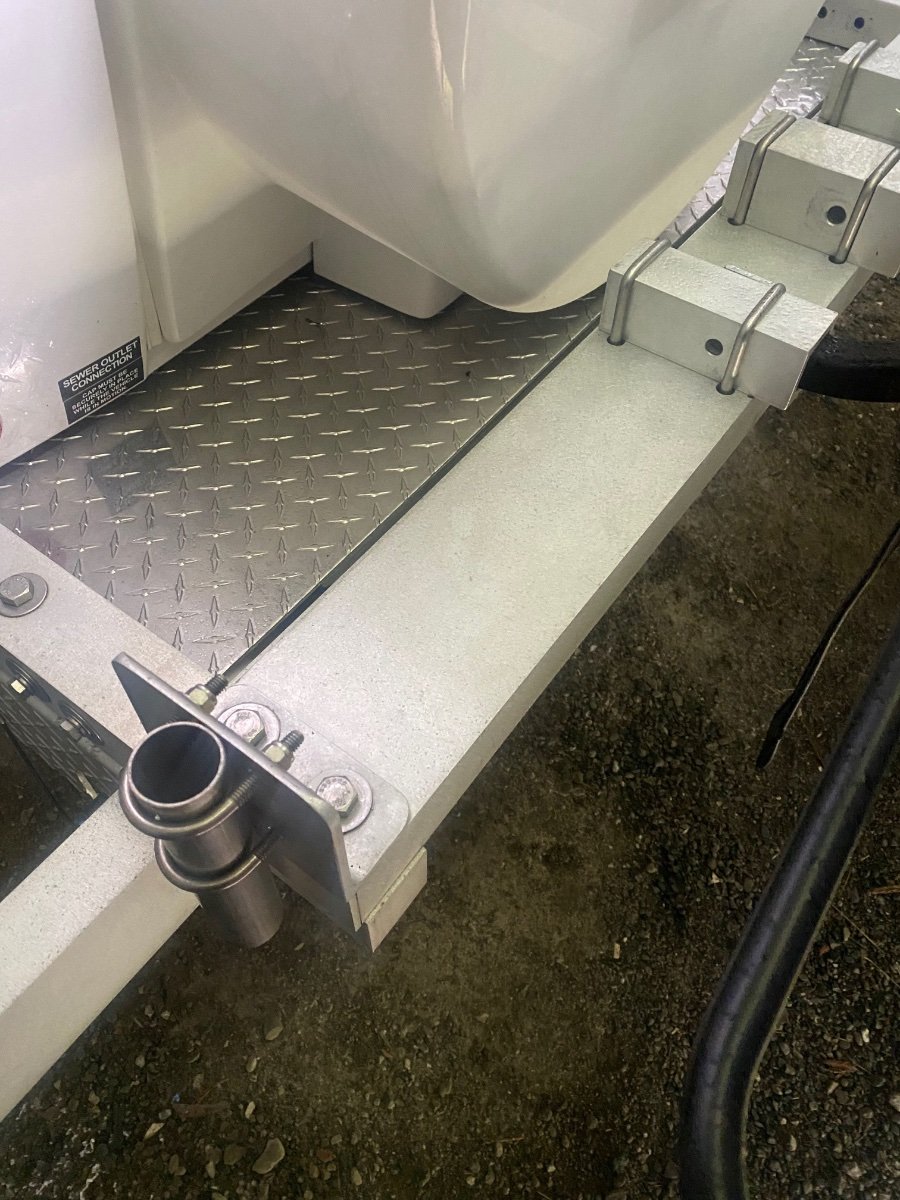
Greetings. Our tacky dishy mast is simply a 10 foot stick of 1” EMT (Electrical Metallic Tubing) with a Starlink mast adapter on one end. It was overpriced for $20 at my local ACE hardware, but much less than other flimsy looking masts that were available the time. I wasn’t keen on mounting anything to the Fiberglass, or using a ladder to step it on the roof. My experience is that you need to be able to move dishy around to get obstruction free sky at many RV sites. I’d discourage any fixed or permanent mounting because parks love trees and you'll often will find yourself without internet because of them. For that reason, I put mounts on both the front and rear of the trailer because it alway seems like one end or the other is shaded by a tree. Of course here in the Great North Wet we have lots of tall trees and we often have to put dishy on the ground to avoid them. We’ve put dishy in neighbors sites more than a few times, on the hood of the truck, and even in a tree. Were thankful that Starlink provides a tripod and long cord. Oh, I should mention that the Starlink App is a great tool for finding obstruction free satellites. I made my mast mounts with 6” x 1-1/2” OD stainless pipe, the rear one was mounted on a 3” x 3” aluminum angle with 2” stainless u-bolts, and the front on a 3” x 3” plate cut from the same piece of angle. They sell 12” lengths on Amazon for under $12, but I got some cut-offs at the local metal supply. The stainless pipe I already had laying around from a marine supply, but I’m sure the metal supply would have it too. The 2” inch stainless u-bolts are pretty common and I may have bent them a smidge to fit around the pipe. The rear mount is attached to the existing (optional) bumper mounting bolts, the front is screwed to the (optional) front cargo carrier. I drilled and counter sunk the front mounting screws. I think there are other frame places you could mount the pipes if you don’t have the optional bumper and cargo carrier. The mounts almost look like they belong there, so at least that part is not too tacky. The mast just slips in through the pipe and sits on the ground. Makes a tacky flagpole too! The mast is stored under the trailer, not tacky at all! I used heavy TY-Wraps to secure a length of 2” PVC pipe with an end cap along the frame rail and into the sewer hose storage compartment. You can’t see it, and it can’t come out unless the bumper is folded down. That reminds me, don’t forget to pull it out before parking to close to something in the back. I provided a few pictures as best as I could… but I couldn’t pull the mast out because I was parked to close to something in the back. Good luck and Cheers, Geoff & Tanya
1 point
-
Best of luck and safe travels, Frank. Enjoy the world we can't reach with wheels.1 point
-
Welcome aboard! We encountered 9 degrees in Shreveport of all places last Christmas, Ollietime had no problem keeping us warm.1 point
-
Welcome to the forums; @Snackchaser don't be a stranger! How timely, your post! We just rec'd our Starlink Mobile kit a couple days ago. Diane works remotely and we need reliable high-speed internet access when traveling during her working schedule. The kit is ready for install, and we've been mulling over YouTubes and determining which way we want to go for a permanent install. Yours is brilliant and we'll be following your procedure. A random thought regarding Dishy Mounting: We're liking the flag pole mount idea, but the flat roof mount is also appealing; but this requires cutting the dishy case and mounting it on some unused real estate on the roof (hard to come by on our's). The flag pole option gets Dishy off the ground and allows for home use options when not on the road. The flat roof mount is clean, virtually out of sight, best of all - it allows full internet access while driving; but may lead to questionable service due to obstructions when boondocked. What are your thoughts on Dishy placement? Just curious. Thanks for posting! Cheers!1 point
-
Primarily covers are used to reduce a tire's exposure to UV light which degrades the rubber over time. The less light that the tires are exposed to results in longer life of the rubber. Some people will use tire covers virtually all the time when stopped - even overnight. But, most simply use them while the RV is in storage. Bill1 point
-
Frank, Mary Kay and I wish you both well as you move on to new adventures. I’ve enjoyed your posts through the past few years. We’ll miss you here on the forums.1 point
-
Frank, good luck with your next phase! Enjoy the travel overseas, there’s a lot to see. Mike1 point
-
Frank - Thanks for being such a supportive and active member of the Forum. Have fun but remember to stay out of trouble. Bill1 point
-
Craig: Absolutely a keeper. Well done! OTT: I highly recommend you subcontract the OTT drawings to Galway Girl! GJ PS: To owners that did not get a full set of drawings with their newer units, you would be doing yourself a huge favor by keeping a copy of this four page file. It GREATLY simplifies one's understanding of our water systems.1 point
-
I use the same "augmented" diagram and valve configuration table as shown above. I have found it useful to label the valves with their corresponding numbers from the table, as they are not physically located exactly as the diagrams are typically drawn. The photo below shows my labeled valves (#1 thru #6) for a late 2018 Elite I configuration. Other years/models may vary.
1 point
-
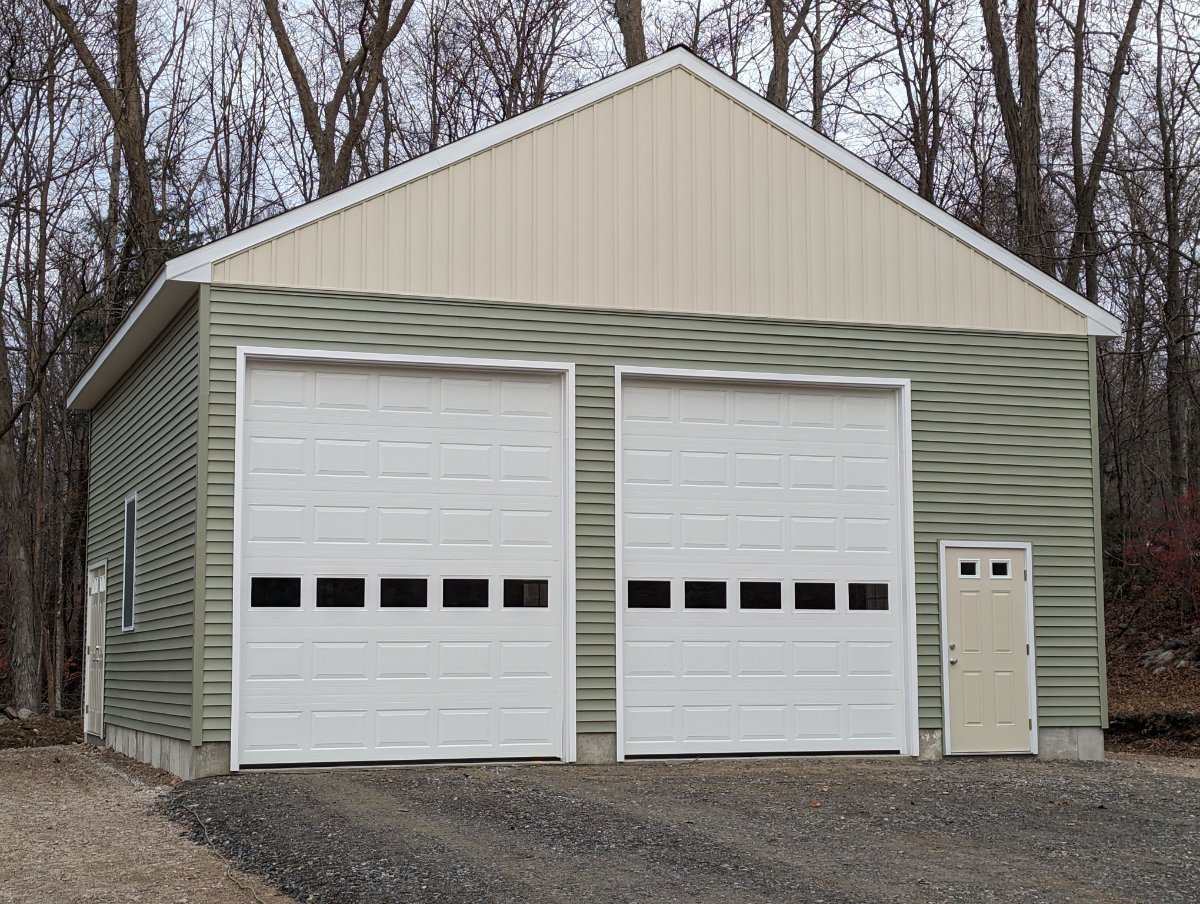
Our garage is almost done. Just need electrical run and installed before Eggcelsior can move in. Hoping to have it indoors before the first real snowfall.
1 point
-
We camped near Sylva for a week and really enjoyed the area. We even drove to Brevard for lunch with another Oliver owner couple there. @topgun21 point
-
In an email response from OTT to the service ticket submitted, I was informed they would have to consult with Xantrex and report back. My service inquiry read as follow: I would like confirmation on the charging ability, specific to my Xantrex Freedom 2000 (non-bluetooth model). I have been paying more attention to the charge aspect of this unit since upgrading to LFPs and installing a Victron SmartShunt. To the best of my knowledge and observations made, there is an initial charge cycle (80A) when first connected to shore power, but no further charge cycles thereafter unless ‘manually’ restarting by either disconnecting/reconnecting the power cord or by flipping the main circuit breaker Off/On. Is this the norm for my Xantrex or is it not operating correctly? I did use the remote panel to reconfigure the unit settings for use of LFPs, but would appreciate knowing the recommended values to ensure optimum use. 2020 OLEll, 579 OTT’s response: This is something that I am going to send to xantrex to get their thoughts on. It typically takes a couple of days to hear back from them. I will let you know as soon as they respond with what they say.1 point
-
Boy scout/girl scout/Ollie scout patch. Love it!1 point
-
I totally support MobileJoy's comments. If you boondock where it gets hot or are heavy microwave users (We are guilty of both), then for sure go with the 3000 w inverter. It is not for most of us" For our 2018, OUR Progressive Dynamics Converter (I.E. Battery Charger) had a Lithium switch. Some others do not. Good threads on checking this out on your. Will only take about ten minutes of your time. Also, you will definitely want to install the 712 Smart Shunt with Bluetooth connectivity. As a boondocker, having DC to DC charging capability is also very nice. For the battery to inverter cable run, you need to use 4/0 AWG. For the DC to DC cable runs #4 AWG minimum. Search the forum and you'll find LOTS of info on these topics. Totally can be a DYI effort if you are handy and have some cabling and electrical skills. But it takes a significant amount of time and planning. Cost of materials alone will be in the $2,500+ range if you shop carefully. You can for sure do it at a lot less cost than having OTT do so. Also you'll learn tons in the process. Finally, please update your profile, and your signature block so we know you TV, Hull Number and year. Without this info, more specific info and help is precluded because we would just be guessing. Your 2019 OE2 is very similar to our 2018. (GJ Updated) GJ1 point
-
This would be great to own if you lived in Transylvania. I enjoy some bright lights at times, on my truck going down a muddy trail, security lights on a house, and seldomly when being attacked by a bear or something while camping. Most of the time, the stars provide all the ambience I need to enjoy life.1 point
-
People really don't have much consideration for their camping neighbors. OK... SOME people... We've had folks using generators (that were placed behind their camper and in front of ours) right up until the 10pm cut off. And most recently a group that set their campfire ring and chairs right next to our trailer and were yakking away until 11:30pm. (OK.. it was in NJ.. I should have expected it) The first night when I told them we were trying to sleep they knocked it off. The second night one guy who had a little too much to drink wanted to start a fight. Preference is state or NP campsites, but when we have to book a commercial campsite I look for one with sites as far apart from each other as possible (Thankful for google maps satellite view) and always check the quiet hours rules. Scotty1 point
-
Basically, an Oliver Owner has three choices on where to put his/her portable generator. 1 - Put it in the basket on the tongue of the trailer. 2 - Put it in the rear of your truck and deal with having to futz around with it when you want to use it. 3 - Put it in the garage at home and leave it there.1 point
-
Yes! And, its still a bad idea.1 point
-
Did I mention that this rear mounting thing is a bad idea?1 point
-
Bad for weight distribution, too. Many Olivers are already at or even slightly below the 10-15% tongue weight recommended for stability.1 point
-
It's like looking directly into the sun.1 point
-
Totally agree. One of our favorite things about off grid camping is night sky, and few neighbors. If we do have neighbors, we sure don't want to ruin their experience, either.1 point
-
Had ours blow up on this last trip. Cost was 22.09 plus shipping brought it to $37.48. 3 week lead time. Number for the company is 574-247-9235. It sure does get your attention when it blows up. Thanks for all the info here guys... appreciate it. Scotty1 point
-
Agreed. But, for a travel trailer subjected to bumps on the road, the issue is not brass vs. plastic, it is the strength and durability of the pipe-to-fitting connection. Oliver uses some brass crimp-ring style and some plastic compression-style Pex fittings. Crimp-style fittings depend on the diligence of the person doing the crimping to ensure a secure connection when subjected to the bumps on the road. I suspect the person doing the crimping in your Oliver let you down. The most secure method for Pex connections, which has been on the market more for a decade, is the expansion ring type. Instead of crimping a brass ring around the pipe, a special tool temporarily expands a plastic ring that is then quickly slipped over the pipe and fitting before it shrinks back to its original size. Where the brass crimp ring is applying outward force, always trying to enlarge back to its pre-crimped size, the plastic expansion ring is applying inward force, trying to shrink back to its pre-expanded size. It is this outward vs. inward force of the clamping ring over time, and particularly when bumped around, that makes the plastic expansion ring type much stronger and more durable. I plumbed our entire home with the expansion ring Pex-A system. That is what I wish Oliver had used on our trailer. It is the system that, in my judgment, Oliver would be well-advised to use going forward. It produces plumbing joints that are even more resistant to the abuse delivered by bad roads than the much more expensive brass Sharkbite fittings.1 point
-
I view Sharkbite fittings as an emergency plumbing part. I keep a couple of 3 foot lengths of Pex and a small assortment of Sharkbite fittings in my Ollie - just in case. In the almost 8 years on the road - thankfully - I've never had to use them. Bill1 point
-
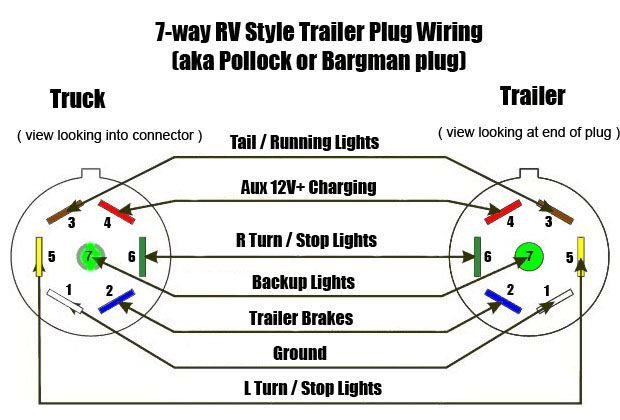
The most common cause of failure is the 7 pin plug and connector between the truck and trailer. Check the contacts on each for bent connectors or corrosion. (I've been able to resurrect a trailer connector in the past by gently bending a prong back into place with a flathead screwdriver, but with a trailer so new yours shouldn't be that worn.) CAUTION: Pin 4 on both truck and trailer may be "hot" (connected to the battery) at all times in some installations, so don't short that one out.
1 point
-
Straight & level make me queasy! 🙃1 point
-
@Sak I had a cover on our former “Demonic Penguin” AC and it never blew off in high wind. It can be cinched down pretty tight. We never had issues with birds or bugs at all. Patriot🇺🇸1 point
-
There are AC covers available, that could help keep daubers out. https://www.amazon.com/s?k=rv+ac+cover&crid=WMFIA4XGFUNA&sprefix=rv+ac+cover%2Caps%2C121&ref=nb_sb_noss_21 point
-
This is a great point. Please go thru the manuals and note all the places this incorrect info shows up. Copy all the HTML links to those errors and send them to Matt at Oliver. He will take care of getting the manuals updated. If you need help getting your collected data to Matt, let me know and I will send it for you. Good idea, thanks.1 point
-
I replaced the gearbox for the Maxxfan today. It took about 20 minutes following the included instructions performed on top of the Ollie. I am starting to feel that this must be a common occurrence by the matter of fact way the instructions read. The instructions were very well done and easy to follow. I could improve on them. The replacement gearbox was more robust looking than the original one I removed. A better casting for sure. Also, I should add that the price was almost twice the cost of the one shown in John's OP (from eTrailer) and that is since January. Could that be a symptom of life during a pandemic?1 point


IMG_7468.jpg.da22171c30aaab394705c676f725b46b.jpg)


-
Recent Achievements
-


")


")


