Leaderboard


Popular Content
Showing content with the highest reputation on 11/22/2023 in all areas
-
If anyone has been considering the Levelmate Pro+ Amazon has a great deal going. Love mine, takes minutes to level up the camper when setting up. https://www.amazon.com/dp/B083ZMZPR8/ref=syn_sd_onsite_desktop_0?ie=UTF8&pd_rd_plhdr=t&aref=E1D817237BBAC56D29C60E0FB0F93BD6FAAB932FB1C7E241DD083DED270EED39&th=1
 4 points
 -
Battleborn is offering some good deals this week on batteries and kits. I'm still scouting a few items, for Ollie's Christmas presents. We'll see what we find...
3 points
-
We will be staying home also. We have a 20 lbs bird. I will start at 1130PM Wednesday and doing a Citrus Smoked turkey. Happy Thanksgiving and May both your joy and stomach be full!3 points
-
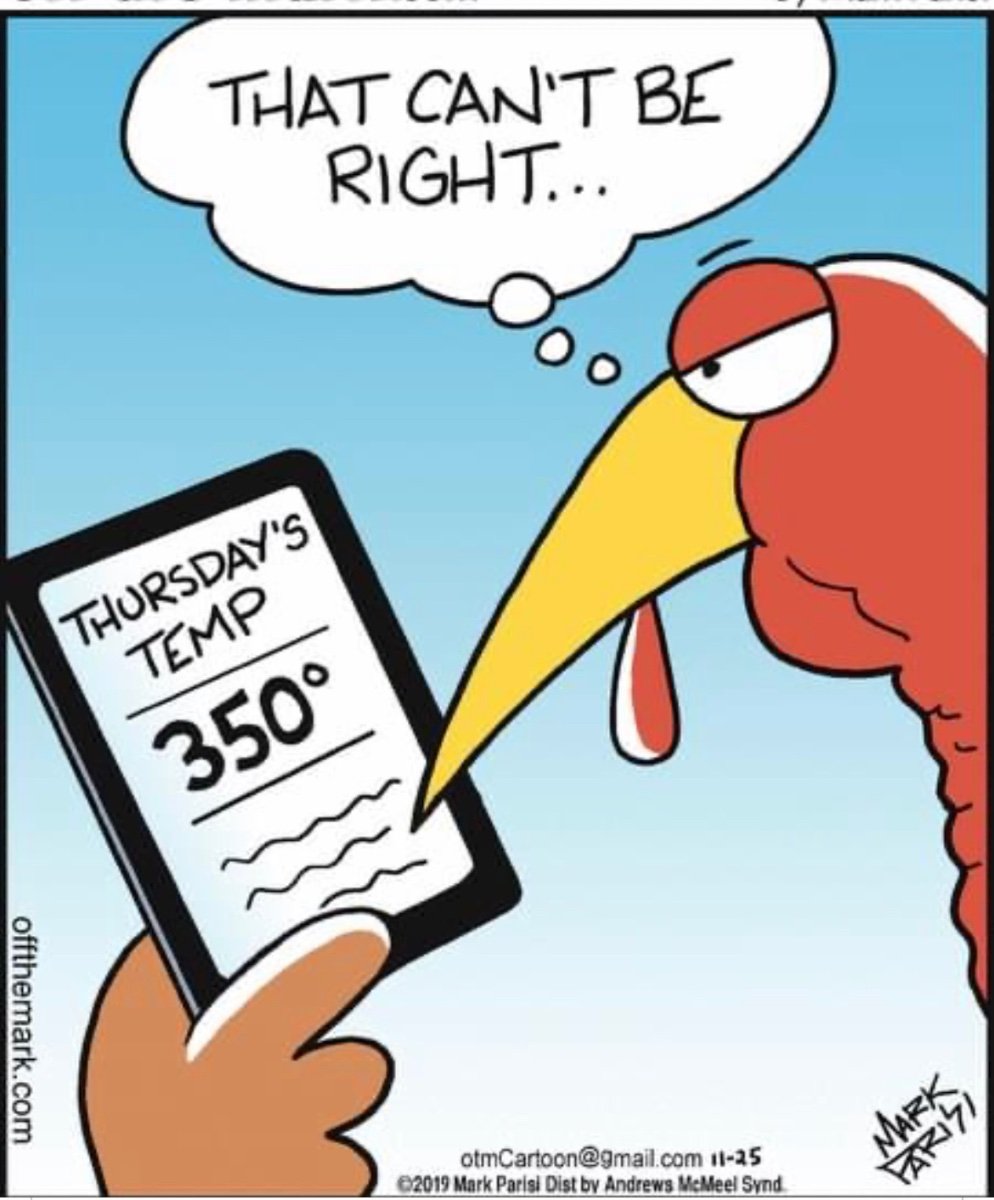
Happy Thanksgiving everyone. If your grilling or cooking a turkey out in the wild, please share your Turkey Day Photos. Happy Camping and safe travels where ever you are. 🦃🦃2 points
-
2 points
-
@jd1923 Is the valve with the blue housing a Misol brand or US Solid brand. If it is a US Solid brand the threads will be 1/2" NPT (National Pipe Thread - tapered threads) If it is a Misol brand be aware that the threads may be 1/2" BPT (British Pipe Thread - straight threads) Both of these brands are manufactured in China. I'm pretty sure that neither brand valves are using lead-free brass. However, the US Solid brand does have a SS version available. My original valves have BPT. knowing that there was a slight difference in the thread pitch, I used Teflon tape (several wraps) to make a watertight seal with the 1/2" NPT plastic nipples that I used to join the valves to the rest of the plumbing. I have never had any seeping or leakage, but I wanted you to be forewarned that it might be a good idea to seal those threads well. I like your plan to also be able to control the valves in such a way that you can also use the system to suck antifreeze into the pipes. The use of momentary contact switches is clever as well. The reason I did not include these functions into my system is because I don't use antifreeze here in the Deep South. I just blow out the lines with air pressure and keep a small electric heater going during the colder months (December thru January) to keep the entire trailer including the basement at about 60 degrees. The reason I did not use momentary contact switches is because the electric valves I used do not have any power draw while they are at rest. I have recently installed a compressed air system in the trailer that lets me flip one switch and it opens two electric valves that allows 40psi compressed air into the plumbing system to purge all the lines and the water heater for my minimal "winterization." There are back flow preventer's in the air lines to keep water from entering the air system when in normal use. I also extended the air lines to quick-connects in the wheel wells to make the checking and filling of the tires easier.2 points
-
Happy Thanksgiving. We're camping with some friends for the week. Trash can turkey on the fire, weather permitting. If not, ham on the grill. Have a great holiday, everyone!2 points
-
Happy Turkey Day "Week", Oliver owners! D and I will be staying home this year, too. We'll be deep frying a 12# free range Non-GMO bird on Thursday afternoon and smoking a heavily marinated 18# brisket in the BGE on Friday. Should have plenty of leftovers - so if y'all're in the AO; swing by! Gobble - gobble! HA!2 points
-
Happy Thanksgiving fellow campers and travelers! We’re home this year (although we considered joining our son and family who are camping this week at Grand Canyon NP). I’ll be smoking two 12lb free range turkeys on the Primo ceramic this year. We’ve been doing two turkeys for quite a while, one inside in the oven and one outside on the smoker. The smoked turkey always wins the taste test, so we’ll just do both outside on the smoker this year! Mike2 points
-
We all have different camping styles, and free times. We do what we can do. Whatever you choose,get out and camp, while you can. The USA and Canada offer so many opportunities. Just go do it! Explore. Have fun Meet like minded folks. We'll be camping with 15 year friends from the forum, this weekend. You never know what life brings,til you step your toe in it.1 point
-
The level mate is a really cool upgrade. We don't have it, but I saw it in action with camping with @Hokieman. We'd certainly consider adding at black friday price.1 point
-
"Boondocking" in Alaska is easy. Every pullout, unless posted, is free camping. In the Yukon, territory campgrounds are plentiful, and free firewood. (Don't take it from place to place, please. No reason to do so.) $12 or so, usd. We've done the trip many times. Be careful of unpaved roads. You don't have to do gravel, if you don't want to, and sometimes treacherous.1 point
-
I did not pursue the quest for a different brand... Sorry, I should have responded sooner. At the time I was interested in rerouting the hoses to relieve the tight bends when I encountered my problem. I ended up with everything as I received from Oliver.1 point
-
Got some plumbing done today. Decided a mounting board was unnecessary and instead connected the accumulators on an old bracket I had, everything wrapped in pipe foam. It should sit nicely on the interior wheel well (see build pic). Yes @Ronbrink just 4 hose clamps, found some automotive compression clamps that fit tight, too bad I didn't have 4. You want a few feet of soft hose by the pump and accumulators so that it runs quieter. I also spent an hour at Depot, figuring out their PEX and SharkBite supplies! I'm thinking some of these will help with the motorized valve installation: SharkBite 1/2 in. Push-to-Connect x MIP Brass 90-Degree Elbow Fitting U280LFA - The Home Depot
1 point
-
I finally understand what Steve was saying here. I purchased the wrong switches! The DPDT switch wired in a cross-pattern (must have 6 leads), allows for switching the +/- leads to the motor. After you run the motor one direction, switch the other way to reverse polarity and the motor runs backwards. I will need two DPDT switches though. One is enough is all you want to do is switch from pulling from the fresh tanks while running to the faucets (normal dry-camping position), then switch both valves at once, to pull from the rear port and push to the tank (for boondocking, fresh tank fill). One DPDT switch will do this. But I will install one DPDT switch on each valve motor to achieve the third position, for winterizing (or to push sanitizer to the faucets). I decided on a momentary DPDT switch: TWTADE 3 Pcs Momentary Heavy Duty Rocker Toggle Switch 6 Pin 3 Position (ON)-OFF-(ON) DPDT 16A 250VAC Spade Terminal Metal Boat Switch With Waterproof Boat Cap And 6.3mm Terminal Wires TEN-223MZX-B223: Amazon.com: Industrial & Scientific This switch rests in the middle (open/disconnected) position. Hold it up for 5 seconds to set the valve one way, then hold it down for 5 seconds to turn the motor and valve the other way. With the momentary DPDT switch, the center fallback position makes it that there is no current draw at the motorized switches when not in use. You would want to do this differently if you wanted to utilize the LED light features of these 5-wire motorized ball valves, but I decided no lights, Keep It Simple Silly (KISS)! Was ready to wire up the valves today, but the new switches will get here Friday after Thanksgiving.1 point
-
After ~5 wonderful years with our Ollie and many adventures around the United States and Canada, we are moving on to a new phase of travel in our lives (overseas, cruises, etc.). So our much loved Hull #461 has been sold to a new owner. This forum has been great for support and sharing among the Oliver owners community, and a thank you to all for the great discussions and information shared over the years. We are definitely going to miss our Ollie, but she is going to a good home with a new owner that is very knowledgeable about trailers in general and also Olivers specifically, and I expect he will be joining this forum (he might already be a guest member). Thanks again to all. I'll still hang around/lurk here on the forums, and safe travels to everyone. Frank1 point
-
You know we all wish you the best. Do come back and share with us about your travels. We expect to hit Italy, France, Spain, UK, etc. someday ourselves. I'll consider you our expeditionary mission.1 point
-
Frank C, we hope you enjoy the next chapter, as well. Drop in once in awhile, and share some of the new adventures. You'll always be welcome here.1 point
-
Happy Thanksgiving to everyone!! We are staying home and eating Turkey this year, nothing special. Safe travels to those who are traveling this year.1 point
-
This month, I started into retirement year 17. One of my better decisions. Go for it!1 point
-
I have a little experience with corroded stainless steel. My experience is from when I TIG welded the stainless steel brewing fittings together for my home brewery. I already knew how to weld mild steel, but had to research the specifics of welding stainless steel and how to maintain its stainless characteristics. Are you using a chlorine bleach based cleaner on your sink? Stop doing that. Chlorine can dissolve the protective oxides on a stainless steel surface, exposing the metal surface to the environment which leads to rust. How about cleaning the sink with steel wool? That's not good either. Iron fragments can get microscopically lodged in the stainless which leads to rust. Use a ScotchBrite pad or bronze wool instead. In order to passivate (establish the protective chromium oxide layer) the recently cleaned spot on your stainless steel sink, you need to use a product containing oxalic acid. As mentioned earlier, Bar Keepers friend is one product. Others include Klein King Stainless and Copper Cleaner, and Revere Copper and Stainless Steel cleaner. Bar Keepers friend comes in a powder and a liquid. I always make a paste out of the powder and scrub the area clean with a ScotchBrite pad to passivate any recently welded stainless steel fittings. A paste of Barkeepers Friend powder and a green ScotchBrite scrubby pad should take care of the issue on your sink. Just keep the chlorine bleach products away from anything stainless steel. HTH, Ken1 point
-
I listed it on RV Trader and also the Oliver Trailers for Sale Facebook page. All of the legitimate potential buyer leads, and the eventual buyer, were from RV Trader inquires about the trailer. The Facebook page generated a lot of comments and likes but no actual buyer leads.1 point
-
Best business card in the world… <Insert Name> Retirement Specialist Work is None of My Business Humor aside, welcome to the group, and thanks for the checklist!1 point
-
Well... last trip out the fan lift mechanism exploded. That gets your attention real quick. Got the part and just re-installed. Wanted to pass along a tip that I did not see here or in the instructions. That spring that attaches to the lifting arm is curiously absent from the instructions that I got with the new part. Ordered it from RV Products directly and they said it would be 3 weeks to arrive but it came in 2 weeks. OK.. here goes. The part of the spring that gets bolted onto the mechanism goes in the hole on top and the same side as the post that turns the bar to raise. That's the hole closest to the hinge when installed. Mine was blown up so I didn't have a reference. Lots of fun... only had to go up on the roof about a dozen times. But no falls and nothing broken. Happy Camping Everyone, Scotty1 point
-
jd1923 - Given the amount of electronic "stuff" in the Oliver, I simply chose to have this system installed at the time of birth. It has worked perfectly over the past years, but, I've never really looked to see exactly how it is installed (with the exception of that remote readout). Unfortunately, Twist is in off-site storage or I'd get some pics for ya. Note that the readout was initially installed under the street side bed. This meant that in order to see what it was trying to tell me, I'd have to lift that bed! Be careful as to where you decide to mount it - the flashing (as it scrolls through its various screens) will make you think that you are trying to sleep in a cheap hotel if you mount it just about anywhere out in the open part of the cabin. However, you will want it in a place where you can see it easily as you plug into shore power. I moved mine from under that bed to inside the pantry - it is high up on the rear wall of the pantry. All I do is open the pantry door and I can see the readout from the entrance door, yet, it is not in the way of storage inside the pantry and, when the door is shut that flashing red display can't be reflecting off the interior of the cabin. Bill1 point
-
He was, til he discovered he didn't have an inverter. Thanks for trying.1 point
-
Of the two inverters discussed above, I prefer the Freedom series. This one can be programmed for most battery types, and it performs automatic switching to your AC circuitry between inverted power and shore power. It is designed to be wired to your AC system where the PROWatt provides AC outlets instead. In your case, there must already be a battery charger in your trailer. Many contributors on the Forum have said that they don't like the combined inverter/charger (Xantrex Freedom) and would have preferred these to be separate to eliminate a single point of failure. You can probably find an inverter that can be wired into your AC system and that does not charge the batteries. Unless your previous owner upgraded, based on your model year you do not have LiFeBlue or Lithionics batteries. I think Oliver started offering Lithium batteries in 2020. A quick look will tell you what you have. If you have the standard lead-acid batteries, an inverter won't provide significant power for very long. You should choose the inverter based on your upgrade intentions. If you are going to install LiFePO4 batteries (many on the Forum have installed BattleBorn) then get a 3000 watt model, otherwise a 2000 watt model is sufficient. Your AC may or may not have the soft-start capacitor which may be necessary when running on inverted power. I agree. Figure out what you want and then open a ticket with your questions.1 point
-
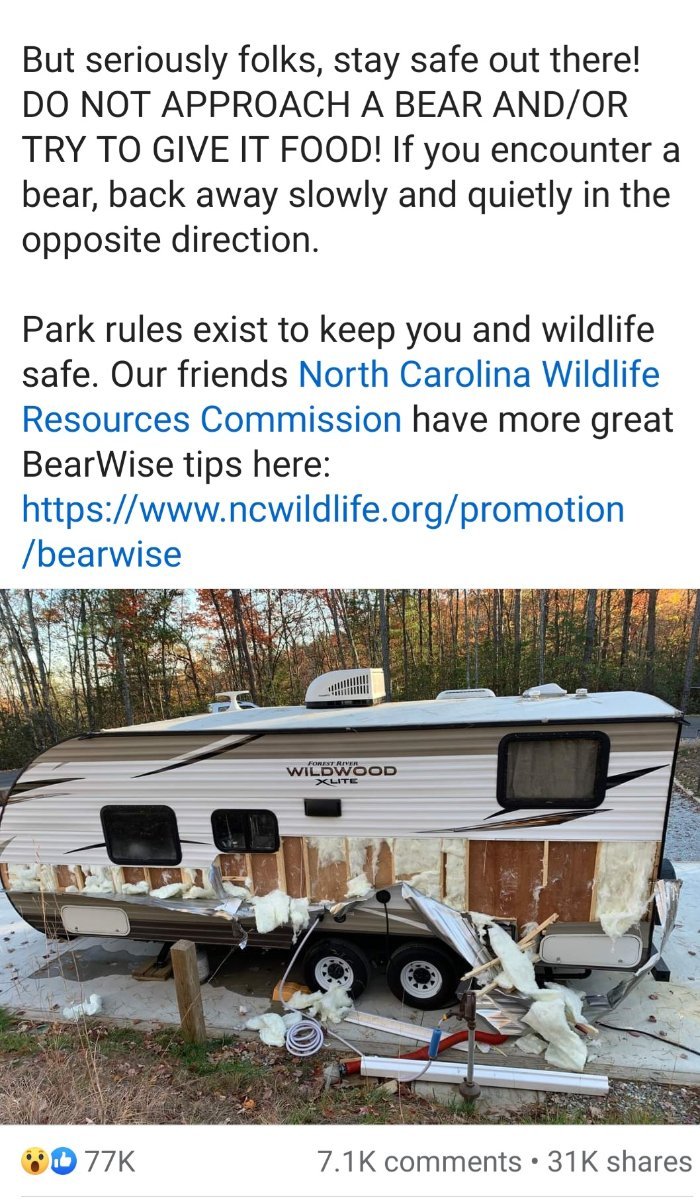
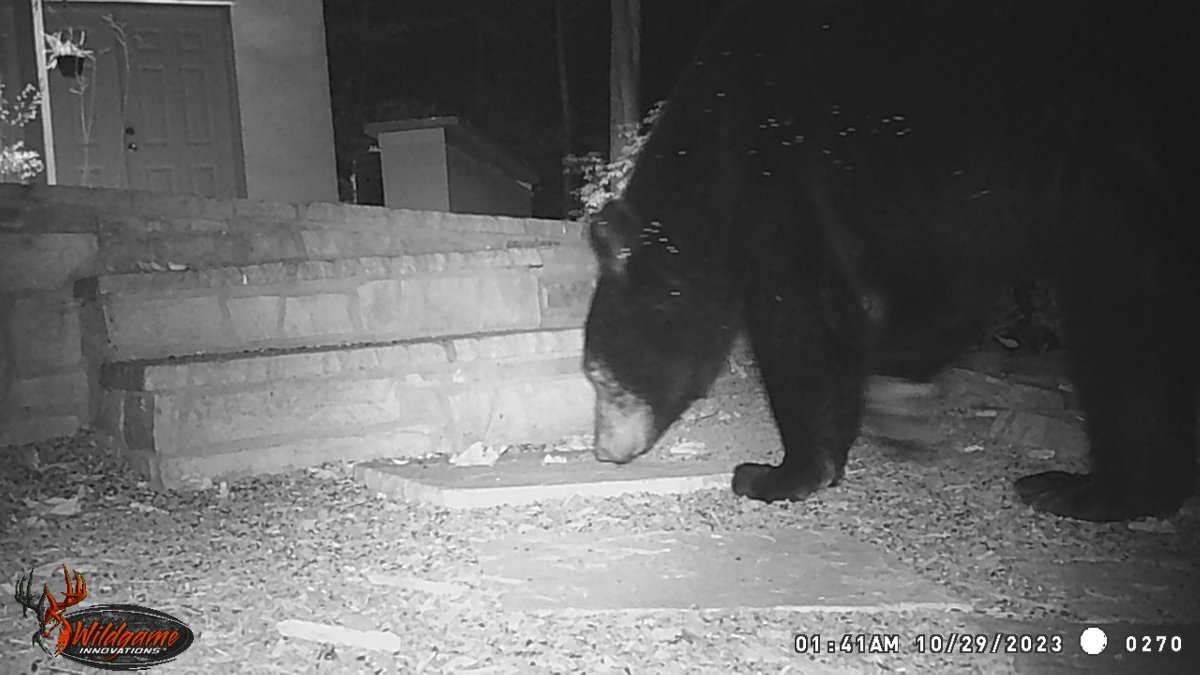
https://www.cnn.com/travel/blue-ridge-parkway-section-closed-feeding-bear/index.html1 point
-
I saw this on Facebook this morning. This stickie camper severely damaged by a bear at Gorges sp, about 20 miles from Brevard, several days ago. Campground will be closed for two weeks.
1 point
-
I got a kick out of the little witch's hat on the Ollie logo at the top of the page. Made me smile. Guessing thanks should go to @JWalmsley for this.
1 point
-
It should be simple to make a turkey out of it.1 point
-
I made the mistake of following Tourons of Yellowstone recently and now my Instagram feed is full of these very special people. It's a given that there are people who don't use good sense but the number of people blatantly disregarding the signage and guidelines is a little shocking.1 point
-
Everytime we are in Yellowstone it is amazing the amount of stupidity we see. There is something else between their ears and it isn't a brain1 point
-
These "Fluffy Cows" stopped traffic for an hour headed to West Yellowstone on our motorcycle trip a couple summers ago...
1 point
-
Our camping property is a forest conservation area, by our choice. one year, we awoke to what sounded like short, intermittent bursts of hail, first night back, in months. It wasn’t. There was a squirrel nest in a tree above us. We were "invading " their space. As soon as they figured out we were harmless, the barrage of nuts quit. The creatures were all here first. We see the bears often, usually in the distance, but they want nothing to do with us. A raised voice, or a bark from my 9 pound dog sends them packing. Keep a clean campsite. Our permanent neighbors do same. Put food sources out of sight and scent. At public campgrounds, make sure everything attractive is packed away, and all doors and windows are closed and locked. You have no idea of previous occupants. Bear, and other creatures, can learn that that campsites are an easy "foodsource". None of us want that. They become at risk, if they become accustomed to human food and contact. They'll eventually "invade" a human space,,and become subject to relocation or demise. Please do your best to let wild life continue to he wild,,and respect their space. We just share it with them, at their pleasure.1 point
-
1 point
-
Had ours blow up on this last trip. Cost was 22.09 plus shipping brought it to $37.48. 3 week lead time. Number for the company is 574-247-9235. It sure does get your attention when it blows up. Thanks for all the info here guys... appreciate it. Scotty1 point
-
That is how we do it. Then we add a little Calgon and Pine-Sol to the toilet and flush a couple of times to let that work on the tank using the bumpy road travel to loosen anything and everything. I have found the roads around Lafayette Louisiana very good for this process. 🤣1 point
-
You duh man!1 point
-
I take full blame for this. We have some more coming next ^^.1 point
-
I'd bet that Jason Walmsley had something to do with that.🤗1 point
-
This might be a good place to bring back an older thread concerning the installation of a mod for the purpose of TEMPORILY stopping that noise in the middle of the night from these "false" alarms. At about the same time John Davies and I installed a switch on the back side of the propane/co alarm. This simple on/off switch can be used to turn this alarm off in the middle of the night without having to search for the fuse and can be used while the Ollie is in storage to remove one more parasitic drain off the batteries. John came up with the idea of being sure to place a ribbon (or something) in a very visible spot to remind you that you have turned this detector off - a good idea. Anyway - here is mine and JD's looks very similar. The power wire to the propane detector is cut and placed on a switch that is mounted in the hole in the bracket. I used epoxy to attach the bracket to the interior of the wall below the aft dinette seat - where the detector is already located. Bill 2 inch square bracket for propane switch.jfif1 point
-
Happy Thanksgiving. We will be Traeger hickory pellet smoking a 6# dry rubbed bacon wrapped turkey breast. https://www.traeger.com/recipes/herbed-smoke-roasted-turkey-breast In addition we will enjoy iron skillet bacon wrapped and garlic and rosemary seasoned deer tenderloin plated at 136d, (med rare). We’ll raise a toast to a very blessed and successful hunt this year. From Field to Table. 🦃🍁🍽🦌 Just off the smoker - let it rest 15 min and enjoy! (The skewers keep the breast upright while sitting on the grill)😊
0 points
-
That's a nice looking light, @Dave and Kimberly. After 15 years, I have one dead puck light (chrome) in the bath, and replacement is tough to find, and about $50. Maybe I could swap out the light over the stove, and in the closet and pantry, with these, and reuse my original switched fixtures. Hmmm.0 points


-
Recent Achievements
-


")


")


