Leaderboard


Popular Content
Showing content with the highest reputation on 12/02/2023 in all areas
-
D and I've been talking about this move for some time now. OTT, as a business, does well in their strategic planning, IMO. The move to incorporate selected dealerships appears to be a timely move, considering the current market. Although it was very cool to explain to our SOB RV friends that one needs to buy an Oliver direct from the factory because of the dearth of dealerships, this will now change. No biggie. The Airstream dealership model is similar in our experience. For example, our friends recently had undergone extensive hail damage to their new rig - the local dealer had to refer them back to the Airstream factory because several adjacent panels needed R&R; a job local dealers aren't equipped for. I suspect the OTT dealership model would be similar and the choice to head back to TN for such repairs will always be the owner's. FWIW: we look forward to a full-service dealership (OTT-trained and qualified techs) that's a much shorter run than the 1,200-mile trek from our home to Hohenwald.4 points
-
That other owner may have been me. I also worked with the "very nice rep" and a new unit was sent and no problems since. Before during our end-of-the-season trip we had many false alarms. Our old unit still had years before the replacement date. Impressed with RV Safe customer service.4 points
-
You're correct, it is a moot point now. So please don't continue to rain down doom and gloom on the rest of us that are still owners. There are still lots of folks that love their Oliver's and many more wishing they could own one. Oliver is working through the same issues that many industries are, but at least they have a long term plan in place that is well thought out, has been years in the making and will succeed. Nobody is being forced to buy from a dealer as opposed to going to Hohenwald. I believe you've mentioned many times about your dissatisfaction of being so far from the factory. These new dealership relations will solve some of those problems. I have an extremely long (fifteen+ years) and close relationship with Oliver trailers as well as the Oliver Family and I can say with confidence that so far, their past business decisions haven't failed them and neither will this one.4 points
-
FYI: https://olivertraveltrailers.com/forums/topic/6811-how-to-lengthen-your-emergency-jack-handle-so-it-will-fit-the-rear-jacks-with-the-gearbox-removed/ John Davies Spokane WA
 4 points
 -
Sure Mike, unfortunately we are home for at least another couple of months. We have room in our driveway for several Olivers so come on by!3 points
-
SUCCESS!!! I purchased the NOCO 10 charger. Three of my 6v AGM batteries read between 1.8 and 2.3 volts. The 4th read .5 volts and the charger wouldn't recognize it. I connected two sets in series and used the 12V option to charge them...and the .5 volt battery was revived. I discovered that AGMs don't have a "recovery" option (or necessity) so the plain 12V option on the charger was appropriate. I reinstalled the batteries and everything appears to be working well. Thank you all for your input and helping me dodge a $800 to $1000 expense.3 points
-
With this new CO/LP RV Safe detector it’s my experience verified by the instructions and by Andrea at RV that 4 chirps indicate CO. This clearly helps identify which gas is present. I have only previously experienced the CO alarm. All good now. Here- Alarm activates with a four beep pattern with a flashing red LED for CO gas, or a continuous beeping with a solid red LED for Propane gas. If both gases are present, the alarm will indicate propane as it requires more immediate action.3 points
-
We also were caught up in the Texas deep freeze that year. We were traveling through Texas and had stopped for a week or so to help Mike and Carol with an Oliver project. On the morning that we were to leave the San Antonio area I woke up to find that I had a retina detachment. A long story short, after emergency surgery Mike and Carol insisted that we stay in their home for several weeks, canceling their own camping plans until I was able to travel. We moved to a campground about 45 minutes or so north of San Antonio in the hill country. I still couldn’t travel due to the gas bubble in my eye so needed to stay close to the San Antonio area for another month and had to cancel the rest of our annual western trip. The deep freeze hit Texas about a week after we got settled in our campsite. During the deep freeze the Oliver protected us from the ice, snow, single digit temperatures, and constant 20-30 mph winds. We didn’t have cell service, WiFi, or television for a week or so. We were able to share our water with some of our neighbors as well. All of the other stick built campers, including the campground experienced frozen plumbing. When we heard that there was freezing weather and snow on the way, we filled our fresh water tank and put away our water hose. We were able to go to a grocery store and load up with non perishable food and some bottled water in preparation. The entire community and little town that was close to us (as well as every other town in Texas) was shut down for over a week due to freezing. Fortunately the National Guard was able to get through and bring in water to the area. Interesting experience but I hope we don’t have to go through that again anytime soon!3 points
-
They are working with a number of dealers around the nation, the timeline for each will be different.3 points
-
The software that runs the Rewards Program has developed an issue and it has been temporarily shut down. Jason and Matt are working to get it back online as soon as possible. Sorry for the complications. Also, there are hundreds of people that think they are part of the program that have never registered with Oliver. You must register to be a part of the program. Procedure is as follows. From the Oliver Forum Page... On the selection line at the top of the page -----> Select HOME On the selection line at the top of the page -----> Select RESOURCES OF the selections on the right ------------------------> Select REWARDS PROGRAM From the left Center of the page --------------------> Select JOIN REWARDS PROGRAM From https://olivertraveltrailers.com/ On the selection line at the top of the page -----> Select RESOURCES OF the selections on the right ------------------------> Select REWARDS PROGRAM From the left Center of the page --------------------> Select JOIN REWARDS PROGRAM2 points
-
We can’t seem to come up with a name. How about FROSTY...2 points
-
It was a great bonding experience having you both here! We were glad you had not headed on to AZ before your retina detached. Do you feel like tackling another project? 🤣🤣Mike2 points
-
This is great news for you! However, keep a very close eye on these batteries - especially the one battery - in that they may now exhibit different behavior than they did prior to being so deeply discharged. This advice is particularly true if you plan a remote trip and/or a long trip. Bill2 points
-
We signed up some time ago, just went to the Rewards URL and it still has us registered as active participants, FYI...2 points
-
Anita is very special lady and we always look forward to taking her to lunch when we visit OTT! 👍🏻👍🏻2 points
-
50: 1 took forever to get the job done. Only did it once. Even with JD's knuckle saver idea, it still took forever. Then I came up with a much better solution: See Below Wait for it Here it is! GJ
2 points
-
And, on December 11th each year a special lady has a birthday.2 points
-
Four six volt batteries would be wired as two sets of two batteries, each wired in series to create two twelve volt sets, but the amperage would stay the same as one battery. Those two sets would then be wired in parallel to keep the voltage at twelve volts. At that point, the amperage would double to that of twice the amperage of one of the batteries. Take a picture of the wiring, take each battery and deal with it separately and follow the advice that @Rivernerd outlined above.2 points
-
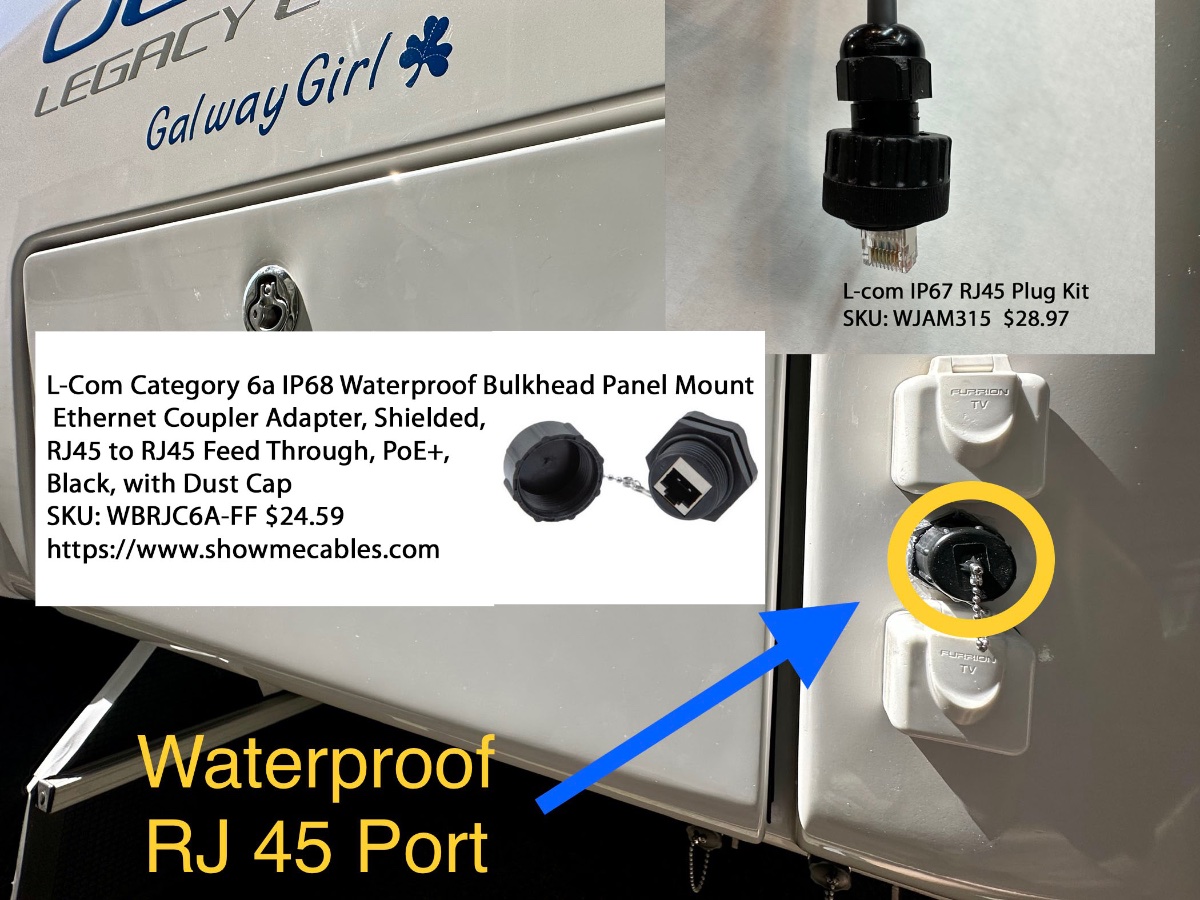
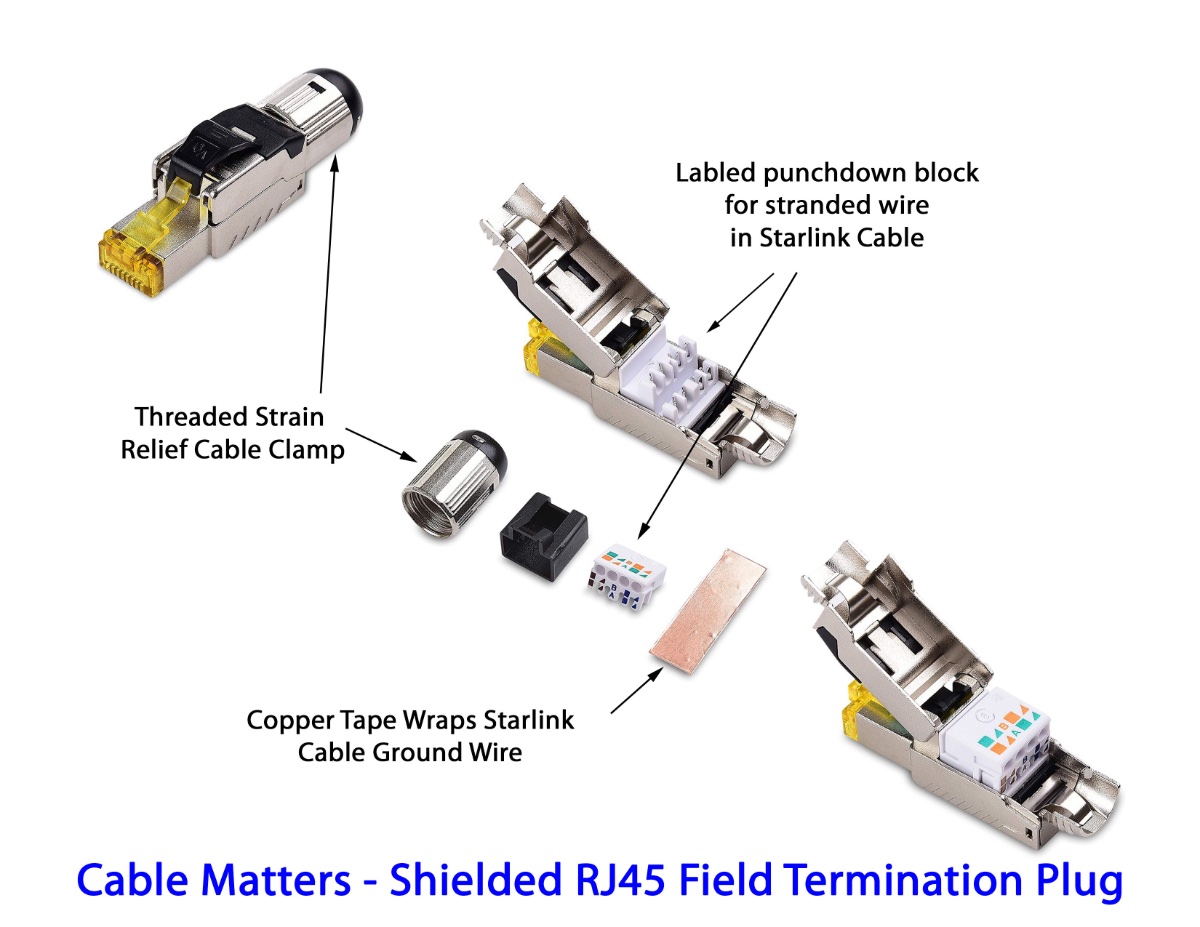
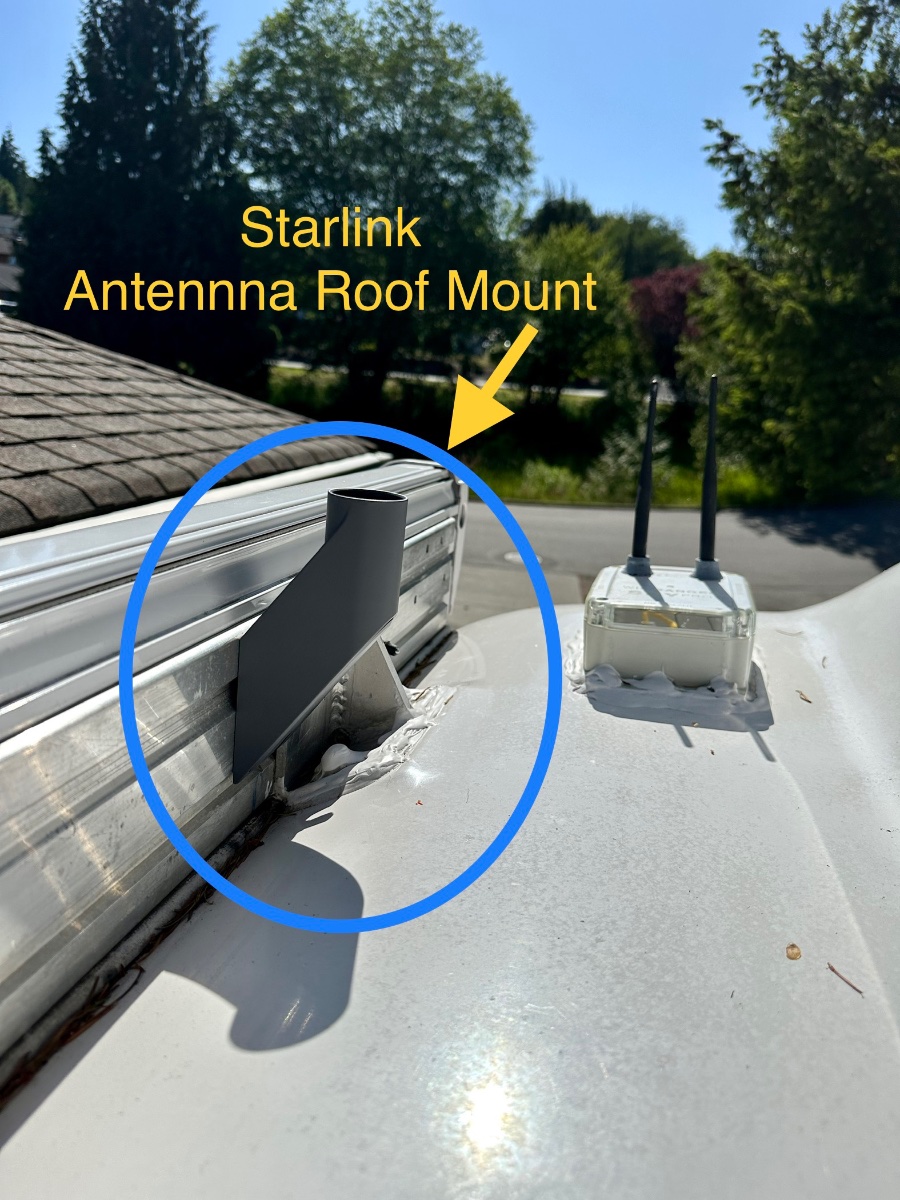
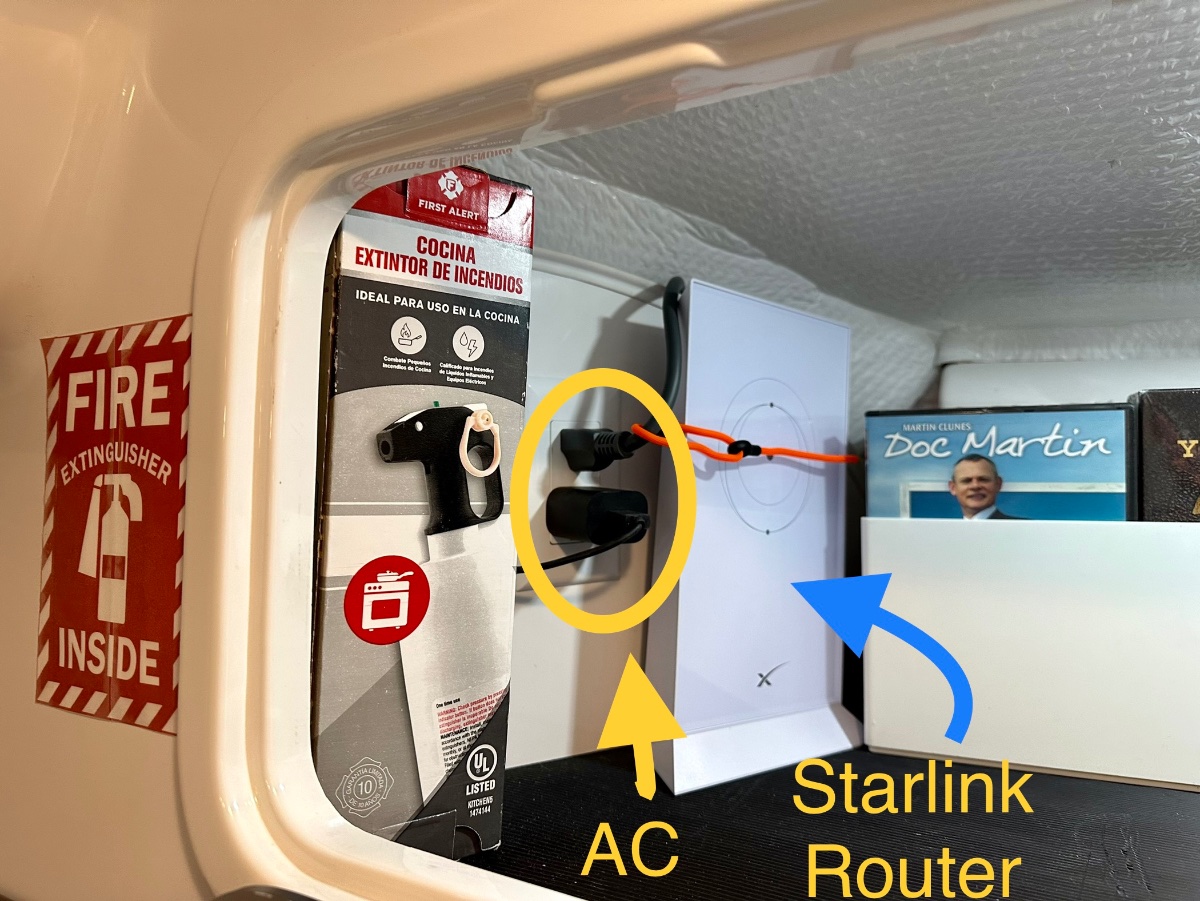
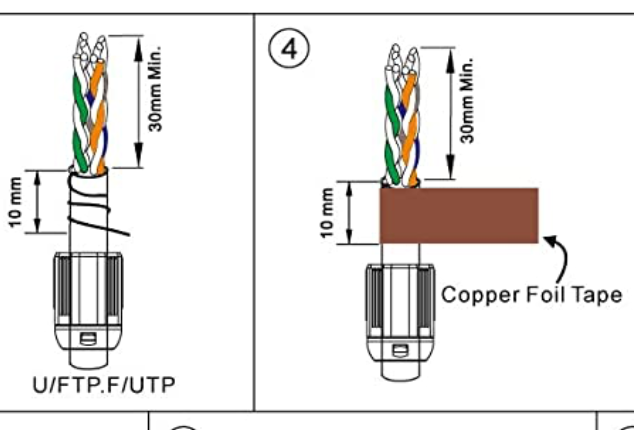
After looking at the forum I found a couple posts on installing Starlink. I decided to add another to the mix. Pre-Installation Starlink Test: In testing the system before a full installation I found that the Starlink Router could be plugged into curb side Oliver outlets and then the router could sit on it's back on top of the tire under the wheel well. This provided 58dB of signal outside the trailer and about 78 dB inside. So if you don't want to hassle with mounting the router, drilling holes etc. you could just find a weatherproof box/cover for the router and leave it outside. (Signal strength and bandwidth drops a bit but not really very much.) Read on if you want to do a more complete installation. 1) Roof Mount: (This is just a way to mount the antenna up high.) I bought the Starlink short roof mount adapter. Our hull 505 had the Dometic Awning, so I could not simply bolt directly to the mounting bolts from the awning brackets as they are at odd angles. I used 1/2" long x 3/8" diameter Self Tapping Bolts. I drilled holes, then drove in the self tappers into the mounting rail making sure to use washer/spacers to keep it from penetrating the back of the awning box. I used blue loctite on those tapped bolts. This mounting position will be perfect in those cases where we have clear sky and want the antenna up high. I'll continue to carry the ground mount for portability uses. I don't plan to drive with the antenna on the roof. 2) Mounting the Router - In the Rear Attic and Running Cable into Basement I mounted the router inside the rear attic cabinet. It's held in place by a simple orange strapping tie that feeds through a hook-eye behind the router. This is a good spot for the Router as it's close to a 110V outlet, and easy to run the cables under and behind the back of the cabinet over to the right side then down to the basement area. To make the cable run to the basement I needed to remove a couple panels: (NOTE: DISCONNECT FROM CURB POWER and make sure Inverters are OFFLINE BEFORE ATTEMPTING) 1) Street side attic panel (2 bolts) tip it down flat to gain access to the street side rear of the cabinet. 2) Basement rear dress panel covering the back the basement. (2 phillips screws). For my installation I ran the cable beside the existing AC drain tube on the street side rear of the trailer. I pushed the cable snake down beside that tube, and then at the bottom in the basement attached and I pulled up a length of pull line from the basement area. I attached the pull line to the end of the Starlink cable (the end that plugs onto the dish) and then pulled the Starlink Cable down into the basement. I tested the Starlink at this point before cutting the cable to get a baseline of speed for comparison after I cut the cable and attached RJ45 network connectors and the thru hull port. After testing I looped up about 3 extra feet of cable in the basement and then cut the cable for installation of the RJ 45 connector that would feed the back side of the thru-hull RJ45 plug. 3) Install new RJ45 male plug on cable in basement: Pro TIP: Use metal field termination plugs for the Starlink cable cut ends if possible/ Trying to use the typical plastic RJ45 connectors is a real hassle as the conductors in the starlink cable which stranded and thicker than normal. I spent well over an hour trying to get my shielded/plastic RJ45's to work. I finally said let's try a real metal coupler. In the picture below is the plug I bought from "Cable Matters" on Amazon $6 ea. They feature a clearly labeled punch down block, a threaded strain relief clamp and copper foil tape that is used to wrap the ground (or drain) wire around the cable shaft where it enters the connector. This is the connector I used on the inside of the trailer connecting the Router to the Thru Hull plug. 4) Install the Thru Hull Connector and connector for Cable to Dish I purchased an L-Com IP68 (waterproof) through hull connector specifically designed for shielded PoE Connections. I also purchased a matching L-Com connector kit for the cut end of the Starlink cable. This matching plug screws onto the outside connector for a waterproof sealed connection. I placed the connector mid line between the two existing connectors leaving both the Cable and Satellite COAX's in place. The new bulkhead coupler fits exactly between those two connectors, but I would suggest shifting UP 3/16" from center to allow the bottom door to fully open. (It's the 'satellite coax' in my case which I never use.) Hope this is useful to any new Starlink owners. More detail is in our blog here: Adding Starlink to Galway Girl Craig Hull 505 - Galway Girl
1 point
-
I just got off the phone with Oliver. I have confirmed that the first dealer is on board and now has the ability to start selling the Oliver Travel Trailers. They have two locations in Georgia. There are more dealers in the pipeline that will be located in other parts of the country.1 point
-
Greetings! I was reading some great instructions for installing Starlink inlet ports on the outside of an Oliver. However, it was a pity that the installations required cutting and splicing the Starlink cable. That’s a discouraging and challenging proposition, so I just signed up to this Forum to share how I did mine without cutting the cable. My method was risk free, super easy and with quality results. The wiring is all plug-in with about $35 worth of Amazon parts. The router and modem is ideally located in the Oliver’s attic where there is an AC outlet and good WIFI broadcasting. Sorry to those if I've duplicated some of their installation methods, I guess great minds just think alike. I’ve provided a list of 3 Amazon parts, and recommended a few tools that are worth owning anyway: Furrion Mini TV/SAT Inlet #FTVINB-PS, $11.30 Penglin #PL252, RJ45 CAT6 female to female panel mount connector, two for $14.99 Juxinice 10’ long shielded RJ45 Cat-6 cable with a 90 degree angle connector, $9.69 Neiko #10194a step drill bit, or similar, $10.99 Generic brand 14’ fiberglass fish rod, or other Amazon options under $20 It’s a good idea to first test the parts by running an internet speed test both before and after plugging-in the new cable and connector between your dishy and router/modem. You can use any internet speed test such as Ookla or the Starlink App, and the speeds should be about the same unless the new cable or connector is faulty. Start your installation by unscrewing and removing the coax connector from the new Furrion fitting, then enlarge the hole with a step drill bit to accept the Penglin connector. This is the exact same Furrion fitting that Oliver uses for the outside Cable and Satellite TV connections, so you could use one of the existing ones if you don’t need the the satellite or cable connection. Find a relatively flat surface next to the existing Furrion cable/satellite TV fittings to install the new Furrion fitting (with the installed Penglin connector). Unscrew the storage compartment liner so that it can be pulled back to access the area where the connector will pass through. Using a step drill, make a hole big enough for the Penglin coupler to pass through into the storage compartment, and drill large enough holes so that the Furrion mounting screws will hold without chipping the fiberglass. The photo shows where I mounted mine, but it gives an illusion of being crooked and unevenly spaced??? With the storage compartment liner pulled back, the AC drain tube can be seen running down between the trailer walls. This is a good guide to fish the new Juxinice cable up into the Oliver’s attic compartment. The recommended fish rod makes this easy and you will have to unscrew and pull back the attic side panel for access. The 90 degree end of the new Juxinice cable will be plugged into the back of the Penguin connector and other end into the Starlink modem in the attic. That’s it! Replace the panels and your done. The Starlink Dishy cable will plug into the outside of the new connector and the Furrion fitting keeps everything dry when it’s unplugged. Don’t worry about the rumored proprietary Starlink wiring, this is just a pass-though connection and the internal color coding of the individual wires does not matter. I was a beta tester for Starlink when it first came out, and I still use the original Gen-1 round dishy at home and when traveling with the Oliver. We used to run the dishy cable though the outdoor compartment door, and we kept the router and modern under the bed close to the AC outlet. This was always kinking the cable, interfering with the compartment seal, and generally in the way. The quick disconnect was really worth doing, and wifey is happy that she doesn’t have to crawl under the bed to pull the cable though anymore. Watch for a future post on how to conveniently mount and store a Dishy pipe mast. Cheers and good luck, Geoff & Tanya
1 point
-
My husband Scott & I picked up our Ollie this past Monday. We decided to name her Pearl. She is now part of a growing family…. We have “Dug” (our Kioti tractor) and “Moe” (our John Deere rider) 😉 We’ve never owned a travel trailer before so there is a TON to learn. I love the resources that are on this site and really appreciate the advice that all of you give on a regular basis. We will hopefully feel more confident as time goes by. The only question that I have so far is an electrical one. We are storing Pearl at a storage facility that only offers a 110v outlet. They had an adaptor that they said would work, but it tripped the GFI on their outlet pole within seconds each time we tried to plug in. I”m guessing that maybe we just need a different type of adaptor? Have a great day! Scott & Cindy1 point
-
I asked a while back about flipping the cupboard door above stove. With the help of a friend we took the door off. Because of the age of my trailer, other doors may not be mounted the same way. But here's what mine looks like. The thin strands are the clear calking around the door. The thicker ones appear to be a thick adhesive. The fellow who helped me does not believe it is butyl tape. The door has some pieces of double faced tape on it also. I'm guessing they tried to mount it with the double face tape and it wasn't enough so the added the adhesive. The picture of the opening showes the interesting square corner. Sweet Olivia 2014 Hull #53 Twin bed LEII
1 point
-
You are the one who brought it up by asking me why, publicly. I just clicked that sad button. Anyone here can have an opinion and nobody should try to silence or put down dissenters who don’t toe the line…. John Davies Spokane WA1 point
-
With what size 1/2" 12-point socket?
1 point
-
I would have thought the first dealer would have been more than 300 miles from Hohenwald1 point
-
I think it is a really bad long term policy. I probably would never have bought “Mouse” if the sale were processed through a stick and staple dealer. It is a moot point for me anyway. John Davies Spokane WA1 point
-
I’m sure you could check with Oliver for a replacement. Mine is not a heavy duty tool, can’t be too expensive. I have had to use mine when a back jack popped off the gears when in the up position. Took a few turns to get things back on track. Mike1 point
-
It's a very slow operation indeed. Another good reason to use planks or blocks under the jacks. If you ever have a switch or motor failure (as I have over the 15 years), it's really nice to know you've shortened the throw. Even so, nice to know it's possible. I'm a 5' 4" woman, and I can still get the jack up in a breakdown. Ours is stored in plastic pocket, in a small dinette seat storage area, which newer trailers won't have. Check there, too. Unfortunately for you, everyone moves everything around. Steve's suggestion is a good one, as well. Never bothered, as we've only had to use the wrench a few times since 2008.1 point
-
Also, a standard 6 point socket will not work. You will need either a 8 point or a 12 point socket of the correct size. You can use your impact driver rather than doing it manually.1 point
-
As far as I know - there isn't a specific place where Oliver has designed clips, or other device to store this "manual wrench". I store mine in the area under the street side bed, but, I know that other owners store it in a variety of places. However, do not fret. Look at the top of either of your rear jacks. On the top of these jacks you should see a square metal "stud". I don't remember the dimensions of that stud but all you need to operate it is a wrench or socket that can be used to turn it. Be forewarned that I believe the gear ratio is something like 50 to 1. This means that if you have to use this manual method of raising and/or lowering your jacks, you will be turning that square stud a bunch of times. Bill1 point
-
Thank you @Ollie-Haus & @Steve Morris. I am not familiar with the Xantrex app yet (so far we’ve only downloaded the Lithionics app. But I will research that today. Sounds like it would solve our issue for sure - thanks again for the advice.1 point
-
Yes, I am leaning toward making a purchase for a handheld. I think if only for piece if mind at would be worth it. Mark1 point
-
@Cindy TownsendThis is most likely your solution. I've made this system change back and forth a few times. With the Xantrex app on your phone it only takes a few seconds. You have to be in the camper and connected via bluetooth. The change is made in the settings menu. You can change that setting pretty low as you are only float charging the batteries all winter. Sometimes a shore power GFI doesn't like what it sees when plugged into an Oliver charging system. I've not experienced this personally though.1 point
-
I plan on making a call to Andrea with Rv Safe, thank you Patriot for your experiences. Sounds like this maybe an issue where having a handheld propane sensor would be a plus. I am going to close all windows and see what happens along with speaking to Andrea. I winterize this past Sunday and the outside temps have been cooler until yesterday, we were around 62 degrees and I hadn't opened up the camper since Sunday. Not sure if the temps with the camper closed up caused the antifreeze to have stronger fumes...but I would rather be safe thank sorry. Thanks again for everyones input, I will post how this turns out in case this is an issue that may come up with someone else. Mark1 point
-
Or slowing the rate of charge - if possible. Another Ollie in NC - yeah! We're located in the mountains of Western North Carolina. Welcome to the Family - glad that you are here. I see that you have used the "signature" feature. But, if you could add a bit more information about your Ollie it might help you to get better and quicker answers to questions you might have in the future. Information pertaining to your Ollie's options such as type and number of batteries, toilet, water heater, etc. Bill1 point
-
Exactly the same situation with me. But, as Patriot said, "I am not a chemist and won’t pretend to be one."👌 With a relatively newly winterized Ollie and a new detector, I'm having no problems. Therefore, my bet is on a "defective" sensor. But, as Seadawg said - a propane leak is dangerous. Be careful. Bill1 point
-
I have a permanent search set up on RV Trader and just now I got a notice via email that my search has 4 new Oliver adds. Turns out they are all for the same dealership in Georgia and they are for 2024 LE2s that they are selling. Thoughts, comments. The pricing looks to be very much in line with factory pricing. Here's a screenshot of the email I got.
1 point
-
Then, as John Davies suggests, invest in a high-quality (ergo more expensive) lead acid battery charger that has a "repair" or "desulfate" feature. I have had good luck with NOCO Genius chargers. They are small but effective. Below is a link to a 10A version for $79.96 that includes a Repair feature for deeply discharged lead/acid or AGM batteries. If your AGMs are 6V, it can be set to 6V as well as 12V. https://www.amazon.com/NOCO-GENIUS10-Fully-Automatic-Temperature-Compensation/dp/B07W3QT226 In your shoes, I would invest the $80 to see if the batteries can be salvaged. Your 400+Ah battery bank will take several days to recharge with this charger, even if it can be saved. After the charger has done its job, verify voltage of each battery with a multimeter, at least twice, before concluding that you have "dodged a bullet." Even if you can't save the batteries, a NOCO Genius charger is handy to have around just for maintaining automotive lead/acid batteries. Good luck! And, please report your results.1 point
-
Battleborn is inexpensive right now, relatively, but I'm not sure we're ready to make the break. Well see how the old agms survive the winter. And,then, decide.1 point
-
Try, slow charge, and let us know. I have my fingers 🤞 crossed for you. Good luck.1 point
-
Battle Borns are on sale big time, maybe your toasted batteries are a sign from above that you should upgrade to lithiums now…. They will survive abuse much better than ye olde fashioned lead acid boat anchors… BB Black Friday sales I have never heard of even one owner that switched to lithiums who regretted it afterwards. Maybe you should add some 21st Century tech to your electrical system. John Davies Spokane WA1 point
-
I have a little experience with corroded stainless steel. My experience is from when I TIG welded the stainless steel brewing fittings together for my home brewery. I already knew how to weld mild steel, but had to research the specifics of welding stainless steel and how to maintain its stainless characteristics. Are you using a chlorine bleach based cleaner on your sink? Stop doing that. Chlorine can dissolve the protective oxides on a stainless steel surface, exposing the metal surface to the environment which leads to rust. How about cleaning the sink with steel wool? That's not good either. Iron fragments can get microscopically lodged in the stainless which leads to rust. Use a ScotchBrite pad or bronze wool instead. In order to passivate (establish the protective chromium oxide layer) the recently cleaned spot on your stainless steel sink, you need to use a product containing oxalic acid. As mentioned earlier, Bar Keepers friend is one product. Others include Klein King Stainless and Copper Cleaner, and Revere Copper and Stainless Steel cleaner. Bar Keepers friend comes in a powder and a liquid. I always make a paste out of the powder and scrub the area clean with a ScotchBrite pad to passivate any recently welded stainless steel fittings. A paste of Barkeepers Friend powder and a green ScotchBrite scrubby pad should take care of the issue on your sink. Just keep the chlorine bleach products away from anything stainless steel. HTH, Ken1 point
-
Unless you are filling your tank from a fire hydrant, it would be virtually impossible to over pressurize the fresh tank. The overflow hose is 4x larger than the inflow hose. PEX tubing has a standard hydrostatic pressure rating of 160 psi at 73℉. In general, residential water pressure ranges between 45-80 psi. You shouldn't run into problems there. However, from personal experience, about 8 years ago we stayed at a commercial campground in San Antonio. When we checked in, management warned us that the campground water pressure was about 90 psi and recommended we use a pressure reducer to protect the water lines inside the trailer. "No problems, I don't need that", I thought to myself. I hooked up the water, placed one of the blue water filters in the line, turned on the water and went around to the other side of the trailer and sat down in a chair. A little while later someone walking by said that I had water coming gushing out of the other side of out trailer. Upon examination, I found that the sonic welds on the plastic casing of the blue filter have given way under the pressure and it had exploded. I removed the remains of the filter and reconnected the water hose. No damage to anything else.0 points


-
Recent Achievements
-


")


")


