Leaderboard


Popular Content
Showing content with the highest reputation on 02/09/2024 in all areas
-
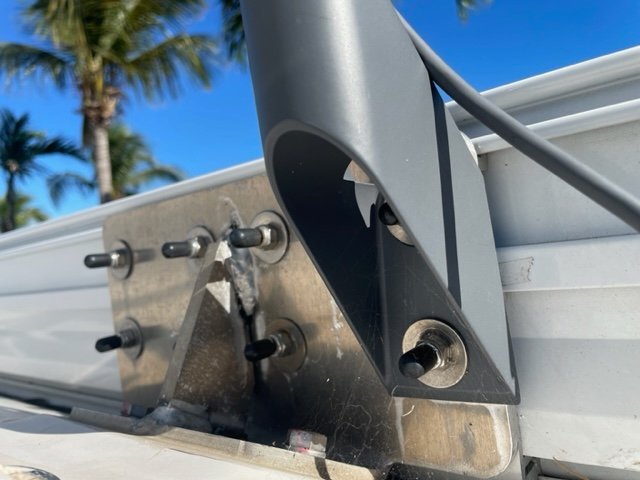
Wanted an easier way to get lesser used stuff to the back of the trunk in our LE2. I had purchased 2 - 20" drawer slides for a project on the truck I never ended up doing so figured I'd try something out. It was as easy as pulling out the "floor board" of the trunk (which wasn't easy, there's about a 1/16" wiggle room at the door) and then mounting the slides. I had to provide a little bit of a riser to clear the H/C water lines at the street rear corner but it pulls out the full width of the trunk space now. Threw two pipe clamps on there for a bungie to hold things down in transit as well. In addition to that, I've never liked toggle switches. These Apiele push buttons work wonders and you can get several different colors. The blue isn't overwhelming and makes for a nice nite light as the Main Cabin Lights I wired to have the blue light on full time (for finding in the dark). The other rings only light up if the desired function is active. Working on the second panel above the curb bed as the thickness of the panel there is too thick for the overall length of the switch. https://www.amazon.com/gp/product/B09DFWF2YR/ref=ppx_yo_dt_b_search_asin_title?ie=UTF8&psc=1
 7 points
 -
Today I added two 4" vents in the closet (one low and one high) in the same locations that OTT is installing in the newer Olivers. Additionally, I added a 3" return air vent in the bathroom that vents into the underside of the forward dinette seat like OTT is now installing. I also added one 4" return air vent like Rivernerd recommended on the hall side of the forward dinette seat. I will be testing the heating system with these new vents later in the early spring, The real reason that I am adding to the post is becasue I wanted to share where I purchased these vents. I looked on Amazon for 4" vents, like some have suggested, to get a price. I then called OTT and got a price for their vents. The price that OTT is charging is substanitally less than Amazon's price. I purchased from OTT 3-4" vents and 1-3" vent for about the same cost as Amazon was charging for one 4" vent. IMO, for those with older Oliver's, that want to added return air vents, I recommend to purchase them from OTT and save youself some money. Plus my new vents now match what OTT is now installing.6 points
-
I mounted the short roof mount Starlink mount which has the same hole pattern as the Girard Awning. Plan is to also have a location to place my Harbor Freight flag pole (Starlink mount) adjacent to the trailer tongue (mount still to be fabricated). I fished the cable from the attic to the basement following the AC drain hose as noted in another's previous post, then using the paddle bit provided by Starlink in their house mounting kit, I drilled through the rear of the outside hull while still within the confines of the spare tire cover. I used marine caulk/adhesive (5200) to glue the included Starlink plug (that the cable runs through) to the hole drilled in the hull. Next I determined that I would need a max of about 50 feet of cable -- if I were to run out the rear, to the front of the trailer then up a 25' pole -- and coiled up the excess, zip tying (the excess) to the spare tire, the remaining 50 feet was then coiled and zip tied separately and marked at about the 8' mark which is the length needed to go from the exit hole in the tire cover to the dishey now on top of the rear-most awning attachments. Next was cutting a 4 inch hole in the spare tire cover and mounting a marine deck port cover, again using the 5200 adhesive. The next day after the adhesive had hardened sufficiently I drilled a hole at about 5 o'clock on the base of the port and then cut to the hole forming a "U" shaped hole to allow the cable to exit and still be able to replace the port cover. The cover-base has a small diameter o-ring that contacts the cover which of course was cut when I made the "U" shaped hole, I put a drop or two of super glue in the o-ring's channel and pressed the cut ends of the o-ring in place so it doesn't fall out and still provides adequate protection for water intrusion as well as helping assure a tight fit when the cover is screwed in place for travel. The 8' of cable just gets pushed up inside the tire cover for travel, however if I need to use the flag-pole for the dishey then I'll have to remove the cover, cut the zip ties and uncoil the 50' length, then recoil and zip tie it when done. Initially I tried just pushing the entire 50 feet of cable up through the new port hole in the tire cover which worked moderately well...but only one time. When I pulled it out and hooked it up the Starlink no longer worked. Upon closer investigation I discovered that I had kinked the cable enough to cause it to stop working. $85 and a couple of weeks later after the new cable was delivered I hooked it up and it worked fine, so then, after pulling the new (non-kinked) cable from the attic to the basement and all the enjoyment associated with removing the marine adhesive holding in the cable plug, I was again up and running. My plan in the off-season is to drop off the spare tire cover to my favorite fiberglass boat repair shop and have them add a mount inside the tire cover that will allow me to coil the unused cable on to the inside of the cover instead of being zip tied to the tire. It will basically be in the same location but attached to the cover making it easier to access the spare tire by not having to cut and later re-coil and mount the cable to the spare.
5 points
-
Ok, we can start the furry feline post. We have two Egyptian Mau cats, RJ is 16 and Sophia is 7. They always travel with us and love the adventures. Steve made a cat scratch post for them on the dining table stand. We open the door to our lower compartment and store their litter box there while being camped. On the move their litter box goes on the back floor of the truck.
5 points
-
Here is a little interesting information on car insurance and what can happen if you use your roadside assistance. It might be worth asking your provider what happens if you decide to use your roadside assistance? Is it considered a claim under your current auto policy? The devil is certainly in the details. https://clark.com/insurance/car-insurance/roadside-assistance/?fbclid=IwAR02oGvp3QfVch9vp8Ys8dvzKWH30fZ3Pr1XWSsBS9H-BwGeVFd-fSxeYas4 points
-
Your solar charge controller should handle that charging profile for you. Depending on the type of controller you have, MPPTs probably use a better AGM charging profile than the PWM type controller. Either way, the controllers should be configured to their specific AGM setting. We had AGMs in our previous camper and used a Blue Sky MPPT solar charge controller wired with 10AWG wires from the controller to the battery bank. Our solar modules would provide enough energy for a 13.6vDC bulk charge to the bank on a good sunny day then drop to a about 13.2v for a float charge after 13.6v was reached. But all charging profiles and systems are not the same... Suggest you contact the battery manufacturer and inform them of the type of controller you have and ask them for their recommendation.4 points
-
Mark, the one major thing that is the most critical with AGM batteries is that you never allow them to go below 12.2. All it takes is one time to damage or ruin them. Solar is a big help, and you should get A battery charging via the truck alternator when driving. It would also be good to have a generator, if you are boondocking. I got 5 years out of my AGM's on my Truck Camper and did things by the book. When I stored the truck camper it was covered and the battery cut-off turned off. There are parasitic draws, so I eliminated that. Every 6 weeks I took a portable solar panel over and plugged it in. 6 weeks later, batteries were at 12.6. If boondocking in cold weather and you let your batteries get too low, your furnace will shut down. AGM's aren't forgiving, so never let them get below 50%. I used 12.3 as my safety bottom line. Hope this helps.3 points
-
This is an interesting topic. Good article, as well. Many thanks for sharing with the group, @Patriot... FYI, We've been with USAA for over 45 years - and started carrying Roadside Assistance Coverage soon after our son was born in '88 when a pop-up tent trailer was added to the stable. Never claimed a "RAC" incident until after many years and 4 RV's later when, in the middle of the Oklahoma Panhandle, we loose the alternator and the TV (a Suburban) is a roadside DOA. We had Verizon cells phones at the time, with a marginal signal, called USAA and they had a tow truck to us in less than an hour from a local town. Rigged up the "Sub" on the truck, and pulled it and the AS back to a Chevy dealer in nearby Guymon, OK. I'm certain there's similar experiences among OTT Owners out there - but, although a "claim", our premiums were not affected. Whether covered as a rider with your primary insurance carrier or from a secondary standalone RAC provider, we think it's worth it. We're glad we had it back then and we still have it today... My $0.023 points
-
We've used Coach-Net with good results as well.2 points
-
Thank you for this useful info, Patriot. I think I'll be seeking out a different provider for this coverage.2 points
-
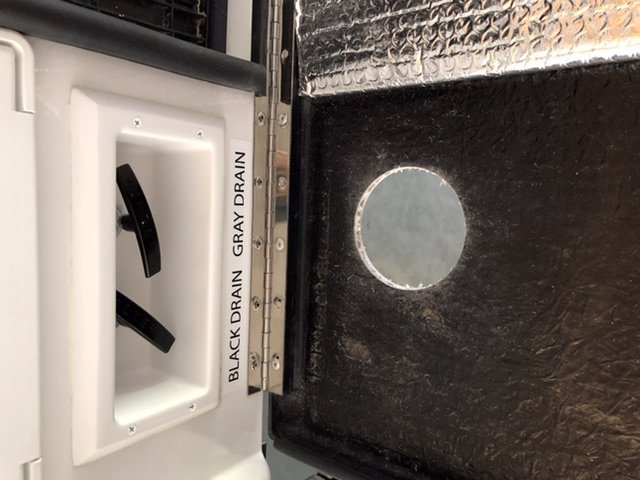
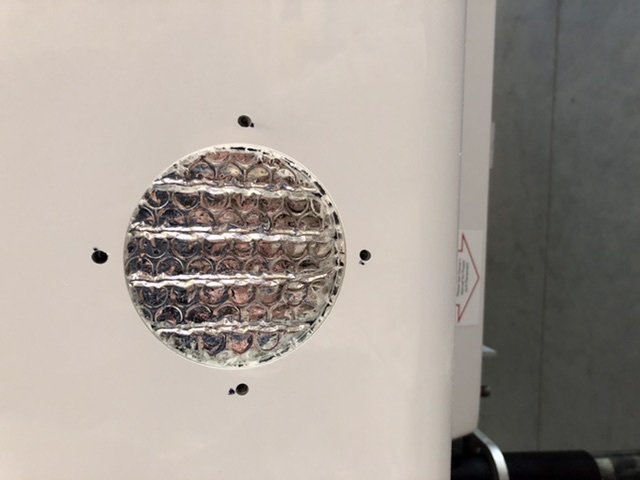
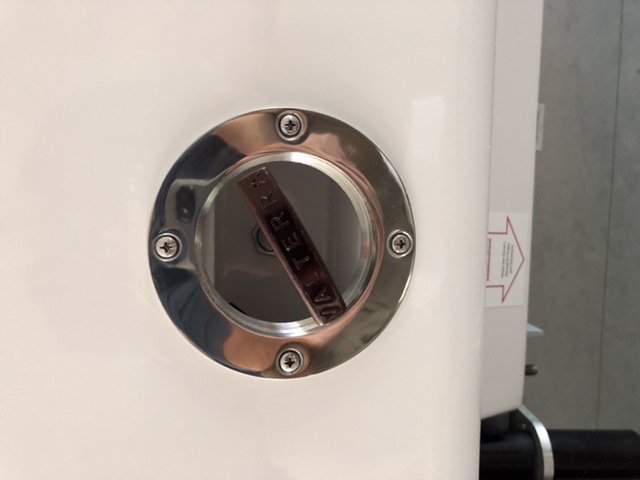
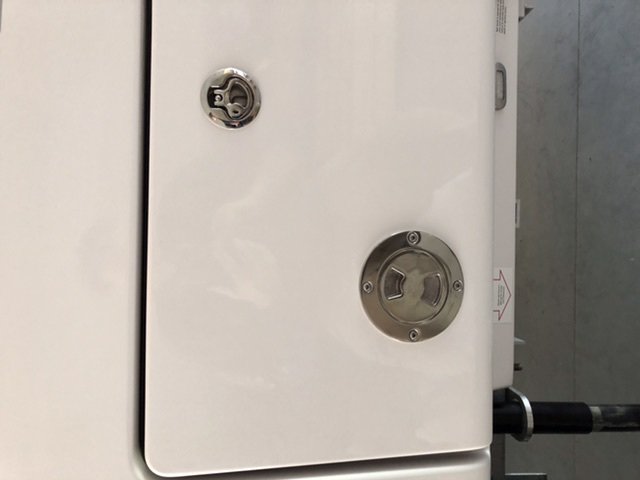
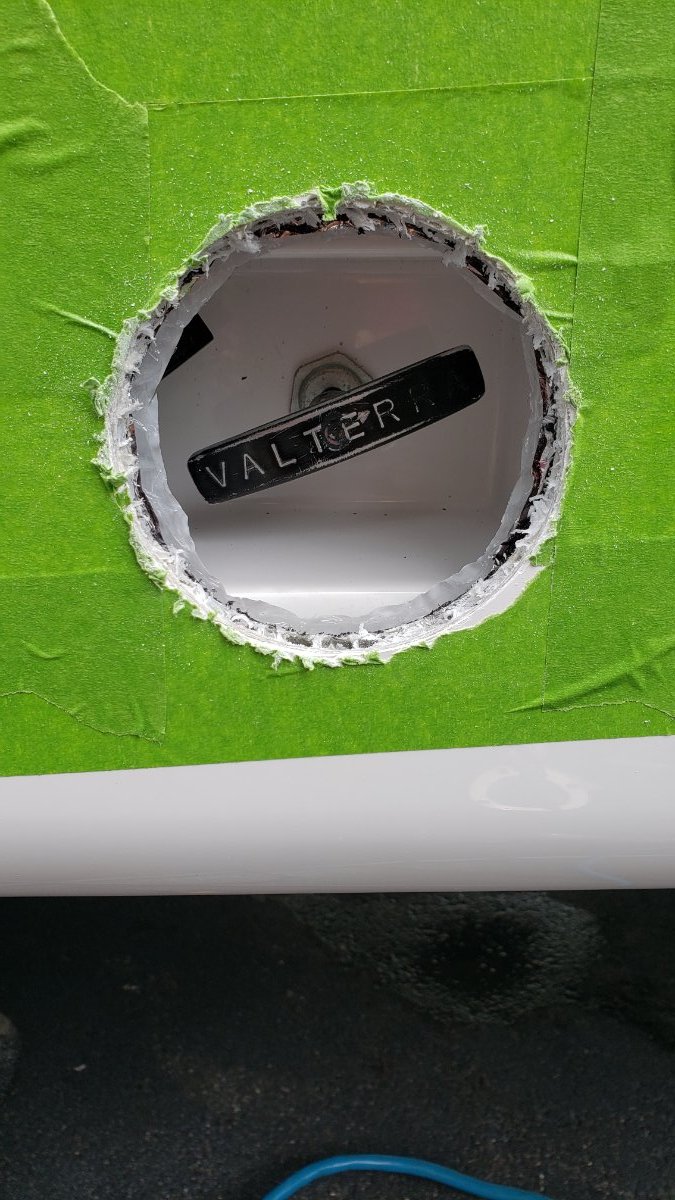
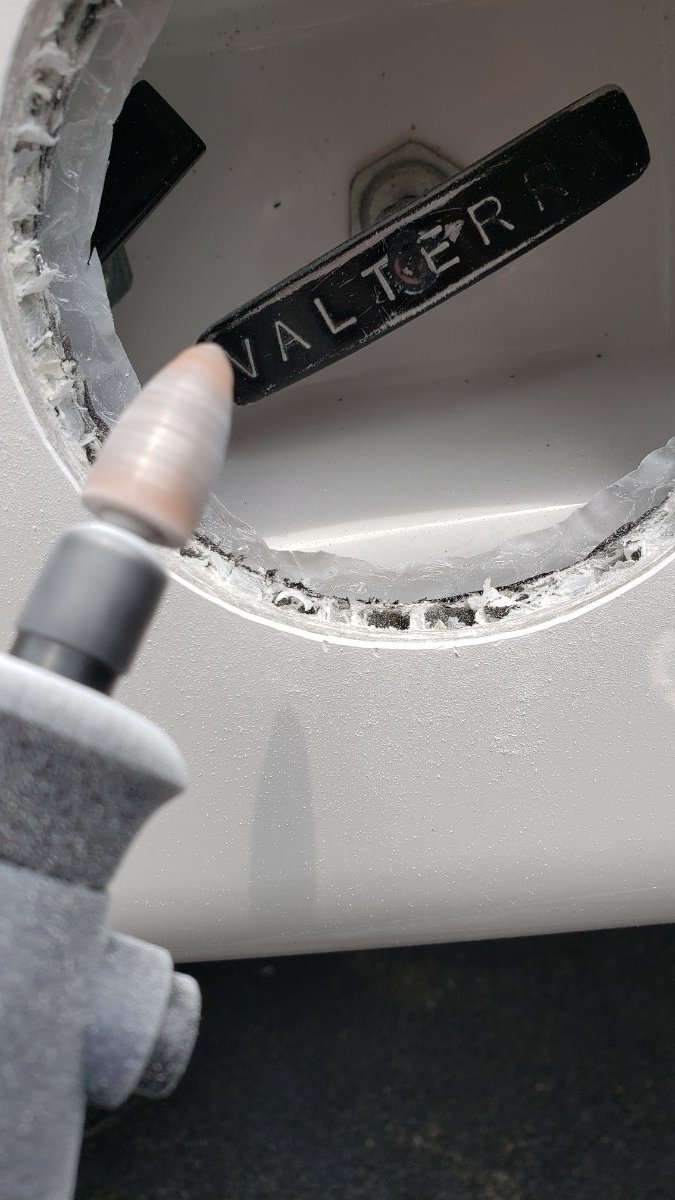
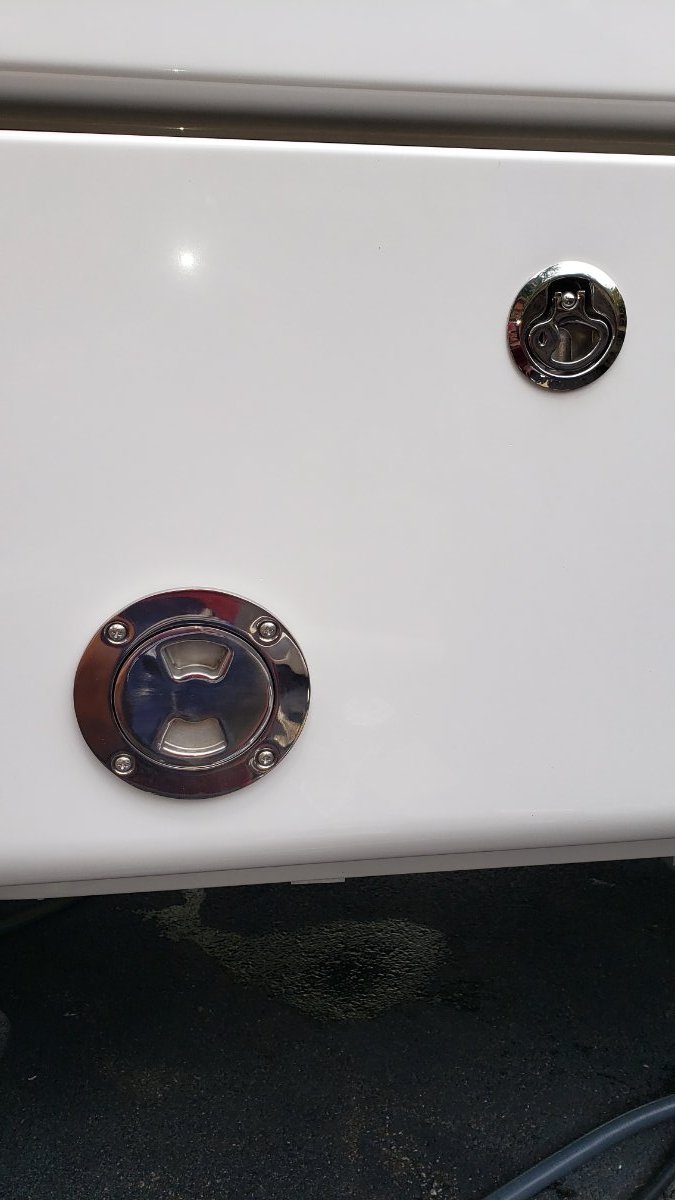
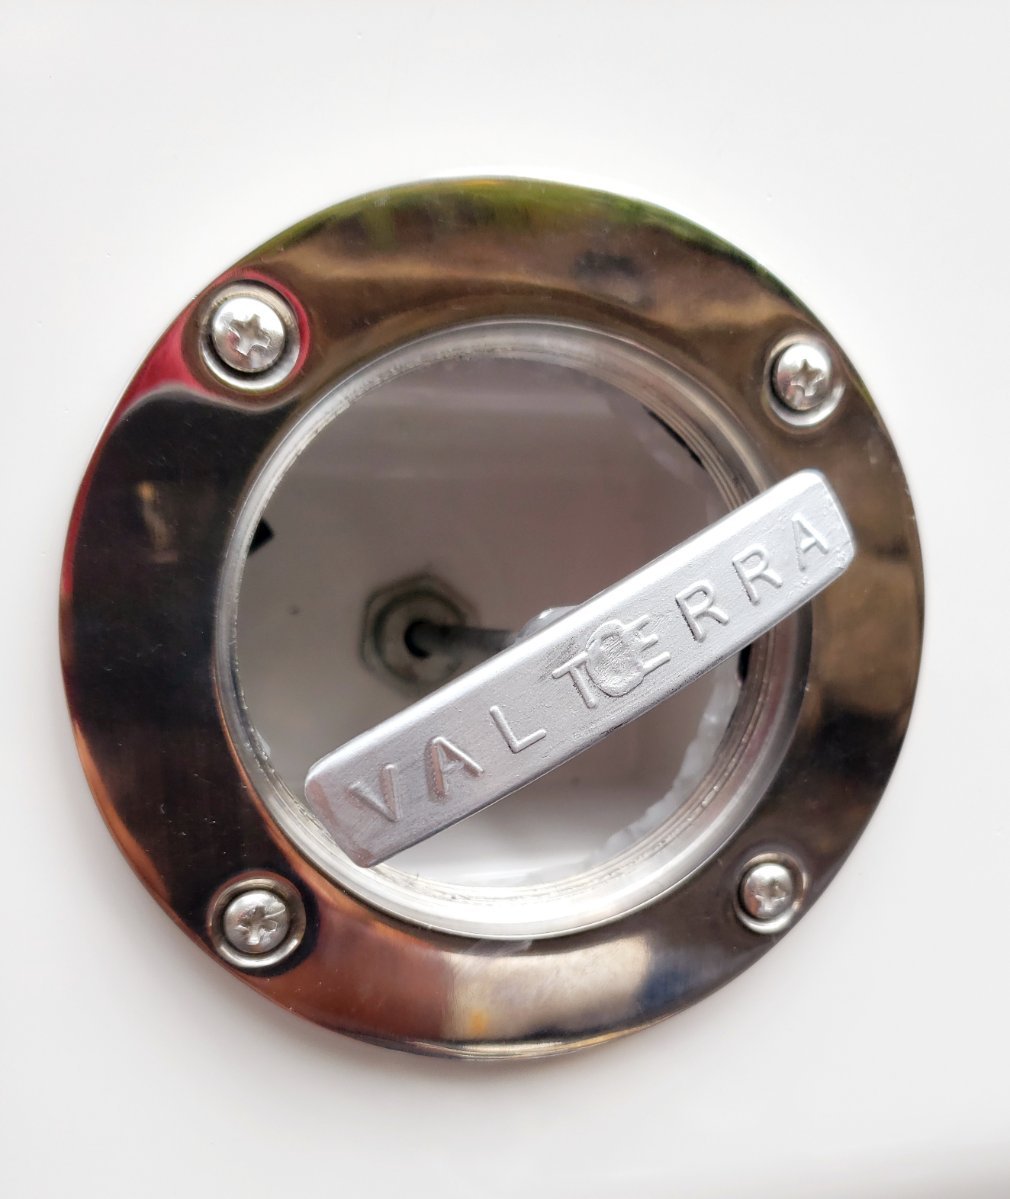
I haven’t seen many Ollie mods posted in awhile. I thought I’d share one of several i did recently. while camping with full hookup i keep my grey water valve open. I didn’t like the idea of having the basement door open while the valve was open. And having the valve open slightly With the door closed didn’t seem like a good idea. The pictures show what i came up with. Just a note. This access hatch is stainless steel one of the reasons for it, was its a 3in opening smallest available. All the white plastic versions are 4in and larger. I will say it does look good in stainless. Install was straight forward a 3in hole saw stainless hardware, measured 90 times then measured another 90. Wiped the sweat of my head and did it. My first major cut into Ollie.
2 points
-
Well, I did a similar mod but used the 4 inch plastic deck port. Using the larger port makes it much easier for me to get my (large) hand through the hole to pull the handle. Additionally the door can now open and close even if the handle is in the "out" position, finally, having the hole a little larger than the handle allows for a bit of wiggle room in the placement of the port, it is much less of an exact science if the hole is 4 inches and the handle is just under 3 inches. I didn't worry much about the insulation, I just marked the hole and after an initial drilled hole, I used my cordless sabre saw to cut out the circle. The mounting was simply gluing in the base using 5200 marine adhesive. I did place a couple of clamps in the base ring overnight while the adhesive set. Finally, a small screw, 12 inches of chain and a bent piece of scrap metal rod I had around sufficed to make a removable device to allow the cover to either hang in place or be removed easily and stowed.
2 points
-
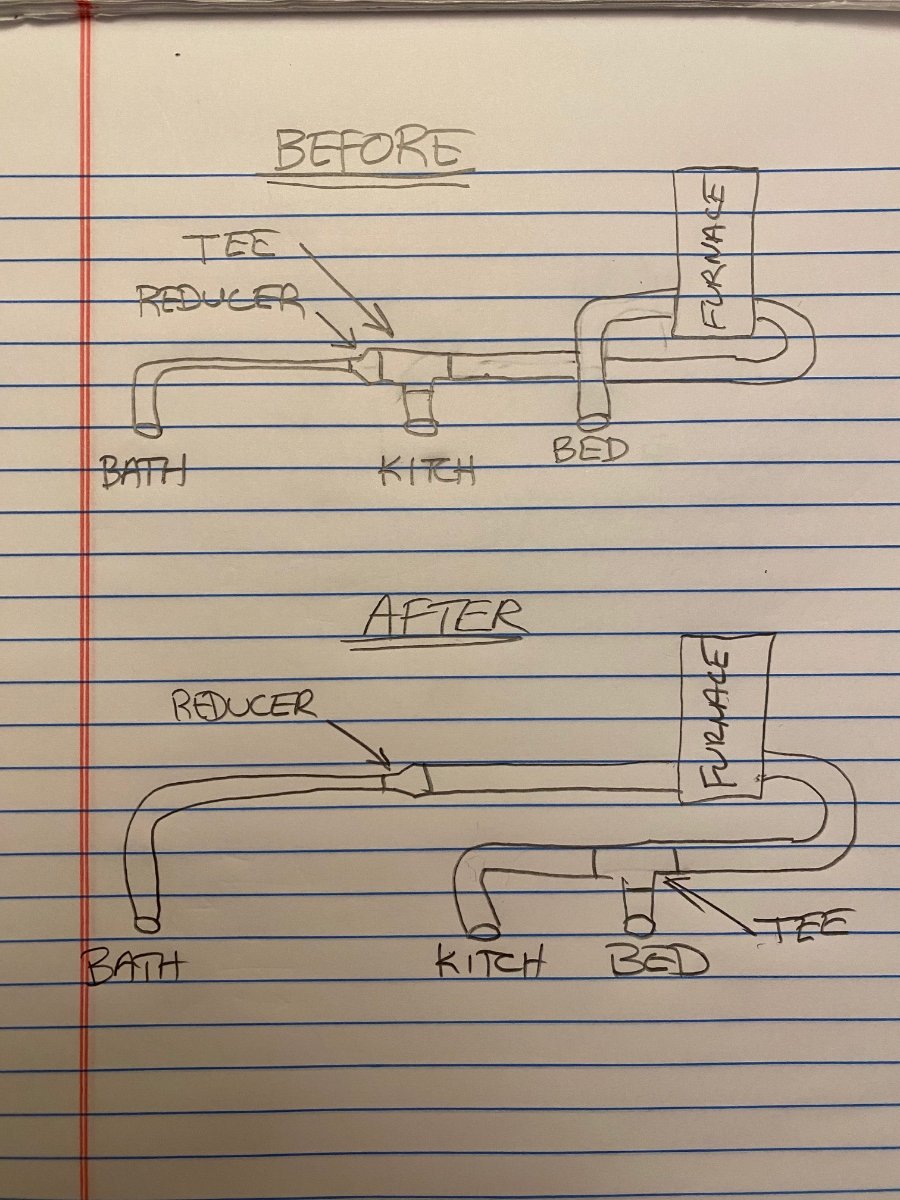
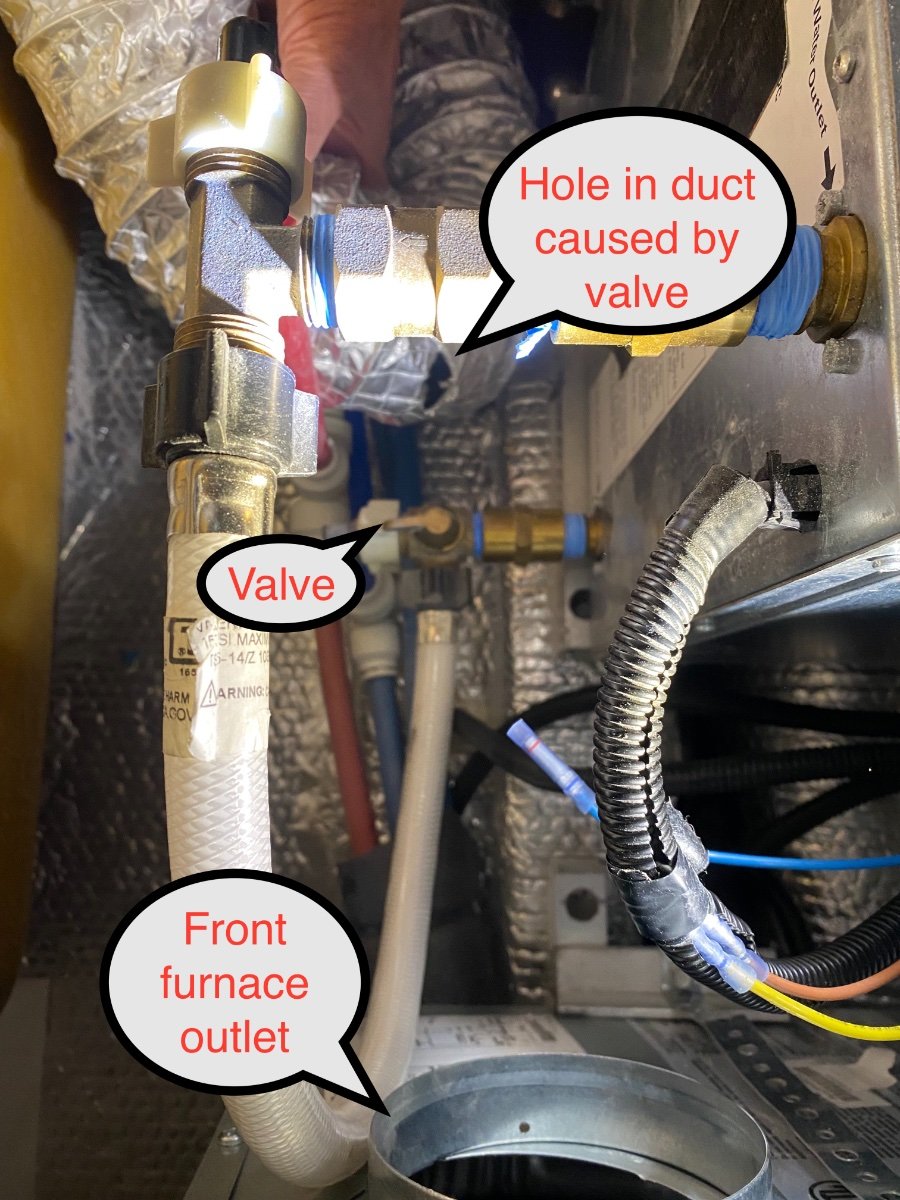
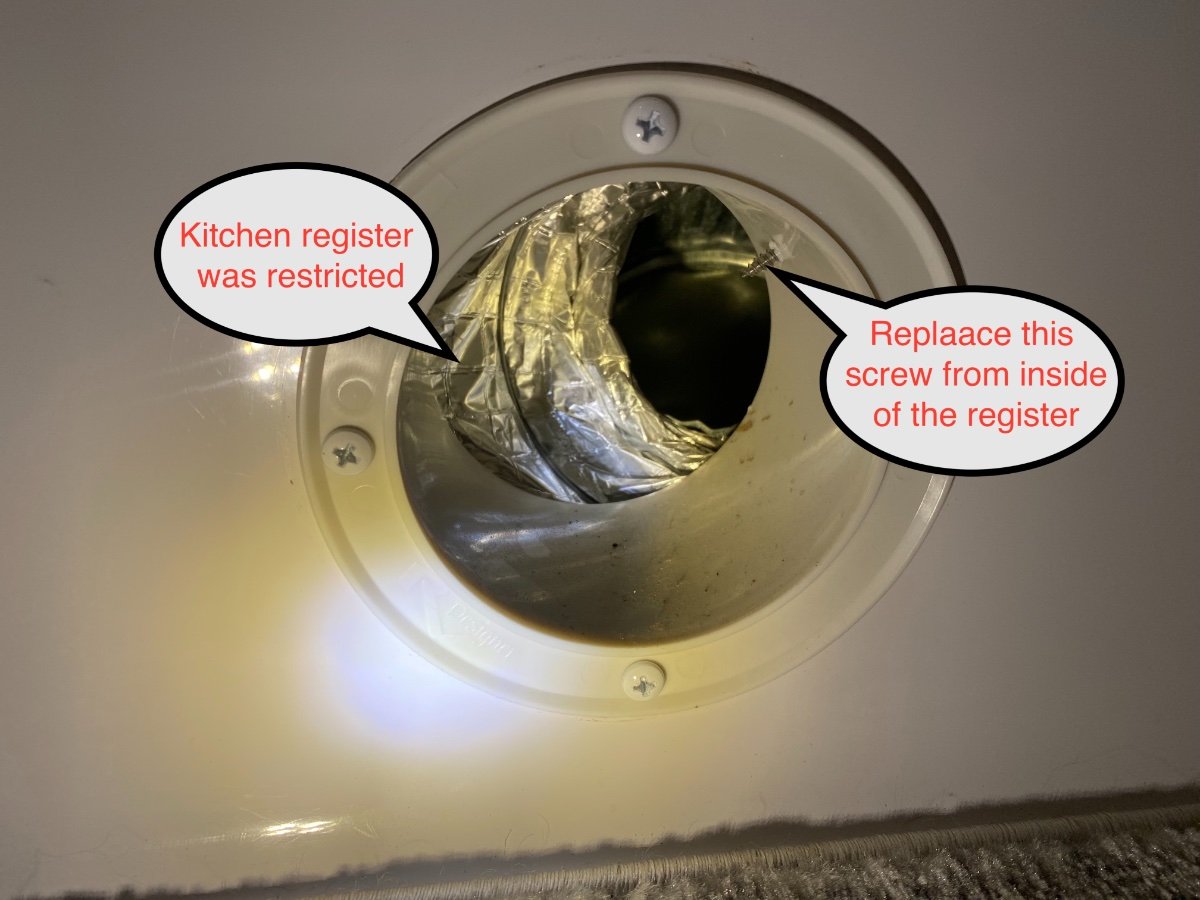
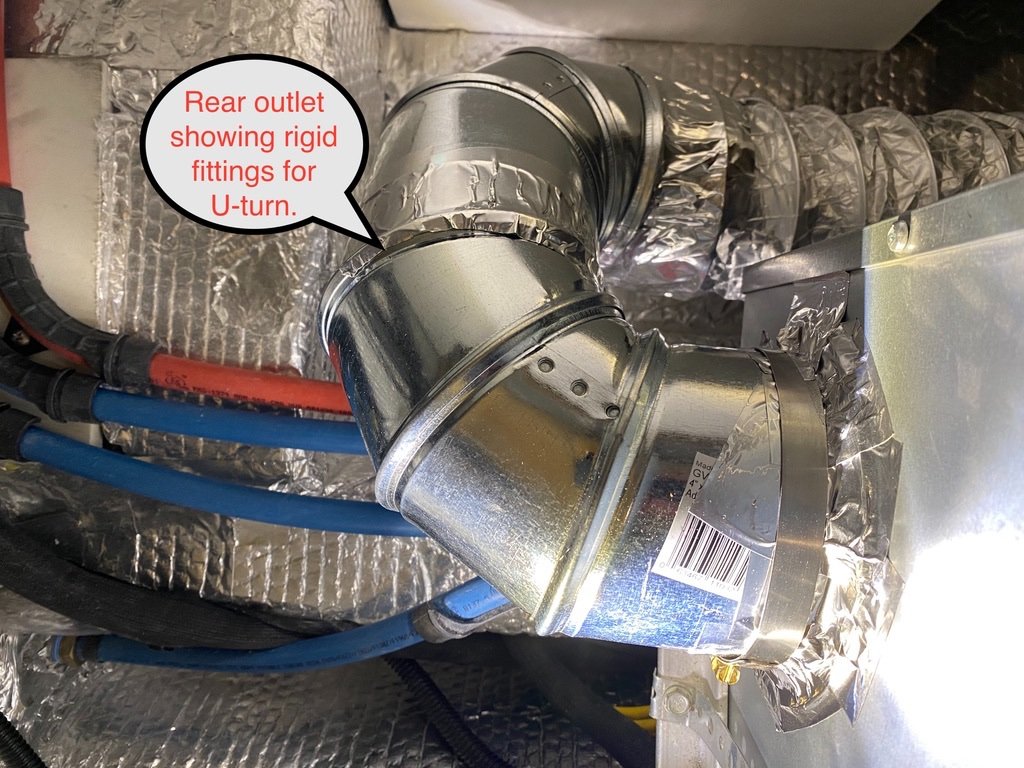
Like others, we’ve been disappointed with the lack heating in the bathroom. In our Oliver, even the kitchen had minimal air flow and hot air was blasting under the bed. When I took a closer look at the duct routing from the furnace, the problems became obvious. There were two 4” ducts coming out of the furnace, one from the front outlet facing towards the registers, and the other from the rear outlet facing away from the registers. The front outlet was connected to the bedroom register with one 900 bend. It had the shortest run with the least turns, and twice as much air flow as the other two combined. The rear furnace outlet was connected to the kitchen register after making a 1800 u-turn. From there it was Tee’d and reduced to 3” to feed the bathroom. The 3” duct then takes a long and torturous path to reach the bathroom. The resistance from over 2800 of turns, and the longer run, resulted in much lower air flow to both the kitchen and the bathroom. I also found a hole from where the duct had been rubbing on the hot water valve, and the kitchen had a restrictively tight bend at the register. Fortunately this was a relatively easy fix, and the results were significant. Our 2022 Elite II has the Dometic furnace, but I suspect that other furnace brands could have similar ducting issues and it might be worth taking a look. The sketch shows how the duct routing was modified for better balance to all three registers. The bedroom and kitchen registers now feed from the high resistance u-turn at the rear furnace outlet. The bathroom has its own feed from the front outlet giving it the minimal number of turns possible. This modification involved moving the Tee which is under the kitchen cabinet. There is an access port under the forward kitchen drawers to reach the Tee and kitchen register, and it’s best to pull them right out of the access port to work on them. The 3” bathroom reducer stays in place and it gets a new duct directly to the front furnace outlet. The bedroom/kitchen gets connected to the rear furnace outlet. Rather than using flexible duct to make the 1800 u-turn, I used two 900 rigid fittings for less flow resistance. All of the parts needed for this modification are readily available at hardware stores. They usually sell duct by the foot, I bought 5’. Use sheet metal screws and foil duct tape for the connections to make sure they don't come apart. The kitchen register can be screwed together from the inside of the register rather than trying to do it from under the cabinet. I used an anemometer before and after the modification to measure flow, and a on-line calculator was used to get Cubic Feet per Minute (CFM): Before After Bedroom - 4” 100.7 53.2 Kitchen - 4" 39.3 65 Bathroom - 3" 11.8 30.2 Total 151.8 148.5 Cheers, Geoff
1 point
-
I have also just let the solar panels maintain the Lifelines and on the average they show about 13.8-13.6 Volts. Going strong after 6.5 years now.1 point
-
That’s a Starlink Short Wall Mount that you have to buy extra ($60) via the “SHOP” button on the Starlink app, As is the Cable Routing Kit ($32 — which I incorrectly called the House Mounting Kit) which includes two grommets (which I incorrectly called the Starlink Plug) and the correct size paddle bit as well as some other stuff. You can also buy a 150 foot cable ($130) through the “SHOP” button on the app instead of using the 75’ cable that comes with the Starlink. You will have plenty of room to coil up 150’ of cable inside the spare tire. When I get the fiberglass work done making a cable holder on the inside of the tire cover my plan is for it to be large enough to accommodate the longer cable just in case I decide I want to use one in the future
1 point
-
Perhaps consider a separate roadside assistance policy. I believe the Family Motor Coach Association provides coverage to all types of RVs now. Good Sam is another.1 point
-
@MAX Burner Thanks for your reply! 👍🏻👍🏻 I just called USAA about RSA on our car and two trucks and also spoke to Progressive about our RSA coverage for our Oliver. I was informed by both providers that a claim for Roadside Assistance would not cause our premiums to increase for the type of policies we have. USAA also said we would not loose our long standing policy discounts. cheers!1 point
-
You bet Dave! Just passing it forward. 😊1 point
-
I'm adding rear axle and cargo/payload number to my original reply! Rear axle = 3.55 Cargo/payload = 1637 lbs. Mossey1 point
-
My data for your inclusion: One other piece of data that would be great in the set is the sticker payload.... in this case our F350 has a factory sticker Payload of 3440 Lbs.
1 point
-
With 36 TVs reported 17 Fords with 8 being 150s, 4 being 250s and 4 350s. There is one Expedition included in the Fords. Two Ollies are LE I, the rest are LE II. 7 GMs with 2 being 1500s, 3 2500s and 2 3500s. One is a LE I and six are LE II. 7 Rams with 3 1500, two 2500 and two 3500. One is an LE I, and 6 are LE II. 5 Toyotas with 4 Tundra and one Land Cruiser. One is an LE I, and 4 are LE II.1 point
-
Nan, if you look at the upper rear of your camper from the outside, the marker lights are the five little round red lights. Three towards the middle are just under the Oliver sign. You can see them from inside the attic area in the last two of my photos. They each have two wires attached. The marker lights in the front upper and lower area are amber (yellowish/orange).1 point
-
There are pros and cons with the Oliver. It's a company that only makes one type of product (Elite 2 is just a stretched Elite 1). Yes there are cool options, but it's basically one product. If it fits your style, you're in luck. If not, there are many other RVs, and many companies that offer multiple products. Many of us have made minor or major modifications, but ultimately your camping style has to match the trailer. For most of us, it's a match made in heaven.1 point
-
Yes, it's directly attached to the Tee for the kitchen register. The 3" duct goes on to the bathroom through some sort of firewall and it's not easily reached. There was enough slack in the 3" duct to pull the Tee (with attached reducer) out through the access port that's under the forward kitchen drawers. The space is tight, and you will need to detach the 4" side from the furnace to get enough slack on that side. You can make most of the new connections while it's out. You'll need to disconnect the kitchen register first. The screw holding the duct to the register can be reached through the access port, but it's easier to replace it from the inside of the register, rather than trying to do it blindly from inside the access port. Cheers, Geoff Here's a photo that I forgot to add in the original post:
1 point
-
The rear LED marker lights are below the Oliver sign but still an excellent point to note that they should be checked as well. Several of my marker lights have leaked. Your post also reminded me that one of the first leaks that I experienced was from the backup camera cable entrance point. That dumped a lot of water into the attic area. Thanks for mentioning the marker lights!1 point
-
Our 2022 Elite II has the Truma Varioheat furnace. The Truma ducting is smaller, more substantial and, from what I can see in the photos, better installed. In addition to the mods detailed above, I recommend you consider adding a return air vent from the bath to the underside of the front dinette seat. Our Truma Varioheat system came with that additional return air vent. It really helps the flow of heated air.
1 point
-
This pole extends 20’ plus the dish post, so roughly twice the height of the trailer. Raising and lowering is not an issue for me. The gen 2 weighs in at 9# including the base which is not used. The new version looks like 7# including a smaller base. As someone previously noted, it’ll be nice to get the dish off the ground. One less thing for me to trip over.1 point
-
Mine has the Truma and the black ducts are very stiff and substantial. They also provide an adequate amount of conduction that heats the fresh water tank and the pipes around it. If it wasn't so late, I would provide a picture. My Pillow is calling me like a siren song.1 point
-
jd1923: It sounds like you found the vent in the bathroom under the toilet paper holder, which is good. In my 2018 Oliver Elite II, we had a similiar low amount of air coming out of the vent covers. After talking to Oliver service, we ended up temporarily popping off the vent covers at each vent and removing the plastic diverters behind the cover and then reinstalled the vent cover back on. These plastic diverters were restricting the air flow. You might want to considering removing the plastic diveters, if they are still installed, as their removal greatly improved our air flow. Also, place you hand in front of the bathroom vent to feel if you are getting air coming out of that vent. If you have no air flow at the bathroom vent. (I have seen on this forum where some people have found that the vent piping was not connected to the vent outlet.) If this is the case, you can remove the front bottle plate (4 screws) in front of the bathroom vanity so you can reconnect the vent piping to the vent cover.1 point
-
I learned the 2024’s will not have touch lights they will have lights that use an on off switch to operate the light per OTT service. Patriot🇺🇸1 point
-
I didn't want to cut and have the drill twist up into the insulation so I just peeled it back to find the center and used some spray adhesive to put it back when the job was completed.1 point
-
You can also pull the handle out slightly and tape a thumbtack to it. Then close the door and the tack will puncture the insulation to mark where to drill.1 point
-
Landrover's mod has been high on my mod list since the day I brought ILOVHER home. Imitation is a genuine form of flattery they say! I have a sewer clean out near my driveway and I really wanted to be able to run grey into it while keeping the door shut and locked. I have a few tools/cords that I don't want to walk off. Keeping the door open while raining also seems counterintuitive. I admit to showering in the trailer and driveway camp as we get frequent power outages here. Something that I was worried about was exact measuring. I came up with an idea to use a pencil eraser super glued to the middle of the handle. I added bit of chalk line chalk to hit the inside of the door to find center. I'm happy to say it worked well! Attached are the photos of my progress. I'm a girl and these kind of things freak me out a little but I'm happy to say everything worked out perfect! I used butyl tape around the marine fitting and stainless screws and nylocks nuts. I decided to paint the handle silver as well since the shortening and grinding of the handle (with a Dremel) made it look ugly. I'm really pleased with this mod.. THANK You Landrover!
1 point
-
Now you need to replace those black handles with some 303 Stainless Steel knobs https://www.mcmaster.com/#60205K37 drilled and tapped for M6x1.0 threads.
1 point
-
Thanks for the reply’s. I was skeptical about posting mods. I’m not one to put pen to paper as you can see from all the crooked pictures, and like John D who does a great job detailing on mods. Most of my fabrication and mods are from thought, eyes and hands not much paper. That being said as for measurements, nothing written down. Simple way. Open the compartment door measure top edge of opening to center of dump handle do the same from the side. Close compartment door and do the same measurement from the compartment opening not the door edge. The two measurements marked on the door will bring you to the center of the dump handle. Only measured ten times to verify, before using the hole saw. One thing i was surprised to see the compartment door is not solid fiberglass, its two thin layers with a plastic honey comb material in between. Still a strong door. One thing i forgot to mention. Because i wanted the smallest opening 3in i had to trim off approx 1/8 in off each side of the handle to be able to pull the handle through the hole easy. Another surprise. The tee handles are not plastic they are aluminum with a black coating, good quality. 2019 model year.1 point
-
As quick as you once explained how to post items i quickly forgot, maybe a how to for the rally navigate and post on the forum. I’m in. Amazon Amarine Made 3” heavy duty 316 marine grade stainless steel boat deck access hatch. $26.991 point
-
Nice! It is rather hard making that first hole..... after that it gets easy. I always wondered why the handles were designed so that you had to leave the big door open. What’s next on the Honey Do List? FYI, if you change the name of your thread to put the subject in it, like “Grey handle access hatch”, a Search will turn up much better results. John Davies Spokane WA1 point


-
Recent Achievements
-


")


")


