Leaderboard


Popular Content
Showing content with the highest reputation on 02/19/2024 in all areas
-
I think I got it precisely backwards. I think I need this instead.
 5 points
 -
So I recently played around some with AirTags that were registered to me and had them “follow” my wife’s phone without my phone present. Her phone pretty quickly got a notification that she was being followed. Her iPhone gave her the option of playing a sound on the AirTag so it could be located, but no other option that I could see to disable the. AirTag. I subsequently removed the speakers from my hidden AirTags. If they can’t find them they can’t remove them.4 points
-
I purchased also the Orion dc to dc charger 30 amp , but I charge from a spare power station I have. Victron has new DC to DC charger 50 amp that is scheduled to be released in us next month. Its 98 percent efficient compared to existing 82 percent. Lower temperature from high efficiency. I preordered it, of course they improve it. It also will tie into my victron components . Great Job on your install.
4 points
-
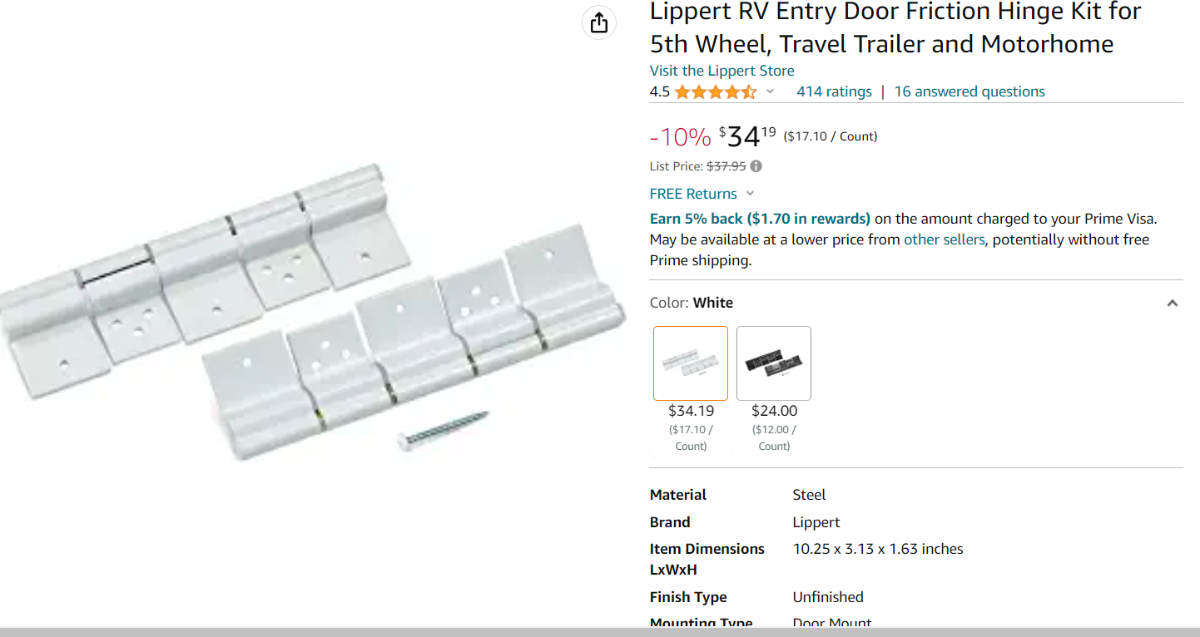
@MAX Burner After seeing and operating your door at Q a few weeks ago, I’m convinced it would take a 40 mph wind to move the door and equally convinced it would never be slammed or jerked out of your hand by less than hurricane force winds. Another owner showed up the day after you left with an uninstalled set of these hinges. They were so tight I could not open them with my hands. @jd1923 I agree with your assessment about the lack of holes in one half of the hinge.3 points
-
Installed our like-new Amazon set today. Amazon "like new" means somebody opened the box, retaped and returned it. Don't need to drill holes in the door or door jamb. The supplied 1 3/4" white-headed self-taping screws with square-bit drive were awesome. I have often pre-drilled for "self-taping screws", but these were sharp and strong of high quality, good hardware. You need a good 1/4" impact driver, no template, just center and get the first hole right. But WTF with this manufacturer drilling most, but not all the holes required for the install? Rarely or never have I run into this kind of BS. They put 3 pre-drilled holes in the two leaves mounting to the door, but only one pre-drilled hole on each of the three leaves mounting to the door jamb. Also, there was not enough screws supplied for all the screw holes suggested. I drilled one extra hole in each door jamb leaf (2 total vs. 3 per the instructions). This way there are 6 screws in the door and 6 in the door jamb to hold each hinge. I had just enough screws, with one left over! Nothing like a door with 5 hinges! It does hold steady wherever you put it. Can't stand the hold-open door latches on RVs and trailers. I always forget they're latched and then I shut the door, over and over again! Did somebody break the stock one on our hull, or did these come with only a very thin wire hook? Somebody must have broken ours before I got a chance to do so! I will be removing ours next. This way I'm certain it's not latched. Thanks again, what a nice mod! Heard about the friction hinge mod just 2 days ago and it's already installed for pennies.3 points
-
Per your reference, I checked Splendiday.com and order out a set of them. Their design uses four "Petals" vs. most others that have just three. I like that. I've used rivet (Blind Flush Nuts as my GrandPa called them) nuts for many decades and they can be a PITA for fiberglass just as you stated. Also for plastic IMHO. Thanks for the suggestion. GJ
3 points
-
https://www.batterycablesusa.com/ If your not as patient as me in making cables. Battery cables usa is a wonderful resource. Im redoing my electrical in oliver with a vicrtron lynx distributor. Check out this great manufacturer at fair prices and USA made. Very High quality. Agree totally!3 points
-
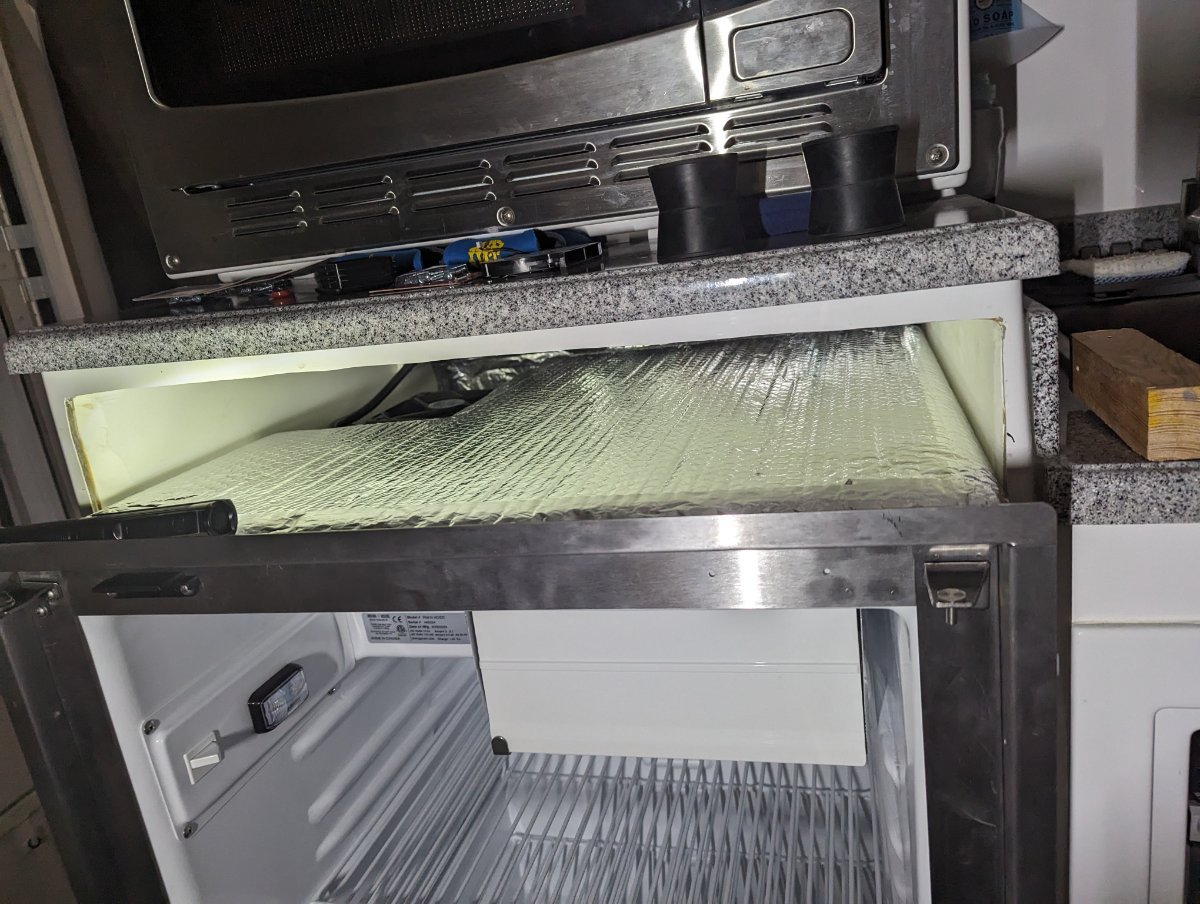
Just Finishing My install of Nova Cool. Wow what a workout. Thanks for all of input. My biggest issues is getting it leveled in existing hole. 2.5 months of hitting it on the weekends. Thanks to all who have contributed. I closed off all my holes and purchased table on bottom hole. I know how John D. felt after installation couple times. Here are couple quick shots. Fridge door came damaged from nova Kool, box was unharmed. But door tore up on bottom. Definately a workout. Tore up old fridge to get out and put back together if anyone one needs old 3 way fridge . Give me a jingle. Used one season. Thanks for everyones input.
3 points
-
Most campgrounds that say 50a also have a 30a and 20a right in the same box.3 points
-
Thanks everyone for your comments or suggestions! Tom and Doreen - thanks for the link, that was an informative read. I need to measure, visually verify, our tank to see if it is less than 14" tall, indicating there is only one sensor strip to go out. In my troubleshooting imagination, I could see two stacked strips and the top one went bad. 🙂 Jason Foster - we use the black tank flush port (multiple times), that sprays water into the tank. Geronimo John - I have not tried dusting the sensor, thanks for that suggestion. I'll get a can of compressed air to blow on the sensor, from a distance. Mike and Carol - we have put Dawn dish liquid in the tank before using the black tank flush port, to help break down whatever. We have not tried to soften the water so I can try that with borax....or driving around with a full-ish tank and dish soap & borax. We have regularly used Happy Camper for maintenance during our ownership. Two years of ownership and the readings started acting up in the last few months so I suspect this is nothing to do with the previous owners. SeaDawg - we regularly use our toilet, just not for poop. We will try using Mike & Carol's method, with more attention to detail on where our previous methods have differed from theirs and see (hopefully, fingers crossed) if we get different results. I would much prefer to clean then replace a part, if possible. Thanks again everyone for the input! We will keep plugging away on this issue until we get it resolved one way or another. 🙂 Alberta3 points
-
Another winter project with help of good friend with "SKILLS" in welding aluminum. Added Bumper box. Thanks to all who contributed on the subjet. I did get endcaps put on and license plate bracket . Before picture. Picture was taken . Will update with better pictures later when snow clears.
2 points
-
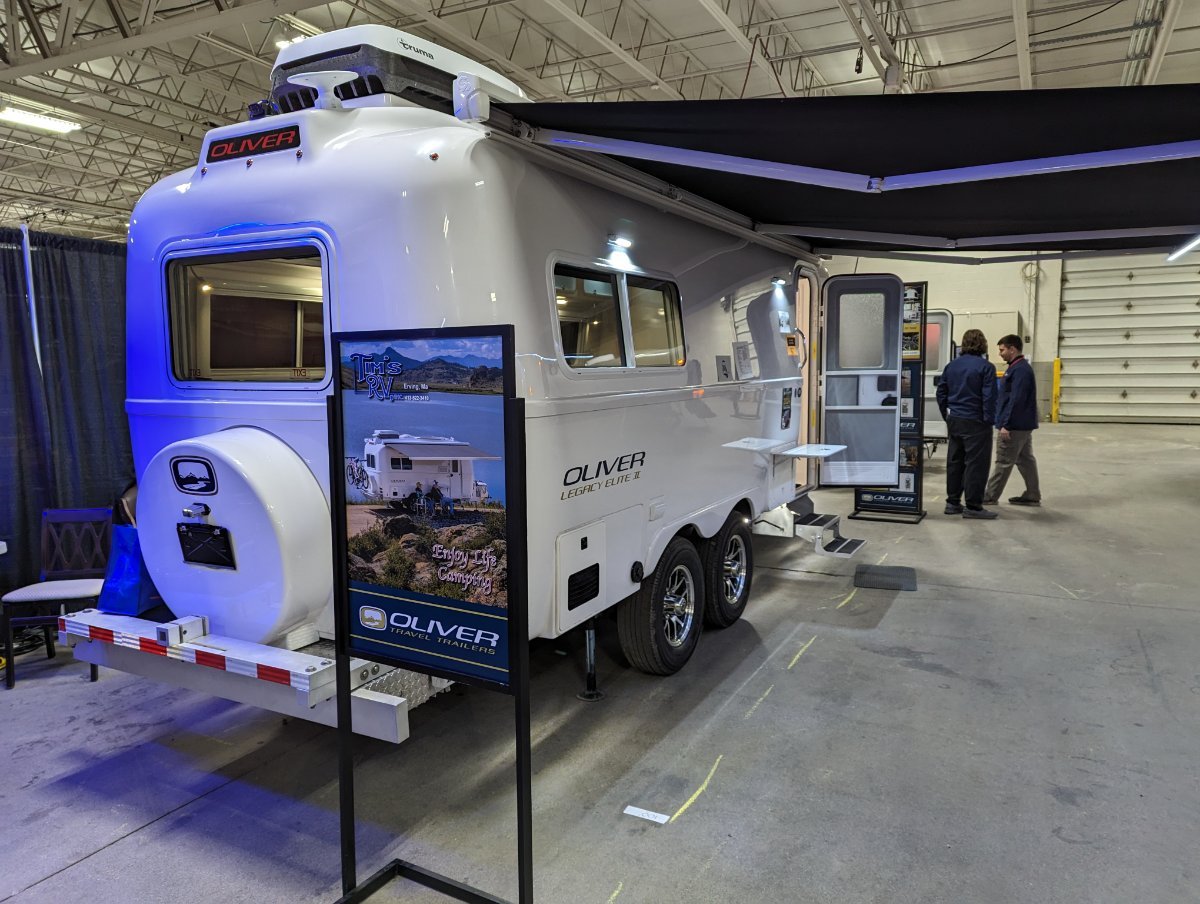
We did see the Oliver trailers in Springfield, both an LE1 and an LE2. The Olivers were displayed next to several Intek Sol trailers (which seem like decent campers). Asking price for the LE2 was slightly over $100K. Saw a couple glance at the LE2 price tag and say, "Are they crazy," so we engaged them and told them about the superior construction of the Olivers. Chatted a bit with one of the sales reps but I think we were more excited about the Olivers than he was. No Oliver family present at this show. While we were there, we did see a couple go inside the LE2 and sit down, a good sign. It was really good to see OTT represented, for sure.
2 points
-
I just ran across and decided to follow a web site that's been ongoing for 23 years according to the introduction. It has a wealth of information about everything RV. Numerous articles are posted each week by actual RVers about every topic that's relevant. My reason for posting this here is because the first search I did was simply for "Oliver" and found that four articles they've posted over the past few years popped up. Thought it was worth sharing. https://www.rvtravel.com/?s=Oliver2 points
-
UPDATE: We got our's on Amazon about 9 months ago - used them on several overseas trip, currently using them on our Dive Trip in St. Maarten, French West Indies/Lesser Antilles - working great! We did, however, replace the batteries in each of the A-Tags before this trip just to play it safe. Easy to do. When we're not traveling - one lives on Magnus' collar and Oscar gets the other, FYI.2 points
-
Those are nice suspenders. But will they hold your britches up?2 points
-
Thanks For posting this mod! Finished mine Today
2 points
-
I picked up one of these relatively inexpensive generator test kits a while back. It lets you verify both generator voltage and also how many watts and amps the generator is actually generating at site conditions (altitude and temperature) with the clamp meter. This can help you rule out generator issues. It comes with a test pigtail to make measurement easy. (see pictures below). You can find it at Microair .net
2 points
-
Yep - #2 not #1. Or, you could ask the campground where you have the reservation if they could move you or if the site you have reserved also has a 30 amp plug at the pedestal - many do. Bill2 points
-
Insert between steps two and three: "Open a hot water faucet to relieve pressure." Otherwise, you may be sprayed with pressurized scalding water when opening that yellow lever! For in between situations, we opted for the Truma anti-freeze kit, which keeps the heating vessel warm to avoid freezing. We've used it frequently when it is close to freezing before leaving home or when we're on the road and can't run the trailer heater.2 points
-
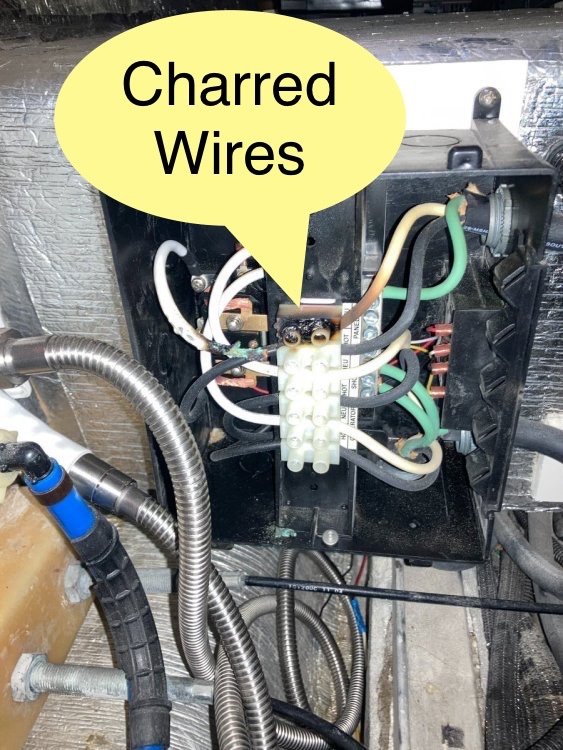
As a safety check as you contact Oliver. There have been a few of those under the dinette transfer switches that failed due to loose wiring connections inside and had thus melted internal wiring. Transfer relay wires can wiggle loose and cause the switch to toggle back and forth when power is applied. To check, you would need to disconnect from shore power and generator, then open the transfer switch box to check if its connections are tight and no smoked wiring.
2 points
-
I used SS ones, but if I had to do it over I would use aluminum or THESE in size M5x25. I found the SS ones were tough to bulge/seat propery, but I think it was because of the homemade tool I used!2 points
-
If the previous owners were not diligent with their black tank maintenance, you may be dealing with their deposits that have become a part of the tank. Yuck. As Jason suggested I would add before filling the tank I would throw in a detergent pod and some liquid Calgon water softener. Also, drive around a bit to get some agitation. If you’re going to leave it sit for a while you might try some Happy Camper, we add it whenever we’re home and our trailer is going to sit for a month or two. After every dump we add a laundry detergent pod (whatever is cheap) and some Calgon water softener. We usually dump at our destination, driving with some level of fullness in the black tank. The only time we dump before we leave is if we’re going to a location where we won’t be able to dump. When dumping, I always fill the tank to 80% or so and then do a couple of additional fills/flushes until what comes out is clear. Good luck! Mike2 points
-
UPDATE: Well, after about 8 months and 5,800+ miles of testing the Lippert hinges in various windy conditions - they all but make the outside "door hook/latch" obsolete. We no longer use it to prop the door open anymore, FYI. As @Patriot might opine... a "sano mod"! HA! Cheers, All!2 points
-
GI NOTE: For the Bathroom Cubby install, the below does not apply to this install. For the anchor point install it would apply. For applications where you can somehow get to the back side here are two considerations: For high load applications, or ones that will be subject to strong vibrations, insert the Petal nut, then place a fender washer on the uncrushed nut. Then crush it. Doing so will greatly reduce fiberglass cracking and strength of the attachment. If you will be needing to unbolt the attachment, add a dab of adhesive to the crush zones of the Petal nut. Once crushed and cured, the bolt can be removed and you'll not lose the Petal Nut in the back space. GI Edit: The pedal nut will not fall out so edited the use of adhesive. Obvious brain fart!
1 point
-
Yeah, wished I read this before taping them into place! I will remove the speakers on the ones installed in vehicles but will need the speaker on my key chain tag.1 point
-
That works great, if you have both: (1) a 30A female to 15A male adapter and (2) a 15A receptacle on the pedestal.1 point
-
Yes, gotta remove those speakers. 👍🏻1 point
-
Just purchased a 4-pack, installed one hidden in the Oliver, our Dodge Ram TV, Chris' GX470 and on my keychain which I misplace on average every other week! Used 3M VHB to mount them in secure hidden locations. Not sure if I need the speaker removal (but will consider it) since if somebody steels my stuff, I'll know it in a heartbeat and would be in pursuit while dialing 911... Thanks for the info! 🙂1 point
-
Belt and suspenders is never an issue.1 point
-
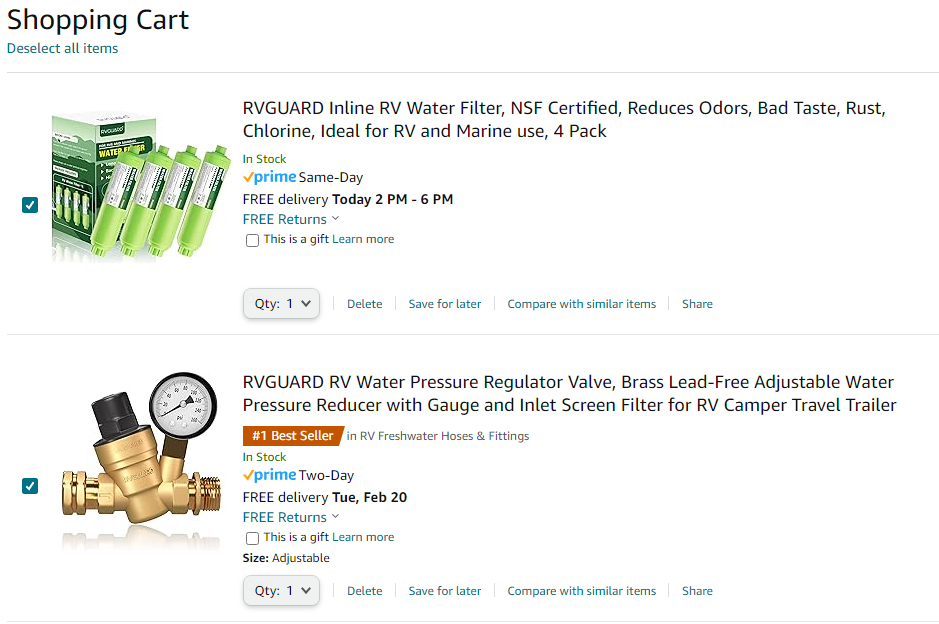
We took those same two items (a quality pressure regulator with gauge and an inline water filter) with us when taking delivery in November, 2022. We used them at every campground stop on the way back to Idaho. I put the pressure regulator on the "upstream" side, with the water filter immediately downstream of the regulator, then a short length of hose to connect to the city water inlet. FWIW, I noted that water pressure varied significantly at the places we camped.1 point
-
TYVM. We will arrive at the mothership with these in the truck:
1 point
-
Old school internal sensors failed early, and always. SeeLevel is awesome, imo. We used them in our boat, too, when we upgraded our system, based onbl their reliability in our camper. As everyone has noted, including @Jason Fosterthey still have to rely on sending through the wall. You said you rarely use the black tank. Change that up, and do follow @Mike and Carol practices. DON'T dump that black tank when only a bit full. Do add calgon, or borax mixed with warm water first, and drive it around to the next camp site. (The old school ice in the tank has never worked for us, in used rentals that we've delivered.) If you follow Mike and Carol's procedures, several times, with a mostly full tank ( you can see it, on visual inspection), you have a bad sensor , imo. Contact SeeLevel. Replacing the sensor with a poop pyramid, or unclean tank walls, will yield the same results. So, do try to clean it up first, imo.1 point
-
I've looked into the PlusNuts and agree they will be a better choice for our Ollie Fiberglass needs. Were you using steel or aluminum ones? What size? source? Thanks for the idea and for posting. GJ1 point
-
If you hear clicking like the batteries are trying to charge and then it shuts off and resets everything, then you will have two issues. One is grounding. Looks like someone already mentioned the required grounding plug. The other is the charge controller is pulling too much power. It has to be reset.1 point
-
If you turned the EMS off and you're now charging correctly you may want to investigate why your EMS is preventing your generator from supplying power. Possibly a problem with the EMS itself or there could be truly something wrong with your generator output. By turning your EMS off you will no longer be protected from AC line problems. Is it possible that you could borrow a external power watchdog to test the output of your generator?
1 point
-
With lithium, you need to change a Xantrex setting before trying to use a small generator. The Oliver's converter (charger) will try to draw more power than the small generator can produce. So, stick with the 3500W genny for now. Also, are these inverter-type generators? Industrial jobsite generators may not produce "clean" power. If the power is drifting in and out of spec, the Oliver's electrical management system may start rejecting/accepting that power. That could be the cause of the clicking. Are you getting error codes on the display in the attic? Next, is the 3500W inverter-type generator producing electricity when not connected to the trailer? Test it with any handy electrical device. If not, the generator's circuit breaker might have tripped. If the generator is producing power, look next to the connection between the trailer and genny. As @topgun2 mentioned, some generators (inc. Honda) require a grounding plug inserted into one the the genny 15A outlets before connecting to an Oliver. If the plug isn't present the EMS will cut the power and the display in the attic will show an error code. The clicking under the dinette might be the transfer switch if you have the optional shore line connector on the front right side of your hitch near the propane tanks. What happens if you plug into the optional front shore line connector instead of the one on the driver's side? When connected to the generator does your microwave have power?1 point
-
Yes, and yes. Water quality and pressure vary widely from campground to campground.1 point
-
We always use a pressure regulator. I carry the simple brass non-adjustable as a back up, but use an adjustable regulator. Why a backup? We were camped in AZ and the weather was only supposed to get down to the mid 30s so I left everything hooked up. When we got up it was 28 and my hose and regulator were frozen solid. The hose thawed out fine but the regulator was stuck at what it froze at. If we’re only going to be someplace 1 or 2 nights and I need to connect to city water I usually just use the big blue filter. If we’re staying a while, I use the Culligan filter and our water softener. BTW, some campgrounds require/recommend a pressure regulator due to high pressure water supply.1 point
-
I believe that Oliver does still provide a water pressure regulator at delivery (check with your Oliver Sales person about this). However, even if Oliver does still supply this - it is a fairly generic one and there are better ones available that allow you to set the pressure that you want to come into your Ollie (the generic ones are usually pre-set at 45 psi) plus they allow you to see what the pressure is at the source (like THIS ONE). I highly recommend getting or at least using the one from Oliver at all times. Water filters are another matter. If you only fill your fresh water tank from a known quality source and/or only use the city water inlet from that same source then you do not necessarily need to have a water filter. But, this is not the normal situation and a water filter can help protect you from getting all sorts of things into your Ollie water system. The "all sorts of things" will depend on where you get your water from. A couple of years ago I had to pump water into my fresh water tank directly from a stream. I was glad that I had a filter to keep any possible creepy crawlies out of the tank! In addition, there are those that couple a water softener with the filter. If you live and/or travel in hard water areas of the country this is something to consider too. Bill1 point
-
Hi everyone. Our forum is a great place to gather and share information about our wonderful trailers. A few years ago (2018) the moderators put together their thoughts on how we should all "play together" here to foster the Oliver Owners family harmony. If you haven't seen these before, please acquaint yourselves with our Forum Guidelines. If you have seen them, consider taking a few minutes to refresh your memories. A family that plays well together is a happy family. Enjoy your trailer as you wander about this great nation! 1OLIVER FORUM GUIDELINES Welcome to the Oliver Forum, a great place for Oliver Travel Trailer owners and future owners to interact, share knowledge, solve problems, and most importantly, to develop friendships. Respectful and considerate responses help build this community. You’ll find a wealth of experiences here, and many owners willing to share their experiences. Have fun, but please keep others’ viewpoints in mind. Respectfully state your point, share your information, or ask your question. Keep it casual and friendly. Reread your post before you hit submit. Is it helpful? Thoughtful? Please try to stay on the original topic of the thread. Confusing the issue may cause the member’s original question to go unanswered. Start a new topic if you have a new question. It’s important for all members to have the environment and opportunity to contribute in a considerate manner, and to learn. Inflammatory and trolling comments shall be removed by a volunteer moderator. We encourage members to use the “REPORT” function (bottom right corner of each post) to help us, as we’re not reading every post, 24/7. If your post is removed, you’ll receive a PM about it. If there is a continuing problem, further action may be taken, up to and including your removal from the forum. Some inflammatory topics to avoid include religion and politics. We’re all about camping, and Oliver campers. Over the years, we’ve seen a few simple topics turn into heated debates. It’s natural to want to jump in, but honestly, it’s often better to let it go, and hit the report button, instead. We moderators are avid campers. Even as we write this, we are all out camping, some with limited bandwidth. We respond as quickly as we can, and the sooner we know, the better. Some have asked why our forum is linked to the Oliver website. Valid question. Since the beginning of our forum in 2008, Oliver Travel Trailers (OTT) has paid for our Oliver “sandbox”, including our web space and an administrator who knows way more than we do about maintaining the software, for which we are very grateful. OTT DOES NOT CENSOR OR INTERFERE with the moderators’ management of the forum content. Moderators are not employees of OTT. We are Ollie owners, and receive no remuneration. OTT does have a employee designated to read the forum for the purpose of improving the “Ollie Experience” for all, but that’s a few minutes a day in a busy job description. If you should ever have an issue or a warranty claim, call tech support. Your post might not be seen on the forum by an Oliver employee. With that in mind, we moderators ask you to communicate directly with the company and afford them an opportunity to satisfy any serious needs before flaming OTT on the forum. We are not asking that anything to be swept under the rug. Just, please, let Oliver Travel Trailers have the first shot to meet and exceed your expectations. Sometimes, communications here may be misinterpreted, because the written word just doesn’t carry the visual clues of face to face conversations. Should you believe a post is a little ill-mannered, consider the poster might be trying to be helpful, but isn’t able to put his or her words together the way you might. Forums work best when our skin tends to be a bit on the thicker side. Remember as well, whatever you post will likely be permanent, and picked up by automated internet software programs. Though this is our forum, it’s still on the world wide web. Our words may very well outlive us. Please, be especially patient with newbies. Our search feature is still being tweaked, and they may not have found an answer by simply using “Search”. You may remember your own newbie questions . . . of many years ago. If you have already answered the same newbie question as many times as you care to, relax and allow someone else to step up and reply. Help foster a community of teachers. We recommend all phone numbers and email addresses be sent in private messages and NOT posted. If you must post personal data, we suggest you post in a manner so trolling automated internet programs will not grab your personal information and use it nefariously. For instance, a phone number might be “8ThreeZero, 5one5, 9 2 eight seven”, or for an email address, something like “Bill DOT Fisher at flyboy DOT com”. Please reread this, and help us continue to make our forum a great place for everyone. We hope you enjoy our forum. Thank you, bugeyedriver, SeaDawg, ScubaRx, Mike and Carol, topgun2 , Mossemi , Wayfinder Oliver Owner Moderator Team1 point
-
I will have to ‘entertain’ that thought!1 point
-
We have been using the "second jug" method and it's worked out pretty well for us.1 point
-
The Natures head sits right on the black tank so the mod should be pretty straight forward. I could see making this change down the road. At the same time, emptying the urine jug in the local toilet is about as easy as it gets. I have considered getting a second jug and cap for those occasions where emptying isn't immediately possible.1 point
-
Several have modified the toilet to drain the liquids into the black tank. The folks that showed us their trailer before we ordered ours had just completed the job that day. I remember that one member here had changed the bathroom sink to drain into the black tank, as well, to avoid urine crystallization problems. Plus, that saves some of the gray tank space. If/when we switch to an AirHead toilet, those are the modifications I plan to make.1 point
-
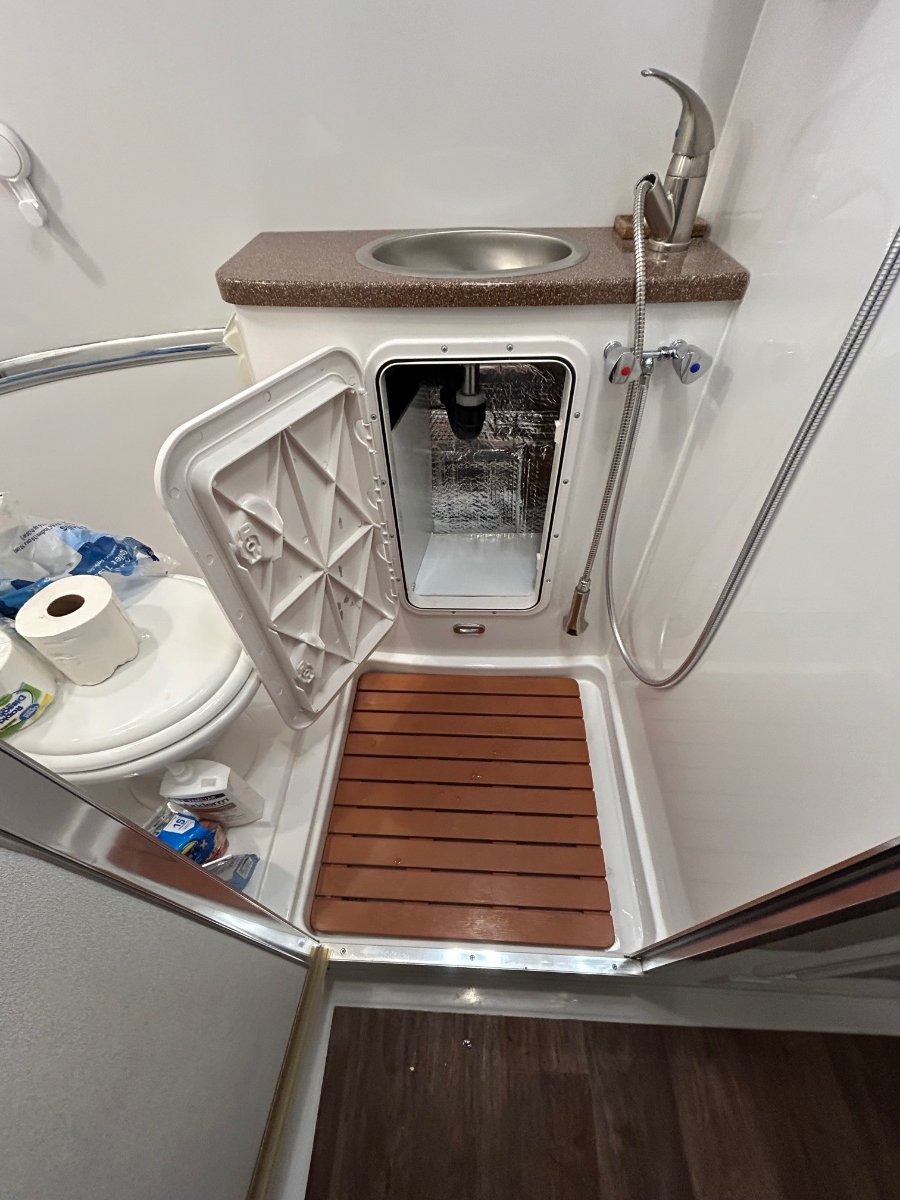
After routing wires and an Ethernet cable under the vanity into the closet for the Starlink system, it was time to finish up the “Cubby Mod”. Used some available 3/16” plywood from another project to fashion a shelf and bulkhead to help organize storage. Rattle-canned a white enamel coating and - poof! One and done: Added 2 extra layers of insulation while in there. Cheers!
1 point
-
I sometimes find hard to locate items on the web by using a picture search on the Google search engine. Mossey1 point
-
An update- 9 months later and the Air Tags are still going strong. Patriot🇺🇸1 point
-
https://www.amazon.com/gp/product/B08R7VF5FX/ref=ppx_od_dt_b_asin_title_s00?ie=UTF8&th=1
1 point
-
That's a really good list. When we traveled to Antarctica and Patagonia last fall, my physician suggested something similar, plus carrying a cd with my recent scans and x-rays, and recent medical history, "just in case." Thanfully, never used them, but helpful for comparison for a physician if I'd taken a(nother) tumble or had an other emergency, in his opinion. In addition, it can be important to understand your insurance coverage away from home. Emergency services in the US are usually covered, depending on your policy, but it can be an unpleasant financial surprise to get sick or injured outside the US, even in Canada. Travel health insurance is relatively cheap, and often covers flight evacuation to the USA for you and your spouse, if necessary. This is especially true if you are covered only by traditional Medicare and spend a lot of time camping in the Yukon, as we have. Not a pleasant topic, but a sometimes a necessary one to explore.1 point
-
I (finally) found blank copies of the forms Patriot shows above. These details plus copies of your driver's license, medical insurance cards, and any health directives that you may have (medical power of attorney, living will, DNR instructions, etc.) should be together. Hopefully these things will never be needed. Bill Medical-History-Forms (2).pdf1 point


-
Recent Achievements
-
")


")


")

