Leaderboard


Popular Content
Showing content with the highest reputation on 04/12/2024 in all areas
-
I think Oliver uses a material that is used by the boating industry called starboard. Others may have the correct name if this isn’t correct. I have used vinyl trim board readily available at Lowe’s and Home Depot in various widths and thickness. I also use an epoxy by Permatex that is very high solvent content and actually melts into both the vinyl board and the fiberglass surface and is much like fiberglass resin. 
 8 points
 -
And did Oliver account for an opposite force when we take our trailers to the southern hemisphere. A lot of us want to explore Australia with our trailers and we need to know how Oliver designed the frame. 😂🤣 John6 points
-
Don't know how many of y'all ever rode in the OTT under tow, but I've done it a few times just to check what needs attending to. I try to convince my bride to keep the speed down -- with little success...😜 FWIW, I rode in the back for the last several miles yesterday on our way back from the eclipse adventure.... From a qualitative perspective, the ride was interestingly noisy, solid/stiff - but not like a buckboard.... It was not appreciably different than the ride I took before changing out the springs. Don't think it would comfortable for more than a few miles, IMO. I checked the torque settings for each of the U-bolt nuts after logging 1,895 miles on the new springs over the last 9 days - all good, no more stretch. Probably a good idea to keep doing so every 5k miles or at least annually. Not to highjack this thread, but: Regarding frame cross member welds - visually inspected all yesterday and photographed each weld to set a baseline for our records. All good. I'm suspecting that the broken welds reported in a parallel thread could be caused by an inexperienced welder at the factory and not a design flaw. I also suspect that Oliver engineers designed the frame to withstand "normal" usage (that may be difficult to define, however). Like other owners, we routinely, yet carefully, travel over unpaved and unimproved roads with a full fresh (empty black/gray) tank without issue - I believe this practice is within the design limitations of the trailer. We'll definitely keep inspecting the cross members after such trips... Thoughts?6 points
-
@Geronimo John look inside the rear bumper. There is a rubber seal around the sewer pipe where it goes into the lower left rear of the trailer that will become dislocated and permit dust intrusion. Reposition the seal and place a clamp around the sewer pipe to keep the seal from slipping back out of the hole. I used a Stainless steel Banjo TC-331 just snug. Not tight.
5 points
-
Here's an earlier thread on same topic.5 points
-
We got the Anderson to work first Try this time. 30 seconds. No sweat. :-)5 points
-
(Copied and pasted from the leaf spring thread): Regarding frame cross member welds - visually inspected all yesterday and photographed each weld to set a baseline for our records. All good. I'm suspecting that the broken welds reported could be caused by an inexperienced welder at the factory - an anomaly and not a design flaw. I also suspect that Oliver engineers designed the frame to withstand "normal" usage (that may be difficult to define, however). Like other owners, we routinely, yet carefully, travel over unpaved and unimproved roads with a full fresh (empty black/gray) tank without issue - I believe this practice is within the design limitations of the trailer. We'll definitely keep inspecting the cross members after such trips, however... Thoughts?5 points
-
John, Hate to be a Monday morning Quarterback, but did you add Coriolis Force?5 points
-
Yep, Pre-Flight aircraft inspections have saved my bacon more than once. Ollie cross member inspections can be made easy with a telescoping inspection mirror during the walk around before towing. Still need to inspect all welds a few times a year using a creeper, too. https://www.amazon.com/s?k=telescoping+inspection+mirror&crid=3GPS6IC729535&sprefix=telescoping+inspection+mirror%2Caps%2C133&ref=nb_sb_noss_14 points
-
I agree Max all great points, Comparing visually just a few early model weld photos to my welds on XPLOR there is a vast difference in the appearance of the skill level of the welder and his craft. I really don’t see this being an issue with later model Oliver’s. I have not heard or read about any cracked welds on the newer Olivers. Oliver TT clearly recognized the need for higher quality welds early on and improved on this with a much better weld. Good on Oliver! All this said it is imperative that owners inspect and maintain ALL areas of their Oliver. Olivers are extremely well engineered and well built in my owner experience. Oliver has continued and will continue to make improvements through the years. If I ever end up with a cracked weld I will simply have it fixed. I know I still own the best TT made in the USA. 🇺🇸 With so few trailers impacted, I am not sure how much more we can beat this dead horse. 😄 Happy Camping!!
4 points
-
That's a new feature. The radio uses a combination of microphones and motion sensors, interpreted by A.I., to determine your mood. Based on that evaluation, it automatically picks the appropriate genre of music for your mood (based on an analysis of your past music selections and Google searches related to songs and artists) and powers up. Future revisions will also feature integrated mood lighting along with the audio. To stop the music, remain perfectly quiet and still while breathing slowly and twitching your eyes to simulate REM sleep. This will signal the A.I. to terminate the music. NOTE: Swearing and gesticulating energetically in the direction of the radio will only serve to switch the music to Kenny G. or a similar genre, so caution is advised. Or, it's broken. Good luck either way.4 points
-
Summary: Check under your kitchen sink I walked up to an Oliver at a campground one time to introduce myself. I noticed water running down the curb side rear stabilizer. After exchanging greetings I brought the leak to the attention of the owner. After looking under the curb side bunk and finding nothing I suggested that he look under the kitchen sink for the source of the leak. Upon removal of the drawers he found water soaked plywood caused by a loose coupling on the kitchen sink drain trap. Since then I have tried to check mine occasionally to ensure that it is tight and to look around for any other problems. Today I found that the quarter turn stop on the hot water was not completely open. It had probably been like that since we took delivery. Anyway, I opened it and improved the hot water flow at the sink. Occasionally remove your (kitchen) drawers and check on stuff down there -tightness of the drain coupling -quarter turn stops fully open -refrigerator plug plugged in -hose weight located between back of drawers and rear of cabinet carcass -hose not twisted -any sign of moisture -anything rubbing against something -and especially that blue clip on the faucet hose assembly. There was an owner that heard water running underneath her sink when she turned the faucet on. Turns out that blue clip was missing and the hose had completely separated. We have a 2018 OEII, hull 313. Some of this stuff has probably changed. The round port was added after production to access a loose clamp on the exit end of the fresh tank overflow hose. It sure is useful for checking below the cabinets. There is a plumbing vent under the back right corner of the range. It is supposed to let air in and not let grey tank smells out. If you are smelling something foul (grey tank odors, not black tank odors) and you can’t locate a leak you might have a bad plumbing vent.
3 points
-
I always Assumed that Oliver used epoxy. It matches so well with the existing fiberglass epoxy that they use in the shell. They must use tons of the epoxy. When I installed my DC-DC charger setup. I used JB weld. I sand the fiberglass surface and mating Marine board with 60 grit sandpaper. I then roughly cross hatched both surfaces with either a angle grinder with .060 cutoff wheel, or used a dremel. I just wanted to make sure it was going to get the best possible adherence. Oliver's joints have been known to fail. I have had 2 joints fail of what Oliver did at the factory. I don't know if JB weld it any better than their epoxy, but the failed parts had smooth surfaces. It sure can't hurt to give the surface more to adhere to.3 points
-
3 points
-
I believe once you have torqued the nuts 2-3 times and get to "no more stretch" you should trust the installation that they're good and you're done. The U-bolts need to be well seated, but they are not a maintenance item and once set will stay put for years, decades even.3 points
-
Installed and operating. I removed the Beech Lane mounting brackets and made sure that I installed the fans so they would blow air out. I used a screw from the mounting bracket to anchor the top right corner of the fans and stainless screw on the lower left. The 2 metal triangles are cut and shaped from a rafter tiedown from local hardware store. They rest on the plastic grill mount very well and prevent the fans from dropping down as the whole fan assembly resides behind the plastic grill mount. I added the screw, bottom left, to keep fans from bouncing up when driving and then falling downward. Same for the top right screw that was original screw from the fans mounting brackets. The small clip was just a piece of strapping metal with predrilled holes. It fits under the plastic grill mount very nicely. I used some wire loom material behind the tubing and fins to mitigate fraying/rubbing of the wires. The temporary tape holding the thermistor will be replaced by a couple of clamps now that I know what's behind the slant board. I had to slide the microwave out to see what was behind it. Lots of room there. BTW my microwave has 6 screws on its faceplate to remove but I had to also remove 2 more screws, not visible from the outside, to get the plate off. I had to shimmy the unit side to side and slide the microwave out and remove those 2 screws. I probably could have kept the faceplate on but the plate seemed like it could be easily bent, so off it came. I drilled a hole through the MDF slant board large enough to accommodate the controller's connecting clip and decided to use the hole provided for the microwave power plug in the overhead compartment. I fished the connecting end of the controller through the microwave power plug hole and out through the slant board. I temporarily taped in place at a distance to reach the fans power leads. My power comes from the power and ground wires from the covered junction box, seen next to my fingers in one of the photos. I used WAGU connectors and reconnected to where they were originally destined. Please feel free to critique my electrical work(and any other areas)...I'm not an electrician...so far so good. It works as advertised in both auto and manual. I'm operating in manual at 70%-80% as I can't hear from inside the cabin and it eliminates frequent speed changes seen in auto. Thanks for everyone's help!!!
3 points
-
sJ, This may be of help. https://www.etrailer.com/question-431835.html David3 points
-
Not a bunch of those trucks around that are getting this kind of love either. Nice job on those "blacked out" rear lights!😁 Bill2 points
-
Actually I believe they all extended the end square aluminum tubing as supports.
2 points
-
Same here, brother! Couldn't agree more, David! We should all invest in something like one of these unless already owned... ...just one last blow to the horse! HA!
2 points
-
Thank you...I use JB Weld as well and will sand and cross hatch as you suggest. Makes sense :) John2 points
-
Thanks Bill. I had missed it by speed reading while looking at his excellent pictures. Every one of them are perfect. What they highlighted to me (beyond the message of fixing the likely vent problem) is just how much dust my Ollie has between the hulls where the majority of our MEP resides. it certainly did not come from the factory that way. Likely the dust is from the air vents for the curb side and lots of dusty camping roads. It can't be good for the MEP systems. Looking forward to having to replaced the Dometic absorption refrigerator and sealing up the refer vents. That should help on the dust issue. Left would be the Suburban furnace grill used to provide cooling and combustion air to the furnace. Maybe a bolder catcher filter there. Plus about three days with a strong vacuum with 20 feet of hose. GJ2 points
-
As per Townesw post above. Bill2 points
-
Following is rabbit hole conjecture on my part for your amusement: The G-forces on loads behind the center point of the twin axles are lineally amplified by the lever arm distance. It therefore is good design to have more structural supports behind the axles than in front of them as reported. As the EZ Flex raises and lowers the axles based upon up/down road bumps/holes/trenches, it could also be adding additional loads to the areas in front and behind the axle center points. If those are in-phase with the road induced G-forces, the structural member loadings would be increased beyond that mentioned above.2 points
-
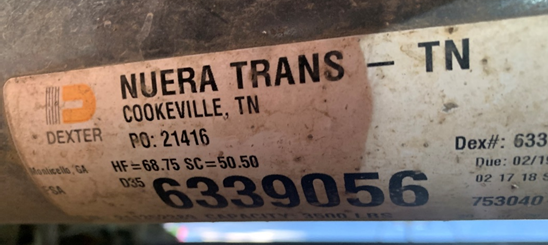
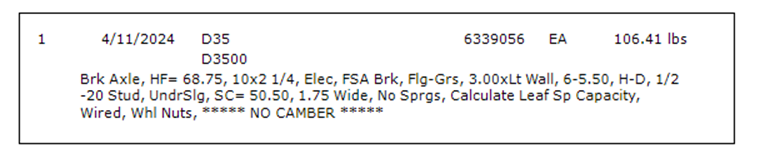
IF your Axle Decal looks like this one, You may want to read the rest of the below. From what I can figure out, Red Neck Trailers was “Integrated” into Nuera Trans which was “Hoovered Up” into Dexter. The original Red Neck Trailers is still in business as is Nuera Trans. All flying the Dexter flag. As clearly printed on a Dexter Label, they were made by NUERA TRANS likely in Cookeville Tn. So don’t waste your time calling Dexter for a "Build Sheet". The correct terminology is to request the Configuration Info associated with 6339056. The Dexter Customer Service could not pull up this info. So instead, call this knowledgeable contact that has been in her job with all three name changes:: Christy Gillentine | CSR Dexter Distribution Group christy.gillentine@dextergroup.com direct tel:: (931) 739-4034 An alternate would be Denise Ameling via E-mail: <denise.ameling@dextergroup.com> Please keep in mind that these contacts are ONLY for NURA TRANS labels axels. If your label is not like the one above, the regular Dexter Customer Service is by far the way to get your axle info. The Nuera Trans Axles (I.E. Really Red Neck Trailer axles that were sold under the Nuera name) were purchased without springs. The springs were sent to them for assembly. They are the Chinese made PR4B springs. Christi stated that if the springs are flattening out, then they were undersized for the application. After they flatten out, then they generally fail as was originally reported on our thread. She stated that the PR4 springs with their thicker steel (2,400 pound rated) would be a better choice. Here is the CONFIG INFO for this Config Number for my rear axle on Hull 342. If you have the same number on yours, here it is: Note it states “No Springs, Calculate Leaf Spring Capacity”. GJ
2 points
-
We almost always leave home with a full fresh tank and will continue to do so, unless we are heading straight to a full hookup campsite. It's not that heavy. Full at about 250 LBS across that wide area is not a concern.2 points
-
I use a 2000 watt generator (with the ground plug) and it powers up the Ollie and the AC. I do have to shut off the breaker to the inverter/charger for it to power up the AC compressor.2 points
-
To sort of close the loop on this thread I started...Oliver has shipped me a new radio. Haven't received it yet but fingers crossed it works as it should. Even after a hard shut down - as John Davies recently commented on which is holding the power button for like 5 seconds - my "old" radio would still come on randomly. And it was not an alarm that I or ScubaRx set that was causing it to come on...A mystery for sure. I tried multiple resets and it still would also not load a movie when we actually wanted the unit on. Separately but somewhat related, Oliver shipped me a new bathroom light and a long piece of bulb weather seal for the lower section of the doghouse. Pretty happy with that level of service. They shipped things quickly and without me needing to negotiate to get them to replace the defective items.2 points
-
Whenever I'm inside someone else's trailer, I try to quickly set the alarm on their radio to go of at 0300 hours. Just for poops and giggles. 😉2 points
-
I don't have a rear cargo carrier/basket, but here are 3 threads that might give you some ideas.1 point
-
Lucky guy. You can still see the buttons on that micro remote................1 point
-
I am ordering parts to do some Maintenace on my LE2 suspension. Mine was manufactured in 2019, came standard with the EZ-Flex and currently has a little over 62k on it. I am hoping to get answers to a couple quick questions: 1: Does the center pin of the EZ-Flex have a serviceable/replaceable bushing and if so, is it the same size and type as the bushings on the spring ends? 2: Likewise, do the two outside holes on the EZ-Flex have replaceable Bronz bushings like the spring ends? Thanks in advance. .sj #5121 point
-
Well now I am setting on the edge of my seat waiting to find out the true engineering intent for these cross braces. Maybe Oliver will share with us some day.1 point
-
We do deflect to the right up here :)1 point
-
It was the first LE2 sold to the public and the last one sold before the shutdown. The only 2010 titled Ollie too.1 point
-
Thanks, @Patriot. The noise isn't a deal breaker, but it would be nice if the fan cycled.1 point
-
Hey Max, Ask your bride to keep it under 100 while you’re in the Ollie. 😄1 point
-
The trailer tows perfectly fine - perhaps even a bit better in high cross wind conditions when we traversed the TX pan-handle. 90-degrees off left to right at 30-35mph. Solid! Nothing noted…. I’m going to ride in the OTT while D drives thru the neighborhood as before we upgraded them to “feel” the before/after….1 point
-
Just by way of an "UPDATE": We pulled into a nice Harvest Host location yesterday afternoon at the "BAR-Z Winery" in Canyon, TX about 20 miles south of Amarillo near Palo Verde SP. We've logged just over 1,400 miles since R&R efforts of the AxleTek and ALCAN spring packs. A prior-to-departure torque inspection revealed no more "U-bolt stretch" as the nuts met target torque specs. For us, at least, our higher level of confidence in the running gear and general peace of mind knowing we've got 2k#-rated 5-spring leaf packs under our 3.5k# axles was worth the $'s, time, and effort in this upgrade, FYI. Cheers from a couple "Happier Campers"!1 point
-
I would install a switch at the fuse box.1 point
-
Yesterday, I installed a Spartan Power Soft Start in my RecPro/Houghton A3400 air conditioner. It's identical to the one RecPro sells and is $100 cheaper on Amazon at https://a.co/d/cvYZV39. The wiring method on this one is different from other popular models. I've done both now and this one is much simpler. I removed the fan and found a place mostly out of the way underneath it on a flat surface. All you have to do is use your finger to trace the wrapped set of wires coming out of the compressor to a point where you can cut them. There will be 3 wires: red, white, brown. After snipping the wires, the 3 that are still connected to the compressor get connected to the "compressor" side of the Soft Start. The 3 remaining wires on the other side of the snip location get wired to the "supply" side of the Soft Start. Red-to-Red, Blue-to-White, and Black-to-Brown. Button it up and let it run for 30 minutes with the temperature set close to the interior temp so that it will cycle on/off a few times. Then good to go! I had no trouble when mine cycled on while the microwave was running. The combination of these two puts me near my limit of 30 amps so it will depend on what else might be running. The refrigerator was off and if it had been running, that might have put me over the limit. It's a balancing act, for sure. The picture with my fingers shows the snipped wires that lead back to the compressor. The other end of the same snipped wires represent the "supply" side. The other picture shows the mounting location which is accessed by removing the 4 nuts that secure the large black fan. Clean the surface with some rubbing alcohol first then peel the double stick tape and press it down.
1 point
-
I believe in your specific trailer has two external ports for shore power. Those connections first go to the transfer switch that is on your front wheel well. That shore or generator power (when applied to either port) goes through that transfer switch then the output connects to the input side of the EMS. The output of the EMS connects to the main Breaker Panel. On that panel you'll see the following breakers as indicated on the inside door panel. The #4 (20A double wide ) breaker is the one that feeds your outlets and microwave. It's also the one connected to the GFCI outlet under the front dinette seat. It's this circuit that your inverter feeds when you turn it on. As to the PF4000 charger output. In the photo you'll see I've taped off the 15A breaker #5. That's the breaker that fed power the charger in the PD4000 panel. I've also disconnected the PD4000 charger outputs from the battery circuit and capped and taped the charger output wires. (That way even if the breaker is flipped on, no power will be applied to the new batteries from that old charger.)
1 point
-
I recommend you check your vent stack in the closet and below the decks. You should not be selling smelling anything. GJ1 point
-
Hull #364 - The Roadrunner 2023 F350 CCLB SRW 6.7L Not knowing your year, but guessing your Hull 364 is a 2018 as is ours. If that's the case, your should look like mine and it is the same as Rideandfly's pictures. We had under cooling and over heating concerns and added the double fan posted above. it has helped quite a bit in very warm or HOT conditions. GJ1 point
-
Never had any interior problems. Our trailer, with water and ready to camp, has always weighed north of 7000 pounds. And, for years we ran 80 psi in all our tires.1 point
-
My final water upgrade, a cute minor addition! I never was much for RV outdoor showers but given the Oliver wet bath they seem more viable, when at times not wanting to get everything inside wet. Problem is you got to hold the shower head, making it difficult to take a quick shower. So, I wanted a holder for the shower head and found these: JONKEAN White Handheld Shower Head Holder with 2 Hanger Hooks, Strong Adhesive Shower Head Holder, Adjustable Shower Wand Holder Wall Mount, Bathroom Waterproof Shower Handle Holder No Drill Need - Amazon.com Comes as a 2-pack. Being 6' 2" I mounted one as high as the shower cord could extend. The second one will be down below for our dog wash! You only have to leave the clear mounting plate on the Oliver and the holder itself fits behind the outdoor shower door with the shower head. With the new water pump, the stream is now so much better!
1 point
-
No "1/2" PEX crimp system has a true 1/2" inside diameter (I.D.). No 1/2" PEX system has as much I.D. as a 1/2" copper system. That is why I installed 3/4" PEX lines, instead of 1/2", to high-demand fixtures in our home, such as the bathtub filler valves. That said, the 1/2" PEX crimp system in our Hull #1291 has worked fine for us. I would not want a water system capable of higher flow. Why? The limited size of the gray tank. We try to use water sparingly, to minimize how often we must dump the gray tank. With a plumbing system that small (compared to most homes systems), and with distances from the pump to the fixtures relatively short, we have not wanted increased flow rates at the kitchen or bathroom sinks.1 point
-
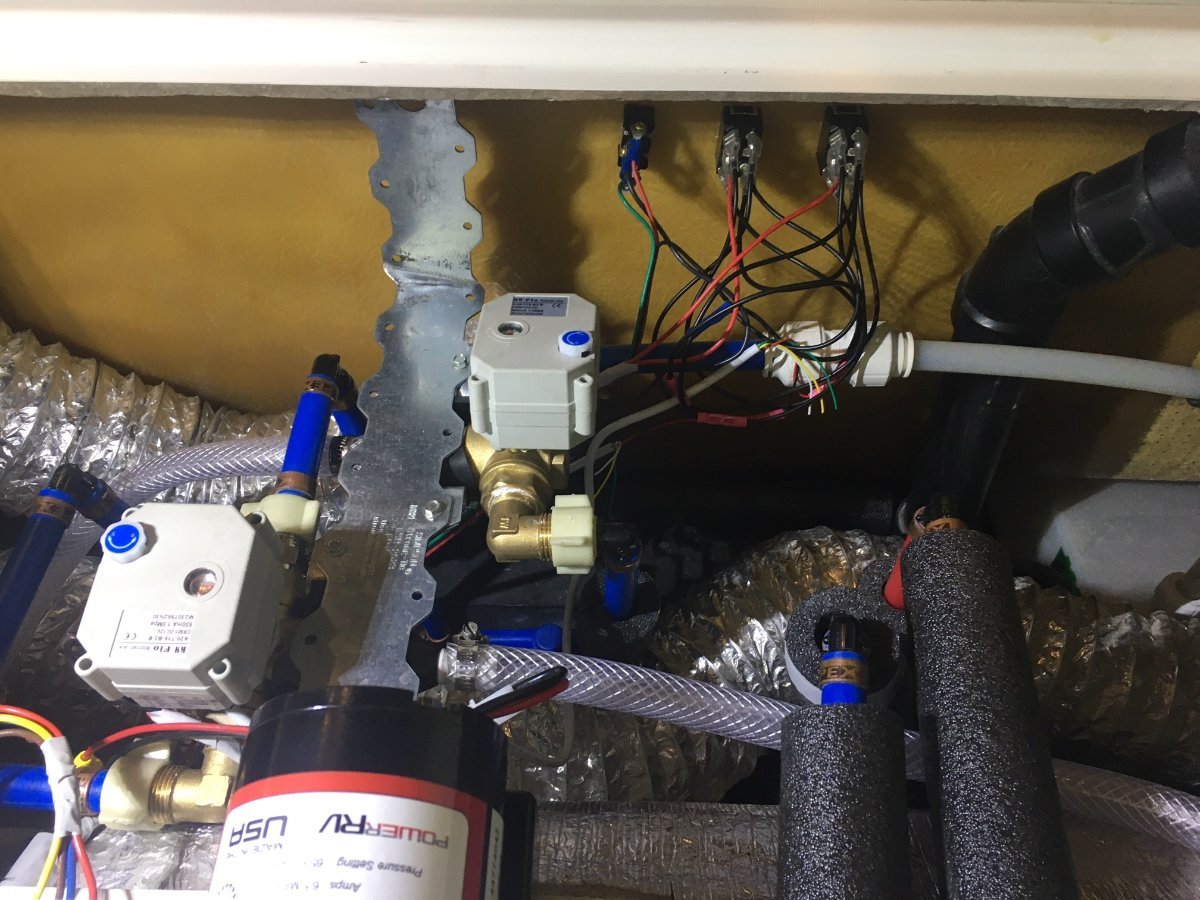
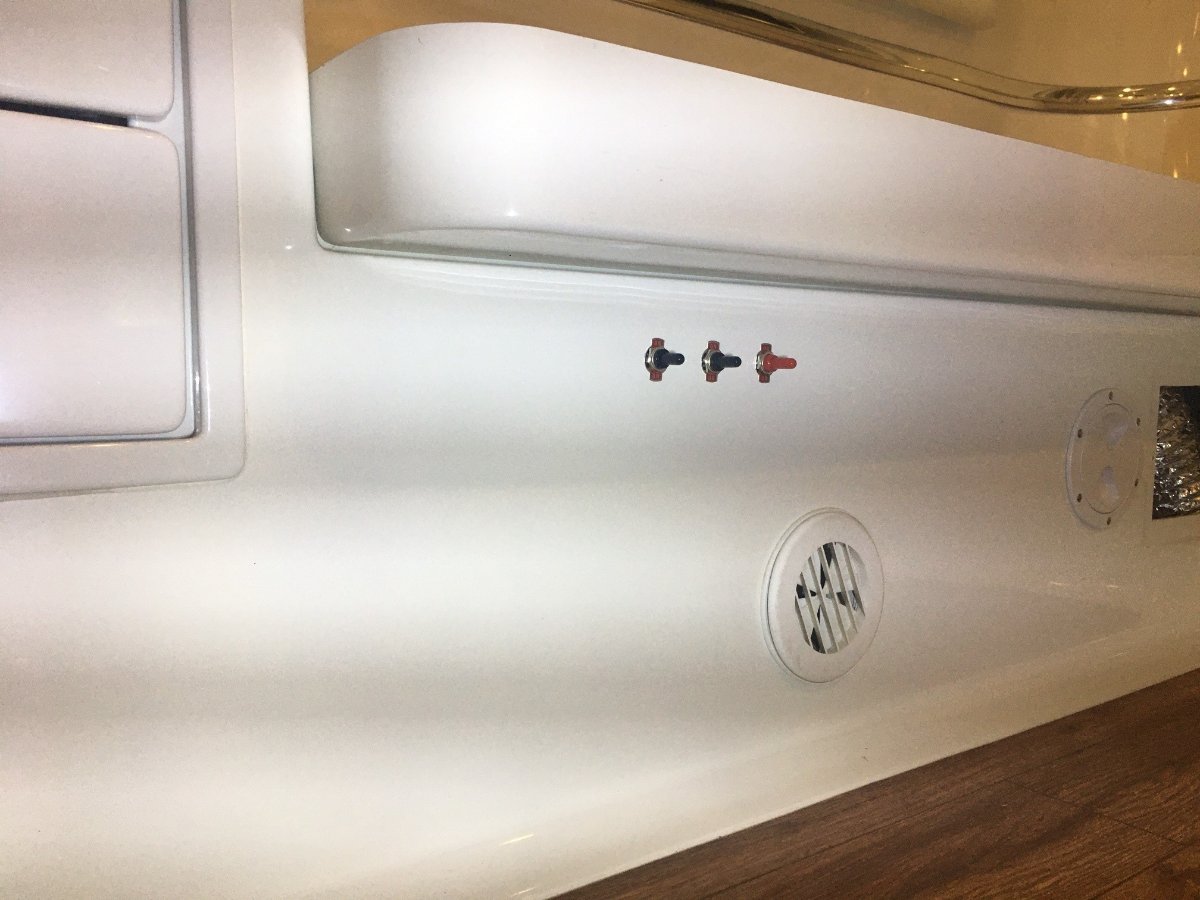
More detail to follow. In the next pic you can see the electrical switches and wiring. Yes, it's a bit complex to keep them all straight. A shout-out and thank-you to @ScubaRx for suggesting motorized valves wired to DPDT switches. Once you get the X-pattern of the wiring they're not complicated. After taking the picture, I wrapped each switch with electrical tape to keep the terminals in place. Each motorized valve has a rubber-lined steel U-bracket underneath the main bracket for support. It was the only way to do it considering the height of the plumbing and the installed bracket height. The structure is rather solid once it was all tied together. Lastly the toggle switches to the exterior. I drilled three 12 mm holes about 2" apart, in a straight line just 3" below the bed frame. The default setting is ALL switches up, for what OTT calls "Normal Camping Position." I wrote up an instruction sheet (PDF below, with a borrowed OTT graphic), but believe me, after all this work I have the settings down! Water Valve Switches.pdf
1 point
-
I had just about the same experience with Oliver Service as our radio not not playing CD’s. Fortunately it still did eject the CD. Contacted Oliver as we were still under our 1 barely under our year warranty. Jason sent out a new old stock radio which I installed. I sent the old one back pre paid shipping and the new one works as it should. Out of warranty it would have been spendy to replace. The quality of the Furion radio is ok, I think a higher quality radio for what one pays for an Oliver should come standard.1 point
-
I'm embarrassed to admit it but mine would mysteriously come on in the middle of the night too. I figured it out in the middle of the third night of ownership that it even had an alarm clock function. I didn't intentionally set it but it blasted out some wrap song @ 03:17 at full volume. I didn't wake up happy. I don't remember what I did but I found the answer in in the manual.1 point


.thumb.jpg.e34bf01ef7f7d5e99ad31856d45afbeb.jpg)


-
Recent Achievements
-


")


")


")


