Leaderboard


Popular Content
Showing content with the highest reputation on 04/15/2024 in all areas
-
I like to keep the grey tank closed so when I am ready to dump the black tank, I can use the grey water to flush the hose. I like to have about 75% grey when I dump black. If you have a composting toilet, this method does not apply. Mossey4 points
-
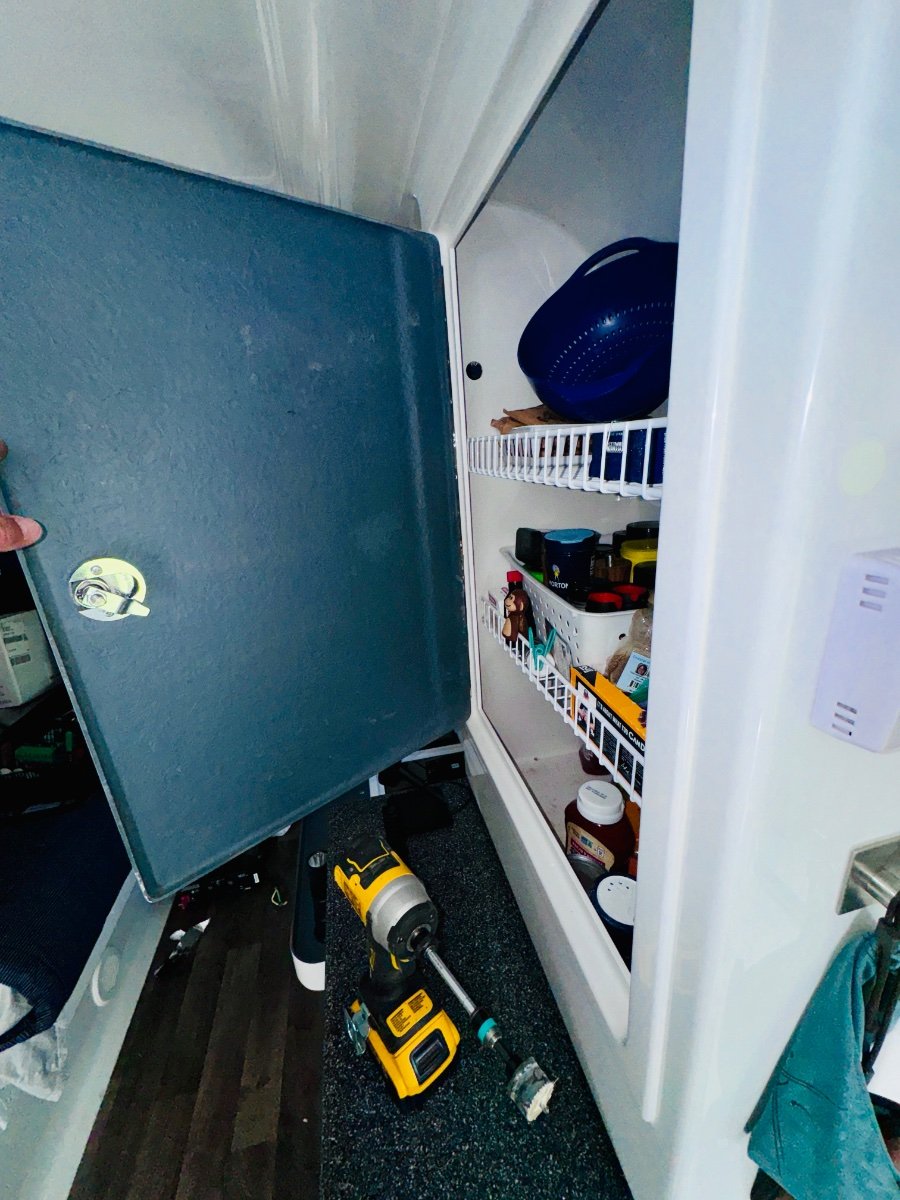
If your drawers now open without trouble, it’s a good time to practice taking them out. Before you begin, a word of caution is needed! The edges of the metal portion of the drawer slides are very sharp, so be careful. Also take the time and unload the drawer you want to remove, it will make everything that follows easier to complete. Only 5 of our drawers come out, the exception being the one under the sink. So pick any of the other drawers and slide it all the out until it stops. Now put your thumbs inside the drawer on each side close to the front of the drawer and your fingers outside with the tips of your fingers under the bottom of the drawer. Now you should be able to feel the release for the drawer slide and squeeze the tips of your fingers to the outside of the drawer on both sides and slide the drawer out of the drawer slides. Dang if that paragraph doesn't have a lot of drawers in it! Or just get on the floor and slide a drawer out and you will see the orange handles that you will squeeze to remove the drawer. Good luck, Mossey4 points
-
I'd just sandwich the cross member with a larger secondary backing plate in between and below with proper hole spacing for the hitch and throuth bolt the whole thing. It would be stronger than the above arraignment and solve the problem of the mis-aligned holes.3 points
-
My door will close with either valve open.3 points
-
X2 a best practice! That gray tank provides a nice soapy rinse.3 points
-
Same for us. We have found we do not need to dump the gray tank more often than every 2 days or so, even with showers, so it takes little time away from our camping adventures. We usually dump the black tank first regardless of its level, then flush with the gray tank contents.3 points
-
Found the orange handles AND decoded the dance steps 🤣 TYVM. Works perfectly.3 points
-
That is the card company. It doesn't have anything to do with Oliver. Seems like Oliver is looking out for us, by doing away with the debit cards and sending $50, so you can have 100% of the payment.3 points
-
Tempus fugit, brother! Looking forward to meeting all y'all at the Owner's Rally... Safe travels, ALL! Cheers!2 points
-
Just spoke with Mike at OTT Service. This new 2” receiver will not retro fit or swap out into the existing bolt holes on your bumper. It has a wider bolt pattern.
 2 points
 -
What! I guess I better get busy on my Ollie do list! Mossey2 points
-
Same here. We keep it closed until dump time. Mike2 points
-
@John Dorrer Thanks for point that out. I checked and have had the same $3.50 charge each month starting in February. I am going to use up my balance ASAP before another charge on May 1. My understanding is the charge is not by OTT but the credit card company.2 points
-
We found that you can crack it partially open until it just taps the inside of the basement door. This seems to keep up with accumulation. I know that some owners have opened a hole in the door to allow full opening of the handle.2 points
-
Hey, Mike: Just a thought which has worked for us on several occasions with some of our Victron components - try giving the boys at Battleborn Batteries in Reno, NV a shout. They are an authorized Victron dealer and are well accustomed to helping out DIY'ers. We've called them many times and have always got a solution to our issues. They're very patient and will walk you through a troubleshooting process to get that AC operating with the MP2. Keep us posted as you go through the troubleshooting as we're interested in doing the same MP2 mod after our 2,000w Xantrax fails. Good luck!
2 points
-
Well, pulled my 2021 LEII out of storage on Friday and was able to crawl around underneath it. Looks like I do have 3,500lb axles (D35) on mine and the four leaf springs. All the springs look in good shape with nice bends but, the trailer only has about 2,000 miles on it so far. So as others have mentioned, now the dilemma is putting two 2,000lb springs on a 3,500lb axle. I found a few custom spring makers in Minnesota so, looks like I may try to source some 1,750lb springs somewhere in the state. Details to follow...
2 points
-
Thanks to Oliver for the reward -- mine was well spent. I think I have $11 left on it, and I'll use it this week.2 points
-
Best instructions yet Mike. 👍🏻2 points
-
Perhaps anyone planning to tow their Oliver Elite II to Alaska should invest in a set of ALCAN 5-leaf springs before the trip.2 points
-
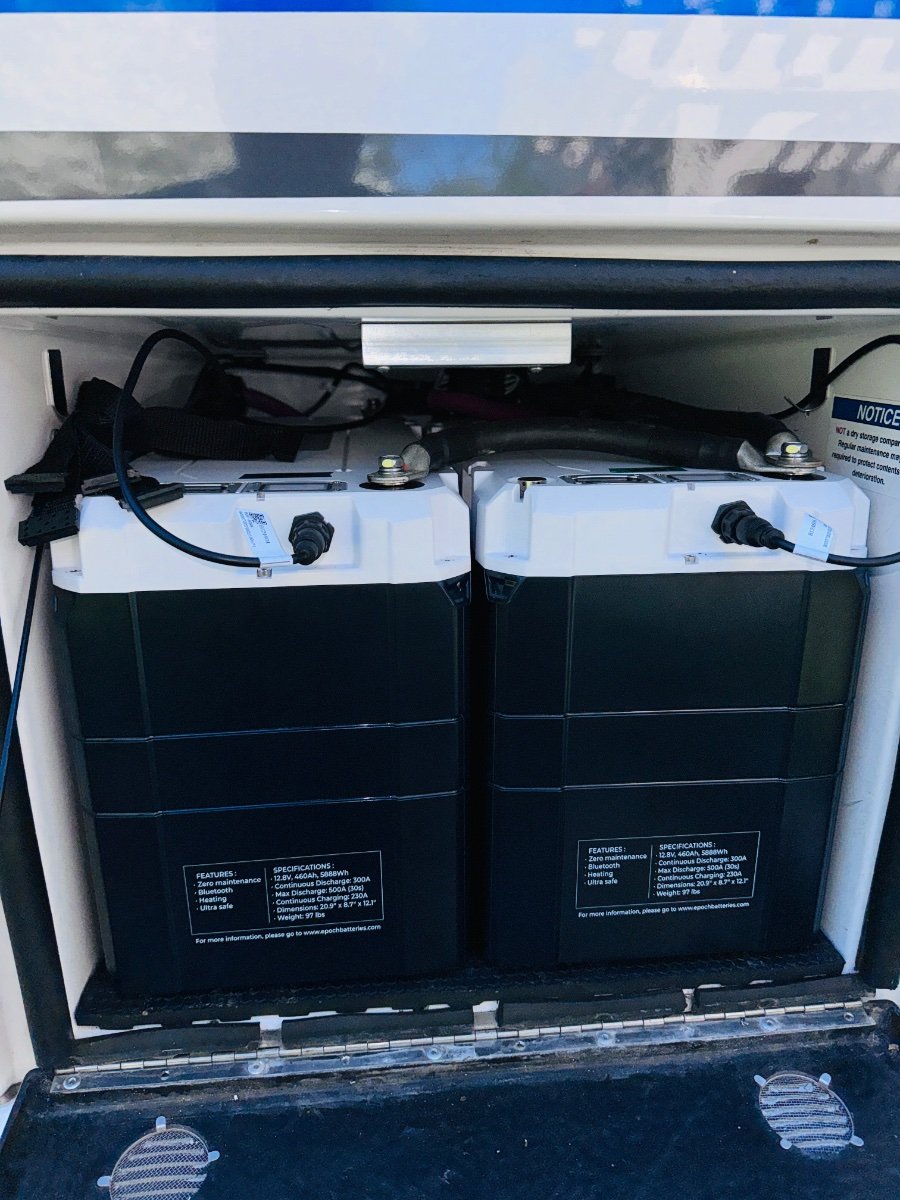
Removed: Old Xantrex inverter, transfer switch including ac legs IN/OUT, charger from PD4000, Trojan batteries, Battery tray Mods: Wired Outlet and microwave circuit directly to breaker, mounted pos and neg bus bars using Star board (heavy), Pulled all wires from battery compartment except 4/0 pos and neg, ran wires for Epoch battery remote battery on/off switch and external battery level indicator, COM port from battery to MP2, Re-used all electrical wire (Used some new lugs and heat shrink), removed 10/3 main shore AC from EMS to PD4000Installed: POS and Neg bus bar, (2) Epoch 460 ah batteries, battery wire zip tie holders Waiting on MP2 stand to give lateral support since it will be mounted horizontally. May still bond starboard to fiberglass wall to fixate MP2 but it weighs 49lbs so I want the extra support from stand. We shall see if it fits with some modified aluminum support for feet.
1 point
-
Love it @ScubaRx. When it comes to fabrication, there's always a solution.1 point
-
FYI, logged into my account yesterday and it did state there would be a $3.50 monthly charge. Tried to spend mine yesterday but it was declined due to an incorrect PIN #. What a racket by the banks.1 point
-
We were thinking about a tour, but at $55+ per person, and the fact neither drink bourbon, we opted to explore downtown Bardstown1 point
-
John, Enjoy the land of the Kentucky Derby, bourbon, and beautiful horse farms. Kentucky is a gorgeous state. Safe Travels!1 point
-
In the 1-1/2 years+ that I have had this rewards card, I have only had one $3.50 charge. I don't believe it was a monthly charge.1 point
-
The same one everyone else sees. No more home office service. New fees, when there weren’t any when you open the account.1 point
-
What pattern do you detect?1 point
-
Oliver is doing away with the debit card and will now send a check. Had the fee taken out on our first showing, but not on any of the other showings. I spent all but $10 on our Texas trip. I would use it up asap.1 point
-
At the eclipse meet up I was asked about tightening the stabilizer rear jacks. i use blue threadlocker to help with bolt retention. Spec: 3/4” Leveling Jack flange bolt nuts (43 ft-lbs). Bolt locations shown for rear. inside : outside:
1 point
-
David, You are welcome. After I saw the carriage bolt heads when I looked inside under the beds I thought a post may be helpful. I checked mine and re torqued them as I prepared the post. Sorry we missed saying goodbye. craig & Rose1 point
-
Another good Andersen day. Took two tries. I'm calling that a win. In other news: 1) After yesterday's spectacular hike on the cliff trail, I drove 10 miles through Del Water Gap with my tailgate down. But NOTHING fell out. This is the first plus from our dramatic overpacking. Things are so crammed in there I don't even need the tailgate! 😏 2) We got a drawer stuck. I was able to slide a ladle in, push down on the offending dish, and get it to open. But this is the second time I wish I knew how to remove the drawers. Now that we have wifi, I'll go take a peek in Oliver U. 3) 4 days in Worthington State Park with no hookups, we used half our fresh water, half our grey tank (of course), maybe 1/3 a tank of propane, and left with 50% charge in our batteries (it was cloudy almost the whole time). That confirms my suspicion that fresh water is what will limit anything we do that approaches boondocking. (And I was using the campground shower. DW, refused cuz it was stinky.) And I now know that our major electric draws (beside the AC) are: jacks, microwave, hair drier, water pump. TV, radio, fridge and lights are almost nothing by comparison.1 point
-
Yea my bad. Was cleaning out my unread notifications and failed to check the date. Hope he is still lurking around. Handy guy for sure! GJ1 point
-
Day #3 Wired in the MP2, Pos and neg bus bars, smart shunt. Turned on inverter... Microwave works nothing els. AC plugged in... nothing. Oh well, had fun installing the hardware and attempting electrical. So everything is mounted except Ekrano display. May give the project a break for a few days and then wire the inverter back to OEM configuration and then hire an RV electrician or talk to OTT to make the changes necessary to use inverter for AC. Best, M
1 point
-
Here is a thread I posted back in 2017 about some mods I had done to the Outlaw Oliver. One of them concerns a rear basket I made to carry chairs and lighter, bulky stuff.1 point
-
I was curious about your use of HDPE and PC-11 Epoxy as I haven’t ever tried using the 2 products together. I haven’t used any of PC-Products line of adhesives, so I went their website and looked into their does and don't. I found the information below, so I will be looking forward to your results. Mossey
1 point
-
HDPE Marine Board from Buyplastic.com. 12x27x1. It is heavy and expensive but turned out to be very well suited for this install. $57.00 PC-11 Epoxy adhesive paste. 1 lb in 2 cans. from Amazon.com1 point
-
Blacked-out is for kids, but when I had all this disassembled, we detailed the taillights, license plate surround and bumper covers and then all black trim on the TV! I degreased all parts, getting off all the sloppy car wax and rubbed them down with rubbing alcohol several times until the final paper towel was clean. Used Mothers Back-to-Black in the past, but it never really did the job. Recently, I purchased "Forever Black" and it works great, covering in deep black without brush marks: Amazon.com: Forever Black Bumper & Trim 6 Oz. (New Improved Formula & Larger Size) : Automotive Looks amazing for 23-year-old trim! Right?
1 point
-
Packed to the gills. I felt like a German mechanic changing a water pump connecting batteries but I am happy with the result. No maintenance and they have remote monitoring and shut offs so they shouldn’t need to come out.
1 point
-
Thanks @rich.dev for the attached links. As was mentioned above, I also would advise against mounting a tray or box by the 1.25" receiver. There's a lot of dynamic load with an extended cargo tray, or bike rack for that matter. The single point Oliver hitch allows a lot of movement side to side and up and down. The two point mount used by those of us that installed boxes or trays inherently provides a high level of stability as well as a direct mount to the trailer main frame rails. Also the 2" sockets at those locations allow you to use a heavy wall 2" square tube which substantially increases the strength of those connections. Even mounted by the 2" tubes, you still use the hitch pins Oliver used to secure the bike rack mounting frame. This still allows the tray or box to be quickly removed for installing a bike rack or service needs. All this having been said, I still believe you should limit the total weight mounted to the back to the maximum that Oliver recommends. The tray or box mounted doesn't extend much farther from the bumper than a double bike rack would, so the loads should be somewhat similar to those exerted by two bikes mounted on the Oliver mount. But again the cargo box is mounted directly with two points that are extremely stable and secure. Just my thoughts. Edit: Additional thoughts. Regardless of your method of mounting a cargo box, clearance for the lid to open without hitting the spare tire cover must be considered. Also if you make the mounting tubes extend far enough into the frame sockets, you will be able to slide the box back far enough to remove the spare tire without completely removing the box from the trailer. This was very important to me because complete removal requires two people and sliding it back enough for tire access can be done by one person.1 point
-
There have been threads on this forum discussing the weight limitations of racks (bike, cargo, etc.) on the back of an Oliver. As I recall, the limitations result from the increased dynamic load exerted by anything cantilevered off the back of the trailer, far aft of the rear axle. These limitations, in turn, prompted Oliver to limit the bike rack mount to 1-1/4". I recommend you carefully consider what you want to carry behind the trailer, and how that will impact the longevity of the aluminum frame.1 point
-
Actually I believe they all extended the end square aluminum tubing as supports.
1 point
-
Installed and operating. I removed the Beech Lane mounting brackets and made sure that I installed the fans so they would blow air out. I used a screw from the mounting bracket to anchor the top right corner of the fans and stainless screw on the lower left. The 2 metal triangles are cut and shaped from a rafter tiedown from local hardware store. They rest on the plastic grill mount very well and prevent the fans from dropping down as the whole fan assembly resides behind the plastic grill mount. I added the screw, bottom left, to keep fans from bouncing up when driving and then falling downward. Same for the top right screw that was original screw from the fans mounting brackets. The small clip was just a piece of strapping metal with predrilled holes. It fits under the plastic grill mount very nicely. I used some wire loom material behind the tubing and fins to mitigate fraying/rubbing of the wires. The temporary tape holding the thermistor will be replaced by a couple of clamps now that I know what's behind the slant board. I had to slide the microwave out to see what was behind it. Lots of room there. BTW my microwave has 6 screws on its faceplate to remove but I had to also remove 2 more screws, not visible from the outside, to get the plate off. I had to shimmy the unit side to side and slide the microwave out and remove those 2 screws. I probably could have kept the faceplate on but the plate seemed like it could be easily bent, so off it came. I drilled a hole through the MDF slant board large enough to accommodate the controller's connecting clip and decided to use the hole provided for the microwave power plug in the overhead compartment. I fished the connecting end of the controller through the microwave power plug hole and out through the slant board. I temporarily taped in place at a distance to reach the fans power leads. My power comes from the power and ground wires from the covered junction box, seen next to my fingers in one of the photos. I used WAGU connectors and reconnected to where they were originally destined. Please feel free to critique my electrical work(and any other areas)...I'm not an electrician...so far so good. It works as advertised in both auto and manual. I'm operating in manual at 70%-80% as I can't hear from inside the cabin and it eliminates frequent speed changes seen in auto. Thanks for everyone's help!!!
1 point
-
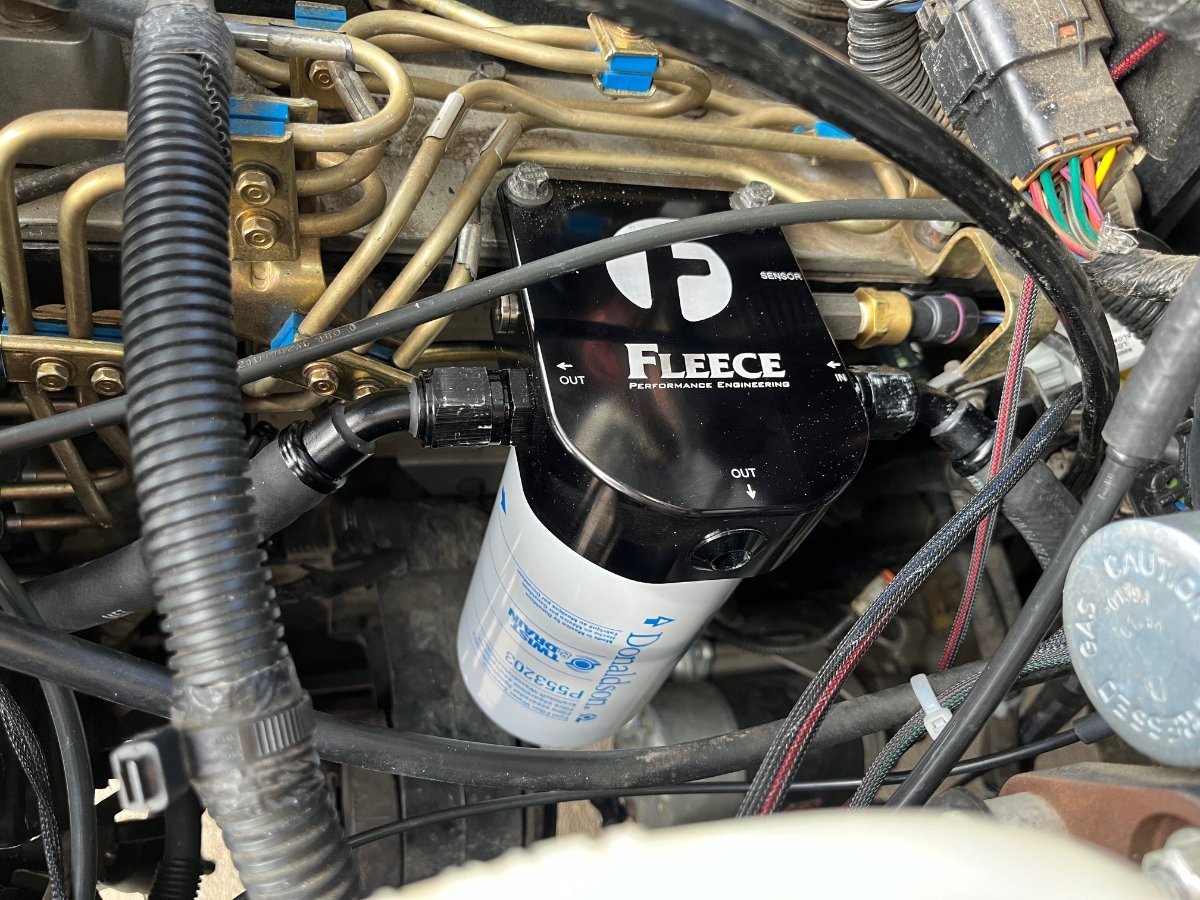
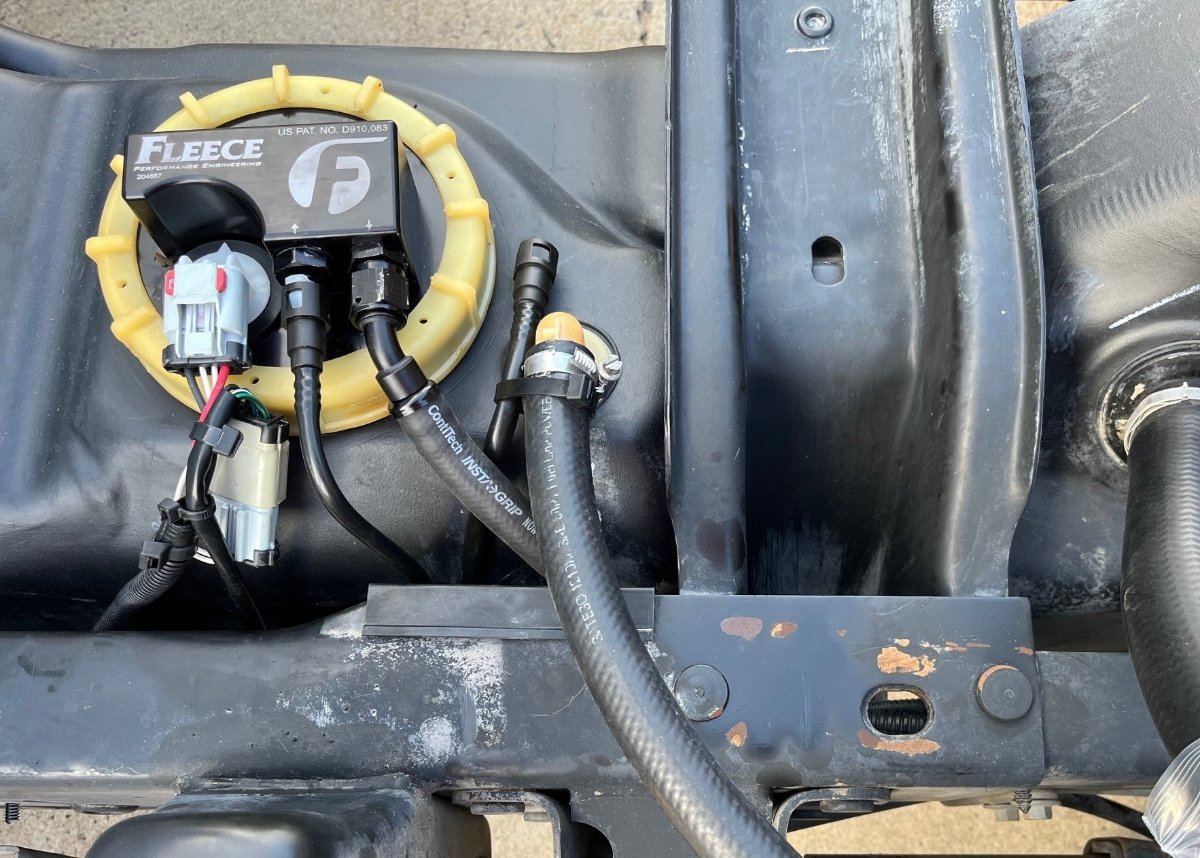
Today was the day to prime the pump and filter. I have the tank so low that first thing was to buy a couple gallons to add to the tank. Bumped the starter a couple times which causes the fuel pump to run for about 20 seconds. The new Fleece pump groaned a bit to fill at first and then it's much quieter than the ringing sound of the OEM pump. I just loosened the nut on the return line of the VP44 (injection pump), a little fuel came out and that's all she needed. Started right up and sounded good. No leaks anywhere. Nice! First pic tells the final story. I had lift pump PSI from 8 PSI idling to 2 PSI with a heavy foot. Now I have a solid 14 PSI (top right corner of the display). I've only idled so far, hit the pedal while standing and still 14 PSI. Friday I will replace the bed and take her out for a drive!
1 point
-
Well. They won't be easy to remove. Time will tell on these. Here's 300 watts. I taped all corners after these pictures with light eternabond.
1 point
-
Made it to Stillwell Store at Big Bend. Headed into the Park on 385 and an Ollie going the other way at around 10:45. Hello out there!1 point
-
Sounds great, but we realized that we could run out of time. Started south to Orange Beach, then a night in Crosby Texas, tonight and tomorrow night we are in South Llano River State park. Need to be in Ft Collin’s CO on the 4th. I backed into the site in good fashion for the first time!1 point
-
The Plexiglas insert on the lower panel of the screen door has proven a success... The two knuckleheads take turns sniffing through the screen door... HA! Great traveling buddies they are!
1 point
-
Not "wide bands" and you do not need much. The installation above, each panel had eight 1x3" 3M VHB 4950. BTW, I like this model for many things, but there may be better versions over 4950, they have so many. I have removed some on several kinds of surfaces. I start with an old soft putty knife with rounded corners, to break the seal and get the bulk off (you don't get too far with plastic scrapers). Then let a little Goo-b-gone soak in. Real damage would come from 8 min or 12-16 screw holes per panel and all the Dicor crud to remove. I've seen YouTube videos where the use VHB tape and then put "Dicor over the brackets to be safe." There is a difference between being safe and just being stupid.1 point
-
So you got 80", fore to aft, longer and narrower than what we have (yes OTT could offer this). Keep us posted after you thaw out up there! Re VHB tape, I use it on bracketed models, anything and everything. It does not work well with textured surfaces but will bond to anything clean and flat. The picture below is the solar install I added on our Bigfoot Class-C. (BTW, every white-colored accessory in this picture was installed by me. I was not up on VHB when I install the Dish, so that item is screwed and Dicor'd.) I used two sets of solar mounts per panel to be safe (2 sets, 8 standard Renogy brackets) to install these extremely heavy panels: Pro 200W 12V Monocrystalline Solar Panels w/ 9BusBar Technology -Newpowa Zoom in on the mounting brackets in the pics, no screws, the brackets just sit on VHB tape! You could not budge them. The Bigfoot also has a fiberglass roof. Screws in fiberglass are an issue long-term, 3m VHB will outlast a screw mount.
1 point
-
Maybe. But so are are fixed panels. The advantage of fixed panels are that they charge as you travel. Rolled up solar does zip on the road. I'd want at least a combo.1 point


-
Recent Achievements
-


")


")


")
")


")

")

