Leaderboard


Popular Content
Showing content with the highest reputation on 04/18/2024 in all areas
-
OTT Forum members reading this really, REALLY need to carefully read the 100s of posts, already provided in the 12 long pages of this thread. Every question asked in the last many days has been asked a good 2-3 times already and answered in considerable detail in the pages above. Bottom line, have your suspension inspected. If your leaf springs show anything but a natural arc, have them replaced. The Alcan product is a good upgrade at a reasonable cost. Mine look fine now, so I have no concern or worry. When needed, replace your leaf springs. It's just that simple.4 points
-
Do this from the inside. Remove shades. Slide screen to middle of window frame. Grasp lower left and lower right corners of screen frame. Lift the lower corners at the same time so that the bottom of the screen frame clears the track. Pivot the lower edge of the screen frame towards you and drop the top edge of the screen frame out of the top track. The rear screen is different. It has 2 clips on the bottom and 2 clips on the top. If trailer is not on fire, gently pull on the bottom frame until clips release then the top of the frame will fall free. The rear screen does not fit in a track so note the positions of the clips before removing the screen. If trailer is on fire, grab the red trapezoidal shaped tab, yank the screen out, fling it to the side, then dive head first out the window.3 points
-
This is solid evidence that Oliver continues to do the right thing. Regardless of how the 5K rated coupler got to Oliver, Oliver installed it on an Elite II, and took financial responsibility for replacement when it failed, even after expiration of the 1-year warranty. This confirms one of our reasons for choosing an Oliver: a culture of integrity.3 points
-
Spot On👍3 points
-
At the rally ask me about our flood experience and the 2am evacuation!3 points
-
We are with the folks that recommended not doing this, in particular if you don’t have a composting toilet.3 points
-
Staying weather aware is so important. ✅ I have to admit we have been through a several really rough pop up Tstorms and stayed safe and dry inside XPLOR unplugged from 30a of course. We always try and have a contingency plan such as knowing where the CG storm or local shelter is IF they have one. In cases where the weather is going to be really severe and possibly place us in harms way we may just pack up and just leave a day early. We also avoid camping in flood zones or low areas which are usually near small creeks and mountain streams. Safety first for sure. 👍🏻 This thread is a good reminder! Thanks Mike.3 points
-
Lost a great guitar player today..2 points
-
We also had this issue while up in northern Canada last summer. We believe it was a problem for a couple of years, we just were not aware of it until it was loose enough to start coming apart. When we returned home I got ahold of Dometic and received the following email reply. ===================== From: CustomerSupportCenter [mailto:customersupportcenter@dometic.com] Sent: Friday, September 1, 2023 9:46 AM To: BryanB Subject: RE: Dometic.com Support Form - US - productsupport - rv - b2c Hello Mr. Bjornstad: I was able to reach out to our engineering department. The engineer indicated the information directly below: “the bolts used to secure the burner caps are common M3x24mm socket head screws. They can be found at most hardware stores. He should apply blue Loctite to the screws before putting them in.” ===================== Yes, there are threads in the underside of the burner caps. The burner cap is made of 'pot metal' so if the screws are not of the exact sizing and ARE NOT 'Loctite-d' in, they may vibrate out again or worse yet, they may strip (as ours did) out of the soft pot metal burner cap. There was no indication (blue) of there being any Loctite around our screw heads when we were taking it apart to repair it. So the Loctite comment above may be a revision based upon customer experience. The following is what we did to fix the issue. We only had one screw per element and no Loctite at the time so we were at a less than ideal situation. turn off the gas at the tanks, remove the stove from the countertop, disco your gas fitting, turn stove upside-down and, make a note of the 'ignition wiring' if you have to disco more than one of them, remove the underside heat shield, (you have to cut the zip ties to remove it, replace zip ties to reduce vibration on re-install), re-insert the screws, apply Loctite where the screw head comes in contact with the assembly, then re-install the stove ‘Check Gas fitting for leakage’. We actually became quite proficient at this and I would be able to do it (less Loctite) as Maggie was doing 'meal prep', so I was done when she needed the stove. That is until the loosening of the screws and vibrating caused the 'burner tube' coming into the mixing bowl to break. At that point the stove was UNSAFE to use. So I put it in the back of the truck, got a brass plug for the gas supply line and covered the area with the 'Oliver supplied' sink cover, and taped that down. That gave us a larger meal prep area, and more outside cooking. Our final resolution when we returned home (because stove was basically shaken apart) was to replace our D21 (AMZN Dometic outlet), because we were unable to find the replacement parts that broke as a result of the ‘burner caps’ coming loose, and shaking/breaking apart the internals of the stove. When the new stove arrived, I took it apart at the bottom and made sure all 4 screws were there and sure enough, signs of blue Loctite on the screw heads. I have discussed using Red (hi-heat) Loctite thru PM's with others on the forum. The caveat is 'if you want it to stay put, Red would not hurt, if you have need to get in there and remove those screws and do other work, Blue would be better'... So I will stick with the Blue for now, as I do not believe that the original stove had any Blue on it. In fact, I do not believe we had two screws in each burner cap to start with. Never did find the two missing screws and I searched the entire enclosure and behind the false back of the drawer area. We can now look back at it as a learning adventure. Yah, may not take as many 'wash-boardy' roads less travelled, and will probably even go slower than we did... We learned a lot about the Oliver, Appliances (lost the WH too), about repair in remote locations, phone conversations with SeaDawg & Outlaw Oliver, and our own tolerances to experiences when dealing with and overcoming unexpected issues that arise, but GAWD, did we enjoy the adventure even with the adversities. So much so, WE ARE GOING BACK again this camping season, with the intent to make it to AK this time. Cannot wait to try (after a local shake-down weekend) our new Dometic stove and WH (another thread)... the adventure continues. B~Out, First edit, if others end up purchasing a new Dometic D21 Stove... the Brass elbow attached to the stove is now pointed 180 deg. opposite the supply line. So I just disco'd it, put on some YELLOW Teflon tape and then tightened it up to the orientation of the old one, and hooked the gas line back up. Second edit, Some of your appliances are going to have 'Metric' in them, especially if they are used outside the US. Just be Aware. Third edit with pics: once you have the stove exposed, you remove the heat shield screws (sm. red circles), notice wht. zip ties.. Your burner cap screws pass thru here (black arrows). The large red circle is the broken supply tube between control knob & mixing bowl. I tried to get some aluminum tubing to repair it. Even thought of sacrificing the stem to the coffee pot... I was told, that was NOT an option.
 2 points
 -
LOL. For sure. The handholding was very much appreciated. We are still very seriously considering changing our truck. (Either airbag suspension or Andersen. Not both.) But that won't be until at least next year. Now I'm off to wander around my next National Park: Shenandoah for 10 days. And that's the whole reason I bought this thing. So the plan is working!2 points
-
Congrats! I seem to recall at least a couple of Forum members advising you to stick with the process and things would get better. It looks like you are over the big hurdle. However, be warned, don't let the success go to your head. These things seem to be able to pick a great spot to act up.😇2 points
-
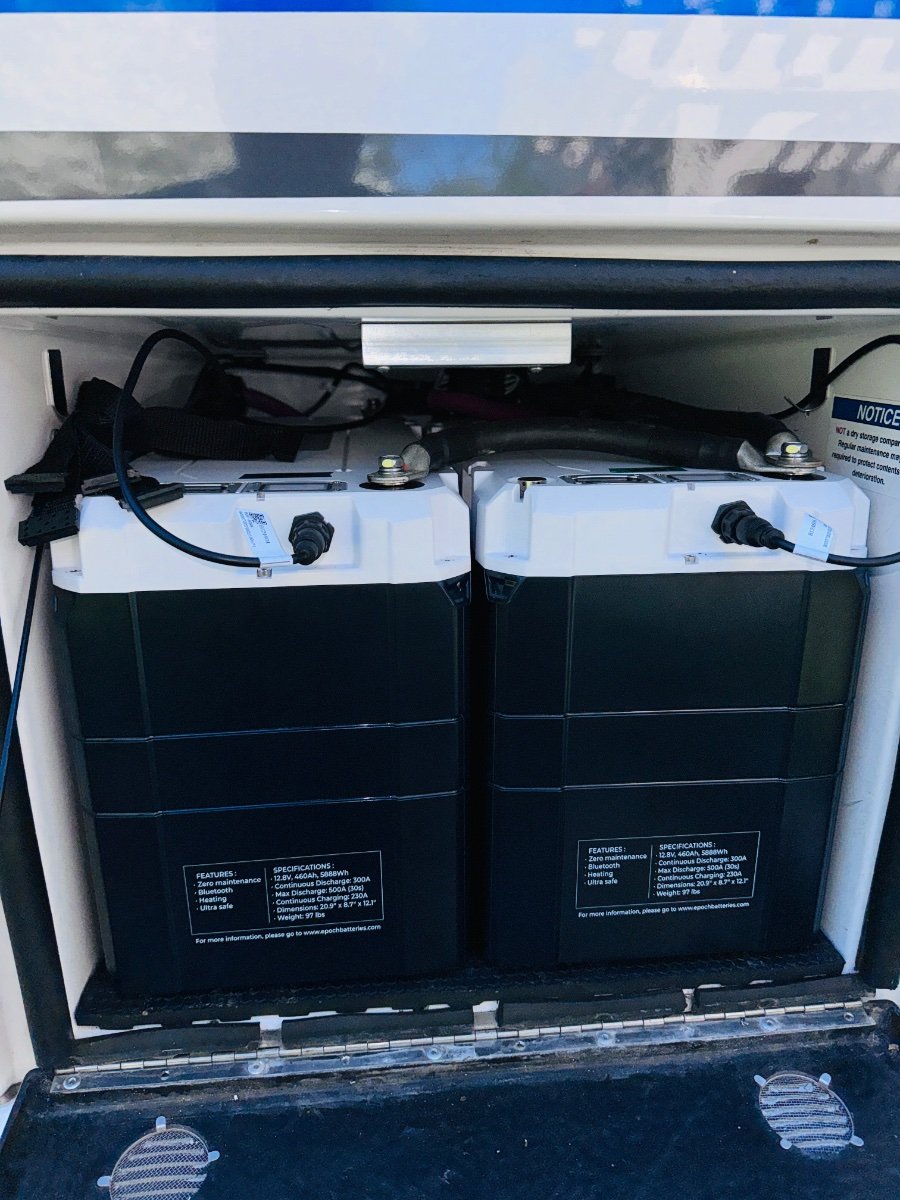
Wow, that might be the limit of our battery campartment. 920 amp hours…amazing! Looks like they released another 460 battery that’s a little smaller. However, it’s about an inch wider which will not fit two wide in the compartment.2 points
-
There are two ports on the outside of the trailer. One is labeled for a satellite feed and should be the loose cable in the attic. the other cable is labeled for cable and should be connected to the back side of the tv amplifier along with the cable from the digital hd antenna. (Both connections are behind the cover plate of the tv amplifier. in my trailer those two cables were inadvertently mis labled at the factory. I plugged the CATV onto the satellite drop inpu and it worked. Maybe check that the cables are really connected from the CATV input in the side of the trailer to the amplifier connection behind the cover plate in the attic.2 points
-
Our original 5200lb axles & springs (5 leaf) on our 2015 LE2 have not given us any trouble, believe Scuba/RX said there have been no failures with these springs reported on Ollies. We try to avoid rough roads as much as possible and go slow over railroad tracks. One time in Montana we came to a construction zone and was directed to a temporary road. It was terrible (we drove really slow), so terrible three of the four AC mounting bolts broke in a another camper before Ollie. Should have turned around and found the long way around, my fault.🙃 Should try what MaxBurner tried, if memory serves, riding in Ollie with my Wife driving the TV to see how good or bad the ride is in Ollie. 🙂2 points
-
We saw our first Oliver out and about. We got excited! We are sharing Shepard State Park with another Oliver. By all appearances they are from Georgia. https://shepardstatepark.com/ Doing the forum wave to you. Oh, and you better go eat at Bozo's. Great sea food and the perfect ambiance. https://www.mybozos.com/
1 point
-
Hi All, I have not been able to get the cable tv to work at campgrounds that have cable. I turn the booster off and try searching for the cable imput on the tv and it doesn't have a listing for it. I noticed there is a loose cable laying in the storage cabinet above the tv, I plugged it into the cable imput beside the booster light and still nothing. I'm sure it is something I am doing wrong. Can someone smarter than me help me out? Elite 11 #1443 2023 Diesel GMS 2500 Denali Thank You, Mark1 point
-
Staying 2nights at Gulpha Gorge CG in Hot Springs NP. Site 12 is a FHU site and good size but with a large downward pitch and sideways roll. Other smaller sites without hookups back onto the creek.
1 point
-
Yes, unless they have changed what they use now in the last 12 months, they have always used 3M VHB 4950. However, 4611 has a higher temperature range and is also commonly used.1 point
-
I second that recommendation. Wait until it's maybe 75% full. John1 point
-
Will do. Kathy and I look forward to seeing you and Carol again!1 point
-
So everything is working. A/C is running off the batteries as we speak. Woohoo! Shore power to ATS to EMS to MP2 AC IN then AC OUT to panel. GFCI circuit hooked back in to panel, all shore power running through MP2. Finally.... WOooohooo... and power assist is so cool. Still have to mount the Solar charger.
1 point
-
So problem solved regarding no power to cabin. I had left off the main neutral to the bus bar. I had tucked it out of the way and with all those wires I just kept missing it. It was so nice to see the MP2 fired up and everything working in OEM configuration. @Ronbrink, I think you may be right. I have reached out to OTT and support at the place where bought the MP2. I will get it done eventually. At least the bulk of the install is done and I am ready to power some A/C when I get it figured out. Some other small things like the Can BMS port was removed from the new Ekrano monitor so Epoch battery Victron coms won’t work without a cable to convert CAn-BMS to VE.can. Old Cerbo GX has CAN BMS port. Now just to tidy up everything. Made a big mess. SIDE NOTE: OTT did reimburse me for my coupler and hitch. Jason was very helpful. Still investigating but looks like a one-off still. Best, Mike1 point
-
Since we are a NH team, we tried this. And it seemed to work. Our next stop is 10 days on full hookups, during which I'll also try closing the drain for most of the day. We'll see which is better for us. Thanks, all. P.S. Another Andersen success today. That's three in a row. So, I'm gonna stop mentioning it unless I fail again. And that's a very welcome silence y'all will be hearing. 😀1 point
-
The answer is on your axle decal. We now know of two sources for our axle configuration number. As posted above, the first one is Nuera Trans, and now we add Tex Trail. If the specifications were different between the two, they would have different configuration numbers. You will want to contact TexTrail for your build sheet, and then verify the numbers against your axle measurements if you can. GJ
1 point
-
“Oh what tangled webs we weave”. Your persistence definitely paid off, good job!1 point
-
HDRider, The carrier with the box pictured above on my May 13, 2023 thread posted by rich.dev, was simple and has worked very well for me. It does have a 1 1/4 inch bar not an adapter. The carrier that I purchased had both a 2 and a 1 1/4 in bar. I also used a hitch clamp that stabilizes the carrier and it does not bounce around as was noted as a negative above. I can verify this in my backup camera. For sure, I stay under the load limit for the Oliver rear hitch. I have also worked out a technique to slide the carrier box assembly without removing it, to remove the tire cover and spare tire. I had to actually do this on a trip to Hohenwald last summer when I had a flat and had to use the spare. In fact, I did it again today as I rotated my tires, putting the spare into the rotation at Jason's recommendation during a tire discussion on that summer visit. Ron1 point
-
Well, now that a second blind broke a string, I had better get busy with a new plan (Stan) :) John1 point
-
And - here we are on April 16th, 2024! The good news is that I've now (finally) got the shade back together (for about the 10th time) and the BIG exception as compared to the other 9 times is that it now works! I never thought that I'd have to be concerned with "string theory". But in the case of these shades there are a couple of VERY important things that one should pay attention to. The reason why it took me 10 times to get it correct was that my intent was to only replace the string that broke. I did this according to the diagram(s) that I found in this thread. I paid careful attention to the route that this string took in those diagrams, but, in each instance once the shade was put back together and the spring tension set, I would quickly see that the string would not stay taught on one side or the other. Long story - but this problem got me to thinking - where does the string go when I raise the blind? About the same time I retrieved another shade from the Ollie hoping that it might give me some idea of were I was going wrong. In looking at the shade I knew was functioning properly and I (finally) noticed that the string routing on the side that was not broken was different than either the night shade and/or the properly functioning shade from the Ollie. This is when I (finally) realized exactly how these shade manage the string - one side takes up the string while the other side basically pushes it out and the spring simply helps smooth out that process. In the diagram from the factory - if you follow it closely - it can been seen that the string goes from the spring, through the corner frame piece, through the lower pull bar (the bar that is used for raise and lower the night shade) and into the upper pull bar (the bar used to raise and lower the screen). But instead of going through this bar, the string takes a turn and travels through the bar under the bottom part of the shade where the shade is held by this bar. I pulled the string down this bar until it came to a grommet that passes through the bottom of the screen, and is then threaded upwards through the holes in the screen fabric. Once this is complete the threading continues through the top of the screen and into the area just above the point where the screen is held in a track at the bottom of the frame itself. Once again, the string then turns and travels back to the original side of the shade where there is a second grommet. Passing through that grommet and then the holes in the screen fabric until coming back to the bar that is used to raise and lower the screen. Back into the narrow track on the bottom side of this bar that holds the screen it is just a short distance (a couple of inches) back to the end piece of the bar where the string feeds over a small metal "roller" and then takes a 90 degree turn back towards the area where the original spring is located. Again, paying close attention to the drawing and to the opposite side to make sure that the routing was the same on both sides I finally got back to the spring. In tying the string back to the spring I had to use a pick in order to get some stretch in the spring. It took more stretch than I would have thought but I needed to take up all of the slack in the string plus make the string taught such that the screen would not "flap" in the breeze. The whole "issue" was that the original stringing from the shade factory was NOT the same as the stringing shown in the drawing above. Instead of passing the string through that second bar (the one used to raise and lower the screen) and then threaded UP through the screening, the string continued up into the top frame piece and down into the screening (i.e. the reverse direction). While I don't think that there is anything "wrong" with this, the problem is that BOTH sides must be strung in the same manner (i.e. in the same direction). Of course I could have avoided a bunch of work and worry if I had simply paid attention to how the broken string side was routed in the first place. But, of course, I simply pulled out the broken string - mistake! Hopefully the above makes some sense and you avoid the issues I encountered. I'd be happy to do a "show & tell" at the Rally for anyone that really wants to see what I'm talking about - just let me know and we'll work on a time and place to do a one on one. Bill1 point
-
fYI, justed looked at my axle , i have 6 leaf spring on my 5033 lb. Axle. LEI. July 2022.. just thought i would it out there for LEI owners.. ( very few of us,😁).. All my welds look good also.1 point
-
X2 a best practice! That gray tank provides a nice soapy rinse.1 point
-
Same for us. We have found we do not need to dump the gray tank more often than every 2 days or so, even with showers, so it takes little time away from our camping adventures. We usually dump the black tank first regardless of its level, then flush with the gray tank contents.1 point
-
Same here. We keep it closed until dump time. Mike1 point
-
I like to keep the grey tank closed so when I am ready to dump the black tank, I can use the grey water to flush the hose. I like to have about 75% grey when I dump black. If you have a composting toilet, this method does not apply. Mossey1 point
-
Found the orange handles AND decoded the dance steps 🤣 TYVM. Works perfectly.1 point
-
I thought the MP2 has an internal ATS, but could be mistaken...1 point
-
When converting my 2020 OLEll to lithium, I had to install a dedicated transfer switch to enable use of the A/C on battery. You may need to do the same; a few other owners on the forum have also discussed the need of an additional TS to accomplish this goal.1 point
-
Hey, Mike: Just a thought which has worked for us on several occasions with some of our Victron components - try giving the boys at Battleborn Batteries in Reno, NV a shout. They are an authorized Victron dealer and are well accustomed to helping out DIY'ers. We've called them many times and have always got a solution to our issues. They're very patient and will walk you through a troubleshooting process to get that AC operating with the MP2. Keep us posted as you go through the troubleshooting as we're interested in doing the same MP2 mod after our 2,000w Xantrax fails. Good luck!
1 point
-
I am going to be replacing my old Victron color display (push button) which took the place of the old Zamp solar charger. So yes, doing the same. For anyone reading the install, this is what I was trying to do without success so far, "The best place to insert a multiplus is inbetween the ATS (assuming you have a generator) or shore power input (if you don't) and the breaker panel itself. That way the shore or generator power will charge the batteries, and the inverter itself keeps the power on even without shore or generator. It also enables the power assist mode to function correctly, where you can dial down the current limit to match the available power, and then no longer need a power shedding device to avoid overload. Any outlets that have GFCI then continue to have GFCI as they should. Those that don't are probably better not to have GFCI, as heavy loads (air conditioner, electric heat) would end up often tripping the GFCI inconveniently and unnecessarily. The one drawback though is that you *must* then have the multiplus in on or charge only mode to have shore power pass through. If you turn it to OFF, there will be no power at any outlet, regardless of the presence of shore or generator power available. Also, no backfeeding. You don't want to deal with islanding, and you don't have to since the multiplus will do the right thing if wired correctly. Shore/gen (or ATS) is connected to AC IN1, and AC OUT1 goes to breaker panel. That's it. You *can* use AC OUT2 to switch additional loads based on other criteria (see relay assistant for control of ACOUT2 relay) but that would require an additional breaker as you couldn't then put that switched power through the existing breaker panel. Note that if you have an existing converter/charger plugged into power from the breaker panel, this will have to be removed/disabled to avoid setting up a loop (120->12->120->...) This is all assuming you have a single phase breaker panel, or one where the two phases have been merged with a jumper wire (also assuming 30a 120vac service here, not 50a 240/120 split, in which case get a multiplus2-2x). If you do have a 30a split panel (where an existing inverter has already been wired in) you would need to either connect it up the same way as the original inverter (one side of the split is "shore", the other side is "inverter"), or if you wanted to power everything through the multiplus (gain ability to operate aircon from battery) then you want to merge the two sides of the split (jumper between the two 30a breakers) and wire the multiplus in as above (shore/gen->ats->multiplus->breakers). I do this on a regular basis (upgrading mostly b, some c class RVs).1 point
-
We are all hopeful it works for you! And if you do need to add some additional support to keep it vertical, a couple of machine screws through the wall up high on your HDPE board wouldn’t be noticeable under the lip up the bed support. Mossey1 point
-
Packed to the gills. I felt like a German mechanic changing a water pump connecting batteries but I am happy with the result. No maintenance and they have remote monitoring and shut offs so they shouldn’t need to come out.
1 point
-
National Forest Campsites are very convenient and in more remote areas, empty. Read the Sign First, maybe Two Times... then Proceed with Caution. Photos: Caribou National Forest, Utah and Gold Panning options in Colorado. Do you have any signs to offer, or ignore them and invite Black Bear into your campsite after Sunset... leaving food on the Forest Service Picnic table? Did you know that in order to cut hanging branches in the National Forest that would drag onto your Travel Trailer sides or roof top, you need to have a Class in Operating a Chain Saw, before using one at any of the National Forest Campsites. Although legally, we have several long handled Trimmers, sharpened at home to make it easier to widen road width and access... for everyone. Many remote roads have become overgrown with brush along the sides of the road. Trees may fall onto the Forest Service Road... locals drive around or over the tree. We stop and pull the downed pine tree Off the Road, so we do not have to drive around half of the road. Sometimes we have to use our imagination... HOW... not having to use our long handle axe in the back of the tow vehicle. We have Two Shovels. A His and Hers. Filling large pot holes in the compact dirt road is a hobby. When full of water... necessary. Camp Host(s) at remote sites in Wyoming get Propane provided for Free to keep an eye of campers coming in and out of the area they are watching. I heard some get some financial incentives and pick the camping site you like the most. You get a sign : Camp Host. You also can post: 'Bears-Secure Food' signs to post. Wyoming and Montana campers may become part of nature's food source if Frying Bacon and not expecting company... sooner than later. Really... There must be some Oliver trailer owners that have pushed the boundaries of Popular Camp Sites with Signs and took the less traveled road gone into areas where Bear Signs are nailed to trees for those who do not carry a Side Arm... to make noise, when needed the most. Yellowstone Park is the ONLY place I have seen Human Beans chasing Grizzly Bear to shoot... photographs with children and flip flops. Spring is coming and you better get ready to scout out some better camping spots in 2024. Before the Signs Appear. 🙂
1 point
-
I have made the trip eight times now and, other than losing a couple windshields during the earlier, pre-paved days. Have experienced no major issues. If I could add one caution to those already mentioned it would be to avoid driving at night. Moose, elk deer, bear and bison are out there in high numbers and are large, dark and tough on fenders.1 point
-
I’m a big Tommy Emmanuel fan. Also anything by Mark Knopfler.1 point


undersideofstove12vdccomingin..jpeg.79ea61d199dd8b4e33a78f44d289b461.jpeg)
afterheatshieldremoved.jpeg.f146698fa58116135949f641b71669a2.jpeg)


-
Recent Achievements
-


")


")


")


