Leaderboard


Popular Content
Showing content with the highest reputation on 05/01/2024 in Posts
-
Almost ready to pour concrete! Of course I had to get a couple of pics/video while I was playing with the drone though! Ollie roof vid.mp4
 6 points
 -
I used a 5% discount code yesterday, you did much better on the discount! 4StateTrucks.com has an A+ BBB rating, too. Picked up a spare 5 leaf spring and Ubolts/nuts for less than $100 today (original 5200lb axles on our Ollie) from the local Dexter distributor since there has not been any reported Ollie failures on these springs, yet. Going to install bronze bushings in it left over from the EZ Flex installation a few years ago.4 points
-
Just ordered the Bulldog shocks from 4StateTrucks.com. I used the code: PT15MAG for 15% off. Maybe it will work for someone else. Best, M4 points
-
What? No grease pit? HA! just kidding - looks fantastic! You'll love it being able to work on OTT projects during bad WX, at night, or just whenever you feel like 24/7/365 - we sure do!4 points
-
Last week I had Oliver replace all of the touch lights with these Obeaming lights. I had three touch light failures, and it might have been more except that we hardly use the ones over the beds. Contrary to others reports, the touch aspect never worked well. The failures were fluctuating light, total failure, and the ability to turn off without using the master switch. They used screws to attach the new lights, and not the screws that came with the lights. Once installed, we found that two of them did not work. They were on when the trailer was returned to us, and my wife could not shut them off. After investigation, it turned out that the lights that had appeared to fail, there was nothing wrong with the electronics. I removed the covers and operated the switches directly. No problem. The issue was that the cover switch button was not reaching the light switch. This was because some of the screw holes were not perpendicular to the mount surface, and so screwing in the light was deforming it (it was not flush to the fiberglass surface all the way around). I removed the screws on one of the lights and elongated the hole in the light fixture so the crooked screw's threads would not catch on it. After reassembly and remounting of the cover, the light works perfectly. I also bought spares since I expect these to be phased out (just as are most things). For easy reference: https://www.amazon.com/dp/B093G795G2?ref=ppx_yo2ov_dt_b_product_details&th=14 points
-
A garage/barn bigger than the house? That's my kind of setup! 😀 And thank you for providing an undeniably valuable reason to purchase a drone: to check for leaf/detritus buildup behind the awnings without resorting to the dangerous ladder. Does that sound convincing? 😂3 points
-
We bought our OTT a year ago, it was 6 years old. 3 of the 4 Monroes were totally shot - they wouldn't extend after compressing them. The 4th was very slow and never fully extended. We replaced them with the OEM Monroes (black in color now instead of the older yellow ones), not knowing about the Bulldog option. Please let us know about how well they wear and perform as you use them this year. They sound like a very promising upgrade... Cheers3 points
-
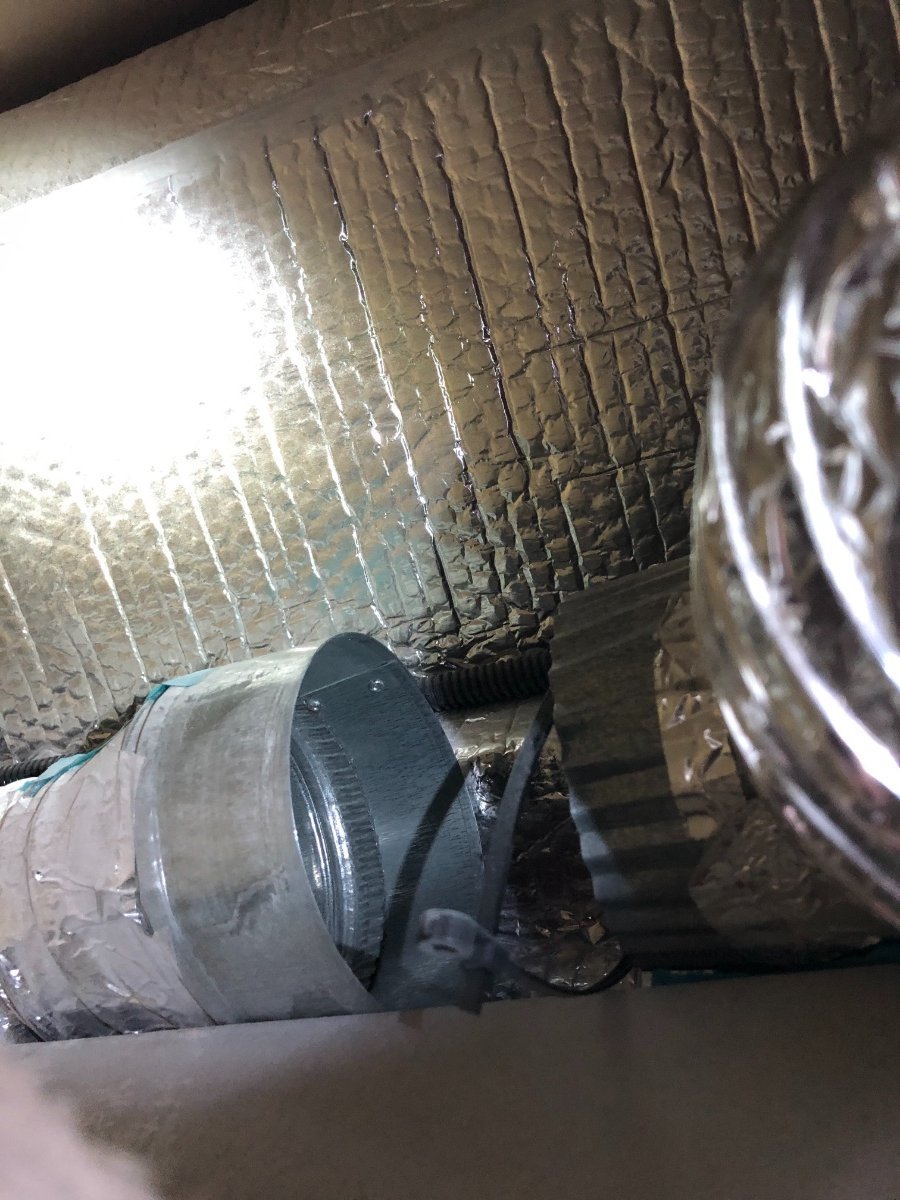
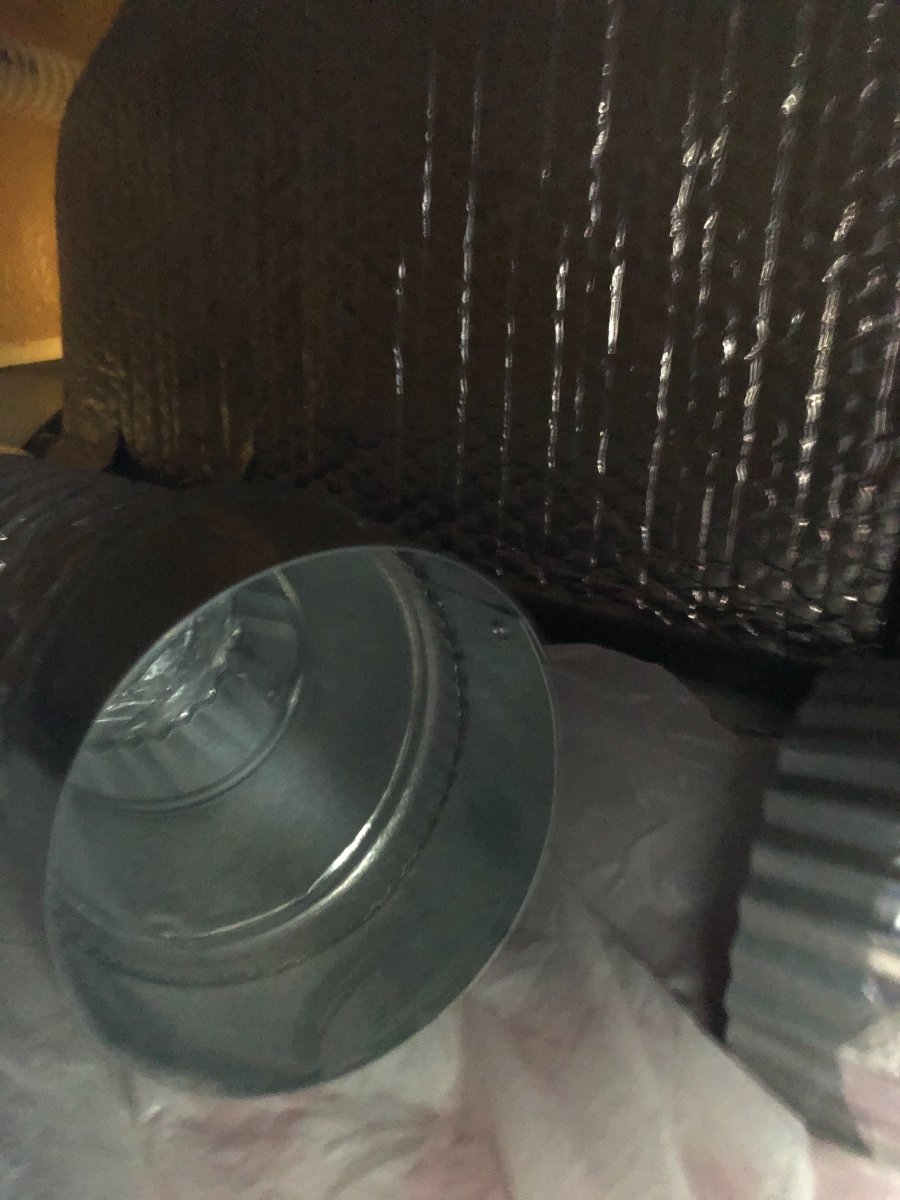
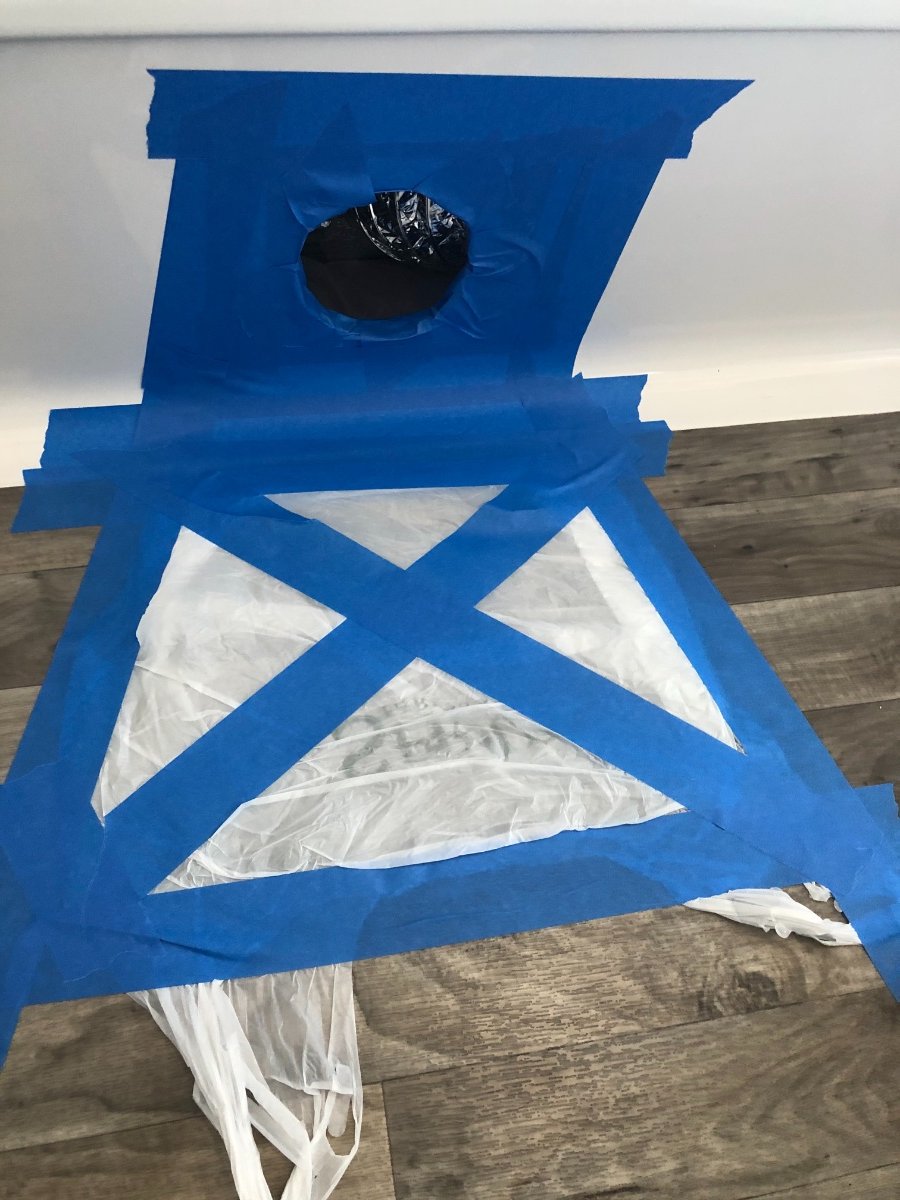
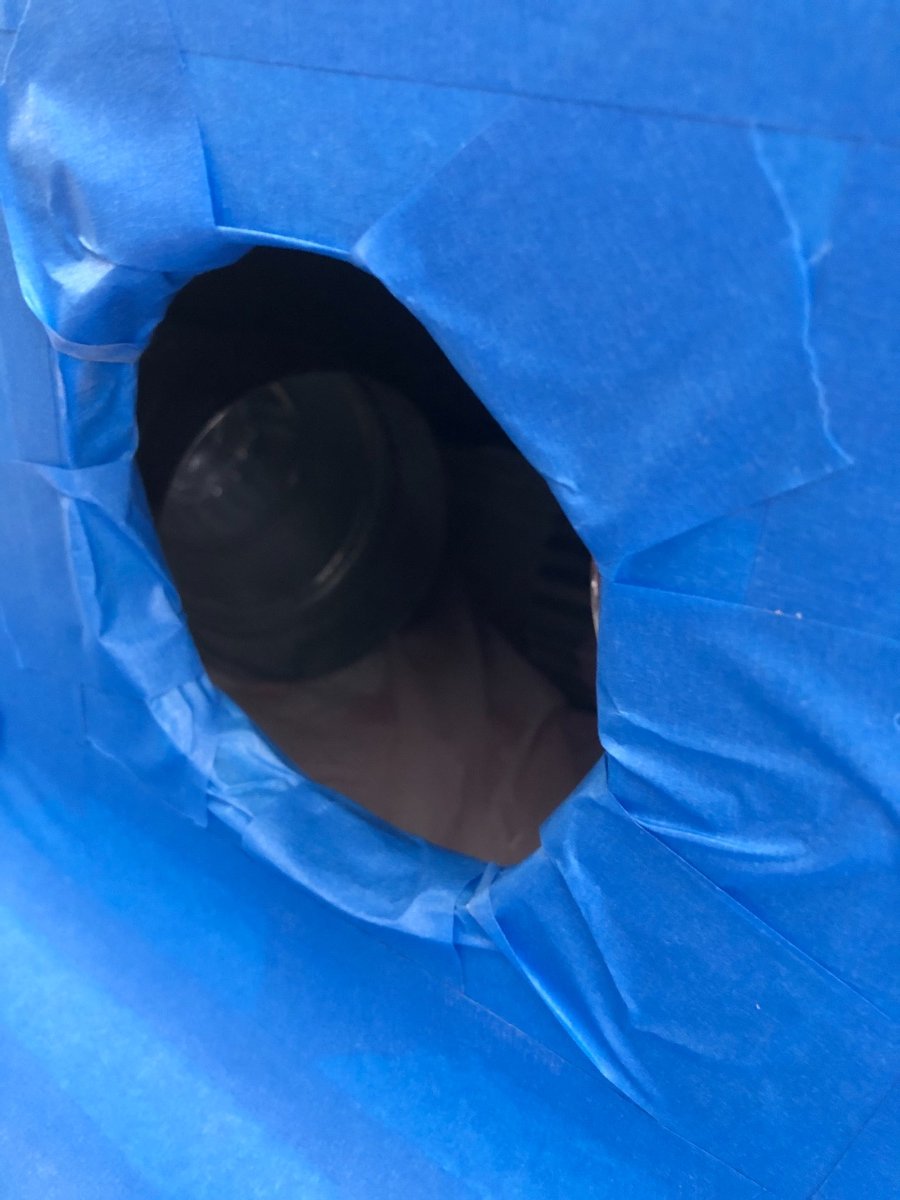
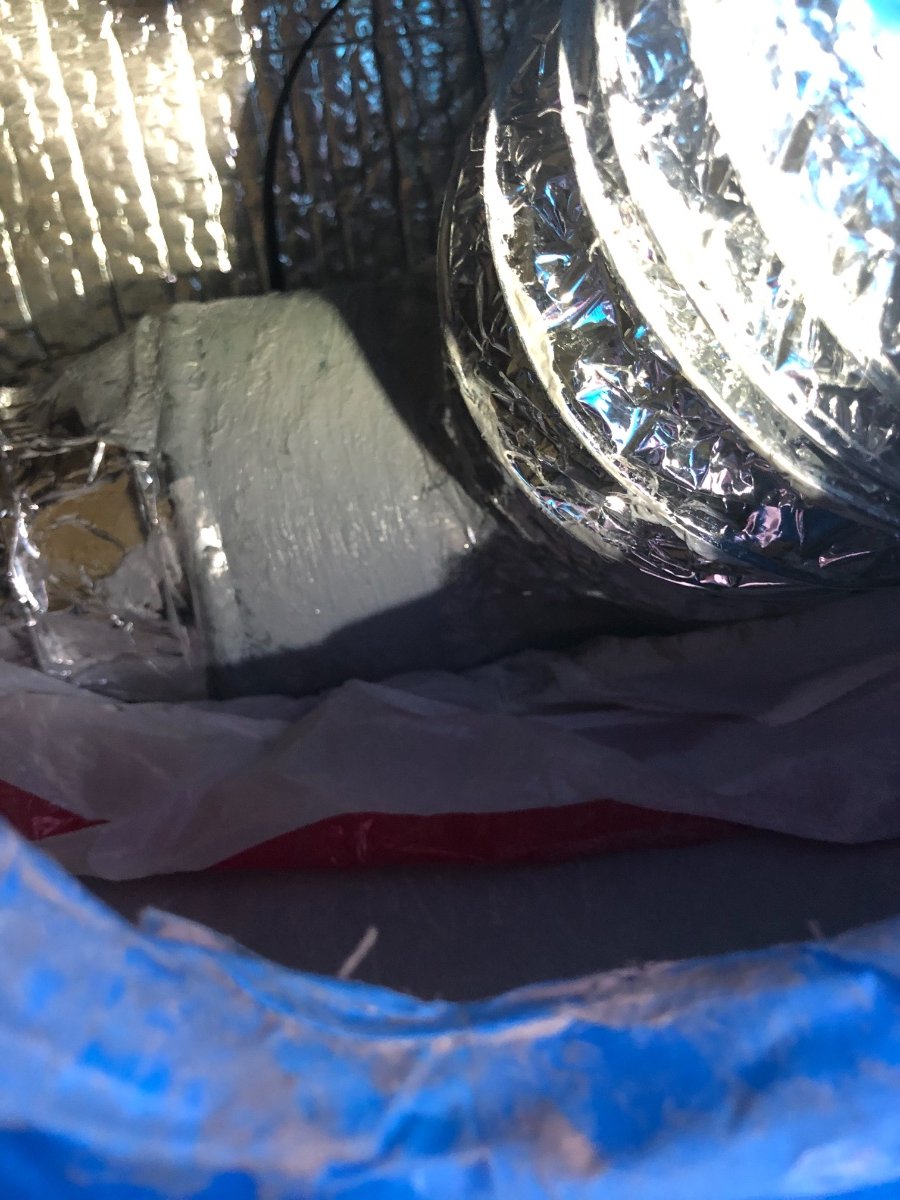
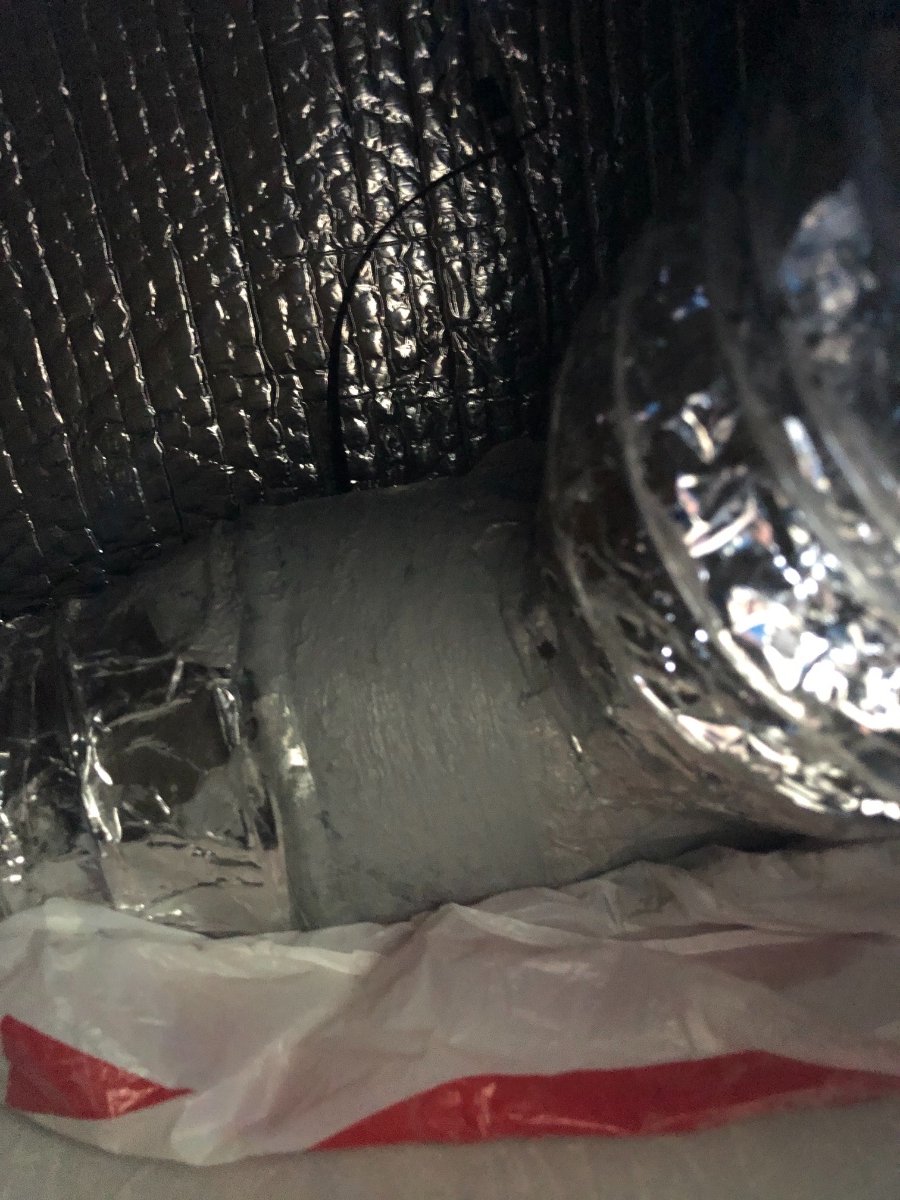
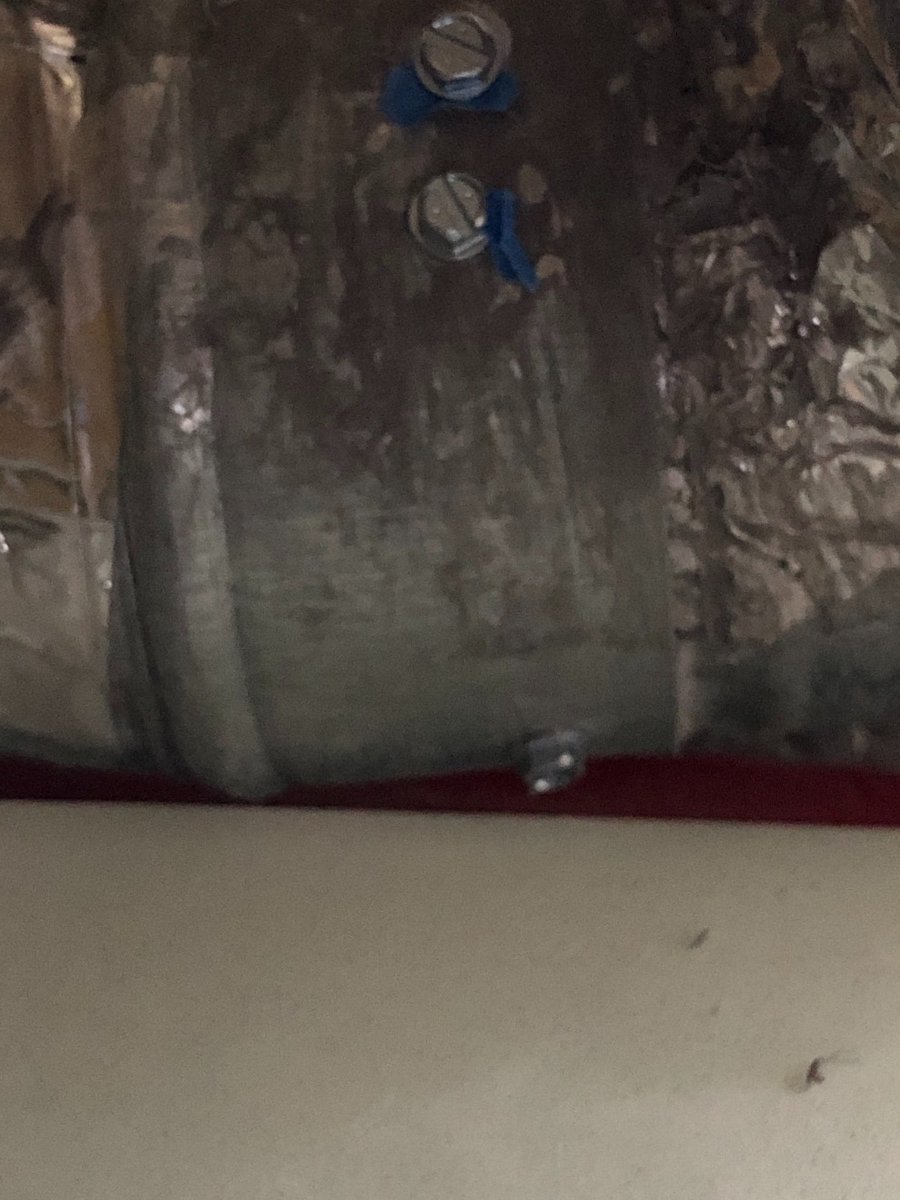
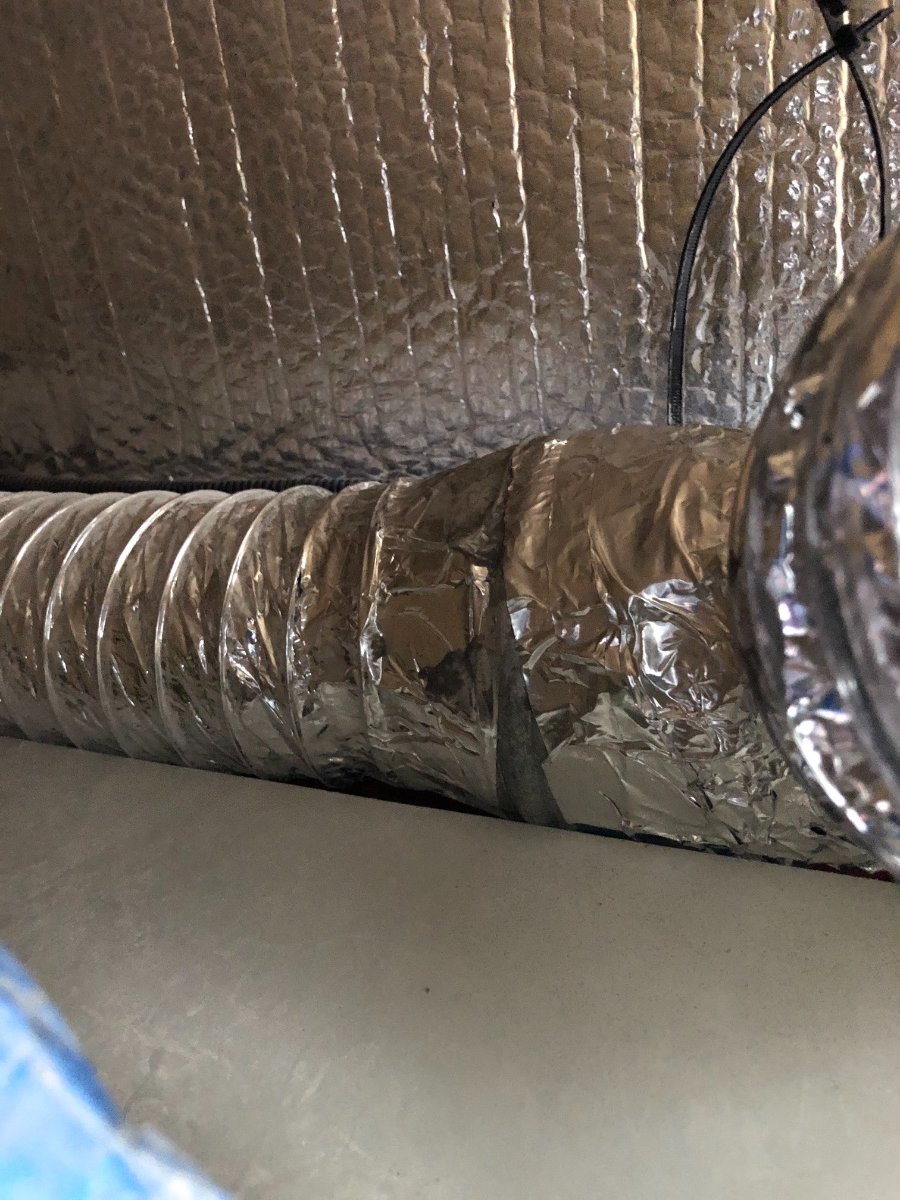
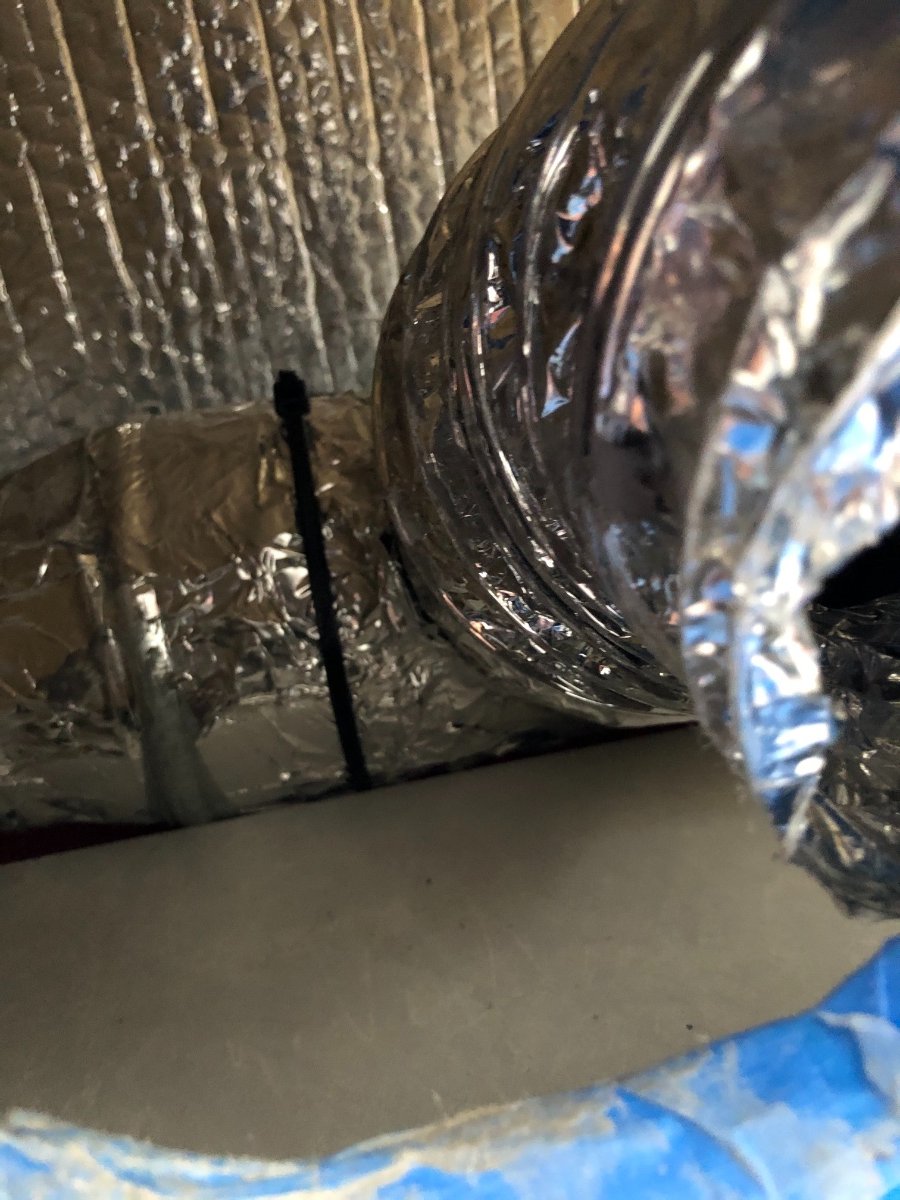
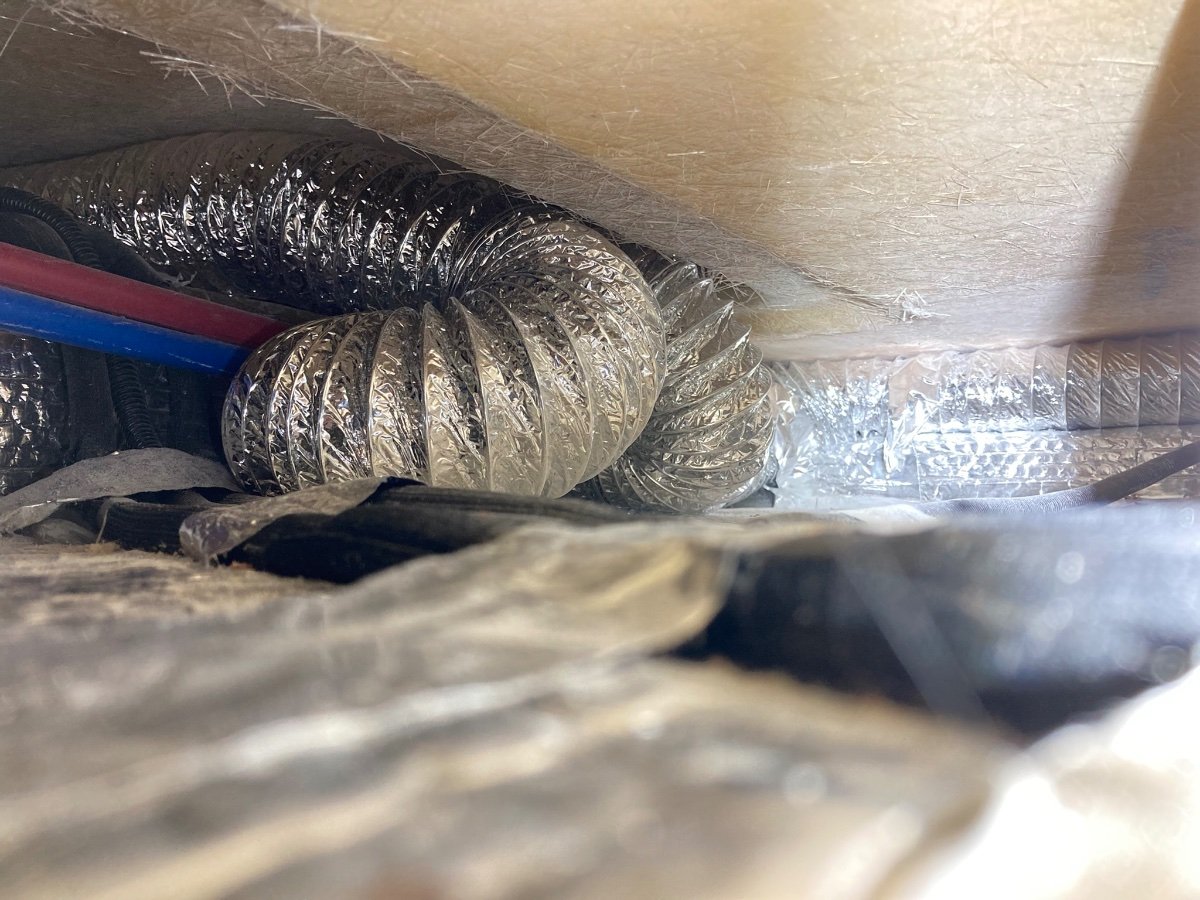
Hi Everyone! In the past, I've seen talk in the threads regarding the low flow from the furnace to the bath vent, well, I experienced that too. Here's what I found after a little detective work... Well no wonder! It helps when you connect the duct together. Yes, it was never connected, no wonder I only felt a very faint breeze from the bath vent. This shot was taken looking toward the kitchen sink, directly under the galley sink. The only way I could access this was to remove the plastic vent cover under the galley sink to connect the duct together. If this had not been possible, then the ONLY way would be to destroy the cabinetry to gain access to it. This was my first view, not touching anything and snapping this photo after I gained access. As you can see in this shot, there is no duct sealant or sheet metal screws, only a lone zip-tie that could not have possibly held this together properly. Notice, I put a plastic bag underneath to get ready to apply duct sealant. This blue tape was on the duct in two locations, possibly to note that this needed to be corrected before this area was closed up? Prepping the floor so I don't get duct sealant all over the place. Here's a look inside through the vent access directly looking at the disconnected furnace vent. The proper solution... three (3) sheet metal screws to follow. Keeping it neat and clean and getting a good bond. All dry, ready for the sheet metal screws... Due to the extreme limited space and only able to work with one hand, I had to tape the screws to the vent and use a hand driver to get the three sheet metal screws in the vent. It was impossible to access the other side however this is more than sufficient, especially with a generous application of the duct sealant and what is to follow... Ah yes, after the duct sealant completely dried and three sheet metal screws, I wrapped the joint with real duct tape and finished it with a fresh zip-tie to complete the surgery. And there you have it ladies and gentlemen... mission accomplished! I later purchased some inserts for the vent ducts that allow me to open and close the amount of flow that I want from the furnace in the bath. I simply adjust the two in the galley to my desired comfort and I'm a warm, happy camper! BTW, the awesome folks at Oliver Travel Trailers were very kind and reimbursed me for the materials, so we're both delighted with the result! For anyone experiencing low/no flow to their bath, this is the very first place I would look. Simply remove the vent cover under the galley sink, carefully disconnect the duct and see if your distribution tee is properly connected. If it is, I would strongly recommend the adjustable registers that can be purchased for these vents, my Ollie did not come with them. You only need two (2) for the sink vent and the bed vent. They are approx. $10 ea. When I run my furnace, I adjust them and can get a good flow of warm air in the bath. Problem solved!
3 points
-
hi, I was able to get replacements from OTT.2 points
-
LOL on the grease pit! Can't wait. They were pouring concrete this morning when I left the house! Walls next!2 points
-
Good one - nice fix!2 points
-
Like the price! I always prefer a grease or wax over any spary product that drips after application and gets messy! Last WD-40 can I bought was in the 70s, maybe the 80s, really. WD the door hinges? NO, just pull the hinge pins and rub them with grease. Thank you for this.2 points
-
Finishing up our visit at Snow Canyon. It doesn't snow much here, so this Utah state park gets its name from two Latter-Day Saint pioneers, Lorenzo and Erastus Snow, who assisted in settling the area during the 1860s. This is a mountain bikers paradise it appears, so many trails. They have a race starting here in a few days and the enthusiasts are showing up each day! They also have an amazing asphalt paved two-lane bike trail from here all the way down to St George. Is this the race route? We followed it for miles, going into town today for supplies. Our final picture here is of the "Petrified Sand Dunes."
2 points
-
Thanks for the walkthrough. Both screws from underside one burner came out...very fortunate Wendy found them both and we were able to use your help to fix everything. I did have to disconnect the gas line and after using gas thread tape and follow up with a "sniffer" all turned out well. We did use blue locktite on the screws. No evidence of previous locktite application Thanks, John2 points
-
Not much to do about those cracks - that I know of. However, when my exterior switch covers (for the 110 volt outlet and the rear jacks) started to yellow, I took them off, cleaned them up, rubbed them down with 70% alcohol and then used Krylon gloss white "rattle can" paint on them. That was 3 years ago and they still look new. Bill2 points
-
Found this helpful thread by John Davies on Suburban hot water heater maintenance, only thing I have replaced were thermostats, so far:2 points
-
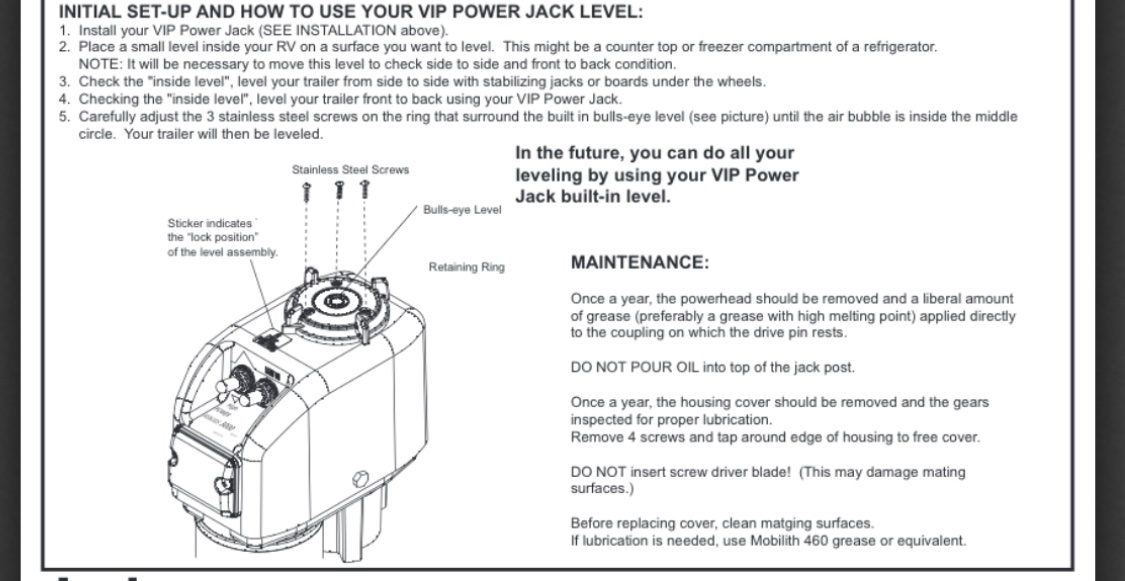
EDIT 04/14/22: ... https://olivertraveltrailers.com/forums/topic/6781-how-to-service-your-rear-electric-jacks/ I have never opened up a jack, they are all starting to get a little loud so I decided to service the front one. I don't remember them being this loud when new: .... Oliver Tongue Jack Operating Sound Here is the manufacturer page: ... https://olivertraveltrailers.com/wp-content/uploads/oliver-university/Component_Manuals/Stabilizing_Jacks/vip3000_Electric_Jack_Manual.pdf The rear jacks are similar to the tongue jack, except they do not have the plastic cover with light and switches. For the tongue jack only, can open up the gearbox area without removing the head, but you are supposed to lube the drive pin where it connects to the vertical tube, so you might as well unbolt the top and take it to a workbench. Unplug the 30 amp slo-blow fuse inside the waterproof holder. Cut any tie wraps. This is the 12 volt power wire, the ground happens through the jack body and trailer frame. NOTE: there is another fuse in back under the street side bed, I am not sure why there are two fuses. Can anyone comment? Use an Allen wrench and unscrew the three countersunk set screws a couple of turns - they are spaced along the base of the head unit. Lift the head off and set it aside. Here is the drive coupling down inside the tube, with the factory lube. It looks fine. Here is the head socket, showing the pin that fits down into that coupling: FYI it is possible to drive the pin out. There is a 1/4" access hole in the side of the cavity. I did not want to disturb it, for fear of damaging the plastic bearing support behind to it. You need to get some slack in the wires so you can slide the cover assembly out of the way. Remove the rubber boot/ nut that holds the Up/ Down switch into the cover, pull it in and let it dangle: Remove the yellow ground wire and pry out the rubber grommet that contains the three wires. Slide it up toward the switches. This will allow the gearbox cover to slide upwards. Remove the other three bolts. CAREFULLY wiggle the lid and pull it off. John Davies Spokane WA
1 point
-
Follow up... the propane sensor went off this AM and turns out the gas line connection came a little loose when I reinstalled the top. Turned off the propane bottle and headed to Ace hardware. I initially used tape that qualified, according to the label, as suitable for gas line connections. It was gray in color. I didn't have the yellow that I have always used before. Took back apart this afternoon and replaced with the proper yellow tape. All is well for now...according to my sniffer. John1 point
-
Beautiful day.... Got the oldies going here at work. Hope y'all's day is going great! FORUMS looking good after the migration, seems faster, at least to me.1 point
-
I couldn't find the correct grommet, so I checked my collection of cabinet door bumpers, and used some of those.1 point
-
Exactly right, John. Our's front cross beam has the same gap with what looks like a rubber gasket between the aluminum and the fiberglass hull...FYI1 point
-
Vector, If you have chosen a lithium battery manufacturer, they may be able to tell you about an installer in your area that's buying and installing their products. We have a BattleBorn lithium battery in Ollie, and they have always been very helpful with my questions. Bill1 point
-
Last time I used WD-40 for anything it was for drying out the distributor cap in my 1971 Dodge Challenger. I guess I could use it to clean and de-grease my bicycle chains but I think mineral spirits does a better job and is a whole lot cheaper.1 point
-
Thank you I admit being a little "slower" than the average Ollie person and after reading your post I checked my overheads ... EUREKA...I would never have thought to look there for a replacement. Mine are not threaded but they are a direct match and we now have a "new" hatch for our dog house. The 3 little tabs on the original broke off and I was lucky to have it not blow off while traveling. I used some of my high dollar glue I got at Quartzsite this year to fashion some tabs to keep the hatch in place in the overhead. John1 point
-
I was going to place an order for Monroe 555001 shocks about this time last year, but failed to do so. Just placed an order for a set of Bulldog shocks you referenced in your post. The Bulldog set cost about $150 delivered with tax. Going to buy & keep one spare 5 leaf spring (matching originals) for 5200lb axles, too. Thanks for the info!1 point
-
@Steve and MA, have you made Truma and Oliver aware of your disappointing door issue? I also think that's a ridiculous price for a replacement door. I just looked up a replacement (metal) door for our Girard. It's less than $60 on Amazon.1 point
-
To stop the crack from lengthening, you can do what's called "stop drilling." Just drill a 1/8" diameter hole just past the ends of the crack. This hole will relieve the stresses placed on the material (plastic, fiberglass, metal, etc.) and keep the crack from expanding. Use something like JBWeld on the backside to strengthen the area of the crack and also apply it around the area of the cracked screw holes on the panel. It might last long enough for you to save up for a new replacement from Truma. Good luck! Just say'n....1 point
-
Bent / sagging crossbeams I have a related issue with some frame crossbeams. I have four and maybe more crossbeams that are sagging (have a belly in the middle). When putting a straight piece of bar stock across the bottom of the trailer's crossbeams, you can see about one inch +/- bow / belly in these crossbeams. Interesting that the beams that are bent are located in the front 1/3 of the trailer ( behind the bathroom and in front of the axles) and the back 1/3 (behind the axles and in front of for the cabinet between the twin beds. The bent crossbars have no apparent other damage other than the belly. I am a big guy, regardless these beams should not be bent. Does anyone have knowledge or experience with bent crossbeams?1 point
-
I posted previously about our Truma with busted tank and circulation valve due to me not draining and winterizing. I went with suburban due to: 1. Truma will not sell you spare parts. Truma requires you to take their products to one of their authorized dealers. I prefer to fix my own stuff. I'm an engineer as well (structural) and a bit of a control freak. 2. Cost. To have the tank replaced at closest authorized dealer (2.5 hrs away) was $1000. Didn't make much sense to me to spend that much and some other part could fail on a 7 year old water heater. I could buy like 5 suburban water heaters for the cost of one truma. 3. Redundancy: gas and electric vs. gas only 4. Simplicity: There is not much to a tank WH...I pulled out the Truma and took it apart to consider repairing (epoxying the tank and circ valve). Truma is far more complex. 5. Past Experience: Had 6 gallon tanks in past 3 trailers...never had an issue...and I have never drained them for freezing (live in the deep south). The only PRO (for me) that I can think of for the Truma would be the ability to stay in the shower as long as I wanted, but my wife and I can both take a shower on 6 gallons and not have an issue. Thanks!1 point
-
For sure. I had some parameters that I had to work within so I went with 10' wide and 10' 6" tall. Adding that extra 6" was the max I could increase the height with a 12' ceiling and that extra 6" required bigger door openers as it was. That should fit the Ollie and my TV without any issues. Might regret it if I ever get anything bigger but I am having them put down class 5 out 12' all the way down the one side in case I ever want to put a lean-to on or if I have any visiting Ollies!1 point
-
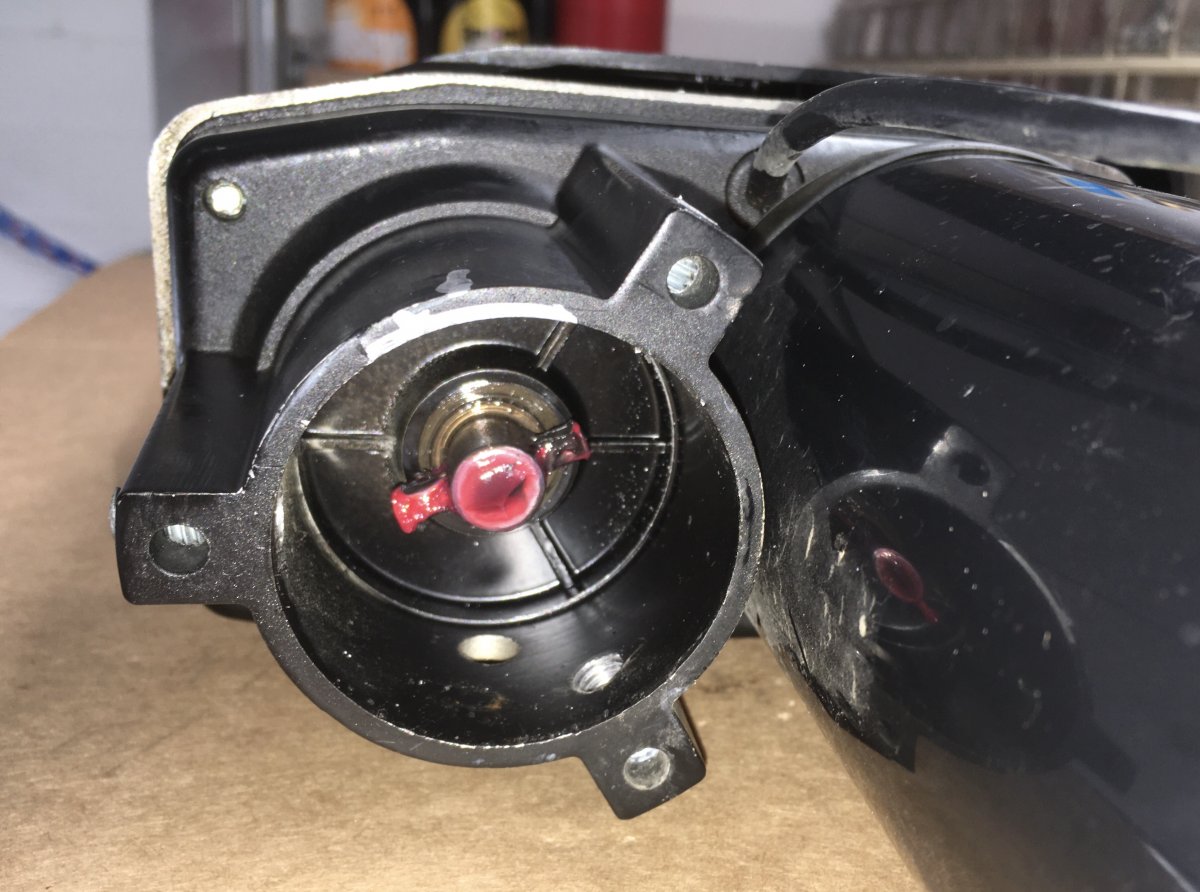
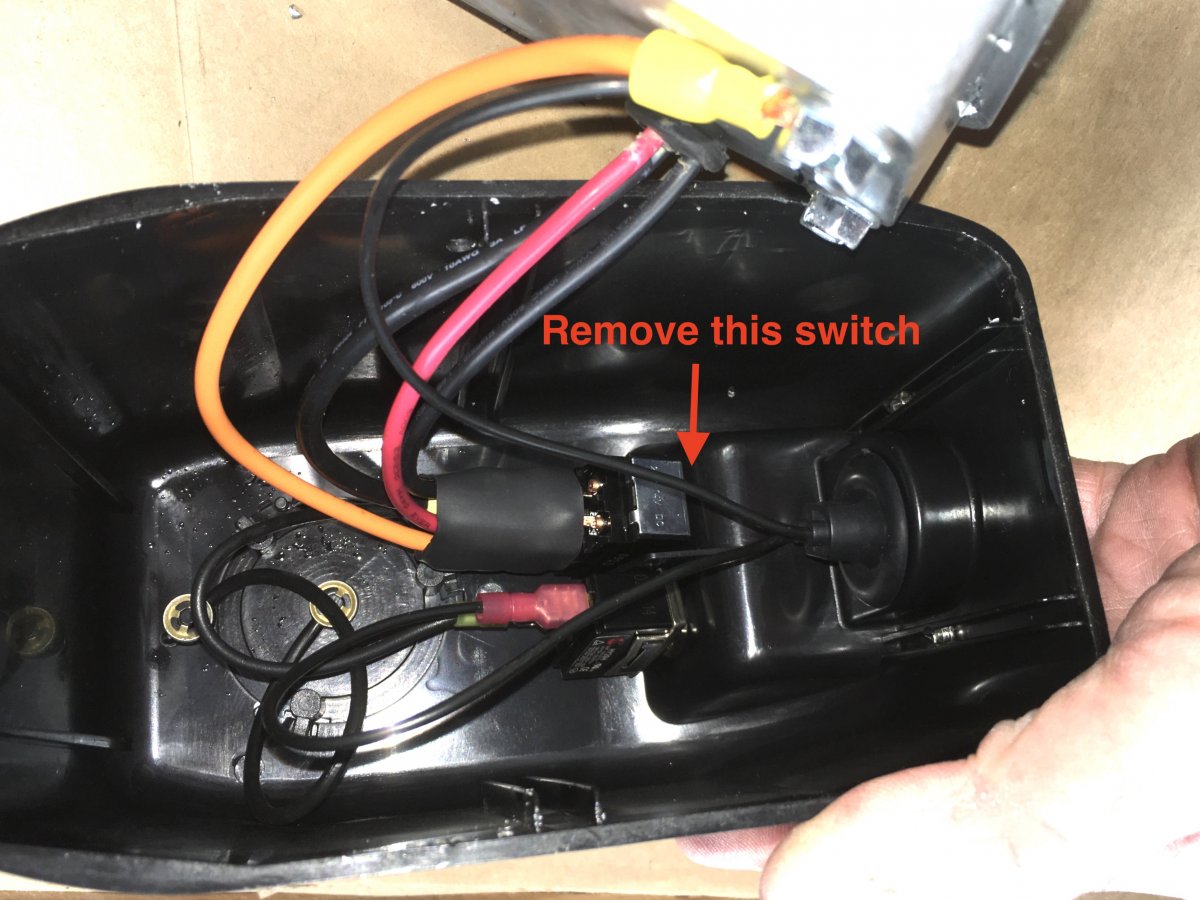
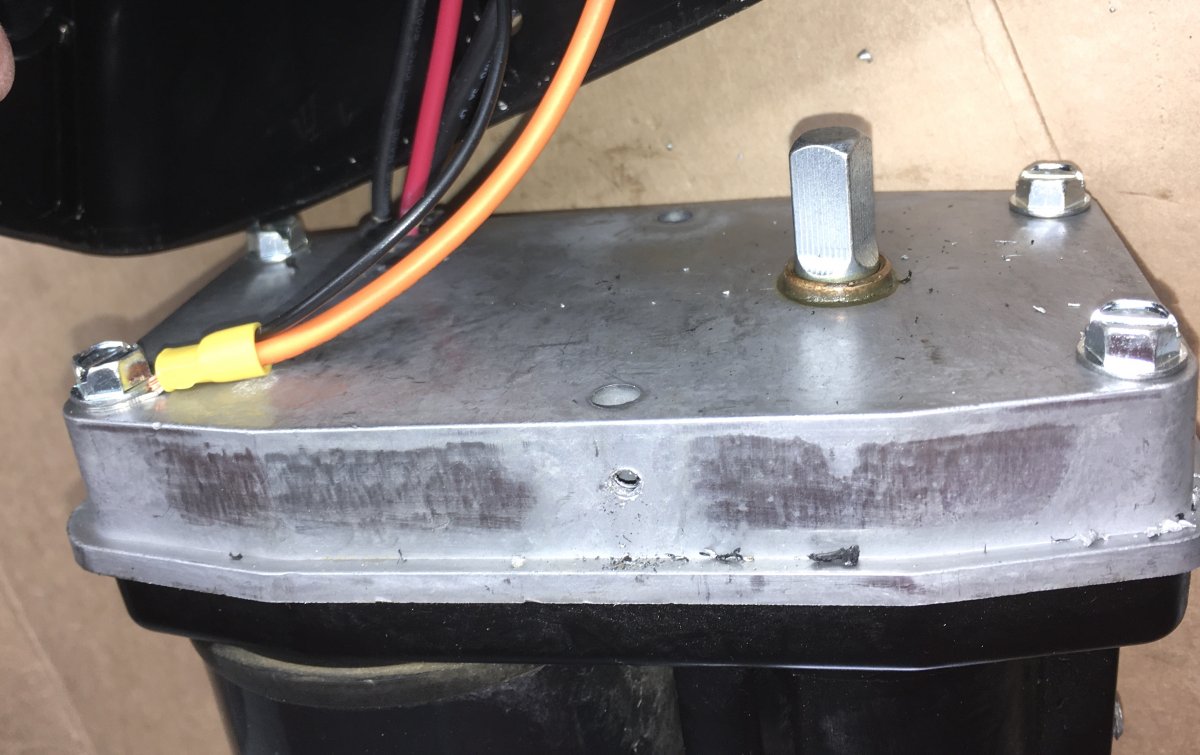
We also had this issue while up in northern Canada last summer. We believe it was a problem for a couple of years, we just were not aware of it until it was loose enough to start coming apart. When we returned home I got ahold of Dometic and received the following email reply. ===================== From: CustomerSupportCenter [mailto:customersupportcenter@dometic.com] Sent: Friday, September 1, 2023 9:46 AM To: BryanB Subject: RE: Dometic.com Support Form - US - productsupport - rv - b2c Hello Mr. Bjornstad: I was able to reach out to our engineering department. The engineer indicated the information directly below: “the bolts used to secure the burner caps are common M3x24mm socket head screws. They can be found at most hardware stores. He should apply blue Loctite to the screws before putting them in.” ===================== Yes, there are threads in the underside of the burner caps. The burner cap is made of 'pot metal' so if the screws are not of the exact sizing and ARE NOT 'Loctite-d' in, they may vibrate out again or worse yet, they may strip (as ours did) out of the soft pot metal burner cap. There was no indication (blue) of there being any Loctite around our screw heads when we were taking it apart to repair it. So the Loctite comment above may be a revision based upon customer experience. The following is what we did to fix the issue. We only had one screw per element and no Loctite at the time so we were at a less than ideal situation. turn off the gas at the tanks, remove the stove from the countertop, disco your gas fitting, turn stove upside-down and, make a note of the 'ignition wiring' if you have to disco more than one of them, remove the underside heat shield, (you have to cut the zip ties to remove it, replace zip ties to reduce vibration on re-install), re-insert the screws, apply Loctite where the screw head comes in contact with the assembly, then re-install the stove ‘Check Gas fitting for leakage’. We actually became quite proficient at this and I would be able to do it (less Loctite) as Maggie was doing 'meal prep', so I was done when she needed the stove. That is until the loosening of the screws and vibrating caused the 'burner tube' coming into the mixing bowl to break. At that point the stove was UNSAFE to use. So I put it in the back of the truck, got a brass plug for the gas supply line and covered the area with the 'Oliver supplied' sink cover, and taped that down. That gave us a larger meal prep area, and more outside cooking. Our final resolution when we returned home (because stove was basically shaken apart) was to replace our D21 (AMZN Dometic outlet), because we were unable to find the replacement parts that broke as a result of the ‘burner caps’ coming loose, and shaking/breaking apart the internals of the stove. When the new stove arrived, I took it apart at the bottom and made sure all 4 screws were there and sure enough, signs of blue Loctite on the screw heads. I have discussed using Red (hi-heat) Loctite thru PM's with others on the forum. The caveat is 'if you want it to stay put, Red would not hurt, if you have need to get in there and remove those screws and do other work, Blue would be better'... So I will stick with the Blue for now, as I do not believe that the original stove had any Blue on it. In fact, I do not believe we had two screws in each burner cap to start with. Never did find the two missing screws and I searched the entire enclosure and behind the false back of the drawer area. We can now look back at it as a learning adventure. Yah, may not take as many 'wash-boardy' roads less travelled, and will probably even go slower than we did... We learned a lot about the Oliver, Appliances (lost the WH too), about repair in remote locations, phone conversations with SeaDawg & Outlaw Oliver, and our own tolerances to experiences when dealing with and overcoming unexpected issues that arise, but GAWD, did we enjoy the adventure even with the adversities. So much so, WE ARE GOING BACK again this camping season, with the intent to make it to AK this time. Cannot wait to try (after a local shake-down weekend) our new Dometic stove and WH (another thread)... the adventure continues. B~Out, First edit, if others end up purchasing a new Dometic D21 Stove... the Brass elbow attached to the stove is now pointed 180 deg. opposite the supply line. So I just disco'd it, put on some YELLOW Teflon tape and then tightened it up to the orientation of the old one, and hooked the gas line back up. Second edit, Some of your appliances are going to have 'Metric' in them, especially if they are used outside the US. Just be Aware. Third edit with pics: once you have the stove exposed, you remove the heat shield screws (sm. red circles), notice wht. zip ties.. Your burner cap screws pass thru here (black arrows). The large red circle is the broken supply tube between control knob & mixing bowl. I tried to get some aluminum tubing to repair it. Even thought of sacrificing the stem to the coffee pot... I was told, that was NOT an option.
1 point
-
There have been numerous posts in this forum about Oliver’s lithium battery systems—about their usefulness, limitations, and value with respect to cost. Despite reasonable arguments against it, a number of us have purchased the lithium package. Reasons for purchasing the option have included the ability to run the air conditioner (A/C) for short durations (like at highway rest stops), greater usable energy (more boondocking in cloudy weather without needing a generator), faster charging, and longer battery life. This post summarizes things I’ve learned over the last 6 months about the Xantrex/Lithium/Zamp system. This post might also be titled “Things I Wish I’d Known from the Start.” This summary is a work in progress. Hopefully, with your corrections and additions, this thread will be of use to others that have purchased the Lithionics option or are considering doing so. At the time of this writing, manuals and other information for the Lithionics batteries are in the Service Center Knowledge Base — see links at the end of this post. I assume at some point Lithionics information will be compiled with all of the other trailer manuals in Oliver University. Battery State of Charge A key component of the Lithionics system is the app that lets users monitor State of Charge (SOC) and voltage (see links below). The reliability of the SOC values (which describes the amount of energy remaining in the battery) depends on (1) maintaining SOC calibration and having (2) up-to-date Lithionics firmware. The SOC should be near 100% at 13.6 volts, and about 50% (+/- about 10%) at 13.2 volts. If this is not what you’re seeing on the Zamp controller, Xantrex remote, or Lithionics battery app, then something’s wrong. By way of example, a couple times we’ve experienced the SOC readings of 60% when the batteries were dead -- not good. Note that the voltage reading on the app while there is a load on the system (e.g., electric heater) is different than when there is no load; the “resting” voltage may be higher. SOC Calibration The SOC requires periodic calibration. According to the manual for the 130 Ah batteries, the SOC can be calibrated simply by charging the batteries to 14.4 volts. The manual also states that fully charging the batteries to 14.4 volts should be done at least once every two weeks for battery life. Get the 130-Ah battery manual from Lithionics using the links below; at the time of this writing, Oliver has the incorrect manual posted in the Knowledge Base). When charging with shore power, it is not always apparent that the batteries have reached 14.4 volts, because when charging, the batteries only stay at ~14.4 volts for a short while before dropping back to about 13.6 volts. You can verify that batteries have reached 14.4 volts by monitoring battery voltage using the Lithionics app during a charging event. If you are unsure that the batteries are reaching 14.4 volts, you can at least confirm that the Xantrex charger/inverter is set to charge to at least 14.4 volts in the Xantrex app (https://support.olivertraveltrailers.com/portal/en/kb/articles/xantrex-remote-bluetooth-pair-operation) and, under Settings, check the custom absorption voltage. Ours came from the factory set at 14.6 volts, which is sufficiently high to get the batteries to 14.4 volts. Lithionics Firmware At least some of us that picked up our trailers in spring or early summer have batteries with outdated firmware. As I understand from Lithionics, more recent firmware versions have an improved SOC algorithm (our initial SOC readings were unreliable). You can check firmware version with the Lithionics app by clicking on a battery, then clicking on the settings “sprocket” in the upper right side, and then clicking on firmware. Our battery came with firmware version 1.0.05; I’ve recently updated to 1.0.07 by clicking on flash firmware. This has to be done with your phone in close proximity to the battery, and has to be done separately for each battery. Updating firmware comes with a “…this is a critical operation…” warning; you might want to check with Oliver or Lithionics if you have any questions about doing this. Has updating firmware improved our SOC readings? I’m not sure yet, but I think so. So far, the readings seem more reliable, but I’m still testing. SOC Calibration by Cycling A Lithionics rep told me that the SOC can be calibrated by “cycling” the batteries, and that this should be done every two months. Cycling consists of discharging the batteries to reserve voltage (e.g., ~12.1 volts) and then charging to 14.4 volts. However, the rep could not point to written documentation supporting this form of calibration. As the batteries support more partial cycles than full cycles (see graph below), calibrating by simply charging to 14.4 volts (assuming this effectively calibrates the SOC) seems better for battery life. Lithionics batteries will not charge from tow vehicle The standard 7-pin connection from tow vehicle to trailer cannot be used for charging the Lithionics batteries. Charging the batteries from the TV requires a DC to DC charger, which is an aftermarket installation. For more discussion on this, search for John Davies’ Redarc DC-to-DC charger installation description. Batteries Turn Off Twice now one or two of the three 130-Ah batteries have turned off when reaching low voltage (which happened because we were relying on incorrect SOC values). The SOC readings themselves looked OK, but the voltage did not correspond with SOC. The battery State in the Lithionics app reads “Off” for each battery when it is off. There is no flag on the Zamp or Xantrex control panel that alert the user to one or two batteries being off. The lesson (at least for me): monitor all three batteries, not just one, and note the Current, Power, State, and Status Code settings. If one or more batteries are off, turn the battery(ies) back on, and fully charge to 14.4 volts. Inverter Noise The Xantrex charger/inverter can be noisy charging the batteries with shore power (I’ve measured 60-64 decibels in the cabin when batteries are charging, and about 72 decibels adjacent to the inverter). The noise comes from (1) the charger/inverter fan and (2) the way in which the inverter is mounted (the fiberglass wall to which the inverter is mounted propagates noise into the cabin). The noise can be masked by turning on the A/C. Alternatively, the noise level can be reduced somewhat by lowering the charger current. In the Xantrex app, go to settings, and change the Charger Current from, for example, 100 amps to 30 amps. This will reduce fan noise. It will obviously take longer to charge the batteries with lower current. If you would like to be connected to shore power (to run an electric heater or the A/C, for example), but not charge the batteries (to avoid keeping them fully charged for long periods of time, or to reduce inverter noise) you can set the charger ignition control in the Xantrex app settings to “auto-on” (thanks to NCEagle for figuring this one out). In this mode shore power energizes the 110 outlets, the A/C, and the fridge, but does not charge the batteries. Turn the charger ignition control “off” to resume charging batteries with shore power. There are likely ways of re-mounting the inverter so that noise does not propagate into the cabin, with either a different mounting location or perhaps mounts using rubber bushings. Has anyone tried this yet? Xantrex Communication Errors Too often, I’ve gotten “Code 20” communication errors on the Xantrex remote panel. This can be resolved by pushing the red button on the 300A breaker under the streetside bed, waiting for at least 30 minutes, and then pressing in the little red flag on the breaker. Yes, this is a pain (I wish this breaker were more accessible), but it usually resolves the issue. Leaving the Xantrex inverter on battery mode for 25 hours or more will result in the Code 20 communication error. The time limit can be changed in the Xantrex app, but cannot be lengthened to more than 25 hours. As long as the inverter has not timed out, turning the inverter off and then on again at the remote panel resets the 25-hour time-limit clock. Battery Storage Lithionics provides guidance for storing the lithium batteries (see link below). Long term storage can include lowering the SOC to about 50%. Discharging to the appropriate SOC can be accomplished by turning on an electrical load (e.g., A/C or space heater) while in battery mode and monitoring frequently. Theoretically one could set the inverter cutoff voltage (in the inverter app, under settings), to something like 13.2 volts, but the highest cutoff-voltage option is 12.8 volts. Lithionics recommends keeping a log of SOC and voltage readings prior to and after storage for warranty purposes. ------------------------ Hope this helps. Again, please correct any errors that you see, and please add your observations and tips. Fritz ------------------------------------------ Relevant Links Lithionics battery app: https://support.olivertraveltrailers.com/portal/api/kbArticles/386680000012415191/locale/en/attachments/lpqvx861bbc9c842d48f7995281b07d0a193d/content?portalId=edbsnfe5dceb1ade7571879ff200cb63e14a94b62f48e3338c31a6401acd00130b0bc&inline=true). Lithionics battery manual: At the time of this writing, the Oliver Knowledge Base has links to Lithionics manuals for 125 Ah and 320 Ah batteries. However, our LE2 has three 130 Ah batteries as part of the 390-Ah package, and the manuals for the 125-AH batteries and the 130-Ah batteries are not the same. A manual for the 130 Ah battery can be found on the Lithionics website: https://lithionicsbattery.com/wp-content/uploads/2018/12/12V130-G31LRBM8-Battery-User-Guide-R1.pdf. Lithionics Storage Procedure https://support.olivertraveltrailers.com/portal/api/kbArticles/386680000012415191/locale/en/attachments/lrotz3ebee5a7020f42a58eb0d4db18a41356/content?portalId=edbsnfe5dceb1ade7571879ff200cb63e14a94b62f48e3338c31a6401acd00130b0bc&inline=true Lithionics FAQs https://support.olivertraveltrailers.com/portal/api/kbArticles/386680000012415191/locale/en/attachments/lrotz0edc34bc92ef4dce941bbb7f3f2d89db/content?portalId=edbsnfe5dceb1ade7571879ff200cb63e14a94b62f48e3338c31a6401acd00130b0bc&inline=true Xantrex Remote Bluetooth Pairing and Operation https://support.olivertraveltrailers.com/portal/en/kb/articles/xantrex-remote-bluetooth-pair-operation
1 point
-
Now there’s an idea! Would be great in getting my ‘late sleeper’ wife up to make this ‘early riser’ his morning coffee.1 point
-
Ronbrinks light the next morning.1 point
-
These are bottom tier cheap products. I doubt that they were ever intended to go in an RV where airborne dirt particles and condensation are major factors. This is a fail on Oliver’s part, unintentional though it may be. Does anybody actually get 20,000 hours of use out of their home LED light bulbs??? These life ratings are pure scam. The LED element itself may in theory last forever, but the board it is attached to can last just a few hours. RVs need marine grade (co$tly) components. John Davies Spokane WA
1 point
-
I don’t think it’s in Oliver’s mindset to cut costs by using inferior components. These obviously didn’t work out. I think they should stay with the original lights, 8 years and ours have never failed. Mike1 point
-
I'm sure they figure those who have the money to boat, can and will pay the premium. And some of us catch the bug and spend a lot of money on RVs. Obviously, I wouldn't be here if I didn't get tired of wasting money on the substandard garbage the RV industry is pumping out. To be clear, some of the new stuff coming out is great but I'm a fan of not reinventing the wheel. I love 12 volt. So simple and reliable.1 point
-
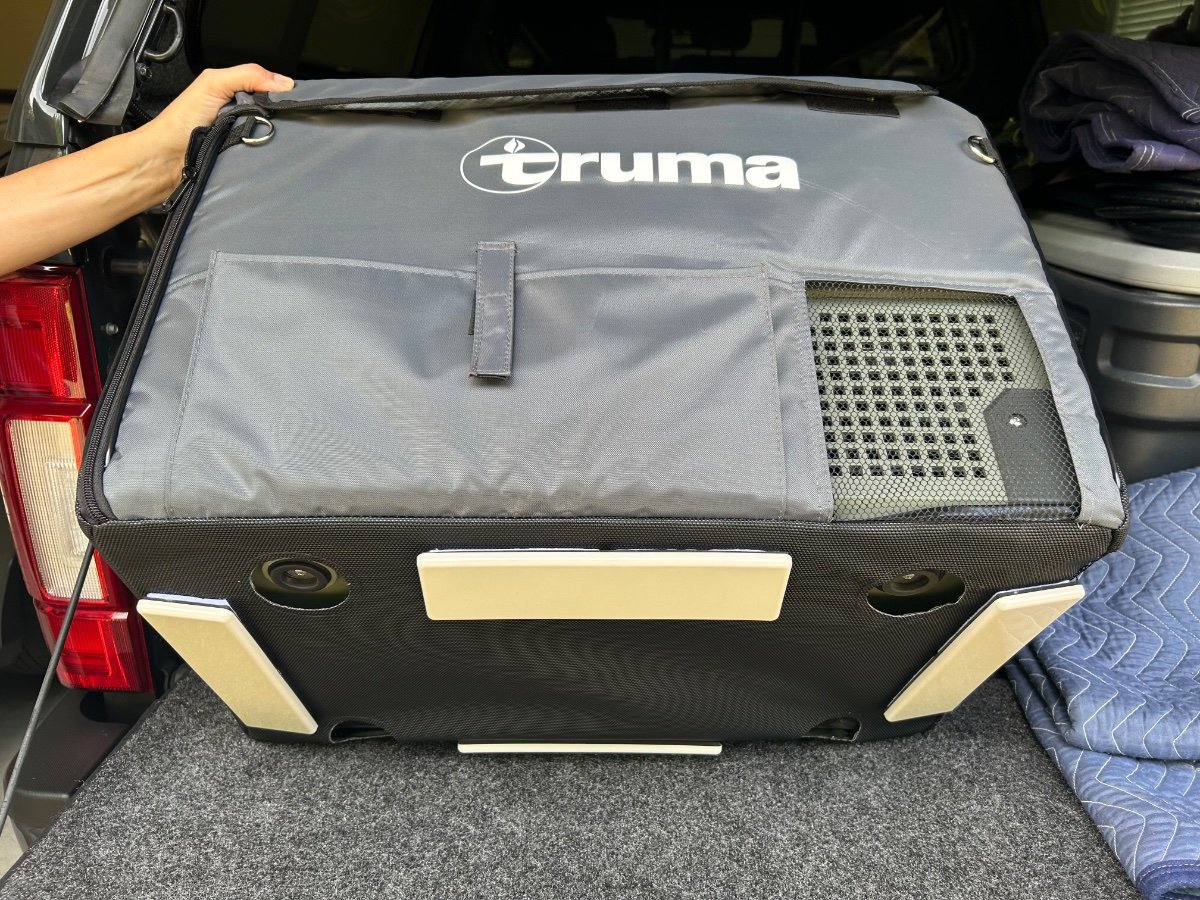
@Ronbrink I happen to be over at Lowe’s this afternoon and scooped up a (4) pack of these furniture sliders. My plan per your suggestion, is to install these on the 4 corners of my Truma C36 insulated cover length wise. This hopefully will make it slide easier on the bed rug then out onto the tailgate bed rug. Thanks again for the mod idea. Patriot🇺🇸 I installed the above furniture glides and they really work great. We can now slide the Truma out with out giving us immediate access without having to lift it off the bed rug. A keeper.
1 point
-
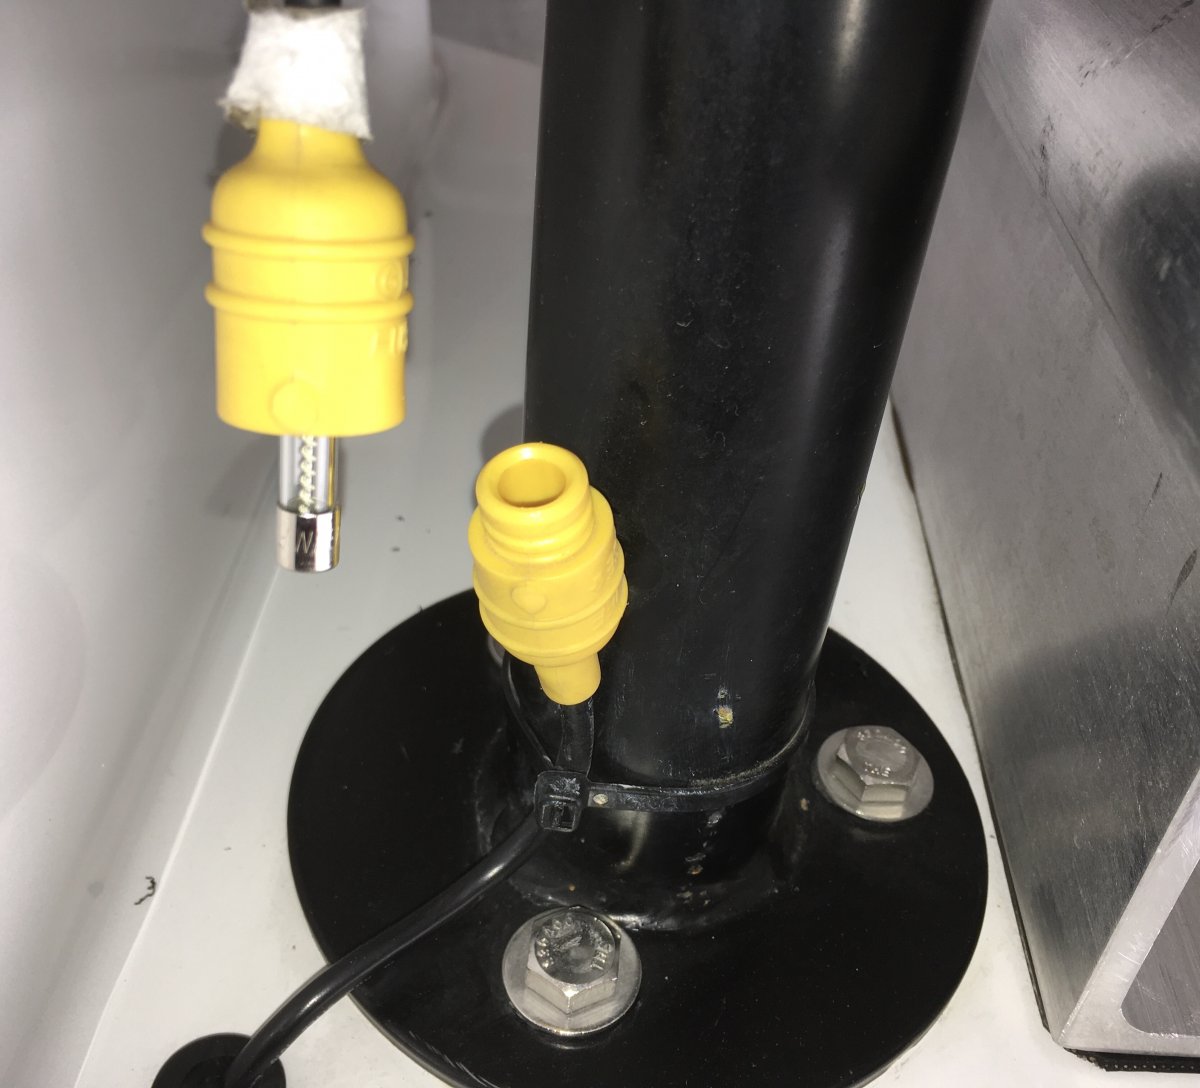
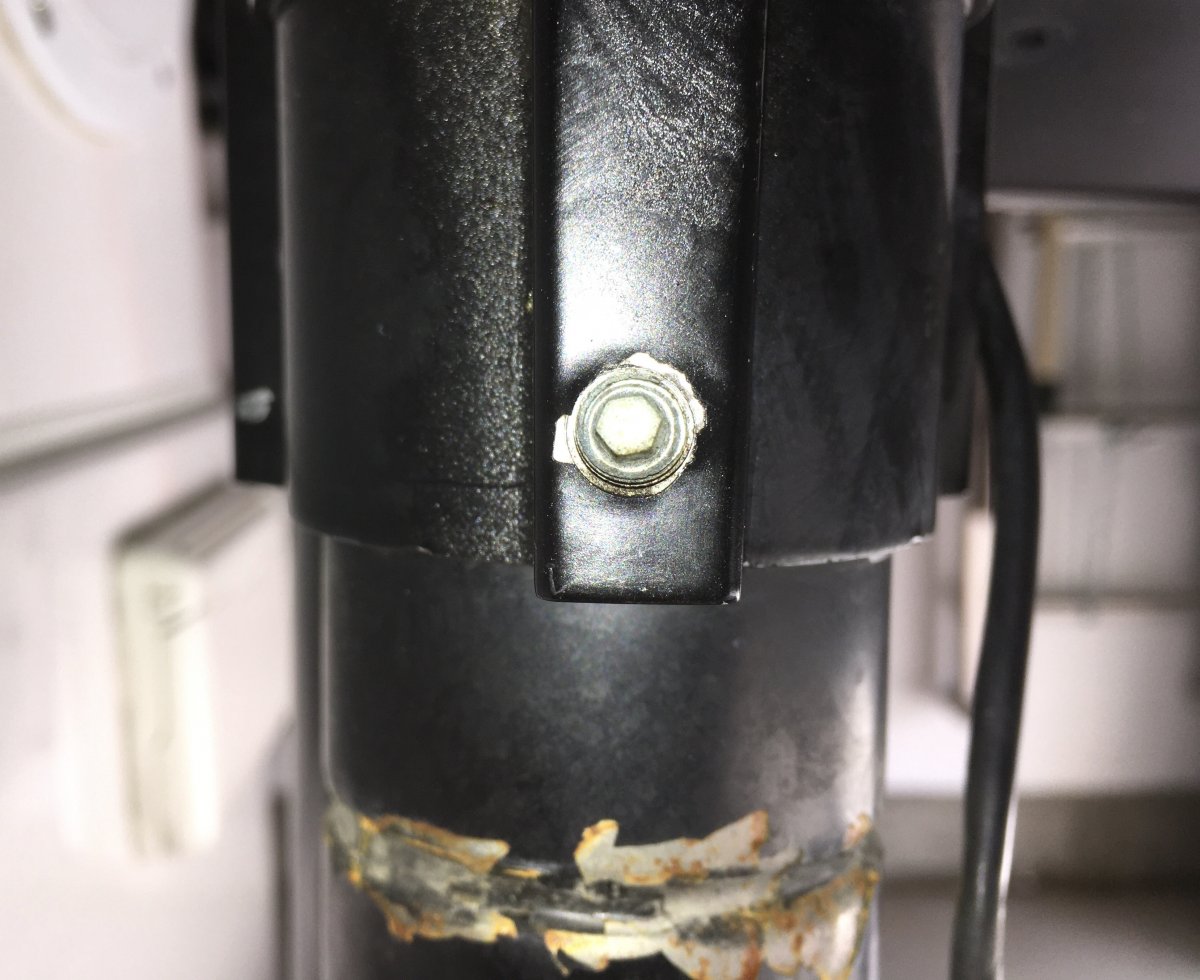
There are TWO fuses For the front jack, the one you can see hanging in midair up front in the yellow rubber holder, and another in back next to the other two yellow jack fuses. If neither fuse is blown then check for 12 volt power on the wire where it connects to the bus, in back. Then followup by checking up front. If there is power, then you may have ground issue, the three bolts holding the base in place do get loose, constantly, and that is the ground path for the current after it flows through the motor.. Of course you may have a burned out motor too. But you need to eliminate the more obvious possibilities. Oliver stopped supplying wiring diagrams a few years ago, you need to complain BITTERLY to Service, in the meantime refer back to an older year, this is from 2017. And note that it does not show the second fuse up front! John Davies Spokane WA
1 point
-
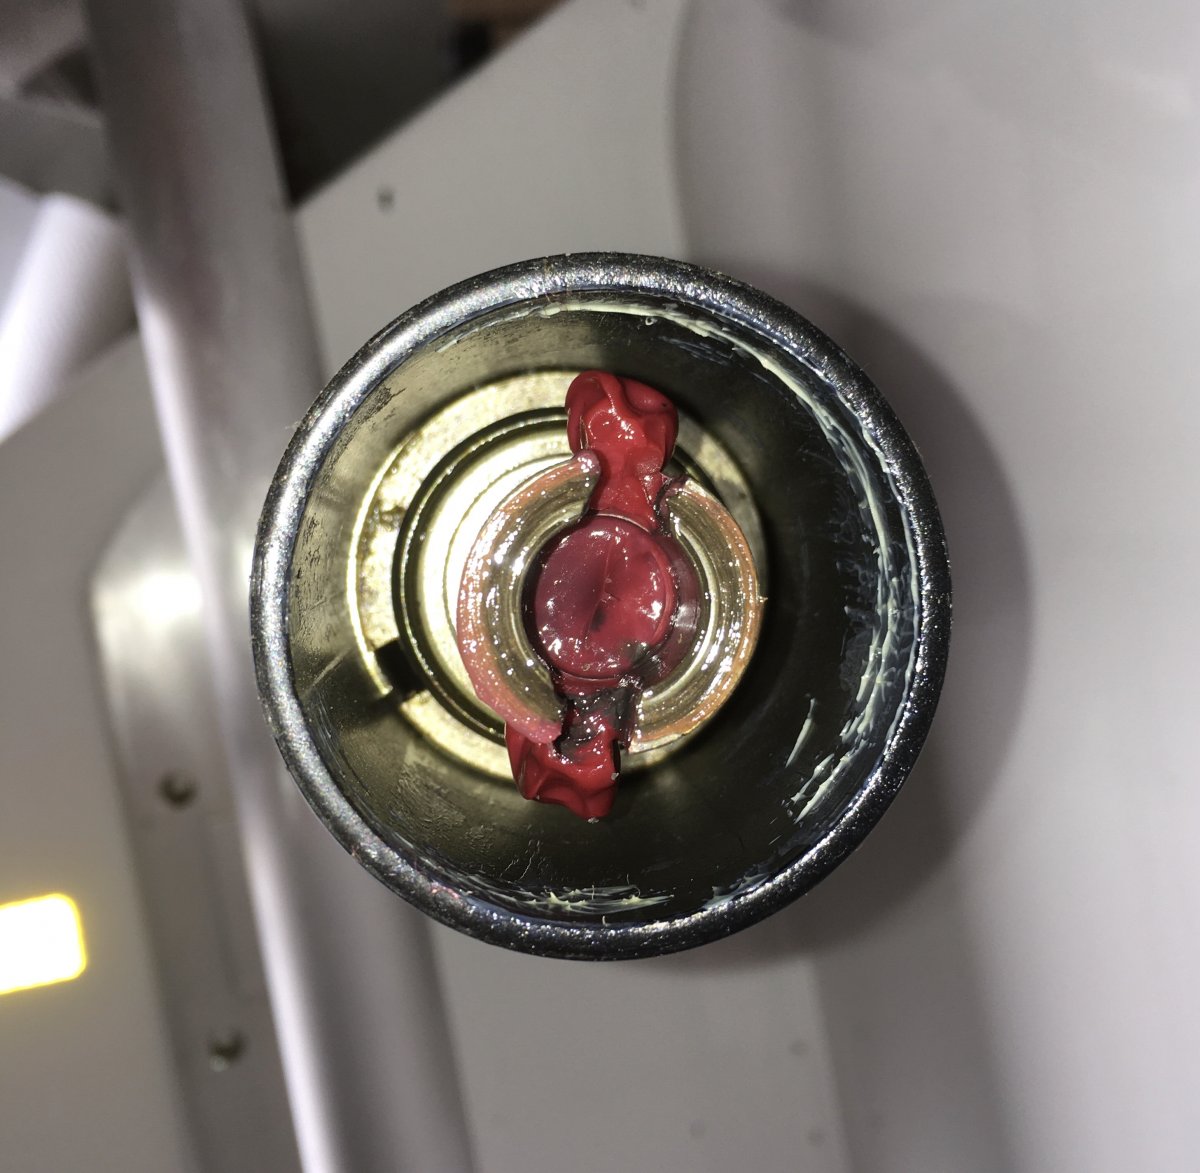
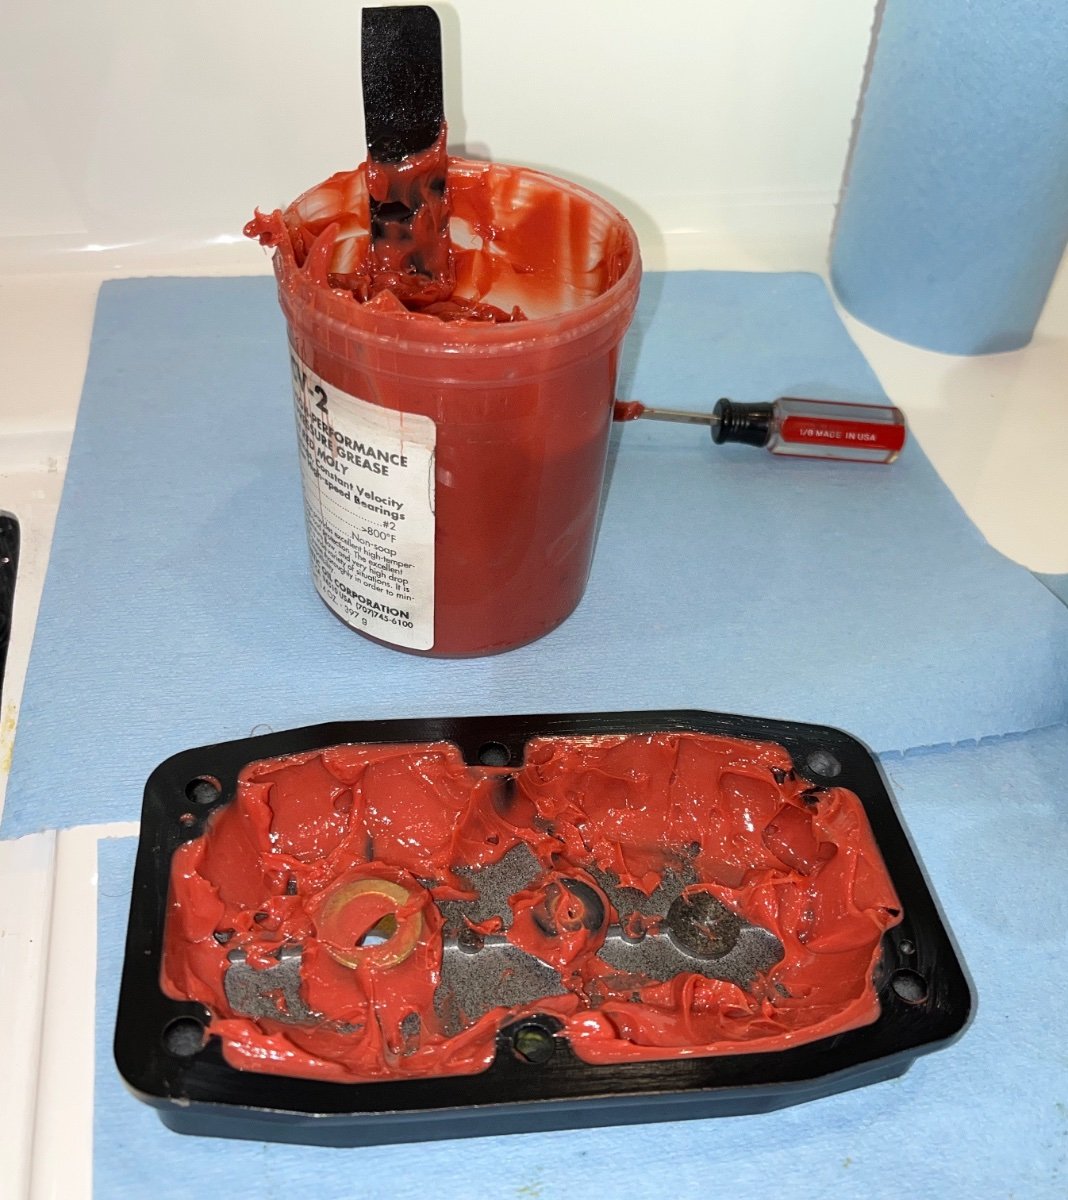
The jack manual says to use Mobilith 460.
1 point
-
The inadequate flow to the bathroom vent in the LE2 has been discussed many times, along with some possible solutions. Just to be sure I did not have a kink, I went poking around under the front dinette seat taking pics in the bilge. I discovered loops of flex duct hose, possibly it may be pinched. Surely this restricts the flow somewhat, but how to straighten it out? I could remove the panel under the bath sink, and try to gently tug on it to get the kinks out. I’m concerned I will tear the hose, and it does not look easy to get to for repair under that floor. I’ve got a Service Ticket in to ask, but I thought I’d check here to see if anyone has noticed a similar problem.
1 point
-
An internet search will return a number of sources for "water hardness test strips". I use the On the Go standard portable softener (portablewatersoftener.com) and usually just buy the test strips from them. Cost is a bit more but easy to just add them on to make a larger accessory order. They also have a stainless hanger bracket for the softener that I rigged to hang off the rear bumper behind the water inlets.1 point
-
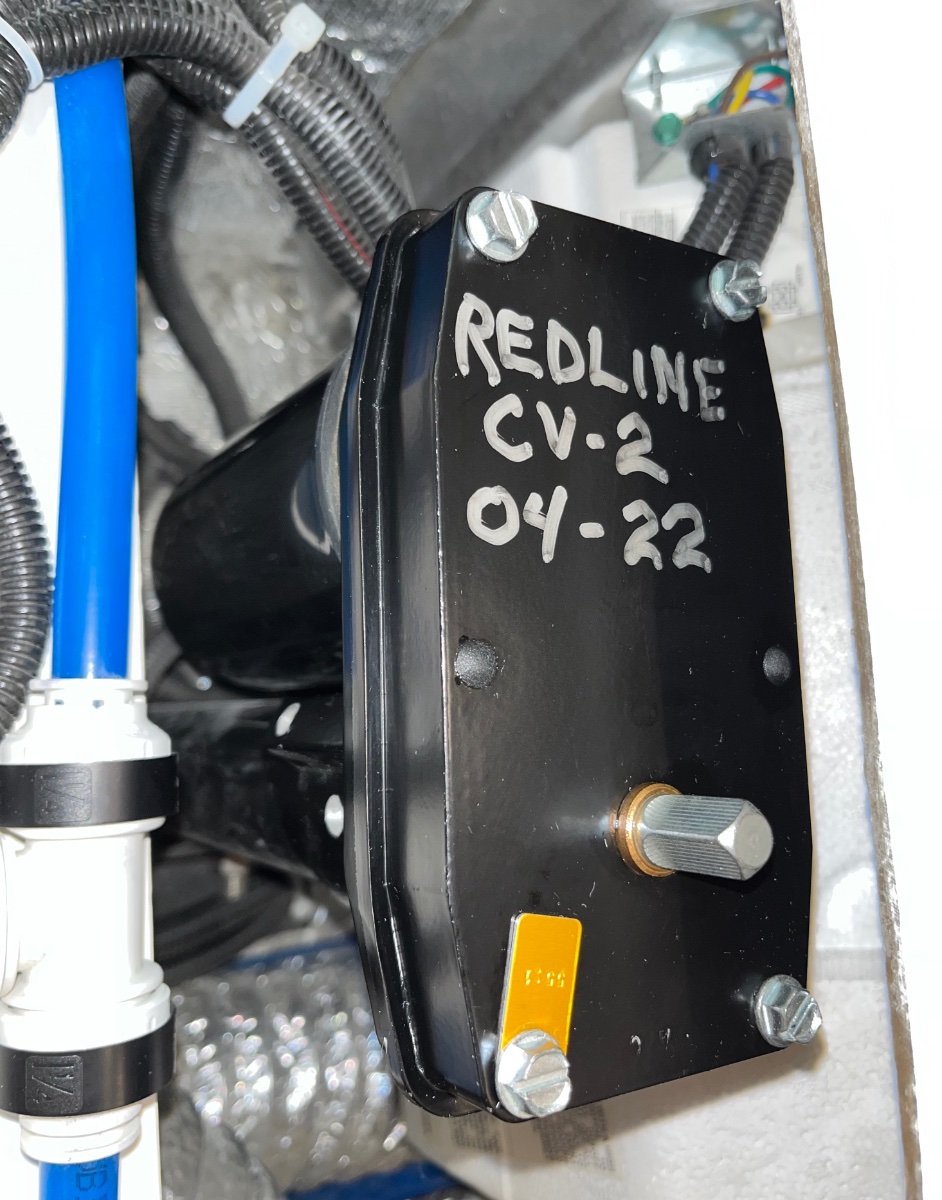
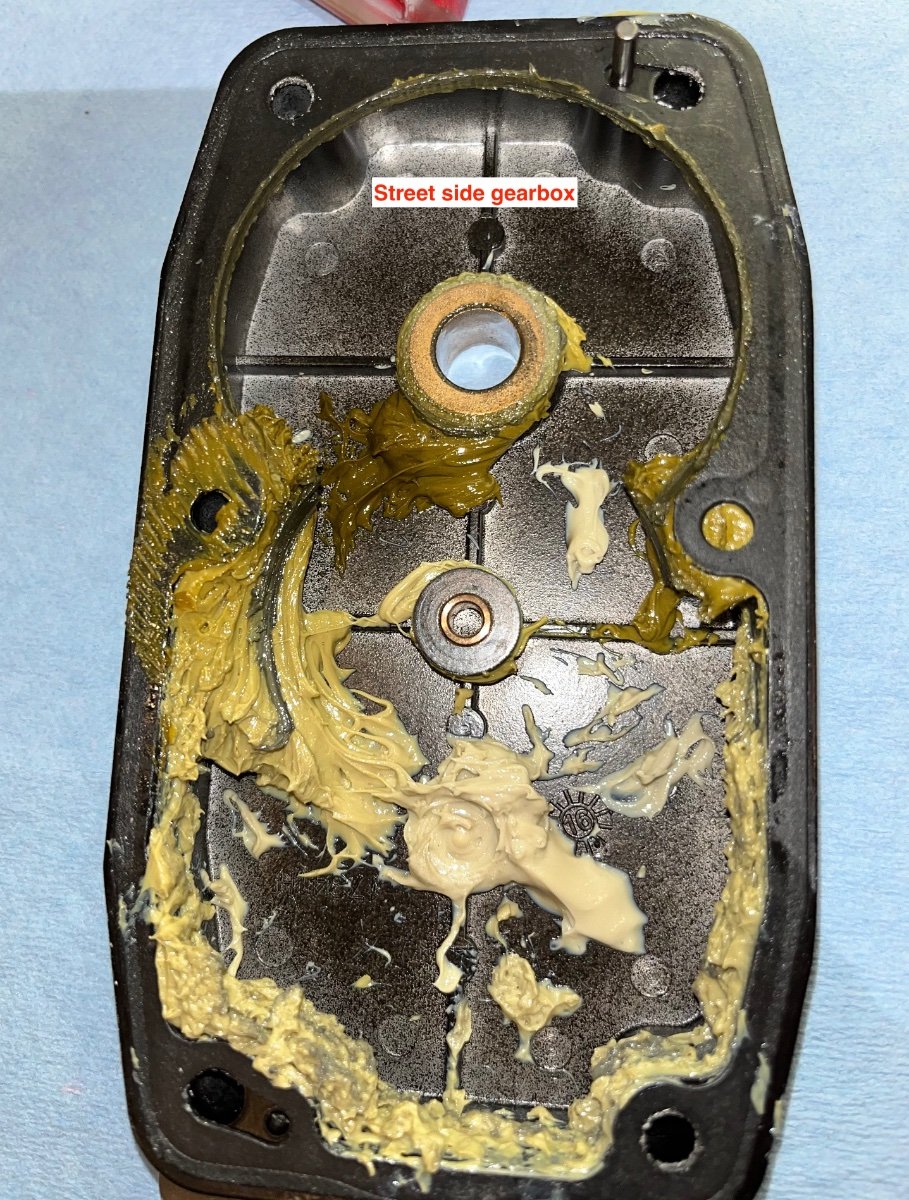
Grease the upper cover: Set the gear and shim down over the lower part, align the gasket and install the cover and the four bolts. Tighten the three set screws firmly, be careful they are steel in aluminum. Clean off the top and make a record of the service: Test the jack for proper operation and shift all your tools and stuff to the other side. My street side gearbox looked very similar - too little lube, some gear wear: Each jack took a couple of hours, most of that time was cleaning out the old contaminated grease. A future service might be a whole lot faster, you could just take a look and add some more CV-2 if needed. I do NOT recommend leaving the old white lithium grease in place, it will not mix well with the full synthetic, and you should get all those black metal particles out!. John Davies Spokane WA
1 point
-
Mike, your post aptly summarizes the reasons we remain committed to finalize the purchase of our Elite II next year, instead of an Airstream. We expect we will not only have the benefit of Jason's exemplary customer service, but continuing access to this forum, with its remarkable collection of knowledgeable veterans who generously give their time to share their experience. That so many of you remain fiercely loyal to Oliver despite the issues with your own trailers "speaks volumes" to me.1 point
-
Is there an enforceable household rule that goes with your timer or is it just for your own amusement?1 point


.thumb.jpg.e34bf01ef7f7d5e99ad31856d45afbeb.jpg)


undersideofstove12vdccomingin..jpeg.79ea61d199dd8b4e33a78f44d289b461.jpeg)
afterheatshieldremoved.jpeg.f146698fa58116135949f641b71669a2.jpeg)


-
Recent Achievements
-


")


")


")


