Leaderboard


Popular Content
Showing content with the highest reputation on 10/15/2024 in all areas
-
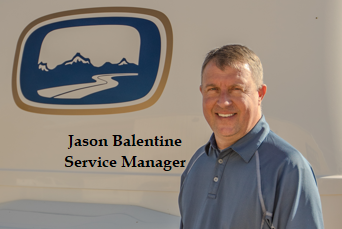
As our business continues to flourish we strive to grow our staffing so we can continue to meet your needs. At this time we would like to welcome and introduce Jason Balentine, our new Service Manager. Jason will be running the daily operations of the in-house service department. Mike Sharpe will continue in his role as our head technical support supervisor. We have separated our phone system out where you can select Technical Support or Service & Parts. Technical Support is for external support, general questions or help locating a service center or dealer near you. Service & Parts will be directed to Jason in Service and he will assist with scheduling appointments for our in-house service department and help with parts requests. And to answer everyone's question, Yes, evidently your name has to be Jason to work here.
 5 points
 -
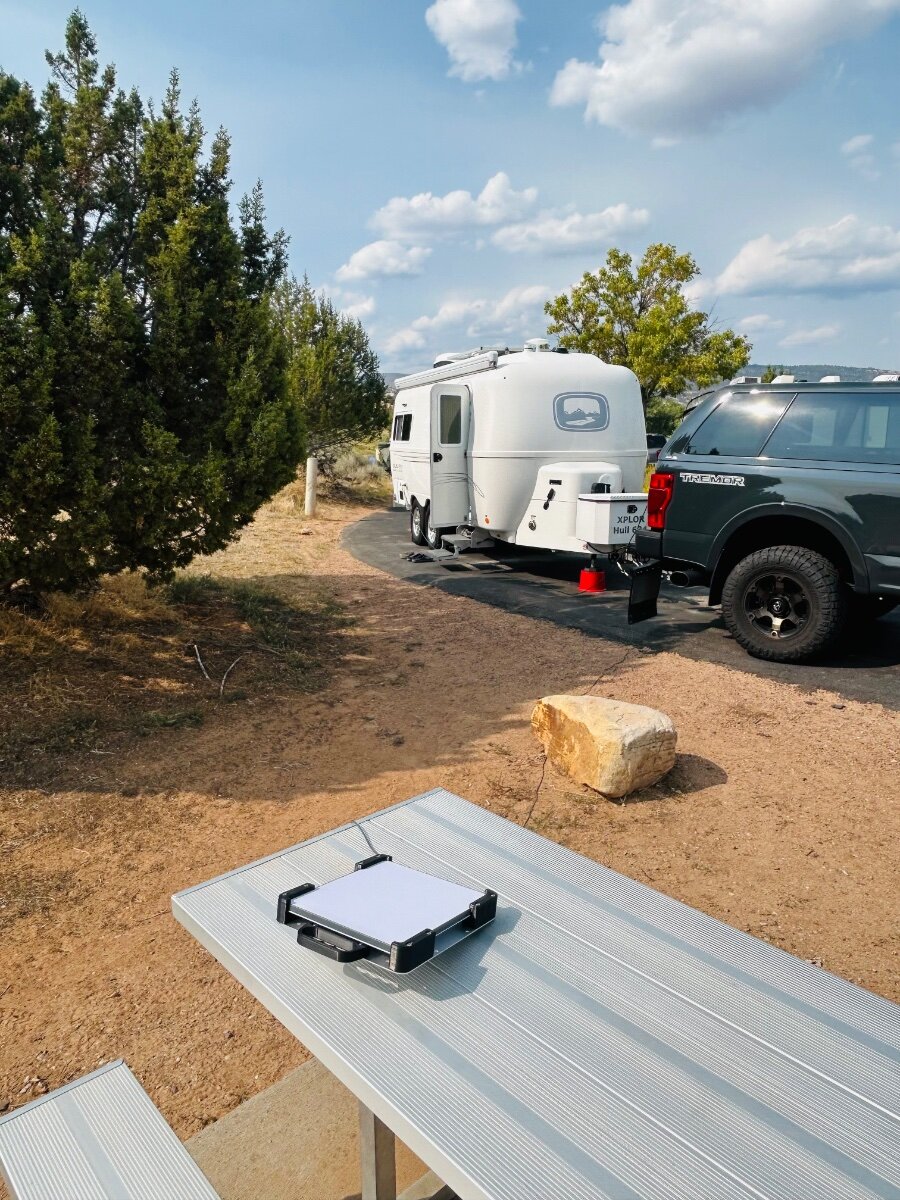
Looking forward to testing the Mini during the next camping trip, this is the main reason we purchased it. It's simple to set up, use, and transport. Started service @ $50 per month for 50 GB of "Roam" service that can be paused whenever not in use. Used ideas from the following video David posted earlier to be able to use the Mini with an Anker power bank for emergency use during a power outage (we have poor cell internet service at home unless used with home WiFi) or if we have a vehicle breakdown in the boonies when without cell service. Had an old Pelican case we used to transport a laptop with. The Starlink Mini, power cable, Mini power convertor, Anker 200W power Bank, 6' power cable for the Mini, and Anker 100W charger all fit easily in the Pelican case.5 points
-
After our SL mini shake down trip out west I have decided to purchase a cord reel for the mini to keep the cord neatly buttoned up during travel. As well as a little quicker to deploy and roll up. I also decided to scoop up an extra SL power cord as well. If by some unlikely chance the cord gets cut by a grazing Bison well…you sorta flapping without a spare. This big guy was grazing on the nice green patch of grass next to XPLOR and he actually tugged on our SL cable and fortunately did not chew through it. Smart Bison! I will post up on how the cord reel works out. I highly recommend a back up spare power cord. As we all know things happen. https://www.amazon.com/dp/B07WYCR42L?ref_=ppx_hzod_title_dt_b_fed_asin_title_0_0 https://www.amazon.com/dp/B0DB21PPSC?ref=ppx_yo2ov_dt_b_fed_asin_title
3 points
-
It should, best mixed 50/50 with water; vinegar and hydrogen peroxide can be used, as well in like manner. Don’t spray directly onto the mattress, rather lightly blot the mattress surface and allow to throughly dry. I would remove the mattress from the trailer for treatment, especially if there is high humidity inside or outside.3 points
-
I switched from a 22" Blackstone to a Carolina Cooker griddle. Smaller footprint, easier to pack, and has a true cast iron griddle top with built in drip tray. Downside is that it doesn't have a cover so I'll have to come up with something for that. You buy the griddle and burners separate. So far, I've been really happy with it but there are a few mods I'll probably consider such as a wind screen around the base and maybe drilling a hole in the drip tray.3 points
-
Nice kit Bill! You’re going to love the ease and portability of set up of the mini. We cannot imagine not having SL after our last 48 day trip out west. 💯 full on game changer. It will be interesting to learn how long you can power the mini off the Anker power bank. 👍🏻3 points
-
Tracing leaks is a real challenge. Up in the attic, behind the side panels, there is a lot of wiring (the dreaded Oliver sign and the marker lights to name two). On my trailer, no drip loops were employed on these wires. So when my rear Oliver sign started to leak, as well as my streetside marker light, the water did not go straight down but traveled along the wires horizontally to a low spot where they dripped. In my case, this was out the rear streetside ceiling speaker, which is right over my head when I'm sleeping! This is all just to say that, water can travel a long ways before it finally comes to light. I would tape the Oliver sign and the marker light as one other test. As Steph and Dud B mentioned, water is still getting in from somewhere, even though you sealed the interior of your window, which you shouldn't need to do. Regarding the window weepholes, This was discussed a while back. They are not so effective draining water due to capillary attraction between the narrow slots and the water. What I ended up doing to solve this was to cut some short pieces of paracord and stuff one end into the slot. It acts like a wick and you'd be surprised how much water they will suck out of the track in a heavy rain, and they do it quickly. I know about heavy rain here in the PNW (well, it used to rain here....)! So, you may also want to try this hack to stop the leak. Good luck, Dave
3 points
-
One other thought. Is it cold out? I've had condensation form on the interior aluminum window frames on cold humid nights when I was running the heater then drip down the wall. A surprising amount of water, actually. If this happened while you were sleeping below that window it could be condensation from your breath. Opening the roof vent a bit might help.3 points
-
So, the leak stopped when you sealed the interior perimeter of the window frame? I'm guessing you didn't stop the leak, but you have redirected it elsewhere. It's probably running down between the hulls and exiting via a scupper drain now. Which is fine and solves your immediate problem. When you get home maybe you could try carefully directing water at various suspect areas while someone monitors the scupper drains to see if there's still an external link. At least you have a dry bed now.3 points
-
Search on this on Amazon. They sell 25' lengths. I put the trim lok site link in my reply because it was the company site. If memory serves you can do one LE2 with a 25' length, but you have to be careful. Scotty Trim-Lok Drip Rail, White – 1/2” Height, 25’ Length – PVC Plastic Rain Gutter for Cars, Vans, and RVs, Easy to Install Flexible Drip Rail Molding to Control Water Runoff, Durable 3M Tape Included2 points
-
The referenced site indicates purchases of 250 feet. How to Order a Drip Rail from Trim-Lok Trim-Lok’s Drip Rails are easy to order. Go to our drip rail product page, choose your color, and choose your quantity of 250-foot boxes of the plastic drip rail. GJ2 points
-
More great news…loving our Starlink Mini!2 points
-
Sorry to hear about the water problems, sometimes very difficult to locate the source. We had water dripping out of of three windows on three occasions so far, but the windows were not the problem in each case for us. We keep the window weep holes clear. One time the porch light over the window was allowing water in above the window allowing water between the hulls resulting in water dripping out of the window, fix was to remove the light and reseal (old style light). One time the Oliver sign on the rear of Ollie (many here had this problem) allowing water in between the hulls dripping out of the window, removed the sign and resealed to fix. One time during the winter when running electric heater for a few days in Ollie without using dehumidifier water dripped out of the curbside window, found heavy condensation collecting between the hulls in the rear of Ollie to be the issue, using two small dehumidifiers cured the problem for us. Checked where we had access between the hulls at other locations and found very little condensation between the hulls except for the rear of Ollie. Just wanted to share some of our experiences.2 points
-
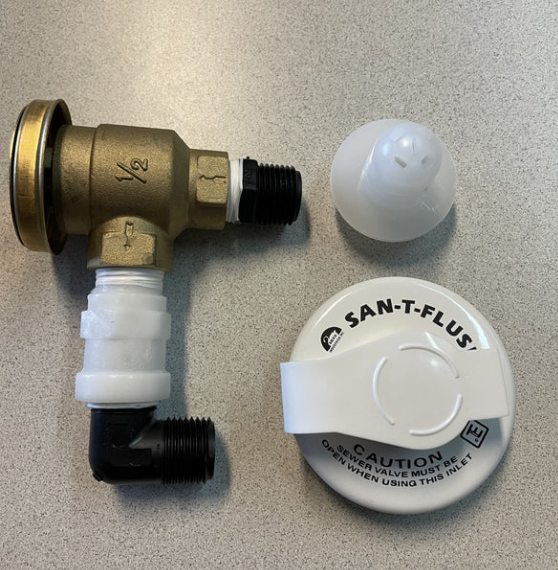
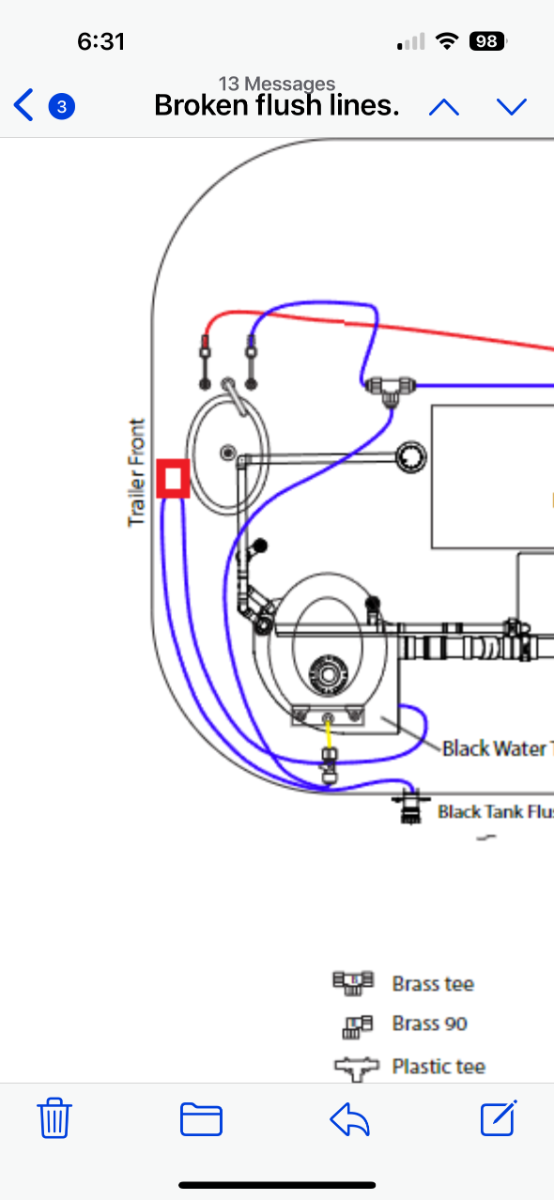
That brass fitting is the vacuum breaker valve from your black tank flush. One pipe comes in from the black flush hose bib inlet on the street side of the trailer. The other side runs back to the flush head on the black tank. It’s auto draining so the black tank flush line won’t freeze. The part is in a kit as the Swan San-T-Flush SFS150. In the diagram from Oliver it’s the red square on the left. I also remember having a smell once because we hadn’t used the shower and the grey tank odor came up the dry p-trap for the shower pan. We put a couple cups of water in and no more smell.
2 points
-
I'm aware of the posts and did in fact do my install on a hot day with tape. It sat for three days in warm weather... My Casita had drip rail as well so it's not my first attempt...Just wanted to help new owners be aware of the bad product.1 point
-
High Risk Low Reward. It takes 10-15 to winterize and maybe 10 minutes to dewinterize. You can carry a couple of small jugs of water and RV Anti-freeze to use in the toilet. We live in Indianapolis and can expect 0° - 20° for extended periods. We get South where it might get to 35° at night and dewinterize. We keep our Truma Aqua-Go closed and the filter stored until we are in wark weather My question is why would you even risk doing what you have posted. When pipes in your Oliver freeze and crack, many times it is in hard to get to places, resulting in added expense and major stress. It simply isn't worth the risk, when it only takes 10 minutes to dewinterize.1 point
-
@Blain Welcome to the Forum and welcome to being a Oliver owner. Since both of the responses above do not have the Truma AC unit, I would suggest you call the Oliver company, identify what hull number you have and what do they recommend for a generator size. The minimium size of generator will depend on if you have the Micro-Air EasyStart option connected to your A/C unit. This EasyStart allows a smaller generator to start the AC compressor, since it will allow less amperage to start the generator compressor.1 point
-
I spent some time under the sink trying to locate any loose fittings and found nothing. I did find out that the black tank from under the dinette seat was a contiguous open area (which I simply did not know) so any smell I had under the dinette was in the sink area too except not as pronounced. I decided to just leave well enough alone and spray OdorBan everywhere as per Ronbrinks suggestion in my original post, including the valves. I put some https://bit.ly/3BLgPdG in there and haven't had smell since. Not sure if warm weather will reactivate it next year but I'm really glad I opened the area up! I may want to change out my faucet someday, check p-traps etc.. and it was pretty simple to do. Thank you for the gasket material you gave me at the rally, however, I didn't end up using it as I thought it might be too hard to place around the perimeter of the cubby. I used this instead: https://bit.ly/3A0quwj It's channel shaped and easy to route. Everything went well. I used the original screws and snap caps even though I had bigger ideas in the beginning. For the number of times I'll actually go in there, it wasn't necessary to use plus nuts and get all crazy. So far no leaks and it looks stock. Good Luck Steve! Let me know if you find anything more. Regards, Claudia1 point
-
It should arrive tomorrow, I will keep you posted! 👍🏻1 point
-
Thanks for the video. Good execution. Hopefully you'll be able to video the unit in action during a future camping trip. GJ1 point
-
I finally got around to giving this mod a try today. I took care to cut and shape the foam to smooth out the airflow as much as possible. I found that the foam cut very well with a tabletop bandsaw, and was shaped into rounded corners easily with a wood rasp. I applied a generous covering of silver metallic tape to hold it all in place. Unfortunately, I didn't get the reduction in noise. 74dB on low and 84dB on cool after the mod, same as before, using my iPhone. I think it did eliminate a little bit of crackling that was caused by the flex duct vibrating. Maybe it had to do with the thickness of the foam, where mine was generally thinner that what is shown in this post. I took advantage of the opportunity to seal up the edges of the return airway as much as possible since it was fully exposed to the rough cut through the hull, and all the dust that comes with that. Overall it was a good experience and I don't regret the time spent, even though I didn't get the hoped-for noise reduction. It was worthwhile to clean up the return air path.1 point
-
@Gliddenwoods I agree with Skipster. The inverter should understand that 12.7V is nowhere near 100% SOC. It’s logic is off and needs to reboot, power down for some period of time.1 point
-
The photo shows, by the old stain on the leaf, that it has always bled this way. The grease will come out the path of less resistance. Just as long as you know a few pumps of grease were pumped, you should be good. This pic looks like as soon as grease is pumped, the same amount comes out immediately.1 point
-
That has happened to us a few times after plugging into shore power and no charging. Had to reset breaker on the inverter and it started charging. Its happened 3 times1 point
-
Just east of Springerville AZ, on US Hwy 60 E, on the AZ-NM state line.
1 point
-
Let’s meet there next spring!1 point
-
There are the White Mountains of New Hampshire! Know them well! I’ve skied Cannon Mountain, Canmore Mtn in North Conway and the top of the White Mountains is Mount Washington, the highest peak in NE. And then there are the Green Mountains of Vermont, smaller yet absolutely gorgeous this time of year, on my favorite State Hwy 9 heading west! The White Mountains of Arizona include all the high county in east central Arizona. Payson AZ is the western point at the edge of the Mogollon Rim. The NE point would be at Springerille AZ, with Show Low AZ in between. Then all the way to the NM state line, and south to the mountains north of Safford AZ. 🤣 Everywhere it’s high elevation, grasslands at 9000+ FT and peaks at 10-12K FT. Those who know, of the several million Phoenix Valley residents, drive up on summer weekends to climb, up, up, up, and in doing so, the temps drop 30F! The AZ White Mountains are the SW corner of the Colorado Plateau, it’s God’s Country. Camp almost anywhere you want between FS and BLM lands. My thinking is it extends into New Mexico though the range may have a different name east of the state line. @MAX Burner would be the expert on the NM side. Thank for asking, posts in Ruidoso NM coming soon. Loving our trip after working 5 months on this old hull (she is doing well, all systems working to near perfection)…1 point
-
@FloraFauna I strongly agree with the above comments. I live in Maine and we have some cold snaps in the witner, like you. With the tanks empty, the worry is really freezing of the water lines, particularily the plastic fittings and backflow preventors. That type of damage is a real pain to fix. The backflow preventors and some of the water lines are difficult to access. Play it safe and winterize. You do not have to have water in the lines to camp in the winter; just bring bottle water to drink. If going south, then dewinterize when you get below the freezing zone.1 point
-
Having any water in the trailer lines with a hard freeze can cause extensive damage. Strongly suggest the above sage recommendation....it's just not worth the risk. Using the trailer dry can easily be done. For the toilet use one of those bags in the toilet or "go" elsewhere. GJ1 point
-
This is so true. The linemen crews, and debris removal crews, are true heroes! Everything looks better with full lights. And, certainly safer.1 point
-
Winterize. It's not that hard to dewinterize when you get south. We had a freak winter storm in late October in nc. I hadn't winterized. We lost the outdoor shower. Even if you just drain and blow out the plumbing, you're better than nothing. I buy rv antifreeze as soon as it's on rhe shelf, and keep a few gallons extra through summer. If nothing else, makes a great door stop. Where you live (and I grew up near there), I'd winterize after last fall trip. That's what we did in "tropical" southern Minnesota. (You know, the pineapple belt....:) You don't have to "de-winter" to do a weekend trip. Just carry water in jugs, and a portapotty, or use a wag bag in the toilet, if you don't want to de-winter.1 point
-
We live in Tampa. Minor wind damage at the homestead. Power back on in our neighborhood, but many others still out. Our kids, who live nearby, are bunking with us for the AC. 😎 Ollie lives in a covered, outdoor storage facility in nearby Plant City. We visited him yesterday. All appears to be well,even though many nearby neighborhoods got hit VERY hard. Some are still underwater. We are very grateful to all the emergency crews from around the country who have come to visit. (I met a crew from Nova Scotia at WalMart yesterday!) It does my heart good to see their solidarity, expertise and preparedness.1 point
-
I could not agree more with @ScubaRx. Especially after traversing 10% grades with our TV and Oliver fully loaded and ready to camp. @Emerson if you ever intend to traverse Wolf Creek Pass at 8% grade, or Teton Pass at a 10% grade you will wish you had a whole lot more TV. An engine brake or Jake brake is a beautiful thing. The Big Horn Mountains on our way to Devils Tower are not quite as steep a grade or as high, but still have dramatic inclines and declines. Everyone has to roll with what their own comfort level is. I can say that we never ever had any concerns in the long steep descents in many of the mountain ranges we traversed. Our 6.7 diesel was up for the job and the righ tool for the job. There was no tail wagging the dog with our rig and we never had to pull off because of hot brakes. I would add that using any CAR or SUV would not leave me with a comfort level on the above mountain passes we traveled on. Some of the passes have hot brakes checks as well. If you are towing an OLEII with a car or SUV you could be asked to pull over and let your brakes cool before proceeding down the steep mountain descents. Then factor in the weight you will have loaded in your Audi and your OLE2. Based on our travel experience I cannot recommend an Audi Q7 for a tov vehicle for an OLE2. Safe Travels!1 point
-
I found this rather exhausting but expansive post by ang934 on an Audi Forum. Perhaps it will provide you with some useful information. Although personally, I think using any CAR as a tow vehicle for an Elite II is a particularly bad idea, there are those here that will tell (and have told) you exactly what you want to hear. Although I could go on ad nauseam with solid information as to why you should not do what you are about to do, I doubt it would make any difference. So, give it your best shot. Good Luck... I’m new to the Audi club, and bought my Audi over other cars for one big reason, to tow a travel trailer. The Audi has a high tow capacity for the size vehicle. The BMW X5, and Jeep Grand Cherokee are up there as well. I do not own a trailer quite yet, but will be getting one soon. So now that I have the Q7, next was the travel trailer, but how big could it be? I thought that this would be easy to figure out, but it wasn’t. I did some research, spoke to experts, read the owner’s manual, and read other AudiWorld posts. I was finding lots of misinformation on AudoWorld and other places, so I decided to write down what I learned here. There are lots of falsehoods out there, and I wanted to have this info in one place. My goal was following EVERY Audi requirement to the letter and NOT second-guessing what they say. In German style, their requirements are VERY precise. My car is a 2019 Q7 Prestige with 3.0 supercharged engine with a factory installed trailer hitch. If you add a third-party trailer hitch, your weight capacity might be less, but it is NEVER more. Note that the the Audi Q7 2.0 liter is rated to tow much less than the 3.0 liter V6 version. So, let’s get started. Let’s start with the car side. Just how much stuff and people can you keep in the car when towing a travel trailer? The Audi manual recommends to “Store objects in the vehicle luggage compartment, if possible. The vehicle should always carry the heaviest possible load and the trailer should have the lightest possible load.” But what is that load? If you open the driver’s door, there is a sticker on your car that gives a capacity for “cargo and passengers.” On my car its 1367 lb., but keep in mind, this is cargo, passengers, AND trailer tongue weight. The maximum tongue weight for my Audi is 770 lb. and Audi recommend I get as close to that weight as possible, and note the type of suspension does NOT matter. So, let’s say I start with the 1367 lb. limit, and subtract 770 lb. tongue weight. This leaves 597 lb. for passengers & cargo. Before adding any cargo, add your passenger weight. You may have 7 seats, but with a trailer, be VERY careful on cargo weight. For this example, I’m going to assume 597 lb. in passenger and cargo weight. Three or four people alone could get there. Or two people and some cargo. Now let’s move on to the trailer. I got my 597 lb. of passengers and cargo that are ready to go camping. Audi says the trailer receiver you pick should be NO MORE than 6.193” from the locking pin to the center of the ball in length. (Who says Germans aren’t precise.) I searched everywhere, and there was only one receiver that met this requirement. Not surprisingly, it’s the one Audi sells for $70, so I bought it. Whatever you buy, make sure the ball and receiver are rated AT LEAST 7,700 lb. The Audi one is. But a problem, the Audi one comes with a 2” ball, and almost all travel trailers today use a 2 5/16th ball, so you need to switch the ball. Walmart and Home Depot have these, but remember you need a 1” shank. First you need to remove the 2” ball on the Audi receiver. Place it in the car hitch receiver but turned 90 degrees from normal. Then get a VERY large 1 ½” wrench to remove it. Warning, Audi puts this on VERY tight. Before you put on the new ball, we need to talk a bit about trailer stabilizers. I recommend one and there is a bracket you can get that fits between the ball and receiver to connect one, BUT it requires a ball with a longer shank. If you use it, get a 2 5/16” ball, 1” shank that is at least 2.4” long. This is tricky to find, but it can be found. While we are here, I should mention the the “load distributing trailer hitch.” Audi say NOT to use one, so DON’T use one. Period. If you don’t like that, argue with Audi, not me. It should be noted that two companies (at least) make aftermarket trailer hitches for the Q7, Draw-Tite and Curt, and NEITHER are rated for a load distributing hitch. DO NOT USE ONE, no matter how smart you think you are for doing so. If your trailer is over 3000 lb. you also need a brake controller. There are three types you can use. One connects to an under-dash connector, one fits between the trailer and car and connects to your phone via Bluetooth, and one mounts to the trailer and communicates with a wireless receiver connected to your 12V socket. Your choice. I bought the trailer mounted one. OK finally on to the trailer. How heavy can it be? 7,770 lb. right? Smiley face. NOPE. Your capacity is 7,700 lb. but this includes the weight of cargo and passengers in the car. For us this is 597 lb. (Do NOT add the tongue weight here.) You have 7,700 lb. – 597 lb. = 7,103 lb. and a tongue weight of 770 lb. OK off you go to buy that 7,103 lb. trailer, but NOT YET. Audi says for ever 3,200 ft. altitude over 3,200 ft. where you tow, you need to reduce towing capacity by 10% (770 lb.) This one is tricky. If you are only on the East Coast, 3,200 ft. elevation is fine. But in the West, that is a joke. So you will have to figure your own case, but I set an arbitrary altitude of 6,400 ft. NOT TO EXCEED, which means my trailer can be 7,700 lb. – 597 lb. – 770 lb. = 6,333 lb. I’m going to round DOWN to 6,000 lb. That’s not a bad trailer. Maybe 22’ or 23’ So, lets try to understand trailer weight. There is a dry weight, the net carrying capacity weight, and the trailer GVWR, which is what the frame and wheels of the trailer can support. Dry weight + net carrying capacity is always equal to or under the GVWR weight. To be safe, I recommend for your GVWR to be under 6,333 lb. but technically its dry weight plus what you have put in it, including water tanks. Water weight 8 lb. per gallon. Again, Audi also recommends that you keep your tongue weight as high as possible without exceeding the 770 lb. limit. Tongue weigh given for trailers usually does NOT include propane weight or the weight of batteries. Anyway, just buy your AirStream Flying Cloud 23FB and away you go…. Yipee!! Smiley face. So to summarize, watch your car weight limits. You can not have more than 3 or 4 people in your car with a trailer, we’ll unless they are supermodels and weigh very little. If that is the case, have all you want as long as your wife doesn't object. Next, add a 2 5/16” trailer ball and trailer stabilizer if you like. Finally, subtract your car carrying weight from your trailer capacity, and derate for high-altitude driving. Be safe and figure these weight loads yourself. The trailer dealer may lie to you to sell you a bigger trailer with bigger profit. And be safe. I hope this is helpful, and if something I stated here is incorrect, please point it out, but please do not tell me how a load distributing trailer hitch changes all this despite the fact Audi clearly says to NOT use one. Your fight with them, not me. Last edited by ang934; 08-06-2019 at 10:36 AM. Reason: Grammer/Spelling Later, in the thread in response to another member who stumbles through several weight calculations and absurdly thinks one could, “...tow the (Airstream) Flying Cloud 27FB with no issues...Tell me if you think my math is wrong...” he added: I think OK, but definitely on the upper limit. Be careful if you are carrying 4 or 5 people in the car as well. That adds to the weight. I wanted add to my original post on some hardware you will need. If you follow Audi's recommendation, it doesn't allow much wiggle room. First on the receiver you need, Audi specifies a maximum length between the ball and receiver pin. Unfortunately this is shorter than any I could find anywhere, so I had to buy the one Audi sells for $70. I believe its made by Curt just for Audi, but if you can find it elsewhere, by all means get it. Unless you want to do LOTS of searching, buy the Audi receiver. Now you also need to change the ball since Audi provides a 2" ball which only works for small trailers. You need a 2 5/16" ball. The on that will work is the CURT 40039 Chrome Trailer Hitch Ball. Finally you REALLY should add sway control, and remember weight distributing trailer hitches ARE NOT allowed. (More on this later.) To add sway control you'll need the Draw-Tite 26003 Sway Control Adapter Bracket. This goes between the receiver and the ball. I used JB Weld epoxy to keep these two together. DON'T get any on the trailer ball threads. The reason for this is to keep the force of the sway control from moving the bracket and loosening the ball. I have heard of people welding the the bracket to the receiver also. And the weight distribution hitch, I know people are in love these, but Audi says NO, DO NOT use one. As it turns Audi does know what they are talking about. The way the trailer hitch fastens to the car in a vertical fashion basically eliminates the need for this type of hitch. It also makes this type of hitch dangerous to use because the weight distribution hitch puts added twisting forces on the ball and the hitch could break off. In end this is a win-win. Weight distribution hitches are heavy, expensive, and a pain, and Audi eliminated their need for you. Again DO NOT use one, but adding sway control, like the CURT 17200 Black Trailer Anti-Sway Bar Control, or similar is probably a very good idea. I have also come across a few electronic sway controls. They basically connect to your trailer brakes, and apply the trailer brakes when there is sway. They look pretty nice, but slightly pricey, but overall look to be an easy solution. Last edited by ang934; 09-06-2019 at 07:57 AM.1 point
-
@Boudicca908, i am grateful to see your report. And very happy for you. We have no power from the grid. No connection to see battery backup, from solar, so winging it, just working from experience. This has happened so darn often, we call it "camping in the house." Just grateful to have a house to camp in. Our county was pretty much half without grid power. battery backup for now, genset as necessary. I heard today from Ollie owners in Bradenton. All good. Trees down. The linemen are working really, really hard. As are the waste removal crews. All hands on deck, as neighbors and friends help each other.1 point
-
We got a small DASH rice cooker on Amazon. It works well and doesn’t take up much room. It is also easy to clean.1 point
-
We are looking for recommendations on a small size electric rice cooker and also would like any recommendations on camp cooking using a flat bottom wok. cooking over gas or induction. Just trying to get a plan organized The rice cookers I see on the web are mostly big countertop sizes and we had hoped to find a smaller size to save space and not haul around a full size appliance as we are outfitting our new to us Oliver hull 1218 my wife is Chinese and about 75% of our meals are cooked in a wok ! We use a flat bottom caphalon non stick at home and it cleans up with just rinsing and wiping it out I don’t think induction and caphalon will work 🤔 together1 point
-
I'd just go step by step and double check along the way. Is the shore power good? It's grounded and the right voltage and everything? I keep a little tester on hand for that. Then I'd connect to the Xantrex bluetooth app and see what it says. Does it show any charging? Bulk, absorption or float? I'd also make sure my settings were good on that Xantrex app. Maybe set the incoming breaker rating to 10 amps and the charger current to 50 amps. Unlike Xantrex, I've been able to reach the Lithionics people via the online ticket system and Dmitri was very responsive. Maybe try that also.1 point
-
Got a chance to lube the Oliver today. Using the Dewalt power grease gun and the LockNLube with 90-degree adapter, took me 40 minutes total. Had one stuck Zerk that a flat punch freed up quickly. One Zerk at the top of the EZ-Flex is hard to get to, but it just made it. The power tool and 90-fitting made the job so much easier (after 40+ years doing it the old way)!1 point
-
Sherry, which part of Florida do you live? Prayers to your family and ALL who have suffered Helene. Hope Milton is not as devastating!1 point
-
My wife and I know those exact feelings all too well... We got extremely lucky with Helene. Water came within inches of coming into our home but the majority of our neighbors weren't so lucky. Many had +4 feet in their homes and lost everything. Two of our neighbors had just completed renovations in order to sell and both homes are completely destroyed. Then we think about those who have it so much worse than we and our friends do... along with so many losing their lives and then we feel guilty for complaining at all.. We are very thankful that we and all our friends are all safe and sound, and praying that we get a miracle and Milton spares us all. I'm at the point where even though we're currently in the bullseye, that I can't hope that it turns further North or South because that just means I'm hoping someone else gets hit instead of myself and my family. I'm now getting ready to leave and I'm running from an approaching storm for the first time in my life.. Be safe everyone..1 point
-
For those who want to come to the area to see the fall foliage, you might consider the Robbinsville / Topton area. We have reservations at Hidden Waters Campground later in October. It actually looks like we might be making this trip. Here is an update from The Campground that you might find useful. This was sent on 10/3/24 Scotty ___________________________________________________________________________________________________________________________________________________________________________________ We wanted to take a minute and thank everyone that has reached out to us about how we fared through Hurricane Helene. Our community was so very fortunate and did not endure the flooding, power outages and road closures that our neighbors to the East did. We had no damage in the campground and are running normal operations. Some of you may not know this, but we are almost as close to Metro Atlanta as we are to Asheville. We are well outside of the impacted disaster zone. Below are a few notes if you have an upcoming stay with us. Transportation All major thoroughfares leading to us are now open with the exception of I-40 on the North Carolina - Tennessee border between Waynesville, NC and Knoxville, TN. We personally keep a physical Rand McNally Motor Carriers spiral bound road atlas in our vehicle in case we ever have to detour in an area with limited GPS. We would also encourage you to check your individual route from your hometown. You will all be so glad to know that some of your favorite rides are open: The Tail of the Dragon, Cherohala Skyway, Wayah Road and Moonshiner 28. Unfortunately, the Blue Ridge Parkway between Cherokee and Asheville is still closed. Fuel The majority of the fuel in our community comes from Chattanooga. We have plenty of gas to get you here and back. If you are coming in the next week, we would encourage you to keep your tank half full if riding the roads as some of the more outlying areas are still cash only. Food Our Ingles grocery store is open, but their operations have been impaired by the flooding of their corporate headquarters and Asheville distribution center. Deliveries are slow and they are currently cash only as of yesterday evening. If you are coming in the next two weeks, the best bet may be just to stop at the nearest Walmart from your direction of travel. We go to the one in Murphy. Our restaurants are open for business! It has been a bit of a ghost town here lately and the local restaurants have been hurt. They have had to cut staff and hours. We would encourage you to eat at least one meal at a local restaurant while in the area if possible. You will be welcome with open arms! Cell Phone Coverage We have three bars with most carriers in our campground. If you are out in the mountains, the coverage can be spotty, but that can be true on even the best days up here. Thank you for booking a stay with us. We look forward to hosting you. Please don't hesitate to reach out to us if you have additional questions. -- Hidden Waters RV Park & Campground 4509 Tallulah Road Robbinsville, NC 287711 point
-
Bill, I believe you will be pleased with everything about the “mini”. We also ordered the 12v adapter cable to allow us to run the mini from our TV. Just a thought. https://www.strikerfab.com/products/dc-power-adapter-for-starlink-mini1 point
-
FWIW: We've been using the GEN2 system since NOV23 (modified to operate on 12vDC). While D's been working remotely from home since 2018, with SL we're no longer limited to our OTT adventures being a function of her having to take PTO. SL allows for her multiple daily Zoom calls, mobile telecoms, and the like. For us, the SL service is definitely worth the $165/mo roaming fee.1 point
-
Thanks for the update on the mini. We have been using Gen 2 for a good while both at home and on the road (we have residential with roaming which was discontinued long ago) and have been pleased with it. The mini with the unlimited package is VERY tempting...easier to manage and just leave in the trailer!1 point
-
Cool, thank you! Btw, if you are a Zoom presenter, which is the vehicle of my parttime semi-retirement job, you are pushing more data up vs. down, and upload latency is an issue in all Sat connections. On all technology platforms, download speeds are 5-10x upload speeds, np for streaming movies, or if you must the Presidential Debate (oh 'twas so painful). 🤣 One part of me wants to be able to do my work on the road, so to travel more often. The other side says screw that and it's a GREAT day boondocking when in a deep canyon we're not connected!1 point
-
Just for reference. I have used the mini for many Zoom meetings, including 2 simultaneously, worked great with no issues.1 point
-
Based on how light and compact the Mini is, I wont be considering a permanent mount. The main reason is if I am parked where there are any obstructions I will have to move the mini to a northern unobstructed view for a solid satellite connection. Now this is just based on our experience so far on this trip. The SL mini has a reported latency of 23 milliseconds according to SpaceX. We have not used it for any zoom meetings, but we did stream the entire Presidential debate last night without any interruption issues. I am going to keep it simple and deploy it from its carrying case. So far we are very pleased with the mini and it is serving our needs perfectly. One thing we have both noticed and really like is that it connects instantly to our (4) devices after plugging in the dish. Perfect! Onward!
1 point
-
The basic answer to your question is - no. These "gutter extensions" are made to actually extend gutters that are already on many campers. However, there are no gutters of this type on an Oliver. The "rain deflector" that you mention is actually nothing more than a pliable gasket that is (via 3M double sided tape) glued to the hull behind the awning. I do not see how these gutter extensions could be used with this gasket in order to direct rain away from the body of the Oliver. Bill1 point


.thumb.jpg.e34bf01ef7f7d5e99ad31856d45afbeb.jpg)


-
Recent Achievements
-


")


")


")


