Leaderboard


Popular Content
Showing content with the highest reputation on 02/14/2025 in all areas
-
By the way, thank you for your honorable service to our great country! 🇺🇸👍🏻3 points
-
We bypass Flagstaff all the time! When I work in Vegas heading home and there's snow up at 7K ft, I head south on US HWY 93 and near Bagdad AZ there is a county highway that heads towards Prescott. Given you are south of Flag, take highway 260 out of the Verde Valley towards Payson. Then Hwy 87 to Winslow which is under 5K elevation and you can get back on I-40 there. We only drive thru Flagstaff if we're going there since there is always traffic, construction on I-40 and SNOW in the winter! This route is equal in time to I-17N and I-40E and a beautiful drive! We're at 5400 ft and overnight had 1-2" of rani at 40F. It snowed and is still snowing there now at 7K ft. I can see the storm clouds from our deck! Hwy 87 shows rain on the road with snow on the peaks around the edge of the White Mountains.2 points
-
100% concur, @Geronimo John, John! We've got the disk brake upgrade on our radar and will likely drop the hammer on them when our current 12" drums need replacement...FYI2 points
-
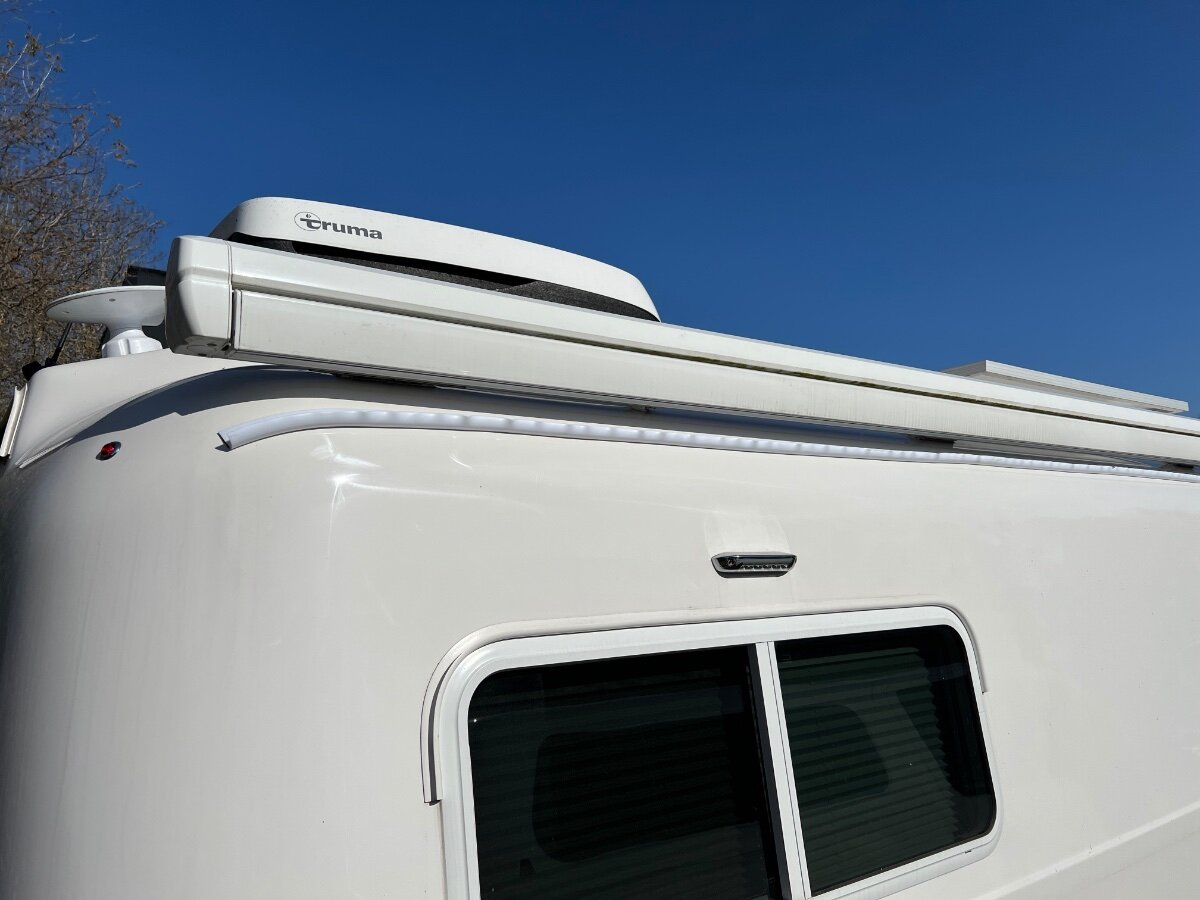
@Galileo Per my previous post, we have a 2023 and I removed the awning seal and installed THIS 3/4” drip rail that works very well. Only issue is the drip rail comes wrapped in a coil and having it straightened up was a mission, almost impossible. Even after I managed to get the drip rail somewhat straightened out and stuck to the side (below awning) of the RV, the front top edge of the "J" is still warped, even now 4 months later. That said, it’s just aesthetics and I still like it much better than the stock seal, all it did was catching junk and it was hard to clean behind it.
 2 points
 -
I also purchased the Shoreline Tongue Weight Scale. It works well and appears to be reasonable accurate. I also weighed our TV and LEII on a CAT scale and computed the tongue weight. The tongue weight reported by the Shoreline scale and the computed weight from the CAT scale were reasonably close, ~500 lbs. I have only measured our tongue weight once with the scale. Unless you make a significant modification or change how you load the trailer, I would not expect the tongue weight to vary much. Given the low frequency of use, I would try to borrow one from a friend, or perhaps rent a tongue weight scale, if one can be found.2 points
-
Yeah, but $412 plus tax and S&H is pretty decent for the door core. I'm looking forward to seeing this when Craig @Galway Girl gets theirs installed! I believe you may be opening a can of worms if "re-skinning" one of these doors. Better have a larger workbench, plenty of clamps, and superior craftsmen skills! Our small cracks are just fine, as-is for now, but I too would buy the core when needed. Thanks again Craig! OTT charges a lot for accessory installation and service since it is not their core business of fiberglass hull manufacturing. I have not gone to OTT for service but have receipts from prior owners and I see it was a lot of money, even back in 2018 and 2020, without the inflation of the last 4 years! It's like their $1,500 "on sale" 30A DC-DC charger install that does not include the TV side of the installation (I estimate about $1000 for labor). Say OTT can purchase a full door assembly for $600 wholesale. That again would be $1000 for labor or close to it. Honestly, I'd rather install the DC-DC charger, both TT and TV sides, than do the work of replacing the door jamb!2 points
-
Depends on the batteries. In the 2022 model year the smaller Lithionics package had heating pads under the batteries with a separate switch, but the larger batteries had built-in heaters without an external switch.2 points
-
Hello everyone. It's time to introduce myself after lurking here in the forum for a few months. I purchased my 2022 LEII (Hull #1056) from Paul and Tina at the end of January. While yet to begin my adventures (as winter has yet to depart the mid-Atlantic), I've spent the past few months learning about the Oliver and it's systems. The four season functionality, quality construction and top notch customer service made my choice easy. The bonus is the informed, pleasant and supportive user community that I've found here on the forum! I look forward to getting to know you all better through the forum and at future rallies. Warm regards1 point
-
I mentioned starting on this project this weekend. Instead, I got deep into fixing/replacing all our waste valves. We leave on a camp on 3/24 and I would like to have both done, but working halftime too. We can leave w/o the DC-DC charger but I must get the drain valves finished which today are ALL torn apart, parts coming between today and Monday. 🤣1 point
-
Something that I have found helpful, is to clean out the accumulated debris under each bracket that acts as a damn holding the water between brackets. Once water is free to flow under the brackets, the ponding, stagnating and browning of the water with tannins is less of a problem. Also, we have the Truma air conditioner, and have found that unless the trailer is leveled just right, the condensate from the AC drains onto the roof instead of through the condensate drain and adds to the ponding of water.1 point
-
Best to contact Oliver. I believe a number of owners have had Oliver Dealers and Truma approved RV places do the work. I thought the letter was pretty thorough. We are getting ours done at the Mothership Monday.1 point
-
i switched from an ecoboost F150 to a 6.7D F250 for the mountain pass reason - F150 could pull, but it didn't have the comfortable braking (including engine braking) the F250 has1 point
-
I doubt THAT very seriously. Bill1 point
-
1 point
-
MANY of us run our A/C on Honda 2200 inverter generators. You would want an A/C unit that has that feature installed, or have a Soft Start installed. GJ1 point
-
looks like mid 2016 LE2 was a changeover time for the hanger width - mine was born in July 2016 and is 50.5" - so you need to measure to make sure oliver was able to upgrade my LE2 hull #157 to all new running gear (D52s etc) side note - my original truma was also compliant with the recall / had all the tabs bent over!
1 point
-
Welcome and happy travels. Here's our web page showing our trips for inspiration and ideas. If you ever come out west let us know. Craig & Rose Hull 505 https://4-ever-hitched.com/trips-overview
1 point
-
Propylene glycol is used in many products sold for use by humans. One example is hair conditioner. It is not toxic to humans or animals. It is biodegradable. But, it can contaminate groundwater in sufficient quantity, or damage the essential microorganisms in a septic system. So, the environmentally safe practice is to recycle it.1 point
-
My valve installation looks very different than yours. Bends in the cable will definitely cause binding. My cable was straight with no bends at all. Interesting because our hull numbers are so close. Mike1 point
-
Olive - Check the ingredient list on the anti-freeze you used. It should not include ethylene glycol - mine doesn't. Therefore mine isn't toxic to dogs and I'd suspect that yours isn't either. Bill How does ethylene glycol affect dogs? Even small amounts of ethylene glycol can cause permanent kidney damage in dogs. Less than ½ a teaspoon per pound of body weight can be enough to kill a dog. Dogs can get into antifreeze by drinking from puddles or licking it off their paws.1 point
-
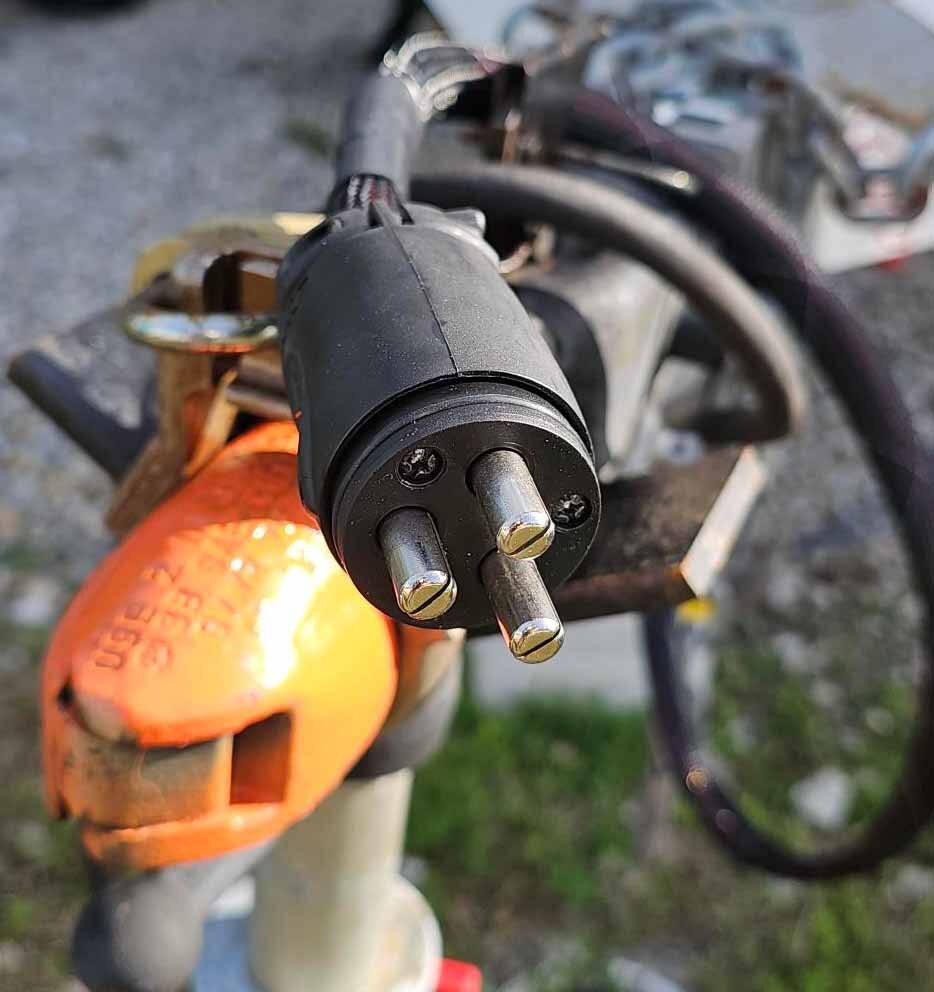
Off-roading in my 2WD tow vehicle, NOT! We have a GX470, lifted with performance suspension for that. Our TV travels roads tame enough to pull the Oliver. Either way, mounting under the bumper was the mistake made. Besides the greater chance for damage, it makes it hard to reach. I'm thinking the cables and SB175 will come out somewhere between the bumper and license plate. If connected to +12V, beside the physical damage to the cables and connector, you would merely blow the fuse which is it's purpose. I purchased the SB175 Environmental Boots, thick rubber to insulate the positive lead at the rear. I wasn't interested in a cut-off switch for our LiFePO4 batteries either. I'm old school, and NP taking a 1/2" wrench to the post. For the DC-DC charger, I'm not going to pop the hood and throw a switch every time we hitch and unhitch. Much too much bother. More on this, in a week or two, in a new post when I finish my installation. There are so many great variations in thought and mod designs discussed in our great forum! 😂1 point
-
I will not merely ground through the frame hitch, etc. I will have the B- from the charger in the Oliver to the SB175 Anderson connector at the hitch. On the TV side I will have a short cable bolted to the frame. Also, another short cable from the front end of the frame to the B- starter battery post. Most do not include this additional ground. Agreed, I too have noted installations here that do not achieve full charging amperage. Not sure why since many details of their installations were not provided. I believe those examples did run B+ and B- cables end-to-end. I see negligible resistance in a solid steel frame and perhaps less voltage drop than 4 awg copper over another 20 ft of distance. BTW, is voltage drop even an issue when the Orion XS 50A charger can accept input voltage from 9V min to 17V max? Not sure. Given I get mine installed next weekend or soon thereafter, we're heading towards Tucson starting Monday 2/24. I'll make sure we leave at a lower SOC and will measure what the new system can produce! I'll ask Chris to take multiple VictronConnect app pictures (from charger and shunt screens) while I drive, so I can study them later. I should remember to turn off the solar charger during this test to isolate the DC-DC charger. I will start the test at the full 50A capacity of the charger (see if the 4 awg wiring gets hot, or other issues). On another day test after detuning the charger to 30A.1 point
-
Looking forward to your forthcoming post on the install! A couple of things that may or may not be specific to my Renogy DC-DC charger regarding installation: 1) Because I choose to mount the charger remotely inside the Oliver and not in the TV, I decided it best to run a negative cable from the starter battery, rather than the typical ground-to-chassis as done in some instances when separate battery banks share a mutual grounding, like a motorhome for instance. I know when a trailer is hitched to a vehicle grounding occurs, but I find no comfort that it constitutes the adequate grounding necessary to fully safeguard the system; 2) the Renogy manual specifies use of ANL fuses with their systems; and 3) since the charger is in the trailer, use of the D+ ignition wire was not utilized and thus, the solenoid install serves the same purpose. I hope this provides a better understanding of actions taken in my install. I have read where others, for reasons unknown, are not getting the rated amperage from their units. I am pleased to report that is not the case in my situation!1 point
-
Initially I installed a ‘resettable’ fuse, but found at times it to trip due to excessive under hood temps during the hotter months of the year. I now use an ANL setup, specifically an ANL Blue Sea Systems 5005 fuse block with insulating cover and 60A fuse. Problem solved! Also, note the solenoid mounted next to the battery. I did not want current powering the DC-DC charger when the Anderson was connected and the TV motor was not running. I also opted to run a negative cable from the bumper-mounted Anderson to the TV B-, rather than a ground-to-frame. Yes, an added cost and measure, but to me the best alternative to ensure optimum performance of my DC-DC setup. I can also utilize this Anderson to power my VIAIR portable air compressor and Dometic dual zone refrigerator/freezer, as necessary. The dedicated DC-DC trailer cable’s Anderson must be connected to the corresponding connector on the TV to power the charger.
1 point
-
I just purchased this tool. Don't know how to test for accuracy, but it seems to work well. It's well made, small and easy to carry and use. Problem I see is you really need to know tongue weight divided by trailer weight to see if you are in the 10-15% range.1 point
-
Our 2019 Tundra takes less maintenance than my wife's sewing machines!1 point
-
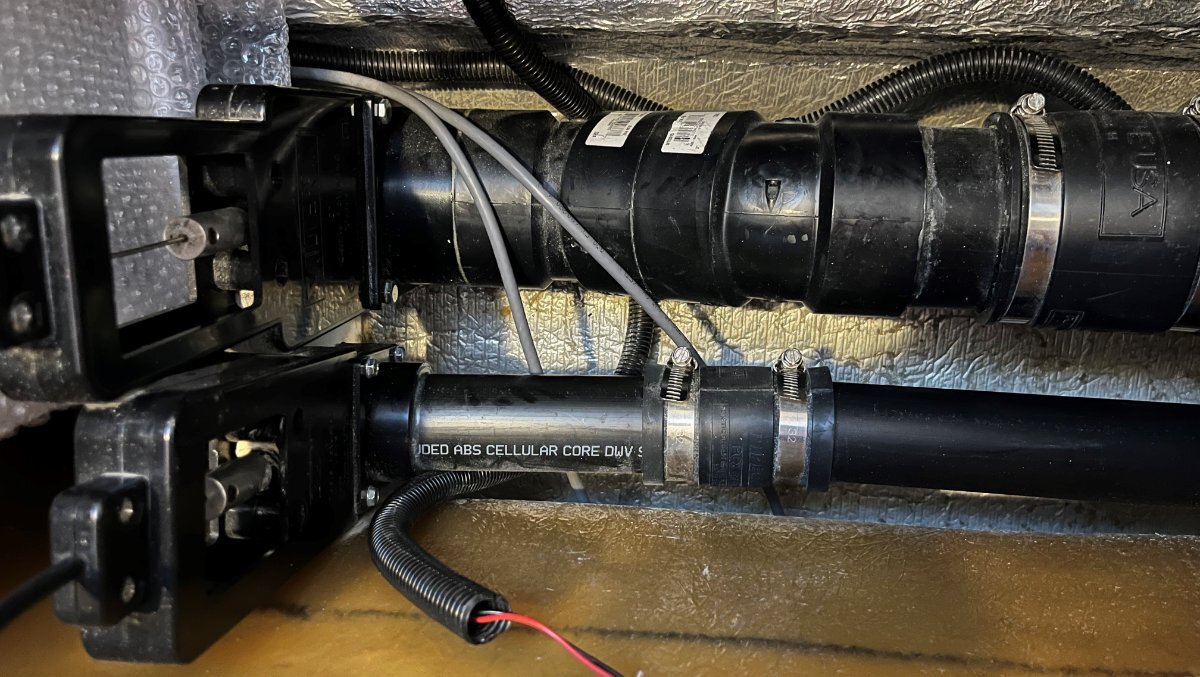
Thanks again Val. 😂 OTT service may have a point. Bummer, as this may kill my all electric plan! And I have another issue... I installed our Victron MP2 Inverter/Charger directly over the gray valve! So for ANY gray tank valve repair, I would have a whole lot of extra work to do! But I would rather do preventive maintenance at home than have a stuck gray valve on the road. Both of my valve handles are difficult to pull and return. Why didn't I think of at least greasing the cable and piston earlier? Not good for me and some others. Wondering why OTT Service does not replace these valves with the exact same part vs. going electric? I either want either two motorized valves or two new pull cables, not one of each. The gray tank valve was installed horizontally by Oliver (see pic, valve is bottom left and corner of gray tank is bottom right). There is ample room around it but the drain pipe is laying on the floor of the outer hull with some insulation and/or a rubber mat below it. The motorized valve protrudes in both directions parallel to the valve. So as-is, it will not fit. There may be a way I could rig this. I will have a new seals and new manual valve on hand when I work this. I don't like to pamper old parts, just to get a little more out of them. The original valves lasted 10 years and want something that will last another 10 years. The electric valve is the best solution since there is no cable, no maintenance. I can't pull the inverter every time the cable or valve piston needs to be greased!
1 point
-
YES, it important to have a pressure regulator. Not using one could result in you blowing your water lines apart at connections. A very costly proposition, not to mention a quick end to a trip. The water pressure isn't the same at each campground. Not using one is "high risk, low reward".1 point
-
It appears many of us use water from the FWT vs. the City Water inlet. Some of the hulls, ours included, have back flow preventers (check valves) AND restrictors on BOTH incoming water lines (see pic). The restrictor on the FWT fill line takes more time when filling the tank. When using water from the FWT you are past the restrictor. When using City Water you GPM is being slowed down by the restrictor during use. Once last year, I tried using the City Water inlet. Immediately, Chris cried out, “What’s wrong with the water?”
1 point
-
Some other culprits: Refrigerator, mulching toilet exhaust fan (if you have one of those), ceiling exhaust fan in bathroom, King TV booster (no idea how much power it uses, maybe nothing).1 point
-
We have a set of brand new still in the plastic mattresses for the twin bed side by side floor plan. When we purchased our trailer we purchased two of the thicker mattresses from southern mattress and installed them before we took delivery of our trailer. So they have been sitting in our spare room ever since and its time to do something with them. We plan to be at the rally in April and we will haul them down with us if someone is interested. I would like to get $100.00 for the two of them, but feel free to make me an offer. They are doing no one any good sitting in my spare room. Bill1 point
-
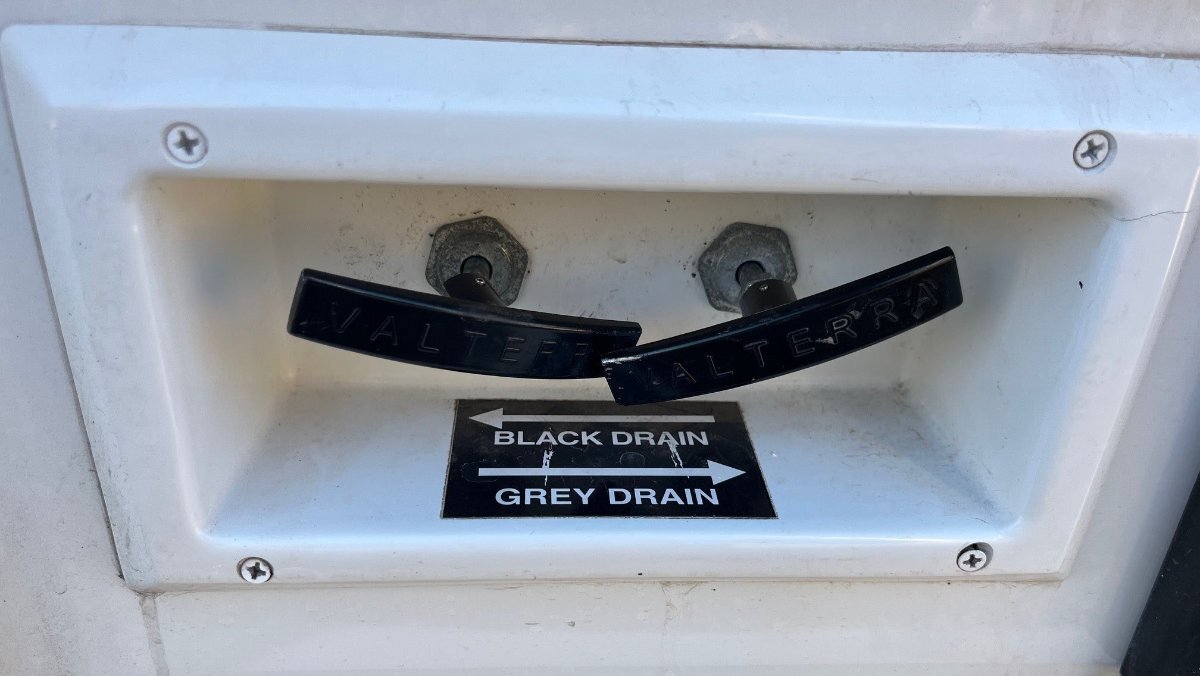
I concur with JD on the Valterra being all or nothing. The description of the product mentions limit switches so you don’t have to worry about holding a momentary switch until it’s fully open or closed (like the Autovent in the closet). There’s no “center off” position on the included DPDT rocker switch, so if you’re not opening, you’re closing or vice-versa. Turns out the included wiring harness is only about 7 feet long, so too short to install the switch in the position of the original handle. I don’t see another good place to mount it that makes any sense. That means I get to make up a new harness as I don’t like to put splices in the middle of a cable run - especially where that might end up someplace inaccessible. I’m also going to upgrade from 18-3 cable to 16-3. Mainly because that’s all I could find at Home Depot - and because heavier wire on longer runs is just good practice. Anyway, until I do the rest of the surgery, I’m have to duck under the forward dinette seat to actuate the valve. Already had one mishap and one near miss where I either forgot to close the valve. (Yeah, messy) or, opened the valve before I had connected the stinky slinky. The saving grace with that is IF you realize it before you take the cap off inside the rear bumper, you can lower the nose of the trailer and take the cap off without getting a shower….1 point
-
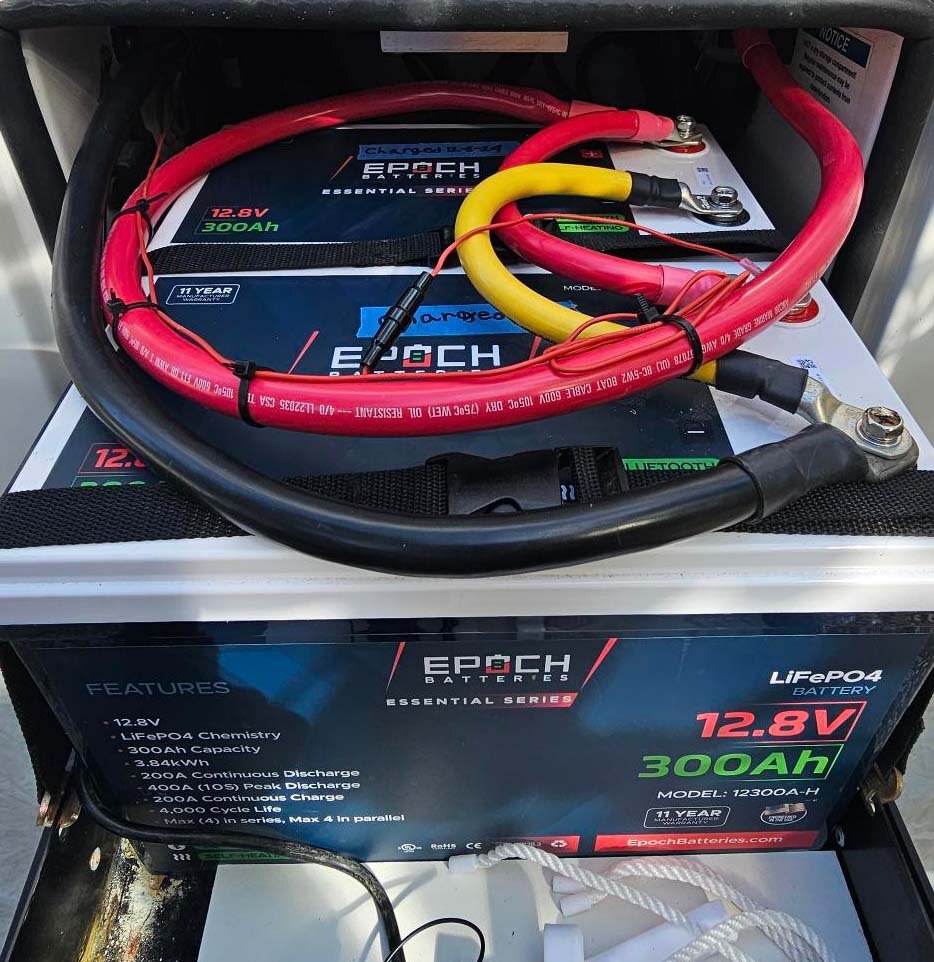
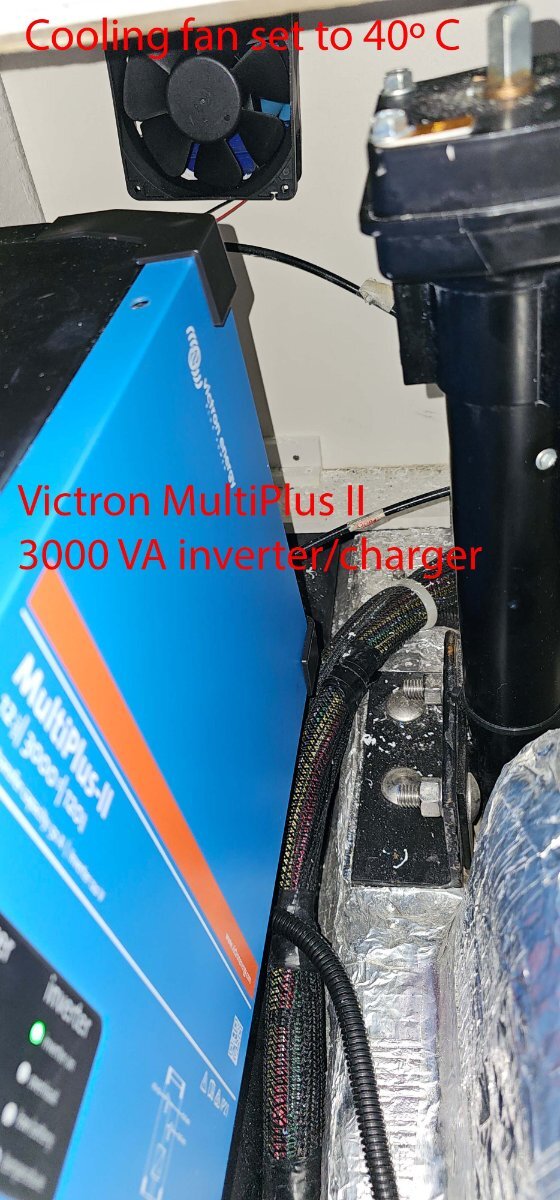
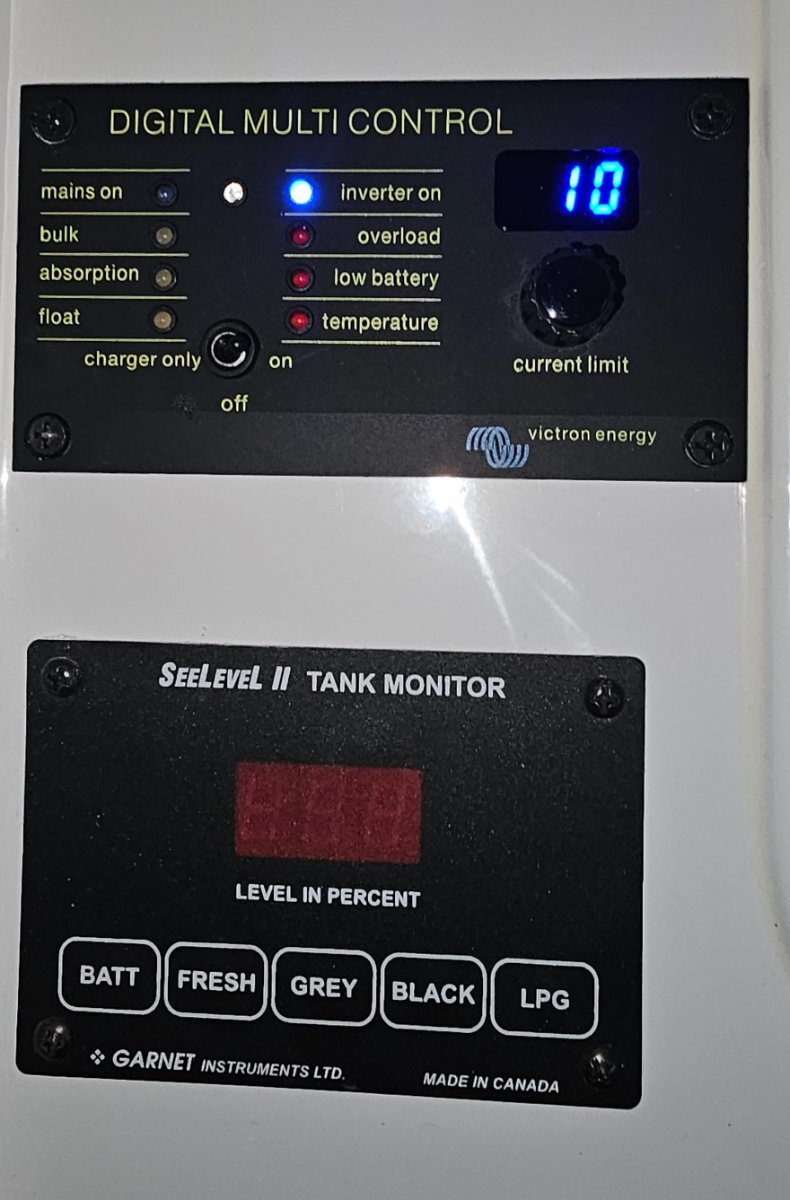
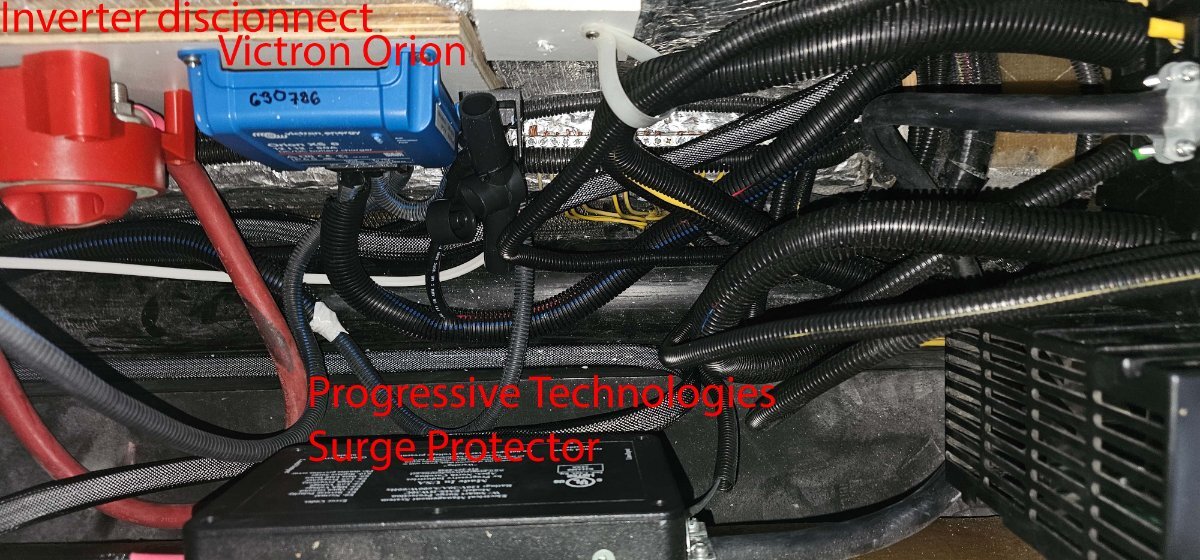
Overview We just got done upgrading our 2018 LEII (hull #344) from AGM to Lithium. The death knell had sounded for our original AGM batteries. So, given the cost to replace the AGMs, their weight, and the limited usable capacity inherent in AGMs, we decided to upgrade to lithium. We settled on 2, Epoch 300 Ah LiPO4 batteries with internal heating (a total of 600 Ah). The decision to purchase the Epochs was made easier by a 15% sale so we bit the bullet and purchased the batteries , a new Victron Multiplus 2 3000 VA inverter and charger, and a Victron Orion DC to DC charger which will allow us to charge directly from the tow vehicle. Here are more specific details about each step. We relied to a great extent on our tech. Victron Orion DC to DC charging We mounted the 50 amp Victron Orion under the aft seat in the dinette. The Orion was set to draw 30 amps from the alternator on the 2020 Ram 1500 Ecodiesel tow vehicle. The alternator puts out about 220 amps so we are confident this is well within safe operating parameters with all existing loads. We used 4 awg coupled to a marine connector from the TV to the trailer which looks to be quite robust. Of course, we disconnected the power from the 7-pin connector. Victron Multiplus 2, 3000 VA inverter and charger We mounted the inverter vertically under the streetside bunk. We also added a dc fan onto the bulkhead between the bunk and the basement to address heat issues and set it to operate above 40C. The inverter has a main disconnect as well as an inline breaker as per code. System Monitoring A Victron Multicontrol replaced the Progressive Technologies inverter switch from the OEM install and was installed in the same location. This is our primary control panel which provides operational status of the system, and allows us to control the input current. Specific battery State of Charge and other more granular data are available in the Victron shunt app, the Epoch app, and the Victron Multiplus app (as well as the original Xantrex Solar Controller which we did not change). Performance of the system We tested the system today by running our OEM Dometic Penguin A/C off the battery bank. We set the thermostat to 75 F. After 5 hours, we were at 55% SOC. Full disclosure, we only finished the install today and the tests were conducted in our winter conditions here in the Keys at 78 F ambient. The trailer did get warm during the day, but I do think we are likely to get 5 hours or so of A/C in the hotter summer months. Maybe even more. We haven't tested the DC to DC other than at idle. As mentioned, we set the charger to 30 amps so we are likely to get a full charge after a full day driving but that is just an estimate. We have enough leeway to turn up the output from the alternator if needed. Special KUDOS A great deal of thanks goes to our tech who helped install all this - Anthony from Outboard Rigging here in Marathon is the Man! Pictures of the install follows:
1 point
-
It's 12 years in my neck of the woods with a 5 year extension after recertification.1 point
-
I am old as well and we both have memories of our roadster days. I once wore a new set of tires bald in 12,000 miles with my 68 Datsun 1600. Anyway, I live in the inner city (Portland OR.) and have a low height garage so a truck is just not practical for me and on street parking in my neighborhood is a challenge. My plan when I first purchased #657 was to limp along with the 4Runner just long enough until a tow capable EV SUV became available. The Rivian would work but according to my wife I can't afford one. And actually, the 4Runner is working out much better than I could have hoped. Of course, having driven nothing but manual transmission cars most of my life (like you probably), I am very comfortable manually shifting the automatic when towing to enhance performance and the transmission in my 4Runner is designed for maximum engine braking when descending. I am comfortable driving in the mountains and rarely have to use the brakes much to control speed, even on 6% downhill grades. I have found that the vehicle struggles with an OEM air filter but performance excels with a K&N air filter. I do have to be careful in loading my TV and have become accustomed to traveling light. If I travel with both my wife and dog, I have used up my cargo capacity and most everything else goes in the Ollie. I always keep the Ollie below 6,000 lbs. My 4Runner is a rare version called the V8 Limited that was factory set up for towing and was made in a Lexus factory in Japan. I am the original owner. I think it is almost identical to your GX470 but mine has the x-reas schocks and a self-leveling rear end which yours may not have. It is also factory rated to tow 7,000 lbs which I believe is a bit more than the GX470. Anyway, right before I drove 2,400 miles to pick up my new Ollie, I replaced the x-reas shocks and air springs at a cost of $5,600 and had a complete brake replacement with all OEM parts at a cost of $2,600. I now have over 20,00 miles of towing my Ollie and quite a bit of it has been on interstates in the mountains of Oregon, Washington and Utah. The car does struggle somewhat at high altitudes going uphill on windy two lane roads, but downhill is never a problem and I have never experienced any sway. That said I sure hope to upgrade to a more capable TV soon. Then we can start bringing a few toys along with us🤪1 point
-
My choice of propane tanks goes to (minimizing) weight being the highest priority. My tow vehicle (TV) has very little cargo capacity so minimizing tongue weight is very important to me. I am an outlier in that regard on this forum. To minimize weight I switched to composite propane tanks shortly after I acquired my LEII. When empty, they weigh about 1/2 of what a common steel tank weighs although the capacities are reduced somewhat. The 20 lb equivalent holds 17 lbs and the 30 lb equivalent holds 22 lbs of propane. Most people couldn't justify the cost because they are much more expensive than steel tanks. However, if lowering tongue weight is important for you as it is for me, you might want to check them out. They are way less expensive then a new TV🤑 I am pretty sure there are a few of you out there that would really appreciate the light weight and don't do extensive cold weather camping. Even if I get a new tow vehicle, I will probably continue to use the composite tanks because they are so much nicer for everyday use. In addition to being much lighter when full, they have a wide base and are extremely stable in the back of the vehicle without tie-downs. Also, they have no sharp edges whatsoever so it is much easier to carry around and pack in the Ollie when carrying a spare tank as I do for cold weather camping. I have never had any problems getting them refilled. They are made in Europe and imported by Viking Cylinders. https://www.vikingcylinders.com/online-shop/ Since they have a much larger diameter base, if you switch to them you will need to switch out your 2 tank mounting tray inside of the doghouse. Viking Cylinders sells a custom fit replacement tray for $40 and the old tray is easy to swap out for the new one and back again if necessary.1 point
-
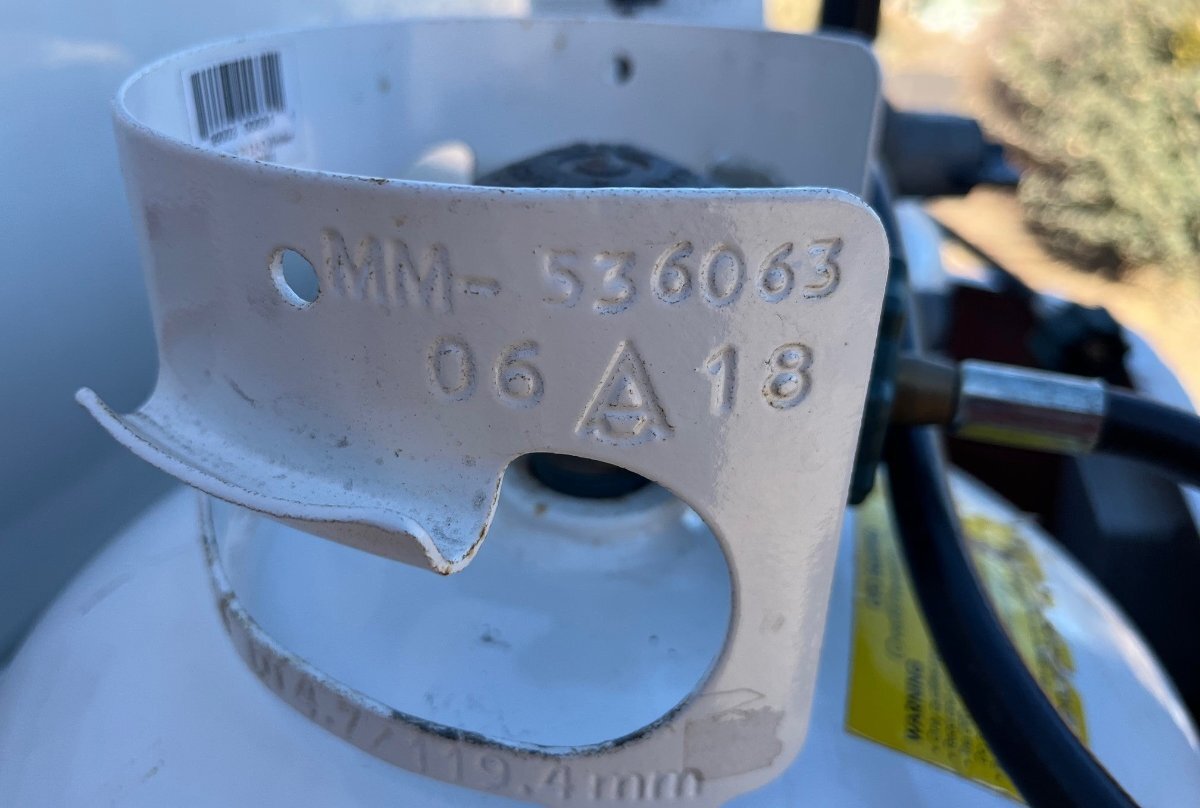
It is my understanding that propane tanks under 100 pounds have 12 years before they need to be re-certified. So you have until 06/2030! 👍 Dave1 point
-
Thank you Steve, for your usual experienced sound advice! I filled our tanks today to get ready for travel. It took me forever to find the numbers since there are nothing but numeric codes all over the top handle of these tanks. Our two 30# tanks both have June 2018 dates. Wow, gotta love it! 🤣 We have 3 years and 5 months left on these tanks. I imagine the original owner received 20# tanks upon purchase and after two years realized two 20s were not enough. Our tanks have a Flame King label. Not sure if this is the brand OTT installed at the time. Love that I have over 3 years for this cost, and again thank you. 😂
1 point
-
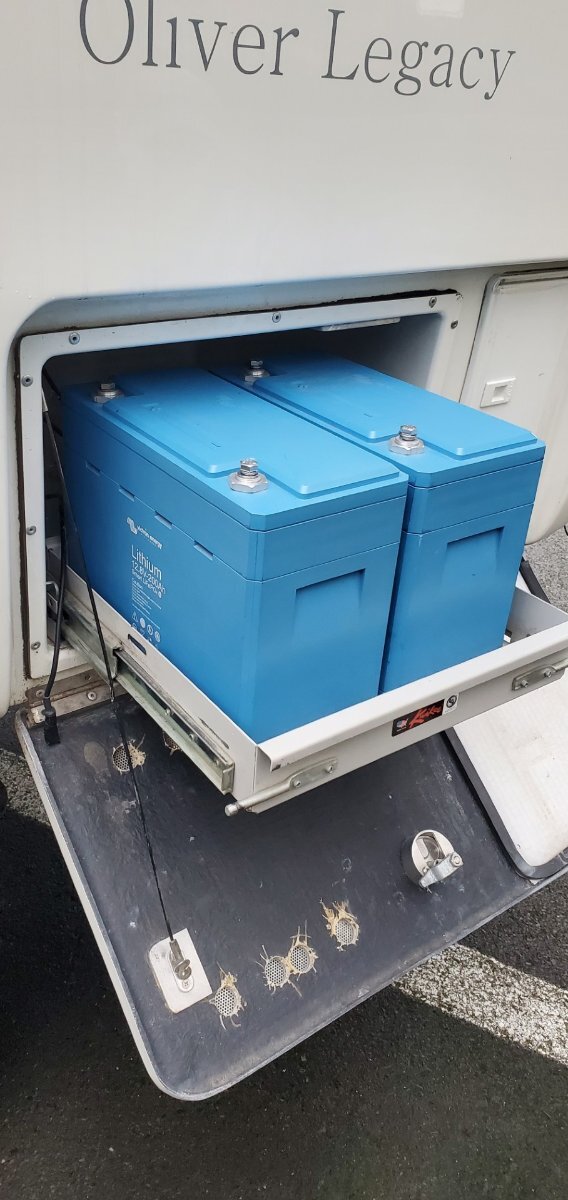
Here's a pic of a couple of "dummy" 200 amp/hr Victrons mocked up in my tray to see if they would fit. Dave
1 point
-
Does that also mean that it is "5 o'clock somewhere"? 😎 Bill1 point
-
Given this statement, why spend much more money than the 300AH Epoch, going to 400AH Victron batteries? Without an inverter these AHs are overkill! It's difficult to use 100AH running 12VDC only let alone 3-400AH. Your batteries will likely sit above 90% SOC most of the time. Another way of looking at it is you could stay off-grid and wait a week or longer for a sunny day!1 point
-
@jd1923 Good idea. Although, I would question how waterproof those switches really are. The rubber boot does not do it for me.1 point
-
And that's the hard part! Running wire and mounting switches NP! Yes, of course more expensive with much greater functionality! Thank you, I just added this to my Wishlist! If you are going to all the work of replacing the valve, I would certainly go this path. I like the short pull (backup) handle that would be more reliable than a 12 FT cable and simple electric motors are generally reliable. I replaced ALL my manual water valves to electric already. This is a no-brainer for our hull! This valve is rated 4.5 on Amazon with 200 reviews. @rich.dev has the best idea, I think. Put the switches where the current handles are located. I would scrap the supplied wire harness (likely not long enough) and the supplied (awkward) switch and plate and buy 3 marine grade (waterproof) simple toggle switches, up for open and down means closed! They will fit in the holes left by the pull handles once removed. Run stranded 14 AWG wire which should be fine since they use a 5A fuse in the switch. I would also relocate all fuses to my 12VDC positive bus. Handy since I relocated it to under the rear dinette seat. Better to have all fuses centrally located than at the switch or the motor (for all appliances). I would replace all three (3) valves, sooner or later. Really dislike the one by the toilet that keeps the gray from backing up. How many times have we forgot that and have to climb back up in the trailer. All switches together, in the same outside location makes sense to me. We always have that rear hatch open when leaving a campsite anyway. Added a couple pics, food for thought, and thanks again for this idea! 😂
1 point
-
Rich.dev, Yes, that’s the one. Only swapped out the black because the grey is fine. Not sure how long the wires are. I’m good at splicing if it comes down to it. Steph & Dud - The valve pushed in dead easy. So pretty sure the cable is binding in the sheath around the bends. And yes, I’m loathe to complicate simple systems, but if those systems don’t work…. Besides, this is the “fix” Oliver uses. Worst case scenario - you can actuate the valve manually - just have to go under the dinette seat. V1 point
-
Just in case, before you install an electric valve: If you disconnect the cable from the existing valve does the cable pull out of its sheath easily? If so, the resistance might be in the valve itself. That happened to us. Valve lubricant worked for a while but the valve eventually leaked and had to be replaced. Still cheaper than an electric valve and less to go wrong in the future. (Electric gate valves add a motor and wiring to a previously simple system.)1 point
-
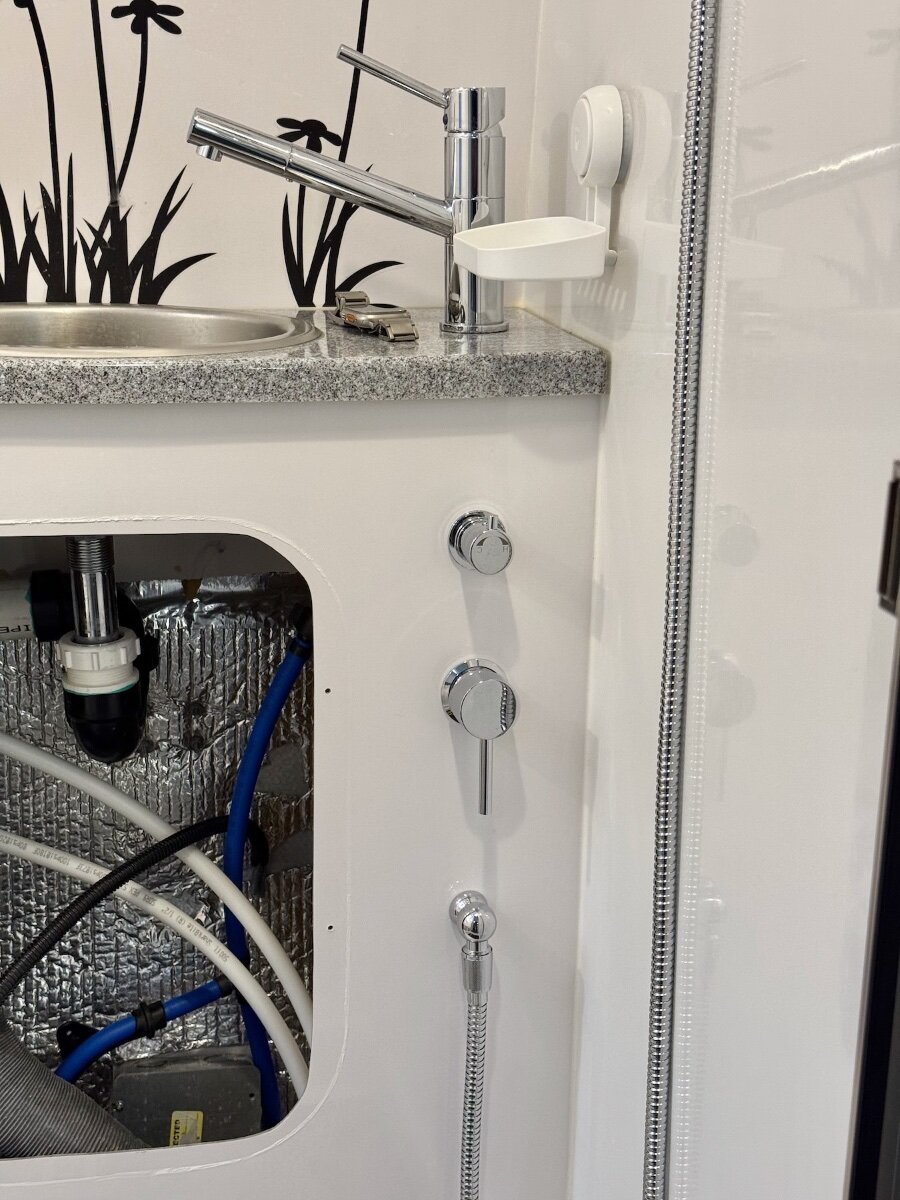
A follow-up now that we’re in Florida at the 9th Annual Eggs ‘n S’mores rally, and can actually test the modification. 1) Someone appears to have connected the hot and cold feed lines on the bathroom backwards… Back in November I’d already had the water heater drained and bypassed, so I had only tested for leaks and function. Guess I should have checked to see if it worked as designed!! 🤪 I’ll swap the feed lines tomorrow. B) Something I didn’t anticipate, and need to look at @mossemi’s drawings again. Everything works fine other than the above notable exception while feeding from the fresh water tank. But when feeding the system via the city water inlet, it is somehow filling the fresh water tank and eventually overflowing. I’m guessing Mike had a one-way valve in the recirculating line that I missed. More to follow!
1 point
-
I understand, feel your pain! First thing I did was to replace the corner mounted 24" TV. Prior owner had replaced the OEM with an Amazon Fire TV, but still bad and ugly. I also do not like the folding center mounts that OTT uses since they fold forward and the TV is hanging out in front of the nightstand vs. back against the rear window for better viewing while in bed. Another goal was also to install a WHITE framed 32" smart TV! Samsung is my favorite brand (better OS than Android, Roku and other). Added a Samsung soundbar too that connects automatically via choice of Wi-Fi or Bluetooth. The very thin hi-rez screen is beyond the quality most and the sound sure beats the 4 cheap OEM corner speakers. It's been 18 months now and I would not change a thing!1 point
-
Thanks, Bill. I don't have any PEX in our house, so I had no need to learn, nor buy a crimper. I'll get the SharkBite "T", and a couple spare straights and elbows. I appreciate the reply.1 point
-
I just had my new TV ceramic coated (Star White Ford 250 Tremor 7.3) and the installer made a deal I could not refuse to coat the Oliver. I showed him the OTT website and he was immediately interested. I might get my first Ambassador stipend before I even take delivery of mine! I'll keep everyone posted. From what I have observed this is not something you should buy from Amazon and brush it on in your driveway. My installer has environmental controls like hepa filters, UV light curing and he goes though about 30 microfiber applicators. This is after he strips and de-waxes, clay bar out the impurities and then buff out swirl marks for prep. Around 20 hours of work.1 point
-
I missed that in your comment. Sorry. You're looking at diy. Honestly, I think at least 75 per cent of modern waxes and coatings, if specifically designed for marine grade fiberglass, are fine to great. We've always used paste wax, with uv inhibitors and a high carnuba content. So, we stay with that. Others have used polymers, and spray waxes. Paste, spray, wipe on/wipe off. It's somewhat of a personal thing. This has been a raging debate for decades in the marine world. Most important, imo, is keeping up, keeping clean, and consistency of product type. You can read practical sailor reviews til your eyes glaze over. Or, review marine forums. Or corvette forums. Or fiberglass plane forums. (I'm a self- proclaimed coatings nerd, and I read them all the time.) My advice is to buy and use a product with good uv resistance, and a shine level, and a personal work level, that you can live with, imo, from a reputable company, like 3m, starbrite, meguires, collinite, etc ., that will remain in business, and allow you to buy the same product, year after year, and you'll likely be good.1 point


.thumb.jpg.e34bf01ef7f7d5e99ad31856d45afbeb.jpg)


-
Recent Achievements
-


")


")


