Leaderboard


Popular Content
Showing content with the highest reputation on 05/20/2025 in all areas
-
There was an earlier question about removing the old fridge. I had quite a bit of trouble with the original fridge (as many on the forums can testify to) so was extremely happy to get rid of it but still was very careful about it’s removal. 🤪
 8 points
 -
Ditto. If a 25 footer were to magically appear, I would try to be the first in line to admire it. But not likely to trade in my Ollie for one. I suspect that the majority of existing owners feel the same.4 points
-
We spend a lot of time away from our campsite. I like having cold foods and drinks (think beer), and frozen treats in the Dometic dual zone when venturing out for the day. So we’re out-and-about and the question comes up “whats for supper”? “Oh, let me take a couple of ribeyes out of the freezer, should be thawed by the time we get back to camp”! ‘Nuff said.4 points
-
Our Dometic has served us well too. We try to avoid the heat, and usually only encounter it as we escape from the south Texas temperatures to cooler climates. I know the time will come when it will need to be replaced, but hopefully we’ll have a few more years of service from the Dometic. Mike4 points
-
Just came across this company today while investigating GPS devices, Infotainment system upgrades, and all things monitoring via 12 volt DC in the tow vehicle. Had not heard of this company until now but the inclusion of a TPMS system integrated into a Rear View Camara with high quality monitor and imaging seems like a double win to me. https://www.haloview.com/products.html And here this fellow provides and excellent review and YouTube video demonstration of the Haloview setup. Hope y'all find it usuful3 points
-
Update on The Dexter Fail: I contacted Dexter using the warranty claim form on the Dexter Brakes web page. In that they asked all kinds of trailer info, and to include contacts at the dealership that did the install and also asked for pictures of all the failed units. After sending all that in via their web form, in 2 days they determined that they were "replaceable under warranty" Dexter agreed to replace all 4 brake assemblies with brand new manual adjust assemblies which they have shipped to my home. End to end the warranty claim to delivery of parts took 1 week. E-Trailer had nothing to do with it, in fact they gave me the wrong contact info for Dexter brakes.. Craig Hull 5053 points
-
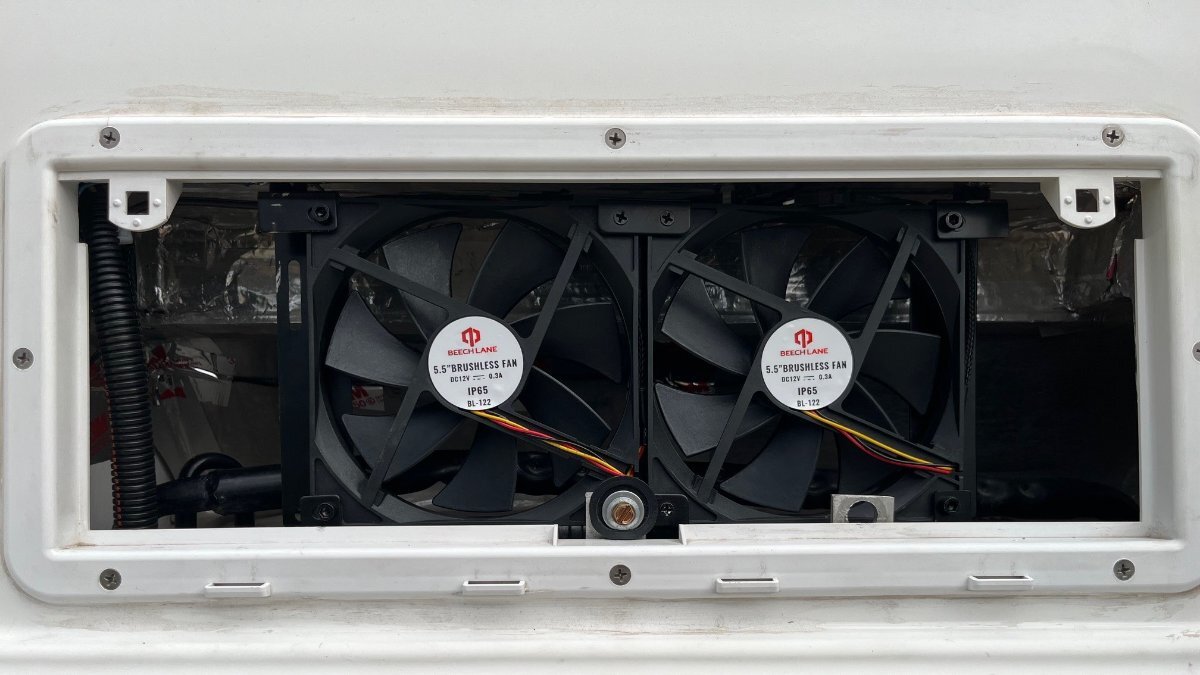
Us too, last trip in the high 9K elevation of the AZ White mountains we turned the fridge down from the 4 setting (of 5) down to 3 because the fridge got down to 29F. Ours also runs stronger on LP than on AC/DC which is a plus for use boondockers. We do not travel in summer, unless like @Mike and Carol we are leaving to head north or high altitude. Last on the way to St. George UT late April, we ran into high 90s once we dropped altitude and and into Nevada. IT was the only time the Dometic Fridge got warm, over 40F and it was before I added the Beech Lane twin fan that really pulls a lot of heat out of the rear vent cabinet required for an absorption fridge. Hopefully none of have to take Ken's lead @mountainoliver, though I would start with a 5 LB hammer! To date all systems, buttons, freezer hinges and everything else is working, knock on wood...3 points
-
Actually, I prefer you here and in prime form. What you say is generally what Im thinking and it is a relief to read comments that sometimes goes against the grain. It’s like adding spice to the stew. Makes it thst much better. I’m not fond of Dometic, but I certainly can’t complain too much if they keep running and doing their job even when the door falls off due to poor design and is held on with duct tape, and the shelves won’t hold a milk jug anymore. I like to keep things simple. I like the phrase, one fridge to find them, one fridge to bring them all, and in the darkness bind them. So I would prefer to have just one fridge freezer that will hold everything instead of two, one in camper and one in truck. And even though the idea of a dry bath is appealing, I kinda like the Hobbit hole I have now.3 points
-
If keeping the OE2 footprint/size the same, I think that a taller refrigerator with more freezer space, and keeping a space for a Microwave/Convection/Air Fryer (pick one). To do so, the overhead cabinet would need to be reduced. Or maybe a 25' Ollie with a dry bath and bigger kitchen to get a full size frig. With a Heavy Duty Package that includes beefier jacks, 5200 axles, disk brakes and race style FOX cooled shocks. Ditch the Anderson and require a F-250/2500 TV. But then this ought to be a separate thread I suspect! GJ3 points
-
Wow, that's a nice setup! I have the TST system for monitoring tire pressure and a VIOFO Dash Cam A119 Mini 2. And based on Mike Urbancic's replacement rear view camera at the rally, I just bought a Haloview MC7108 to swap for my Furrion. Combining these three into one unit would be fantastic, and eliminate some wiring. The Haloview I just bought was $200, and I could send it back. But I'm not sureI want to spend an additional $400 to replace the TPMS and dash cam I already have. Hmmmm... But if I were starting again, this is definitely the way I’d go.2 points
-
Yep me too! But with currently just one ice tray in the frig, and down the road with likely a Nova Kool with it's 20% smaller freezer (Thanks JD!), it looks like I will need to add one of these to my Ollie inventory this year! But wait a minute... that likely will cause me to add TY J's 300 Watt Bouge Cigs Fla Solar Panels on the roof next year! Thanks guys you just made my 2025 and 2026 Ollie Mod lists! GJ
2 points
-
I could definitely go for that. Mine usually goes over ice.2 points
-
Nothing like good ol’ rich two cycle smoke. It keeps the bugs away. Maybe you were referring to something like this?
2 points
-
Thank you @ScottyGS for the reminder re this Sirocco II fan! OTT had drilled a HUGE hole in the back corner for TV cabling, so I was able to install ours without drilling any holes. If this hole was not already there, I would have drilled a 9/64" hole for the wiring, centered to the mount so no wires would be visible. Instead you can see about 3" of wiring coming out the the side wire channel of the fan. They provide 2 screws and nuts to secure the mounting plate to the fan. Wire first, then screw the plate, then add the tape. Wired it to the 12VDC present above and the whole job took an hour. It's rather hard to square up the fan in this location, since the back wall is curve. To line it up, I laid on the bed looking up, let one edge slightly touch and when sure of its alignment pushed up. Then push up on all sides, rock it, twist it so the tape will bond. The down side of VHB tape is if you do not get it straight on placement it will forever be installed on an off angle. Be patient. 3M VHB 4950 is a great product. I've used it to install rooftop solar panels on our old Class-C, on the new antenna I installed on the Oliver and in dozens of installations. Some do not trust tape but it is amazingly strong. In fact I will be very sorry if I ever have to remove it. Likely for this fan, I could have used half as much tape. I ran one length of tape right down the middle and then two more and used a razor blade to trim it to a fitting oval (pic1). BTW, do not purchase the tape I linked above which is 3/4" and a mil thinner (another Amazon return!), pay more and get this product instead. https://www.amazon.com/dp/B007Y7GIKI/ If you prefer to use screws, do it correctly as Scotty demonstrated, machine screws with nuts and make a backing plate. I used that kind of installation for our TV mount. Never use wood screws into fiberglass as OTT does in way too many installations. I wanted the fan far back and pretty close to our TV to make the most room possible for our PJ baskets (pic2). Also, in this location the rear window can be cracked on that side to bring in cool fresh air. Chris will be VERY happy on our next trip. We're leaving next week to MN, ND, SD, WY, and the Western Slope of CO!
2 points
-
with 80” long beds! (1/2 a queen)2 points
-
No your good John. We all appreciate your posts and the quality of the mods you do. I do have to admit that some of us may be a bit anal sometimes in our responses though. Like mine maybe? I don't think of our Dometic 3-Way as a total POS. After all it is in it's 8th season and gets the job done. And as you mentioned the Beach Lane condenser fans do make it more effective in very high temperatures. I do think that its technology presents a few special hazards that we owners need to keep top of mind to ensure tragedy stays away. When I was planning ahead to the future and posted an updated DIY, it was just that... looking to the day when my Dometic dies. Hopefully I'll have a few more years before doing a John Davies on mine to get it out; and buying a new one. For both of us, hopefully by then the price will have come down like the Litho's have.2 points
-
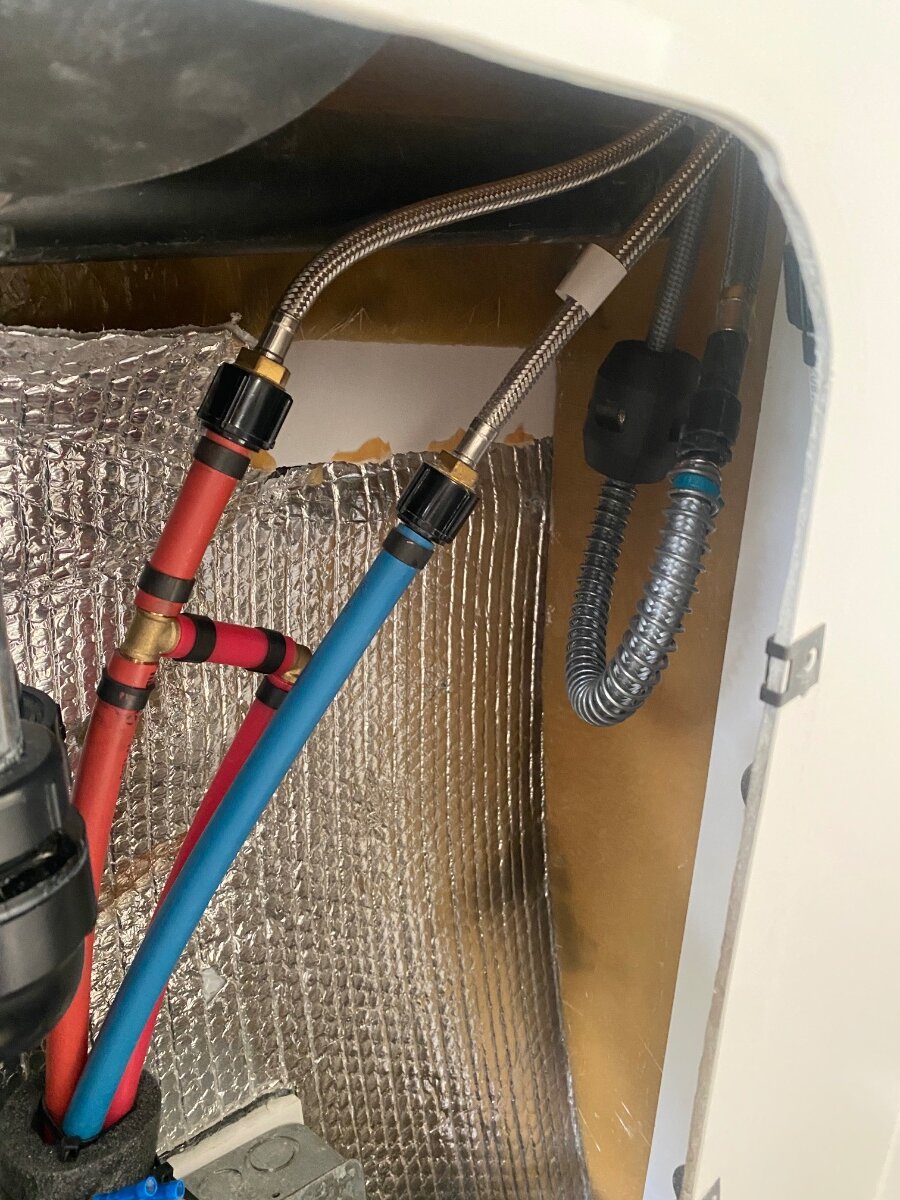
Added a cooling fan following many other installations in our 3 way Norcold. Fan mounted by bolting onto a shall sheet of screen door panel from Home Depot. Air flows up from the heat chamber around back side of the panel and forced out vent slots by fans. Unit held in place with high temp furnace aluminum tape. Used high temp race for wires down to the bottom chamber where the control is mounted and wired into +12 / GND. Hope this helps anyone else doing a similar mounting process. Pix 1: Upper Vent area: Fans wouldn't fit directly onto vent cover due to space, so I chose to mount it at an angle that blows the hot air directly out the vents (which are slanted that direction). Wiring in the controller to the +12 and GND took a bit of cable splicing and re-building. In hindsight, if I'd had 3-way cable crimp connectors it would have been easier to wire in the controller. Craig - Hull 505
1 point
-
Follows is a whimsical discussion "envisionating" what such a trailer would be. I'll crawl out on the limb and call it an OE3 for grins. First I agree 99.9% of your suggestions on the what we would like to see in an OE3. Assuming 25' and 8000 pounds of the OE3 we can consider the tongue weight/balance. I assume that your suggested OE3 12%+ tongue weight is to accommodate heavier than average OE2 rear bumper loads. Over my past eight seasons with our OE2, I have noted a significant number of owners hauling more stuff on their rear bumper. So far, I don't recall any such owners experience any increased sway of their rigs. This speaks highly of the OTT efforts to make a non-sway trailer that we all enjoy. It is logical that a family wanting a larger Oliver, would also want to haul more storage inside as well as on the front and rear of the OE3. Additionally that pound for pound, that rear loads have far more impact on sway than front loading. Granted my Beast (F-150) would likely protest that assumption! For OE2's, If we are running with no or lighter rear bumper loads, then the current OE2 sway design is near perfect for most of us. As well, it is likewise for those running with greater rear loading. A statement of design safety margins OTT used. I am postulating that most of us are likely running in the mid 500's on tongue weight as a result and our loaded trailers are around 6,000 pounds. That calculates to about 9% tongue weight. For an OE3: I am thinking that the additional length and mass of the box section would move the CG rearward of the current OE2 CG. The further from the hitch the CG. the less sway becomes a concern. So I am thinking that if they shoot for the same % tongue weight for a 8000 pound OE3 (720# TW), they should be good to replicate the great sway performance of the OE2 design. What do you think? GJ1 point
-
Spot on. Your comment caused two of my few remaining brain cells to wake up. The twin 5" fans of the Beech Lane moves a lot of air. Hence why it is so much more effective than the 3" Titan's some of us once used. This air movement can act to assist in purging the cabinet of potential CO.1 point
-
Ron sir, you are the king of mods, having something for everything. Reason why your HD van was the right TV upgrade for you. When are you going to add solar & charger and a small cooler to those e-bikes? Think e-bikes that never run out of juice and a cold beer while coasting on your e-bike. You're also going to need one of these: https://www.amazon.com/RAM-MOUNTS-RAM-B-132-400U-Tough-Claw-Self-Leveling/dp/B00PAQKQH6/1 point
-
Perhaps a more precision extraction device can’t be found. I would likely use a Sawzall just to cut down on the smoke.1 point
-
So far at least for us we have not encountered issues with the Dometic fridge and while we don't camp normally in uber hot weather like you folks do in the Deep South and Southwest in the summer still we have been in temps well into the 80's, 90's and flirting with triple digits yet the 3 way absorption seems to cool well enough and keeps items in the freezer section frozen with a setting at 4. The big complaint is the lack of fridge storage and now the possible concern of CO2 emissions in the cab not something I had been aware of until now. Good to know. Would have preferred if Oliver had designed the interior for a larger fridge and eliminated the microwave which we opted out of. Don't use one at home, saw no need for it while camping. While we have made good use of that space for other storage, still it would have been a great option for larger fridge, Oh well nothing is ever perfect.1 point
-
thanks for the lead. I found it at: "Improved Toilet Rinsing" on Google Search. https://olivertraveltrailers.com › forums › topic › 10505... GJ1 point
-
Wow! Great job and good looking installation. I know that you will really like the new fridge. Glad to have been able to be of assistance. We never have to even think about the fridge, it just does its thing without worrying about outside temperature or if it’s level or bugs/dust getting into the camper through outside vents. You absolutely will never regret the changeover!1 point
-
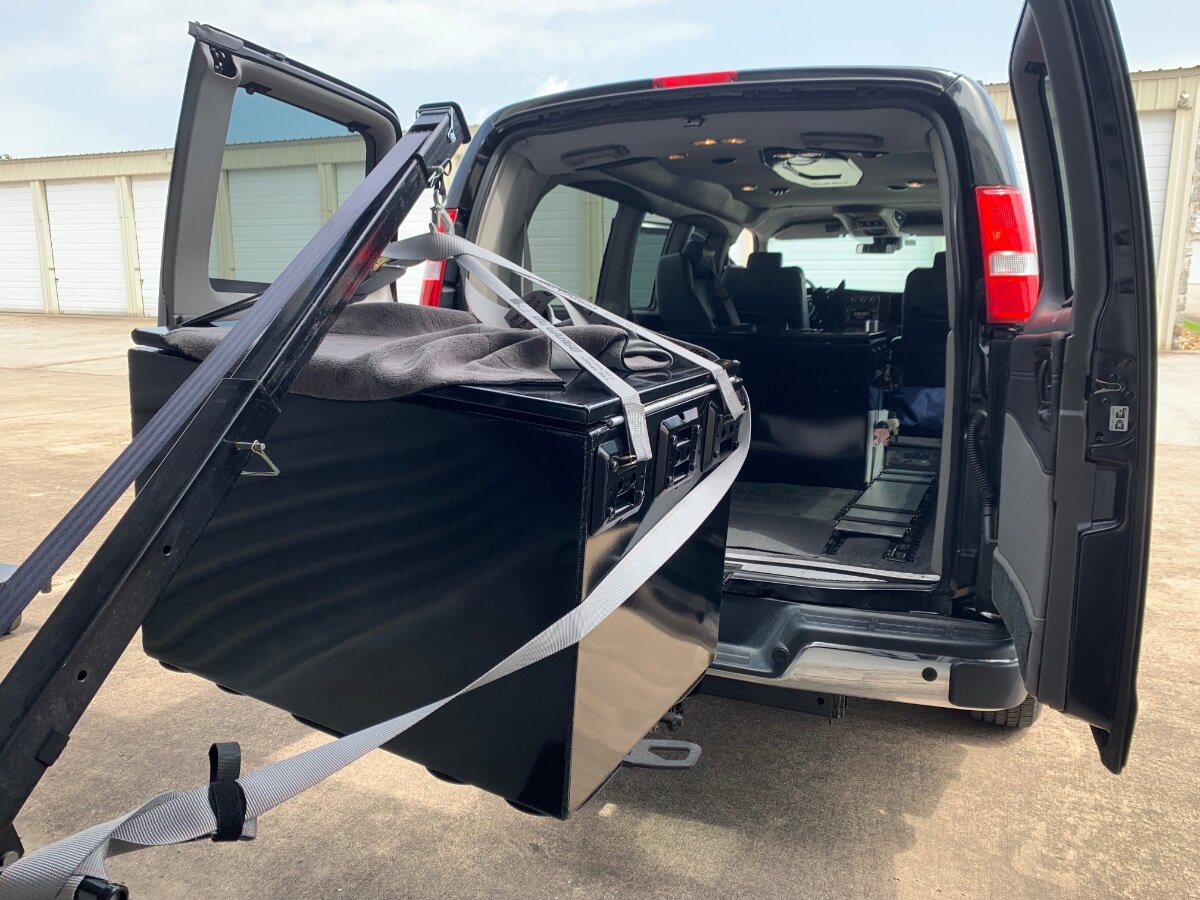
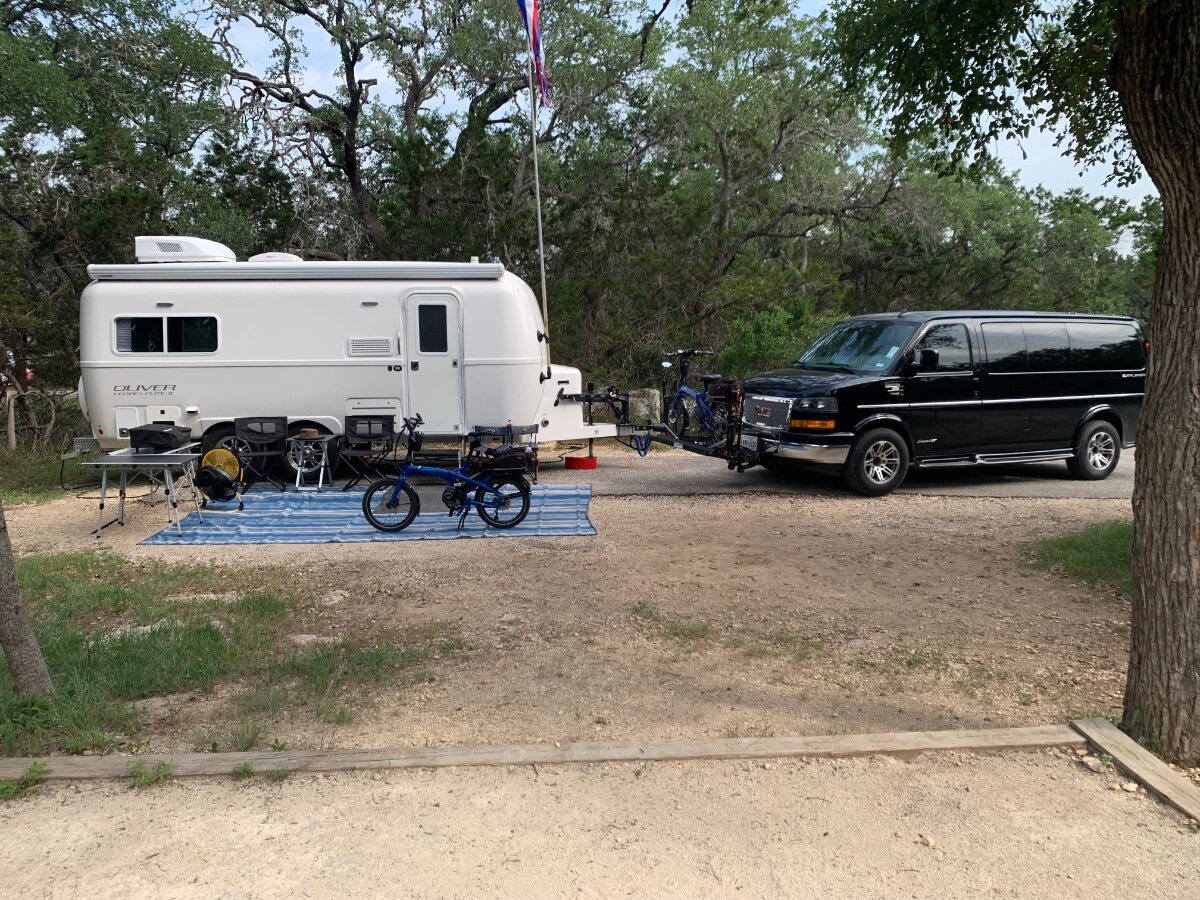
With the Savana readied to roll our COW to a scheduled destination, last week’s trip went very well; credit to the many upgrades and mods in the past few months. Here’s a few pics: Loading modular box at COW Barn containing camping gear. Improved safety chain management with newly installed hammerlock coupling links. Newly configured 7-pin and DC-DC connection cables. Ready for takeoff. Smooth landing at destination. Camp R&B, Guadalupe River SP, Spring Branch, Texas. Trailhead parking for an evening bike ride. Morning coffee inside the Savana from a rear passenger captain seat. Wash station setup.
1 point
-
Great job MIke! One of my favorite up-grades. Much more efficient unit boon-docking and works without worry. I like the fact that if I have to do anything, it is turning the setting down to keep things from freezing. Again, the vents look awesome. BTW, I did have the door come open on our last weekend trip. If you have the door loaded up make sure to use the locking clasp. Best, M It was good to see you at the rally.1 point
-
I was also looking to extend that hose, but couldn’t find a hose to fit it. Instead I lengthened the existing hose by sliding the weight down and adding a spring to prevent kinking. I got about an extra foot. This was described in a post titled something like “ Better toilet rinsing “ I also extended the shower hose by adding a second section. Those fittings are common to most showers and hoses are readily available. That post is titled something like “Washing dishes outdoors.” Sorry if those titles are not exact, but it should be close enough for the search engine. Good luck! Geoff1 point
-
Great looking installation! We've got a 2018 Dometic 3-way that's likely the same as yours was. It struggles in the heat and will probably suffer the same fate at some point... we're messing with fridge fans now, but the compressor fridge certainly seems like the way to go. Did the old Dometic have to come out in pieces? Did the new Nova Kool fit through the door opening without removing the screen or the door?1 point
-
Very nice with the vents in the fridge basically matching those in the microwave. Like the additional insulation in the compartment too. Nice job! Bill1 point
-
Here’s my adaptation in mounting the two Sirocco ll fans back in 2020 shortly after our OLEll purchase. By chance, my setup has worked really well, thus far! Rather than a permanent mount and hardwiring, I used Velcro for attachment and installed ports in the fan base for a detachable power cable. The fans and cables are stowed in the attic when not in use and can be deployed, as needed. The two primary locations are above each bed and an alternate in the galley to direct air flow toward the dinette. I like that the fans are multi-directional both forward and downward facing. The white Velcro is not very noticeable at the three attachment points and excess cable is simply wrapped around the base for a clean appearance.
1 point
-
Same issue a few years ago. I cleaned the hull area where it was mounted with alcohol first removing any residual factory adhesive. I secured it with 3m VBH tape and it has not moved. 👍🏻1 point
-
Gorilla tape OK for a trip to Depot or True Value… Get this instead and at this price, buy two and keep a roll in the Oliver. Since I found this for you and the price dropped from $20, I just purchased an Oliver-only roll! https://a.co/d/dMG8apM1 point
-
Not really "Wild" but it was an "Adventure" and it is an Ollie... This was taken down on the beach at Rocky Point in Old Mexico a couple years back...
1 point
-
Good idea! Frankly had not thought to do so!1 point
-
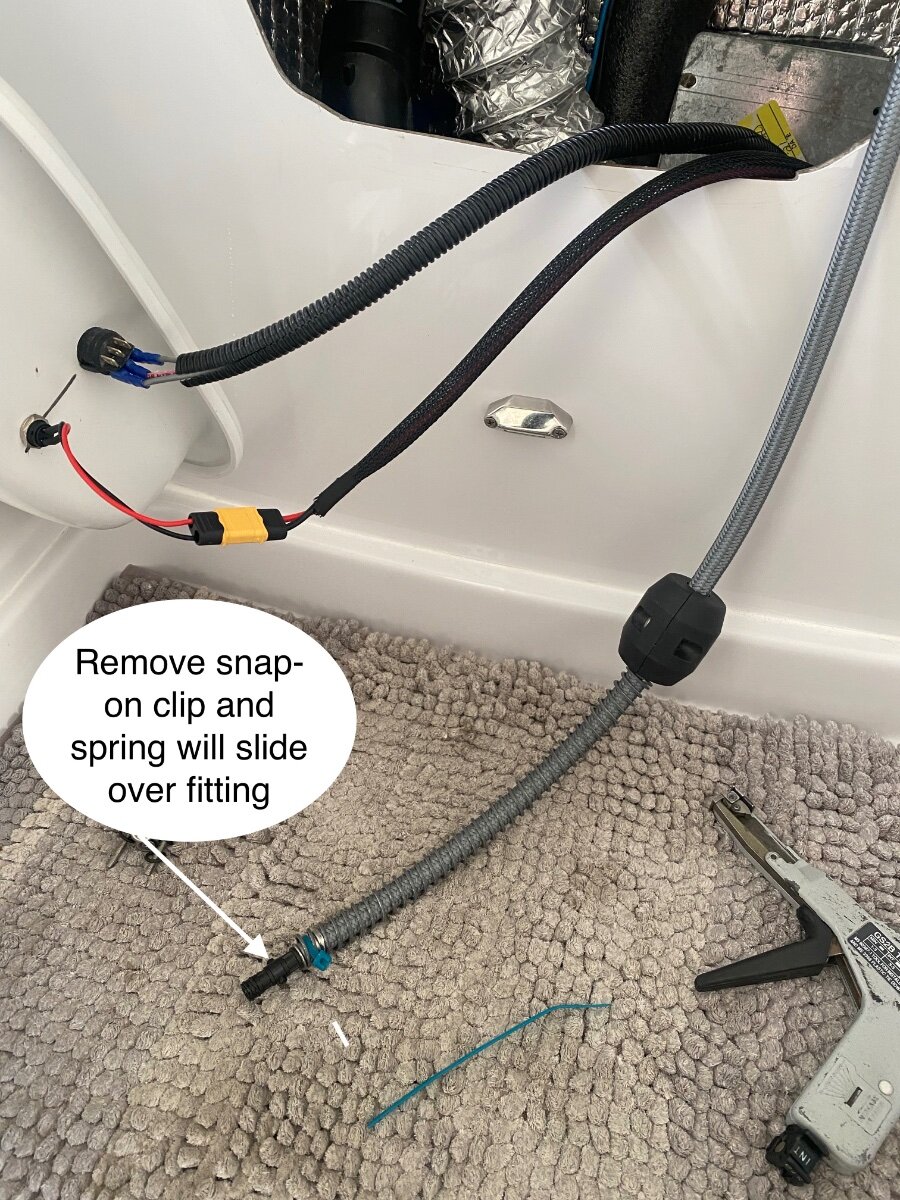
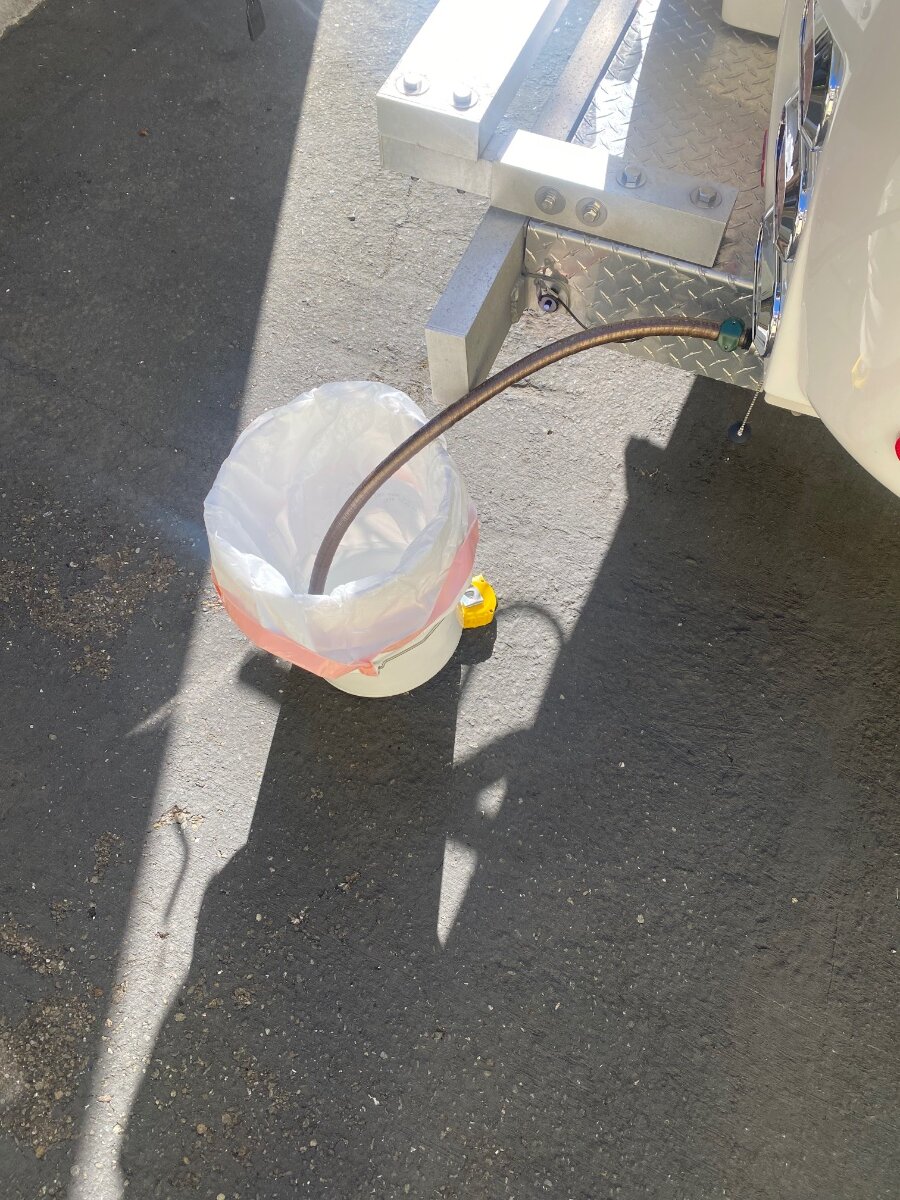
Last year while messing around under the bathroom sink, I adjusted the weight on the “pull-down” faucet hose so that it would pull out far enough to rinse the toilet. That worked for awhile, then the hose started kinking when it was pulled all the way out. Rats! So while preparing for the next trip, I decided to try another approach. I found a 1/2” x 10” spring at the local Ace that fits snuggly over the hose (when little snap-on clip is removed.) The spring was tie-wrapped in place and it allows the hose to bend tightly without kinks. Now the hose easily reaches the toilet for better rinsing. This is a quick and easy mod, particularly if you have done the “Bathroom Vanity Cubby Modification” by Frank C. It allows cubby to be quickly removed without having to re-caulk every time. I was also adding a little water freshener today, so thought I’d share another idea that's probably not new. We always carry a 5 gallon bucket and tall kitchen bags to use as an outdoor trash can. If we want to fill the fresh water tank from the Boondocking inlet, we use the bucket with a new trash bag as a clean liner. We also carry a short piece of garden house for this purpose. Saved us a few times. Cheers! Geoff
1 point
-
I have been using this hose with a quick connect fitting and I love it. https://www.amazon.com/gp/product/B0894GMDWP/ref=ppx_yo_dt_b_search_asin_title?ie=UTF8&th=11 point
-
I purchased a six foot water hose from a big box store, and cut it in half. One end goes in my truck to help me fill my Reliance 5 gallon tanks from a hose bib. The other us used to suck out water from my 5 gallon containers when boondocking it into Ollie. Both of the cut ends of the hoses are beveled 45 degrees to keep them from "sucking down" in the containers. GJ1 point
-
This is a great idea, but with no room to haul a bucket we carry collapsible water containers and a dedicated hose to draw water into the tank; stow under the street side bed behind the stabilizer jack assembly. EDIT: Original comment stated a ‘silicone’ hose, but actually it is a flexible PVC hose, as detailed in further comment.
1 point
-
Thanks for the idea. I have been flirting with the problem for a while since rinsing is an easy way to keep the toilet clean. Some of my old rv's had spray wands mounted next to them. This would have been nice from the factory.1 point
-
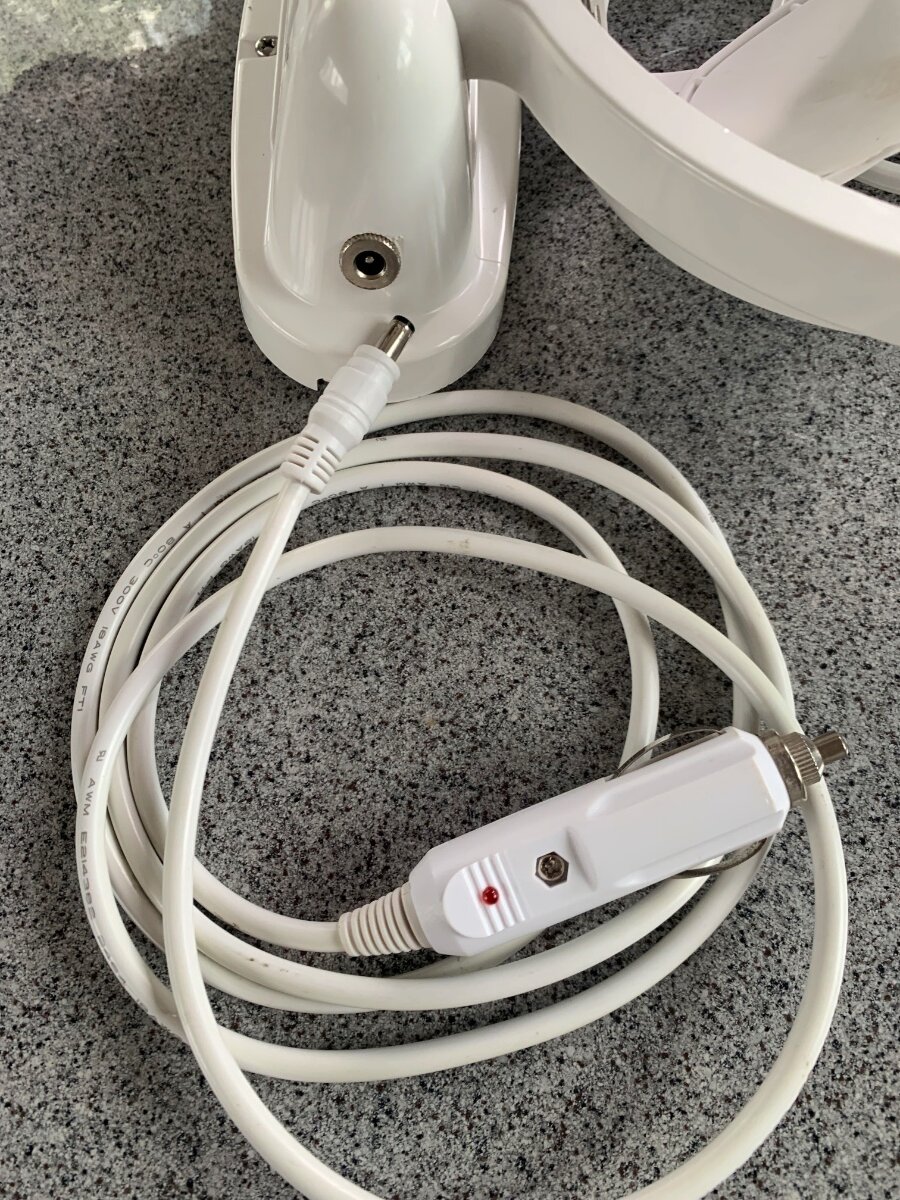
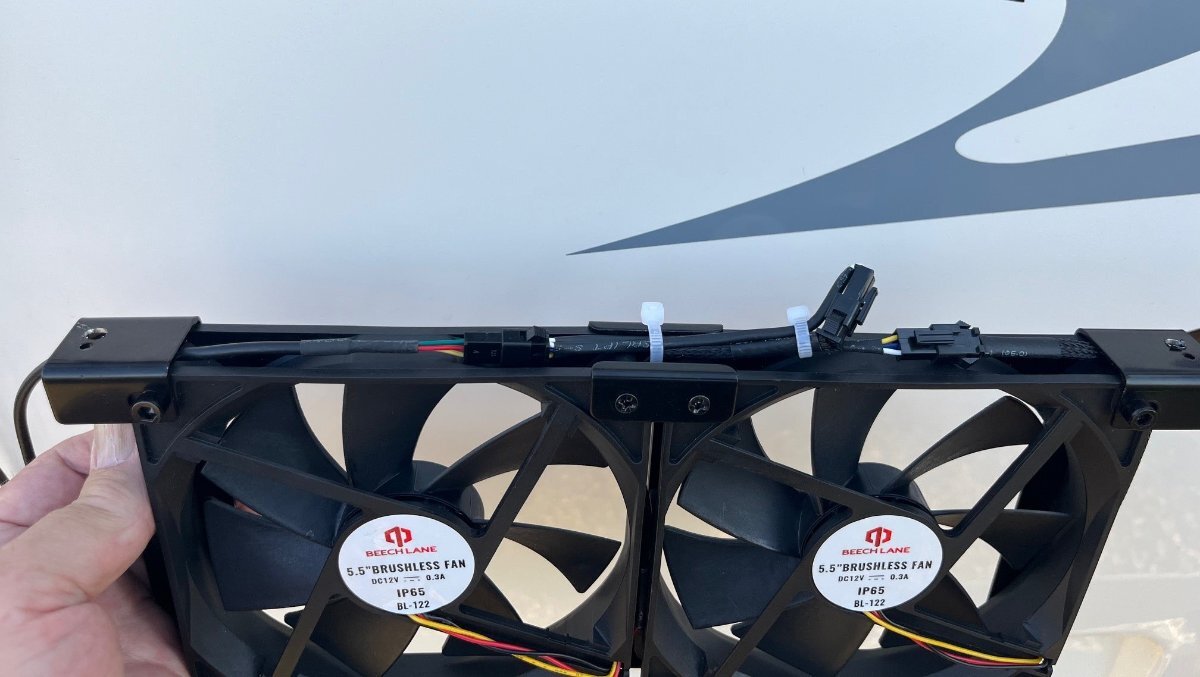
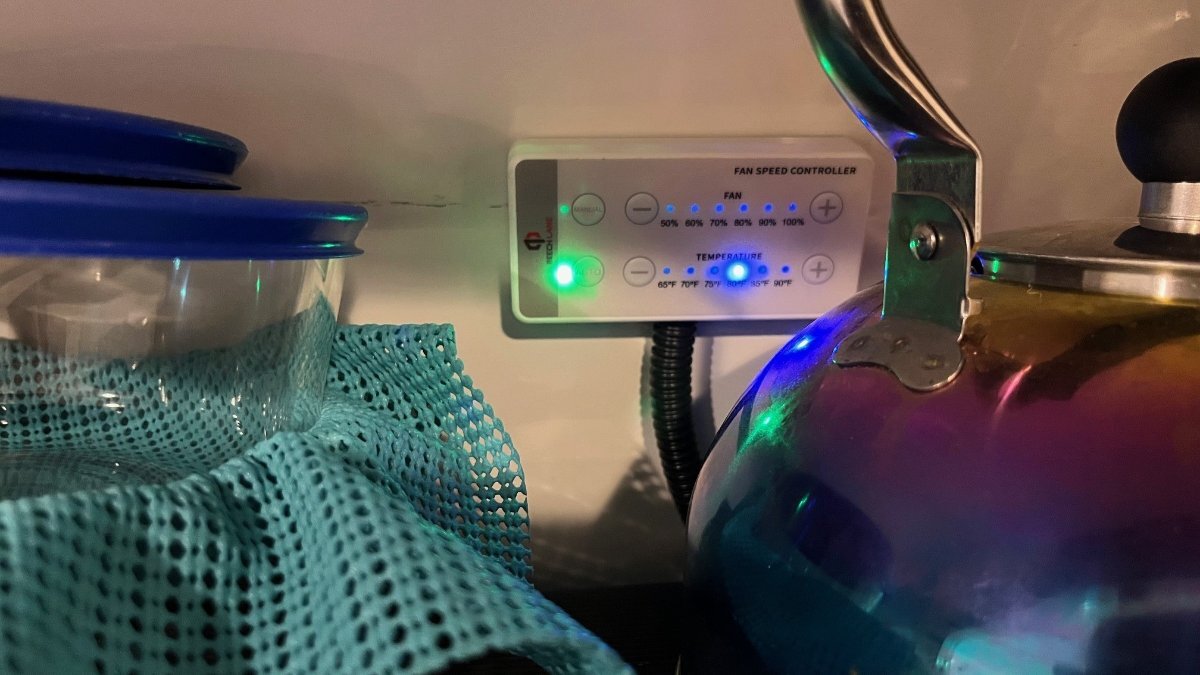
I have not installed the Beach Lane Twin fans yet, but I did just verify they work and noted how much they use per manual setting, at least indoors with ambient temps around 75 degrees. There are impressively quiet, even at 100%. And they move some serious air. Make a nice decorative wooden enclosure and they'd be better than any desktop fan you could buy. Would keep you cool at night for sure! Hmmmm! Speed - Watts Used 50% - 0.6w 60% - 1.2w 70% - 2.05w 80% - 3.2w 90% - 4.6w 100% - 6.6w
1 point
-
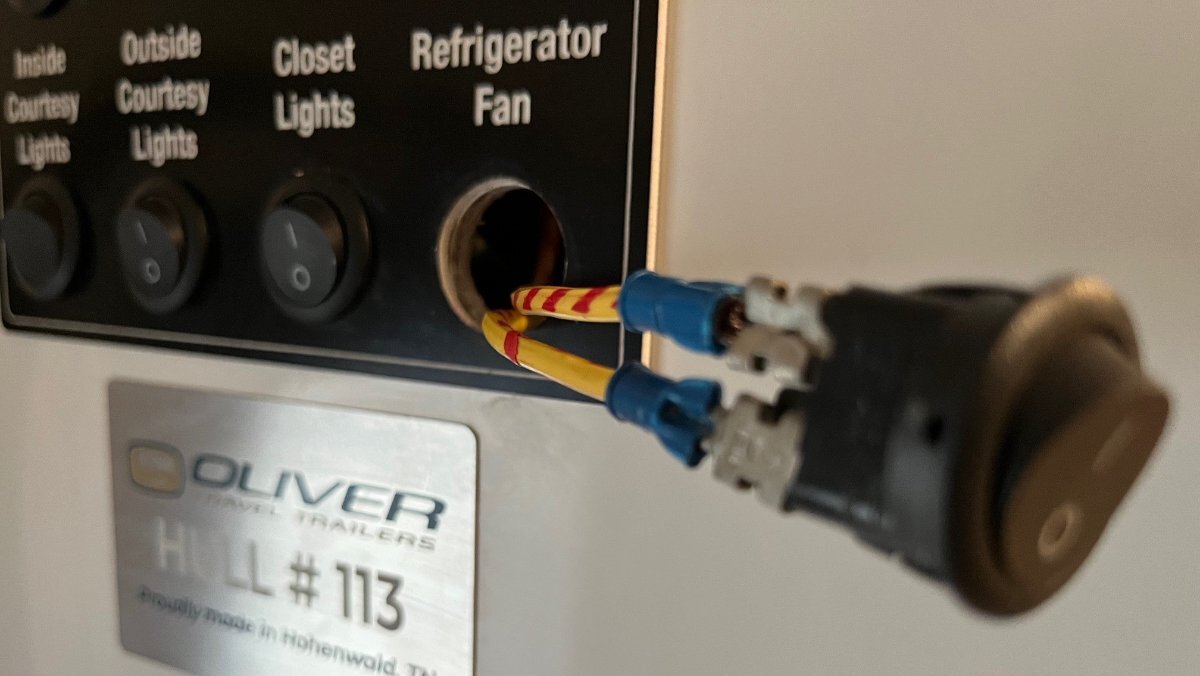
Mike, thanks for the confirmation where your fan now gets power. I was also wondering if that location would be enough juice for fans and fridge components. And No! There is no power making it to the inside fan switch. No biggy now that I know I can drop new wires to that location you circled. That's extremely helpful. Thank you so much. I have that beach fan in my cart, but did not pull the trigger yet. Also, after reading the service manual on the fridge and testing the thermistor, and placing it in the correct location in the fridge, I'm currently at 35.5 degrees in the fridge at 9:30 at night. The fan is currently off. This is the coldest I've seen it in a long time, and with nothing in the fridge. I think I have confirmed that lamp #5 in the "eyebrow" is faulty, I've set the fridge from #4 lamp to #5 and no lights (lamp indicators) on the eyebrow are lit up now, but the fridge still gets cooler. So far, so good. We'll see how much longer this fridge will last. Oddly enough I found the Domestic Service manual pretty straight forward and easy to read. I'm sorry for breaking any "Manly-Man rules" by reading the instructions. It will not happen often, I promise. 😂 I will site the Man's Prayer now from the Red Green Show.1 point
-
Think of the 12V B+ and B- as 2 of the wires in a CAT5 cable, if data doesn’t get from the server to my desktop, what is the IT Department going to do about it. Verify the output of the server and the input at the jack in my cube. Look for the break or run a new CAT5 cable. Your picture below has been marked up to show where the 12V power connects to the refrigerator in my Ollie. Yours may or may not be the same. Does your fan switch have power in and out? If so and the power does not’+**get to the fan, I would run a temporary B+ jumper from the output of the fan switch to the in put of the fan. Does the fan work with the jumper? If so, there is a break in the in the original B+. I don’t think that the original B+ wire is at fault and it is probably the thermostat switch which is located in between the on/off switch and the fan as @jd1923 mentioned. Try following the B+ wire from the fan back to the on/off switch, you should be able to locate the thermostat. When you locate the thermostat, disconnect it and put a jumper between the input and output of the thermostat. My original thermostat had male spade connections and the jumper I used was about 6" of wire with female spade connectors crimped on. If the on/off switch now works, you can replace the thermostat or just use the on/off switch to control the fan, although a thermostat works much better and saves 12V power. And forget about removing the refrigerator or microwave, just run new wire. Mike Mossey
1 point
-
Worked on this Saturday afternoon and an hour today to button it up! I started working it like some installs here, and I was able to poke a steel fish-tape from the back of the pantry down and right through the foil-wrapped Styrofoam to the exterior fridge opening. Then I thought about routing the wires down and realized if I fish the wires down about 20" further back at the rear of the fridge, the wires could go straight down to the bottom in one line. The bottom of the close side of the fridge is where the LP burner is located, and you would have to divert your wiring somewhere. The whole Beech Lane wire harness and a pair of switch wires (yellow/stripped red) fished through after cutting the opening shown with a rounded chisel and a few tugs. The temperature sensor taped to the upper incline. Switch legs run up and the across the back of the upper kitchen cabinet. Yes, removing the 110V outlet makes fishing easier. One leg is connected to the ground at the exterior base of the fridge and the other to the fan ground. I taped this switch prior to reinserting. The fan comes with clips to mount to the exterior vent cover (not a great idea for several reasons). I modified the fan assembly so that the cabling would be captured by the frame and tied down. Notice the screw holes left and right drilled larger for mounting to the ceiling of the vent opening. The fan was first rubber-mounted with one screw bottom center in place of a small screw that held the two fans together. Drilled pilot holes and screwed up in each top corner. Notice the 1/2" automotive wire loom LHS that holds the harness and switch wiring. Bottom vent opening showing the junction B+/B- source, with harness +/- connected here and taped. Control panel in upper kitchen cabinet, mounted with 3M VHB. No interior drilling harness just hides behind rubber floormat. Can reach in nicely or move the tea kettle if you must. Everything tested positively, the ON/OFF switch on the OTT light panel, manual mode with fan speed adjustments, and auto mode temp settings matched my RUUVi sensor readings. It was hot in the afternoon and then a front came through and dropped temps 20 degrees. The fan turned itself off and when I set temp two clicks lower it resumed. Thanks @Ronbrink for your help! The Beech Lane product is great, works well, fits the opening fully, and is quiet even on 100%. When it's running, and you're inside with the entrance door shut, you will not hear it. If you do not have the OEM built-in ON/OFF switch, don't worry you should not need one. My panel has one, so I felt obligated to make it function again. No complaints from this old installer! 🤣
1 point
-
Hi John, yes I believe this is what Oliver recommends. Unfortunately I couldn’t find it locally and was leaving on a trip so I ended up using ext/int Gorilla double sided tape. We traveled from CT to PA to VA to SC and back and encountered rain, sleet, and heat along the way with no problems. This may not be the best solution but I don’t believe that the antenna will detach again.
1 point
-
Unless I am doing something wrong, all sites are already booked. Verified by phone with reservations. Jumper69 2024 GMC 2500 diesel, Hull 5280 points
-
Yeah, after my $12K+ in upgrades, some of them would be transferable to a new hull, but everything is in great shape now, comfortable for an overnight stay anywhere. Still need to replace the A/C, but not much else. Likely we could not afford it, and from my reading here many new hulls have more issues than we do. The only way I would buy a need hull first with longer beds, or not interested at all. I would ask for NOTHING roof mounted except for cabling to solar and cutouts for fans and A/C. The bath fan should have a 12" flat area shaped into the fiberglass. No awning(s) and nothing else screwed into to roof. Inside, no batteries, no inverter, yes taller fridge with 2x freezer space, an opening for my installation of an Emeril Air Fryer. We're OK with the wetbath. No bedding of cushions added as we have better bedding companies here and a great upholsterer. 2 5/16" ball, 5200 LB axles Alcan springs with disc brakes. No bike rack but larger basket in front and balance the rig for 12%+ tongue weight! Sell me a great hull and not much else!0 points


-
Recent Achievements
-


")

")


")


