Leaderboard


Popular Content
Showing content with the highest reputation on 08/13/2025 in all areas
-
I’m okay with this change. It will be interesting to see how low “low-speed data” is. We’re currently camped at Great Basin National Park with very sketchy cell service and the Starlink mini is working great. No utilities here so I’m using a Jackery power supply that was 50% off on Amazon prime day. No complaints. Mike4 points
-
Yep, plan to keep this one a while. Really, I am! 😁4 points
-
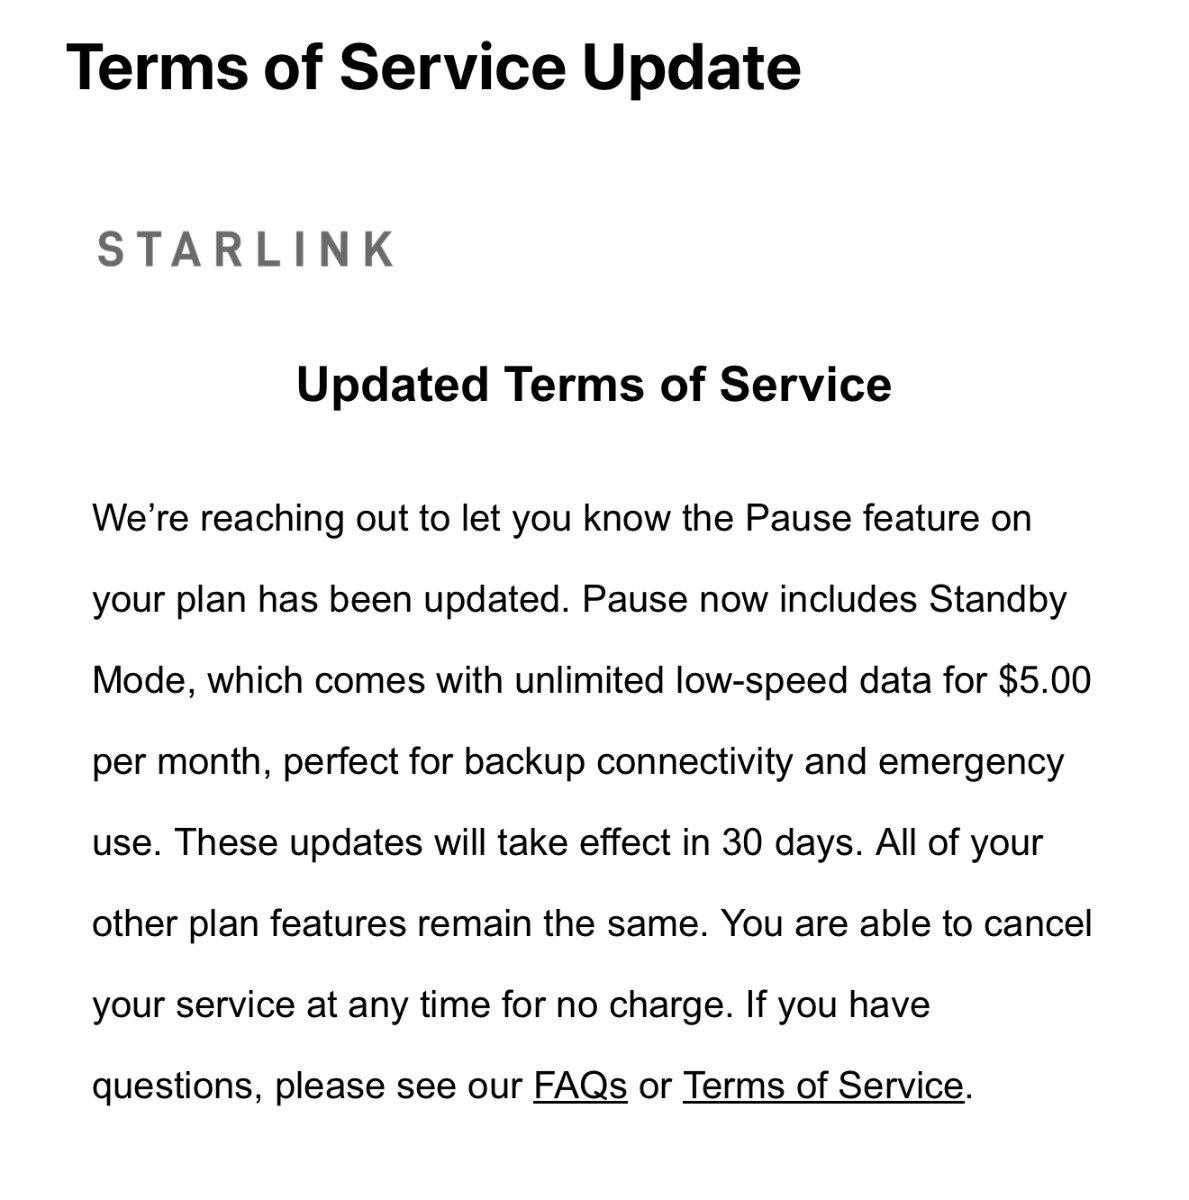
It appears that Starlink is going to charge a $5.00 monthly fee for roam plans that are paused based on the email that I received today. I’m not certain if it’s possible to opt out of the $5.00 standby mode.
 3 points
 -
Since the front of our glass trailer is exposed to road debris from our tow vehicle, I went and had the lower front end of the trailer and front of the frame PPF'd. A good quality one will protect the trailer pretty good. So far is has worked pretty well. I also added mud guards front and back. The PPF can be replaced anytime if it starts to look bad.3 points
-
According to (sometimes incorrect) chatgt there will be no more free pause option, now a pause for $5 per month will give you unlimited low speed data. But...if that a good enough connection for me then $5 per month is a pretty good option over $165, but not so good if I don't need any service. I doubt they will allow streaming, IMO, but I'll still be obliged to give up $5/mo for slower data transfer. John3 points
-
Bill, I look forward to your Super Duty build, function, and farkle! 😄 Let the “function and sparkle” begin! Also really glad your F350 fits nicely in your garage. Farkle On! 👍🏻3 points
-
Very NICE! Extended cab and long bed, love it! I thought the big three stopped making extended cab trucks. Everything seems to be quad-cab (or larger) and short bed. Love when the back door is not getting in your way. I guess you're going to keep this one a while! 🤣3 points
-
Well done Bill, I think you’re going to really like that “Minizilla” power plant. Wishing you and Debbie many happy miles in your new F350! Happy Travels! David & Kathy3 points
-
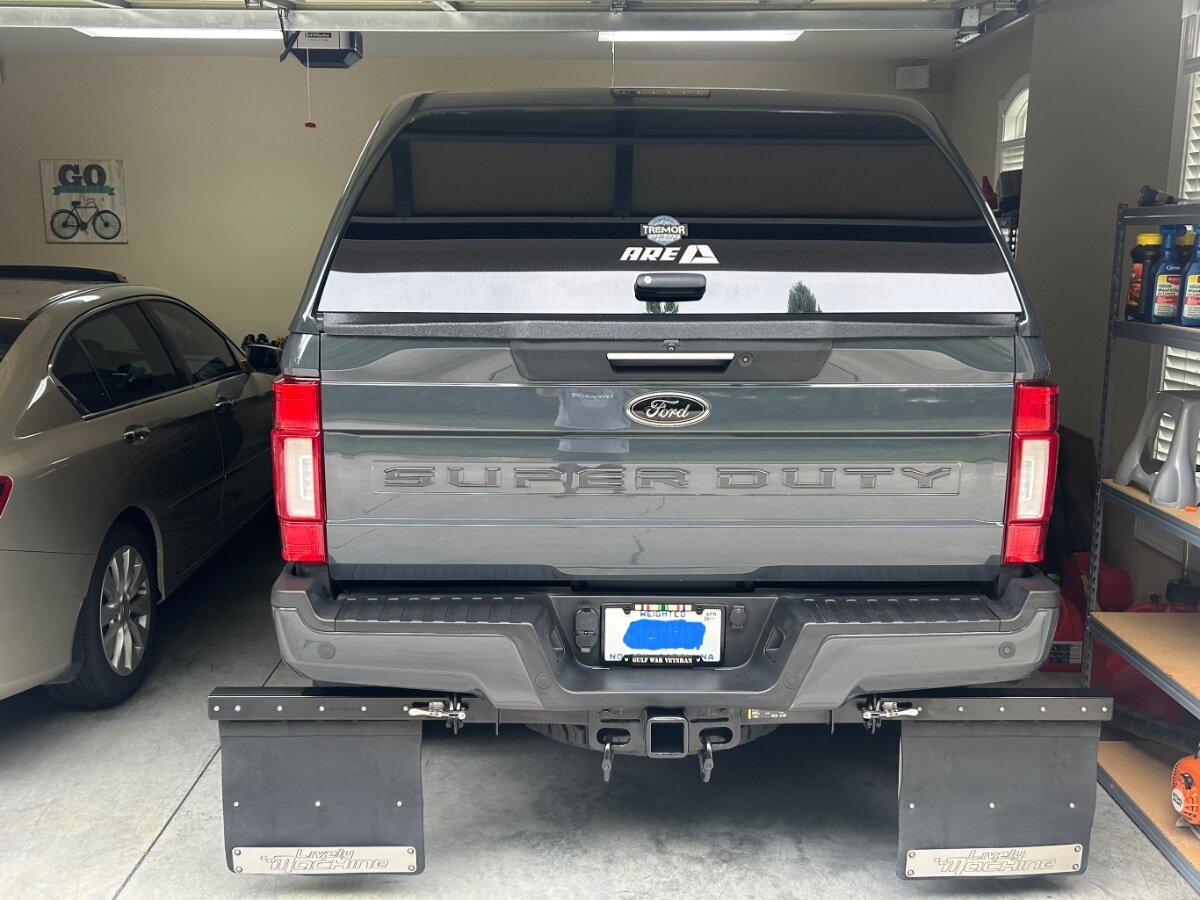
Just bought a new 2024 F350XL Super Cab 6.8L gas V8 (MiniZilla) with 3.73 rear differential, got $12,000 of MSRP. I have towed Ollie with three different 1/2 ton trucks that did a good job for us. We decided move to a larger tow vehicle with a 8' bed. We camp light with one of the lightest LE2's here, have to admit Ollie's ready to camp weight will increase a little with the new TV. The larger pickup bed size will be for extra bulky stuff that's hard to pack in the previous 5 1/2' pickup bed when boondocking. One hurdle to overcome was fitting this truck in our garage with a garage door that's 81" high. The way this F350 is set up from Ford it's 79.1" tall. The length was another issue, but at 254.4" long, there's plenty of room to park it in the garage and still have room to work at the workbench behind the truck. The payload is 4058 pounds. Looking forward to towing Ollie with the F350 in the mountains out west. Got about 19.5MPG probably downhill one way (most folks get lower) on the 30 mile trip home from the dealership with the F350 around 65MPH on the highway. Used to get 22 to 23MPG with the F150 5.0L on the highway under 70MPH. Averaged 14MPG towing Ollie with the F150 5.0 at 60MPH, will see how the F350 does on roundtrips after 1,000 mile break-in unloaded and towing. I have driven F250s, F350s, F600s in the past, the new F350 is not as soft of a ride as the F150 unloaded, but the ride is fine for us.3 points
-
The old Dometic unit was 13,500 BTU, still last year for example, in the southern Arizona desert we were camped in 115 degree weather. The Dometic ran continuously all day from mid morning until late afternoon. If the temperature dropped to the upper 90’s the unit seemed to be able to cycle off and on but close to and over 100 it would not cycle off while maintaining about 75 degrees in the camper. I question buying an air conditioner smaller than 13,000 BTU unless you never plan on camping in the summer or later on selling it to someone who never wants to camp in the summer. Maybe my old unit was having other issues as well, who knows.2 points
-
Look at the bright side, it's like having nearly free DSL. 🤣2 points
-
I think it's well worth the $5 per month just for the peace of mind of having emergency connectivity if needed.2 points
-
Over the past couple of years on Facebook and the Forum there have been posts about the Truma AC going from blowing cool air to warm, humid air. I don't remember if there was an adjustment that solved this issue. An Owner on Facebook set-up camp, turned on the AC, and things started cooling. They left on a hike and upon return the unit was blowing hot air. Upon arrival to the campground the temperature was a sweltering 97°. Looking for suggestions to help this person. I suggested she contact Truma first thing this morning. I did Google this and posted some trouble shooting ideas, and requested additional info and any updates. Unfortunately, she hasn't posted back. Thanks.2 points
-
@johnwen, my apologies, I thought I had included the details on the Ethernet cable running from the RJ45 through jack utilizing the Furrion external shell. All of the Ethernet cables I purchased are Cable Matters products. All are shielded Cat 6A. In addition to the 20 ft. cable used inside the trailer, I purchased a 50 ft, and 2x 25 ft. cables and a single 1ft cable. I also purchased VCE CAT6A Waterproof RJ45 Coupler IP68, 10Gbps CAT6A/CAT6/CAT5E/CAT5 Female-to-Female Outdoor Ethernet Connector Shielded, Network Cable Extender for Outdoor Use 2-Pack, 5.3 in. To connect the Ethernet cable to the PoE splitter, I had to slightly trim the black plastic anti-snag protector on the 1 foot long Cat 6A able. This was necessary because of the tight fit through the watertight connector on the PoE splitter. You may have run across mentions of this issue by others online who are using this PoE Injector and Splitter. Once I trimmed the soft plastic cover over the cable release tab I was able to fit the RJ45 connector through the watertight connector on the Splitter. I chose to use the 1 foot long cable so that I could leave the splitter and the 1 foot cable connected to Starlink Mini. I find the connectors going to the Mini from the Splitter to be difficult to remove due to the watertight seals. I don't like the idea of pulling on the cables to release the Splitter from the Mini. I anticipate repeated removal of the Splitter from the Mini will result in damage to the cables on the Splitter. Replacement Splitters appear to cost about $65. At the other end of the 1 foot cable I attached one half of the VCE RJ45 couplers listed above. This way it is much easier to disconnect the Ethernet cable from the Mini without messing with the watertight connector on the Splitter again. I also installed the VCE couplers on the ends of the 50 foot and 2x 25 foot cables. This way they are like extension cords which are easily connected/dis-connected. I am impressed with the VCE couplers. They are excellent and easy to use. I bought the three longer length cables to be able to easily connect 25, 50, 75 and 100 foot long cables, as needed. I specifically want to avoid having to deal with a single 100 foot cable, which I find to be a PITA. I have not yet had a chance to use the Starlink Mini on a trip, but have only tested it with our LEII parked in our driveway. Due to tree coverage, I needed to connect at least 75 feet of Ethernet cable to position the Mini for a reasonably unobstructed view of the sky. The Mini still had some obstructions, but I was able to measure Ethernet speeds inside the trailer >100 Mbps. I sometimes saw speeds drop to the 50-75 Mbps and rise as high as 200+ Mbps. I suspect the variable is at least partially attributable to the position of Starlink satellites at the time of the speed tests. The satellites are each only in view 8-9 minutes, without obstructions. In any case, I connected my laptop to Starlink WiFi inside the trailer and was able to browse comfortably. I did not notice the occasional losses of service which I noticed in the performance data on the Starlink app. I don't recall any RV park or state park where the provided WiFi was anywhere close to the minimum speeds I have observed in our driveway. BTW, in our residence we have AT&T wired gigabit Ethernet throughout, so I have a low tolerance for poor WiFi service. I have high expectations for using the Starlink service, based on reports by others and my experience so far. At this point, I have not used any adhesive to attach the PoE Injector to the top of the frame member on which it sits. I have a small zip tie connecting it to a PEX cold water line. With the Ethernet cables attached it cannot really go anywhere. I did not want to use a more permanent method to secure the PoE Injector, until field testing on a road trip. We have our next trip scheduled in late August, so I will observe it over a 400+ mile trip. I will likely use a small strip of 3M VHB tape to fasten to the hard rubber frame covering. Good luck with your installation. If you have any questions, feel free to send me a Personal Message and I will be happy to answer.2 points
-
David, Thanks! Looking forward to towing Ollie with a F350. Busy ordering stuff to "Farkle" the Super Duty right now. Motorcycle term "Farkle" https://ridermagazine.com/2017/02/01/what-the-heck-is-a-farkle/ Bill2 points
-
The 'previous' mentioned Mobile Service called and their 'mobile service person' hurt his back on a previous work project and wanted to reschedule... which I passed upon. I began to self educate myself, viewing similar issues of other travel trailer owners, discovering the shorted wiring in the rear Dexter Axle 'tube'. Wow... this has been going on for decades. At $125 an hour for trailer labor... that is a lot of nickel video poker loose change for us. Our Bankroll is $20 to $40 at the three hand video poker machines and a $5 tip for a cold glass of beer on tap. Hmmm. I can get onto my 'creeper' and get to everything... now. This wiring should have been changed decades ago. A close local Travel Trailer sales and service had a two month waiting list that had, mostly, good reviews. Been under the Oliver yesterday and noticed some work had been done on the rear outside brake wiring... which indicates previous issue possibilities. The Axle Wire which shorts is the original and is the cheapest wire that you would find on an old television... in the dump. Shorted wires in all kinds of RV's and Travel Trailers, same Dexter Axle through the hollow axle and wears to expose wire and shorts out the braking system. Same issues and manufacturers continue with the same procedure. Moved the Oliver outside, onto our down hill, angled driveway to the street, for a better natural lighting. This angle gives me more space to work with than a flat garage surface. Picking up a new 7 pin plug on the trailer... just in case that may be the problem. But not optimistic that will do it. I will have plenty of experience after this... investigation. Thank You... fellow Oliver owners with the same problem and fixed it themselves, giving advice. If all fails... the options are few and expensive.2 points
-
We use the built-in audio quite a bit. When we stream video to the TV we use the ARC channel to put the audio on the speakers. We also like to find local FM stations, especially the little independent ones, that have things like farm reports and swap meets. If Steph sleeps in, I use the A/B speaker selector to choose only the front speakers. I have music on a flash drive in the Furrion head as well and, once in a while, we'll break out a DVD.2 points
-
Follow-up re this thread. This spring I worked brake service on our Oliver. I wanted to be certain the self-adjusters on the Oliver were dialed in. The front axle was close and the rears were a bit looser. This is likely normal. In doing so, Chris was applying the brake in the tow vehicle. At times there was nothing. I asked, "Are you pushing the brakes?" She said "Yes" but the brakes did not stop the spinning wheels. Increased the gain and tried again, the brakes would stop the wheels but 3-4 seconds later. My next comment was, "We need a new brake controller!" Purchased and installed a Tekonsha P3 Prodigy Brake Controller and ran the same test. On the default 6.0 gain when Chris hit the pedal the brakes (all 4) banged abruptly to a stop when spinning in the air. I now believe that when our brakes were over-heating last October, some of it had to do with the weak controller not applying enough power to the TT brakes which caused the brakes on the TV to overheat!2 points
-
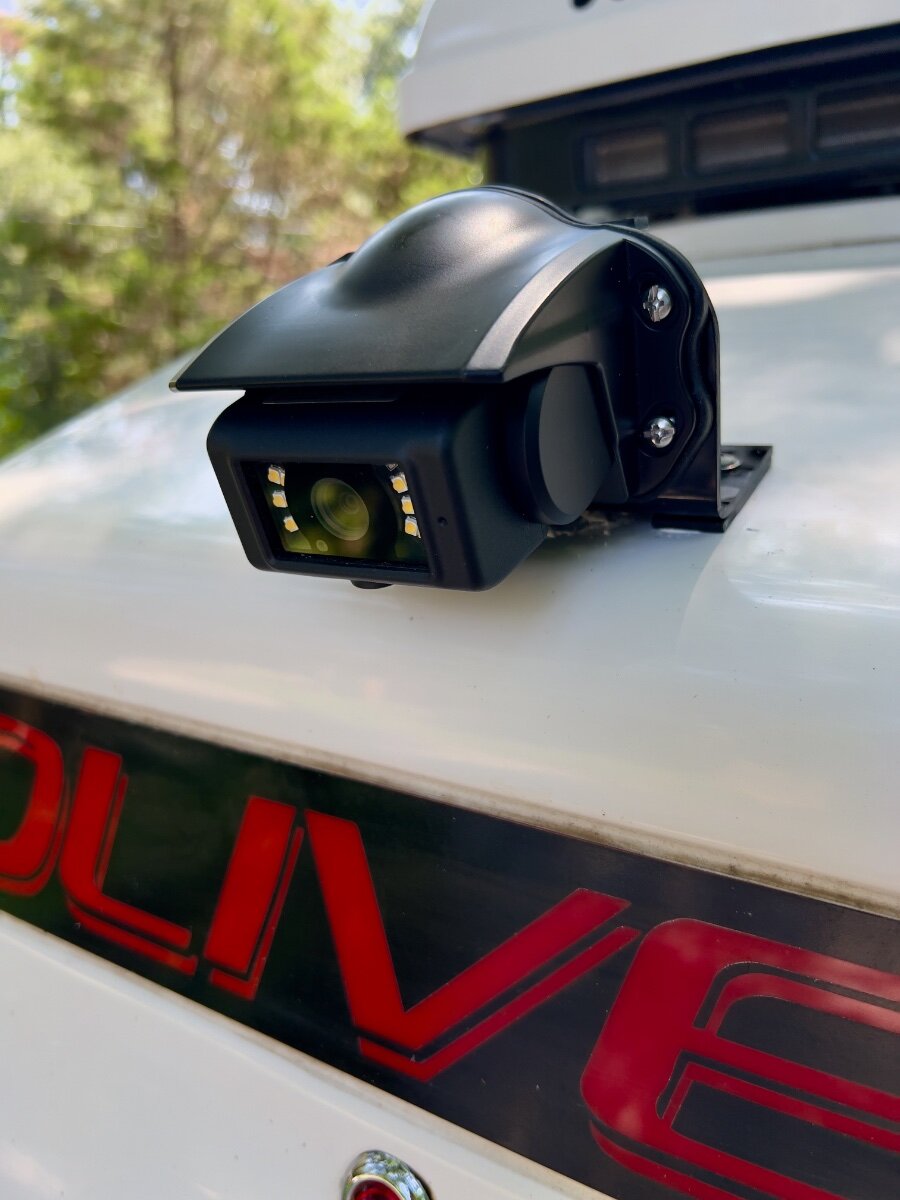
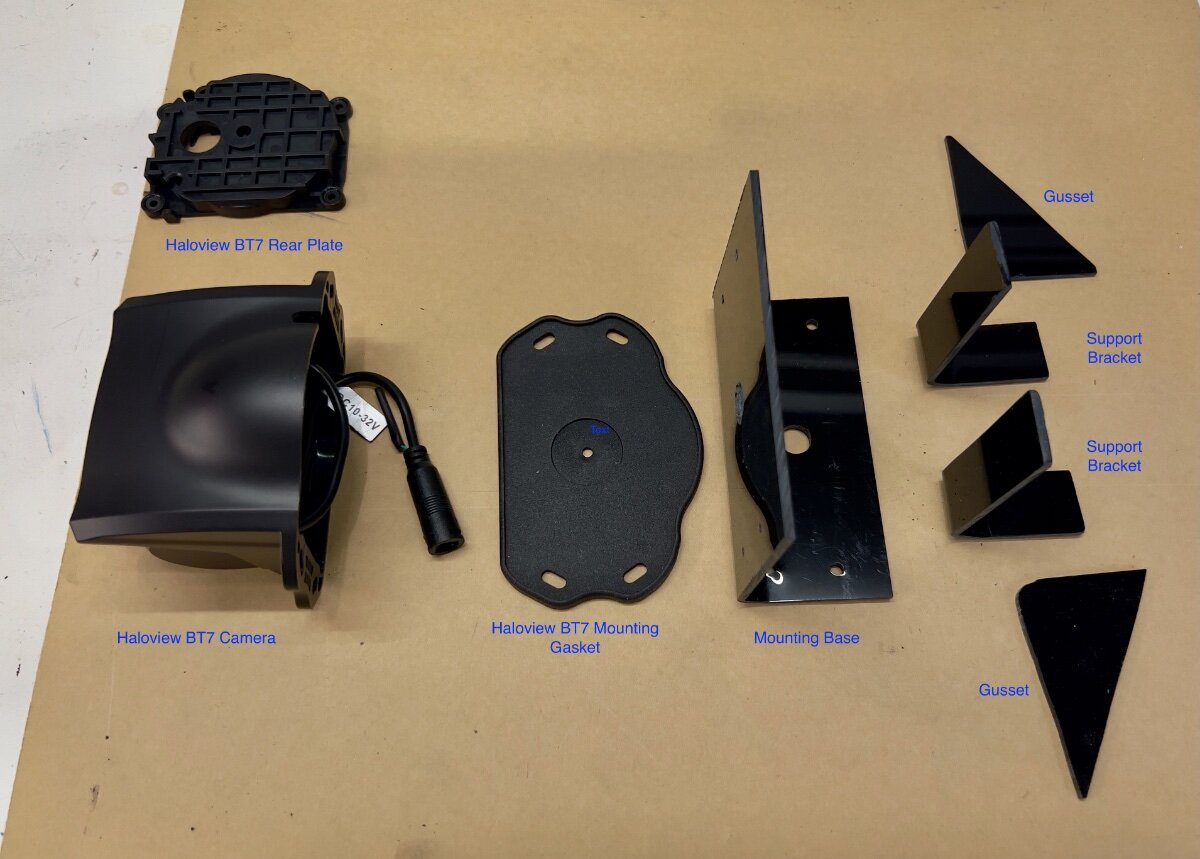
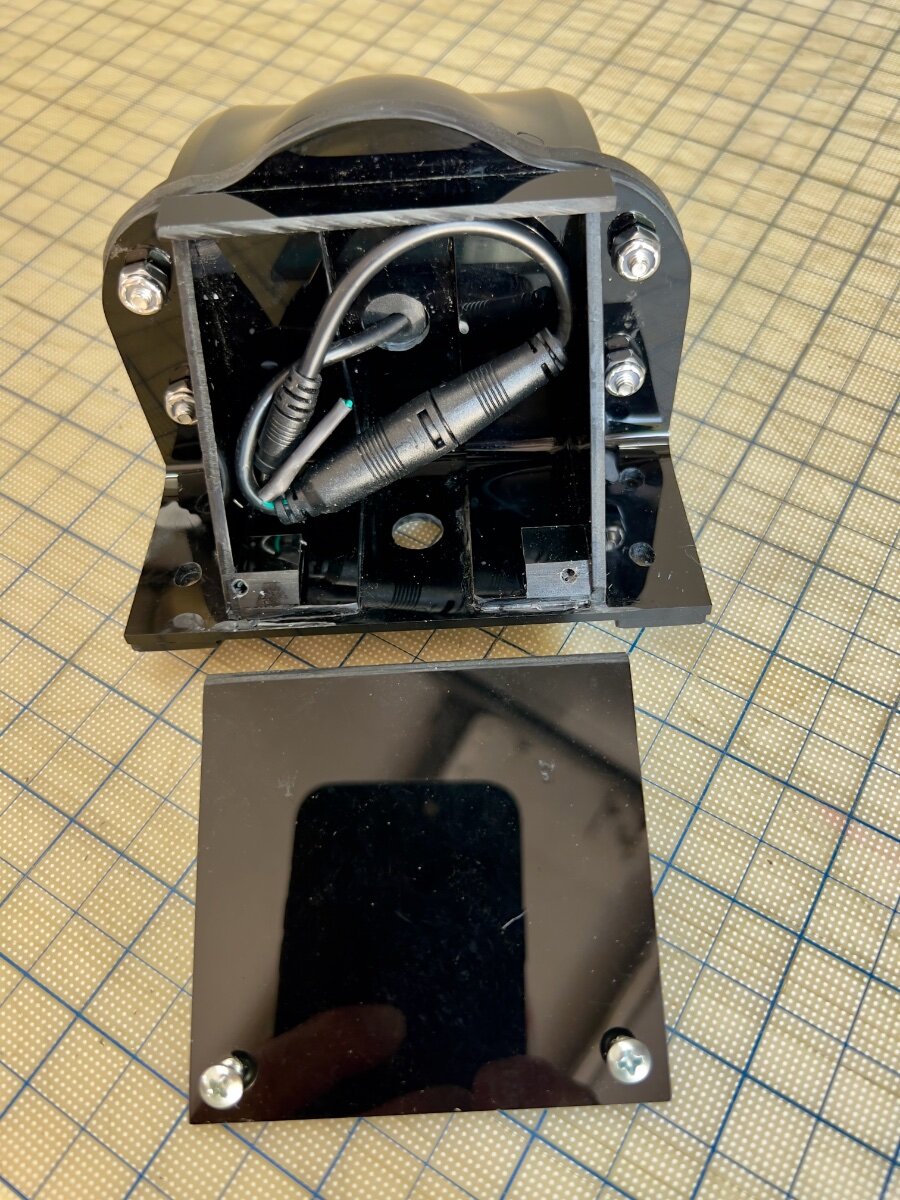
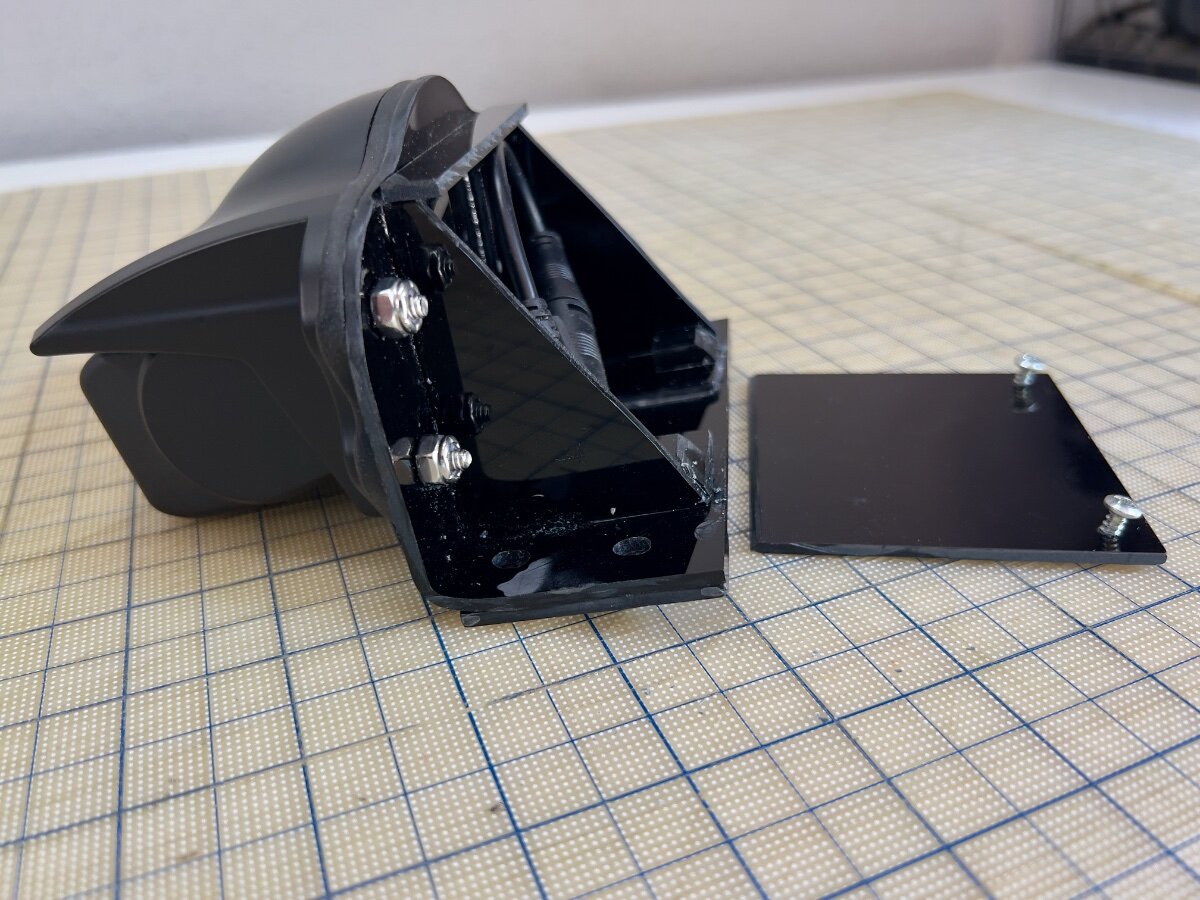
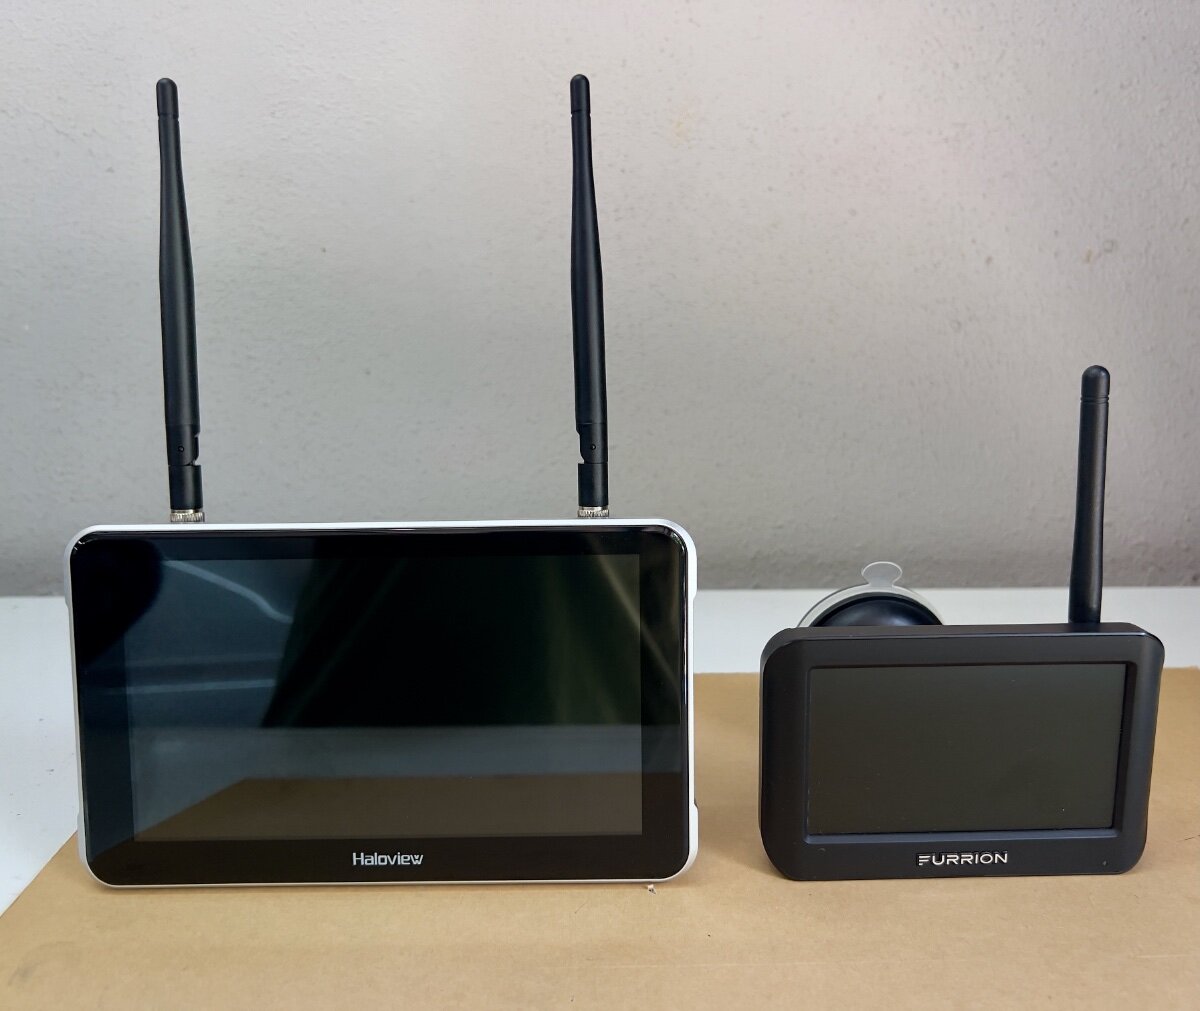
I recently purchased a Haloview BT7 Touch Rear Camera to replace the Furrion Vision S Camera System (Model F0S43TADS) we purchased as an accessory option on our 2022 LEII. Following delivery of our trailer in February, 2022, it was quickly evident the Furrion camera was largely useless. I continued to use the Furrion camera, with increasing frustration. The very limited view to the rear was a safety issue. I began to research RV rear cameras and after reading many reviews selected the Haloview BT7 Touch. I was impressed by the specs and favorable reviews, but failed to note the camera is designed to mount to a vertical rear wall, not the sloping rear roof of an LEII. I could have returned the Haloview camera, but I did not see a good second choice. Thus, I decided to fabricate a mount to be installed in the same position as the Furrion camera. The result is the custom mount below: Fabrication Process I had some black acrylic sheet, .010" thick, from a prior project (See: Window Vent Mod- Louvered Ventilators), which seemed suitable material for a camera mount. I had some thicker acrylic sheet, but decided to first use the thinner sheet to create a mockup by bending the acrylic sheet. Initially, I had concerns the thinner sheet would not be sufficiently rigid to hold the camera steady, but I was not sure I could bend the thicker sheet. The Furrion camera and its mounting gasket were removed from the roof of our LEII and used to begin the layout of the base for the new mount. I wanted to use the four existing holes in the roof which held the Furrion camera in place. I had a scrap piece of acrylic about 7" wide and 20" long. I used 2" blue painter's tape applied to the acrylic and, with a fine point mechanical pencil, began marking out the mounting hole pattern from the Furrion gasket. Next, I flipped the scrap sheet of acrylic over, applied blue tape and began positioning the Haloview camera on the tape. My initial concept was to have the main part of the mount be a single piece of acrylic bent to an angle of approximately 80 degrees. When mounted to the sloped roof of the trailer, the face of the mount would be approximately vertical for mounting the Haloview camera. The layout of the mounting base resulted in the base being approximately 2.0" wide, and the nearly vertical mounting face approximately 3.5" tall. I also allowed about 0.75" for the bend radius. So, before bending the rectangular sheet of acrylic was approximately 6.25" x 7.0". I cut this piece from the end of the 20" long scrap. Before bending, I drilled all needed holes in the mount base, as marked during the layout process. NOTE: See YouTube for many useful videos on bending acrylic sheets. To bend the mounting base, I sandwiched the rectangular piece of acrylic between two pieces of scrap wood approximately 12" x 3", with the acrylic area to be bent aligned on the long side of the wood scraps. I extended the acrylic from the wood scrap approximately 2.5" to 3.0" in preparation for bending. I clamped the sandwiched pieces to my workbench to ensure it would not move during the bending process. Using a heat gun, I began to heat the area to be bent, moving back and forth. Wearing gloves, I held two other pieces of wood, each approximately 2" x 5". As the acrylic became heated, I applied gentle pressure to the extended portion of the acrylic, using the pieces of wood in my hand. I continued to move the heat gun along the bend area until I could begin to bend the acrylic. As the acrylic began to bend, I used care to keep the bend straight and at 90 degrees to the sides. I used a steel carpenter's square to test the acrylic as I bent it. As I approached the desired finished bend angle, I released the acrylic to check the angle. Satisfied with the bend angle I trimmed the top of the mounting base to the contour of the Haloview mounting gasket with a scroll saw. Having the mounting base bent as desired, I began to plan how I would make it sufficiently rigid to hold the camera steady. The photo below shows the other parts which would comprise the rear support area. Also at the rear I wanted to enclose the wiring connecting the camera to the 12VDC power from the trailer. Haloview BT7 Camera and mount parts Once the mounting base was bent as desired, I cut two pieces approximately 1" wide from either end of the mounting base using a table saw. These two pieces became the support brackets. Being bent at the same angle as the mounting base, they fit well to backup the mounting face. The triangular gussets also add rigidity, being bonded to the mounting base and the support brackets. The photo below shows the mounting base (face down) with the support brackets and gussets attached at the rear. Acrylic cement was used to weld all parts together. Mounting base face down with support brackets and gussets in place Side view of mounting base with support brackets and gussets in place To protect the power supply wiring from UV exposure and squirrels, I added a cover and a top piece across the gussets. The rear compartment does not need to be watertight, since the wiring connectors are watertight. Haloview includes a short adapter which connects to the existing Furrion connector protruding from the roof. The photos below show the camera on the mounting base and cover from the rear and side views. Mounting base and cover (Rear) Mounting base and cover (Side) Mounting the Camera to the LEII When I removed the Furrion camera from the roof of the trailer, I noticed several things: The 12VDC power supply wiring passes through a hole in the trailer and was effectively sealed with the white caulking used throughout the trailer. This was not visible before removing the Furrion mounting gasket. The sealant was in good condition, however, it formed a small mound on the roof of the trailer. The base of Furrion camera was hollow and the mounting gasket conformed to the mound, allowing the outer shell of the camera to meet the trailer roof. The holes for the screws holding the camera to the trailer roof are NOT through holes, reducing the risk of water leaks into the trailer. The Furrion camera was not mounted at the lateral center point of the trailer, but not so far off that I had noticed in over three years using the trailer. The Furrion camera was also not quite parallel to the Oliver sign just below its mounting position. From the ground this was not perceptible. There were multiple trial fittings of the new mount as the fabrication process proceeded. From these fittings the following adjustments were made: The mounting holes for the new base were elongated (using a Dremel tool) to permit the new mount to be swiveled slightly in azimuth to have the front face of the camera parallel with the top edge of the Oliver sign. Two acrylic "runners" approximately 0.5" wide and 2.0" long, were attached to the bottom of the mounting base to straddle the mound of caulk where the power supply wire passes through the roof. I reused the mounting screws, putting fresh caulk into the screw holes and around the screws. The new mount covers the same area where the power supply wire passes through the roof. It is protected from UV by the new mount, but water can run under the new mount. The Results The Haloview BT7 comes with two mounts, one with a suction cup for windshield mounting, the other a 3M VHB bonded disk for attachment to the upper dashboard. I prefer the windshield mount, which is substantial and widely adjustable. It is very stable, with no vibration. The signal strength indicated on the monitor showed a 5 bar strong connection to the rear camera. Monitor comparison- Haloview 7" vs. Furrion 4.3" (diagonals) Yesterday, I took a 35 mile shakedown cruise for the camera on the way to the storage facility. The Haloview camera and monitor have met all my expectations. The visibility to the rear is vastly improved. I now see vehicles approaching in the same lane and in lanes on either side. I was particularly impressed to see merging traffic entering the highway on my right, before I could see them in my mirrors. Overtaking traffic is now seen well before they come abreast of the trailer. In bright Texas sun, the video on the monitor is clear and not washed out. There is no jitter in video from the camera, and the signal was always strong, even with the antennas folded horizontally across the top of the monitor. The touch screen controls work well and are easily used while driving. Also, my custom mount proved to be very solid, with no vibration of the video due to camera movement. I recommend the Haloview BT7 Touch camera to anyone considering replacing their Furrion rear camera. Unfortunately, Haloview does not appear to have a roof mount adapter available. I had sent an email query to Haloview Support and received a reply indicating they did have such a mount and provided the following URL: https://www.haloview.com/bt-series-camera-peaked-cap-bracket-compatible-with-furrion-and-voyager-pre-wired-rvs.html. Nothing on this page convinced me it was a roof mount. It does say the Furrion hole pattern is matched for mounting to the trailer. But only if the Furrion camera was mounted to a vertical surface. I have not yet received a reply to my email pointing out they sent me a link to a vertical mount. I hope this is useful to other OTT owners with Furrion cameras. Regards, Don
1 point
-
After 8 years of use it was time to retire the Dometic air conditioner. I have looked at several brands and for one reason or another I decided on the Tosot brand which is the same as the Atmos brand and probably others as well. Since last summer the Dometic has been making fan bearing noises off and on and I’ve grown tired of climbing on the roof to oil the motor. After eight years I really didn’t want to replace the motor only to have something else fail so this was an excellent excuse to replace it with a higher efficiency quiet unit. We’ve been traveling out west for the past three and a half months and were passing “close” to Elkhart Indiana so decided to drop in and visit the SDG folks. The entire replacement process was perfectly coordinated and our installer Joe knew exactly what needed to be done. We’ve camped out in their parking lot the night before with 30 amp shore power available. The next morning at 8:00 AM I backed our trailer into their shop and about two hours later the job was done. They even printed a custom cover plate to cover up the holes from the old Dometic thermostat. We were able to sleep through the night with the air conditioner running for the first time in 8 years without having to use earplugs, and to watch television at half volume instead of full volume! The air registers force air towards the front of the trailer instead of most all of the cold air being forced onto the bed area. We’re parked in central Ohio for a few days and it’s very hot and humid but the air conditioner is keeping the Oliver very dry and comfortable. On low fan the unit draws about 9 ac amps. Running from the inverter the inverter draws 94 dc amps. The Dometic on inverter would draw between 130 - 140 dc amps under similar conditions. We are extremely pleased with the work that SDG provided and with the comfort and efficiency of the Tosot unit. I strongly recommend the folks at SDG for the air conditioner replacement. They have done several Oliver air conditioner replacements and have experience in replacing/installing air conditioners on many different rv types.1 point
-
Hmmmm, not loving this as I often have my service paused for months (especially over the winter). I am more on the side of saying this is Starlinks way of getting a bit more money out of everyone. Here is some more info Starlink Replaces Free Pause Mode With $5 Monthly Charge | PCMag It is not optional: "SpaceX is sending emails to customers who have used paused mode, telling them to opt in to standby mode or lose their paused service line." "internet speeds will be capped at 500kbps. " You are not doing much at 500kbps.1 point
-
I don’t mind supporting the infrastructure at that amount, which is likely their intention. They haven’t disclosed at what speed they will limit speed to. Unlimited data at low speed, depending upon the speed, may not be all that useful. AT&T did that to our cellular plan which rendered it virtually useless.1 point
-
I really like the unit so far. A little disappointed with the owners manual however. They tell us about certain features but they don’t describe exactly what they do. Curious about Xfan function and I can’t tell the difference between air conditioning and the dehumidifier function. The Cielo thermostat was not mentioned to me but I did notice that SDG had one on the wall in the office area! After using the new unit for about a week now in high humidity I’m really thinking about adding the Cielo thermostat.1 point
-
I am still amazed at the efficiency and cooling power of the Atmos and glad that SDG adopted the Tosot as an in-kind replacement unit due to tariff-related issues. I did not opt for the Cielo Max Breez thermostat being offered at the time of my purchase, even though it was widely used by SDG in their typical Class B RV installs. I have since added this device and find it extremely beneficial in energy savings, comfort and humidity control. If you didn’t opt for the Cielo with this a/c upgrade I would highly recommend adding one, you won’t be disappointed! I think it is also worth mentioning that these 15K units are far superior to the DPll 11K formerly in my OLEll, which was often found marginal at times during extreme heat conditions here in Texas. I was really disappointed to learn after initial purchase that Oliver began putting this smaller unit in the 2020 year model and thus, always my intent to upgrade to a bigger and better unit. No regrets in my choice and certain you will feel the same!1 point
-
I had 10 mil XPEL PPF installed on our Oliver a few years ago, it’s holding up great. It’s worth the money spent if you want to protect the gelcoat. Also a good set of rear flaps is worth the investment. Here is a link to a thread on my PPF install. I also had my entire tow vehicle covered in 8 mil XPEL PPF.
1 point
-
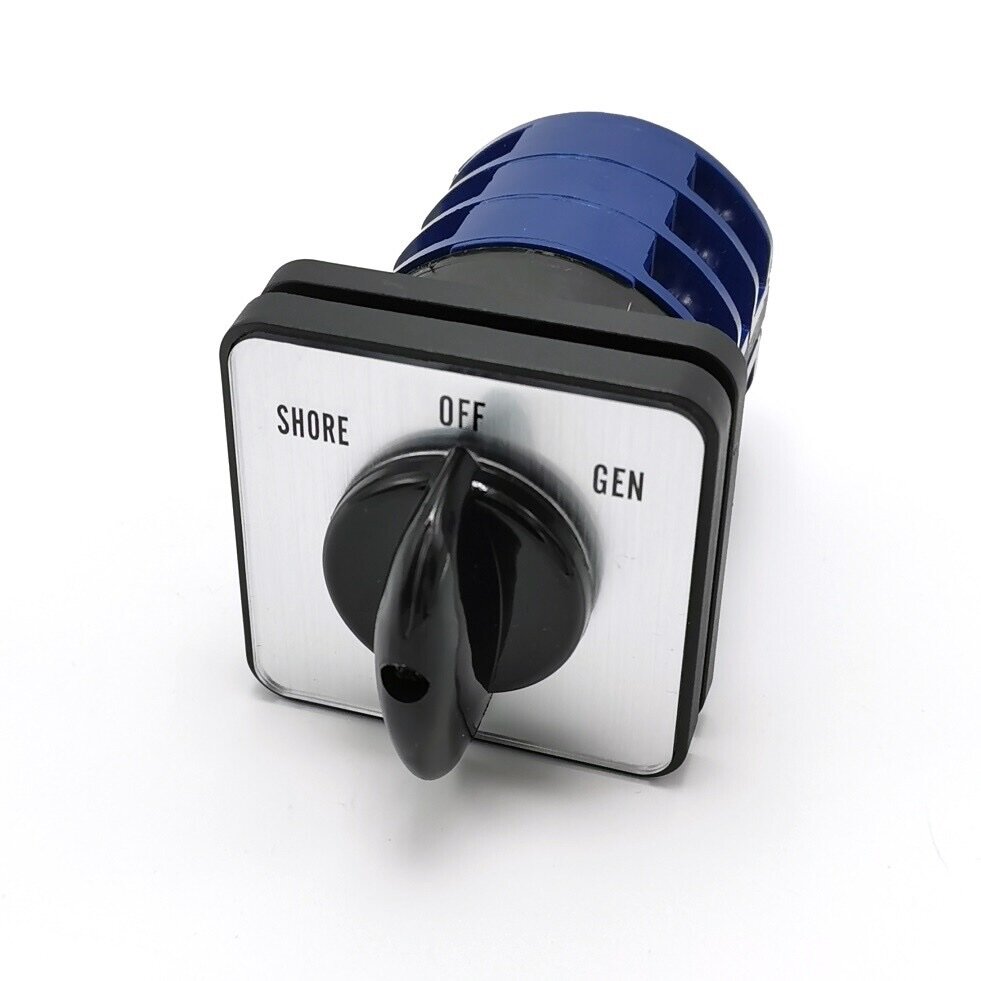
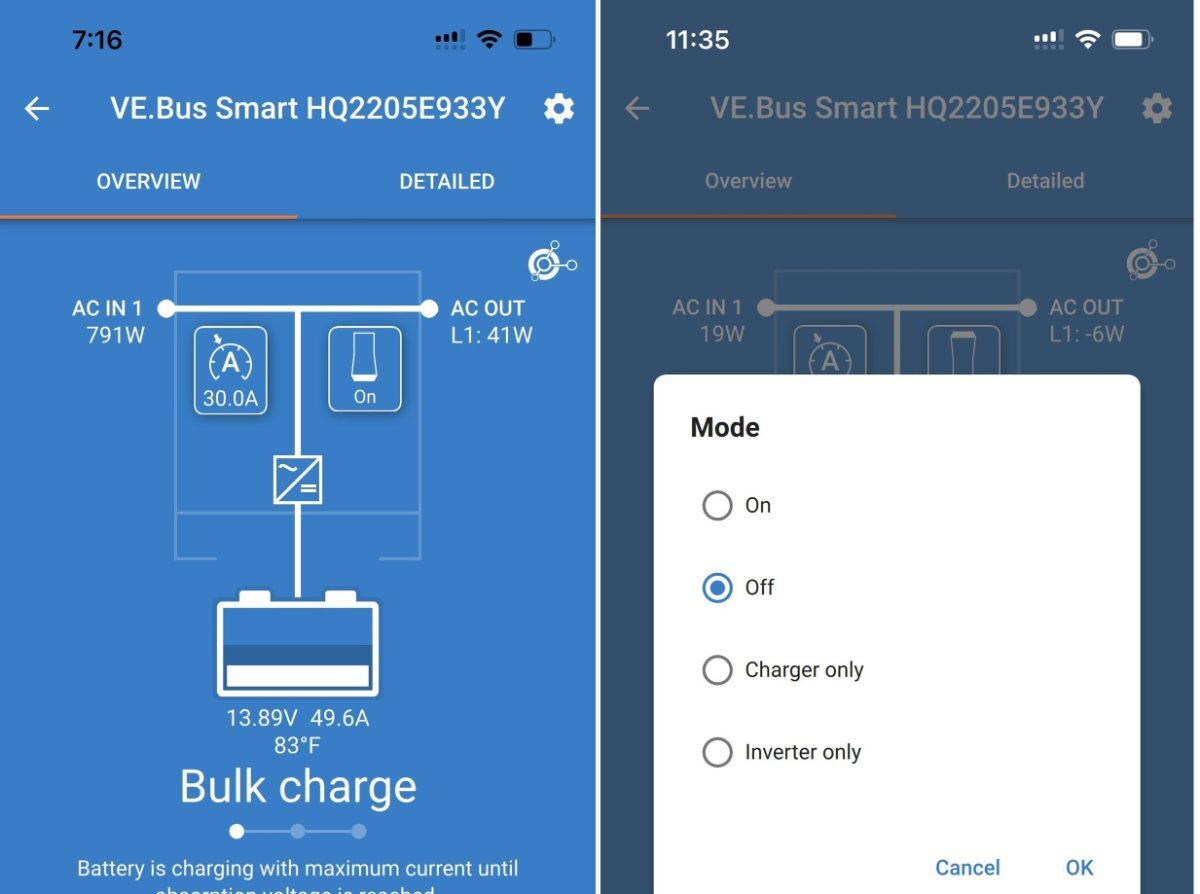
This is correct, I have tested it. The same for "Inverter Only." I've never seen the need to turn the inverter off when connected to shore power. When connected to shore power the Victron MP2 ON acts as an UPS, backup power for brown or blackouts and 1Ah drain is negligible when on the cord. My only issue with no pass-through power is if the MP2 was to fail the 120VAC could be left in an open state. I have a few wire nuts for this small likelihood and your switch idea would also gaurd against inverter failure. Thanks1 point
-
JD, This is unfortunately one of the drawbacks to the Victron inverters, but supposedly you can switch it to charger only mode to allow shore-power pass-through with the inverter off, with less standby power used. Bit of a pain though! However, a clever and handy guy such as yourself could install an external by-pass switch that would be easier than the App. Victron makes an inexpensive 30 amp beauty for switching between a generator and shore-power. I've seen them for $45. This can be wired so that you can switch the inverter off and still have shore-power. It's a great solution that might get you some extra sleep! 🥱 Cheers! Geoff
1 point
-
We keep our Victron Multiplus II on ALWAYS because we use AC appliances all the time! Also, with the MP2 full OFF does not allow for shore-power pass-through. There are 4 states as seen in the menu which can be changed via the VictronConnect Bluetooth App (see picture). The MP2 is more efficient than the original Multiplus as follows with power saving modes: - Zero load power 13W - In AES mode 9W - In Search mode 3W 13W is about 1A or 24Ah used per day (I don't bother with the power savings Modes). Since our Oliver is always outdoors, it takes about 3 hours of sun or 6 hours of clouds to replenish the 36Ah in 24 hours, the 24Ah for the inverter and another 0.5Ah x 24 for DC usage, Exterior Courtesy Lights ON and DC parasitic draw. I will on occasion turn the inverter off overnight, for example when charging is creating noise under my bed or when boondocking and SOC is low from use (<50%) and we need to be off-grid more overnights. On the rare occasion when the inverter is turned OFF overnight, Chris will try to start the electric kettle for coffee in the morning and when she gets no power she knows. So, I turn it back on using the app while still in bed! Our batteries have to be really low to use LP. The 1100W electric kettle (usually draws 900W) boils water in half the time. When SOC% gets low we have DC-2-DC charging and an extra 400W in suitcase solar. Our Epoch and Victron upgrades are GREAT and we use them to the fullest!
1 point
-
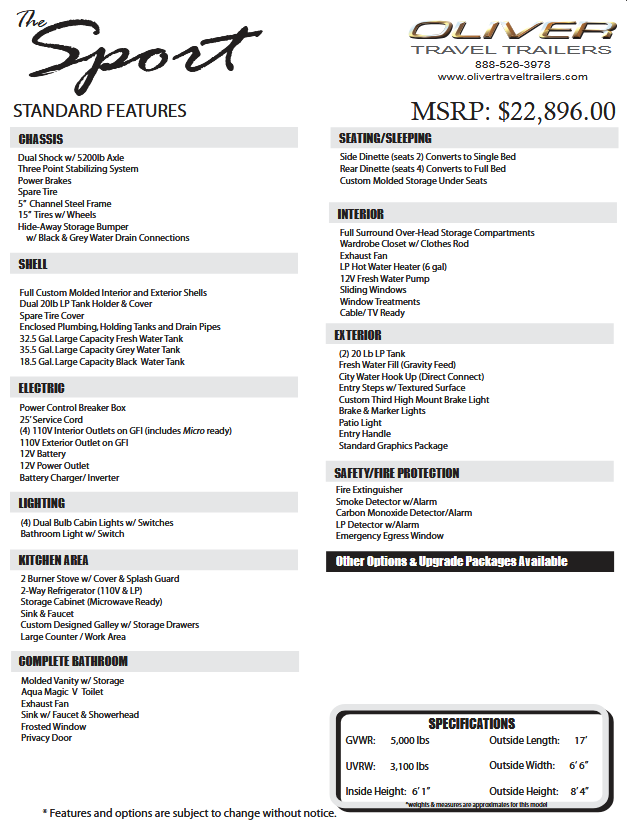
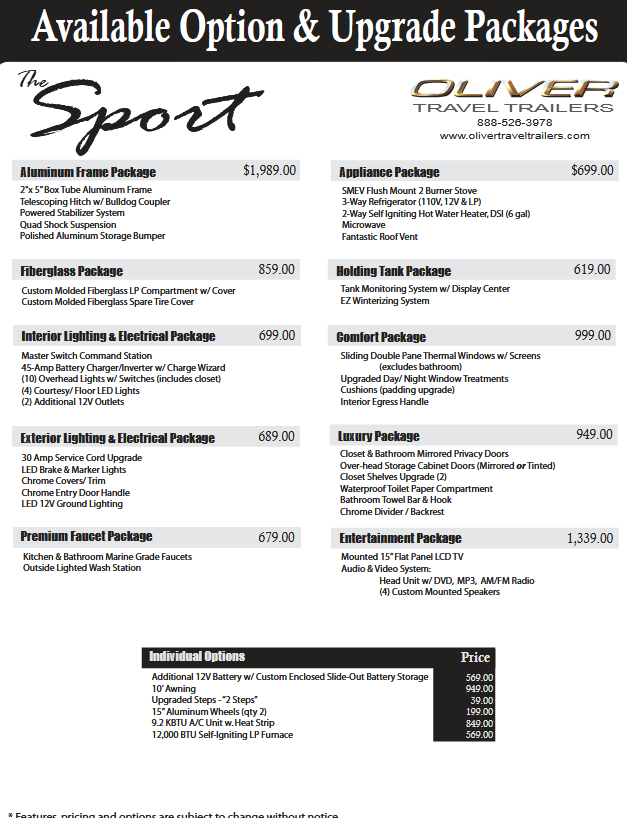
Here are the brochure spec sheets for them.
1 point
-
Actually, there was only one made.1 point
-
We use to use our interior speakers occasionally as well. More often we use a set of portable JBL Flip 6 Bluetooth speakers and stream XM radio music or news sourced from our iphones or iPad. The sound is excellent and they are super portable! We are very happy with the Flip 6’s. They typically live on our Yamaha Umax, (pic) unless we are traveling in XPLOR. https://www.amazon.com/JBL-Flip-Bluetooth-Waterproof-PartyBoost/dp/B09RQ47HC8/ref=sr In this pic I have the set attached to our Yamaha Umax 2+2. I would not hesitate to buy again. 🎶
1 point
-
We use the speakers quite a bit. I bought a small used SiriusXM receiver from Amazon 7 or 8 years ago. I wired it into the Furrion and we can listen to news, sports and any of the music stations wherever we are. Mike1 point
-
Ditto on the audio with the 4 speakers. Often we don't get a cell signal so pulling in something FM or listening to an old CD is our only fix to our technology addiction. After two years we have never used the TV. I have considered removing it.1 point
-
We use these speakers on occasion, only when Chris connects music on her phone by Bluetooth. I don't like the speaker right on top of my head in front dinette seat. We use a high quality soundbar for TV and can stream or play DVD/Blu-Ray/CD music there with a player installed in the attic (better than cut into the walls)! The interior hull would be better without the 4 large speaker holes, 16 screw holes. I'd go without the Furrion head too! But there are not many of us who would sell our Oliver to buy a new one for a few features, plus or minus! Heck, if we got a new Oliver I go without any factory options and then I'd have to rework all the mods I've worked over the last 2 years. Life is not long enough! 🤣1 point
-
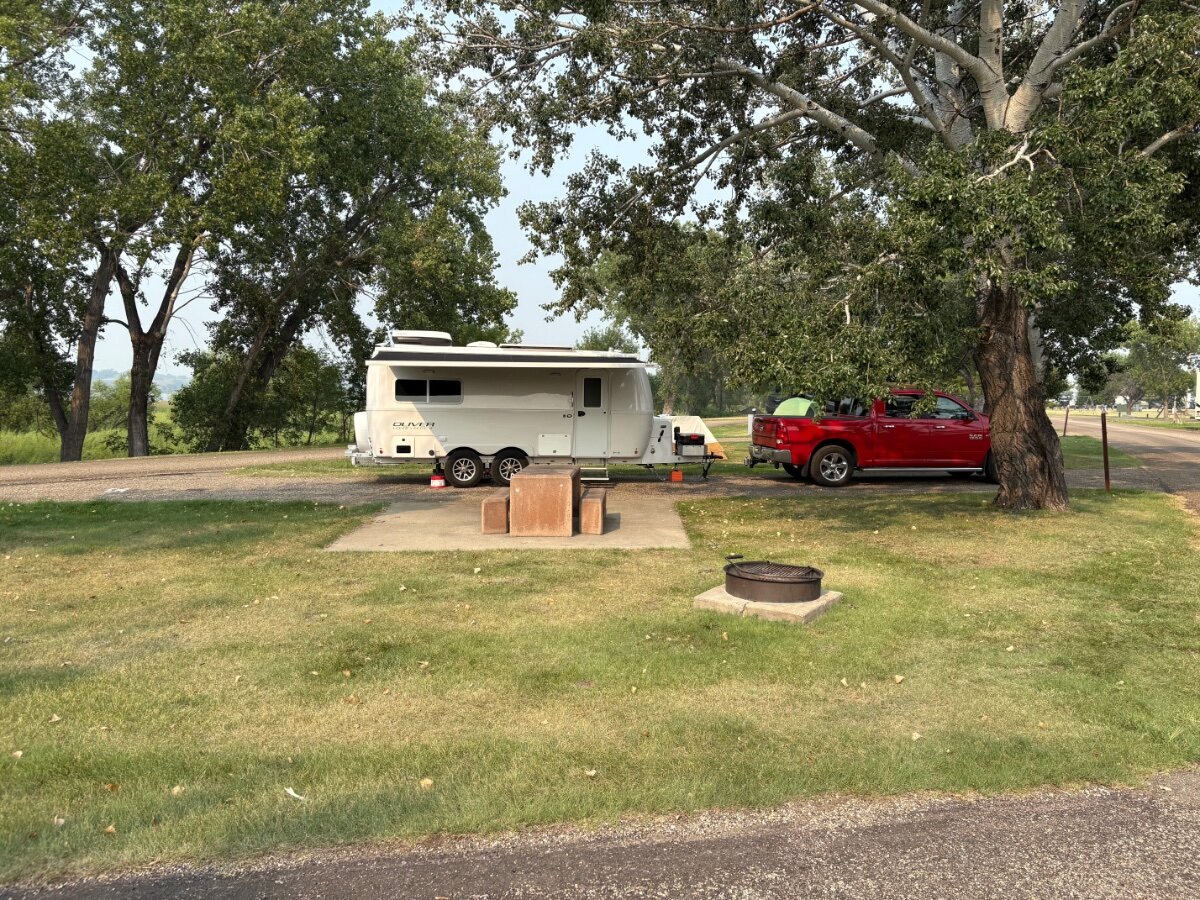
We scored a wonderful spot at a Corps of Engineers park today (August 11,2025). Site 25 at Left Tailrace Campground near Fort Thompson, SD. The weather has been much better than Tennessee when we left for the west. Looking forward to some great boondocking in a few days as we head to higher elevation.
1 point
-
I’d read in another post here or on Facebook that the speakers are gone, replaced by Bluetooth speakers. I don’t know if that is an option or standard equipment. I’ve never used the inbuilt audio system. We don’t use DVDs, and we have a Sonos Move for streaming audio inside or out.1 point
-
Hard to be sure, but it looks like the overhead speakers are gone. We like the old sound system for music and videos. I'm glad the swing out windows are here, but they usually have integrated shades/screens in other RVs. Those bulgy shades look sketchy.1 point
-
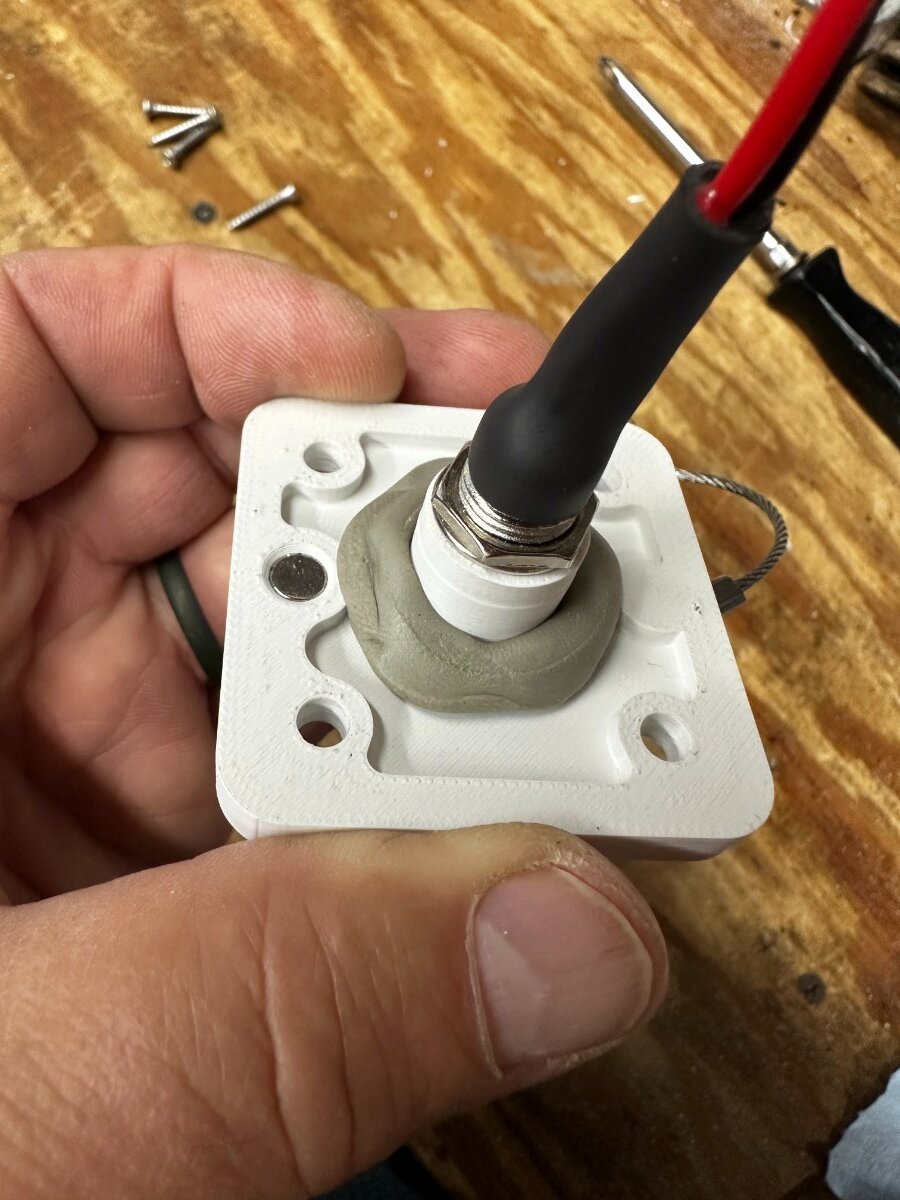
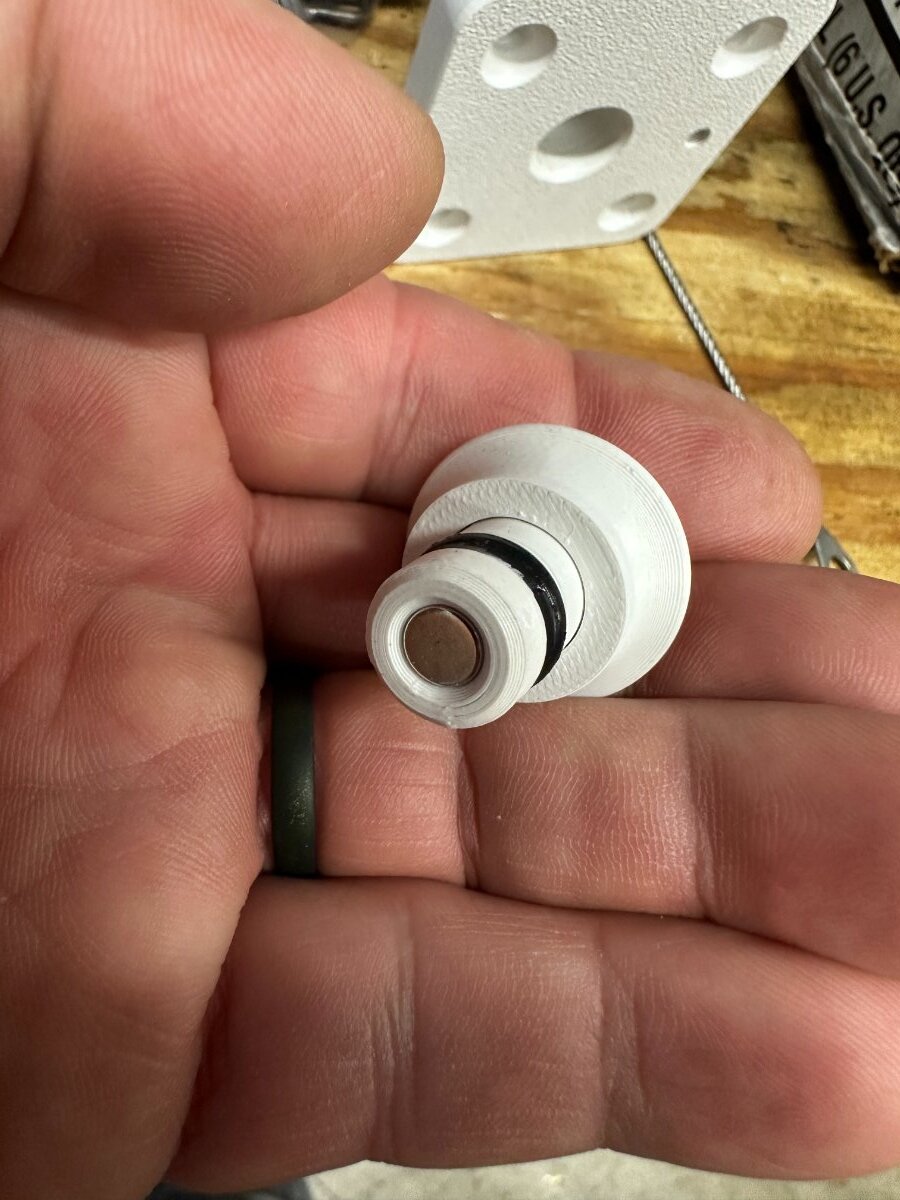
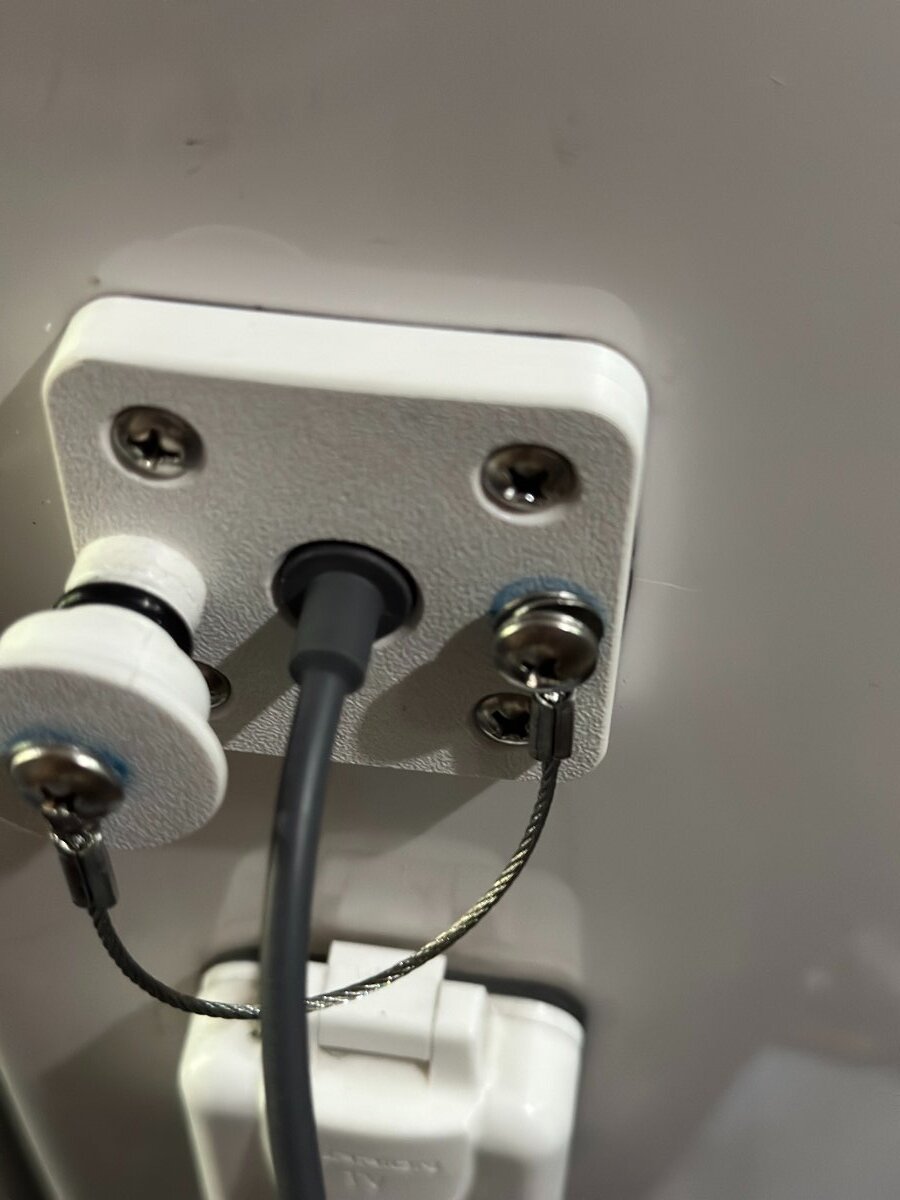
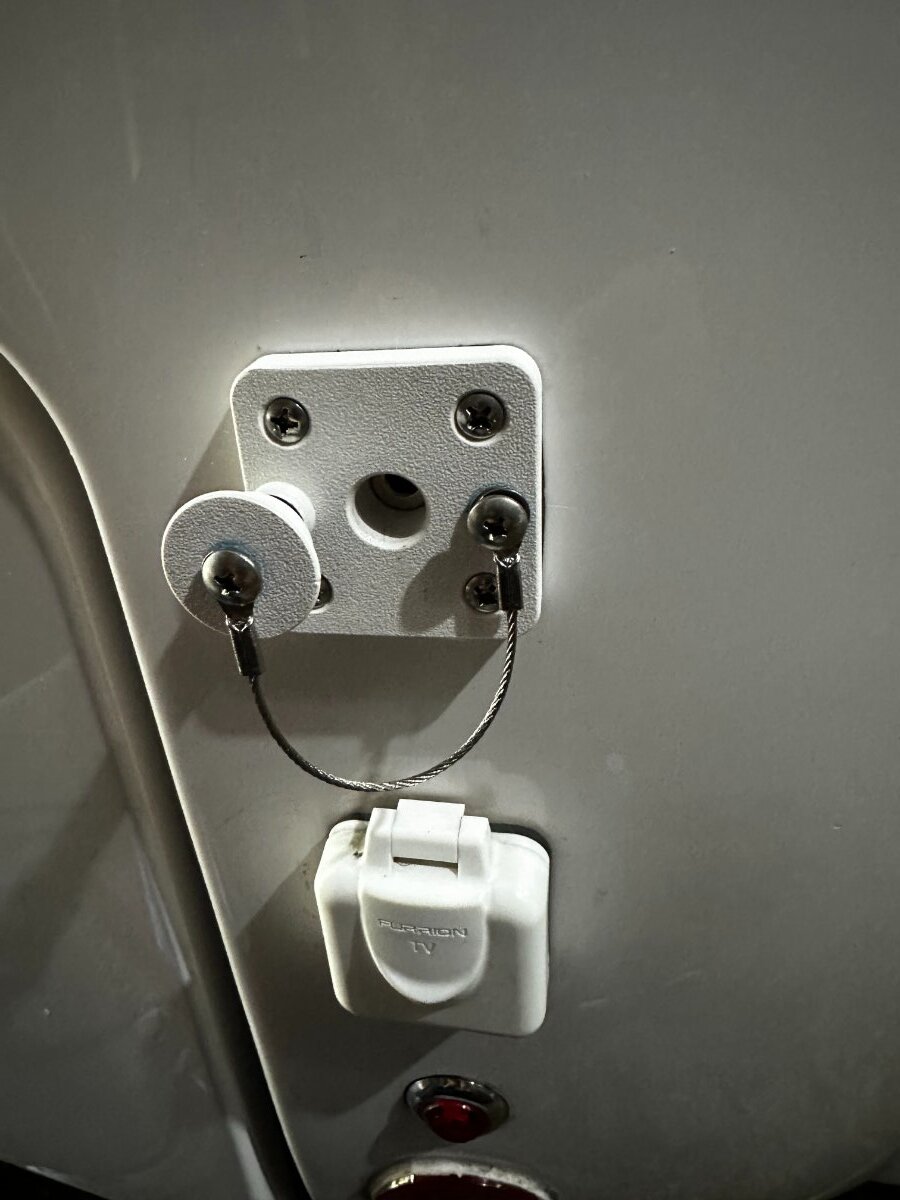
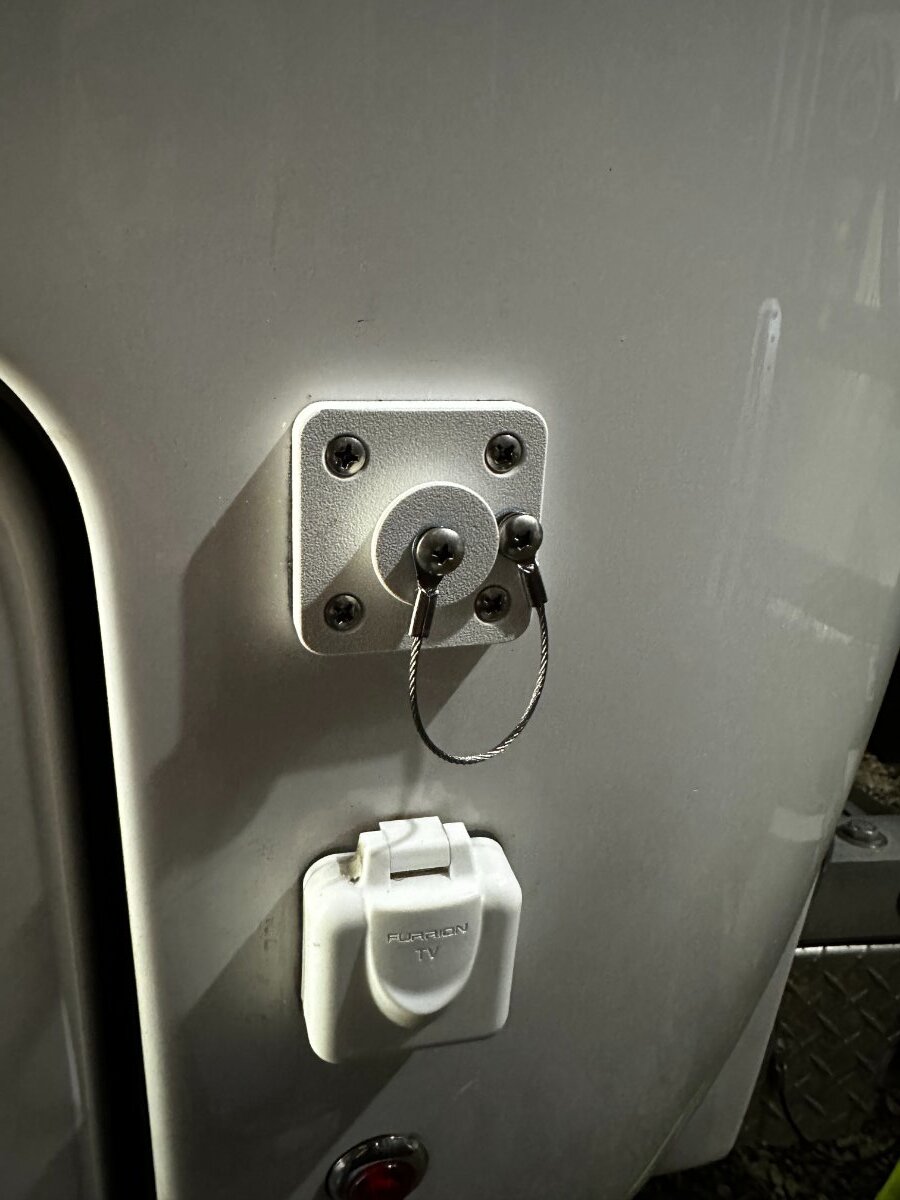
Going back to Geoff's original post on this thread, I did this (except for relay) and it works great but have been concerned about water penetration at the exterior socket when Starlink cable is plugged in. I have swapped mine out for a water-resistant component custom designed and made by Tom at Platypus3DDesigns in Mesa, AZ. Although the original socket worked great, it was not water-resistant so I asked Tom to create one that would replace the Furrion Mini TV/Satellite Inlet. Here is the link to his component. https://www.etsy.com/listing/4349330543/starlink-mini-dc-cable-pass-through It has 18 gauge wires attached and a magnet that holds the cap in. In addition, he adds another magnet on the side that can hold the cap when not inserted. I asked for a modification so I could add a lanyard. Tom drilled and threaded #8x32 holes for that. All screws and machine bolts were attached with blue Loctite. I was able to use the original Furrion gasket. I had to drill out the hole in the fiberglass a bit larger and I wrapped some butyl sealant around the barrel upon installation. Here is a link to the lanyards. https://www.amazon.com/dp/B0B4RXTKBH?ref=ppx_yo2ov_dt_b_fed_asin_title&th=1 To finish it off, I used a very small amount of dielectric grease on the cap seal and rubber fins on the Starlink cable end. Works great. David P.
1 point
-
Just an FYI. If the digital rear view fails, it still acts like a normal mirror. It has to, because the camera doesn't work well in the dark.1 point
-
Much, MUCH better than the stuff coming out of Elkhart… That said, dropping the ball on a cosmetic issues on a LOT of units (based on comments above) gives a black eye. Our interior “belly band” started falling off on the curb side after a season or two. I suspect that improper/lacking surface prep combined with a heavy material - and likely shrinking with age - caused it to pull out of the corner(s) and progress from there. Back in the golden days (late ‘70’s - early ‘80’s) I used to install body side molding on new cars. Very very similar to this belly band material. Clean surface (acryl-sol) and heating the material were key to good adhesion. Even then, the material would try to return to its original coiled shape and start to pop loose at the ends. I purchased enough 1/2” 3M “VHB” tape to re-apply the band - but have not done so yet for two reasons: As with auto body side molding - getting this stuck on -straight- is damn difficult! I used to have a magnetic guide bar to assist - but that wouldn’t help in this case. I just don’t want some wavy install reminding me for the next 5-10 years what a half-fast job I did. I also don’t want the durn thing falling off again. Im thinking a much thinner, lighter type of trim tape would be a better solution. Actually, I just thought of a replacement that -may- be acceptable: https://www.3m.com/3M/en_US/p/d/b40068317/ I’ve used this to temporarily seal up holes or cracks on our sailboat until a permanent repair can be made. I do find that it doesn’t stand up long-term when exposed to sun, but inside the boat, it seems to hold up pretty well. I’d like it it were thicker - so that the holes below the seam didn’t “print” through, but lacking a thicker tape (or thinner piece of trim) it may be an acceptable option. Being white and easier to work with, it’s less likely to go on with curves and undulations, and less obvious if it does. Anyway, I’ll read the rest of the thread to see if anybody else can up with a better trim material.1 point
-
If I remember correctly from 40 years ago when I read it, the best thing you can do is start a list of names with short notes identifying who they are. 🤣1 point
-
Not one for audiobooks. Recently finished a fun science fiction series named “Backyard Starship” and decided to delve into something a bit deeper. I’m now enjoying the psychological family drama The Brothers Karamazov, by Fyodor Dostoevsky. Although written in the 1800’s, the strong interpersonal family relationships are lessons still applicable to today’s society.1 point
-
Thanks for sharing your A/C replacement experience. The Tosot unit looks very attractive compared to the Dometic. Would you care to share the cost of the new unit plus installation? Thanks. Don1 point
-
Poor Tommy Lee. He gets blamed for everything.1 point
-
Are you sure this is not a crime scene?1 point
-
Just to follow up on post. What I found ...... No oring, where screen housing connects to pump. Flexible line attached to screen housing did seem a little loose, snugged it up. One of the "quest fittings (unsure if that is the brand) was loose enough to allow air to draw in ....... After correcting these issues, all works great. Small issues easily remedied..... Thanks for the conversations. All tips used and helpful......1 point
-
You and @Golfnut with LEI have this. Just got my new axles yesterday and they are rated the full 5200#. Must be an LEI thing likely limited to 5033# due to the springs. Good news, my axles are here! Bad news, Dexter packed them so poorly, they came badly damaged and going back. Alcan was the reseller on the axles. I special ordered the 50.00" axles from them. They got right on the phone with Dexter this morning, forward the many pictures I took showing the damage. Dexter will Rush Order my axles but rush means another 2 weeks plus shipping. Notice dinged Nev-R Lube cap and dented backing plate. So bashed in that the drum on the left will not turn. What a waste!
0 points
-
Before I finished reading your post, the very end of your post had already passed through my brain🤣0 points
-
The old Pullman Sleeper Cars had nicer looking blinds. They were nice and tight, not like a pillow🙃0 points


.thumb.jpg.e34bf01ef7f7d5e99ad31856d45afbeb.jpg)


.jpeg.bc5410dca345743218c7cdd61cd7a837.jpeg)
.jpeg.db24308a47698837a565fc55eec3a655.jpeg)
.jpeg.b601f1e7eac4638423f2297d1cfed3e5.jpeg)


-
Recent Achievements
-


")


")


")


")


")


")