Leaderboard


Popular Content
Showing content with the highest reputation on 02/12/2026 in all areas
-
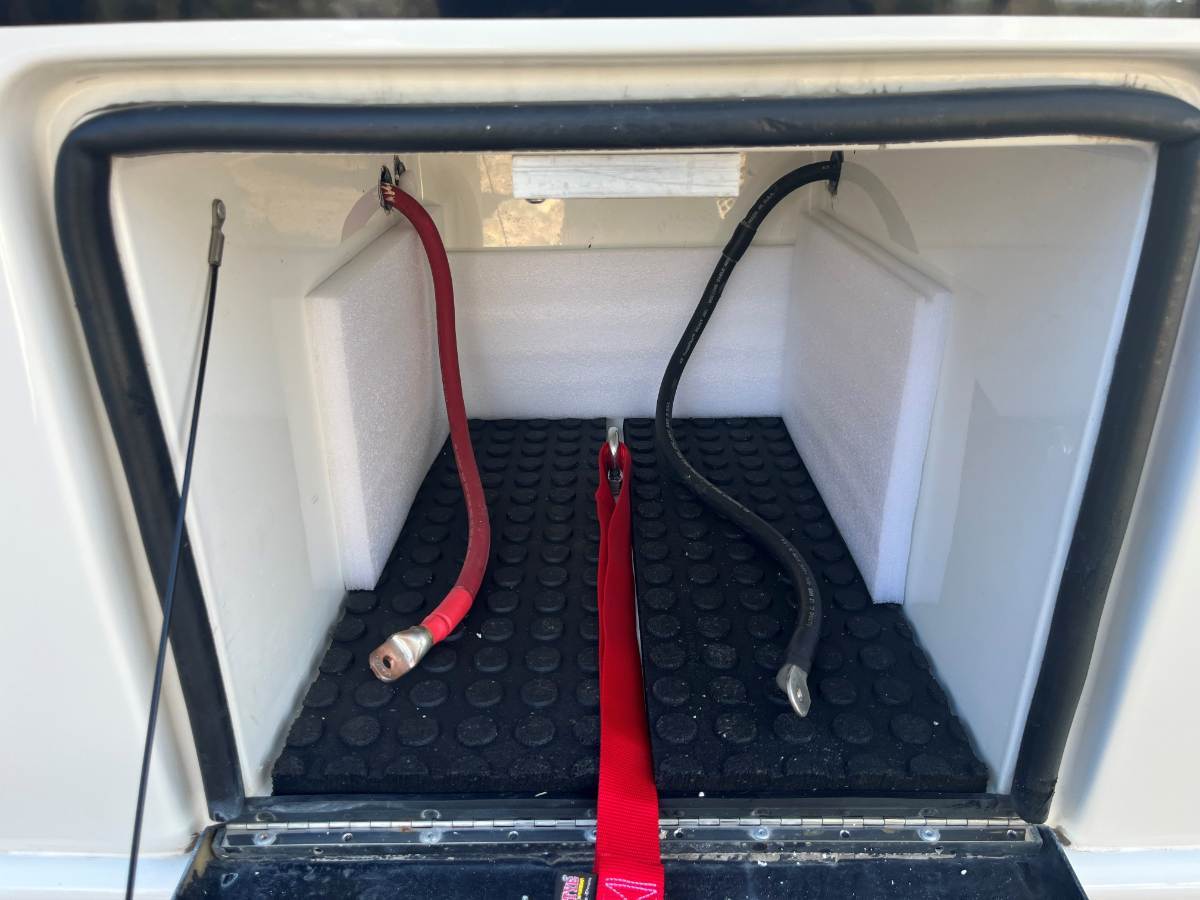
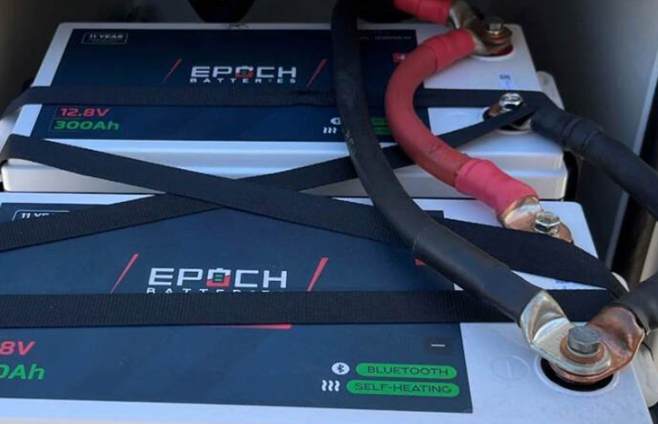
I’ve ordered my new Epoch 300aH batteries. When we, @mountainoliver and I, did my upgrade from AGM’s to the Battle Borns, we also recabled everything so that like John, I have one red cable and one black cable in the battery box. My Battle Borns are just over 5 years old. I’ll keep them for a while as this Dragon Fly crisis progresses. Mike5 points
-
We do use them for leveling and have done so since our first Oliver bought back I early 2008. Advice: Chock the tires fore and aft, then unhook the trailer and move the truck. Raise/Lower the front jack first to get the trailer level front to rear. If the trailer is not level side to side, use the jack to raise the low side to level. Then lower the opposite side to stabilize it. Make sure you place a block between the jack foot and the ground. That way when you forget to raise them before driving away, you won’t ruin $1200 worth of jacks. Routinely check the bolt that holds the foot plate to the inner jack tube. If this bolt works loose, you will lose the foot plate that will cost you close to $40 to replace.4 points
-
This thread has evolved into an incredible resource thanks to everyone's input. It’s worth remembering that none of us are affiliated with or endorsed by Battle Born. If a product fails to live up to the marketing hype, we have to prioritize the safety of our families and move on. We can only hope that BB management find their own way out of this. While the name 'Battle Born' implies strength and integrity, corporate marketing doesn't always align with the reality of the consumer experience. The best approach is to listen to those doing the real-world research and keep sharing what we learn. We won’t always have all the answers, but as a close-knit team, we’re much safer and more successful together. Keep the great info coming, Oliver family!4 points
-
Because it is easier and cheaper to deny and shift blame, and hope that a class action doesn't take place. This is the way the world has gone, no integrity. I would bet the CEO is selling any shares if they even have them. Sorry for the rant.3 points
-
Just more bla bla bla…when I read garbage generic responses like this I want to 🤮, the CEO’s coffee maker probably pulled this letter from their 10yo archives! Why not own up to the fact their batteries have an issue, or at least come back with a something /video some explanation that makes sense to people that have more than 2 brain cells why Will Prowse, and btw Lithionics who called them out for same issues year ago, are taking too much kool aid!3 points
-
You worked some great upgrades! Love your tool sentiment, but I'd be in trouble with Chris on the dog thing. 🤣 I've rewired all the important things in the Oliver, also added the DC-2-DC charger but using only 4 AWG. I understand a EE calculation calls for 2 AWG, and your a step better than that. I worked mine on a tighter budget, used the frame for the B- length of the truck, 65 ft total with a long-bed, and the design works well (less length, thinner wire). I also spent enough replacing the 130A OEM alternator with a US made, high quality 180A unit, thinking +50A was enough. I doubled the +/- connections from alternator to starter batteries by adding just 2 ft additional 6 AWG. (The main Oliver ground was only 6 AWG and I doubled that too.) I get 35 Ah charging at idle with the 5.9 Cummins, numbers in the 40s when towing (highest reading 49A) with the Orion 50A. No issues ever with any of the cable and HW. Chris and I LOVE this upgrade. Five hours on the road will consistently provide over 200 Ah. In a 600 Ah system that's a 33% increase in SOC %, rain or shine! Ever get too low when boondocking, time to hit the road! 😎 Quality copper wire costs a fortune today. Sooooo high they are opening new copper mines in Arizona after many had closed decades ago! My battery compartment is simpler than anybody's! I didn't want anything but batteries, 4/0 cables, insulation and tie-downs, nothing else (see before and after pics). What a mess OTT made of the battery bay, OMG. None of the extra 6 AWG wires were necessary. I cut off most of their length and attached them to interior buses. For 45 years I have been servicing vehicles. Often the first thing I do is grab a 1/2" wrench and disconnect ground to battery. That's my shut-off. I understand in most use-cases a switch is handy, but our Oliver is 24x7x365 never in storage, only shut-off when working another mod. I also never turn off the inverter nor outside courtesy lights. The rooftop solar handles that. I installed the shunt on the other end of the main 4/0 ground cable, attached directly to the inverter terminal with a shorty 4/0. Back to the subject at hand... For those replacing Battleborn batteries, it's a good time to upgrade the wiring and other electrical mods.
 3 points
 -
Preview for Oliver friends: Since we're between trips with Hull 505, we decided to try out some ai song creation tools and do a road log video. This is the link below is to our page which includes the lyrics for the video shown below: Blog Article with Video and Lyrics Craig & Rose Video from our website below: Oliver 505 640 - SD 480p.mov3 points
-
I updated my Truck to a 245Amp alternator with 4/0 to one battery and upgraded the link between batteries to 2/0. I ran 1/0 back to the Oli for the Victron DC to DC charger. While I was working with the big wires, I did the John Davies clean up in the battery compartment with 4/0 with smartshunt and shut off switch so that when I upgrade from AGM to Lithium I would have a good foundation. I bought a hydraulic crimper and I loved it. Made all the work so much easier. While I was at it I bought several extra lugs from 6ga to 4/0. I love my dog but for me tools are mans best friend. They can make life so much easier, they just aren't warm and snuggly.3 points
-
With all the cautions mentioned above, I do what others have mentioned. Get the trailer close to level using lifts or blocks under the wheels, if needed, and then use the jacks the last few inches to make the trailer level. The jacks are pretty robust and seem to lift and support the trailer without problem. Having said that, I also highly recommend the use of blocks under the lifts to reduce the amount they have to extend. I read this forum weekly if not daily and find it a valuable resource of information for owning, using and enjoying your Oliver.3 points
-
ripple963 - First - Welcome to the Forum. There is a TON of information here and it is amazing what one can learn by simply "poking around". There is also the Oliver University where you can find videos and help on all sorts of things involving your Ollie. Please do not hesitate to contribute to the Forum with your own ideas, mods and travel experience - pictures are especially welcome (they to say 1,000 words). Second - You can use the "search" function to find previous "threads" that just might help with what you are looking for. Unfortunately, our search function is not what one might call "the best" and there have been posts here over the past few days regarding ways that you can use to help refine your search and to actually speed up that search. Third - Your question - there are numerous threads on the Forum regarding this very question. There was a time a number of years ago when Oliver actually noted that our jacks could be used for both stabilizing and leveling - and - jacking one side of the scamper in order to change a tire! However, due to a number of "issues" over the years, Oliver now only recommends the jacks be used for stabilization. Having said this, there are many of us who still use the jacks for all things even to include tires changes/bearing service, etc.. Please note here that if you are inclined to use your jacks for purposes other than those recommended by Oliver, you do so at your own risk and should take ALL of the proper precautions in order to protect yourself (and others) from all relevant risks similar to what you do when jacking a car/truck wheel off the ground. If you intend to do this then I'd highly recommend that you read everything that you can find here on the Forum so that you are aware of how to do this properly without damage to your new Oliver and/or the people near you. Forth - Congrats on the new Oliver! The longer you live with this camper the more friendly it becomes. Bill3 points
-
According to AI as of 2pm 2-12-2026 There is not an active, certified class-action lawsuit against Battle Born Batteries at this time, but a class-action lawsuit investigation is underway due to reported issues with overheating battery terminals. If you own Battle Born batteries, a survey has been circulating to gather information for the class action lawsuit investigation. Key Issues Under Investigation The potential lawsuit stems from a reported design flaw in certain Battle Born battery models (specifically 12V, 100Ah, and potentially the GC2 models) where the positive terminal can overheat significantly during charging or under load. Design Flaw: The positive terminal design is alleged to be problematic, with plastic isolating the terminal post from the busbars, forcing all current through a single aluminum bolt and nut. This can lead to the nut loosening, the plastic melting, and dangerous temperatures. Safety Concerns: Temperatures at the terminal have been reported to exceed 250°F (120°C), posing fire and burn hazards. Company Response: Battle Born Batteries (parent company Dragonfly Energy) has stated the terminal melting is an intentional "thermal failsafe" feature designed to prevent heat from reaching the internal cells in cases of misuse or improper installation. Warranty Issues: Some customers report that warranty claims related to these issues have been denied, which critics argue is contributing to the call for legal action. For potential claimants, industry experts and consumers on forums suggest: Checking the temperature of your battery's positive terminal under load using a temperature gun. Contacting the law firms conducting the investigation, whose information can be found through resources like the survey link mentioned in the search results.2 points
-
This may be the capacity of the jack itself but it may not be the capacity of the jack as it is installed on the trailer. The method of installation of the jack by Oliver may or may not be as highly rated but in any case, in my opinion, Olivers specs can't be more than the manufacturers specs. That rambling aside I would prefer to use blocks or ramps to do the majority of the 'lifting' and use the jacks to fine tune that and stabilize.2 points
-
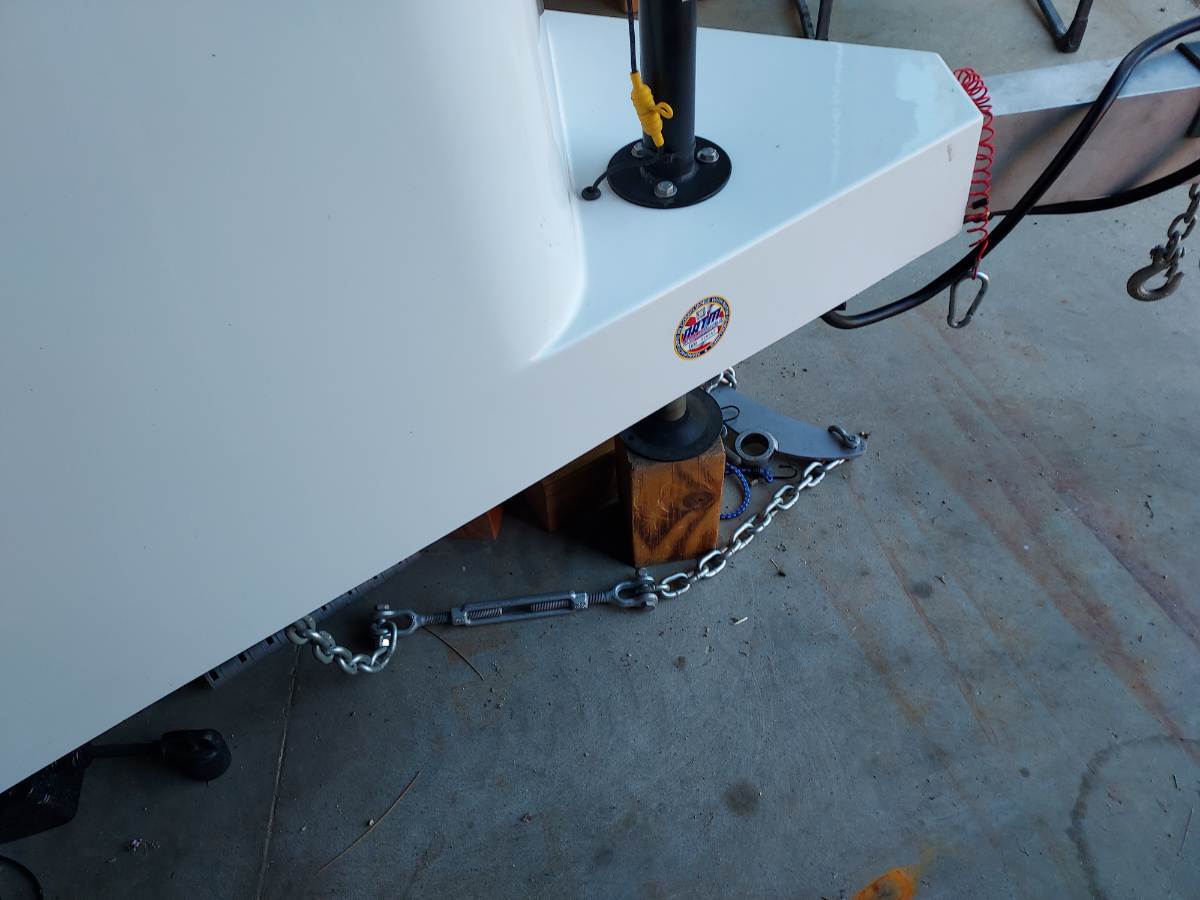
We, too, level and raise our Hull #1291 (2022) with the jacks. But, we always use support blocks for two reasons: (1) to avoid jack damage if we forget to raise the jacks before driving off and (2) to shorten jack travel distance. See photo below of one of our three support blocks in place under the front jack. Since that photo was taken, we have added Snap Pads, as recommended by Patriot, above. We like 'em. One caution: ensure that the jack foot is placed on level ground, or the foot plate can be bent, requiring replacement. If using the jack on a slope (such as on the side of significantly crowned roadway), place tapered levelers under the jack foot to provide a level platform. Don't ask me how I know...
2 points
-
Here’s a blog post we wrote showing the installation of snap pads on our 2019 back in 2020. It is so easy! Blog with installation video2 points
-
@ripple963 Consider a set of these for your new Oliver. We installed snap pads on delivery day and they have served us well. It advertises for a 2023 OLE2. Oliver has not changed the size of the leveler base plate to my knowledge. Keep in mind you will only need 3 snap pads. You could inquire with the company and see if they would sell you a 3 pack. Congrats on your new Olive and welcome to the fourm! https://rvsnappad.com/products/mini-6-4-pack?_gl=1*1v0inyc*_up*MQ..*_gs*MQ..&gclid=CjwKCAiAkbbMBhB2EiwANbxtbResXJ2E1axK6bHy80zoefux8nAjJbXwQ8Ok6W8Kv_TmK9BnMxXnMBoC3EkQAvD_BwE&gbraid=0AAAAADD4zBgubd1W_JWGft8lx6EV5EltU
2 points
-
While researching my RV tech/inspector certifications, I was reminded that it's easy to change your phone's camera format. For an iPhone, the default these days is an HEIC format. Before you take a bunch of pics for posting to forums, consider changing your phone to a more compatible format. That way you do not need to convert or resize so much before posting. With iPhones (recent models) go to Settings, Camera, Formats, and under "Camera Capture" select "Most Compatible". Also to be more friendly to forums anywhere, change "Photo Mode" down to 12 MP (megapixel). Change both settings back for more a more efficient/capable format if desired. I'm a bit surprised these forums do not have a back-end convert function to greatly reduce storage requirements. 🤷♂️
2 points
-
We have a factory installed Truma Adventa with both the panel and the remote. We never use the remote and have found it glitchy with poor connectivity. It has to point directly at the ir receiver on the Truma, it often seems out of synch with the wall panel and the time is never correct for long on the remote. However, You cannot access the dehumidification mode on the panel, only on the remote. We don’t use the dehumidification mode any more because it turns the trailer into a meet locker and we now use a small countertop dehumidifier. Maybe we would have a better experience if we used the remote regularly instead of occasionally. Just one man’s opinion!2 points
-
We use ours for leveling all the time, have for the last 10 years. I’ve also used them to change tires. As Bill mentioned, this has been discussed a lot here, if you want more data do a search and you’ll find lots of opinions! Mike2 points
-
Yes have done this for years. Level and stabilize and not to worry. That said I do make every effort to get as level as possible before with blocks etc before setting down the jacks. Hope this helps2 points
-
We never lift the tires completely off the ground when setting up at a campsite. We usually level with "Lego" blocks under the tires first, then use the jacks to take most of the load off the tires, so there's no tire bulge at the bottom. Sometimes I will also use a jack to help level side to side, maybe an inch.1 point
-
Like Mike, I'll use them to change tires which OTT suggested years ago until likely lawyers got involved in policy (over engineering) . Oh yes, we certainly all have opinions! 🤣 I don't like to level at a campsite with wheels/tires off the ground for days. I don't feel it's safe and will show reason to follow. When you find out the leaf springs on your new Oliver are borderline in weight capacity and upgrade to (search for keyword) "Alcan" springs or the like, the Alcan suspension is so firm that when leveling you tires will quickly be lifted off the ground! I had the bracket to one rear jack break. Good thing I was home servicing the Oliver and nobody was inside as the hull banged down, fell on the curbside! If this happened while sleeping, the person on the streetside bed would have been thrown into the center aisle and on the other side against the wall. I'm not kidding! When camping I level with Andersen levelers and only stabilize with the jacks so to keep the wheels on the ground. I also find when using this kit I do not need or use additional wheel chocks. Chris puts them into place easily as I drive up them to level watching the LevelMatePRO app from the driver's seat! These tools work great! 😎 https://www.amazon.com/ANDERSEN-Accessories-Levelers-Leveling-Motorhome/dp/B01LYQ1Z8S/?th=1 If you go with LevelMate, get the PRO model, hardwire it hidden under the rear dinette seat out-of-sight, and never worry about access and battery changes. https://www.amazon.com/LogicBlue-Technology-LevelMatePRO-Wireless-Leveling/dp/B01FGGSWPW/?th=1 Hope this helps!1 point
-
I will be very surprised if a class action does not take place!1 point
-
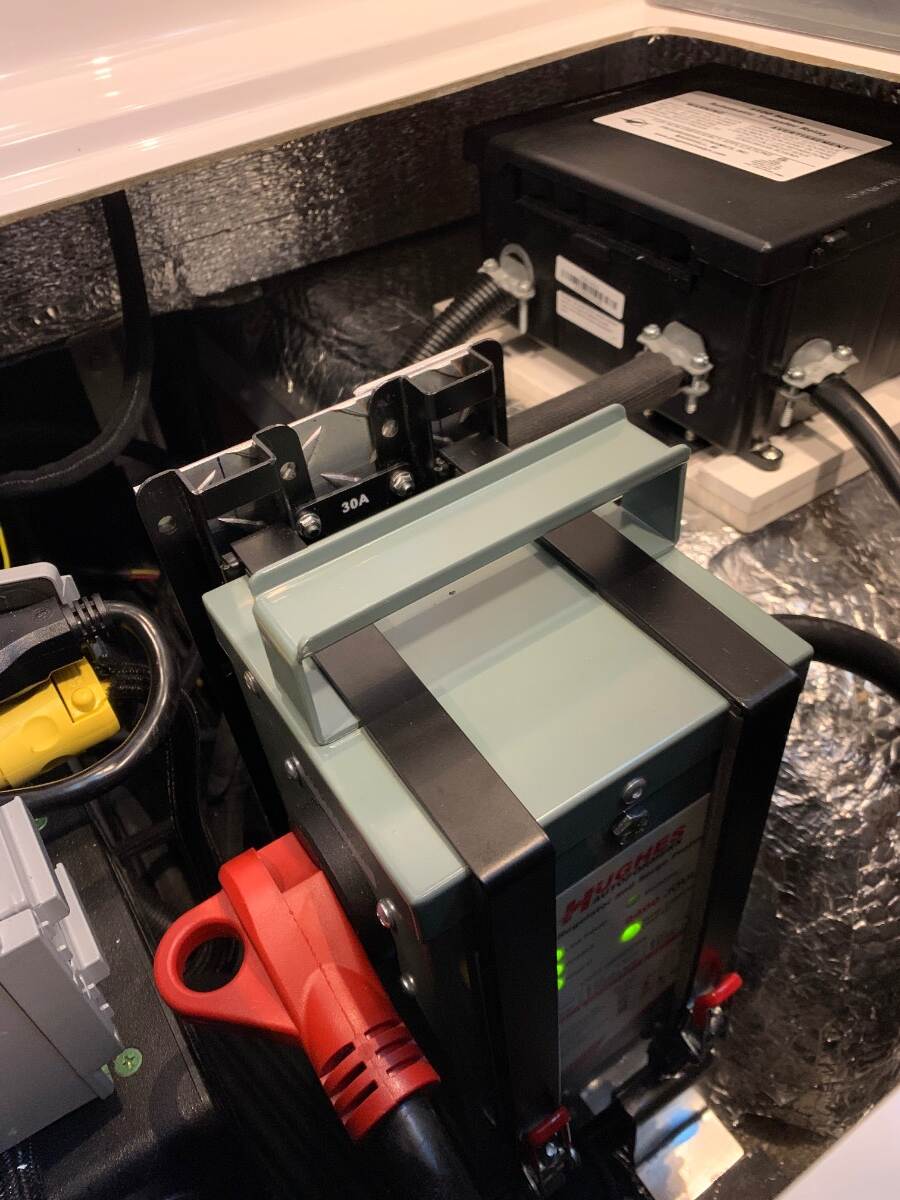
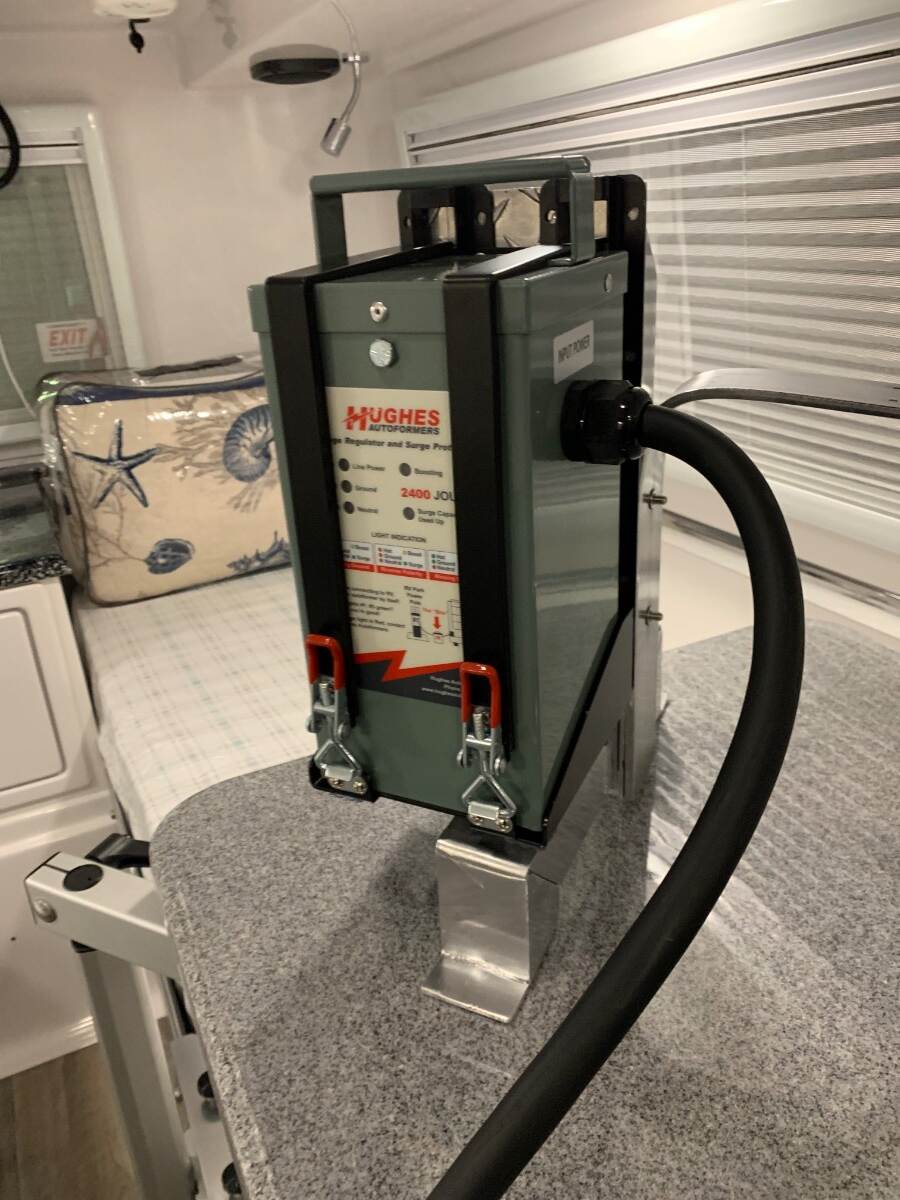
Unlike the former version, this newer version is “engineered to be completely weatherproof”, which was a concern in using the original Hughes Autoformers voltage booster outside at the power pedestal. To eliminate said concern, I choose to mount mine under the rearmost dinette seat for ease of continuous use and protection. With the larger footprint of the Watchdog Power Center, I doubt it could be mounted in similar fashion and thus, no plan to upgrade. Both 30A versions have replaceable surge modules, the former with 2400 joules and equivalent newer at 3000 joules of protection. I also use a 30A 12,000 joules circuit analyzer at the power pedestal. Here’s a couple of pics of my install:
1 point
-
New Statement from BB.
1 point
-
@ripple963 welcome to this awesome group of members. Like others have mentioned, I also use my jacks to level my 2016 Elite II. However, a few things maybe not mentioned here. I have already replaced the old Lithium grease in both of my Jacks in early 2023. So with 7 years of use, the original grease was indeed getting a bit dry or stiff. I think I got them just in time. Greasing jacks is also in the Oliver University video library. Put that on your long-term maintenance schedule. You should not need to worry about that until at least 2031/2032. Wow that seems futuristic to type. Anywho.... I'm always worried about bending a jack foot (round plate), so I always keep small, thin oak blocks in my truck in order to level out any blocking I use for my jacks - also good for leveling outside tables for cooking. We don't always get to be on nice level ground. And yes, like others, as long as Oliver does not change the jack models, I completely lift my Ollie off the ground for maintenance. I ONLY do this on completely level concrete/pavement if I can. As mentioned, I also use lots of good blocking so the jacks do not need to lower much. This reduces wear and the jacks do not rock back & forth nearly as much, making for a VERY stable camper. Good for normal camping and maintenance. SAFETY FIRST though. We all likely use additional jack stands when doing bearing/hub/brake maintenance. I will be putting on new leaf springs soonest and will have the camper jacked up for that too. I go slow when lifting the trailer, stopping for a moment in hopes of not blowing a fuse or other gear wear. Once you have your rig, add to your spare parts list the proper slow-blow fuse for the jacks. I think these days they wire all three fuses next to each other under one of the bunks. My rear fuses are near each jack. I have never found the front jack fuse if there is one in my hull. My used Ollie came with a nice aftermarket front jack and the fuse is outside with the jack. I have a new borescope camera now, I should look harder for the inner front jack fuse. LOL Good luck and keep using these forums.1 point
-
@Galway Girl Your creativity is always a joy! Mossey1 point
-
JD: your battery bay sure looks a lot simpler with your new batteries! Also like the cross strapping idea. GJ
1 point
-
What a lovely and creative way to document your travels. Thanks for sharing. I am grinning ear to ear after watching and can't wait to hit the road again.1 point
-
Amazing. Just amazing. Have been to more than a few of the sites in the video, hope to do more. God willing. GJ1 point
-
BB Owners: The above thread has some safety precatutions to think about taking if still using your BB's. They appear to be: Individually inspect and test your BB's as presented by Will P. Also inspect the BB terminals and ALL 4/0 cable lugs with an IR gun or IR camers to visually as suggested above. Only charge your BB's if you are present and can check in on them periodically. Don't use excessively high charge currents. My limit is 60 amps for three BB's. Install the temperature sensor that came with your 712 Smart. Place a rate of heat rise detector in your battery box. From AI: For an RV lithium battery storage box, a Rate-of-Rise (ROR) Heat Detector is generally recommended over a standard smoke detector. Because lithium battery failures often involve rapid overheating (thermal runaway) rather than immediate, thick smoke, ROR detectors provide faster, more reliable alerts by triggering when the temperature spikes quickly, minimizing nuisance alarms from dust or minor temperature fluctuations GJ1 point
-
JD: Many thanks for the offer. I'll order out lugs and cable just to have them in case they are needed at other locations. I'll also bring my Harbor Freight tools in case my BB's fail on the road. But your cutter and crimper are for sure higher quality than mine. Hopefully my BB's will survive at least until the warranty has expired. Although I doubt that will be the case so being ready and prepared with options is warranted. Many thanks! GJ1 point
-
Good thoughts. Fortunately they will not all start to fail at the same time. Also, thanks to Will P. we know exactly what to look for. Hence should one of mine start down that path, I'll pull it out of the harness and "Only" have 200 AH of power. More than I had when I purchased and used the OTT AGM's for five seasons. So we have a pretty decent path forward. Key is Knowledge, and that comes in great abundance on our forum! GJ1 point
-
FYI - I wrote Marshall Excelsior today to ask them whether going to the MEGR-253H (H for high output) was the right decision. I've got to say their customer service is RESPONSIVE from a webform request! I've had companies, related to Oliver, Eley Hose Reels company for example, that never answered a webform query or direct email on a 2nd try at all, no reply (and I paced 2 orders totaling $250)! Marshall Excelsior replied within the hour, forwarding my question to the Product Manager. Then an hour later he replied. My question was this: Trying to decide between your MEGR-253 and the MEGR-253H. We have a travel trailer, use a fire-ring always, dual burner Napoleon grill, and inside the furnace, HWH, and fridge. Our trailer came with the MEGR-253 which is now 10 years old. I want to renew and keep the old, still working as a back-up. The MEGR-253 has been fine. The MEGR-253H is the same cost. Is there an issue with more BTU capability? Stick with the MEGR-253 or upgrade to the MEGR-253H? Thanks, JD His reply was this: Hi JD, The MEGR-253H will work just fine. There are no issues with more BTU/H capacity. Just means you can run more appliances at the same time. Cold weather can affect capacity for generating vapor in the tank. Thank You, Wes My experience with corporate CS is that if I ask on a Friday, a Monday reply would be more-so expected. Maybe the Fairview regulator I got was a knock-off, but if not then this Fairview regulator failed in <30 days (sure looks real). I've heard others complain of regulators failing quickly. I'm not absolutely certain our Marshall Excelsior MEGR-253 was OEM installed, but it sure looks 10 years of age! Up to 10 years without failure, and the outstanding CS of Marshall Excelsior, I'm preferring this product over the equivalent Fairview model! 😎 https://www.marshallexcelsior.com/products/pressure_regulators_and_accessories/two_stage_automatic_changeover/megr_253_series.html1 point
-
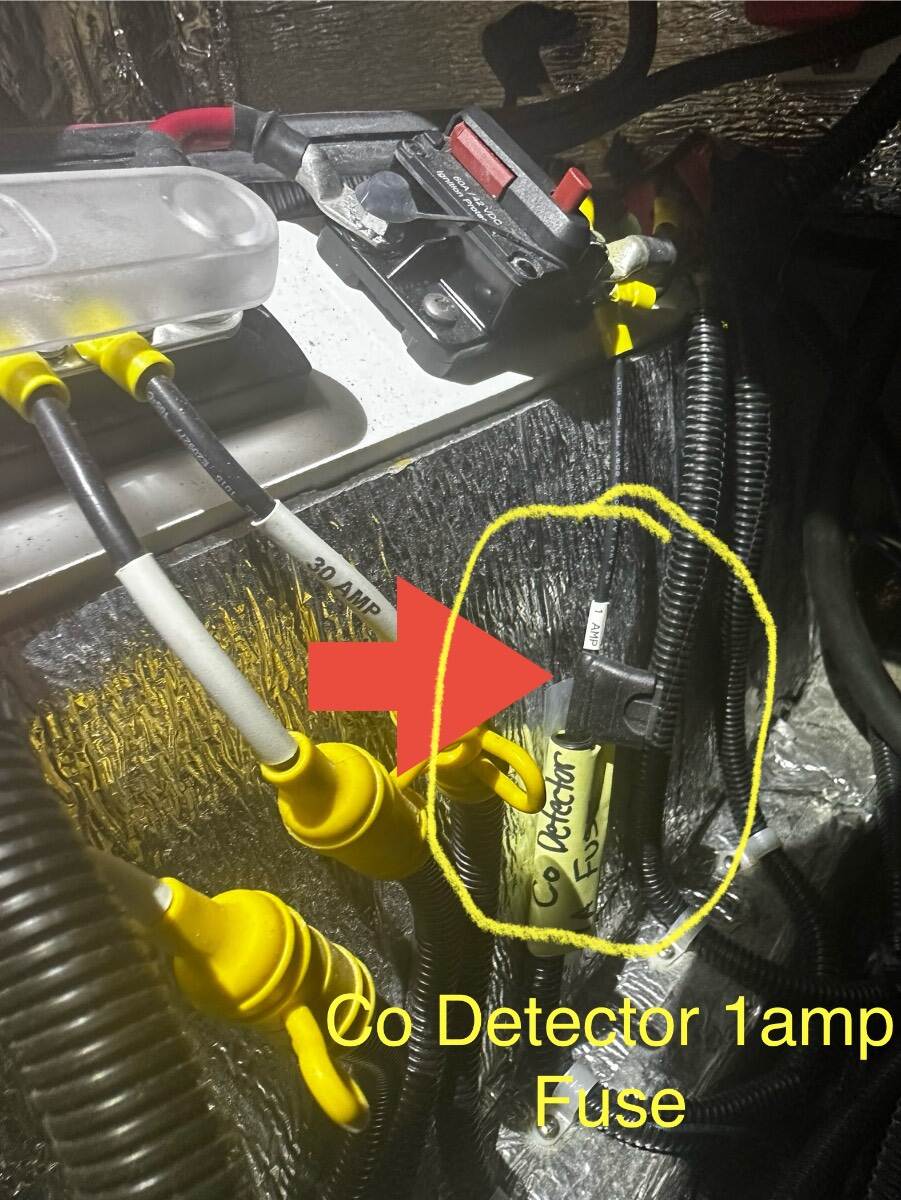
If you follow that cut wire back you'll eventually find an in line automotive style 1 AMP fuse in a holder nearer to the area where the 12v lines go to buss bars etc (Under the street side bed). It's that fuse you could have pulled instead of cutting the wire. You may have inadvertently popped that fuse. Hope you find the fuse and that it helps. (This is a 2019 trailer so your wiring may be different.)
1 point
-
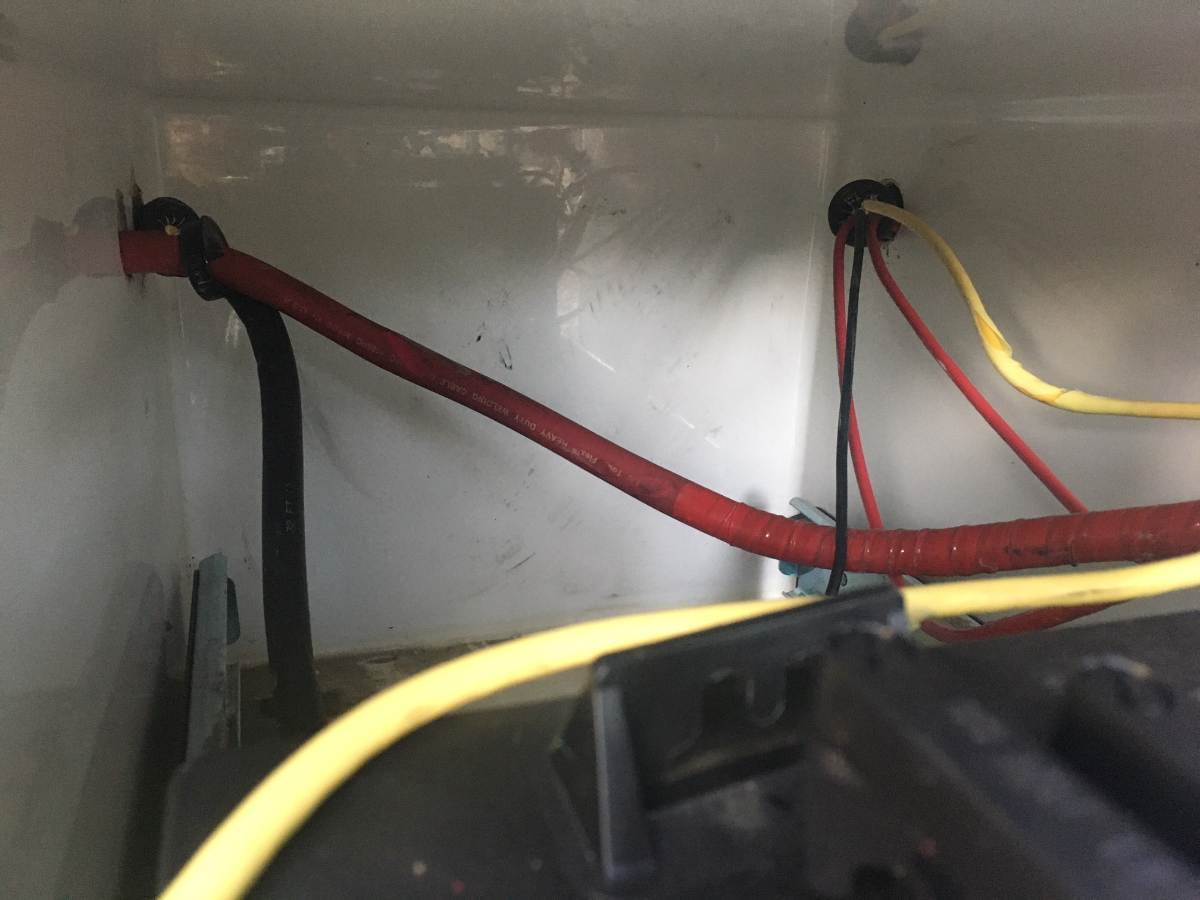
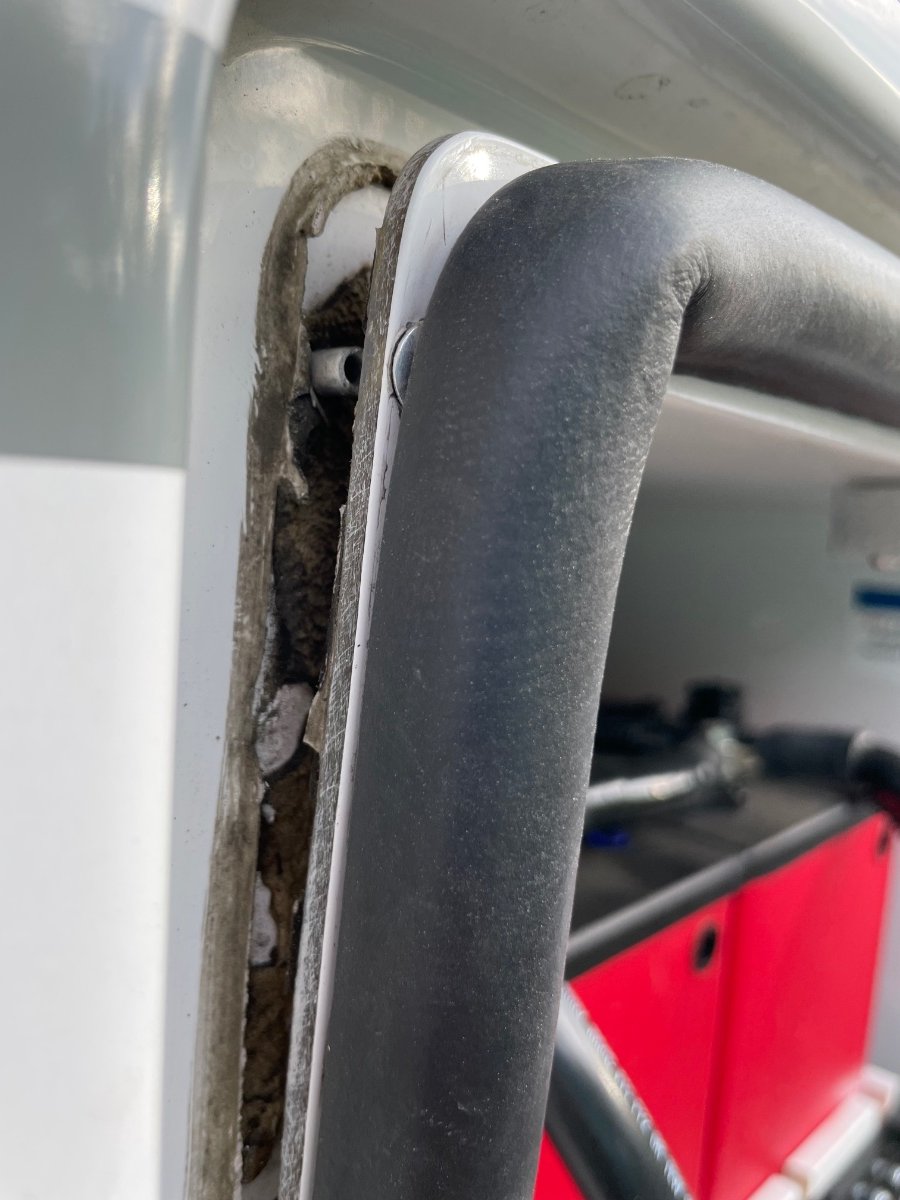
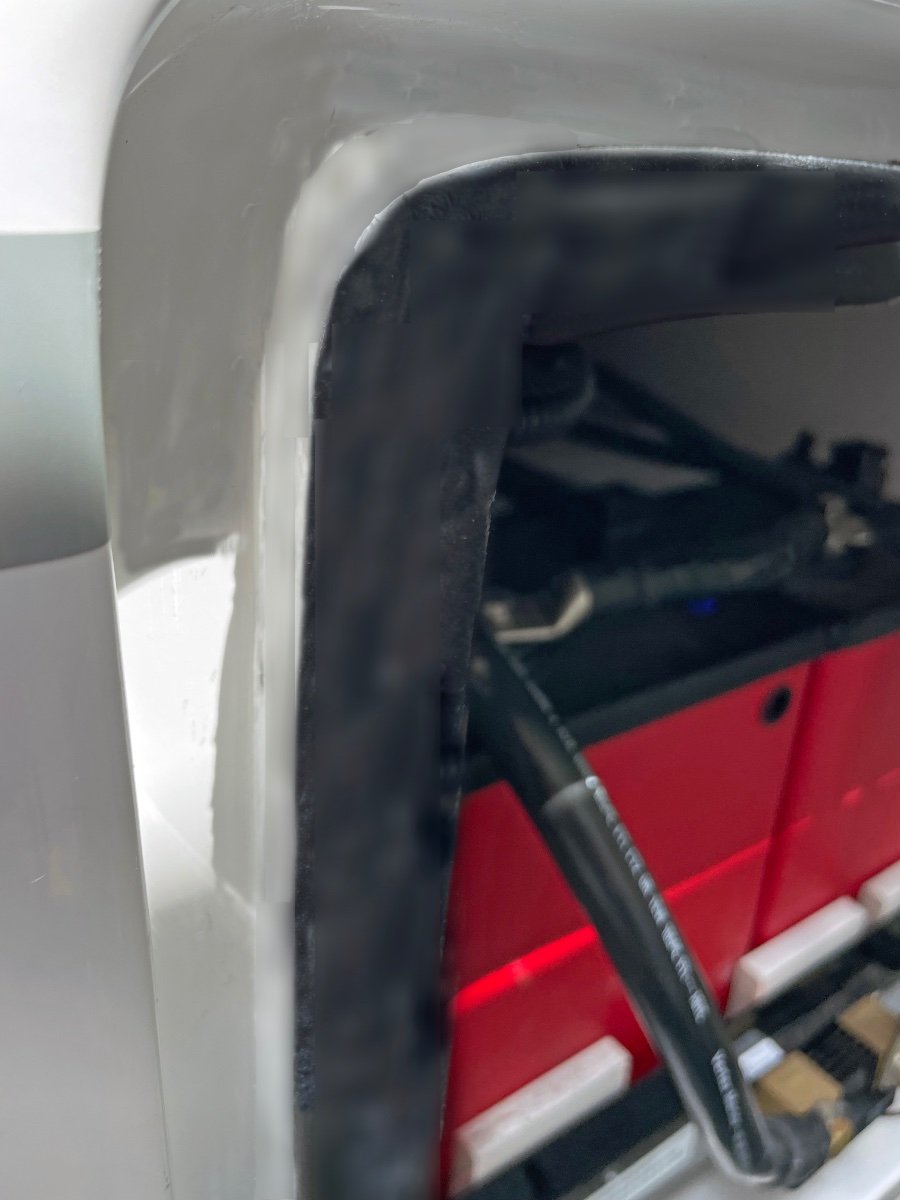
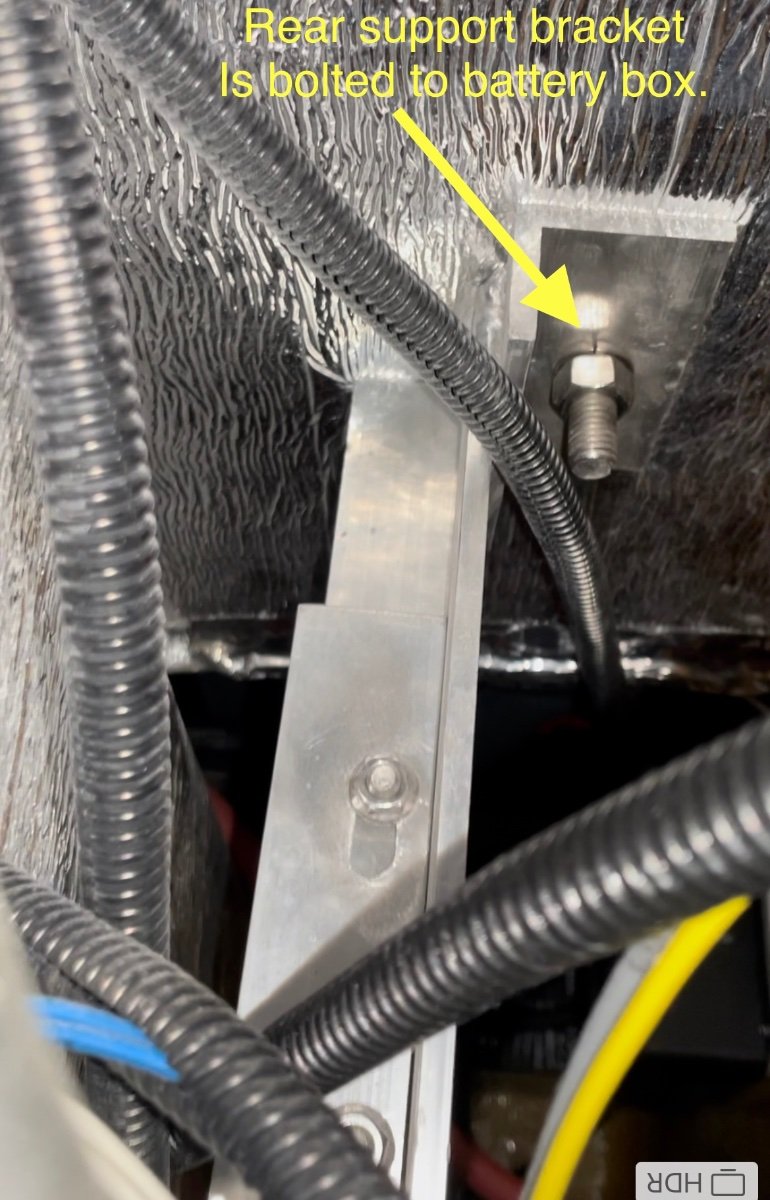
This spring as we were prepping for a new road trip, I noticed the battery box door seemed to be sticking out further than normal. I thought I would adjust the latch to pull the door in a bit tighter. What I found was that the battery box had started to tip forward away from the main hull as shown the pix below. All the rivets up both sides and all across the top of the box had sheared and the box was tipped out about 1/2". I contacted Oliver Support to understand how the box was designed, mounted etc. They cleared me for travel after having me check the support strut inside the trailer (under the pantry area) . After some further consultation I was able to perform a repair. Here's a sketch of how the battery box is installed in our Hull 505 (2019 Elite II) trailer. The repair steps I took following Oliver instructions were: 1) Remove the batteries from the slide tray to get weight off the box. 2) Drill out all sheared rivets. (3/16" bit) 3) Release the 2 support bracket bolts inside the trailer under the pantry (one of which is adjustable). (This step is a pain and requires some long extensions for the ratchet wrench to make reaching nuts possible.) 4) Tip box back into position. (Check that the box base still has a slight outward tip for water drainage.) 5) Re-tighten support bolts. 6) Re-rivet all around the perimeter. 7) Clean seams and add a bead of boat life white sealant around the battery box seam. (See pix below). Repaired Box Above: Door closes with a good seal all around and the box sealed to the body. We are going to keep an eye on this as we travel this next year, and make a trip to the Oliver factory for them to inspect and repair if necessary. I'm not sure of the root cause or mechanism by which the box tipped out in the first place. One concern would be that the box is putting too much pressure on the outer hull while bouncing down the highway. I don't see any indications of cracking in the glass hull or box at this point. Hope this helps if anyone else see's an issue. Craig Hull 505
1 point
-
We got the AGM batteries charged up at a local battery store and were told they were in good shape. We had flipped the 30 amp breaker to off, thinking that would cut any power that needed to be off while reinstalling the batteries. We did not know where the master off/on for the solar panels was located, as it was not in the overhead shelf side wall like I've seen in photos from others. While cleaning several days later I found the solar on/off switch under the street side bed, so I now know where that is located. It was still on while we had reinstalled the batteries, and thankfully nothing happened (arcing, twitching, etc.). We got our Casita sold and now have the Oliver sitting in our driveway, plugged in to the wall. The charge controller came back on and I can cycle thru 5 or 6 different items so that seems to be okay. I did notice that the charge in/charge out view did not have any number registering for the "in" part, and it was a sunny day so that caused me to think that a number should be registering if the solar is putting in a charge (it was a sunny day too). The "out" was registering 0.4 and that sounded normal compared to what some of you have mentioned is your normal phantom charges. I still need to educate/convince myself the solar is working and make sure I thoroughly understand what the charge controller is telling me. The manuals only help me so much so I will be doing some searches on the FB page and Forum for descriptions as well as some videos. Thanks again everyone for all the contributions! We are closer than farther away to trucking. Alberta1 point
-
We have two generators. The little Honda 1000 that's been our BFF for 14 seasons, and a Westinghouse 2500, 2200 running watts. We disconnect the trailer after charging, but I wouldn't run a big saw or our air compressor while the trailer was plugged into the Westinghouse. We have charged makita batteries at the same time as charging the trailer. The Honda won't run much, at 1000 watts, but it's great for charging our 2 agm batteries, only.1 point


.thumb.jpg.e34bf01ef7f7d5e99ad31856d45afbeb.jpg)
.jpg.004a3a89ee4c2c0887a8a489e5b1e099.jpg)


-
Recent Achievements
-


")


")


