Leaderboard


Popular Content
Showing content with the highest reputation since 05/27/2025 in Posts
-
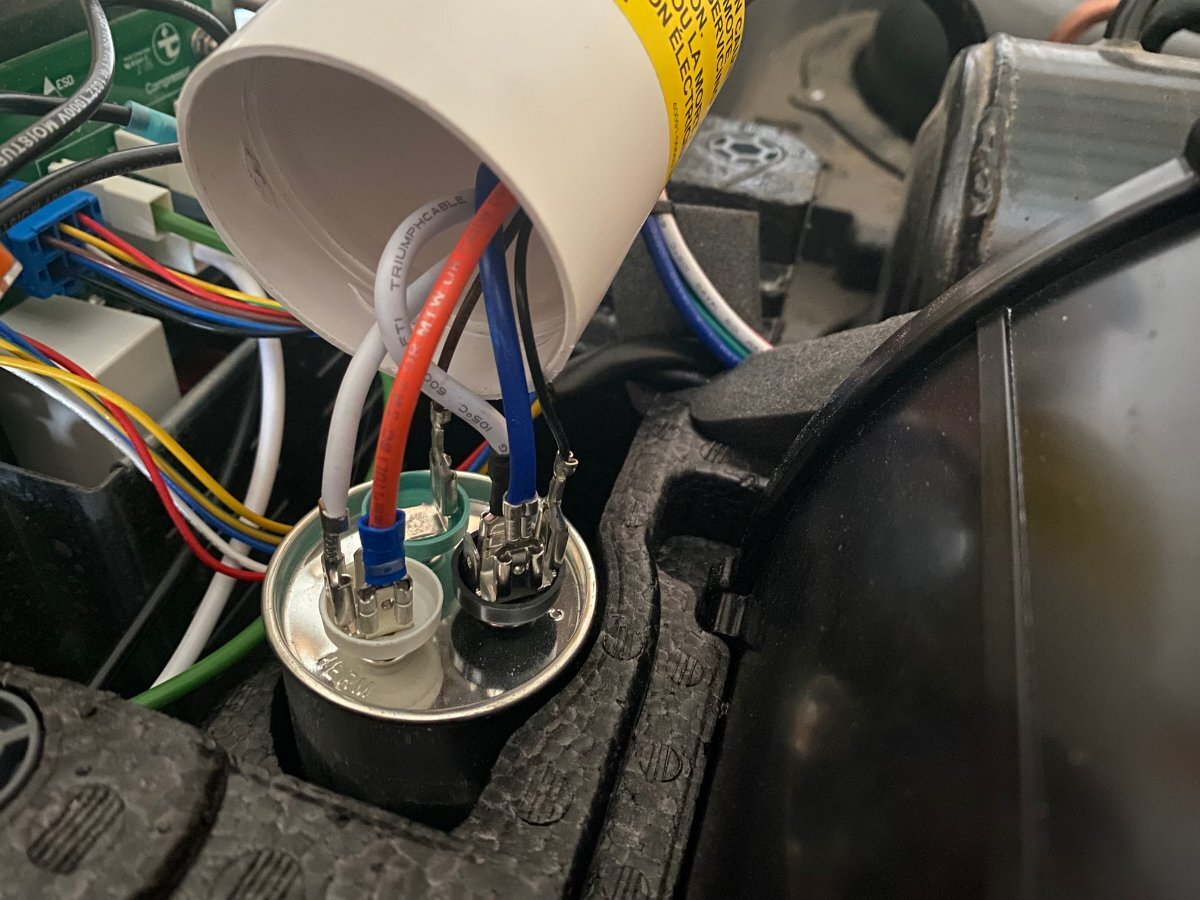
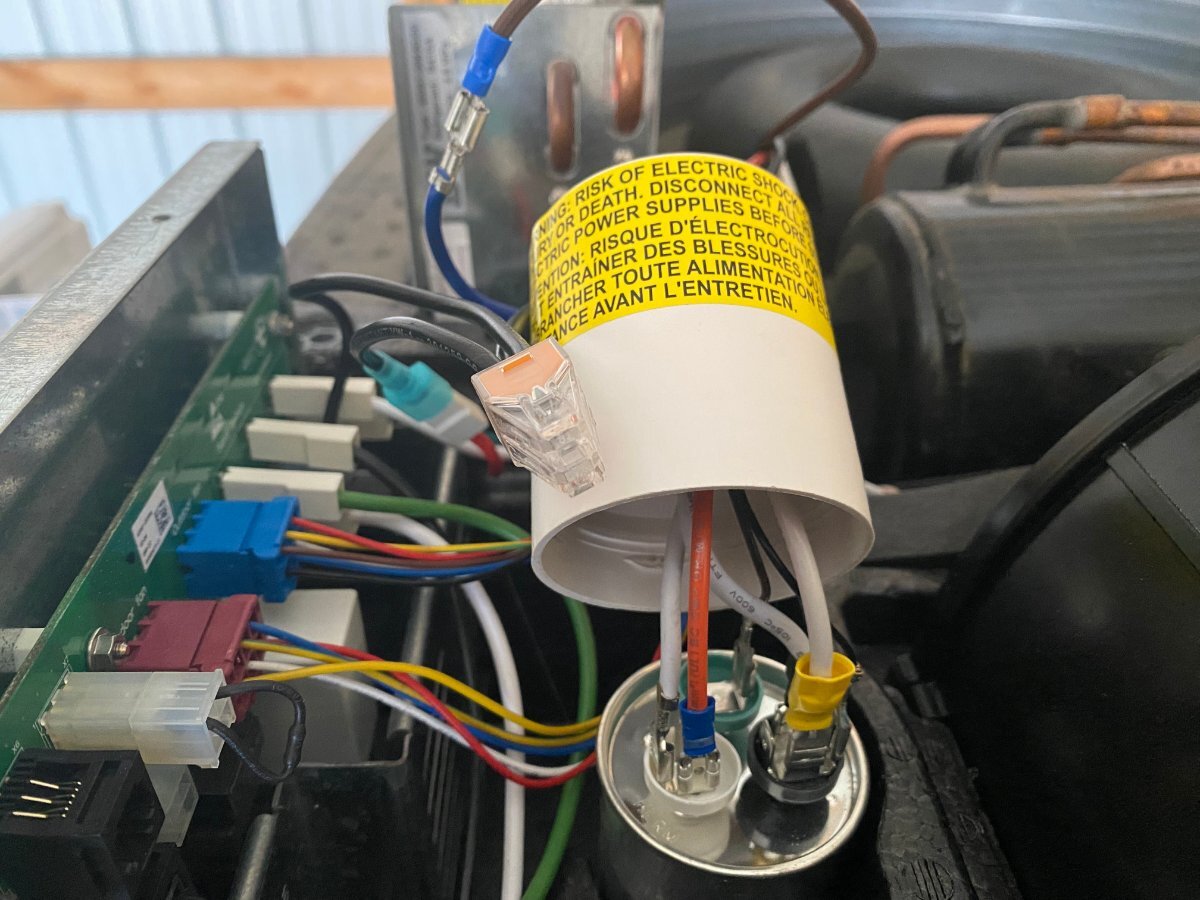
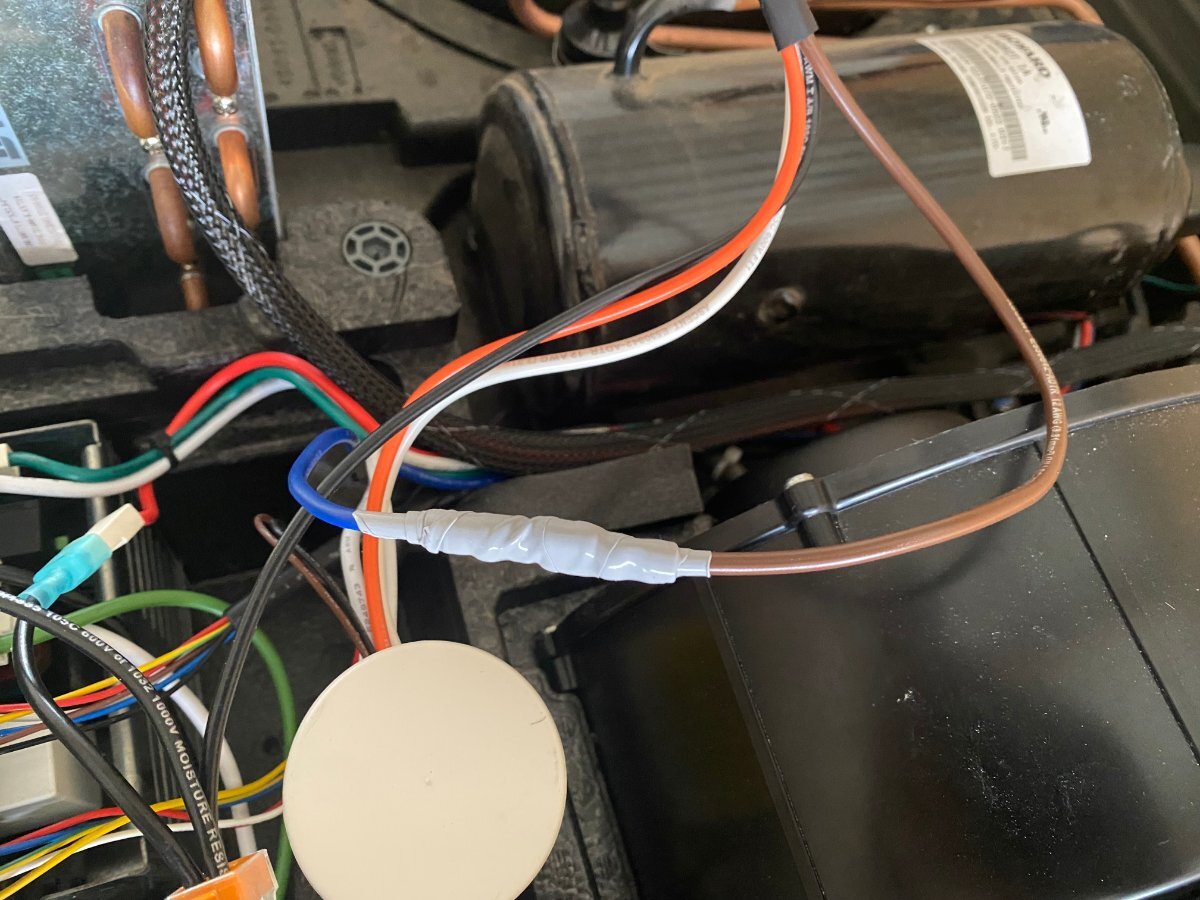
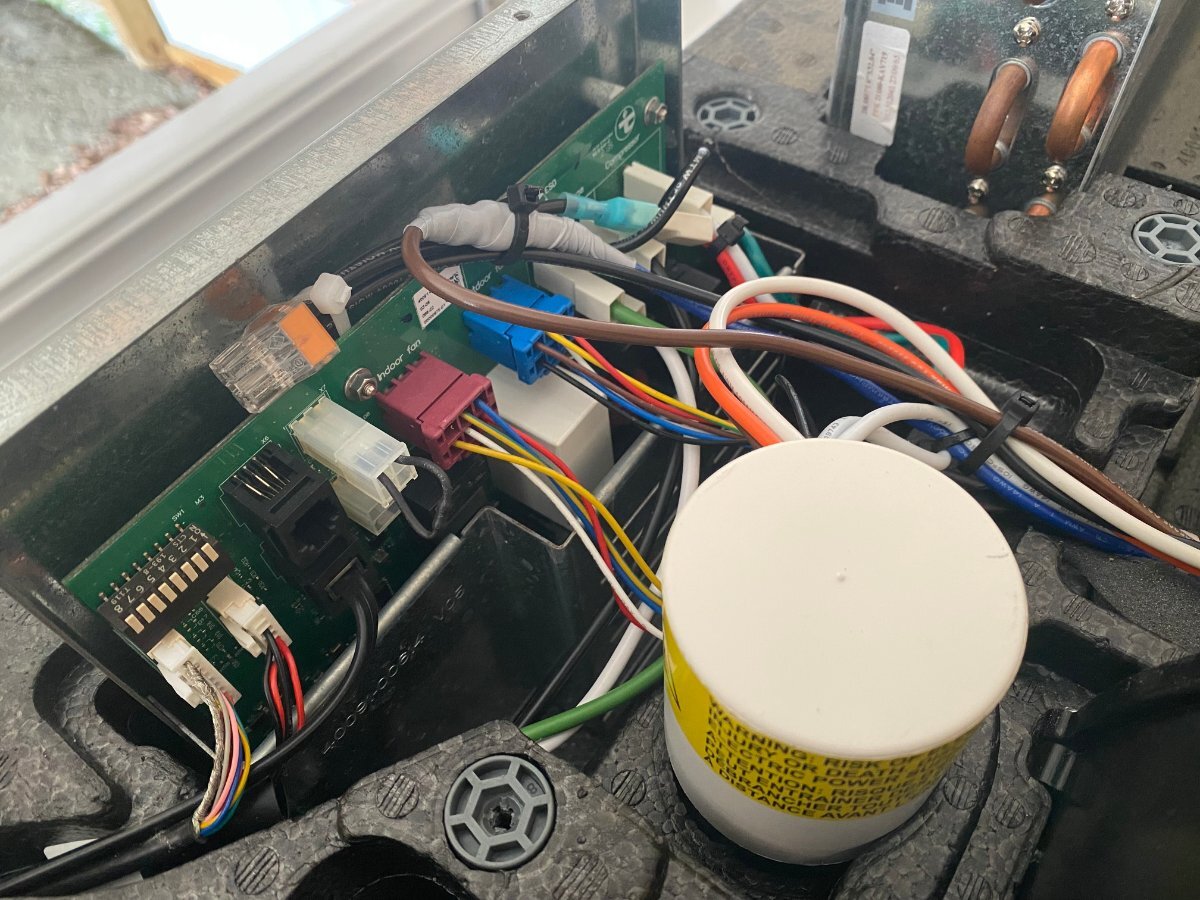
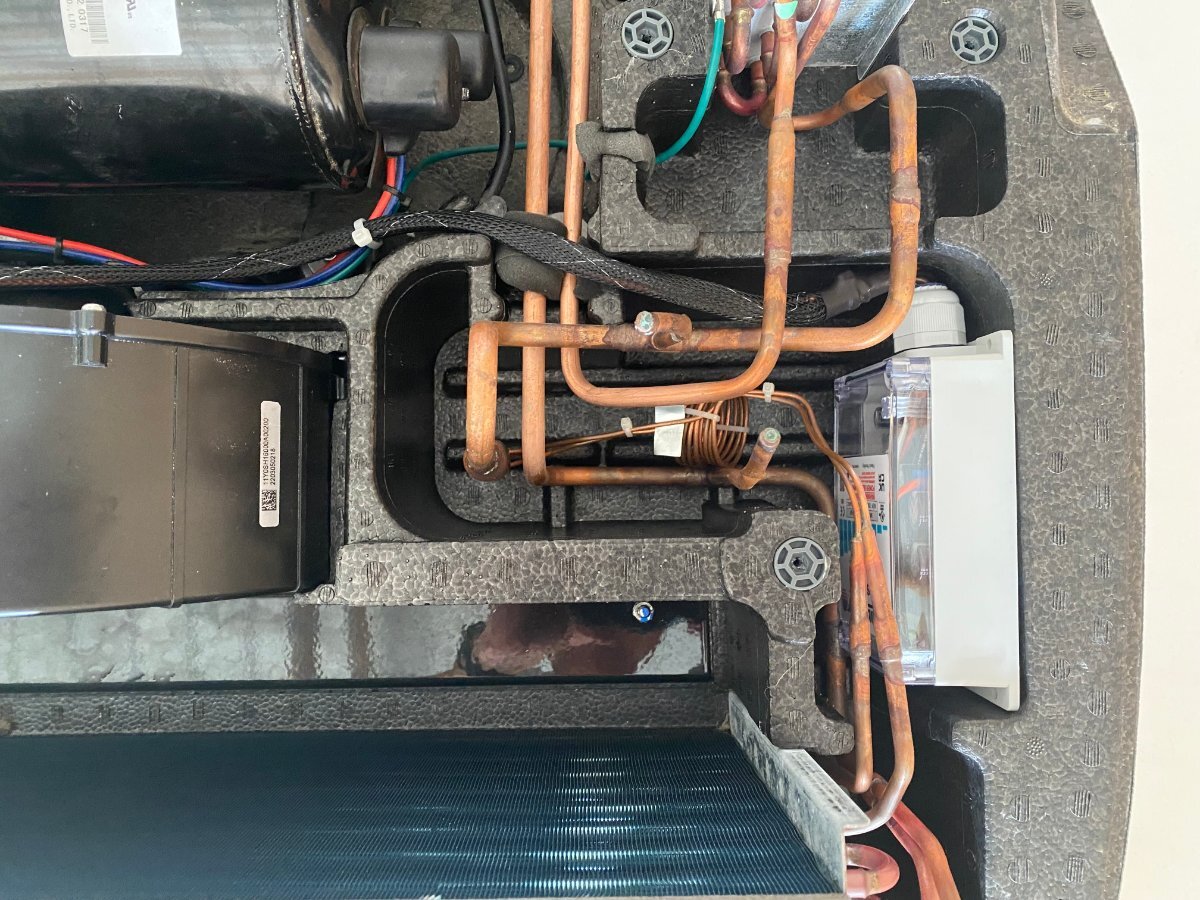
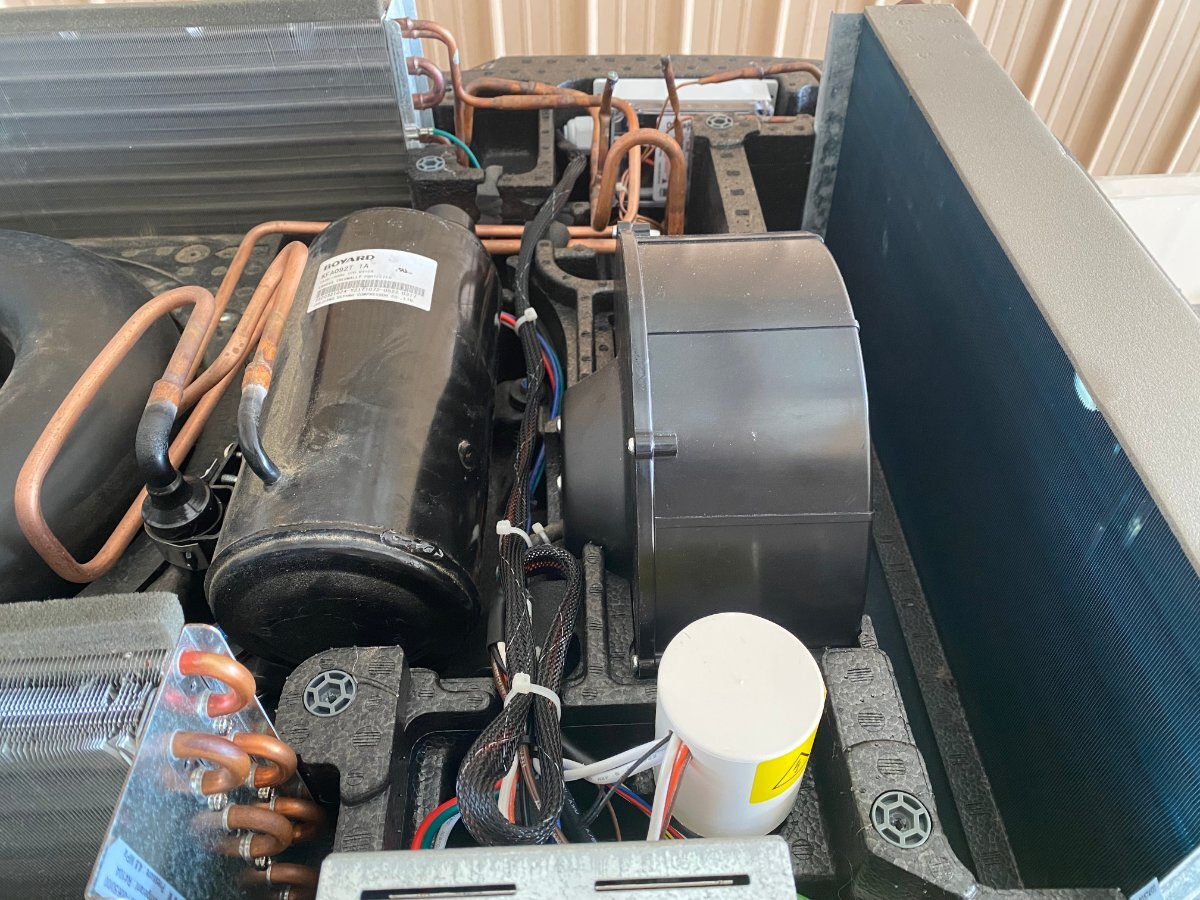
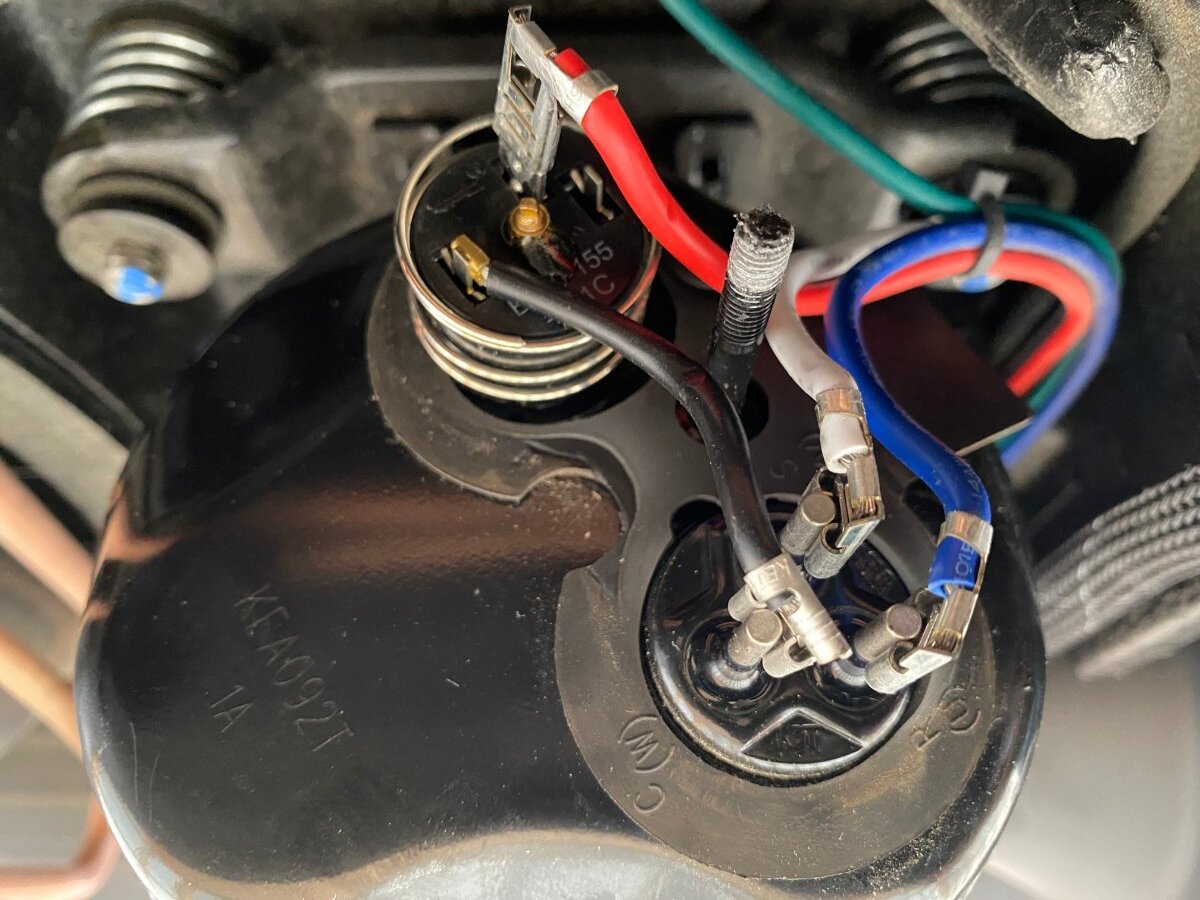
I have been chasing down the solution to a Norcold refrigeration problem for 18 months. My fridge worked well on AC, so so on DC and inadequately on propane. The best it would do on gas was 7-10 degrees in the freezer and only 50 in the fridg section. We do a lot of boondocking and really wanted to keep the gas option. Here are the various steps I took one at a time without success: Pulled the fridge and cleaned the burner tube, changed the thermistor (3 times), changed the main board, checked the gas pressure, changed the thermostat and added a dual extra fan to the top, changed the DC board (one to the right of the main board), changed the eyebrow board, added venting, added insulation. All of these steps were recommended by techs who I paid. The last tech I hired told me that I needed to replace the cooling unit since I was wanting to keep the existing model. Unfortunately, Norcold no longer makes the N412.3 model and replacement cooling units are out of stock. I was advised to find a cooling unit from a 3rd party, order it and then pay the tech to install it. The first cooling unit manufacturer that I contacted did not make units for this smaller fridge model and recommended talking to a guy in Olive Branch MS who rebuilds cooling unit. When I spoke with this gentleman in MS on the phone, he was far more than helpful and told me that my cooling unit was not the problem. He told me to remove my burner and soak the orifice in a high percentage alcohol for a few hours, then blow it out with a compressor and reinstall. Now mind you that my flame looked fine and didn’t seem to be a problem to me or to the two professionals that previously looked at it. 80 year old Mr. David Force, owner of Cooling Unit Warehouse explained that there was a paraffin buildup in my orifice and that although my flame’s appearance didn’t visibly change after cleaning it, the temperature of the flame had been slightly below the necessary temperature. He said that a 10-degree flame difference can change everything. Bottom line, I followed David’s advice, the fridge has been working like a champ for 50 hours on propane so far. I wish I had known this before I spent 18 months and 7-800 dollars on un-needed parts. Nevertheless I am thankful that it works like it is supposed to so that we can head out next week for a month long trip. I'm posting this in hopes that someone can avoid a refrigerator adventure.18 points
-
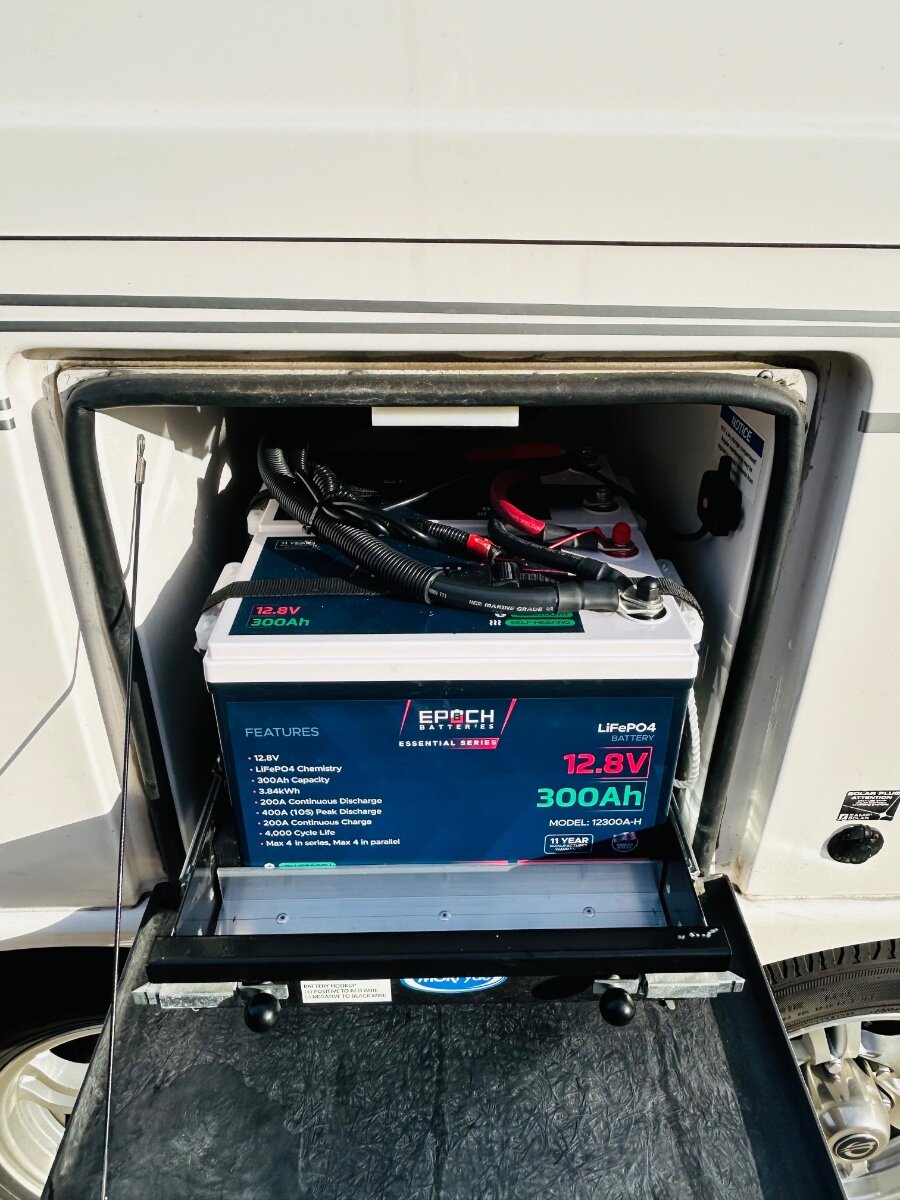
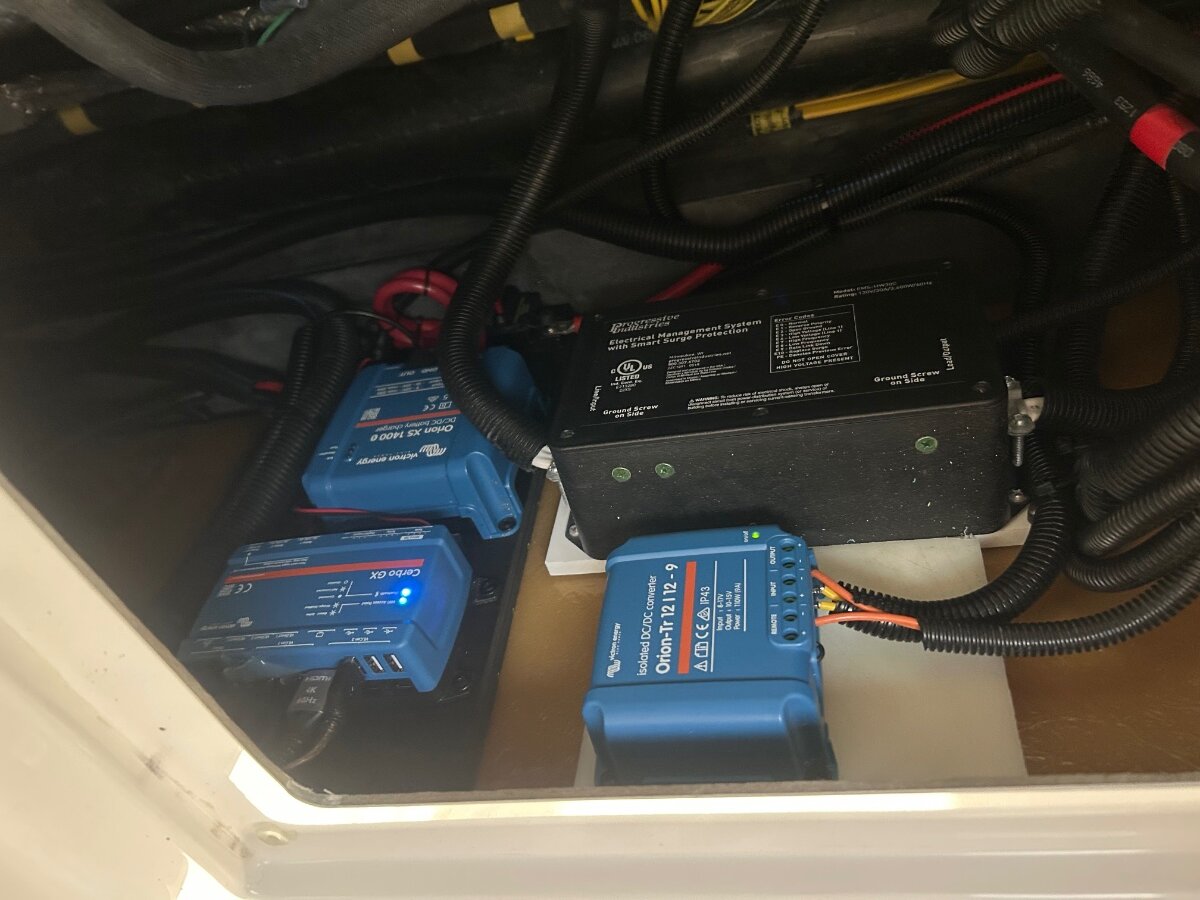
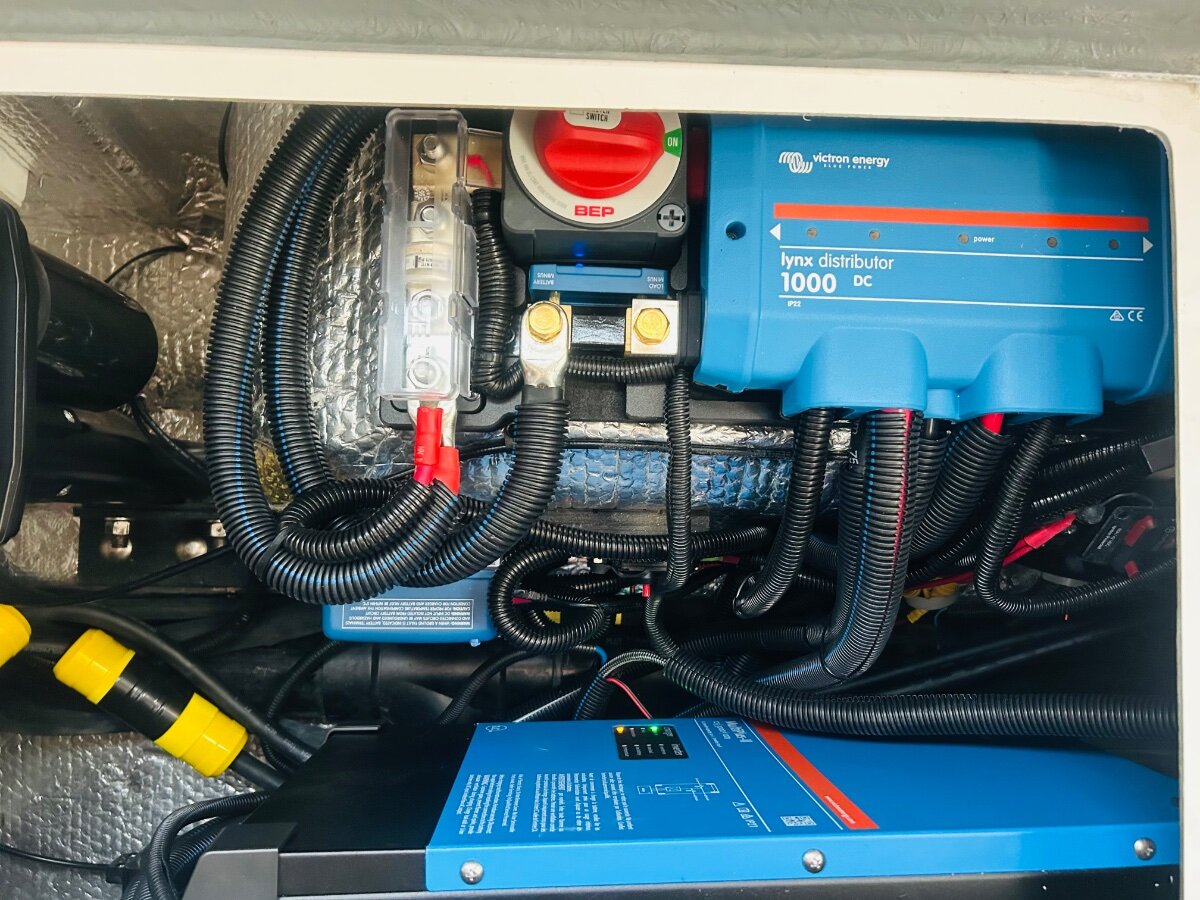
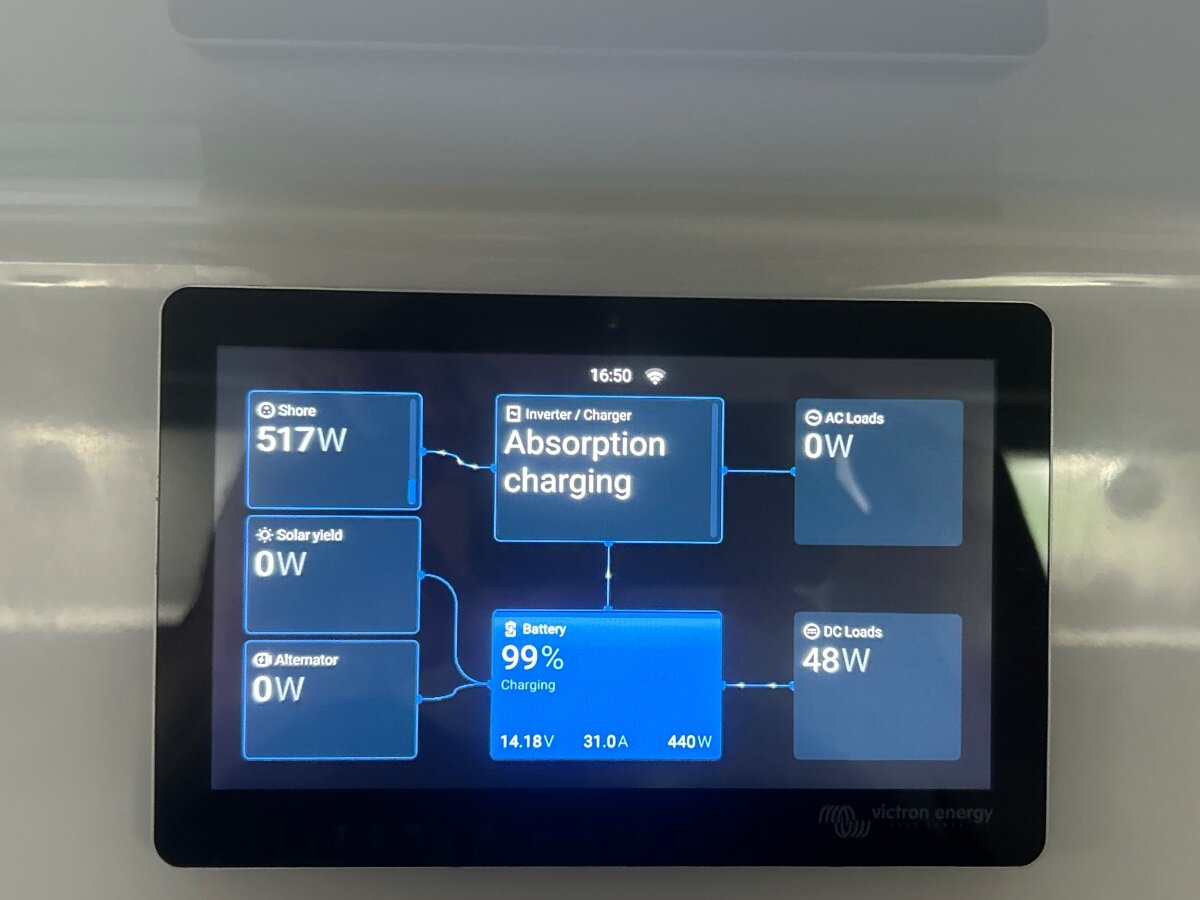
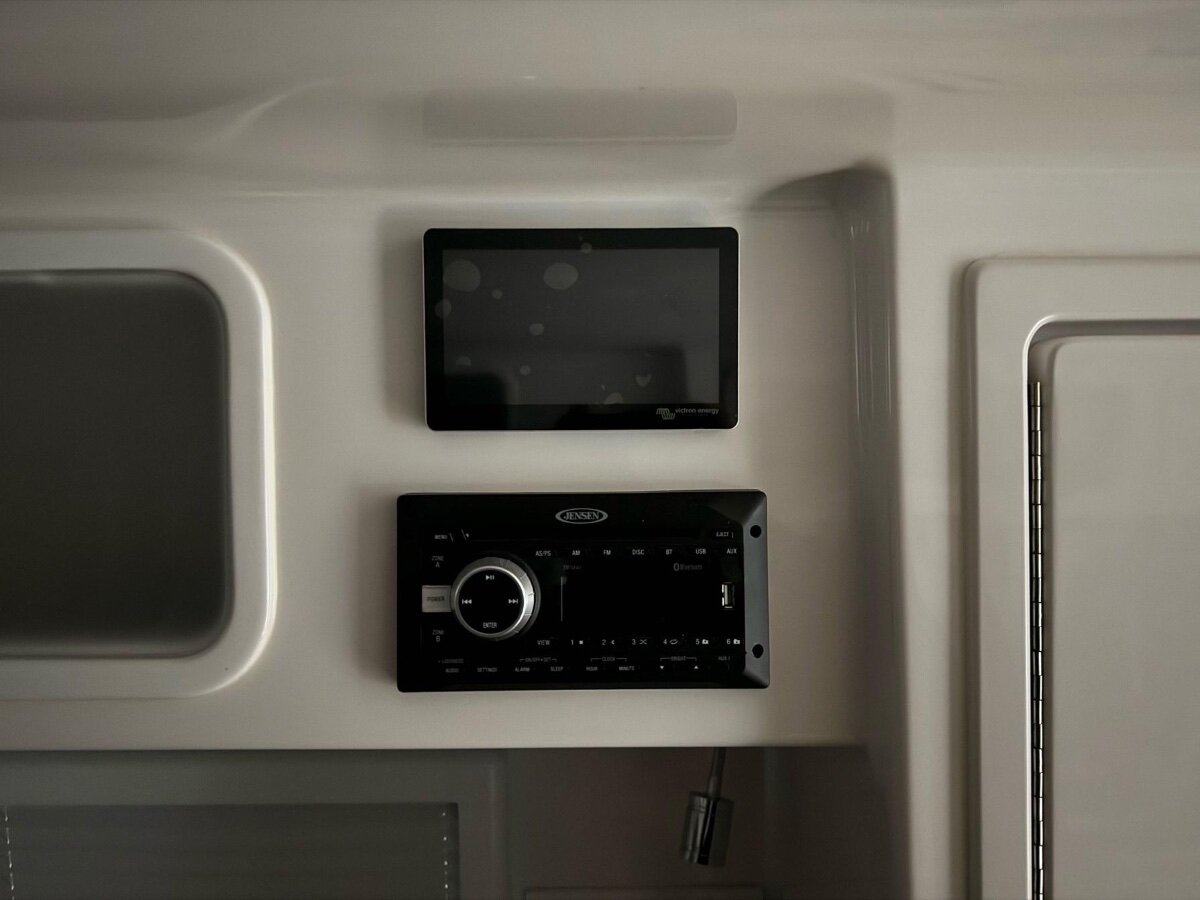
***Long Post*** XPLOR Hull #634 Victron 3000 watt inverter, Victron 12v DC to DC charger and Epoch lithium battery upgrade. Note: To discuss options and pricing, please contact Jordan Hall at Inverter Services, White House, Tenn. Our OEM AGM batteries were getting long in the tooth and it was time to upgrade our batteries to a complete lithium battery system on our 2020 Oliver LE2. Our good friend, and former Oliver owner Jim Posey, highly recommended we speak with Inverter Services in White House, Tennessee. I called and spoke with Service Manager Jordan Hall and discussed our needs and options. Jordan and his team at Inverter Services were excellent to work with and have a lot of experience working on Oliver travel trailers. Our tech/installer, Easton Ford, kept us updated on our install progress with photos and discussions as needed. We found Easton to be extremely detail-oriented and dialed in and focused on our project. We were originally scheduled to have this work done next March. After returning from our 54 day New England and Canada trip, I decided to call Inverter Services and ask if they had any cancellations. They did and we immediately took the cancellation. They are typically booked 6-7 months out. So we hitched op Oliver and headed to White House, Tenn to leave our Oliver with the team for 2 weeks. Important note: Inverter Services supports the RV and Marine industry in ALL things lithium battery and electronics. This is one of the most detailed and thorough, cutting-edge companies we have ever done business with. I chose Inverter Services to do this install because this is not my area of expertise and it absolutely is theirs. These guys are experts in their field and I admittedly am still in the learning process. Based on our excellent experience, we highly recommend Inverter Services in White House, Tenn if you are considering a lithium upgrade. We chose all Epoch & Victron following products for this install. (2) Epoch 300ah lithium batteries (internal heating elements) -https://www.epochbatteries.com/.../12v-300ah-heated... *Victron MultiPlus-II 3000w Inverter/charger *Victron GX 70 Touch Screen *Victron Smart Solar MPPT *Victron Orion XS DC-DC Battery Charger **We also had the RV Soft Start installed on our Truma Aventa AC. Inverter Services provides tech guidance/support/firmware updates as long as we own our Oliver. I cannot stress enough the pride this company takes in their work. As I think most would agree, Victron components are a class all their own and leaders in the Marine and RV industry. Post install, we have on board 600ah of lithium battery power, and with our extra 90W Zamp panel now configured to lithium, we have approx 410 watts of solar. This will certainly give us more options on the roads less traveled and boondocking. Still lots to learn on this new system. Now having the 12v DC -DC charger I don’t think we will see a need to carry a generator any longer. Thanks to all those on the forum who made the Lithium upgrade happen. ⚡️ The information gleaned here helped me decide the direction I wanted to take this install. ⚡️Happy Camping and Safe Travels! ⚡️ A few install pics- The Victron GX 70 touch screen fit the existing opening with no cutting or trimming of the fiberglass. Our system at a glance. The touch screen nice option if no cell service is available for the Victron app. Although with our SL mini that’s not an issue. Very happy with the touch screen and the Victron app. We can set the screen to time out at 5 or 10 min or longer and then go dark for sleep mode. Zamp 90W suitcase. 12v DC to DC Andersen connector. On our way home we camped at Cumberland Mountain SP in Tenn and gave our new system a shake down. It’s nice to not have to plug in. 😊
 16 points
 -
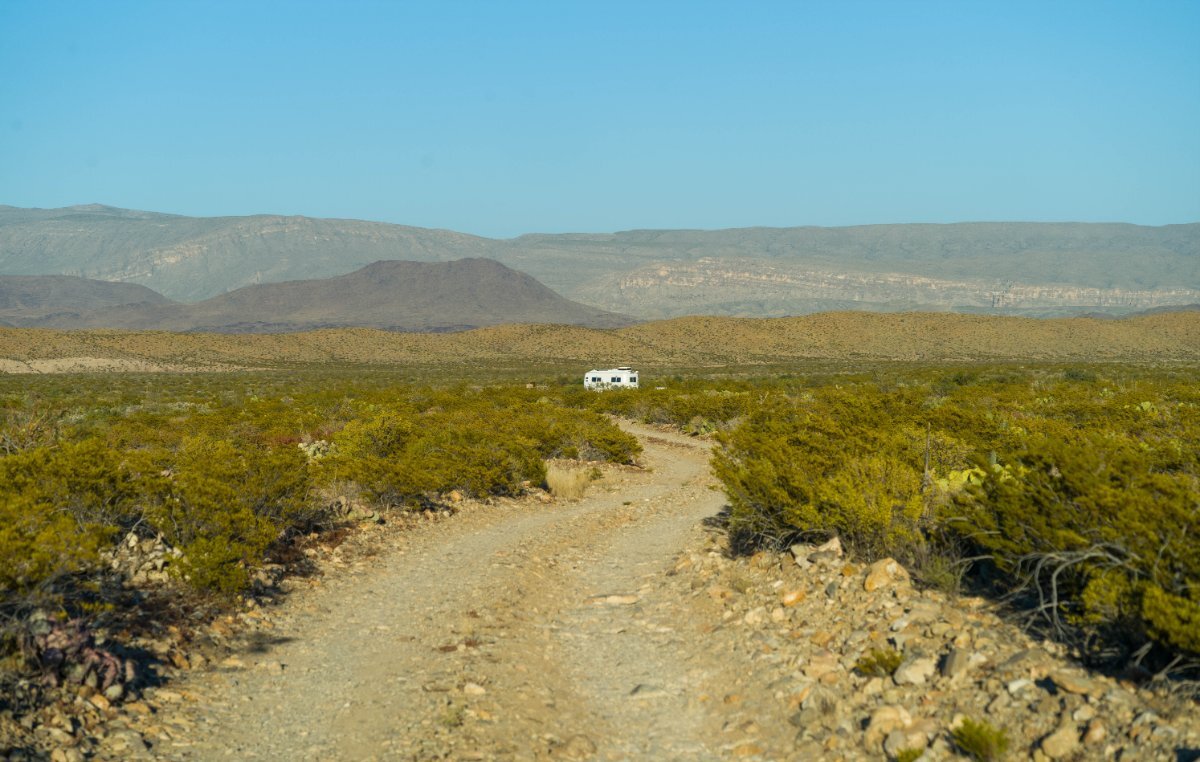
Been here for the last 5 days. Chihuahuan Desert, Big Bend NP
15 points
-
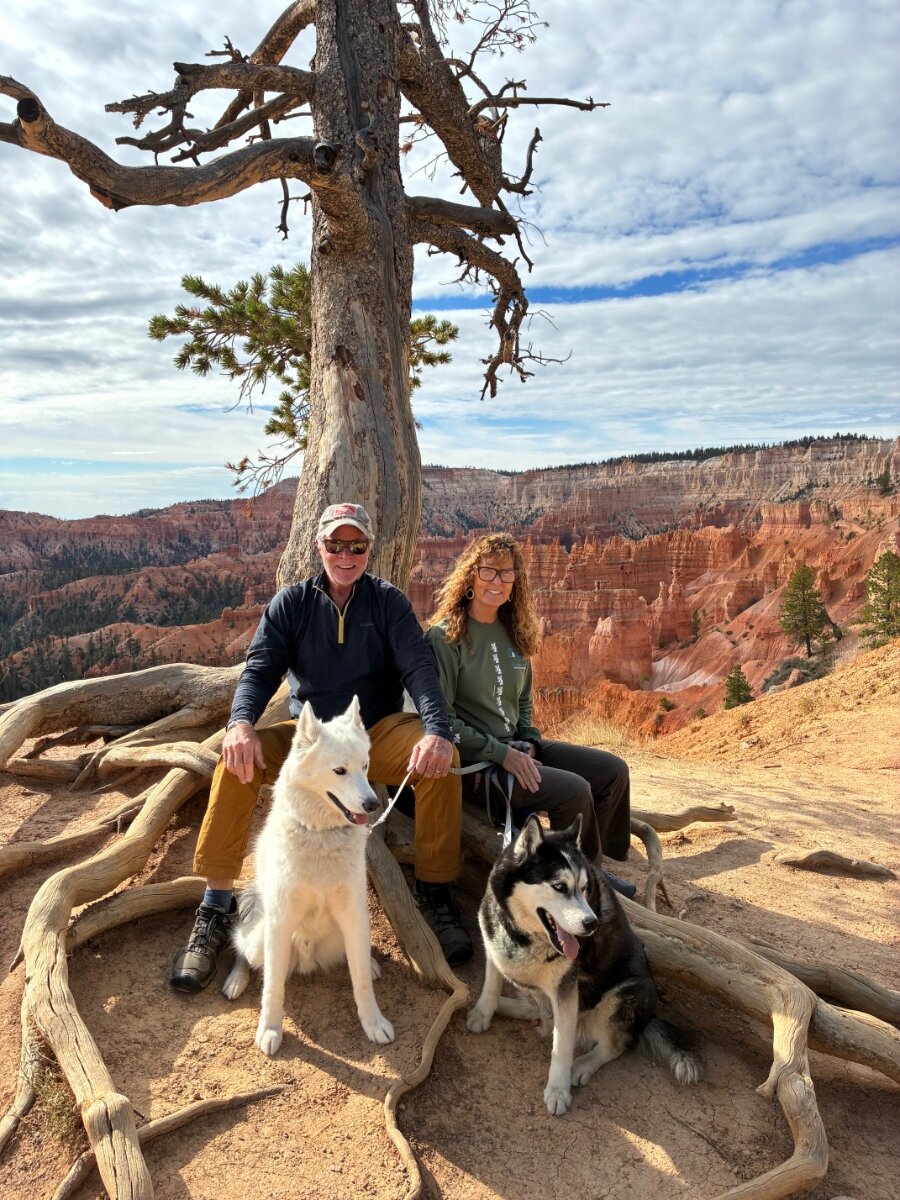
Just departed Bryce Canyon NP arrived Zion after a beautiful drive…. Safe travels and Cheers to all y’all road warriors! Best,, A & D (Magnus & Oscar, too — woof!)
15 points
-
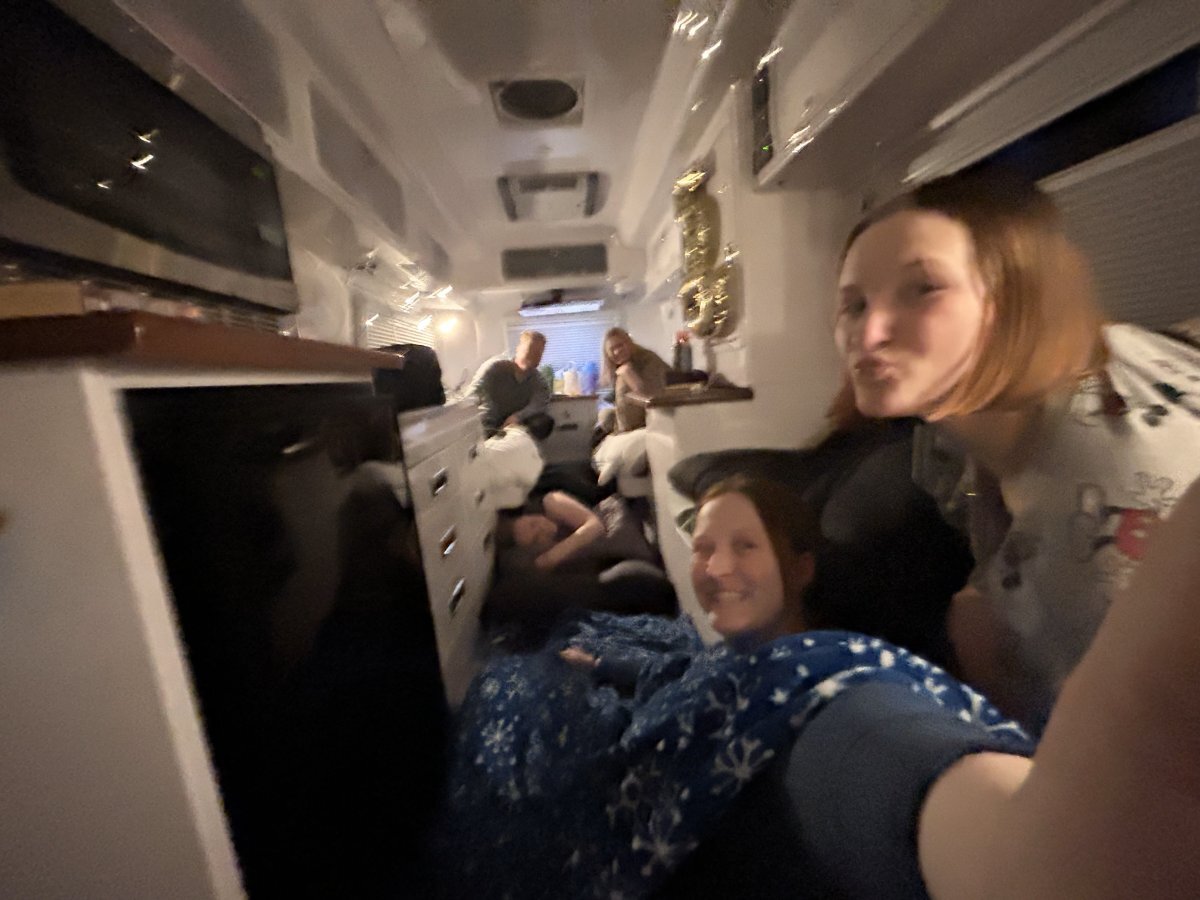
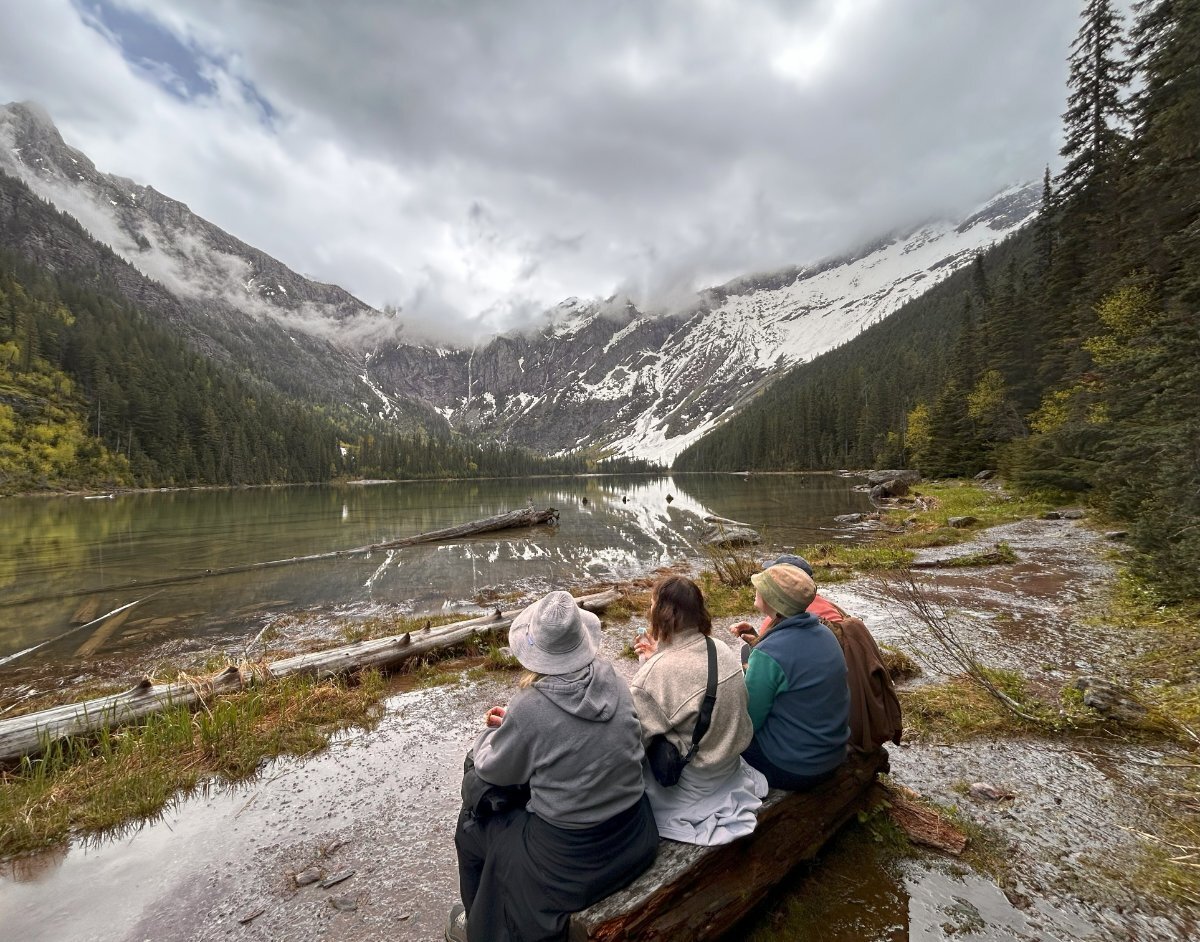
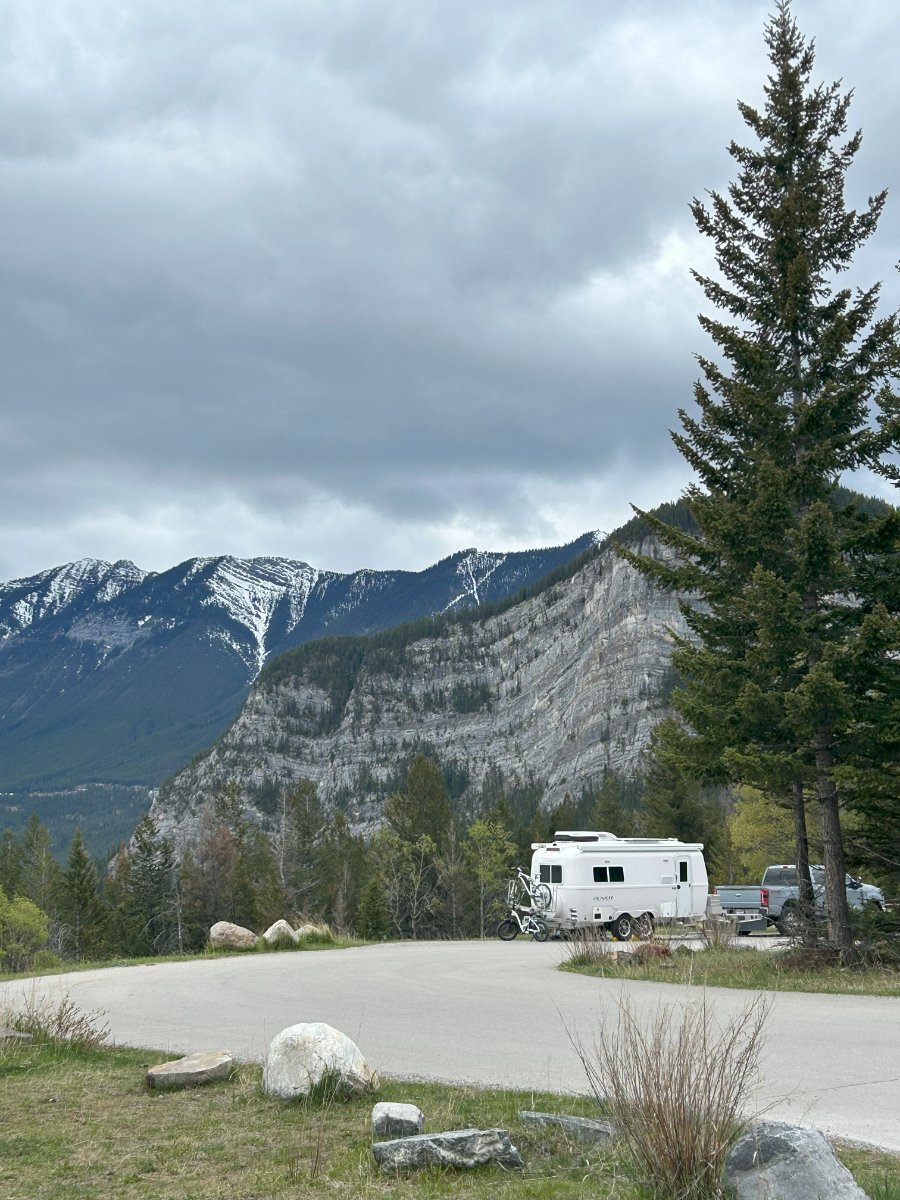
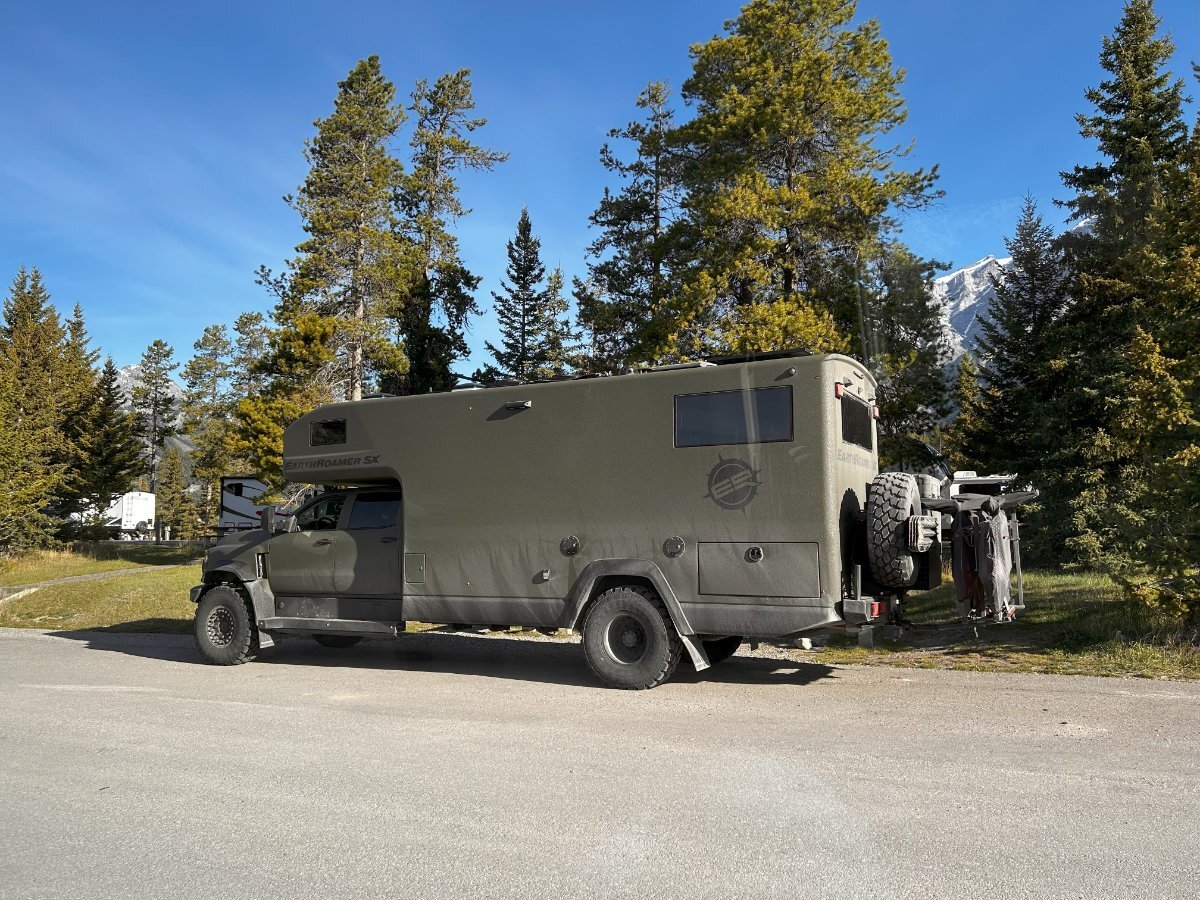
We recently returned from a week-and-a-half-long trip through Glacier and Banff for my 50th Birthday. Farily last minute all 3 of my girls decided to join us on this trip. This created some logistical challenges we had to figure out. We got it all worked out but it left us with one night where no one had a place to stay except in the Ollie. That meant all 5 of us sleeping in the trailer! Who says it is just a couple's trailer, bring on the family camping 🙂 Not a great picture but had to share. The girls were great sports about it and we had a fun night hanging out and watching a movie. We ended up having a wonderful birthday trip through Glacier and Banff. It was our first time in Banff and it did not disappoint. An amazing hike up Avalanche Lake in Glacier. And then we got an amazing site in Banff Tunnel Mountain II Lake Louise did not disappoint either. We also had a great time talking with our neighbor, who was headed to Alaska in their EarthRoamer (pricey little machine)! Overall, an incredible way to celebrate a 50th birthday!
15 points
-
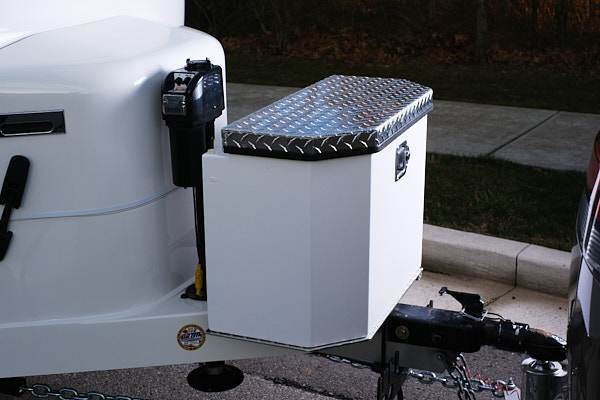
Barb and I have had our LE I for about 18 months now. We fancy ourselves minimalists, but truth be told, we viewed the LE I as a bit of an experiment knowing that it would be a challenge getting all of our gear in the trailer and the Pathfinder. What helps is that we are both perpetual organizers and efficiency nuts so we welcomed the challenge. The game changer for us has been connecting with the folks at Sea Biscuit. Knowing we needed a little more storage one of the first accessories we added was the rear basket from Sea Biscuit. We weren't quite sure what types of containers we could put in the basket, but we knew it gave us lots of options for adding storage. After looking at the myriad options of storage containers, boxes, etc. that could go in that rear basket, we settled on the rear storage box from Sea Biscuit. The locking rear box is home for our hookups, a large tool bag, our outdoor carpet for under the awning, and several other items that immediately come out when we land at a destination. Our sewer hose for draining the gray tank (we have a composting toilet, so no black tank hose) is still in the bumper and it is surprisingly easy to store and deploy when needed even with the box over top. The expanded storage we gained from the rear basket and box combo was our first game changing moment. It allowed us to move several items out of the Pathfinder permanently. Shortly thereafter we noticed the front box that many of the LE II owners had added. To our disappointment, the box was not compatible with the LE I, but we started a conversation with Dave and Kristine at Sea Biscuit about our options. Fast forward several more months and we are one of the first to acquire a front box unit designed specifically for the LE I. The front box is deeper than the rear box and fits neatly between the front jack post and the bull dog coupler. It sits on a steel platform making it super stable, and when opened leaves plenty of clearance for the jack post. The front box now holds our DC to DC charging cables, wheel chocks, and several other necessities that also formerly rode in the back of the Pathfinder. This was game changing moment number 2. One of the final accessories we added to compliment our storage accessories from Sea Biscuit was the rooftop basket from Rhino Rack. The rack holds our chairs and camp table that were also - yes, you guessed it - in the back of the Pathfinder. (Low and behold, I can now see out of the back window.) Barb and I are huge fans of the little Ollie having put over 15,000 miles on it, visiting 21 states in 2025. Our travel style is such that we rarely spend more than a couple of days in one spot so the flexibility of the smaller LE I, and smaller tow vehicle (17 mpg with the Pathfinder) is the perfect combination for us. For anyone who is considering an LE I, or who has an LE I and is looking for quality accessories to expand your storage, we cannot recommend the folks at Sea Biscuit highly enough. The products are top notch and the Hess's are awesome folks. See you on the road!
14 points
-
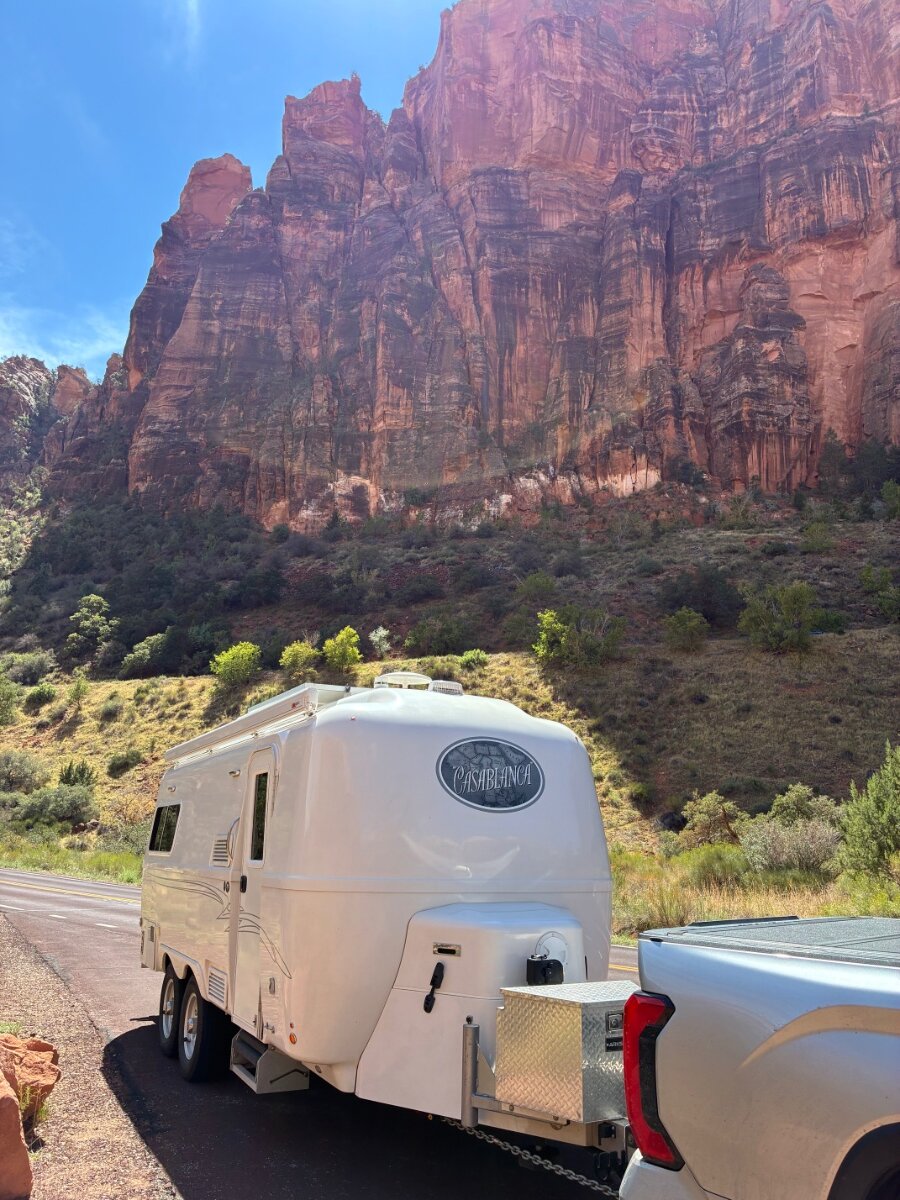
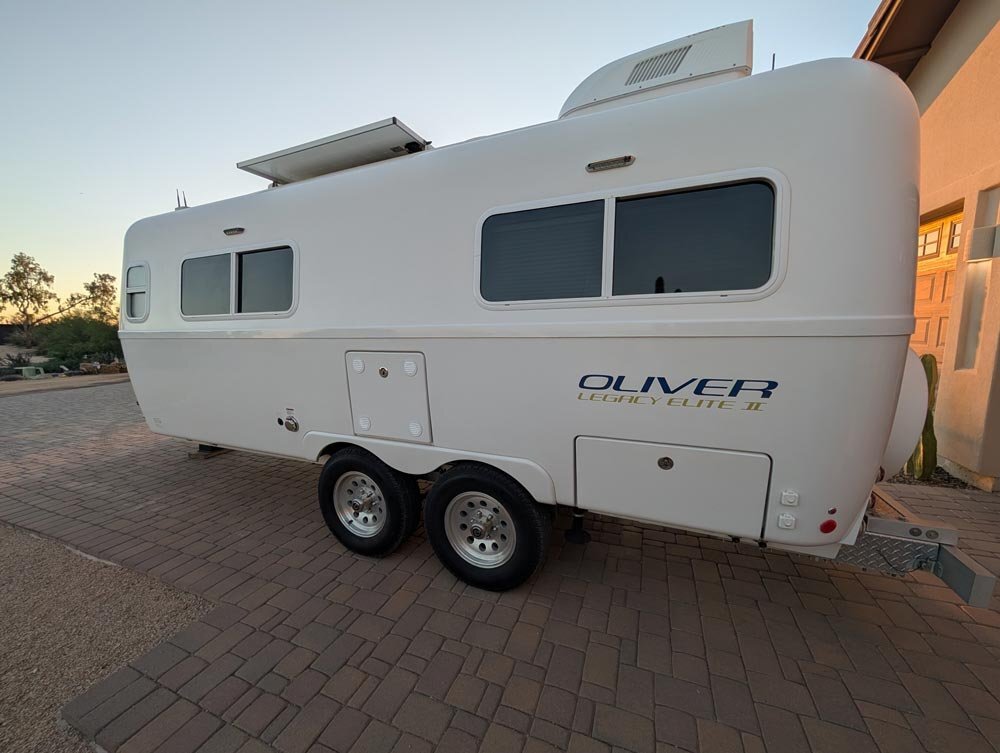
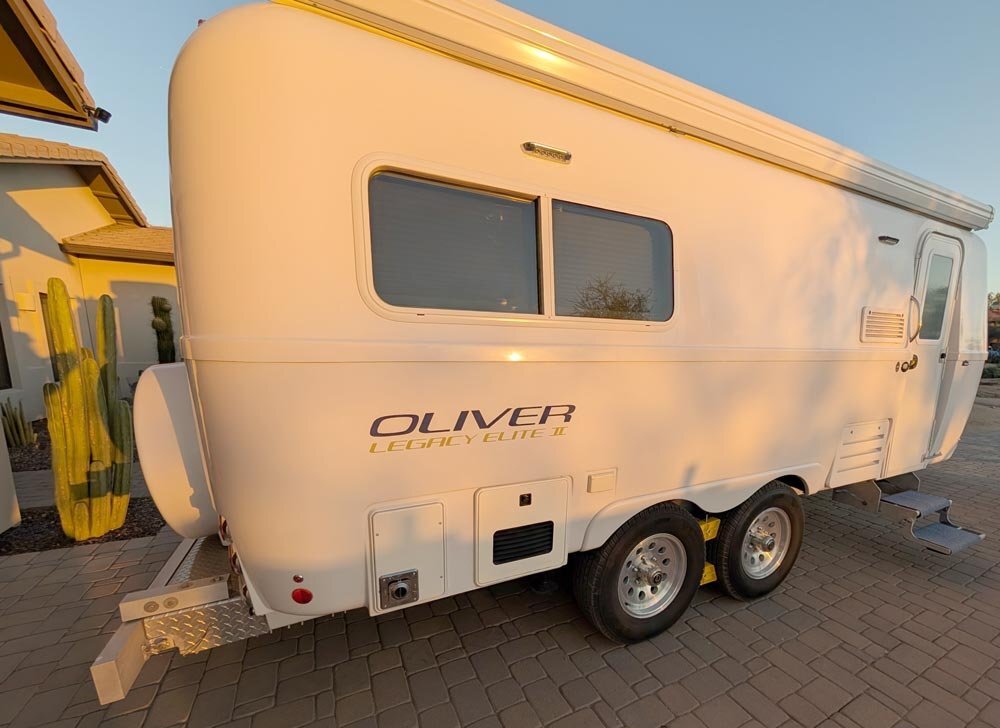
Greetings, All! Well D and I went over to the "dark side" and sold Casa Blanca to a great guy from near Kerrville, TX, David Knight. Please welcome aboard @Kpaladin David into the Oliver family. We're now into our next chapter of RV'ing and starting new adventures with our 2026 Brinkley I 235. It's totally "Victron'ed" out and includes 600A-Hrs of Epoch LiFePO4s and 800W of solar modules. We'll stay in touch! MAX Burner
14 points
-
I’m sure everyone is aware of the flash flood we experienced here over the weekend. We’re soggy but okay. Our neighbors north in Comfort, Kerrville and Hunt didn’t fare as well. You’ve heard about the children’s camps along the Guadalupe River that were affected, there were also homes and a couple of RV Parks. I’ve learned that one RV park had all RV’s washed away, some campers got to higher ground, some didn’t. July 4 weekend, everything was full and the river came up so fast there was little time to react. There is a huge first responder turn out, church’s, and private companies also. Our local grocery store chain, HEB, was one of the first on site with disaster recovery products, supplies and food. HEB was founded in Kerrville. I know some fellow Oliver owners have camped at Guadalupe River State Park just 9 miles from our house. I don’t have a status on the park. Please keep this area in your thoughts and prayers. There are still a lot of missing people so the death toll will continue to rise. Mike14 points
-
We are wishing a Happy July 4th to all OTTO's! the Mossey's14 points
-
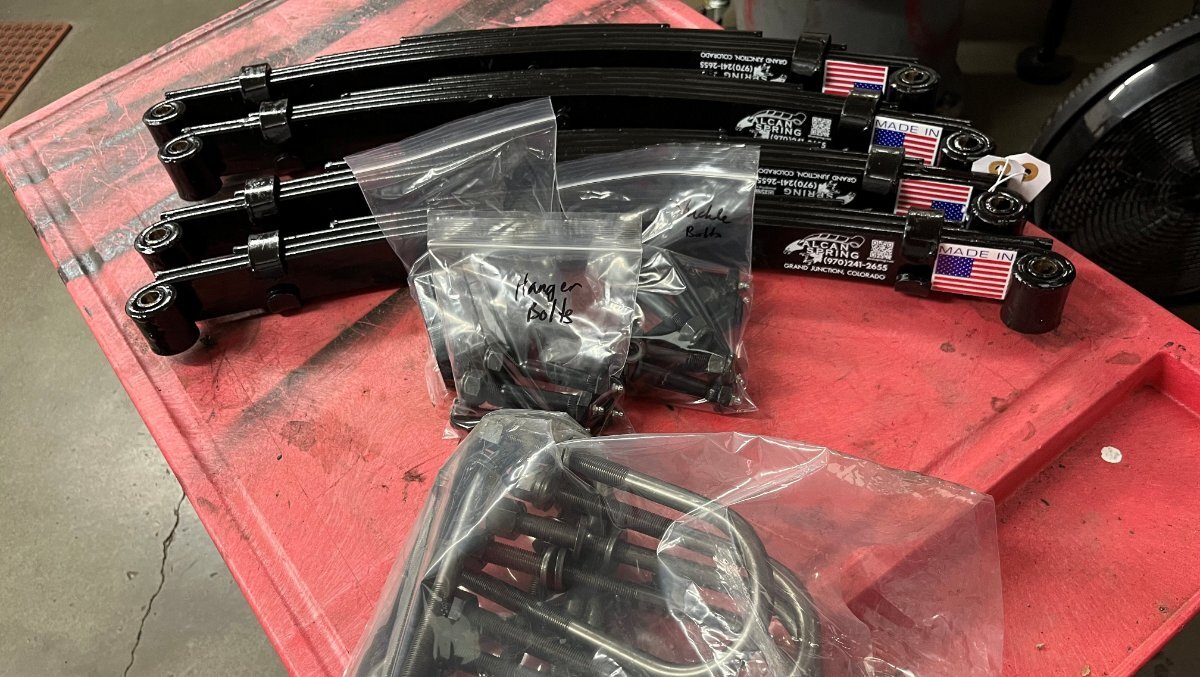
I visited Alcan Spring today in Grand Junction CO. I was impressed by their operation and service, what they were able to accomplish on a minutes notice. As a medium-sized manufacturer and automotive service company, I quickly noted their company quality, efficiency and fully capable staff (see picture of a portion of their operation). I purchased leaf springs for our Oliver, including HD shackles, new wet bolts and U-bolts (pic2). Our Oliver requires the 50.00 length axles. They measured our Oliver. For comparison they manually measured their 50.50 springs which they stock for Oliver customers. I asked them how can I go about getting the correct D52 axles for our hull. They replied that the could special order axles for me and charge me the same price as the axles they stock and buy in bulk for Oliver owners. And that's what I did. Getting my special-order axles will take 6-8 weeks and they will ship to me when ready. I was out the door in an hour. Four staff members were working together to help me. Simply put, they were awesome! I had a smile on my face, the whole way to Montrose to see our friend Ken. He was happy to see the parts, since he has a full installation scheduled soon. RE the purpose of this thread. Alcan only sells the Dexter Nev-R Lube axles. They report good reliability with these sealed bearings, not hearing of premature failures. So they do not have experience with the EZ Lube product. When asked about replacement bearings for the Nev-R Lub, they replied they would ask their Dexter rep and get me a quote. @CRM if you have a link for the correct Timken brand replacement Nev-R Lube bearings, please advise. I appreciate that @John Dorrer has posted his experience so far, and of course if/when any of us have failures, we should read it on our OTT Forum. I'll be working my installation later this summer and will start a new post documenting the job. Like I mentioned before, it will be fun getting into this! 😂
14 points
-
Greetings to you all! We are the happy new owners of Hull #1665, an Oliver Elite II. We picked up our new camper at the dealer in Colorado a few weeks ago. Our first night in the camper was at a Cracker Barrel on the drive home to New Mexico. Last weekend we had our first official 3 day -2 night camping trip and had a wonderful time. Our previous camper was a nuCamp Tab 400. We really loved that camper and it will be missed, but we both realized it was time to get a camper with more head room on the bed! (Especially Mary who always slept scrunched against the wall with two pups at her feet. :0) ) We live in Albuquerque and have been long time hikers, climbers, skiers, campers, hunters and general outdoor enthusiasts. Having a larger camper definitely makes traveling so much more comfortable. There is much about the camper that we love. We like the fact that the Ollie has a great suspension that will allow us to go on two track roads. The battery capacity and solar means that we can be off grid in NM for quite some time. After our first trip, we both realized just how comfortable and usable this camper really is. This summer we are planning a long trip back east for an archery competition and will be making a stop in Hohlenwald for some minor issues with the camper. We also are planning a long trip to Portland this fall to visit a new baby granddaughter. We look forward to meeting other Ollie owners on the road as we travel and at future Ollie rallies! Zane and Mary Rakes '26 Oliver Elite II One man, one woman, two small dogs and a sense of humor. 😊
13 points
-
The 48th state was Rhode Island. We completed the last fifteen (15) states over the past 12 Months. Newport, RI was a fun town to complete the job.
13 points
-
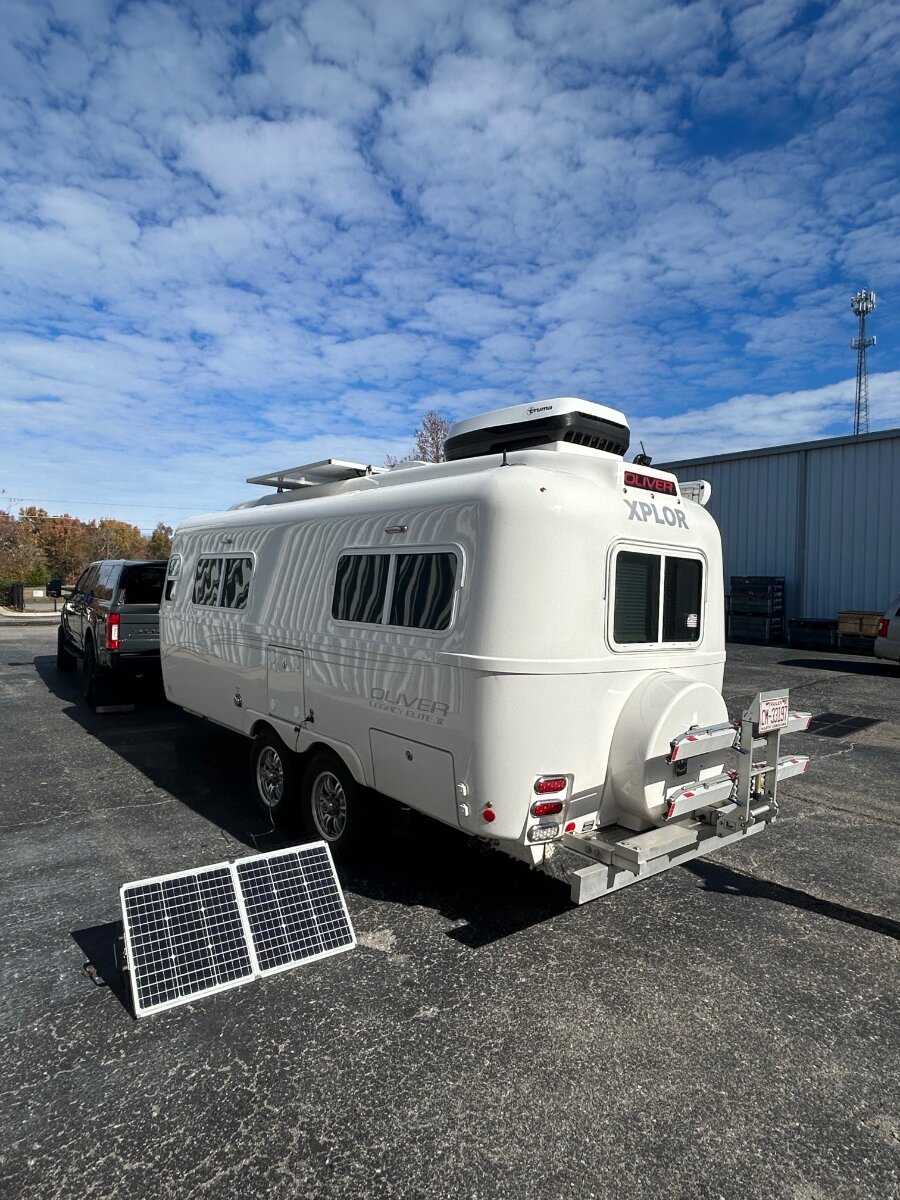
Hi everyone — I previously did an intro in the introductions section, but my wife and I are new (to us) Oliver owners (about 2 months in). We’ve camped twice so far and already have several trips planned over the next several months, including a lot of boondocking in USFS campgrounds. I've had travel trailers of various forms for about 20 years and we are super excited to now be Oliver owners. I just finished a lithium / inverter / portable solar upgrade on our 2019 Legacy Elite II (Hull 514) and put together a detailed project write-up with photos, wiring approach, parts list, and lessons learned (see attached). The trailer came from the factory without an inverter, no roof solar, and no solar connector. It had two AGM batteries when we bought it. The main goal was a clean, reliable, serviceable install that leverages the existing factory AC/DC wiring/routing and keeps the system simple (including an inline inverter/charger pass-through so the trailer’s AC panel works “like stock,” just with inverter capability). I found great info on this forum as I undertook this project and hope to give back just a little by posting this as a practical reference for anyone planning a similar upgrade — happy to answer questions or share any additional photos/details if it helps. Happy camping!! Lithium Inverter Solar Write-Up.pdf13 points
-
Mather campground Gand Canyon NP An amazing week to be in Grand Canyon N P. The main water supply is shut down for repairs and the whole Park is almost empty. That would be Hotels, campgrounds, parking lots and South rim drive. The park is a ghost town. We are among the few dry camping in Mather Campground (only campground open). Might be 20 campers tonight. No traffic, no lines, no people. This might be a once in lifetime event to have the greater Grand Canyon N P uncrowded and as our personal playground. Doesn't get better than this.
13 points
-
Have two 30lb tanks and never even bother to weigh them. Run one tank until it's empty , switch to the full one, and then just plan on filling the empty one as soon as I can.13 points
-
The unimaginable has once again, tragically, become a reality. A large number of those lost were children. I cannot imagine the grief of their surviving families. Here's how you can help, at least monetarily. Click on any one of the links. They all need your support. The needs are immediate, but I can tell you from experience, the needs will be long, for many organizations. If you feel you can afford it, click on a monthly donation. Or, just remember to contribute from time to time. My first is always Salvation Army. They were first on site, according to my mom, when our home was destroyed by a tornado when I was a few years old. And, they do so much good, in so many ways, in every community they serve. If you're still working, some generous companies do matching funds. Sometimes, for retirees, too. You can help, outside of Texas, by giving blood, as well. May God wrap his arms around the survivors, and give them solace, and peace.. Here's where you can donate to help Central Texas flood recovery - CBS Texas https://share.google/mLDD7AfFVtWQ5fajI13 points
-
Lots to celebrate today. Having lived in other countries it is clear to me that there’s no place like the US of A!13 points
-
Happy 4th of July! Let Freedom Ring! 🇺🇸🇺🇸🇺🇸🇺🇸🇺🇸🇺🇸 Patriot13 points
-
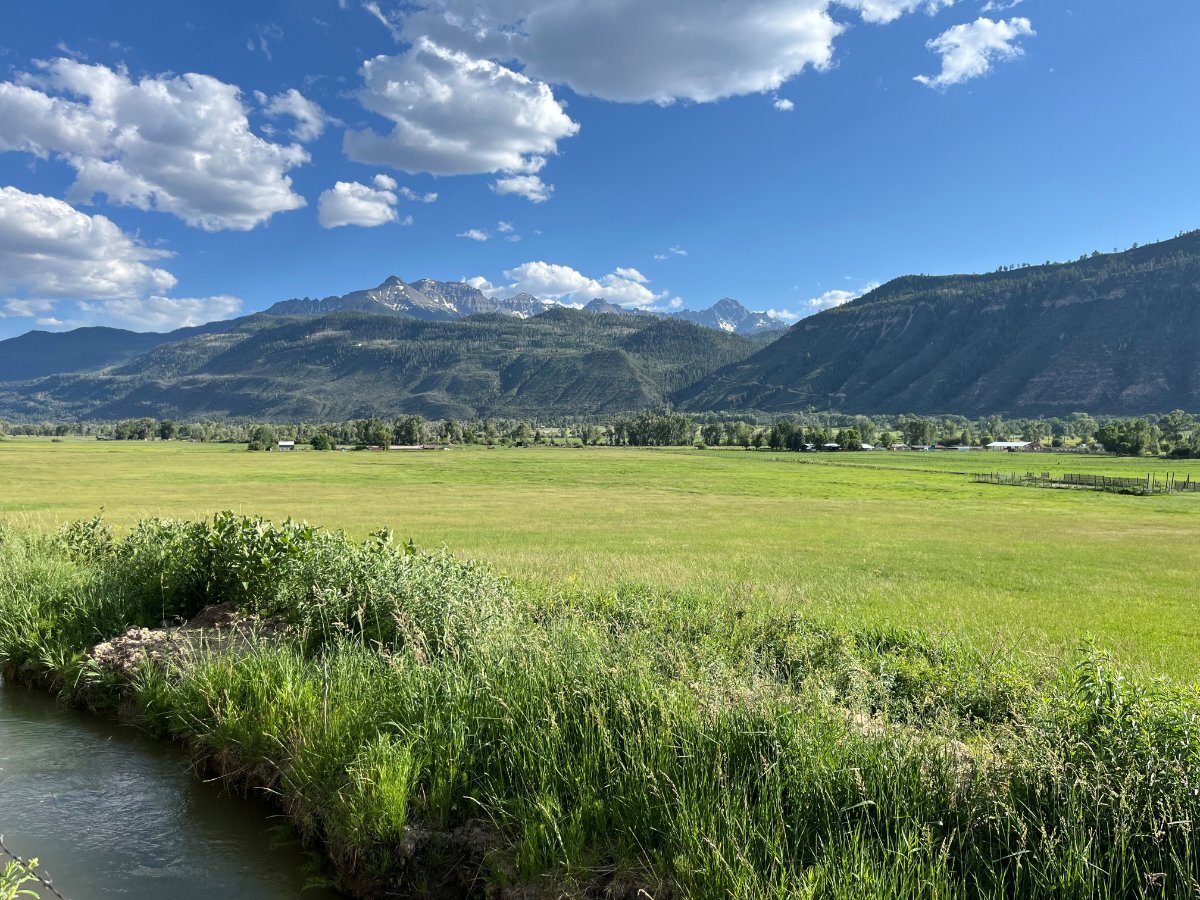
BaseCamp550 - just S of Ridgway CO, 8 miles N of Ouray, our view from the back of campsite #17 looking southeast. The tallest peak on the right is Mt Sneffels, one magnificent Colorado 14er, simply amazing! 😂 Certainly our best campsite in 5 weeks travel. An older RV park from the 70s. Though I have a leaf-blower, if I had my weed-whacker I'd clean up this site a bit. The view makes up for it and we have a triple-wide spot between a cabin, their front facing away, and the laundry which makes it private, not having RVs left and right. It's just so nice!
13 points
-
I always thought that it we had a blackout or local crisis, God forbid a forest fire (we live in the Prescott NF) that we could get in the Oliver and relatively quickly get to safety! Those of you in hurricane climates should certainly understand the idea! We keep ours as many of you do, 95% ready for the next trip. We start the fridge, stock the pantry, pack clothes, fill the TV with grill and lawn chairs, all kept in one area of a shed, and we're ready to go in little time. So we just got back from a 5-week trip, washed and parked the Oliver Saturday. Were out for the day yesterday and when we returned the house felt hot. Later is was apparent our home A/C was not cooling, thermostat set at 77F was 83F actual. We didn't sleep well last night, opened the windows where at our elevation we got down to 75 hours after the blazing Arizona sun had set! Called for service and the best they could do is Wednesday afternoon. We plugged in the Ollie this afternoon. We are back to camping the next two nights on the edge of our property! 😂12 points
-
RV owners should know the height of their trailer or rig. For the last ten years 9’ 7” has been in my brain just in case we encountered a low overpass. My thinking has always been if it’s under 10’ I’m turning around! Some years ago we came to an overpass on a back road somewhere that was 9’6”, there was no traffic and I was able to easily back up turn around and find another route. On our trip home from Hohenwald a couple of weeks ago we were on I-35 South between Dallas and Waco when our GPS showed a red road ahead and recommended we exit and take back roads. That’s what we usually do anyway so we followed all the other folks doing the same thing. We started out on normal county roads but after a half hour or so we were put on a small, unnamed road for a few miles before intersecting with a major highway. We were one of many, there was a big boat and two long travel trailers ahead of us. The road soon narrowed to about a lane and a half. Basically one way traffic unless you moved over to be half off the road. There were a few oncoming vehicles, so we slowed and moved over. We could see the highway ahead so we ventured on with everyone else. When we got close to the highway we saw that we had to go under the highway, make a sharp left and continue on the access road before merging onto the highway. As we got closer we could see a big sign on the overpass - 9’10”. The boat ahead went right under. The 30+’ travel trailer stopped and two guys got out, scratched their heads, rubbed their chins looking at the overpass and their trailer while traffic is backing up behind us. They turned around and announced they couldn’t go under and would back up to get out of the way. This is on a 1.5 lane road, with a curve and a line of traffic. Cars started to scrunch over and he proceeded to back his long trailer with his big dually pick up. I put my truck mirrors in, there was about 12” clearance as he went by, slowly. Once he passed the guy in front of me came back and asked me “how tall are yew?. I said 9’7”, how tall are you? He said he had no idea and wasn’t about to measure now. He said I could just go around and then he’d do the backup thing too. When I looked at the line of traffic behind and the narrow road I estimated that it would be a better choice to break my 10’ rule and go for it. We pulled around the other long trailer and moved slowly to the overpass. Carol jumped out to watch and I was checking my mirrors. We had at least 2” to spare. I heard cheers and “he made it!” being yelled as Carol jumped back in and were were quickly on our way. Worst case I figured I might have to replace my noisy Dometic AC, but alas it is still there! Mike12 points
-
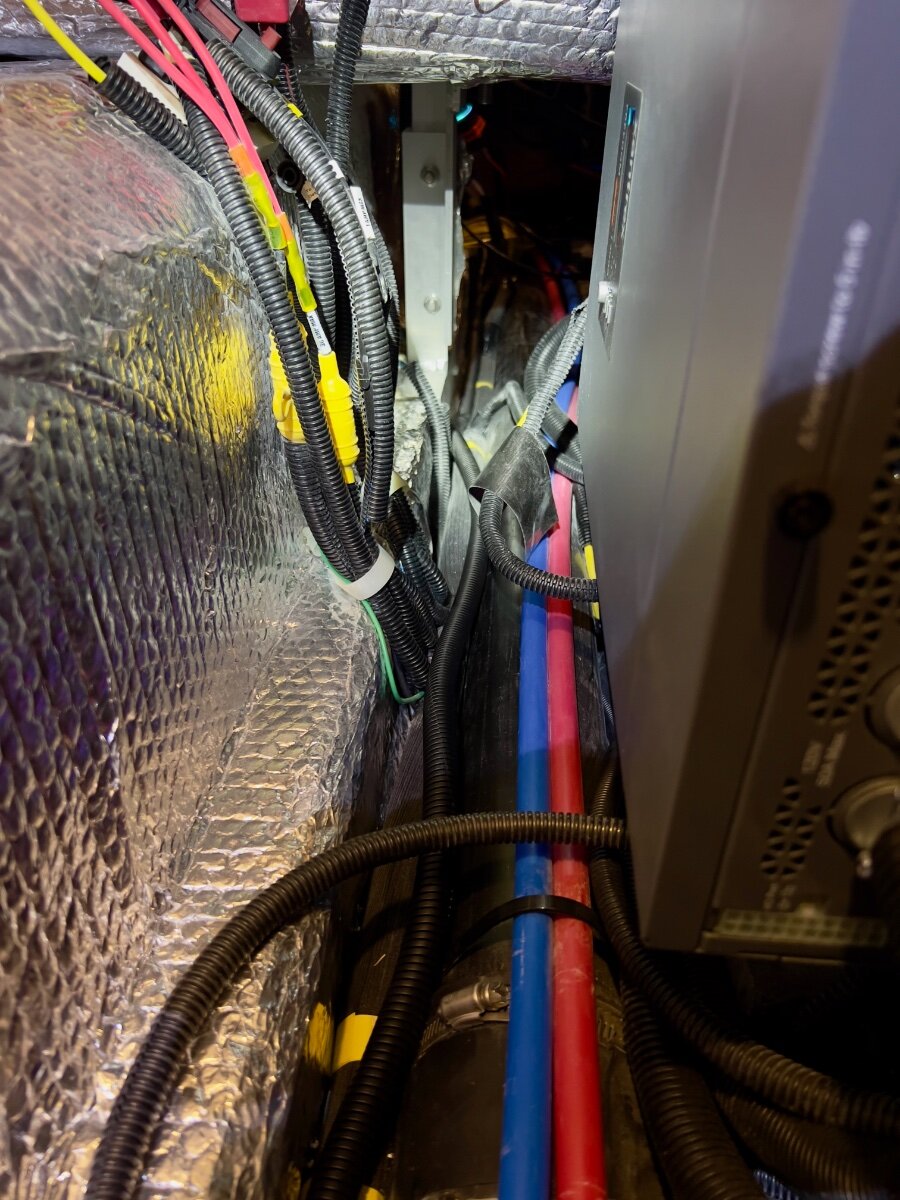
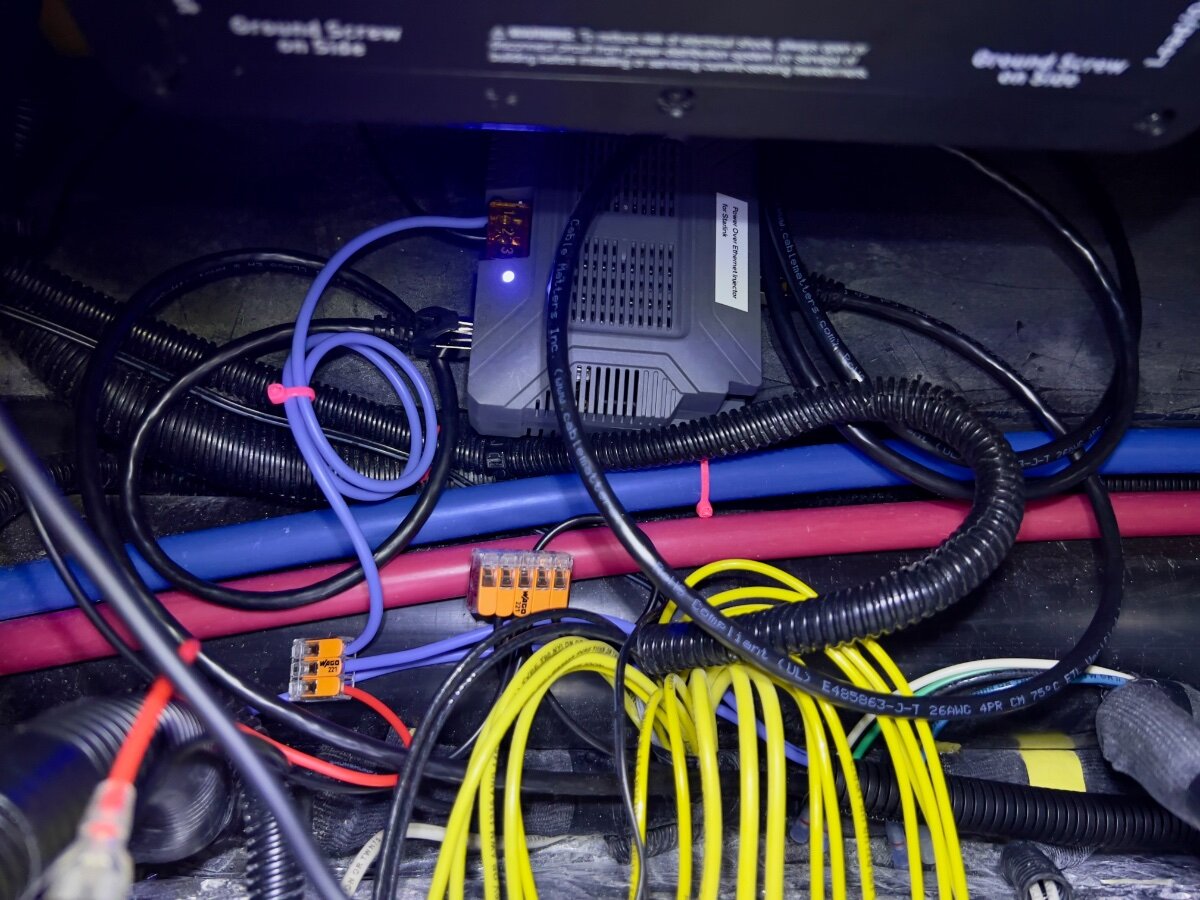
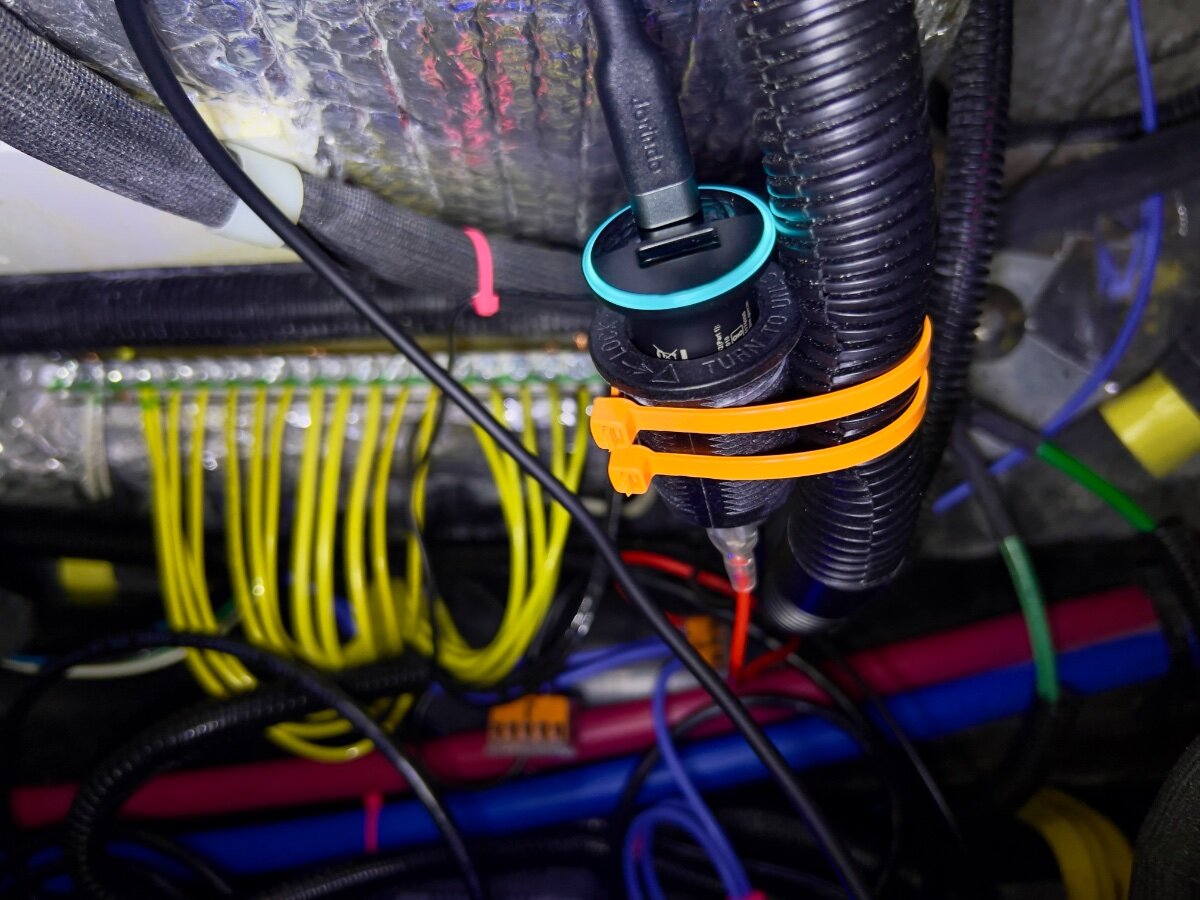
On a recent trip from Dallas to South Carolina we stayed in multiple locations with no (or very limited) communications capabilities (cell phone or WiFi). Over the three years we have owned our LEII, there have been many other occasions with no ability to communicate. As a result, we decided to order a Starlink Mini and a Starlink Router Mini to use on our trailer trips. I have been following Starlink related postings on the OTT Owners Forum, especially since the release of the Starlink Mini. I have found the postings by @Snackchaser particularly helpful in planning the installation of our Starlink system. I especially liked the use of a Power over Ethernet (PoE) injector to power the Starlink Mini and to provide an Ethernet connection from the built-in router back to the trailer, using a single cable. Installing the PoE injector and a DC powered router in the attic of the LEII seemed a reasonable location, being nearly directly above the exterior Furrion ports for connecting satellite and cable TV. So I planned to install in a similar location in the attic of our LEII, assembling a list of the components required. I ordered a PoE injector from MobileMustHave.com and the rest from Amazon. Once all the key components had been delivered, I began the installation, with the first step being to replace the Furrion Satellite coax port with an RJ45 pass-through connector and to fish an Ethernet cable from the basement to the attic. Replacing the Furrion coax connector with the RJ45 pass-through connector was no problem, even though enlarging the hole through fiberglass exterior shell was required. However, fishing an Ethernet cable from the basement to the attic proved to be a major obstacle. Although I have prior experience fishing wires through difficult spaces, I was unsuccessful getting a fish tape (or rods) from the attic to the basement. I could get the end of the fish tape rods down near the ceiling of the basement, where the interior shell ends and multiple cables run up to the attic area at the rear of the trailer, but not into the basement. As suggested, I tried following the A/C drain line and multiple other locations but could not get past the bottom of the inner shell into the basement. I tried running the fish tape/rods in both directions. No luck. Consequently, I began to ponder other installation locations inside the trailer for the PoE injector and Starlink Router Mini. After a couple of days, I had an Aha! moment- install the PoE Injector and Router Mini under the rear dinette seat. I inspected the space between the basement and the rear dinette seat, nearly all of which is readily accessible from the two rear street side hatches and the rear dinette seat hatch. Only the space under the battery compartment is not accessible from directly above, but is easily accessed from either side. I looked for any obstacles to using this location and found none. I could easily route the Ethernet cable from the Furrion/RJ45 pass-through connector forward to beneath the rear dinette seat. I located the PoE Injector atop the trailer frame member, just below the Progressive surge protector box, which is mounted on the aisle wall of the rear dinette seat. The PoE jack and the power terminals of the PoE Injector are positioned toward the front of the trailer. I connected a 20 foot shielded Cat 6 cable from the inner side of the Furrion/ RJ45 port, then routed it under the floor of the basement, around the street side rear stabilizer, then following the waste water line, forward to the area under the rear dinette hatch. About 3 feet of excess cable are coiled in the basement, concealed by the rear wall of the basement. I installed a lighted rocker switch through the forward basement wall, mounted high, almost directly above the side-to-side bubble level on the left side of the basement entry. This switch is to control 12VDC power to the PoE Injector and the Starlink Router Mini. Using 14 AWG silicone coated wire, I ran two purple colored wires from the space beneath the rear dinette hatch back to the rocker switch on the forward basement wall. A third, 14 AWG black wire was also run along the same route to the rocker switch. The switch has two terminals with red lead wires,: one to the DC power source and one to the load. The third terminal has a black wire, which connects to ground (the bus bar). The ground wire enables the light on the switch to operate when DC power is ON. On the DC power panel, position 15, I installed a 15 amp fuse. One of the purple wires connects to the 12VDC positive terminal on the PoE Injector. The other purple wire connects to position 15 on the rear of the DC power panel, using a crimp on connector. The single black wire from the switch connects to the ground bus located under the rear dinette seat. Another 14 AWG wire connects the PoE Injector negative terminal with the other end connecting to the bus bar. All wire-to-wire connections were made using Wago lever lock connectors. I also added a 12VDC auxiliary power outlet (cigarette lighter type) which is connected to the same circuit as that which powers the PoE Injector. An Anker 323 USB-C Car Charger Adapter (USB Power Delivery (PD) capable) plugs into the auxiliary power outlet. A USB-C to Male to DC 3.5 x 1.35mm Male Power Jack is used to power the Starlink Router Mini from the Anker charger. I found the Starlink Router Mini conveniently fits on top of the Progressive Surge Protector box. I later secured it with a releasable zip tie around the surge protector. The 20 foot Cat 6 Ethernet cable from the rear connects to the PoE jack of the PoE Injector. A 5 foot Cat 6 Ethernet cable connects to the LAN jack of the PoE Injector and to the WAN/Satellite port of the Starlink Router Mini. All Cat 6 Ethernet cables used are shielded. I believe this installation location approach has several advantages over an attic installation: Access is MUCH easier. Fishing wires is no challenge. A dedicated circuit from the DC power panel provides power to all Starlink related components. A lighted switch for the PoE Injector and Starlink Router Mini is located in the basement, near the exterior pass-through Ethernet jack. The PoE Injector is located where it cannot be covered by clothing or other cargo stored in the attic which might cause overheating. The VERY bright blue light on the PoE Injector is not visible in the cabin (always ON if power to the PoE Injector is ON). The Starlink Router Mini is located centrally in the trailer and should provide uniform WiFi coverage within the trailer. We have not yet taken the Starlink on a shakedown trip, but plan to do so at the end of August. Regards, Don
12 points
-
Happy Veterans Day As a veteran myself I understand at least a bit of what fellow veterans gave to our country and I certainly thank them for the time and sacrifice they spent/gave on behalf of all of us. We should all give at least a few moments today to reflect on what time and sacrifice means to all of us. Bill12 points
-
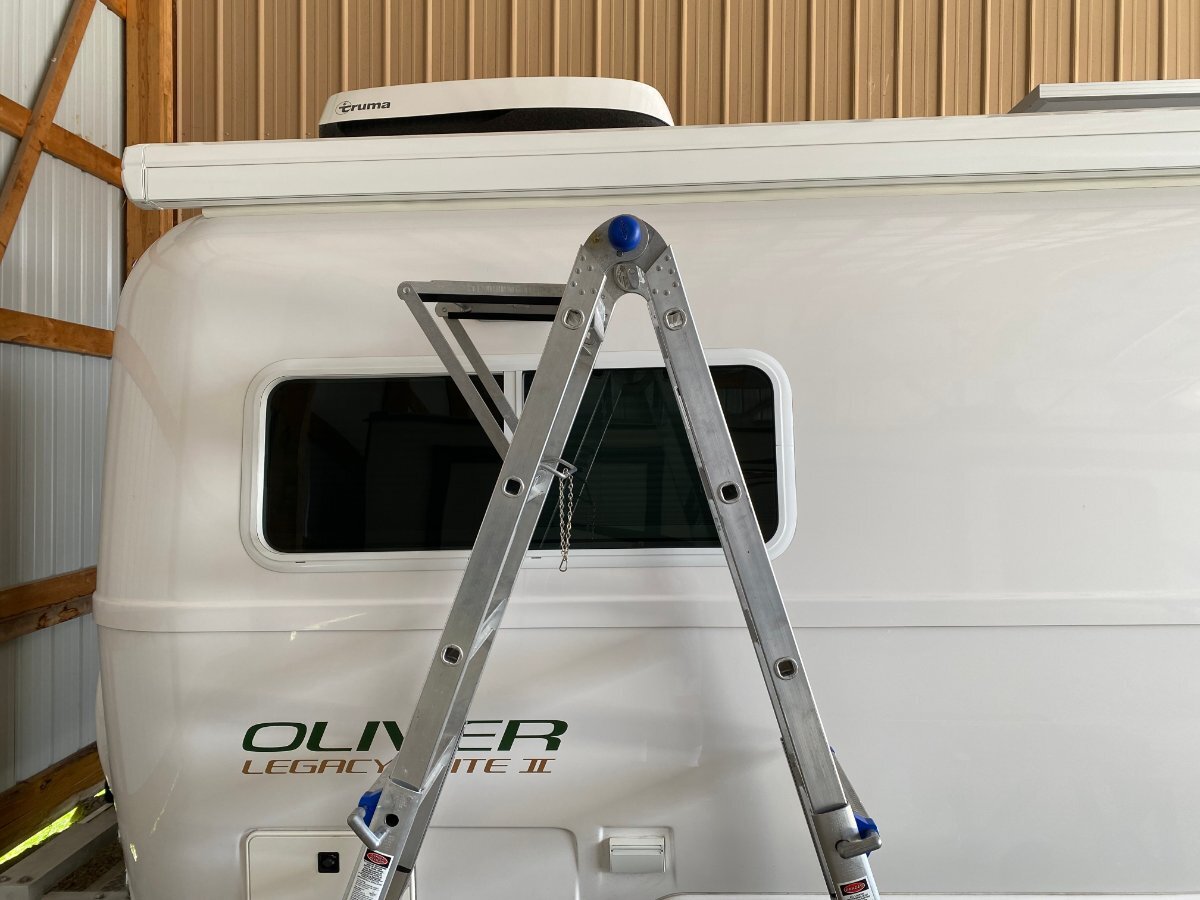
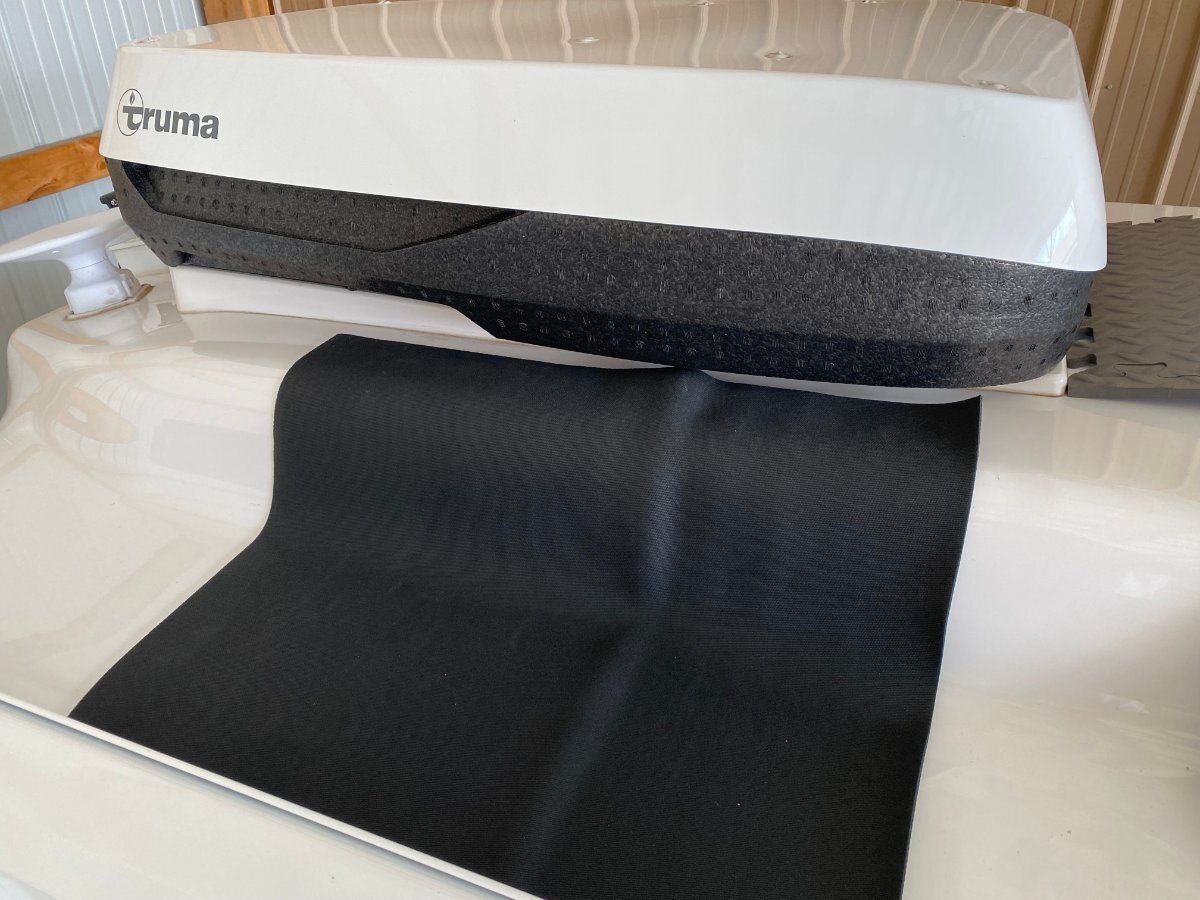
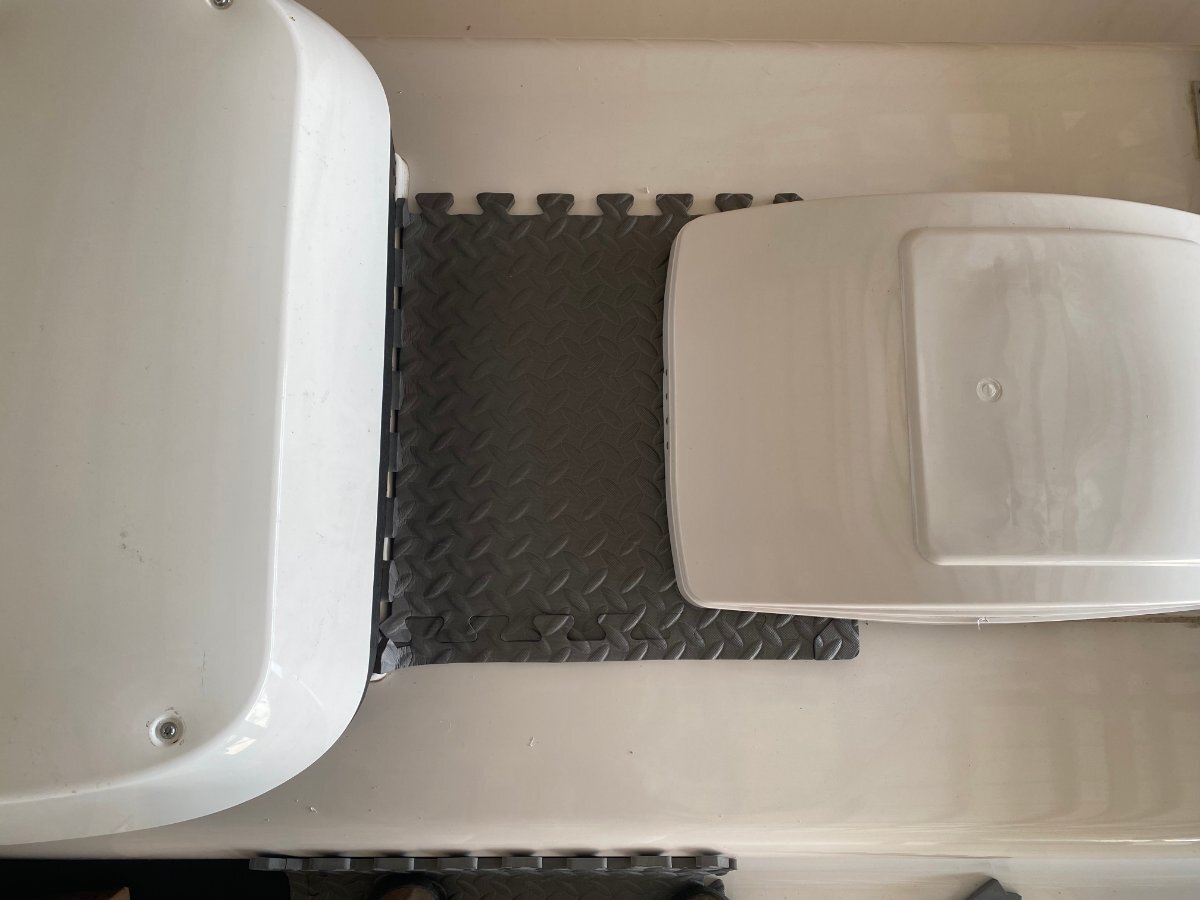
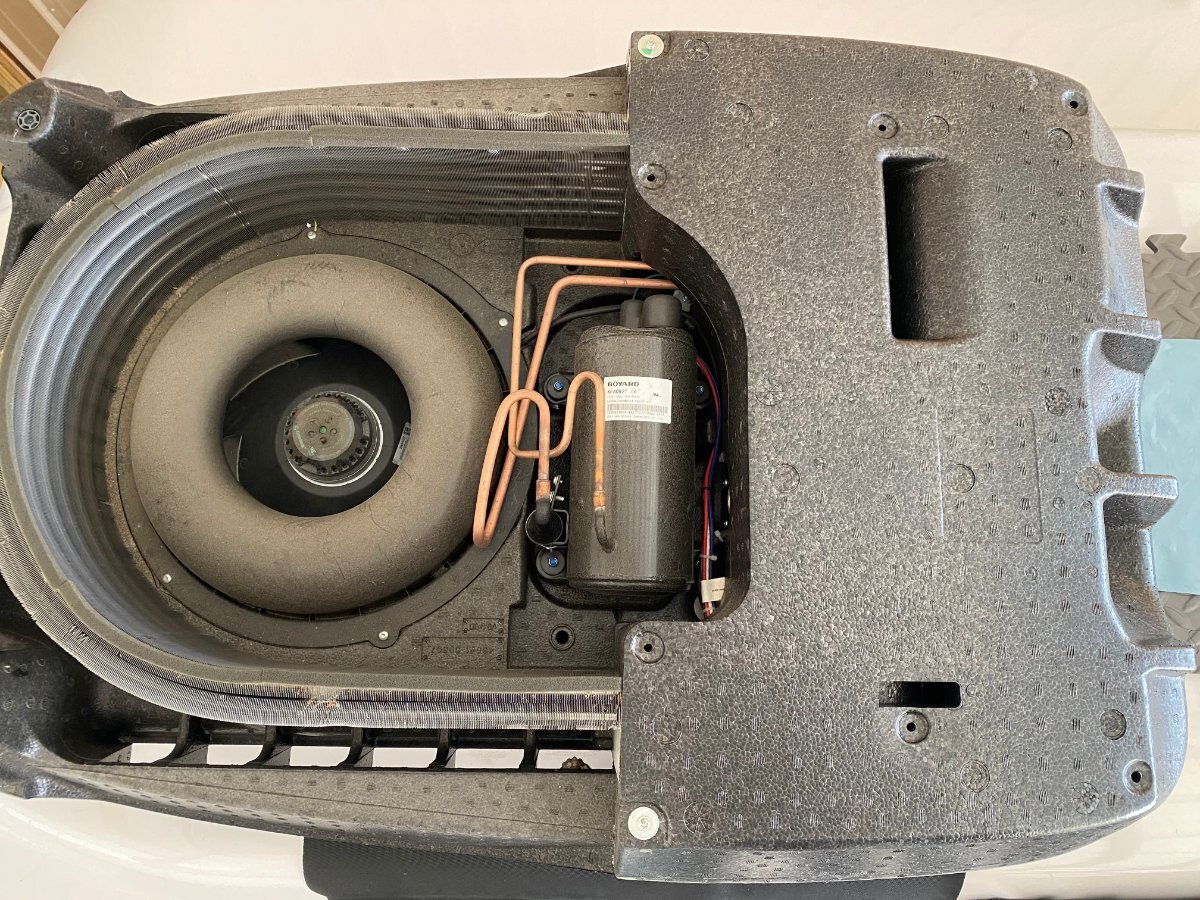
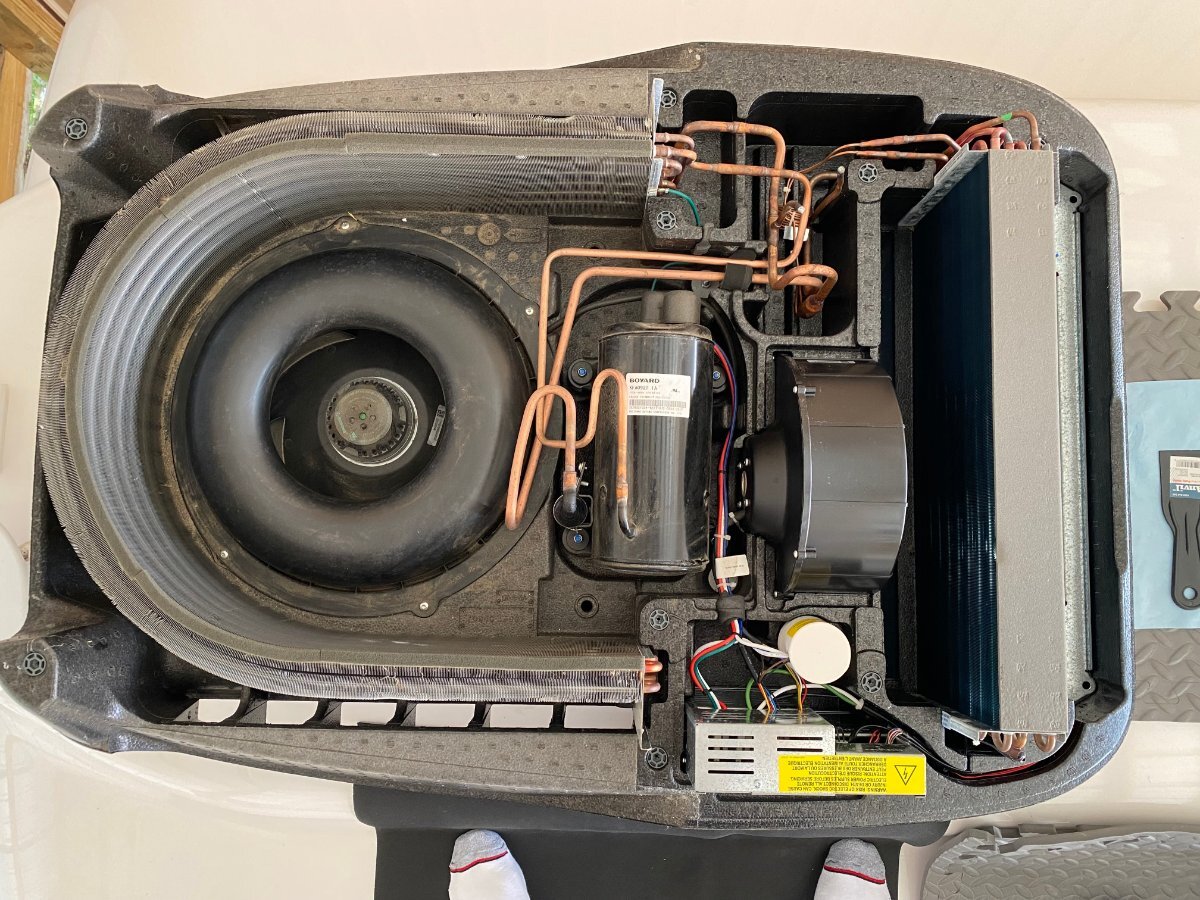
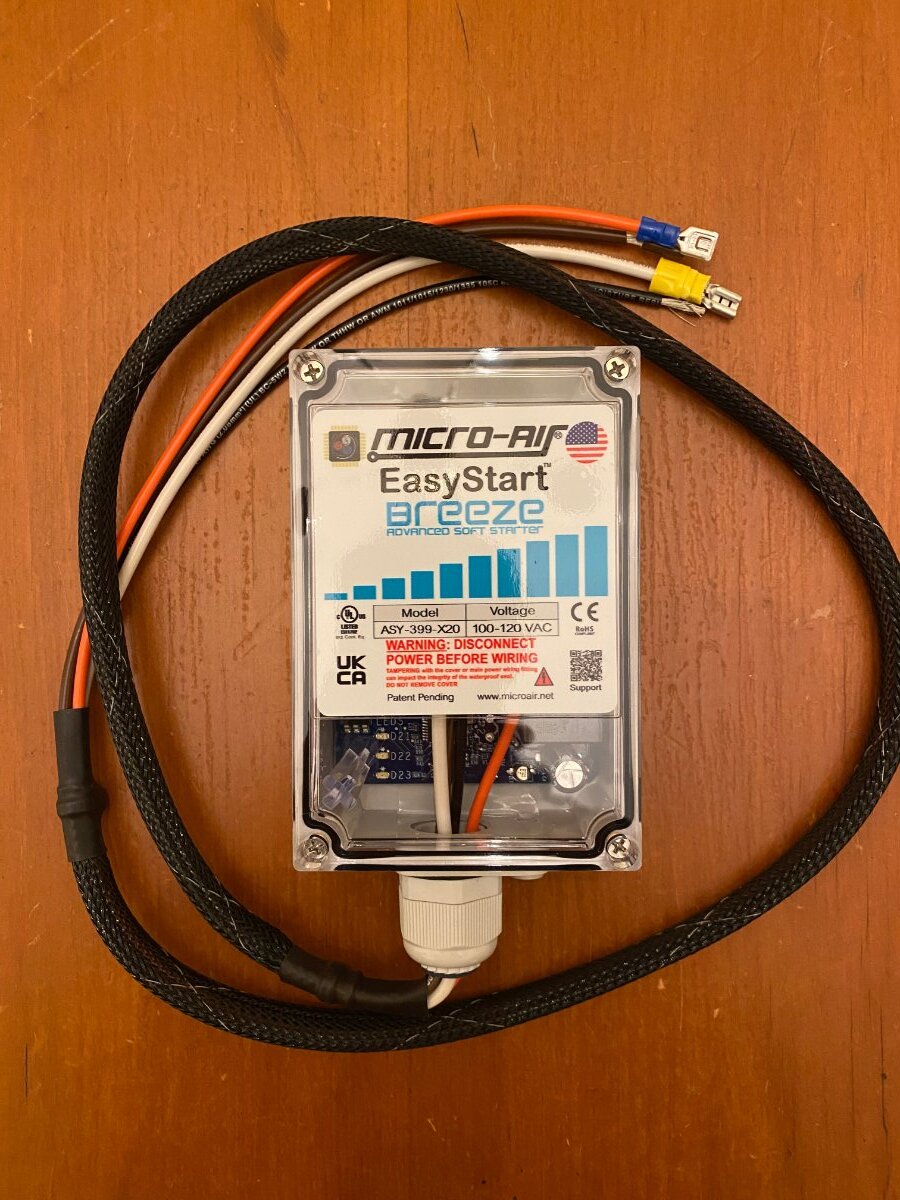
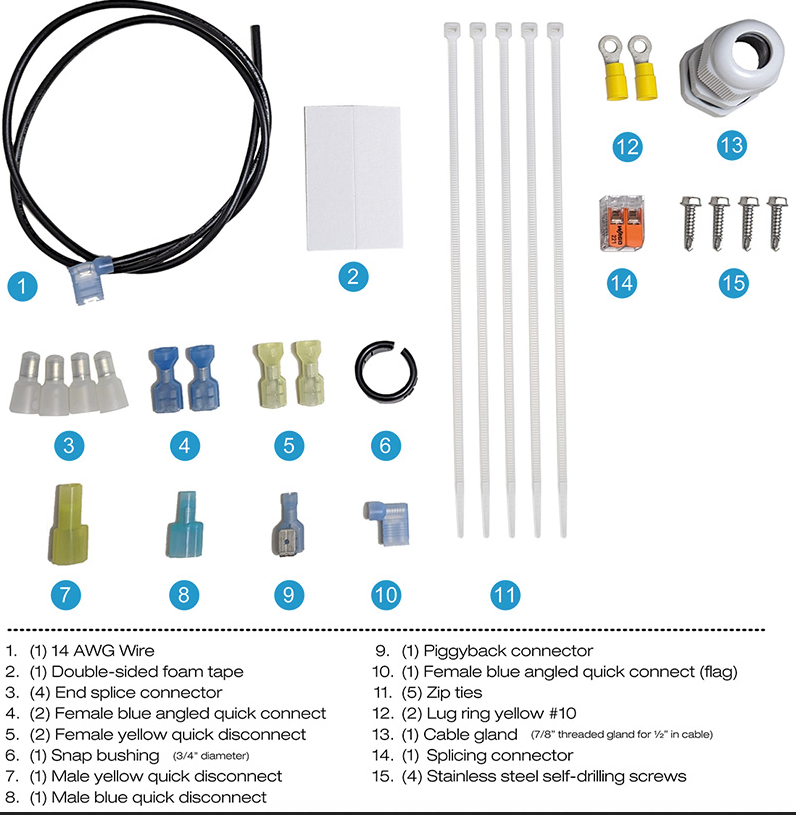
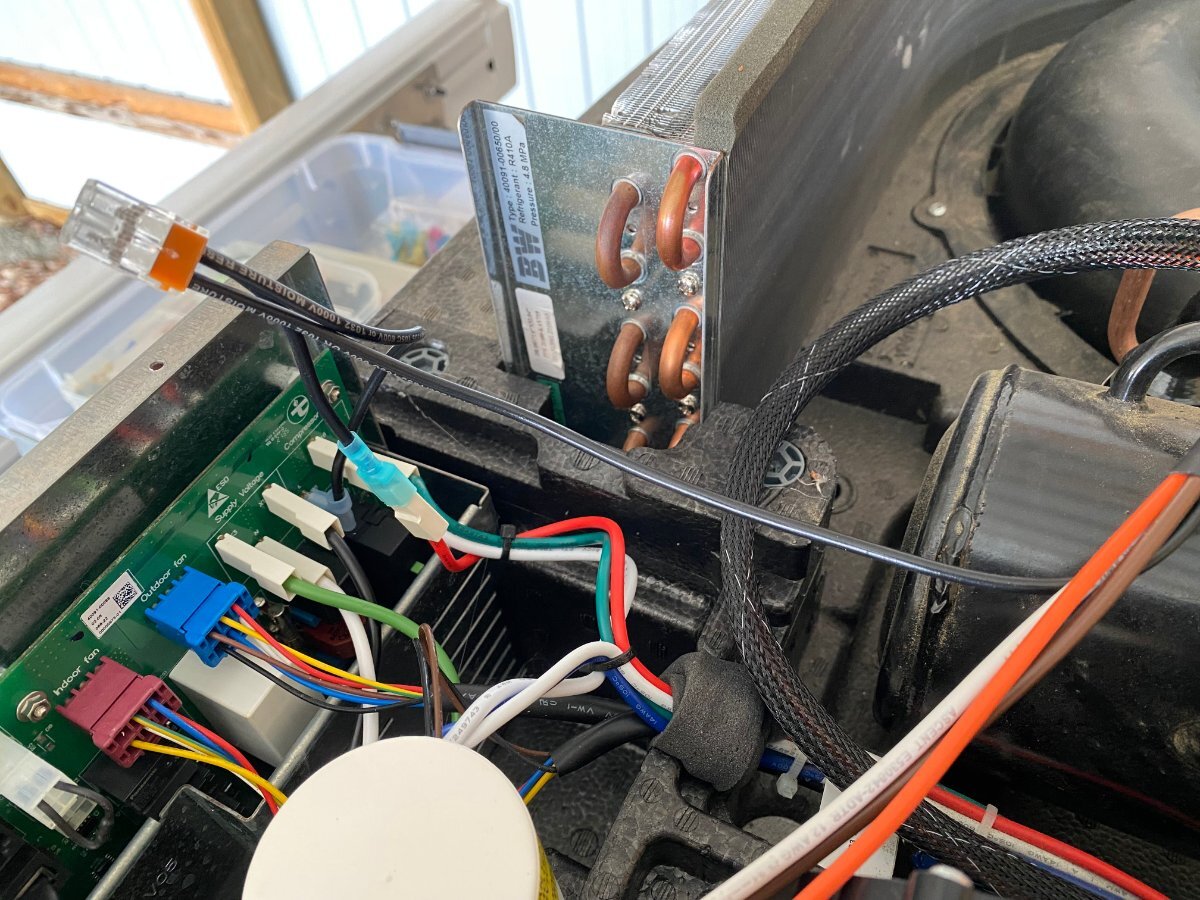
Since purchase of my OTT last year, I had been thinking of installing a MicroAir EasyStart on my Truma A/C. However, I wasn’t sure if it would allow my Truma A/C to run off my Champion 2000W generator, especially since I run it on propane and often camp at elevation. Fortunately for me I met @mossemi at the Oliver Rally last May and it turns out that he has the same generator and like me, runs it on propane. He told me that with the EasyStart, his A/C ran fine off his generator even at elevation. Thanks to Mike for that info. So now you can imagine my excitement when they announced that there were going to be ten EasyStarts given away at the Rally! But alas, I was not one of the winners. However, I met a nice couple from Oklahoma who did win one. And as luck would have it, they had decided not to use it, so they graciously gave it to me! Although I made several attempts, they refused any compensation. So I owe them a big thanks. Below are the details of my installation. First, thanks to @Patriot for previously posting this video: SoftStart Install on Truma A/C I found it to be very helpful for understanding how to remove the A/C covers, where to mount the EasyStart, how to run the wiring, how to get access to the control board and for making connections to the capacitor. However, DO NOT follow the detailed wiring instructions because the video is for a SoftStart not an EasyStart. Next, a couple of thoughts on safety. After I removed the A/C cover I found an old mud dauber’s nest. Fortunately it was not inhabited at the time. But they seem to like that area, so beware. Second, the video doesn’t mention it but you should make sure that the capacitor has been discharged before working around it. Since I’m not a qualified electrician, I won’t comment any further. Finally, I used my 17’ Werner ladder to get access to the roof. The optional Werner platform made this much easier. Also, accessing the roof from the curb side felt safer since the awning acts as a short railing. I used a sheet of rubber tool box liner and a piece of interlocking foam utility mat to protect the fiberglass and provide slip protection. With those additions, I felt safe enough to work in my stocking feet. As shown in the video, the white cover can be taken off by removing the eight screws (covered with lap sealant) with a T30 Torx driver (note that the two screws at the back are shorter than the others). Following that, removal of two additional T30 screws allows the foam cover to be lifted off. Be careful as you work with the cover off because the exchanger fins are easy to dent. Access to the silver electrical box is achieved by removing three T15 screws (one on top, and one on each side). Here’s the EasyStart device that I installed and the universal installation kit that comes with it: In general, I followed the wiring instructions provided by Micro-Air. I will say that I found the generic wiring instructions to be a little confusing (did I mention that I’m not a qualified electrician?). However, I was able to find specific wiring instructions for the Truma (that even I could understand) here: EasyStart Wiring Instructions for Truma A/C Although not necessary, I first removed the cap covering the wiring connections to the compressor motor with an 8 mm socket to confirm the wiring colors at the R, C and S terminals. (I don't know why but this photo is upside down and I couldn't figure out how to change it). I did deviate slightly from the installation instructions in one aspect, as I chose not to cut any wires but instead use terminal connections. That way, if I ever decide to remove the EasyStart, I can put everything back exactly the way it was. So instead of cutting the Red wire coming from the control board, I removed it and installed the provided 14 gauge Black wire with female terminal in its place. I then cut the Black wire and crimped on a male terminal to the portion not used and connected it to the female terminal on the Red wire that I had just removed. Finally, I used a WAGO push-in wire connector to tie these two to the black wire on the EasyStart. Next, after removing the white cap from the run capacitor, I installed the Orange wire from the EasyStart onto the Herm terminal next to the White wire. Then, I removed the Blue wire from the capacitor terminal and replaced it with the White wire from the EasyStart. Finally, I connected the Blue wire that I had just removed to the Brown wire from the EasyStart. Here’s a look at the wiring after everything was tidied up with zip ties: Overall, I’m pretty happy with the installation. However, looking back there is one thing that I wished I would have done and that is to add a bit of HVAC tape to the top of the EasyStart to give some additional support. I’m not sure how well the double sided tape will hold to the foam, especially given the conditions that some of our roads are in. I’ll probably go back and do that at a later time. BOTTOM LINE: After the install of the EasyStart, I noticed a very gradual ramp up of the compressor, as expected. More importantly, I can report that my Truma A/C runs very well with my 2000W Champion generator running on propane, even at 6000’ elevation. Added bonus: Unlike before, I can now run the A/C off my 15 A circuit at home. If you have any questions about this install, feel free to comment below.
12 points
-
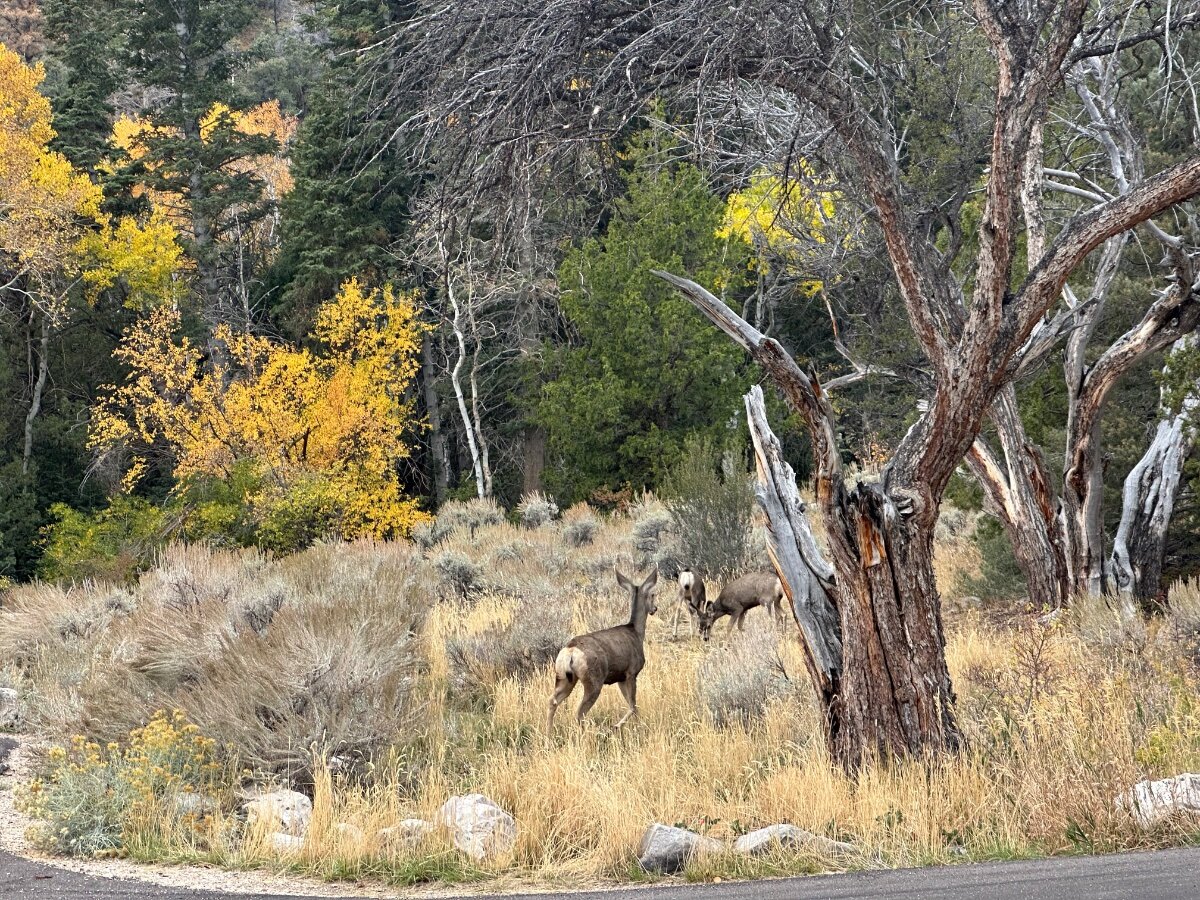
Glacier NP Two Medicine campground
12 points
-
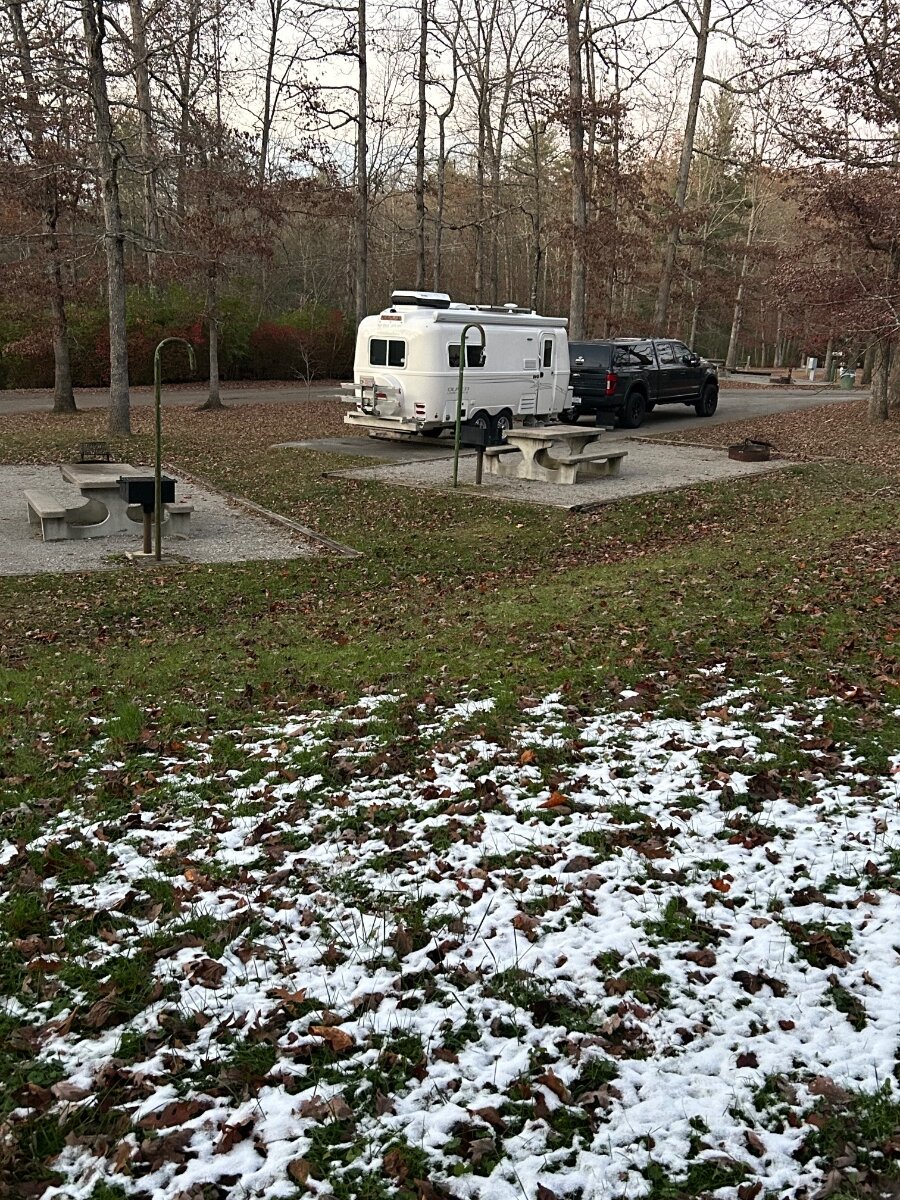
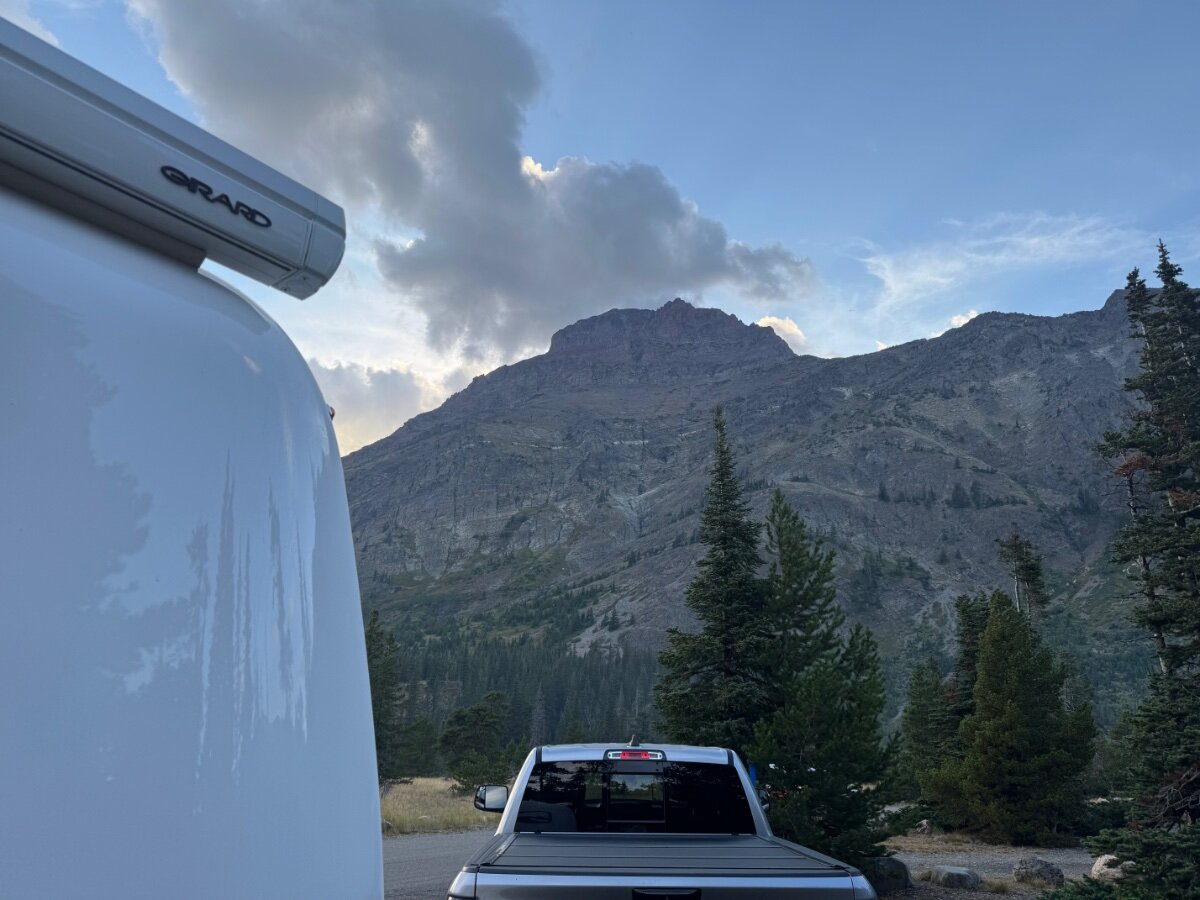
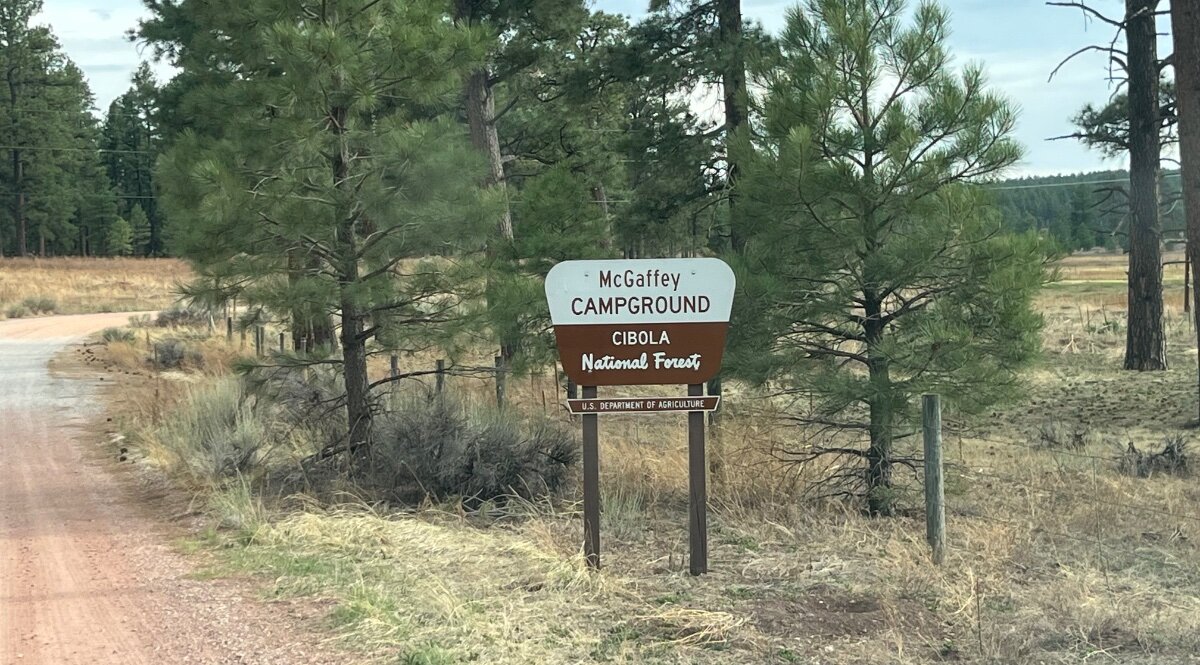
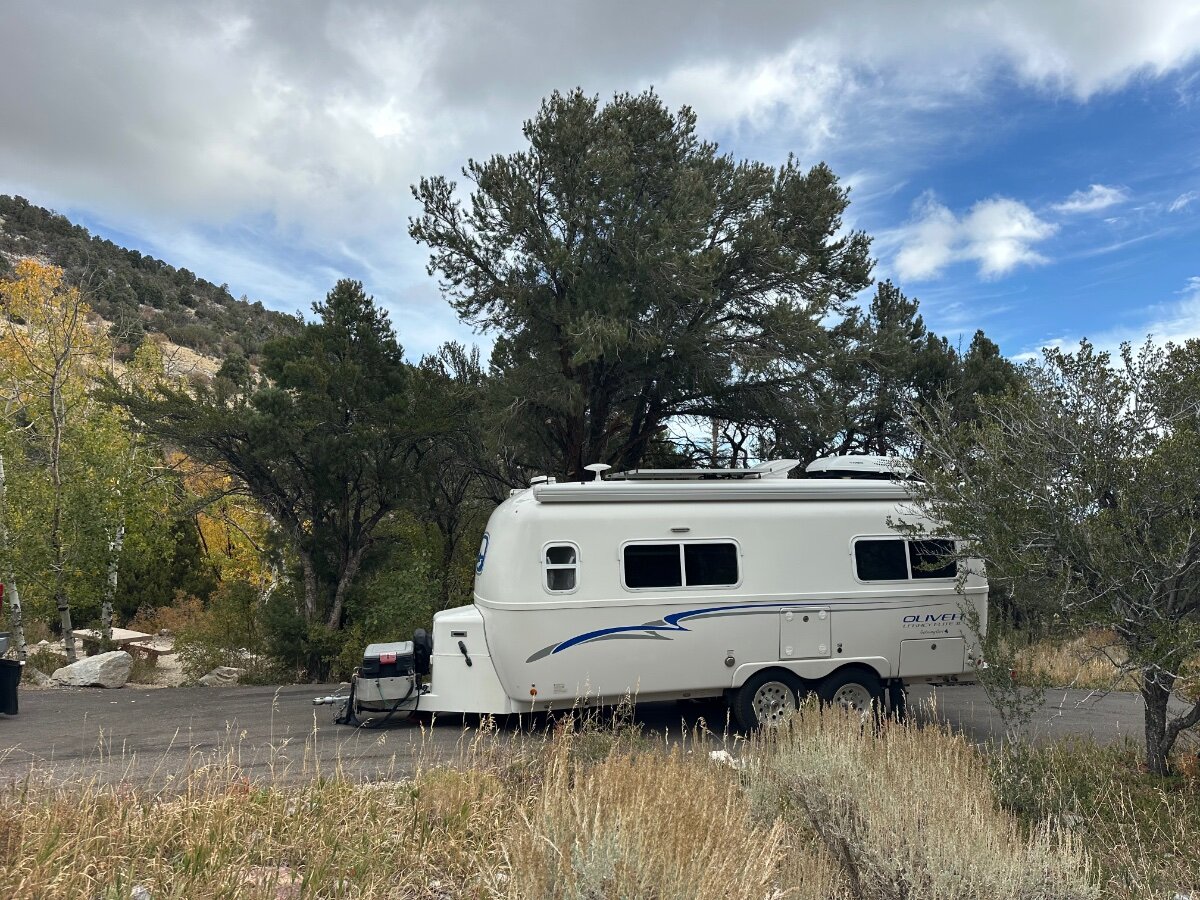
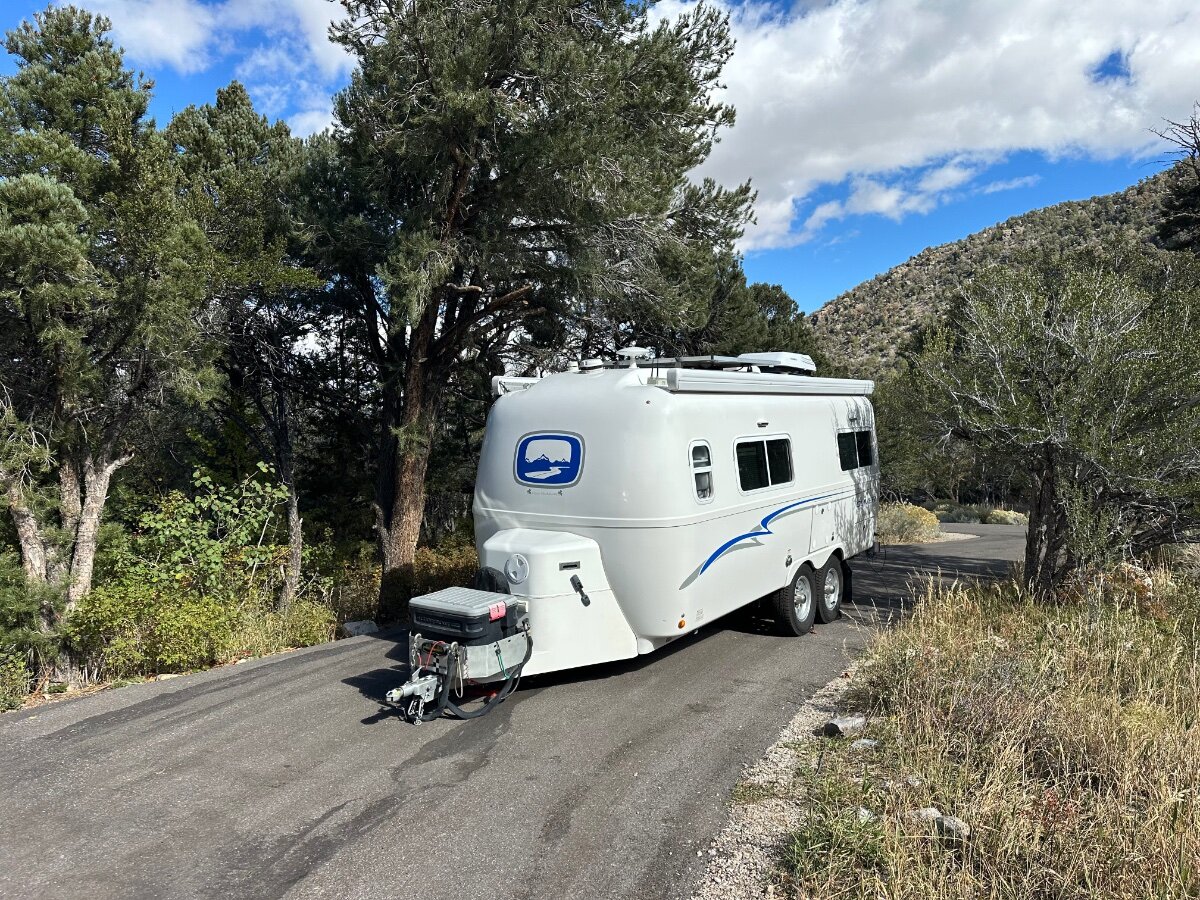
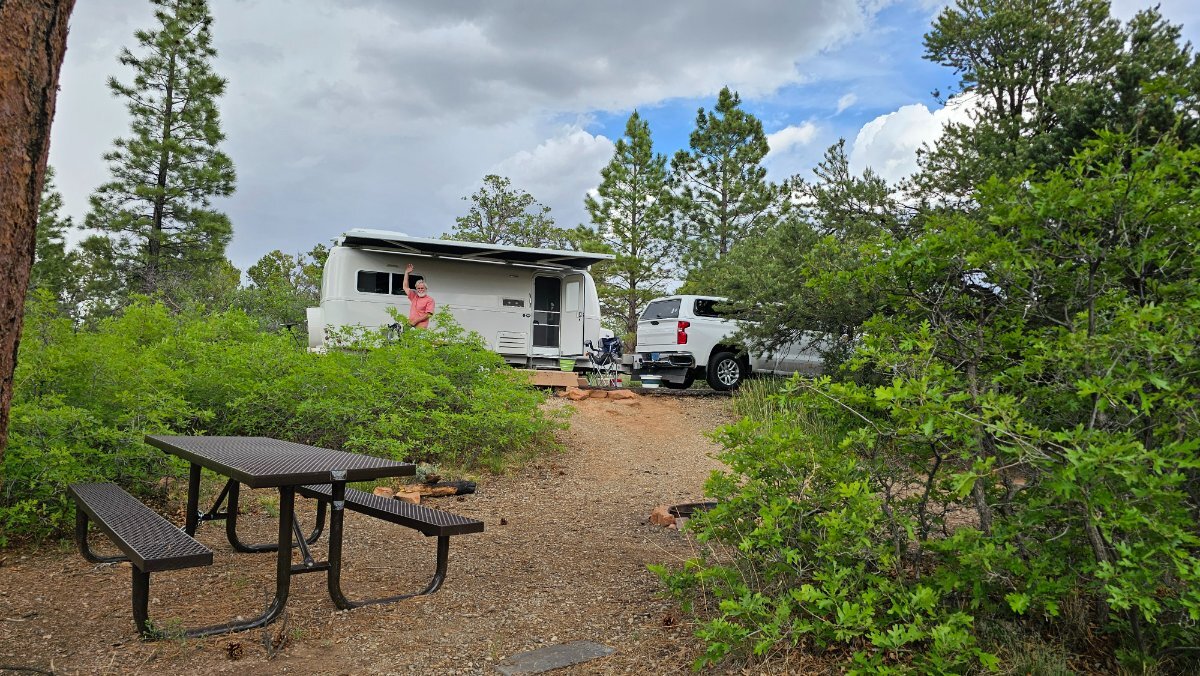
This will be a first for us, though common to many of you who have more time for travel. I have 6 weeks off work, for our personal longest camping trip ever. I was inspired by a post our friend Steve @ScubaRx made last year where wrote that he and Tali often travel across country without reservations! This is difficult for the Project Manager in me, but should make for a spontaneous and exciting adventure! First stop just 5 hours from home, we’ll stay 2 nights up at 7760 ft in this beautiful McGaffey Campground SE of Gallup NM.
12 points
-
Mike, Good to hear you and your family are OK. We have been following this tragic storm aftermath closely. So sad to hear about this after our recent hurricane in NC. One of the charities we like are normally on the ground quickly in disaster situations like this one. Will do on the thoughts and prayers for everyone in the area.12 points
-
Happy birthday America!!!
12 points
-
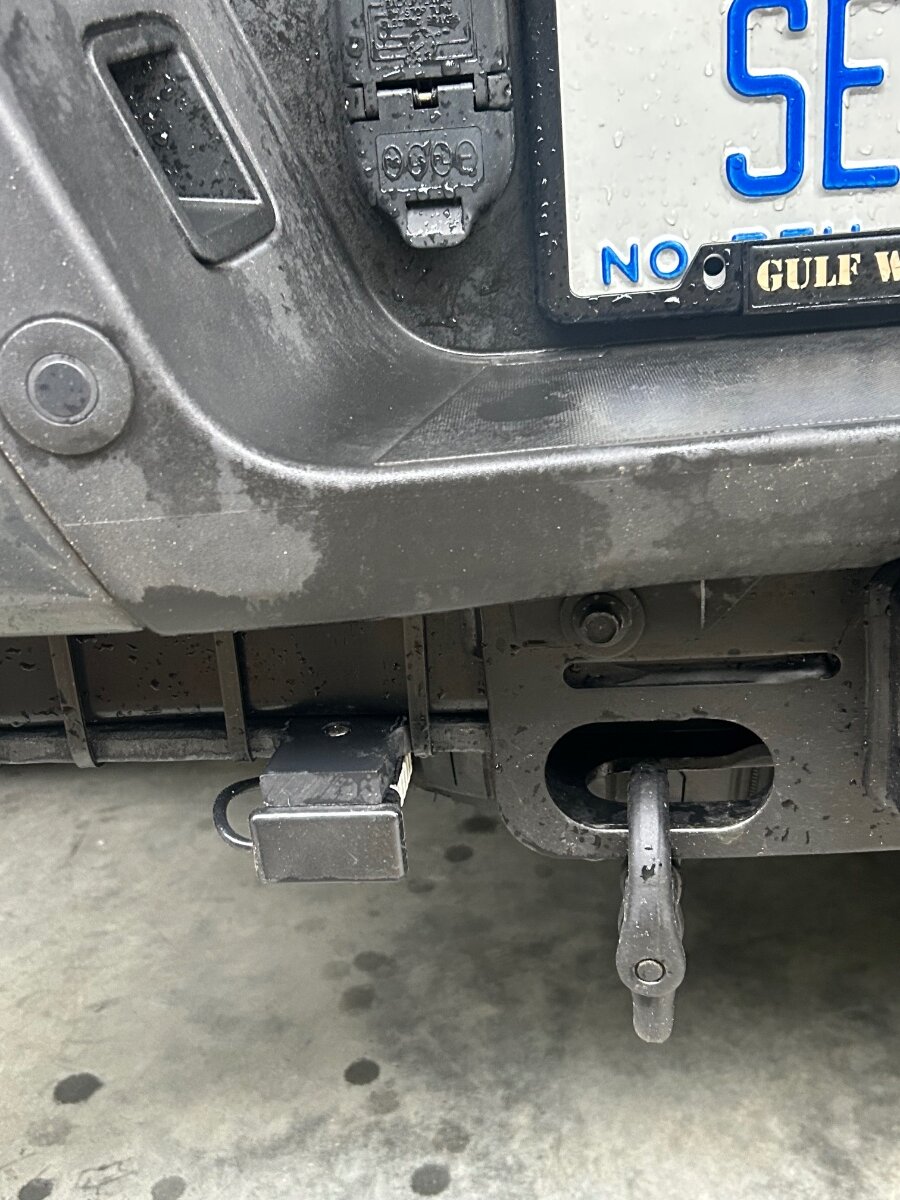
After talking to an attorney friend it’s time to eat some crow and admit my mistake. The Oliver is an extremely well balanced trailer and I can get the truck and trl within all legal weight limits without the Anderson hitch, however, it was explained to me that vehicle oem’s install the class 3 hitch and derate it with the caveat of using a weight distribution hitch, he told me that there is no federal law to require me to use the wdh, however I could get in trouble on a state by state basis. so… after 8 yrs my options are, get an Anderson, or replace the class 3 hitch with a class 4, and replace my bumper to make it fit, I ordered an Anderson this morning. The next vehicle I order will be spec’s with a class 4 hitch, sometimes lessons learned can be embarrassing, but it happens🤷12 points
-
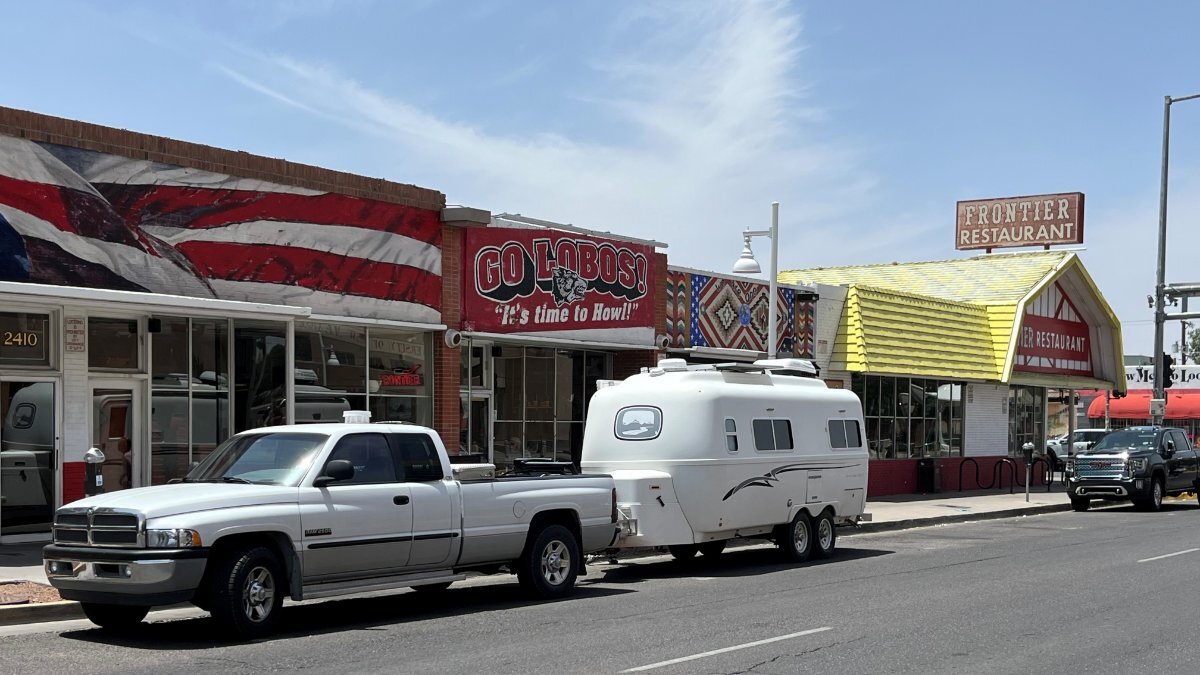
New Mexico is a wonderful state in its hidden treasures from the area NE of ABQ (where Art lives) up to Santa Fe and to Taos NM, then further up to Raton NM for the Santa Fe Trail Balloon Rally (we just happened by this rally when moving from VA to AZ back in 2005)! Then there is Ruidoso! It's Gods Country in Lincoln County NM of Billy-the-Kid and Smokey-the-Bear fame. Don't travel across southern NM without spending some time here. The area is named the White Mountains of NM, wild elk and feral horses walking the city streets daily and so many cute carvings Smokey is shops everywhere. If you're ever traveling through Albuquerque and need breakfast, lunch or dinner, or just great sides to go, like their amazing salsa and beans, Mexican meats and stews and much more, you've got to stop at the Frontier Restaurant. Just one exit S on I-25 of I-40, head a few blocks east on Central. This is my 4th visit here but the first time I parallel parked with an Oliver! (There was a car behind me when I parked and just a narrow alley in front). It worked out great and we could even keep an eye on our rig from the window seat! Chris had the Taco Salad and I enjoyed the Frontier Burrito, pints of salsa and beans to go for upcoming campsite dinners!
12 points
-
What I just posted in John's Facebook group for Oliver Owners. This does not require a lot of discussion. WARNING: Fake Facebook groups cropping up everywhere! Folks, we have a growing disturbing problem with Facebook (FB) groups, especially, because you are reading this, in regards to owning an Oliver. You may have noticed at least one or two new Oliver-related FB groups crop up lately. From the very first picture posted, from the Oliver group that has the word "Community" in it, there are suspicious postings & members. Now the more legit people who join these fake groups will make the group look more and more legit itself. Our information is being collected, I promise you. I'm not usually an overly suspicious person, but as an active Information Technology (IT) guy who also supports cyber security, I'm seeing more obvious signs of trouble. Even a dumb monkey like me can start to see the issues. Now, I just left that "Oliver Community" group just last night after I had seen enough AI generated material and started to smell bad actors. You can ask any AI out there this question and read for yourself why and how and why this is happening. Just ask it something like this: Are there fake facebook groups being created to collect information on us? I usually have not cared about what is collected on me, as big American businesses are notorious about collecting info. These fake groups are not maintained by American businesses, I promise you that. I have no stake, nor real loyalty, to this group we are in right now. I am not an admin, and frankly, I was once kicked out of the group for a misunderstanding on my part. I was later asked to rejoin due to my loyalty to the OTT owners in general. That's it. I'm sure this will be received like politics. We will be split down the middle 50/50 or at least split 33/33/33. Just be VERY safe out there in this mucky world of social media we have created. This group is managed by real good people. We may not always understand why they do what they do, but that is because you are not trying to keep bad actors out of a private group. It's a fulltime job these days. Some forums of the world have to block entire countries due to the issues developing now. Be safe and "you do you", but you've been warned.11 points
-
Snackchaser was spot on. I got up this morning and found the emergency breakaway switch had gotten pulled out during setup. I put it back in and voila, back to 0 draw. Thanks you all so much for the responses. I was really stressing out about this issue.11 points
-
Probably most members and readers of the Forum are aware of the "brewing" winter storm that is forecast to hit the southern states this weekend. But, for those that are not - it is forecast to start Friday over in the mid to northern Texas area and move through Oklahoma and Arkansas. Then on Saturday morning it moves over Tennessee, the northern part of South Carolina, and North Carolina. Continuing through Saturday and well into Sunday the storm then moves slightly north before exiting off the coast in the mid Atlantic region. While totals of snow are as high as 18 inches, it is the ice that will cause many problems - downed power lines and roads that are very difficult to clear. For those not familiar with the southern States - many simply do not have the equipment to deal with either the ice nor the amount of snow that is forecast. If anyone and or their Ollie is in this area of the country, NOW is the time to prepare for this storm. Be careful and best of luck to everyone in dealing with all that is to come from a winter wonderland. Bill p.s. HERE is one forecaster's take on the storm11 points
-
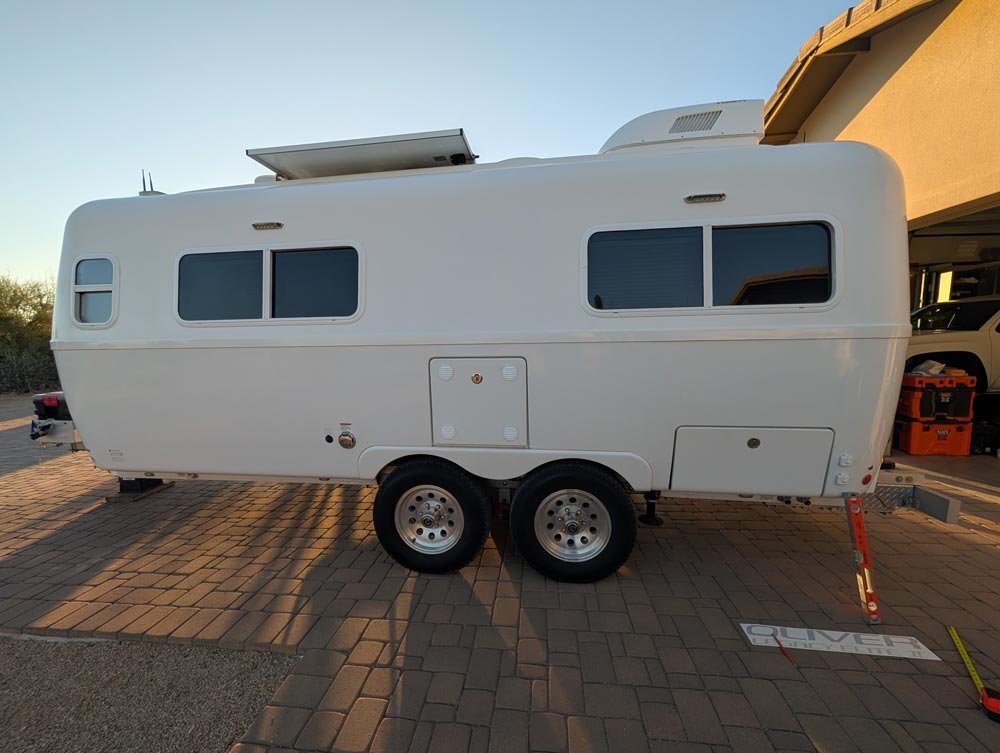
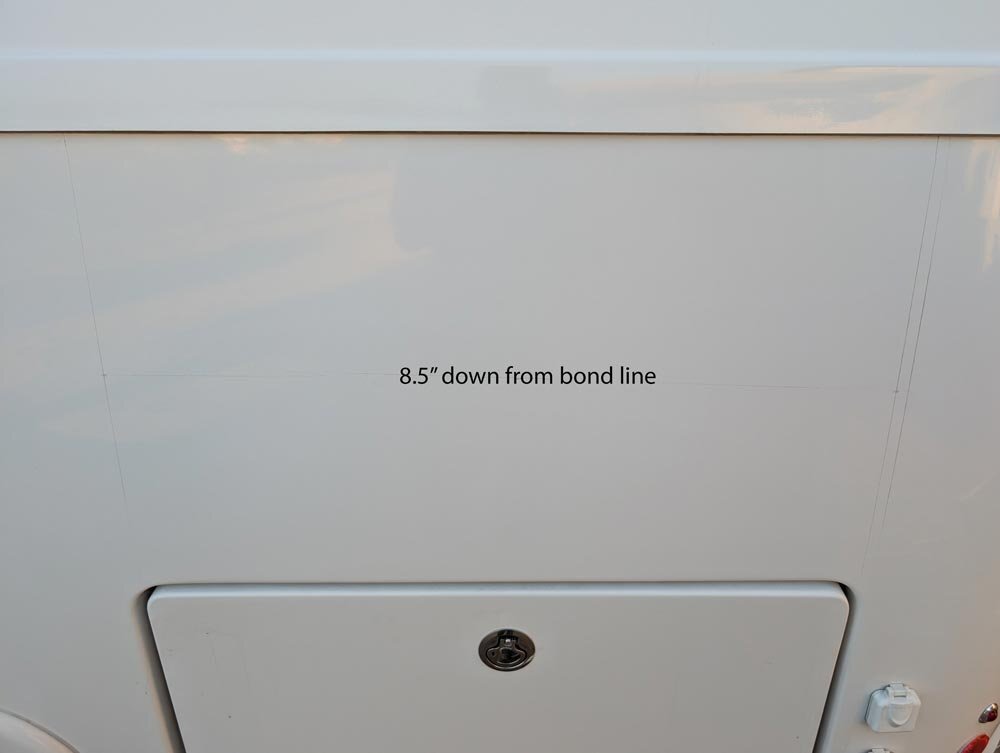
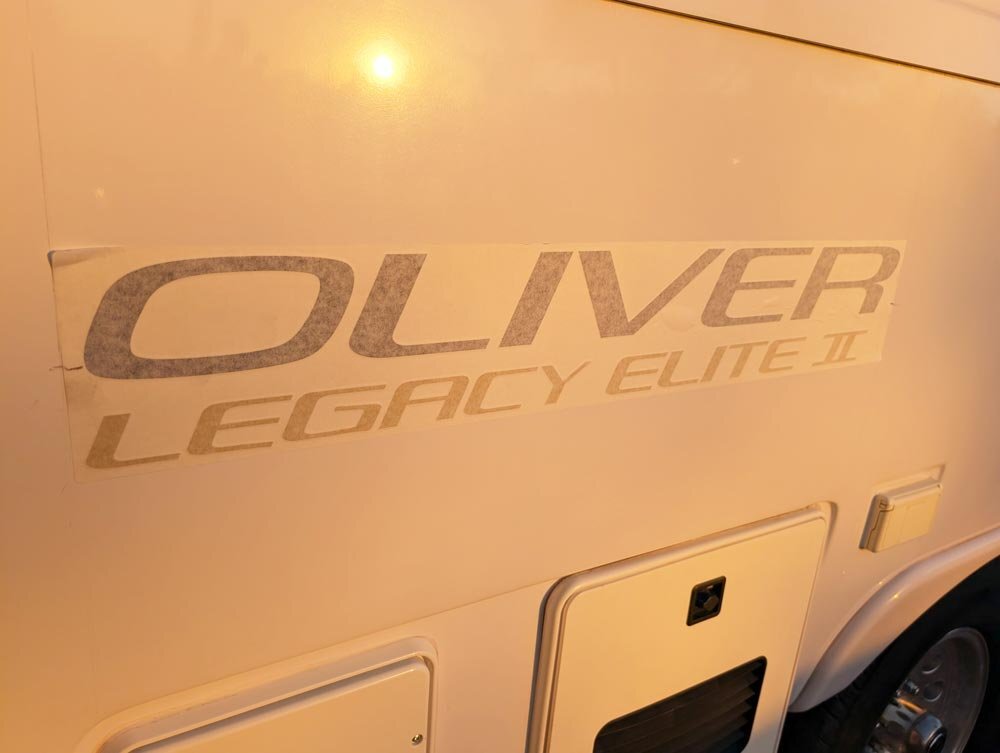
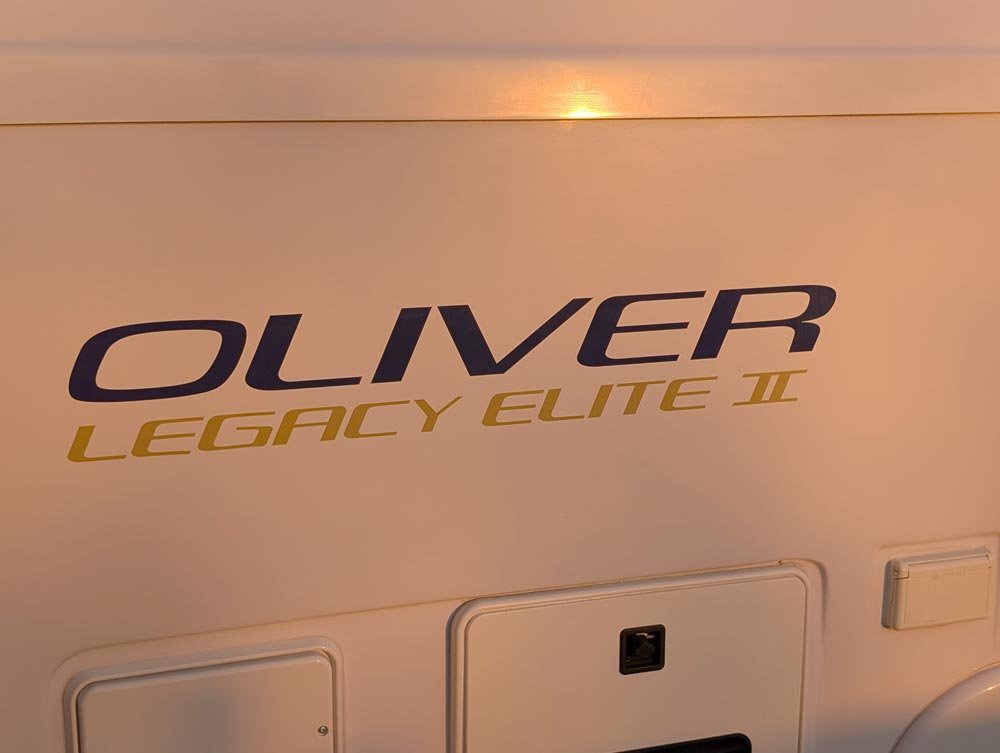
Put the new side decals on. Looks like nice quality decals and went on easily. I clay bared the sides first, then hit them with a 3M 1 stage buffing compound, then wiped and cleaned it before measuring it out. Drew vertical lines about where the doors are below where it goes, then measured to the middle of the bond line and door. I came up with 8.5" down from the bond line and that was the center of my decal placement. $73.71
11 points
-
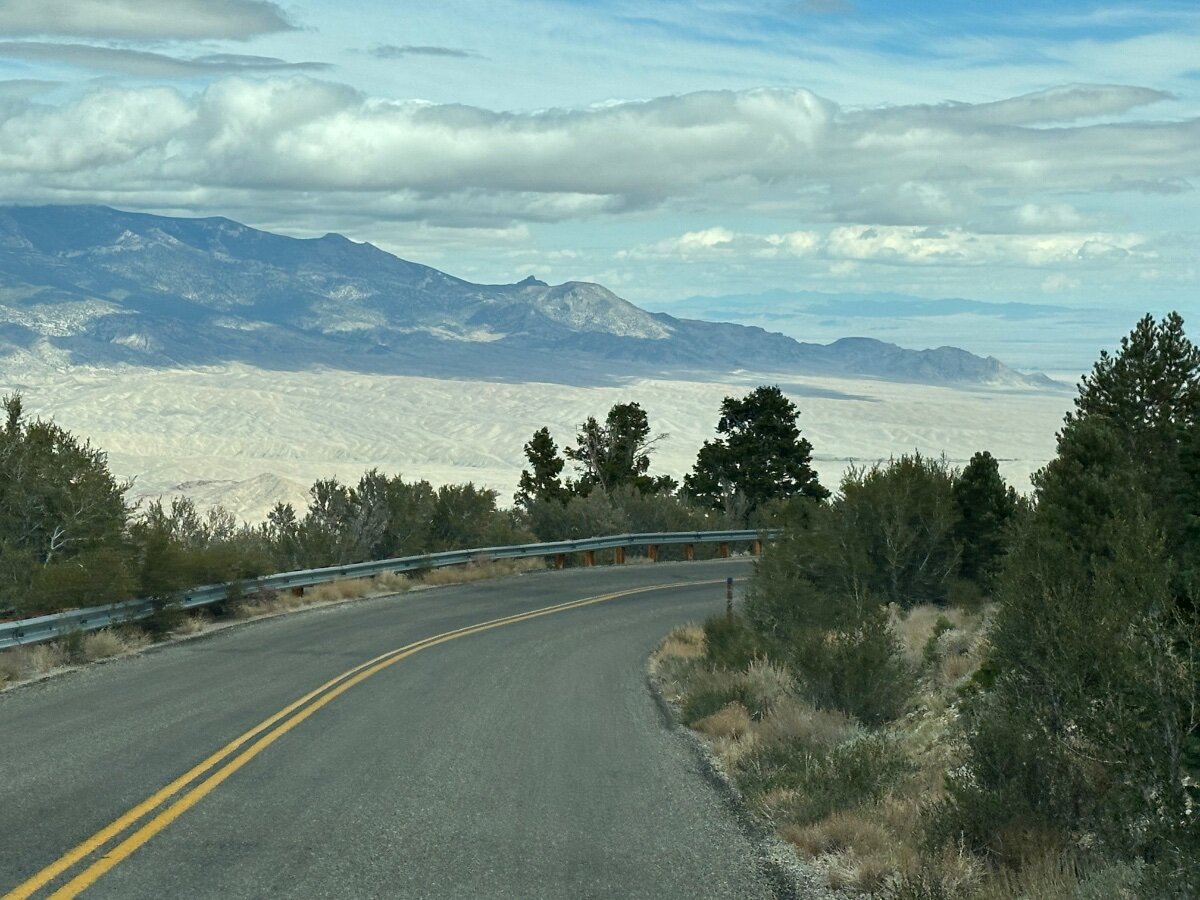
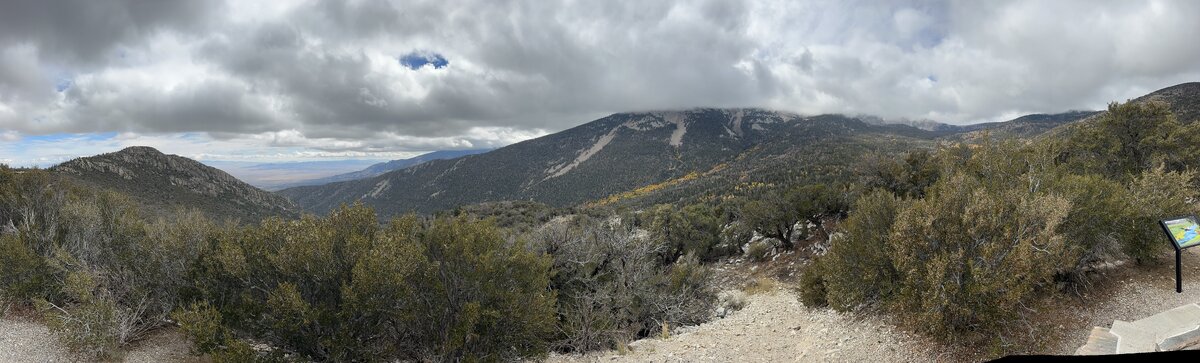
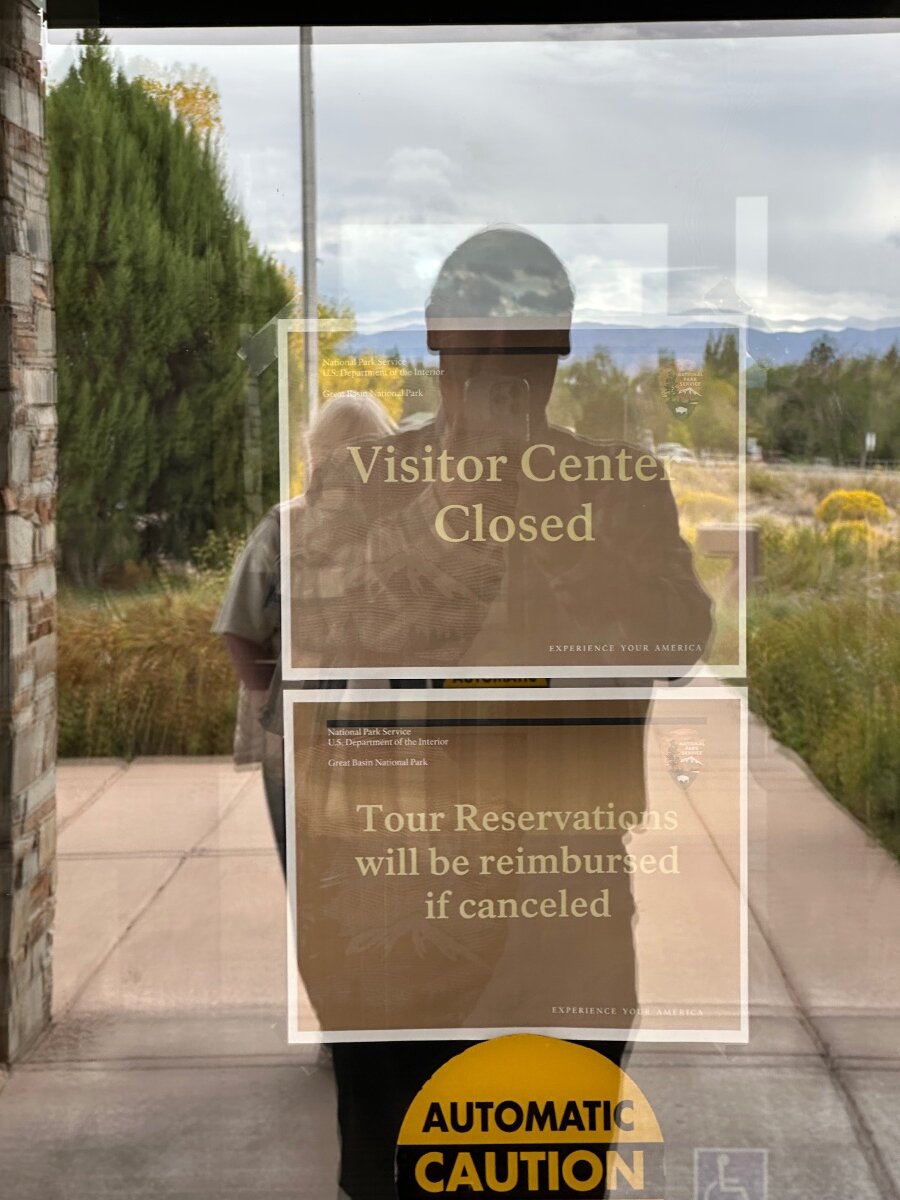
In Great Basin NP..upper Lehman CG site 17. Very steep slopes. Lower Lehman CG has been closed and completely re graded and all ne asphalt. Will open next spring. Visitor center closed…park campsites open as are roads to top of park Saw people come thru and collect trash.
11 points
-
There’s a wide range of “below freezing”. If it’s only down to the high 20s we still rely on our electric space heater (Vornado). I can turn it so that some of the heat is directed into the vent under the bed with the water pump, water tank, etc. We’ve never had anything freeze. I figure if the outer hull is in 27 degree weather and the inner hull is in 68 degree inside weather then between the hulls will be something in between. Below mid 20s we do use the furnace. That’s not been very often since we tend not to camp in very cold weather. Mike11 points
-
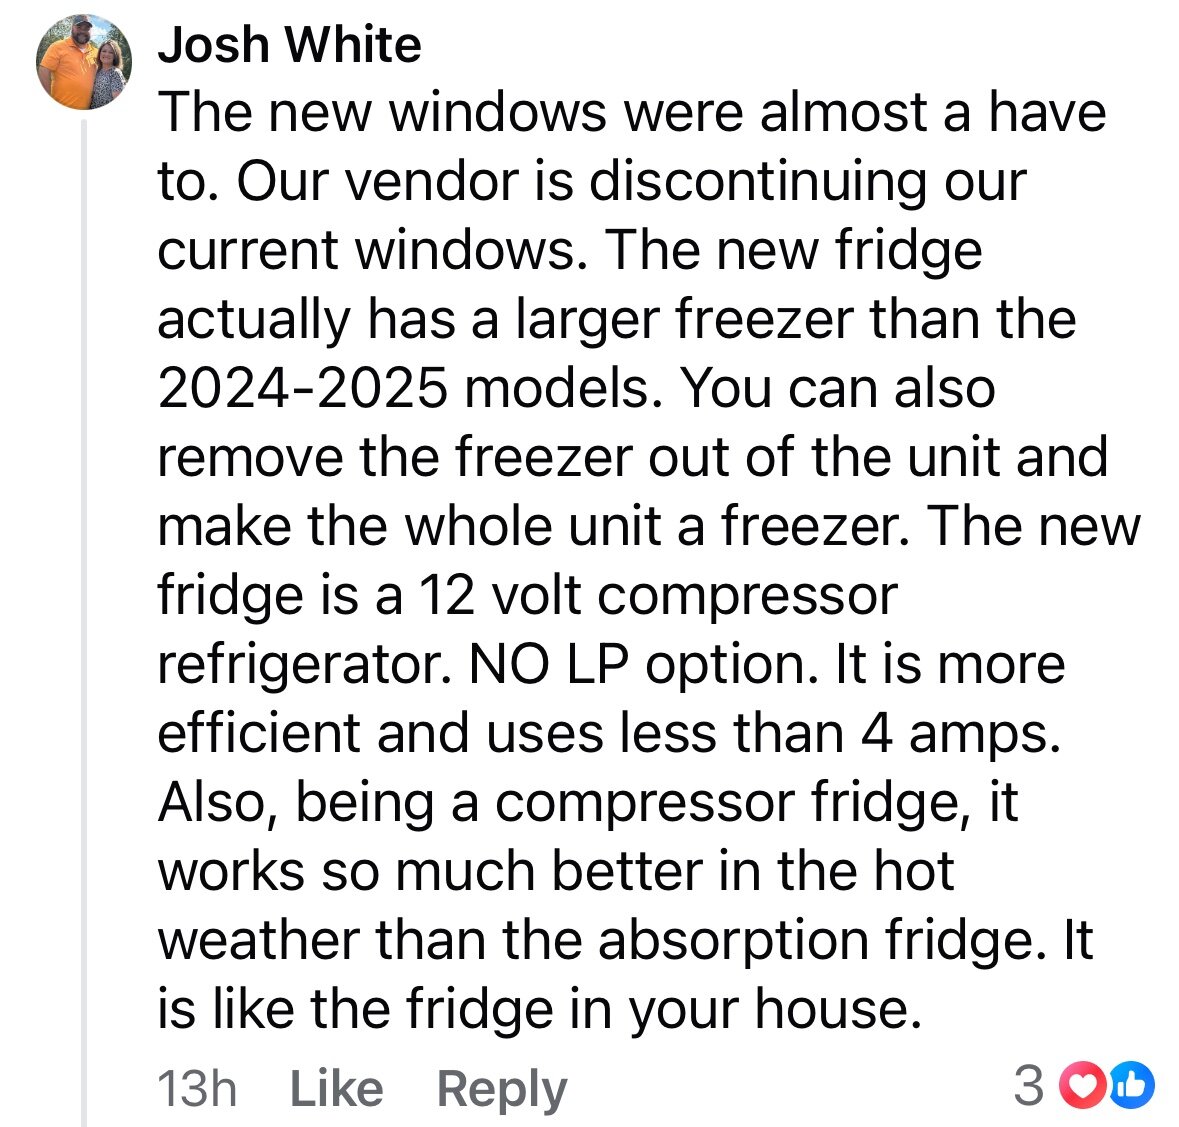
Saw a post on FB from Josh in sales saying there is a new model compressor fridge coming for 2026. It has a removable freezer section. Does anyone know the make/model yet?
11 points
-
Important Update: Customer Support & Service/Parts Department Changes Dear Oliver Travel Trailer Family, As we continue to grow, we are making important changes to better serve you. Beginning September 5th, our Customer Support Department will be relocated to our production facility and will now be managed by our Plant Operations Team This change allows us to dedicate resources more effectively, ensuring you receive the specialized support you deserve. What’s Changing Customer Support Managed by our Plant Operations Team Primary Contact: Brett Johnson Handles phone support, warranty questions or warranty parts requests Additional team members will be added to strengthen support capacity Phone: 888-526-3978 (select Option #2 - Technical Support) Email: support@olivertraveltrailers.com o Hours of Operation for Phone Support Monday - Thursday: 7:00 am - 4:30pm CST Friday: 7:00am - 11:00am CST Closed Saturday & Sunday Service & Parts Remains at our Sales & Service facility Primary Contact: Mike Sharpe Handles service scheduling and parts purchases Phone: 888-526-3978 (select Option #3 – Parts & Service) Email: service@olivertraveltrailers.com Hours of Operation for Inside Service remains Monday - Friday 8am - 5pm CST Important Notes Starting September 5th, the Phone Support Department and Service & Parts Department will be completely separated. Mike will not be taking phone support calls, and Brett will not be scheduling service. Emailing either department will automatically create a ticket in their system. However, tickets are not shared between departments. Why the Change? As Oliver Travel Trailers continues to grow, we want to provide a better experience by having team members focused on specific tasks rather than managing multiple roles. This separation ensures that your questions and needs are addressed by the right people more efficiently. We appreciate your understanding and support as we take this step forward. Thank you for being a valued part of the Oliver Travel Trailers family.11 points
-
Geoff, I thought some regulars here may notice! I did use jack stands at the fronts of the steel frame members, took them away for the picture! 🤣 I have the jack stands back under the Oliver overnight in the same front positions so the weight of the Oliver is spread over 5 points, sitting nice! With the Alcan leaf springs, I purchased everything new from them, HD shackles and new wet bolts. You may have to remove your wet bolts, the ones not accepting grease, and clean the dirt out of them. After removing ours today, they do get dirty inside! After 25K miles? It certainly could be time for new wet bolts and bushings. After 2 hours cleaning up our Dexter E-Z Flex equalizers, I found the main center bushings cock-eyed and heavily worn, the end bushings for the shackles also a bit worn. After cleaning, the center bolt sleeves just wobbled inside of the bronze bushings. I would not have known this without removing them and fully cleaning, disassembling and inspecting them. I need to replace them, but cannot wait for parts now with work in process. I have no idea total miles on our hull. Good to get a fresh start after 10 years. I've got a whole lot more to write about soon!
11 points
-
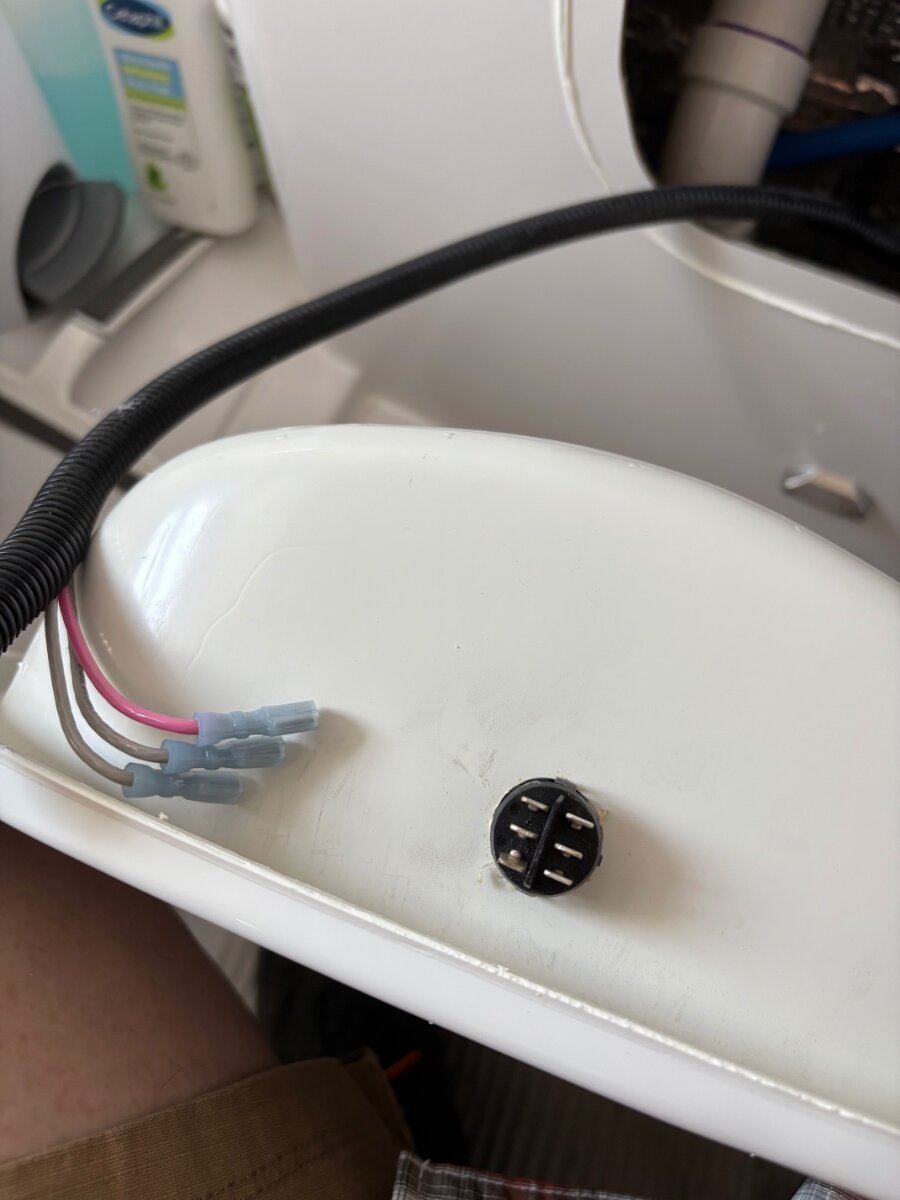
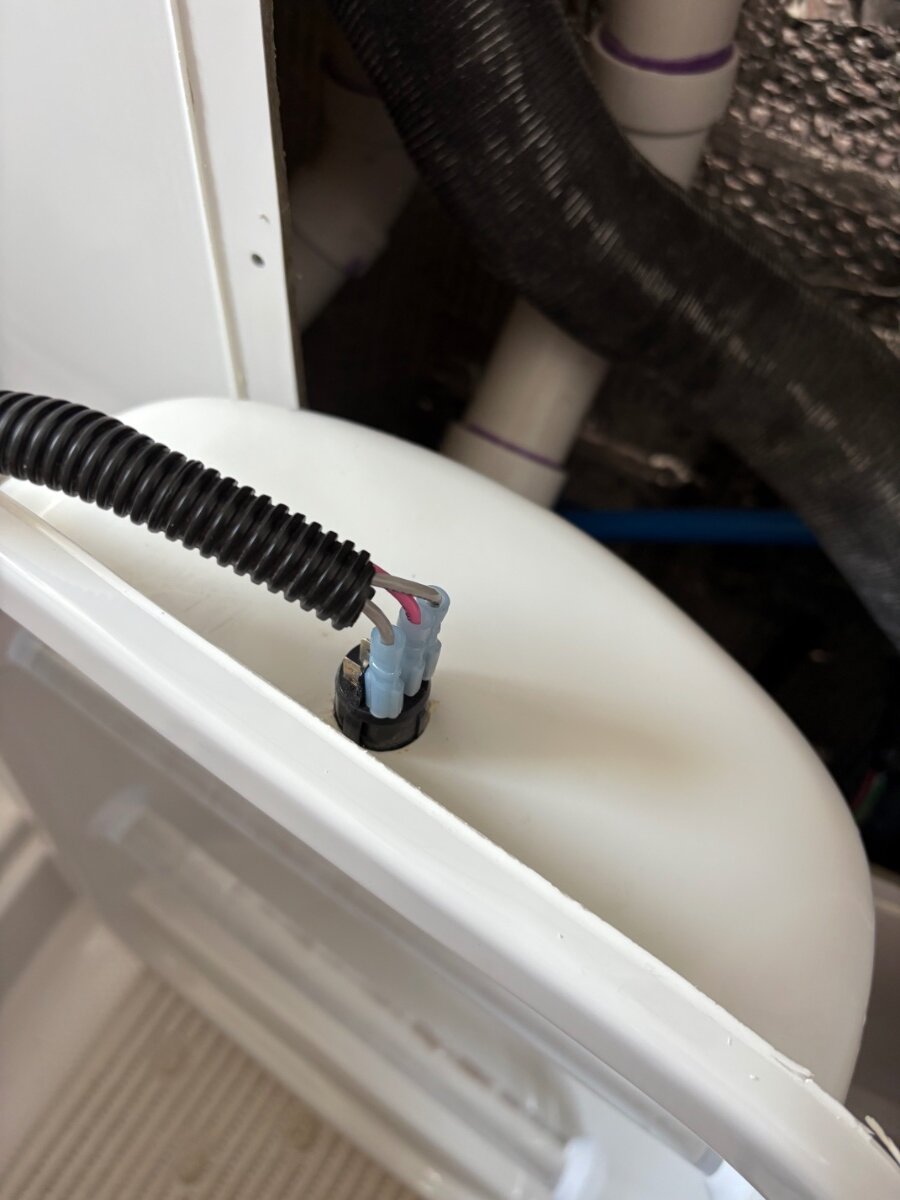
We were on our first long trip consisting of 2 to 3 months in the Ollie ( mostly Boondocking) . We were about 2000 miles from home in Billings,Montana and had stopped in a parking lot for lunch. I went to wash my hands and the water pump wouldn’t work. I noticed when I put pressure on one side of the switch in the bathroom it would pulse on like a momentary switch. I removed the screws from the bathroom caddy and carefully scored the caulk. When I removed the caddy all the wires fell off the switch. I had no idea which color wire went where. After a call to Oliver and with their help and research I used a pair of pliers to gently tighten the wire connectors and pushed them back on the proper spade. The red wire attaches to the center spade on the right side and the grays on the outside spades. I have two pictures that show the switch. Hopefully this post will help someone who might experience the same problem.
11 points
-
Just before leaving on our current trip, I covertly made a new cherry table and installed it to the surprise of wifey. She had wanted to keep the Oliver’s stock modern look, which is understandable considering that the house is already full of custom wood pieces. But after using it on this trip, we both absolutely love it! If I were to choose to have only one Oliver modification, it would be the enlarged table! The original table was small to fit between the seats for a third bed, and it is barley big enough to fit much more than a two piece place setting. The new table is 28” x 37” (about 10” longer and 5” wider) and it makes a huge difference to have the extra tabletop space. We can now fit the computer and our place settings. I realize not everyone has access to a wood shop to build such a table, but there are consignment woodworkers just about everywhere that could easily do it. As wood working projects go, it doesn’t get much simpler to joint and glue planks together and sand them flat. Many hardwood lumber shops even have wide belt sanders available to flatten tabletops. You could even have a lumber shop cut a nice piece of hardwood plywood, round the corners with a saber saw, and dress the edges with real wood self-stick or iron-on edge bands, just like they do for kitchen cabinets. I recommend experimenting with a cardboard template to determine the optimum size to fit your body types. I also remember a guy who advertises wooden accessories on this forum who might sell larger tables. Anyway, it’s a worthy project or expense to think about! Cheers, Geoff
11 points
-
Truck Weight Class ≠ Tow Capacity Truth! Think your truck’s weight class tells you everything you need to know about towing? Think again. Many assume that a 1500, 2500, or 3500 series badge automatically dictates if a weight distribution (WD) hitch is needed—but that's not the case. Did you know? Today’s 1500-series trucks (a.k.a. half-tons) can tow anywhere from 7,000 to 13,300 lbs, depending on their specific configuration. Compare that to 1-ton trucks from the 1990s, which often maxed out around 8,500–10,000 lbs towing capacity. That's right—modern half-ton trucks can outperform the 1-tons of the past! 😲 Just because two trucks look identical on the outside doesn’t mean they have the same guts. You MUST: Check your exact vehicle build and tow rating. Consult your vehicle’s manual to see if a weight distribution hitch is recommended or required. Call your insurance company—some require WD hitch use when recommended by the manufacturer, others don’t. Additionally, while the Andersen Weight Distribution Hitch includes integrated sway control, it’s important to know that most half-ton trucks recommend the use of a weight distribution hitch when towing over 5,000 lbs—especially to help manage trailer sway safely. Bottom line: Don’t judge a truck by its series number. Know your numbers. Protect your tow. Example of 1500 Truck series and tow capacity ranges based on engine and other equipment: Please note: We are not recommending Chevrolet or any specific truck brand—this example was simply used to illustrate the wide range of towing capacities within a single truck class. Quick Tow Tip: Did you know that in most cases, a 2WD truck can tow more than a 4WD version of the same model? That’s because 2WD trucks typically weigh less, leaving more of the vehicle’s Gross Combined Weight Rating (GCWR) available for towing. Always check your specific truck’s tow rating!
11 points
-
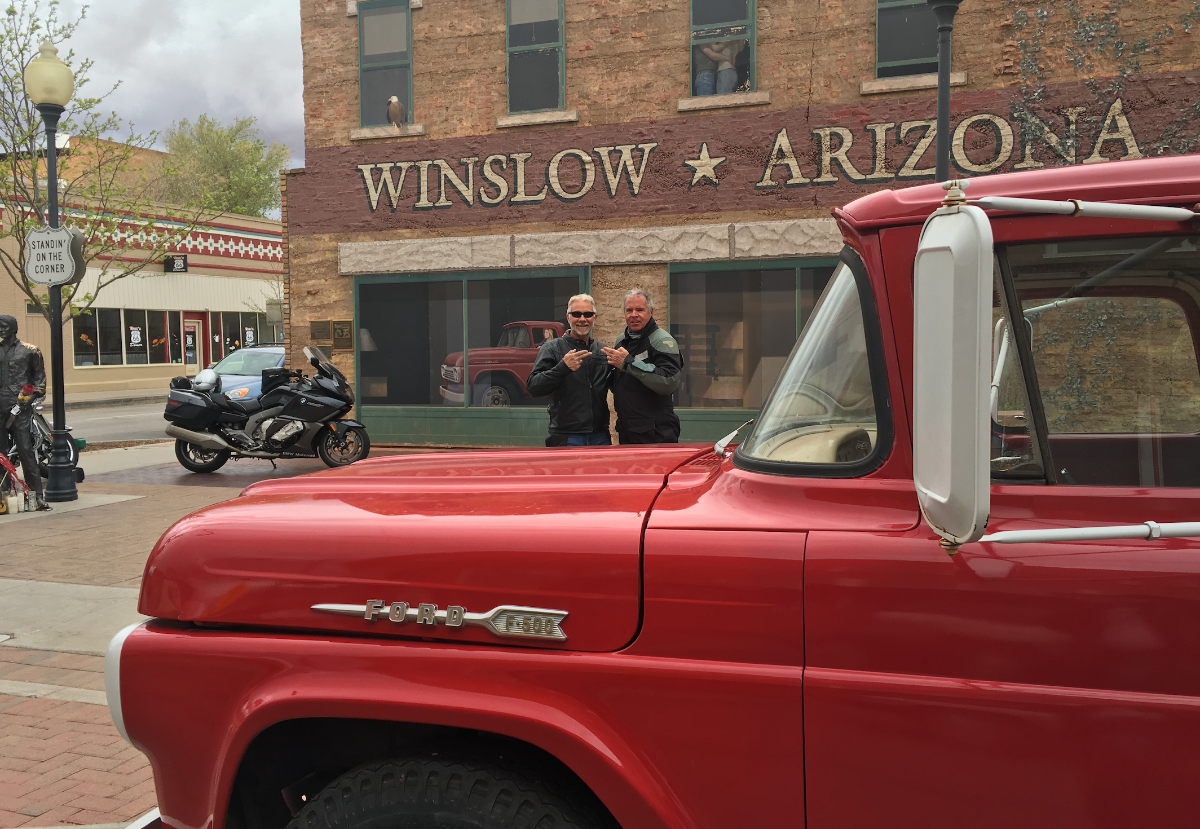
Stand'n on the corner.... Here's a shot taken during a MC run thru Winslow a few years back:
11 points
-
Mike, Kathy and I have been following this terrible tragedy. Please know our thoughts and prayers are with ALL Texans who have been impacted by this disaster. We are so glad you and Carol are ok. We are also happy to hear HEB was first to step up and is doing all they can to assist those in need. Thank you for the post and update. Prayers will continue to be lifted up. David & Kathy11 points
-
Happy 4th of July to Everyone Here!!!!!!!!!!!!!!!!!!!!!! We are spending our time waxing Ollie in the shade today! Like the scaffold folks here mentioned, bought it on sale at Home Depot and working great!11 points
-
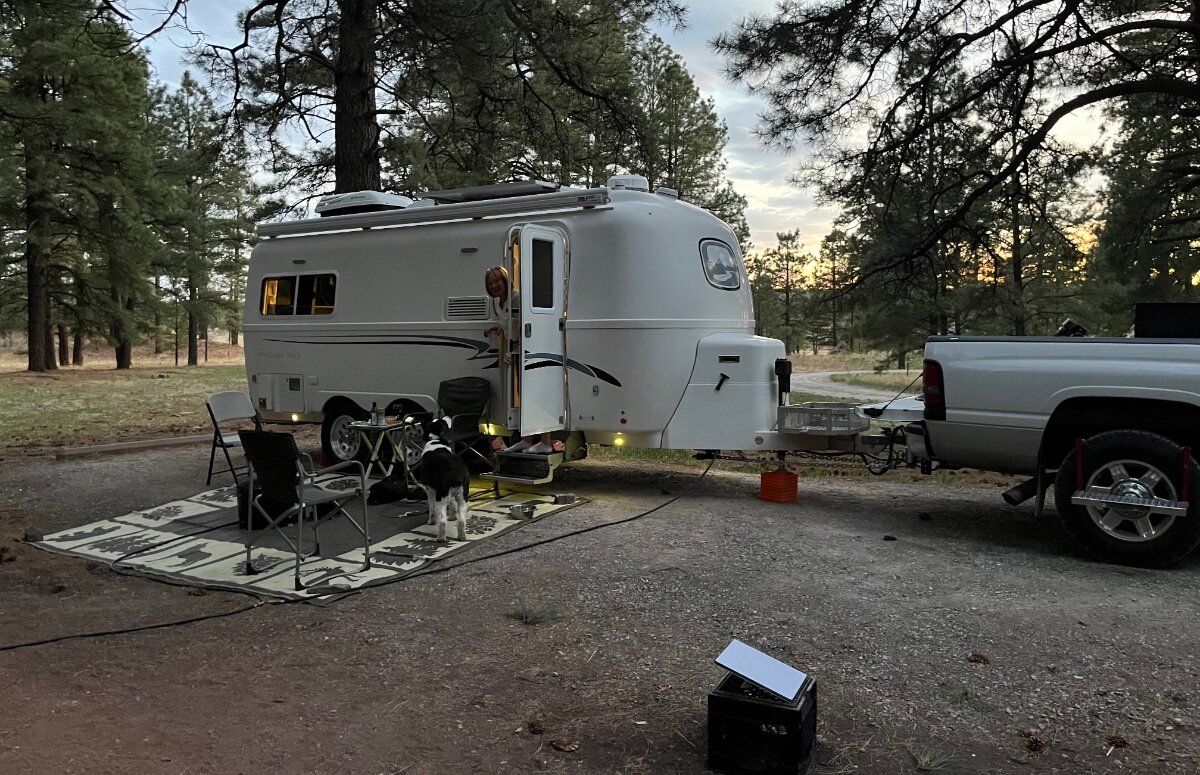
Got back from dinner and the Host had changed the entrance sign to “FULL.” Got here at 12:30 and after we quickly setup camp, a neighbor stopped by and said, “You got the best site, #12. A trailer pulled out just before noon.” We’re sitting at 9,550 FT and not a bad view for our last two nights before heading back to AZ!
11 points
-
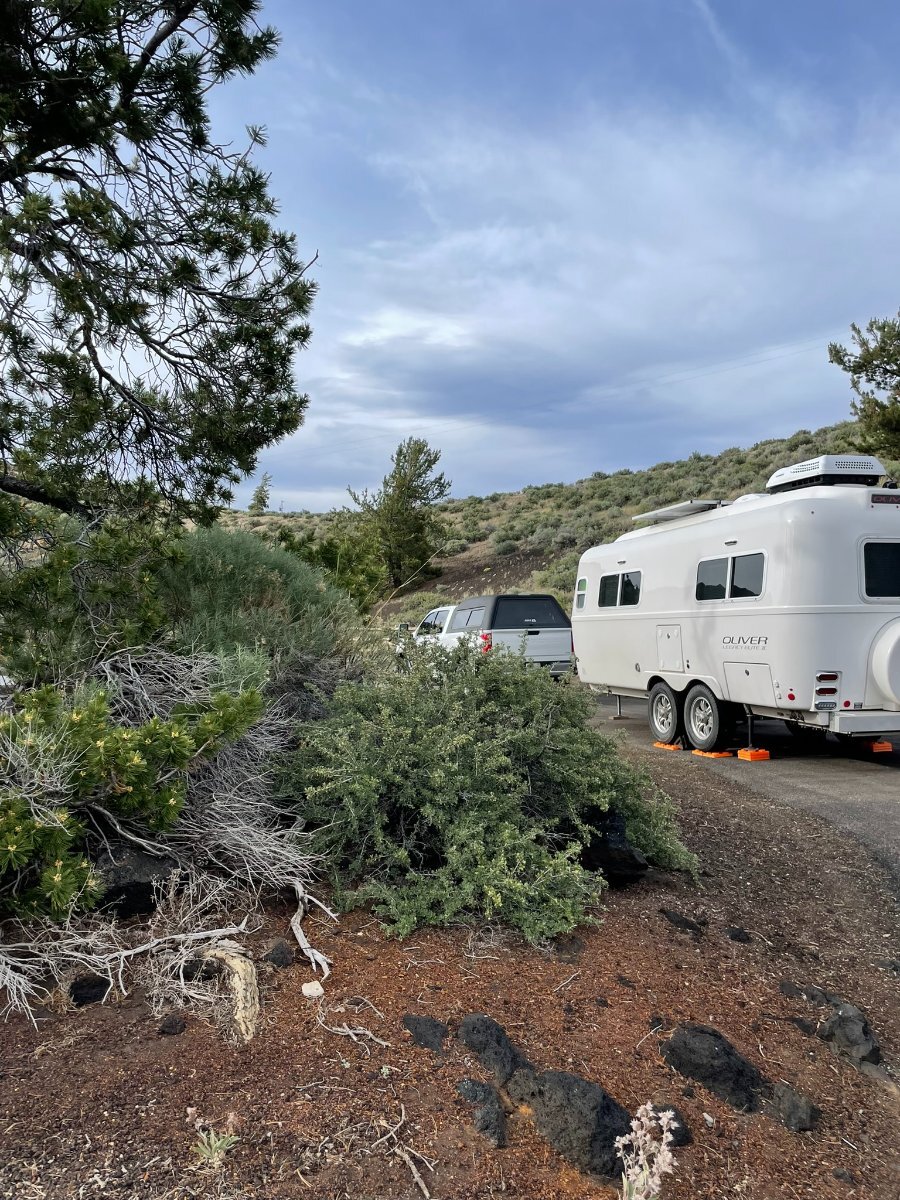
I finished my first visit to Idaho this week, and it was a great trip, though I wish I had more time. Coming from Jackson, my first stop was Craters of the Moon National Monument & Preserve where I managed to land a spot in the Lava Flow campground (FF and somewhere in the fine print, they warn people not to pull trailers past a certain number). The park is generally viewed by driving along a loop road, with some parking at various spots. There are opportunities to hike up and around lava formations, as well as climbing down into lava caves. It was very windy! I recommend the hike up the Inferno Cone (a stiff hill that is longer than it appears) where you can see the Great Rift, the Snake River Plain, the Pioneer Mountains and the Teton Range 100 miles to the east. Entry into the caves requires a free permit from the Visitor Center (with instructions from staff). The campground was okay; it's in a lava field so the sites are arranged around the landscape.
11 points
-
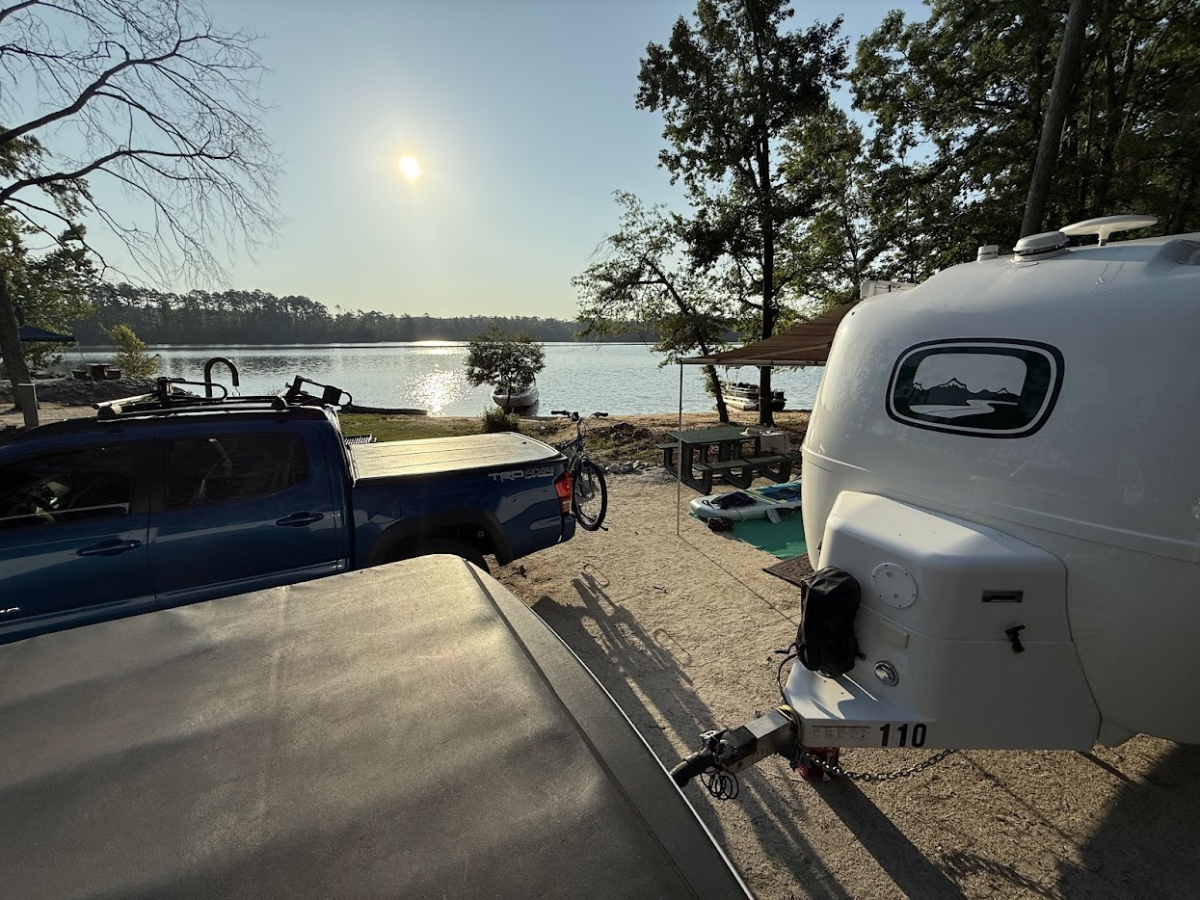
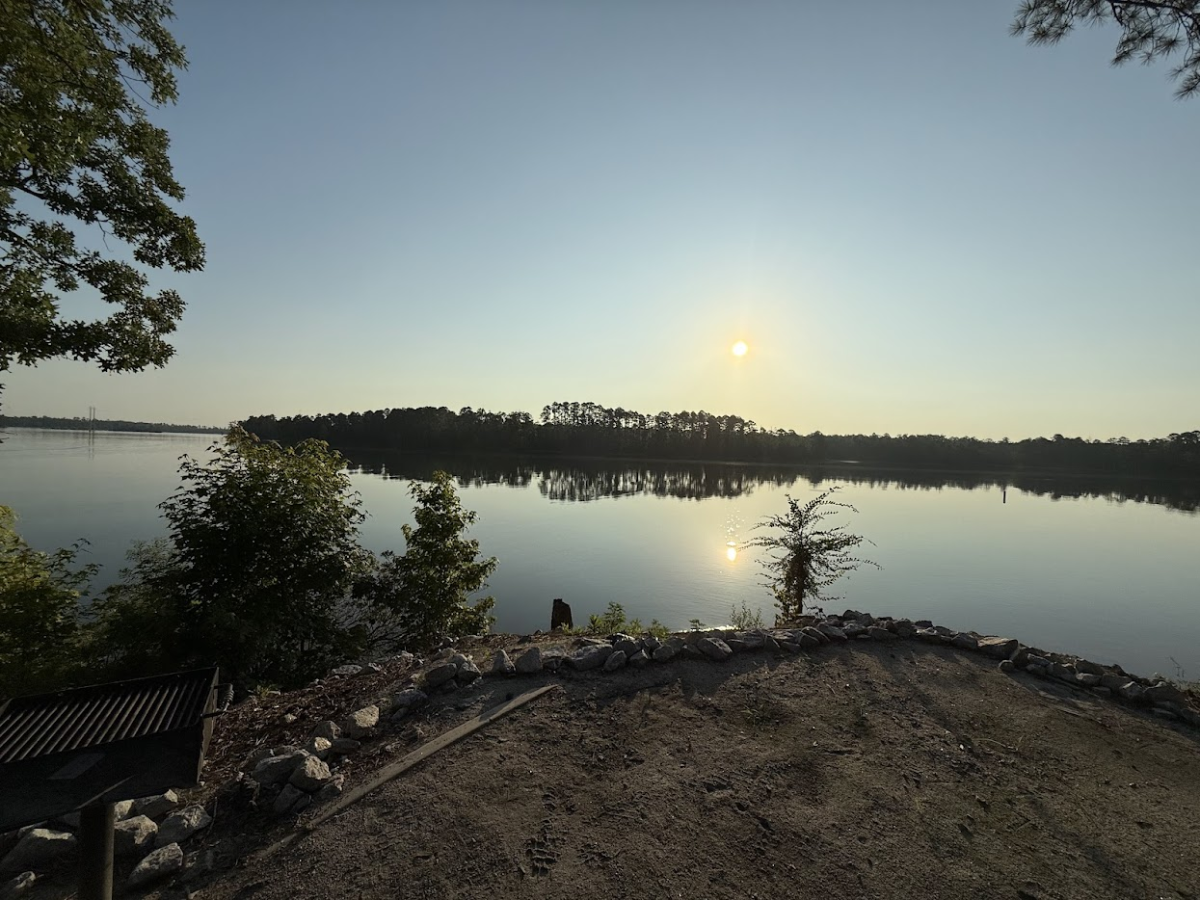
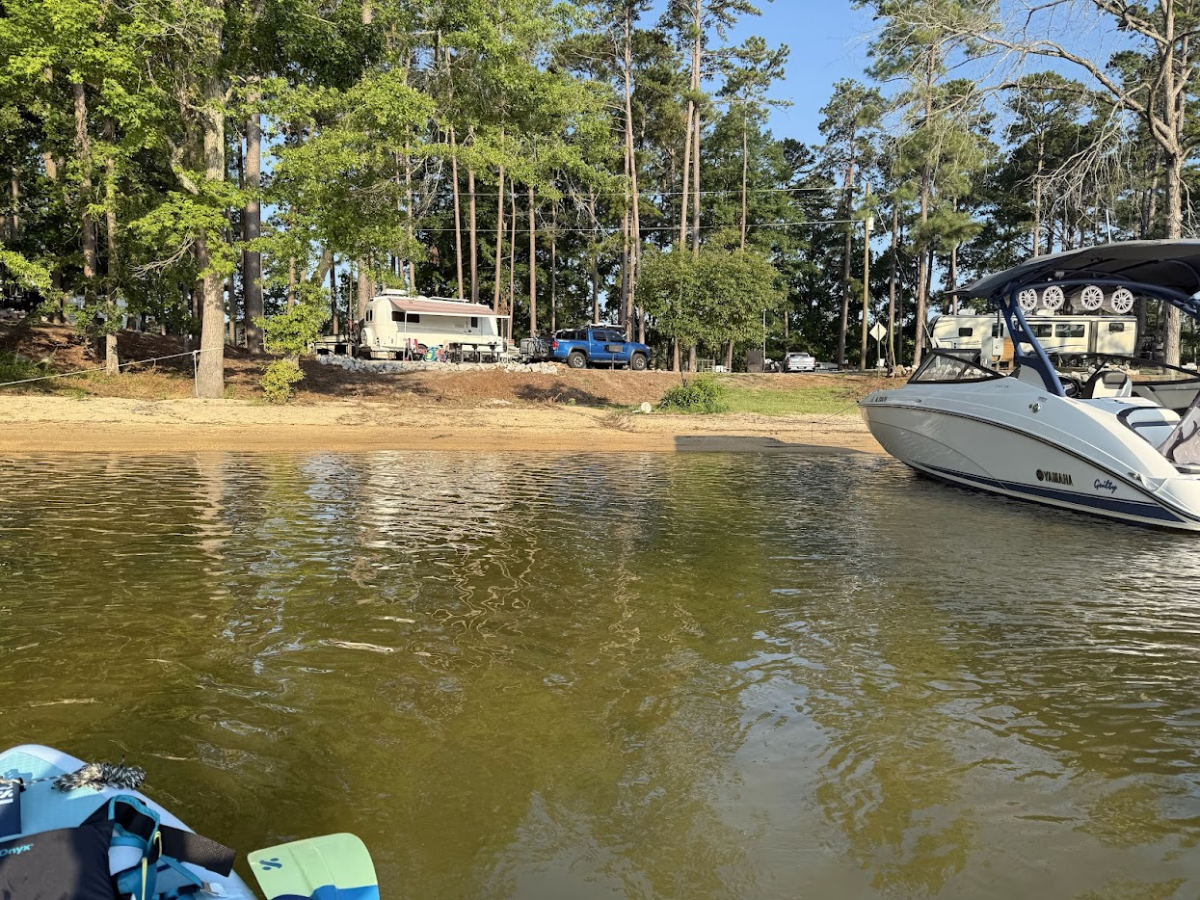
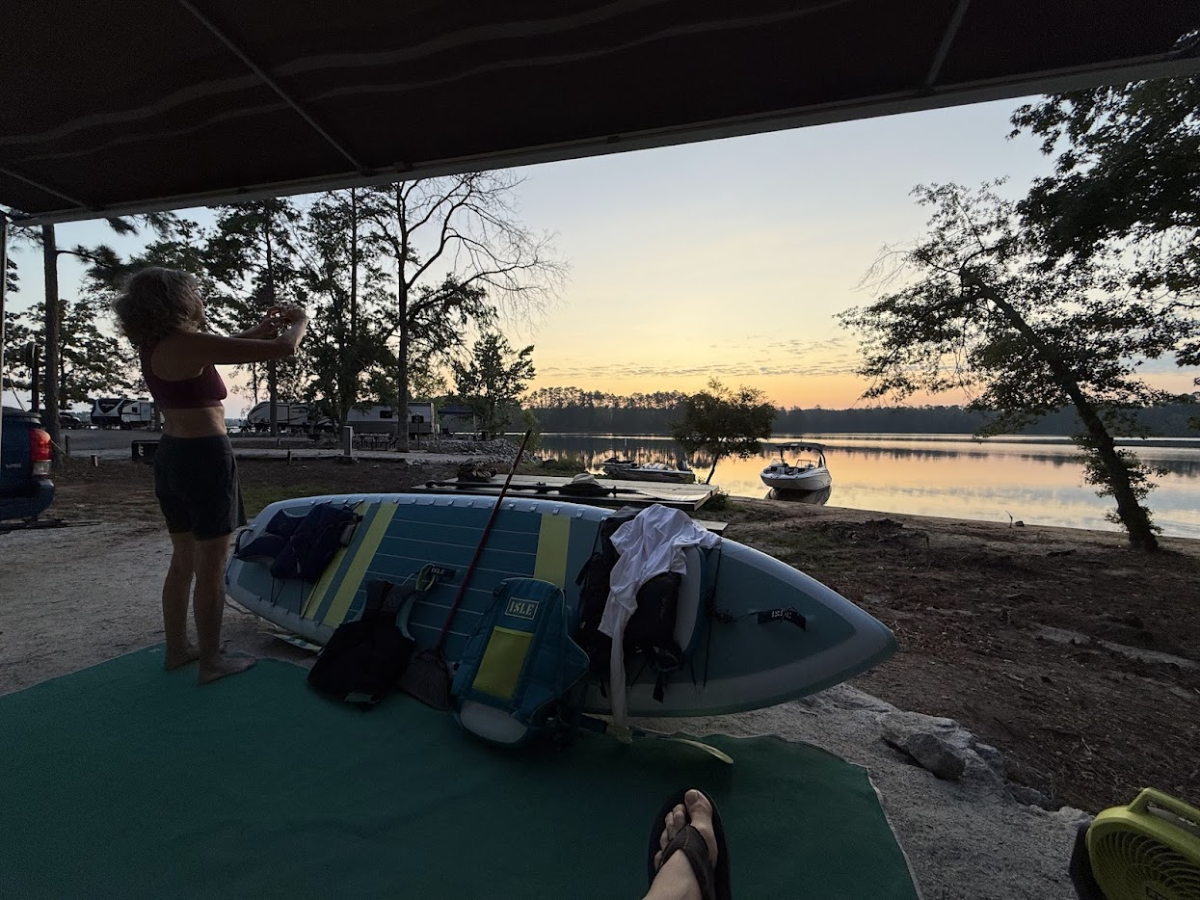
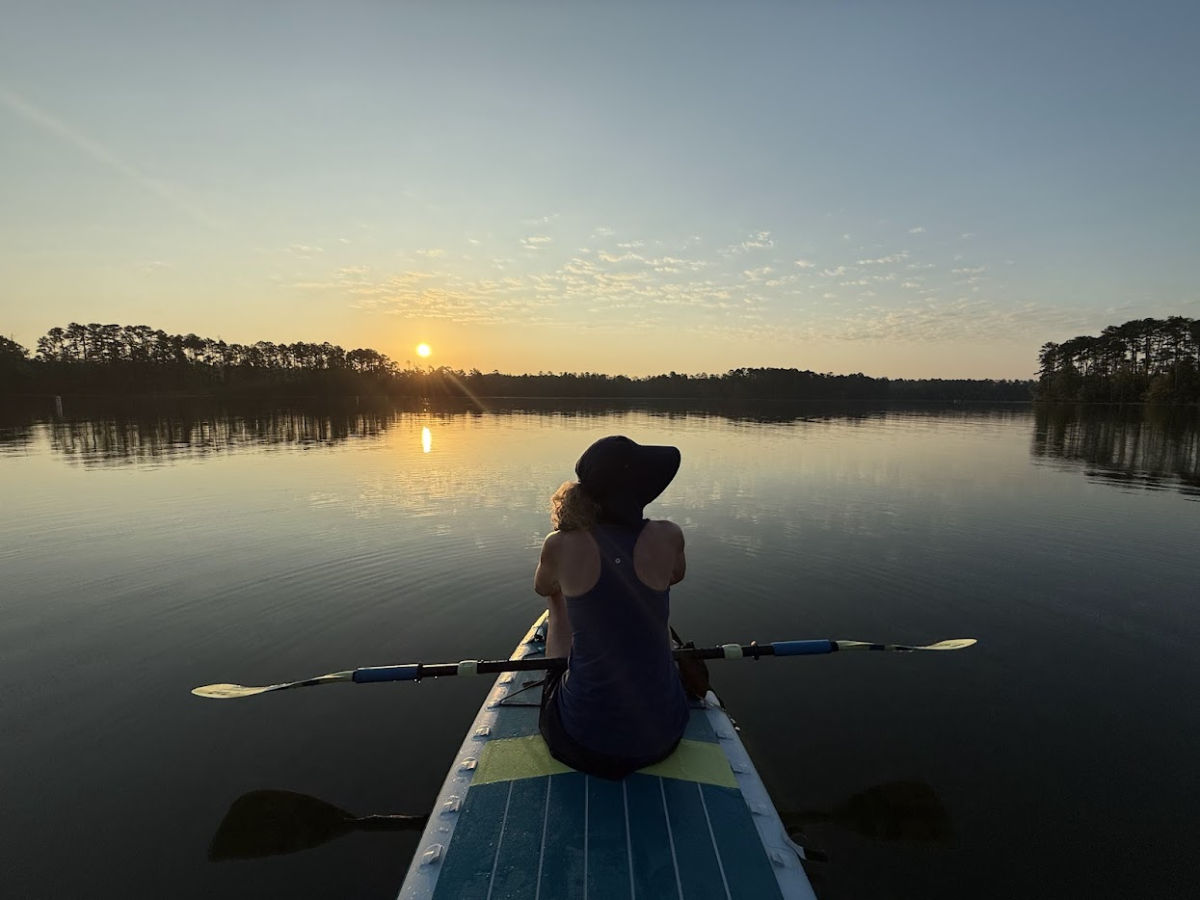
Not too far from home, but had a great time in Appling, GA with a beach-side camp site at one of the few parks open this season, after last October's hurricane. Lots of paddle boarding, cycling, and swimming was done this week. Not bad for $25/day at Wildwood Park.
11 points
-
Manti - La Sal National Forest, Devils Canyon CG, Utah...45 degrees this AM (furnace on) woohoo! Spending the night in a hotel in Moab for 41st wedding anniversary and doing the tourist thing. We tackled some awfully wicked hiking trails today in Canyonlands NP and will need some time to recover tonight. John
11 points
-
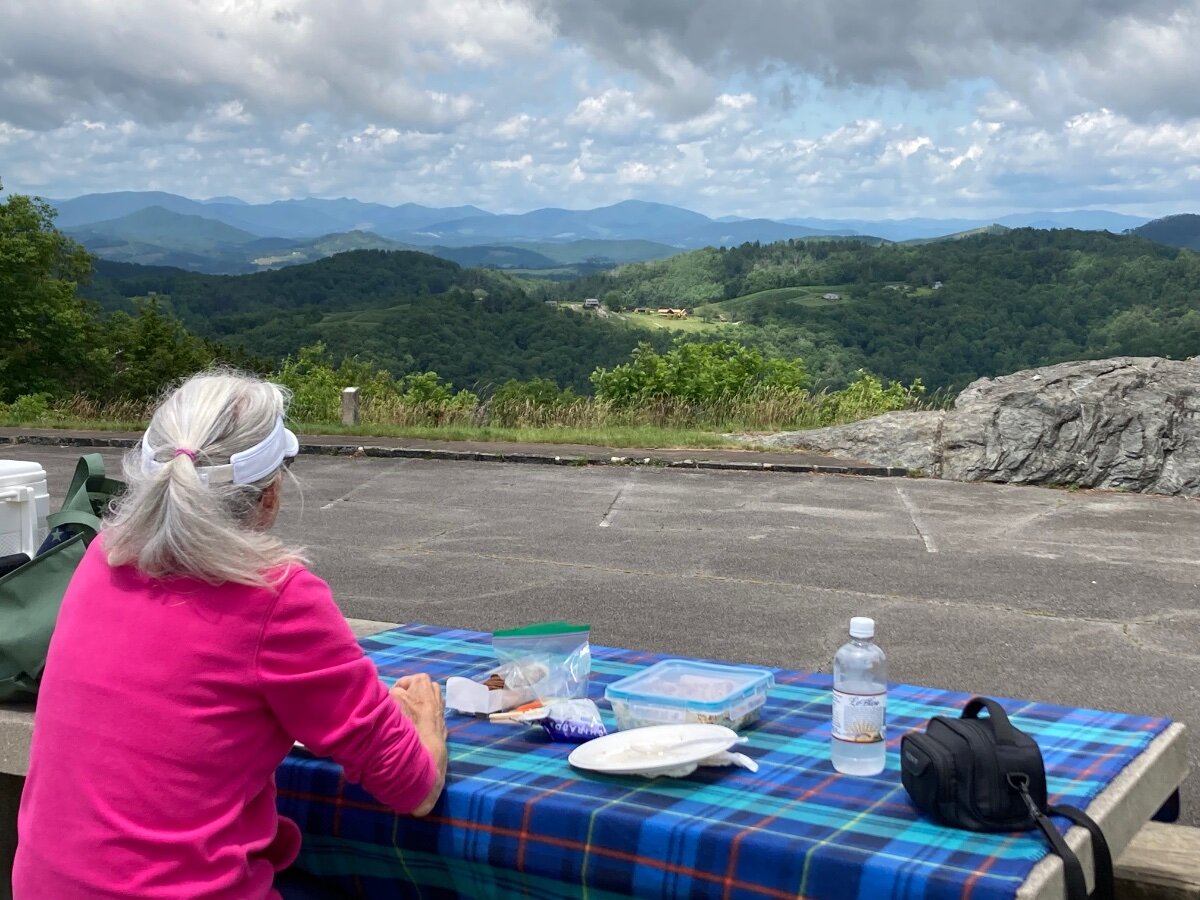
Doughton Park NC on the Blue Ridge Parkway. We head to the BRP to beat the heat this time of year. After the hurricane last year, many areas are still closed, but repairs are being made and areas slowing reopening. No electricity or water at the campsites but Ollie handles it fine with a portable solar panel. Directions to Doughton Park, take Rt. 21 to the BRP to the Park. Doughton Park Picnic Area: Air Bellows Overlook:
11 points


.thumb.jpg.e34bf01ef7f7d5e99ad31856d45afbeb.jpg)


.jpeg.799f3cf194b3b21d05b2a7bb19f728b1.jpeg)
.jpeg.dd379fc2e5087fa6910ce21b437441ad.jpeg)
forPoEInjector.jpeg.2ff4c7b3725adaf25e5bdfc30965ceff.jpeg)
atopProgressiveSurgeProtector.jpeg.5c03a313182d5fdb47bf1a254dec329d.jpeg)


-
Recent Achievements
-
")


")


")


")


