Leaderboard


Popular Content
Showing content with the highest reputation on 10/18/2022 in Posts
-
We are spending the night at Oliver National Park tonight. We took Anita out to lunch and had dinner tonight with Phil and two of the lovely ladies in his life. Phoenix is adorable as expected. I found out several weeks ago that Oliver had made (what I consider) a major change that will be included in the 2023 models. Today I sat down with some management folks to get the lowdown. As many of you probably know, Goodyear has bought Cooper Tire. Oliver has equipped their new trailers with Coopers for the past few years. Due to the immediate unavailability of the tires they have been using, their only choice was to switch tire companies. During their research they reassessed their needs and goals for running gear. The decision has been made that going forward and starting immediately, both Oliver models will be equipped with 15 inch wheels and tires with a matching spare. The tires will be Goodyear Endurance ST225/75-15’s. Tire SizeST225/75R15 Product Code724857519 Speed RatingN Load Index117 Load RangeE SidewallBlack Uniform Tire Quality Grade (UTQG)- Max Load (lbs)2830 Max Inflation Pressure (PSI)80 Approved Rim Width (in.)6.0-7.0 Measured Rim Width (in.)6.0 Section Width (in.)8.8 Tread Depth (in 32nds)8 Outside Diameter (in.)28.38 points
-
I took this photo this morning of one of the Elite II’s on the showroom floor. Rodney says this is the tires and wheel’s they will be using on the 2023 models. He did say that their existing stock of 16” wheels and tires will be used first. So, it may be as late as March of ‘23 before the new models will start to be delivered with the new sets.
 5 points
 -
Just another thought on the pipe insulation. I put it on also, not as much for insulation as for sound. At least in my trailer the water pump creates vibration and putting on the pipe insulation helps with the noise. One other thing I do is remove the plastic outside shower head make sure the metal hose is drained and shove it back inside the trailer. Even when I have winterized. I have heard people say that shower head is prone to cracking if it freezes.4 points
-
I had someone locally who wanted to see how we outfitted our Elite II. I sent them to Mike for a much better design experience. Refined, but not overdone. Guessing more Carol's influence than Mike's, other than 'no clutter please'. 😉3 points
-
There is no fuse at all. You don’t need to shut off the Zamp controller or any other 12 volt source, but you should disconnect shore power (or turn off the inverter) when actually working directly on the wires. The 120 volt circuit breaker does the same job as a low voltage fuse. You need to buy or borrow an outlet GFCI tester, similar to this. Make sure it has the Test button. Check all your outlets, the GFCI one is the “first in line”, it protects all the others from a short circuit. It is very common for them to fail. If the wires in back appear to be secure, then you may need to replace it. If you are not comfortable changing the outlet, you need to borrow a friend or hire an electrician. If yours is a new trailer, it should be covered by the Oliver warranty. https://www.dfliq.net/blog/what-is-gfci-outlet/ Please add your tow vehicle and trailer model and hull number to your signature, so we know what you have!, John Davies Spokane WA
3 points
-
Agree with John - soaked, wet bugs come off a lot easier. I usually give our Ollie a hand wash in the driveway after a trip. I soak the bugs with water/carwash soap solution then wash the whole trailer leaving the bug-covered front for last. While washing and rinsing, I will hit the bugs with a stream of water and more soap from the soft car wash brush I use. Finally, use the soft brush or microfiber cloth and they come off pretty easy after soaking. Keeping the front polished with a good coat of wax twice a year helps too.3 points
-
We winterized yesterday being risk adverse. I think it took maybe 25 minutes to winterize taking our time. The Truma makes winterizing really easy. In the fall we pack and carry our winterization hose and pump with us along with a few gallons of anti freeze should we take off to a much warmer costal climate.3 points
-
Second time TPMS warned us of an impending flat. Glad we had two axles allowing us to limp off interstate. It was 100° in the shade. Good reason right there to get port side awning. Used stablizer to lift Ollie then added scissor jack. Good Samaritan taught us trick to get [dang heavy] tire back on. (Sit on ground, cradle tire between thighs & lift. Hahaha- I'm envisioning myself splayed out on egg frying hot asphalt, trapped underneath tire.) Chris
3 points
-
In San Antonio we get into the 20s for a few days several times a year. I’ve never winterized. On those occasions I turn on the hot water tank, set the furnace at 55, open all the hull openings and turn on our electric space heater. No problems coming up on our 7th winter. We’re currently at Cumberland Mountain State Park outside of Crossville and the temps are supposed to get into the mid to low 20s at night starting Monday. All I need to do is disconnect the water hose and we’ll be fine. Mike3 points
-
I'm in the Oliver Referral Program and show my trailer to people interested in a Oliver Trailer. I recommend that you see one in person to get a feel of whether it will work for you. Make sure you can use the bathroom and get around each other. Trailer is only 7 feet wide which makes it more compact then the other big box trailers. We have the king size bed and I'm 6' 5" tall and have to sleep side to side to stretch out, the single wouldn't work for me. Larry Bettinger Spokane Washington2 points
-
The axles are not changing. The are no parts available to convert the 3500 pound axles used on the Elite II from drum to disc. It would be possible on the Elite I since it is supplied with a 5200 pound axle.2 points
-
Actually, Michelin quit making the tire they were using. Is your trailer still on the market? This is a non issue for current owners.2 points
-
Michelin stopped making the tire. Papa Bean counter had nothing to do with it. Bill2 points
-
Too much or little application is usually a controller or actuator design causation. I use both a Redarc Elite and Prodigy P3 controllers when towing HydraStar EOH braked trailers, including my LEII with 12" discs. The P3 modulation is noticeably smoother during light applications as in stop and go traffic but the Redarc is much easier to "tune" on the fly for specific conditions. Point is, one controllers may perform "better" than another and some EOH actuators perform differently than others. As far as cold weather operation, there are two things that should be validated with any EOH installation subject to extreme cold temperature operation. Given your location, I would have expected MoRyde's top notch operation to be mindful of at least the first and suggest it be part of the installation. Hopefully they did. First concern is the current rating of the 7-way aux circuit. EOH actuators typically need a 40 amp minimum for extreme cold operation but there is no consensus between vehicle manufactures and 20 or 30 amp circuits are the most typical. The Ram 3500 is 30 amps. I have had to upgrade every tow vehicle for EOH compatibility except my Toyota Land Cruiser, which came with 40. Second is brake fluid. DOT 3 or 4 is generally the norm for manufacturer recommendations but DOT 4+ or 5.1 (not DOT 5) have a significantly lower viscosity at the low temperature end and will improve EOH performance below zero degrees. If the installer filled your system with DOT 4, this is the highest viscosity of all and not the ideal choice for extreme cold operation. I currently use a Bosch branded fluid that is an approved substitute for all of the above but there are a number of single spec, Low Viscosity, fluids available. My experience with EOH disc brakes has been quite the opposite. Using either controller, the discs are more confidence inspiring in downhill or emergency applications, and don't feel the additional cost over electric drums is even a consideration. While the LEII is only about 6300# ready to go, behind my 7300# Land Cruiser, it hardly feels like a light-weight rig. Maybe I need a bigger truck.2 points
-
"Good reason right there to get port side awning." We did order the street side awning for a variety of reasons. Picking up in three weeks. Hull number 1290 we're told. John2 points
-
Well, after more investigation, I've settled on Maxxis M8008 Plus ST205/75/15 radials, with a load carrying capacity of 2150 lbs at 65psi and 2040 lbs at 60psi. They have a deep aggressive tread which, according to "Tire Hungry", will "allow sipping and gripping on all weather conditions, including icy, hot/dry, and warm". It tended to better a competitor with a shallower tread configuration. I plan to run them at 60psi, cold temp. They have a speed rating of "N" which is 87mph, although I will still plan for 65mph or less. Not meaning to hijack a thread about LT tires, but from recent extensive research, it seems that between 2005 and 2008 a lot of ST rated tires, predominantly from China, were experiencing a large number of failures. This is why I chose to go to LT tires in 2009. After 2010, "ST" tire manufacturers appeared to get their act together and current ST tires have a much better dependability from their earlier models. Having a 2008 Elite, my spare tire cover is not as spacious as the later Elites, so I chose a thinner 205mm tire to ensure fitting well under the cover without rubbing against the fiberglass.2 points
-
I would not use a plastic plug. Simply put the anode rod back in - it is simple enough to do and thus prevents "forgetting" to do it later. More than likely the reason there was a plastic plug in your old heater was because it was not a Suburban water and thus didn't have a steel tank which requires an anode rod to help prevent problems with the interior of these steel tanks. Bill2 points
-
By the way - If the weather forecast changes calling for even lower temps - the regular winterization process really doesn't take very long. to either complete or to reverse. Yes, it will cost two or three gallons of anti-freeze, but, if there is any question regarding the temps then it is far cheaper to pay for the anti-freeze as compared to the cost of replacing a shower assembly, external fittings and/or anti-siphon valves (mostly found just inboard of the exterior fittings). Bill2 points
-
Recently, my inverter stopped working and wouldn't power on. Here is what I found so far (long story, feel free to skip and go to installation section below) The trailer was parked in at my property with shore power and the inverter was working when we were back from camping trip a few weeks ago. Over the weekend we found that the breaker was tripped and narrow it down to problem with the inverter. When on shore power, either the breaker at the shore power or main breaker underneath the dinette seats would trip unless switched the breaker of the inverter to off. The inverter screens didn't show anything for both remote and on the inverter itself located under the street side bed. When not on shore power, inverter didn't power on. Checked the voltage at the DC positive and negative terminal at the inverter using digital multi-meter and confirmed that there's ~13V at the terminal. Tried to reset the inverter by cutting DC power using the 2 red button switches near the inverter and confirmed using digital multi-meter that there was no DC at the terminal. This also didn't work. The inverter wouldn't power on when restoring power to it. I decided to submit a ticket and Jason and I agreed that there's an issue with the inverter itself and I had to contact Xantrex. After submit a ticket to Xantrex, the technician recommended updating firmware and that didn't help. Xantrex agreed to send me a new one because it's still under 2 year warranty. Installation I got most of the information below from Oliver and it's specific to my 2021 LE2, please contact Oliver to confirm if you have a different model year. Disconnect Shore Power from the camper. Flip the 30A Main Breaker to the OFF position (located in the AC Breaker box under the Dinette) Flip the 25A Breaker for the Inverter to the OFF position. Trip the 200 or 300A Inverter Breaker located under the street side bed access panel area. The breaker is located up & under next to the side of the battery box. Remove the inverter cover in order to gain access to the wire connections. The 120V wires on located on the left with the 12V connections on the right, pictured below. Once the cover is removed you will need to disconnect all 4 wiring connections inside the inverter. As a precautionary measure, do not let the wires contact each other. With shore power removed & the Inverter breaker tripped there shouldn't be any power but it is best to be safe just in case you got in a hurry and skipped or missed a step. Make note of the 120V Wires once you disconnect for which one is the AC In and which one is the AC Out Disconnect the ground wire located on the top edge of the inverter. Remove the screws securing the inverter to the white AP1 board. There are two screws located on the bottom and two located on the top. You may see other screws that are securing the wires to the white board but it is not necessary to remove them when replacing the inverter unless you are installing new wires. See screws pictured below as reference. Follow the steps in reverse to install the new inverter. Mount the inverter on the white board & secure with the 4 screws Connect the ground wire Connect the 12V Wires. Red is positive & Black is Negative. Connect the 120V Wires. Be sure to connect the AC In & AC Out wires correctly. Reinstall the cover Reset the Inverter Breaker by pressing the leg by in. Turn inverter on at the inverter itself (not the remote display) and verify 12V to 120V operation through the inverter. Turn the inverter off at the inverter Flip the 30A Main & 25A Inverter breakers back to the ON position. Connect shore power to the camper and verify charge state through the charger to the batteries. It may take a minute or two for it to engage. Once the inverter has been installed you will need to check the settings and set it based on your battery type The only settings that are changed by the Oliver factory are: #02 ,#05, #20, #24 & #28, based on your options, and are in bold font below Xantrex Customer Support: 800-670-0707 Oliver Service Department: 888-526-39781 point
-
My trailers just started in production. Suppose to get it near the end of November. Just the small Elite because I'm not much for camp grounds. Like boon docking anywhere I like. Anyway, it amazes me the Oliver for it's high price tag doesn't offer any special options. I live here in the Northwest and we have to contend with a lot of mountain passes and hills. I wanted to have disc brakes instead of drums and no way. Have to do the mod's my self. Disc brakes with CarbonCeramic pad would be the ultimate brakes for any travel trailer. Never have to worry about brake fade and life expectancy is awesome. More people should ask for it and maybe Oliver with switch over to disc. Just my two cents worth.1 point
-
Just did my 2021 today and found the exact situation as John when I opened them up. John1 point
-
Problem solved, thank you dewdev! It was the #3 fuse in the attic. I've owned the trailer for two years and never would have looked in the attic for another fuse panel. Looked almost everywhere else. Thanks to everyone!1 point
-
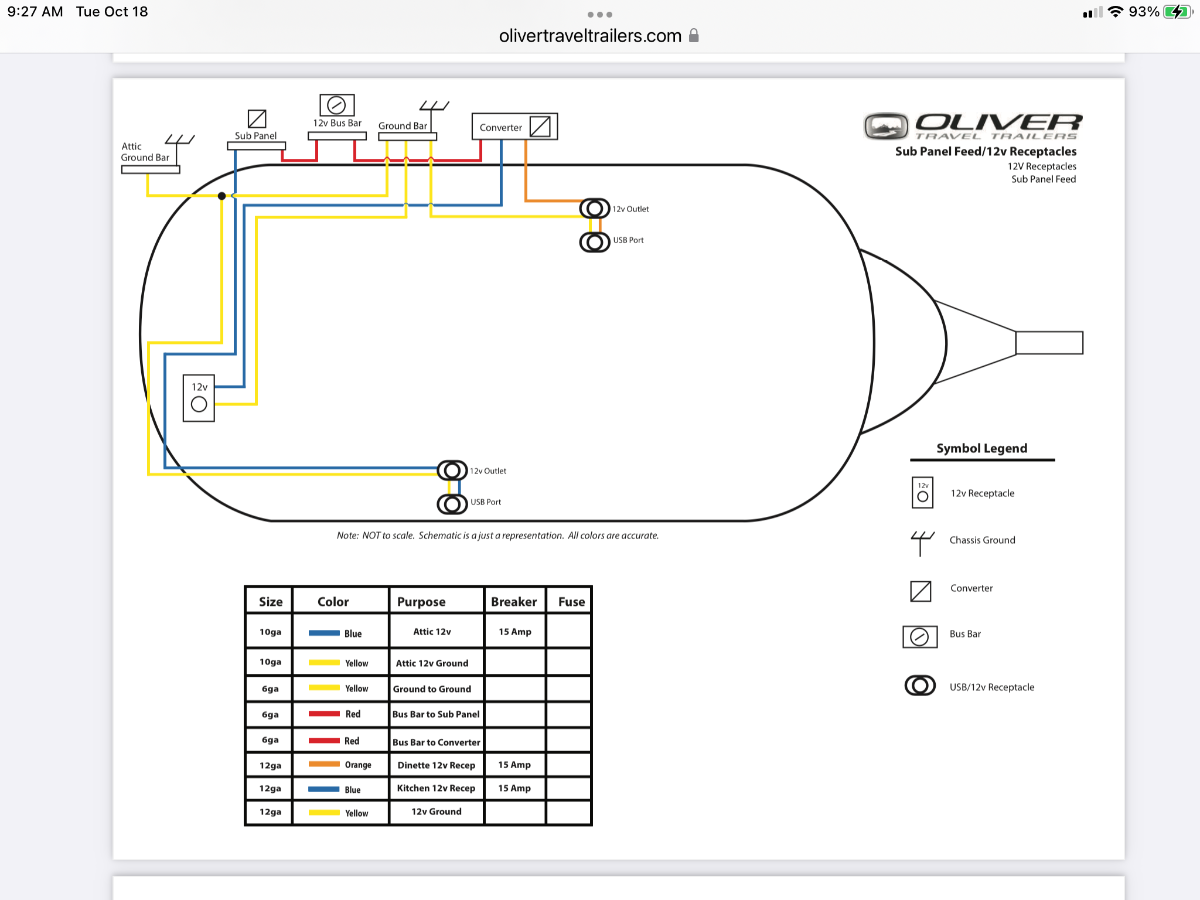
The USB ports are 12 volts DC (input), the AC outlet is 120 volts AC, they are in no way connected (electrically). You need a basic volt ohm meter so you can do some testing. The AC outlets are all wired together, with a single circuit breaker. You are lucky in that you have real wiring diagrams, they quit supplying them after your year I think. While you are checking fuses in that panel (at the converter) check all the little brass “ears” that grip the fuse contacts. These DO loosen and can cause intermittent or complete failure. Remove each fuse one at a time, and carefully squeeze the ears together using needle nosed pliers. You should disconnect the batteries first unless you like taking risks…. When reinstalling fuses, push them straight in, do not cock them or you will just loosen those ears again. That may fix the USB issue, but it has nothing t do with the AC outlet.That may be faulty, it is easy to replace. John Davies Spokane WA
1 point
-
OR, if you don't remember to have your face and/or private parts out of the direct line of that anode rod!😬1 point
-
With the current cold front moving deep into the South, this might be important. A few that don't usually winterize, a few novices, or those that usually do this later; remember to open the T&P valve before taking out the anode.1 point
-
Airstream uses same tires on current models.1 point
-
Thank you for the update.1 point
-
Got it! Thank you!!1 point
-
How long after you charge all four batteries are you seeing that 6.75 volt reading? As has been said a number of times before - the only real way to test batteries is to put a "load" on them. This you have done in your testing and those low readings are indications to both you and me that those batteries are basically toast. AS a matter of course - all batteries should be replaced together - not two at a time and the replacement batteries should have a manufactured date as close together as possible (i.e. they should be the same age). Of course this applies to AGM's or straight lead acid batteries - I'm not certain about Lithiums but suspect that they will be close to being the same. Bill1 point
-
Yes I have winterized will be traveling after the freeze so will dewinterize after I arrive at my destination1 point
-
Remember that to use Battle Born batteries effectively you need to install an external smart battery monitor, that indeed requires some additional parts and professional labor in any Oliver, you must reroute and possibly make new ground cables so all of them go through that device’s “smart bus” terminal. Some other brands do not require this! Read this: https://battlebornbatteries.com/what-is-a-battery-monitor/ The reason you do not necessarily need one with a Lithionics, for example, is that there is an included app that does it. I still prefer BB! BTW your solar controller should be Zamp. That is what was in mine, Hull 218, originally. I swapped in a better Victron unit. Good luck. John Davies Spokane WA1 point
-
Thanks everyone for your thoughts and pictures! We will be ordering mattresses from Southern Mattress Company and I believe they will be 10" as well. I think I can get the dimensions close enough and then tuck in any excess as needed on the wall side. However, given my slowness in finishing these types of projects, I'm glad to know I can get something "off the shelf" and make it work too. 😉1 point
-
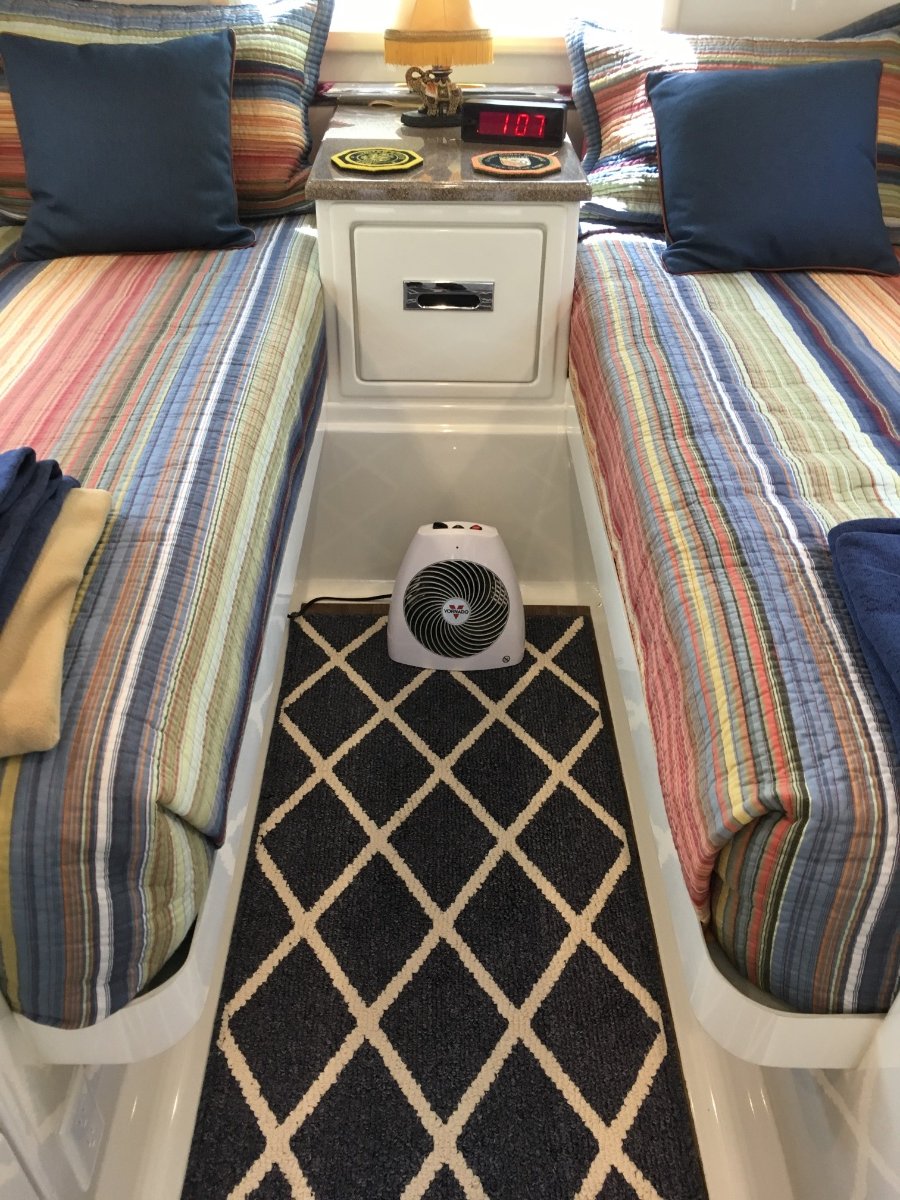
Thanks for the compliment, Bill. We are on our third set of quilts/spreads. They have all been standard twin sets from Bed Bath and Beyond or Target. We sleep with our heads to the kitchen but make the beds with the pillows at the back. We tuck in the excess quilt under the mattress on the wall side and have a normal amount on the aisle side. Nothing fancy, we try to be practical! Just took this tonight as we’re camping in Tennessee. This is our first iteration when we picked up in 2016 Another set a couple of years ago.
1 point
-
No problem at all - keep those questions coming. If you have the question then it is highly likely that someone else has it too. They do sell both "angles" and larger diameter sections of this type of foam insulation. Other than a couple of spots where I happened to have these angled pieces left over from doing my home, I simply either used larger diameter for straight fittings or cut the foam such that it would form a 45 or 90 degree bend. This is easy to do with either a razor or a sharp knife. Some places - like the small filter on the water pump - I simply got as close as I could and wrapped electrical tape over the end of the insulation such that insulation would close around the fitting as tight as possible. Note that another advantage of doing this pipe insulation is that it does make the water pump "activity" a bit quieter than it is without the insulation. Bill1 point
-
I agree with topgun2; it's so easy to winterize, why go through the steps suggested above but still worry that you didn't do it right? Just spend the 45 minutes and a couple gals of anti-freeze and sleep comfortably not worrying. I appreciate that the odds are you'll be fine, but why take a chance?1 point
-
I assume that you are talking about the exterior fittings - city water, fresh water, winterization and black tank cleaning ports. At the temps you are talking about I would not worry about these. Yes if you have something to wrap around them it would not hurt but, again, I would not worry. As a note - these exterior fittings are one of the vulnerable places that many people forget about when winterizing. These take a couple of "pumps" of anti-freeze when doing the regular winterization process with a pump like THIS. Bill1 point
-
Went down to Lowe's and got a number pieces of 1/2 inch foam pipe insulation like THIS. For that outside shower insulation - if you don't have some regular fiberglass insulation laying around then you can simply use a couple of old rags. Bill1 point
-
Sound advice, thanks Bill. What type of pipe insulation did you use? Did you wrap them or did you just stuff insulation around them or both?1 point
-
Except for the 26 degree night (unless your weather forecasters are like our - i.e. not worth a darn) I'd would not do a thing. For that 26 degree night I'd make sure that my kitchen drawers were open (warmer air to the kitchen faucet). and the access hatches to the basement area were open and the closet door open as well as the bathroom door. Finally, you might place a small wad of insulation in the outside sower door and pour a 1/2 cup of RV anti-freeze in each of the drains (Bath sink, Kitchen sink and don't forget the shower drain) . All of this is to make sure that you get some warm(er) air into the areas where the pipes are. In my case, I've put pipe insulation on all pipes that I can get to so I'm really not concerned until things get down below the middle 20's for short periods of time. On a side note - you might want to PM Patriot about restaurants and other details concerning HBSP given that he just returned from there. Bill1 point
-
Thanks for the replies & just confirming my perspective. My O is 2.5 weeks old and I am very pleased overall & very impressed with the quality & the O staff (good people!). However, I (as a boat & furniture woodworker) can not in anyway understand the O use of too long of bolts that are just wrong is wrong. No woodworker would do this. I checked the door in the showroom and the same incorrect bolts/construction is on the show O2. I hope O is listening and will correct this error going forward. Disappointing. Easy for me to fix, but...1 point
-
I carry two hydraulic jack stands with me. They serve two purposes; 1) to jack the trailer for wheel service and : 2) to place under the front corners of my trailer when camping to eliminate wobble or rocking when walking inside the trailer. Have found them to be extremely useful. Wouldn't leave home without them. Here's a link: https://www.summitracing.com/parts/pwb-620471?seid=srese1&gclid=EAIaIQobChMIitDm9vrh-gIVwuDICh0wdAmXEAQYAiABEgI0F_D_BwE1 point
-
Those should be stainless, so just whack them off flush AND file them smooth with the nut surface. My guess is that they ran out of the correct bolts and just grabbed longer ones. How in the world did you scratch your leg with rubber caps on them? Did one fall off? They do look too big for the thread diameter. If so, that is two strikes against the tech who did the job... ;( If you don't like the look of the cut-off shanks, you can replace the nuts with cap nuts (with enclosed ends) AKA acorn nuts. I don't know the thread size, most likely this: https://www.homedepot.com/p/Everbilt-1-4-in-20-Stainless-Steel-Cap-Nut-800281/204274073 John Davies Spokane WA1 point
-
But it needs to be Off to use cable.1 point
-
On my previous fifth wheel, we went in Indiana at MoRyde to get and independant suspension and disk break installed on the rig. Honestly, disk brake didn’t make a great difference because it is powerred electrictly and the reaction is always to much brake or not enough brake. Its hard to get the right ajustements. And the hydraulic pump and reservoir take a bit of space in compartment. In cold weather, sub zero, braking is harder because of the oil viscosity type. For a small rig like Oliver, i won’t get it for the price and the small difference on braking for a light weigh rig…….1 point
-
Should have opened a faucet inside, to relieve the pressure, per the winterization video.. HOWEVER, the video casually mentions to drain the waterheater, with no mention of opening the T & P valve. Live and learn...1 point
-
Very nice! Love your peeping dog!👀🐶1 point
-
"I always have 4 chocks with me." Good morning Bill, thanks for the message. I do have the two heavy rubber ones, but may pick up two more from Harbor Freight, as they're only $8 each. I have the Camco levelers which have a plastic chock for each leveler, but I like the rubber ones for peace of mind. I used four pieces of split logs for 20 years with my tent trailer! I am nearing the end of buying the must haves which is good because we're 27 days from pick up. TPMS was the first purchase. What do you use at the power pole? I know the trailer has a surge protector, but some people use a meter to check the outlet while others use a surge protector at the pole that also checks for proper wiring and current. TIA. John1 point
-
I always have 4 chocks with me. While I use the Andersen leveling system if I need to level from side to side, I still have the extra set of chocks. This is in case I'm on what appears to be "level" ground or if I need to unhitch and leave the Ollie somewhere without regards to using it for sleeping. I feel a bit "safer" if all four wheels are chocked in some manner at all times while not hitched. I even get nervous when dropping off my Ollie at the Oliver Service Department - it is on a concrete drive and very level and none of the Olivers there are chocked. But, habit is a hard thing to deal with particularly when it comes to my baby. While on the road I take two of the heavy rubber chocks (like THESE), my Andersens (like THESE), and a set of plastic chocks (like THESE). I virtually always use the rubber chocks but due to how heavy they are and the lack of use on the plastic ones I don't feel the need to always carry another set of the rubber ones. However, the rubber chocks will last much longer than the plastic ones. Bill p.s. in a pinch - don't forget about what resources that might be found around you - scrap pieces of wood, rocks, etc. can all be used as chocks1 point
-
The chocks that come with my Rophor Camper Levelers. https://www.amazon.com/Rophor-Leveler-Version-Leveling-Non-Slip/dp/B09NJSXRRB/ref=asc_df_B09NJSXRRB/?tag=hyprod-20&linkCode=df0&hvadid=563823049430&hvpos=&hvnetw=g&hvrand=7131554787834866815&hvpone=&hvptwo=&hvqmt=&hvdev=c&hvdvcmdl=&hvlocint=&hvlocphy=9029558&hvtargid=pla-1637492471943&psc=1 I figure they can do double duty: (1) part of the trailer leveling system when camped and (2) chocking the wheels on the side opposite from a flat when changing a tire. I also plan to follow wise counsel received on this Forum and leave the trailer hitched to the tow vehicle, set in Park with parking brake engaged, for added stability.1 point
-
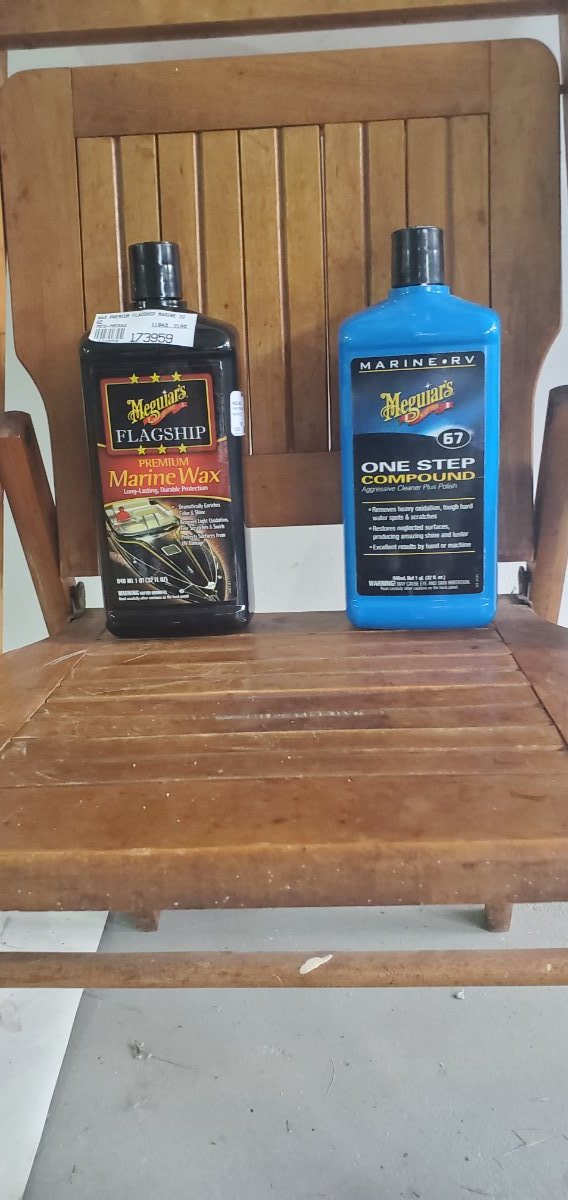
hbschof: I wax over my decals. I have a 2018 Elite II and I have never seen any oxidation (like I would see in my past older boats) on the fiberglass but in the spring there is some dark water stains on the sides that come off the roof (I guess from dirt on the roof) after sitting all winter. A good wash lightens the water stains and I then use the Meguiars 67 One step compound. A light application takes off the water stains very easily. I then put on a coat of the Flagship Professional Marine Wax.
1 point


-
Recent Achievements
-


")


")


")


