Leaderboard


Popular Content
Showing content with the highest reputation on 07/23/2023 in all areas
-
Screenshot from the Dexter website below. It’s one of those things where some people do it and will say “it’s fine, not a problem” (famous last words before many unfortunate accidents). But the manufacturers always take a very conservative (legally protected) approach. Same as the Oliver instructions that the electric jacks are only for stabilizing, not for lifting the trailer for tire changes.
 4 points
 -
Last I knew, Dexter advises to NOT jack a trailer by placing a jack under their axle tubes as shown in the Trailer Legs photo.4 points
-
Wife and I watched a movie on Prime that she thought was funny and I thought was a serious documentary. "The Long Long Trailer" follows a newlywed couple through their experience with getting and using a big travel trailer. Definitely worth a watch.
3 points
-
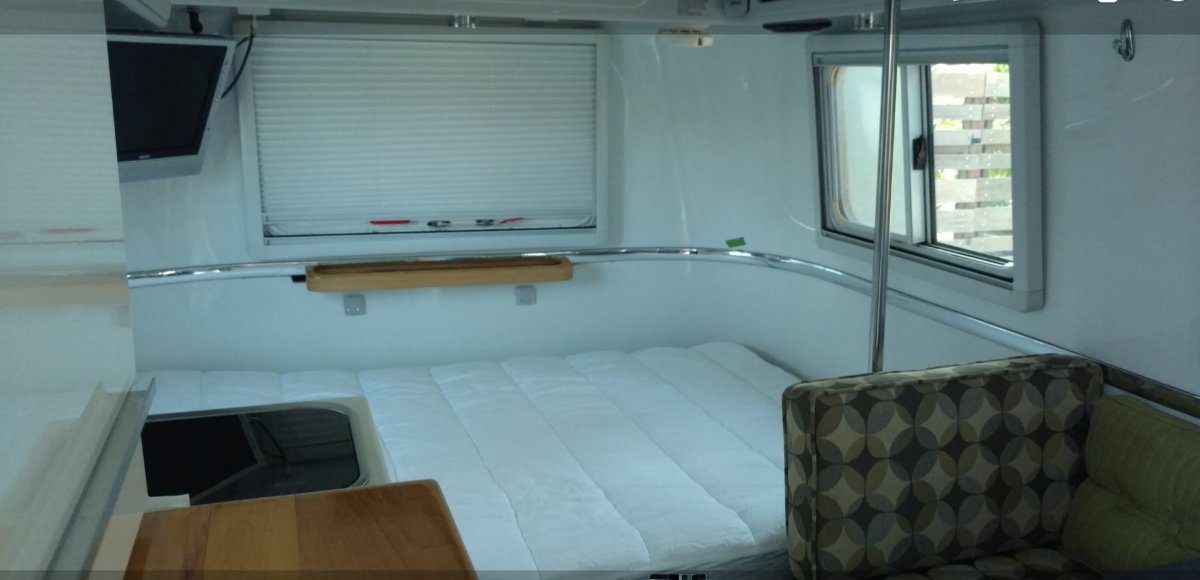
Your installation is clean, and pretty. And, I love reading about well-planned, well-executed mods, like yours. Our older (2008/2009) trailers had the tiny Jensen 12v TV, in the corner, silver frame. So old, the system has an integrated cd player (@!!), but no Bluetooth, etc. It doesn't fold up. When it dies, we'll probaby take it out, and patch the holes, tuck the wiring up in the attic, case our daughter wants to use it someday. Lots of other projects in the meantime. Do relocate the exit stickers. Here's our tiny "black eye."
3 points
-
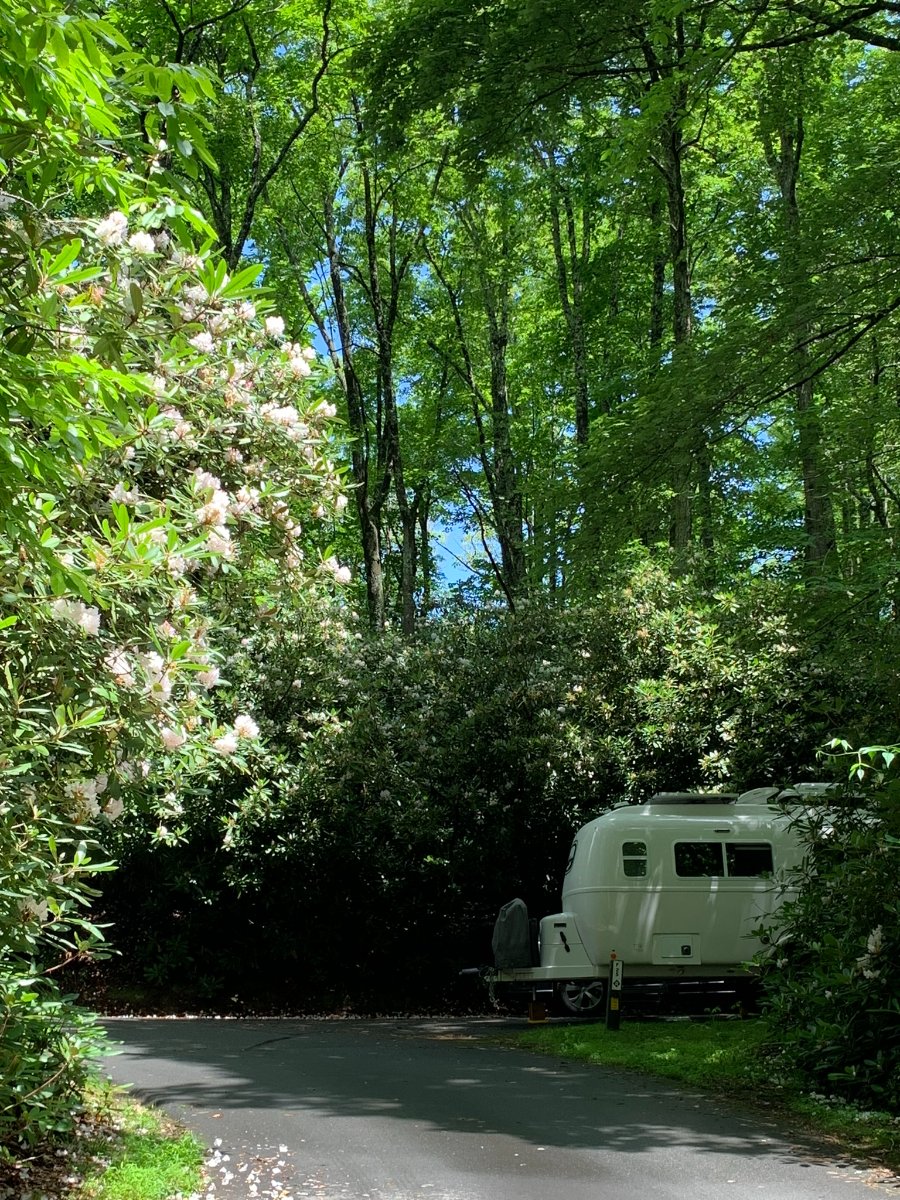
Last weekend we went to Art in the Park at Blowing Rock NC as we do every year, but normally it was in May, June, or October in our Aliner pop-up at Julian Price CG on the BRP. This time we decided to try July in our almost 1yr old Elite I (Hull #1209). We caught the peak of the Catawba Rhododendron bloom. We were in the clouds, a good bit of the time but 10-15 degrees cooler than the 90 degrees when we left home in East TN just 90mi, a couple or hours away.
3 points
-
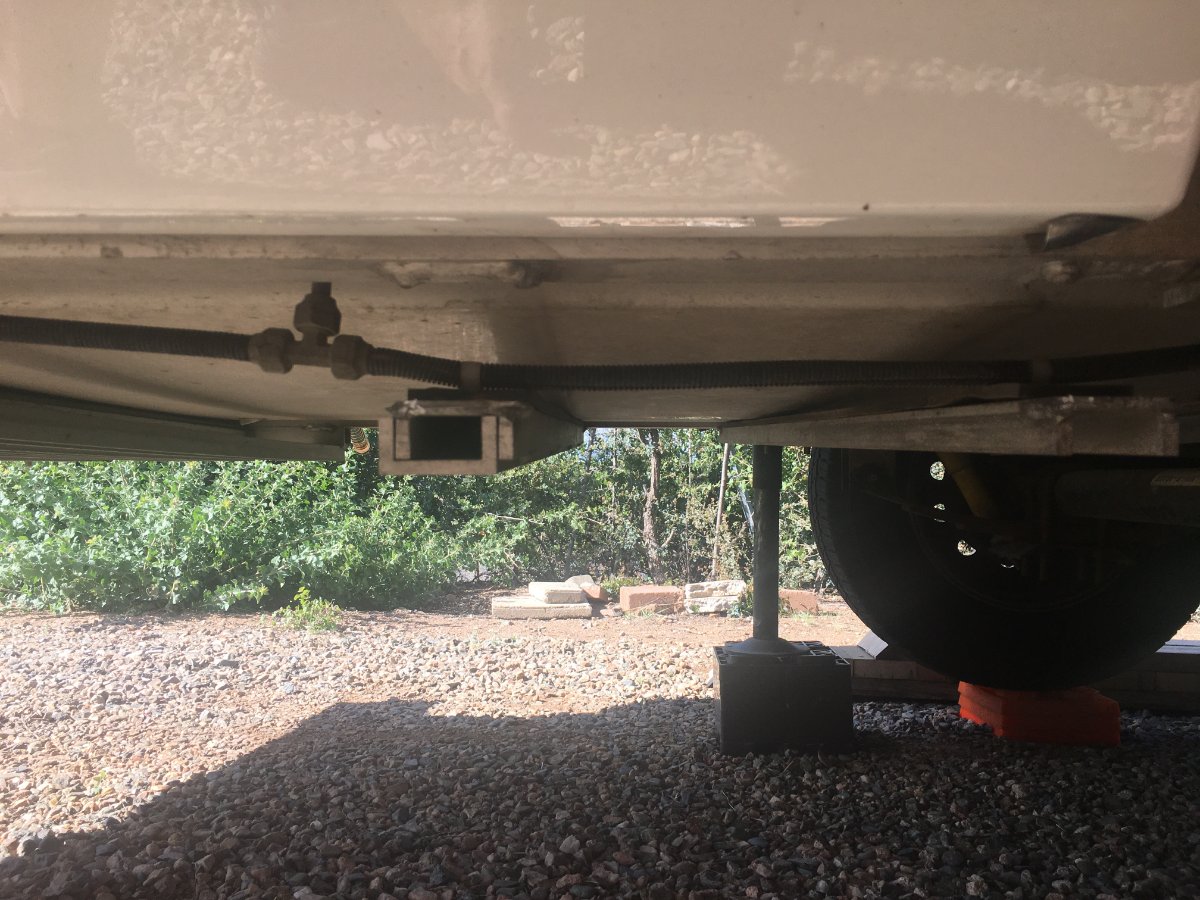
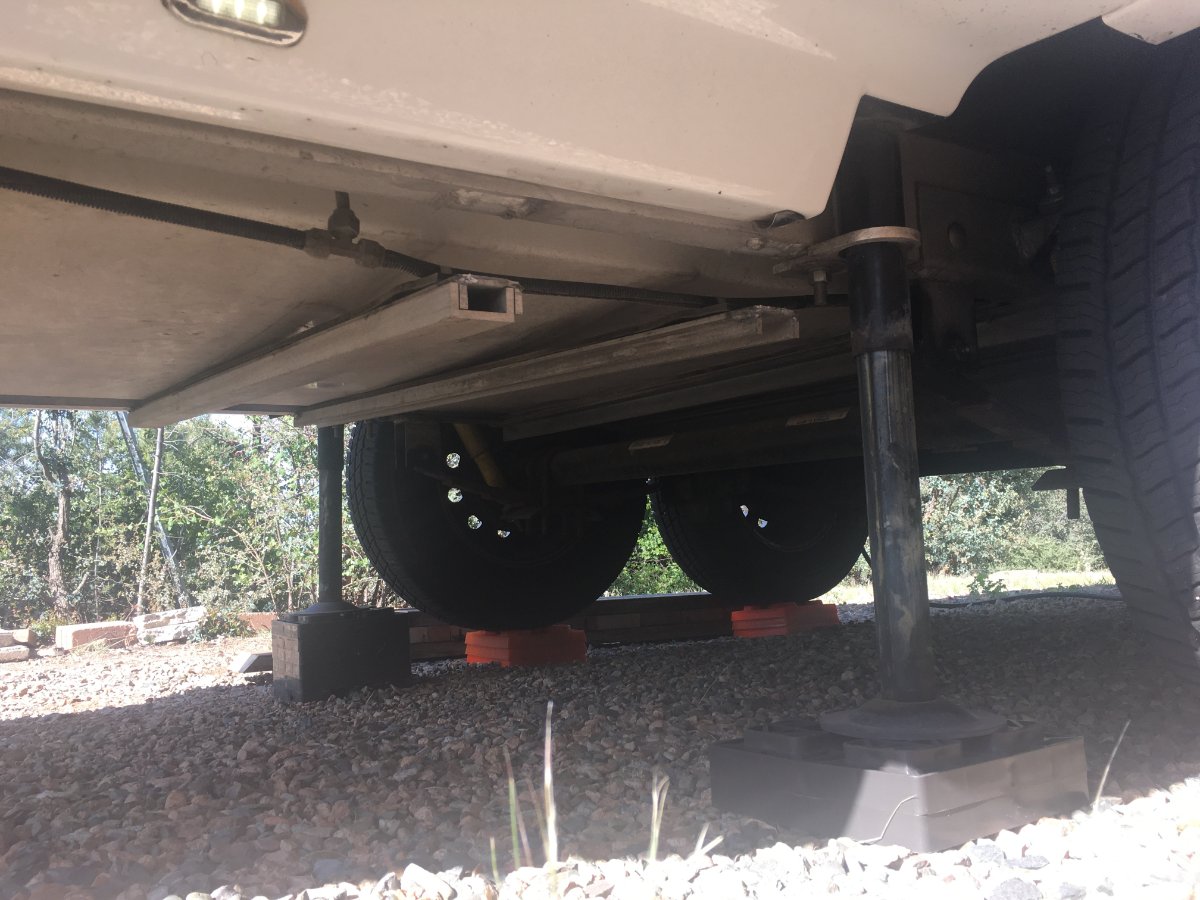
I just thought I would make others aware of an issue I found, go figure just the week after we bought our older Oliver EII. I can't remember a time, when purchasing a used car or truck that I had not laid on the ground inspecting the bottom side, left, right and front to back! For some reason, when we first viewed our OTT listed locally for sale, I did not look underneath. I think I was enamored by the beauty of and cleanliness of it, along with I felt we were just looking, and I wasn't thinking I would spend this kind of money on a TT. Later we closed the deal over the phone. Paid for it 2 days later and the prior owner brought it to our home. I was down low installing 6" hose extensions on all the hose inlets, and I thought it was a good time to inspect underneath and could NOT believe what I found! Pictures to follow. I found 2 broken welds, curbside the first two right behind the wheels. OMG, my heart sunk! I called the prior owner. He thought I did it by overdoing the stabilizer jacks (not). He said he recently greased the Dexter components and he could swear the damaged was not there before (again, not). You could tell by the aluminum corrosion that these had broken some time ago. I'm not asking for help here, as I found a guy in town who runs a welding shop and does contract welding for many metal artists in town. He repaired this, charging an hour $75. Most of the hour was setting up for aluminum welding and creating a heat shield. I believe he used MIG. I gave him a Ben Franklin and it was done prior to our maiden voyage a few weeks back. I had no idea the aluminum welds would break at the contact point. The OTT welds must have been defective when the frame was built (edit: OTT likely welded this fine, later replies show this to be 80 PSI tire pressure). I called OTT service to ask about this and other questions, and the rep really had little to comment. My reason for writing this thread, is to let others know and to suggest that if you haven't looked under recently, it is a good idea to inspect your frame soon and regularly. Thanks for reading.
2 points
-
The nightstand drawer is a great catch-all until you need to find something. The drawer is deep, long, and can hold a lot of stuff, but finding something is always, a dig until you find it. My two-piece organizer solves that problem by dividing the lower part of the drawer into a larger back compartment and two smaller front compartments. Sitting on top of these lower compartments is a sliding half drawer that provides quick access to the most needed items – remotes, keys, glasses, etc. And with a simple push, you can get to the items below. Crafted from mahogany with birch plywood bottoms, it is assembled using miter and dado joints for years of use. To this, a hand-rubbed oil finish is applied to show off the beautiful mahogany and make it a fantastic upgrade to your nightstand. I charge $115 + UPS shipping. I do not require a deposit as I like my clients to see my craft before they compensate me. I accept checks and Zelle for payments. Lead time is one week. PM me if you would like me to craft one for your Oliver.
2 points
-
I think it is very good that the sagging crossmember did not break the gas line. If you haven’t already, take a very close look at all the propane lines you can get to inside the trailer. Was there any damage to the fiberglass belly from hanging down unsupported? Even Ollies can have bad problems. I am glad yours was relatively easy to correct. John Davies Spokane WA2 points
-
Ellison area
2 points
-
Dungeon Provincial Park
2 points
-
Trinity light house in the distance
2 points
-
Trinity historical sites
2 points
-
Eagle Nest Lake State Park, NM... Where's Magnus? He's love'n the 60F temps (so are we for that matter)! His FAV spot - right under the Ollie steps! Red River, NM - 8,600' near Eagle Nest - great weekend romp! He's spent... Oh, well... charge up his batteries and go again in the morning. Cheers, A&D
2 points
-
Beautiful pictures. I used to fish the NC/TN line and drove some beautiful roads, and especially beautiful during the Rhododendron bloom2 points
-
Is your grill on a solid table surface (not slats)? I'd probably find a big storage bin, cover it with the bin upside down (no lid) after it cools, and put a weight/rock on top. Not had a problem with our grill. Yet.2 points
-
Gbergh, there are quite a few very nice, and active on our forum, owners in Michigan. You might revise your title to reflect your very polite request, including "Michigan. " If you've run past the 24 hour edit privelege, pm me or another mod, and we can do it for you. Good luck.2 points
-
Always interested in modifications and installs even if I don’t do it! I did move our TV from the corner to under the attic years ago (2017 I think, I posted what I did on the forum somewhere back then). We used to watch DVD’s in the evening but now we settle in with a good book, haven’t had the TV on in 3 or 4 years. I did install a Sirius/XM receiver in the attic with the antenna in the back between the insulation and the outer shell. I have it wired in to the Furrion you show above. We get news and music just about anywhere without worrying about cell coverage. Mike2 points
-
We have SiriusXM in two vehicles (not our new tow vehicle) and we occasionally play music via their app on our phones. It was a challenge to get SiriusXM to charge us for 1 vs. 2 receivers monthly. We argued that we generally drive only one vehicle at a time. How much would they want for a 3rd receiver in our TV or OTT?! Chris synced her phone via Bluetooth to the wall mounted Furrion audio system, so we can play SiriusXM. However, unless we install a SiriusXM antenna/receiver in our Oliver, we could seldomly use SiriusXM when camping. Many of our campsites out here have little to no cell service. No way a SiriusXM antenna/receiver can be integrated to the archaic Furrion systems. Dish Network has many music stations too, and we can get that anywhere. We often play a jazz or country station while playing our favorite Rummikub! Any of you ordering a new OTT? Let them know you want a white wall-mounted receiver (if you can find one, or at least silver) with higher quality speakers in the corners with white covers. Look back at the first picture I posted. What are the only other black objects in the photo? I may upgrade the audio system a few years down the road. The speakers could be upgraded, for sure, though something like this might add a simple cosmetic touch (not sure of correct size): Amazon.com: uxcell 2pcs 6.5" Mounting Hole Diagonal Distance Speaker Grill Mesh Decorative Circle Woofer Guard Protector Cover Accessories White : Electronics I understand there is a way to turn off speakers in the current system. I'll have to figure that out, because the one by the dinette, just over your head, needs to be off when sitting there. Mike and SeaDawg, delete those old dusty TVs, clean up your space visually and save about 20 lbs. in the rear of your Ollies! And btw, thanks for taking interest in my installation thread, even though TV A/V is not your thing!
2 points
-
Beautiful shots! We were on the Blue Ridge Parkway camping earlier this week:2 points
-
We’ve been using the 17” Blackstone when camping for several years. No lid. I do have a cover that fits pretty well. It needs to be covered, not necessarily for varmints but because dust, leaves, twigs, etc will end up on the cooking surface. In areas where bears are present I put the grill in the bed of the truck under the tonneau cover. Other areas I’ve never had an issue with critters getting under, or through, the cover. I just ensure it’s clean after use and we’ve been fine. At home I use a 22” Blackstone (with cover) that sits outside and no issues either.2 points
-
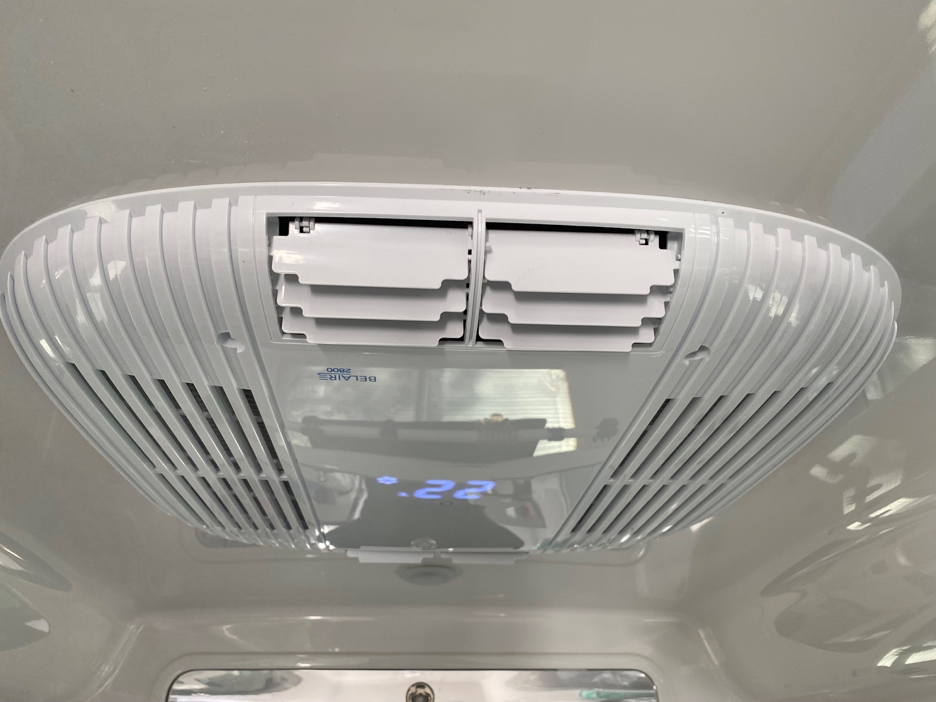
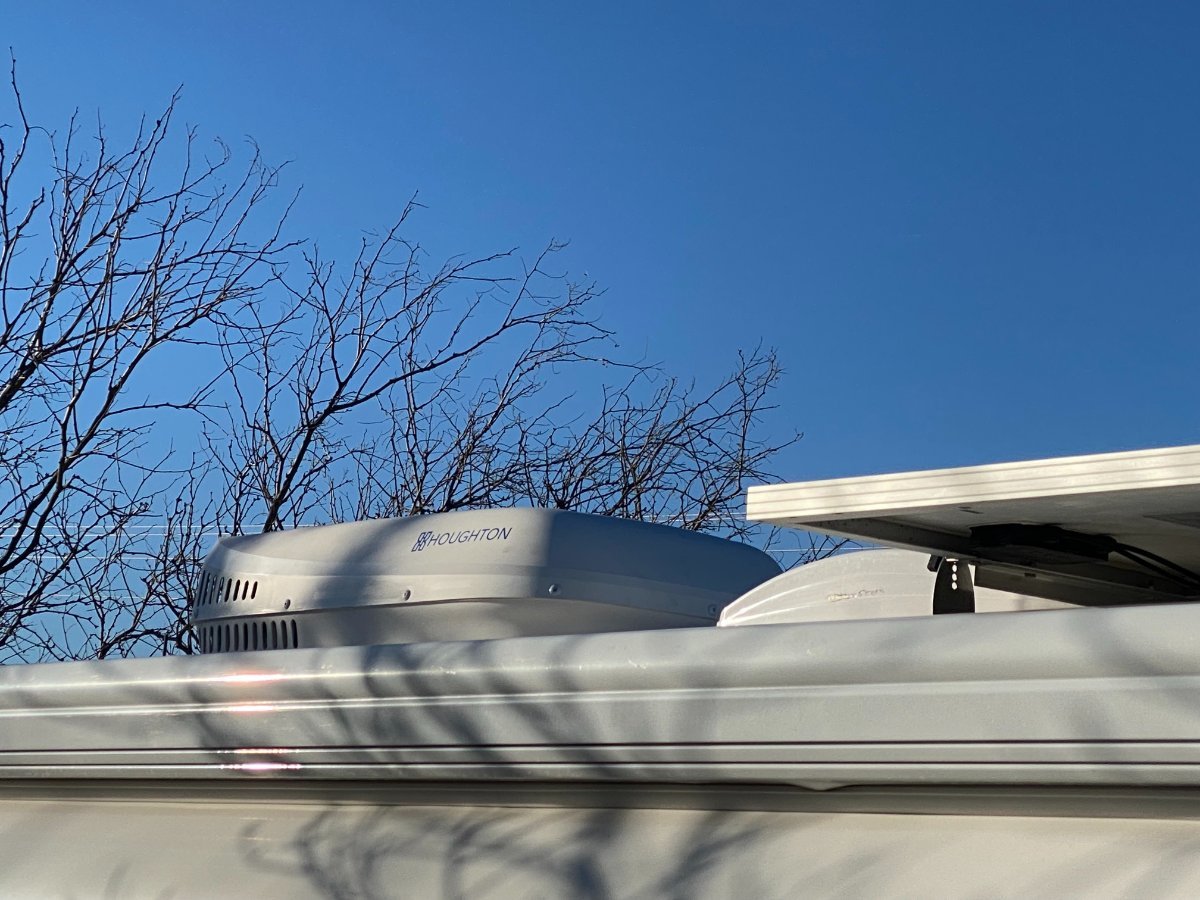
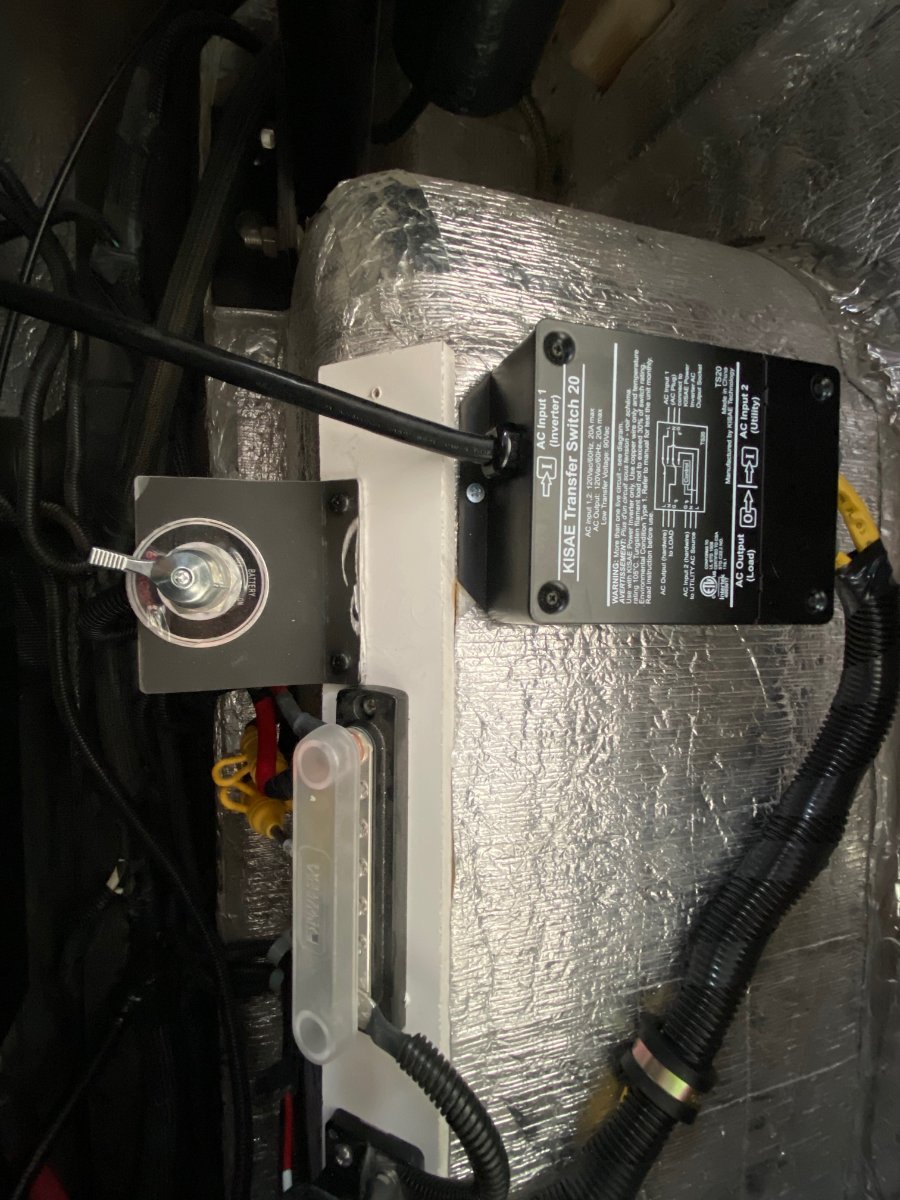
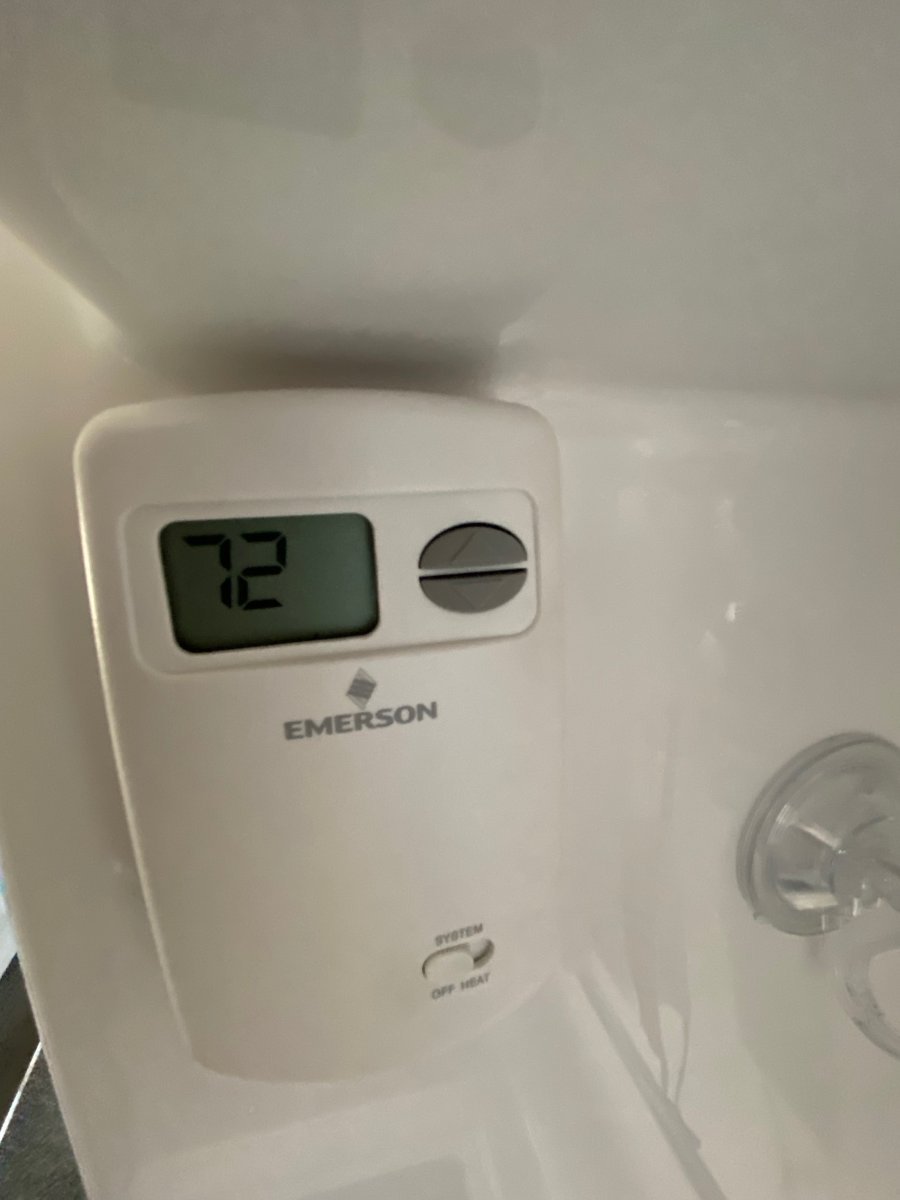
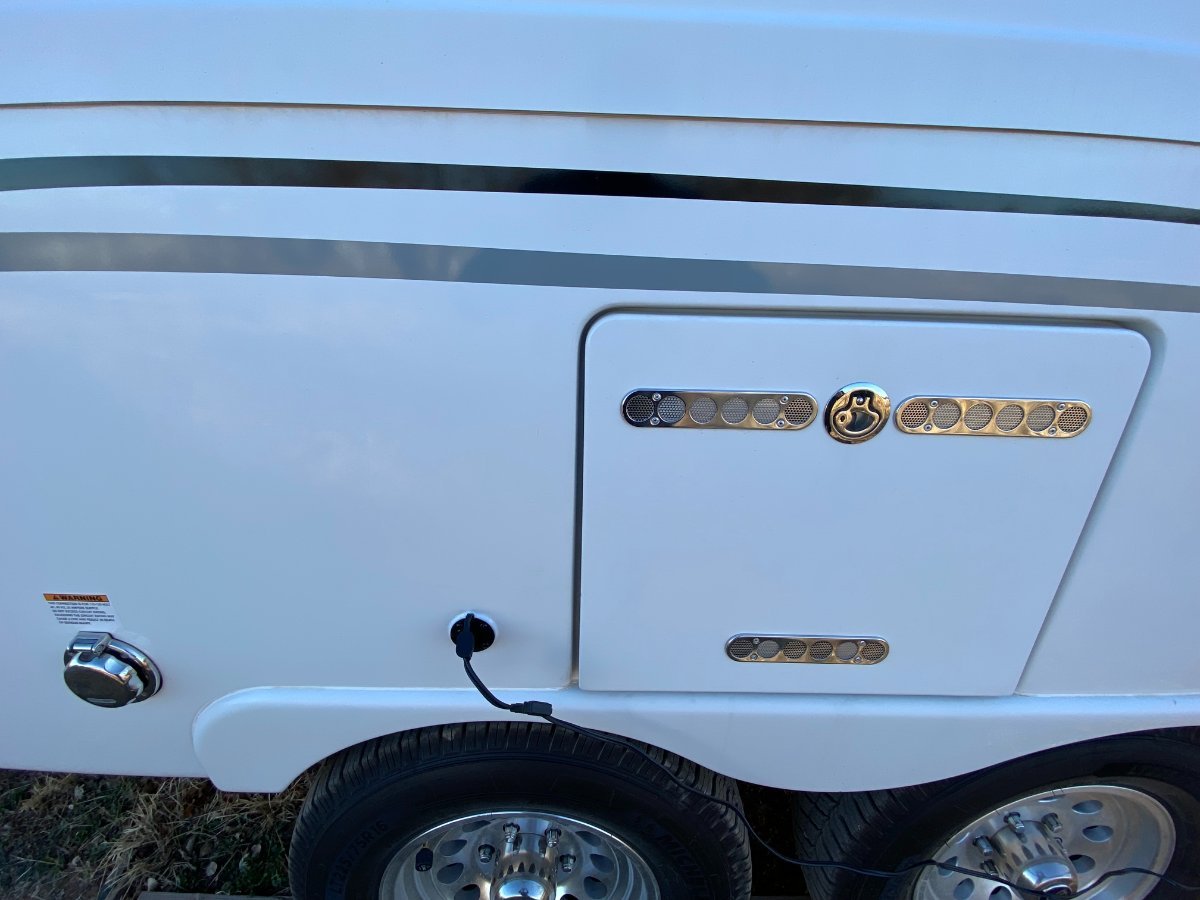
With the help of a number of good folks on this forum and my great RV Tech, Mathew Gonzales, who has worked on my 2017 Elite II since I brought in home to SE AZ, I finally achieved my goal of being able to run my AC off of my 2000-watt inverter and my new battery bank: 4 100ah Battle Born lithium batteries. After asking for, and getting, advice from folks on the forum about a number of issues that Mat and I ran encountered when attempting this upgrade, I made these decisions and Mat did this work: I first made the decision to purchase the Houghton 9.5K Low Profile Air Conditioner from RecPro--due mainly to how much quieter it runs compared to the Dometic Penguin that came with my Ollie, and to its lower amp draw (10 vs. the 16 for the Dometic). I learned that the Houghton could be run off of the 2000-watt inverter that came with my Ollie, using a transfer switch plugged into it running to the AC. I asked Mat to move the Micro-Air soft start previously installed in the Dometic to the Houghton. We discovered that he needed to reprogram the soft start to coordinate with the new AC. Since, unlike the Dometic set-up that came with my 2017 Ollie, the Houghton did not have a way to control the furnace, Mat installed and wired an Emerson non-programable thermostat--once again using information gleaned from folks on this forum--to control the furnace. I figured it was a good idea to supplement the 320-watt solar panels that came with my Ollie with a 180-watt Zamp solar panel kit. I also purchased a Zamp solar port that Mat installed near the shore power input. When my AGM batteries overheated last fall, I found I had no way to easily disconnect the battery bank. (This, I suspect, is something that is an original defect in the electrical system of my Oliver. Is it for all Olivers still?) So, while Mat was doing all of the other work, I had him install a battery disconnect switch near the inverter. I don't want this to appear as a straightforward process. It took a lot of back and forth between Mat and me trying to come up with solutions to problems encountered along the way. This back-and-forth involved a lot of advice from folks on this forum, some of whom I have not thanked by name. I would like to give special mention and thanks, however, to CnC and Minnesota Oli, who spent a good deal of time with me exchanging private messages. Man, were they patient with this technical novice! The outcome is that I now have a much quieter AC that runs off of my solar, batteries, and 2000-watt inverter. One can read elsewhere about the advantages of the Houghton. Mat told me, before I took my camper home, that he ran the Houghton for about four hours, supplementing the roof-top solar with the Zamp portable kit, and the voltage never dropped below 13 volts. I ran it when I brought the camper home, and verified that the system seemed to run the AC flawlessly AND much more quietly than before. I am delighted, as I have been wanting for a long time to be able to boondock in climes needing cooling of the cabin without having to resort to the hassle and noise of a generator. I will follow up with another post if I run into any issues. Disclaimer: I still have very little technical understanding about how this system functions and how the components and wiring fit together, so I will not be the one to answer many, if any, technical questions, but I know that on this forum, if you ask, you receive. There are some good posts on this forum involving the Houghton AC and related issues, so take a look around, and don't hesitate to submit your questions on this forum. Doing so paid off big time for me! Here is the interior view of my newly installed Houghton 9.5K Low Profile Air Conditioner: Here is an exterior view (birds won't be able to nest in this one!): Here is a photo of how Mat secured and wired the transfer switch and battery disconnect switch: Here is a photo of the Emerson non-programable thermostat to control the furnace (thanks go to John Davies who suggested the purchase): Here is a photo of the Zamp solar port with cord leading to the Zamp 180-watt portable solar panel kit: Here is a photo of the charge controller on my Zamp 180-watt portable solar panel kit, showing the voltage just after I plugged it in. (In less than 10 minutes, this controller and the interior Zamp showed the voltage up to 14.6 before dropping back into the floating voltage range.):
1 point
-
The first thing welder said was, "That wouldn't be an LP line, would it?" I said, "Yeah, the tanks are off and I released the gas in the line." and he proceeded without worry. There is a little kink in the line, as you can see front of the T, but it holds pressure, so I left it as-is. Yes John, good observation. The vertical line is right there, going up to the kitchen (edit: Furnace and HWH) which could have been damaged. We camped 3 days, just after fixing this and if there was an interior leak, I certainly would have smelled it. I would think it would be difficult to eyeball/follow that line along its entire length. No sag, no fiberglass damage visible. CRM and rideandfly, thanks for your comments. I'll bet there will be a couple hundred OTT owners getting under their frames this week!1 point
-
Couple years ago, while working on a friend’s 2015 Legacy Elite, found some cracked welds. He took his Ollie to Oliver to inspect and re-weld. Inspected our Ollie’s welds several times and at 5 years old during a service visit to Oliver, they inspected the frame, too. So far no frame weld issues.1 point
-
I looked over every weld that I could see before purchasing my Ollie, but just went out again to recheck them all after seeing this post. Glad it was an easy fix.1 point
-
George: Your best way to see an Oliver in your area is to contract Oliver Travel Trailer company sales department. They will set you up with the closes Ollie owner. You might want to mention if you want to see the twin bed model or the standard (full bed) model.1 point
-
I need to do the same. Haven’t used it in years. For us, Sirius/XM is enough. Mike1 point
-
I opted for the 17" Blackstone with the lid. Normally, I would just leave it sitting on the picnic table, but I'm thinking about critters (rodents) that might decide to help themselves, and the lid doesn't fit tightly enough to prevent their entry. The fabric bag won't stop any rodent that is determined to get in there. Does anyone have a solution to this, besides moving the grill each night?1 point
-
Why is it so hard to find low pressure grills and stove? This year We started using the Nomadiq grill. https://www.amazon.com/NOMADIQ-Portable-Lightweight-Tabletop-Tailgating/dp/B08588PLK8/ref=asc_df_B08588PLK8/?tag=&linkCode=df0&hvadid=416696576536&hvpos=&hvnetw=g&hvrand=961126175319737280&hvpone=&hvptwo=&hvqmt=&hvdev=c&hvdvcmdl=&hvlocint=&hvlocphy=9003291&hvtargid=pla-900043571940&ref=&adgrpid=92049668097&th=1 It's low pressure out of the box, no regulator built onto the grill itself. It comes supplied with hose and regulator to work off a small Coleman LP bottle. I opted to purchase their adapter hose to allow direct hookup to Ollie. https://www.amazon.com/nomadiQ-Adapter-Hose-Portable-Grill/dp/B09MDJ5M75/ref=pd_bxgy_sccl_2/138-2326693-0637356?pd_rd_w=z118w&content-id=amzn1.sym.26a5c67f-1a30-486b-bb90-b523ad38d5a0&pf_rd_p=26a5c67f-1a30-486b-bb90-b523ad38d5a0&pf_rd_r=ADVPY0FTH99QWGZCH486&pd_rd_wg=t3Oiv&pd_rd_r=82bf38df-5095-4974-9182-eb1158b627de&pd_rd_i=B09MDJ5M75&psc=1 It works great for us, Cooks really well, lightweight and small foot print when folded. When I want to use the cast iron skillet, I have a one burner low pressure stove https://www.amazon.com/gp/product/B07PFL5D3R/ref=ppx_yo_dt_b_search_asin_title?ie=UTF8&psc=1 that fits the bill.1 point
-
Thanks SeaDawg, we had the same rule in our family. No TV on Sundays, when we drove to visit our cousins and Yiayia (that's Greek for Grandma), or they came to our home. For the first 20+ years of my life, it was every Sunday. Yep, no football, no-way, nor anything else on the TV! We lived in Europe during the 60's and had no TV, no radio really, and we played music on the phonograph and families talked (no cell phones, video games and social media, oh I long for the days). Moved back to the states in the 70s and there was TV! The great TV westerns, Gunsmoke (our favorite), Bonanza, and the great sitcoms of that era. The larger family get-togethers are not with us anymore. I love to wind down, after working a long hard day, get my mind off my responsibilities, watching TV choosing the most brain-dead show I can find, to stop processing and fall asleep. Or watch a great movie, when we can find something new! You really need to delete your TV. Simple rule for organizing a space, if you haven't use it in the last 2 years, throw it out, drop it off at Goodwill. If we meet you at an Oliver owners meet, give me 5 minutes and I'll delete it for you! Lol, best wishes, JD1 point
-
Hi everyone, I just got the fresh jet installed at an RV place. Total cost was $1600. It is indeed very quiet and uses the existing ADC and thermostat and they are going to sell the old penguin for me. They take 10% which is totally reasonable and means I don’t have to haul it back home. It was 108 here and I’ve been outside all afternoon so I won’t do a decibel check just yet but I will at some point. But it works fine and it is indeed very quiet.1 point
-
On way south from Denali NP today, the “Great One”made a rare clear skies appearance. Just WOW!
1 point
-
CRM, thanks for sharing your track system! You get that when the TV folds down, it's too far forward. There is only 76", top of bed to the back wall. My TV is 4" off the wall, so you have a full 6' viewing length to the hi-def screen, vs 4 ft distance to the low-rez 24" screen. I'm with you on using what you got, but the only TV I have lying around is a 47" TCL/Roku. It's large, thick, black and heavy! I wanted clean and white, like everything else in the Oliver. Could not pass up this screen at $328 Amazon used, at only 14 lbs. and 12mm thick. Thanks again.1 point
-
I installed a Furrion 13,500 BTU A/C unit in our Bigfoot Class-C three years back. It was a ducted system in a 30 ft Class-C and cooled it nicely. We don't camp in hot summer weather, but I run our RV A/C units during the summer when parked at home. I would guesstimate the large Class-C has twice the cubic ft of our little LEIIs. The original Dometic failed, condenser fan dislodged and stuck in the casing. Buy another Dometic? I hope y'all find a better alternative. My feeling is you need to be down at perhaps 11,000 BTU as was suggested above. The 13,500 BTU (or greater) A/C system will likely not cycle enough in most climates, which means less air movement and less humidity management. It is important to engineer an A/C system at the right BTU rating, not too much or too little. We're keeping our old clunker original Dometic, for now. It's parked outside with A/C running now, only part of the day, and we've been high 90s to 100. I have it set at 84 degrees, so the interior stays nice. Yes, it's noisy (LOL, I can hear it from the front door of my house, and my 100' hose doesn't quite reach the Oliver)! Keep in mind, we live in the dry Arizona high country. The A/C does not run at night at all, and it would have to perform better, perhaps require more BTUs, if for say you live in the SE United States, or camp in the Midwest during the summer months.1 point
-
Hey JD, thank you for these ideas. I will say, I have read so many of your upgrade posts, some amazing work! Thank you for sharing and I will study your work in the months and years to come, as we get to know our Oliver better. As far as warning labels, they're not of interest to me. The insurance industry and Federal Government have dummied down America, to make everything idiot-proof, with WARNINGS! I have already taken my heat gun to several labels (use a little Goo-B-Gone after), the one by the smoke detector, those by the cooktop, other labels outside are soon to go. The visual noise removed, all clean white fiberglass. Thanks for the sound quality app. I will show it to my son who is a sound engineer. Perhaps he can run the test. More to come soon on this post, as I have time not working. I will add a post re adding the Dish receiver, configuring the Weingard Satellite, and adding a rack in the attic for multiple A/V input sources. My final post will be to show how I made this TV monitor fold up to the attic ceiling, being out of the way of the rear view and emergency exit window. It's not a simple push mechanism, what OTT uses on their smaller 24" TV, but given the thin profile of this TV, you will hardly see it when folded, all parts white! Thanks for reading!1 point
-
High tide trail Squid island We have found some of the best places to eat and hike just wandering around small towns in Newfoundland. Today we had lunch in a small town called Happy Adventure at the Happy Adventure Inn the view is amazing and so was the food.
1 point
-
Old School trail Near Sandy Beach
1 point
-
We are up here too. had to go to Whitehorse for some repairs. Depending on how things go we either adjust routes or head home. We will know more in a couple of days.
1 point
-
Made it to Denali NP and Riley Creek CG. Happy surprise at out AT&T connection speed in the campsite B77. Two site sizes here when reserving. A - sites for longer trailers up to 40’ B -sites for <30’ and many double width so truck and trailer are side by side. Really wide site and quite deep beyond rage rear curb stops. Setup the clam on the tent pad.
1 point
-
1 point
-
I searched extensively to find a quality propane grill with dual burners and separate controls. I selected a Napoleon TravelQ TQ285 Grill. This grill is currently $295 on Amazon (vs. $319 direct from Napoleon). I managed to catch a sale for $250 on Amazon. This grill has a clamshell style body with porcelain coating and weighs just under 30 pounds. I also purchased a PORTAL Outdoor Folding Portable Picnic Camping Table to serve as a stand for the grill. The table was $80, but now listed on Amazon for $72. Compact size was a critical selection criteria for both the grill and table, since I needed them to fit in a rear mounted cargo carrier. Our tow vehicle is not a pickup truck, but a BMW X5. I did not want to carry the grill within the TV. Upon receipt of the grill, I modified the fuel feed to enable use of quick connect fittings for use with the low pressure propane connections on our LEII. I also purchased a DOZYANT 18 feet Low Pressure Propane Quick-Connect Hose, $25 from Amazon. Below is a photo showing connection for both high and low pressure propane supplies. The high pressure connection is on the right with a 1 lb. fuel container attached. The low pressure quick connector is located to the lower left of the regulator. The red handled valves control selection of the desired propane source. The grill is shown with its folding legs extended. This setup has proven quite satisfactory. The grill easily reaches any temperature you would reasonably need for cooking. The grates are cast iron. There is also a griddle available for one side, which we have not purchased. This grill lives in our rear mounted carrier, with a Champion Dual Fuel generator (also configured to use the low pressure propane connections on our LEII). See the packing arrangement below, including stabilizer bases, chocks, etc.. P Prior to using the grill, I line the interior with aluminum foil. The grill comes with a grease catch pan under the center, which I also line with foil. The aluminum foil is easily discarded after use. I scrub the grates with a grill brush and wipe them with paper towels. I also wipe out the grill interior to remove any grease prior to storing the grill back in the cargo carrier. We don't notice any odors from the grill following this procedure. I highly recommend this grill. Don
1 point
-
1 point
-
We didn’t see any other Ollies, so it must have been us!1 point
-
Linda and I were excited to see an Ollie as we were coming west from Brenham on 290. Saw you turning off to go toward the campground. (Pretty sure it was you). We live in Carmine, TX which is nearby.1 point
-
On our way to the rally. We stopped overnight at Rocky Creek COE Campground near Burton, TX. It’s on Somerville Lake, typical COE campground. Sites are nicely spaced. It seems to be popular with boaters, there is a ramp and parking at most sites for a boat and trailer.
1 point
-
Thanks so much for your photos and details. I installed my Houghton a few months ago but at the time didn't bother to wire the furnace. Your info made the job super easy. Thanks again!1 point
-
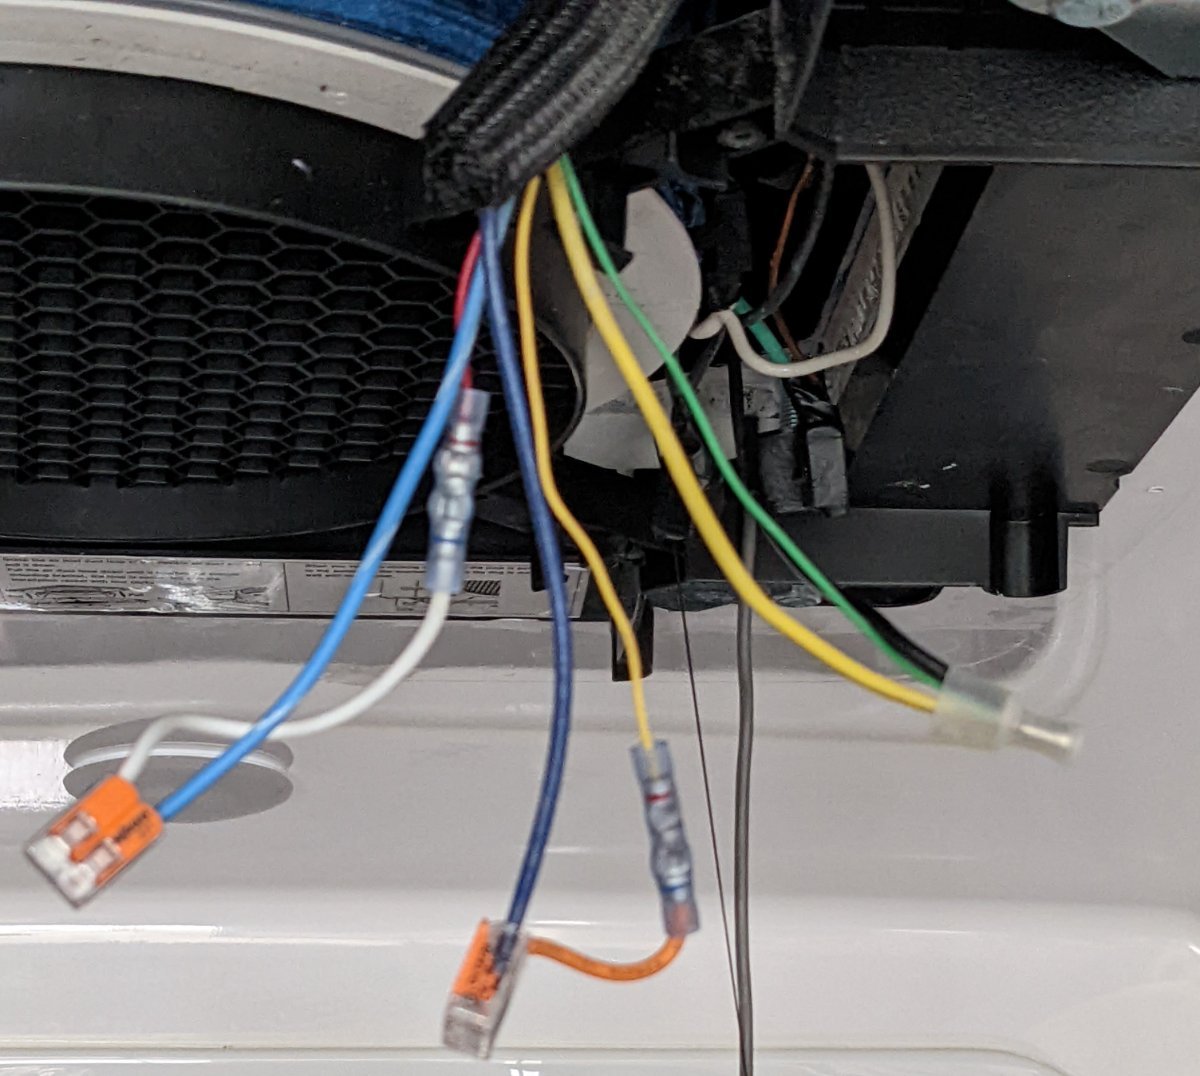
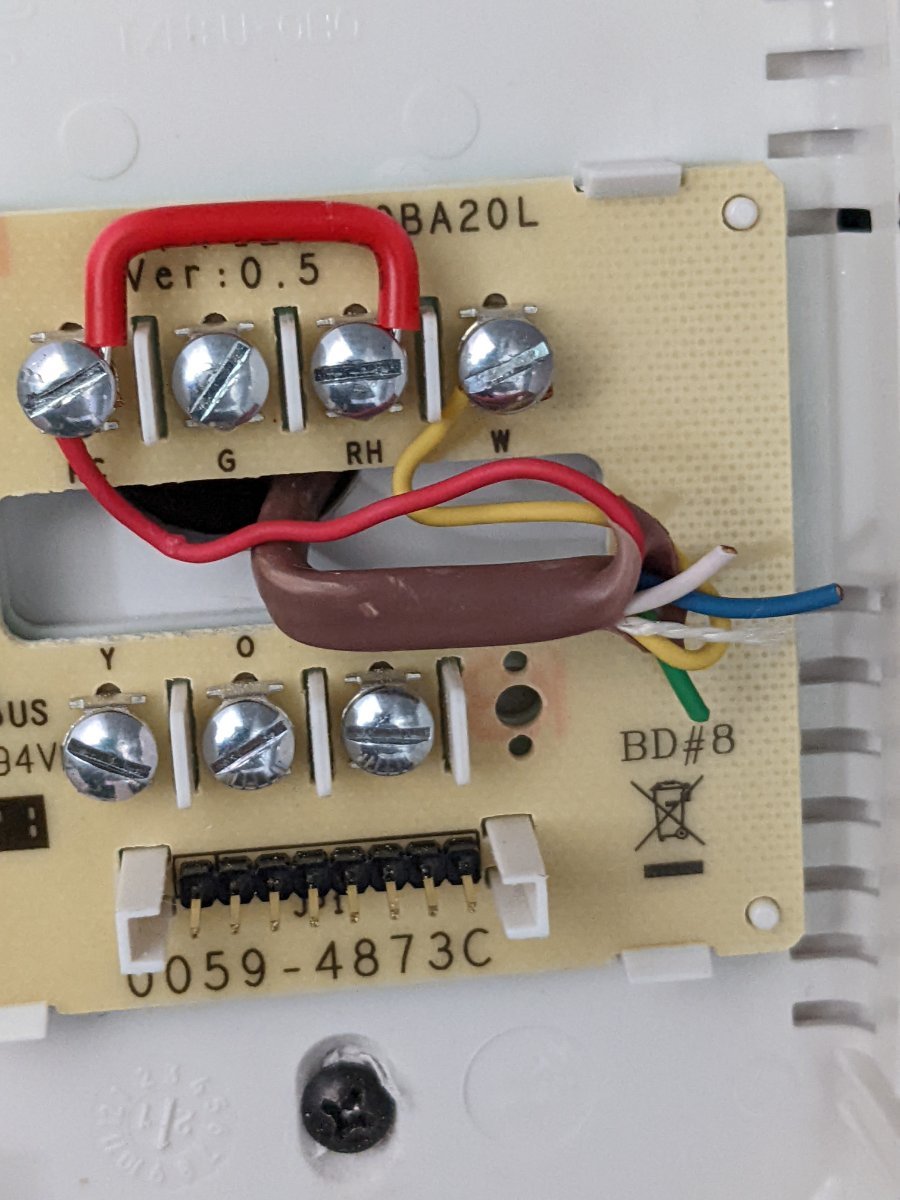
Here are the photos of the final wiring. I used the Red (spliced on AC side to white) and Yellow (spliced on AC side to orange) thermostat wires. As you can see in the photo the blue/white was the 12 v and the solid blue was the wire to the heater as @Minnesota Oliconfirmed. I checked with a volt meter and connected them at the AC side to confirm the heater would turn on. On the Tstat side the wiring is self explanatory from the picture. The only casualty in the install was blowing the 7.5 A fuse which is located under the dinette. After closing everything up and THEN putting in the new fuse so I would not blow it again everything is working great. What an excellent upgrade the low profile inside portion along with the reduction in operating noise was well worth it. BTW: if you are in the metrowest Boston, MA area and need any RV repairs; I used TRIC Mobile RV to do the heavy lifting to remove and replace the actual AC unit. https://tricmobilervrepair.com/ They did a fantastic job so I would definitely recommend them.
1 point
-
I believe the sold blue wire heads to your relay board on the furnace. I believe the blue with the white stripe is 12 volts hot. Check with a voltmeter to verify with fuse for furnace in place. If you touch those two wires together it will start the furnace, you will have to let the furnace time out before it will shut back down. If that checks out then you will splice one unused thermostat wire to blue and another unused thermostat wire to the blue with white stripe. Then back at where the thermostat wires come out of the wall you will use those two newly allocated thermostat wires to hook up the new single mode thermostat. Hope that helps. Paul1 point
-
Let me preface this story by making it clear that I am NOT a hunter but I do now understand why we SHOOT deer in the wild... I never liked the taste of venison, too gamey or too wild or too something. So, I had this idea ...that I could rope a deer, put it in a stall, feed it up on corn for a couple of weeks, then kill it and eat it. The first step in this adventure was getting a deer. I figured that, since they congregate at my cattle feeder and do not seem to have much fear of me when we are there (a bold one will sometimes come right up and sniff at the bags of feed while I am in the back of the truck not 4 feet away), it should not be difficult to rope one, get up to it and toss a bag over its head (to calm it down) then hog tie it and transport it home. I filled the cattle feeder then hid down at the end with my rope. The cattle, having seen the roping thing before, stayed well back. They were not having any of it. After about 20 minutes, my deer showed up-- 3 of them. I picked out a likely looking one, stepped out from the end of the feeder, and threw my rope. The deer just stood there and stared at me. I wrapped the rope around my waist and twisted the end so I would have a good hold. The deer still just stood and stared at me, but you could tell it was mildly concerned about the whole rope situation. I took a step towards it, it took a step away. I put a little tension on the rope, and then received an education. The first thing that I learned is that, while a deer may just stand there looking at you funny while you rope it, they are spurred to action when you start pulling on that rope. That deer EXPLODED. The second thing I learned is that pound for pound, a deer is a LOT stronger than a cow or a colt. A cow or a colt in that weight range I could fight down with a rope and with some dignity. A deer-- NO Chance. That thing ran and bucked and twisted and pulled. There was no controlling it and certainly no getting close to it. As it jerked me off my feet and started dragging me across the ground, it occurred to me that having a deer on a rope was not nearly as good an idea as I had originally imagined. The only upside is that they do not have as much stamina as many other animals. A brief 10 minutes later, it was tired and not nearly as quick to jerk me off my feet and drag me when I managed to get up. It took me a few minutes to realize this, since I was mostly blinded by the blood flowing out of the big gash in my head. At that point, I had lost my taste for corn-fed venison. I just wanted to get that devil creature off the end of that rope. At the time, there was no love at all between me and that deer, but I figured if I just let it go with the rope hanging around its neck, it would likely die slow and painfully somewhere. At that moment, I hated the thing, and I would venture a guess that the feeling was mutual. Despite the gash in my head and the several large knots where I had cleverly arrested the deer's momentum by bracing my head against various large rocks as it dragged me across the ground, I could still think clearly enough to recognize that there was a small chance that I shared some tiny amount of responsibility for the situation we were in. I didn't want the deer to have to suffer a slow death, so I managed to get it lined back up in between my truck and the feeder - a little trap I had set before hand...kind of like a squeeze chute. I got it to back in there and I started moving up so I could get my rope back. Did you know that deer bite? They do! I never in a million years would have thought that a deer would bite somebody, so I was very surprised when ..... I reached up there to grab that rope and the deer grabbed hold of my wrist. Now, when a deer bites you, it is not like being bit by a horse where they just bite you and slide off to then let go. A deer bites you and shakes its head--almost like a pit bull. They bite HARD and it hurts. The proper thing to do when a deer bites you is probably to freeze and draw back slowly. I tried screaming and shaking instead. My method was ineffective. It seems like the deer was biting and shaking for several minutes, but it was likely only several seconds. I, being smarter than a deer (though you may be questioning that claim by now), tricked it. While I kept it busy tearing the tendons out of my right arm, I reached up with my left hand and pulled that rope loose. That was when I got my final lesson in deer behavior for the day. Deer will strike at you with their front feet. They rear right up on their back feet and strike right about head and shoulder level, and their hooves are surprisingly sharp... I learned a long time ago that, when an animal -like a horse --strikes at you with their hooves and you can't get away easily, the best thing to do is try to make a loud noise and make an aggressive move towards the animal. This will usually cause them to back down a bit so you can escape. This was not a horse. This was a deer, so obviously, such trickery would not work. In the course of a millisecond, I devised a different strategy. I screamed like a woman and tried to turn and run. The reason I had always been told NOT to try to turn and run from a horse that paws at you is that there is a good chance that it will hit you in the back of the head. Deer may not be so different from horses after all, besides being twice as strong and 3 times as evil, because the second I turned to run, it hit me right in the back of the head and knocked me down. Now, when a deer paws at you and knocks you down, it does not immediately leave. I suspect it does not recognize that the danger has passed. What they do instead is paw your back and jump up and down on you while you are laying there crying like a little girl and covering your head. I finally managed to crawl under the truck and the deer went away. So now I know why when people go deer hunting they bring a rifle with a scope......to sort of even the odds!! All these events are true, so help me God...An Educated Farmer1 point
-
This may be of interest: I just estimated the weight reduction by replacing my 4 6-volt AGM batteries with the Battle Borns, and replacing the Dometic AC with the Houghton. Our Ollie may have lost about 300 lbs (along with about 1 inch of height).1 point
-
That looks like a great system. How much trouble was involved in installing the Zamp portable hookup plug, or was that already wired into your system?1 point


.thumb.jpg.e34bf01ef7f7d5e99ad31856d45afbeb.jpg)


-
Recent Achievements
-
")


