Leaderboard
Popular Content
Showing content with the highest reputation on 09/29/2023 in all areas
-
My inverter wouldn't switch from battery to grid mode when I connected to shore power. The mechanic found that the neutral cable into the transfer switch had come completely loose, so the inverter in fact wasn't getting any shore power. It has been reconnected, snugged down tight, and so far, everything is working properly.4 points
-
Here’s the part that broke on our Dometic 311 toilet, and the repair process. Foot Flush lever - broken center shaft. No Dometic repairable parts. Note, we could still manually reach down and flush the toilet as temporary work around. 10 steps in the repair 1) ordered a new Dometic model 311 toilet with slow close heavy duty lid. Opened and inspected new fixture to assure all parts are there and no damage. Dometic Model: 311 Mfg#: 302311681 Amazon $261.00 Note: It comes with new seal already installed on bottom of toilet and new T bolts, nuts and plastic covers. 2) Turn off water valve behind toilet & flush toilet and inspect no water in bowl or clinging items down drain. Remove water supply line on bottom/back of toilet. 3) pop off plastic caps from mounting bolts on both sides of the toilet with flat blade screw driver. 4) use 7/16 wrench to remove the 2 toilet mounting bolts. 5) pull toilet straight up then pivot back out of bathroom. 6) on the mounting ring, remove existing t slot bolts and clean mounting ring and seal mating surface. If mounting flange has no cracks or breaks, then continue. (If you have cracks you can buy a steel toilet flange repair ring that mounts on top of the existing plastic body.) 7) insert new T slot bolts into flange so they are parallel to the front of the shower pan. ( 3 and 9 o’clock) 😎 Lower new toilet down over mounting bolts. The toilet will not be fully down on surface until you tighten the bolts. 9) use 7/16” wrench to tighten bolts alternating from one side then the other to compress the seal. Don’t over tighten either side, just slowly tighten until the toilet is flush with floor all around the base. 10) hook up water and test flush checking for any leaks around toilet base or water lines. This took me 30 minutes. The RV Park in Moab we were at let me ditch the old toilet in the shipping box in their dumpster. We are back to foot flushing. As an added benefit, our new toilet has a very substantial slow close lid.3 points
-
I passed an Oliver in GTNP on Tuesday 9/26 — they were heading south on the road. No opportunity to catch their state or identification, but it made me smile, to see another Oliver, looking good rambling down the road!3 points
-
10 amps is appropriate, your 100 watt panel will never put out more than 7, at best. It looks like a standard ATC type. Buy a set of spares for the future, in all sizes. John Davies Spokane WA2 points
-
One advantage of rubber stem mounted sensors: first thing in the morning before departing, make sure your monitor is awake, then walk around and do your tire and wheel inspection, and rap each sensor a couple of times with your finger. This will trigger a new signal to the monitor. As you leave you can see TODAY’S pressures, not yesterday’s!!! If a tire picked up a nail yesterday it could have been slowly deflating all night. Read and learn: https://olivertraveltrailers.com/forums/topic/6043-article-on-how-tpms-sensors-operate/ Turn in your junk wheel without the rubber, and you should get about $14 or $15 for it.. or hang it on your garage wall as a keepsake. I hope you turned in a Service Request about this, maybe a bad batch of tires? Oliver needs to know when these events happen. I am glad the Ollie survived. The rubber scuffs will buff out. John Davies Spokane WA2 points
-
KenB, please post a follow up, especially if you have some wind, I wonder if the trailer will rock more? How many more AHs? Etc. The reason I put up my “HOW TO links page” is that after about a dozen threads, I realized that having them all in one location could really help somebody find them, especially years later, and that page can be added as a bookmark. For those other members with lots of tech threads, you could do the same… start your own page. John Davies Spokane WA2 points
-
In the spirit of the debate tonight. Well Sir, you got one thing right, the Jack works! But when it comes to Navy, you should cheer…they need it. The Air Force is taking the Commander’s trophy this year. Cheers Brother! Aim High!2 points
-
2 points
-
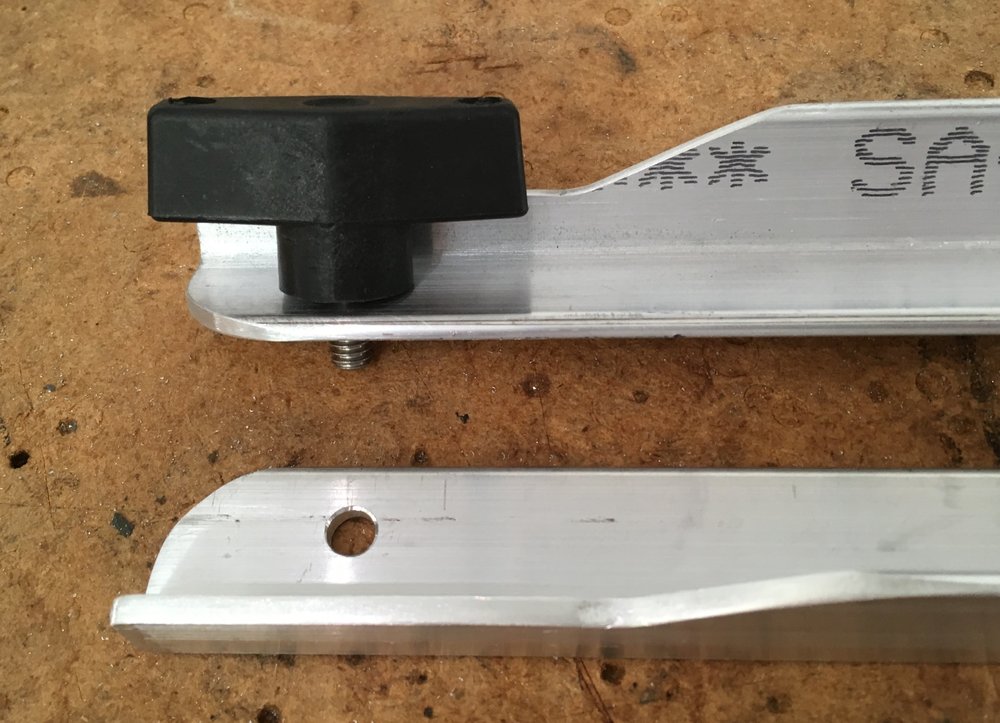
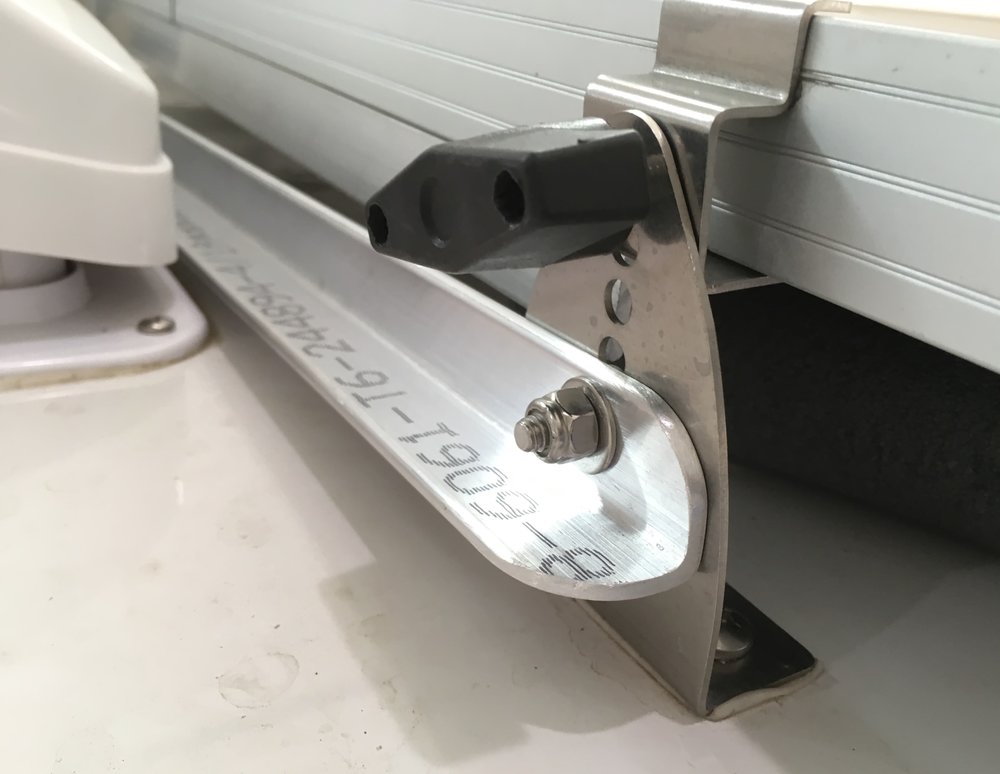
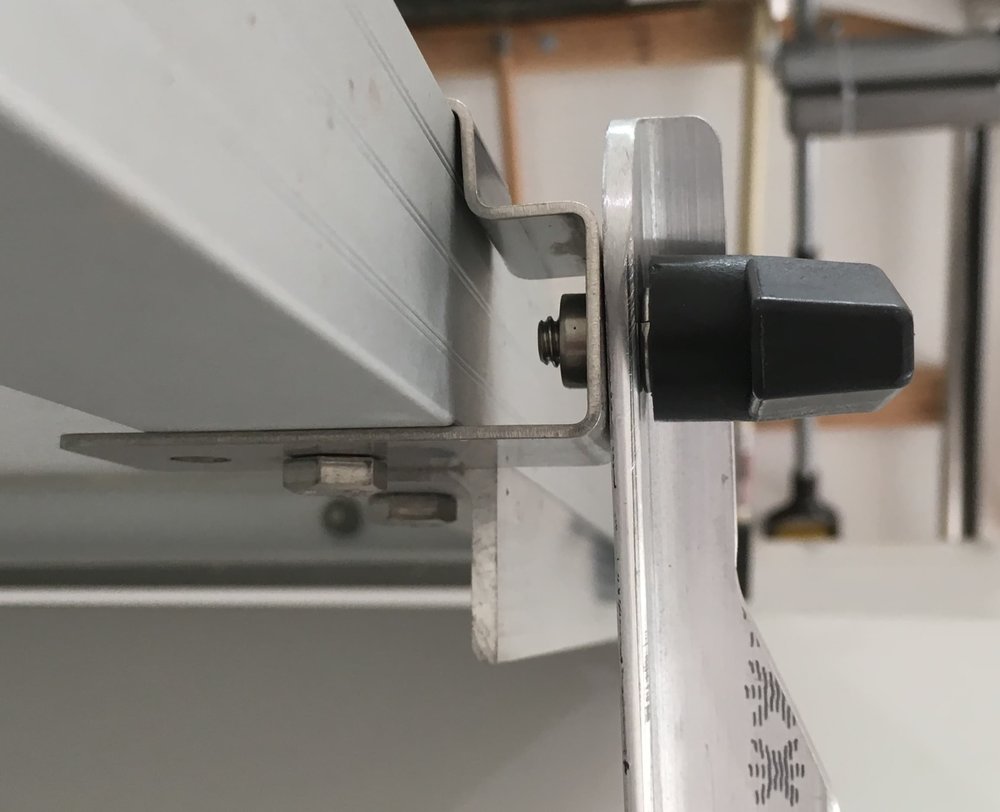
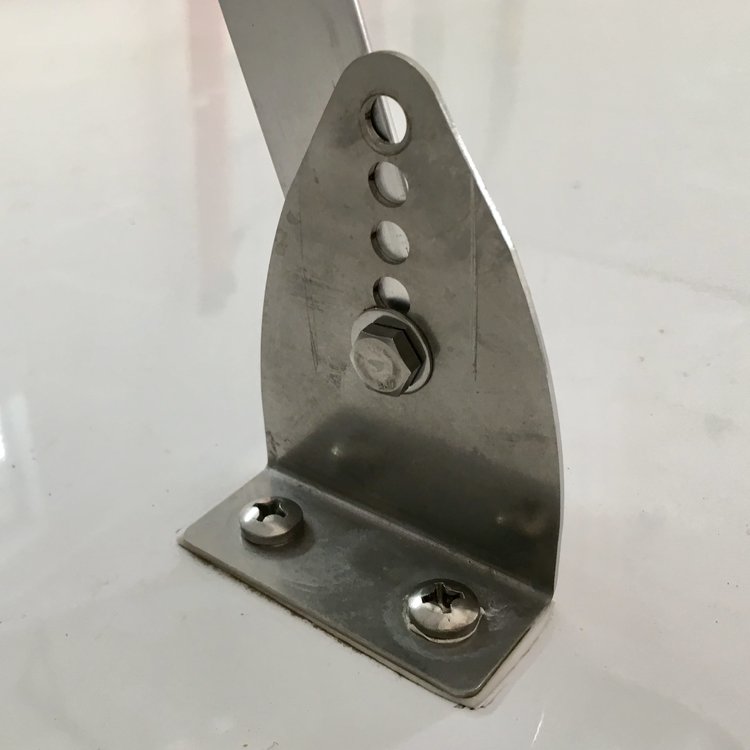
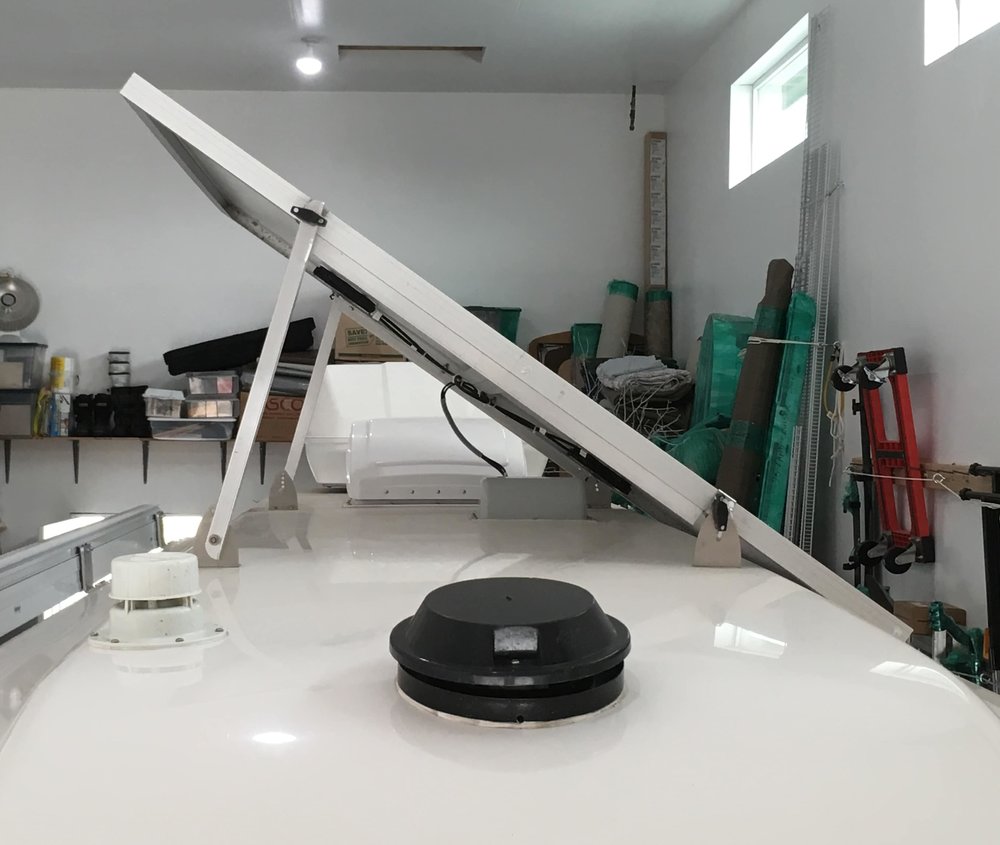
This mod is great for either working on your roof, for repairs or detailing, or for angling the panel toward the sun if your Ollie is parked long term, such as in the off-season. I used the following: 40” of 6061-T6 angle, 1 x 1 x 1/8”. For ease of fabrication, you could use 1 x 1/4” flat bar. I wanted angle since it is more rigid for the same weight, but I think the flat bar would be adequate. 2 - 1/4-20 x 1” stainless bolts, 4 - flat washers 2 - self locking nuts (nylocks) Cut the material into two 20” sections. Drill a 1/4” hole 1 inch from each end along one side of the angle. Center the holes in the inside of the angle (3/8” in from the edge). Since I wanted to use the existing knobs at the top of the arms, I trimmed away a section to allow the “ears” to clear. I left a 3/8” wide section for strength. You need to make two “mirror image” arms (front and back). Radius the corners, and file and sand with 180 grit paper. A workbench belt sander like my 4x36” Harbor Freight one works great for this. To use the arms, you have to climb up carefully with a ladder with padding under the top part. You can start at either end of the panel, the right side is shown in the pics. Attach the appropriate arm at the bottom hole of the bracket using a bolt, snug it down. Make sure that it can rotate up. Remove the knob and let the panel settle. You can put some foam underneath but I didn’t need any. Go to the other end and attach the second arm. Remove the knob, raise the panel and screw the knob back through the arm, into the panel. Go to the other end, raise the remaining arm, and secure it. You can see in the above pic that there are lots of threads sticking out the back of the nut, so if you use thicker 1/4” flat bars, they should work fine. If you are going to leave the panel up long term, in the weather, tighten the lower bolts and all knobs. If you are just going to have the panel up for maintenance you can leave the lower ones slightly loose. With the arms in the bottom holes of the roof brackets, the panel will be at a 35 degree angle. You could get a few extra degrees by selecting higher holes, but the other end of the panel frame might hit the gelcoat on the roof. Use caution. I have NOT tested this mod outside in strong winds. It feels very solid when the hardware is tight, but I cannot guarantee how well it will work in violent weather. Use caution. I thought about not mentioning this last part, but I will anyway.... Please leave a prominent note inside the trailer on the table, or a bright piece of surveyor’s tape flying from the panel, so you do not drive away with the panel up. John Davies Spokane WA1 point
-
This also happened to me when I flushed the toilet not realizing the pipes were still frozen. Non replicable part. I first tried to glue it with a special "epoxy plastic glue". Worked for about three days. Did the same as others and ordered a new toilet, scavenged the useful parts I needed and discarded the rest of the toilet (what a waste for such a small part) After discussing the problem with a friend, he suggested searching the web for a 3D printing file of the part. He mentioned a lot of small parts like this get scanned and the files are posted to the web. Then one can have it printed locally (or he offered to do it for me) I know nothing of 3D printing how it works or what it takes to create a file for a small part but if someone had the knowledge and resources to create such a file, they would be making an immense contribution to mankind; or at least to those of us who had to learn the art of hand flushing the toilet.1 point
-
...that's an understatement this year! New coach, small/younger team - not good. Anchors aweigh!1 point
-
You might try a PM to Patriot - I believe that he has this genny. Give him a couple of days for reply in that I believe that he is currently on the road. Bill1 point
-
Just wanted to say Thank You to John for putting this mod documentation together. I knocked out a set of extension arms tonight. Tomorrow we are heading up north to some property we have. The camper is parked there for most of the summer and fall, but it's boon docking only. As the sun drops lower and lower on the horizon, the panels often can't keep up after a number of cloudy days and the additional load of running the heater occasionally at night during the fall. The fall color prediction from the Minnesota Department of Natural Resources this weekend is 50-75% of peak up at the camper. Temps will be 60-80 degrees, so not much use for the heater this weekend. I'm looking forward to trying out the arms and seeing how much they might improve solar charging. Thanks again John.1 point
-
I used Eagle Rock RV Service in Idaho Falls, ID for a lube and wheel bearings pack. They were great.1 point
-
I just had an electrical system overhaul done by Royal Coach RV in Bakersfield, CA. They did an excellent job.1 point
-
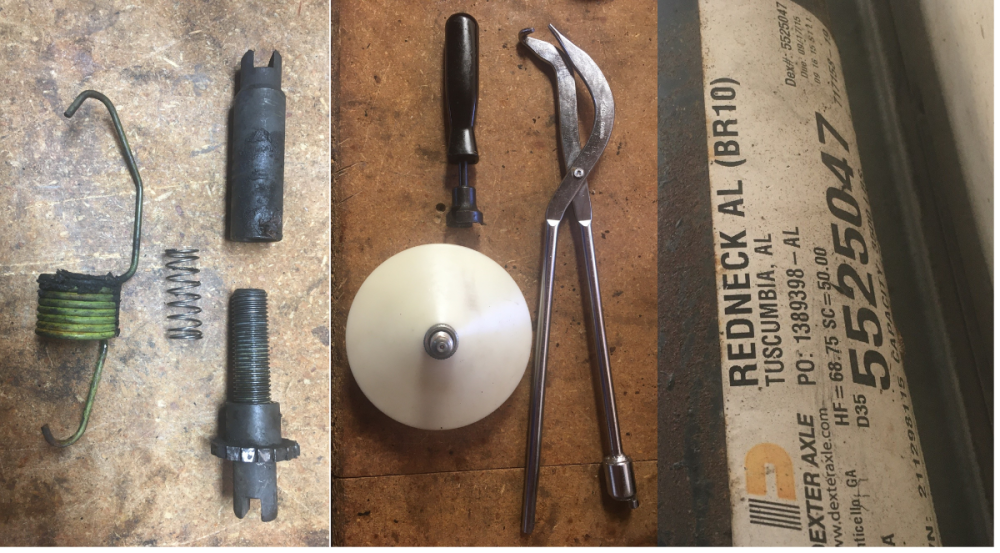
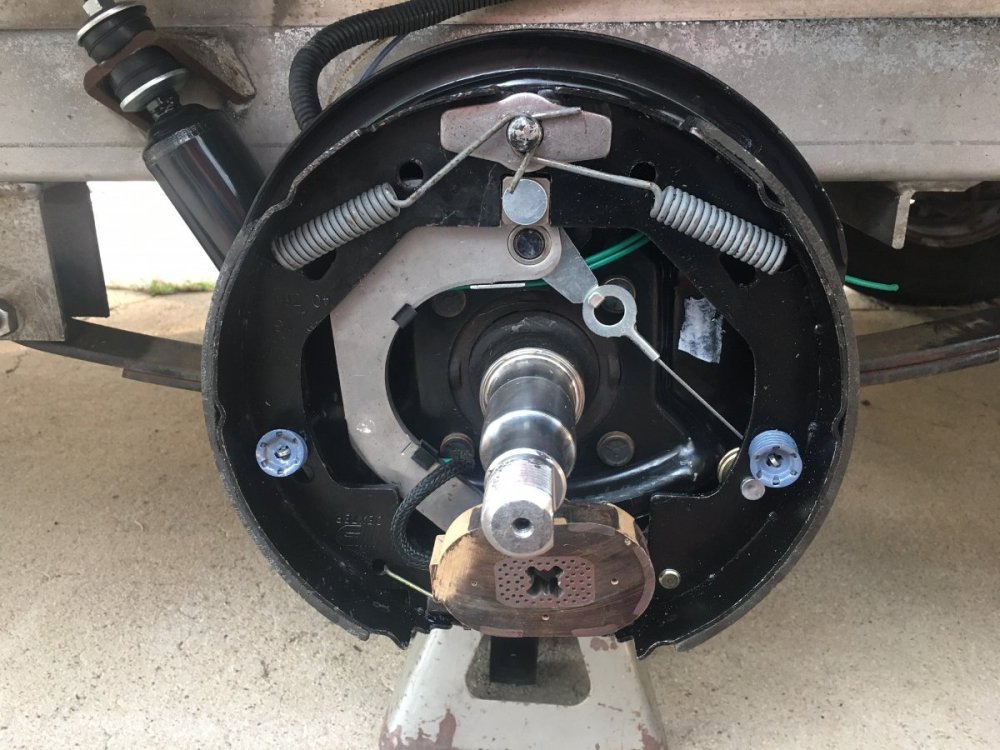
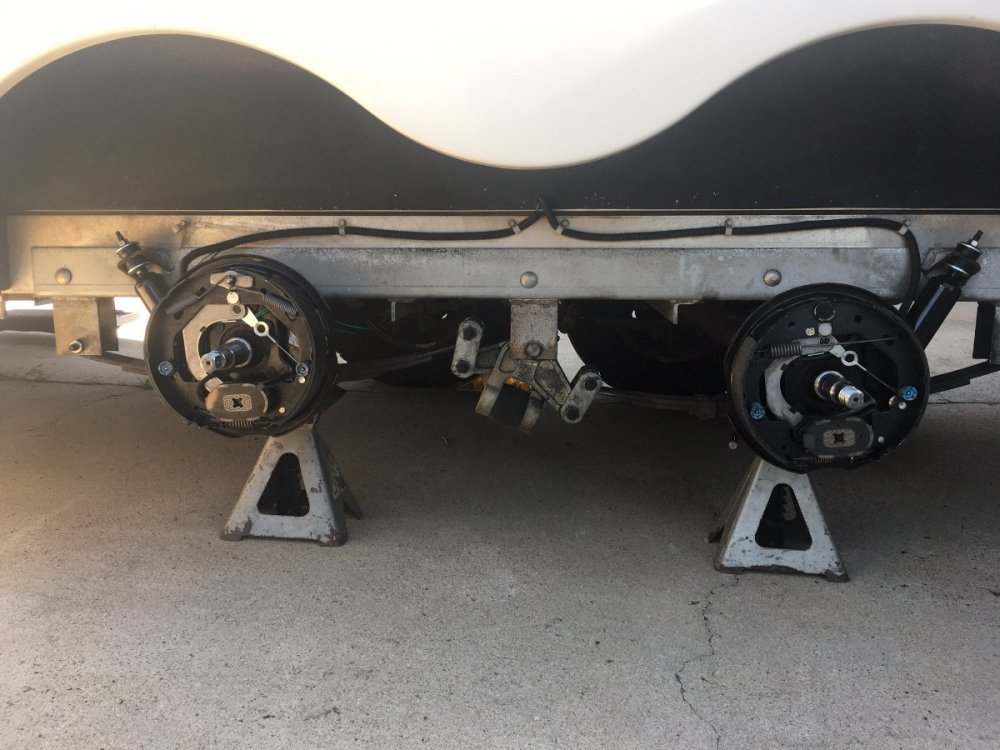
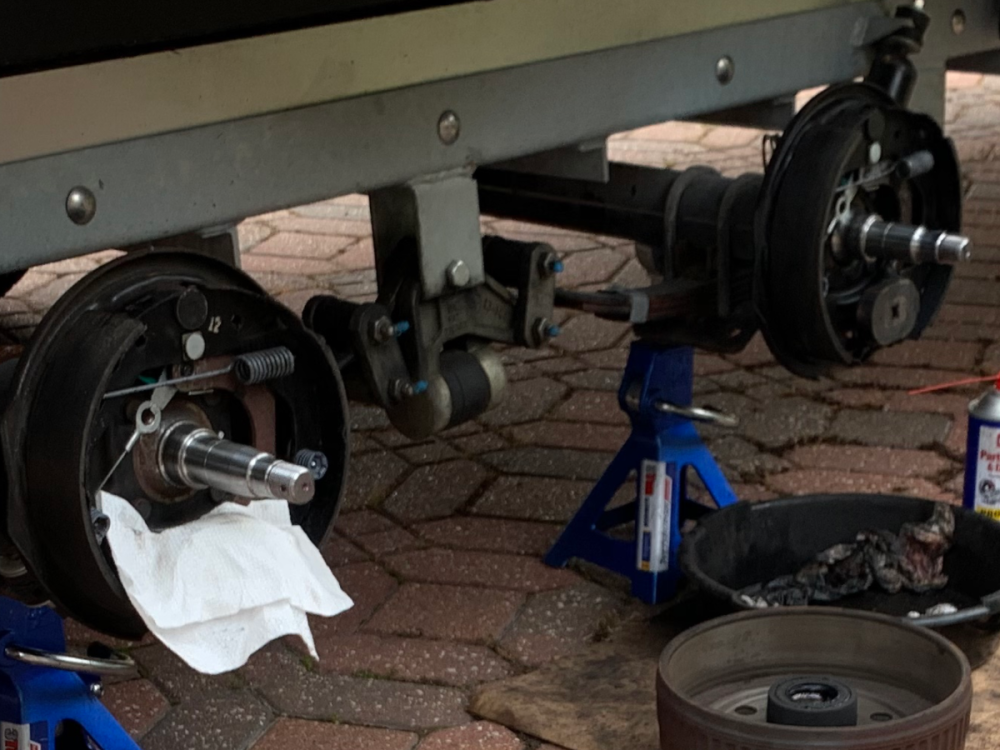
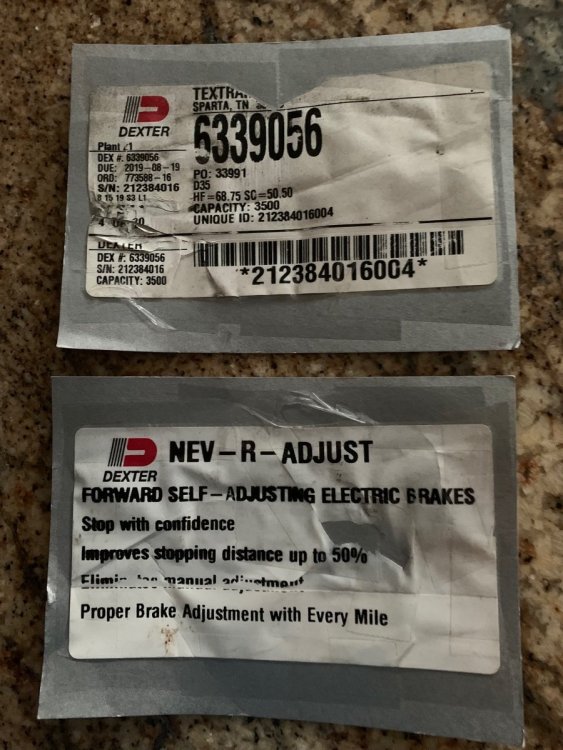
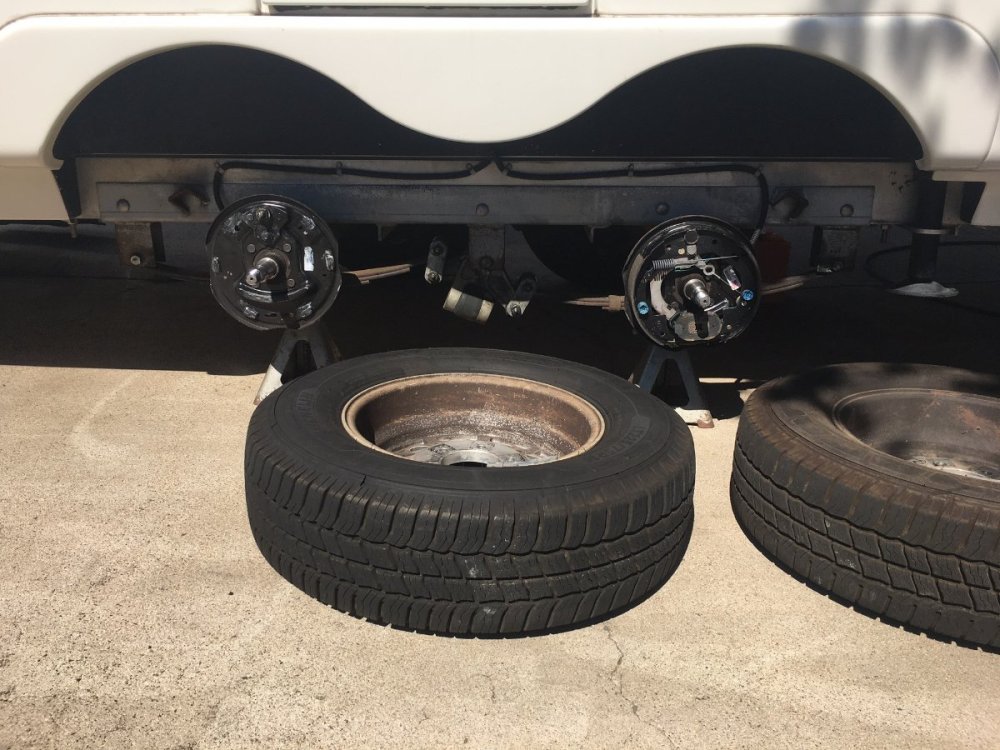
Thank you @topgun2! Got the streetside bearings done yesterday. I was able to find sockets the correct diameter to press in the races. Packed the bearings with a convenient tool, otherwise it's a large swab of grease in your palm. Removed the adjuster from the rear wheel to grease after having pressure washed this assembly. I ended up removing ALL the brake parts to grease the contact points and did some additional cleaning on the back sides of parts. When I work the streetside I will first remove ALL brake parts and pressure wash only the backing plates and suspension. You need these tools to do the complete brake job. Wondering how y'all use Brakleen and apply grease where it is needed, as this spray will remove the grease as well as pressure washing. But I really don't need to know, just won't use the messy spray. When I disassemble parts, I clean them by hand with GoJo hand cleaner, rinse with water and use compressed air to dry, and they will come out as clean as the one pictured above! The two axles both had identical labels, see label/part number, and there was another label "Nev-R-Adjust" on both. Love the REDNECK AL label - LOL! My front axle must be the older version. The only differences are as follows; There is a different top post which does not need the oblong assembly plate, there are two springs (easier to remount with drum brake tools) vs the one main cross spring. The self-adjusters are identical with one exception. The second one has the spring (pictured). I don't see any purpose for the spring, except to hold the adjuster nicely to the shoes during assembly. The spring is extremely light duty and can't do much, or is this the reason why some shoes "over-tighten?" Hmm, probably not. I've done brake jobs on a dozen 50s-60s-70s cars with drum brakes. They all had the two top shoe springs with oblong plate, never a large cross spring, and I don't ever remember having a spring in the adjuster! Tested the brakes, wheels on and truck attached. My son Adam hit the brakes as I was spinning the wheels. My heart sunk as the wheels did not stop! I could hear the magnets powered. What could be wrong? I had to rewire the front brakes, due to pack rats chewing the wires, but power to the magnet does not have a specific polarity. One wire needs power from the blue/brake wire and the other needs ground. They were working last week when I moved the trailer. Then we jacked up the other side, that I had not yet worked, same thing no brakes. Turned power up full on the brake controller and finally wheels would stop, but only a little. Symptoms are looking like a weak ground. It turned out to be the connection at the hitch. Our trailer plug, looking old, has a damaged/recessed ground blade. Must have achieved ground last time, but not anymore. Went on Amazon, ordered a new one and some dielectric grease! I'm thinking a day off this project, before I tackle the other side! 😊1 point
-
When I repaired my fan cover I had to replace my old gasket. I used a adhesive backed foam molding that comes in a roll from the hardware store. I match the thickness of the old gasket which was thin about 1/8 of a inch, so far that has been working.1 point
-
Rebuilt the front axle brakes and greased all contact points with silicone brake grease. Today I will remove the adjuster spring on the rear and apply grease there, since yes, the pressure wash cleaned it dry. Installed the new shocks (don't over-tighten the rubber bushing). Amazon used was good for 3 out of 4, one was blown, as you could compress it easily by hand and it would sit there and return very slowly. I submitted a return on that one and ordered another one at the new price of $34. Good practice with new shocks, out of the box, is to fully compress them, and allowing them to expand, 2-3 times. My Timken seals arrived from eTrailer yesterday, so I will finish up the left side and start the right. They certainly look of better quality, with made in USA printed on both sides. BTW, if you have the original CHINA bearings, and they have been maintained, just clean them well and repack them and you should be fine for some time. For my Oliver, with dubious maintenance history, thought it was the right time to install new bearings. I like to get my vehicles fully serviced, while I'm still able to do this kind of work. And we're not like some of you who put 10K miles on a year! For us, 3000 miles would be a big year (I like to be home!). Like to plan our RV trips, driving just 2-4 hours a day, boondocking between other stops. I do not plan to open these drums, grease the bearings again for a few years, after I get them right. I understand the suggested maintenance schedule, often written by legal departments and not experienced mechanics. Also, not driving through major rainstorms, as JD had mentioned, which is a rare case in the SW. We pull over and wait out such storms!1 point
-
On the differences between brake assemblies, probably a redesigned version in order to manufacture the assembly more cheaply (inexpensively). Oliver purchases the axle assemblies by the pallet load and just grabs two at a time for each LEII. They don’t disassemble them for inspection other than checking to see that externally they aren’t damaged. As a side note, after pressure washing the brake assemblies I’d recommend removing the adjusting screw assembly and disassembling it and thoroughly cleaning/lubricating them. I’d be willing to bet that water made its way into the threads and will corrode/lock up the adjuster.1 point
-
Just for reference adding to the discussion, I replaced all of my brakes and hub/drums three years ago. In the process of pricing out the various components (at that time) Textrail (Sparta, TN) was the least expensive even with shipping. For example the complete brake assemblies were $46.03 each left or right for the self adjusting type. I’ve never had any problems with this type, don’t know just saying. The hub/drum assembly complete with bearings (chinese) and seals were $60.36 each. I also have never had any problems with the factory seals. Maybe because I polished the spindle seal area and pre lube the seals a little at installation. The prices from Textrail that I found at the time were half of my local Dexter supplier/trailer shop. With shipping, taxes, everything from Tennessee to my driveway in Virginia $571.03 I have since replaced the bearings with genuine Timken bearings purchased from an industrial power transmission supplier that I have dealt with for years at work and upgraded the grease to Red Line CV-2 grease. Timken bearings are not inexpensive but are of great quality. Also, Textrail is the axle supplier for Oliver (at least they were three years ago) and have offices all across the country.1 point
-
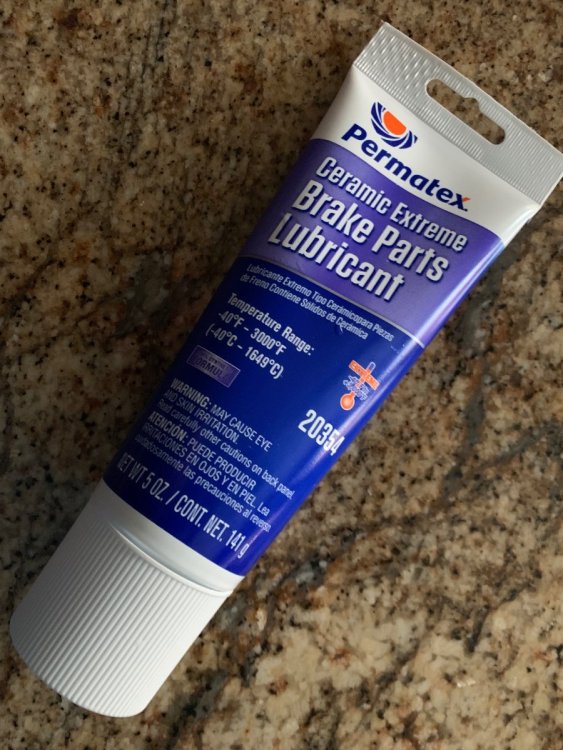
The brake assembly shown on the right is definitely a ‘left-hand’ Dexter Nev-R-Adjust. It will be interesting to see if the corresponding assembly on the curb side is the same, other than being the ‘right-hand’ equivalent. If so, it is possible you have two different axles. Perhaps one was a replacement as you speculate; hard to believe Oliver would mix-and-match axles. Here’s a pic of my curb side; you can see the adjustment cable to the left of the spindle (right-hand version), whereas yours is to the right (left-hand version). You might want to check if your axles still have the manufacturer’s sticker(s). I removed these from one axle for preservation sake. As a side note, to quote John E Davies “Be very sure to lube all the many moving parts of the brakes after a deep clean, they will not work properly otherwise.”, this is what I use.1 point
-
My 2020 Ram 6.7 Diesel has exhaust brake, I think it was standard or maybe it came with the tow package. Either way, like Patriot and others I use it a lot. Mike1 point
-
Thank you Patriot🇺🇸, you have an amazing TV in your "2021 F350 6.7 liter Diesel Lariat..." OMG, wanna trade? LOL! New model Ford F250/350s with the PowerStroke diesel engine, have an exhaust brake accessory. I'm not sure if it is standard, or an option that comes with a special tow package. Perhaps the new Rams also have this, but not us old Ram 5.9 Cummins. It's pricy, but the purchase price of my TV was a steal and I planned from the start to put another $10K into parts for it, me being the primary installer! After I complete my build, I will still be at about 33% the cost of a new diesel truck! This is on my build list (watch the product video): PacBrake PRXB Exhaust Brake Cummins 24V (dieselpowerproducts.com) Keep in mind, we all need good brakes in stop-n-go traffic, both truck and trailer, since an exhaust brake cuts out at lower RPMs. The diesel engine brake is a must for frequent mountain driving. One hour from our home, on the way to Phoenix, is a 4000 FT drop in elevation!1 point
-
@jd1923 with that Cummins diesel engine brake, your truck and new trailer brakes should last a long time👍🏻. I rarely use my truck or trailer brakes on long mountain passes with the engine brake. We are really appreciating the diesel engine brake right now out here in the Colorado Rockies. In my experience, Ford absolutely nailed it on the diesel engine brake in our TV. It works excellent. Nice job on the rebuild! 👍🏻 Patriot🇺🇸1 point
-
jd1923, CRC non chlorinated brake cleaner is $6 at my NAPA store, on sale now for $5, I buy by the 12 count case when they heavily discount it. You have to be very wary of getting all that nasty dirty oil on a clean driveway, it may not all come out. It is better IMHO to catch it all in a pan using the cleaner, then let the solvent evaporate off for a few days. then wipe your pan with solvent and paper towels and let them flash dry before disposal in the trash. I have pressure washed AFTER degreasing the nasty bits. Be very sure to lube all the many moving parts of the brakes after a deep clean, they will not work properly otherwise. Don't forget the adjust linkage and where the shoes rub the plates. It sure does look pretty tho, I would have guessed that the paint would fly off. John Davies Spokane WA1 point
-
Got to pressure washing yesterday! It really turned out nice. Had to lay on the ground under the trailer to clean the backside too. I'm not fond of the Brakleen type sprays. First you're wasting a couple cans of this chemical at close to $10 a can and it gets so messy as you can see in Ronbrink's pics above. After pressure washing you just need to pressure-wash your driveway a bit to run the dirt off. On the edge of our driveway, we have a landscaped wash, and the dirt just joins other Arizona dirt downstream! I took the front brake assembly apart and cleaned each part by hand and the pressure washed side looks almost as good. Did the backside of the wheels and tires too. You can also see the wheels before and after below.1 point
-
SomeDaySoon - Thank you for joining - it wasn't really very difficult (Was it?). Certainly we can use any help that you are willing to provide to include your knowledge of Canada's National Parks. If your goal really is to see all there is in Canada and the USA - I'd strongly recommend that you get started. Every single time I hit the road I see something new and that's even if I go back to the same place that I've been before. Simply put - there is not enough time and the sooner you get to it I'm guessing that there will be even more for you to find. If there is anything that we can do to help your journey - please - ask. Welcome! Bill1 point
-
Indeed, it is the upward travel that is lacking. Do you plan to carry an air pump? Run your trailer tires at 42-45 psi all the time and lower that number if you have more than say five miles of washboard. Rock hard tires and crappy suspension kill parts and belongings. John Davies Spokane WA1 point
-
I found that my TPMS would alarm without the transmitter after traveling about 1/2 hour. I cut off the alligator clips on the transmitter and sodder on a USB connector onto the wire that I can connect into the Ollie USB connectors. The transmitter, using velcro strips, is located above the dinnete table. Works pretty slick and no more false alarms.1 point
-
This is how I discovered a brake failure on a previous trailer. The brake assembly fell apart due to a broken spring and the parts were rattling around inside the drum. I noticed that wheel was running hotter than the others - but not hot enough to trigger an alarm - so I pulled over to check. The early catch may have prevented spindle damage.1 point
-
1 point
-
In order to clarify this statement - Most (if not all) TPMS systems will alert you to "issues" with a tire - such as sudden loss of pressure, or pressures or temperatures that are outside of a predetermined range that you set. And, the TPMS system that integrates with the Ford system and screen will do this too as I assume that the other truck makers do. However, I've found an unexpected plus to having the stand alone monitor is that I'll watch it keeping an eye on the relative differences between tire temp and tire pressure under varying road and climate conditions. All things being equal - tires running on a concrete road will have a lower temperature and pressure than those running on a black asphalt road on a sunny day. smooth road. Generally, the same statement is true for a rough surfaced road versus a smooth road. So, how does one decide on what tire pressure is correct for their particular trailer? In the pages of this Forum there have been many posts that flat out state that one should NEVER have tire pressures under "X" or above "Y". These statements may or may not be correct for the particular trailer the poster is referring to under the conditions that they normally drive - or even those conditions that may be encountered from time to time. Trailer weight, the roads that are normally driven or even specifically driven, the speeds at which they drive, the weather, etc., etc. all influence the decision as what tire pressures are appropriate for any given situation. Indeed, many of these posters will "admit" to "airing down" for those times when they travel on rough (dirt) roads. This is done for basically two reasons: 1 - for better traction; 2 - softer ride. Interestingly, this is one of the same problems that we are all trying to solve when deciding what our "normal" or "regular" tire pressure will be. We don't want to have such a high pressure in the tires such that they are like (to borrow an oft used statement) rocks. Nor do we want a tire with such low tire pressure as to cause it to heat up too much in "normal" driving. By keeping an eye on my tire pressures while also seeing the tire's temperature I can make a rough judgement as to when or why a tire is reacting to any particular situation. For instance (for my Ollie loaded for a "normal" camping trip), I will set my tire pressures at 60psi. But, the weather changes and/or one of the main roads I'm traveling has been repaved from concrete to fresh black asphalt and I note that my tires are increasing more than about 1 psi for every 10 degrees increase in air temp. Depending on how long or how severe this situation might continue, I might decide to add 3 or 4 psi. This is a bit counter intuitive but note that a harder tire (more psi) will have less rolling resistance and therefore run cooler than a softer tire. Another way of thinking about this is that a softer tire (less psi) will have more surface of the tire on the road and will "squirm" or "flex" more thus causing more friction and thus more heat. Over time I have been able to predict (generally speaking) what tire pressures are about right for me and my Ollie. But, just because I chose to run my tires at a certain pressure does not mean that this is the correct pressure for your Ollie in any given situation. We all want as soft a ride as possible while at the same time we want good traction, high tire mileage and most of all safety. By having the information provided by a TPMS we not only increase our immediate safety but we also obtain information from which we can make informed decisions as to satisfying some of the other conditions present when operating in a constantly changing environment. Bill1 point
-
When I ordered our Silverado 3500, I also ordered the trailer tire sensors and the rear camera that goes on the rear of the trailer. They were delivered with the truck from the factory. If you have a tire problem with one of the truck or trailer tires, it will pop up on your DIC. You do not have to actively monitor a separate screen to check the tires. It's all integrated into the truck.1 point
-
“HOW OFTEN IS A SENSOR TRANSMITTING INFORMATION? This varies among manufacturers, but generally, sensors have different settings while parked and while in motion. The better question is what causes the sensor to transmit? When a sudden change in pressure is detected, the sensor should transmit whether the sensor is stationary or moving. When the tire starts to roll, tiny accelerometers cause the sensor to wake up and start broadcasting at regular intervals. In rolling mode, sensors transmit, on average, once every 30-120 seconds. While parked or in stationary mode, depending on the manufacturer, sensors may transmit only when a significant pressure change is detected. If a TPMS sensor transmitted all the time, a sensor would not last very long. Most TPMS sensors will transmit when movement is detected through a simple accelerometer inside. If the wheel stops moving, the sensor will stop broadcasting after a programmed amount of time. But once it is triggered, the sensor transmits on a predetermined interval set by the manufacturer. A sensor will immediately send a signal if it detects a sudden loss in pressure.” https://www.underhoodservice.com/tpms-radio-frequency-theory-and-operation/ Mine has screw on sensors, and when getting ready to leave in the morning I “wake up” each one with a couple of raps from my finger so they transmit today’s value, not the one from when I arrived, in case one of the tires picked up a nail and was quietly deflating overnight. I would much prefer to see that warning or low pressure reading in the campground than a couple of miles down a busy highway… and this is a great reason to NOT choose a type that installs inside the tire. You can’t wake those up except by driving away. John Davies Spokane WA1 point
-
We have a Tuson TPMS system with internal TPMS and it is installed in our LEII tires and spare and is very good. They provide a transmitter for the trailer if it is longer than 18 feet as I recollect. I installed it too. I was curious on how it reads the spare and was pleasantly surprised to get the info when the trailer is moving. I purchased the activation tool from them to ease the configuration for the spare’s TPMS which was purchased separately. The activator sends a signal to the TPMS that simulates a pressure drop. Alternatively without this tool, I would have had to bleed air from the tire. I opted for the tool. It ended up being important for me to use on the other TPMSes installed so I could get all the tires displayed in the right order.1 point
-
I totally get that. A long way to go for a few little holes. You might want to try a small tube of marine tex (Amazon and lots of other places) on the screw holes, and see what you think. Here's a good YouTube on repairing holes in a white hull with marine tex. Good luck. Like I said, worst that happens is you hate it, and sand it and do the tedious gel coat repair over the top. You still have to fill the hole. Or, take it to a boatyard. Just guessing there aren't many in Montana. Good luck! Sherry1 point
-
I had a noise coming from my PD4060K Power Control Center only when plugged in to shore power, with the charger in storage mode at 13.2 volts and with nothing on in the camper. The charger will normally make a faint hum, but this was a loud noise. The instant anything was switched on the noise would either change pitch or completely quit. KountryKamper listened to it at the rally and told me some things to try but I couldn’t get the noise to stop. I called Progressive Dynamics and told them what was happening and they immediately said that they were aware of the problem and would send me a new converter module. The following picture shows the old and new modules side by side on my work bench. The new larger module fit in the space where the smaller old module had been. This photo shows the edge of the old module that can be seen with the front panel removed from the power center. This photo shows the edge of the new module that can be seen with the front panel removed from the power center. Again, the charger will normally make a faint hum but if you have a loud noise coming from your converter there is a fix available.1 point
-
JD: I think we ALL agree with you on the backwards hinge/removable cover issue. What a PITA!1 point
-
The fuse clips are very weak, and if you apply any side force to the fuse while inserting it, the ears can spread and then you have a poor connection. I had intermittent fridge operation due to this problem. Check EVERY single fuse by carefully removing and reinstalling it straight! If one fuse is loose, tighten the clip by gently squeezing the little ears together to make a narrower gap. You can use a set of narrow tipped needle nose pliers, and you could do it with power connected if you tape the tips and are brave like me, but it would be best to disconnect power entirely. I am less than impressed with the choice of this unit for an Oliver when there are better marine grade units out there. I consider it to be an unacceptable shortcut on their part foe a premium trailer. I too found an incorrect fuse. The Natures Head one should be 2.5 or 3, they had a 1 amp that blew on Day 2.The mistake was probably due to a simple failure to read the installation manual, it is clearly listed there. John Davies Spokane WA1 point
-
While you are in the compartment looking, check the fuses. The chart on the door doesn't match the fuses that the factory installed, at least in mine. The chart shows the basement should be 15 amp. However what they actually installed was a 7.5 amp. Now I have not had any problems and the 7.5 amp has not blown, so it may be adequate. I guess my concern is if the fuse blows and it is replaced by the 15 amp, have we created a problem? But I also found that I need to carry a fuse removal tool. Laying on the floor trying to look around the door, holding a flashlight, fuses are hard to get too. We also pushed the test button on the propane/monoxide under there too. It did not go off. There is our immediate next project...1 point
-
John, this sounds crazy, but what if you pulled the power center out and put it back in upside down. The door will open the opposite way. It is so close to the floor I have to lay on the floor to see it and even then it is difficult to see with the readers in the bottom of my lenses. Mounted upside down you could lean over the dinette seat with your chest resting on the edge of the seat and look down at it.1 point
-
Any idea if the hinge is swappable? I never understood why this unit does not have a removable cover instead of a hinge, which is very much on the wrong side for the mounting location!!! The only practical way to work inside the front (replace fuse or tighten fuse socket) is to completely remove the table, which is an extremely poor design for a “quick access” breaker/ fuse panel. Thanks, John Davies Spokane WA1 point
-
KountryKamper told me to unplug from shore power and turn the refrigerator on DC on the highest setting and pull the batteries down to 12v resting voltage. Took several hours but I got the batteries down. Then he had me plug back in to AC and leave the refrigerator on DC on highest setting. Well that did the trick. With the charger trying to recharge the batteries and the refrigerator on DC the EMS display showed 27 amps and that little fan was blowing like crazy. So this test ruled out the fan. The fan is actually a variable speed fan and will change speed based on (I think) the temperature.1 point
-
Townesw, Ours was just out of warranty when it failed. They asked if I could hear the fan running, but I never heard the fan run. Don't hear very well anyway after years of riding motorcycles and flying without proper hearing protection. :)1 point
-
Bill, it wasn’t the fan running or trying to run. It wasn’t a hum either, more like contacts chattering. I will try to post a video. I can’t post a video. It is too long and I don’t know how to edit it. If someone wants to hear the sound let me know and I will email it to you.1 point
-
Noise might have been the fan. Replaced ours because of charging problems.1 point
-
Gregg, The Progressive Dynamics power center is the device located under the dinette. And yes, I have to stop and think about Progressive Dynamics and Progressive Industries. Edit: Well I had to think a minute. My Progressive Industries EMS-HW30C is also located under the dinette seat in the same compartment as the Progressive Dynamics PD 4060K power center.1 point
-
Been carrying a similar device as the Anderson Rapid Jack since we had a blow-out on our AS back in 2012. Its not light, but like @Brian and Brandylyne noted, it saves time and the rear jacks. Cheers, GO NAVY beat AF!0 points
-
Recent Achievements


