Leaderboard


Popular Content
Showing content with the highest reputation on 11/25/2023 in all areas
-
Those seals are considered to be " consumable" parts, meaning you should just replace it and move on, But you are correct, that was an installation error. Coat the oring with a silicone dielectric or plumbing grease every time and you won't see further problems like rolling or tearing. You can buy tiny tubes at $10 per ounce, this one a much better value and a great product; it can also be used to moisture-proof electrical connections. I always use it on every oring, such as those on my PCP air rifles. and always on spark plug boots. I have been using this particular DC4 product for over 40 years. Now that I am retired from fixing airplanes, a big tube like this lasts me about ten years... 😉 Dow Corning 4 Electrical Insulating Compound 5.3 Oz (150 g) Tube (1, Single Pack) John Davies Spokane WA
 5 points
 -
Happy Huskies: Magnus and Oscar are absolutely beside themselves with the light dusting and our first winter wonderland this morning....
4 points
-
One of the major reasons we bought the Oliver was knowing when it was time to sell, we could do it in a more personal way here. This is a terrible decision by Oliver Travel Trailers and I hope they will reconsider.3 points
-
Trashcan turkey is at 156. Another 15 minutes or so. Everything else is done. Stuffing, squash, mashed potatoes
3 points
-
Inside vs. outside should make little difference (even in Wyoming where wind chill can be brutal) because when in the battery compartment, the batteries are fairly well protected from wind. The connection to shore power should keep the battery warming mat, on what must be your 390 Ah Lithium Pro Package, well supplied with power. For what it's worth, we store our Hull #1291, with the Lithium Pro Package and the battery warming mat, in an enclosed but unheated shed, connected to 30A shore power, during our central Idaho winters. We get nighttime lows barely below 0 F at times, and have not had any issues. Lows much colder than that are rare. What night time lows do you commonly get in your part of Wyoming in the "dead of winter"? If much colder than 0 F at any time, I would open a service ticket through which to ask Oliver Service what the temperature limits of the battery warming mat are, even when continually supplied with shore power.3 points
-
I would call the battery manufacuture (or OTT) and tell them your winter weather temperatures and ask them what they recommend for storage and degree of charge on the batteries prior to removing. If you do remove your batteries I recommend: - Shut off the power switch from your solar panels to the battery compartment. - Take a picture of the batteries-wires prior to removing the wires-batteries. - Mark where the wires are connected to and maybe bag the battery wire ends just to be safe.3 points
-
If you do use the space between the beds for storage, keep it on the street side half. Be sure to allow at least 12" of free air space in front of the furnace return air vent on the curb side. The Truma Varioheat furnace installed in all 2023-24 Elite II units will register error messages when the air return is blocked, such as by a storage tub. This is because the furnace air opening is right behind the bulkhead under the bed on the curb side, and it has air flow sensors that should not be blocked. We have even gotten those error messages from the Truma Varioheat in our standard floor plan model when a pair of shoes shifted during travel and ended up in front of the return air vent! We feel your pain. We, too, have searched for storage locations in our Elite II. We have learned the "hard way" that using too much of the tempting space between the beds (or under the bed in our standard floor model) will prevent furnace performance.3 points
-
Some hardware stores sell o-rings in the plumbing department. I have sometimes been able to find a replacement by taking the "old" o-ring to the hardware store and comparing it to what is available. Then, as John Davies has wisely recommended, apply dielectric or plumber's faucet grease to all o-rings before re-installation.2 points
-
You might find some storage ideas in this post. Mossey2 points
-
@ScubaRx, replacing my halogens with leds was much less. They're still working. Cost isn't the only factor. It's workmanship. That's an unknown, til crap happens, and I'm sad for the folks who got a bad batch. The new,,individually switched lights, will be much more expensive, imo, but better lights.2 points
-
It was totally awesome, and a Thanksgiving (friday) to remember.
2 points
-
Sherrill: Absent signature block info about your trailer and TV, one can get and give really bad info. Here is your profile info: If you don't have a hard sided camper, then I would never recommend boondocking for a trans Alaska trip. Just too many opportunities for wildlife to ruin your day. GJ
2 points
-
I love Calvin and Hobbes. I really like my job which allows me to work in a home office which makes all the hobbies I have even more enjoyable.2 points
-
I posted this inside our closet door.
2 points
-
Personally, I find the touch lights very easy to use and efficient. Granted, I’ve had issue with three of them, two under cabinet and one ceiling center, but with each a simple adjustment of the spring (under cover) remedied the problem whether flickering or not coming On. And, they’re fun! When showing the Oliver to prospective buyers, they are always ‘amazed’ when I touch the lights with the back of hand, and they’re faces light up, as well!2 points
-
Even though for most of my trips I travel alone, I still do not use the space between the bed to store anything meaningful. I have placed a "rack" for my shoes on the short wall below the streetside bed and when I'm towing the things that sit on top of the nightstand are placed on the floor at the foot of the nightstand. I assume that you have utilized the space below the front dinette seat and the space below the streetside bed? Once I found the perfect sized plastic container for under the front dinette seat it has been the depository for my coffee maker and things that will not fit in the pantry. Extra charcoal, my shower tent, safety cones and a few other things go below the streetside bunk. Happy Thanksgiving and good luck on finding the storage solution(s) that work for you. Bill2 points
-
I don’t think it’s in Oliver’s mindset to cut costs by using inferior components. These obviously didn’t work out. I think they should stay with the original lights, 8 years and ours have never failed. Mike2 points
-
Hey, all. Prepping to go full-time after my Elite II pickup in late April. I have a spec sheet provided by Oliver which has measurements but perhaps someone can share pictures of the various storage cubbies in their E2? The ones on the site really just show the doors of the cubbies but not the shape + contour of things inside. Even better if this prompted a discussion here from folks who have advice on what they've settled on for dividing/organizing the various storage cubbies. Nothing exotic planned for storage needs on my end: clothes, dishes, and similar. Thx!1 point
-
Yes, descale HWH with vinegar. But dump it. Keep it isolated from any bleach. Use the hot water isolation valve to do so. When done, then button up the HWH open the isolation valve and flow fresh water through it to purge all vinegar and scale out of the HWH. I have attached my water systems checklists. It has several processes with detailed steps that a new owner could follow easily. Once you have done them a few times, it will come natural. But I do understand not knowing for sure what you think you may not. Each use I find ways to improve them. So If you or others see errors or ways to improve them, please PM me and I'll update. Mahalo, GJ 2024 WATER SYSTEMS SERVICE AND SANITIZATION (Updated 2024 Version).docx1 point
-
I used a ratchet strap to minimize the slop between the bike rack and the bumper mount, and between the bumper mount and the trailer. I put just enough tension on it to pull both joints "up", and then a click more. This allows a little bit of bounce to absorb road irregularities, but eliminates almost all of the movement I had before adding the strap. (Yes, I later replaced the hook with a clevis. 😉 )
1 point
-
That will work fine, you should use a NON-CURING silicone GREASE, not a sealer/ sealant, which would definitely stop the leak but you might never get the part back out. https://www.crcindustries.com/marine-premium-dielectric-grease-3-3-wt-oz/ It says: "Also ideal for lubricating plastic & rubber." How do you like that finger tip dispenser design? Is it useful or a gimmick? I don't understand why anyone would want a pressurized container of this stuff, you only need a very tiny amount each time. John Davies Spokane WA1 point
-
@John E Davies and @Rivernerd I have this dielectric grease, I don’t think it’s silicone based, can I use it?
1 point
-
Ditto. Also need to add that protecting the front of your trailer is ESSENTIAL. Below is a picture I lifted from Sherry's post link. Mud flaps near the rear and front tires plus bigger flaps at the bumper is not enough. But they are the first and second line of defense. There are posts on our forum of several ways and materials to do the protection. But I like hers the best personally. GJ
1 point
-
Bill: Would you please share the info for your container? Maybe a pic of it in place too! thanks JPR1 point
-
I was 100% in agreement for Dewdev's post, up to the word storage. Beyond that and assumptions can come into play and bias the discussion. Recommend you advise your battery mfg if your rig will or will not need to be used during extreme conditions. Then just ask the question as modified above. Some battery mfg's have no problem with their Litho's freezing hard so long as there is zero draw or charging happening until well after they thaw. If you bias the discussion, you may not get their "Full Monte" of understanding the specifics for your batteries in your location during worst case events. GJ1 point
-
Thank you very much. Our winters are very cold on occasion. I will open a ticket and ask.1 point
-
Late March is the perfect time to visit the Texas Hill Country. Inks Lake SP puts you in the triangle with amazing towns to visit. Burnet, Llano (Cooper's BBQ), Marble Falls (Blue Bonnet Cafe and Bear Brewery), and Fredericksburg. So much to do in Fredericksburg (Brewery, German food, Military museum, including George H.W. Bush exhibit. Lady Bird Johnson and LBJ historic sites around Johnson City, TX. Best of all of this is you will be in the heart of Blue Bonnet season. Follow the Blue Bonnet Trail, and the Willow City Loop. The drives are beautiful and the Blue Bonnets and Indian Paintbrush are the frosting on the cake. Inks Lake - North Loop, right on the lake, site #88. Though at this late date, the North Loop is probably full.1 point
-
The main reason Oliver started using the "touch" lights in the first place is because prospective buyers kept asking for them. On our previous Oliver, 2008 Hull #026, each light was outfitted with a little rocker switch. We enjoyed being able to control each light individually. Also, the original lights used a 12 volt Halogen T3 Lamp with a G4 Bi-Pin Base rated at 10 watts. These bulbs drew about 0.8 amp each and put out a good amount of heat. Most of us early adopters quickly swapped the bulbs out with LED's drawing about 0.1 amp each. LED's were just coming into wide spread usage in mid to late 2008 and they were still reasonably expensive. I remember ordering enough bulbs to replace all the inside and outside lights and it costing over $120. During our 2013 build, I was somewhat dismayed when I found out they intended to connect several lights together on a single switch. I convinced them to wire a switch placed right beside each of our lights. I love the lights in our current Oliver. There was a time around 2015 when Oliver got a bad batch of those lights and they started burning out quickly. Oliver came to the rescue with a bag of lights for each owner that said any of their lights had gone bad. Our trailer has now been on the road for 10 years and I've only ever had one to fail. I like the idea of them going back to lights with integral switches.1 point
-
@SeaDawg what happened to the back half of your Ollie? Yeah, those lil' Ollies are so cute! Still daylight out west, near sunset. On my first drink, but don't worry, I'll catch up to y'all soon. 🤣 No camping here today, just a simple oven-roasted holiday bird. Our son Adam just came upstairs to mash potatoes, the old-fashioned way, with homemade gravy, yum! Love the cartoon supplied by @mountainoliver - thank you! To all, have fun with your family & friends and Happy Thanksgiving!
1 point
-
When you take a look inside you will see that the microwave has a sheet metal piece attached to the bottom that extends about 5/8 inch from the bottom of the microwave. Then there are four rubber feet - one at each corner - that extends another 5/8 or so for a total of 1 1/4 to 1 1/2 inches. As I remember, I used scrap 2 x 4 around the bottom to wedge around that wood box and under the microwave until the wedges hit the rubber feet. Then where that didn't fit I shaved off slices (using my radial arm saw) until it was tight. Pay attention to the fore/aft movement - you can wedge wood not only against the rubber feet but also between the sheet metal at the base of the microwave and the front of the interior cabinet. I did not drill into anything - the simple wedging did the trick. Once you get the trim piece off, you will see that the "metal" is actually very thin and only supported via the plastic framing. There really isn't much metal there at all. Bill p.s. in wedging the material around the unit I used a small hammer to tap the wedges into place. Small because of the working space and I didn't want to bend anything out of shape on the microwave. However, I did want to have the wedges very snug. Finally, when I was satisfied I drilled four holes in the front of the face plate and screwed directly through the fiberglass into the wood box. Then I used screw covers to "hide" and dress up the screws. No one has ever commented that the covers look out of place.1 point
-
The obvious most important warning is not to mix those chemicals in your living space. More than a few folks trying to unclog/clean a sink/toilet have done so to their peril. So good reminder. But for this discussion (Tank and Fresh Water Line Cleaning), the solution to your process is not to mix the Pine-Sol that you put into the black/gray tanks with the the Vinegar you put into the hot and cold water lines to sanitize. How? Raise your trailer tongue at a dump station or camp site where you have full hook-up and open the black and gray valves to drain them after your tank cleaning. Then flush the water lines first with a bunch of clean water to flow water through the water and they drain into the tanks to remove any Pine-Sol residue. Then introduce the bleach water into the hot and cold water lines and complete the sanitization process. Flush the tanks some more and close the valves. Always remember to bypass your hot water tank. You don't want bleach in it. GJ1 point
-
I'm sure they figure those who have the money to boat, can and will pay the premium. And some of us catch the bug and spend a lot of money on RVs. Obviously, I wouldn't be here if I didn't get tired of wasting money on the substandard garbage the RV industry is pumping out. To be clear, some of the new stuff coming out is great but I'm a fan of not reinventing the wheel. I love 12 volt. So simple and reliable.1 point
-
"Boondocking" in Alaska is easy. Every pullout, unless posted, is free camping. In the Yukon, territory campgrounds are plentiful, and free firewood. (Don't take it from place to place, please. No reason to do so.) $12 or so, usd. We've done the trip many times. Be careful of unpaved roads. You don't have to do gravel, if you don't want to, and sometimes treacherous.1 point
-
2019-Elite-II-Augmented-Plumbing-Diagrams.pdf455.61 kB · 20 downloads Repost: I had been trying to figure out the same thing as both Cedar Forks and GeronimoJohn...so I combined together the works from GeronimoJohn and Cedar Forks along with the original 2019 Elite II Factory Plumbing Diagrams into a complete PDF.1 point
-
A RotoZip spiral saw, or like product, will make circle and straight cuts much easier, faster and precise. Used mine when installing a forward receptacle in the propane doghouse; the result, very smooth cut edges in the fiberglass. In close quarters, the spiral bit can be set to a depth slightly beyond the fiberglass thickness. As 2008RN suggest, proper PPE and a shop vac should be used.
1 point
-
I'm guessing that Oliver Service would be able to tell you - assuming that you opened or added to a Service ticket. Good luck! Bill. p.s. We do not have the same type of installation as you do. but, when I was having similar issues with my 2016 I wound up taking the facia trim off, shimming (with scrap pieces of wood) the microwave in such a manner that a earthquake would not move it and replaced that trim. Haven't had a problem since.1 point
-
There are many posts on our forum about our life safety detection systems and consequences of what can happen when things go badly. For this post, I am trying to highlight one simple step that each of us need to do when leaving our Oliver unoccupied and unattended for extended periods of time. But first, some info about propane. Both of the LPG gases, propane (C3H8) and butane (C4H10), are heavier than air. Propane is about 1.5 times heavier and butane is 2.1 times heavier than air. In a stagnant air situation, they will pool at the lowest level they can reach. Good news is that propane will only ignite within their upper and lower explosive limits (LEL). Said differently, the lower explosive limit is the lowest possible concentration of a gas that will burn or explode if ignited. The upper explosive limit, is the highest possible concentration of a gas in the air which will burn or explode if ignited. So, keeping your life safety detectors in good working order is an imperative. Doing so gives us great protection when using Ollie. However, the purpose of the below is to call your attention to a potential hazard that most of us have not likely considered…. What about when we are gone for months? BLUF (Bottom Line Up Front): It is imperative to shut off the propane tank valves and totally kill & secure the power to your trailer if it is left unattended for long periods of time. Scenario: You are going to be away from your Ollie for several weeks or months. Unknown to you, there is a super small propane leak in your Ollie. It is so insignificant that it does not set off your propane detector. For long duration storage, to minimize battery losses, you have turned your master 12V electrical switch to “OFF”. You have removed and secured the shore source and power cord. So electrically your trailer utility wise is dead. But, this time you forgot to turn off the propane tank valves and did not place the propane auto switch-over in the center position. In your absence, the small leak continues to leak. Eventually, it it pools in a low space and continues to grow. Eventually it exceeds the LEL for propane. For the fire/explosion triangle, you now have fuel and oxygen. But since there is no ignition source, no fire/boom. Weeks or months later you return to Ollie. You pull out your Arrival Check List and proceed to uncover and unlock Ollie. You carefully check for wasp/hornet nests as you carefully open the door. Then you open up the trailer windows. With your flashlight, you check all areas of Ollie for things that may have changed in your absence. Things like pest intrusions, leaks, spills, canned food or wine bottles that froze hard and then leaked, or any of a host of other things that can happen while you were away. Part of your Arrival Check List process is to open up the hatches and look there too. When all looks good and you do not smell any weird smells from the above sources, or the distinctive “rotten egg” smell of mercaptan (The propane mal-odorant), you turn on your 12 Volt master switch to power up the trailer lighting. Another quick look...all is good. Then you fire off the Max Fan for fresh air, and you can safely connect up to shore power. Next you turn on the refrigerator and A/C. Miller Time! But this year, a family member is the first to Ollie and they have just a bit of trailer experience. Their first mistake is not to follow your Arrival Check List, but instead they plug in Ollie to shore power. Boom. So, for long duration unattended time frames, please ensure that you make safe your propane system by isolation from the tanks and killing the 12 and 120 volt shore power systems by turning them off and locking up any means for them to be activated until you have inspected your trailer for unknown hazards. Mahalo, GJ1 point
-
Sorry, I did not mean to turn this into a discussion about batteries. I only mentioned the storage procedure I use (recommended by Lithionics) to indicate that I do have electrical switching going on in the battery compartment. Without an added battery box circulating fan, I do not see any leaking propane finding its way in there. With the tanks shut off, I do not see small propane leaks as a storage issue. I do understand your points about unique circumstances leading to lower explosive limits being reached. For us, we do not provide unsupervised access to our trailer to anyone else, we religiously make sure the tanks are off when in storage, there is no available shore power at our storage location, and I don't think we have a master DC cut-off. The Lithionics batteries can be turned off, but then they would have to be removed for cold weather. I will look into adding a master DC cutoff switch. This would kill all power to the trailer while allowing me to leave the batteries and heating pads turned on. GJ, a big thanks for this advice!1 point
-
To topgun2’s point, I make use of a digital water flow meter connected directly to the dump station’s water spigot, next a hose valve to control flow, then a dedicated 25’ Zero-G hose with a quick disconnect to the black tank rinse-out port inlet. This assembly is rolled up and stowed within the rear bumper compartment when not in use. Prior to dumping the black tank, I setup this rinse hose assembly; the dump station hose is removed from the spigot regardless of condition. Once the black tank is initially dumped, the black tank valve is closed. I then zero out the meter, open the hose valve, then measure 10-12 gallons before dumping the rinse water; the hose valve remains open during this rinse dump process. When complete, the black tank dump valve is again closed, the meter is zeroed out and water allowed to fill to the measured amount. This rinse cycle is repeated up to three times. The use of the meter does not require having to go in and out of the OTT to monitor the tank level, which is not accurate, especially with the tongue raised to better hasten the dump.1 point
-
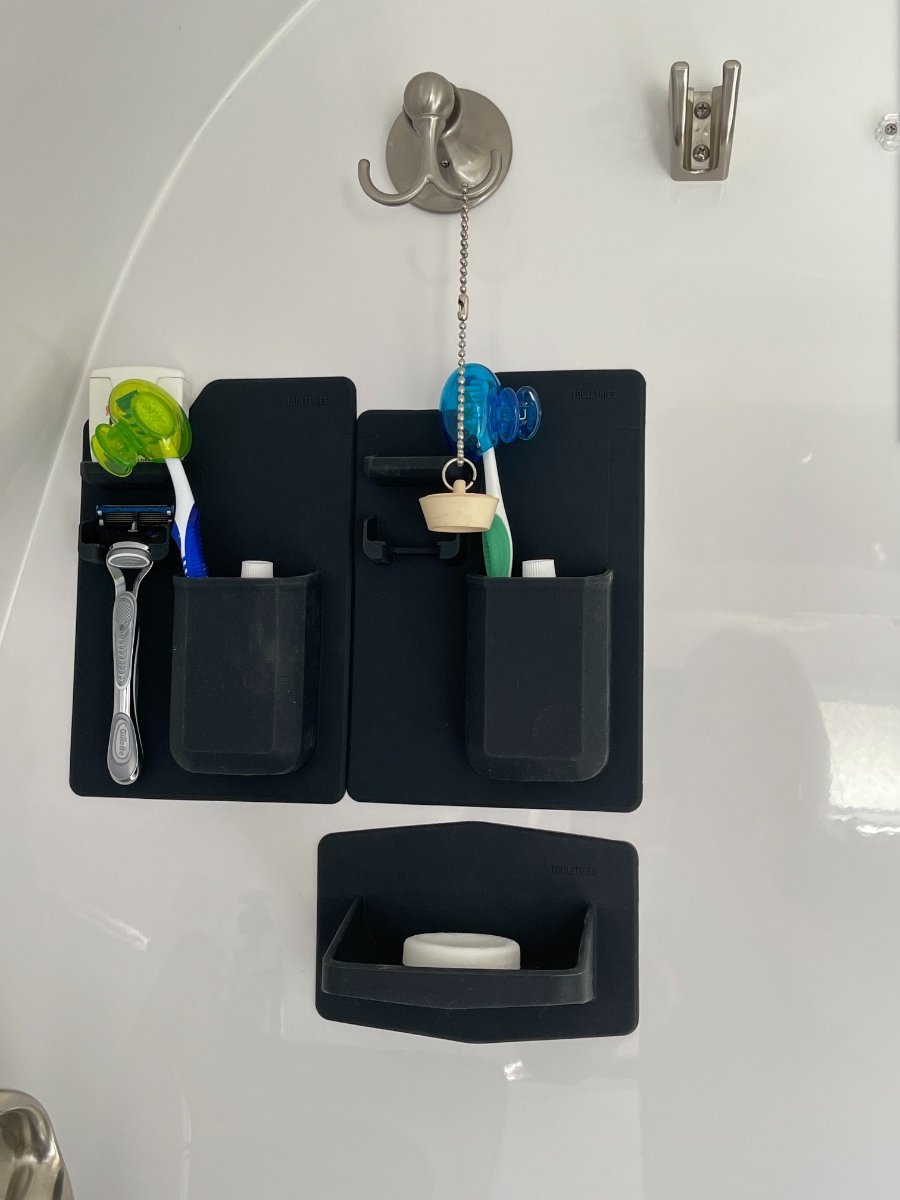
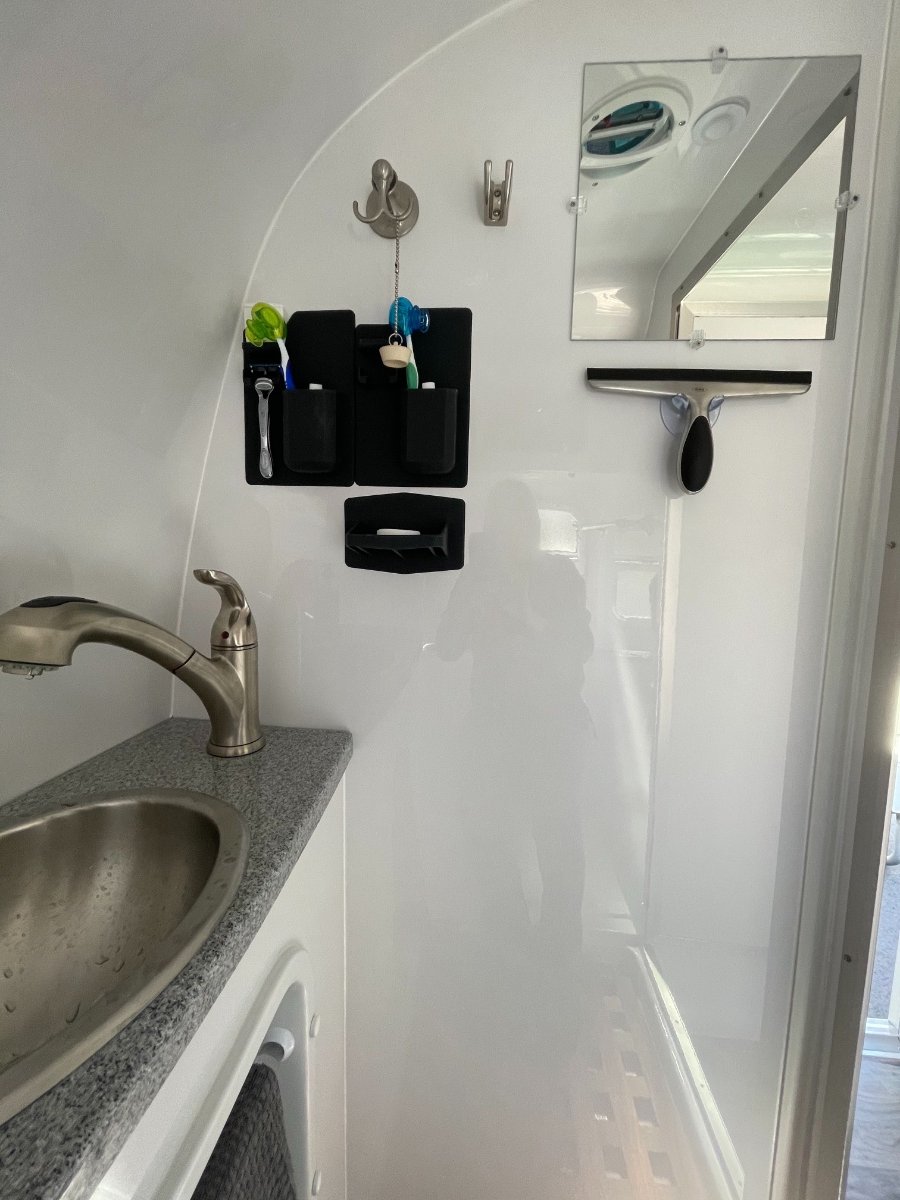
Got these at Kohl’s but also available on Amazon. They are silicon and stick to the inside of the trailer without any adhesive and are moveable. The brand is Tooletries and they are a little pricey but well worth it This one is called the Harvey. They work great. I forgot to remove the razor before travel. When we arrived 6.5 hours later the pillows had bounced in the floor but the razor was still firmly in place! We also got the soap holder called The Benjamin. All of them have drainage holes in the bottom and can be removed to clean if needed then reapplied.
1 point
-
I found these at TJ Maxx and 3 of them fit side by side perfectly on the middle pantry shelf. They are clear and don’t block the view. Only 2 will fit on top of bottom. The first ones I got was a set of 3. The next trip they were individuals for $3.99 each.
1 point
-
I’m just here to help in any way possible. 🙄 Mossey1 point
-
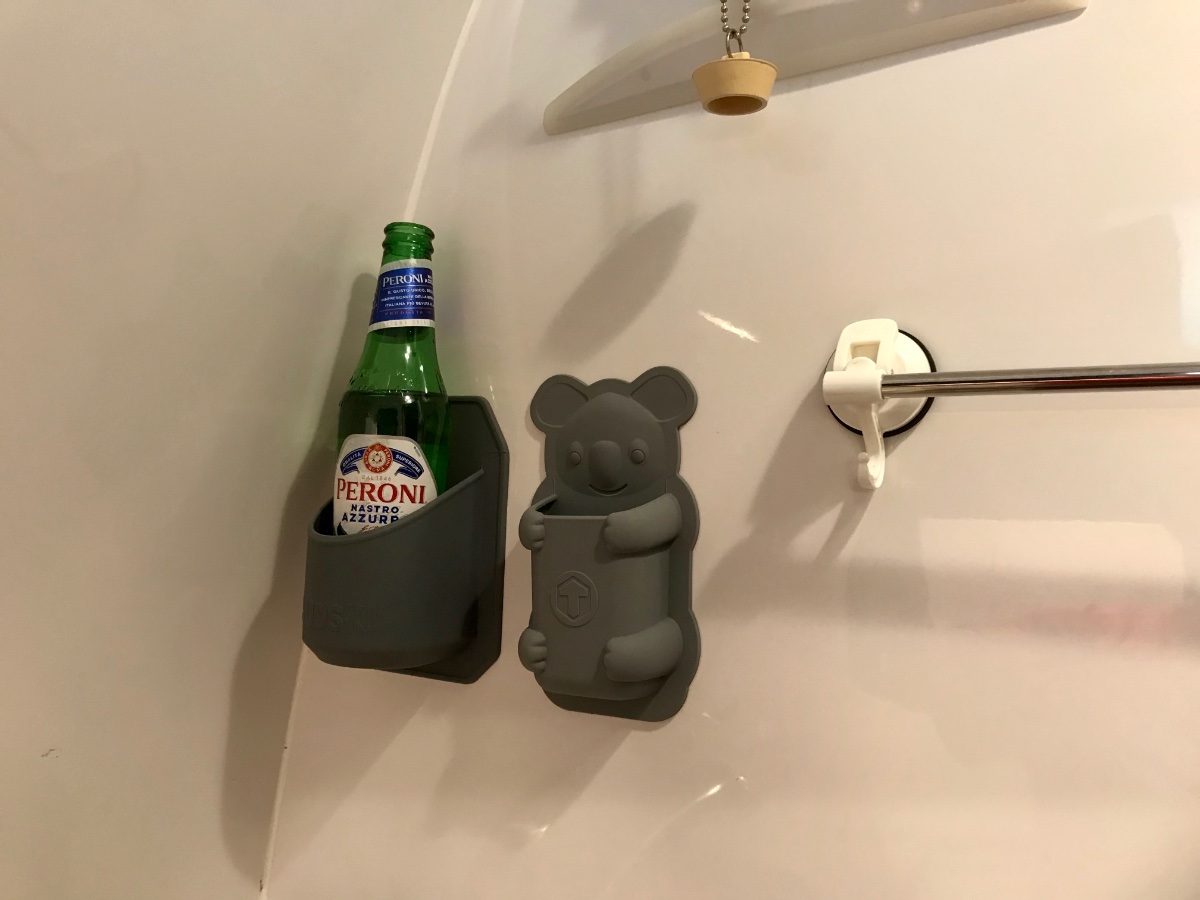
I can vouch for the shower beer can holder, but it isn’t a Toolsie product. It is labeled Sudski and it was the first silicone wall product I bought. I found it on sale at Kohl’s and I had a coupon as well. I think it was about $6. Mossey
1 point
-
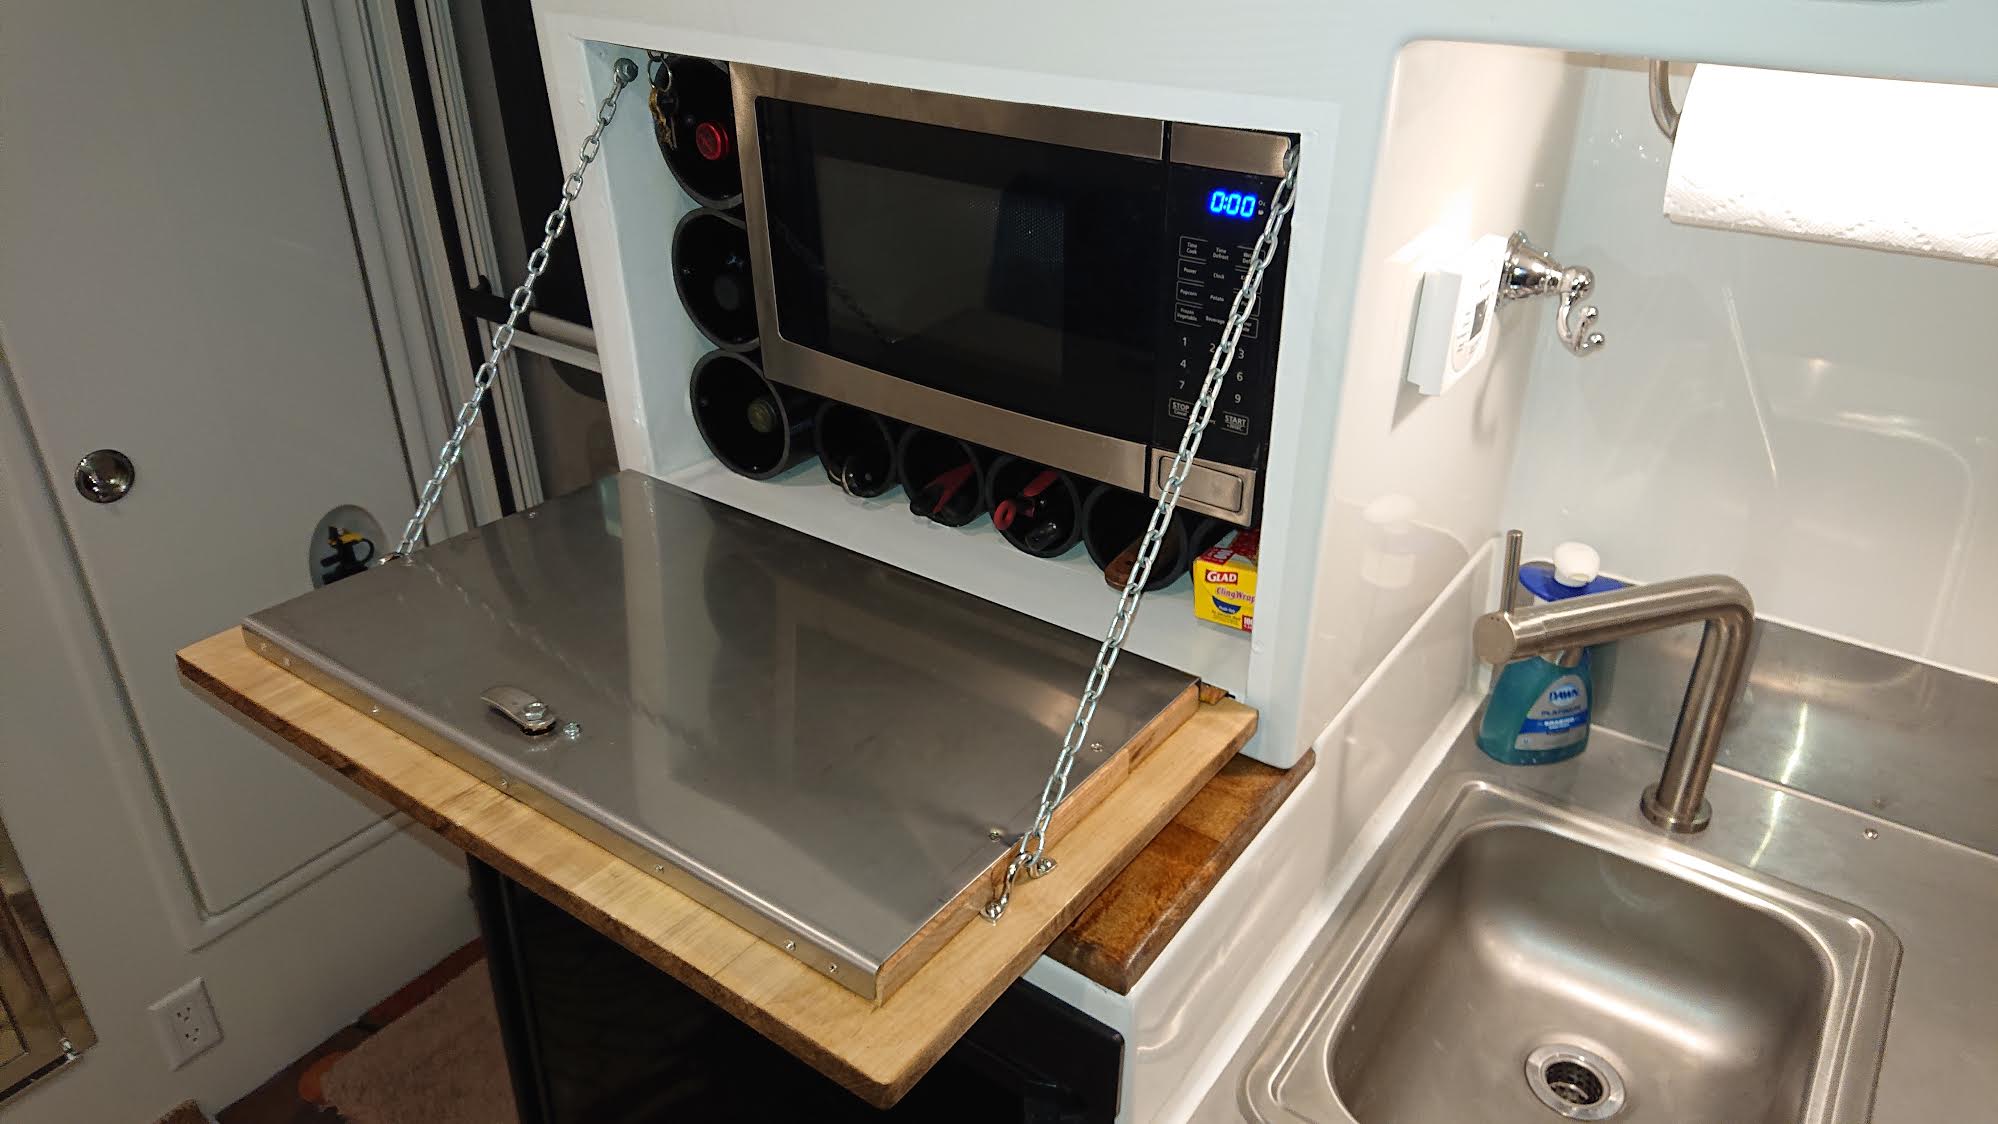
After my microwave tried to escape from it's cabinet twice, I redesigned the cabinet to include a wine rack, utensil storage, key hooks and a smaller microwave that cannot get away. It also provides an additional work surface when open.
1 point
-
Mike - No problem with any of my pictures unless they make me look really stupid! Bill1 point
-
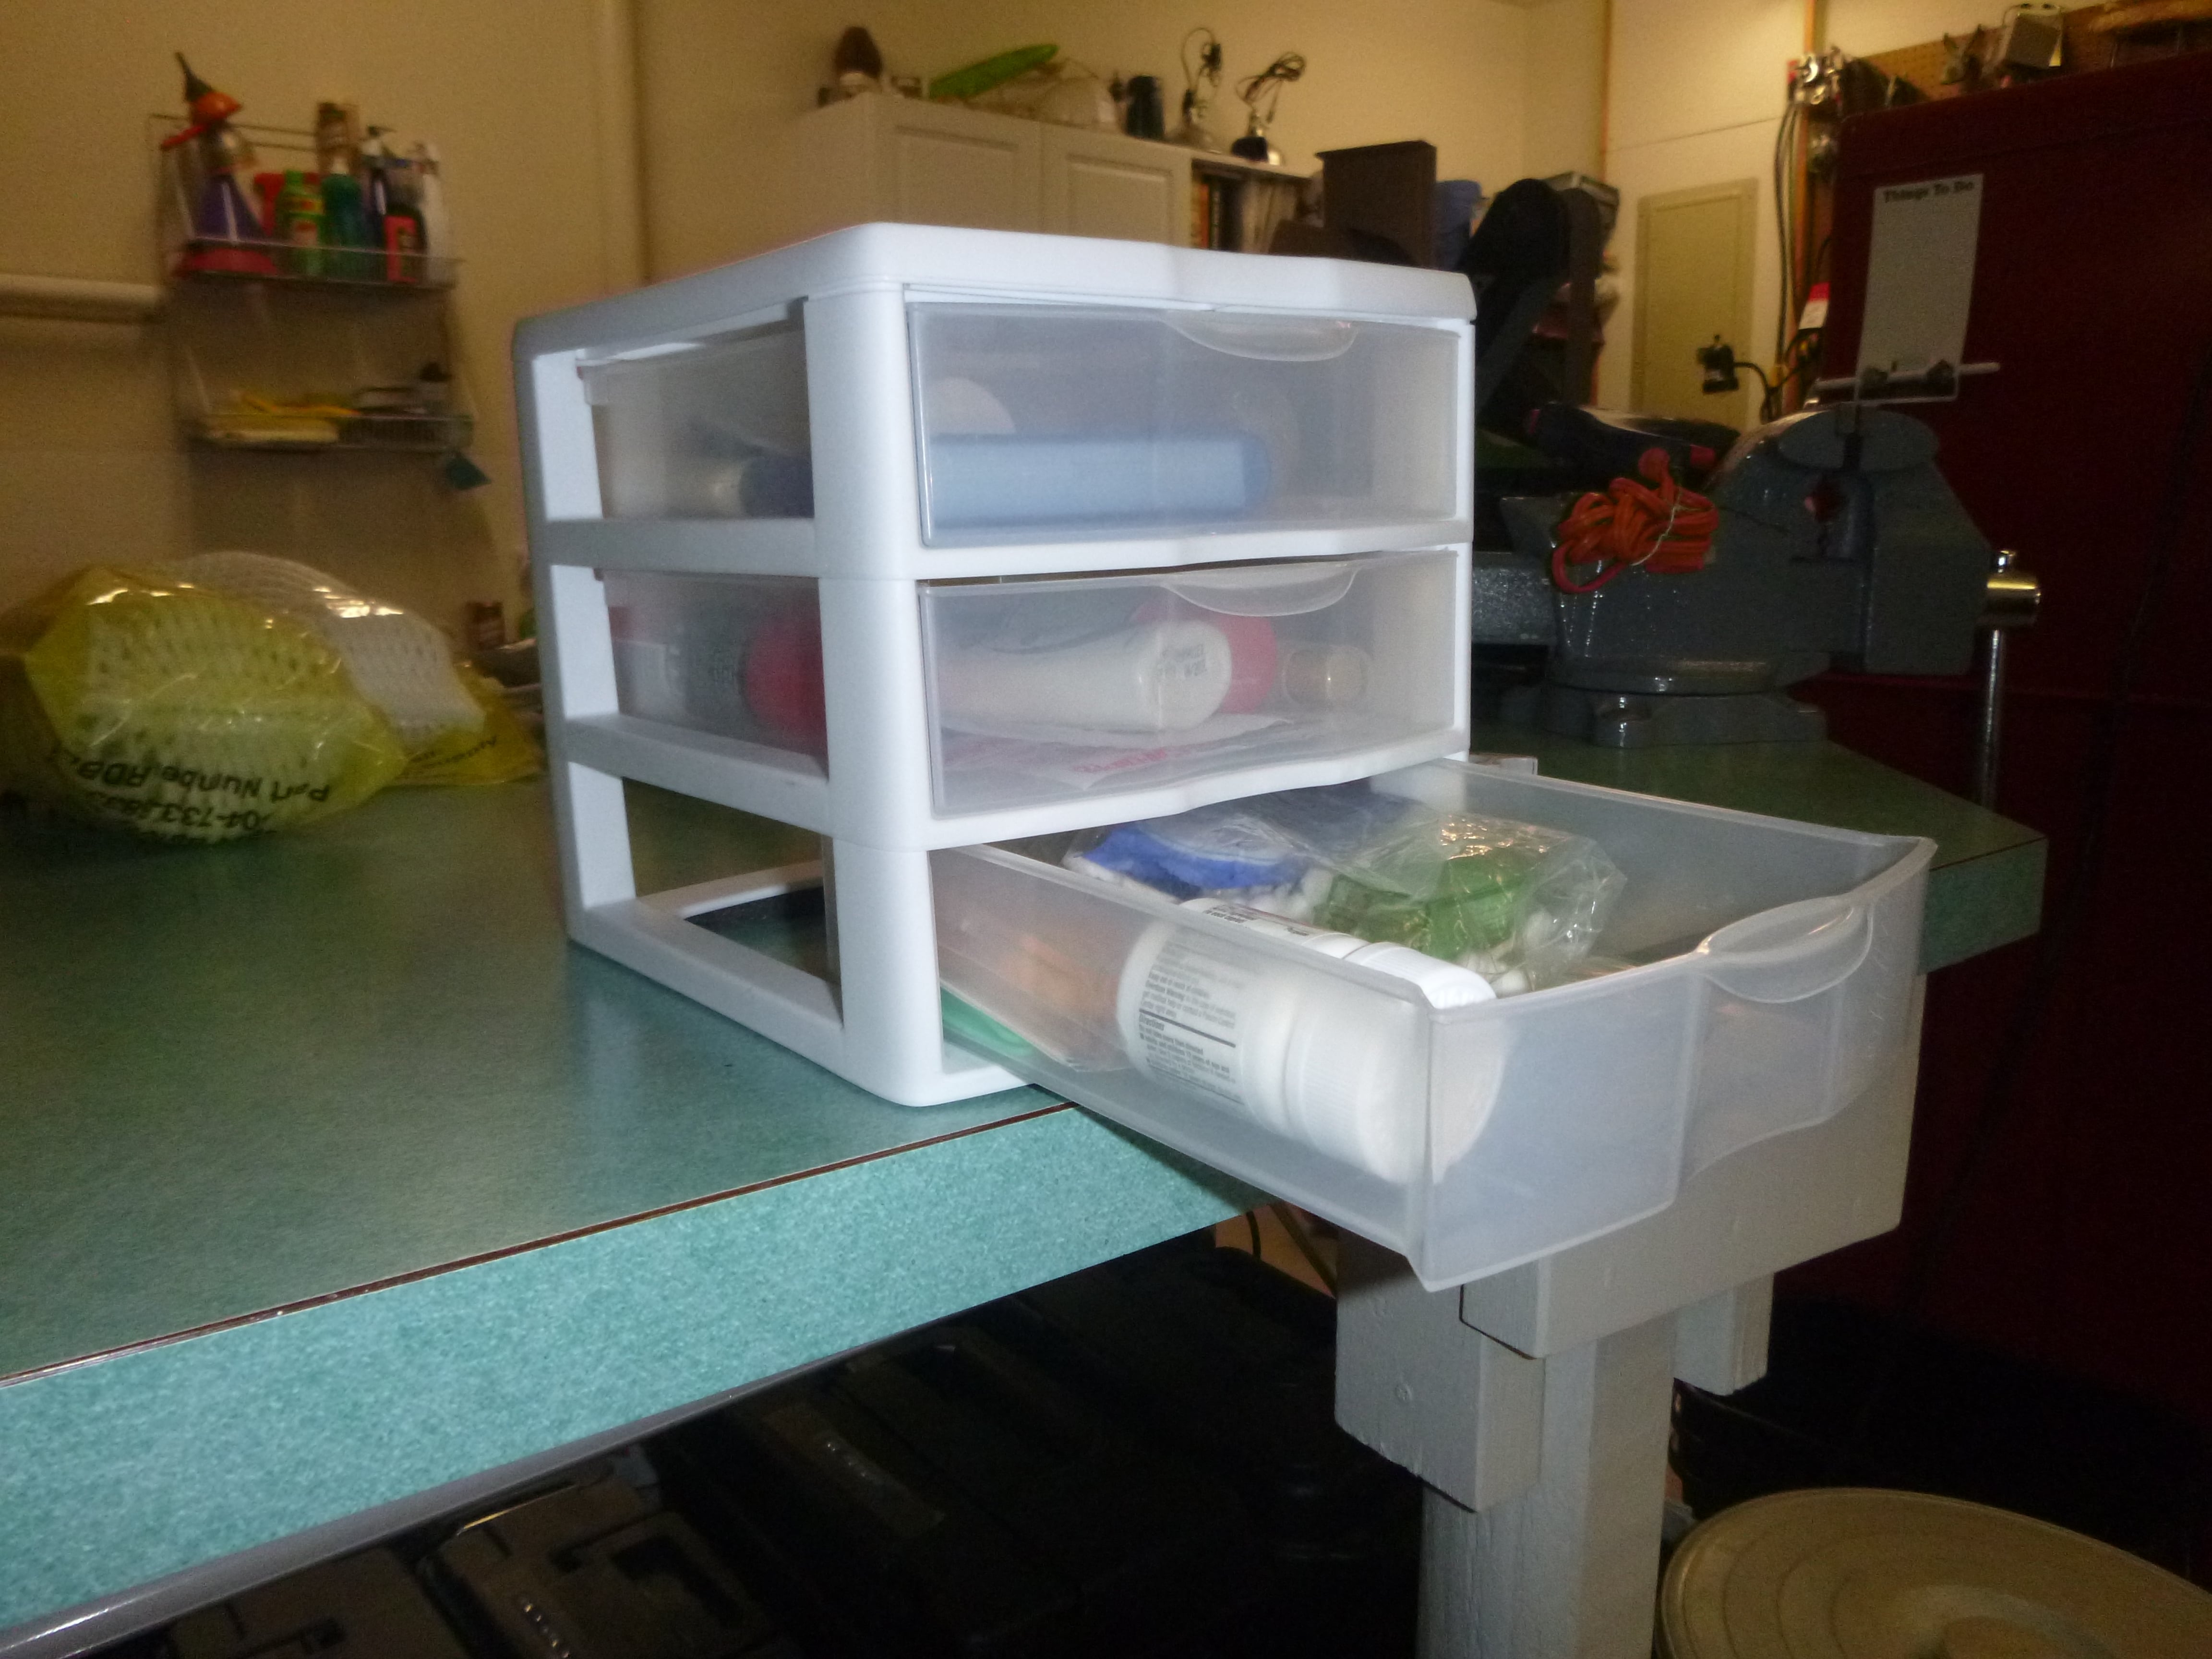
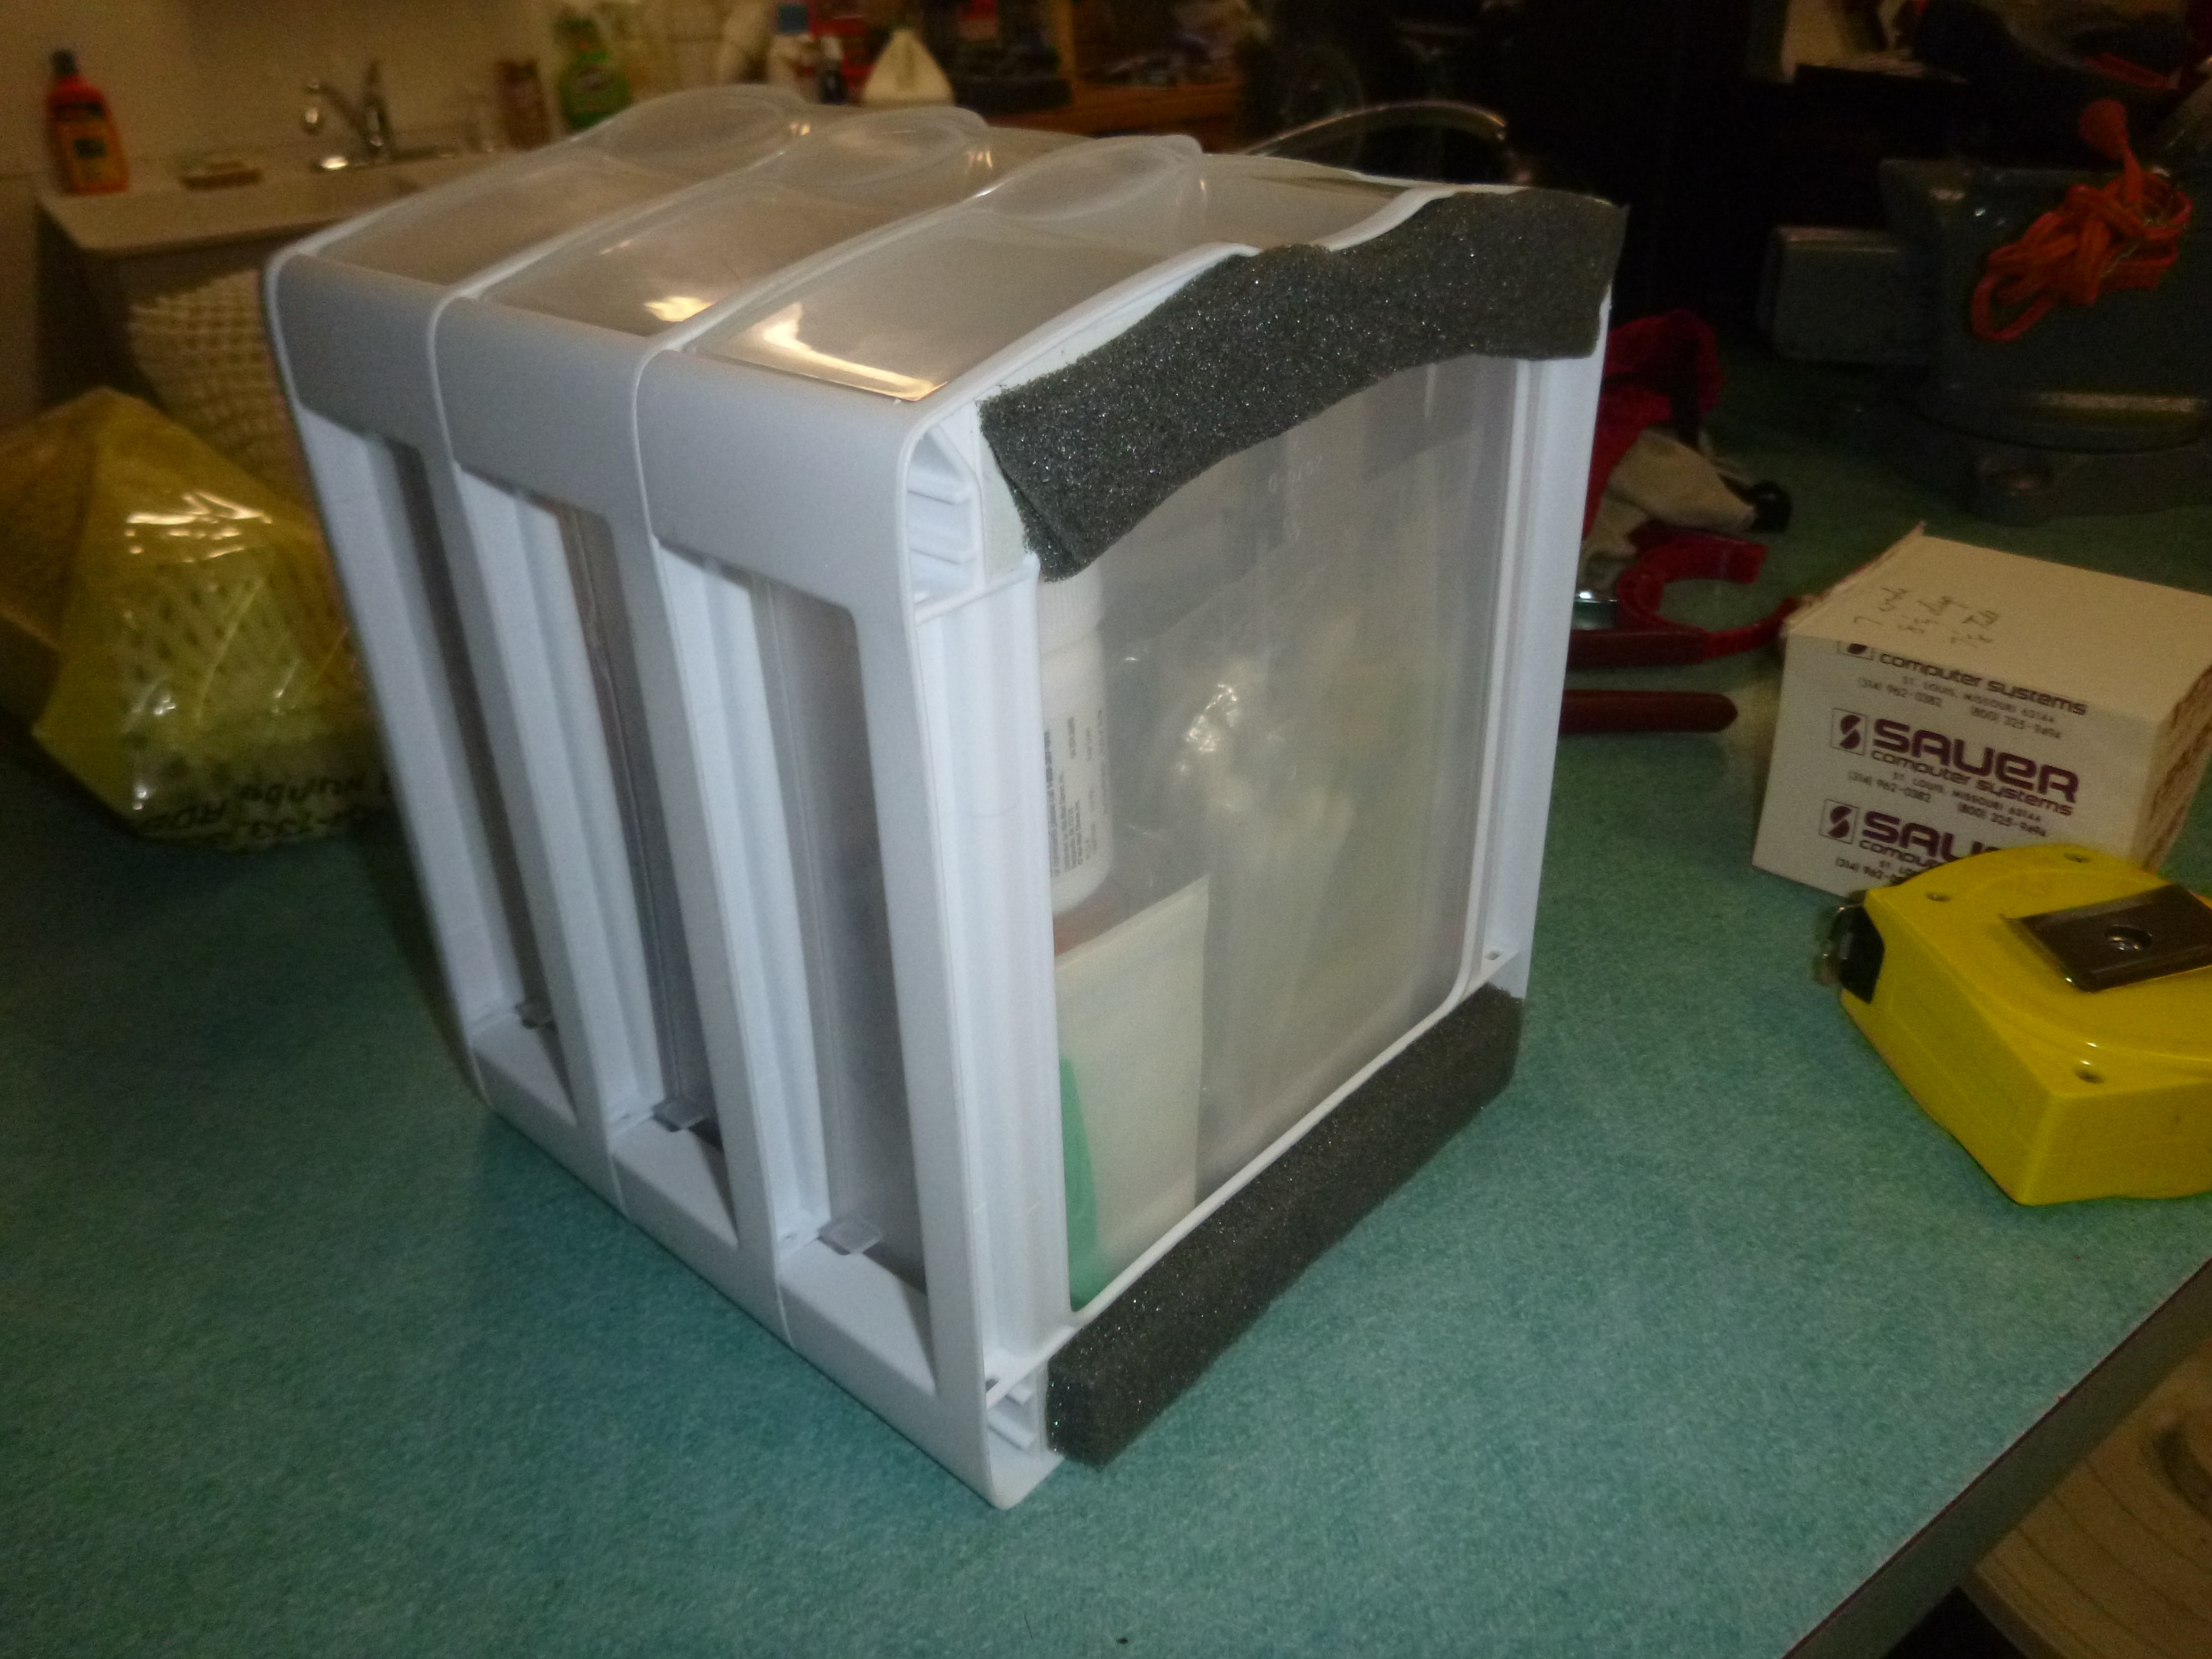
G & T - Here is another idea for you: I've got two of these that I use to store little items in. They fit very nicely in the cubbies. I did glue strips of 3/8" thick foam on the bottoms so that the lower drawer would clear the lip of the storage area. They measure: 7" wide 7 1/8" tall 8 1/4" deep - including the little pull handles on each drawer
1 point
-
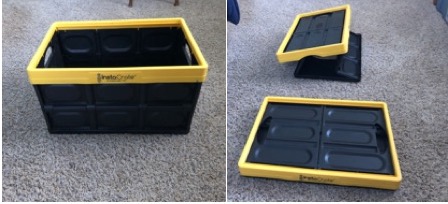
We found that we weren’t using the cupboards above the dinette very efficiently, since some of the things we were storing there were not very tall. We solved this by buying two of these wire shelves, one for each of the two cupboards above the dinette. Before we got Ollie we were advised to get refrigerator bars such as these, to prevent stuff from falling out when the fridge door was opened. We found that stuff in the pantry shifted around during transit, and so we got some spring-loaded bars double bars for the pantry. We had put heavier stuff on the bottom shelf of the pantry, but things just moved fore and aft during transit, sometimes making a mess. I found the fruit box from the Farmer’s Market fit perfectly, and I could stack canned beers or soda two high in the box to optimize space usage, and they would not shift during transit. But the pantry bars were not enough. The major problem was not being able to maximize the use of vertical space in the pantry. I measured both the available space and the size of the opening at the pantry door, and then went virtual shopping at Amazon and the Container Store, looking at dimensions posted on the web sites. I ended up getting these Wire Storage Organizer Baskets from Amazon. They fit perfectly. GrumbleandTwist put an Ikea bag under the front dinette seat. I wanted something with a solid bottom and sides, as we wanted to carry our pressure cooker in this storage area. So I measured the space and again searched at Amazon and the Container Store. The problem was that bins large enough to use the space effectively are too big to fit through the opening. And then I had an inspiration. Have you ever seen InstaCrates, these collapsible storage bins? We got them at Costco for $7 each, and they are available at Amazon and Walmart for $12-14. We use them when organizing for our trip (foods or clothes), and to carry stuff out to the trailer. At the end of the trailer trip, we bring a bunch of collapsed InstaCrates out to the trailer and use them to carry stuff into the house. We love them. Well, I discovered that the collapsed InstaCrate will fit through the opening into the storage area under the dinette seat, and then I can open it up when it is inside the storage compartment. It works well for our needs.
1 point
-
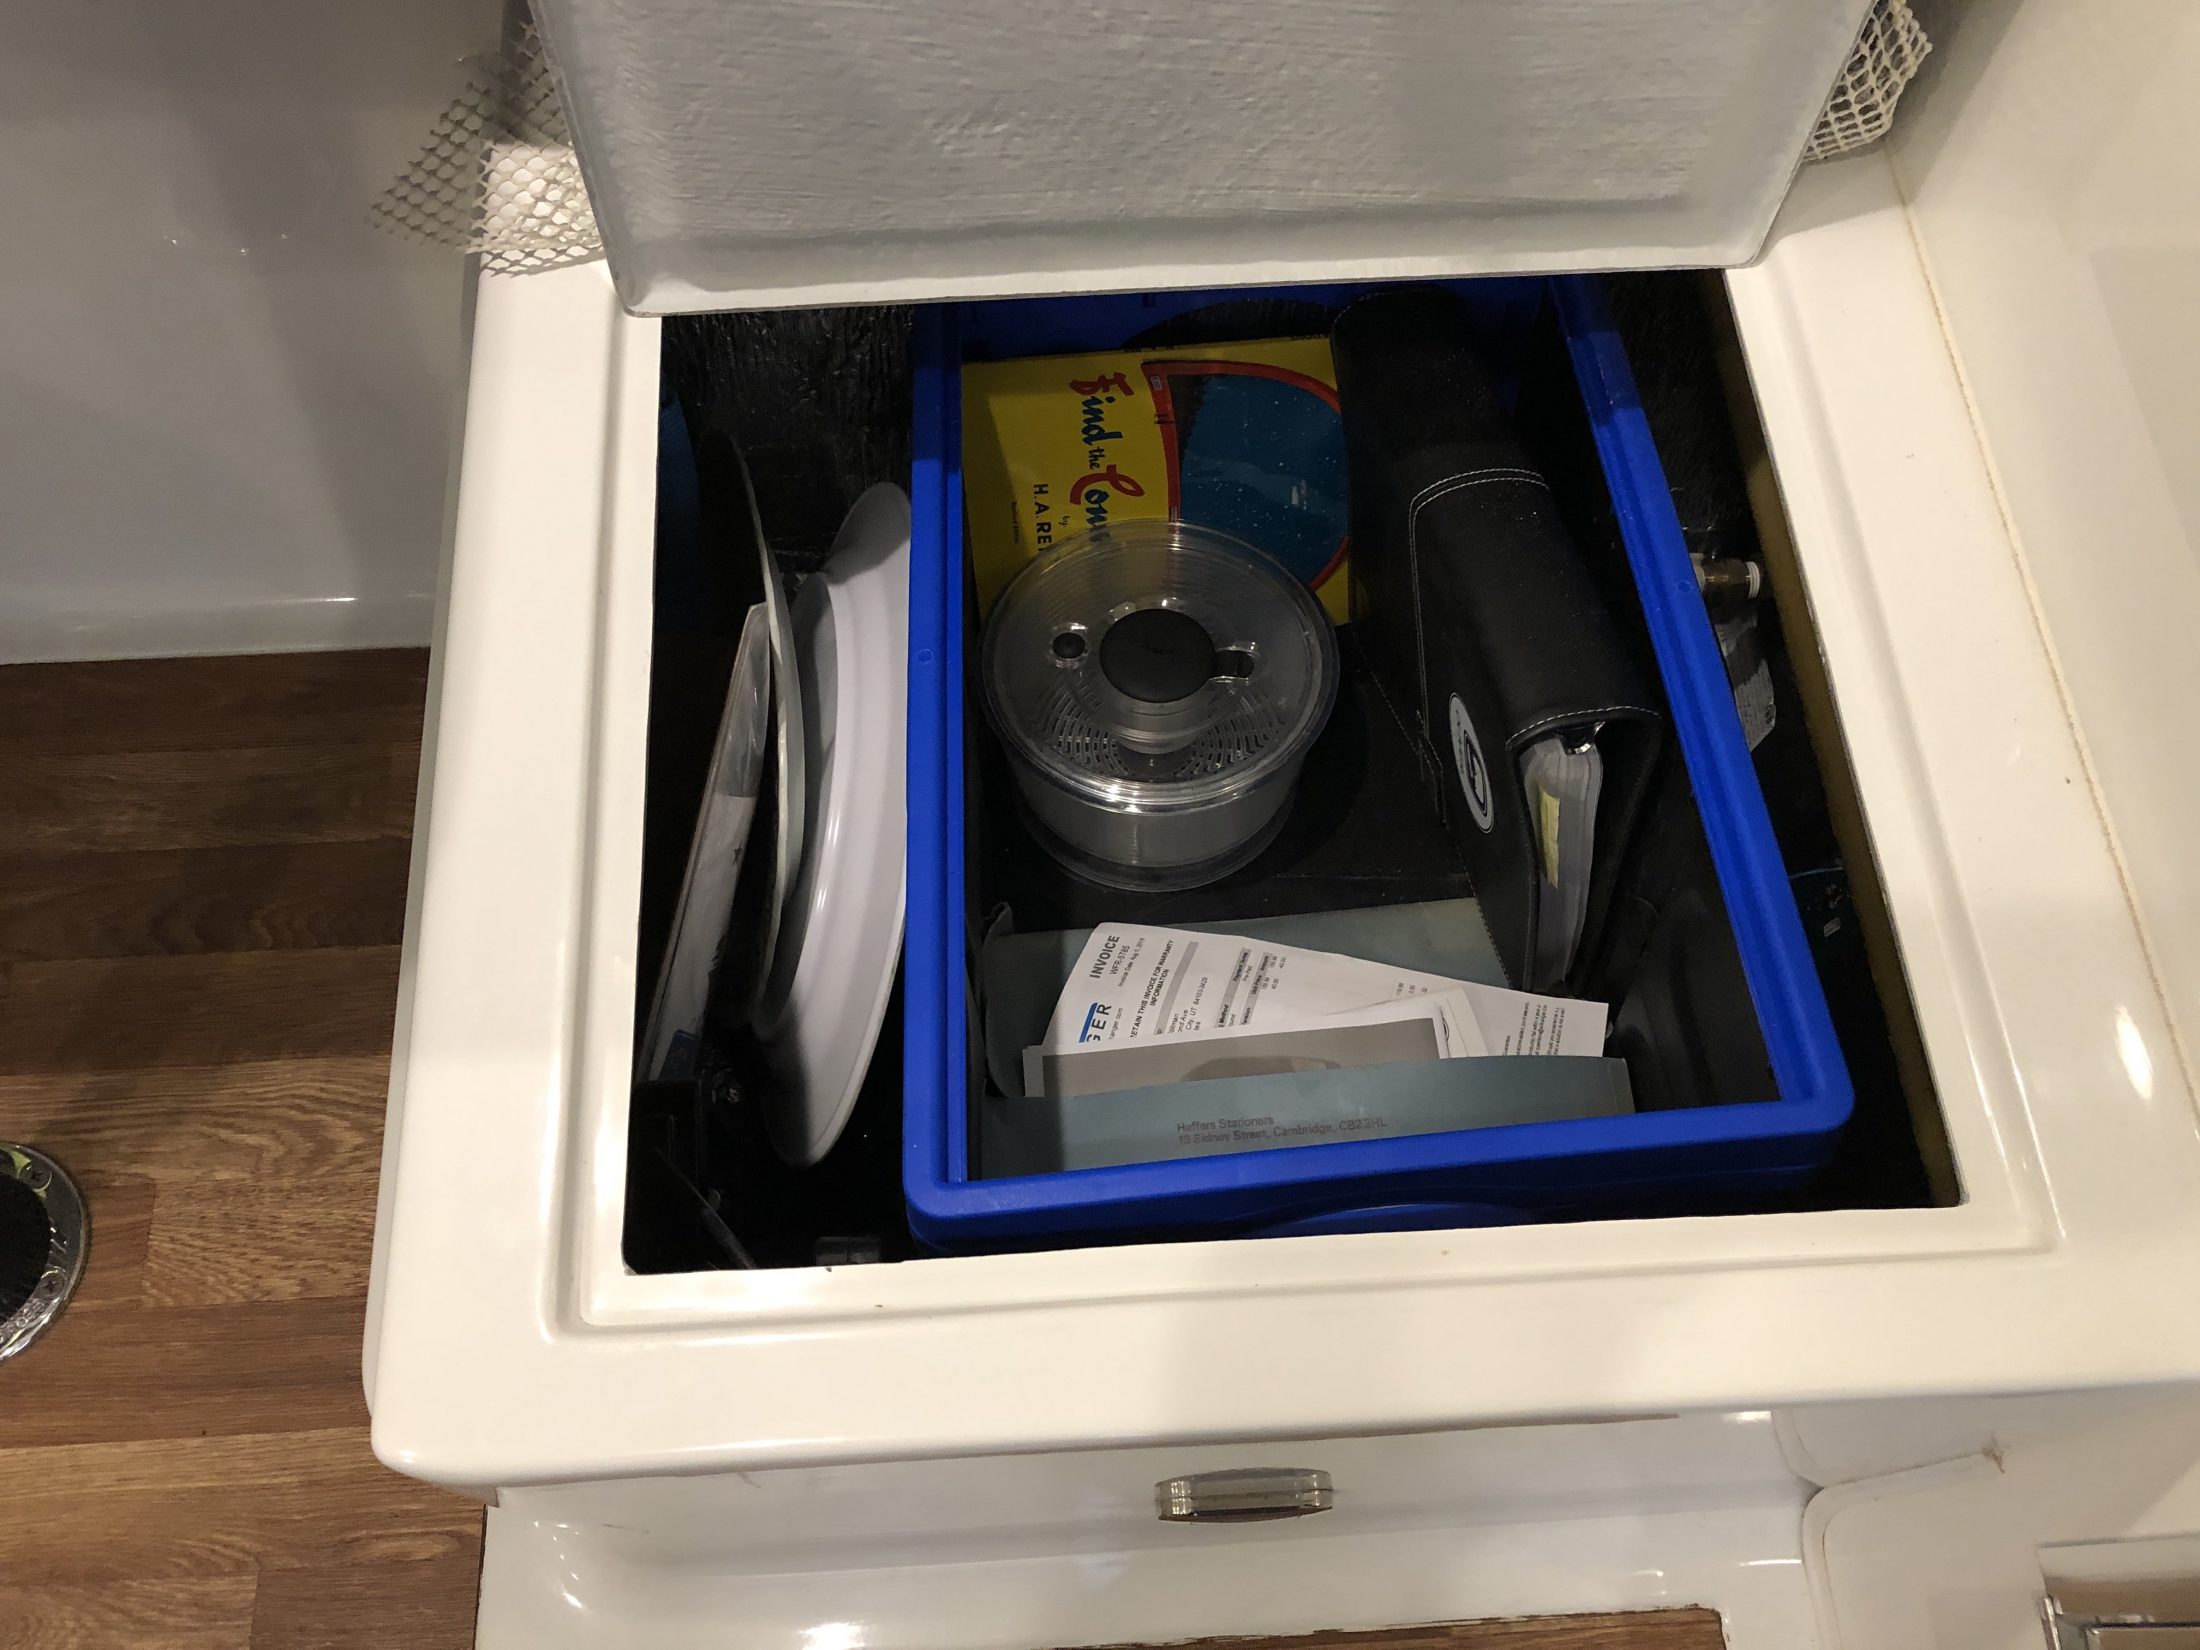
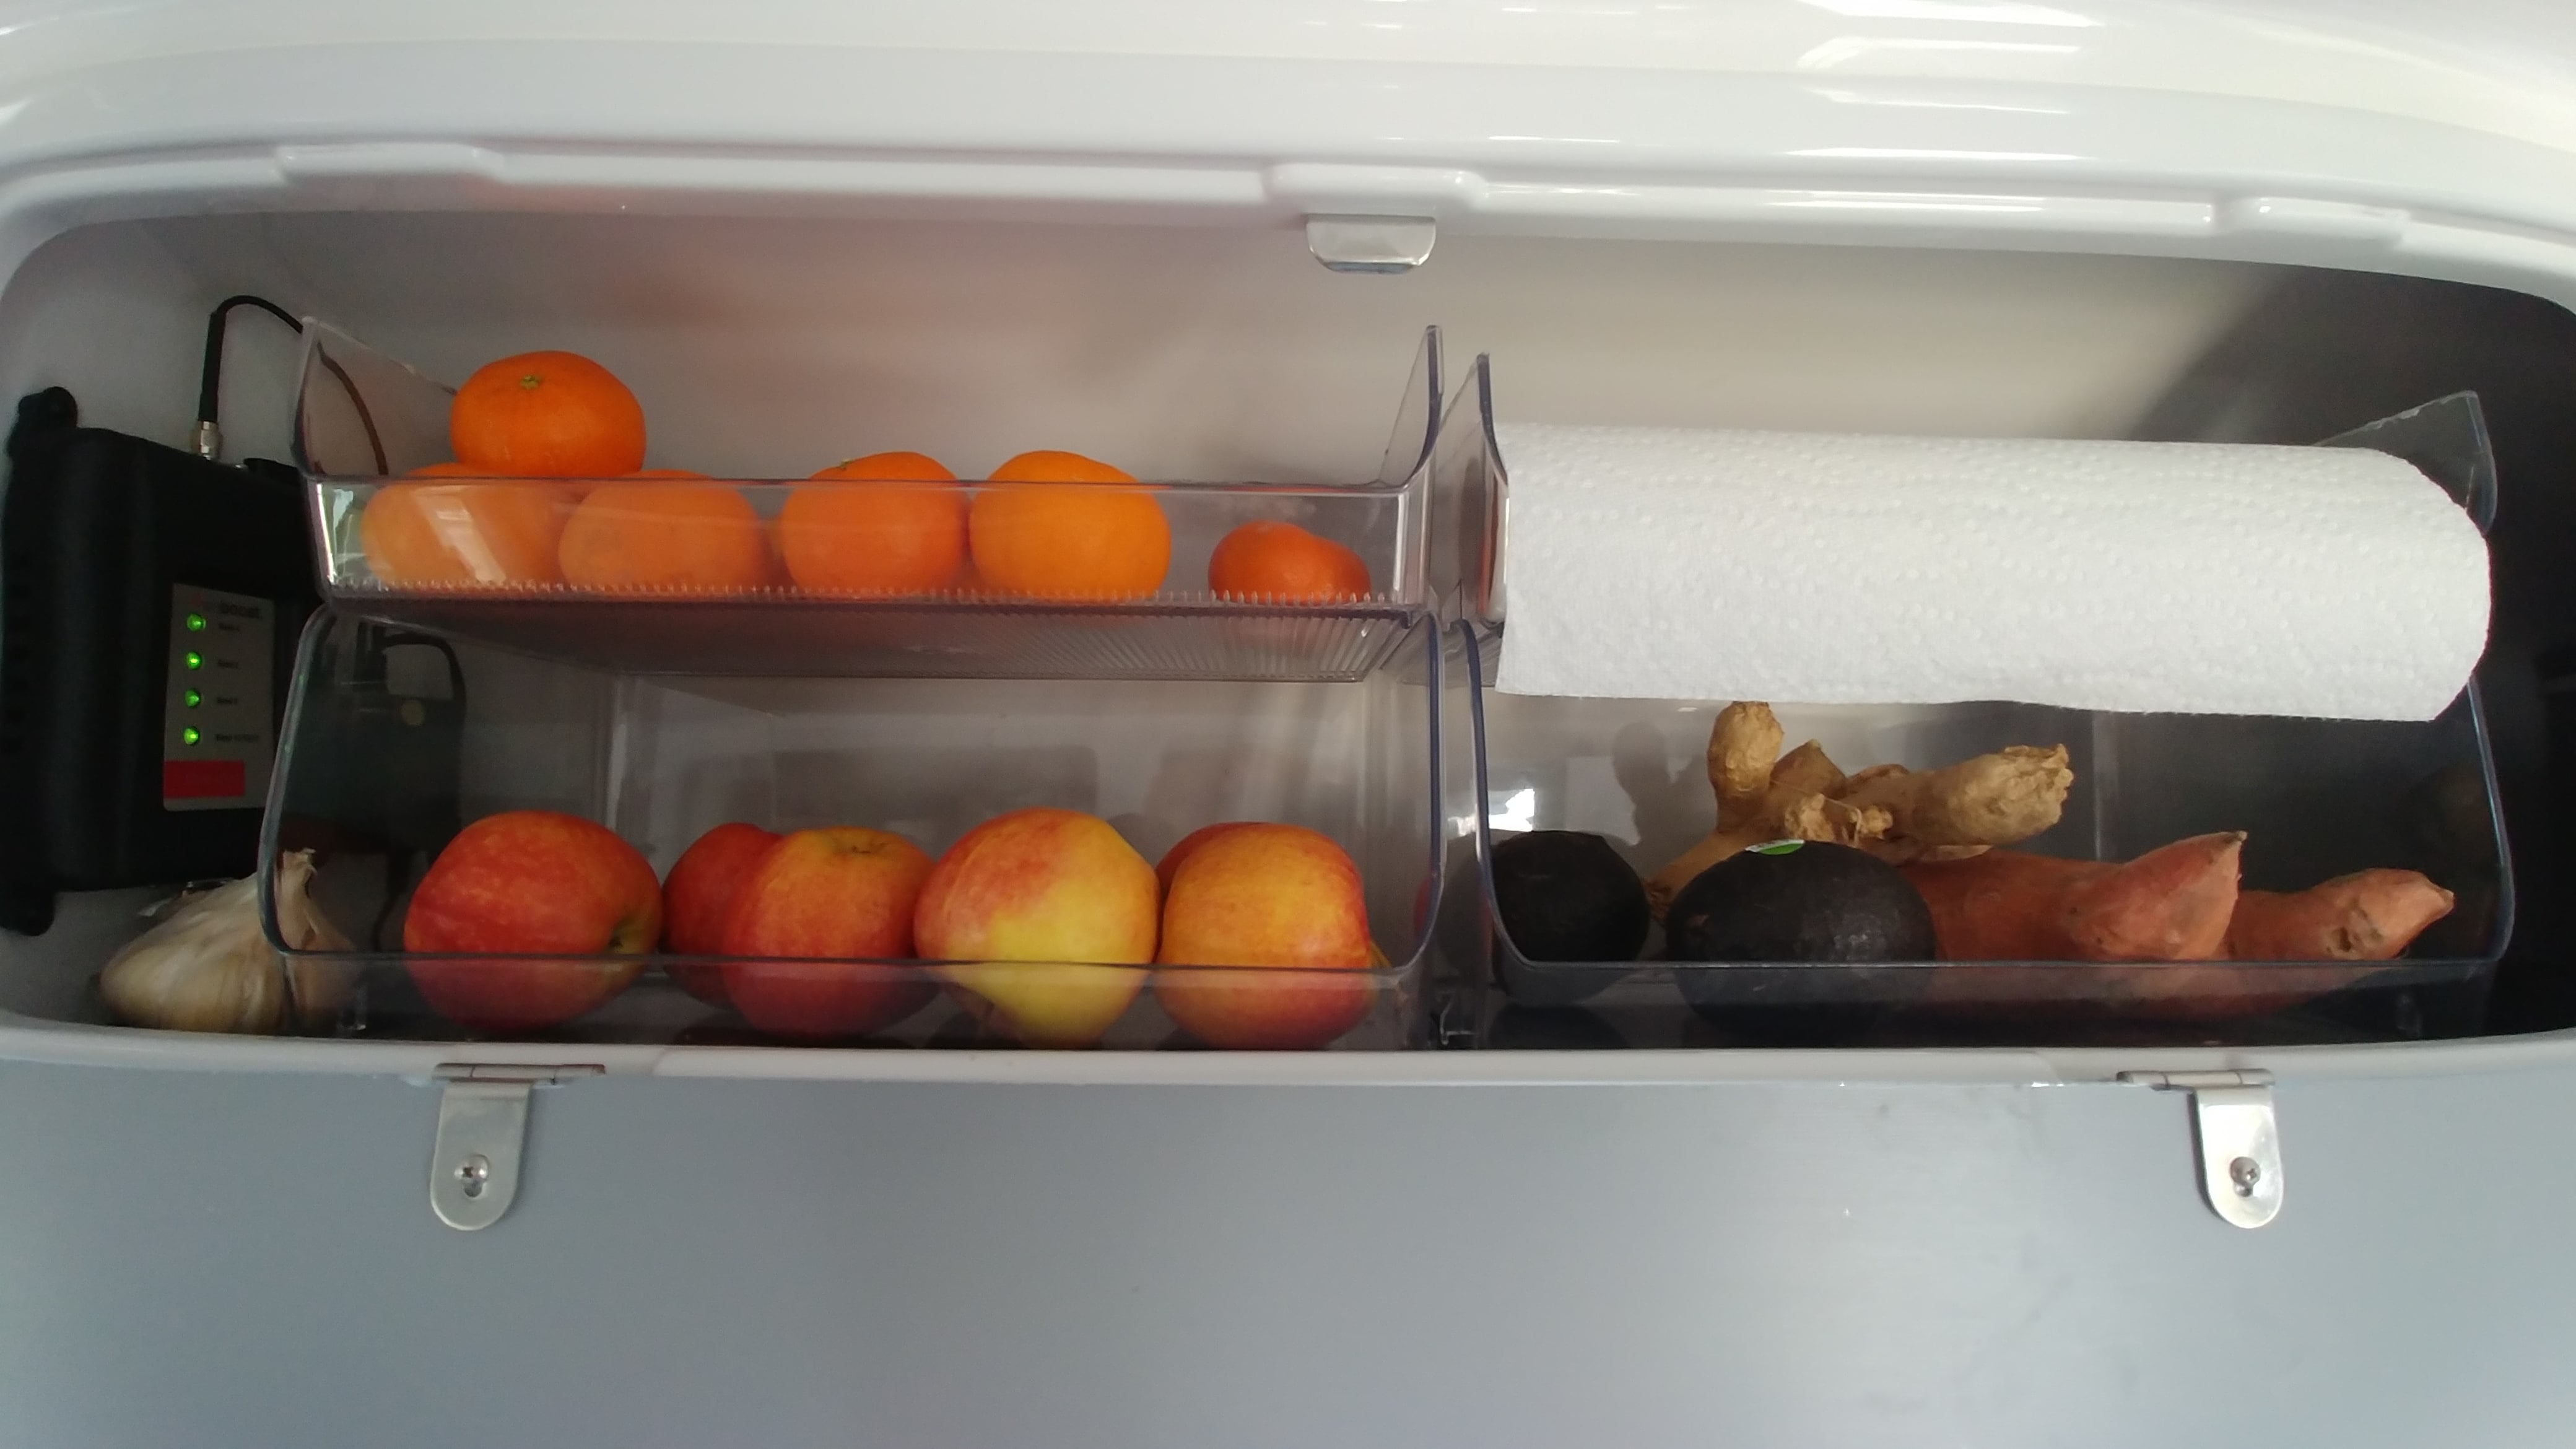
This one appears to have been dropped from my last post. These are stacking bins for produce in the cubby next to the pantry.
1 point
-
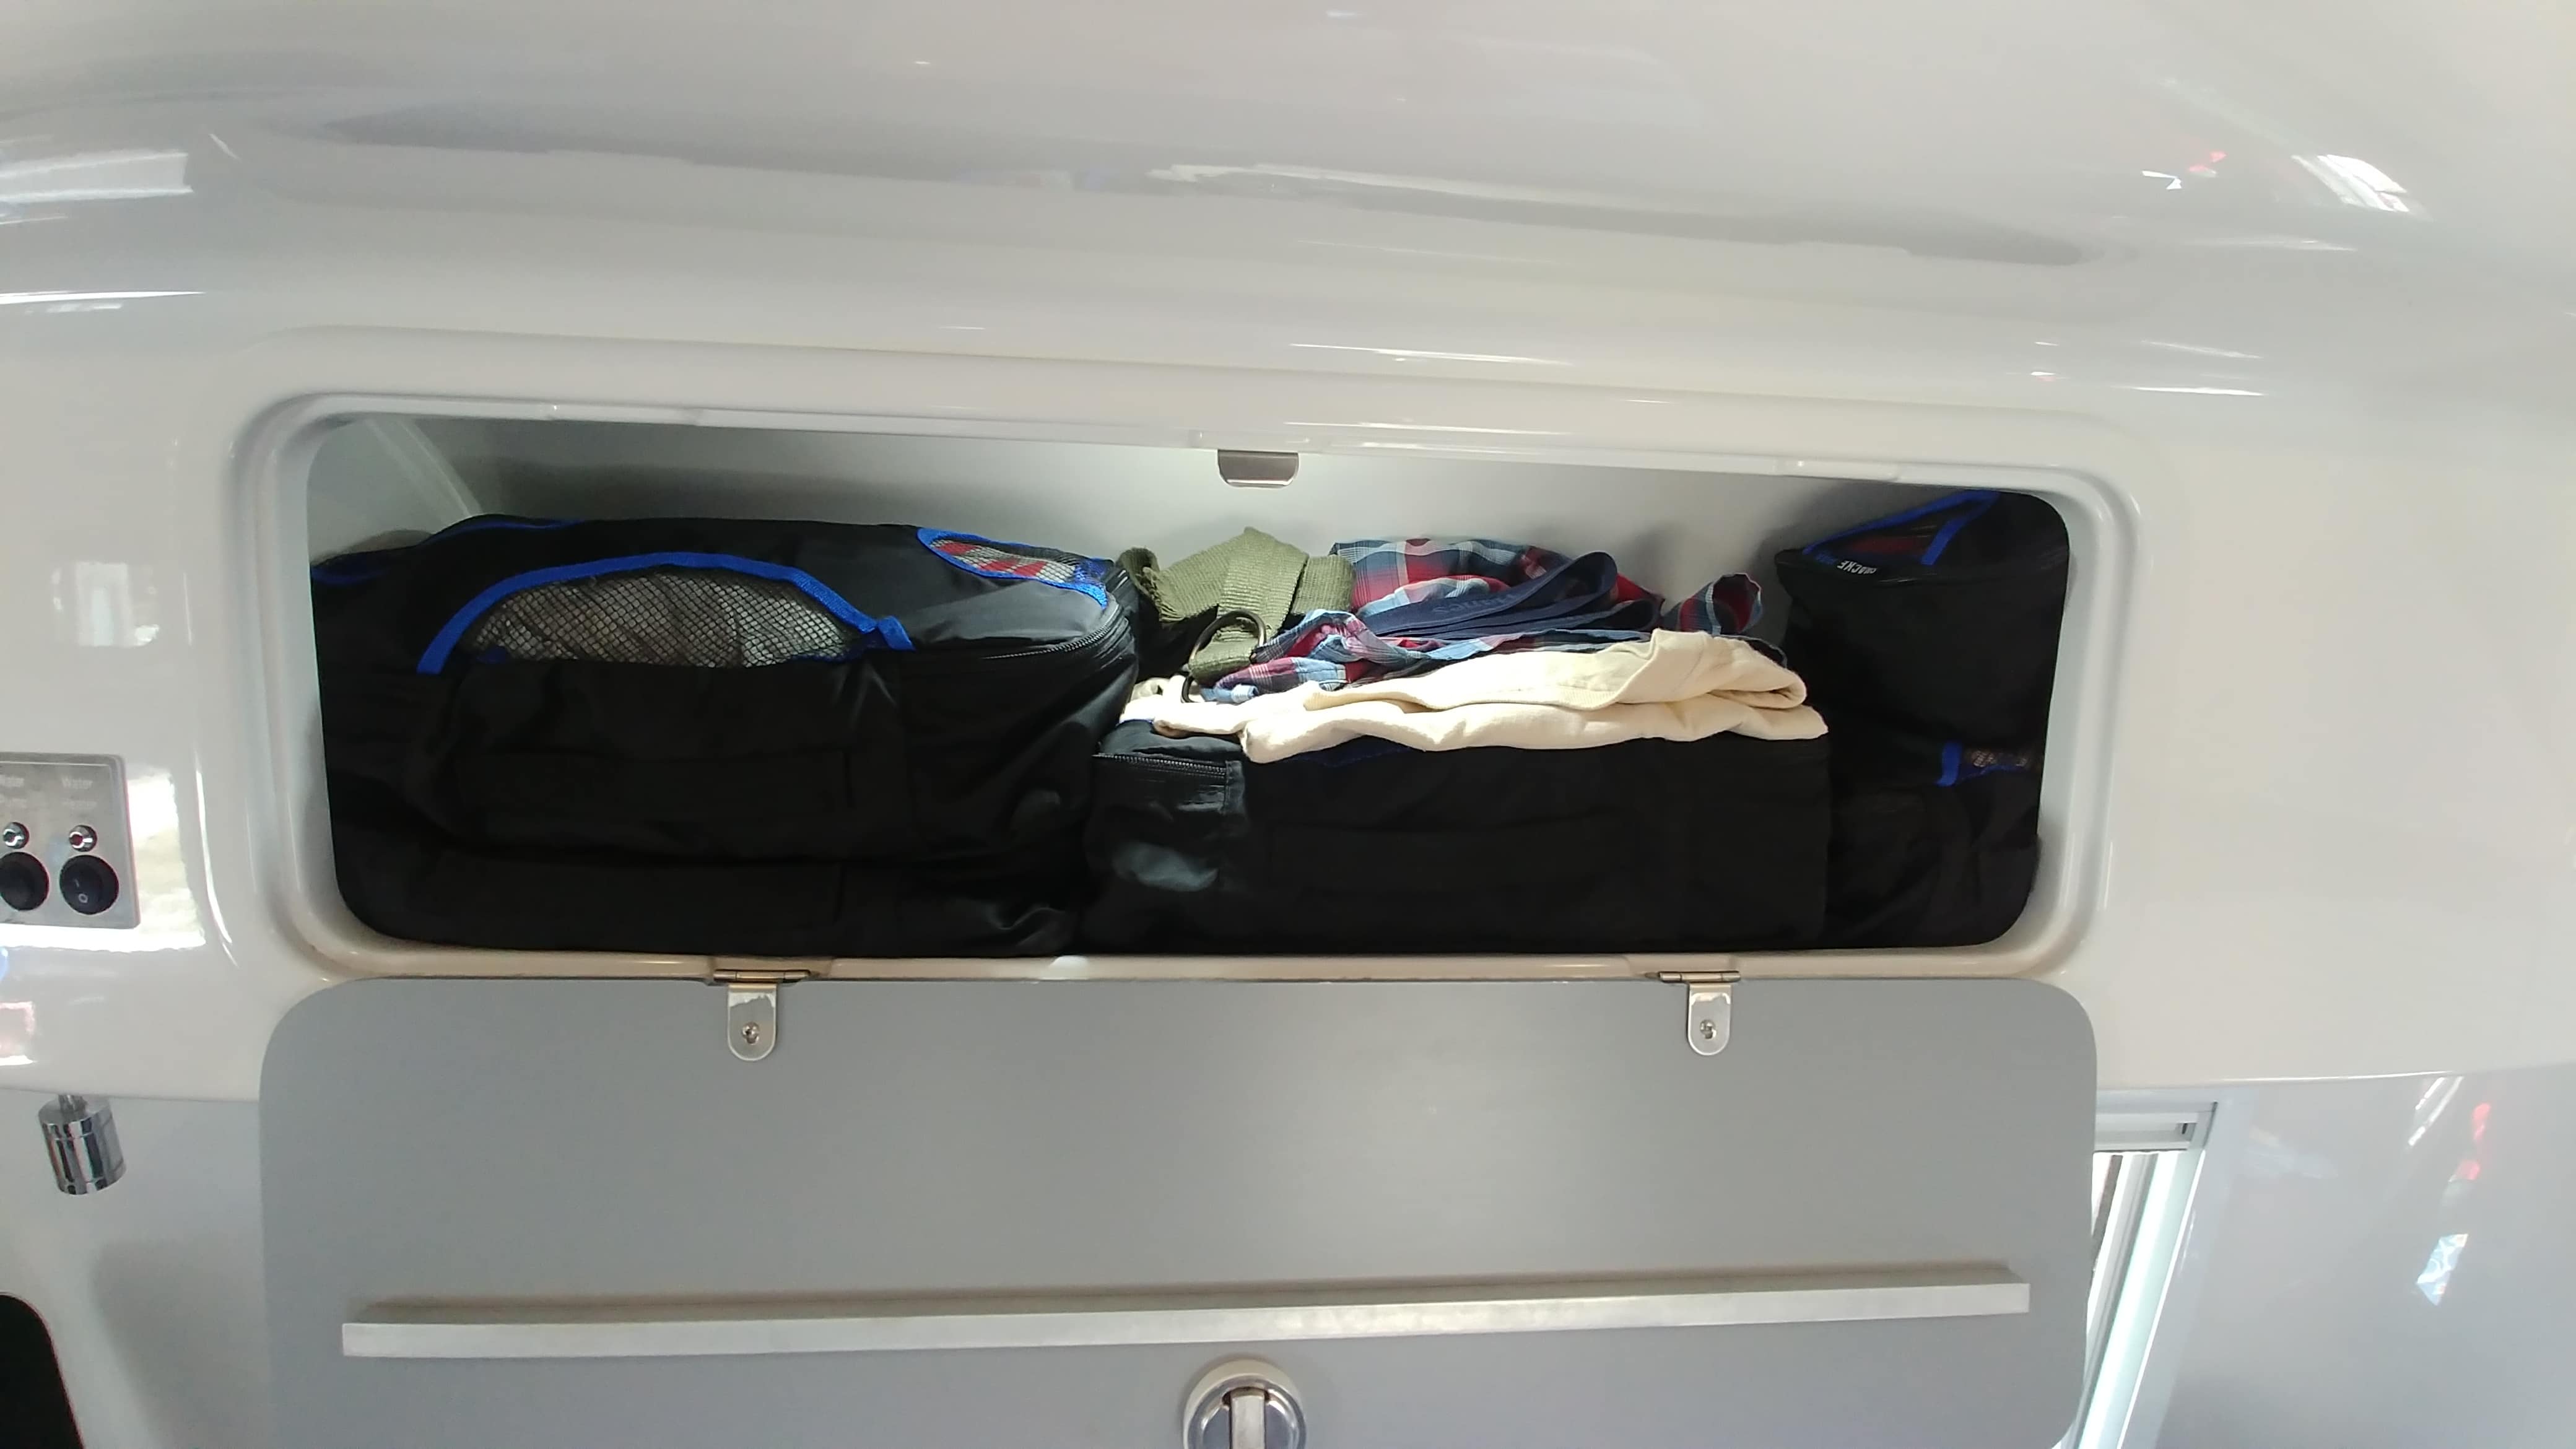
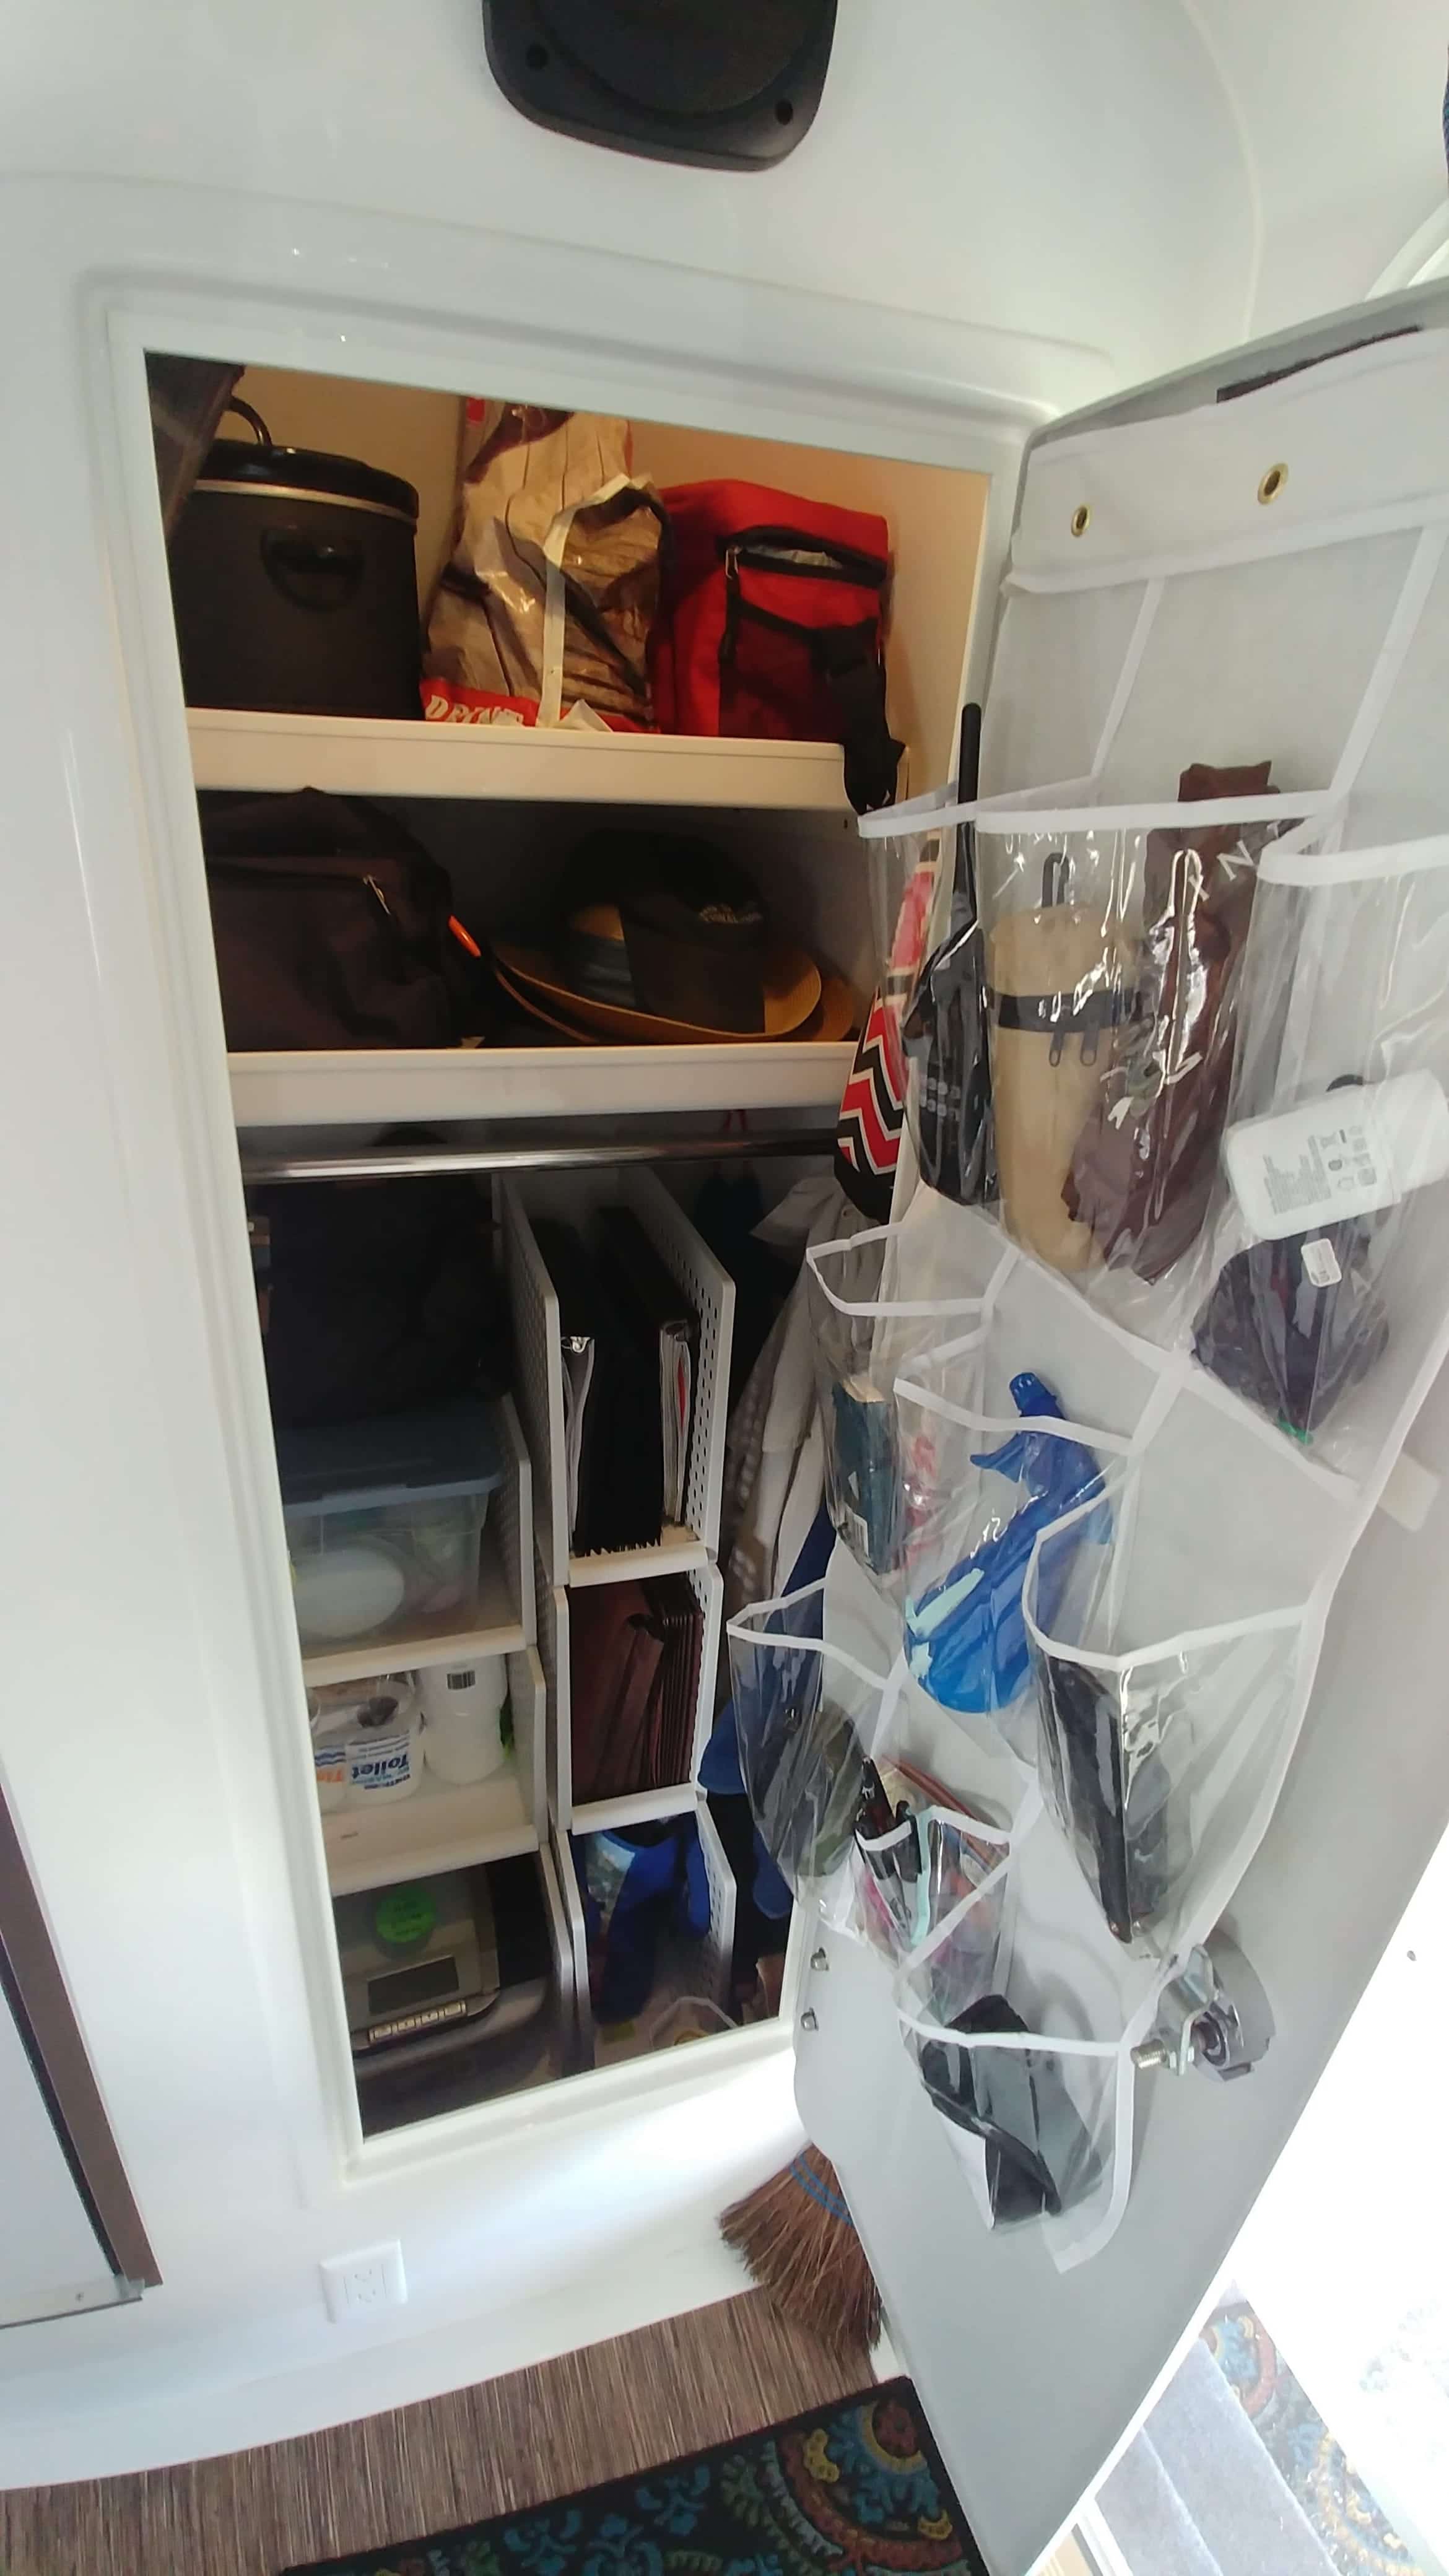
We've been full timing in our Oliver since Nov of 2017. Here are some pics of storage solutions that work for us. It took a while living in the Ollie to really determine how we would use the space so I would caution you to give yourself some time. [attachment file=0311191047.jpg] [attachment file=163145] [attachment file=163148]
1 point
-
Kathi, if you look on Oliver University (the last menu item under Travel Trailers on the website) you’ll find several downloadable PDFs for various dimensions for your trailer. Here's a direct link to the main measurement index.1 point


-
Recent Achievements
-


")


")


