Leaderboard
Popular Content
Showing content with the highest reputation on 12/11/2023 in all areas
-
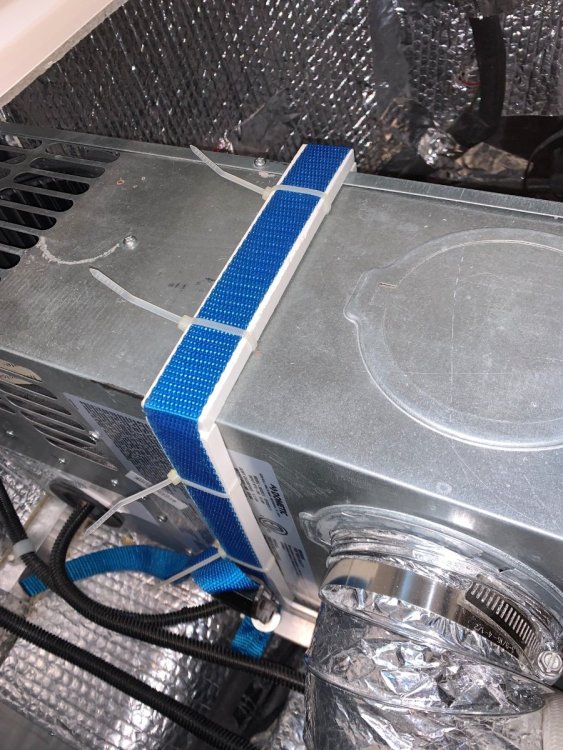
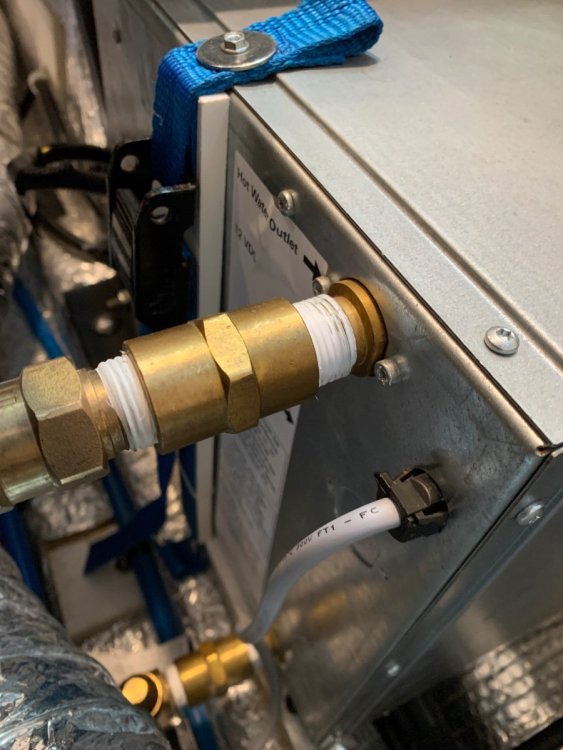
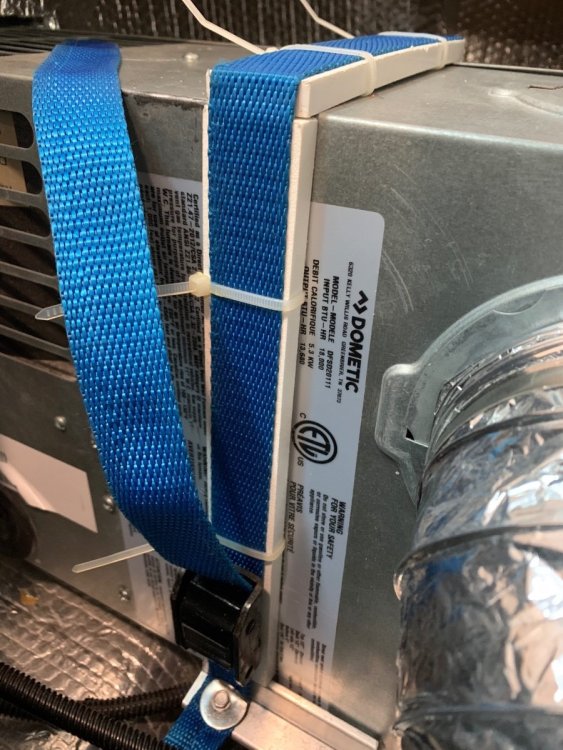
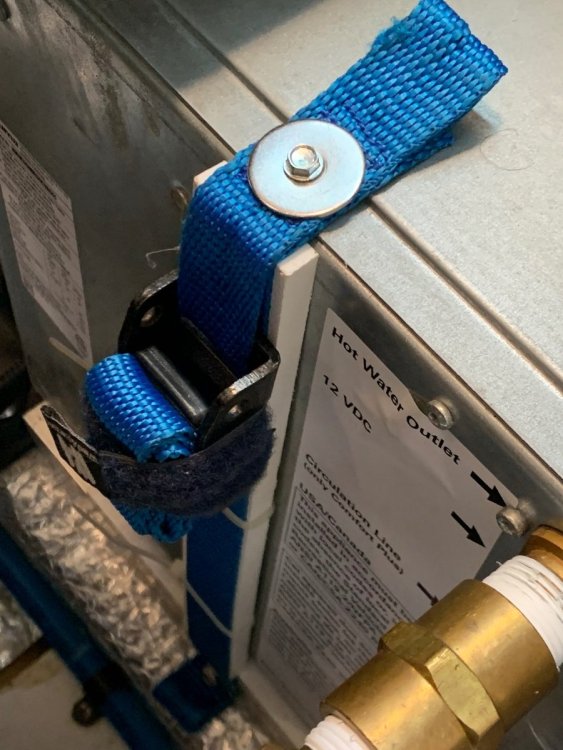
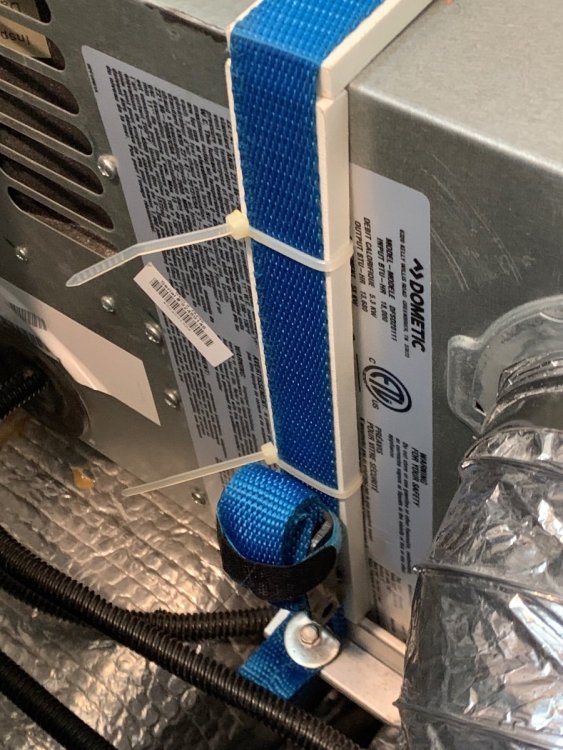
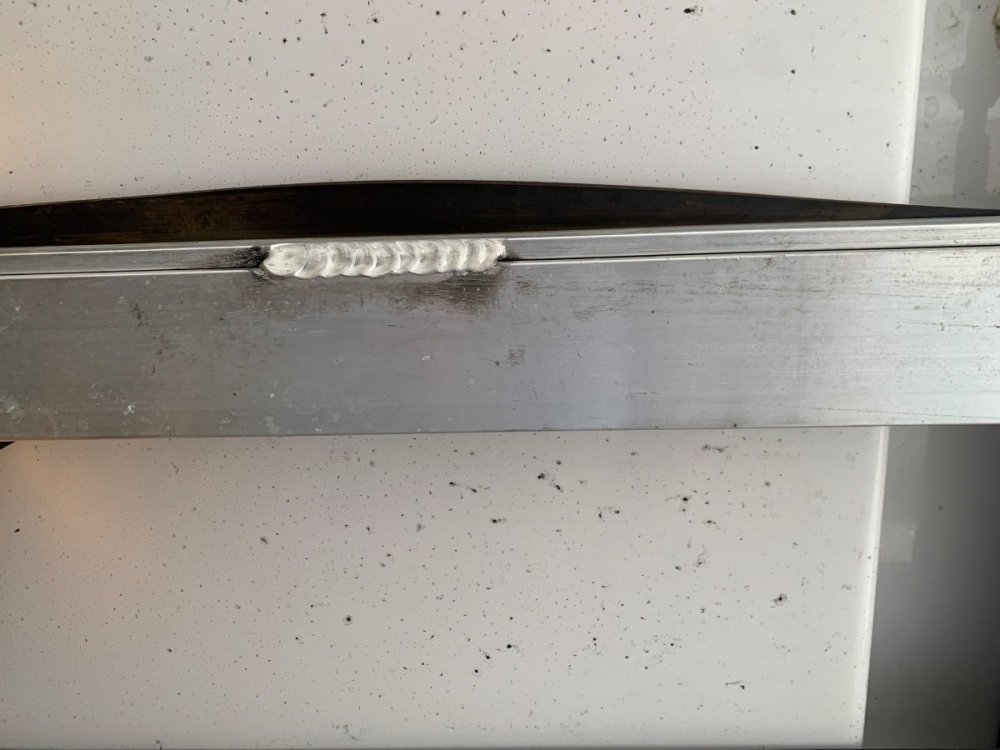
Less than two years into ownership, I made two repairs to the factory-installed metal straps used to secure the Truma water heater and the Dometic furnace. These straps were the typical HVAC metal galvanized hangers, which broke due to stress fractures likely caused by the over-inflated tires Oliver advocated a few years ago; at pickup, my 2020 OLEll Cooper tires sported 80 psi! The water heater strap broke first, repaired, then the furnace, repaired, then the water heater again. With each repair, I used a heaver gauge metal strap, to no avail. After the third failure, I decided to try some other means in hope to permanently fix this reoccurring issue. Aside from reducing the tire pressures to 55 psi, I utilized some cam-lock web straps for the fix. One year in and all good; no more worries of potential damage to the water and gas lines or electrical wires servicing these units from bouncing around while merrily driving down the road! Lines and wires at jeopardy! Cam-lock to tighten strap for optimum securement. Stainless steel self-taping screws and fender washers to fasten strap ends. Starboard strips to insulate web strap from heat and abrasion, secured with cable ties. Excess web strap bundled and secured with a Velcro cable tie.6 points
-
5 points
-
I don’t know if any of you folks follow the Escape Travel Trailer forum. I’ve been a member there for 15 or so years and I check in a couple times a week to see what they are saying about Oliver. They’re generally a touchy bunch especially about Oliver’s. Recently Escape has put out an advertisement to drum up business (I suppose that is the reason for all advertising). Anyway, the members over there are not particularly impressed with their own trailer’s marketing attempt and have been lamenting the quality of their video. Here is the Escape video https://www.youtube.com/watch?v=IgDnr4djkQU On the other hand, they seem to have be quite impressed with Oliver’s latest video. One saying, “Now that’s how a trailer video should look.” Here is the Oliver video https://www.youtube.com/watch?v=2SSLCwOjg-I4 points
-
Nice, a lot of people just cannot fathom how much force 6 gallons of water inside a steel tank can generate when moving on rough surfaces! Mine never failed, but I never towed with hard tires either. What straps did you use? Regular ones? Those have some stretch which in this case is probably not a bad thing to have, but for other applications such as battery tie down straps, you don’t want to have any at all, so you should seek out mil-spec zero stretch webbing. This is excellent, with a footman loop at the bottom on each side, you can position the buckle up top where it is easy to reach and inspect. These straps will stay dead tight, they actually “twang” when you flip one with a finger, very excellent stuff! https://raingler.com/products/blockoff-kit For a lithium battery upgrade, consider adding these to keep them secure and safe. https://olivertraveltrailers.com/forums/topic/5356-how-to-fabricate-battery-hold-down-straps-and-anchors/ John Davies Spokane WA4 points
-
4 points
-
4 points
-
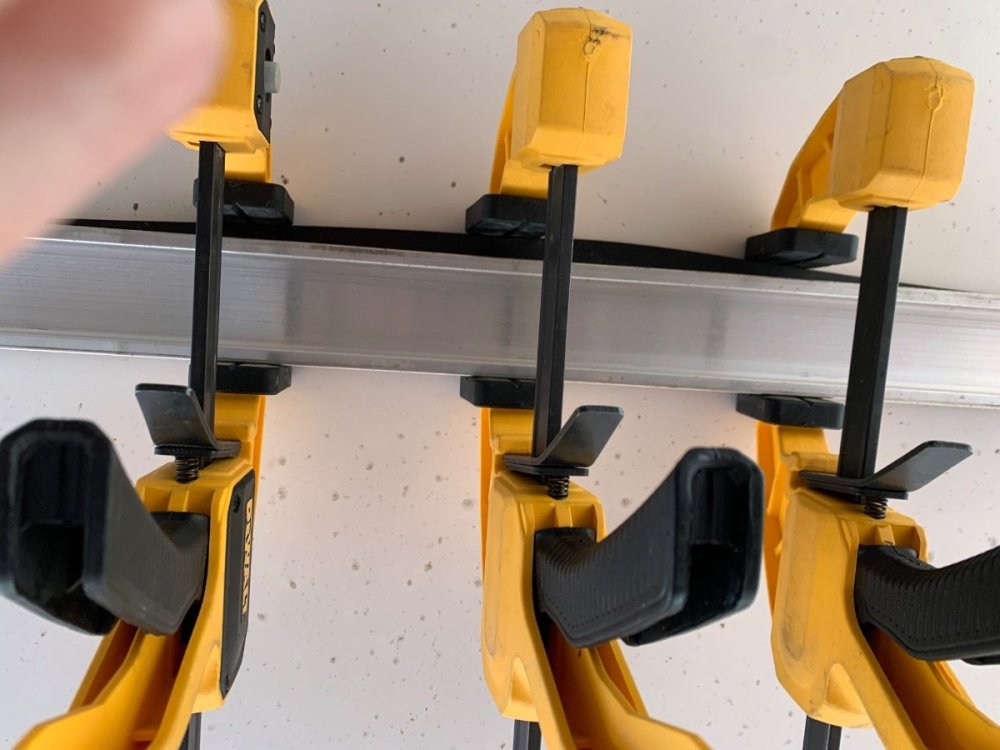
The early models were notorious for this happening. I fixed mine and several other owner's units back in 2015 using jacks with supporting pieces of 3/4" plywood on either side of a cross brace. You don't need more than 1/8" of clearance to put the rubber strips back into place. The fiberglass will easily give that much without damage. Wetting the area well helped to facilitate. Using the quick clamps as above should make the job easier. The sealant mentioned by @SNY SD UP between the frame member and the rubber is an excellent idea.3 points
-
We need to understand if the strips were supposed to be glued down to the frame rails, with VHB tape for example, prior to mating the frame to the hull. If that step were omitted, intentionally or by Covid accident, then that could be the root cause of the slippage. Oliver Service will certainly be able to clear that up. If there is indeed supposed to be something binding the strips to the frame or to the hull, then an easy field repair would be applying beads of a good adhesive/ sealer to the edges along the accessible areas. That should suffice to hold everything in place. And it will help to keep road grit out which is very destructive (in the long term) to fiberglass that is under a load, but always flexing a little. It acts just like grinding compound. John Davies Spokane WA3 points
-
The high viewership of the Escape video could be all the Escape owners clicking to see how bad it is (Oliver owners too). The bear delivered the best lines in the spot.2 points
-
Like JD - I too have never had a problem in this area. And, I keep my tires at 62 to 65 psi. And, I have traveled down some pretty rough roads. However, it is what it is and your solution to the issue appears to be a good one - nice work. Bill2 points
-
These were some heavy-duty straps once used to tie down an ATV. I modified them for this application; the end hooks were removed, length shortened and cut ends heat treated. Although the Truma is tankless, it still has substantial weight; and restricting movement imperative, in that the lines are hard plumbed. I am very pleased with this mod.2 points
-
Agreed. And sadly with the current situation with open borders we are going to see a lot more of these nasty diseases that we once for the most part eradicated in our country. The present illegal invasion streaming across our borders is continuing to bring with it lots of unchecked pestilence. When will we learn? Let’s hope and pray this changes soon. Patriot🇺🇸2 points
-
GJ, I think you meant to write 2020 builds, Hull 579 for me and 665 for Bryan, both Twin models.2 points
-
What root causes can you think of for this problem? Change in the bedding material to one that is more dense. Softer material would crush on both sides of the frame thereby form a channel that would keep it in place. More dense could slide out. Your turn! GJ2 points
-
2 points
-
2 points
-
Sort of. The first blue sky Oliver system was originally designed by Technomadia, in early 2008, for their wonderful Ollie. I'm sure Steve's design follows their designs, as did we, with our spin. With their knowledgeable input, and permissions. We followed their component recommendations when we asked Oliver to install the side-mount system my husband designed, and Oliver (amazingly well!) fabricated and installed for us in September, 2008. 15 years later, with upgraded 2 x 200 panels, installed by us, and an additional slave blue sky unit, we are still thrilled with the rooftop solar capacity of our little Elite. Is Victron better? In the marine world, definitely. More exposure, more support, worldwide. More connectivity, with other integrated marine systems. Great customer support, according to my tech friends in the sailing and boating world. Better ip waterproof rating. Doesn't tempt me to change what works in our 2008 Ollie. The support we get from Ryan @ BlueSky is absolutely stellar. He spent hours on the phone with us, when we were doing our upgrade, and helped us select and program new unit. Like Jason at Oliver, there's no replacement for a dedicated and knowledgeable caring human at the other end of the line.2 points
-
Here's a link to the installation manual. Might help, until you hear back from Oliver. https://www.manualslib.com/manual/327956/Norcold-N400.html#product-N4122 points
-
If a review of the link posted by rich.dev above doesn't help you then I'd suggest a call to the Service Department of Oliver. They might be able to give you some quick "hints" as to how to get that fridge out. Good luck! Bill2 points
-
1 point
-
That's a nice and neat solution to the problem. Fortunately I was forewarned (thru this forum) about the correct OTT tire pressure (50 is what I fixed on). I did notice that the metal straps seemed a bit sub-par in securing the furnace and water heater. I like your solution better. (another someday project)1 point
-
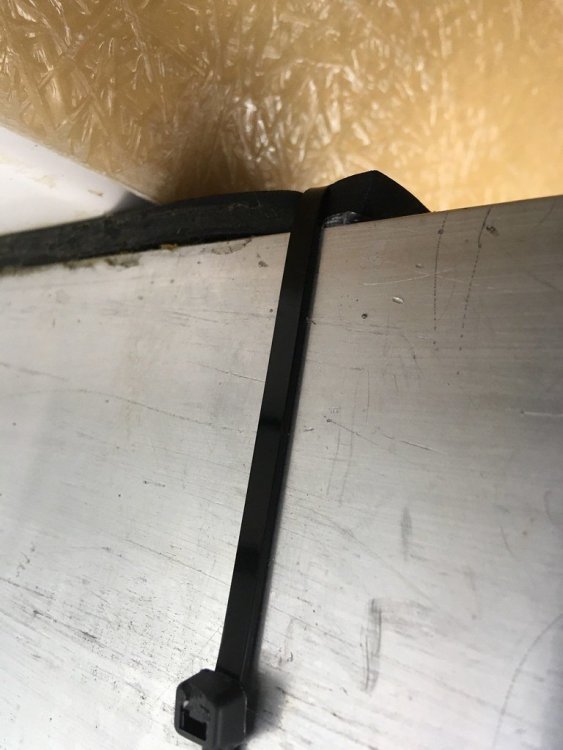
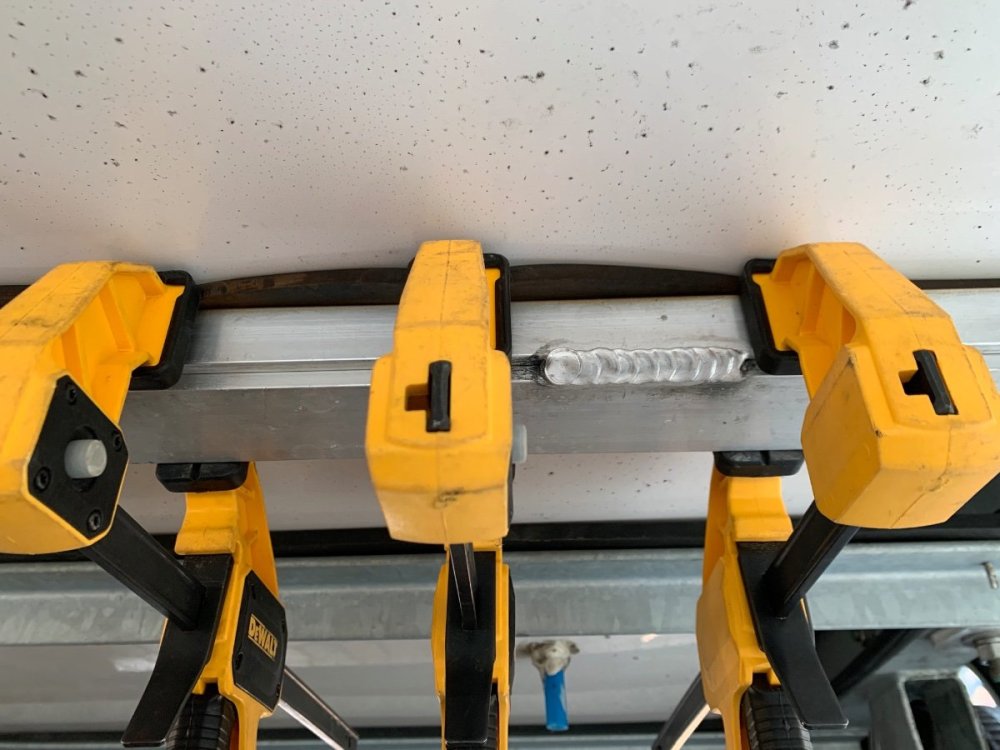
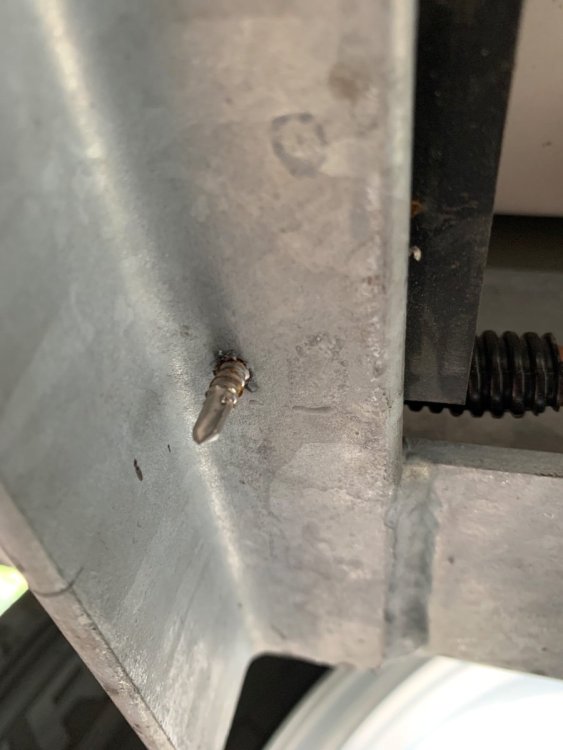
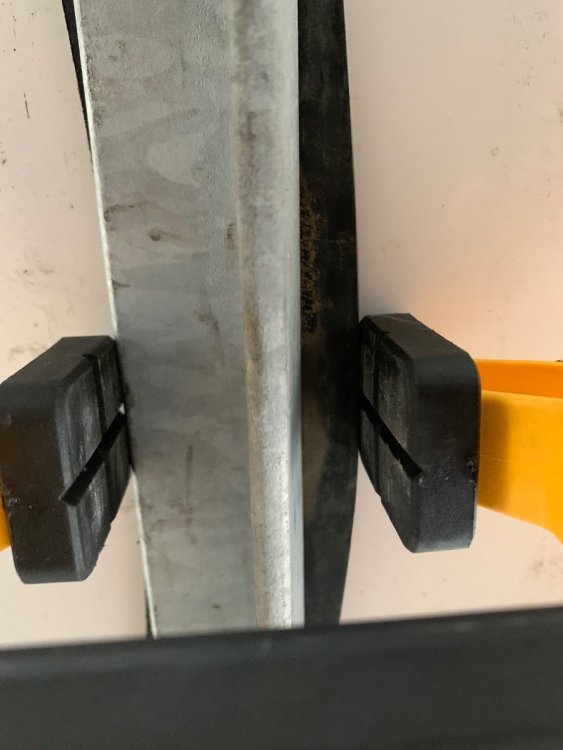
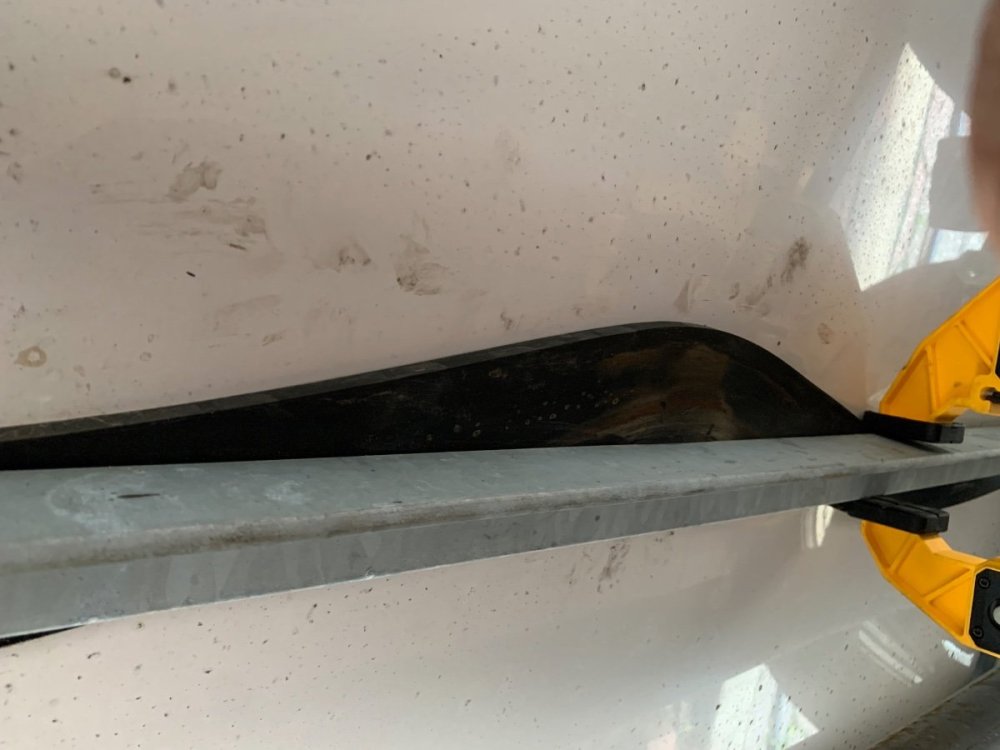
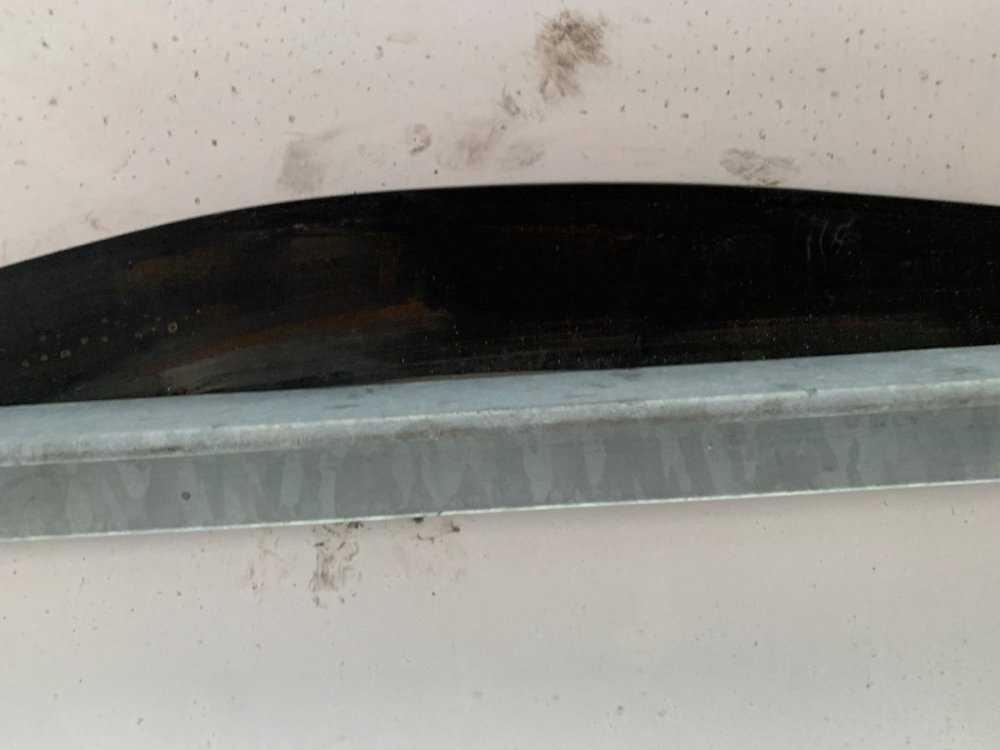
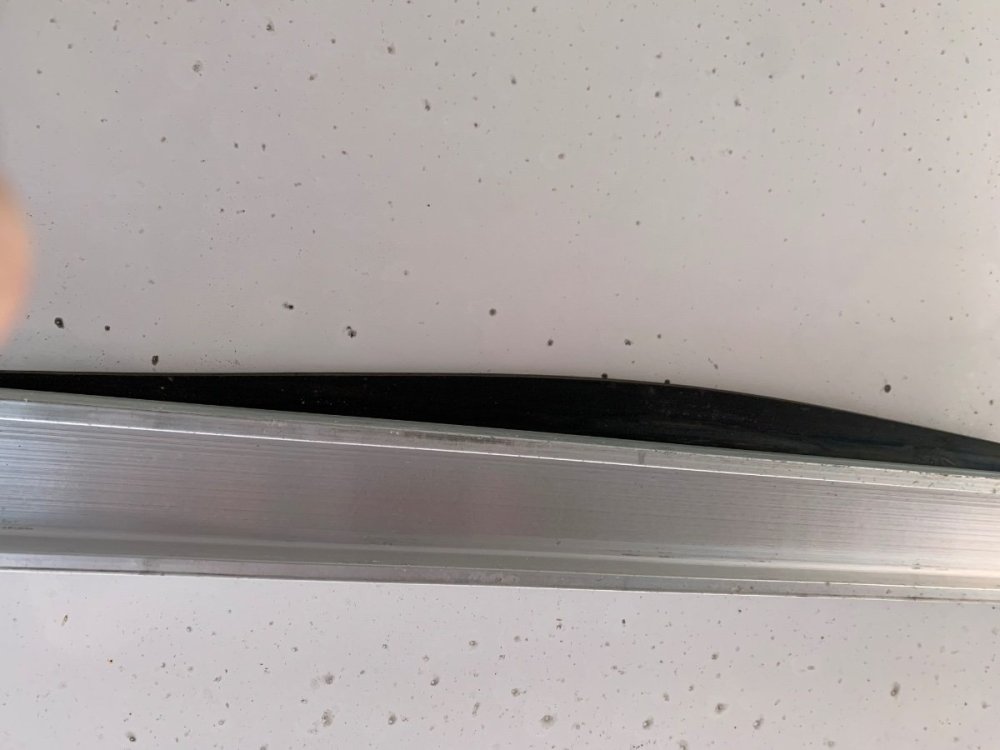
Last Spring while upgrading to Timken wheel bearings, I noticed some of the rubber neoprene runners Oliver places between the aluminum frame and fiberglass hull were out of place. After remounting all of the wheels, I crawled under the trailer to further examine in order to devise a fix. I eventually made use of some trigger clamps to help force the runners back, with varying degrees of success. I had similar issues previously with these ‘cushions’ at the tongue frame and was able to use cable ties to hold them in place. However, due to the tightness at the underbelly supports, the best I could do was attempt to reposition them with thoughts of continued monitoring of future migrations overtime. I did find these runners secured on each end with a screw, which lessened any concern of them falling completely out (think added rubber road debris for motorist to dodge!). This is what I found. Note the smudges made first trying to use a rubber mallet to force back in place. I began by attaching a clamp at the outermost points of concern. Then used additional clamps to work the runners moving inwards. Easy, right? Not so much, very little clearance tolerance! Retainer screw at each end. It would have been nice if Oliver would have used adhesive, as well, to keep these runners in place! Cable tie used at frame tongue. No further a problems there at the three points! To conclude, although I don’t perceive this a ‘major’ problem, these runners were factory installed for a purpose and thus, I feel obligated to maintain them to ensure proper support of the hull’s underbelly.1 point
-
Next ‘go’, I may try the board and lift method. If enough clearance, a may slip some cable ties around the truss to hold the rubber runners in place, as opposed to an adhesive.1 point
-
Looks like another upgrade/preventive project for next spring for Ollie-Haus. Thanks for sharing. 👍1 point
-
1 point
-
FYI slightly related topic: https://olivertraveltrailers.com/forums/topic/3330-how-to-remove-modify-the-cover-over-the-waste-storage-bay/ Check your clearance the next time you are poking around under the frame. John Davies Spokane WA1 point
-
Interesting out of the very many OE2's, the first two owners to mention this problem are both 2022 builds. Good move Ron and SNYSDUP!! I am guessing that before 2022 2020 there was somewhere around say 500 that came off the line. pre-Covid. Either we have a LOT of owners that don't crawl laps under their trailers, or something changed with the design, or installation, or both. Worth a question for sure. And I'll be inspecting mine this summer as well. GJ PS: Likely there will be a lot more of these. Question is how widespread through the fleet is the situation. Service Tickets all on this one. PSS: We need a catchy name for this syndrome. Covid Slip maybe?1 point
-
I ruled out trying to lift the hull in any manner for fear of cracking the gelcoat/fiberglass. Oftentimes when I attempt to do something “very carefully”, stuff happens! However, your suggestion to use soapy water to cleanse and lubricate is a good one. Also, I will take a look at the hull nuts, as well. Thanks for your response. I don’t know how commonplace this issue is, but other’s suggestions to open a service ticket may have some merit. It would be interesting to know Oliver’s thoughts regarding a lift to the underbelly or some other proven remedy for the fix. Since I’m a ‘huge’ DIYer (yet another thing that drives my wife nuts!), I’ve learned to be very resourceful and handy at making and fixing things over many, many years, thus reluctant to ask for help. That said, you will probably submit a service ticket long before I give thought to it. I transit mostly paved so I can rule out “wash-boardy roads” as the culprit in my case. My thought on use of an adhesive/sealant was to simply run a bead along the edge of the runners, rather than attempt to adhere them at the mating surfaces; not there yet. Did someone say ‘magic mushrooms’?1 point
-
Most likely as you stated. But, maybe not. When in troubleshooting mode, between Muphy's law and my spelling of "ASS-U- and Me" I try as best as I can to avoid both. 🙂 But, as you stated the odds are that it likely would have evaporated. More likely water got into the control board at the same time as on the heat exchanger. Water on the control board area would generally result in a unit failure. But then, I'm now making ASSUME's too. GJ1 point
-
THAT is great customer service and glad that it worked out for you. It makes me happy to know that there are companies in addition to Oliver that try their best to actually help their customers. Bill1 point
-
It is not the fiberglass hull that is affected, just its connection to/ interface with the frame. My hunch is that the “forever hull warranty” applies just to the molded part. Have you noticed how old fiberglass boats never die? The attached parts rot off fairly fast, but the hulls themselves stay intact forever, which is a huge problem in terms of recycling. Ollie hulls are also forever parts, which is why they get that great warranty. John Davies Spokane WA1 point
-
Bump, added a link in the first post to the Oliver Service page about this toilet. https://olivertraveltrailers.com/forums/topic/6720-natures-head-compost-toilet-troubleshooting-user-guide/ John Davies Spokane W/1 point
-
Somewhere in the dark hollows of my brain folds I recall that we have a lifetime warranty on our hulls. Assuming I've not inadvertently been feed some magic mushrooms on my pizza, is this the case and would it not be a warranty issue? PLEASE send OTT a service ticket on this. GJ1 point
-
Interesting, I haven’t heard of this problem before. Thanks for posting the pics.., Could you use a big piece of wood, like a 2”x4”, and a hydraulic jack under the fiberglass to very carefully take the load off the rubber to allow you to push it back into place? Also, some soapy water, applied liberally to flush out the dirt, would act as a lubricant to perhaps help them move a little easily. Did you check all the big hull mount nuts to see if any were loose? They do loosen, the ones at the jacks especially, and below the propane compartment... I am having a hard time visualizing a situation where these rubber pads would drift out of place if all other factors were normal. This could just be a visual symptom of another problem that remains to be corrected. I suggest that you file a Service Report - they may have other cases like this, and the extra info might lead to a a new technical bulletin. John Davies Spokane WA1 point
-
1 point
-
That Escape add is a bit corny, doesn’t really highlight the trailers just the silly bear. Mike1 point
-
For anyone who has never been present for one of these launches - it really is something to experience. Please post those pics - if you can get any. Its always a thrill. Bill1 point
-
When I was active duty, I was on the Joint STARS Test Team at the Northrop-Grumman facility at the Melbourne airport (tough assignment). Patrick AFB kept my personnel and flight/medical records but I worked over at NG. And, I do know what you mean...lol Brian PS - nice pic!1 point
-
Assuming you are going to reinstall the fridge, maybe use some real insulation like the pink Owens Corning 1” foam board, that is rated R5. I am not sure if regular styrofoam has that high an insulation value. The pink stuff is fire retardant and will not absorb moisture at all. Lots of aluminum HVAC tape will hold it in place and hopefully seal the gaps. The idea is to stop outside air entry. I sure would be reluctant to foam it back like yours is now, with the spray stuff…. https://www.homedepot.com/p/Owens-Corning-FOAMULAR-NGX-F-150-1-in-x-4-ft-x-8-ft-SSE-R-5-XPS-Rigid-Foam-Board-Insulation-20WENGX/315197840 You can also use that board to insulate bare spots like under the bathroom vanity. … https://olivertraveltrailers.com/forums/topic/9039-how-to-bath-sink-compartment-mods-duct-rework-insulation-disconnect-flush-line/ Please start a complete thread on your job, I don’t recall seeing one for the Norcold unit. Good luck! John Davies Spokane WA1 point
-
Not sure this will help as its for a Dometic, but here’s a link to how JED removed his Dometic.1 point
-
I am of the mindset that a Critique of the Oliver Trailer is very important in discerning the Failure Mode and effect analysis. John Davies comments provide a wealth of information. The positive and negative information John has contributed to the Oliver community is priceless. As a member of Management at Ford Motor, Critique is a very important tool. Least we forget the PINTO! Very Respectfully, George Bergh1 point
-
HERE is a YouTube video from a couple called "Changing Lanes" that discusses fire safety in RV's. About half way they mention the Proteng system they had installed. Certainly some good safety info in this vid. Bill1 point
-
We were going to pull the fuse but decided to try once more to just turn the batteries back on to see what would happen. No more sizzling, everything is operating "normally". I ran the fridge on DC for a couple of hours as suggested by GJ, it cooled down with no issues (I remain absolutely enamored with our lithium batteries - there was hardly any draw down of the batteries during this time!) I think the fuse would have been the more important link to pull, this was only happening while DC power was energized. We discussed that as a possibility but couldn't imagine what other wiring would be in that particular area. I have an appointment to take it to a local service center to get the wiring checked out to make sure it's not a bomb waiting to explode. Thank you all for being helpful and supportive!1 point
-
Yes, you can. It is my understanding that you simply turn the batteries back on after the BMS turns them off at the RVC level. BUT, that is for emergencies only. If you use the Lithionics batteries for too long after reaching RVC, you can permanently damage them. I would only turn the batteries back on after reaching RVC to run the jacks and get the trailer hooked up to my tow vehicle, then I would turn the batteries off again. I would then tow the trailer to a place where I could fully recharge the battery system. That is one reason I carry a generator when boondocking: so I can recharge should the batteries ever get down to the "shutdown at RVC" point without having to find 30A shore power somewhere.1 point
-
1 point
-
Update on brake problem. Welll it was a multifaceted problem. Unfortunately I turned our Ollie and Tundra over to a shop which was incapable of actually fixing the problems. They had them for five weeks. They gave it back to me twice as “fixed” and I made it almost two miles before the drivers side brakes started locking up, didn’t look back. They did get the drums turned. Actual problems were: 1. Bad Curt controller - friend and I replaced with Toyota specific wire harness and Prodigy 3 controller. 2. multiple wire issues where wire had been pinched between frame and hub tube, also some bad (shorting) connectors, mostly affecting passenger side brakes - solution, did some of our own cleanup and then took the rig up to All Wheel RV in Redding, CA (5 hours away) where they patiently went through and cleaned up electrical. 3. Still problem with rear passenger side brake not working, the old mechanic said alright let’s swap drums cross way and see what happens, problem stayed with brake. Inspection revealed that the brake was only making minimal contact, so replace that one plate (brake), after several test rides with shop owner and adjustments all brakes are working. After almost 3 months finally have our new Oliver available for trips. Very frustrating, and definitely a learning experience. I would fault Oliver in the electrical work done around the brakes and brake lights. Dexter on that crappy brake shoe. A lot of people are saying that quality control, in general, went way down during Covid. I should mention that the “All Wheel” boys liked how heavy duty the axle, brakes, and tires were on the Oliver. They pointed out a much larger trailer and said that I had the same brakes that the big one had. He also said that even without 4 perfectly braking wheels, we had a lot of stopping power. Which was reassuring. I’m going to send some of the costs off to Jason and we’ll see what happens. Can’t say enough good things about All Wheel RV. They will let you trailer camp in their yard too.1 point
-
After careful adjustment, the next step is to determine the total power going to the four brake magnets. I can think of two ways to do this: 1. IF YOU HAVE SOLAR: Disconnect from TV. Shut off everything in the trailer and note the residual amp draw. Go to the street side bed area and locate the power connection for the emergency activation of the brakes. Using your solar control system, check and record the amp draw causes by parasitic draws (Smoke and propane detectors, stereo, tv etc. Record this amp draw. Should be very low. Pull the break-away and check your solar system control and determine the amp draw. Subtract the two numbers and you will have the power going to your brakes "locked up". It should be right around 12 amps. Reinsert the break away pin to conserve power and avoid overhheating the magnets. If the increased power draw is less than about 12 amps, it likely will be around 3, 6 or 9 amps thereby indicating you have one or more magnets with a problem. If it is near 12 amps, the issue is not with the trailer end of the system. I would then take it to a trailer brake pro, not a RV shop. 2. If you don't have solar, than I would connect Ollie to your TV and having a partner to activate the brakes: Measure the total amperage going to the brakes. Requires a clamp on amp meter. Should read between 11 and 12 amps. This will tell you if one or more of your brakes are not getting the power it needs to fully activate. If low: Test the power going to each side. Should be half of the above (around 6 amps) and equal side to side. If not: Test each of the four lines going into the brake assembly to figure out which one is the problem. If found, determine if it is: Broken/corroded connection, bad ground to that magnet, or a bad magnet. As above, knowing the amp draw at various places allow you to figure out where the problem is. If none of the above works.... get professional help before replacing your controller. Ask prospective shops if they have a plug in testers that connects up to your 7-pin at the TV bumper to diagnose TV brake controller and wiring. Finding a bad connection there would be a lot cheaper than a new controller installation. Hope this helps. GJ1 point
-
Results After 2 Years Of Use: We have never had any problems at all with our composting toilet. This is mostly due to doing our homework by having read through the earlier parts of this forum and watching a few you tube videos. Helped us avoid problems others have suffered through. The only modification we've done is John's idea on drilling a few small holes in the bottom of the container holding the pee tank. Never had bugs of any sort. The fan housing unit has a fine screen where it feeds into the solid tank so no bugs can come from the vent pipe into the solids container. There is also a fine screen on the intake side. For good measure we add a half cup of diatnatious (sp?) earth to every load of coir. We don't add toilet paper to the solids container. Seemed like a gross option when we first started but has turned out to be an easy solution. We use the same round step lid garbage container suggested earlier in this thread. We line it using recycled plastic bags from grocery store - the type you put fruits and vegis in. Soiled paper and wipes take about 5 days to start to fill the bag and we've never had any smell at all. Weird but true. As previously discussed, the only smell associated with the toilet is a slight potting soil odor when changing the coir, even if the toilet has been recently used. We add a few ounces of vinegar to the pee bottle before using and there is never any smell from there either except while emptying a full container. Even then, it's surprisingly slight. To clean, we allow to soak for a few hours filled with water with 1-2 tablespoon of bleach. Our bottle is 2 years old, has had lots of use and looks practically new. To empty the solids bin, while on the road, we simply cover with a 13 gallon recycled garbage back, invert and ban the bottom a couple of times. If anything sticks, we use a paint stir stick to dislodge which, in turn, we wipe with alcohol and store in a zip lock. If at home, we dump the contents at the base of a bush and spread out with a rake. Plants seem to love it. While on the subject, we dump full bottles of pee around bushes as well and they really seem to benefit from it. We use coir as it is cheap and more environmentally friendly than peat moss. We travel with two 1 gallon zip locks of prepared material (the perfect amount to fill container to center line of stirring units) and an extra brick big enough for to make another batch. Soaking for an hour is all it takes to totally break a brick down to the right consistency. The video on the first page seems like an easy process. Our test for proper hydration is to squeeze a fist full of material in our hand. If it almost holds together, it's just right. Takes about two weeks of constant use by the two of us to be ready for changing. If not quite ready after a trip, we leave the fan on for about a week, then unplug and let it sit and continue to decompose. True for winter as well but, if around freezing or colder, the decomposition will pause till things heat up again. No smell at all even after the fan is turned off. We couldn't be happier with this system.1 point
-
We towed our 2008 Elite 60-70K miles. We always ran our tires at 80 psi because that’s what Jim Oliver told me to do. I now know a hell of a lot more about towing. The tires on our Elite II are 12 ply all steel belted and have a maximum tire inflation rating of 95 psi to 110 psi and that would be fine if our Oliver weighed 12,000 pounds. Fortunately, despite the fact that she’s a big ole gal, at “only” about 7000 pounds I can safely run them at 60-65psi, which I do. Now, that’s for highway use. Only. If you head up something like a rough forest service road or, heaven forbid, decide to drive the 70 miles of washboard into Chaco Canyon or the 27 miles of very bad road out to the Racetrack Playa in Death Valley then please stop and air down. Obviously, you’ll need the ability to re-inflate when you get back to the pavement, so a good compressor and tire gauge is imperative. If you are unable or unwilling to do this, then just don’t go. Ignore this at your own peril. If you do, you’ll be tightening, repairing and replacing plumbing, electrical and mechanical stuff for a while. And some of this will be before you even get home. I’ll leave it to your imagination to figure out why I mention these things.1 point
-
It can and has been done. I’ve got video and photos of mine coming off.1 point
-
Recent Achievements


