Leaderboard
Popular Content
Showing content with the highest reputation on 12/25/2023 in all areas
-
I've been thinking about this and my gut feeling is that you shouldn't... because where do you go from here... eventually the others slowly die off... each time replacing it with a new one. I'd agree with Bill.... just change them all out at once. That said...I'm wondering... if the others are still "good", why could't you continue operating on those remaining batteries until they die as well. I'm thinking 12 volts is 12 volts and the number of batteries simply creates "capacity". So just continue on with the remaining batteries until the your capacity becomes unacceptable for your needs. (I have lithium... but I suspect the same logic would apply) Then when its time... upgrade, replace... whatever, and start over.4 points
-
A few years ago, out of curiosity, I took one tire off the port side of the Oliver and let the jack all the way down till only the one wheel and tire was supporting that entire side of the trailer. This was back when I still had about 270 pounds of AGM batteries in the box. The remaining tire was nearly touching the wheel well cover. If you had a catastrophic loss of a single tire on an LEII with AGM batteries you might should expect some damage to that cover. Were it to get into the wheel well proper and go through the fiberglass, you could end up with a mell of a hess. It might be to your advantage to check this at home under a controlled situation so you will have some expectation of what will occur should you ever lose a tire rapidly. Something to consider when trying to determine the best pressure to run in the tires. You can run low to support the actual weight assuming four good tires, take a chance on the odds and hope for the best or you could run a little higher pressure to mitigate some of the odds. I've never considered "hope" to be a valid strategy.4 points
-
3 points
-
Merry Christmas Eve from Farmersville, TX! D, the boys, and I've been here for a week now - it's been raining about 50% of the time. In fact, the rain started last night around 2230 and has yet to stop. Glad to report that "Casa Blanca" is dry as a bone inside. We've kept the bathroom window and ceiling fan vent open (fan not running) and the MaxxAir fan blowing in "Air Out" mode at 10% RPM: result - absolutely no condensation on windows or bulkheads! Right now, enjoying some breakfast wine while D's learning how to crochet... HO, Ho, ho! Cheers, All! @topgun2:PS - Bill, just "Ravel'n On", Ha! TKX!3 points
-
BLUF*: If you are just starting to look at DIYing Oliver electrical projects, and are not experienced with major electrical surgery, then I suggest reading further. As an Oliver DYI guy, I have relied heavily on more electrically inclined owner's guidance and suggestions. This forum has been invaluable in planning and execution of the installation of my Houghton, Battleborns, Victron 712 Smart, DC to DC Charging, and 3,000 watt inverter projects to name a few. A common thread of each of these projects have been the use of electrical cable, lugs, and specialized tools. As a Mechanical Engineer, I have always purchased very high quality tools and materials for my mechanical efforts. But for electrical efforts, I was far less informed. Frankly, my electrical hand tools were junk, my electrical lugs were Chinese Junk, and my hammer actuated lug crimper was not up to the task either. Worse, I would not know a quality cable if you hit me over the head with it. Then came Ollie. I knew I wanted my Ollie DYI efforts to be first rate and I had to learn about electrical tools and materials. But that process took a lot of time and effort. So good choices were made only because I listened to the DYI Owners who had already plowed the path. But what I did not really understand was why the high quality (and expensive) electrical components they recommended really do justify the higher costs. So, for the new to the DYI Oliver electrical system upgrade team, the below rather long winded video will fill in some of the voids. Shameless Plug: I do highly recommend and use: Kline Tools, Blue Sea Systems (anything) and BatteryCables USA (Pure Copper Cables, Lugs, Heat Shrink) GJ * NOTE: Bottom Line Up Front (BLUF)2 points
-
Steve: Good test for visual understanding of the problem. Not much clearance between our tires and fiberglass. For discussion purposes, let's say are well away from any assistance. We hit something that destroys both right side tires. We only have a single spare tire. What would you do? I would: Try to slow down ASAP, deploy 4-way flashers, and quickly pull over if reasonably safe to do so. Deploy a visual warning well behind the trailer. Likely my wife with a red T-shirt and flag. Grab lug wrench and loosen both tires lug nuts slightly. Use Oliver jacks to raise the trailer tires off the ground on the blown side. Remove the blown tires/rims. Place dunnage between the springs and frame to try and keep clearance when lowered. ( I have 11 each 2"X6" short boards in a milk crate that I use for leveling OE2) Install spare tire and lower jacks so that the axle is supported by the dunage and frame Proceed slowly to a safer location and deal with the two blown tires. What have I missed? What would you do differently? GJ2 points
-
There's a good chance that construction debris has found its way into the drain line and probably all the way down to the valve itself. If there's water still in the tank, I'd raise the front of the trailer several inches, open the drain valve, use an air nozzle to blow air into the drain tube from under the trailer to try to force the junk back into the tank. You'll know you've been successful if water flows out of the drain. Of course there's always the chance of re-occurrence, but it might be a long time coming (like in that CSN song). You'd be more likely to be able to get it out if, when you cut the drain line to install the electric valve, leave it draining for a bit to see if it will come out the straight line without the valve in it. Yes, you will be draining the water into the hull, but it will quickly run out the hole left from removing the line where it goes out through the bottom of the hull. Besides, to the best of my knowledge, there's no wires in that area of the bottom hull, just water lines.2 points
-
2 points
-
Same here. For the same exact rationale that @Geronimo John explains. Keep in mind - the "generic" TPMS, configured correctly, will allow you time to find a safe place to come to rest if it's a "slow leak." OTOH, if you've just experienced a catastrophic tire failure, you may need to rely on the "good" axle (if you've got an LEII) to get the rig to a safe stopping location; or if single-axled - just enough time to stop safely where you're at. We've had the catastrophic blow-out scenario on a secondary road in southern Florida 15 or so years ago - two axles, no TPMS, never knew it happened until stopping many miles down the road. The second axle saved the day.2 points
-
Merry Christmas to All in the Oliver Family... May 2024 bring in Peace, Happiness, and Prosperity to us all Cheers! A & D2 points
-
Once again I would like to thank @Hokieman for putting me onto this thread and everyone who participated on this thread. I had missed it when you guys are actively creating it. With my new Michelin Agilis Crossclimates going on the trailer next week, they will still be brand spanking new by the time I make it to the rally, let the inspection begin. 😉 I have doubts that I will be able to tell any difference from my original 2015 Michelin LTs, while driving. It sounds like I will be just fine staying within 45 to 55 PSI, no matter how heavy I load the trailer and maintaining 7000 lbs, unless I load up with too much good Lagar. 🙂 Many of us continue to learn from these forums. Thank you all! It's really appreciated by me.2 points
-
That's one way to say it. Another way is to say, "to winterize, expel all water from the plumbing system using compressed air." I do understand OTT does not advise this procedure, I've heard and read this several times, but I've never been very good at reading directions or listening to advice (some say an attribute of the good engineer). I have used this method for years in other RVs and just worked this yesterday on our Oliver. This is more complex in the little Oliver than say on our past Bigfoot Class-C RV, because of having four (4) hose water inlets. Please allow me to list my procedure and please comment if you believe I missed something, where there may still be some water in the system. I learned this from a Bigfoot owner, on the BOCI forum, who lives in Calgary BC Canada. He uses no antifreeze where of course lows are sub-zero for several months of winter. 1) Park your OTT nose uphill and start draining the Fresh Water tank. 2) Drain Hot Water Heater (HWH) and set HWH bypass valve 3) Reduce air compressor pressure to 50 PSI and use an air to hose fitting (see pic of one I built with spare parts). The fitting must be connect to the hose first, unless yours has a shut-off valve. 4) Turn your water system draw valve to the Winterize/Sanitize position. 5) Open the kitchen faucet both hot and cold sides 6) Connect the compressor airline to the rear Sanitation inlet (a few seconds is all required). 7) Change water valve back to Normal Camping Position. 8) Connect the compressor airline to the City Water inlet (a few seconds is all required). 9) Connect the compressor airline to the Fresh Water inlet (leave it connected). 10) Go inside and close the kitchen faucet. Then open each faucet separately. The toilet, then hot and cold, one at a time, for the bathroom sink, and kitchen again. Run the water pump at some point to expel internal water. Go outside and do the same for the outside shower. Go back inside and check each faucet again. They should all blow water mist when the lines are mostly empty (empty enough). 11) Close Fresh Tank drain when empty. Finish up with the HWH and reset the bypass valve. Get everything back to Normal Camping Position. 12) Empty Black and Gray tanks. Connect airline to Black Tank rinse, or at least remove cap to release water in this line. 13) Add 3-4 OZ of RV antifreeze to each drain (bath, shower, kitchen) and in the toilet bowl (with water).1 point
-
The new Starlink Gen-3 system is out, and it works great! I got one early because Starlink did a special invitation for Gen-1 users only, but now they are available for mobile accounts too. So here are my thoughts on some of the great new features and disappointments that are important for mobile users: 1. Gen-3 uses RJ45 connectors, and it works perfect with the Oliver installation described in my “Don’t cut your Starlink Cable” post. I had previously, and incorrectly, assumed that all Starlink’s systems used RJ45 connectors because thats what my Gen-1 dishy and Gen-3 router had. But alas, the far more common Gen-2 systems did not. Hmmm… that explains why Gen-2 users can’t use the upgraded Gen-3 routers. 2. The Gen-3 dishy is bigger than Gen-2 and it has a wider sky view. I’m not going back on the roof to measure it, but the shipping box is 25 x 15.5 x 3.75 inches to give an idea of the size. I’ve heard complaints that it’s bigger and harder to stow when traveling. In my opinion it’s way easier to stow because It has a convenient fold-up kickstand that eliminates the bulky tripod that came with older dishy’s. I really hated that tripod, it took up as much room as my BBQ. 3. The Gen-3 dishy has no motors or other moving parts, which should be more robust for the rigors of mobile use. 4. The Gen-3 power consumption is 195 watts per the label. That’s higher than Gen-1 (185w) and Gen-2 (about 65w.) This is not great news for boondockers. 5. Starlink still doesn't have a DC power option as many hoped. It has a separate 110v AC power supply with a 57vdc output (3.42amp) and a standard DC power connector. I’m sure someone will soon come up with a 12 to 57vdc volt power supply that can handle that wattage. 6. The Gen-3 router has longer WiFi range and it supports Mesh Node. Of course, the farther away from the router you get, the weaker the WiFi signal gets, and slower the internet speed gets. The Gen-3 router really helps with that. I’ve had a Gen-3 router on my Gen-1 dishy for a few months now and it made a huge difference in internet speed throughout the house. The Mesh feature allows you to add Nodes, sort of like radio relays, that give even further WiFi range, which is a good way to make new friends at camp. 7. The Gen-3 dishy comes with a built-in fold down kick stand designed to sit on a level surface. A pole mount option can be bought separately. You have to use the Starlink App during set-up to get it manually pointed in the right direction. I put mine on the peak of my roof facing West, and tilted it on the sloped roof to approximately match what the kickstand tilt would be if placed on a flat surface. The Starlink App liked the direction it was pointed, but it made me adjust the tilt a few degrees upwards before it would connect to the satellites. I don’t know if there is a work-around for that, but it might be a concern for fixed flat surface mounting such as an RV roof, and for the direction the vehicle is facing. From my almost 3 years of RV experience with Starlink, a fixed dishy mounting is not ideal. You need the flexibility to move the dishy around to find a clear sky view, so its going to be sitting on the ground a lot of time if you want to get a satellite signal. In conclusion, with its wider sky view, built-in kickstand, and the ability to lengthen the cable with a store bought RJ45 cable, I like the Gen-3 despite it’s short comings.1 point
-
Wishing everyone a very Merry Christmas and a Happy and Prosperous New Year! Enjoy the Oliver video! Mr and Mrs Patriot🇺🇸🎅🏻🧑🏻🎄1 point
-
Very likely. My parents fancy themselves as a jack of all trades. I checked their wiring with my mom’s 20 year old voltmeter but it was probably just as faulty as the wire and breaker. I finally gave up on it. The batteries stayed charged enough before we left for home1 point
-
The only power draw was the Xantrex. My wife and I got sick with an upper respiratory virus so we packed up and came home. I haven’t plugged it in here yet.1 point
-
Unfortunately the general wisdom is that all batteries should be of approximately the same age. Sorry. Bill1 point
-
1 point
-
An interesting observation on this deflation graphic. Note that while the width of the contact patch does increase as tire pressure is reduced, the significant increase is in the length of the patch. Maybe all those old loggers running pizza cutter tires knew what would give them the most traction in the woods. Happy Holidays1 point
-
My point on TV alternators was not re limiting factor. The DC-to-DC chargers drawing 20-30-40A and with 4GA cables can pull a lot of Amps. Is your alternator designed for that? Some have extra capacity, what you may call a HD alternator and some do not. if you're investing the expense of a DC-to-DC system, make sure your alternator is up for the task. Back in the day, I had an alternator give out in an old car while on the Interstate. Didn't know it went out, until I heard a backfire and the engine quit (battery charge got too low to run ignition system). We were lucky and coasted off an exit ramp, pulled into a hotel parking lot, where we spent the night, went to the AP store in the morning! Would hate to be pulling a trailer in this situation. Every alternator is rated for amperage, and if there is a higher capacity model, it's the one you want for DC-to-DC charging. Look up your TV on rockauto.com, replacement parts and further down the list premium parts (usually 2 amperage specs). Those running these chargers should keep their eye on the battery/Alt gauge and if you do not have one, add one. @Geronimo John I agree with your written statements re the purpose of both the Shunt and the Solar Charger (SC). I've always seen them integrated. Look again at my Blue Sky pic above to see what I mean. I believe the SC reads the current draw data from the shunt in their charging algorithms. I may be wrong, but in the two systems I've worked with they are always installed together (perhaps not with Victron where everything is modular). We do need an experienced EE in our group! Check out two PDF files (attachments). I installed a Bogart Engineering BMS and SC on my last RV. One doc simply explains the shunt. The other is for their SC product. Check out page 2 for the wiring diagram. They sell their SC with a shunt. @Ronbrink I'm totally jealous of your battery bay installation, cleaned up the factory install, and everything is so NICE, excellent work! Electrical_Shunts_Explained.pdf SC2030 INSTRUCTIONS_041018.pdf1 point
-
1 point
-
Not necessarily due to the many variabilities involved. For the vast majority of TV's being used for OE2's, the charge current is not limited by the factory alternator size when charging up to 30 amp units like the Victron- Orion 12-12/30 amp unit size. Rather, I believe that the main limiting factor is the cable size driven voltage drop. For our size of rigs, the absolute minimum I would suggest using is 4 AWG. I also prefer running two parallel cables vs. using chassis grounding. For those using Litho's and/or having a Smart Shunt on the negative side, the only thing connected to the battery bank is the shunt. I believe OTT knows this and would be "Shocked" if they had not wired their Litho systems accordingly. Beyond this imperative we could have a discussion about wiring various other charging systems.... actually the topic of a thread or two. 😉 I'll leave the first part of this response to others to debate. However, the bolded part tosses a red flag in my pea brain. At a basic level, the PRIMARY purpose of the shunt is to MEASURE charge current and battery draw for the purpose of calculating the battery bank SOC. Whereas the solar controllers CONTROL the charge rate and doing so properly does impact battery life. Not the shunt. Granted using additional equipment may aggregate data for display and other purposes. But the basic equipment purposes remain the same.1 point
-
I see now how this thread was split off from another post @Geronimo John started about flexible panels. Like your 'OllieEvolution" story! We totally get it and hence we purchased used to be affordable. Our own Oliver Evolution has been long in only 6 months... We have already added $5K in extras, none of it solar related, but can afford this given our initial cost (new TV A/V system, rebuilt axles, new beds and bedding, improved water pump and electric valves, etc.). Bought a 20-year-old TV too and when I'm done, we will have another $10K into it (already new suspension, wheels, tires, brakes, water pump and timing belt, hoses, all fluids, fuel pressure/temp gauges, tool boxes and water tank, performance chip and next year an exhaust brake). When I get all done, we will have spent 30% the cost of a new diesel 3/4-ton truck. Start small and yes, Evolution! Our solar/battery/inverter setup is good enough for quite a while. LFPs for us will come 4-5 years down the road since our 450 AH of lead acid is only 2 years old. I would like to add the Victron SmartShunt ($130), not thinking we need anything else at this time, but I enjoy reading about everybody's upgrades. I'm thinking I can add the SmartShunt directly at the battery ground like @CnC did for his 712 install, and just leave the Blue Sky shunt as-is (see pic above). What a simple install, since I'm not adding the 712 display, everything is wired within the battery bay with Bluetooth to read battery information. Although, the SmartShunt has a gray lead that can read the TV battery voltage, be attached to a battery temp gauge, and other uses. I could wire this to the black lead, at the +12VDC bus (also shown in pic above), which connects thru the trailer electrical connecter to the TV battery. This should show about 12.6V when sitting and 14V+ with engine running when operating correctly. Just purchased this: Amazon.com: Victron Energy SmartShunt IP65 500 amp Battery Monitor (Bluetooth) : Automotive1 point
-
Is there a chance you have a wiring fault at the receptacle you’re plugging into? By 20 amp, I assume you’re referring to a typical residential outlet. We use a short adapter to connect our Ollie (via a heavy duty extension) to the wall outlets in our shop.1 point
-
To all my friends and the whole Oliver family tree: Merry CHRISTmas and a Partridge In A Pear Tree…1 point
-
I think they're designed for 30 amp service. I don't have any problems with 30 amp. What are the big power draws at the moment? John1 point
-
1 point
-
Yes, thank you @Patriot for starting this post! I thought I would see a holiday thread here, so I stopped in to see. Merry Christmas and Happy New Year to all OO and families! We're very happy to be Oliver Owners too, just past our 6-month anniversary! The next 6 months, we'll do less learning and fixin' and more getting out on the road. Hopefully a New Years week outing will work out for us and if any of you will be in Quartzite in Feb, we'll haul down the mountain to meet you! Equally happy to be part of this forum and getting to know y'all! Ho-Ho-Ho1 point
-
From the charts I agree. But... If we are running 34 or 40 PSI with a tire minder, we would need to set it lower to alarm. I run our OE2 @ 50 PSI. This gives my tire minder an opportunity to alarm earlier, for the express purpose of giving me more time to find a safer place to get off the highway. Yes, this is a compromise of sorts, but far less than what John D. and I tussled OTT to reduce their required PSI of 80 a couple of years ago.1 point
-
ICE engines will fade from vehicles, but hopefully ground based ICE generators will expand in rural areas to support grid-independent DC fast charging facilities. Using technology available today, these hybrid renewable EV fueling complexes can be built with a combination of on-site solar and/or wind power, some flow battery storage, and ICE generators with on-site fuel storage. The ICE generators would burn locally produced renewable diesel (not biodiesel) made with agricultural or forest biomass. All at lower cost than today’s grid-connected fast chargers that rely on expensive, increasingly unreliable grid supplied energy. And unlike every charging station in place today, these chargers would continue to work when the grid goes down. Rural economies would be the big winners.1 point
-
While EVs may be coming and ICE engines going, it cannot be accomplished on an arbitrary date. Population density and relatively shorter distances in the northeastern corridor of the nation are not the same conditions as west of the Mississippi. A reliable and well spaced charging station infrastructure must exist before mandating the end of ICE vehicles. And then, we will need a reliable 24hr energy infrastructure, capable of supplying the enormous amount of energy to replace all of the BTUs found in the gasoline and diesel in all the vehicles plying our nations's roads. We do not live in ' Fifteen Minute Cities'. We hit the roads and explore . . .1 point
-
When Elon Musk and his Space-X honchos started successfully landing rockets on boats in the ocean (to my knowledge, NASA has never remotely landed a rocket anywhere, let alone on a floating platform), I figured that his engineering groups are head and shoulders above anything that has every been seen before. When he proposed a class 8 semi EV, Bill Gates made headlines saying that it was physically impossible (IE, against the laws of physics) to make such a vehicle since the weight of the batteries would preclude it from having a functional hauling capacity. This too proved to not be the case. The Tesla semi continues to rack up miles and data which is looking more and more like the wave of the future. I expect the cybertruck is just the tip of the iceberg, and that in the next few months and years we will be seeing more and more improvements in the technology and capabilities to the point where in the next few years I expect that internal combustion vehicles will go the way of the buggy and steam locomotive.1 point
-
Merry Christmas and Happy New Year everyone!!! My wish for the new year is safe travels for all and many camping trips this coming year. Looking forward to catching up with friends and making new ones this coming year!1 point
-
1 point
-
1 point
-
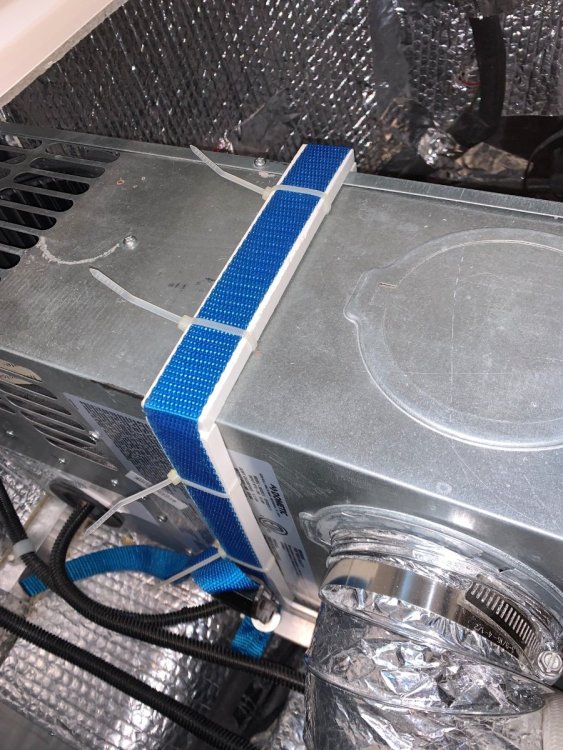
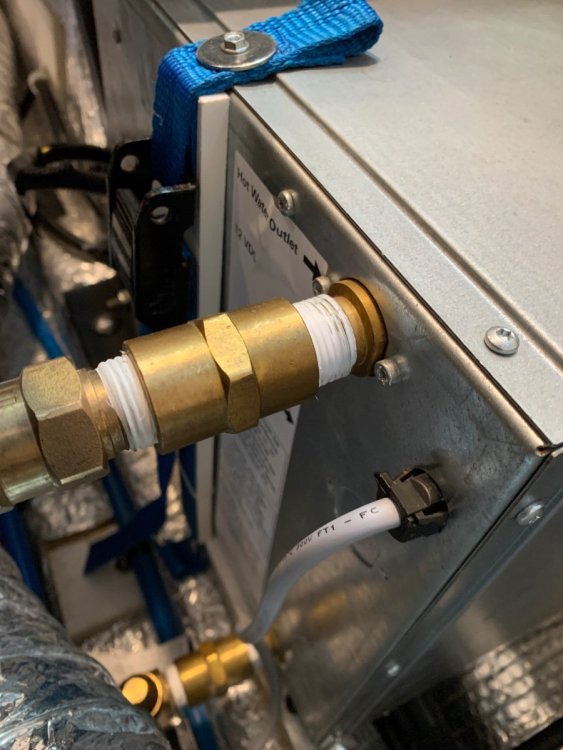
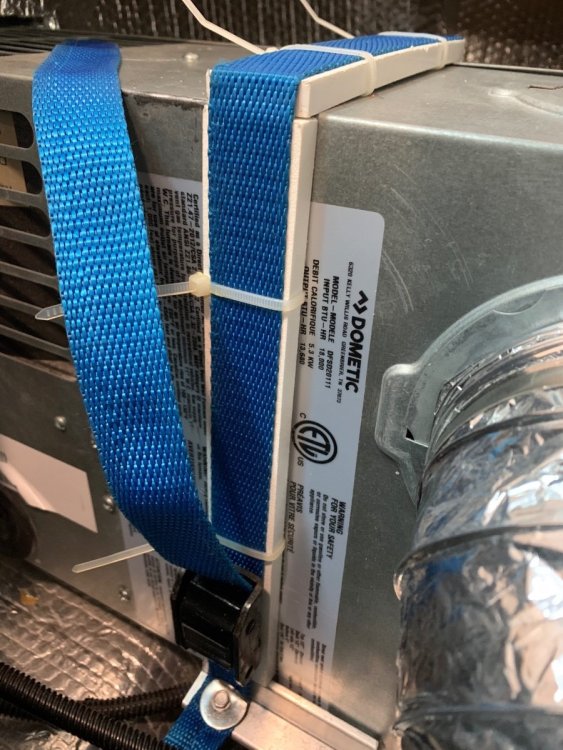
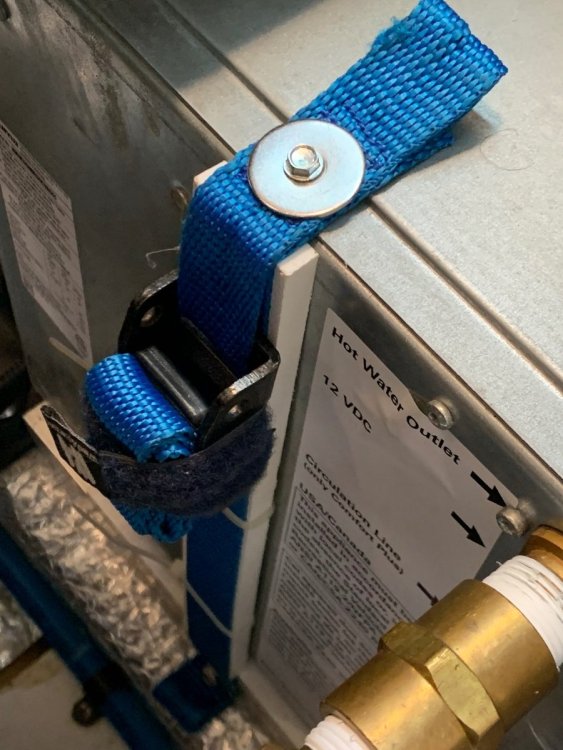
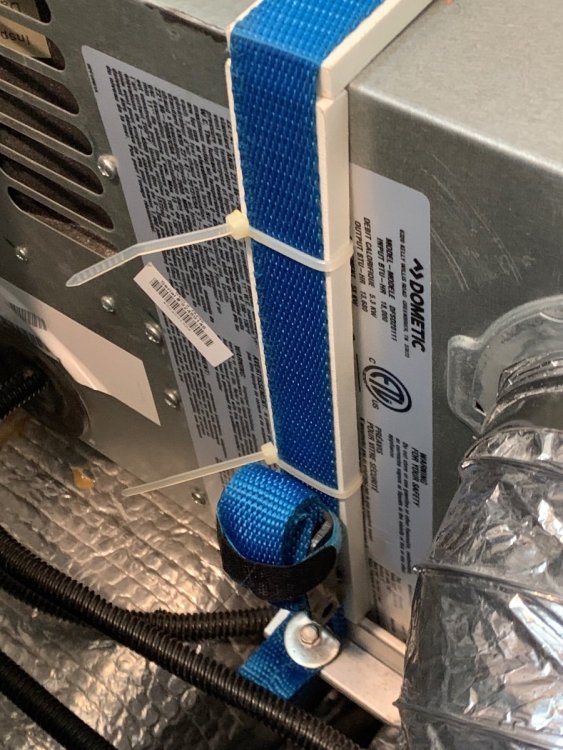
Less than two years into ownership, I made two repairs to the factory-installed metal straps used to secure the Truma water heater and the Dometic furnace. These straps were the typical HVAC metal galvanized hangers, which broke due to stress fractures likely caused by the over-inflated tires Oliver advocated a few years ago; at pickup, my 2020 OLEll Cooper tires sported 80 psi! The water heater strap broke first, repaired, then the furnace, repaired, then the water heater again. With each repair, I used a heaver gauge metal strap, to no avail. After the third failure, I decided to try some other means in hope to permanently fix this reoccurring issue. Aside from reducing the tire pressures to 55 psi, I utilized some cam-lock web straps for the fix. One year in and all good; no more worries of potential damage to the water and gas lines or electrical wires servicing these units from bouncing around while merrily driving down the road! Lines and wires at jeopardy! Cam-lock to tighten strap for optimum securement. Stainless steel self-taping screws and fender washers to fasten strap ends. Starboard strips to insulate web strap from heat and abrasion, secured with cable ties. Excess web strap bundled and secured with a Velcro cable tie.1 point
-
That's a nice and neat solution to the problem. Fortunately I was forewarned (thru this forum) about the correct OTT tire pressure (50 is what I fixed on). I did notice that the metal straps seemed a bit sub-par in securing the furnace and water heater. I like your solution better. (another someday project)1 point
-
True statement, @Ollie-Haus: However, the only slight exception would be those that run a Victron Smart Shunt 712, in those cases, the negative lead from the aux solar connection goes to the SS (then to the battery bank) so the shunt can keep track of the current generated by the suitcase solar modules.1 point
-
Nan - There are many YouTube videos on this subject. Simply go to YouTube and type boondocking in the search box. HERE is a start for you. A simple and safe way for you to "test" your boondocking "skills" would be for you to simply unplug your Ollie from both water and electricity while you are still a commercial campground. That way, if you don't feel comfortable and/or something goes wrong, you can simply plug yourself back into the pedestal without fear. Good luck. Bill1 point
-
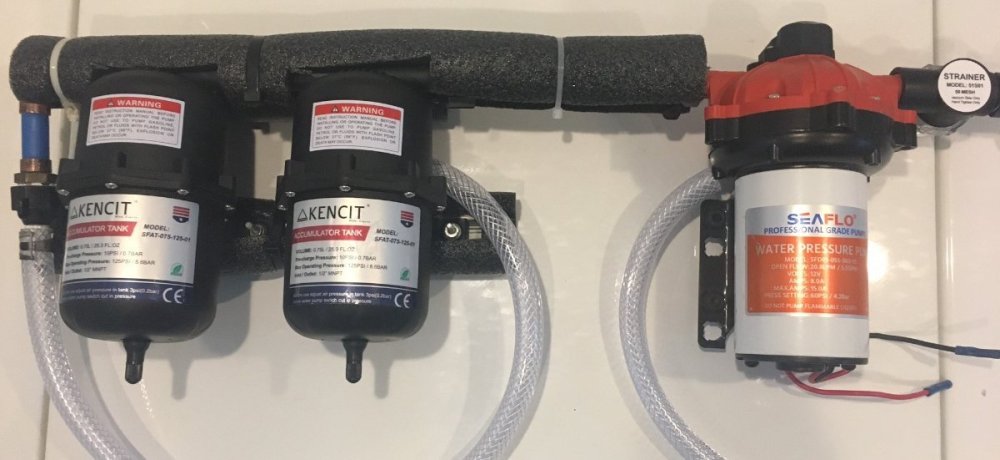
Got some plumbing done today. Decided a mounting board was unnecessary and instead connected the accumulators on an old bracket I had, everything wrapped in pipe foam. It should sit nicely on the interior wheel well (see build pic). Yes @Ronbrink just 4 hose clamps, found some automotive compression clamps that fit tight, too bad I didn't have 4. You want a few feet of soft hose by the pump and accumulators so that it runs quieter. I also spent an hour at Depot, figuring out their PEX and SharkBite supplies! I'm thinking some of these will help with the motorized valve installation: SharkBite 1/2 in. Push-to-Connect x MIP Brass 90-Degree Elbow Fitting U280LFA - The Home Depot1 point
-
I finally understand what Steve was saying here. I purchased the wrong switches! The DPDT switch wired in a cross-pattern (must have 6 leads), allows for switching the +/- leads to the motor. After you run the motor one direction, switch the other way to reverse polarity and the motor runs backwards. I will need two DPDT switches though. One is enough is all you want to do is switch from pulling from the fresh tanks while running to the faucets (normal dry-camping position), then switch both valves at once, to pull from the rear port and push to the tank (for boondocking, fresh tank fill). One DPDT switch will do this. But I will install one DPDT switch on each valve motor to achieve the third position, for winterizing (or to push sanitizer to the faucets). I decided on a momentary DPDT switch: TWTADE 3 Pcs Momentary Heavy Duty Rocker Toggle Switch 6 Pin 3 Position (ON)-OFF-(ON) DPDT 16A 250VAC Spade Terminal Metal Boat Switch With Waterproof Boat Cap And 6.3mm Terminal Wires TEN-223MZX-B223: Amazon.com: Industrial & Scientific This switch rests in the middle (open/disconnected) position. Hold it up for 5 seconds to set the valve one way, then hold it down for 5 seconds to turn the motor and valve the other way. With the momentary DPDT switch, the center fallback position makes it that there is no current draw at the motorized switches when not in use. You would want to do this differently if you wanted to utilize the LED light features of these 5-wire motorized ball valves, but I decided no lights, Keep It Simple Silly (KISS)! Was ready to wire up the valves today, but the new switches will get here Friday after Thanksgiving.1 point
-
Still want a reply from @ScubaRx on the electrical switches... Made some headway today. Anybody, yes ANYBODY who has an older Oliver with these 3-way brass water valves MUST change out these valves, even if you do not want to motorize or upgrade! I cannot believe OTT installed these valves! The opening in only 1/4" WT*! See pic, this is crazy! What were they thinking? The OEM water pump is 3 GPM. I measured water flow at the kitchen sink and the shower, cold side came in at 48 seconds to fill a gallon container. That's 1.25 GPM down from 3 at the pump due to multiple restrictions along the path! OMG! 🤣1 point
-
This does not surprise. From the chart above one could even assume a tire pressure of 40 and perhaps even 35 might be adequate given the weight of a 6000 lb trailer. From various other online charts I've come across they tend to be approximately the same as above. Thanks1 point
-
JD: Great graphic. I intuitively knew what was happening with air pressure and tire contact/drag forces, but had not seen it visually. thanks for sharing. It also makes a great justification for not going over 50 PSI on our OE2's unless it is way loaded. For us in the 6,000 pound group, doing so would appear to be little drag reduction with increased down sides as discussed above. Would be totally cool if OTT could run the OE2 over a glass plate at these pressures to see how close it mimics the Jeep visual. My gut says it would be really close. GJ1 point
-
The terminal feed through posts are Blue Sea, they might be installed without drilling extra holes, but I bit the bullet and put two 2” access holes on the inside of the hull, which made attaching parts there super easy. Then I covered the holes with white plastic plugs. They are not noticable. I will try to get that thread going, it will be a long one, though I may break it down into smaller ones. John Davies Spokane WA1 point
-
Recent Achievements


