Leaderboard


Popular Content
Showing content with the highest reputation on 01/15/2024 in all areas
-
I am a woodworker. I suggest a hardwood plywood, like oak, maple or birch. Even when it comes to plywood, hardwood is stiffer than softwood (like, say, pine). And, don't use Orient Strand Board (OSB). It lacks the tensile strength of plywood.4 points
-
Hey, @Geronimo John - Mahalo, Brother; Hope all is well in the islands for you and June! If all you're looking for is a means to convert the twins to a larger "cozier" sleeping area, then a single purpose wooden extension between the bed rails is all you'll really need. I'd suggest any high quality plywood in 1/2" thickness. The piece would be the same width (20 1/4") as our Lagun but long enough to fit from the night stand drawer front to the the curve of the bed rails (49 1/2"). The grooves are 3/8" wide to accommodate the white plastic rail edge caps installed earlier (see pic below). The edge cap material protect the raw fiberglass rails as well as your fingers when making up the racks. All edges should be champhered, flat surfaces sanded smooth, then entirely sealed. Being only 1/2" thick, it would stow nicely under a mattress - Princess June would think it was a "pea". In fact, let me make this easy for you - I will design and make a prototype for you. It will be ready when you're here next summer. All you'll need to do is decide on the type of filler material you'll want to use between the twins - frankly, we use the spare pillows, works great and you're not having to stow another piece of kit. Like I mentioned in the earlier post, "easy peasy." Cheers!
 4 points
 -
I don't have the Truman but virtually all burners I've ever looked at have a thermocouple that "senses" heat. If there isn't any heat (flame) then the gas flow to the burner is shut off - automatically. Bill4 points
-
A pretty neat video on heat shrink self solder water tight butt slice connectors. Patriot🇺🇸4 points
-
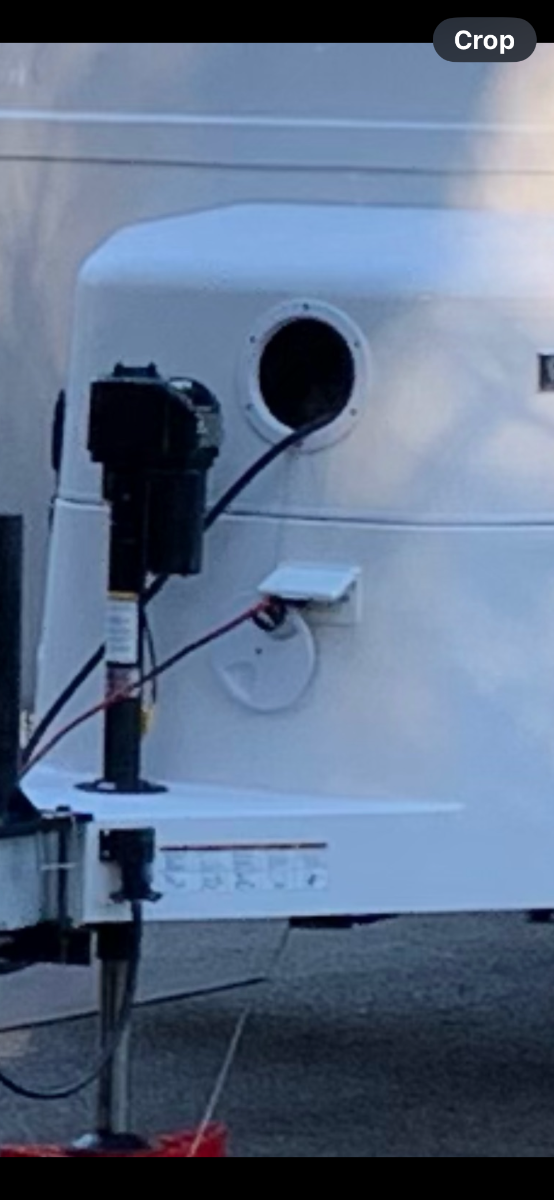
Noticed a couple of issues with our 2021 Legacy II (with Truma) I had not run into before. We have had a week of unusually cold weather here on WA's Northern Olympic Penninsula with temps sitting in the low teens and 20's. I had left the fresh water tank very low after our last usage and found, on attempting to fire up the Truma anitfreeze kit, that the water pump was starting to pull air due to tank being near empty. This prevented the Truma from filling and as a result, the Truma would not operate the antifreeze kit. An error message on the panel told us of this issue. Lesson learned - ensure some water is in the fresh water tank and that the water pump can deliver water to the Truma prior to startup of the antifreeze kit. Adding water to the tank solved that issue. Which bring us to issue #2. A week of temps in the low teens resulted in a small ice plug forming in the street side fill fitting. Hooking up a hose and attempting to add water to the tank did not work. Note to self - street side water fill fitting is in a low, cold and virtually unheated part of the area between the hulls. Prolonged temps in the teens allowed an ice blockage to form right at the fitting. Solved this by filling a couple of 5 gal water jugs with warm water and bringing it into the fresh water tank through the boondocking fill . Problem solved - water pump purged air from the lines, Truma got it's water and all is good. Heading out for 6-8 weeks toward (hopefully) warmet climes tomorrow with a freshly lubed, filled and pampered Oliver and fresh tires on the truck Should be fun.3 points
-
Art: So gracious. Thank you. I was trying to think of ways to cut the groves with a skill saw. Not ideal. I'll be bringing Costco steaks and plenty of wine. Bet I know someone with special steak cooking skill!. You may want to invite Ruth Chris over to learn how to REALLY cook steaks. Thanks so much. Will coordinate further off line. John3 points
-
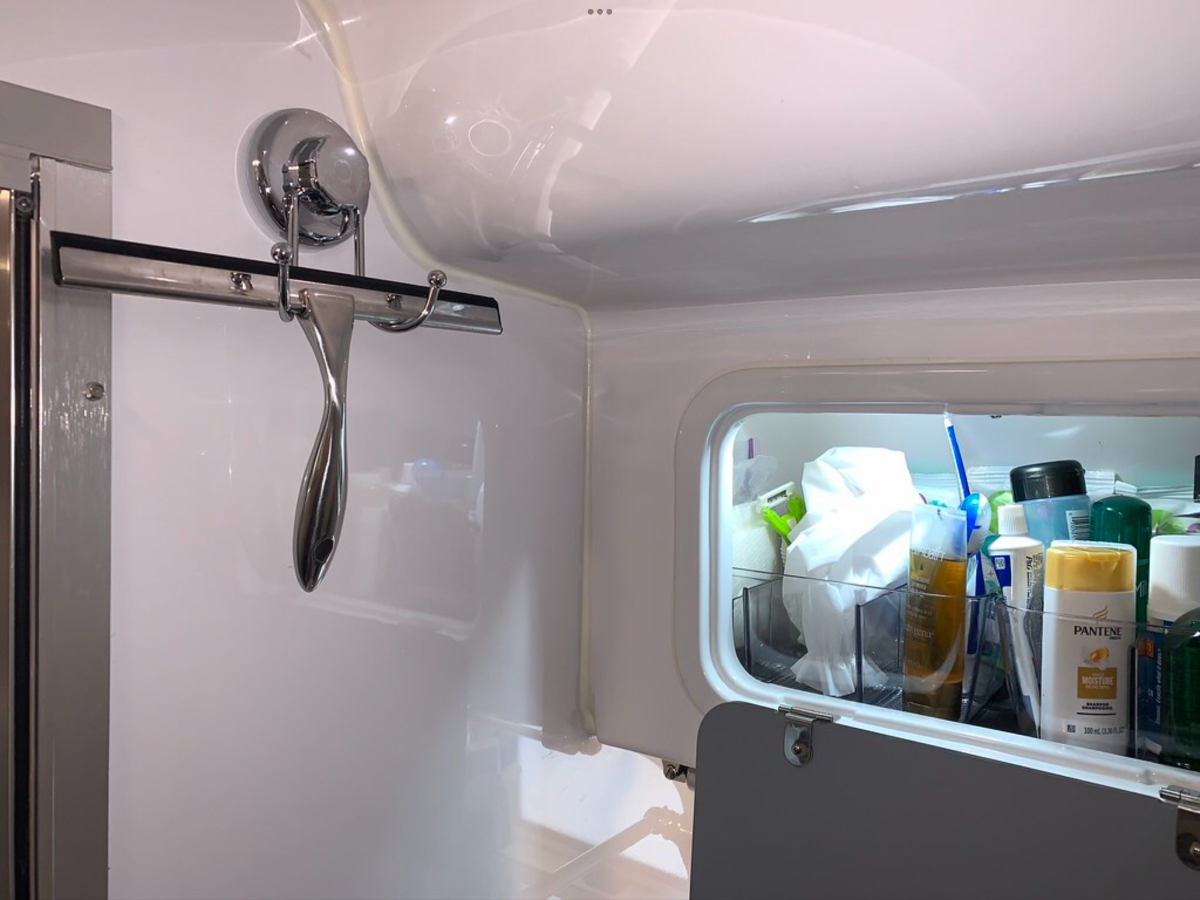
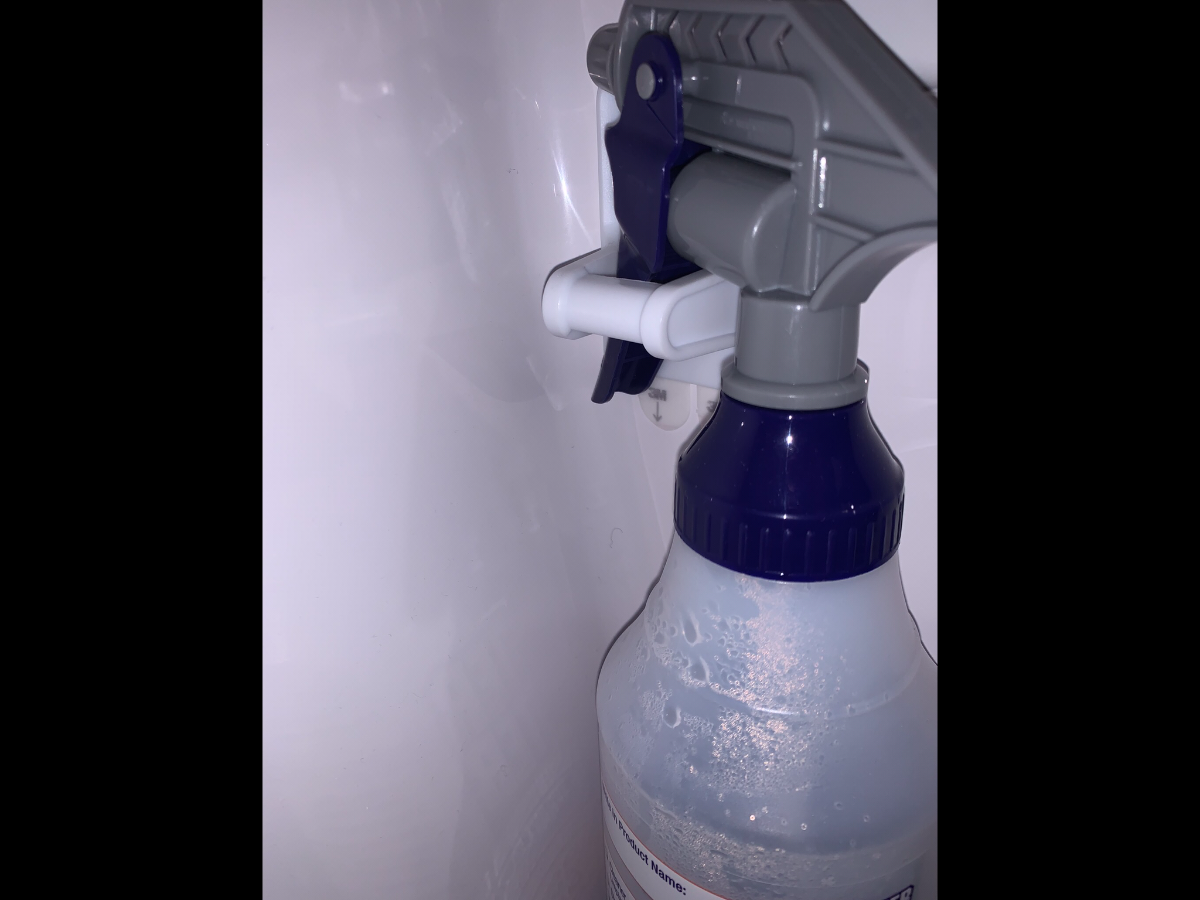
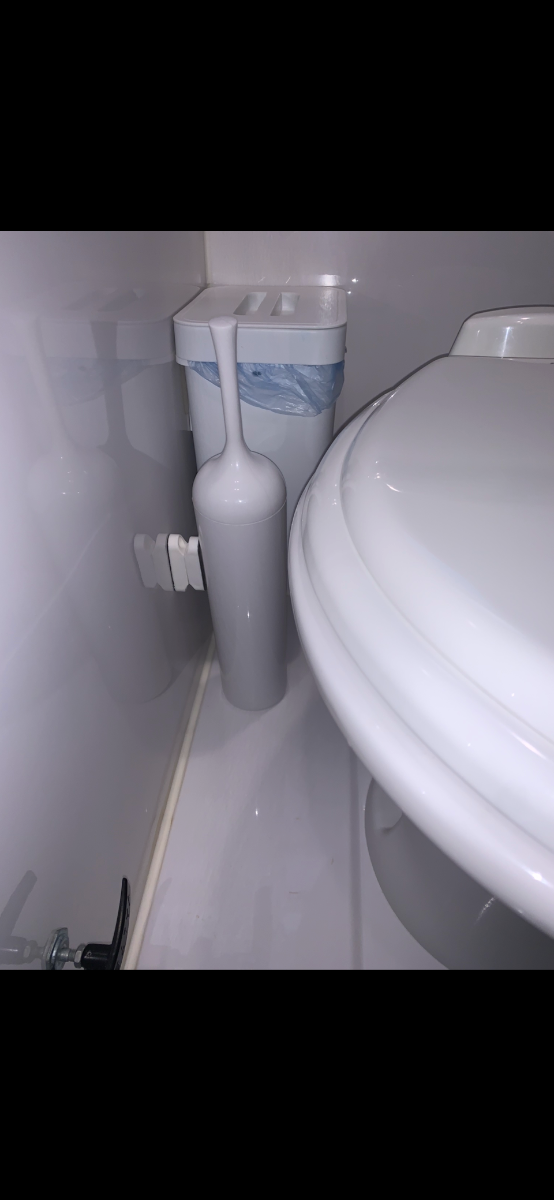
A dozen simple mods! * Denotes pending or completed mods inspired by other owner’s, with full credit and kudos to those individuals. Thanks! *Convenient umbrella holder: Not my idea or pic, but a great one I plan to do. *Collapsable hanger: Added suction cups to a length of pool cleaning pole. Great for drying towels and clothing; SS hooks for shoes, trash bags and such. *Propane tank lock: A couple of holes are drilled in alignment into existing parts to accommodate a long shank padlock; a security cable can be added to further theft deterrence. *Drain holes in awning support brackets: Drilling holes to facilitate proper water drainage on earlier OTT models. Propane auxiliary hose: This is a regulated hose extension that can easily be deployed by removing the round screw cap on the tank cover. It has an inline valve and conveniently stowed coiled atop the tank of proximity. *Tethered screw cap: A wire tether ensures the cap will not be lost if one fails to reinstall upon removal or it vibrates off in transit. And yes, that duplex outlet is another mod, but of the ‘more expensive and difficult to install’ category! Additional USB ports: Easy to achieve by upgrading some of the existing interior duplex outlets with USB capable outlets where needed the most. Handy squeegee for the wet bath: HASKO hook accessary used to hang this tool for convenience of use. I put a clear bumper bead on the wall where the handle end makes contact to protect the fiberglass. Backup plan!: Extra this and that for ……, well you know! Sanitary bags at hand: A convenient roll dispenser for general use, especially if one is in the ‘no paper in the black tank’ camp! Moving on! *Spray bottle: Staged below the TP holder and hung on a Command Brand spray bottle hanger. Great way to not only conserve water, when the toilet needs a little extra attention after use, but also fill space in the black tank. Handy toilet brush: Another use for those magnets widely used to help hold the shower door open when in camp.
3 points
-
Make sure your spouse's phone, a laptop or another device is not connected. The message "LINK OKAY" likely means there is a connection, but perhaps not your source. When we've had this connectivity issue, this is generally the cause.3 points
-
An unbalanced tire causes vibration. It would have to be extreme to create this kind of cupping, and less likely than other causes. Checking the balance doesn't matter anymore, since after this cupping it is certainly out of balance. You must determine cause, though bottom-line Mike, before a major trip you need to but a pair of new tires for that axle. Save the good one in case you do not find cause and have another single tire worn upon your return. I read some comments here suggesting alignment, but there are no alignment mechanisms in trailers like in an automobile or truck. You cannot adjust camber, caster or toe-in on trailer wheels. Looking at the picture, you can see that the axles are attached and float on the leaf springs, which bolted to the frame at 3 fixed points. The leaf springs generally have a centering hole that would not shift and again, not adjustable. Also, it is highly unlikely that a damaged axle would affect one side and NOT the other! Likely possibilities: a 1) damaged rim, 2) the bearings or spindle, or perhaps 3) the leaf spring for that wheel. When your trailer is sitting level, before you jack it up, inspect the leaf spring thoroughly and compare its height and shape to the good side. When you get the affected wheel up in the air, check for free play by pushing it in the 3 to 9 o'clock and 6 to 12 positions. Remove the wheel and check the backside of the rim for any cracks or bends. Now look again at the leaf spring thoroughly and check for bangs, bends or cracks. Lastly, it is most likely the bearings or a worn spindle on which they sit. It appears the cupping is more so on the outer edges of the tire, which again looks like bearings. See what the grease looks like. Clean inner and outer bearings with old fuel or kerosene, blow dry and see if they spin freely and quickly when sitting on a workbench. Check the axle to see if it is out-of-round, has any discoloration, bad spots or anything that does not look like clean hardened factory steel. Of course, correct anything found to be damaged. If you cannot find anything, just repack your bearings, mount those new tires and try to enjoy your trip! Once you get underway check the temp of each hub each time you stop. I just read this in another thread here. You can get the fancy infrared digital thermometer, or just use the palm of your hand to feel the heat. Feel if one hub seems hotter than the rest. And of course, keep a closer eye on this RR position that had the issue. Good news is you found this prior to leaving, tire cupping is not life threatening immediately, as it likely took tens of 1000s of highway miles for this tire to get this amount of cupping. I understand you put a lot of miles on your Oliver annually. Best wishes
3 points
-
We have, courtesy of the previous owner, two inserts that span the aisle between the beds. A neat unintended feature is that by stacking the foam pads with one insert on top, next to the galley counter, we have a nice counter extension. At this time, I don’t have photos.2 points
-
OK, so let's call that worn shackle bushing needing replacement vs. the trailer needing an alignment. When these bushings go dry and get bad, after a whole lot of miles, you would hear screeching or some kind of metal on metal noise. The trailer wheels would still drive pretty much straight and could not be the cause of cupping one of 4 trailer tires.2 points
-
It is factual that we have no means to adjust incrementally tire alignment on our trailers. But worn out spring attachments can easily put a tire into an abnormal wear pattern. SO checking that the spring bushings are still there and doing their job is a good idea. I would put a pair of chocks against both sides of single tire and have a partner in the TV gently stress each of the bushings one at a time. If you see visual slippage on the shackle bolt of the spring...bingo. Or if you are young and strong like mule just jack it up and slam it around some. Me, I'll use the Ole Man's way. GJ2 points
-
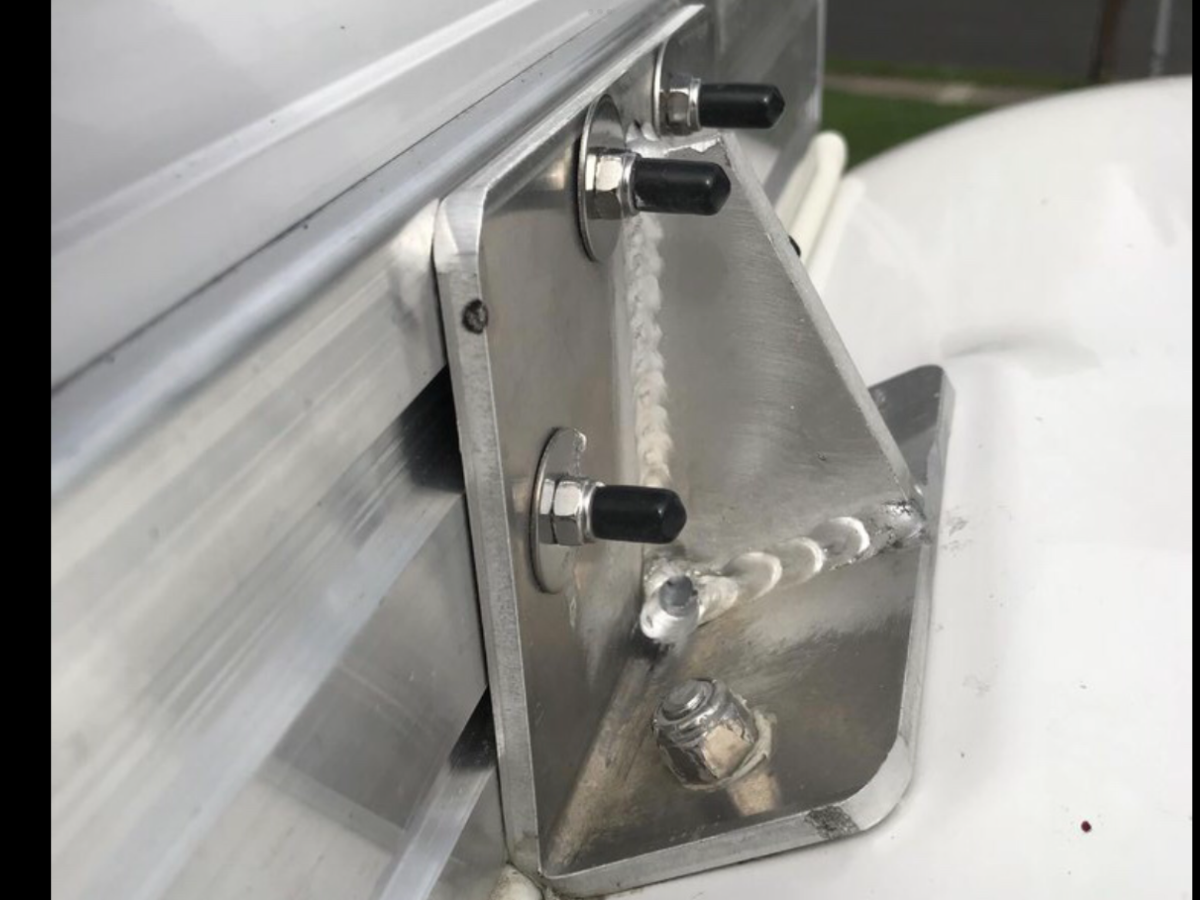
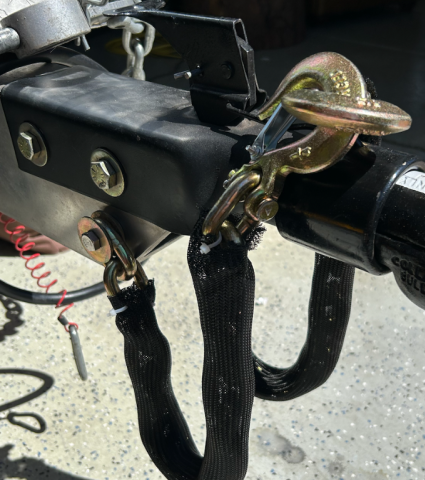
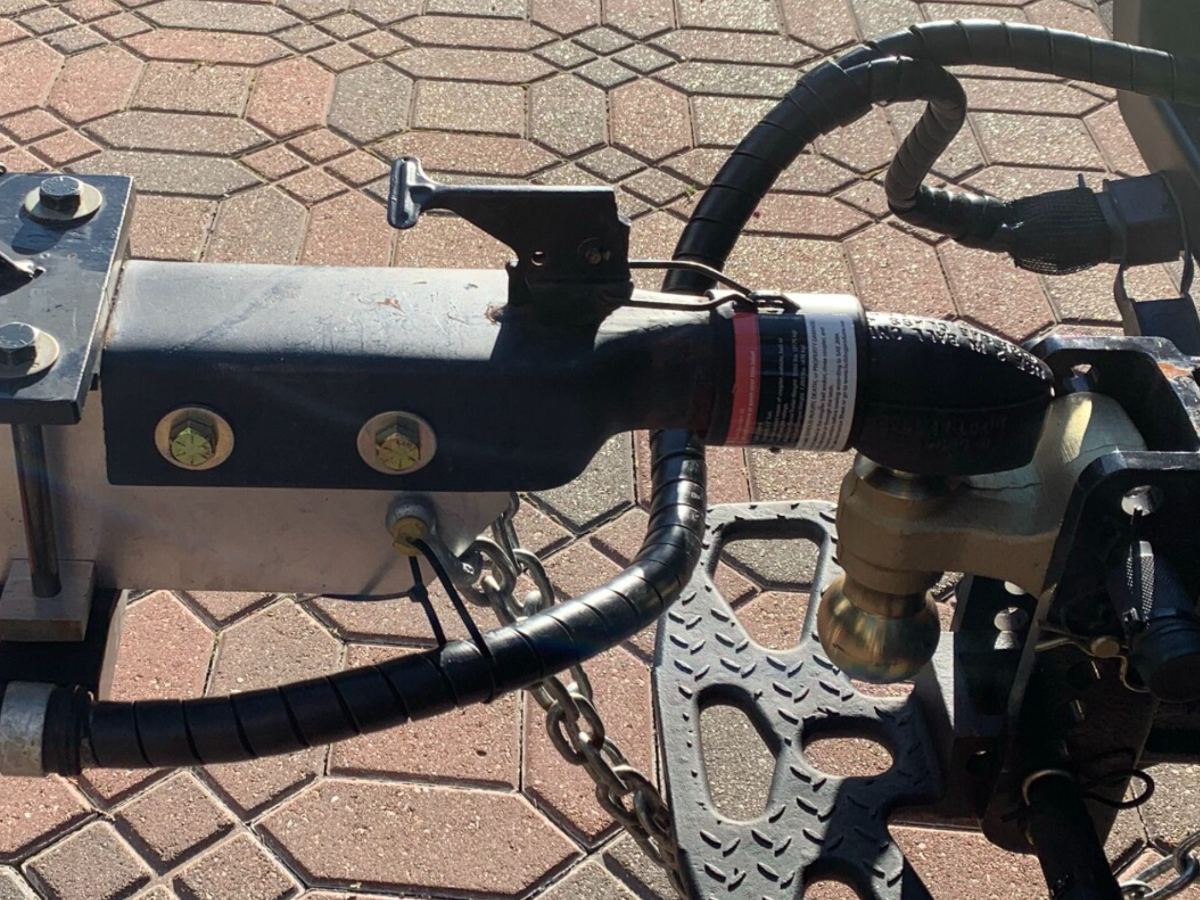
Some time ago we had posts about a F-350 and SOB trailer being hung by their safety chains. That visual and our shared distain for the curly safety wires have put this on to do list for sure. If you have an extra few inches of chain, I would suggest the following considerations: First, the shear strength on a 3/8 grade 8 is between about 5,000 to 7000 pounds. Your chains are rated at 24,000 pounds. Excellent chain choice! Gold Stars. In an emergency situation, likely the trailer chains will not come tight at the same time. As such, one chain will absorb the initial impact loading. If it breaks the bolt, then the other chain will basically follow the path of the first (Stay connected to the TV) as the thru bolt will fall out. Then Ollie will exercise the break away switch. To better utilize the capability of the chains more bolt strength would be warranted. Recommendations in order of how much you believe any of the above follow: A. Replace the 3/8" thru bolt with two shorter bolts. That way if the impact takes out one side, you are still connected. B. If you have an extra 3" of chain, you could anchor the end of the chain to the Bulldog bolt above and then down to your two 3/8" bolts you have installed. Chain hardware would be needed as I doubt that the chain will pass on a 1/2" bolt. C. If you have more length than that you could run the chain to both bulldog bolts. And of curse to the two 3/8" bolts. More chain hardware likely needed. D. Or, if you are a John D., you would machine two spanner bars running from the two bulldog bolts and connect to the spare 3" of spare chain to your two 3/8" bolts. PS: I'm deep enough into the rabbit hole. Personally I'll put on my to do list Option B is smarter chain guy knows of good hardware to connect a chain to the 1/2" bulldog bolts. GJ
2 points
-
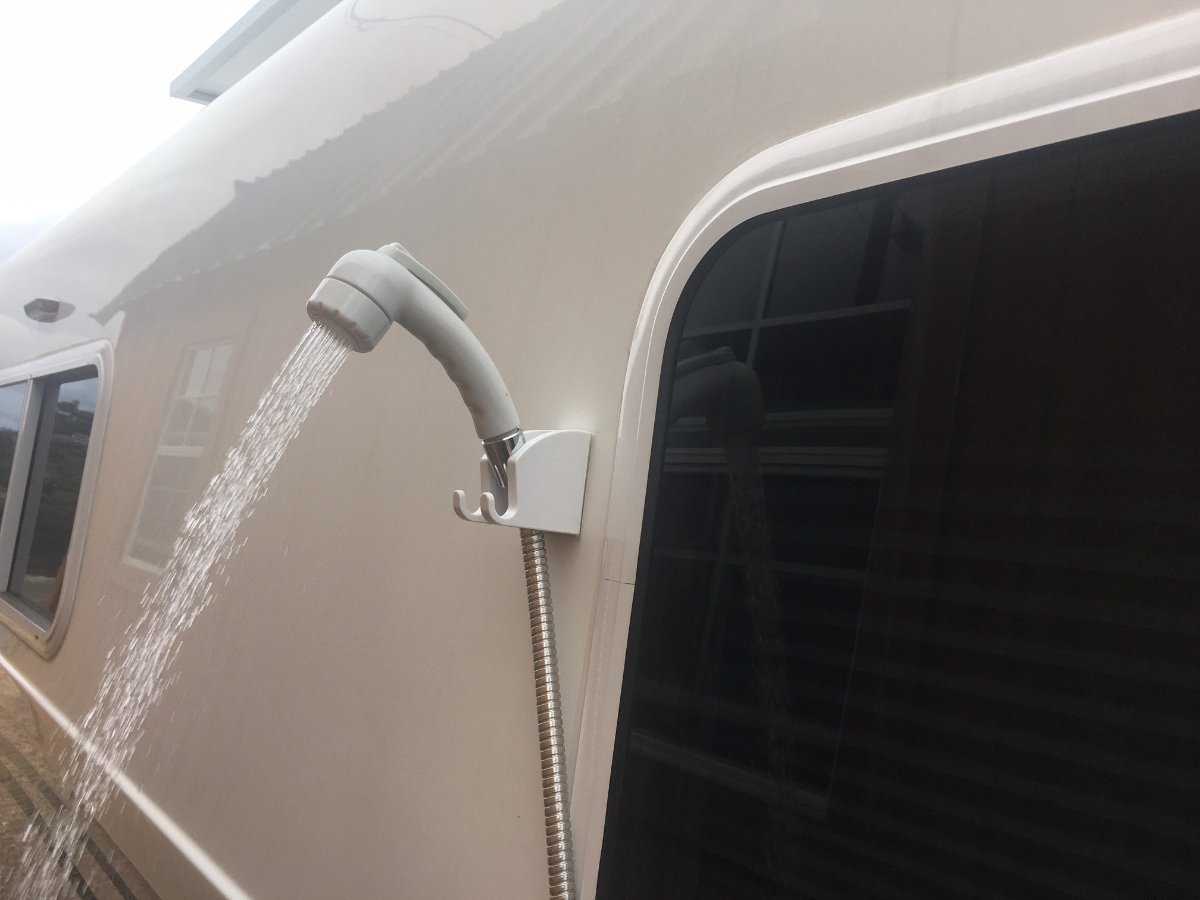
Along the theme of "Inexpensive Helpful Modifications" thank you @Wandering Sagebrush I had shown this in my water pressure upgrade topic, but it certainly belongs here. How about a real outdoor shower? Buy a pair of these (or you can purchase one). Hang one high above head height and hang the second one lower to wash your dog(s). Only the clear plastic mount stays taped to the Oliver and the bracket fits in the shower cabinet! They come in white. Still an inexpensive mod, even though with the crazy inflation seen over the last 3 years, the single now costs what I paid for a 2-pack just 3 months ago! JONKEAN 2 Pack Handheld Shower Head Holder with 2 Hanger Hooks, Strong Adhesive Shower Head Holder, Adjustable Shower Wand Holder Wall Mount, Bathroom Waterproof Shower Handle Holder No Drill Need - Amazon.com
2 points
-
@Jps190: Here's an idea for you, brother... We made a Lagun table with Red Oak and fitted it with slots to fit onto the overhanging bed "wings" - its purpose was to be used as both a table and dog log rack. More space for the humans and the canines during slumber operations. I'm pointing to the slots here: The table top can be lowered onto the bed wings and pillows fill in the height gap between the table top and the mattresses. One or both of the Huskies fight for the cushy pillow addition... (Pls. ignore the dog logs in the pix below): Magnus won the fight: You wouldn't need to remove the night stand as the dimensions of the extended (port/stbd) sleeping area is approximately 52.5"W x 80"L. A standard queen is 60"W x 80", FYI. To make this design into a larger sleeping area work for you and save some $'s... All you'd need to do is 1. Make the table top 14" longer or 2. Use the existing Lagun table top dimensions and make a separate 14" section to fill the gap from the table top to the head of the bed. Then it's just a matter of getting a memory foam insert to match the height of your mattresses. The advantage to this system is its versatility - you can have the extra table space of the Lagun-style table plus the larger sleeping area with just a single additional component to your load-out. FYI: We store/strap our Lagun table top onto the inboard bulkhead in the closet - out of the way completely until we need it. Easy peasy. PM me if you need additional details - happy to help out. Cheers!
2 points
-
We're all over the map on camp stoves... We're both pretty much "foodies" and love to cook. Volume and weight not being an issue we'd have our Weber grill, 22" BS, and the 10" Smithy dutch oven for full range of outdoor cooking options. Depending on the trip, we may take all 3 - this current trip, only the BS came along because I'm flying solo and I like the griddle for breakfast and dinner options. Here's a snap of last night's "BS Fest": Strip steak seared to med-rare, potatoes with rosemary and garlic.... What's not to like?
2 points
-
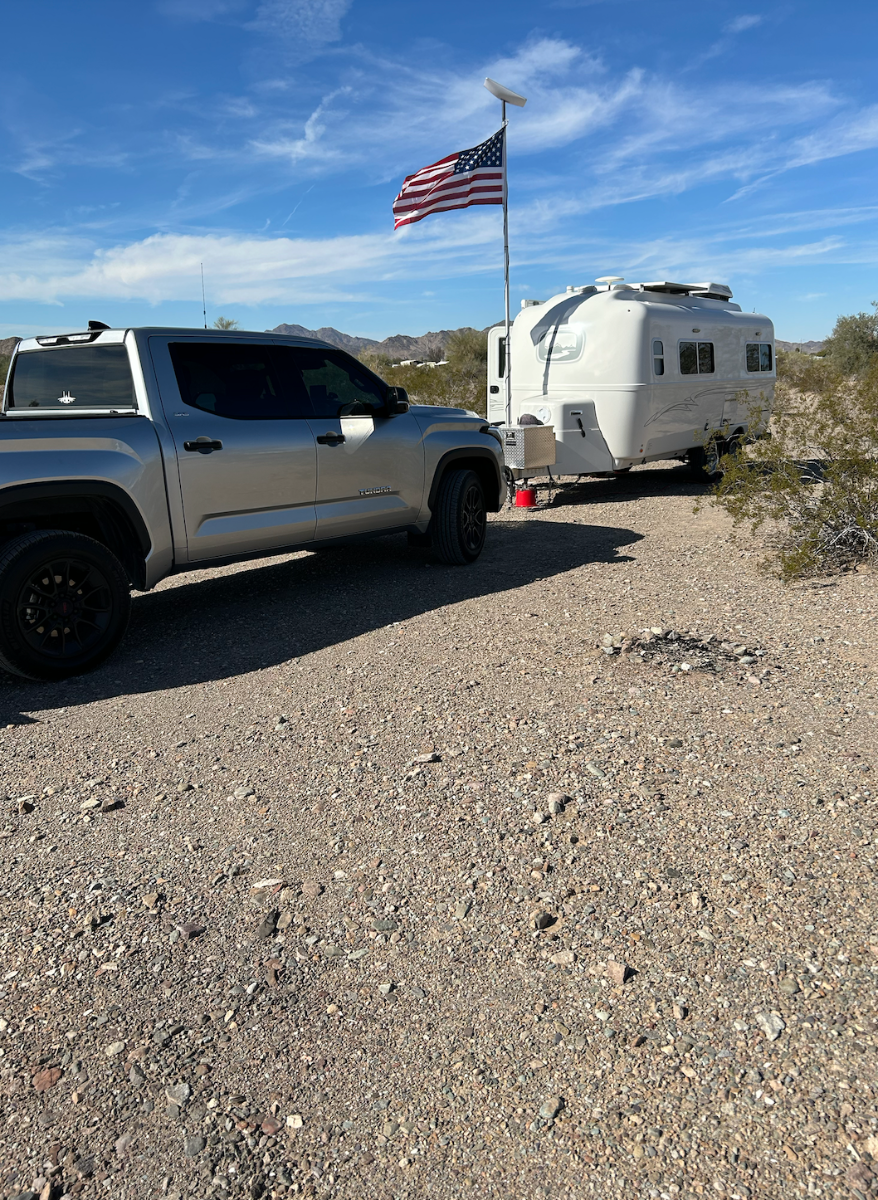
Well, let's see... The ultimate answer should be - "It depends". Why? The situation for us is fluid. Currently, the boys and I are solo in Quartzsite... Therefore, I get which ever "side" I want - port or starboard. Last night I chose the port side, head fore because we were watching a Netflix movie - Magnus did too. Oscar was banished to the starboard rack. When D is aboard - she opts for the port side and usually takes Oscar with her, he's smaller and gives her more room. Magnus and my 6'1" old bones get the STBD side and make due. What about morning coffee/shower time? Similar to @ScubaRx's comment, interestingly, after the coffee is made we switch from heads fore to aft... Why? Better view - especially when D climbs out of the shower... Cheers!2 points
-
The huge Tampa RV Supershow opens again this Wednesday. It's a fun time, great to explore, and maybe pick up a few accessories, or ideas for mods (or just confirm and gloat that you already own the best camper for your camping style!) Plus, there are always a number of free and interesting seminars on the schedule. Oliver is again exhibiting during the show, at a site a few miles away, at Force Customs. 9839 E Adamo Dr, Tampa, FL 33619 https://olivertraveltrailers.com/events/tampa-florida-rv-show/1 point
-
They could dip their toes in some of the smaller (less expensive) shows. There's 3 in the Northeast in the next couple of months: Hartford, Agawam, and Foxwoods Casino. No doubt many more like that throughout the eastern US. The nice thing about a show is that it could expose people to Olivers that would never even have considered (or maybe even heard of) fiberglass trailers before. They'd go in looking for a conventional camper and say, "hey what's that white one?" That's how we bought our unusual Glendale Titanium fifth wheel: saw one at a show and was amazed by the unique over-cab bedroom. Prior to stumbling on Oliver via an RV news article, we had seen the occasional Scamp or Casita but assumed they were cheap junk, never having seen one up close. An RV show gives curious buyers a chance to investigate products they normally wouldn't consider. If Oliver wants to expand their customer demographic, I'd think RV shows would be an effective way to do that.1 point
-
We have the manual deployed awning. That's where we keep the pole/handle, as it was an ingenious addition by Oliver. Great use of space for those of you with an electric awning! I like the bar on your screen door, too. Nice mods Keep us apprised as you go forward!1 point
-
Good test @MAX Burner and keep in mind the dry air of Quartzite is likely best conditions possible. An overcast day on the coast would impede the signal a little. We're on the road tomorrow, on way to Burro Creek, so I'll report on what I read from the cab of our TV. Thanks1 point
-
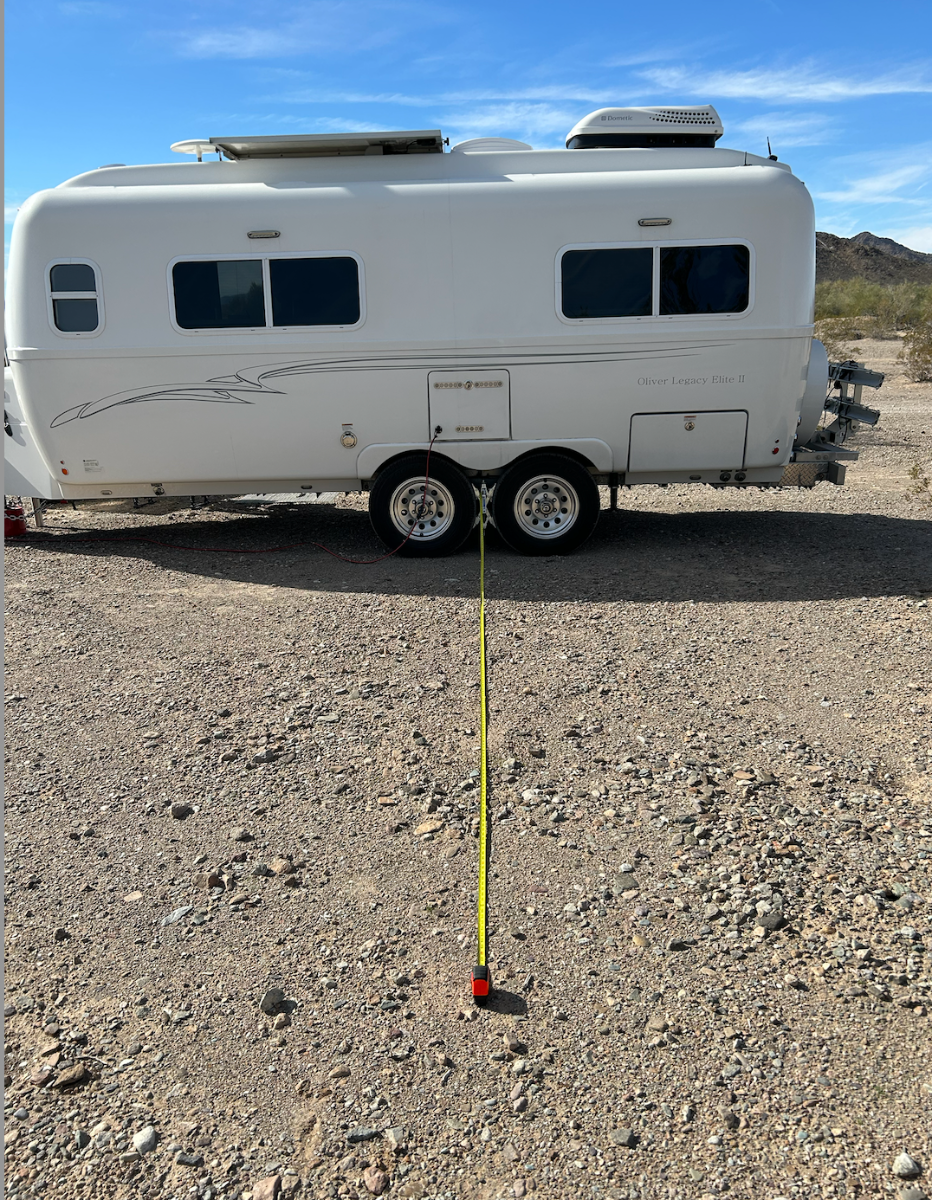
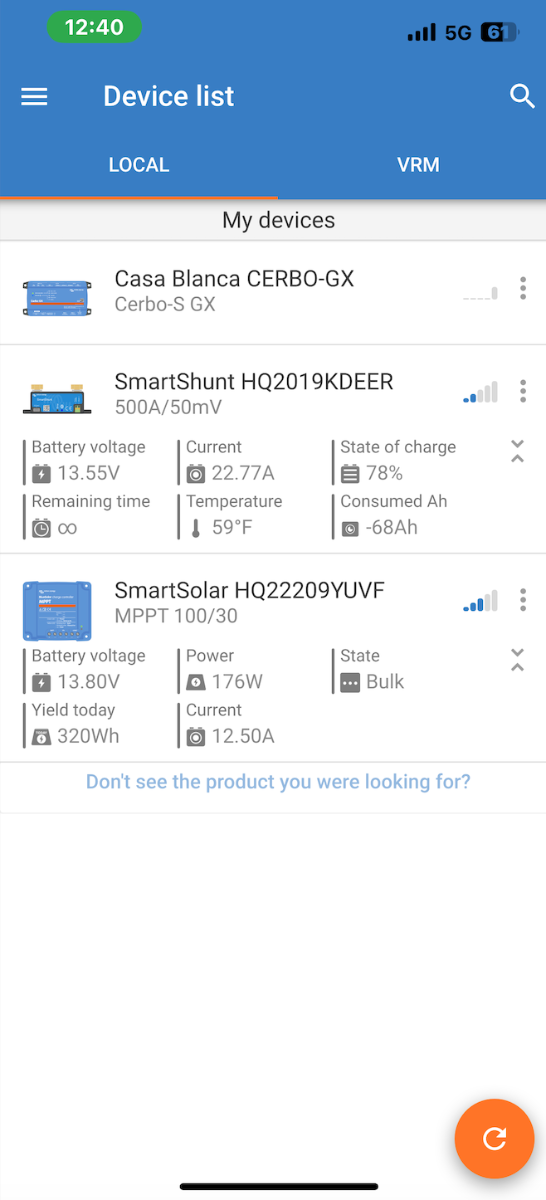
OK @jd1923; after performing a signal strength experiment with the Victron SmartShunt and the Solar Controller, here's what was learned: Placing the tape measure at 15' from the outer hull adjacent to where the components are mounted within, connection was successful: Screenshot of the SmartShunt after connecting at 15 feet: Screenshot of the SmartSolar MPPT Controller at 15': The 15-foot radius from the hull seemed to be the maximum distance to acquire either device. Stepping back to 18 - 20 feet was too far away for the Victron app to connect to the devices. However, as JD noted, in the My Devices screen the readouts for each device seemed to still transmit/receive out to 20 feet. Here's a 20' screenshot of the My Devices page: This got me curious. So, Part 2 of the experiment: Went back out and with the My Devices page selected at about 40 feet - no BT signal received - zero bars on each device, then started walking ever so slowly toward the rig. At about 30 - 35 feet, the signal strength bars started popping up to about 2-3 bars. At this distance the data was now displayed below the SmartShunt and Solar Controller sections of the My Devices page. So, one could get readings from this distance but will not able to connect to the device individually. Pic from the distance of 2-3 bars (approximately 30-35 feet):: Here's a screenshot of the My Devices page at this distance where the BT signal begins transmitting bulk data: Unfortunately, the cab of the TV attenuates the BT signal such that this data cannot be observed when towing. It would be nice to know if the Victron dongle would increase BT signal strength enough to monitor the system from the cab when towing. That would certainly be worth the $40 + tax to have that capability, IMO. Cheers!
1 point
-
Now that they're starting a dealer network, why isn't Oliver displaying at (not "near") any of the RV shows? We picked our last 2 fifth wheel models at shows in the Northeast. (Didn't buy them there, but used our research from the shows to make a decision that we acted on later.) I've been dubious about the dealer network, but I can see Oliver really standing out at an RV show, where people can look at lots of different trailers and see how Oliver compares directly.1 point
-
We have the same issue using our Furrion with multiple BT devices. We usually do a manual check in "Settings - Blue Tooth" to discover which device is connected when the Furrion displays the "LINK OK" message. We've defaulted to agree we always use D's devices for the music source and my BT is simply selected to "OFF".1 point
-
My OTT came equipped with individual shackles, but an upgrade to grade 8 chain is something to consider, as well as extra length to further attachment. That said, it was an easy task to upgrade my SoloSkiff trailer with 3/8” Pewag square security chain, so it’s only fair that the Oliver gets equal treatment!
1 point
-
That was a concern of mine as well. I opened the housing and looked at the way Truma built the heating system. The shielding around the burners is fairly impregnable without tools and the exhaust is routed out and down. It would take a very powerful burst of wind directed inside the vent to worry me about that. Even so, the design wouldn't allow gas venting if the flame blew out, it would just relight it. Regardless, I drove close to 800 miles on highways and interstates with no problem.1 point
-
We have one. 😊1 point
-
Jason, and you did not have issues with the flame blowing out? That is a huge concern for me, that the flame would blow out from the air passing by while doing 60-65mph going down the highway, and if it doesn't relight, well now you have gas just blowing out! Unless there's a safety feature that will shut the gas off if the flame bows out, I don't know!1 point
-
Same here - use them regularly; good for up to about 14AWG as I recall... Easy peasy!1 point
-
When mounting flat, call it "floor-mounting" the heat sink is under the electronics of the charger, and since heat rises, a cooling fan would be necessary. When "wall mounting" the heat can escape naturally as heat rises. Given adequate ventilation space above, though hard to find in the Oliver basement, would eliminate the need for a fan.1 point
-
We purchased our Truma Aquago Antifreeze Kit with our Hull #1291. It would not work until the Oliver Service folks did something to get the Aquago to recognize the antifreeze kit (which they neglected to do before they delivered the trailer to us). We have the digital CP Plus wall control. It would not recognize the Antifreeze kit until it was "introduced" to the kit. Electric-antifreeze-kit-AquaGo-min.pdf Above is a .pdf copy of the Antifreeze Kit owners manual. It provides specific steps to initialize the system, starting with turning the Aquago off, both at the unit outside and the control inside, then installing the antifreeze unit, etc. In your shoes, I would follow those steps and see if the antifreeze unit then works. Do you have the digital CP Plus wall control or the dial control? A digital copy of the CP Plus owners manual is also attached. I would try re-initializing that control, as instructed in the manual, after installing the antifreeze kit. If you have the dial wall control, you may need to locate and download the owners manual for that control. If this does not work short term, I also do not recommend driving with the Aquago on, because of the open flame. At a minimum, pull over away from gas pumps and turn the Aquago off before refueling. Then, pull away from the pumps and turn the Aquago back on after refueling. Good luck! Truma - Thermometer Model Truma CP Plus Operating Instructions.pdf1 point
-
NEWSFLASH: They don't die...1 point
-
I need a “None of the above” option. I sleep on the curb side with my head forward, next to the stove. I sleep elbows out on my stomach, and the one time I tried with my head aft, I kept bashing my elbows on the nightstand. Deb sleeps street side, head aft. She finds it easier to ge in and out and likes the convenience of the nightstand for her stuff.1 point
-
I'm surprised that you could pull your trailer up the shear side of those mountains. Carol must have been behind pushing.1 point
-
For those that have a bit of time on their hands AND want to save a couple of bucks too: Take those "yellowed" outlet covers off, clean then really well, wipe with alcohol and then given them a couple of coats of Krylon white spray paint. Let dry overnight and put them back on. I did mine this way about two years ago and there have been no signs of the yellow reappearing. Bill1 point
-
This would have been my thought - or, possible you took a right turn a bit too tight and hit that tire on a curb. I'd take a very close look at the sidewall and then take a very close look at the street side tire. If the street side tire looks good then the issue is - probably - not with the entire axle. But , it could be just the spindle on that side. And, this is where GJ's measuring would come into play. Finally, from your pics it is a bit hard to tell, but, is that abnormal wear actually "cupping" or simply having the tire riding too much on the outside? If you can't tell then hopefully your guy at Discount tire can make the call. The reason this is important is that your bearings and/or spindle on that tire could need adjusting or replacement. Good luck! Bill p.s. at the very least I'd get that wheel off the ground and test for bearing play (i.e. grab the tire at the top and bottom and see if you can move it in/out). I think that you once told me that you use a local guy to do your bearing maintenance - can you get to see him for a quick check before you leave?1 point
-
Ron: I very much like your setup for managing the two umbilical cables. Would you please share the cut sheet for the product you used to protect the cables? Thanks GJ1 point
-
To actually answer the question on how to fix? I would JB Weld the back of the shroud in a "pond" if HB Weld with a SS fender washer in the JB Weld, and use a second SS fender washer on the outside after letting it cure a few days. GJ1 point
-
They were balanced and mounted at Discount Tire in January 2021. I have 42,044 miles on them (not counting miles in the local area for maintenance and to/from storage). No rotations or balancing since. This is not something I’ve noticed before and I do check the tires before/after trips. Like I said, the other three look new still. All four old tires these replaced looked new after 5 years. Maybe I hit a pothole or something recently….1 point
-
What is your preferred sleeping position in your Oliver? (given the twin bed option) And please comment with any pros & cons you see. Ok, I get the intent of the question and politely ask forgiveness due to hijackings the thread in a moment. Considering only two options, I sleep with my head fore and my wife towards aft. My reason is to gain shoulder width facing Fore. But if one were to get my real preference, it would be neither of these options. 🙂 Which brings me to the hijacking forgiveness part. This photo give me an idea. IF the Froli folks made a folding bed extender along the lines of this photo that required no center support, was about 50" long, and exactly fit in-between the dimension of the bed mattress side rails, there would be more than a few of us that would use that other answer. 🙂 For the bonus design merit badge, it would have the ability to adjust it's hang elevation below to level out using 2 layers of the standard OE2 cushions with either a 4" or 6" foam mattress on the twin beds. There by creating a near horizontal wall to wall X 5' wide sleeping space... thereby needing a third option to the survey. How about it Froli, GJ
1 point
-
We sleep with our heads toward the kitchen. We always setup the trailer with the front a little higher than the rear and we like our heads a little higher than our feet. We also lean against the kitchen cabinets and pantry while watching television.1 point
-
Another vote for heads to galley, and others have hit on our reasons, as well. Another plus for heads to galley is the ability to use the Froli adjustable headrest under the mattress; this headrest, coupled with their mattress support, have reinforced the heads to galley position best for us.
1 point
-
Heads to the front. We like being able to see the tv. The back just seemed too cramped I sleep on the curb side, CPAP sits on the stove glass with 12v plug right above. CPAP put away in the closet during the day.1 point
-
I will preface the following by thanking Mike and Carol for a segue into the issue of bedding variables. Hopefully it will be helpful to some or at least entertaining to others. We make our twin beds in such a way that eases this somewhat difficult task and doubles the layers of cover to better dial in personal comfort; works great for our ‘he’s hot’-‘she’s cold’ dilemma! It all starts with proper planning and prep, mostly done in the convenience of home when the bedding laundry from a trip is being done; sheets, pillowcases/shams, blankets and throws. I’ve grown accustomed to that ‘fresh’ scent opposed to the ‘seasoned’ smell of my old camping/hunting bedroll, but I’ve digressed! Once laundered, the fitted bottom sheets are folded in the usual awkward manner; however the flat sheets are each folded in half lengthwise, laid out (as if on the Oliver twin) to initially fold the bottom up and over to the desired bed length (foot of bed where tucked in to wherever you like the sheet top to be when made), then subsequent folds of the remaining in smaller lengths to complete the process for stowage; the blankets are folded in much the same manner, but rather than a half fold allow the top portion a bit more width for aisle overhang (more on this later). Along with folded pillowcases/shams, throws and pillows, all is zippered up in a clear bag and placed in the Oliver for future use. If a second set of sheets were used on a trip, they are folded in the same manner, but stowed at the closet upper shelf until next needed. We rarely completely make the beds prior to departure, but at minimum the fitted sheets are installed to protect the mattresses in transit. ‘Bed Scrunchies’ are your friend, especially if one uses standard twin sheets rather than the custom ones that better fit the curved mattress corner. ‘Why all the hoopla?’ you may be thinking, well let me explain! When it comes time to make the beds, your uniquely folded flat sheets are laid out ‘head to toe’ with the ‘lengthwise’ fold against the fiberglass wall, and if done properly that ‘initial’ fold you made will be at the foot of the bed. Now simply take that generous length of folded sheet and lift the mattress enough to tuck it into place; do the same with the blanket. Voila, the sheet and blanket ends are firmly anchored and the bed is almost made, less the pillows and optional throw, if desired. ‘Now wait a minute, what’s the big deal?’ you may be thinking, well let me explain! Traditionally, RV bed covers are tucked in at the bottom (easy), as well as along the wall (not so easy). A standard twin sheet/blanket is way too wide for the Oliver’s bed size, thus resulting in unruly bulk, and a lot of reaching, bending and tugging to tuck the excess away in good order. Many resort to altering bedding or making do with non-standard sizes, and I get it. However, I’m a simple man (my wife is laughing), but innovative! I now have two layers of sheets and two layers of blanket to crawl under, allowing me to peel off consecutive layers, as necessary. But there’s more! The crux of the matter is the simplicity and ease of effort in straightening the bed covers, whether during the night after getting up or just in and out of bed in the morning, and of course making it up for the day. ‘How is that?’ you may be thinking, well let me explain! If laying or sitting in bed, by grabbing and aligning the top corners of the sheet while slightly lifting and pulling, they will self-make; the blanket can then be done is like fashion. Because each are snuggly tucked and anchored, you can pull as taut as you like for the desired result. Making up the bed is just as easy, only from a standing position and in a jiffy! The proof is in the pudding!
1 point
-
Those things are great. Have used them to fix brake wiring in the past.1 point
-
Welcome to the Family! Exciting times . Hopefully you have already started getting VERY familiar with the Oliver University. This not only will make your delivery go much smoother but it should help you way on down the road too. In addition - perhaps when you get bored with the University, you could simply start scanning through the Forum. Threads here run the gambit of things that cover both new and old(er) Ollies, places to see and do, problem solving, mods, etc.. Have fun! Ask questions. We're more than happy to help a fellow member of the Family. Bill p.s. thanks for helping us all out with your Service! There are a bunch of us ex military types here and we know the "drill".😉1 point
-
I've said this before in another post... but at the risk of repeating myself again... Oliver is not a "club" or like most of us, a bunch of retired people who have already accumulated enough wealth to sit back and be philosophical about how we would do it. It's a business that has several hundred employees who come in everyday to the Oliver factory trying to earn enough money to get to the place most of us owners enjoy right now. Warranty work (every dime of it) is anything that fails or wasn't done right the first time... it costs the factory money and is a cash drain. Service work could and probably is somewhat profitable and self sustaining part of the Oliver business, but the real cash cow that the owners and every employee counts on (remember they have their own life dreams too) depends on selling new Olivers. With hull numbers around the 1500 mark they have likely picked the low hanging fruit. Now they need to dig deeper into the existing marketplace to fulfill the burden and obligation to pay for tools, equipment, buildings, benefits, healthcare, wages and everything else that those several hundred people working there are depending on so they can make their house payments, buy groceries and maybe even someday own and Oliver and travel around the country seeing and doing everything we all are doing right now. Growing the business by selling new product doesn't mean forgetting the customers that have already purchased Olivers, rather it is doing both in a way that is fulfills everyones goals. It's not easy. Sometimes feels like a balancing act. There will be the occasional mistake... but I'm counting on the Oliver management to provide that "North Star" to keep the companies core moving in the right direction. We were just recently in the extreme north west and several times had conversations with folks who might have been prospective buyers... they just rolled their eyes when I said you could only buy and pick them up at the factory in Tennessee. All of us need to remember that if we want an experienced service team that is equally invested in our Oliver the factory where they are built needs to survive and grow. Otherwise, "who ya gonna call"?1 point
-
Lest we not forget - The travel trailer "arm" of the organization is just about the smallest in the overall company. Oliver has many years of experience with a number of products (like their walk-in bath tubs) in both the consumer/retail and industrial sides of the business world. I believe that they know much more about their products and the associated marketing of those products than I ever will. Yes, even the best plans just don't work out, but, from what I know about the company they will do whatever it takes to get the job done and done right. Bill1 point
-
I'm rather excited about it, actually. One of their locations (if it's the dealer referenced by @Ollie-Haus a few days ago) is SEVEN and a half hours closer to me than Hohenwald, and I go past it often on the way to North Carolina, and just about anywhere else i go in the north.... And, they have stellar service reviews. (And decent hotels, and restaurants, and an interesting microbrewery nearby.) I really can't imagine Oliver going into this program without careful selection and deliberation. They have almost two decades invested in establishing themselves as the premiere molded fiberglass trailer. I, too, was very perplexed and questioned the whole concept at first, but if it expands the network of quality, trained service, it certainly has some merit. @John E Davies, everyone is absolutely entitled to their opinions. Let's see how it plays out.1 point
-
Very well stated @ScubaRx on all levels and I agree 💯. Patriot🇺🇸1 point


-
Recent Achievements
-


")


")


