Leaderboard


Popular Content
Showing content with the highest reputation on 04/16/2024 in all areas
-
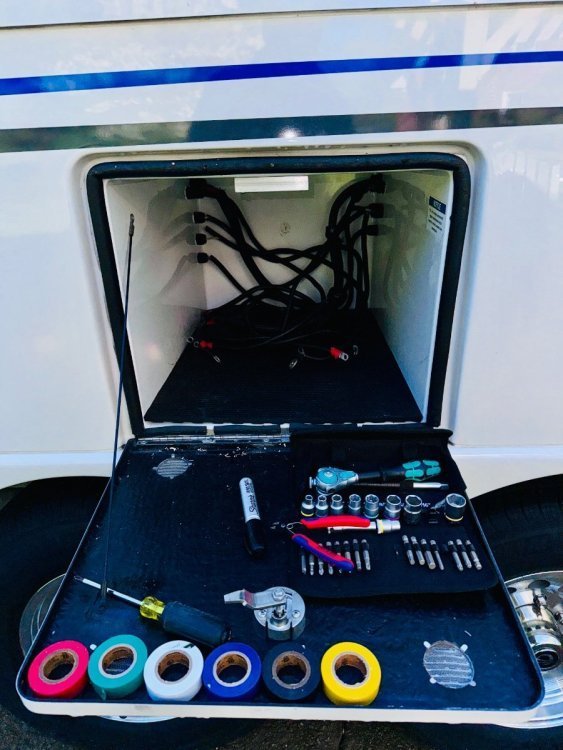
As far as mounting the panels, the combiner box and, the interconnect wiring…. I paid Oliver service to do that. I bought the Zamp panels from Oliver and since they know exactly where the aluminum plates are located in the outer roof, they mounted the panels as well. All other wiring and solar controls ScubaRx and I installed. I had to look the other way and bite down on a broken arrow when the first hole was drilled into my new camper but have since gotten over that trauma.8 points
-
Our storage is under cover, so the only time we’re exposed to the sun is while camping. When CGI did our trailer they noted that it was not oxidized very much for a 7 year old (at the time) trailer. Covering definitely helps. Mike6 points
-
It’s a rite of passage for a lot of owners!5 points
-
I'd bet that the guys from CGI will be at the Rally again this year. I'd also bet that they would be more than happy to bring their gloss meter to your Ollie and give you some gloss readings. Bill5 points
-
@rideandfly Bill, A pretty neat video which contains useful polishing steps by the fellas at CGI. I may add another larger buffer to my arsenal. Nothing like a clean and polished up Ollie!5 points
-
As early as April, 2015 they were molding wire chases into the upper inside hull to run the wiring down between the hulls to the rear attic space. I shot these photos on 04-29-2015. The above shot shows the rear of the hull. The upper attic door will be cut here. This photo shows where the wires would go through the outer hull and into the wiring chase toward the front of the trailer This photo shows where the wire chase starts. This photo is looking from the front towards the rear of the trailer. I don't know if these will help. At one time there were some little dimples in the top of the outer hull to show where that wire chase terminated. X marked the spot on the inner hull in photos #2 and #3.
 5 points
 -
For years our MaxxFan 7000K has made a high pitched chirping noise at lower speeds. I had been told that it was due to pulse width modulation speed control so I didn’t try to fix it. My wife can’t hear the noise but it really annoys me. I finally googled and found this video. I cleaned the brush dust out of the motor and now the fan is pretty quiet. Be aware that black dust will come out of the motor when it is disassembled so you might have someone hold something under the motor as you pull it apart.4 points
-
Impressive video! Really like his three step process, results, and gloss meter.4 points
-
I had breakfast with Chukarhunter (Steve) this morning 😊
3 points
-
It is and thankfully Steve provided counseling to help me through it all! 🤪3 points
-
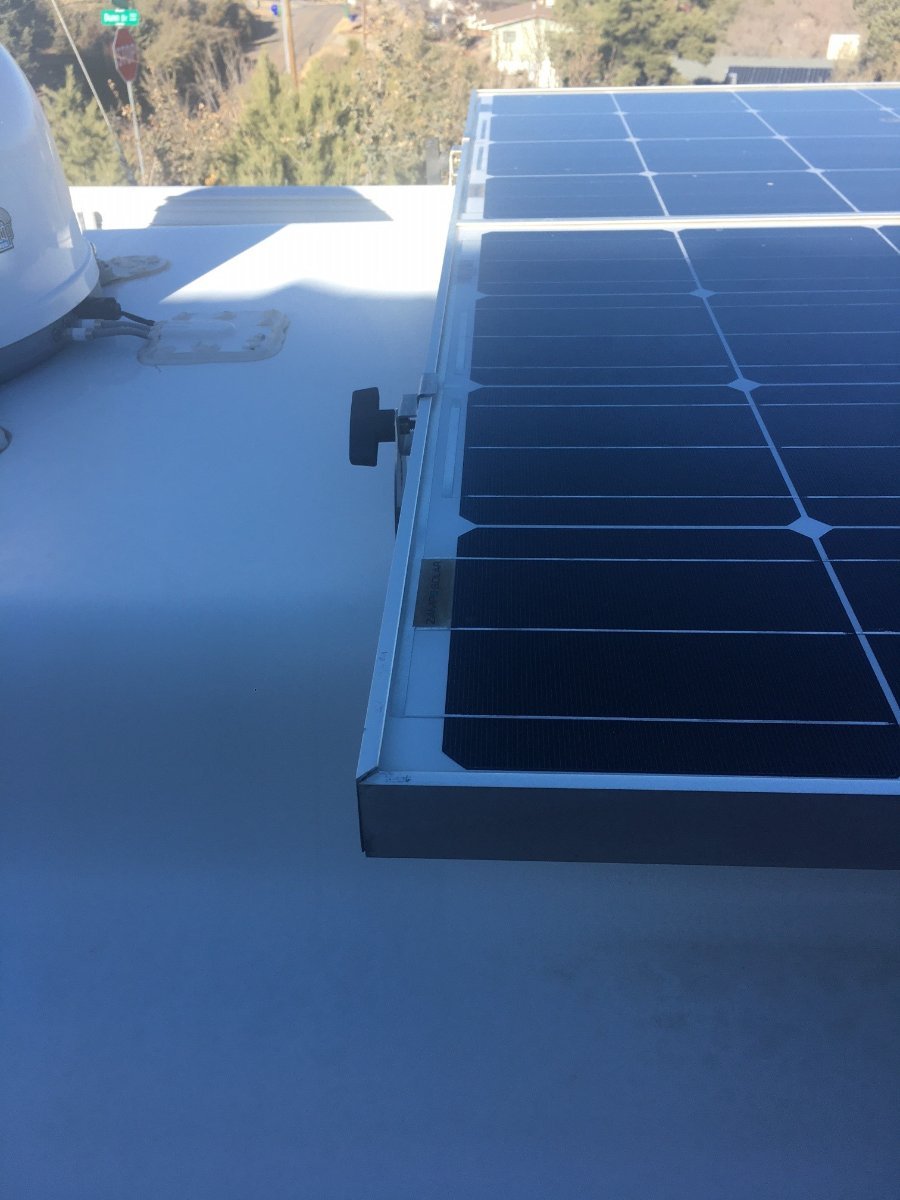
Something to think about before mounting flexible solar panels on your roof. I've seen the same results when permanently mounted on fiberglass boats. Don’t Mount Flexible Panels Directly to Your Roof3 points
-
Yes, agree on the three step process Bill. I also appreciate the info on the products they are use. Keeping our Oliver under cover when not in use is a huge help in delaying the oxidation process.3 points
-
Considering that they created their website in 2021, haven't updated it since and weren't even planning to make this product available until Q3, 2024, I'd say not too good, if at all.3 points
-
When we purchased our trailer in 2017 Oliver was just changing solar equipment brands. They changed from Blue Sky equipment to Zamp equipment. I didn’t know much about solar power at the time so defaulted to not getting solar. ScubaRx schooled me about the Blue Sky vs. Zamp architecture and I choose to add Blue Sky solar. The trailer (at least at that time) was “pre wired for solar.” The roof did not include the combiner box but the #6 cable was in place and a battery temperature sensor was in place as well. ScubaRx and I had to run the 4-0 welding cable as needed and other #6 cables in the basement as needed along with the main switch and circuit breakers, shunt, etc. I had the Oliver folks mount the panels and do the interconnections. Technically, the total system was not completely wired, just the hard to access cable was in place. The trailers are not turn key wired by any means, you will have to do the majority of the wiring yourself along with all of the system component installation.3 points
-
Steve: Again you are providing a gold mine if great info. THANK YOU! So, with twin cast in place conduit runs, am I correct in thinking that as shown in the above "N9" picture: The left conduit (Street side) is provided for the pre-wired solar system feeds to the attic. The right one,(Curb Side) that runs from the front closet area to the attic feeds attic area miscellaneous electrical needs. I will for sure be up top this summer looking for that dimple. I seem to recall seeing it and wonder "What's dat for?" If so, it marks the "X" on the spot for buried treasure. Made my day! GJ
2 points
-
And - here we are on April 16th, 2024! The good news is that I've now (finally) got the shade back together (for about the 10th time) and the BIG exception as compared to the other 9 times is that it now works! I never thought that I'd have to be concerned with "string theory". But in the case of these shades there are a couple of VERY important things that one should pay attention to. The reason why it took me 10 times to get it correct was that my intent was to only replace the string that broke. I did this according to the diagram(s) that I found in this thread. I paid careful attention to the route that this string took in those diagrams, but, in each instance once the shade was put back together and the spring tension set, I would quickly see that the string would not stay taught on one side or the other. Long story - but this problem got me to thinking - where does the string go when I raise the blind? About the same time I retrieved another shade from the Ollie hoping that it might give me some idea of were I was going wrong. In looking at the shade I knew was functioning properly and I (finally) noticed that the string routing on the side that was not broken was different than either the night shade and/or the properly functioning shade from the Ollie. This is when I (finally) realized exactly how these shade manage the string - one side takes up the string while the other side basically pushes it out and the spring simply helps smooth out that process. In the diagram from the factory - if you follow it closely - it can been seen that the string goes from the spring, through the corner frame piece, through the lower pull bar (the bar that is used for raise and lower the night shade) and into the upper pull bar (the bar used to raise and lower the screen). But instead of going through this bar, the string takes a turn and travels through the bar under the bottom part of the shade where the shade is held by this bar. I pulled the string down this bar until it came to a grommet that passes through the bottom of the screen, and is then threaded upwards through the holes in the screen fabric. Once this is complete the threading continues through the top of the screen and into the area just above the point where the screen is held in a track at the bottom of the frame itself. Once again, the string then turns and travels back to the original side of the shade where there is a second grommet. Passing through that grommet and then the holes in the screen fabric until coming back to the bar that is used to raise and lower the screen. Back into the narrow track on the bottom side of this bar that holds the screen it is just a short distance (a couple of inches) back to the end piece of the bar where the string feeds over a small metal "roller" and then takes a 90 degree turn back towards the area where the original spring is located. Again, paying close attention to the drawing and to the opposite side to make sure that the routing was the same on both sides I finally got back to the spring. In tying the string back to the spring I had to use a pick in order to get some stretch in the spring. It took more stretch than I would have thought but I needed to take up all of the slack in the string plus make the string taught such that the screen would not "flap" in the breeze. The whole "issue" was that the original stringing from the shade factory was NOT the same as the stringing shown in the drawing above. Instead of passing the string through that second bar (the one used to raise and lower the screen) and then threaded UP through the screening, the string continued up into the top frame piece and down into the screening (i.e. the reverse direction). While I don't think that there is anything "wrong" with this, the problem is that BOTH sides must be strung in the same manner (i.e. in the same direction). Of course I could have avoided a bunch of work and worry if I had simply paid attention to how the broken string side was routed in the first place. But, of course, I simply pulled out the broken string - mistake! Hopefully the above makes some sense and you avoid the issues I encountered. I'd be happy to do a "show & tell" at the Rally for anyone that really wants to see what I'm talking about - just let me know and we'll work on a time and place to do a one on one. Bill2 points
-
Its the "snap" of the rubber gloves that always gave/gives me the "willies". Of course there is always that sly smile on Steve's face when he says things like that!🥺2 points
-
I placed an Alcan order this morning with Luo for springs, 9/16" u-bolts and nuts.2 points
-
During a service visit to Oliver a couple years ago, talked to one of their detail guys and he gave me a sample of their buffing compound, at that time they were using Buff Magic, a Shurhold product. Tried it out on Ollie's roof last fall with good results before waxing. Still using Surhold orbital buffer (weekend warrior equipped) 🙂 and started using their compound/wax products last fall. Gloss meter could go in the same drawer with my digital thermometer. 🙂 Gloss Meter: https://www.amazon.com/s?k=gloss+meter&crid=23MK7D73P1HXV&sprefix=gloss+meter%2Caps%2C117&ref=nb_sb_noss_1 Buff Magic: https://www.amazon.com/s?k=buff+magic+compound+marine&crid=1DS30K3AQJJBI&sprefix=magic+buff%2Caps%2C103&ref=nb_sb_ss_ts-doa-p_3_102 points
-
I don’t remember that there were any wires pre installed in the ceiling but know that there were #6 cables and the temperature sensor wire running from the basement area just aft of the pantry up the wall between the window and pantry, into the open area where the radio is located. Oliver service connected to the #6 cables near the radio and ran those back to the attic area up between the roof panels and to the location where they mounted the combiner box.2 points
-
Good for you guys! Bill1 point
-
1 point
-
I replaced my Zamp PWM CC with a Victron MPPT CC which I installed beneath the street side bed and I had to connect the wiring from the solar panels to the wiring going to the Victron CC. That splice was done behind the original Zamp CC location. And I found that solar panel wiring ran from the original Zamp CC location back to the attic and up into the inner/outer hull cavity and onto the combiner box. It seems to be the same route mountainoliver mentions above. Mossey1 point
-
Leave it to a mom to get your attention with properly timed "colorful" language! 🤣1 point
-
Thanks! I remember him selling it but wasn't sure if he was still visiting. Much appreciated!1 point
-
Right! I was measuring some with my calipers a few days ago as I thought that was the case since the aluminum is extruded. I want the ability to take the rack on and off so milling some material off is probably my best option for how I want to build it.1 point
-
Aluminum tubing is not measured like steel tubing. Two inches ID or OD is EXACTLY two inches. They WILL NOT slide into each other. You will need to mill 1/32" off each face of the male tube to make it fit. Even then, if the receivers are not perfectly parallel, the cross member will still not go in very easily. I solved that problem by over sizing the four bolt holes for the receivers and used nylock nuts left very slightly loose. There's just enough play to make them go in, a little spray lub won't hurt.1 point
-
Yup, I just assumed he got the "old" 1 1/4 (or is it 1 1/2") receiver with his 2024 Ollie. My mother always said, assumption is the mother of all "f" ups! 😜1 point
-
No worries, get yourself one of these or similar, much studier than that new Oliver 2' receiver!1 point
-
fYI, justed looked at my axle , i have 6 leaf spring on my 5033 lb. Axle. LEI. July 2022.. just thought i would it out there for LEI owners.. ( very few of us,😁).. All my welds look good also.1 point
-
My door will close with either valve open.1 point
-
Same for us. We have found we do not need to dump the gray tank more often than every 2 days or so, even with showers, so it takes little time away from our camping adventures. We usually dump the black tank first regardless of its level, then flush with the gray tank contents.1 point
-
Same here. We keep it closed until dump time. Mike1 point
-
I thought the MP2 has an internal ATS, but could be mistaken...1 point
-
Love the Wera and Knipex tools. Your plan may not have yet worked out as well as you hoped, but you have been using quality tools!
1 point
-
To Oliver Owners and Valued Customers, The Oliver team and family greatly appreciates and values our current owners and individuals that are considering the purchase of an Oliver. Without you the organization and Oliver brand would not be what it is today. As most of you know, Oliver Travel Trailers is going through a transition period and some of the decisions have created some questions and potential uncertainty as it relates to the direction of the company. Oliver is paying attention, listening, and monitoring all of the feedback and comments on the forum, social media, emails, and phone calls. Oliver Travel Trailers’ intent is to be very straightforward and honest with our owners, potential customers, and employees. Integrity is the foundation of the Oliver brand. Oliver feels an official company update is appropriate to help clear things up. The following are some key facts: The rumor that Oliver Travel Trailers is positioning the business to sell is absolutely a false statement. The Oliver sales team is still actively working with all new and existing customers to answer questions and assist in the purchasing process. If you are interested in purchasing an Oliver or have questions, please contact us directly. The Oliver service team is still actively providing technical support to our Oliver owners to ensure issues are resolved as quickly as possible. If you have technical support needs, please contact us directly for assistance. The decision to close the service department at this time has not been received well by many Oliver owners and potential customers. Oliver leadership is listening and plans to have discussions on this topic next week. Oliver will update our owners in the coming weeks regarding any changes. Again, Oliver Travel Trailers truly values the voice of our owners and potential customers. We’re listening and we care. Oliver Travel Trailers isn’t a prefect organization, but we are committed to ensuring our brand, our owners, and our future customers have a product and customer support that is the best it can be. Thank you for being part of the Oliver Family. Rodney Lomax Director of Operations Oliver Travel Trailers Sales & Service1 point
-
Thanks for the confirmation of Oliver Travel Trailers' continued dedication to Oliver customers, past, present, and future. "Transition" is a common event in the life cycle of businesses as they mature and grow. With OTT's strong heritage and dedication to building a quality travel trailer that, with proper care, will last a lifetime, you have brought value to the market and joy to many individuals and families throughout the nation. I wish you and all employees of OTT all the best as your company evolves into the future.1 point
-
Never had any doubts, but thanks for the update and reassurance!1 point
-
Thank you Rodney.1 point
-
Thanks Rodney1 point
-
Been to the Silver Bean many times, got the SS coffee mug to prove it, HA! Great Joe there, for sure. This was in '18 while on our annual "Spine of the Rockies" ride going through Cortez, CO:
1 point
-
I purchased also the Orion dc to dc charger 30 amp , but I charge from a spare power station I have. Victron has new DC to DC charger 50 amp that is scheduled to be released in us next month. Its 98 percent efficient compared to existing 82 percent. Lower temperature from high efficiency. I preordered it, of course they improve it. It also will tie into my victron components . Great Job on your install.
1 point
-
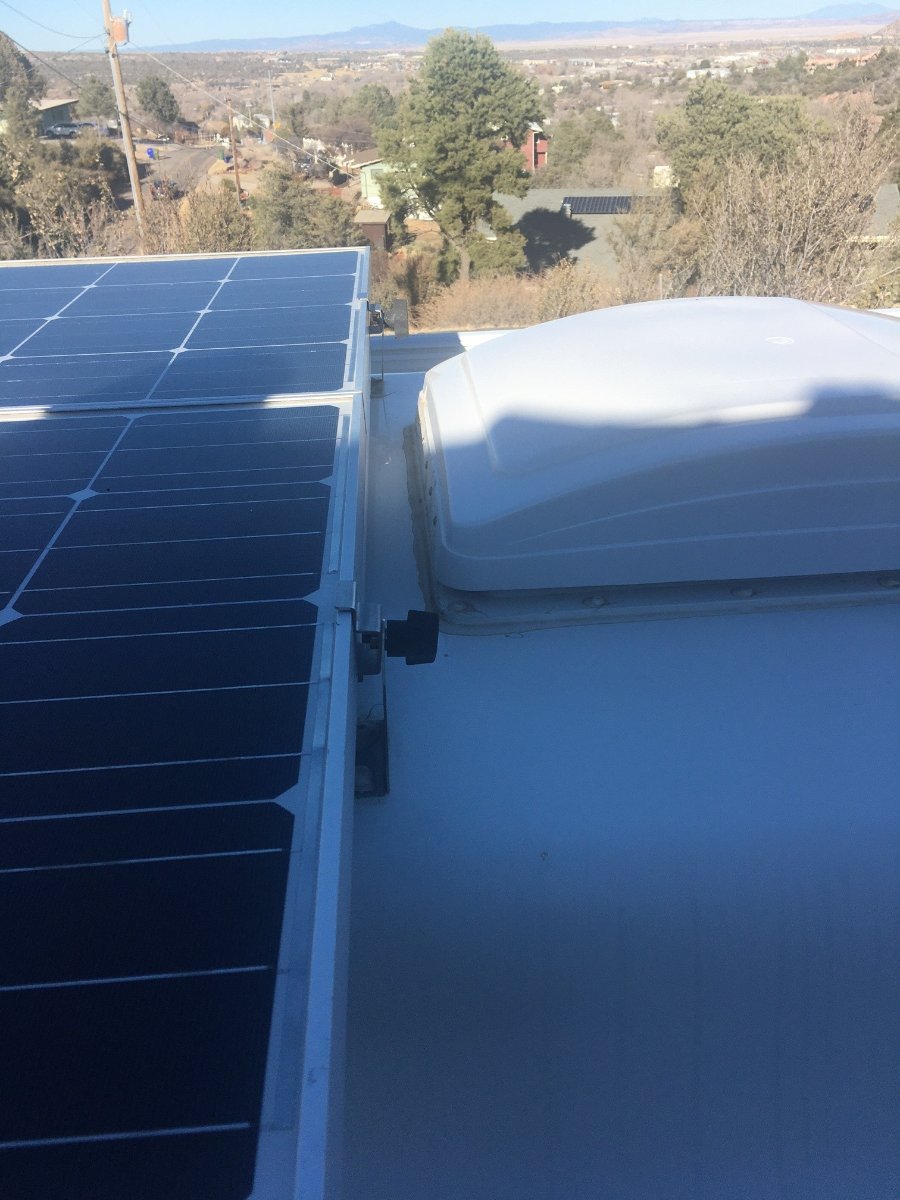
Really, you're thinking 80" wide? It seems like mine stick out enough sideways at 52" wide. And BTW, if you're thinking 3 panels, it almost doesn't matter at 78x80" total, but 3 panels would install easier sideways. Yeah, the OE2 is 7 FT wide, but not at the roof and then the very top it is much narrower. I would go with 2 mounted lengthwise, if it were me. The antenna is an easy move, though you would likely have to run the coax on the roof for a foot +/-. You would seal that opening and the newly installed panels would then cover the current opening. I'm working and more day out there today (just finished the sanitize process). I'm going to take some more measurements for you, like how much length between the bathroom fan and the MaxFAN. More later...1 point
-
Hey @Geronimo John, I measured today as promised. The double panel on our hull measures 58 1/4" long (front to back) and 52 7/16" wide (width of 2 panels). Our roof layout looks quite different vs. your picture. I know you have an OE2, but your picture looks like maybe it's an OE1. I have the Winegard Sat up front, then about a foot of length, then the panels and 2-3" to the MaxxFAN. The pic above goes from bathroom vent to MaxxFAN all the length of the panel. I noticed a serial # Z2015071020403 on mine today, so thinking it's a Zamp panel. The measurements of the panels are within an 1/8" of these, two 170W panels, 340W total: Amazon.com: Zamp Solar Legacy Series 170-Watt Roof Mount Solar Panel Expansion Kit. Additional Solar Power for Off-Grid RV Battery Charging - KIT1009 : Patio, Lawn & Garden
1 point
-
Don't bet the ranch on that - once down the rabbit hole the rabbits tend to take over!1 point
-
I really like the Meguiars products and the one step 67 really removed the mild oxidation we had on our Ollie with very little effort. 👍🏻1 point
-
Nice! Just goes to show that with the right polisher - even a Tundra can be made to look good! 😇- (I'm just kidding folks in case there was any doubt). Thanks for the pic, Bill Bill1 point
-
It's cloudy here today, but here's the best I can capture with a smartphone:1 point
-
I've been turning wrenches over 50 years, but never learned about vehicle detailing with a powered polisher. Purchased the Shurhold 3100 Dual Action Polisher. Also purchased their pads that work with this polisher. They have videos on Youtube showing how to compound, wax, and how to clean & reuse their pads. https://shurhold.com/products/worlds-best-dual-action-polisher Like Seadawg recommended, the first project was our 2003 Tacoma that we purchased new and has spent most of it's life outside in the Carolina sun. Just finished compounding and waxing the Tacoma. The Shurhold polisher works great for compounding and waxing jobs for the weekend warrior. The Tacoma looks so good, going to put new wheels on it. Going to wax our 2022 Tundra next! Then compound and wax Ollie. Glad Patriot started this thread and appreciate the information from everyone! https://shurhold.com/1 point
-
Yeah, if I hadn't had a pretty significant rehab job to do, I think I would have leaned more toward a device like the one you got. As you note, the trick is to keep up with the washing and waxing so you avoid needing to buff out oxidation in the first place! I learned my lesson with the van; of course now that I'm retired I'm less prone to let that sort of job go for years on end 🙂1 point


.thumb.jpg.e34bf01ef7f7d5e99ad31856d45afbeb.jpg)


.thumb.JPG.dd838cdb3df463dab6a16861fa23a319.JPG)
-
Recent Achievements
-


")


")


")


