Leaderboard


Popular Content
Showing content with the highest reputation on 05/23/2024 in all areas
-
Exactly and only missing the Christmas tree on top. 😄4 points
-
70 years later it’s another Chrysler Town & Country! 🤣4 points
-
I am finishing up installing the Isotherm fridge in my 2021 Oliver. I removed the Norcold 3-Way fridge and stripped the 2 circuit boards and front control panel. They are free to anyone who wants them. Just pay the shipping costs. John
 3 points
 -
Both for those that missed attending this year's Rally and for those that were there, Steve's Road Trip Chronicles has posted the first of a two part series about his experience at the Rally. This part one includes remarks from Rodney Lomax at the opening reception. A big thanks to Steve (and Oreo) for posting this! Bill https://www.youtube.com/watch?v=1AhTMweTUB8&ab_channel=Steve'sRoadTripChronicles3 points
-
I like the white marinetex, as I've suggested many times, for minor projects. It's always in our supply locker, as in most boaters. It's "pretty close" to our Oliver color, "pretty close" to the boat color, to fill in screw holes. If you cover the filling with saran wrap or tape (remove promptly after set), it stays fairly glossy. And smooth. Wprk on cooler days (70s) No need in inobtrusive areas to gel coat, as you would need to do with bondo or fiberglass paste. . Which is a pita. If you don't like the end result, it's easy to drill out and redo. There are many videos out there on YouTube.3 points
-
The Victron 12/12vDC charger totally meets our camping style and needs... When departing after boon docking for a few days during overcast weather - we know that our SOC will be at 100% within a few hours, so we'll start with a "full deck of BB cards" at the next destination. As y'all know, the "non-isolated" version will require installation of a dedicated negative cable from the TV battery/alternator to the rear bumper connection then continue with a thru-hull penetration to the Smart Shunt bus bar. FYI, (knocking on wood) we're 3,000+ miles into an 18-day trip and the Victron suite has performed flawlessly. Glad to hear at LGSP that OTT is considering Victron as an optional upgrade - good stuff along with Renogy, Blue Sea Systems, and others. Cheers!3 points
-
@Geronimo John Glad you appreciated my update. Now the actual thread can continue on about Steve ‘s awesome vid of the rally. 👍🏻 Your courtesy to the thread is also appreciated. 😉 Onward! 🇺🇸🇺🇸3 points
-
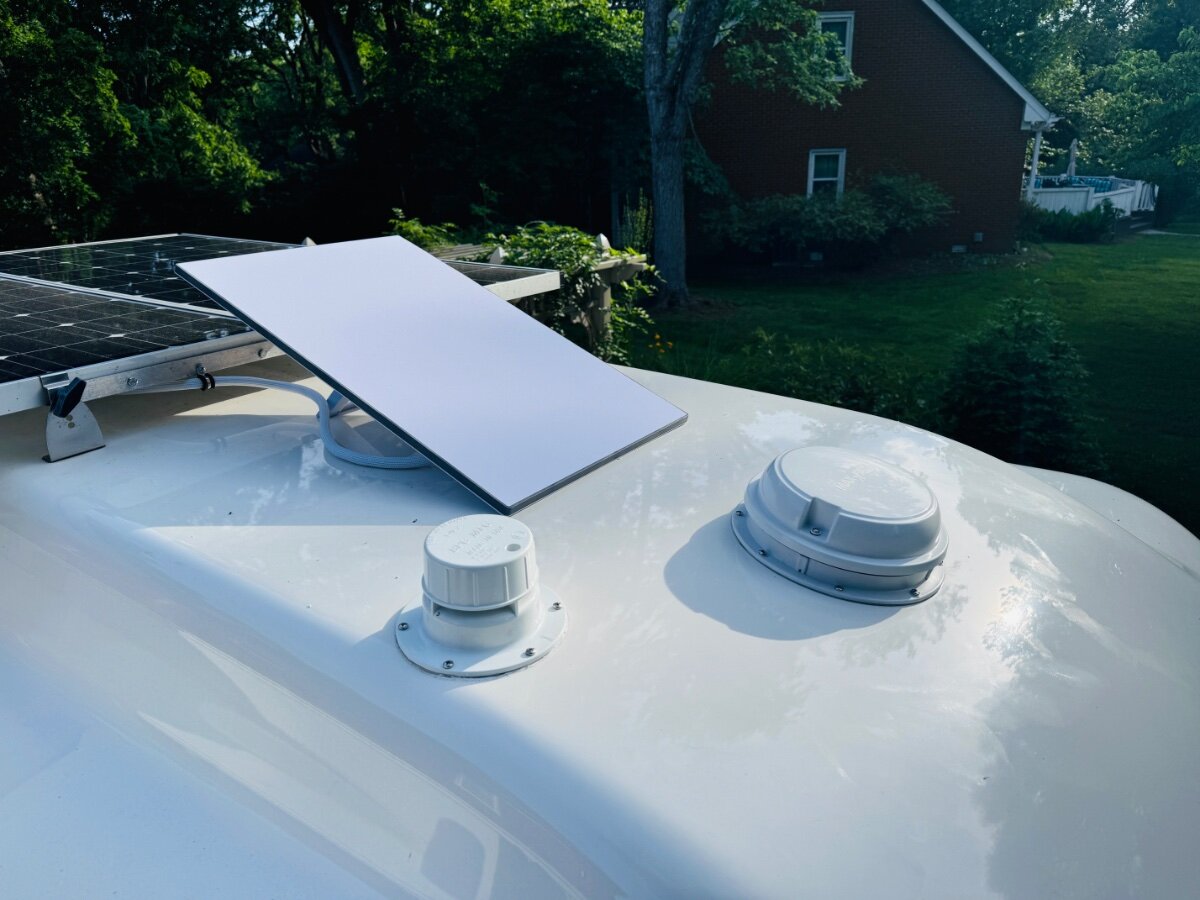
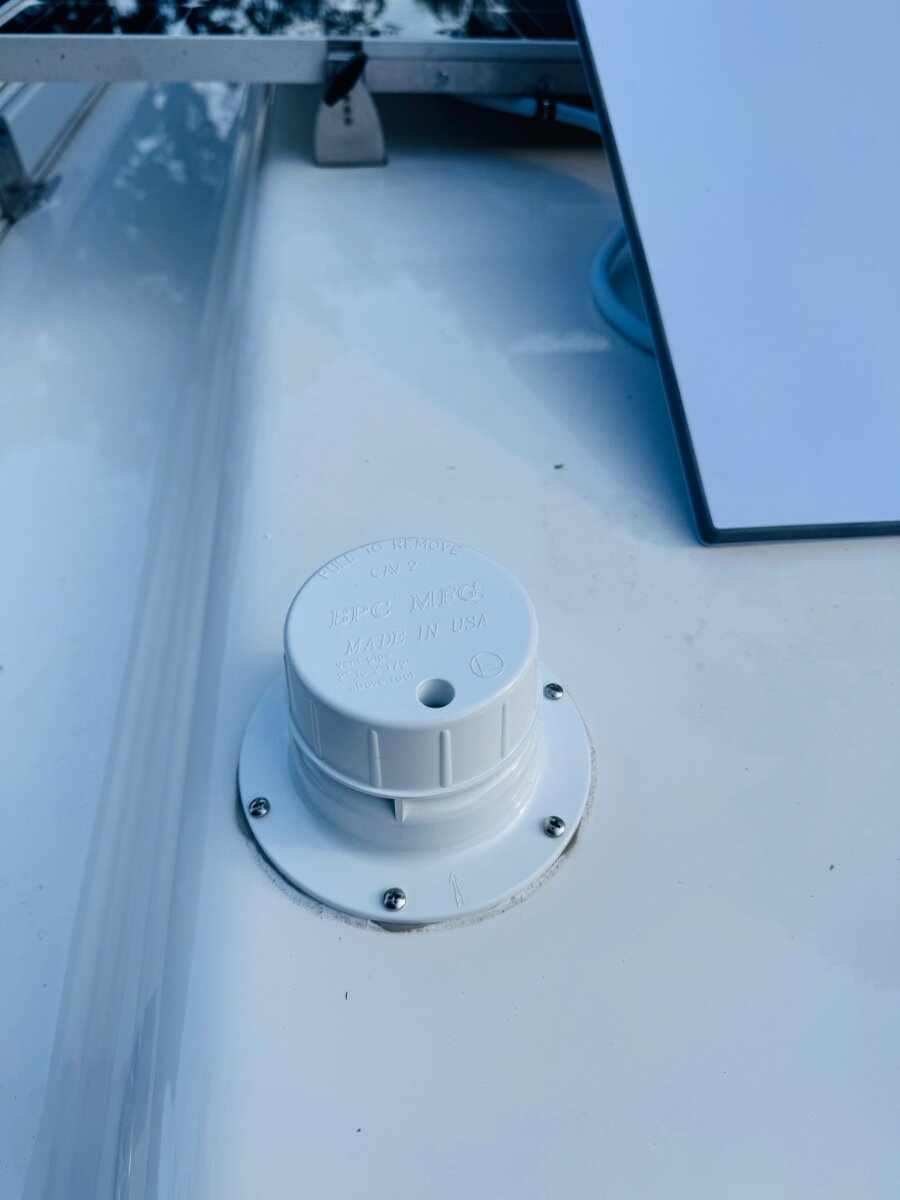
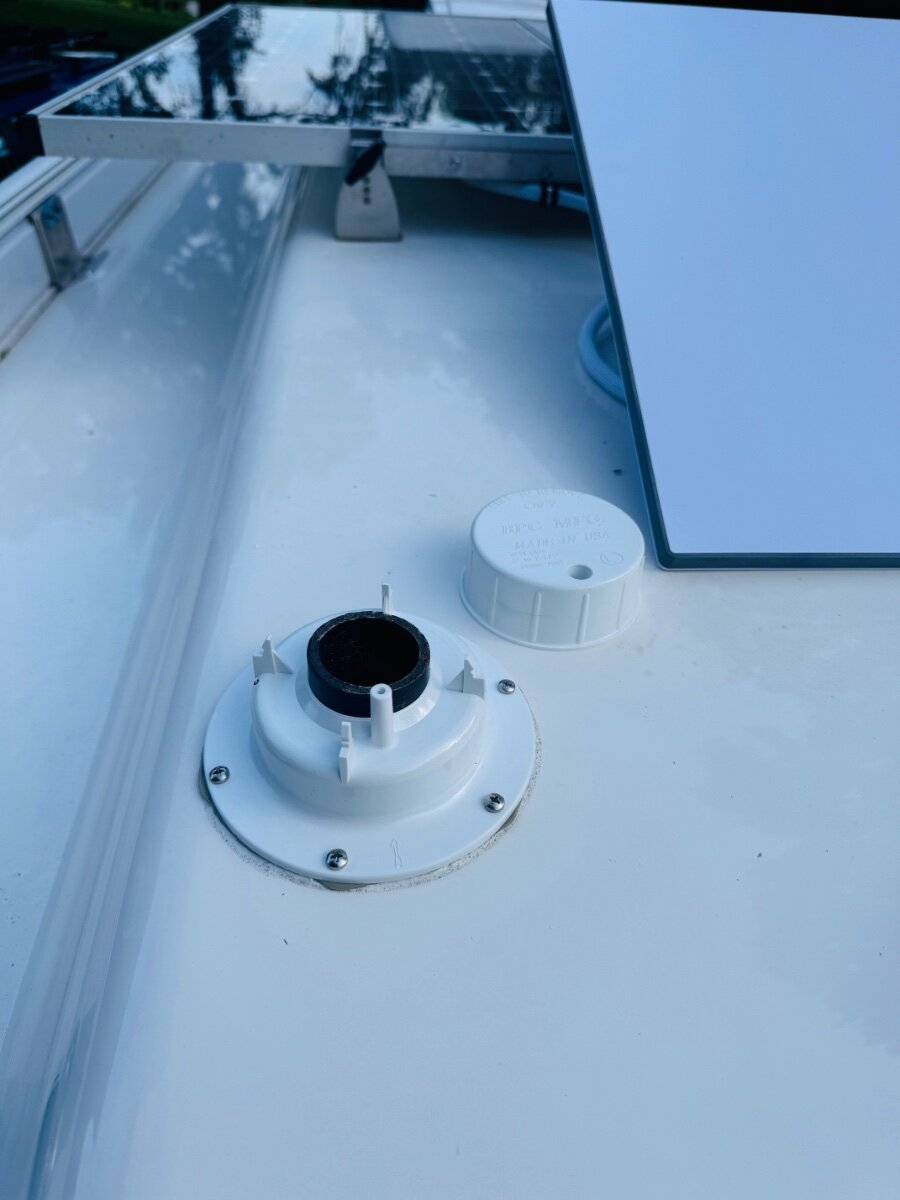
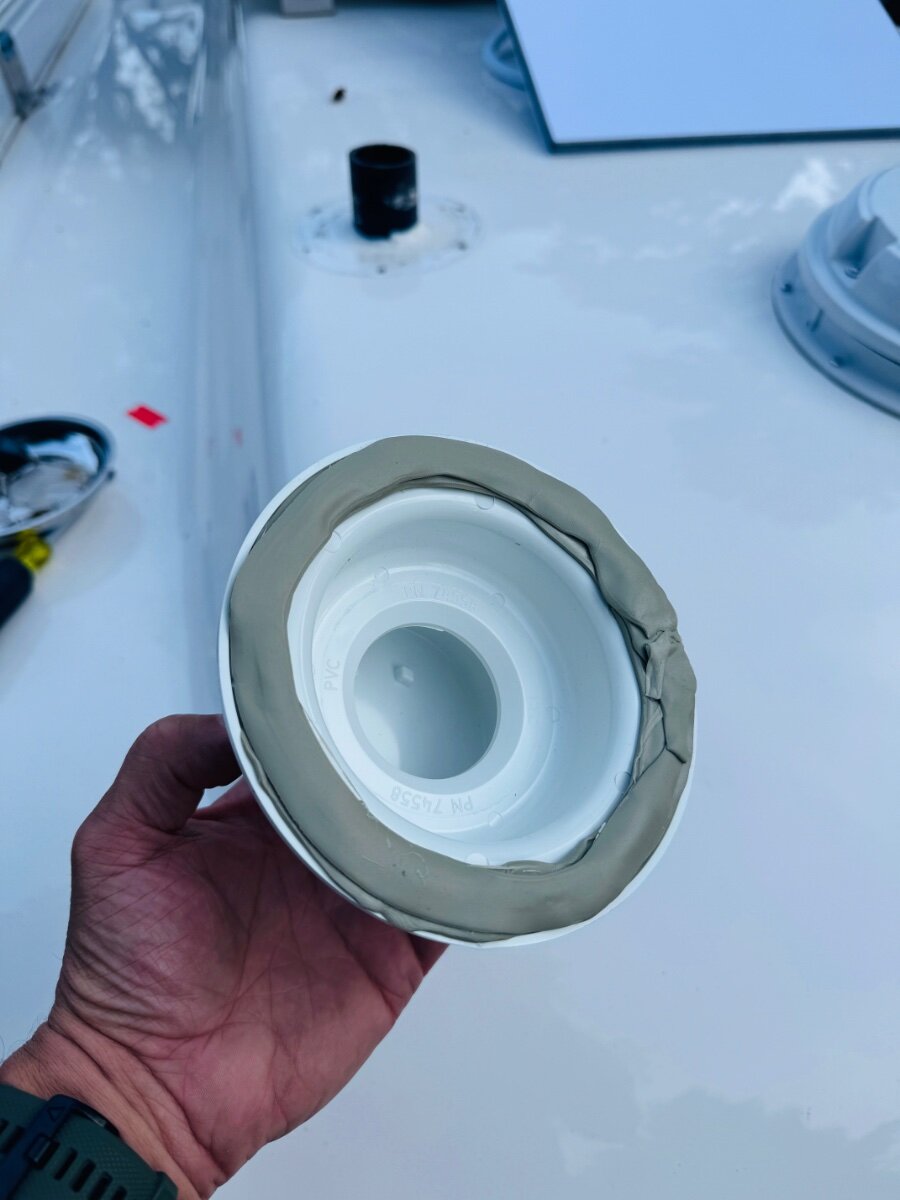
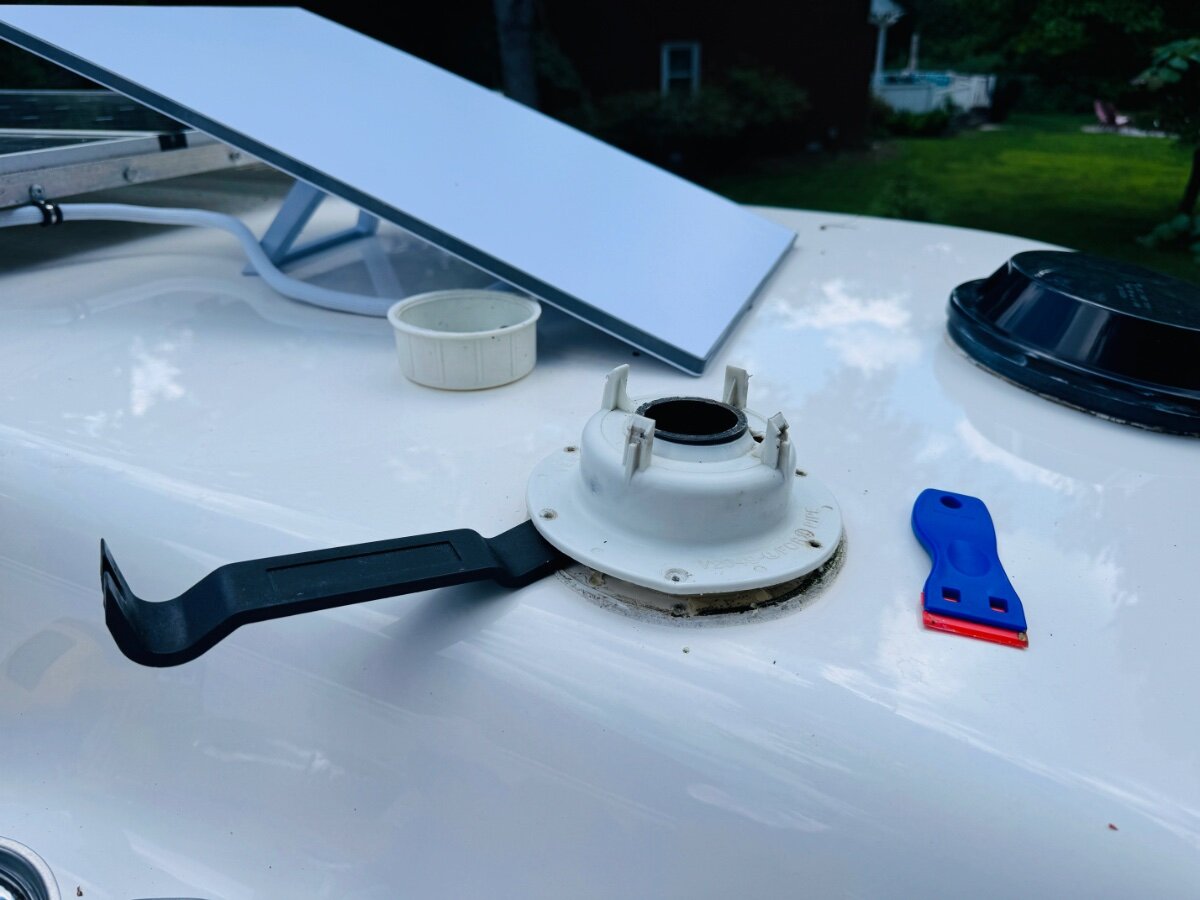
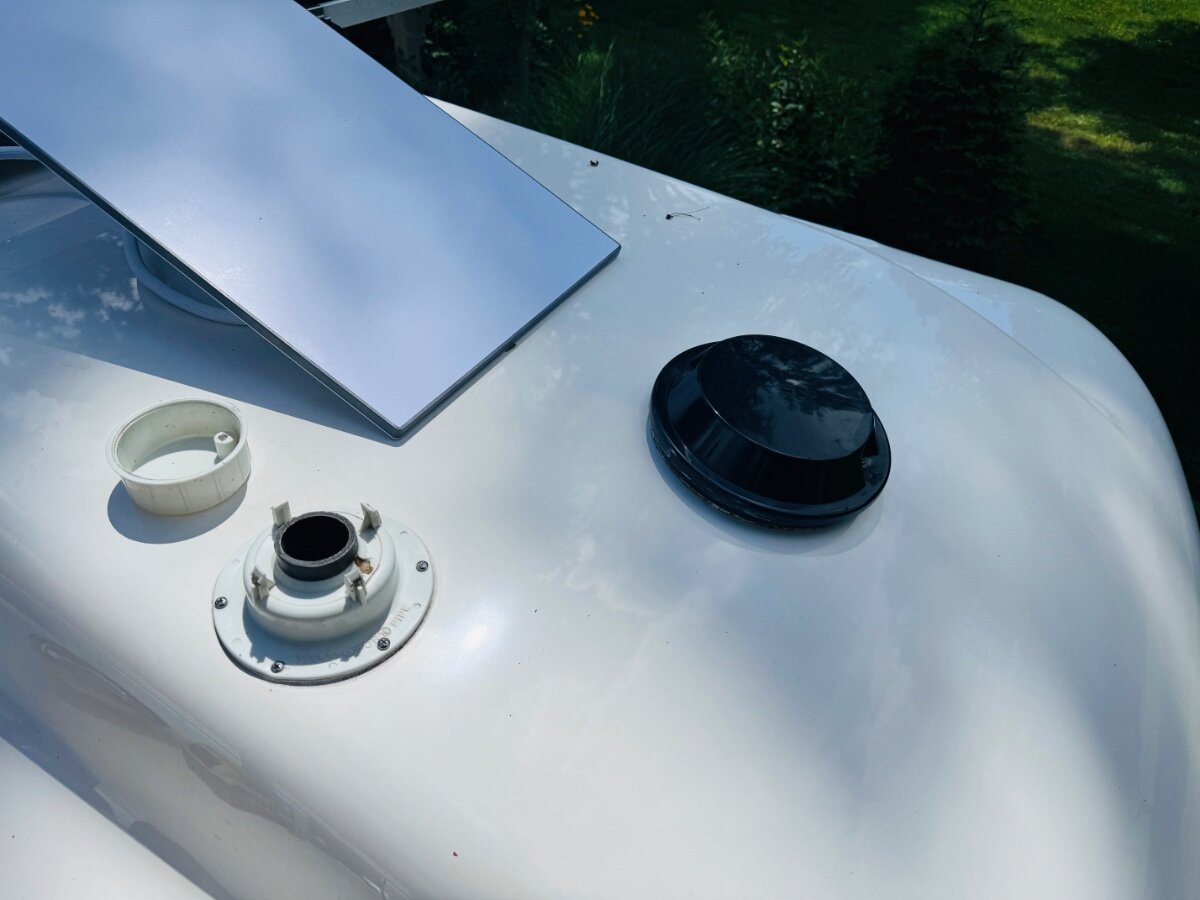
@rideadeuce Mike, thanks for this. I might be going crazy. I could swear I wrote a comment on this Monday night after you posted and it's not here! Must have not clicked the Submit button. Thank you for finding the correct part, as you stated, sourcing can be the difficult front work of the job. Made in USA and reasonable, nice! Question is, what was your reason for replacing the vent? For $16, I might replace mine just to remove the ugly of the old vent and Dicor on top of Dicor mess. I'm working this summer on removing all old Dicor and caulk so someday she will be ready to apply a decent shine. Your installation is clean, nice work as always. 😂3 points
-
Likely ran out of juice, just a few miles down the road. 🤣3 points
-
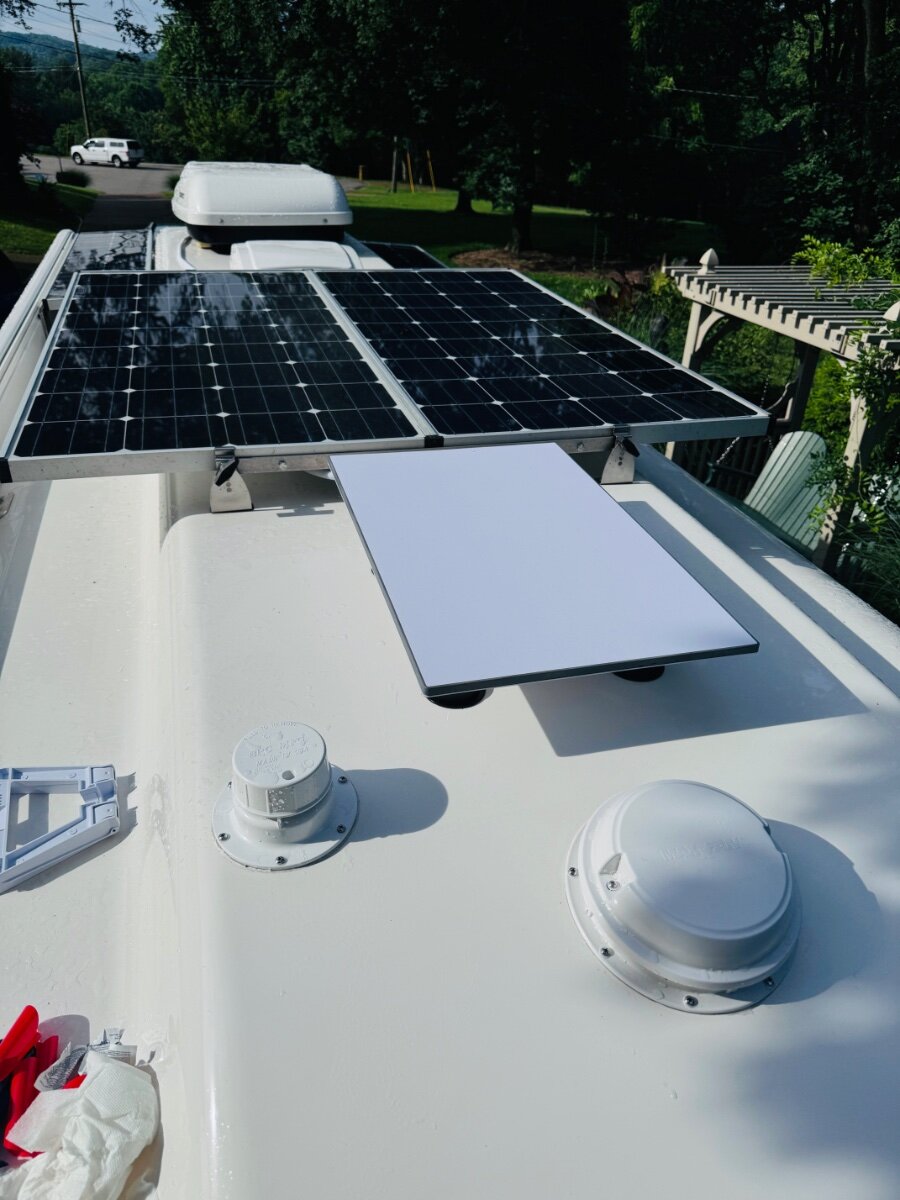
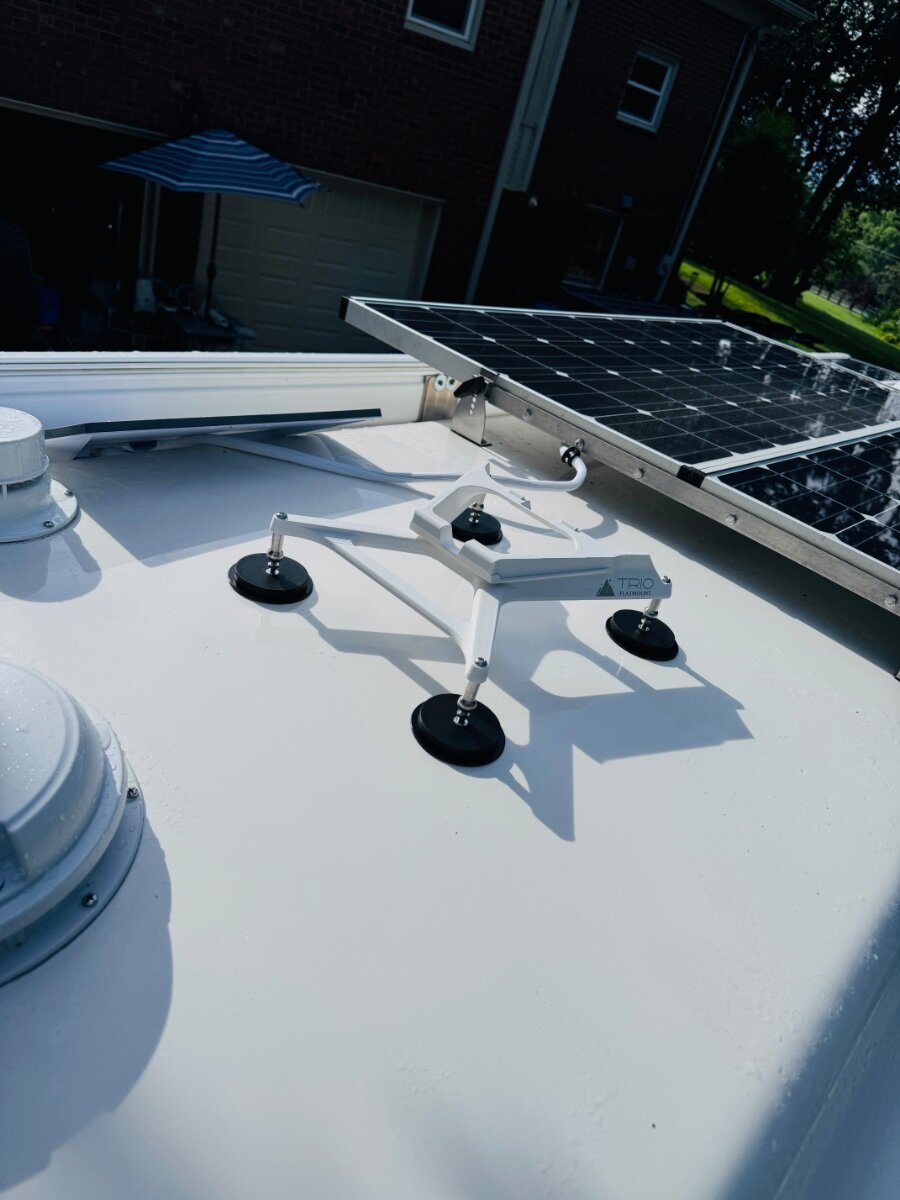
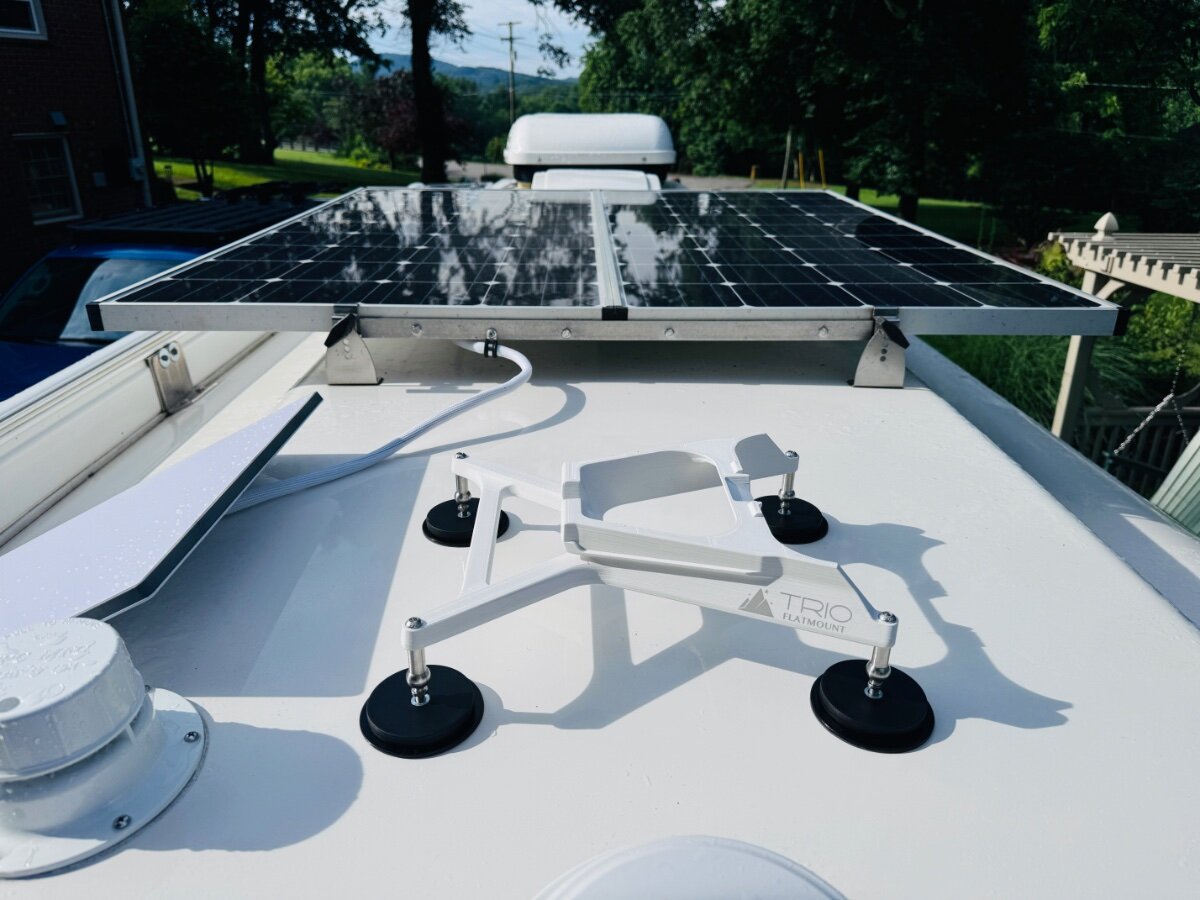
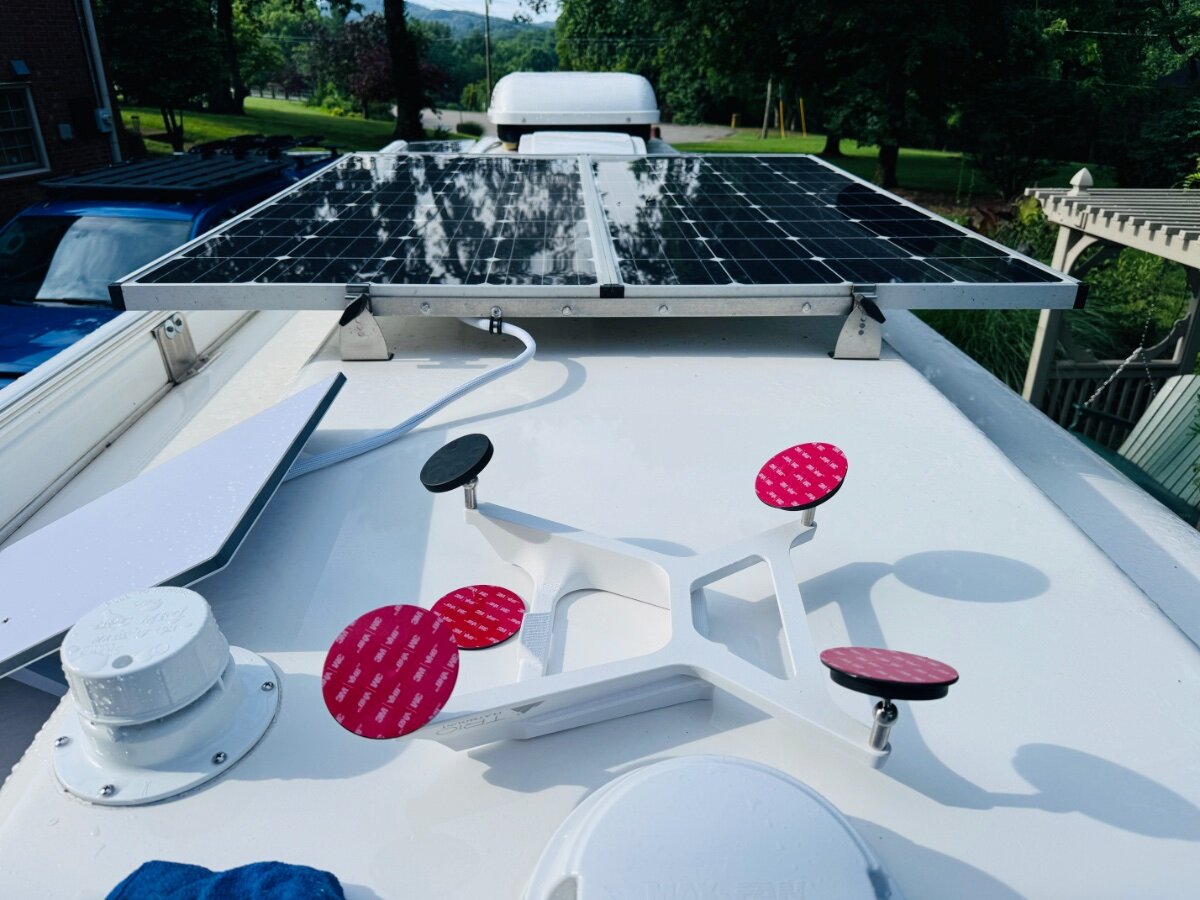
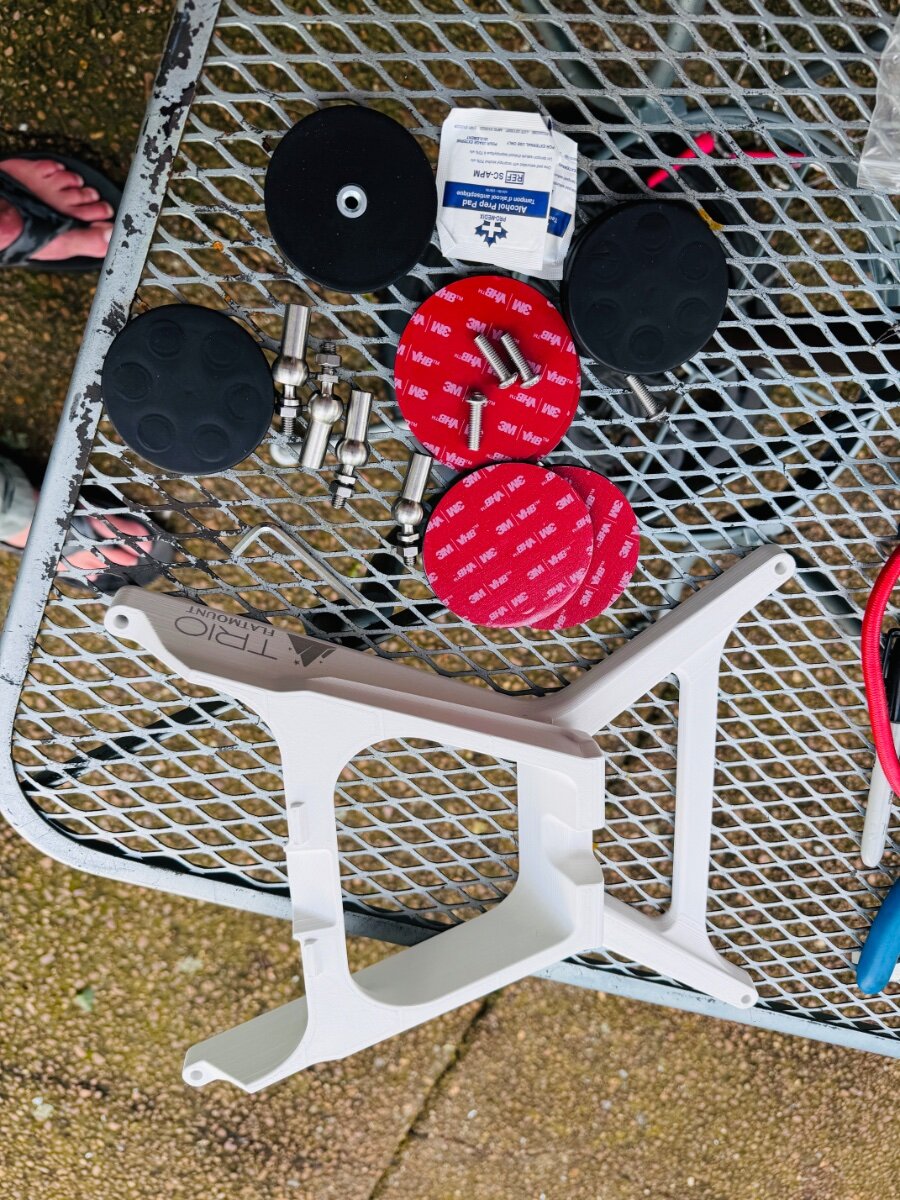
Really happy with the mount and semi-permament installation.
2 points
-
Tape the surface to be cut or drilled2 points
-
Long ago when I had boats, I'd run the hole saw backwards to cut through the gelcoat, then forward though the fiberglass. This almost always eliminating chipping.2 points
-
Do you have any photos of the installation? I’ve already installed a compressor fridge in my trailer five years ago but, there may be others who would be very interested in seeing the installation (I am as well!). Thanks2 points
-
I am thinking that it is a wise idea to install a negative regardless of which Victron 12-12 30 you purchase. Why: One way or another the rated power of the DC - DC charger will be flowing from the TV battery to the Ollie batteries. With my clamp on amp meter, tests with a pair of 4 AWG wires for the pathway, I see 100% flowing via the Positive, and about 70% flowing via the Negative cable. So, the rest, 30%, is flowing via the frame/Andeson Chains, and Bulldog to the frame. Without the Negative cable "home run", all of it would be going thru the frame via the Bulldog, greased balls and Anderson chains ending up at the Battery Cable for the TV. The Battery Cable may or may not be sized for the additional load. But for sure, the series of resistance connections on that path would be a concern. With a clamp on amp meter and our 712 Smart, we can learn a lot. Kind of fun exercise as well. GJ2 points
-
Not the fastest, but definitely better than anything else we have had especially for remote areas.
2 points
-
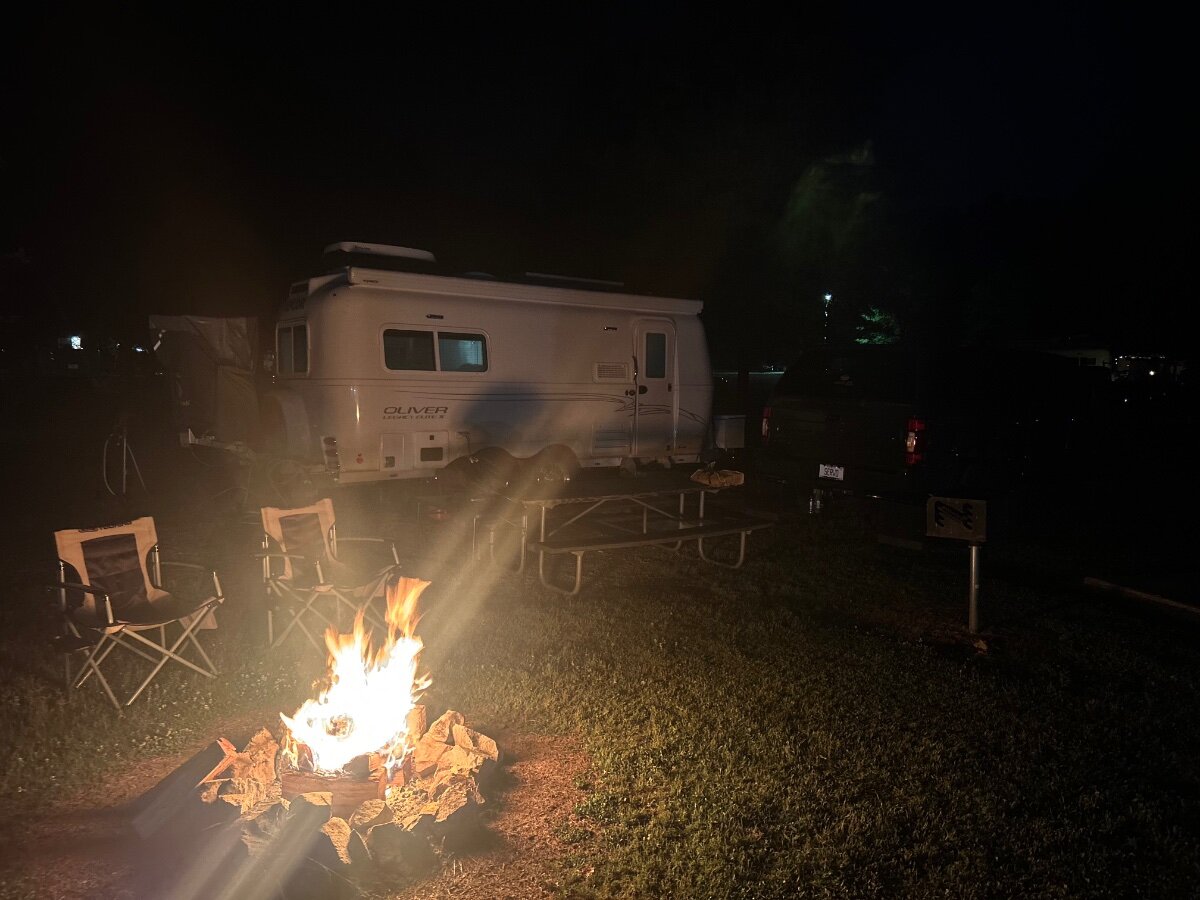
What a wonderful evening! Thanks to everyone behind the scenes, and it was good to see new and old friends.
2 points
-
It was a dirt dauber nest. Got on the trailer, took off the top of the AC, cleaned the nest and all is good with world. I am now sitting in my campsite with a happy wife. It is hard to see how the little bugger got in there it is very well sealed, but he did.2 points
-
You can't see it in the picture but the cap posts were cracked and the screw mount that held it down had been broken as well during a wash/wax job. Kept falling off.2 points
-
I knew it was only a matter of time….
2 points
-
For hull 342, I have recently purchased the Dexter Bronze Bushings. Per their sales Order Confirmation: 8 each cost $47.76 plus tax. Their part number is D014-077-00. They are .57" ID X .690 OD X 1/74 long. Can't help you with the Shackle bolts themselves. Hope this helps a little. GJ2 points
-
As to NOT derail this post. I did hear a few comments and it was basically that the failure rate was so low it was not of much a concern at all. And I agreed, the leaf spring horse is dead, it’s a nothing burger. Carry an extra leaf pack, or spend the lettuce and upgrade to a 5 leaf pack and get on with traveling enjoying your Oliver. This was the best rally ever in our experience. Everyone was chilling, grilling, making new friends, greeting old friends and having a fire side blast and enjoying their Oliver’s. Some of the fire side tales were actually true. 😄 Onward!🇺🇸🇺🇸
2 points
-
FYI: We observed our 2nd and 3rd Cyber Trucks yesterday headed eastbound on I-20 in LA -- again, on the back of a flat bed. Will report our first sighting of a Cyber under its own power whenever it occurs... HA!2 points
-
It was an exceptional rally, many hours renewing acquaintances and making many new friends with so much in common. It's really hard to grasp how you can have so much in common with so many people from every part of the country. It's a special community indeed. Site G34 is already reserved for another great rally next year! BTW I only got a couple phone pictures, geeze what a slacker! I will do better from now on.
2 points
-
Wow - looks like you all had a great time!!! Thanks so much for the pictures. We look forward to making it next year, the good Lord willing and the creek don't rise!2 points
-
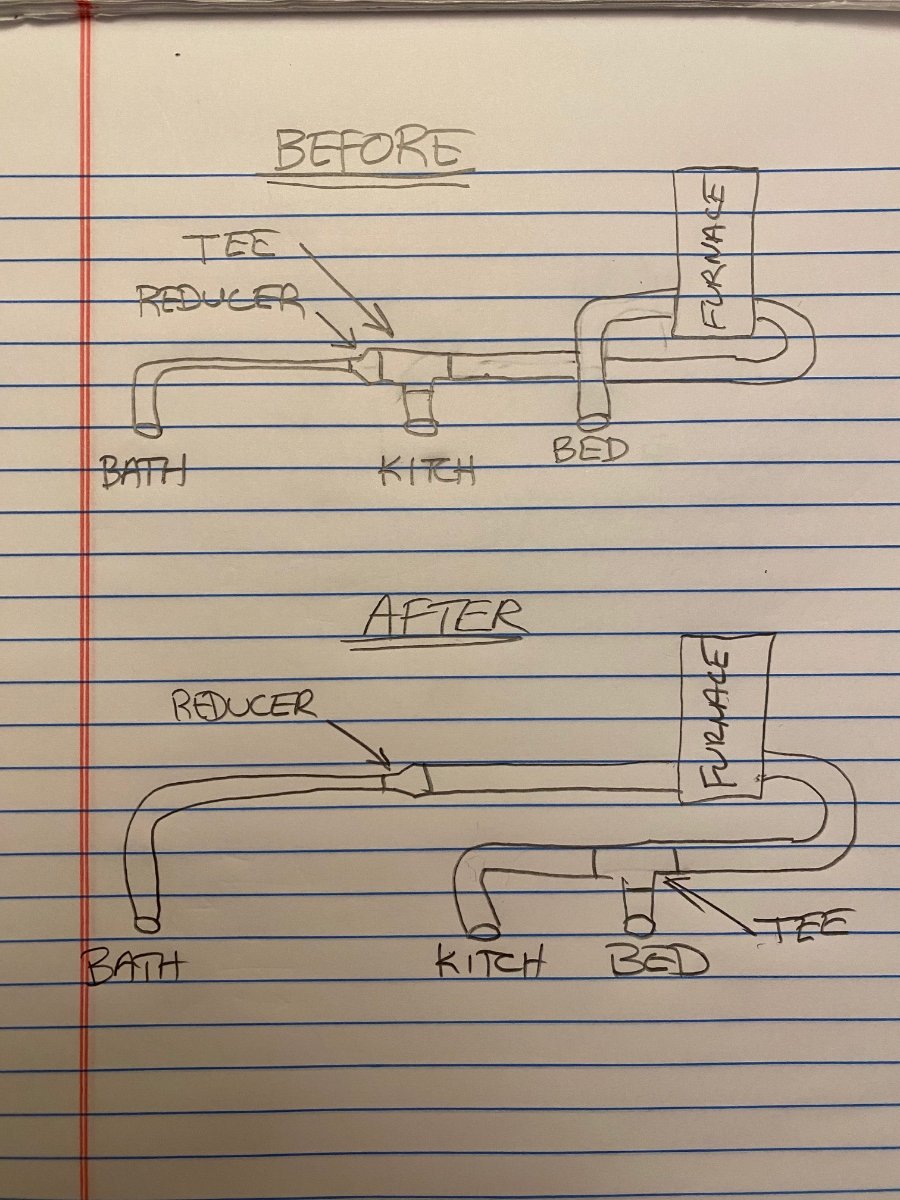
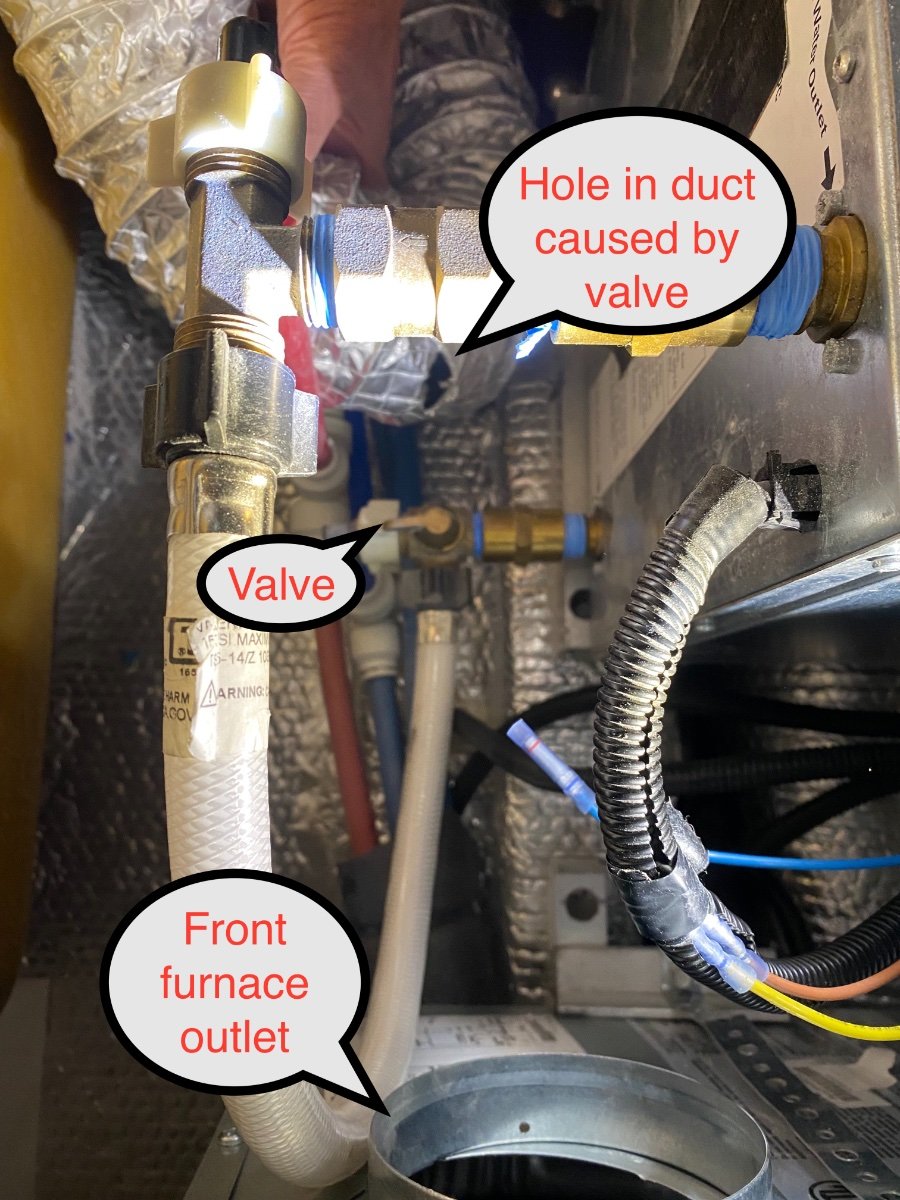
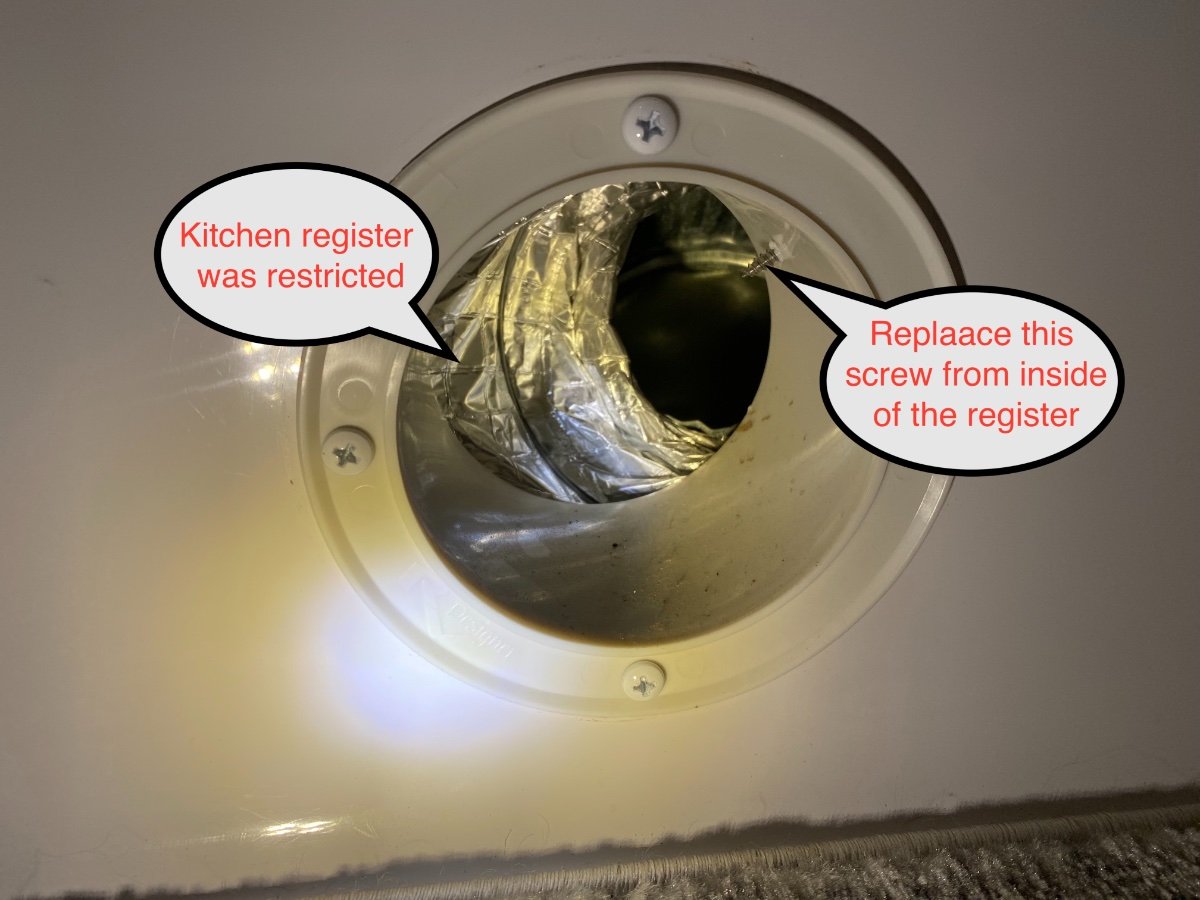
Like others, we’ve been disappointed with the lack heating in the bathroom. In our Oliver, even the kitchen had minimal air flow and hot air was blasting under the bed. When I took a closer look at the duct routing from the furnace, the problems became obvious. There were two 4” ducts coming out of the furnace, one from the front outlet facing towards the registers, and the other from the rear outlet facing away from the registers. The front outlet was connected to the bedroom register with one 900 bend. It had the shortest run with the least turns, and twice as much air flow as the other two combined. The rear furnace outlet was connected to the kitchen register after making a 1800 u-turn. From there it was Tee’d and reduced to 3” to feed the bathroom. The 3” duct then takes a long and torturous path to reach the bathroom. The resistance from over 2800 of turns, and the longer run, resulted in much lower air flow to both the kitchen and the bathroom. I also found a hole from where the duct had been rubbing on the hot water valve, and the kitchen had a restrictively tight bend at the register. Fortunately this was a relatively easy fix, and the results were significant. Our 2022 Elite II has the Dometic furnace, but I suspect that other furnace brands could have similar ducting issues and it might be worth taking a look. The sketch shows how the duct routing was modified for better balance to all three registers. The bedroom and kitchen registers now feed from the high resistance u-turn at the rear furnace outlet. The bathroom has its own feed from the front outlet giving it the minimal number of turns possible. This modification involved moving the Tee which is under the kitchen cabinet. There is an access port under the forward kitchen drawers to reach the Tee and kitchen register, and it’s best to pull them right out of the access port to work on them. The 3” bathroom reducer stays in place and it gets a new duct directly to the front furnace outlet. The bedroom/kitchen gets connected to the rear furnace outlet. Rather than using flexible duct to make the 1800 u-turn, I used two 900 rigid fittings for less flow resistance. All of the parts needed for this modification are readily available at hardware stores. They usually sell duct by the foot, I bought 5’. Use sheet metal screws and foil duct tape for the connections to make sure they don't come apart. The kitchen register can be screwed together from the inside of the register rather than trying to do it from under the cabinet. I used an anemometer before and after the modification to measure flow, and a on-line calculator was used to get Cubic Feet per Minute (CFM): Before After Bedroom - 4” 100.7 53.2 Kitchen - 4" 39.3 65 Bathroom - 3" 11.8 30.2 Total 151.8 148.5 Cheers, Geoff
1 point
-
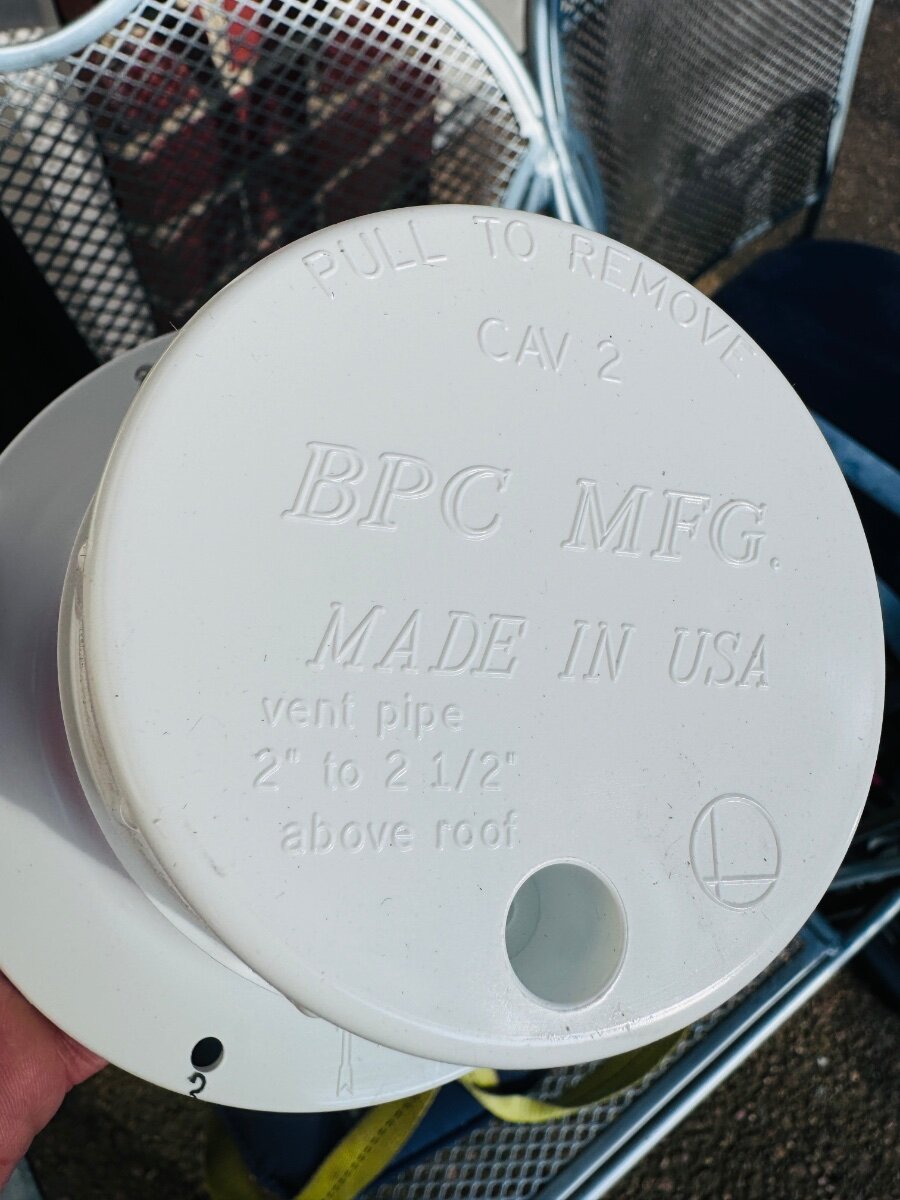
The hardest part of this job was finding the correct part so that you do not have to drill new holes. Make sure to get one that is 5 1/2 in wide NOT 5 1/4 which most are. The one I found is from eTrailer and it is made in the USA even better. After butyl tape cures for a few days, I will put down some marine caulk. https://www.etrailer.com/RV_Vents_and_Fans/LaSalle_Bristol/34474558.html Best, Mike
1 point
-
I drug our Ollie out of the RV barn for some much needed cleaning, and noticed that the Furrion shore power connection was pulled away from the doghouse, and had one missing screw, with another about to fall out. The gel coat around the upper two screw holes had several cracks. As we have never used that connection, I can only assume something happened before we purchased. I was disappointed ☹️ to discover that wood screws were used in the thin fiberglass of the lower doghouse, without any backing. I will replace all four screws with similar size stainless machine screws, washers, and nylock nuts. I’m pretty sure I have some in my boat fastener bin. It might be worthwhile to take a quick look at your connector if you have that option.1 point
-
On the I-81 side, Jim Thorpe, PA is nice. We were there recently and posted some info/photos on our blog. Also, maybe run part of the Blue Ridge Parkway/Skyline Drive? Along the east coast there's Ocean City, MD and Assateague Island. Gets you off I-95, which is not a fun road.1 point
-
Looking for standard cushions for the bed/dinette for an LE1. Ive got the KTT, but prefer the dinette cushion layout. Custom cushions made locally will cost $2,500. Maybe someone in out there in Oliver Land, who replaced the standard seat cushions for a mattress, might have a set? Thanks - DD1 point
-
The VHB metal discs are permanently applied, but the magnetic rubberized feet on the mount make it removable for land mount or cleaning/waxing.
1 point
-
Never been a fan of FB, and after years Chris closed her account.1 point
-
I haven't used it on an Oliver but from my fiberglass boating life, I liked MarineTex, Epoxy.1 point
-
Thanks for the great suggestions. I had ordered a complete set of bolts and bushings last summer for this project, so parts weren't going to be an issue as long as I didn't need to do both the curbside and the street side. I successfully installed the first bolt today. It was probably the worst to do. I had to support the axle with a screw jack, lift the spring with a small hydraulic jack, and for my final alignment, pull the axle forward a bit with a strap to allow for the final alignment for the new bolt. I had installed the new bronze/brass bushing in advance before attempting this today. I still need to do one of the bolts on the EZ-Flex on the rear axle same side and based on Steve's response, it looks like I may need to remove both bolts, shackles and nuts and replace all at the same time to insure the spline seats into the new shacI know from reviewing on the forum that I need to torque the nut to 40 ft lbs while holding the wet bolt end to insure the spline stays put although on the front mount,1 point
-
Very nice! Is the mount 3M VHB permanently mounted to the roof and the dish is removable?1 point
-
Found this Dexter EZ Flex installation instructions: https://www.dexteraxle.com/user_area/content_media/raw/059-A45-00E-ZFlexInstructionSheet.pdf1 point
-
It was so good to see everyone. I think we had 10 couples bring chairs join us sitting around our campfire the second night 🔥. What a great time! IMG_1049.mov1 point
-
Thanks Patriot. Believe it or not, your update is appreciated. But since you chose to again mention your approach on springs: There is a hand full of owners that believe a heavier duty, more compliant 4-leaf spring is a more appropriate option for the 6,000 pound OE2 fleet use. Out of courtesy to this thread, I'll leave it at that. If you will. GJ1 point
-
AKA @shhQuiet here on the forum. We thoroughly enjoyed our time with Steve, and when he walked over to Curiosity, Deb made a beeline to Oreo! 😁1 point
-
Thanks for sharing, Bill - awesome vid! Cheers!1 point
-
I saw this on YouTube, and while I don’t officially recommend it, the spout fix looks “interesting”. Let your conscience be your guide. 🤫1 point
-
I have those spouts, too. I don’t really like them, but they do work. My McGyver effort will be on Rotopax spouts.1 point
-
Neat video! And a really fun time.1 point
-
Yes and only slightly better looking than the Airstream horse trailer AKA the Basecamp. 🤪1 point
-
Used through bolts, lock nuts, and backing plate when installing the Furrion 10A solar port. Later modified the 10A Furrion Port to install a 20A Zamp port in the existing Furrion port, working great, too.1 point
-
If you get a dometic 311- suggest the one with the upgraded slow close seat/lid. It's a residential lid made of heavy material. The default from dometic is a plastic lid/seat with no slow close and it is rather flimsy.1 point
-
Really?1 point
-
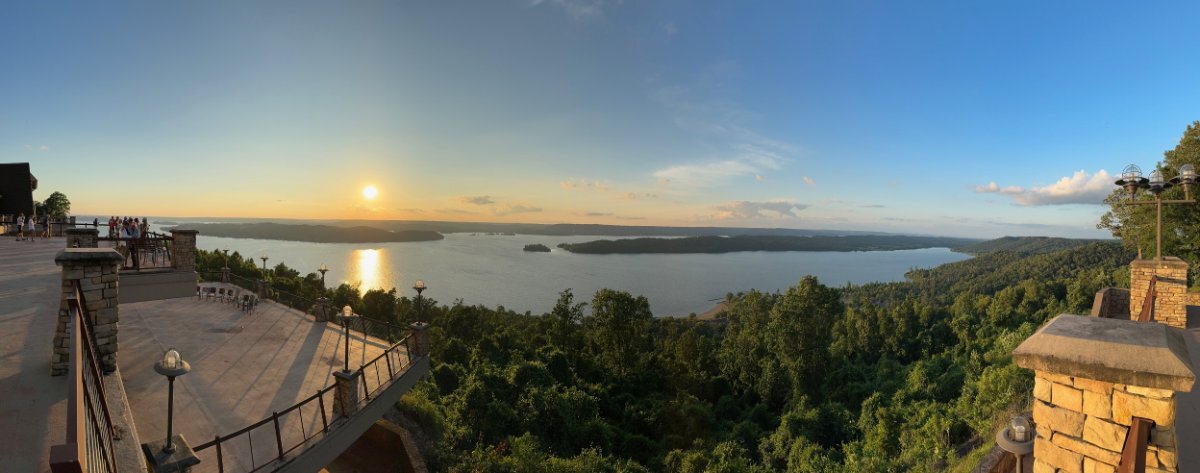
I fully expected to comply! Last year I only took a handful and told myself to do better this year. I had four cameras with me (including my phone), but other that the above sunset photos and a few at Cathedral Caverns, I didn’t take a single photograph. Oh, except of @mossemi’s plumbing, but nobody wants to se that! 😜 Maybe next year…1 point
-
Looks like there are several vibration dampers on that unit. Truma Aventa Compressor Vibration Dampers Kit1 point
-
Like @jd1923 said, the truck model does not matter, and if you have a F150 it probably has a 2" hitch receiver. ***Important, do you know what size the bulldog coupler is on the EII that you're purchasing, probably 2", but it's also available with a 2 5/16" bulldog coupler (we have it)? You want to know that spec because the AWDH is also available with a 2" or 2 5/16" ball. BTW, we got our 2023 LEII with the 2 5/16 bulldog coupler and 2 5/16" AWDH with 2" receiver. We recently upgraded to a Chevvy 2500 with 2.5" receiver so I prchased a 2.5" stinger/shaft from Anderson for the AWDH. Yes, I know I don't need a WDH with the 2500 but I'm thinking I have it so why not use it!1 point
-
I have no idea of how the Truma is constructed, but I've seen the same happen on other brands when the rubber isolation mounts between the compressor and the base of the unit go bad or are missing. When that happens all the compressor vibration travels straight through to the camper. Edit: Also, I've seen where the compressor jumps up off the mounts after hitting a large pothole or rough stretch of road. Definitely not the blower motor if the sound only comes and goes with the compressor engaging.1 point


.thumb.jpg.e34bf01ef7f7d5e99ad31856d45afbeb.jpg)
-
Recent Achievements
-
")


")


")


