Leaderboard


Popular Content
Showing content with the highest reputation on 07/31/2024 in all areas
-
Our sink and shower would back up, or at best drain very slow, and would not completely empty when dumping gray water. We knew the previous owner had some roof repair that included a new vent cap. So, we took the cap off expecting to find a bird or wasp nest or something blocking and causing an air lock. We used a shop vac and was surprised when we removed a half gallon of water. Problem solved. Between the time the cap and been damaged and replaced, the uncovered vent must have experienced a rain storm. Hull 803.4 points
-
Before doing too much, suggest verifying all the water valves in the curb side rear bunk area are fully turned in the proper direction. If one is partially shut WEIRD things happen. GJ4 points
-
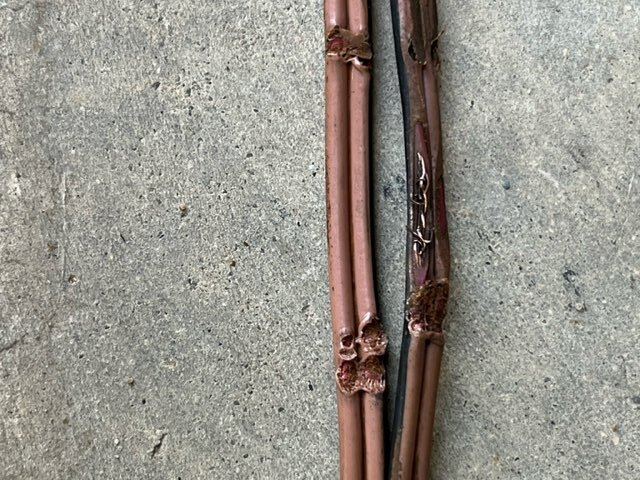
To All, Mine were abraded somewhere within the axle tube in the middle between the hubs. There was about 12' of wire stuffed in the axle between the hubs. Mike T. & I were in discussion, as we both had this issue at overlapping times. I believe I was just further in the process when we discussed. I will include pics (of both dbl. insulated wires) of where abrading exposed to the bare copper within the two insulations. I did not remember to label front & rear. It was explained to me that the during the forming of the axle tubes (and this may vary depending upon manufacturer) the inside of some may get a robotic welding, as well as the outside. the outside of course is smoothed off and painted. The inside, depending on the process may get a smoothing, however most of them are left with weld spatter inside so the axle tube on the inside resembles a concave wood rasp... just what we do NOT want to house our brake wires. Mine actually look like they were somehow pinched, or maybe during the shorting out process heated up enough to melt(?) the insulation near the abrasions. So I went straight to a previously read article by Prof. JED, Emeritus, which dealt with replacing the brake wiring. I ran my newly purchased (NAPA Shielded Brake Cable) wires outside the Axle Tubes, putting them thru a loom at about 9 o'clock (to the rear) to protect from rocks or other strikes. Using butt-splice connectors from the Shielded Brake Cable wires to the leads going into the brakes, then buttered the connectors up with adhesive-sealant to further protect connectors from moisture. I have some ZIP TIES (I've been told, like the ones 'LE' uses on your wrists...) which are 1/2" wide and abt 1/8" thick, and used those secure the loom to the axles. At least that was my approach at the time, as I wanted to get back to camping. The Brakes have worked as they should. B~Out
 4 points
 -
Thank Gawd, this procedure was explained. I envisioned struggling holding the fridge on my shoulder, whilst walking up-down the runway, patting it on its back. B~Out4 points
-
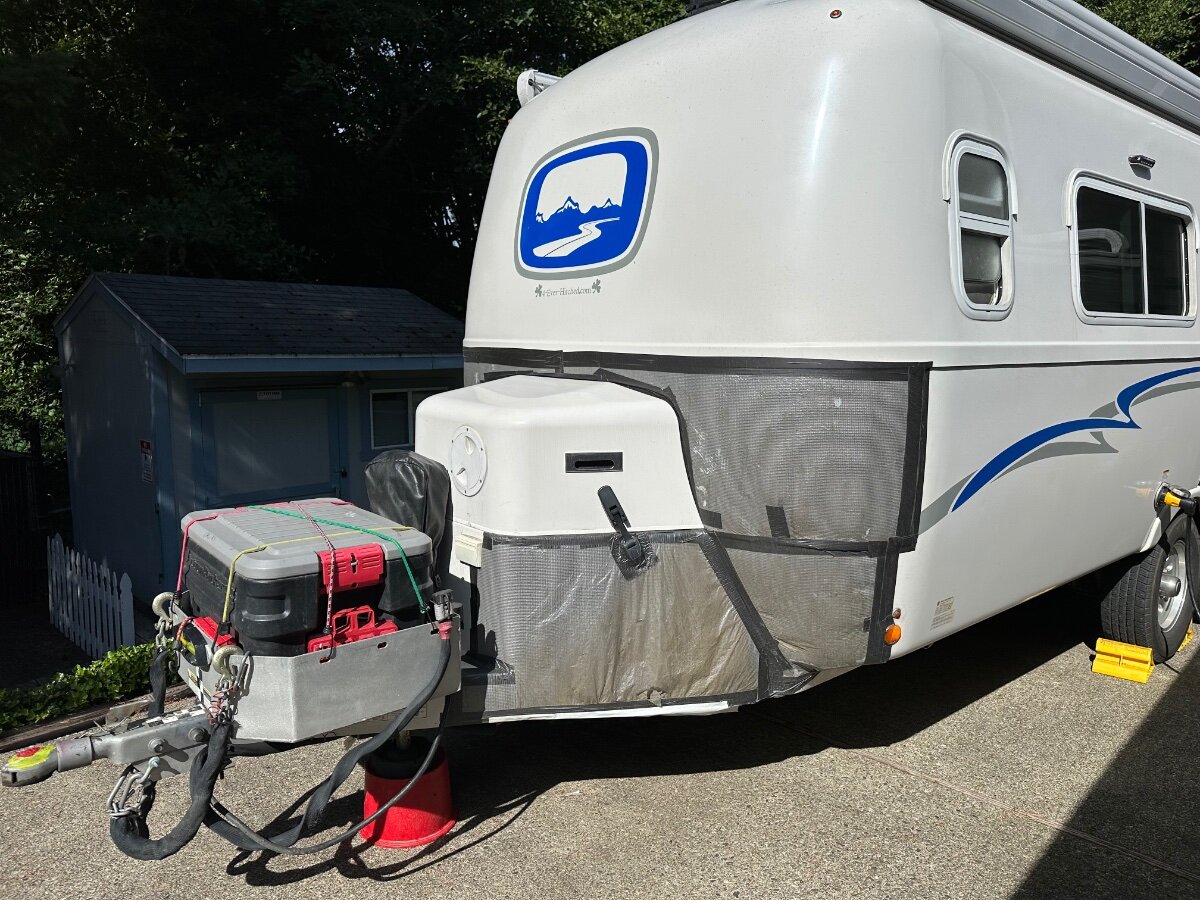
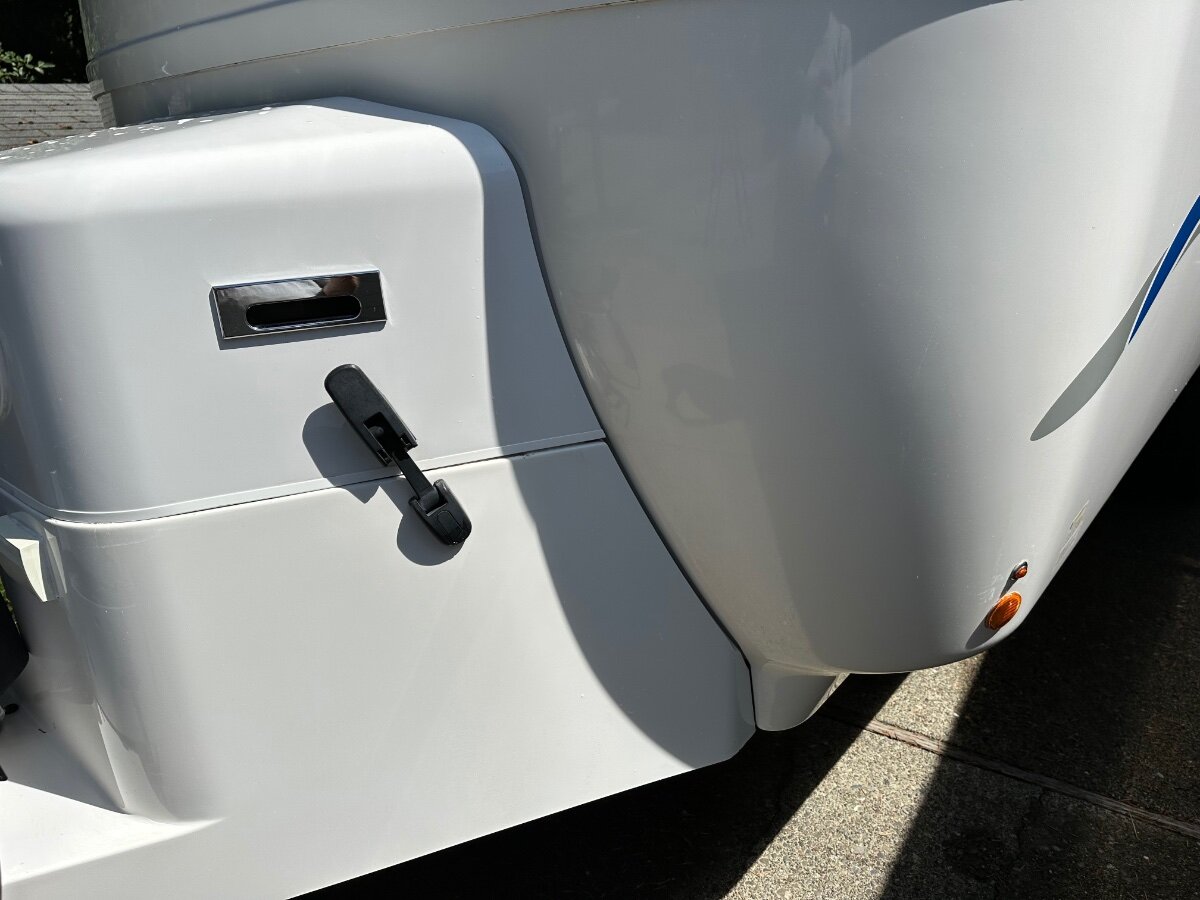
Skipster, Please go to your account settings and then click on Signature. Then enter info on your trailer and tow vehicle, as Craig (Galway Girl) has done. This really helps those who read your posts understand a bit more about the Trailer or Tow vehicle, and they can give more direct answer or suggestion. As Craig mentioned, Pictures (see his post) can help people see what you are seeing. I just finished reading Craig's post on his Battery Box issue and thought of your issue i had read earlier. Craig is correct, similar but not the same. Nice fish on your account page, where was that caught? additional comment I am having the same issue with the basement door latch raising, but the door stays closed, while under tow. The door may be a bit sprung, as it is always dropping to the tether when opened. But i am not seeing any issue with the rivets at the bottom. This started on the way to/from ND to AK. However not enough for the door to open, so i just started locking it. i need to figure out what the issue is and repair it before our next outing. Bryan4 points
-
so bottom line I bought a blackstone griddle with side burner and a fitting from amazon and all problems solved .4 points
-
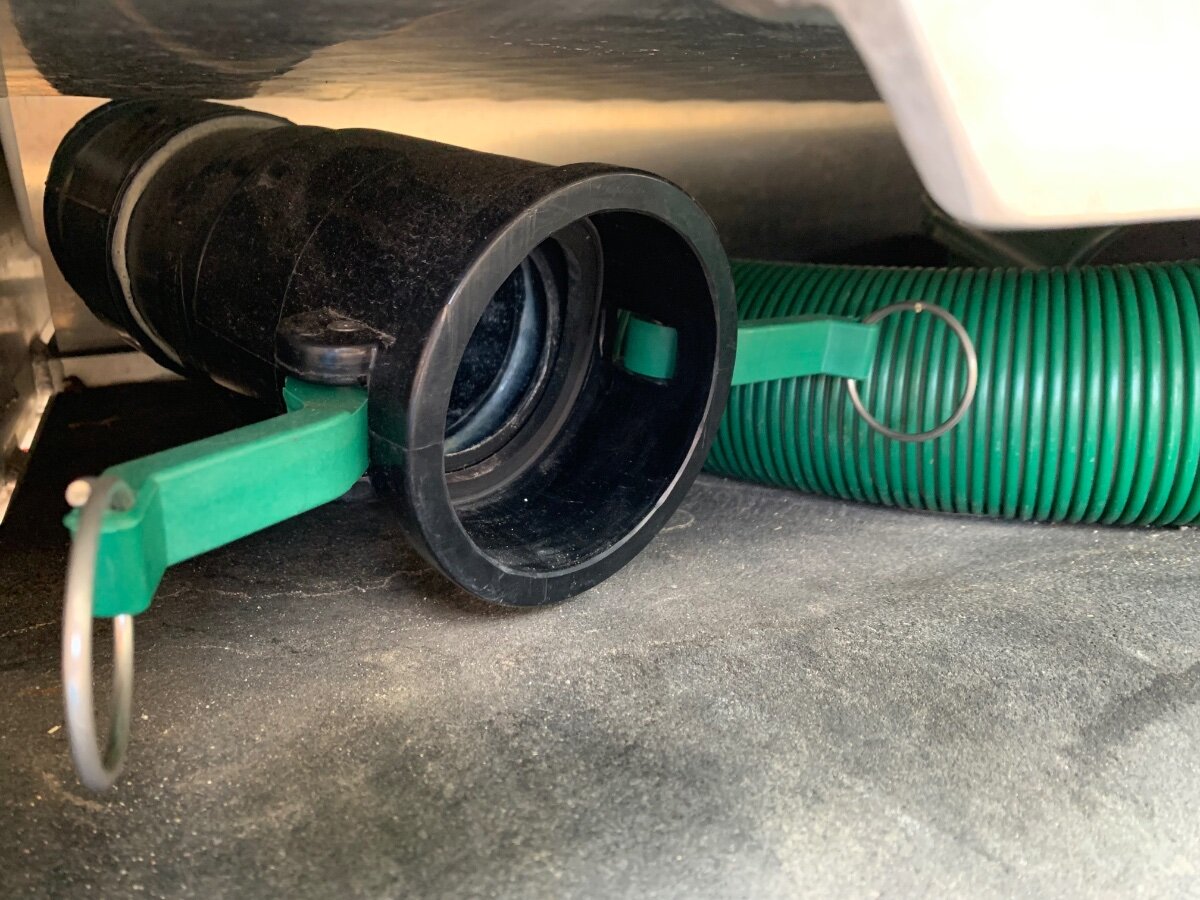
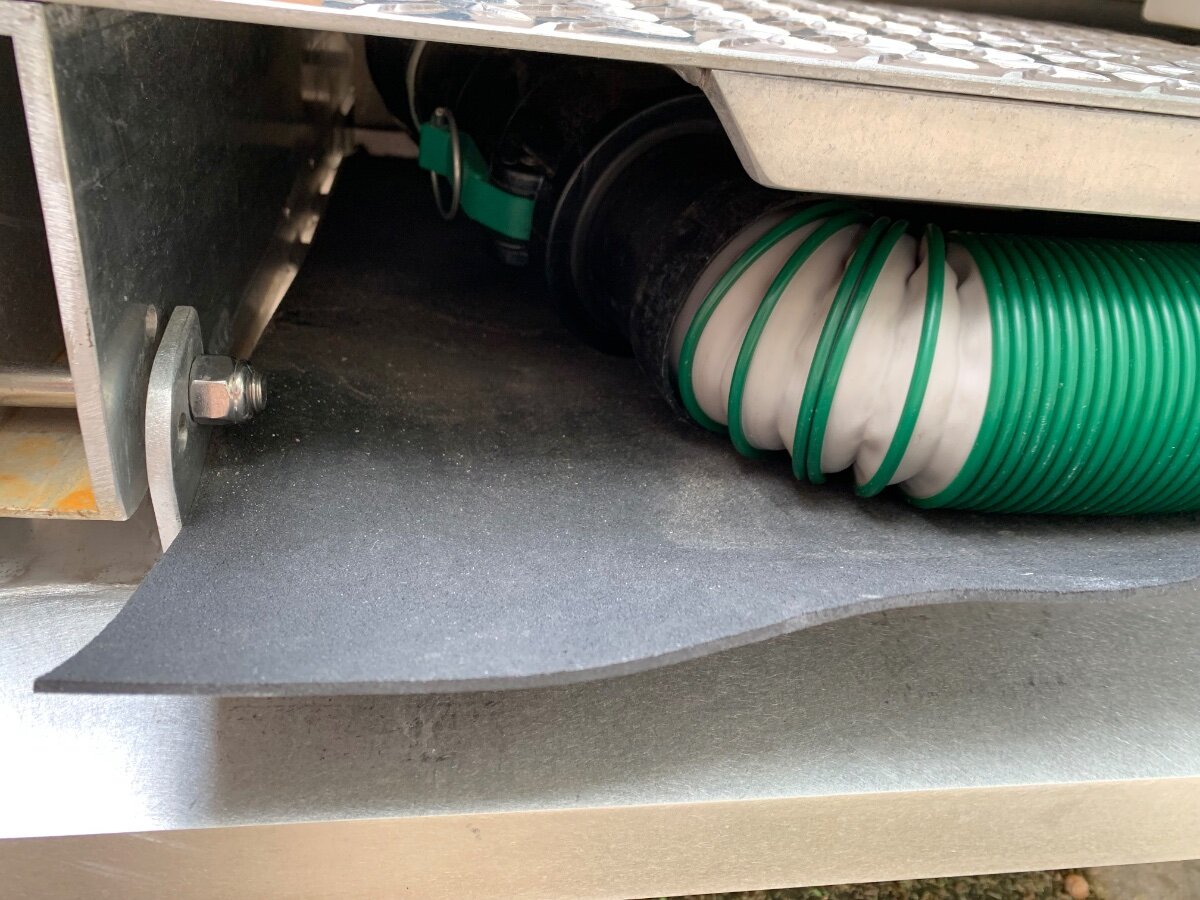
We decided to replace our sewer hose with a Lippert Cam Lock version. They are expensive but have a nice design that includes a smooth interior and that improves flow. I used the honey pot option so I wouldn’t have to modify the interlocking connection on the Oliver. I purchased the primary hose, a coupler, and the honey pot cable for the same functionality. I also received an adapter that can be used to permanently modify the Oliver, but don’t anticipate ever using it. I did purchase the hose adapter to convert the honey pot hose to allow a garden hose connection as we only dump grey water and want to be able to dump to a container for longer stays where we don’t have sewer hookups at the campsite. I have attached a video. IMG_0349.mov3 points
-
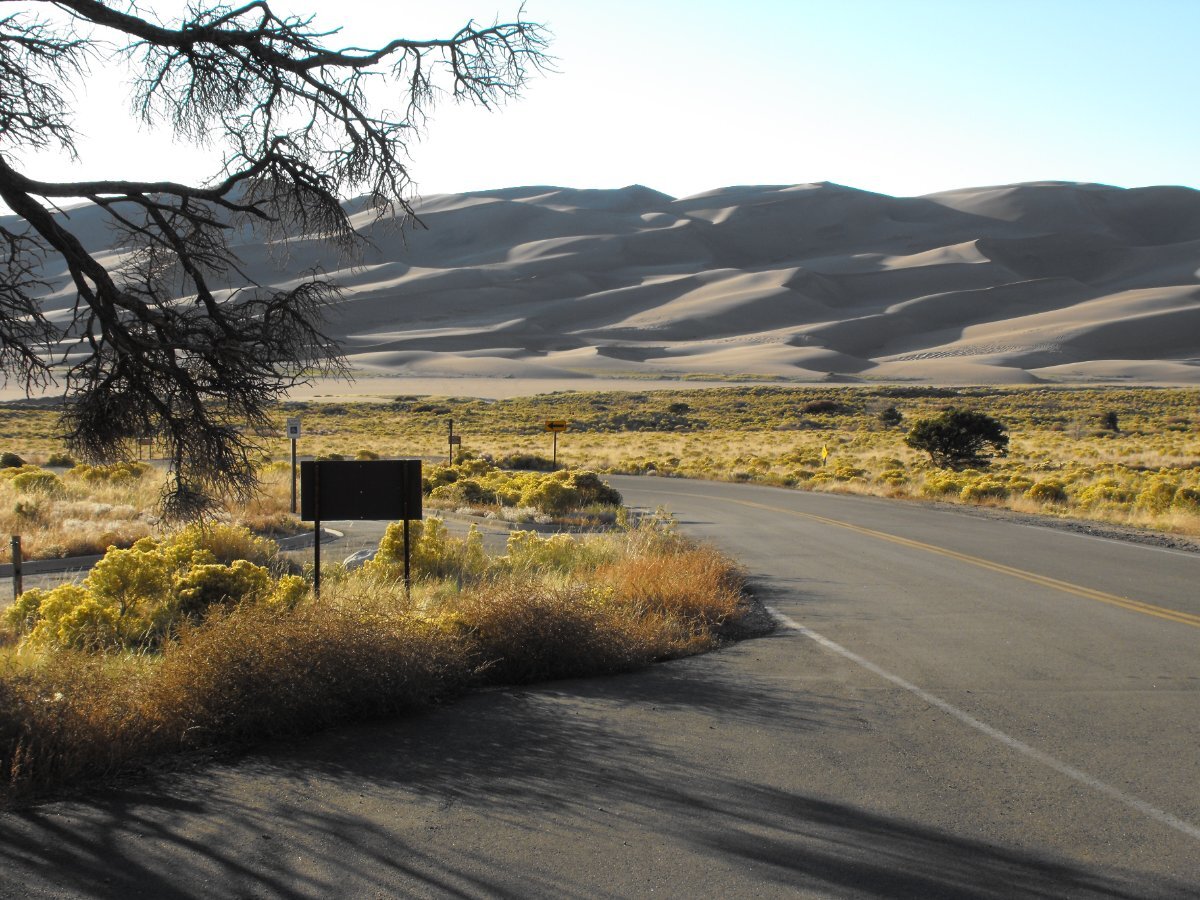
Our site at Piñon Flats fit our trailer fine. There was a 25’ Airstream two sites away.
3 points
-
That rules out the tv DVD player. I would verify the tv wiring first as it’s easier to get to. Next compare the tv wiring to the stereo wiring, which should be accessible through a port hole in the upper street side cabinet. I’m not familiar with your equipment, but the video signal is probably a HDMI cable. Mossey3 points
-
My domestic fridge just stopped cooling, no signs of leakage. Everything testing good on the troubleshooting guides. The opinion of the local RV guy was that I had a failed cooling unit. That left me with two options: buy a new unit or replace the cooling unit. After talking to Jason at Oliver and him telling me that to remove the fridge from the trailer you need to remove the door, I thought I would try to replace the cooling unit myself. I found some places that would ship a unit for $500 to $1000 and I do the install. I watched many videos and researched the work. In this research I found several people talking about burping this kind of unit, it entails flipping the unit on its side, top and allowing the ammonia mixture to reposition and displace any air pockets. Since I had to remove the fridge from its housing I thought I would try it...and it worked! We just took a 10 day trip and it worked fine. Some RV techs said it was a wive's tale. Glad I tried it. Hope this might help somebody.3 points
-
The antenna should not have anything to do with the DVD player. It is a little difficult to diagnose without knowing more about your tv and stereo equipment. I will add that my LE2 #193 has 2 DVD players, one in the tv and another in the stereo and we can use either to watch a DVD on the tv. Mossey3 points
-
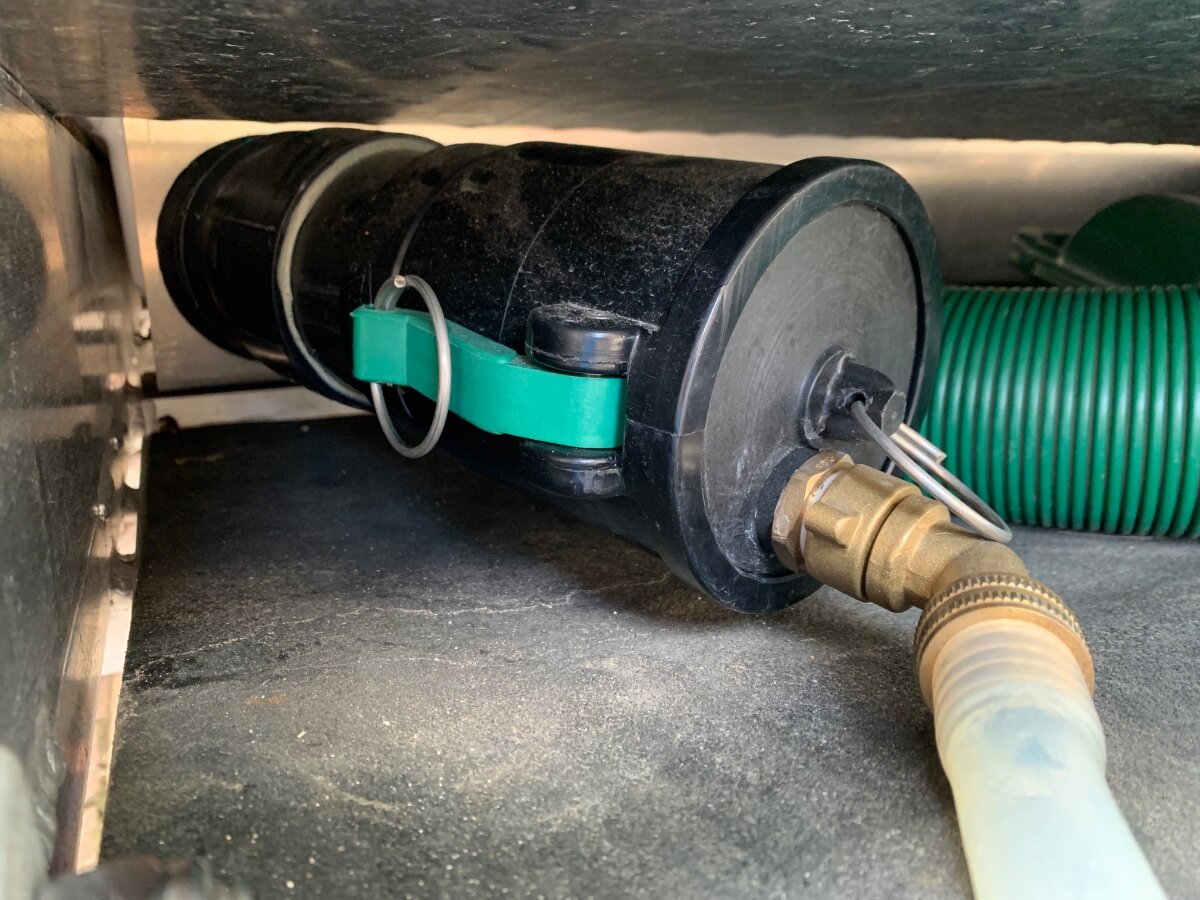
A look at my permanently installed black tank connection; requires cutting off the bayonet coupler and gluing on the cam lock fitting. View of waste hose connected; allows for rear bumper to be closed. However, I usually keep an end cap fitted with a hose for gray water management; the hose has a valve at its’ terminus. Another benefit, the clear silicone hose serves as a sight glass in the event of a black tank valve leak.
3 points
-
@Mike and Carol Your pics look remotely familiar. These were shot in 2008...
2 points
-
A shot from the Dunes showing the Airstream.
2 points
-
Update: My original spare tire was shorter, 215/60R/16 on hull #75. Other 2015 & 2016 LE2's reported so far have 215/70R/16 (taller) spare tires. I had to move the spare tire mount up 7/16" for the new (taller) 225/75R/15E spare tire (standard on new LE2's) to fit correctly in my original spare tire fiberglass housing. It's possible that folks with the taller original spare tire might not have move the spare tire mount up, but I recommend trying a 225/75R/15 first before buying one. Oliver should have them at the plant, I'm in North Carolina and happy to use my spare tire to see if it will fit on your trailer without modifications if you're in the Charlotte NC area. Made four plugs from a piece of hard plastic board (kitchen cutting board) to fill the empty 7/16" slots above the mounting bolts to keep spare tire wheel mount from moving downward in transit. Used a hacksaw to cut the plugs out and a belt sander to shape the plugs and sand to same thickness as the aluminum mount plate. Also have a piece of UHMW plastic board I could have used, but the cutting board was closer to the correct thickness and should be fine. 🙂2 points
-
Good advice posted above! We had an older Furrion unit (Hull #75) when the Furrion's DVD player starter acting up. Ours was out of warranty. Eventually found an RV surplus dealer on Ebay that had an exact replacement new unit on the shelf.2 points
-
I don't know if you ordered directly from Dexter that it would be considered a custom order. They may or may not be cheaper directly from a Dexter distributor. You won’t get a straight answer from anyone until you have your as built information. Mossey2 points
-
Thank you!2 points
-
Skipster, One issue I have with the Battery Tray is one side catches easily when pushing it in, the other side does not and i have to make an additional effort for it to latch properly. if you have this issue, could that have sprung your Battery Door at the hinge. Your post makes me want to examine my Batt Door hinge, when the offending side does not catch. And Craig's post makes me want to check my rivets on the door sides and monitor going forward. B~Out2 points
-
That would be very convenient if Oliver will order your axles! Please post your axle build sheet when you get it! I can update the list, if needed.2 points
-
@rideadeuce - A tip...Last year when we went to Alaska we bought some yoga mats and used some 3M no residue tape to attach them to the lower front of our trailer. They worked like a champ at keeping gravel from the Yukon highways from chipping the body of the trailer. We also used a roll of clear rug protection plastic from Home Depot on top of the Yoga Mats to keep them from absorbing moisture. Below: First week of the trip and the yoga mat's are doing well...tne extra coat of vinyl floor protection film is holding water at bay. F Below: After a full 9 weeks on the road the yoga mat's took the beating, but our trailer was protected. Below - After yoga mat removal and quick wash...
2 points
-
Just brought her home, new to us 2017 Elite II. Hull 207. We are so excited to be here and to be the proud new owners of this beauty! We have a Casita independence which we will be selling. We live in NH. We both retired in the past few years and want to explore our amazing United States while we are still in our go go years. We are looking forward to learning about the Ollie and enjoying adventures on the road.1 point
-
This is most likely cause. Is HDMI connected to the TV? Next step, can the Furrion play a CD, sound coming from the 4 speakers. If so, the player is likely fine and the HDMI signal not getting to TV.1 point
-
Here's my 2 cents... I just replaced all shocks with the Monroe 555001s. I did so as a first step in trying to figure out the cause of sudden scalloping of both fronts tires. One of the tires was severe enough to warrant exchange with our new spare. As per Scuba Rx, one of the Monroe cushions indeed needed to be compressed to get 1 of the shocks to fit. I'm happy with ease of installation and time will tell if the shocks were the cause. Tires were removed to facilitate installation. Hull 996, picked up new in Jan 2022 and now with over 41,000 miles, has had its share of highway hard knocks, most of which surprisingly occurred on very infrequent use of interstates. The included photos show one of the shock "stems" bent and both front shock shafts were indeed sheared. The other 2 rear shocks were intact, though badly worn. Since both front shock shafts were sheared and only the front tires showed unusual wear I suppose they were the cause. The 2nd picture shows the shaft was stuck in and I pulled it out with pliers. John
1 point
-
@R-Villa We had to replace our Furrion dvd/radio a few years ago under warranty. It just quit working. Several other owners have had similar issues with their Furrion dvd/radios. I called Oliver and they sent a new unit as I was still under warranty. Oliver sent a paid return label for the non working dvd/radio which I shipped back. Have you removed the dvd/radio from the wall to check that all wiring is attached to the back of the radio?. Also try disconnecting the radio from its power source to attempt a hard “reset” it. Sometimes this works.1 point
-
In April 2024 (this year) I had the factory review the repair. Jason said it all looked stable and they didn't see any further signs of fatigue or cracks. I'm keeping my fingers cross and carrying a rivet gun and stainless rivets in the truck just in case. Craig1 point
-
I just developed this same problem in my Dometic (2018 Oliver, Hull 310). Replaced the thermistor, that didn't fix it. I'm going to try this burping technique next, otherwise I'm looking at purchasing a new fridge! Wish me luck!1 point
-
Sorry @mossemi, I was "not getting it". Now @jd1923 has poked me with a fork. Since OTT didn't mention any other options for axle sizes, I assumed it was a done deal and could not get upgraded 5200 axles. There's still a lot I'm taken in with all these great threads of golden nuggets. Thanks again @rideandfly for calling Dexter! I've posted in the other thread about axles and frame size. If someone now says I've pulled my head out of my butt, then I'll inquire again with OTT about the custom order.1 point
-
@jd1923 has shown me the trees beyond the forest. I was not "getting it". Now I think I do. So maybe OTT can special order the size of axles for my trailer and install them getting all the upgrades I want at once. Hmmm. I will get my serial numbers off my axles soonest.1 point
-
Wayfinder, you will need to replace your seals too, so you should had those, qty 4.1 point
-
I meant auto-adjust. John E Davies disliked them and suggested to replace them. I thought that was crazy and some others agreed they were good as-is. Per @mossemi's post above. You went to OTT and they said they could not fit yours, ONLY because they do not at this time stock the 50" axles. Check your other post, end of page 1 where @rideandfly on July 22 had called Dexter and found both axle lengths can be ordered: New axles may not fit all older sub-frames - Page 2 - Mechanical & Technical Tips - Oliver Owner Forums (olivertraveltrailers.com) Am I happy with mine? No, I got them serviced OK. But wish I had not spent $200 on Timken bearings and maintenance and saved that money to buy the 5200 LB axles with 12" brakes. Mine will be OK for a couple years, since we do not drive many miles. But prior to another maintenance and ANY addition of repair parts, I'll just wait and replace the full axle/brake assemblies, also with improved bearings and adjusters, at some later date. And Install Alcan springs at the same time.1 point
-
Ty J, It was my Humor, which gets me in trouble every now and then. I really did understand that the Clips, Clamps and Braces, would come off before use. And we will be installing a tether of some sorts on the frame to bath door/latch, as it popped open again while under tow on our last trip, however nothing was damaged this time. B~OUT1 point
-
A small amount of hot water can pass through the kitchen faucet valve. Those lever-operated combination valves will do that, even a "dribble" when new, more when the internal O-ring seal wears with some age. The real question is why the cold ran so long without the pump kicking in. The cut-in pressure did not work correctly on your water pump allowing the cold side to drain completely. Given this has happened before, you likely need a new water pump. It kicked in later when at zero pressure and likely water leaking in from the pressurized hot side backfilled the cold allowing the pump to prime. Just my hypothesis. Could also be you run more often on City Water and the pump pressure switch got stuck from lack of use. Either way, I would replace your water pump, knowing this is likely to reoccur. I also suggest replacing with an upgraded model over the OEM pump. You can add 5 PSI with no ill effect on the plumbing and go +1 GPM for much improved performance. Water pumps are relatively cheap and an easy swap.1 point
-
When I do these jobs, I do all I can, prep everything, get to the point where I can grab my son, and he helps with the heavy lifting! This is at times a two-person job.1 point
-
What a surprise when D and I were screaming around a left turn in the Jemez Mountains of northern NM and spotted that "oh, so familiar" big red Texico Star prominently fixed on the nose of Mike's and Carol's Oliver at a local service station! D poked me hard in the ribs and shouted over the roar of the engine downshifting to an appropriate gear for what will become a serious "bat-turn", "Look! There's Mike and Carol!" HA! Sure enough, we circled back and pulled into the station to say, "HEY!" After blasting out a, "Hey, MIKE!" -- it was clear from his 2,000 yard stare that Mike had no clue who was addressing him from atop a big Beemer, so, like Mike described above, I introduced myself and the look of recognition appeared on his face and we both laughed! I'm certain that this will likely remain as our most exciting "Oliver Sighting" ever! Small world, for sure! Cheers!1 point
-
Damn, I just tried to help @Ralph Mawyer with his question, and get piled on left and right! Im 5’7” and Deb is 5’1” She weighs less than me. We’re not average. I spent 45 years doing mechanical engineering, so I know numbers, too. Im out…1 point
-
Joe installed a light on our Max fan in the Casita. He added a dimmable feature to it which helped with the brightness. So far we have not found a need for additional lighting in the galley/salon area of the Oliver. He did change out two of the touch lights that were malfunctioning. Joe and Janet Childers/LE 2/2020 #5881 point
-
I suspect that the lighter rated springs oscillate at a higher frequency and travel more than they would with stiffer leaf springs causing the OEM shocks to wear out sooner than expected. Our new Monroe's lasted less than a year before replacing them when we upgraded to the D52s.1 point
-
Mine are fine. We’ve put about 5,000 miles on the ALCANS and all is well! Mike1 point
-
You are correct, sir.1 point
-
BTW, I did get a return authorization on the KISAE and just got refund less shipping yesterday. I have not heard if they tested it to determine the issue. Twice for me it would not recognize shore power, so the A/C would not run and later it ran fine for 2 weeks in bypass mode from shore power before I removed it. The combination of lead-acid batteries, 2KW Xantrex inverter (older model w/o charger) and old Dometic Penguin (according to the EMS draws 15A on shore power), did not add up to a viable solution. I wired the A/C back to the breaker directly. I received 600AH Epoch LiFePO4 batteries, waiting on shipment of a 3KVA Victron MP2 inverter that of course has the built-in ATS (shore or inverter) that will power all Oliver 120VAC needs.1 point
-
Yep, you were editing. I'm on this site too much! I need to get out, work on the Oliver and get some yard work done today. Lunch break is over! Now that you have the highly capable Victron charger, if it were me, I would bypass the Xantrex charger if at all possible. Use its inverter function only. As you wrote, "soon after showed erratic output." This could be caused by the Victron charger sensing amperage supplied by the Xantrex charger.1 point
-
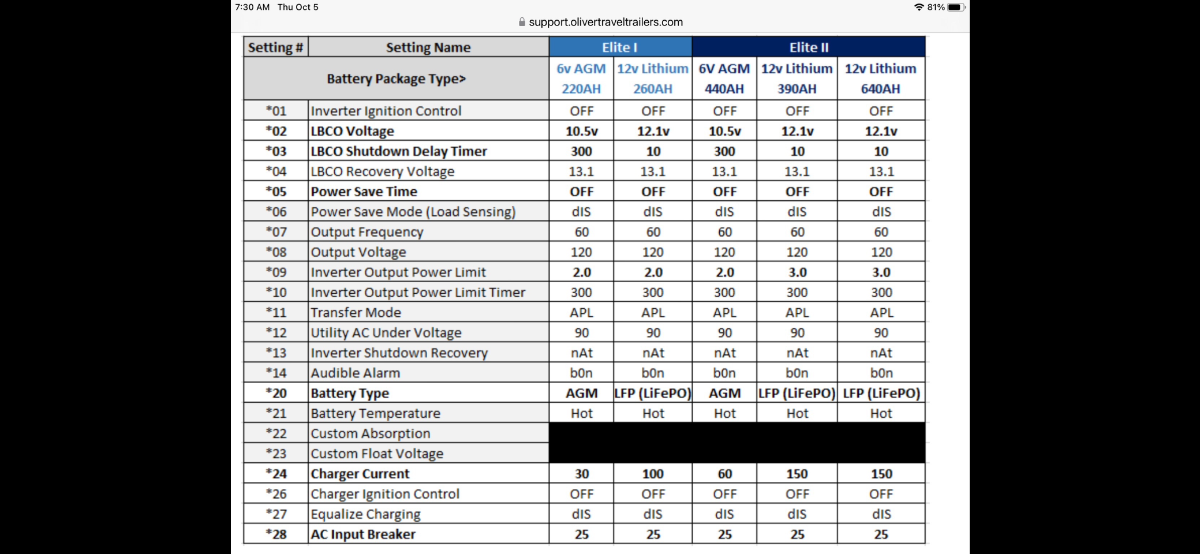
I don’t know how to answer your question other than by example. The attached chart from Oliver shows a ‘Charger Current’ setting of 150A supplied by a Xantrex 3000W (3.0) unit in an Elite ll equipped with either a 390 or 640AH Lithium battery package. For Elite l with a 260AH battery bank and Xantrex 2000W (2.0) unit, 100A. I should note however, that my stated 108A combined charge current (110A minus a couple amps of draw) was not sustained for long and soon after showed erratic output in the 38 to 107 amp range. When checked, the Victron charger was steady, whereas the Xantrex output varied.
1 point
-
On a 2-year-old jack adding grease has nothing to do with this. Don't think it's about maintenance you could have done. Many run these VP-3000 jacks for many years ignoring maintenance. I would check the switch. Given it works to lift the trailer, the mechanics of the jack are working. As it takes much more work on the motor to lift vs. lower. If you are in a fix while traveling, you can pull the switch to find three wires. Connect the center wire to one to lift and the other to lower. Hope this helps!1 point
-
You could hang one of these guys to remind you to "duck."
1 point
-
1 point
-
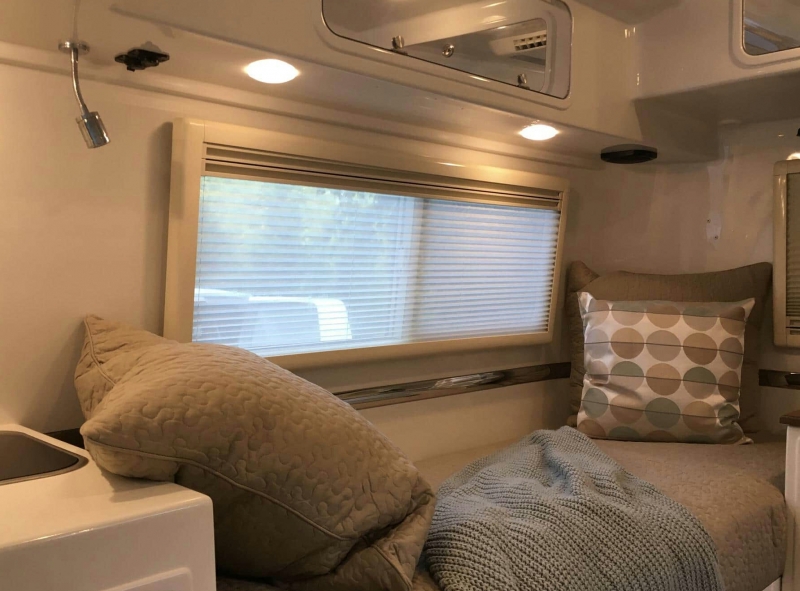
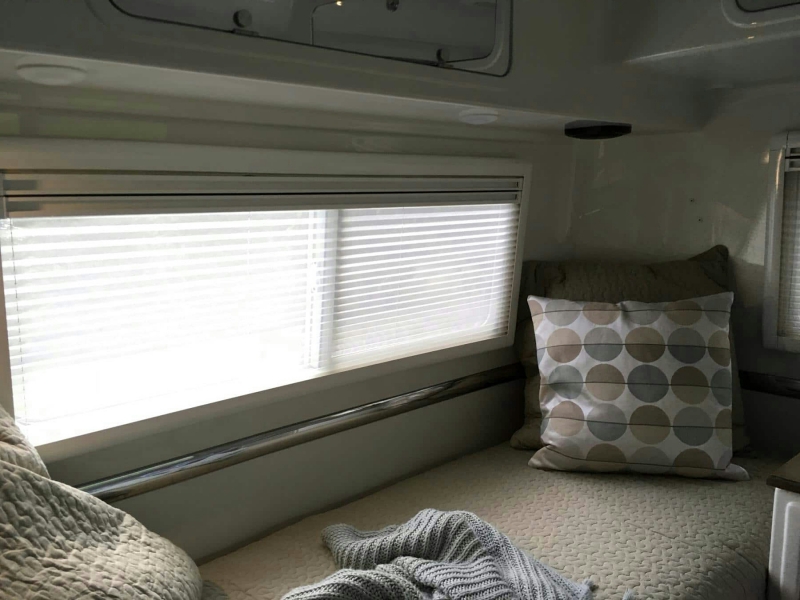
Well I couldn't stand it any longer and painted my window shades bright white. My understanding is that the window shades are not available from the manufacture in white so Although not a quick fix mine are now bright white. The plastic and my Krylon Supermax paint for plastic didn't get along real well with some of the shades even after cleaning them with a degreaser. I then tried some of an old stand by Krylon Fusion, I had a limited supply of it in a flat white so used it as a primer then second coated it with the Supermax I'm not sure why this worked but it did and the results are fantastic. There is a lot longer story on this modification for anyone wanting to do it so I won't bore the masses but would have the full story for those interested. Marc1 point
-
Great idea Marc, I never have liked the color of those shade frames. Why they aren't available in white is just a mystery to me. I hope the paint holds up for you. Looks like you also painted the channel bars which you use to raise and lower the shades? Kind of tricky there but a careful masking job should do it. Was the Krylon Supermax too hot for the plastic or what was the issue there? It looks so much better, I may have to paint mine now. Thanks. Dave1 point
-
Marc's windows flipped
1 point


-
Recent Achievements
-
")


")


")


