Leaderboard


Popular Content
Showing content with the highest reputation on 10/08/2024 in all areas
-
99.999% probability that they are of chinese origin with steel from a ‘59 Buick. So on the bright side they may in fact be made of mostly USA steel. 🤪4 points
-
Pulled mine off last week. Disgusting holder of all things gross. Came off in two pieces while only pulling by hand. Residual adhesive came off easily using plastic razor blades. Whole job took under 30 mins. Good riddance!3 points
-
Mike, given our hull numbers and the fact that I removed our microwave this summer and still have it, I'm your guy. Also, we had the exact same model. If your goal is only to secure the microwave vs. removing it, likely you can leave the bezel as-is. If it needs major surgery, the bezel is held by four (4) screws. See the first picture, all 4 corners are the same. The two screws in the bottom corners are not easy to remove. Pull the countertop first to give more room and not to damage it and you will likely need a right-angle Phillips to access these. I have one that drives off a 1/4" impact that worked well. Honestly, I could not believe this installation. More of a backyard mechanic rig vs. a factory installation. Empty the cabinet above, pull the rubber lining and you should find 3 screws (see three holes in the metal plate, second picture). It's likely these have loosened. If so, remove the loosest screw, keeping the others in place and work to replace one at a time. However, they may all be gone. If you're lucky you could install screws of same length, one size up or finer threads to hold. If they are all disconnected, you will need a long thin punch or a nail to something to realign the holes. My guess is the top mount is the issue and remember to check this before messing with the bezel. I supplied two more pics so you can see the other sides. I don't remember any other screws holding it in place. The sheet metal in the rear just rests against the curved cabinet. Note the wood strip along the bottom-front which is designed to keep the microwave from sliding front to back. This should get you started, and you'll likely get it secured quickly. Best wishes, JD
 3 points
 -
Thank you. Tampa Bay. We are now about as ready as we can get. We will see how it plays out.3 points
-
We’ve been in Main this week at Schhodic Woods Campground in Acadia NP We left this am to head south stopping a Walmart to re-supply. Upon returning to the trailer I noticed that the steps were much closer to the ground. Upon further inspection I found (After 5 years and about 65000 miles ) Hull 505 EII finally broke a leaf spring. it was the curb side rear and sheared just where the first and second leaves meet. Lucky this happened 5 miles from a Maine Trailer location. it looks like the issue was caused by a small crack in the leaf that has the bolt eyes. That small original impurity caused internal rust weakening the metal and over time and bumpy roads it finally snapped right where the next leaf touched the longest spring. I called them at 11:30 and they got us in on a Friday at 12:30 and on the road by 2:30. That’s pure luck! I had a spare pair of springs in the bumper from our Alaska trip, but had them put on 2 new springs that were a perfect match, so I kept the spares and put on the new ones on the rear axle. $314 installed! new springs Maine Trailer 101 Coldbrook Rd, Hampden, ME 04444
2 points
-
Okay, that’s our definitive answer. Anytime someone is evasive in answering a direct question it only means one thing and one thing only. They are not proud of where their product is made and that means china! Okay, TruRide is off my list. I can buy less expensive china made springs most anywhere. The cheap ones I bought with u bolts, nuts, and bronze bushings are for emergency roadside replacement just to get me home. When I can go to Colorado I’ll get the USA made springs and not need the emergency spares. Those will go in the yard sale pile. Less junk to haul around.2 points
-
I am guessing that picture below is the one you are referring to. This link will take you to the website for 'LET'S GO AERO' the company that make the bike rack in the picture. Mossey
2 points
-
Nope - neither Oliver nor the MW Manufacturer has it. My frame was/is cracked like Mikes. Once I got the MW secure inside the cabinet then I drilled two new holes in the face of the frame (midway down on each side), put a long stainless steel screw into the wood behind it and used black decorative caps on the screw heads in order to make it look a bit nicer. Yep - I drilled those two holes as per the instructions from Oliver Service. Not sure why you have three versus my two and I didn't even think to add a third. I don't remember how many pieces of wood I put into the space to secure the MW but I did make sure that the final pieces I put in needed to be "tapped" into place for a tight fit. Bill2 points
-
Sorry I can’t directly help with your issue but my Dometic fridge would not run reliably on propane either. The Oliver folks tried everything and replaced everything, even replacing the fridge with a new one and it still wouldn’t run reliably on propane. I’m sure they thought that I was doing something wrong but many friends saw the issues while boondocking. I finally just replaced it with a compressor fridge. Best decision ever, five years and zero issues. Seems like a lot of mainstream brands are switching over to compressor type fridges now that lithium batteries and solar power are more mainstream as well. And, hope with the help of other Norcold owners you can get to the bottom of this issue.2 points
-
I'm not sure what anyone can do to prevent a storm surge of 10 to 15 feet. I pray that all those (especially you and the family and the Mossemi family) in the area of the storm remain safe. Certainly Milton is one powerful storm!😟 Bill2 points
-
Just did this myself earlier in the summer. Mine was also pretty much dry rotted and ugly. It's a job make no mistake. Have yet to install rain gutters over the windows though, probably should do that soon.2 points
-
That’s what I did four years ago. I don’t regret the decision!2 points
-
Rob, special tools make it easier but not always necessary. Fronts are in general more difficult. Any Mobile Mechanics in your area? They would not have issue with customer parts. Shops speel crap re warranty which is BS. In reality they want profit on parts in addition to their exorbitant shop rates! Another point, shocks have absolutely no bearing on wheel alignment. If your truck drives straight down the highway and tire wear has been even, do not align it. Only get alignments done at alignment shops, not general repair shops as they can certainly make the alignment worse. Good alignment techs work alignments daily an it takes more knowledge than reading numbers on the machine. Any alignment shops in your area? They usually install shocks. Muffler shops too. Also local tire shops but not the National chains i advise, find an alternative so you can cancel that appointment! $200 labor with your parts is reasonable, or 1 1/2 hours at the hourly shop rate. Hopefully, I gave you some ideas to research. Best wishes, JD2 points
-
When is it not windy out here? 😂 So far the wind blew in CO, UT, ID, WY, SD, Just sayin.2 points
-
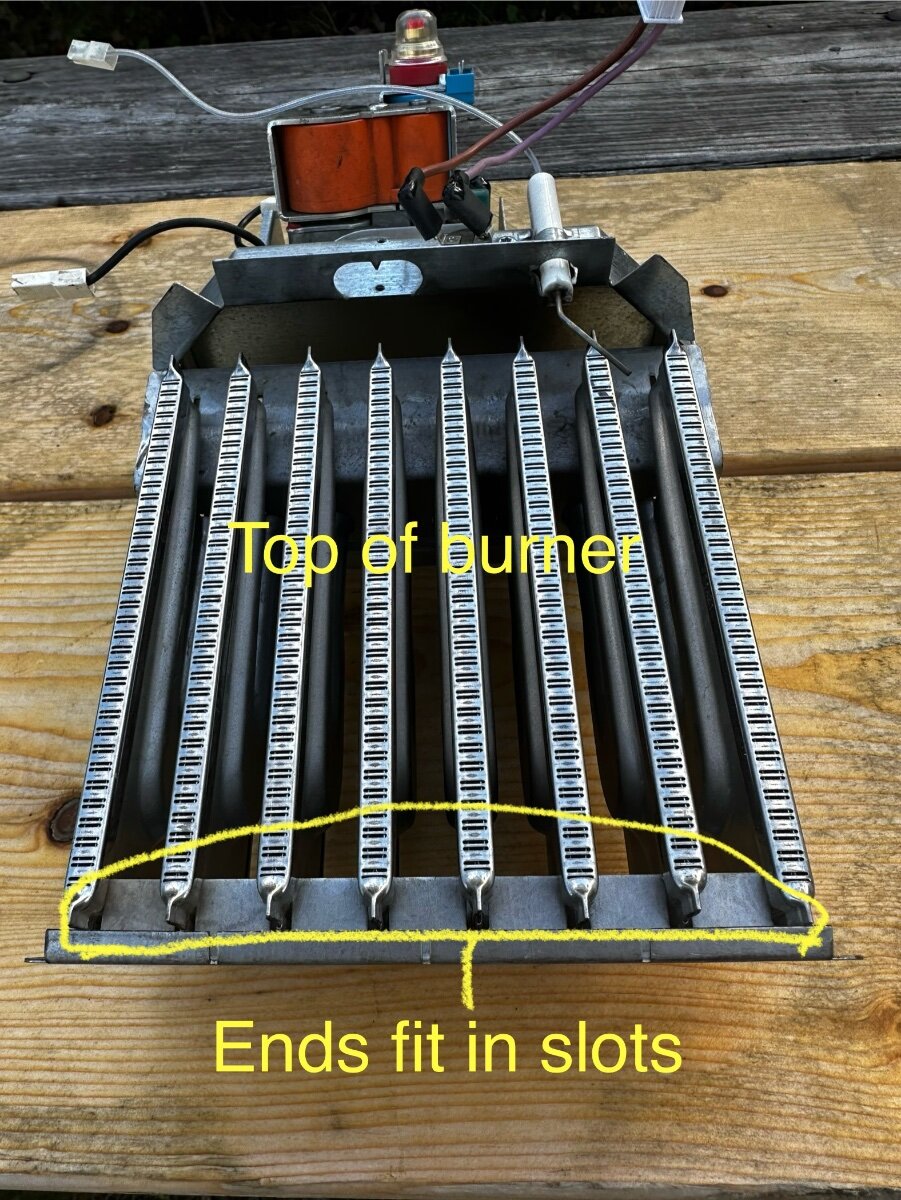
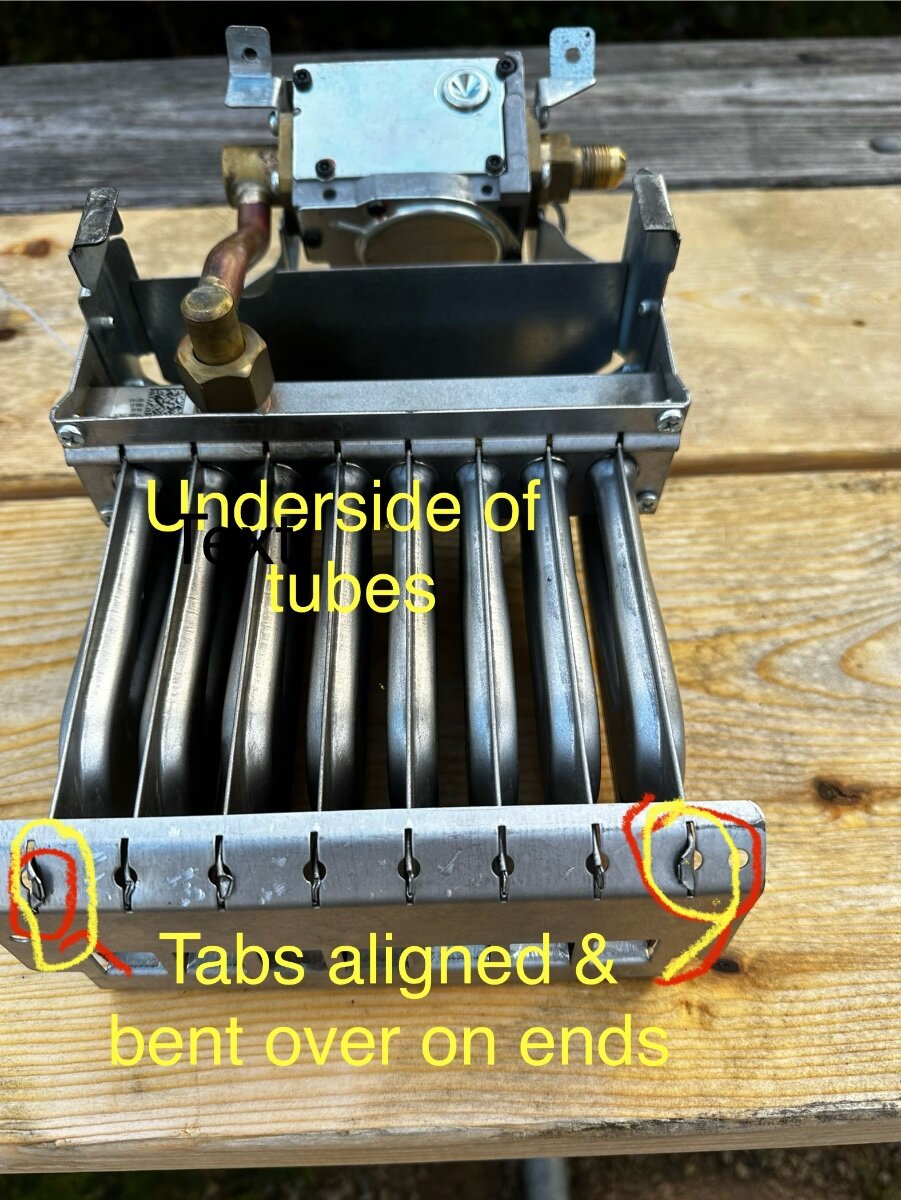
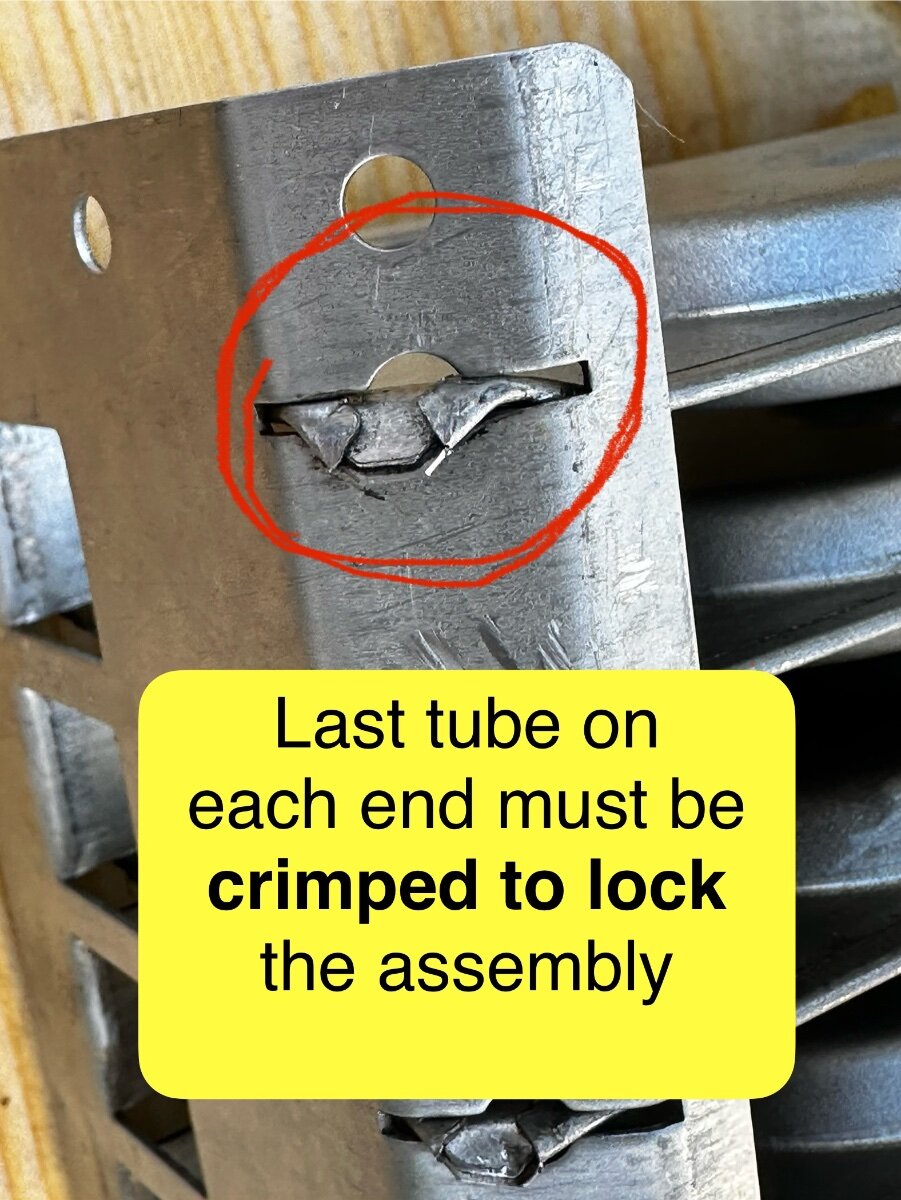
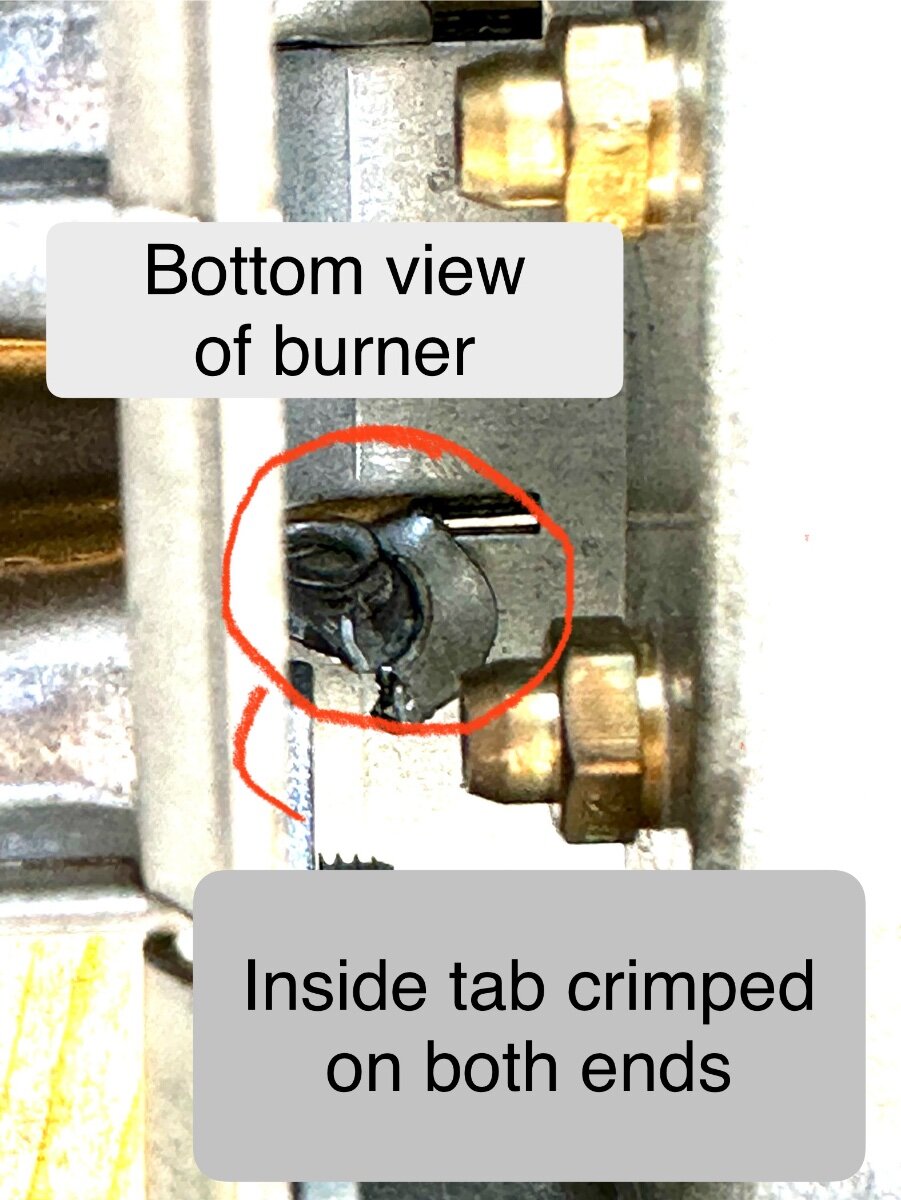
We’ve been on some bumpy roads in Nova Scotia and it caused an issue with our truma water heater. Symptom: Louder than normal water heater ignition. A loud whoosh or pop on ignition. Strong enough to blow out the flame. A smell of gas! Cause: Burner tube assembly had come apart on the end of the tubes by slipping out of the retaining slots (last tube on either end) Fix on the road: Removed the burner and regulator assembly and re-assembled by re-aligning and re-crimping the burner tubes into the frame. Time: 40 minutes Tools: Crescent wrench & pliers for gas feed 2 Different size torx bits for burner screws Steps: Turn off gas & let burners cool down Pull fuse for water heater Take pix of wiring ( for re assembly) Disassemble gas feed using backing wrench Disconnect various wires from plugs & headers ( Includes 2 screws to remove igniter) Remove 2 screws on front of burner/regulator assembly Slide out burner. Reassemble burners in slots and crimp end burners Reinstall in reverse order, checking for gas leaks before reinstalling fuse. Run water heater to test. Enjoy hot water ! The last right and left burner tubes had fallen out of the registration slots. That caused gas to flow from the two orfices directly into the burner chamber. ( A nice big ignition event that blew out the other burners.) I reassembled and crimped them back in place. video describes which tabs need to be crimped. IMG_0872.mov
1 point
-
I have been on this forum for many years as my wife and I researched, learned, and awaited when it made sense for us to join the clan of Oliver ownership. First, I want to thank this group for all you have shared and knowledge over the years. My wife and I were introduced to Oliver a few years back. Like many of you once we saw the quality, community, and how Oliver conducts themselves we had a hardtime accepting anything we saw in other places. We have camped with our kids as they grew up and camped in many different ways including car camping, tent camping, yurt camping, popup camping, teardrop, and renting a few different types of TT. We thought it would be a few more years before we jump into Oliver ownership since we still have one at home for 2 more years. But all the stars aligned this summer and we decided to pull the trigger. We are now the owners of hull #1305 after working with @Snake River Idaho who were great to work with and had a wonderful trailer they had decided to part ways with (such great people to work with and a great reflection on the Oliver community). We just got home from a one-week trip to bring her back home. There is certainly a lot that goes into anyone making this decision. For us, we had heard stories on this forum about health issues making it hard or impossible to do things like this. We have also been personally close to a number of these stories with quite a few of them happening recently. So since we found ourselves in a place financially to do it we decided we were not going to wait any longer even though we have to account for a 3rd sleeper for 2 more years (which on the week trip home she did wonderfully on via the dinette setup each night). The trip home was wonderful. Despite spending a few years learning and researching, doing it for real still had me learning and trying to figure things out. We did have a few minor events on the trip home we had to figure out like the overly sensitive LP/CO2 sensor that woke us up in the middle of the night the first two nights. Or that leather cushions on fiberglass don't stay in place and slide right off (does anyone have a remedy for this?). But we got to experience things on the trip home we have always wanted to but never had before like Bannack State Park Ghost Town one of the most well-preserved ghost towns in Montana and a beautiful sunset in the middle of nowhere outside Dillion MT. Or the Atomic Museum (way cooler and more educational than my wife, I, or our girls expected) outside Arco Idaho along with Craters of the Moon (meeting up with some friends who just happened to be passing through). Not to mention and most importantly having some dedicated time with our youngest laughing, talking and playing games (she is in the final two years of High School and missing her older sisters so getting her away from all the teenage struggles and into a quiet place allowing her to connect with mom and dad and nature and history was wonderful!). We did the showering in the Oliver and I have to say it was easier than I thought. I am 6 foot 1 and while tight it worked great. We had a couple of nights when all our girls were able to come meet up with us and we spent those nights in the Ollie playing games, and eating dinner while watching the Olympics. I have to give a shout-out to @Foy_Mirna for his lagoon table as it was a major win for those nights being able to get all 5 of us around the table again (I expected it to feel more cramped with 5 in the trailer but it did not)! Towing the trailer was also a great experience. I am glad because my wife towed pretty much the entire trip given I was on a business trip the day before pick up and lost my wallet so no driver's license for me. We live in North Idaho so going up and down mountains will be a thing for us no matter what direction we head. It and the truck did great up and down passes, construction zones, and passing semi-trucks. We even had a day driving where we saw 20 MPH wind gusts and my wife did not even realize how windy it was until I told her. My wife did great (she even backed us into a camp spot on the last night and did great!). We head out on the next trip in a week and are very excited! Thanks for letting me learn and take part in this community over the last few years. We hope to see some of you on the road in the coming years.
1 point
-
Everything is like this in this neck of the woods. The growth in the area has been explosive over the past several years, got worse during covid with apparently no end in sight. Existing labor and services can't keep up with the demand. Still looking for an alternate shop nothing so far. Thanks1 point
-
My new springs from Maine trailer l are clearly Chinese.
1 point
-
Sorry Mike, late last night I did not read carefully and focused on the later sentence re the microwave itself. I'm sure you noticed Bill's second picture to see how the frame is attached to the microwave. When the top mounting screws are removed you can pull the MW out enough to remove these. I forgot about these mounting tabs because when replaced our MW with the Emeril Air Fryer I cut off these tabs as they would have had issue with the heat of the oven. Given the top mounting screws are in place, remove them to slide the MW out a few inches to access the side screws. It appears you will have to remove the frame and epoxy it, do whatever so that the 4 corner screws will hold again. I don't imagine OTT still has this part but maybe. Ever had the thought to upgrade to a convention oven or something else, this would be a good time! Convection Oven Upgrade? No let's just replace the MW with an Air Fryer! - Ollie Modifications - Oliver Owner Forums (olivertraveltrailers.com) Bill wrote his was not top mounted OMG, though I do see two holes in his picture vs. the 3 screw holes in ours. Also, unless he removed it no wood piece along the bottom front. If yours has no wood along the bottom, maybe add one as the front of the MW sliding is what likely damaged your frame. Let us know how yours is alike or different! If you need any parts off my MW let me know and I'll bring them to the Texas Rally. Best wishes for a quick repair and see you in a couple weeks!1 point
-
I bought them so I could replace them myself when time allowed. Other commitments have, so far, been higher on the priority list, This is largely because Hull #1291 has spent much less time on the road than we hoped when we bought it, so miles are still low. I don't know what the weight rating is, but I believe it far exceeds that of the 4-leaf factory springs. I don't plan to replace the shocks yet.1 point
-
There's not exactly a bunch of things near the Badlands to block or even slow down the wind. That wind comes down off the mountains to the west and can really blow. I've been there when it is calm (relatively) and not crowded. It is a special place at both sunrise and sundown. Bill1 point
-
Good pics from jd1923! Here are a couple more that show the microwave without the "brace" on top. In the case of my microwave - the top brace was never installed during manufacturer such that the only thing holding it in the cabinet was the trim frame. Obviously the trim frame didn't hold it in place very long and with the help (via phone) I added the top brace. Unfortunately, even the top brace didn't hold the microwave securely - perhaps it is all those dirt roads I travel looking for trout that combine to shake it loose. The oven bounced around in there such that the "feet" on the bottom actually eventually broke off! In any case, as long as you have things apart I would highly recommend that you add additional bracing between the cabinet and the microwave such that the oven is basically wedged into the space and does not move with or without the brace. I simply used scrap pieces of wood for this purpose. Bill
1 point
-
Strongway case from Northern Tool. Flexible panels are generally installed onto a mounting surface using beads of adhesive and/or some kind of tape, air space nil to nonexistent. My panels have been installed for four years and remain efficient with no issues. No thoughts on ‘excessive temperature at the ARE topper’, mine is lined with BedRug equivalent material which likely buffers heat transfer, if that’s even a concern.
1 point
-
If you have front struts yes, just shocks then no. BTW, you can visit an Oreilly's, AutoZone or other national auto parts stores and borrow a spring compressor for the day (they charge your credit card for the tool and refund upon return). Hope you find another alternative. Shops here usually get you in the next week (service shops not RV shops). I should head north and open an auto service shop if there is that much demand! just kiddin'!1 point
-
Mike, Ours had 2 screws, 1 each side, just behind the lower faceplate...accessible only after sliding the cabinet out a little. Hope the festival was a good time! John1 point
-
@Ronbrink Very cool build! Thanks for the detailed description and photos. I was thinking of something similar but building your own portable power station is brilliant. I think I might have to copy that. Is that an Apache case you used to house the Li battery? Do you think the lack of airflow underneath the solar panels reduces their efficiency or causes excessive temperature at the ARE topper?1 point
-
I have attached a Norcold Service Manual that explains the "n" error message with some troubleshooting techniques. See page 24. Hopefully the pdf will be allowed to upload. Norcold Service Manual.pdf1 point
-
I just removed the awning seal on our 2017 LE1 and it had deteriorated to where it was no longer effective. I was able to really clean that area for the first time while I was washing and waxing her. I plan to forgo replacing it and apply an over the window rain gutter. Amen.1 point
-
Especially if you forgot to let the Hot Water tank's contents cool down first!1 point
-
Normal highs in Prescott AZ (at 5,400 FT) late September/early October are high 70s. We had those temps a couple weeks ago and I thought fall had begun, summer was over. Instead, we've had more than a week of highs in the 90s and it will take until next week to drop again. City of Prescott has broken high-temp records every day for the last week. I've been in the driveway, sun burning down (sun here hotter than the dry air) installing an 180A HP alternator which turned into a bigger job replacing lower radiator hose and all heater hoses (9 of them on a 2001 Dodge Cummins). Another half day should be done tomorrow. At least when I duck back into the garage it's better. Should have moved some stored vehicles to get the Ram into the garage. Just thought it was going to be a quick alt swap, a two-hour job! When I got the old alt out, I noticed how I could get to the lower hoses (can of worms).🤣 We are always 20-25 degrees cooler than the Phoenix Valley and the desert down to Yuma, Lake Havasu, etc. Flagstaff and the White Mountains, all at 7,000 FT, can be up to 10 degrees cooler than us. Looking forward to the cool down next week and camping in the White Mountains!1 point
-
I'm usually pretty careful not to pick sites with bad slopes, but it can always happen regardless of careful planning.1 point
-
1 point
-
That sounds like fun. If our old house ever sells, we might be able to go do some fun stuff as well. Economy. uhgg.1 point
-
"I can't remember the exact sequence of events, except when I unscrewed the anode that sucker shot 20 feet across my yard just missing me by inches. Live and learn! Dave" Dave: You were lucky! Personal experience tells me that not being missed by inches hurts. Remember that the height that anode is just about the same height as your "man purse". I'm telling you that you will certainly remember the result of not relieving the pressure in that tank before you even think about even putting a socket on the puppy.🤪1 point
-
Same here, but never say “never”!1 point
-
Leaving to the Texas Rally next Wednesday. Five nights in the Arizona White Mountains on the way followed by 3 nights in Ruidoso. Highs should be 65F at 7000 ft, lows about 40F. We dislike the heat, reason why our Oliver has been parked for maintenance and mods for the last 5 months. Central Texas should be warm, daytime highs in the 80s, but hopefully not too hot since we still have that noisy Dometic Penguin.1 point
-
We often do a one-night stay, where we stay hitched, still need to level. BTW, camp these days anywhere near the border, stay hitched in case you need to leave in a hurry Not a good time to Boondock south of Tucson or anywhere from McAllen to Del Rio, TX! I stopped using the 1” blocks everywhere but the front jack where we may need a few inches or over a foot. I’ve gotten to where I only want to use the levelers up or down 6” at the most, usually less. Love these for the back levelers. Magnet on and down a few inches. When we leave, I only go up enough to free the block and leave the leveler at that height, it’s high enough! 🤣 OMG, everything is so expensive these days! Thank you .gov. I bought ours at $60 on eBay last year: https://a.co/d/aWFURPk1 point
-
New episode at Burchfield Branch COE campground:1 point
-
Heck! I had mine apart on the workshop floor for a few months!🤨1 point
-
Take your time! I had the shade on the kitchen bar for a few days.1 point
-
Bill, I saw Mike's post and it looks as if he was able to detach the pleated shade from the pull down bar which sure would make threading along that bar easier instead of using a wire. I'll try the wire. Thanks for the help Bill. John1 point
-
The inside fan for air circulation really helped in spreading the cold and maintaining a more consistent temperature.
1 point
-
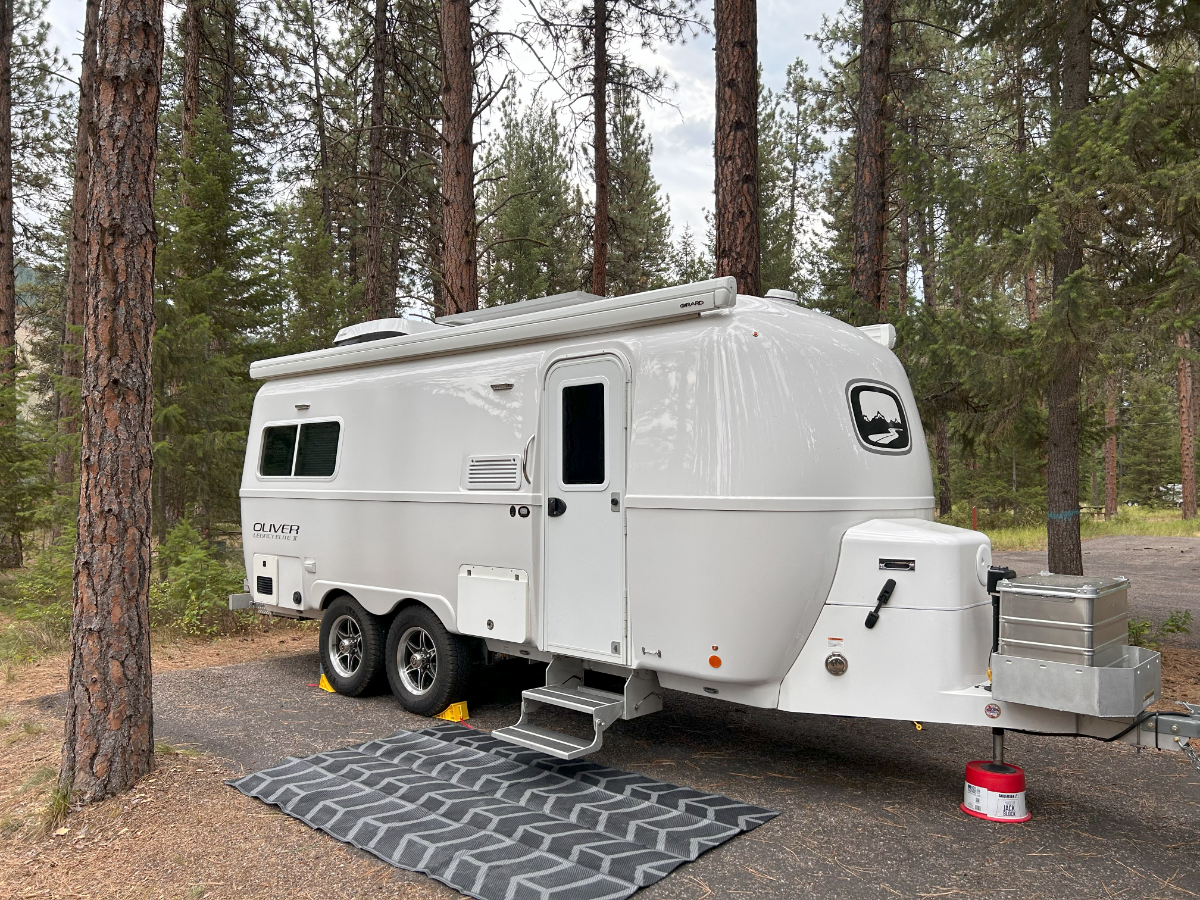
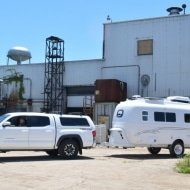
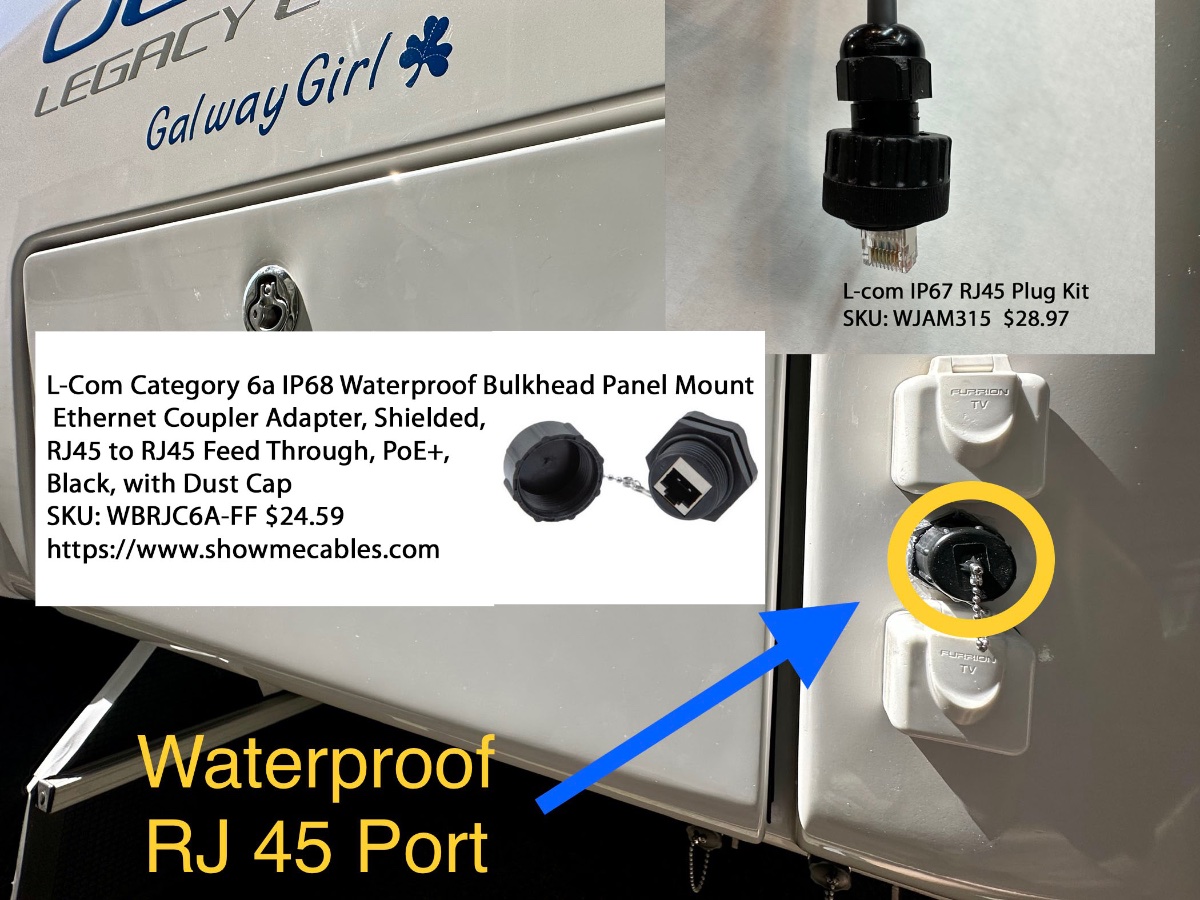
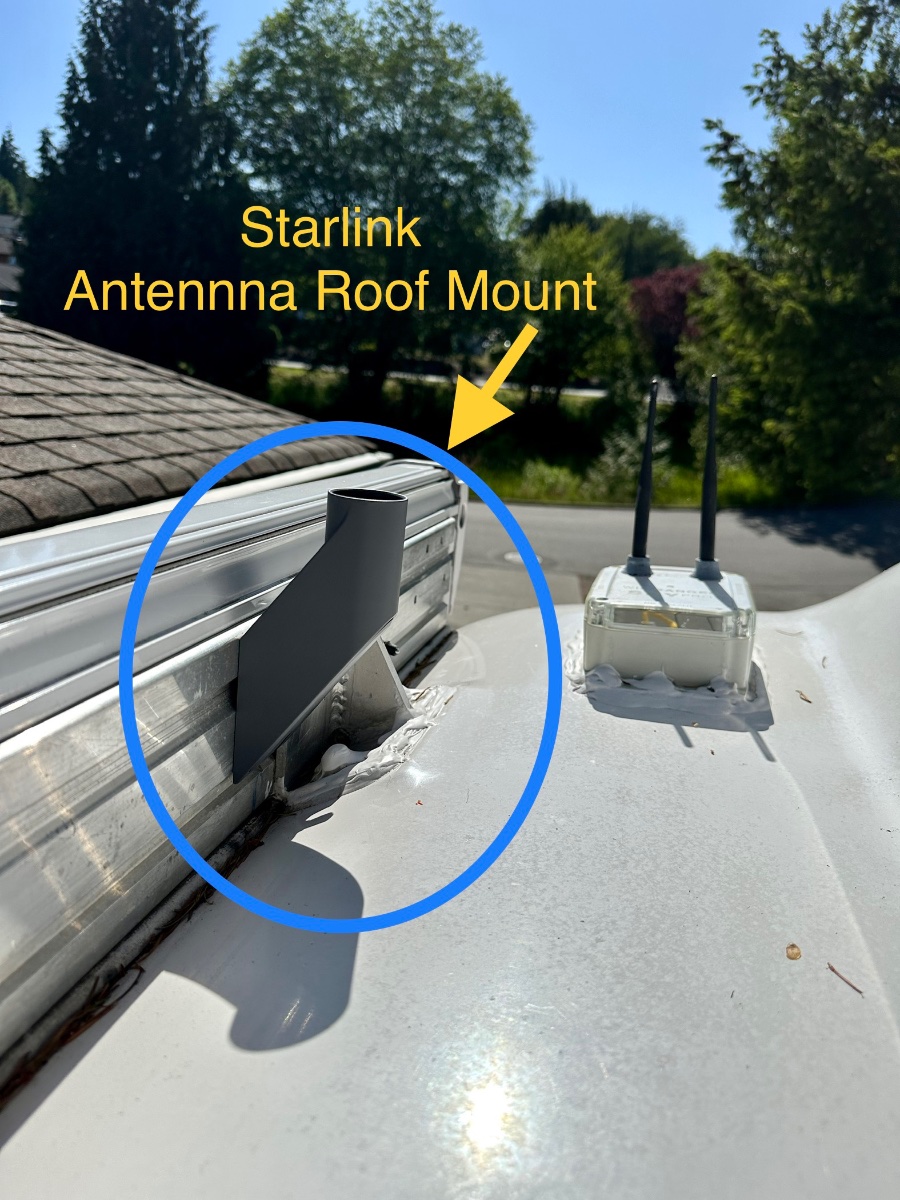
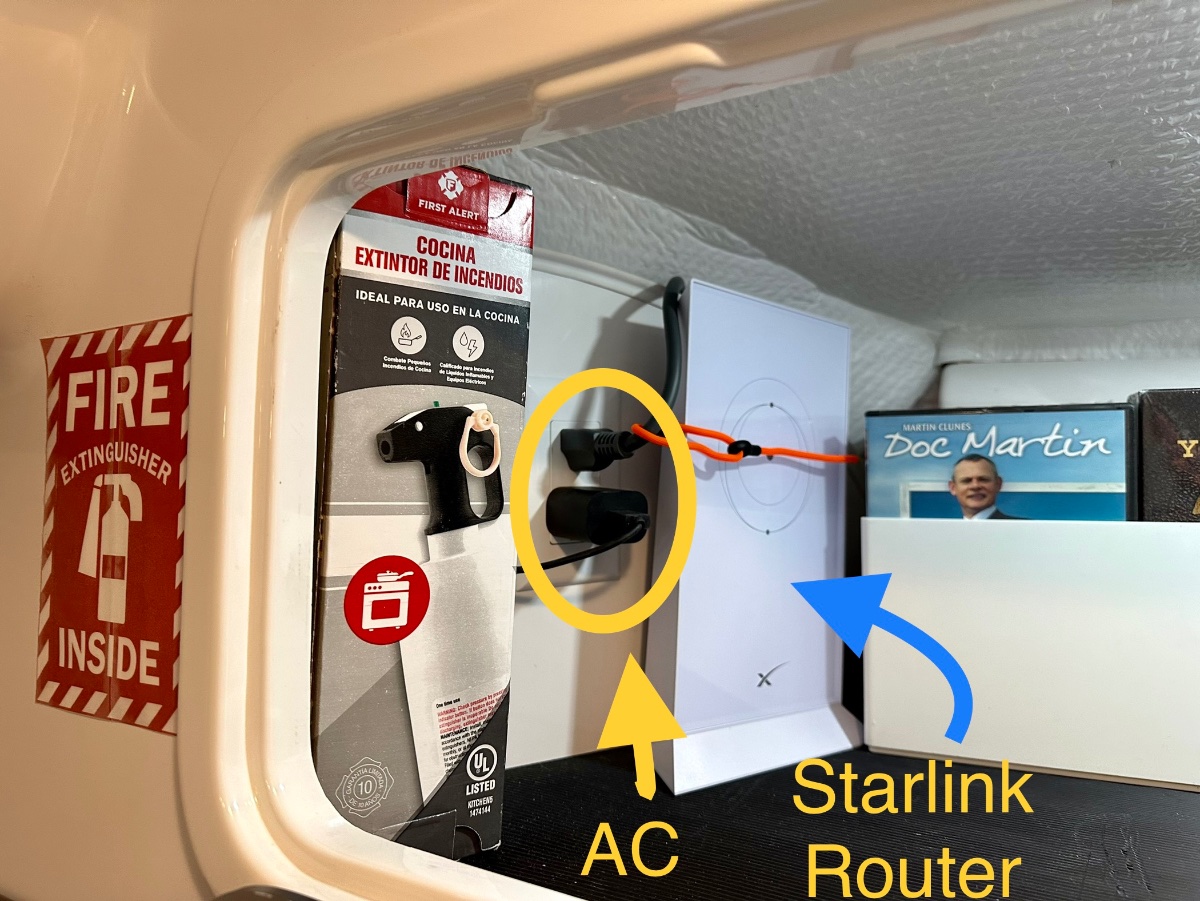
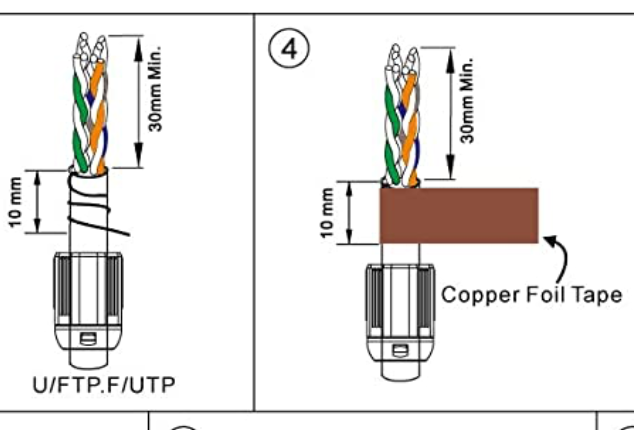
After looking at the forum I found a couple posts on installing Starlink. I decided to add another to the mix. Pre-Installation Starlink Test: In testing the system before a full installation I found that the Starlink Router could be plugged into curb side Oliver outlets and then the router could sit on it's back on top of the tire under the wheel well. This provided 58dB of signal outside the trailer and about 78 dB inside. So if you don't want to hassle with mounting the router, drilling holes etc. you could just find a weatherproof box/cover for the router and leave it outside. (Signal strength and bandwidth drops a bit but not really very much.) Read on if you want to do a more complete installation. 1) Roof Mount: (This is just a way to mount the antenna up high.) I bought the Starlink short roof mount adapter. Our hull 505 had the Dometic Awning, so I could not simply bolt directly to the mounting bolts from the awning brackets as they are at odd angles. I used 1/2" long x 3/8" diameter Self Tapping Bolts. I drilled holes, then drove in the self tappers into the mounting rail making sure to use washer/spacers to keep it from penetrating the back of the awning box. I used blue loctite on those tapped bolts. This mounting position will be perfect in those cases where we have clear sky and want the antenna up high. I'll continue to carry the ground mount for portability uses. I don't plan to drive with the antenna on the roof. 2) Mounting the Router - In the Rear Attic and Running Cable into Basement I mounted the router inside the rear attic cabinet. It's held in place by a simple orange strapping tie that feeds through a hook-eye behind the router. This is a good spot for the Router as it's close to a 110V outlet, and easy to run the cables under and behind the back of the cabinet over to the right side then down to the basement area. To make the cable run to the basement I needed to remove a couple panels: (NOTE: DISCONNECT FROM CURB POWER and make sure Inverters are OFFLINE BEFORE ATTEMPTING) 1) Street side attic panel (2 bolts) tip it down flat to gain access to the street side rear of the cabinet. 2) Basement rear dress panel covering the back the basement. (2 phillips screws). For my installation I ran the cable beside the existing AC drain tube on the street side rear of the trailer. I pushed the cable snake down beside that tube, and then at the bottom in the basement attached and I pulled up a length of pull line from the basement area. I attached the pull line to the end of the Starlink cable (the end that plugs onto the dish) and then pulled the Starlink Cable down into the basement. I tested the Starlink at this point before cutting the cable to get a baseline of speed for comparison after I cut the cable and attached RJ45 network connectors and the thru hull port. After testing I looped up about 3 extra feet of cable in the basement and then cut the cable for installation of the RJ 45 connector that would feed the back side of the thru-hull RJ45 plug. 3) Install new RJ45 male plug on cable in basement: Pro TIP: Use metal field termination plugs for the Starlink cable cut ends if possible/ Trying to use the typical plastic RJ45 connectors is a real hassle as the conductors in the starlink cable which stranded and thicker than normal. I spent well over an hour trying to get my shielded/plastic RJ45's to work. I finally said let's try a real metal coupler. In the picture below is the plug I bought from "Cable Matters" on Amazon $6 ea. They feature a clearly labeled punch down block, a threaded strain relief clamp and copper foil tape that is used to wrap the ground (or drain) wire around the cable shaft where it enters the connector. This is the connector I used on the inside of the trailer connecting the Router to the Thru Hull plug. 4) Install the Thru Hull Connector and connector for Cable to Dish I purchased an L-Com IP68 (waterproof) through hull connector specifically designed for shielded PoE Connections. I also purchased a matching L-Com connector kit for the cut end of the Starlink cable. This matching plug screws onto the outside connector for a waterproof sealed connection. I placed the connector mid line between the two existing connectors leaving both the Cable and Satellite COAX's in place. The new bulkhead coupler fits exactly between those two connectors, but I would suggest shifting UP 3/16" from center to allow the bottom door to fully open. (It's the 'satellite coax' in my case which I never use.) Hope this is useful to any new Starlink owners. More detail is in our blog here: Adding Starlink to Galway Girl Craig Hull 505 - Galway Girl
1 point
-
You may want to present your question in Mechanical & Technical Tips of the forum for a better chance of response.1 point
-
@RAshellWelcome to the OTT forum neighbor. Hope your pickup is as exciting for you as it is for most new owners. Mossey1 point
-
Many of us have cut foam mattresses to radius a corner. I'm doing this again in the next two weeks on new mattresses from Brooklyn Bedding as soon as Chris removes the underside stitching. Want the mattress cover to be intact, cut the foam inside and then will hand stitch the cover in each corner. Many mattress sizes here: Dreamfoam Essential - RV (rvmattress.com) We have twin single mattresses in an Elite II, but the idea is the same. I used a large piece of cardboard to create a template for the radiused corners. As far sheets, we just buy twin sheets which fit well on a tall single mattress. Then we use these: Amazon.com: RayTour Bed Sheet Holder Straps Sheet Stays Keepers Bedsheet Holders Fasteners - Elastic Adjustable Bedsheet Holders for a Wrinkle Bed Sheet : Home & Kitchen which they have for corners and there are other kinds.1 point
-
As @mossemi noted, some of these questions are really subjective, and I agree that you will figure them out. That said... My tendency is to camp for long durations -- 3 or more months at a time. My longest stop in one place is about 2 weeks. This year, I boondocked continuously for 5 weeks, hooked up at a campground for a few nights during the extreme heat wave, and then boondocked for another 4 weeks. There were small towns with laundry facilities, grocery stores, fresh water, fuel and propane refill options. I have a composting toilet; @Cameron summed up the benefits. I'm very frugal with short showers and efficient dish-washing. I've never run out of water. I carry a 3rd 20# propane tank and that has been helpful. Space has not been an issue for me, but I converted from bicycle touring so I'm used to paring down to essentials. I carry clothes for all seasons and find that I rarely wear some things. I can go for about 4 weeks without the need for a commercial laundry. My shirts and socks are merino wool; they air dry in an hour. That's a trick I learned from bike camping. About 90% of my clothes live in the bulkhead on the rear end. I have the twin bed model and love it. Food is subjective, and relates to how you like to cook and eat. I love to cook and don't eat processed foods, with few exceptions. I carry my freezer full of meat, and cheese, milk, eggs, veggies and cold drinks in the refrigerator. I never feel shy of food space. In the pantry I carry dry goods (beans, rice, dried fruits, nuts, spices, oils, canned fish, paper towels). I have a stove-top pressure cooker and cook batches of stew, chili, soup or other meals that make several meals. In my tow vehicle, I carry extra food, and plenty of bottled drinking water. I probably carry too much food. My dishes and cooking pots all stow in the drawers below and the cabinets above the kitchen area. Some Oliver owners have devised clever ways of stowing things in their front closet. My closet is a catch-all and is not very efficiently organized yet. If it fits your schedule, I would suggest that you attend an Oliver rally, where you can tour Olivers that are set up in different ways. There are mini-rally gatherings in different parts of the country; I think one is coming up in Texas.1 point
-
Hi. My wife and I downsized from a triple slide fifth wheel and now have a twin bed LE2. We find we can fit enough clothes in the trailer for about 2 weeks of warm to moderate temperature travel. A little less if the weather is cold. As for food, the pantry and fridge are big enough for about 2 weeks of food. One thing to note: the new fridges have more fridge space but less freezer space then ours, so you may be more limited on the frozen side. We have the standard black tank. 3 days if you're using it exclusively, but we've gone several weeks by using bathhouses for everything but those early morning/late night calls from Mother Nature. Expect over 2 weeks on the gray tank if using max water saving measures. If using for daily showers, etc., then probably 3 days. You'll need an Andersen WD hitch with your truck and an LE2. We have a lot of stuff in the bed of our truck: Clam, chairs, mats, griddle, table, etc., etc. so watch your cargo weight. We have the Platinum lithium package and love it. It's the saving grace of this trailer. Haven't used our generator for 2 years (we don't use the AC much). We also love our additional street side awning. It's one of our favorite features. Keeps the cabin much cooler and gives you shade all day long. One final word. We may be an outlier but our 2022 Oliver has not been without issues. Some were not Oliver's fault, some are. Most minor, some major. It's a good design using good materials but, in our case, it has certainly not been trouble free. In fact, we have a cosmetic fiberglass issue right now. Maybe we got a bit of a COVID camper, maybe just bad luck, but I want to be honest about that. Thank goodness the Oliver service team is generally exceptional and none of the issues seriously interfered with our plans. We still like our Oliver and find it very comfortable and easy to find sites for.1 point
-
Totally agree. We recently converted to a twin and absolutely love it. Feels like a completely different camper and is much more "livable" now.1 point
-
There are a lot of subjective questions which I choose not to answer and I think you will figure it out on your own. I do have a pretty strong opinion on the twin bed option for two adults. Our's was a full bed originally and later converted to a twin. It was extremely hard to make up the bed each morning and leaving the full bed in place everyday really makes the LE2 interior small, as it amounts to about 40% of the interior floor space. Regarding the weight distribution hitch, I think it is a must for any 1/2 ton pickup or SUV available. Your owners manual should stipulate the allowed trailer and tongue weight with and without a WDH. Ultimately the choice is yours, as is the liability involved! I do not know of any LE2 using anything other than an Andersen WDH. The fiberglass on the front A-frame presents a mounting obstacle. I’m pretty sure it could be done but I can’t think of any benefits of using a bar type WDH. Mossey1 point


.thumb.jpg.e34bf01ef7f7d5e99ad31856d45afbeb.jpg)
-
Recent Achievements
-


")


")


")


