Leaderboard


Popular Content
Showing content with the highest reputation on 10/29/2024 in all areas
-
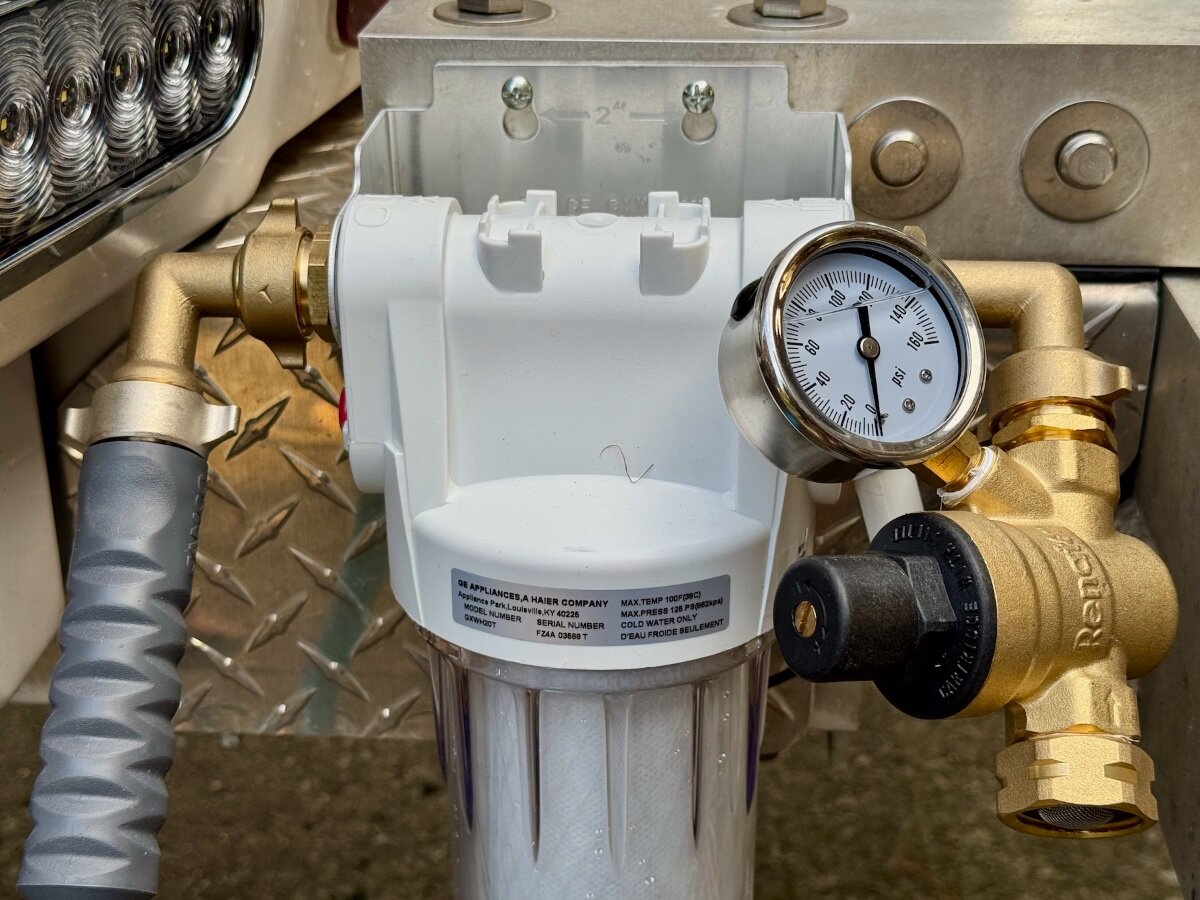
I've seen similar filter and water softener additions. Here's mine. I recently saw that James at FitRV released a single 2.5" X 10" water filter element to replace the standard 3-stage system. I've considered one of the smaller 3-stage systems as an upgrade, so I thought I'd give this a try as a less expensive alternative. Of course using one 3-stage filter instead of three separate filters is going to mean a shorter interval between replacement. But the cost difference should be negligible, and I won't have to find a place to store a 3-stage system. Here's the FitRV video and article: YouTube: https://youtu.be/t_SQNVapBEw?si=FfufAl7n4p_80Eys Web article: https://www.thefitrv.com/rv-tech/our-new-rv-water-filter-the-fit-rv-3-in-1-filter/ I bought a cheap filter canister from Amazon, that arrived with horribly oversized 3/4" NPT pipe threads, and enough slop that the filter moved over 1/8" up and down. That's not going to work at all, so back it went and a GE housing was ordered. Much better! I assembled with a 3/4" NPT to 3/4" GHT (garden hose thread) on each end; one male-to-male, and the other male-to-female. Then I gave it a test fit on Curiosity's rear bumper. Dummy! The hoses would interfere with the trailer body and the drop down sewers cover. :facepalm: Back to Amazon for a pair of 90° 3/4" GHT male-to-female connectors. In hindsight, I should have used a 90° 3/4 NPT to 3/4 GHT set, but looking today, I couldn't find that combination. This also allowed me some flexibility in the angle of the input and output. Back when I ordered the Oliver, and spent those agonizing months waiting for delivery day, I accumulated a bunch of bits and pieces to get ready to go. (Didn't we all?) One was an adjustable water pressure regulator. I didn't realize that Oliver would supply a fixed 40 PSI inline regulator, and the inline unit was convenient to store with the Camco inline water filters I've been using. So now's the opportunity to get it off the garage shelf and put it to use! I drilled and tapped two threads into the side of the bumper support, and screwed and LocTited in two stainless screws. These are used to hang the whole contraption while in use. It'll be stored in my bucket during transport. I hope this is helpful for anyone wanting to upgrade from an inline water filter. List of components: GE Filter Housing: https://a.co/d/7cbaS28 FitRV 3-in-one filter: https://a.co/d/b0NzDt8 Camco 4' Potable Water Hose: https://a.co/d/eVeV4BJ 3/4" NPT to 3/4" GHT fitting: male-to-male (2-pack): https://a.co/d/5MopLFL 3/4" NPT to 3/4" GHT fitting: male-to-female 2-pack): https://a.co/d/dE1gWDC 90° 3/4" GHT Elbow: male-to-female (2-pack): https://a.co/d/24kw8xO Teflon tape for NPT threads Total cost: $133 plus tax Question: The fixed pressure regulator that came with the Oliver is 40 PSI. I've set the adjustable water pressure regulator to the same 40 PSI. What pressure do those of you with adjustable regulators use?
 9 points
 -
I’ll say yes. My trailer is outside 24/7/365 and has been since being purchased in 2017. I have washed/waxed it at least twice a year over the years and gradually the shine had disappeared. When I’d do a thorough job, it would take me four days. No telling how many times I’d move the ladder or how many times I would climb up and down it. One of the last times I washed/waxed it I fell off of the ladder, hit the rear bumper and ladder on the way down to my asphalt driveway. I was lucky enough not to break anything. Since having the trailer coated it is much easier to wash and a quick spritz of the CGI magic elixir and it shines better than new. More important than the shine is the long term protection of the gelcoat. Additionally, as everyone else has said, is the fact that the CGI guys are the finest group of guys that you’ll ever meet.4 points
-
If anyone is interested in trying the Bulldog shocks, AutoZone sells them for $53.99 online only and claims to have them in stock. They state they have a Limited Lifetime Warranty (you can read it at the link provided below.) The part number is HD1214-0656. This link should get you there.4 points
-
Generally, I'd agree, especially as I'm cargo capacity limited. However, we're spending two months in Florida this winter, and will be plugged in most places we stay. So saving propane by using free electricity for seven weeks is appealing to me.4 points
-
I cannot deny that the Ceramic Coat work performed by CGI is top shelf. I have seen a couple Ollies with this treatment and they are spectacular. That said, my E2 lives outdoors, uncovered 24/7x365 and lasted three years with 2x/yr hand washing and waxing before it started to show signs of light oxidation. I took the dive and bought a Makita rotary buffer and a forced-rotation DA polisher and did the top half this Fall. Looks good enough for who it is for and I enjoyed the physical activity and the chance to get intimate with my trailer. This direction is subject to change as I age of course, but for now the $3k sits in my bank account.3 points
-
Yesterday I installed new AIR LIFT LoadLifter 5000 Ultimate Adjustable Air Springs on the Savana. I knew prior to departing for the Texas Oliver Rally that my receiver hitch was an inch shy of the recommended ball height with the trailer in tow, and that was after maxing out the pin hole height adjustment. As illustrated in the first picture of this post, the van and trailer were ‘well poised’, but once loaded with cargo for the trip there was a slight squat. Regardless, it was always my intent to install airbags for ease of adjustment in varying conditions. Today I will remove the AIR LIFT pump assembly from my former TV and reinstall on the Savana. Problem solved! As a side note, I really liked being able to inflate the airbags, via a remote, to tilt the Oliver upward when dumping the tanks and hopeful this new setup will provide like benefit. Inks Lake SP did it right with their new dump station! At some facilities however, raising the trailer’s nose is a must to fully empty the tanks. Did someone say ‘airbags’?
2 points
-
Steve, this is an excellent mod! I had not heard of a 3-stage in one filter and shorter filter life is fine for us who travel occasionally. I spent double building a dual filter system with Clearsource components an it’s heavy / bulky. Your build is perfect! Your water pump is likely 50 PSI or more. I installed a variable speed pump at 60 PSI. You can run anywhere in the 40-60 PSI range. PEX is rated at 100 PSI. Our older hull has built-in pressure restrictors, not regulators, which can be seen in this picture. The plumbing diagram only shows back flow preventers, but it has both inline devices on Fresh and City water inlets. They truly impede water flow and I will remove ours eventually and add an external adjustable regulator like yours. if we use the City water connection, the water flow rate is poor due to the restrictor. When we fill the Fresh Water tank, it fills slowly, but the onboard pump delivers much better pressure. Not sure if all Olivers have the internal restrictor but something to look into since whatever pressure you’re setting it reduces the flow rate (GPM) at the faucets.
2 points
-
I think you will be very happy that you had Alcan do the job. I know I was. Good for you on getting an appt with Lew and his team. 👍🏻2 points
-
Thanks for reminding me to turn on the battery heater under my three Lithionics batteries for the winter! Our local forecast is for temps well below freezing starting tomorrow night.2 points
-
It does pro-rate based on start date. Our billing cycle is on the 11th of each month. In September we started on the 15th of the month and only paid $45. But it is only pro-rated based on start as regardless of when you pause you get it through the end of the billing cycle.2 points
-
@John Dorrer here is what I used. It worked perfect and only $8. https://www.harborfreight.com/finger-release-ratcheting-pvc-pipe-cutter-62588.html2 points
-
I have almost always been adamantly opposed to hiring someone to do a job that I can do myself, which is virtually everything. I remember years ago I had a stopped up washing machine drain. I called a friend to ask if he had a drain snake and he brought one over to help. After monking with it for about an hour and not doing any good I suggested to him that I should just go out to a rental center and rent a powered snake. He asked what it would cost. I remember it being in the $100 dollar range for a few hours. He stated, "...or you could just call a plumber for about the same price and not have to fool with driving out to get the machine, coming home and messing around with it for another few hours and maybe still not get it open and then driving out to return the machine and still ending up having to call a plumber." I called a plumber. I always consider how long it would have taken me at work to earn enough money to pay for the job at hand. The older I've gotten the more willing I am to pay someone rather than doing it myself. I plan to die with a balance of only 5¢ in the bank. I did pay the CGI boys their fee to do my trailer when they first went into business. I've never met a finer bunch of young men. Our trailer is looking like it needs it again but aside from Hull #045, ours is the oldest Elite II still on the road. I've never waxed it even once and have usually paid to have it washed. Here again, number of hours worked vs amount paid to have the job done. I would take me several hours to wash the truck and the trailer, I pay $125 to get both done at a detail shop. No brainer for me!2 points
-
We had The Swallow, #509, done in June at the Maine rally. I was a bit appalled at the price but we could see some oxydation beginning on the top and the nose even though we waxed twice a year. Our Ollie does sit uncovered in our driveway in NH so it takes a hit from the weather. I didn't mine the washing, but the waxing was hard on the arms! Anyway, after watching the CGI guys work for an entire day and a half it was clear that they earned their money. What a nice and hard-working crew! The shine is amazing but the ease of washing off the bugs and road grime, then giving it a quick "spritz" and wipe with the the ceramic spray is worth every penny. Paula
2 points
-
I may actually do a camo wrap so I can lose it in the woods.2 points
-
Sorry to quote myself but I did re-watch this movie. Very funny... stands the test of time and shows what genius's Lucy and Desi were. Forgot about the whole "rocks" thing and Donna and I were laughing hard at that part. It was funny hearing the "tech" guy explain the brakes using magnets and shook my head realizing that we have the exact same brakes that they did in 1953. Before I was born for crying out loud! The movie is available free on TUBI. You'll have to watch some ads but not too bad. If you have not seen this movie... or not seen in it a while I strongly recommend "The Long Long Trailer" with Desi and Lucy. Scotty1 point
-
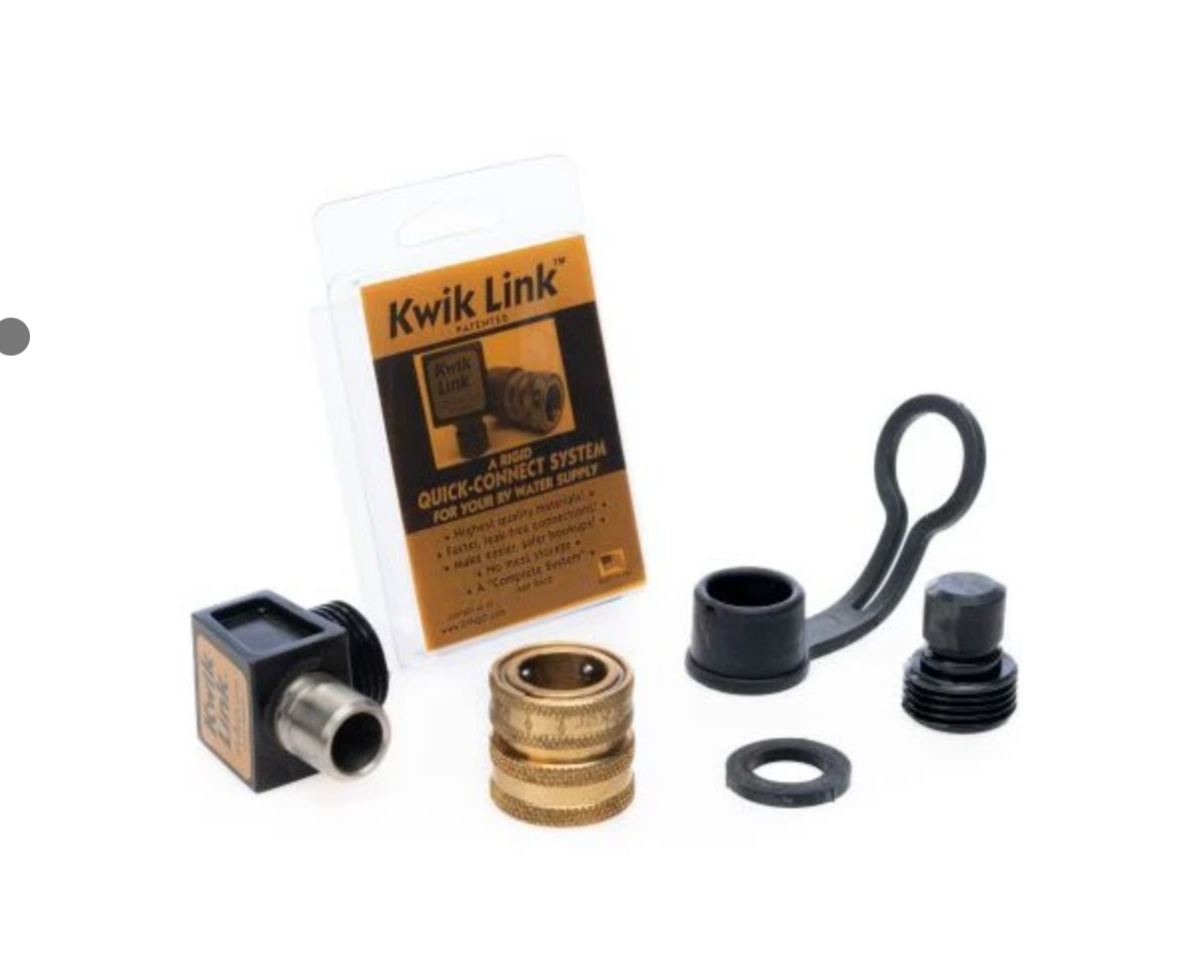
https://www.rvwaterfilterstore.com/products/kwik-link-connect-system-90?srsltid=AfmBOoqDmJNms7camHGuO4lzVh1ExSXi1dzYkfr0DoPzl1VMP0qVfYAE Similar quality to Eley products and they come with a cover. I have had them in use on all water connections for 6 years. Work great. They use to have one that was less than 90 degrees, worked great on the city and fresh water inlets. But I don’t see it now. I zip tied the OEM threaded cover to the rubber cover to keep it safe and out of the way. Leaving the QC on semi-permanently and then attaching QC to all your hoses makes setup and takedown much easier and quicker. 120 degree? 90 degree
1 point
-
Honestly, I just hooked it up for the photo, and didn’t look at which port I attached it to. 🤪 Usually, I fill up at home without a filter for trips under a week. I use the filter when on full hookups or when we need to refill on the road. Heading to Florida for two months this winter, any the timely release of this new FitRV 3-in-1 filter prompted this upgrade. I considered the proximity of the hanging location to the septic outlet. But we rarely use full hookups sites. The filter would be stored in my bucket at a dump station (which we also rarely use, as I use a macerator pump at home into my septic tank for trips under a week.) Hanging on the basement door would work and maybe be a more sanitary location. I’m in the basement frequently, so not ideal in full hookup settings. Both have compromises. It could be placed in a stand on the ground, too, and moved under the trailer. Lots of options. Thanks for your input!1 point
-
Very excellent post. I am sure many OTT owners will follow your lead. I especially like your mounting concept. When being used, it is secure and out of the way. Since your picture shows it feeding water to the fresh water tank, I suspect that when the tank is full, you secure the system elsewhere. One possible alternative to the "Black Water Area" of the OTT trailers would be to use you exact set-up, but drill the holes into the Basement Storage area lid. (Using flat stock on the inside for reinforcement). This alternative mounting location would get it away from potential contamination of the OTT sewer outlet leakage and Black/Gray tank dump process. Additionally benefit is it would be higher and easier to use for some of us RoF's. 🙂 Other than that I think you have hit a home run! GJ1 point
-
"I have had zero problems with exchanging the bad shocks at O'Reilly's (lifetime guarantee...thanks Steve L) but am thinking I'll want to try another brand to see if it lasts a little longer. Still happy campers here... :)" I got a message from Lew at Alcan Springs and he was hoping that RadFlo could be the best choice for a shock, but theirs were about $200 each. I will be bringing four shocks with me of the Bulldog equivalent to the Monroe 555001 if those are available. We will have the five leaf spring replacement done in April. John1 point
-
If it has a good power cord, doesn’t get hot to the touch, you’ll be good. I’ve used some old classics and usually replace the original cord with a cut-off #12 extension cord.1 point
-
I have found that the built in battery heaters in my lithionic batteries will also a cause a difference between SOC readings on my Victron Shunt and my Lithionics app. Power use for the internal battery heaters does not register on the Victron. Not sure if it has been cold enough at your location to trigger the heaters.1 point
-
As if they knew we were talking about heating, Long Long Honeymoon just released THIS Video that contains some additional ideas. Bill1 point
-
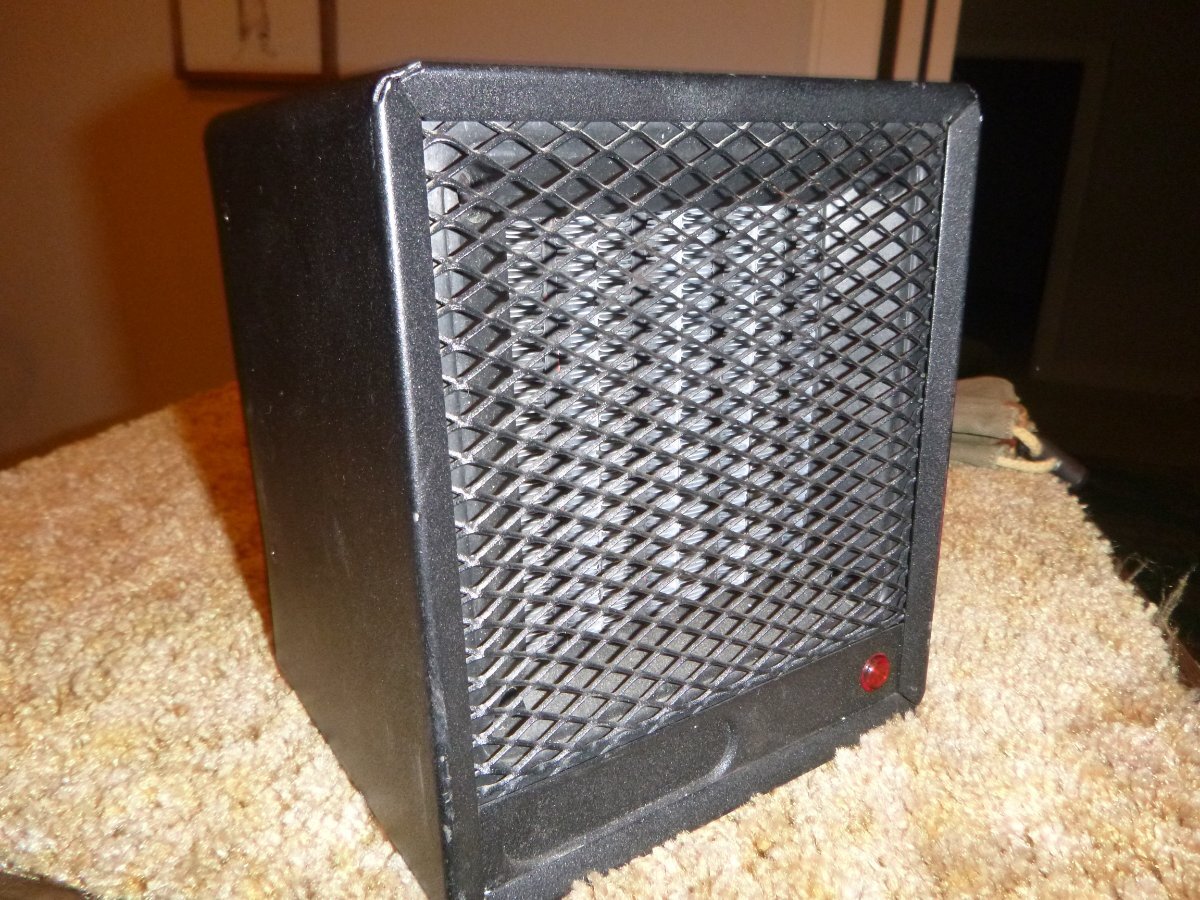
We picked up the Costco-special model of the Vornado TAVH10 which is 750/1500 Watts. To make sure it worked, I stuck it in Curiosity yesterday, mid afternoon. Inside was 58 degrees and outside 55 and sunny, with no wind. On high, the temperature only raised 5 degrees the first hour, 6 more the second, and 3 the third, ending at 72. Seems like it wouldn’t get any warmer, even though I had the setting at 85 degrees. Kill-A-Watt showed it wasn’t using more than 1250W at the 1500W setting. That might work in the 30s or 40s if I use the Truma furnace to get up to temperature, but I’m not really confident in its ability for such a highly rated product.1 point
-
I found the little guy below at a garage sale for $5 about 12 years ago -it measures about 6x6x6 inches. It has a temp sensor, on/off switch and rotary switch where I can set the desired temp on the back of the unit. Like many of these electric space heaters its maximum wattage is 1500 and it can roast me out of the Ollie if I leave it on full blast for over 30 minutes without setting the adjustable control lower. However, I never leave it on overnight or while I'm not in the camper. Bill
1 point
-
John @John Dorrer, when you install yours cut each length about 1 1/2” longer than the original piece you remove. This makes up for the shrinkage you have and the shrinkage that will occur to.the new rubber. Start at the bottom and push hard to compact the rubber to make room for the extra length. Be firm and patient. If some end up a little too long you can always cut a little off but you can’t add length. A hose cutting tool works well as it is hard to use a razor/box cutter when the piece is in place and it cuts square. https://a.co/d/gNDM9QE1 point
-
If it is worth it, then it is worth it.1 point
-
Ours is original and black. It’s also about an inch short at each window. I keep the gap on the upper part of the window. I’d replace them but the rubber is still good and the gap doesn’t seem to be an issue. Mike1 point
-
I have always been self sufficient. Ever since I was a young man, a kid even, I would refuse to pay anyone for something I could do myself. The first job I ever tackled on my own was fixing the crank on my bicycle. I was 12. From that point on, the toys got bigger and the repairs did as well. Instead of hiring someone, I bought tools and learned how to do it. That progressed to the point that I now have a shop, $20k (probably more) worth of tools and have enough trade knowledge in my head that I can do just about anything. Is it worth it? To me it is. I have literally built houses, cabinets, plumbing, electrical work, I have rebuilt a few engines that actually worked afterwards and I have never paid anyone a penny for it. On top of that, it has built wealth for me. I will die with more money left in the bank than I can spend unless the country falls apart and the dollar tanks. But even then, I will have the knowledge and the tools to keep going. Do it all again. Until I get old and spend $3000 to get my Oliver detailed. :)1 point
-
I feel the pinch too. Everything has gone up except my pay and I am still paying for two houses waiting for the bigger one to sell. Hopefully, the economy will get better after the election.1 point
-
When the lid is open, fan running, and you key the OPN/CLS button it will close the lid and the fan stays running. @Mike and Carol thanks for the note of the fan blade. I will clean it when we get home. I’ll also study the wiring to see what can be done. I’m not going to carry an electric heater. We have an Atwood furnace. Prior owner wrote a service complaint re noise and had OTT replace the Suburban. The mods I made, running hard ducting the first 6 ft, eliminating the under bed duct, eliminating the dual outlets and adding a return air filter has made it even quieter! We ran our furnace for a week in the high country, mornings in the 40s. It was very quiet and it only blows in kitchen and bath. The overhead fan, even on 10%, bothers me more.1 point
-
I ceramic coated my truck at home. It is a chore but it looks nice. I believe it cost me less than $100 for the product and about 3 hours of time. I already had the equipment, so no extra cost on that. If I did the Oliver, I figure 3 to 4X that at $400 and about 12 hours. If I paid myself $100 an hour for my time, it would only come to about $1600 total. That is being generous. It would likely take less time and less money. My truck was FILTHY. My Oliver had some swirl marks from the factory, so they paid to get mine polished. I took it to a local boat detailer and he put a nice ceramic coat on it for $1300. $3000 is too much in my opinion, unless they come to your house and your trailer is horribly oxidized. If I can't do it myself, I will take it to my boat guy.1 point
-
I clean the screen and blade assembly after each trip. You figured out the screeen, the blade is held on by a single set screw that comes off easily. If we want the vent open and no fan I usually just turn the fan down all the way to 10, it hardly moves any air. The vent is pretty noisy, once we open it it stays open. We got down to 43 here last night, both vents open and Vornado heater providing quiet, even heat. Mike1 point
-
John Did you replace with same brand? Or did you replace with a higher quality (if one exists) brand?1 point
-
@Dennis and Melissa Not to throw a shadow over your trip plans. As this was a possible contingency trip for us IF our recent 48 day 14 state trip out west fell through due to wild fires. We did a fairly deep dive and learned that the roads in Newfoundland are really in rough shape. Everything from pot holes due to frost heaves to “deep pit holes”. For whatever reason the funding is just not there for road maintenance. If you do go, I would highly recommend a spare leaf pack if you have the OEM dexter 4 leaf pack. We also learned from a few recent Facebook posts that Nova Scotia roads are just are not that great as well. It’s a beautiful area for sure, it’s just too bad the road reports we read on FB from a few Oliver owners were really not good. One person said that as long as you don’t mind dodging pot holes in the roads, you will be fine. 😟 All this said hopefully you can learn from somebody that has recently been up in this neck of the woods this past summer for more updated info. Just wanted to pass on what we have learned. For now, this area a no go for our future trip planning. Glad we did the Western Loop, it was epic. Patriot🇺🇸1 point
-
Yes, and fresh in the dairy section! Chris and I were born and raised in Chicago where Bays started and didn't know of the other name brand until we traveled east. About Bays | Bays English Muffins1 point
-
No chemist here ha! The customer service rep said their company would replicate the RV anti freeze odor and determine if that’s causing the detector to alarm. She said they have had several calls after people have winterized and immediately there after their CO/LP alarm sounded. I guess we will wait and see what the experts come up with. This is the second time around for me. It was interesting to hear her say they have had multiple calls this week on this exact same issue.
1 point
-
Seems to be a recurring theme... same thing happened to our unit yesterday. Just replaced the original Atwood detector with an RV-Safe detector in April due to the Atwood repeatedly false-alarming. Worked fine all season. Shortly after winterization (maybe an hour?) it went into (CO) alarm and would not stop. Tried 'reset' twice and it began to alarm again shortly after the reset each time. Propane turned off for 2 weeks, no appliances running, RV anti-freeze in the toilet, traps and water lines. Fortunately we are done camping for this season, so I pulled the fuse and visibly tagged the detector as "OFF". If we had had to winterize at elevation this month while still camping, this would be a bigger issue. Sounds like a design flaw???1 point
-
I throw a greeting out to whoever I saw this morning up in the texas panhandle headed north. I was on my last day of the return trip from alaska back to san antonio. This trip I've seen my first 2 "wild" Ollie's. One out on the Homer spit a couple months ago and the one today. Sorry I didn't get a chance to say hi I think it was hull 747 or 757 I don't recall but we tent camped for a night on the spit just to say we did but the wind was so brutal that night we were hunkered down.1 point
-
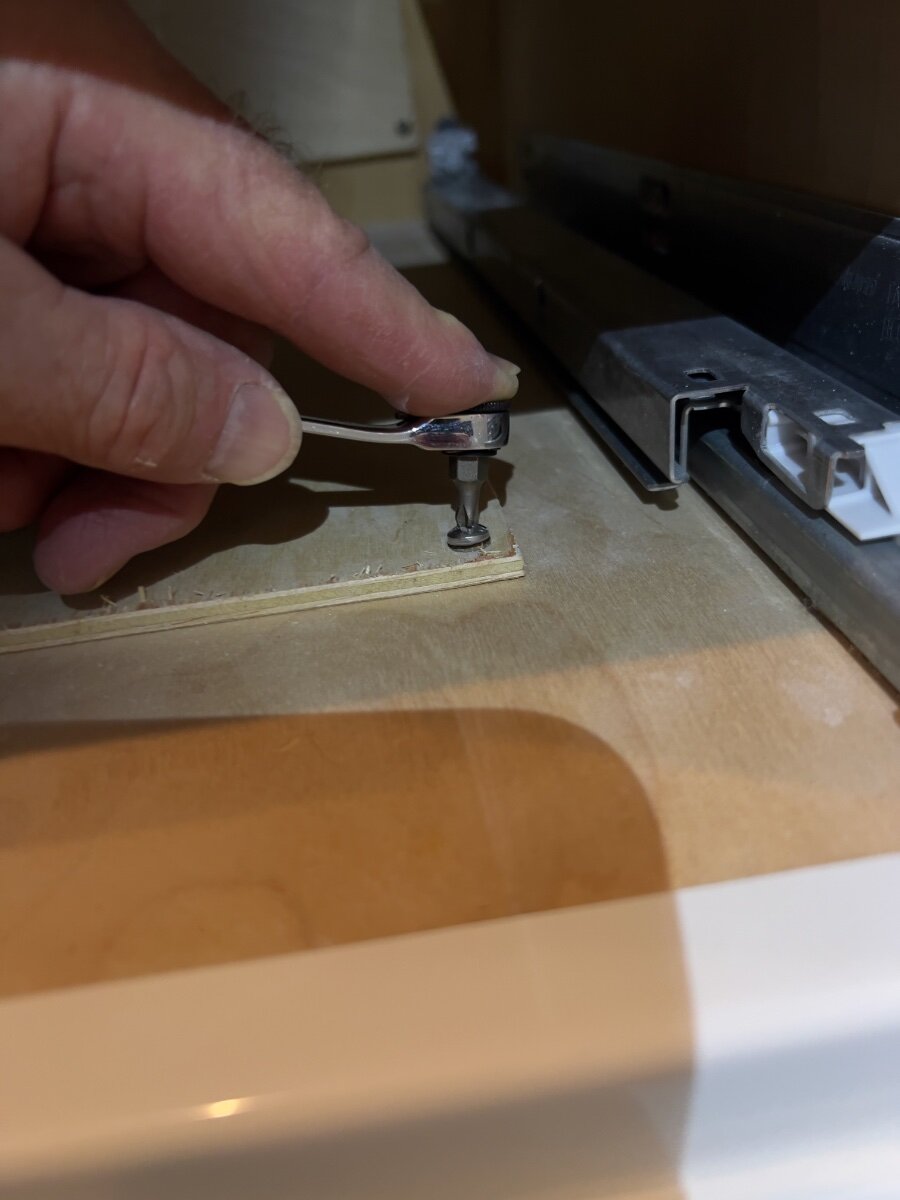
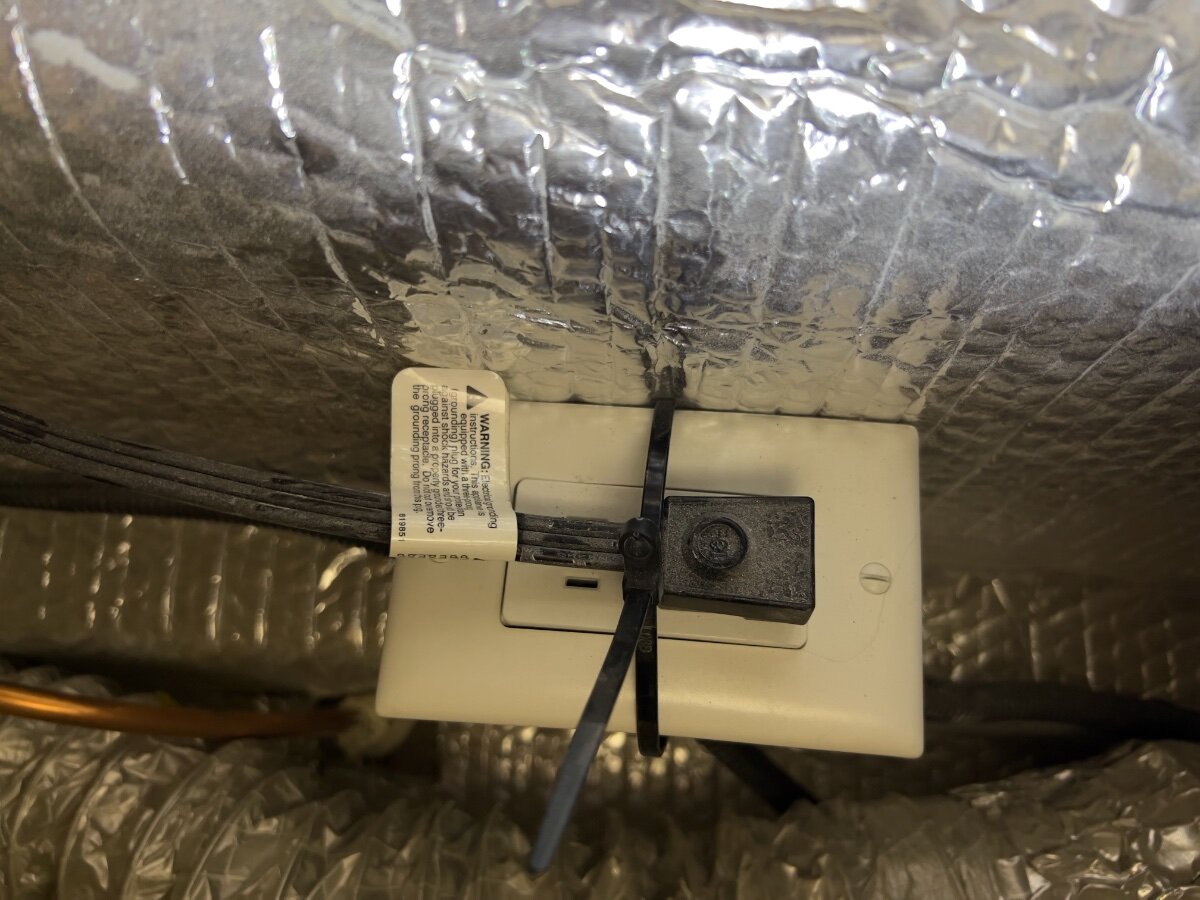
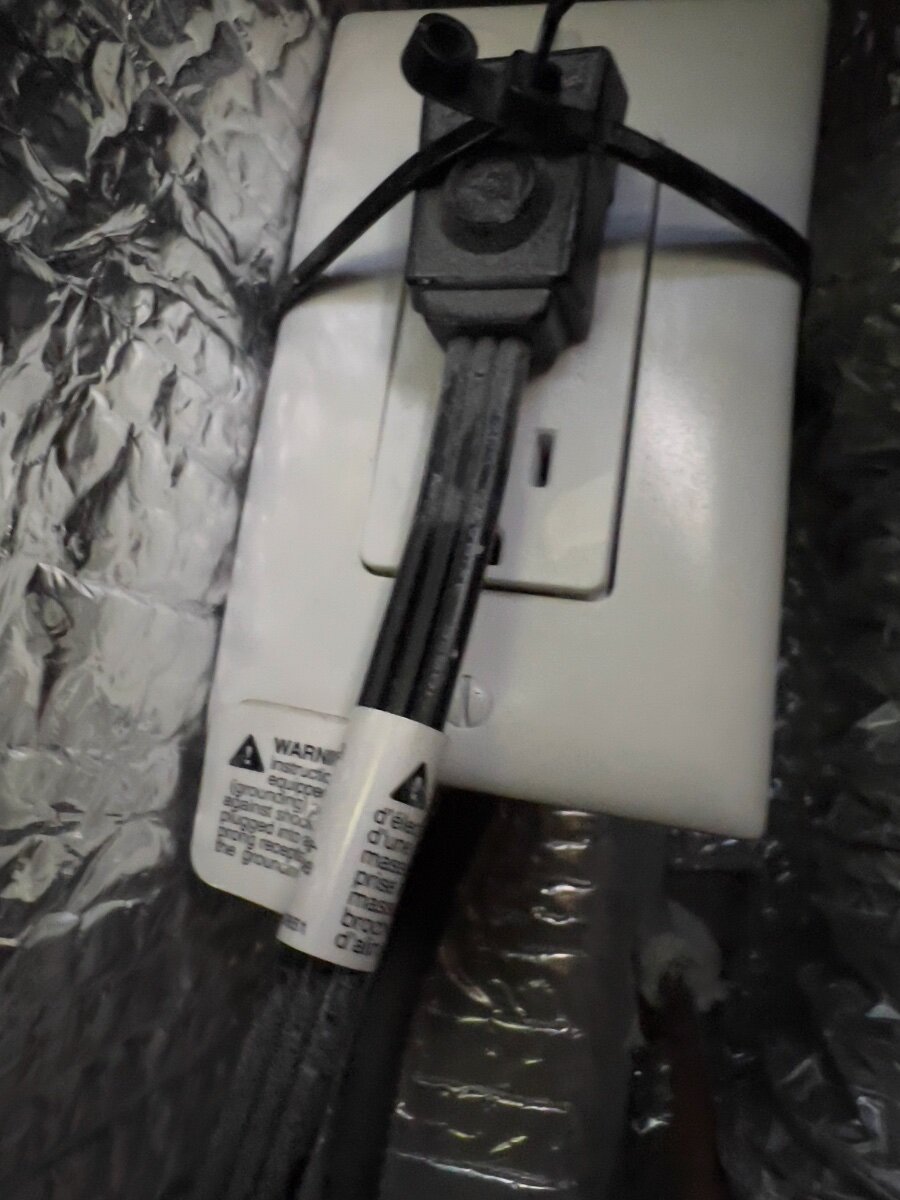
Yesterday, I retrieve OTT LEII Hull 990 from storage to prepare for a photo trip to shoot fall color in The Smoky Mountains National Park. Upon arrival home, I unhitched, connected shore power and turned ON the Norcold 3-way Refrigerator. The refrigerator would not startup on AC shore power and the fault indicator on the door displayed an "A". I consulted the Norcold N41x_ N51x_Service Manual and found troubleshooting steps in P. 21. I checked the AC breaker in the power panel under the rear dinette seat, which was ON. I checked the GFCI protected outlets and they were ON. Next, I removed the exterior access panel to the refrigerator, next to the entry door. I removed the AC supply line from the refrigerator (located in the lower left, near the control board cover) and found NO AC voltage on the supply line. This morning, I phoned OTT Technical Support and described the problem and symptoms and asked if there we any other breakers or fuses between the breaker panel and the refrigerator. Mike Strong informed me there were none. He did, however, tell me the refrigerator AC supply line plugs into an outlet below the left/forward galley drawers. This outlet is accessed by removing the bottom two drawers and removing a thin plywood hatch attached with four wood screws to the bottom panel of the drawer cabinet. I proceeded to remove the drawers and found the plywood panel. Removal of the wood screws requires a short Phillips screw driver. I used a small ratchet set with a ¼" Phillips No. 2 bit to remove the screws. I found the outlet and the AC supply line to the refrigerator. The AC plug was partially dislodged from the AC outlet. I reinserted the plug and tightened the zip tie, which had been installed to prevent the plug from vibrating or otherwise coming out of the outlet. With AC power restored, the refrigerator now operates normally. The first step in the troubleshooting flowchart on P. 21 of the service manual calls for checking the AC power input to the refrigerator. However, it provided no clue to the existence of the concealed AC outlet beneath the galley drawers. My thanks to Mike for informing me where to find the concealed outlet. Our trailer was delivered in mid-February, 2022, and now has traveled over 12,000 miles. I suspect the cause of the AC plug dislodging from the outlet was vibration while underway. I would expect other OTT owners will have similar experiences. See photos below. Access hatch removal AC outlet as found with plug dislodged (note position of zip tie) AC outlet and plug with zip tie relocated and tightened Regards, Don
1 point
-
Welcome. I hope you have enjoyed the first season of camping with it as much as we enjoyed ours!1 point
-
Ours is a bit dirty. But it seems that procrastination is my middle name.1 point
-
Our TV is also a brighter white, but our TV is 24 years old and the whites are now pretty close. The front fenders and hood of the TV could use some paint too. Sunlight UV rays do take their toll. I’ve got a painter, a retired pro who has a paint booth on his property and does reasonable side jobs at half todays shop rates.
1 point
-
This may be of interest to Truma a/c owners, illustrates how the SoftStartRV is installed.
1 point
-
A white object reflects all wavelengths of light, so the light is not converted into heat and the temperature of the object does not increase. I bet Oliver took this into consideration when designing the first Oliver. I like the white and will keep it OEM.1 point
-
WOW! Have not thought of that movie in a while. I DO remember watching it on TV when I was very young. It made an impression on me. And, I like almost everyone at that time did truly "Love Lucy". Thanks for digging that one up. Scotty1 point
-
@ScubaRx you beat me to it. I also suspect a painted Oliver might be easier to maintain vs the gel coat which constantly needs waxing, ceramic coatings etc. No doubt it would also cost a good sum of money to have one painted properly too.1 point
-
Thanks David, Springs are replaced, but 1 of my 2 1/2 month old Monroe shocks was blown (I replaced all 4 in July). Thanks to Scuba Rx my lifetime guaranteed shock from O'Reilly was ordered at the next stop and I replaced it...no problem).1 point
-
Our Hull # 050 has exactly 11 inches from the floor of the garage to the bottom of the rear jack feet. BUT, our early build came with the (then standard) 16" wheels and tires. The standard for the currently produced trailers is 15" wheels and tires which might make about 1/2" difference.1 point
-
Yes, do this. The shackles (correct term?) can flip over on the Oliver leaf springs and when that occurs you’ll have to run over another curb to straighten them out! Happened to me once when testing an EZ-Jack and there is a thread here about reversing it. Just measured ours at just over 12”. Be careful to stop the electric lift prior to topping out so not to damage the jack gears.1 point
-
Quartzsite is a good place to try your hand at dry camping. It was our first real boondocking experience back in Jan 2017. It’s easy enough to go into town if you need to dump or refill water. Winter weather in Q can be quite pleasant if you’re coming from colder areas. It’s been fun to meet other Oliver owners there over the years but it has also been a nice stop over all by ourselves for trips to/from California. Plus, the price is right. Joshua Tree NP isn’t far from Q and is worth a visit as is Death Valley NP. Mike1 point


-
Recent Achievements
-


")


")


")

