Leaderboard


Popular Content
Showing content with the highest reputation on 02/22/2025 in all areas
-
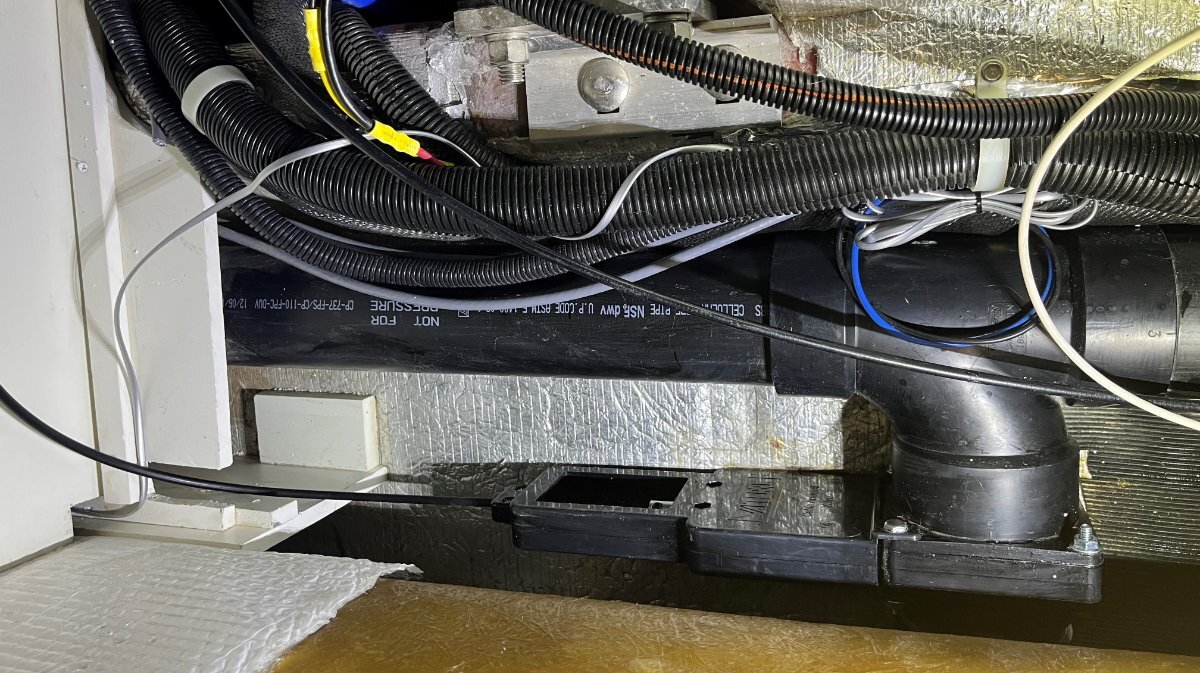
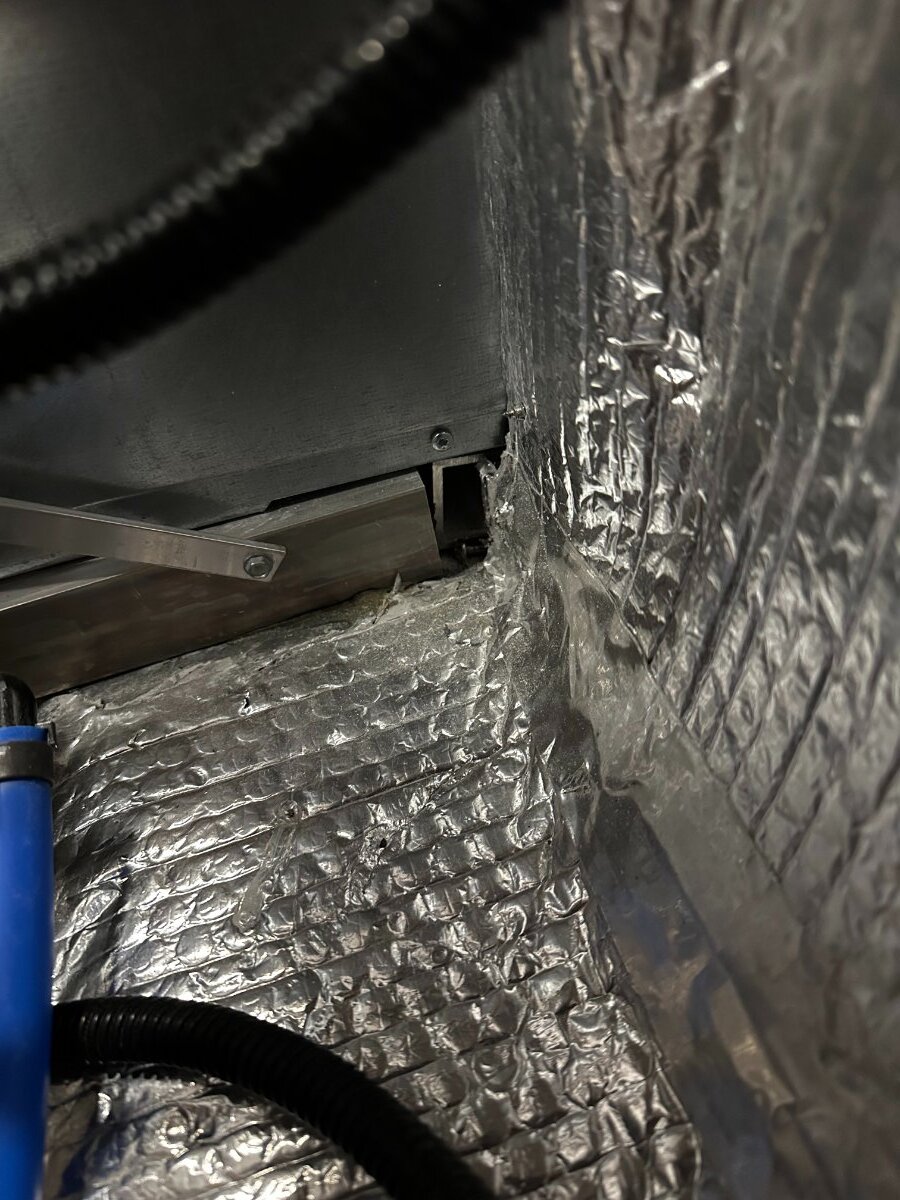
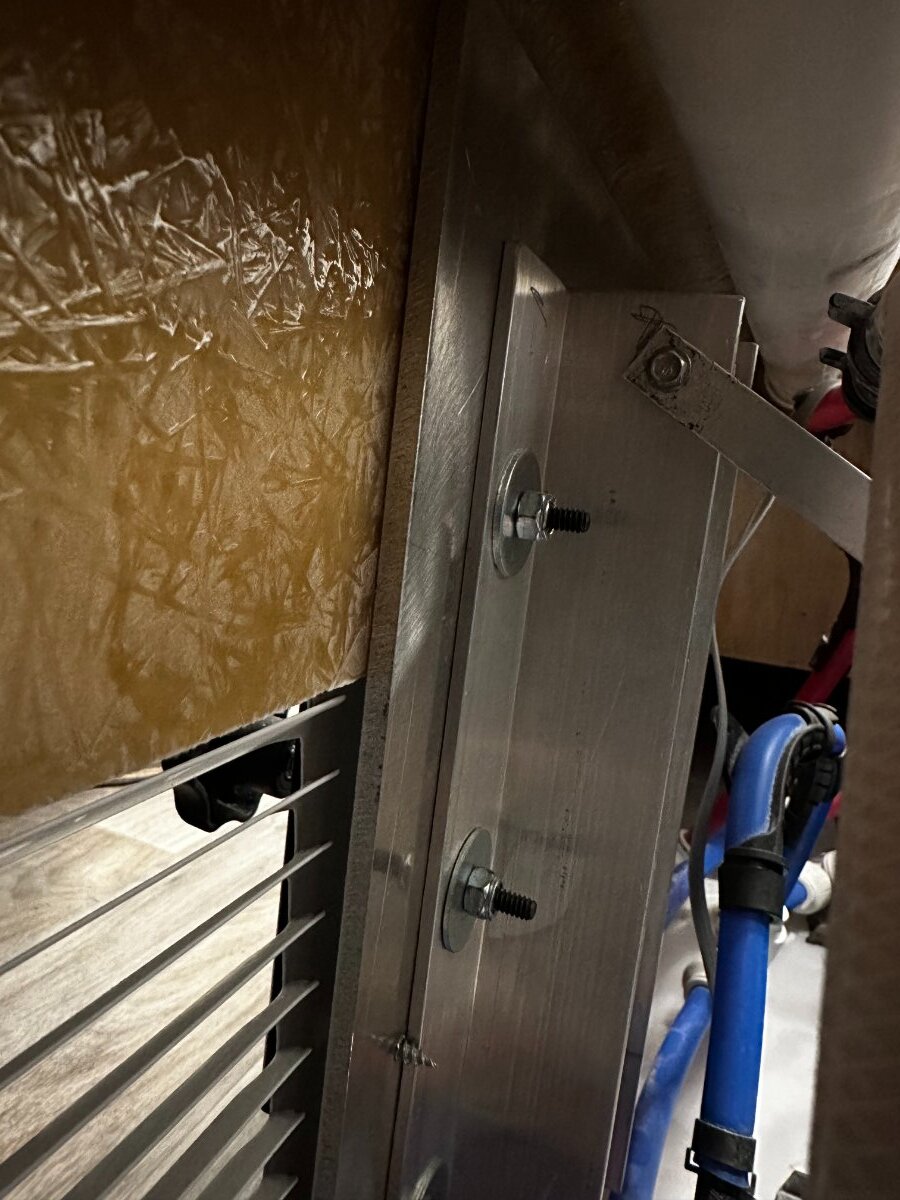
Was a long day getting the new gray waste valve installed. But by 5PM today... it's done finally, yay! 😂 It's difficult to get the valve in place, in tight quarters, without the rubber seals slipping. The valves in the front have rubber couplings which can be removed giving so much room, but not down here. I applied a sealant on the back side of the rubber seals and set them on the flanges the day before hoping that would keep them in place. One slipped off but the other stayed which certainly helped. The two flanges were on different angles, tied down by the weight of the 3" gray plumbing on one side and the gray tank on the other. Pulled a long crowbar to raise and shift the plumbing over, used a longer bolt to get one corner started. Installed one part at a time as the full valve assembly would not fit being crammed into the floor. Got everything torqued down, "good-n-tight" after another hour or more... Removed the old cable to install the new one. You can only source 6 ft cables and must cut them down to fit. OTT installed a stock 3 ft cable. I found it to be jammed up in a corner for being too long. I cut the new cable sheath to 32" and the pull cable 4 3/4" longer. I also cut into the shelf that extends in the rear trunk area of the Oliver using a handheld coping saw, so that the pull cable would have a straight line to the valve (notice bottom left of picture). So all was good, ya think, but the thin SS steel cable would not fit into the push rod of the valve, the fixture which holds the cable with an Allen key. I tried and tried and then I got a thin needle tool and found that the opening was defective, made in Mexico POS, and mostly closed. In the bottom of the basement, valve installed, I had to drill an opening into the cable receiver using a 90 degree extension powered by a 1/4" impact tool (whoa, make sure yours is good before installing)! 🤣 New waste valve, new pull cable nicely realigned and this valve now opens and closes like butter, so nice! Tomorrow the 12' cable for the black valve should be delivered. I will also fill tanks to test all three valves tomorrow. Hopefully no leaks but given Murphy's Law, new plumbing often leaks somewhere on first try. I need a break on this project and hoping for the best! Hopefully we're done tomorrow so we can start the fridge, pack clothes and tools, hitch up and be ready for the next adventure! 😂
 3 points
 -
I haven't followed this thread totally and if someone has mentioned Molykote 111 compound by DuPont I apologize. HERE is a video on the subject and I believe that it is available on Amazon HERE. I've not personally tried it on my blade valves and seals nor on my toilet seal. Bill3 points
-
Lost my front one last year on the way up to TN. We were in Nashville, were leaving the trailer at CGI Detailing, went to put the front jack down and saw that the foot had departed. My immediate concern was the potential for causing damage, injury, and general mayhem behind me after spitting out a fairly good chunk of metal at high speed on a crowded freeway. Secondarily, did a thorough inspection of the underside to make sure it hadn't put a hole in the fiberglass, much to our relief it had not. Popped over to Oliver since I was in Nashville to pick up a replacement and applied blue Loctite to hopefully avoid any future incidents. Now part of my regular inspection, both front and back. Sounds like this is a recurring event that necessitates repeated close inspection.2 points
-
That reminds me that there are a few automotive designers that need to be slapped around a bit….. Having to pull an engine to change a spark plug sounds like a good reason for capitol punishment. One shouldn’t need to be double jointed and have eyes on one’s fingertips to do periodic maintenance on any device. That said your suggestion of “well you put it there” is unlikely to phase anyone.2 points
-
You may well be getting older (glad it’s only you 😂 ) but it sounds like you’ve got a good amount of get-up-and-go left in you with that description of the work you did! On valves - We have the “Autovent” option for the gray water “fill” from the factory. Keeps the grey water out of the shower pan while moving. Oliver installs the switch in the closet with a spring-loaded open/close rocker switch. We remember to open/close it -most- of the time. I suppose even it will need seals replaced eventually. Then again, unless it’s a dramatic failure, I don’t think it’s as critical as the dump valves. Grey tank dump - that T handle moved quite easily. Short cable. Hopefully it will last us the ten years yours has. Maybe it will be the next owner’s problem. I have no plans to upgrade it to electric. Blank tank dump - I think that horse is dead. I’m dismounting. Tank Additives - We usually use an odor-control additive in the black tank. Only occasionally in the grey tank. I really miss the good old Thetford blue stuff. It was quite effective and actually made the black tank dumping smell kinda good. I think it was the same stuff they use(d?) in commercial ports-potties. Pretty sure it had formaldehyde, so mere mortals prolly can’t obtain it. My current favorites are Thetford Aqua Max “Summer Cypress Scent”. It smells nice. Downsides are I think they’re optimistic about one packet treating 40 gallons…. That, and it doesn’t dissolve completely. Leaves some grainy specsks behind. (I dissolved on in a clear container with plenty of warm water.) I’m also leery of the packets. I think they’re some kind of gelatin, and I’ve found they don’t dissolve completely either. That said, I probably won’t buy them again. The Camco TST liquid seems the safest bet to me. Nothing to clog up or be left behind. As for my least favorite, “Happy Camper” gets the nod. I can’t understand the raves on Amazon. The stuff doesn’t dissolve easily, and tends to harden like plaster! Looks like an invitation to gunked-up valves! That, and I find it has about zero odor control. I have half a bucket of it left that I’ll donate to a non-discerning RVer. As for valve lubricants and treatments, I’ve tried the Thetford valve lubricant to try to help my black tank valve - and it did nothing. Probably because it was the cable, not the valve. Anyway, I suppose you can get away with using no additives at all - but emptying the black tank (and even the grey tank) are gonna be a smelly adventure!2 points
-
We pulled into a campground for the night in Ft. Stockton Texas, I started to unhitch and noticed that the front jack foot was loose. I tightened it and checked the other two. The rear ones were tight. I checked them all right after we purchased our trailer in 2017 and haven’t thought about them since. Probably something to check periodically and will add some blue loctite to each bolt. Probably not good to lose one, at least I’d hate to run over one.
1 point
-
The Texas Oliver Rally 2025, for Oliver Owners only, will be held October 20, 21, 22. Checking in Oct 20 and checking out Oct 23 at Lake Mineral Wells State Park. For those interested in attending starting May 20 you can reserve a campsite. A potluck dinner is scheduled for Oct 21 and. BBQ dinner us scheduled for Oct 22. A hall at the campground has been reserved for these dates. Paula Ratcliff has arranged for live music for the potluck dinner. I have contacted Truma and they will have a service rep on site. If you need service, you are to contact Shelley Deisinger at s.deisinger@trumacorp.com be sure and let her know you are at a campsite during our rally. I did reach out to Girard but they let me know they will not be at our rally. A representative of the Oliver approved dealer in Ft Worth, United RV will be providing the BBQ dinner. However I had to reserve the group dining hall at $180 per day, so I hope everyone will contribute to this cost. Hopefully someone from Oliver will also be there. Jason E. Attended our last one.1 point
-
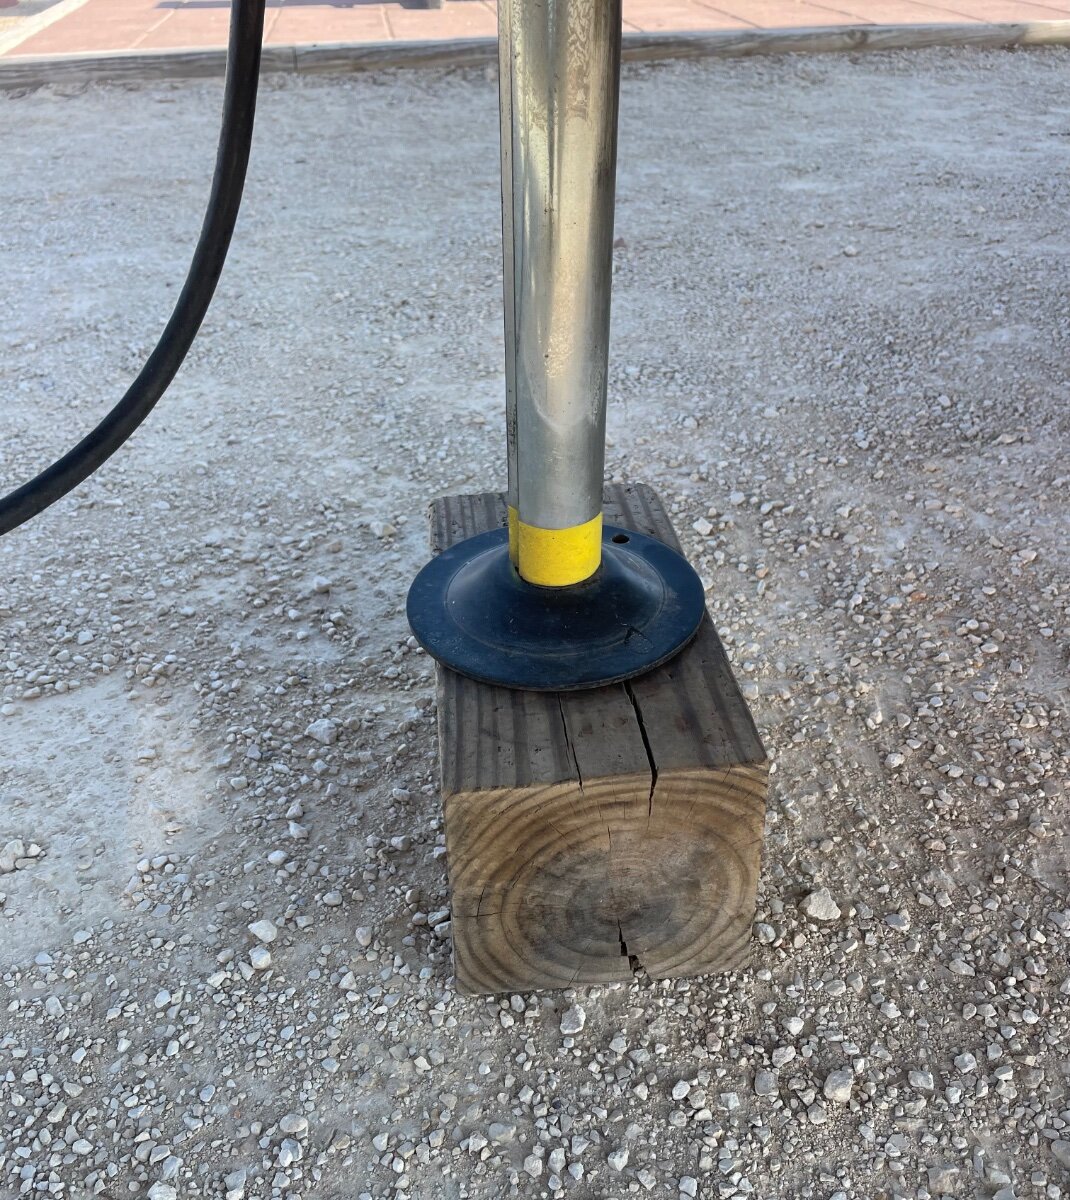
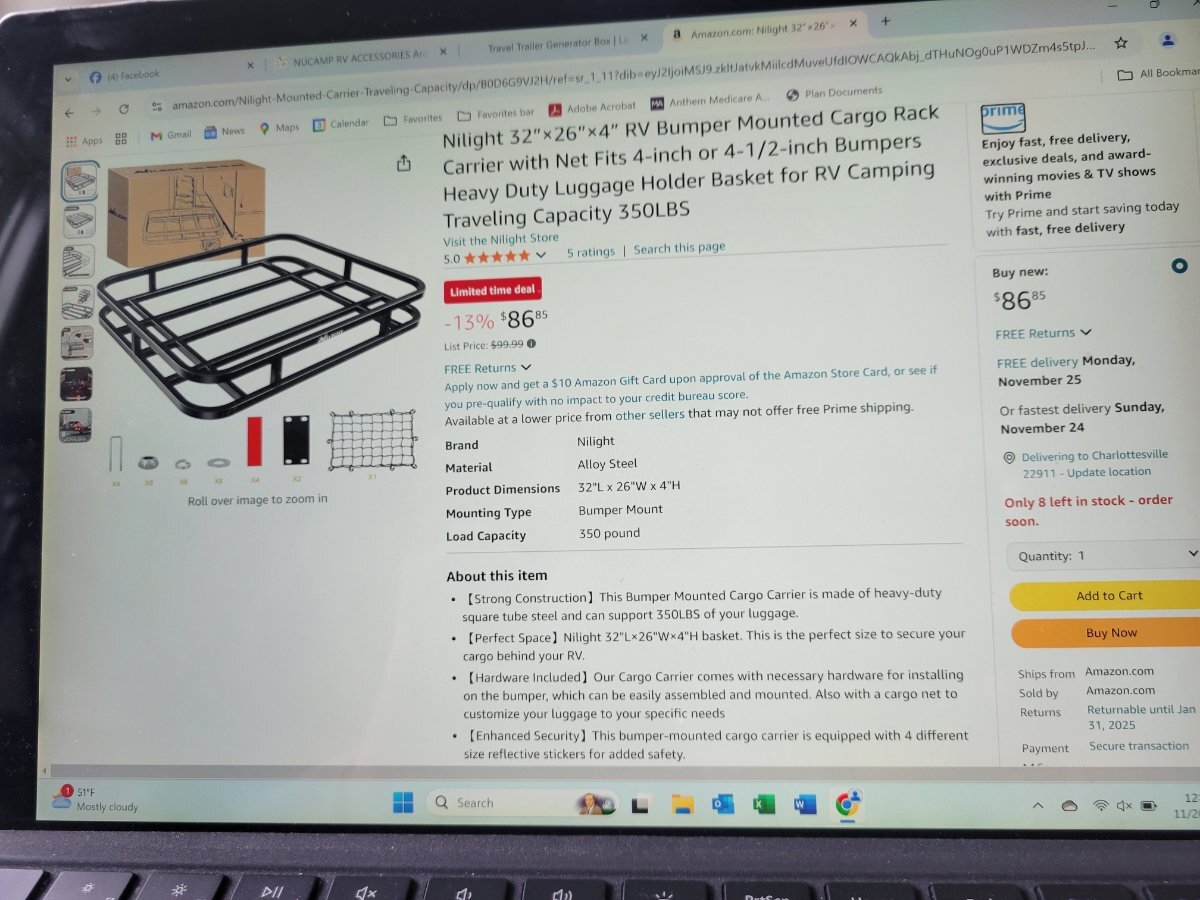
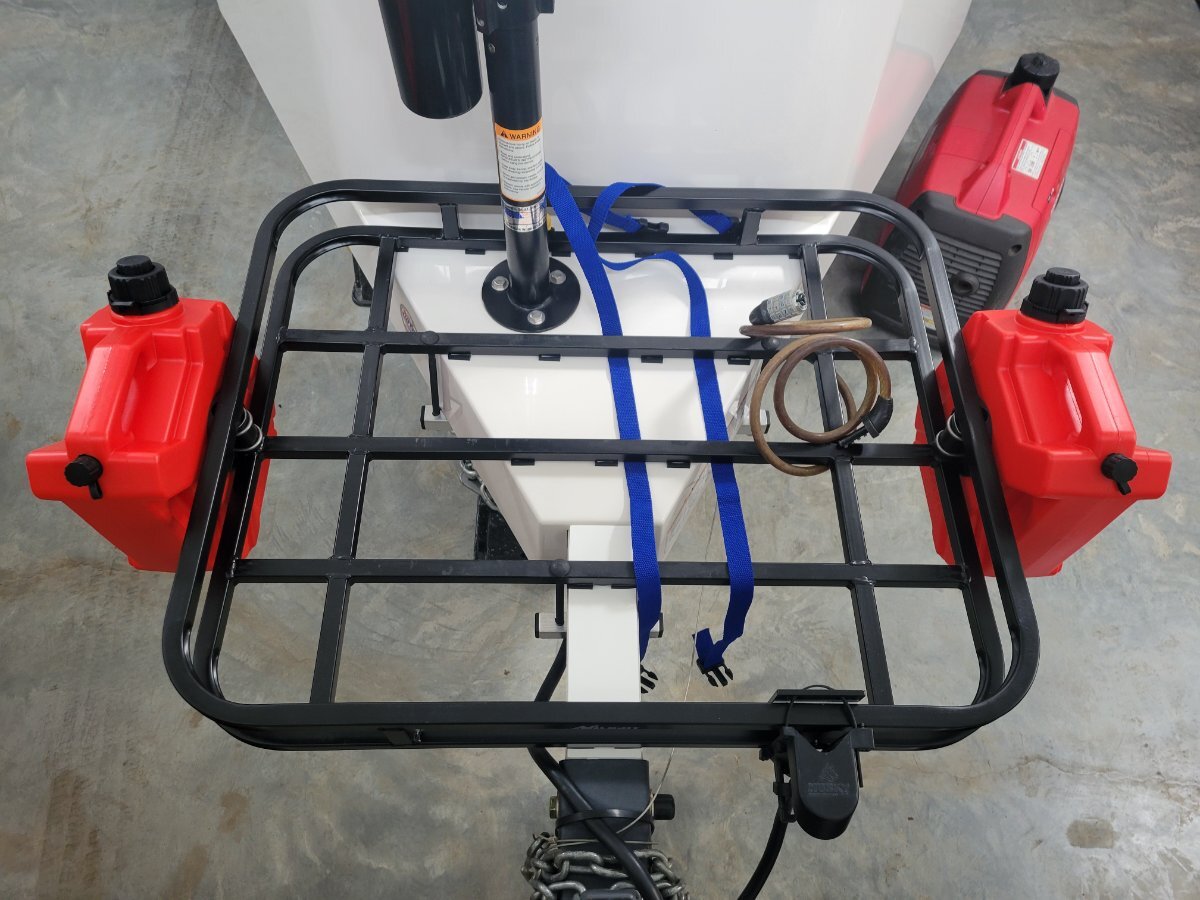
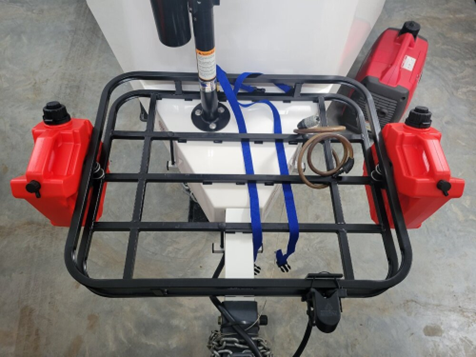
I wanted a front storage basket that my generator could travel in that would also have enough extra space for a couple other items. This basket fits over top of the jack so there is no wasted space behind it, and I didn't have to drill any holes in my LEII to attach it securely! I used two pieces of heavy guage 1" aluminum pipe across the bottom of the tounge and four 8" bolts that are through bolted to the basket on the sides. I used square rubber spacers between the rack and the fiberglass tounge which allows cargo straps to secure items in multiple locations. An added bonus is the basket framing is spaced perfectly to allow the rubber feet on my generator to fit securely over it (I did stick four more rubber spacers to the bottom of the generator where it straddles the basket framing. The basket, the generator, and the other items add about 100lbs to the tounge. I will be offsetting this added weight with a receiver style bike rack I will be adding to the rear of our LEII (more on that in a future post). I measured how tightly I will be able to now turn (especially while backing up), and I should be fine. I am very happy with this storage basket and the price! 😊
1 point
-
We have purchased two Brooklyn Bedding high-end hybrid mattresses for our home and love them. Made in Phoenix, so we can drive down to try them out and drive it home. They make their Dreamfoam Essential in a dozen different RV sizes. They roll them up and boxed shipped CONUS no additional charge. We have the twin bed layout, so we bought two 30" x 75" mattresses. They come in 6, 8, 10, 12, 14" sizes. We went with 10" thickness which is a bit tall for sitting but wanted 3 layers of foam density (2 layers in 6-8" mattresses). The 8" might be a better height but firmer and the 10" is med-firm. We removed the stitching in one corner to bare the foam and then with a long insulation knife I cut the radius from a template I made of cardboard. We could have sewn the cover back, but just tacked it and the mattress cover holds it together nicely. Check it out: https://rvmattress.com/products/brooklyn-wanderlust-memory-foam/rv-bunk-30x75-10-inch1 point
-
Mike, we live in the Portland area. August can be hot. September and October are nice here. Hopefully we won't have a bad fire season. The West burns up every summer with the exception of the winter fires this year in Los Angeles. It can be quite hazy if there are lots of forest fires. All things considered, it's a great time to visit the Northwest. John1 point
-
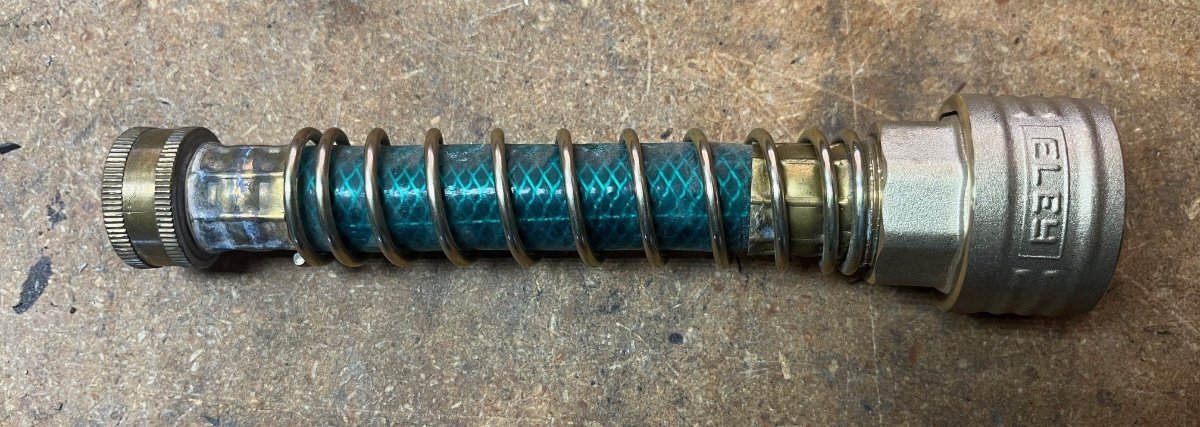
I made this fitting for quick campground connections. It should work well.
1 point
-
Wanted to provide an update on this statement. Just yesterday, in another post on this subject, I learned of Drain Master waste valves. This product is flush on one side, so it can be installed directly on the floor in the gray tank waste valve location. Looks to be a very good option when anybody needs a new gray waste valve. https://drainmaster.com/rv/product/pro-series-s3vt-kit-2-valves-60021 point
-
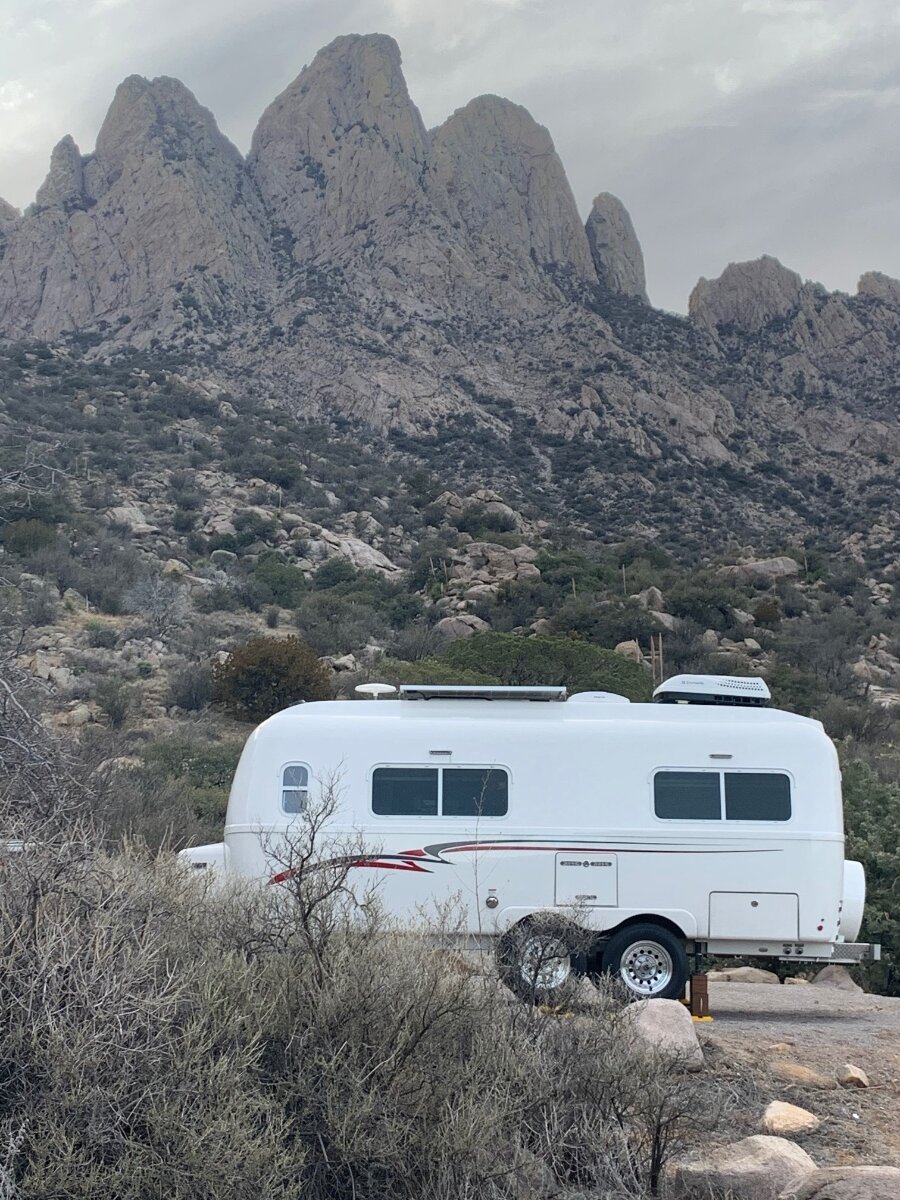
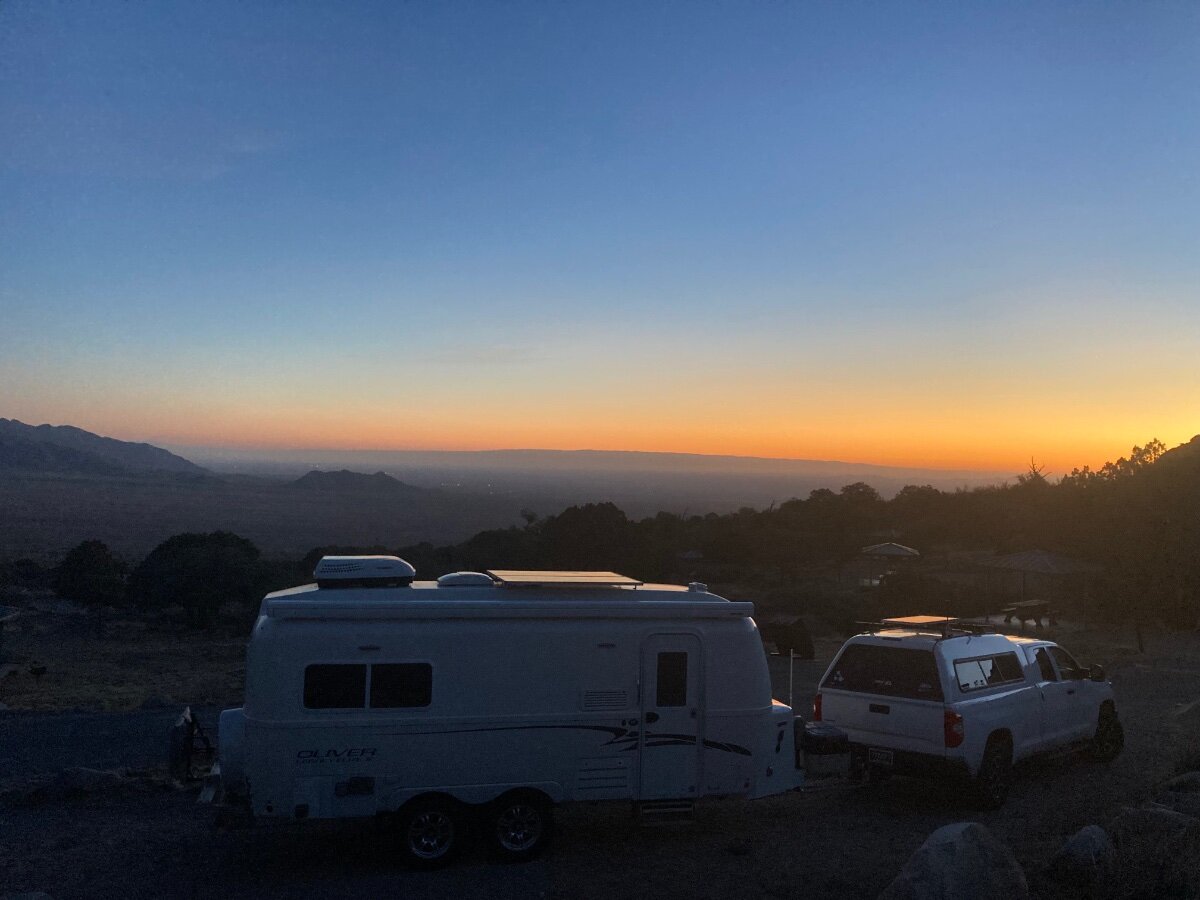
This is Aguirre Spring in January…
1 point
-
I have awnings on both sides and the seal does collect stuff, but I just take a brush to it and water pressure and clean the area. I don't think much about it either. John1 point
-
Never tire of this campground. Aguirre Springs, site #18. Campground was nearly empty so finally got what I consider to be the best site. Organ Mtns, NM. White Sands on plains below to left
1 point
-
John, Hoping all goes well with Lou and his staff with your install. Maybe post up on how the install goes? I think you will be very happy with the Alcan leaf pack, HD shackles and wet bolts. Oliver Service might be able to ship you a jack pad/steel foot or for the bottom of your stabilizer or front jack. Or better yet a local RV shop may have a spare. I would consider using a little blue locktite on the fastener to secure it. Safe Travels!1 point
-
We lived in Washington state for 26 years before moving to Colorado. I also agree with EurekaJ's comments. There is so much to see and do in the PNW! I hope you are allowing lots of time. If you have flexibility, I might suggest you plan for September as the crowds are a little less and the weather is still spectacular. After Labor Day, you may find it a little easier to find availability and a little more elbow room. The Oregon coast is really special with amazing places I would put on your list (from South to North) - (these are just a few) Cape Kiwanda - hike up the sand dunes on the North side of Pacific Beach for unbelievable views, especially at sunset. Cape Mears Lighthouse Oswald West State Park - from the parking lot, take the paved trail under 101 highway to Short Sand Beach Cannon Beach/Haystack Rock - great beach town, Haystack Rock is an Oregon icon. Ecola State Park - Drive all the way out to Indian Beach for fantastic views and scenery As a side-note, the coast of Washington is really not worth visiting except from Klaloch north into the NP. I might follow EurekaJs suggestion of visiting Fort Steven's at the mouth of the Columbia River and then heading east back to I-5 and from there up to Rainier NP. While in Olympic NP, make sure to take the drive up to Hurricane Ridge. I would plan to do this in the evening. All the tourists head down the mountain around 5pm but it's still light until almost 10pm that time of year. When the crowds are gone in the evening, the wildlife comes out. I've seen marmot, bears, fox and deer. Drive along the ridge to the end parking lot and take the short hiking trail for incredible views across to Mt. Olympus and the whole Olympic range. Go early or late for Rainier NP as well. It can be an absolute zoo around the visitor centers and nearby trails mid-day. Mt. Rainier is considerably more stunning in the early morning light or at sunset. I would recommend the Paradise visitor center area on the South side over the Sunrise visitor center on the North side. If you are a hiker, one of my very favorite hikes, ever, is Pinnacle Saddle. https://www.wta.org/go-hiking/hikes/pinnacle-saddle If you are going all the way up to North Cascades NP, you might also consider a side trip out to the San Juan Islands. You could leave your trailer and take the ferry across from Anacortes. The ferry ride is beautiful and you could get lucky and see the resident Orca whales or take a whale watching boat from San Juan Island. I've rambeled on enough. Hope this is of some help and happy answer questions if I can...1 point
-
I’ve noticed ours does the same thing. Haven’t figured it out yet other than the only way to assure it stays of is to turn off the switch under the outside cover.1 point
-
Yea, sorry, more details would have helped. We only turn on the Truma Aqua Go when we want hot water, usually morning and evening. We use the Comfort setting, and dial it down to about 109 degrees. All the rest of the day and night it is in the OFF position on the panel (but obviously still ON on the outside switch. We have the full Truma package, so our control panel is the digital Truma CP Plus that controls everything. It is mounted above the SeeLevel panel to the right of the pantry, above the rear dinette. What occasionally happens is the water heater fires up randomly even though it is turned off at the panel. BTW, thanks again for the details on the shower and recirculating system, Mike. It is working beautifully!1 point
-
Just checked Beverly Beach SP for availability in August. All reservable sites are reserved. It looks like a 6 month reservation window and a number of sites are not reservable, I’m assuming they are probably first come first served. Big park! Will continue to check.1 point
-
We plan to turn our water heater off every night and turn it back on in the morning until the warranty work is done. Most likely the water heater will work fine. If it doesn't, then at least we don't waste months waiting for the repair and have a fire while sleeping. Hopefully you let Oliver know if your unit was one that needed the new burner assembly so you're at least in line. John1 point
-
I haven't seen or heard of this before. The ECO mode does fire up periodically as needed to keep the water warm. When you mention 'control panel', are you referring to the inside panel? My inside control panel is above the curbside bed and the wiring is accessible from the porthole in the cabinet above the cooktop. Mossey1 point
-
I concur. I still have an '08 (with a few dings) to get me to river put-ins, and a 2019 (that still looks new) for towing Hull #1291. Both are still reliable. That is why I installed a Genuine Cooling Systems transmission cooler in the 2019 rather than replace it with a 3/4 ton GMC. It tows our Elite II well (with an Andersen WD hitch) and summer transmission temps now remain normal when towing.1 point
-
I’ve attached photos showing how I mounted the EZ Reach table system. To do this, I used a 12" x 16" aluminum sheet and aluminum L brackets. Additionally, I attached an angled brace from the top of one of the L brackets to the aluminum frame supporting the heater. The setup is very sturdy, and we’re pleased with how it turned out. For the EZ Reach system, we selected a 16" arm and a 12" arm to achieve the level of articulation we needed. The table top was purchased from Oliver. Note: We always remove the table top from the system while traveling. Hope this information is helpful!
1 point
-
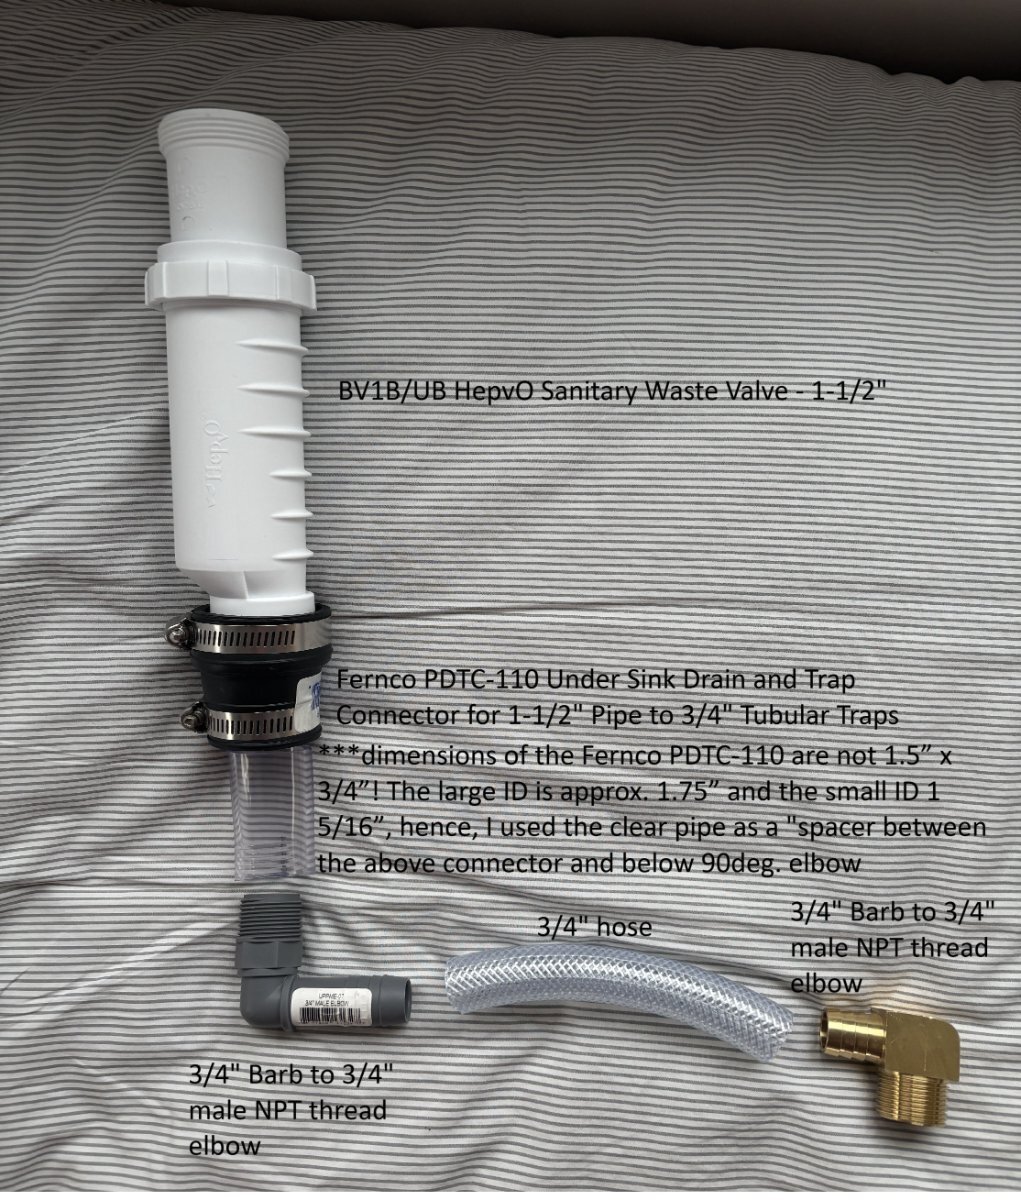
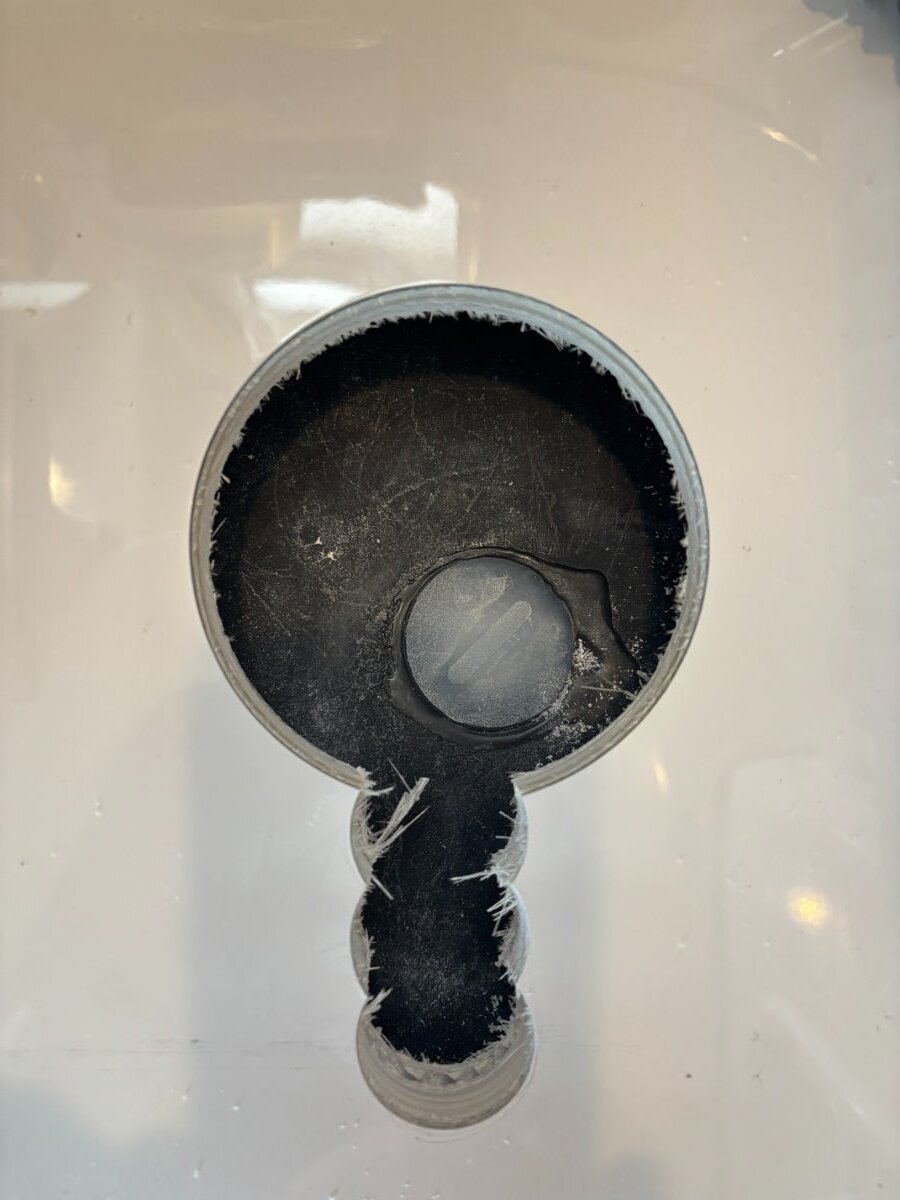
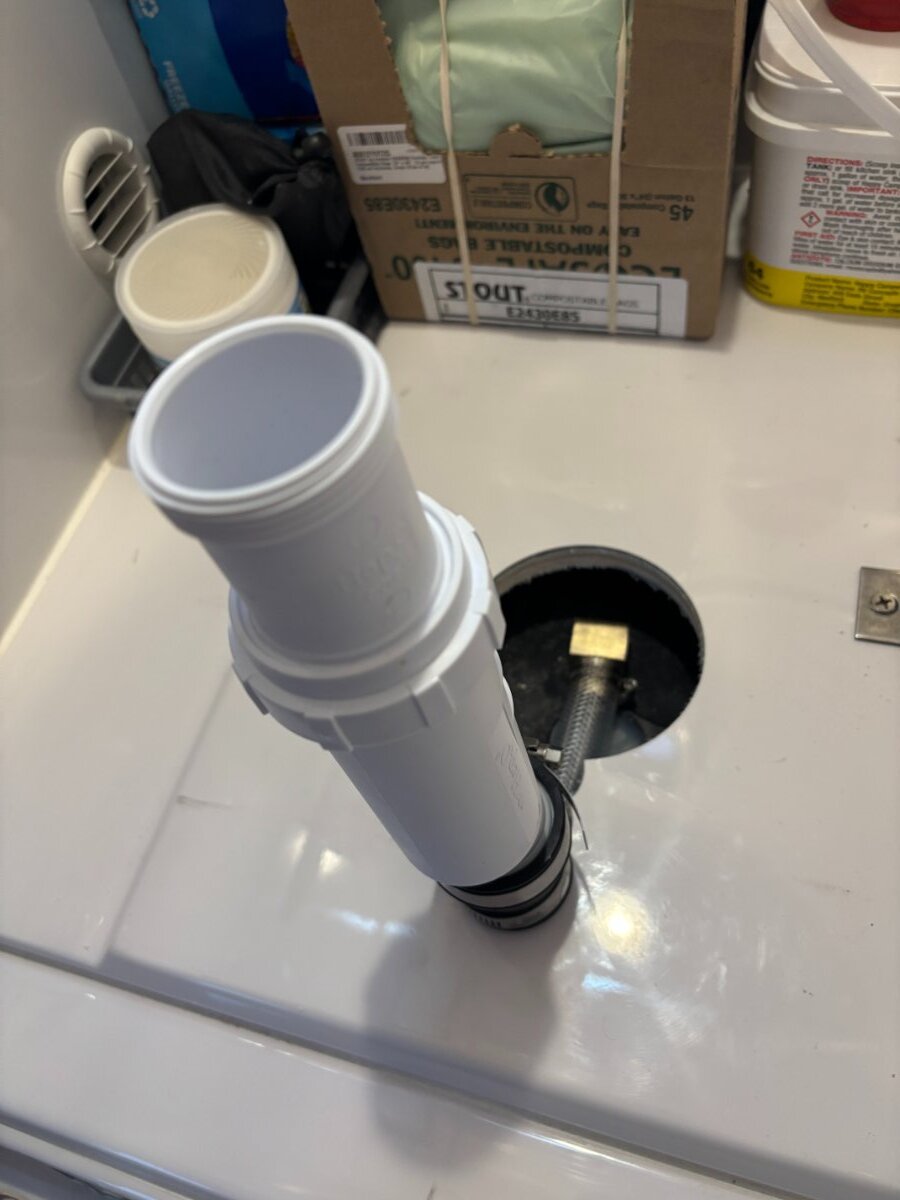
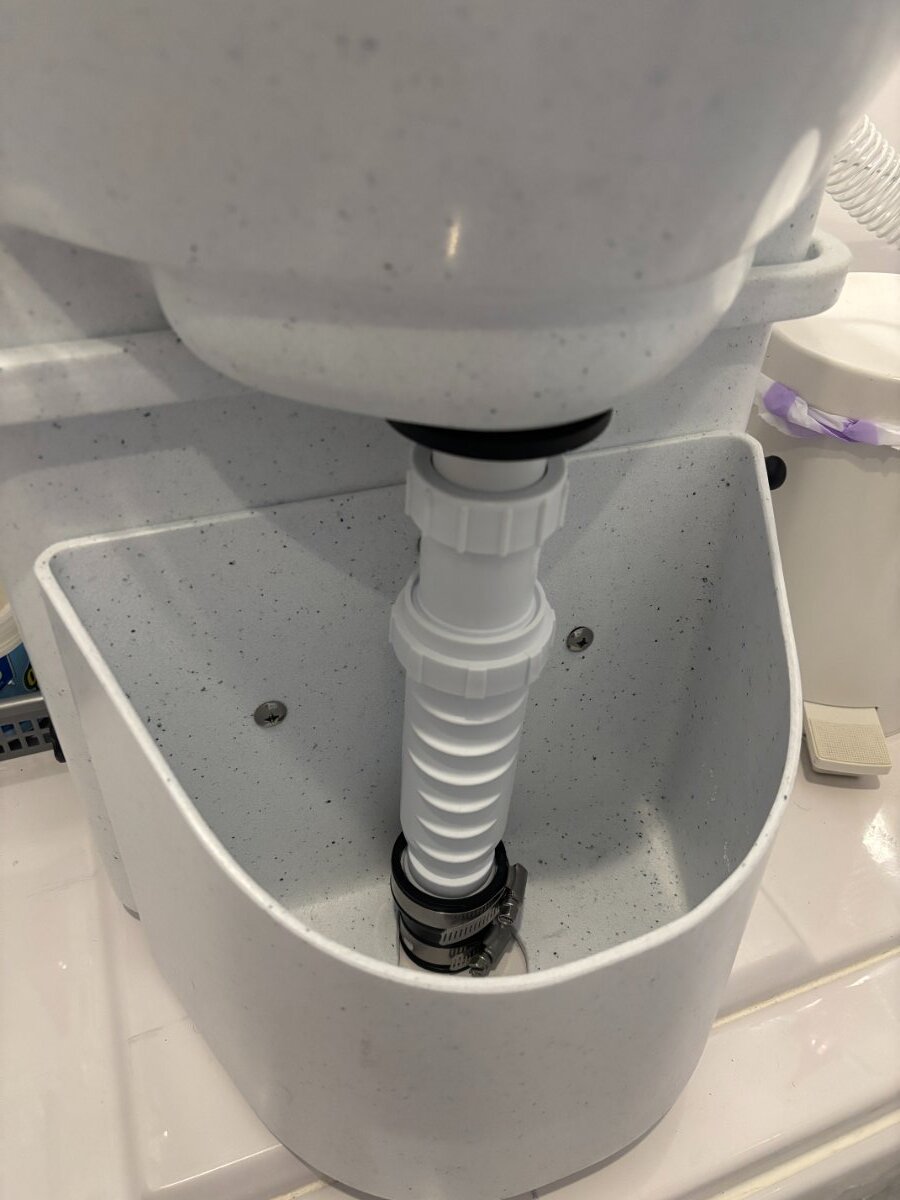
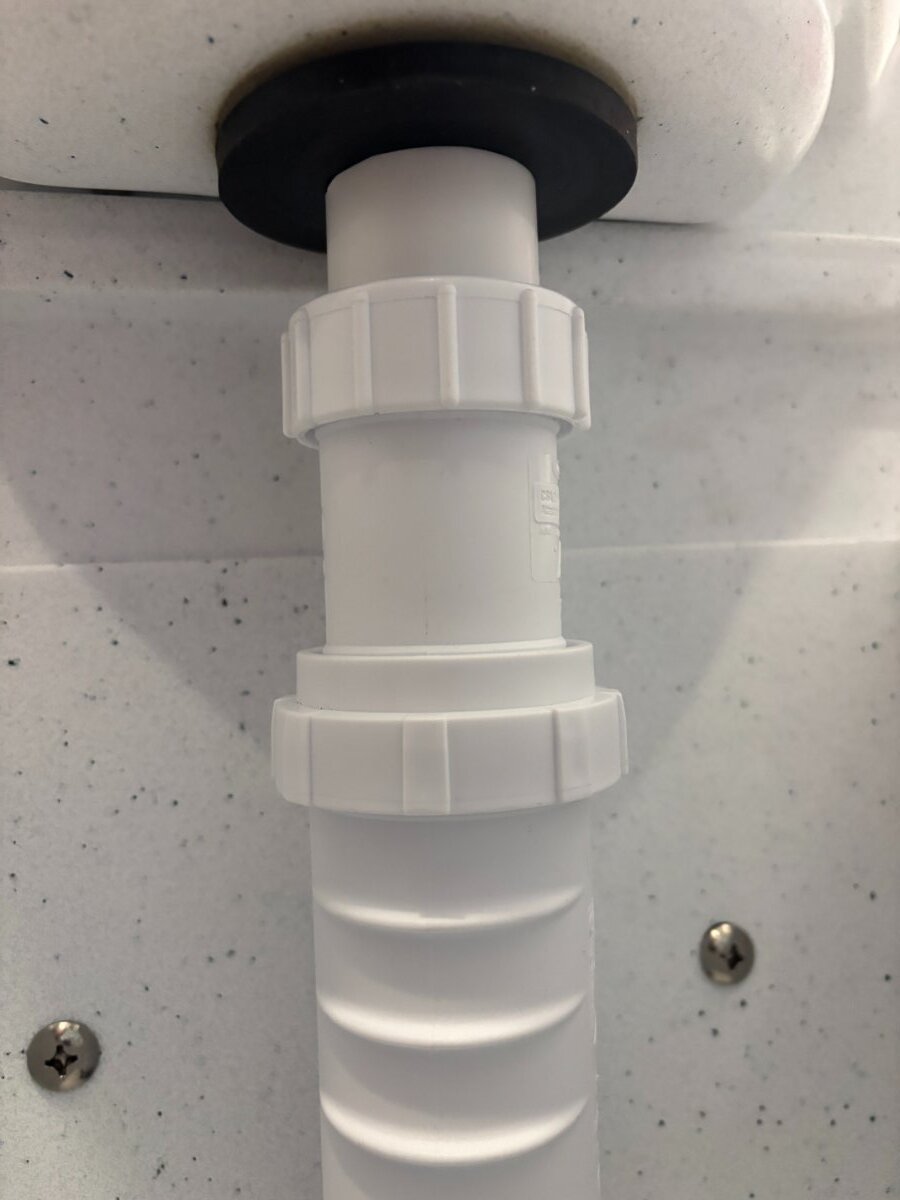
Ok time to revive this thread! I know there are mixed feelings about diverting the nature's head urine tank into the Ollies unused black tank. Well, I actually went ahead and did this mod and so far FOR US we absolutely love it, more so for me not havig to dump and clean the 2.2gal urine tank every 2 to 3 days!🙂 Instead of using a ball valve to eliminate any odors from the black tank I used a 1.5" BV1B/UB HepvO Sanitary Waste Valve, and yes we still add some water and vinegar after every use, so there is no odour at all. Obviously there are other ways to do this, and maybe a better way, but here are some pics of how I did it, pretty self explanitory so I will not go into much detail explaining it. Next mod will be to reroute the sink drain to the black tank. Large hole was from factory, I drilled the 3 smaller holes.
1 point
-
I have found Micro-Air support to be very helpful. Mossey
1 point
-
Update: I was able to work directly with Lippert to order a "door core" which is just the door including the window. (The door frame, hinges, and threshold all stay in place, and only the door core is replaced.) The factory wanted $1600.00+ taxes for the replacement, and direct order cost is $676.21. ($1k savings) The installation is like replacing a pre-hung door so I feel confident I can do this repair at home. Hope this helps anyone else who requires a door repair. Be careful to look at how your door hinges are attached as they have changed from older models to newer models. When I do the replacement I'll repost with photos. Lippert Part Order Detail: For Hull 505 (2019 Model Year) Lippert Custom Part : V001045386 -CORE R 24 X 64.5 RH WH 8211PW ISPL GCR A3HV STDWWOB W/SCN $411.95 + to my location shipping $264.26 = Total $676.21 Lead time is 5-10 business days for production + transit. Shipping is calculated specific to end location at the time of ordering. To place an order please call 432-Lippert (432) 547-7378 The installation instructions they sent for removal of the door core: ccd-0006252.pdf1 point
-
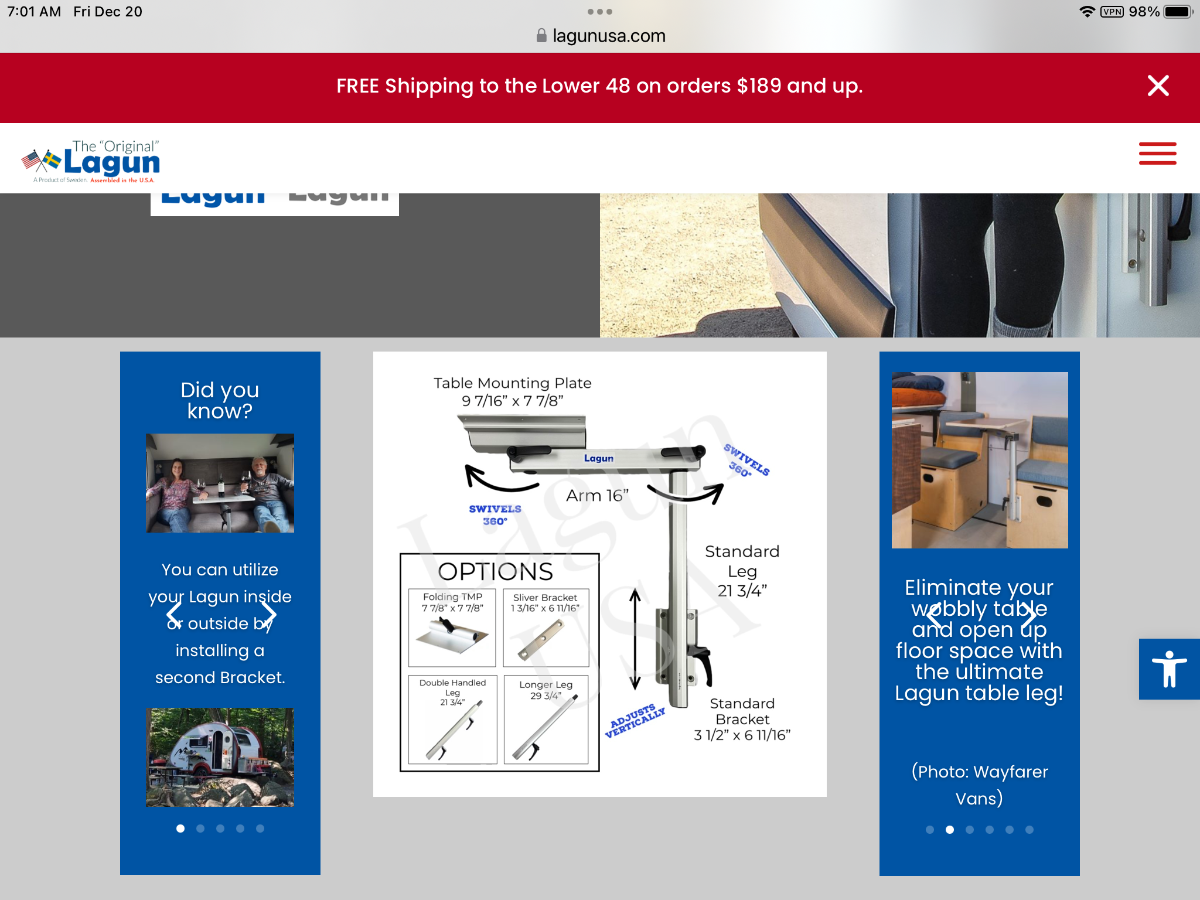
Alternatively, Oliver uses the Original Lagun table support, visit lagunusa.com for more information.
1 point
-
I actually have a 70s lava lamp in one of the guest bedrooms. No shag carpet, though. Lol1 point
-
Unless it is the 4th of July! 🤯 (Note - just kidding here)1 point
-
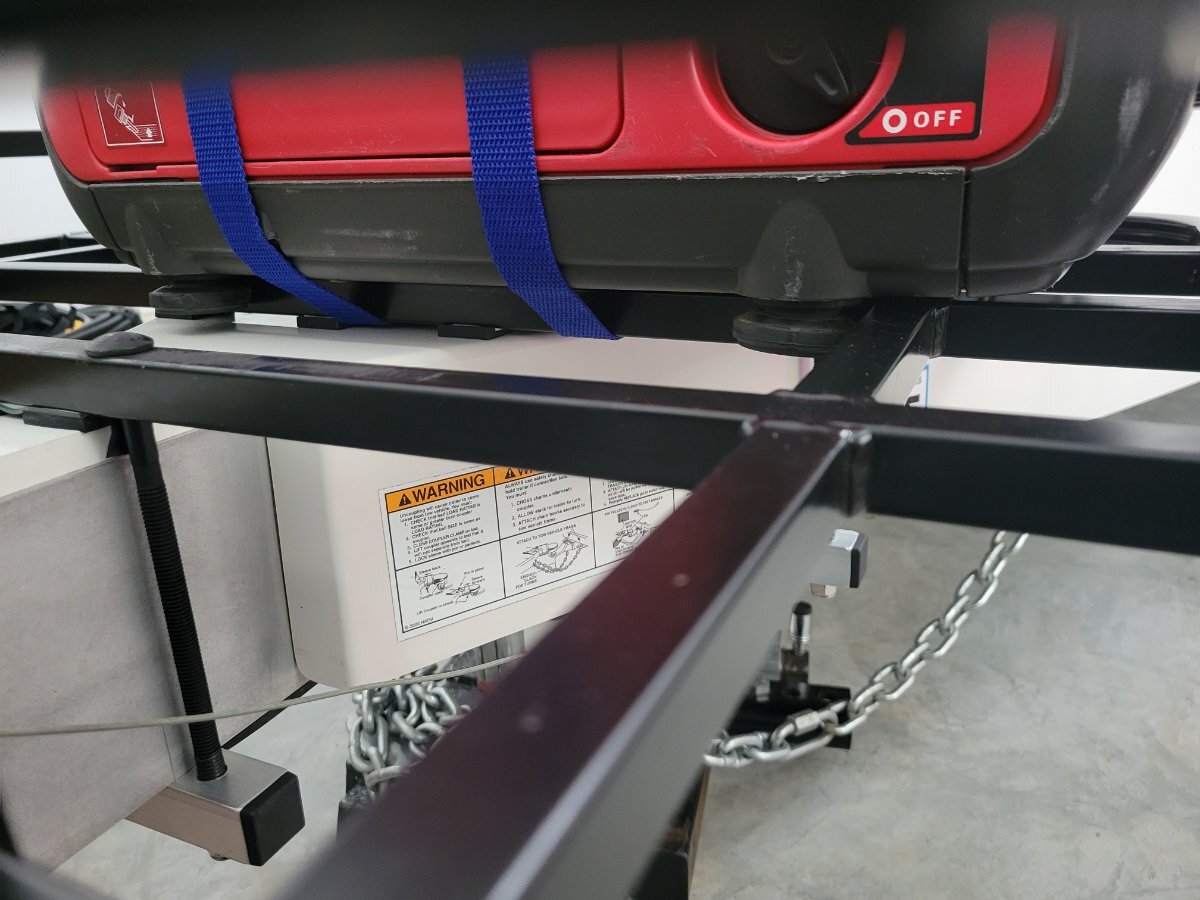
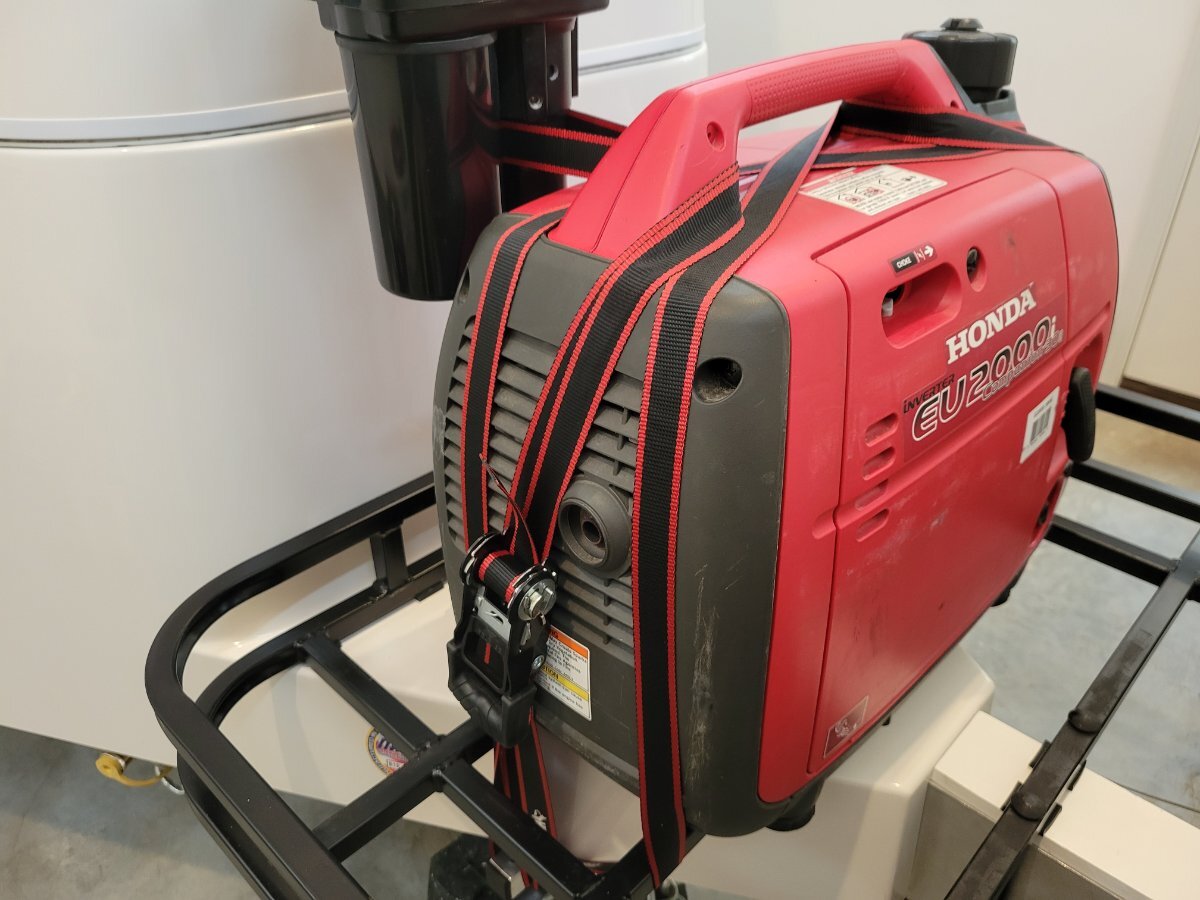
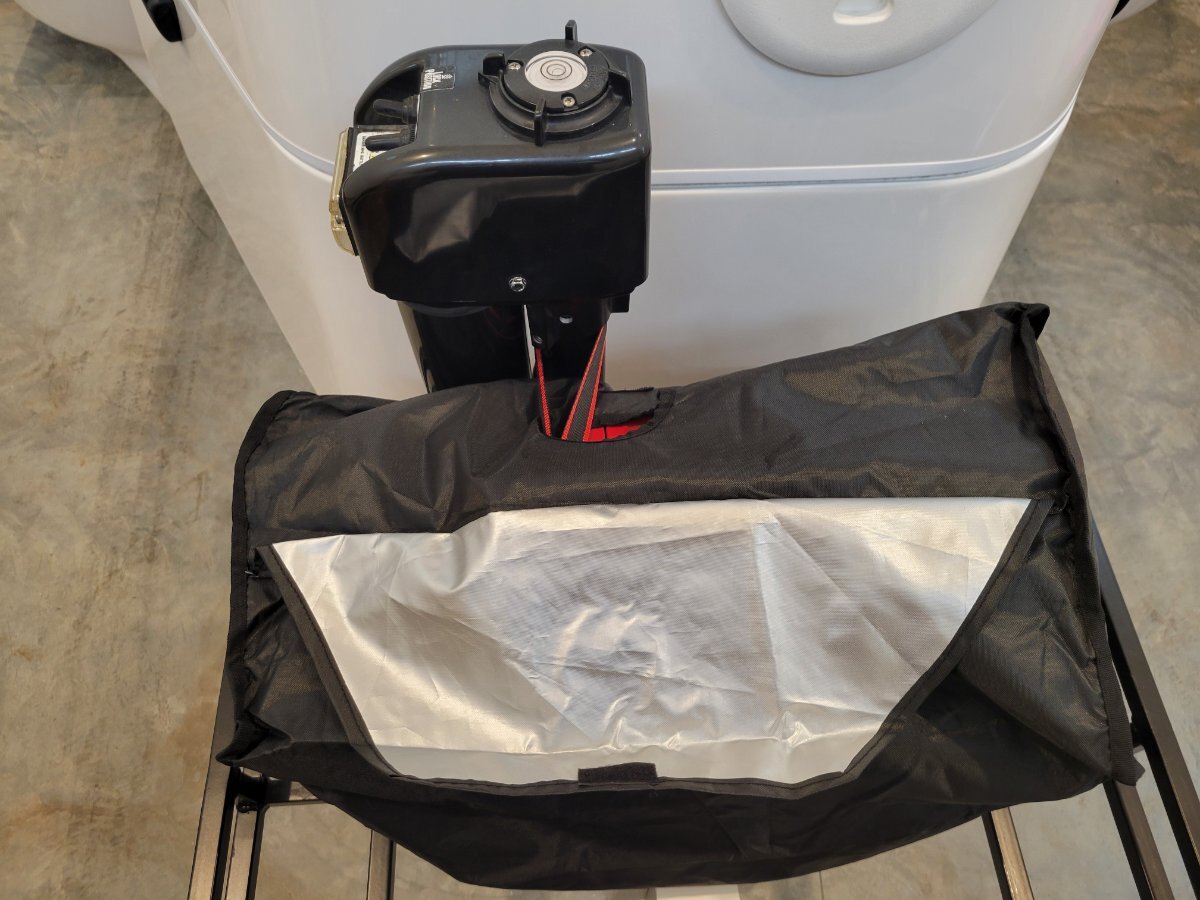
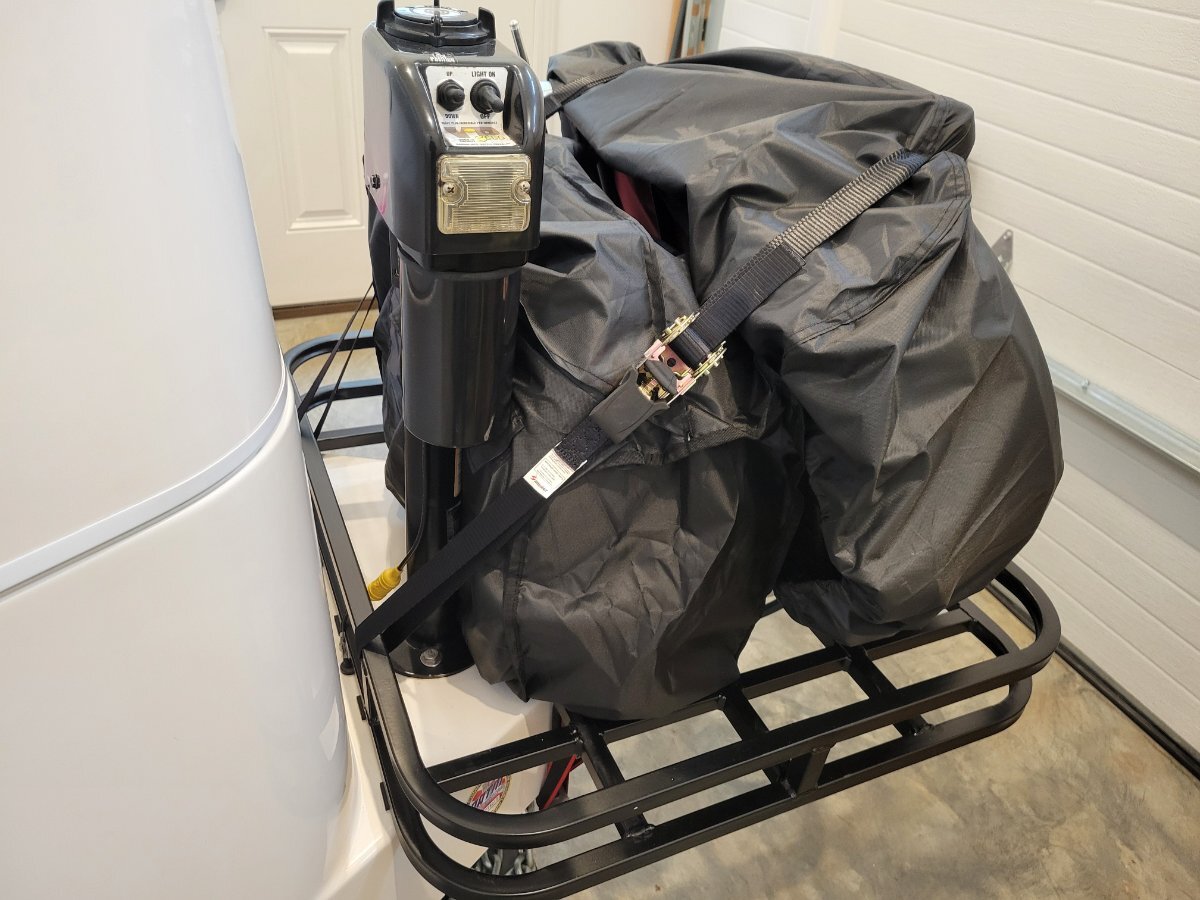
I want to first thank all in the group for indicating their concerns, and offering suggestions. I removed the side mounted gas cans, and upgraded to four substantial ratchet straps. The ones that I used around the generator have large hooks on each end. I crisscrossed the straps over the generator and wrapped them all the way around the tounge and hooked them to the main framing under the tounge on both sides. I also slid the generator over so it is now centered on top of the main framing and I looped one of the straps around the jack pole for added stability since the generator is now right next to it. I will watch for any wear on the straps and reroute them as necessary. Although we don't use our generator often, we wished we had it on a 45 day summer trip we took up the east coast into Canada in 2023 as there were a lot of overcast days when our solar panels couldn't keep up with our tired batteries. We took it with us on a 70 day trip back up North this year and used it about 20% of the time when the weather didn't cooperate and we were without hook-ups. Lifting it in and out of our truck's bed got old real quick. Letting it travel on the tounge of our Oliver will make things a lot easier when I need to pull it off and use it. For now, I will use the 2.5 gal no-spill gas can that I bought before this year's camping season and keep it secured inside our truck's bed as I did this year near the tail gate. I travel with the generator and gas tank empty and only fill them up at the end of the day when we get gas for our truck just before checking in at campgrounds where we won't have an electric connection. Prior to checking out I pour any remaining gas in the generator into the can and then into our truck. This way I'm not traveling with any gas in the generator, or in the gas can, and we are always using fresh gas when we need to use it. The basket that I have installed extends forward the same length as the Sea Biscuit basket and it is only 2" wider on the sides. The corners are rounded, although not quite as far back as the Sea Biscuit basket. The basket that I have left enough room for our dog's fold-up stroller which was the other item I found difficult to be pulling in and out of our truck's bed. I will confirm my ability to make sharp turns before heading out on our next trip. The quality of the Sea Biscuit products is unquestionable and I may switch out my basket for one of their containers in the future when our dog is no longer with us. For now, my wife always acts as my spotter when we're pulling in and out of campsites to keep me from hitting something so she can let me know if I'm getting too close to our truck's bumper. Thanks again for all your input. Joe
1 point
-
Sounds like these Roller Cam cam lock straps would be a great choice for battery hold downs. Thanks GJ1 point
-
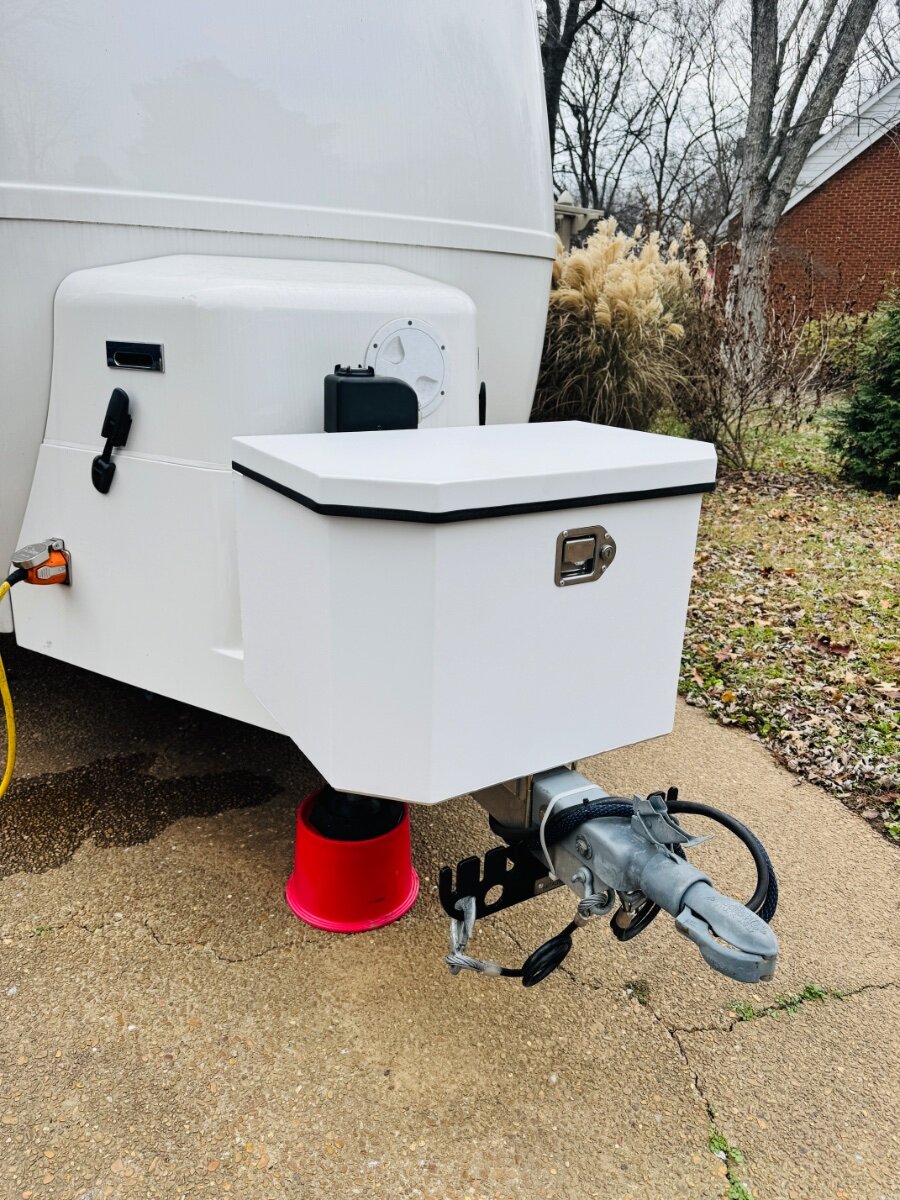
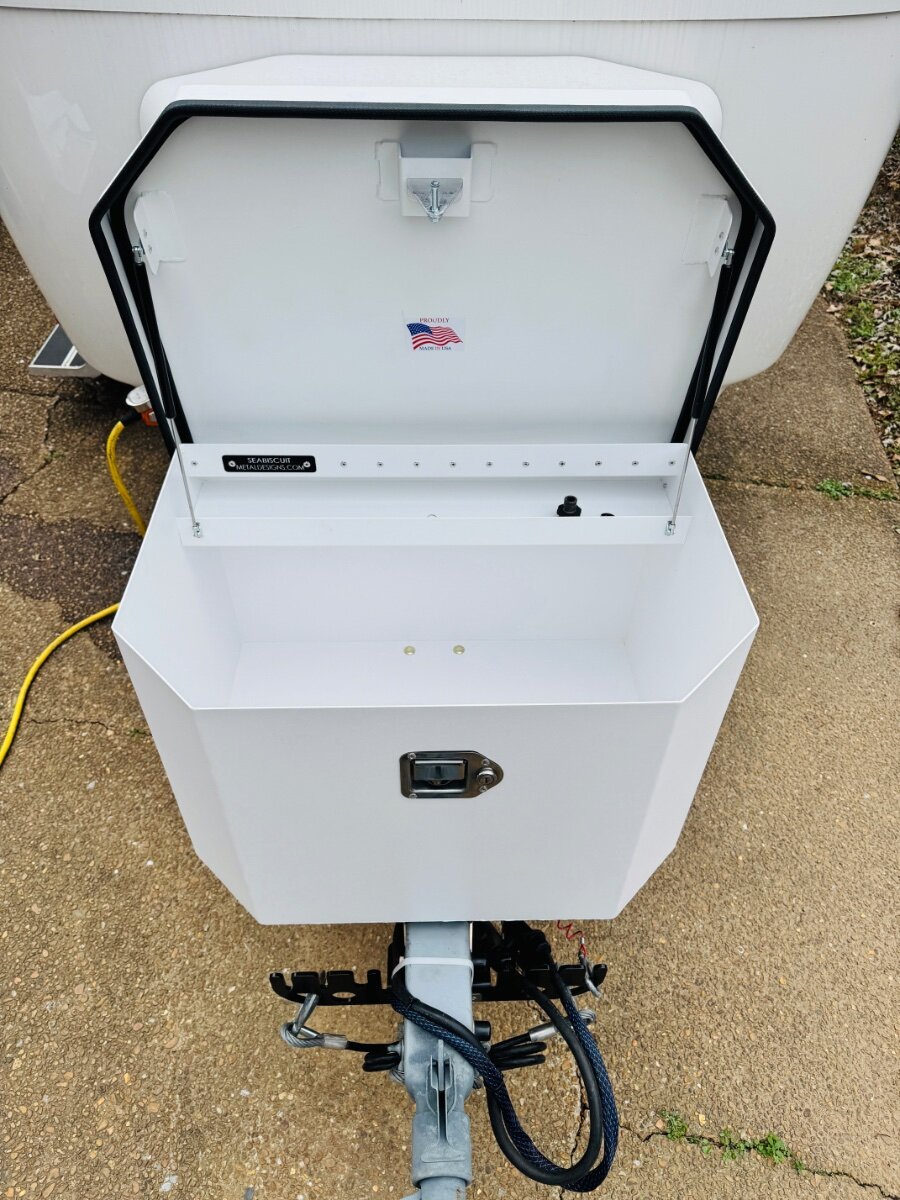
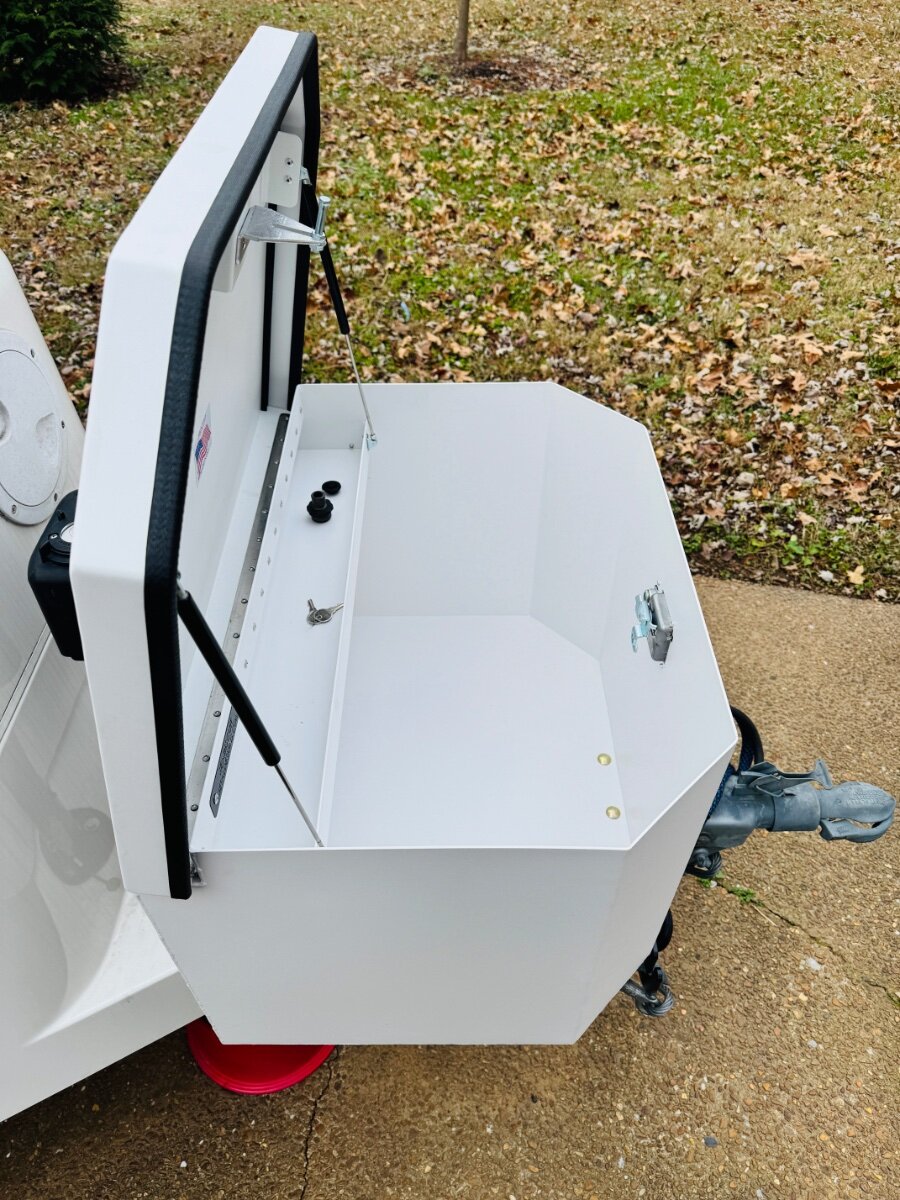
@Just Joe There are many available options out there for front storage boxes. In 2023, we did an epic 42 day loop out west and had our Honda 3200i mounted in the front basket. We never used the generator. During the trip, we quickly learned that storing a gen in the basket was not best use of this valuable storage space for our travel needs. The first thing we always found ourselves needing were chocks, blocks, 30 amp cord, LP grill hose, extension cord, and just all things go to gear. This meant opening the tailgate and unloading this gear out of a storage box in the bed of our TV. After returning home and doing a little research, I opted to order and install a front storage box from SeaBiscuit in Johnson City, Tenn. We actually went to their shop and picked it up as we do not live that far away from JC, Tenn. David and Kristine Hess, owners of SeaBiscuit, are some of the nicest people we have ever met. The quality and craftsmanship of their USA 🇺🇸 made products are excellent in our experience. On this year’s 47 day trip out west, the SB cavernous water tight storage box was a great decision for us and has served us well. It sure was nice to have quick access to set up gear instead of opening our tailgate and pulling out our gear at each base camp. We now store/carry our rarely used 3200i gen locked down in our TV bed. Everyone’s budget, storage and travel needs are different. This storage box works for us and is how we roll. If you decide to attend the 2025 Oliver Rally at Lake Guntersville State Park in Ala, David & Kristine Hess and their staff will likely be attending with products to display. Hope to see you there! Welcome to the forum! Patriot🇺🇸
1 point
-
I am going to give another shout out to Seabiscuitmetaldesigns.com located in Johnson CIty, TN. It is not just that they make wonderful, well made custom products for the Oliver but when you buy from them you are supporting made in USA by USA workers that need support to put food on the table and keep the doors open. Awesome, friendly staff, including the dogs! Best, M Agree with @Patriot, every trip gives you more experience on how you want to pack/load the Oliver for each own's specific camping style. I like having the watertight storage for useful things that I can keep handy. Goal Zero solar generator will go into the bed of the truck when and if I need it.
1 point
-
Ditto. I would only say "Danger Will Robins Danger". There is a good reason OTT cut off the corners of the front box. I and many other owners have the "witness marks" to prove it. 😞
1 point
-
Yes, the sea biscuit box looks very well made, I just couldn’t justify paying $1200 for a box that I can get on Amazon for more than half the price. Yes I know it’s not the same quality but I (me personally) don’t need a “safe” to hold my chocks, levelling blocks etc. in, but hey, that’s why there’s dark and white chocolate, I like dark chocolate! My $350 box from Amazon is working perfectly fine for my needs. 😊1 point
-
I would be more concerned when turning sharp corners or turnarounds with your setup; even backing up into a campsite pad could be challenging, which is usually not a straight shot! Aside from that, you’ve made good use of this valuable real estate; really like the gas can mounts. Many owners have added weight to the tongue and seem pleased, rear additions or not. Good luck with your endeavor!1 point
-
I keep a very inexpensive yoga mat rolled up in the front bin for work under the trailer and for Anderson hitch chain adjustments. Since those almost always occur in gravel sites it keeps me from starting the day looking like I crawled through chalk and mud on the way to the truck. 🤣1 point
-
For $1600, Craigs tape job looks really good to me! Thought when I looked a year ago these doors were under $900. Like Mike, our few lights cracks will stay as is no tape required, but I would do the same it the laminate was coming out of the frame as pictured. To remove and replace the surface will not be easy, given you want it installed within the frame like the original. The only removeable section is the bottom cross-member (see door bottom pictured) and the window surround and door handle. You can buy 4x8' sheets of similar material at Depot and other stores. Cutting smoothly to size with top radius corners is not easy but doable. The trick would be after getting all the old material out would be slipping the new surface into place. You would likely have to chisel and file the core of the door to make extra room for material that would be a few mils thicker. Or you could just glue it over the frame. 🤣 I'll replace our door ONLY after we have trouble opening and closing it!!!
1 point
-
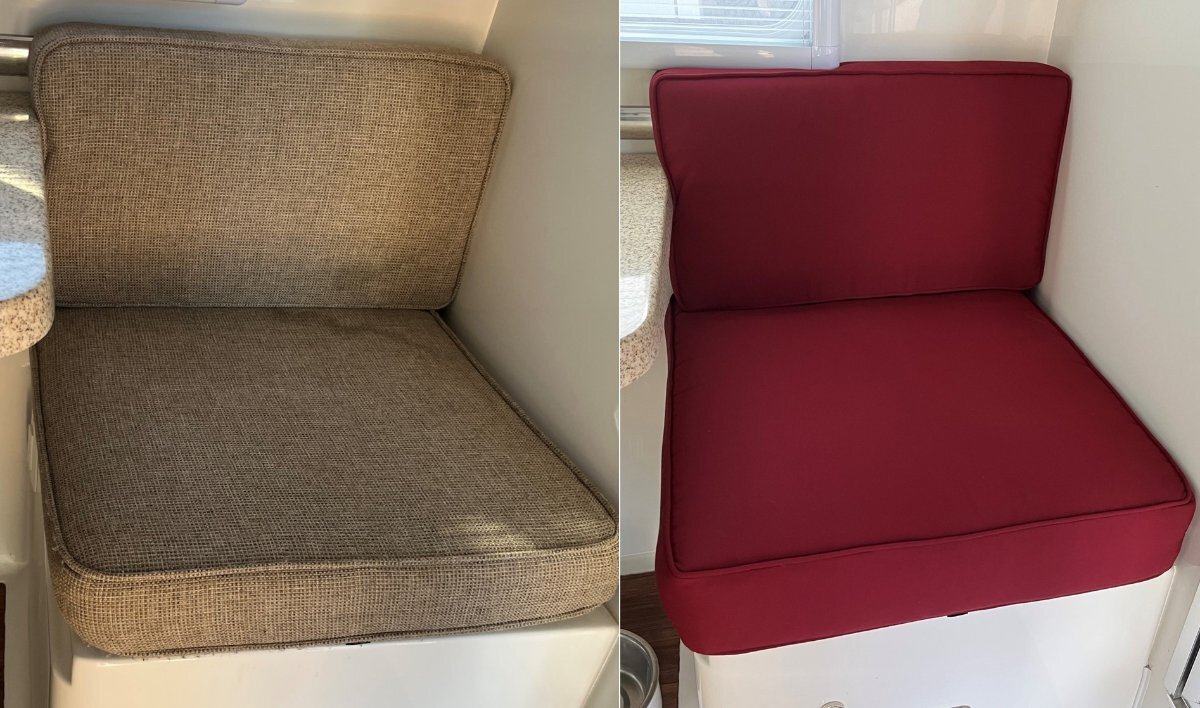
This would be nice at times but will take depth from the seating area. I like the pool noodle idea or a lumbar pillow since they can be removed when dining. I have one that I can use at the dinette and always when watching TV from bed. Sitting correctly when eating I prefer the full depth, but perhaps not needed for all given Ron's comment. Our dog Charley likes to sit at the dinette in the morning looking out the window and when we are away for the day. We're looking now for a throw-cover, so he doesn't dirty the new fabric! Checkout my before and after picture. Our old cushions were just gross! I tossed out the bottoms but kept the backs which are great for kneeling when working in the Oliver basement! One reason ours got so dirty is that all summer I used them for kneeling or laying on the floor working all our Oliver mods.
1 point
-
I heard it from a naked rat.1 point
-
Maybe I can glue some astroturf to the inside of the door. Or, use some of the rat fur that’s inside a Casita? We’ll probably just live with it. Mike1 point
-
Same here Bill, Possibly Lippert had a bad run at some point? It sure is a costly replacement for something that should last a long time. 😒1 point
-
That’s a good point, I wonder if a change in the door was made after 2010. We’ve got a number of horizontal cracks in our 2016. Mike1 point
-
Airstream trailers use a much thicker 'plastic' on the door interior. Probably the ONLY 'plastic kind' of material being used. I do not know the composition, but it is not Aluminum or metal. OK? It is a 2019 as is my 2019 Oliver Elite II. They purchase the plastic from... someone, somewhere. Possibly the same company that makes this 'plastic', or whatever it is... for Oliver. Plastic: PET, POM, PBT, PA... and the list goes on. This door 'material' is thin on the Oliver. After a time span... it has become brittle. Some may say it is used to save WEIGHT to the Trailer. Yeah... right. My wife saw this thread earlier today, which got my attention. Anyone who has worked with Fiber Glass... like some of us did with 1960's Corvettes when they were... cheap... whoa... the smell is something I never forgot. Once 'cured'... no smell. Older automobiles can have parts or components that shrink. Acetate Dice and earlier Nitrate Casino Dice... also have a problem. Nitrates shrink, distort and decompose exposed to air over decades. Acetate Casino Dice... will keep their sharp edges and probably last a hundred or more years. This issue with the very thin interior door 'material' is a problem. I find cracks in my Oliver door. I suspect everyone will have hair line cracks. Some will get those that shrink, but fold and curl up on vertical shrinkage. If you have the horizontal hair line cracks... you are one LUCKY owner. The curling I saw next the door window, may be the same material, but cut to size differently. The material is inexpensive, compared to the LABOR to remove and replace. Makes my nasal hairs... tickle. 😞 Sorry for taking your time... I did OSHA inspections in my youth... and... heard lots of excuses and finger pointing, as well.1 point
-
This, to me, appears to be 'Plastic Degassing and Shrinking'. Not due to your misuse of the Oliver or Heat or something you Did or Did Not Do to prevent it. You are lucky if the cracks are... Horizontal. Left to right... fractures reduce the tension from the longer length of the thin door panel. The gap in between the cracks reduces the tension by cracking. You will probably get lots of them, but there is nothing that can be done. Another original sheet... will also do the same if it is Degassing. Nobody has explained this to me... as it is very common in plastics... and some, even thick items, can become brittle and crumble. It is a definite defect in the plastic being used and not of your making. Buckling... you would have to look at the entire door to understand that one I see photographs. The more small fractures, the tension is reduced. Although the plastic will still be brittle and if you hit it... it will crack into pieces. Again... this a manufacturing issue of the plastic being used. Not from your use of the trailer, weather, road vibrations... etc.. The Buck Passing AFTER Warranty is rather slick. It may take several years or longer... beyond Warranty... and now it is Your Fault and Responsibility. I recall plastic toys... that Degassed over time and became brittle and fall apart. I thought by now these poor products were extinct. Guess not. Try finding some site about Plastic Degassing. Finding one that makes sense... you are a lucky person. I see no good results by replacing the interior plastic with the same plastic. Just my opinion.1 point
-
I have a temporary fix for the cracked in net liner of the door. What I found was the door frame has a very narrow slot where the inner lining fits. In our case the lining had popped out and during a day with high temp swing had expanded enough to crack the inner door panel. With careful working of the inner panel I was able to fit it back into the groove on the edge. I apply white Gorilla Tape to hold it in place and cover the cracks. Given that a new door would likely be a different color and not have our stripes we may just live with the ugly. The door works fine and has no exterior issues. I wish I could get the door manufacturer to respond as to the door design and assembly, but no luck. Mike Sharpe is trying to find a door part number. Ticket to remain open for now. We head out Wednesday for our trip home to Wa from Florida. Happy Thanksgiving! Craig - Hull 505 Inner door lining slipped out of edge and then heat expansion caused cracking: Used a putty knife to re-align inner lining into slot in door frame and applied Gorilla tape. Ugly but door is fully functional.
1 point
-
I’ve got horizontal cracks all up and down the inside of the door. No separation yet. It’s mostly cosmetic and we’re living with it for now. Mike1 point
-
In a case of odd timing, I received mine yesterday, too. Just a day after I finish my bathroom fixture replacement... I now have one of each style. If anyone has or will be getting a High Sierra shower head to replace the original Oliver pull-out faucet head (just the head, not the hose or entire faucet) let me know, and you can have either of mine free. The adapter with a male hose connection is for Oliver Travel Trailers pre-2021 and the adapter with a female hose connection is for the later model. I can bring them in April to the rally, I'll be at the Eggs-n-S'mores rally in Florida in January, or you can pay to have one shipped to you. https://www.highsierrashowerheads.com/shop/adapter-for-oliver-travel-trailers-chrome/1 point
-
I received my faucet adapter for newer Oliver trailers from High Sierra today. It fits great. It is made very well to boot! If you have purchased one of these and need the adapter just go out to their web page (under Help) and submit a comment stating the year Oliver trailer you have and that you had already purchased their faucet but need the adapter for newer trailers (My 2021 E2 has a smaller, male fitting on the end of the hose).1 point


-
Recent Achievements
-


")


")


")

