Leaderboard


Popular Content
Showing content with the highest reputation on 09/08/2025 in all areas
-
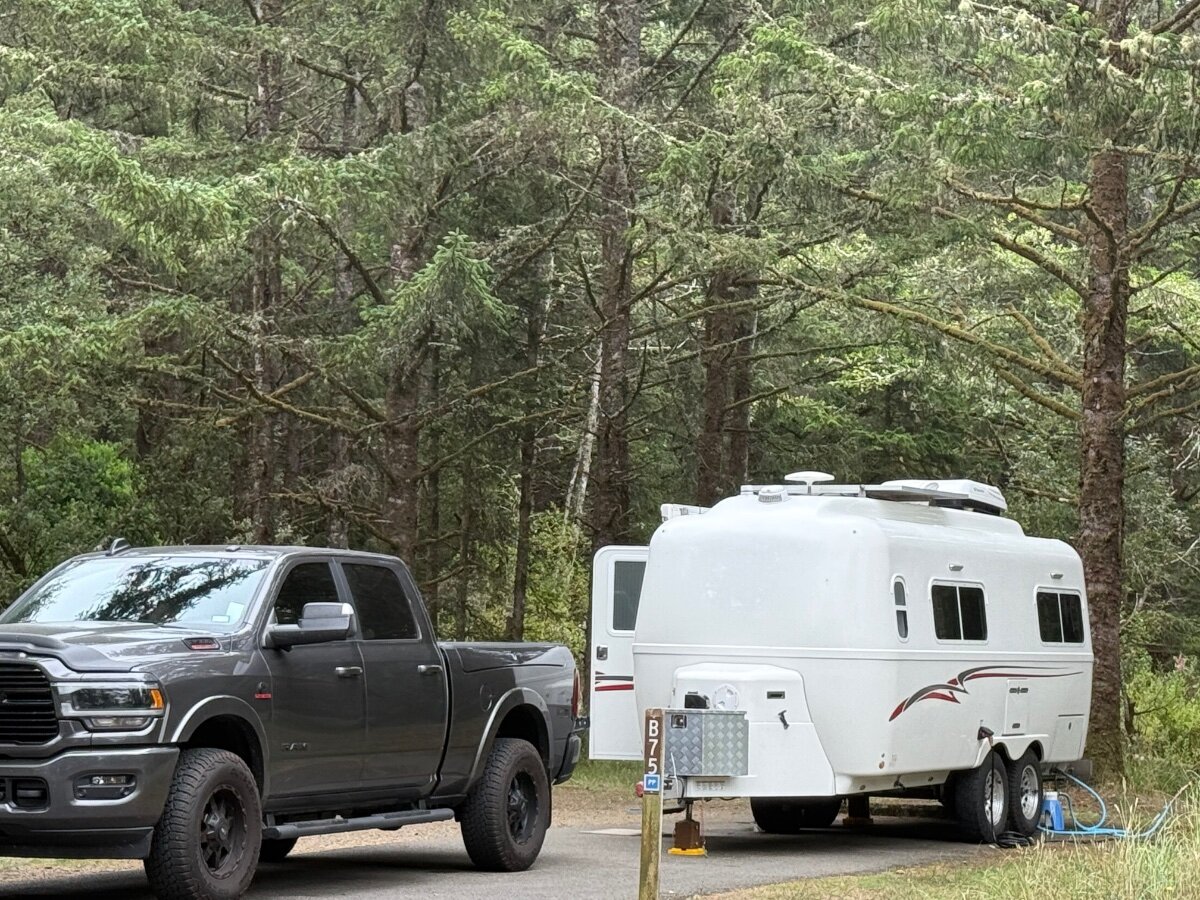
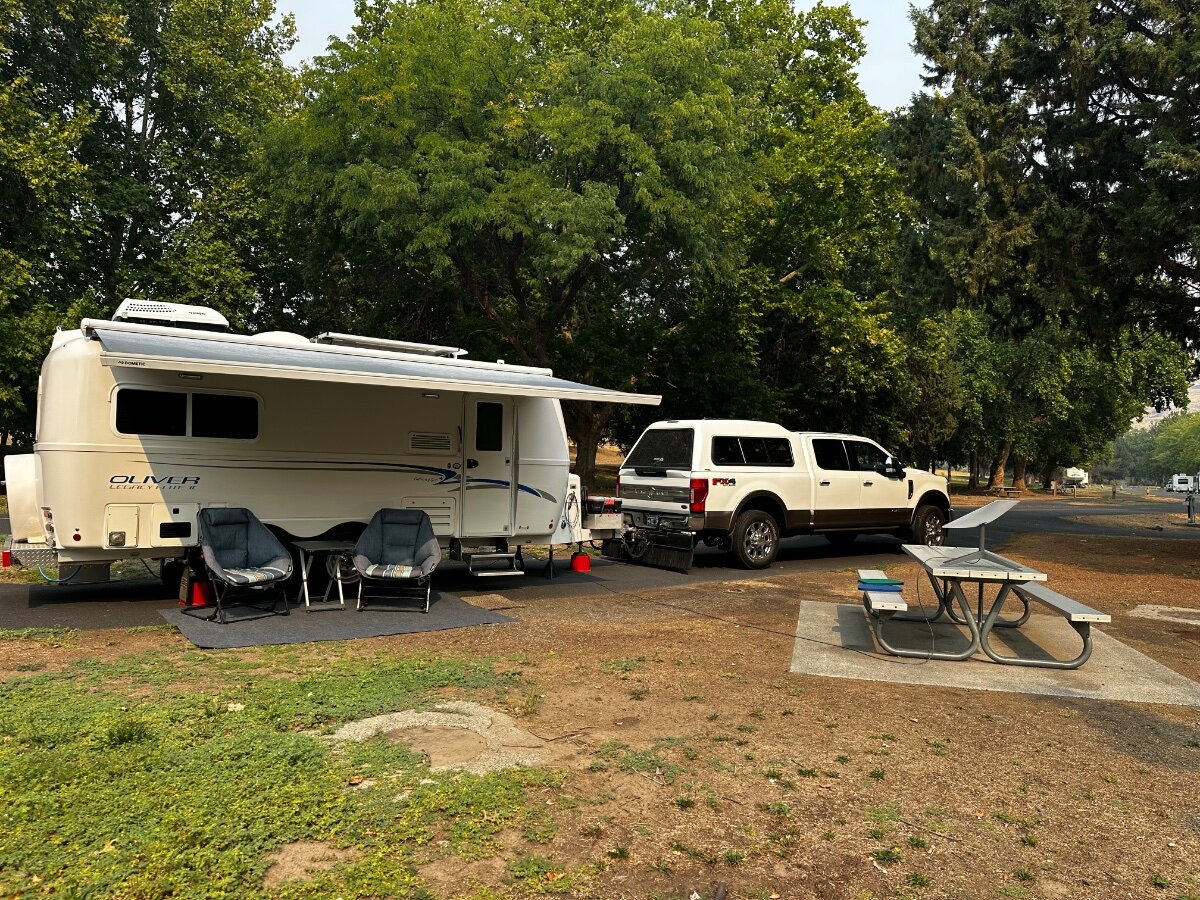
A little further up US101 after Tillamook just across the border in Washington is Cape Disappointment State Park. It’s a big park and was full the days we were there. A lot of sites on the beach, ours was about 50 yards from the shore but we still heard the crashing waves all night. The weather was cool and gray, probably normal for the end of August.
 9 points
 -
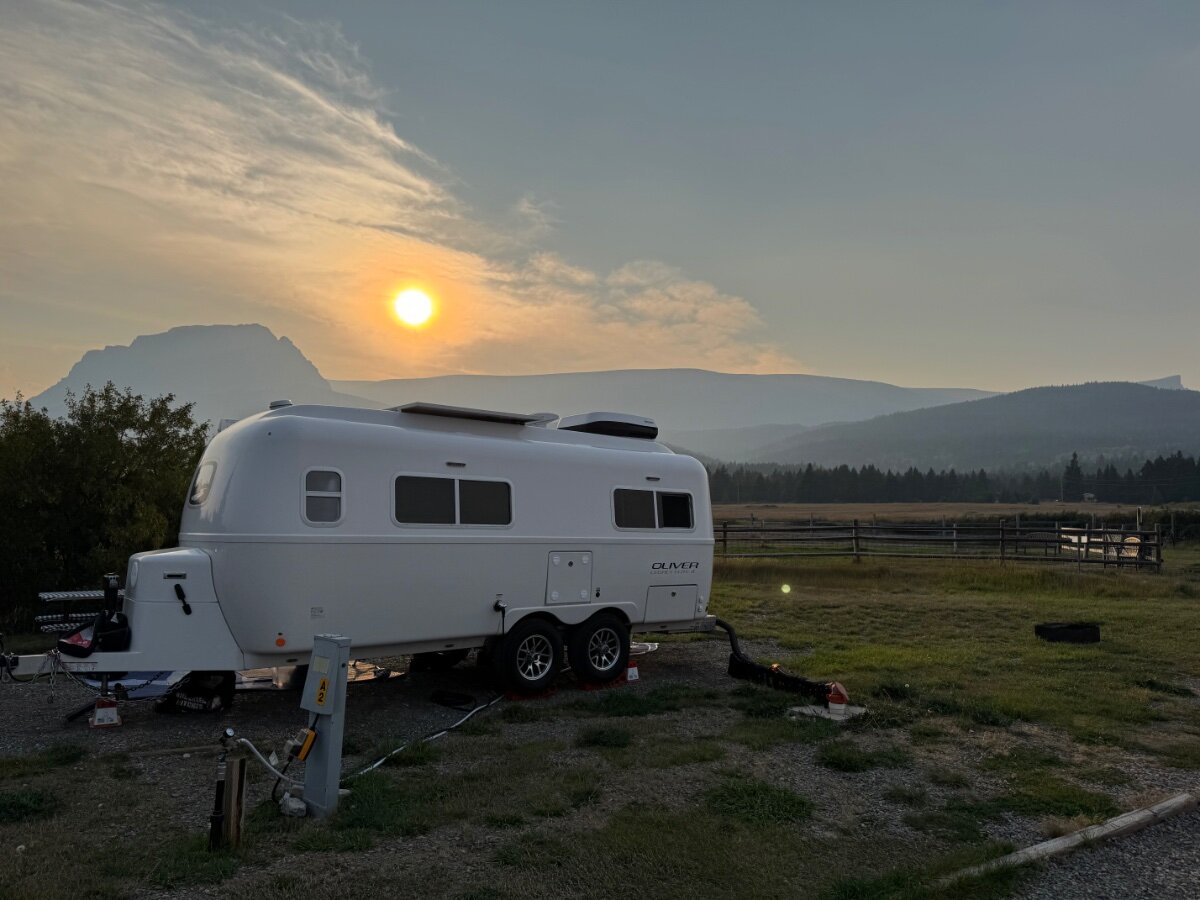
East Glacier (KOA) lots of smog from forest fires still beautiful whenever it clears a bit
7 points
-
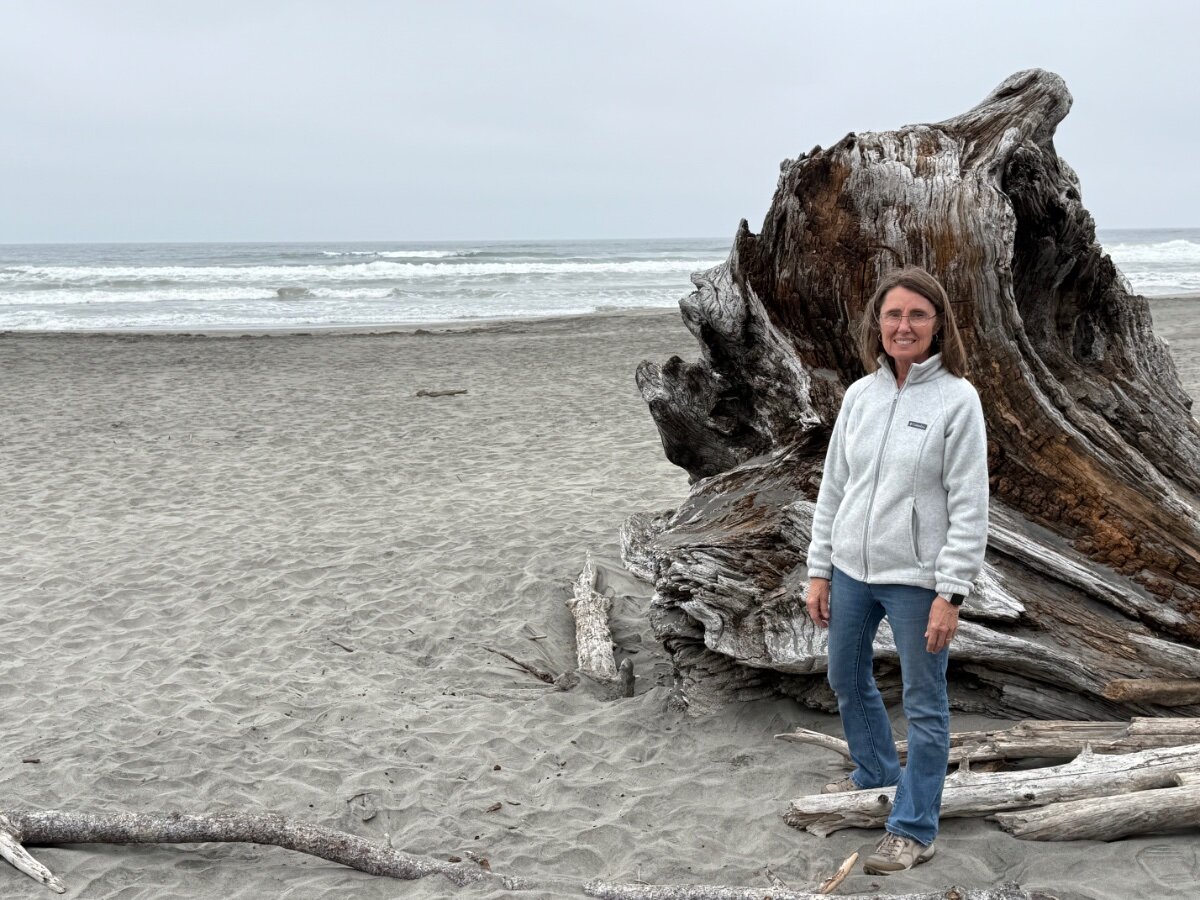
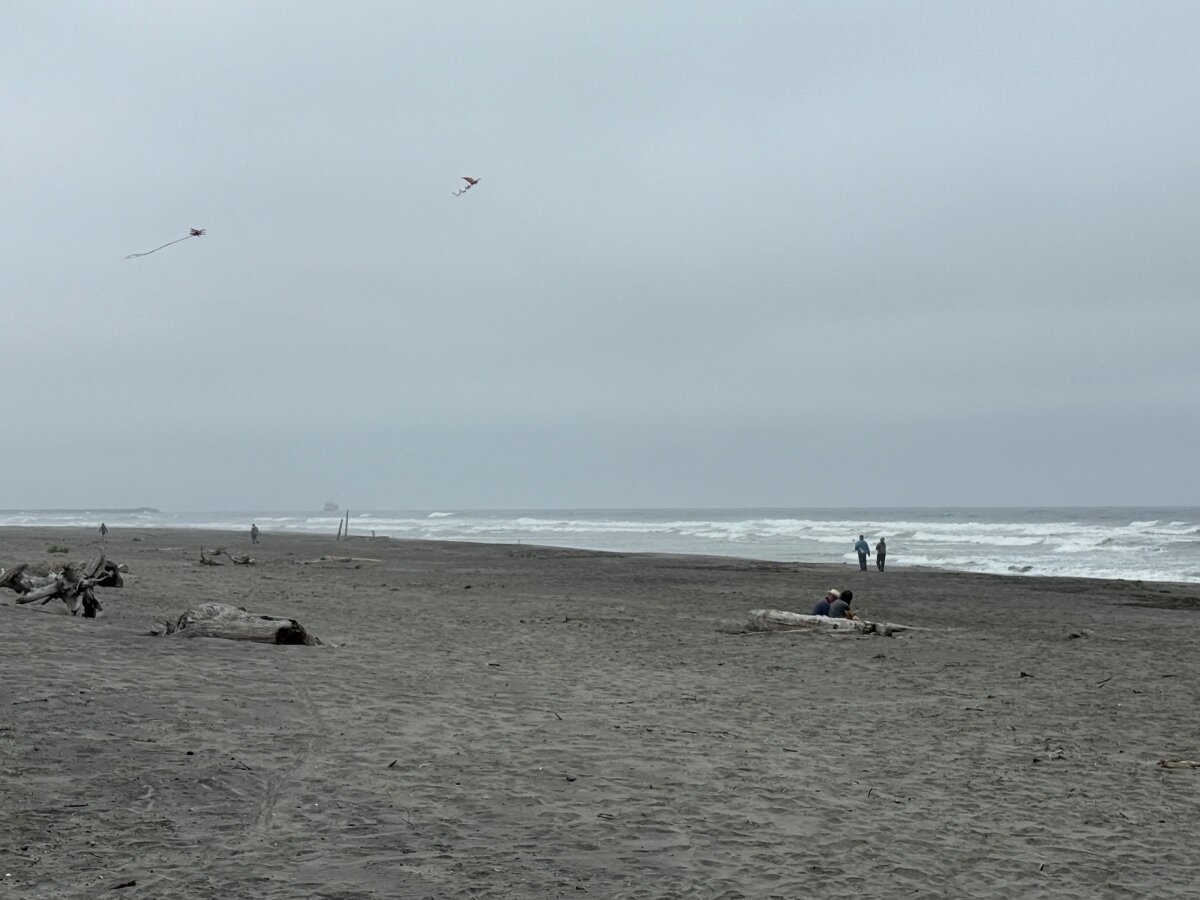
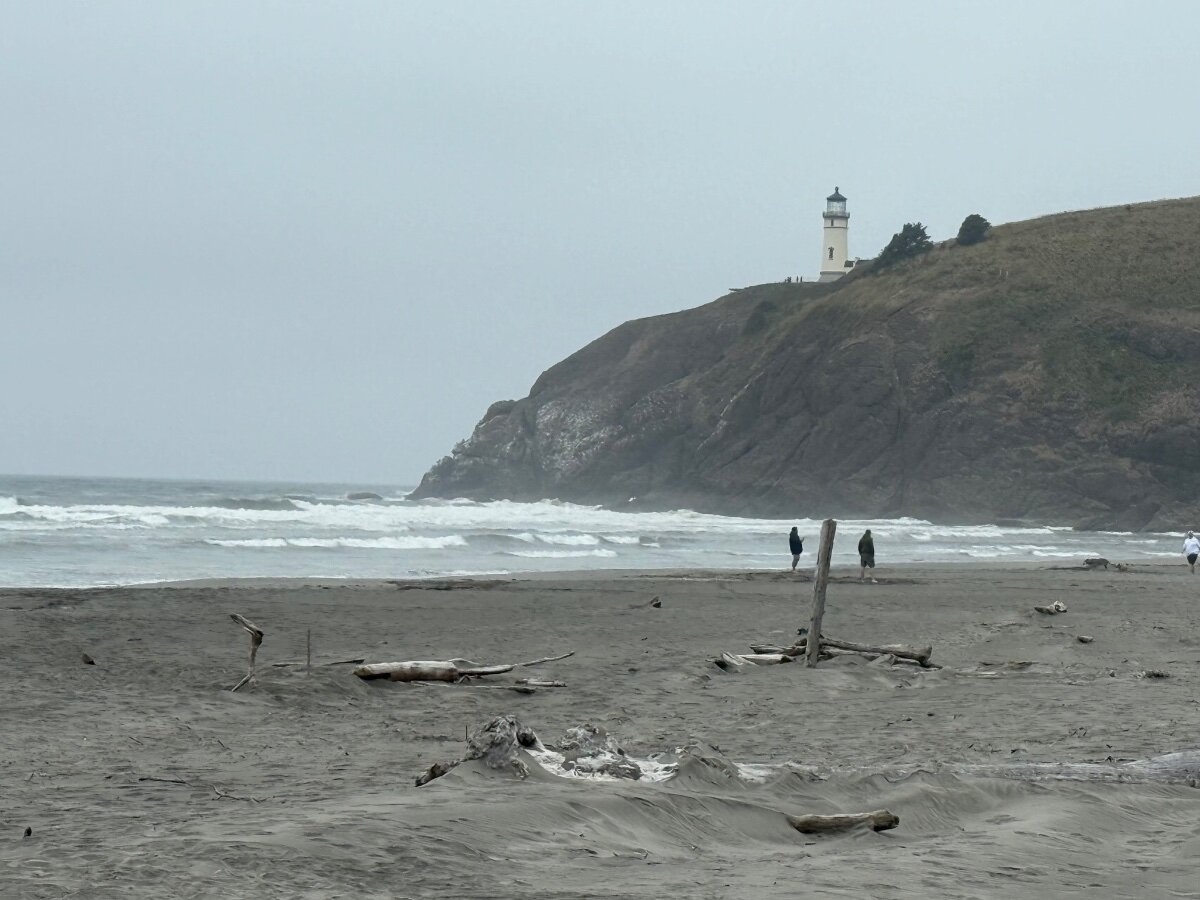
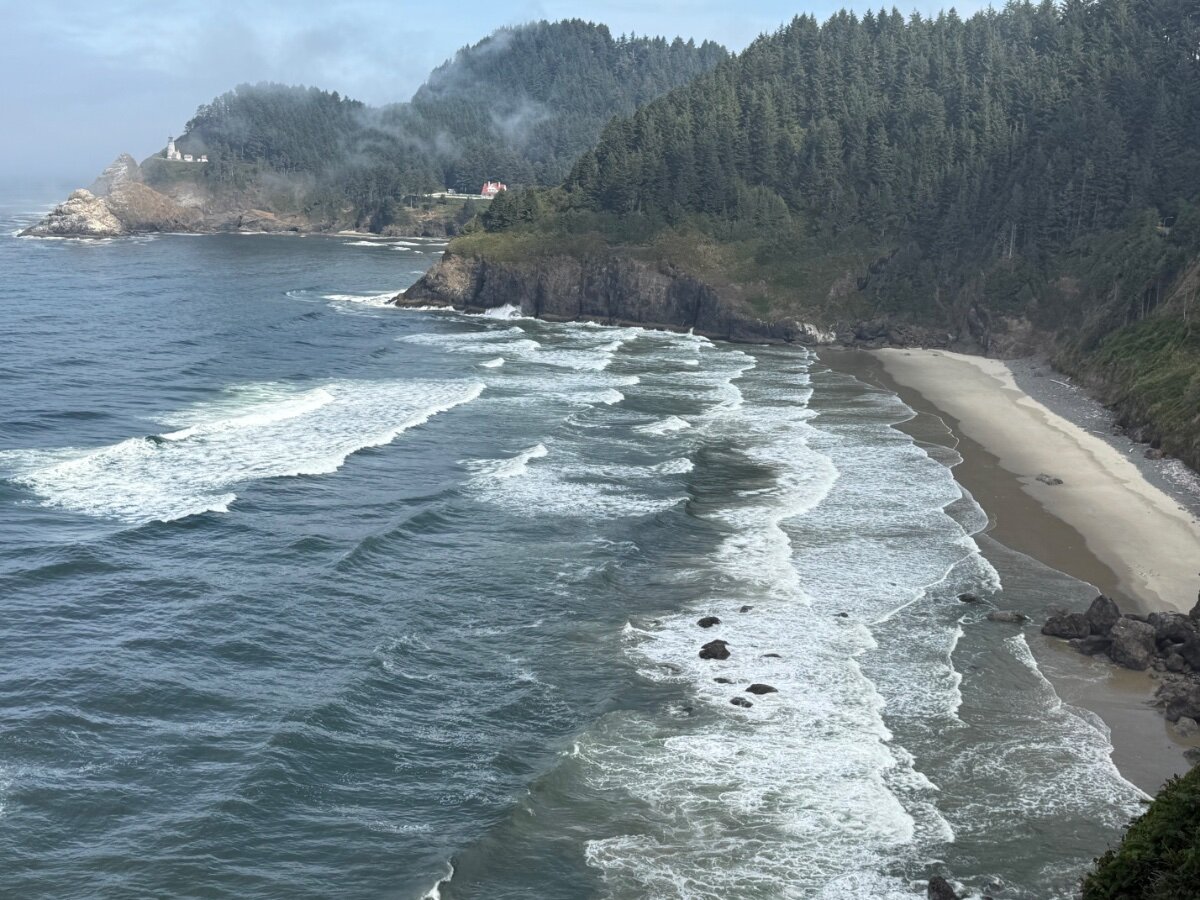
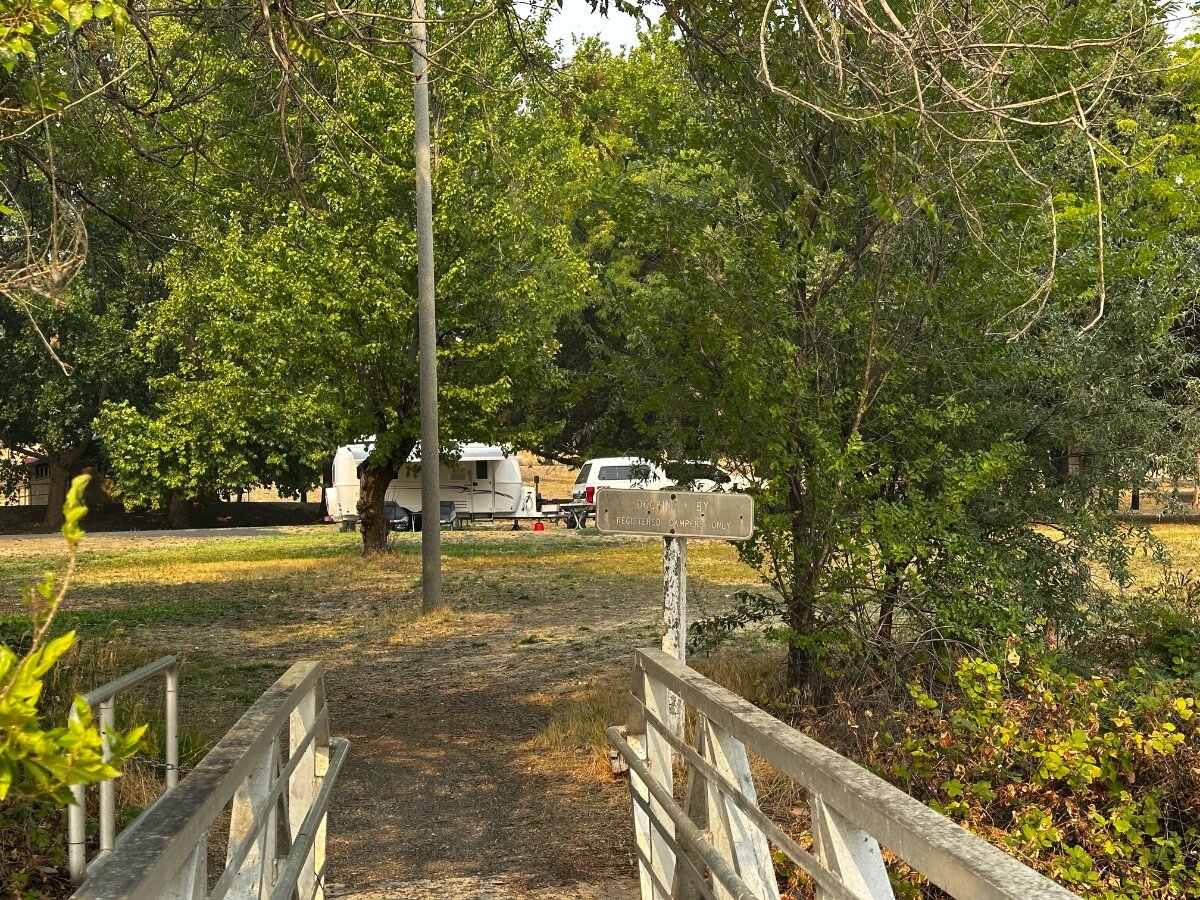
After Crater Lake NP we went to Carl Washburn State Park on the coast in Oregon. Nice little park, well maintained. Lots of shade. Active lighthouse.
6 points
-
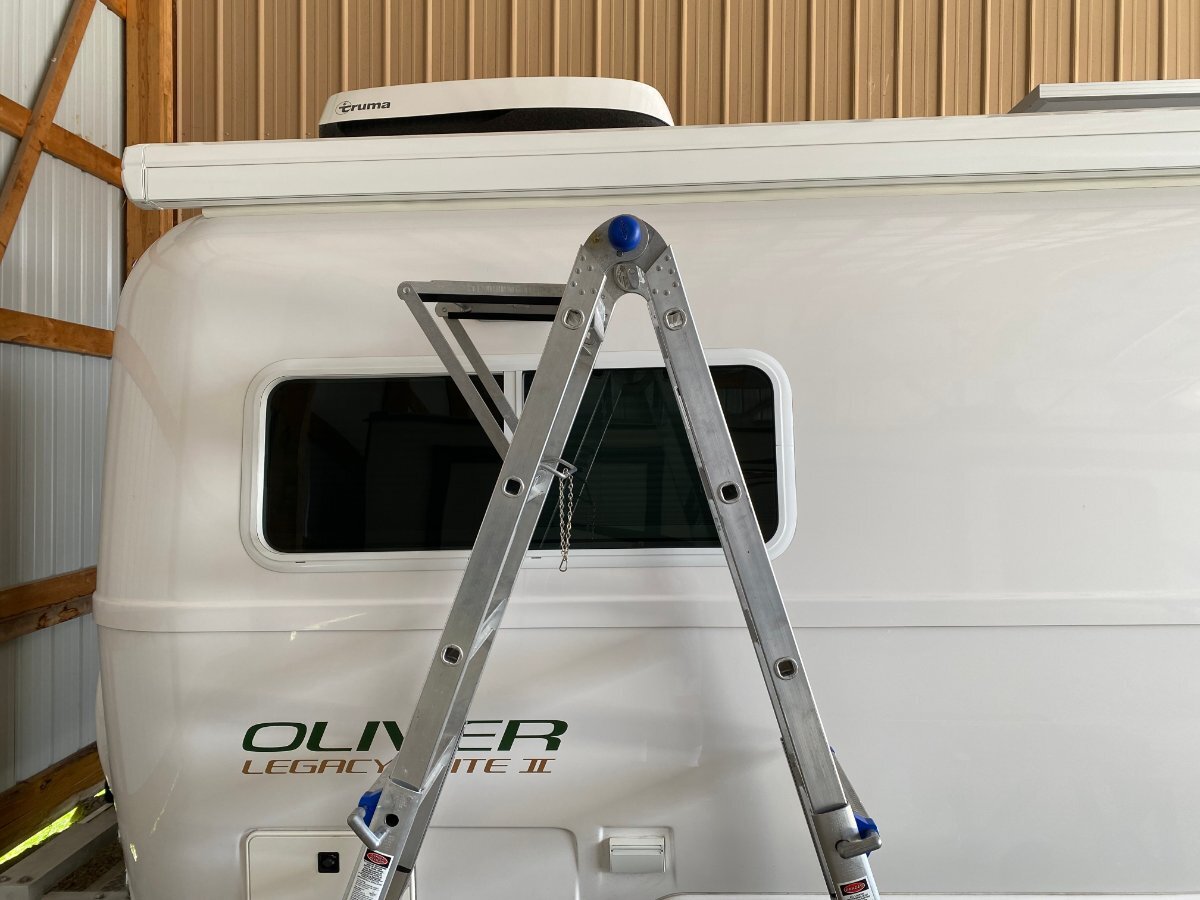
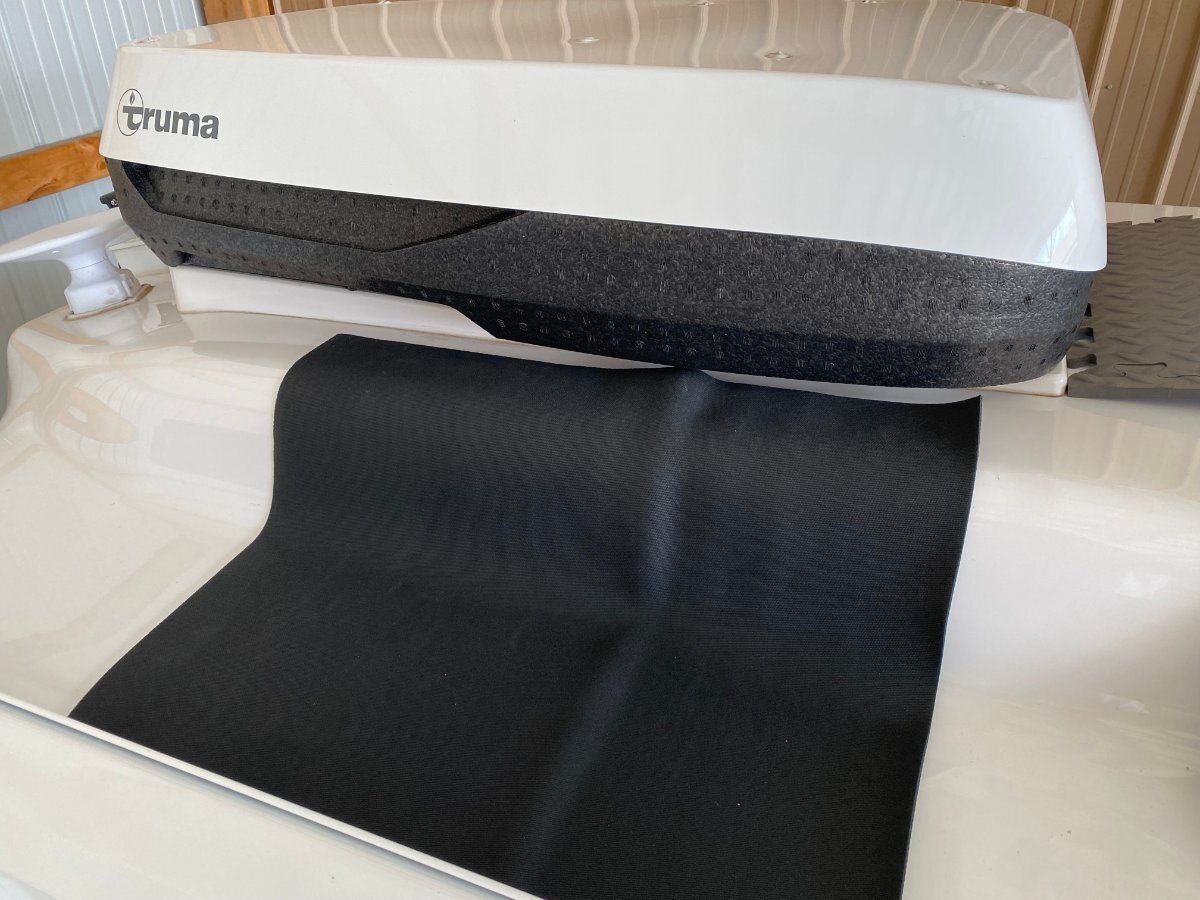
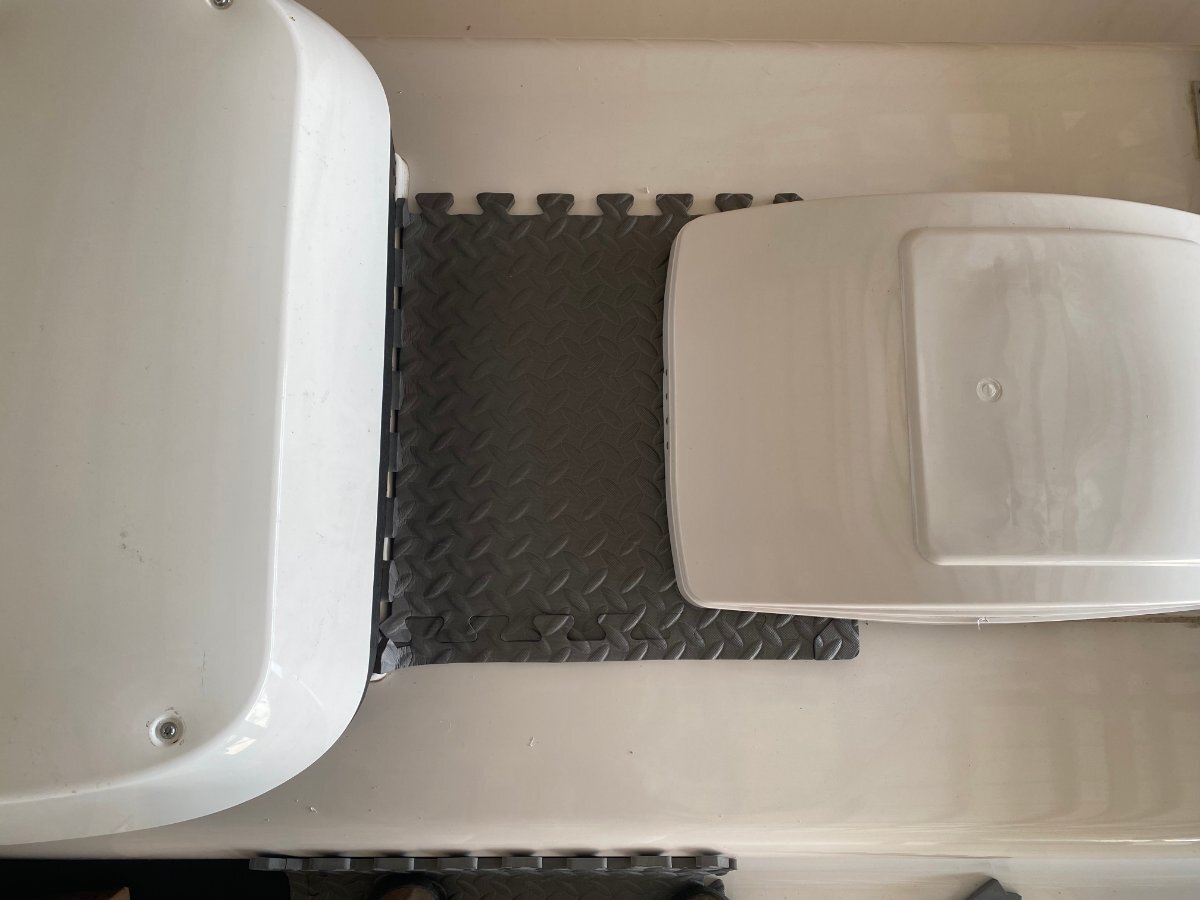
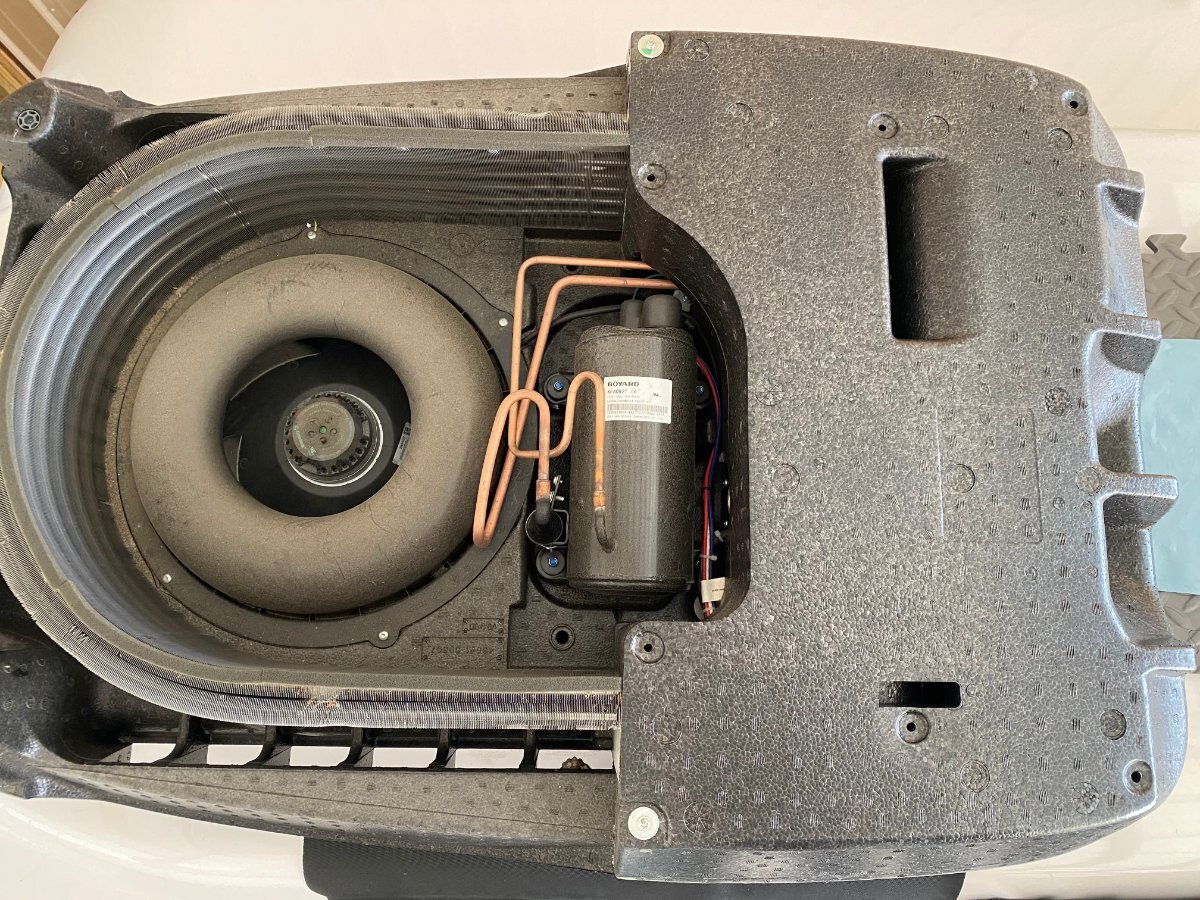
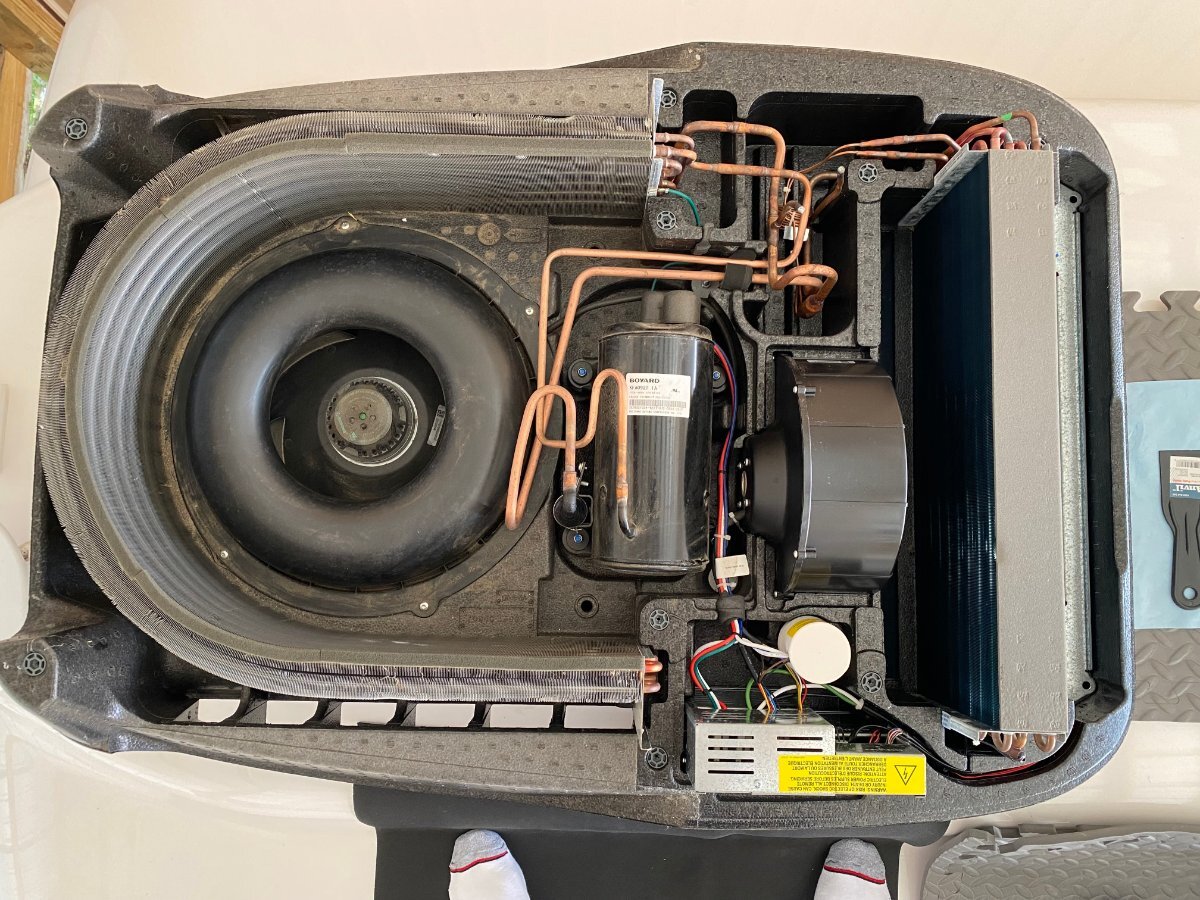
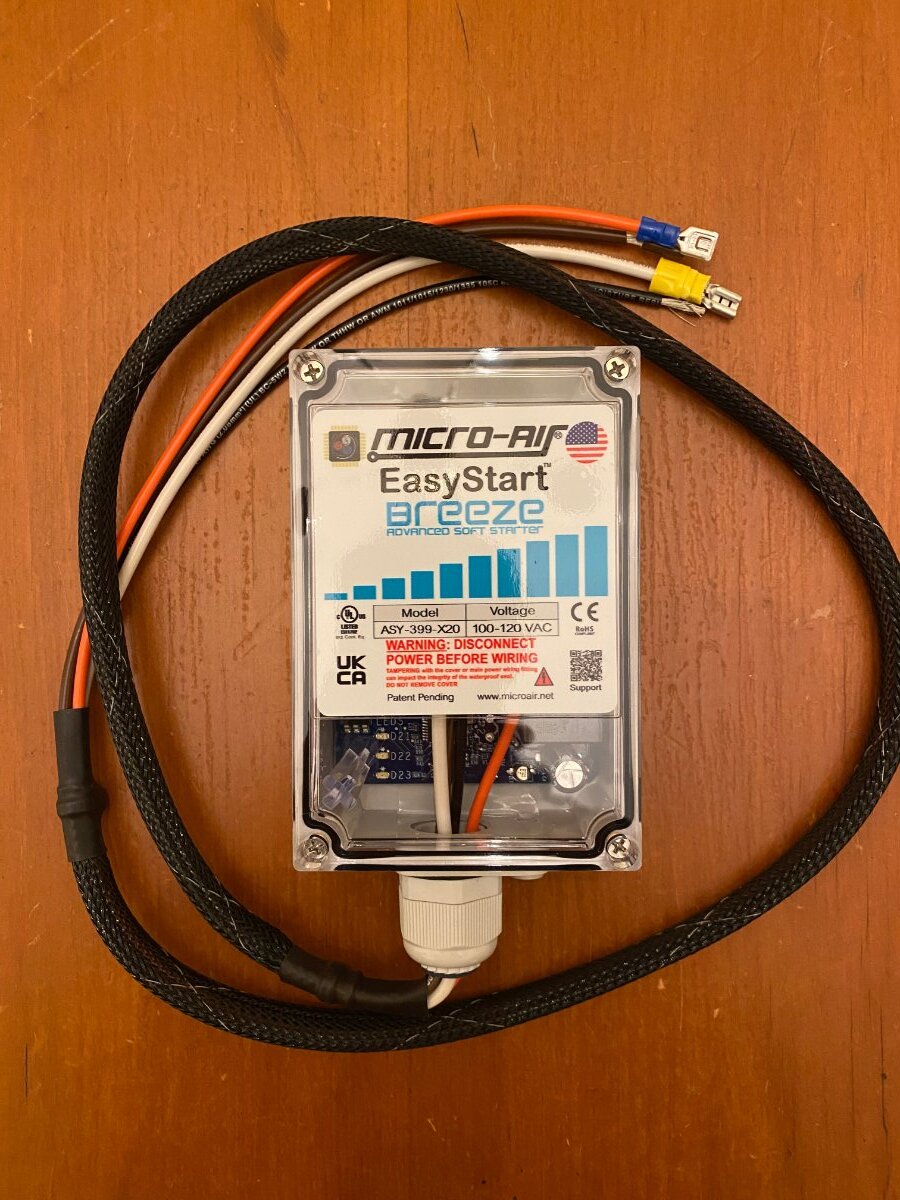
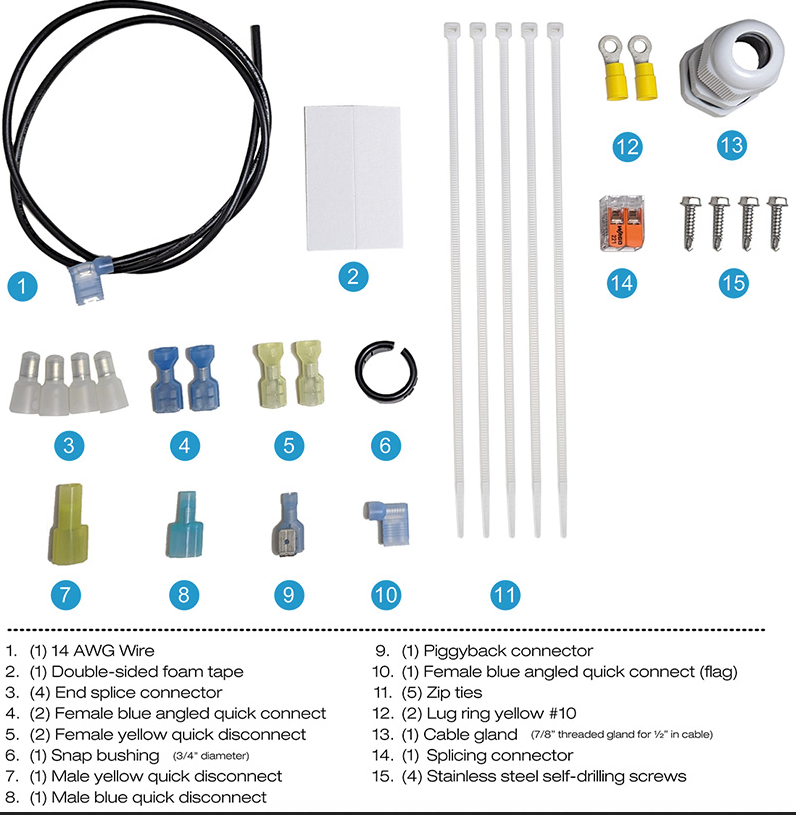
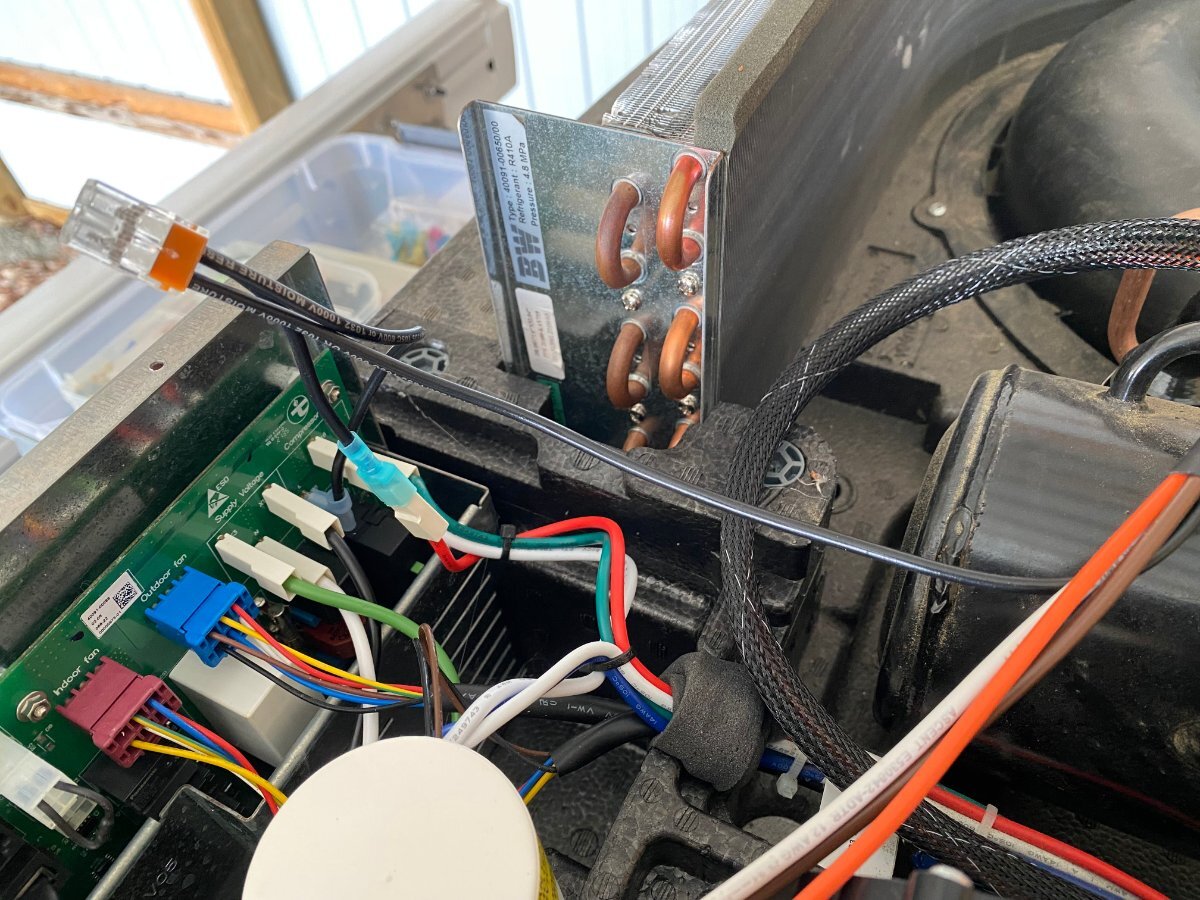
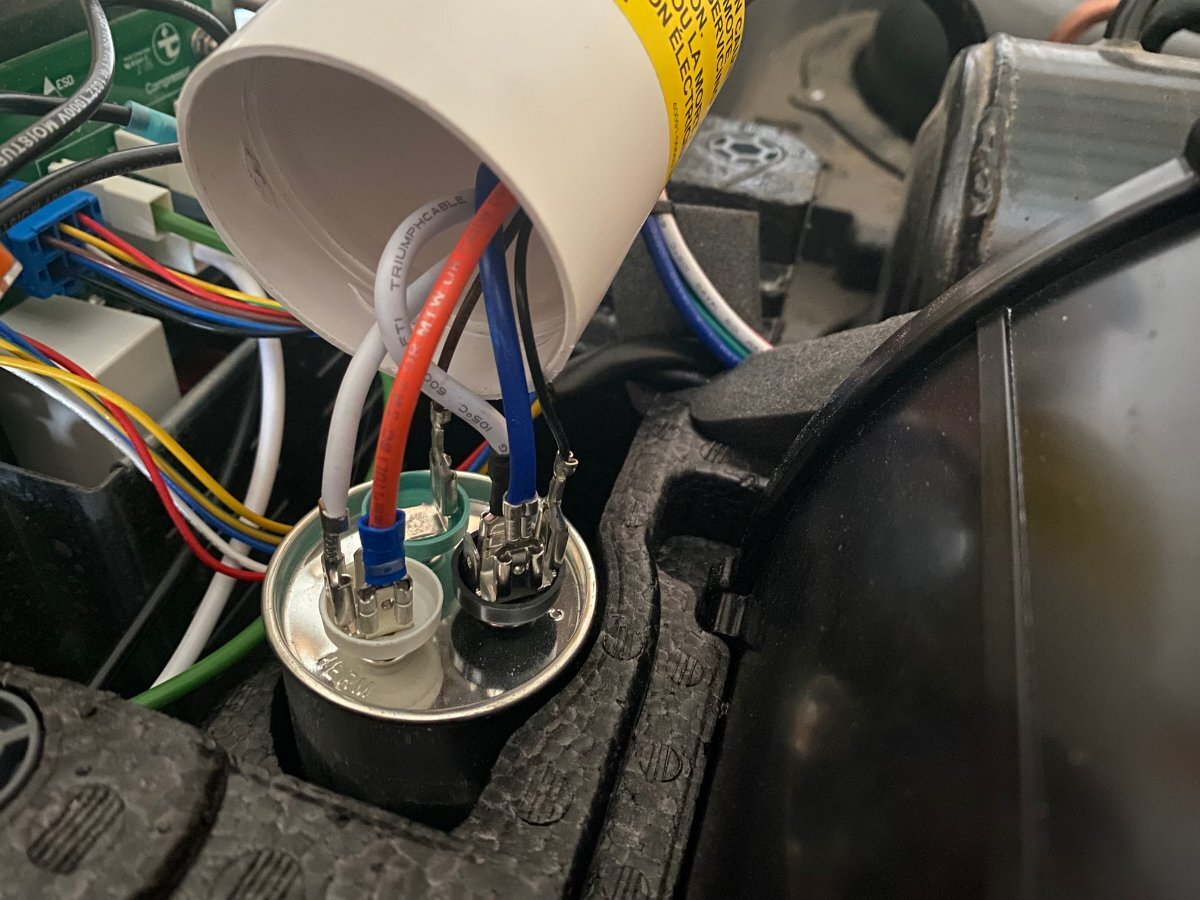
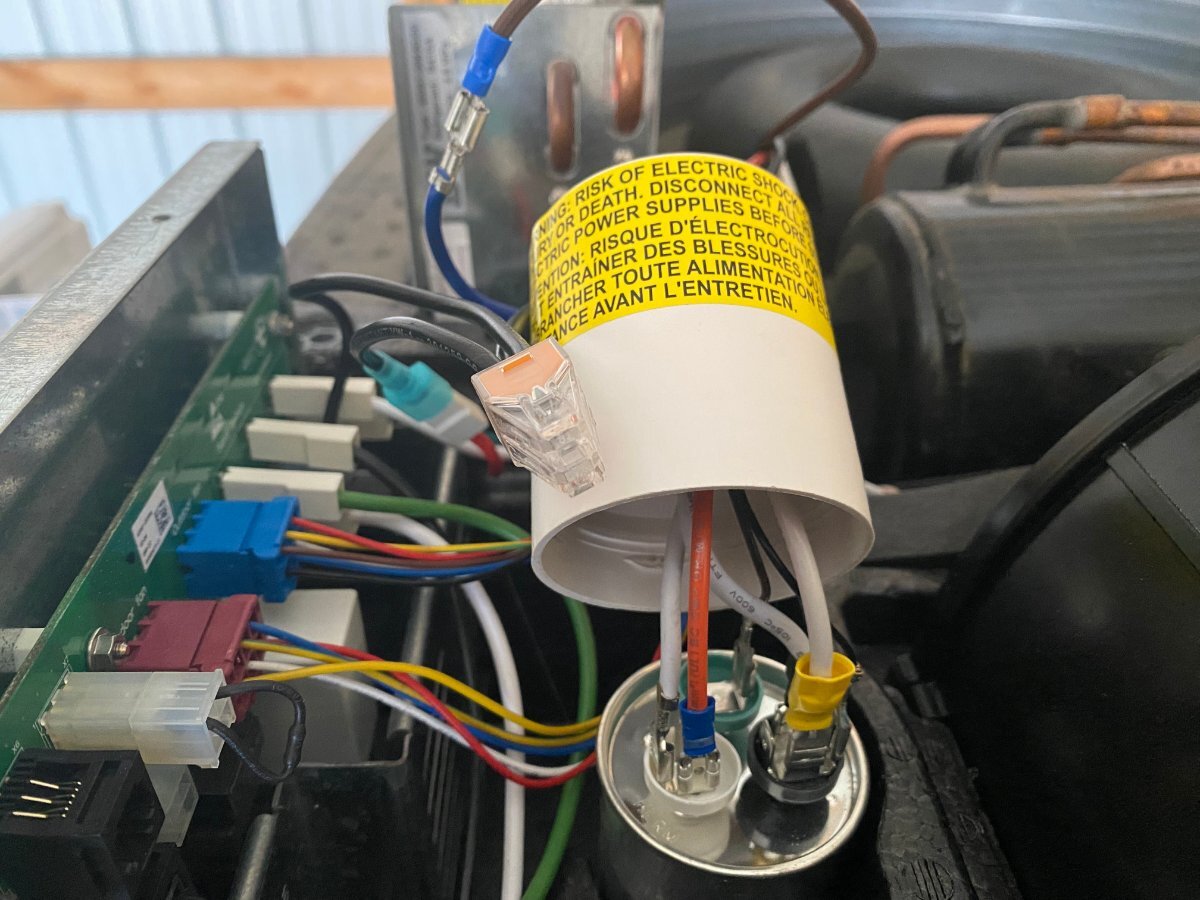
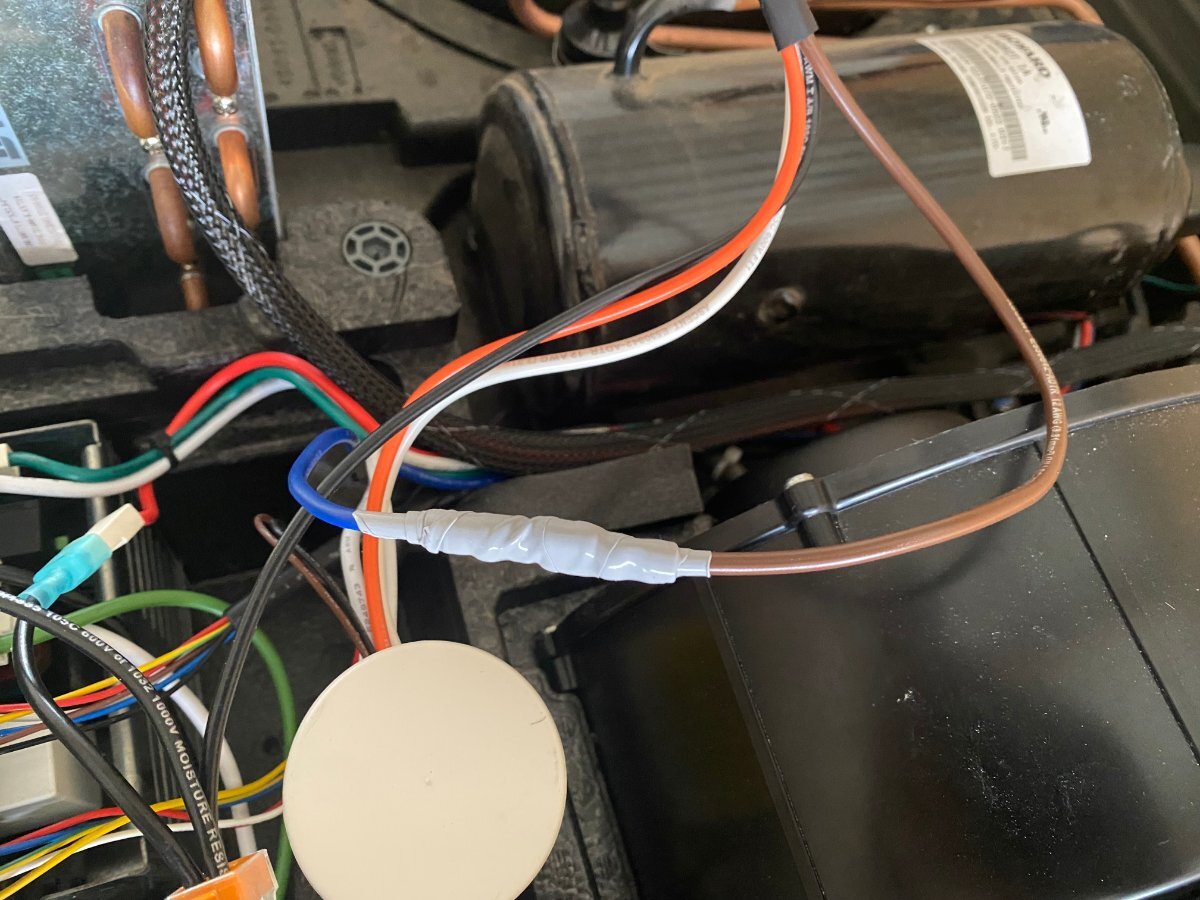
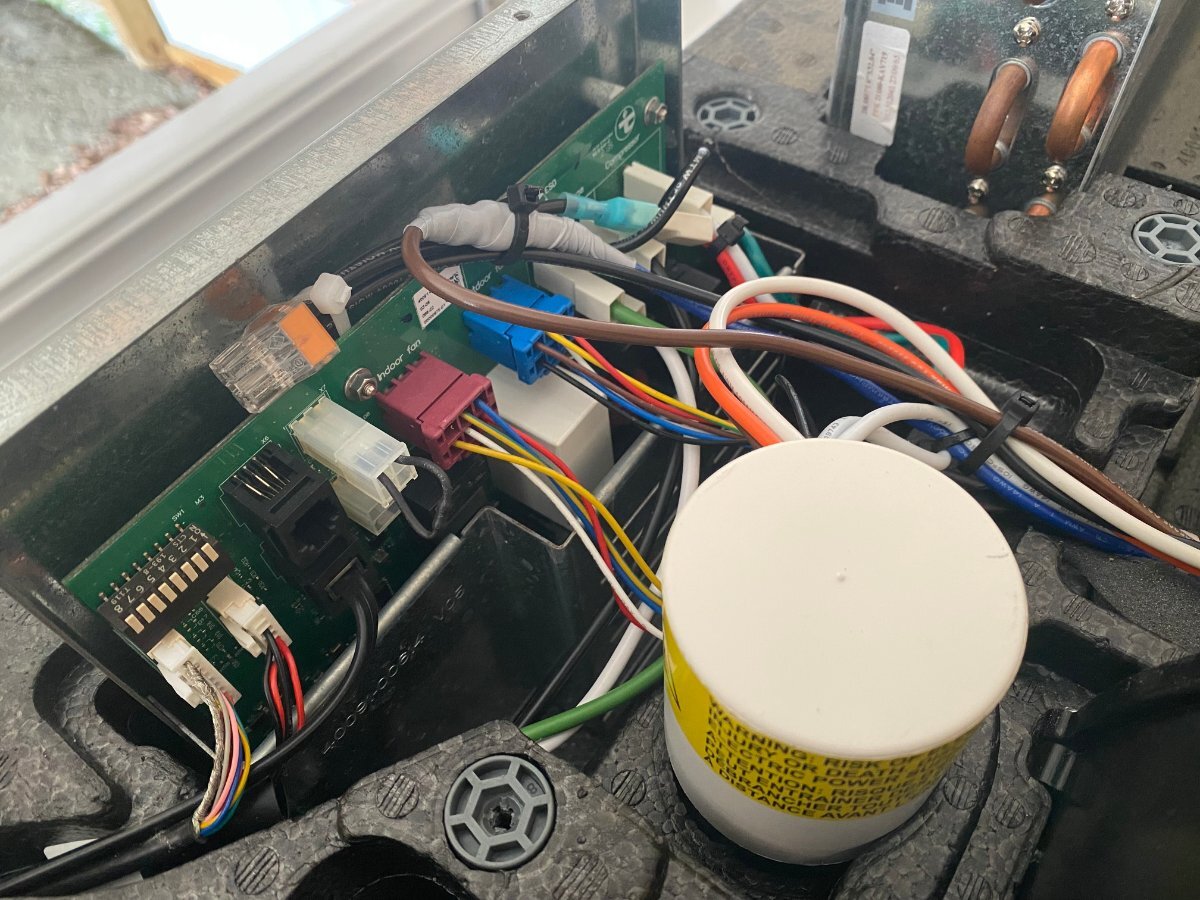
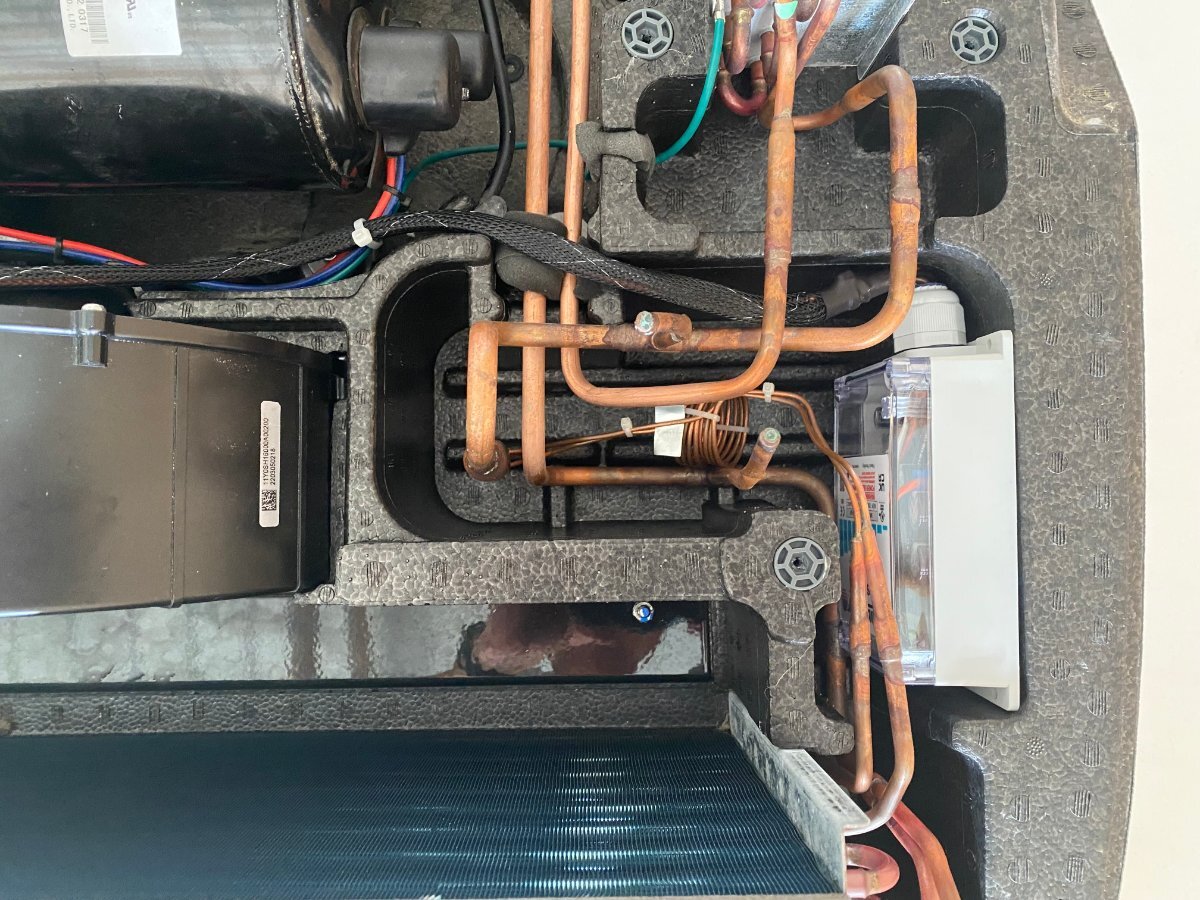
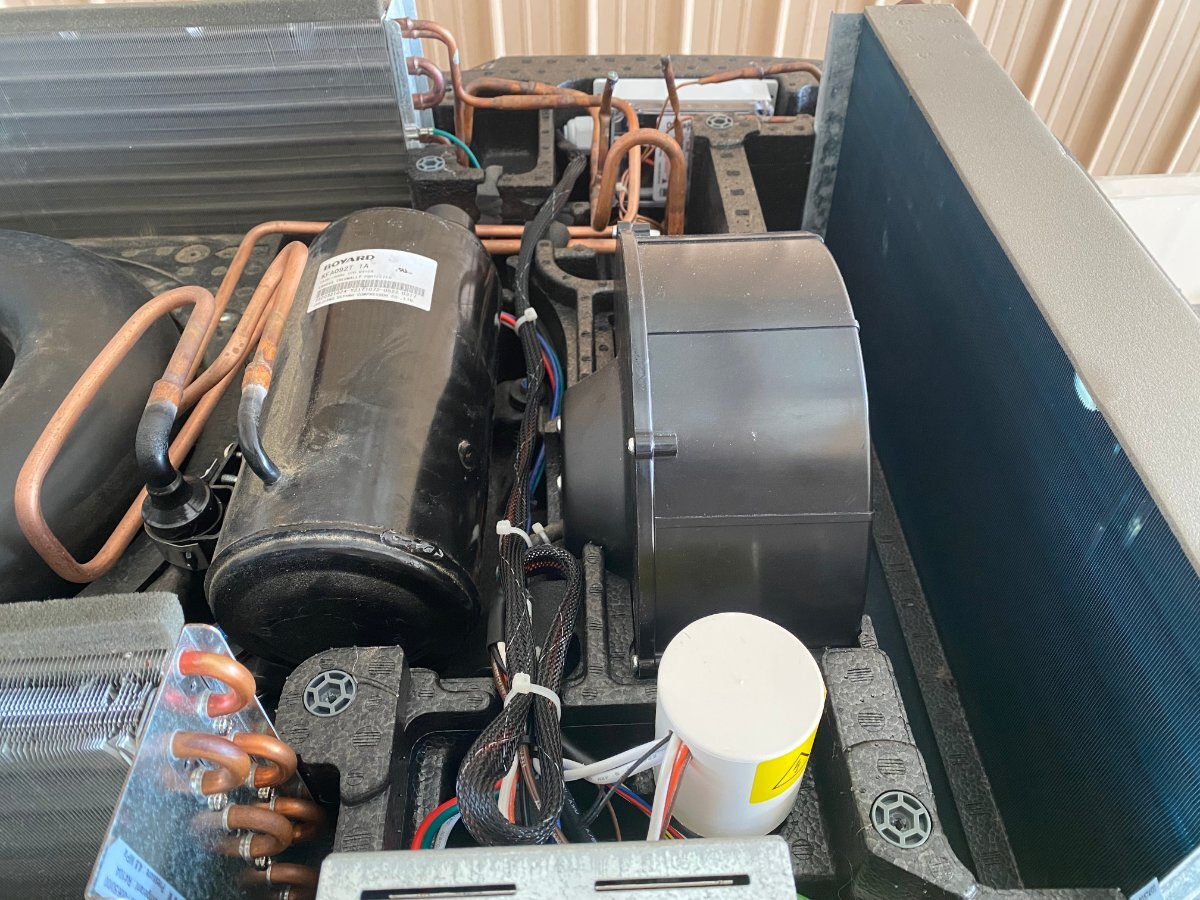
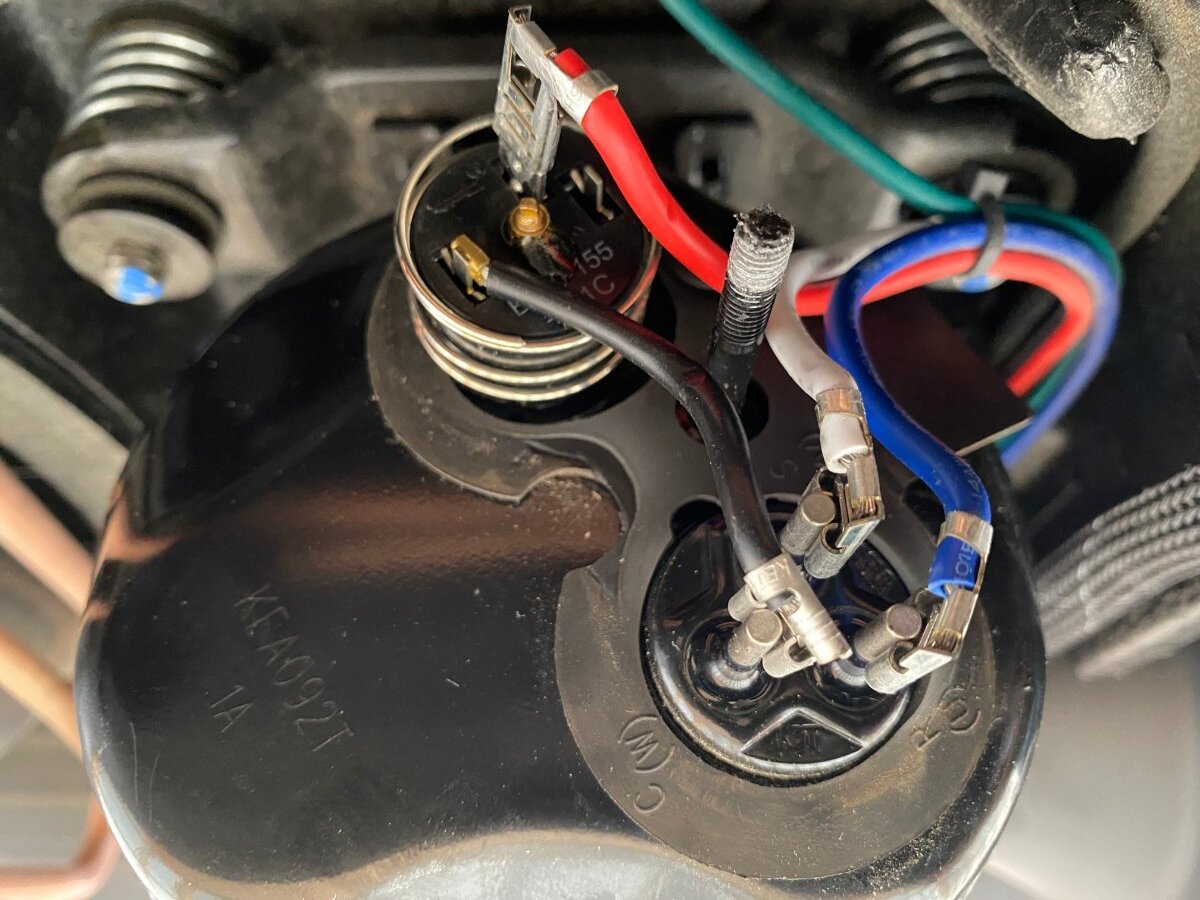
Since purchase of my OTT last year, I had been thinking of installing a MicroAir EasyStart on my Truma A/C. However, I wasn’t sure if it would allow my Truma A/C to run off my Champion 2000W generator, especially since I run it on propane and often camp at elevation. Fortunately for me I met @mossemi at the Oliver Rally last May and it turns out that he has the same generator and like me, runs it on propane. He told me that with the EasyStart, his A/C ran fine off his generator even at elevation. Thanks to Mike for that info. So now you can imagine my excitement when they announced that there were going to be ten EasyStarts given away at the Rally! But alas, I was not one of the winners. However, I met a nice couple from Oklahoma who did win one. And as luck would have it, they had decided not to use it, so they graciously gave it to me! Although I made several attempts, they refused any compensation. So I owe them a big thanks. Below are the details of my installation. First, thanks to @Patriot for previously posting this video: SoftStart Install on Truma A/C I found it to be very helpful for understanding how to remove the A/C covers, where to mount the EasyStart, how to run the wiring, how to get access to the control board and for making connections to the capacitor. However, DO NOT follow the detailed wiring instructions because the video is for a SoftStart not an EasyStart. Next, a couple of thoughts on safety. After I removed the A/C cover I found an old mud dauber’s nest. Fortunately it was not inhabited at the time. But they seem to like that area, so beware. Second, the video doesn’t mention it but you should make sure that the capacitor has been discharged before working around it. Since I’m not a qualified electrician, I won’t comment any further. Finally, I used my 17’ Werner ladder to get access to the roof. The optional Werner platform made this much easier. Also, accessing the roof from the curb side felt safer since the awning acts as a short railing. I used a sheet of rubber tool box liner and a piece of interlocking foam utility mat to protect the fiberglass and provide slip protection. With those additions, I felt safe enough to work in my stocking feet. As shown in the video, the white cover can be taken off by removing the eight screws (covered with lap sealant) with a T30 Torx driver (note that the two screws at the back are shorter than the others). Following that, removal of two additional T30 screws allows the foam cover to be lifted off. Be careful as you work with the cover off because the exchanger fins are easy to dent. Access to the silver electrical box is achieved by removing three T15 screws (one on top, and one on each side). Here’s the EasyStart device that I installed and the universal installation kit that comes with it: In general, I followed the wiring instructions provided by Micro-Air. I will say that I found the generic wiring instructions to be a little confusing (did I mention that I’m not a qualified electrician?). However, I was able to find specific wiring instructions for the Truma (that even I could understand) here: EasyStart Wiring Instructions for Truma A/C Although not necessary, I first removed the cap covering the wiring connections to the compressor motor with an 8 mm socket to confirm the wiring colors at the R, C and S terminals. (I don't know why but this photo is upside down and I couldn't figure out how to change it). I did deviate slightly from the installation instructions in one aspect, as I chose not to cut any wires but instead use terminal connections. That way, if I ever decide to remove the EasyStart, I can put everything back exactly the way it was. So instead of cutting the Red wire coming from the control board, I removed it and installed the provided 14 gauge Black wire with female terminal in its place. I then cut the Black wire and crimped on a male terminal to the portion not used and connected it to the female terminal on the Red wire that I had just removed. Finally, I used a WAGO push-in wire connector to tie these two to the black wire on the EasyStart. Next, after removing the white cap from the run capacitor, I installed the Orange wire from the EasyStart onto the Herm terminal next to the White wire. Then, I removed the Blue wire from the capacitor terminal and replaced it with the White wire from the EasyStart. Finally, I connected the Blue wire that I had just removed to the Brown wire from the EasyStart. Here’s a look at the wiring after everything was tidied up with zip ties: Overall, I’m pretty happy with the installation. However, looking back there is one thing that I wished I would have done and that is to add a bit of HVAC tape to the top of the EasyStart to give some additional support. I’m not sure how well the double sided tape will hold to the foam, especially given the conditions that some of our roads are in. I’ll probably go back and do that at a later time. BOTTOM LINE: After the install of the EasyStart, I noticed a very gradual ramp up of the compressor, as expected. More importantly, I can report that my Truma A/C runs very well with my 2000W Champion generator running on propane, even at 6000’ elevation. Added bonus: Unlike before, I can now run the A/C off my 15 A circuit at home. If you have any questions about this install, feel free to comment below.
6 points
-
That is the valence which holds the privacy shade and night time shade. When you pull either shade down it has tiny magnets which attach the bottom of the shade to the interior window frame so the shade does not naturally hang straight down away from the window frame. I think and really do hope there will better future designs of this shade configuration. As it stands now, 💯 just not a fan of the look or the function. It needs to be completely redesigned IMHO.5 points
-
If you are going up US101 in Oregon you must stop at the Tillamook cheese factory in Tillamook. They have a nice self guided walking tour of the factory and a big gift shop to load up on cheese and other dairy items. We’ll worth the stop! Entrance, the cow portrait leaves no doubt where you are! This is a pretty cheesy photo, buy why not?
5 points
-
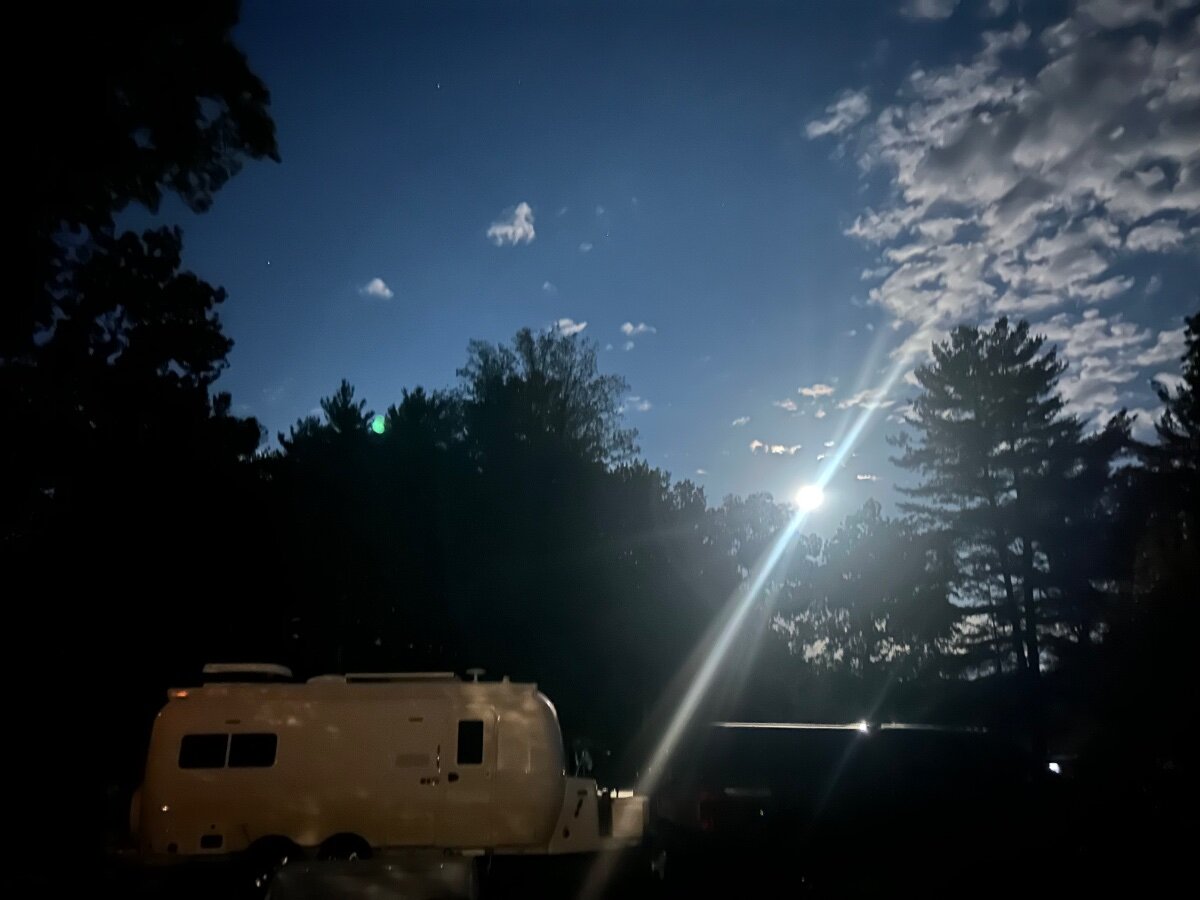
Landed at an old favorite CG in upstate NY near Rhinebeck called Interlake. Took a few photos of XPLOR with the “blood moon”. I can’t say we actually saw a total lunar eclipse. However the moon was really really bright and beautiful as ever. An AI take on the Blood Moon. 🤷♂️ The "blood moon" on September 7, 2025, refers to the reddish appearance of the moon during a total lunar eclipse, a phenomenon caused by sunlight scattering through Earth's atmosphere. In astrology, this event signifies a powerful time of revelations, emotional breakthroughs, and accelerated change, particularly in relationships and personal paths, as it occurs in the intuitive sign of Pisces. It is a significant astrological event, seen as a "portal of change," that challenges individuals to balance fantasy and reality while fostering spiritual growth and authenticity. What is a blood moon? A blood moon is a total lunar eclipse, where the Moon appears red or orange due to sunlight passing through Earth's atmosphere and casting a reddish glow on its surface. It is a striking visual event, often described as a fiery or copper-colored moon. Astrological significance: Time of Revelation: Eclipses are powerful moments for breakthroughs, bringing hidden emotions and long-held truths to light. Pisces Energy: This eclipse falls in the mutable, intuitive sign of Pisces, emphasizing themes of healing, empathy, compassion, imagination, and spiritual growth. Balance of Opposites: Occurring in Pisces and opposite its opposing sign Virgo, this eclipse highlights the need to balance intuition with discipline, fantasy with reality, and creativity with responsibility. Accelerated Change: Lunar eclipses are seen as agents of upheaval that accelerate personal and collective transformation, dissolving stale patterns and demanding action. What to expect: Emotional Intensity: You may feel a heightened sense of emotion and intensity, with significant shifts in relationships and personal dynamics being almost inevitable. Personal Reflection: The event encourages shedding old habits and beliefs, fostering authenticity and courage to embrace your true self. Spiritual Awakening: The energy of the eclipse promotes deeper spiritual connections, trust, and the ability to surrender to the flow of life. Karmic Adjustments: This eclipse is seen as a major checkpoint for karmic adjustments and potentially, grand finales or new beginnings. This photo of XPLOR and our TV was taken while sitting next to our campfire. A peaceful evening for sure camped in the Hudson River Valley.
5 points
-
You may find success by re-graining the stainless finish on your existing sink using red and/or gray scotch brite hand pads. I did this with great success on a stainless oven door which had been heavily scuffed during transport. Looked like new after application of some elbow grease. https://specialtystainless.com/tips-stainless-steel-countertops/articles-about-stainless-steel-countertops/graining-blending/4 points
-
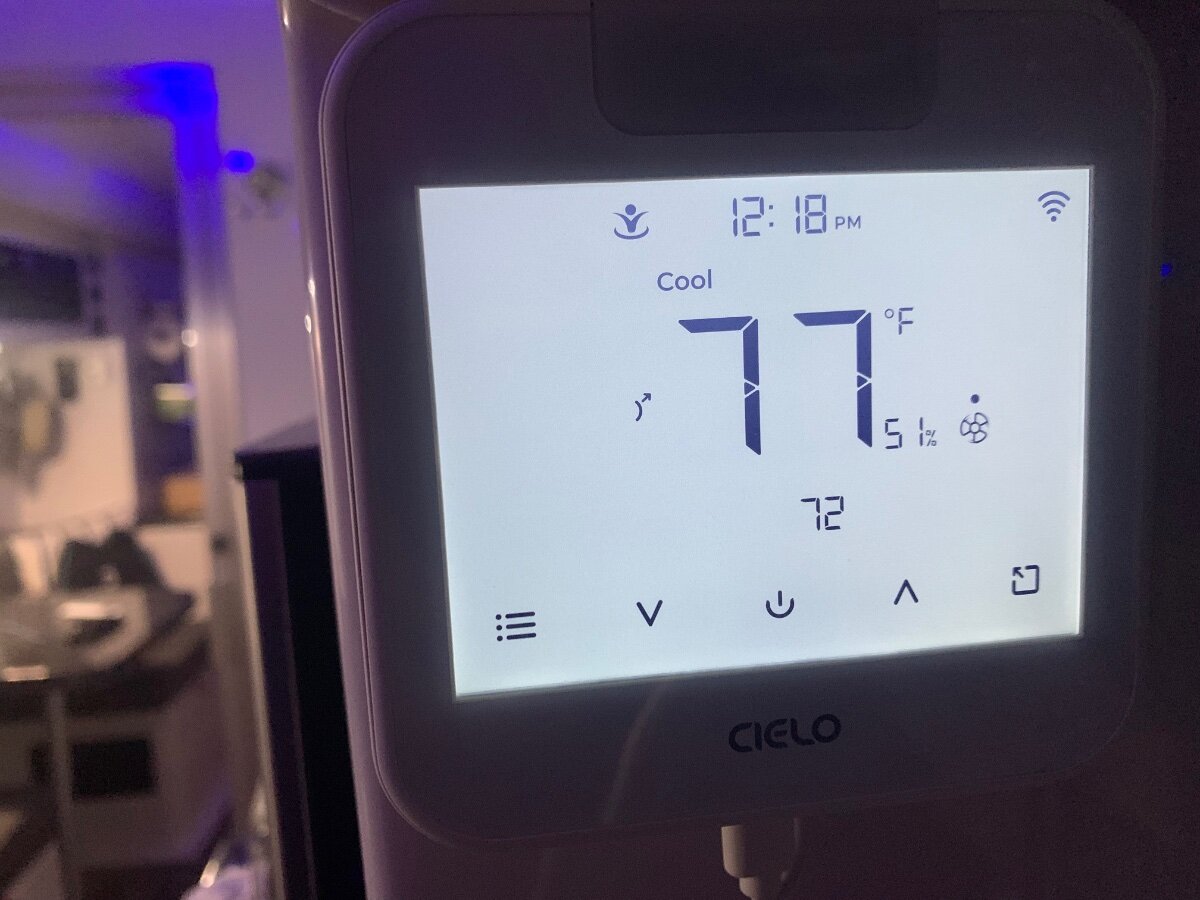
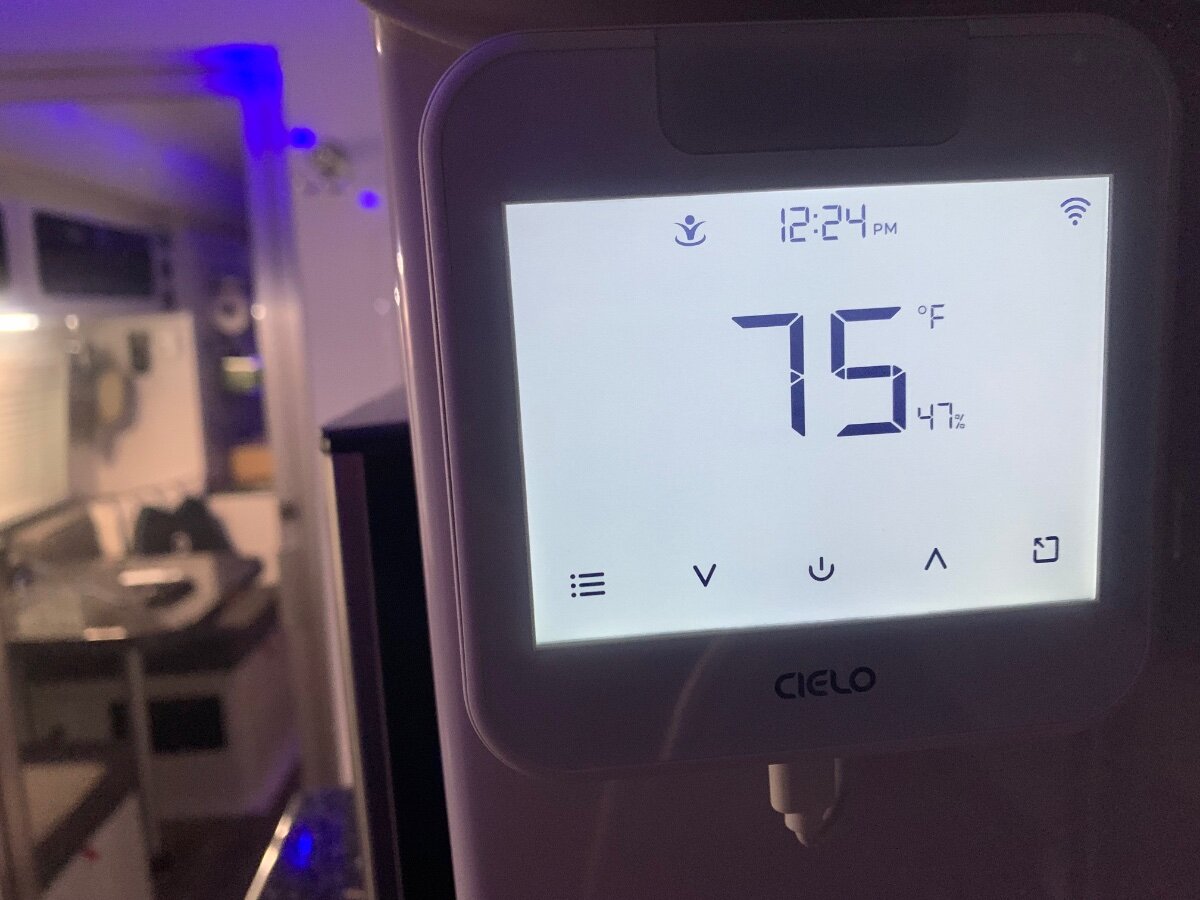
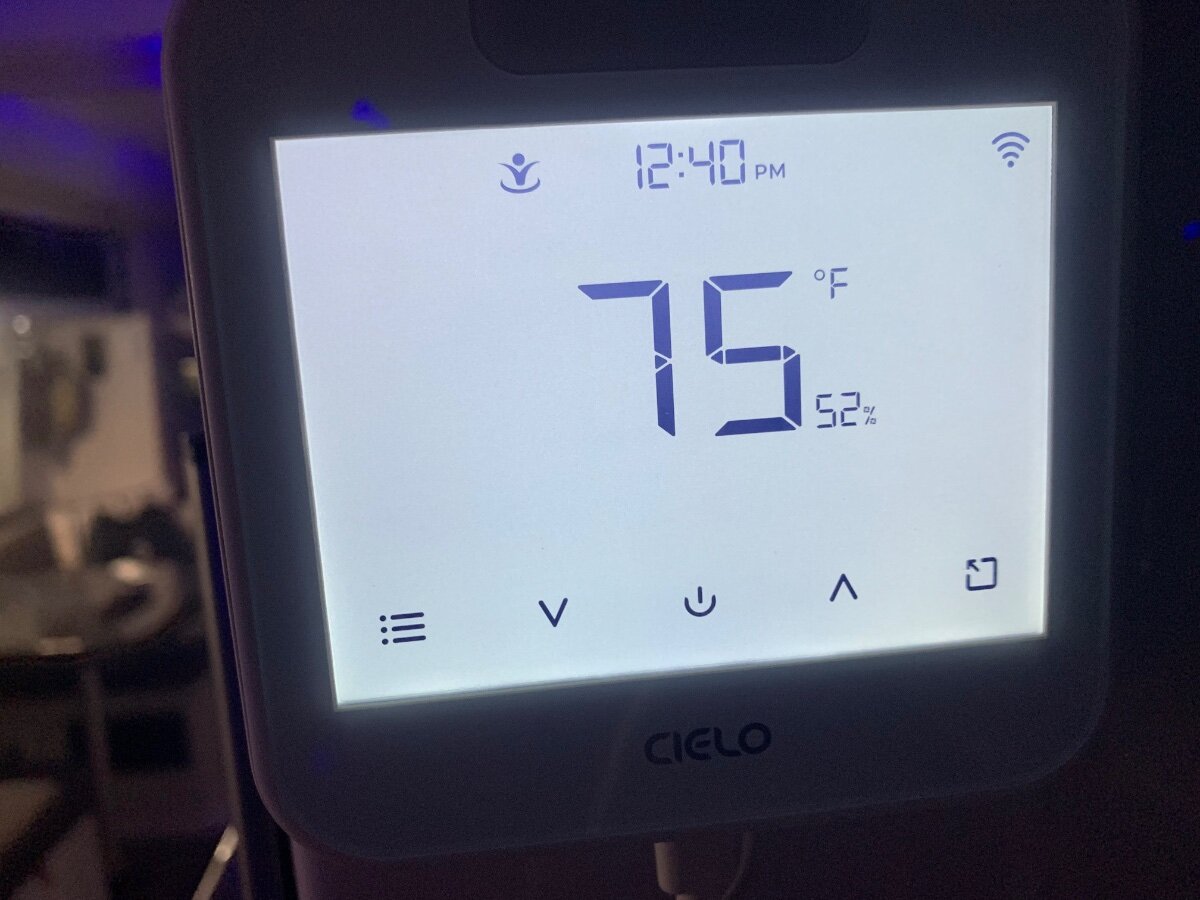
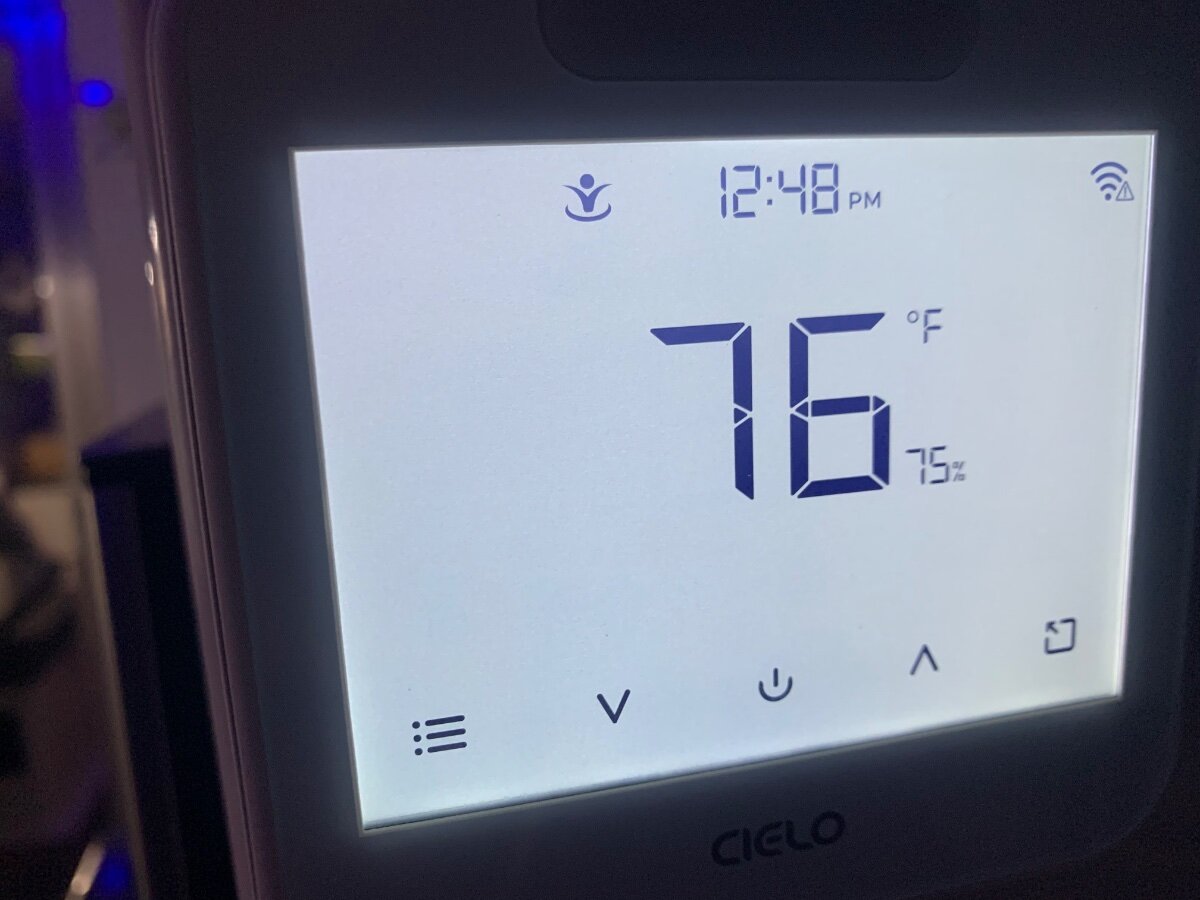
I have repeatedly stated how the Cielo Breez Max thermostat is effective in resolving inherent humidity spikes due to the a/c supply fan running continuously in the Oliver. This particular device has a Comfy Mode feature that will turn off said fan in sync with the compressor and thus, significantly lessen moisture from being reintroduced back into the cabin space. I would like to share the results of a test performed yesterday as tangible proof of its effectiveness: As I rolled up to the COW Barn with my Starlink Mini’s new Standby Mode unpaused (low-speed data plan), the Cielo phone app was used to start the Drieha Atmos 4.4 from my vehicle to begin cooling. I spent about twenty minutes reorganizing inside the van before opening up the CB and entering the Oliver. I should mention we had a temperature drop from the day before, so not real hot (83°), but relative humidity was high (72%) (P1). The Atmos was still cooling in Comfy Mode (preset to turn off when temp falls below 76° and turn on when temp goes above 77°) and the Oliver was 77°/49% (temp/humidity) at entry per the Cielo’s display (P2). A few minutes later the Atmos turned off in total (supply fan and compressor), the display was 75°/45% (P3). As the interior temp increased the Atmos turned back on in total, the display was 77°/51% (P4). It is important to note that the humidity rose 6% during this total off period. The Atmos then turned back off in total, the display was 75°/47% (P5) with a 4% drop in humidity. I let the Atmos continue to cycle in like manner a while longer before switching from Cielo to remote operation (P6) set at 75°. Since the Cielo can still be used to monitor temp/humidity, at time of remote start the display was 75°/52% (P7) and the compressor shutdown soon after (supply fan continued to run). When the compressor came back on, the display was 76°/75% (P8). Yikes, a 23% spike in humidity! The compressor shutdown once again, the display was 75°/53% (P9) and back on again, the display was 76°/74% (P10); a 21% spike. Compressor off at 75°/53% (P11), on at 76°/72% (P12); a 19% spike. As demonstrated, it is evident that the Cielo’s Comfy Mode does in fact lessen those dreaded humidity spikes experienced at times, you be the judge!
3 points
-
I like the exterior look. The interior side, especially the valence? Not so much at all. To be honest the limited opening would seriously make me think twice about purchasing the trailer.3 points
-
Earlier in the thread someone posted that the sliders aren't available now, so Oliver had to go with the awning style windows. Personally I like what we got in our hulls #1290 and 1291. John3 points
-
I enjoy waking in the middle of the night and sliding the window open to gaze at the stars!3 points
-
A new American Gothic?😃3 points
-
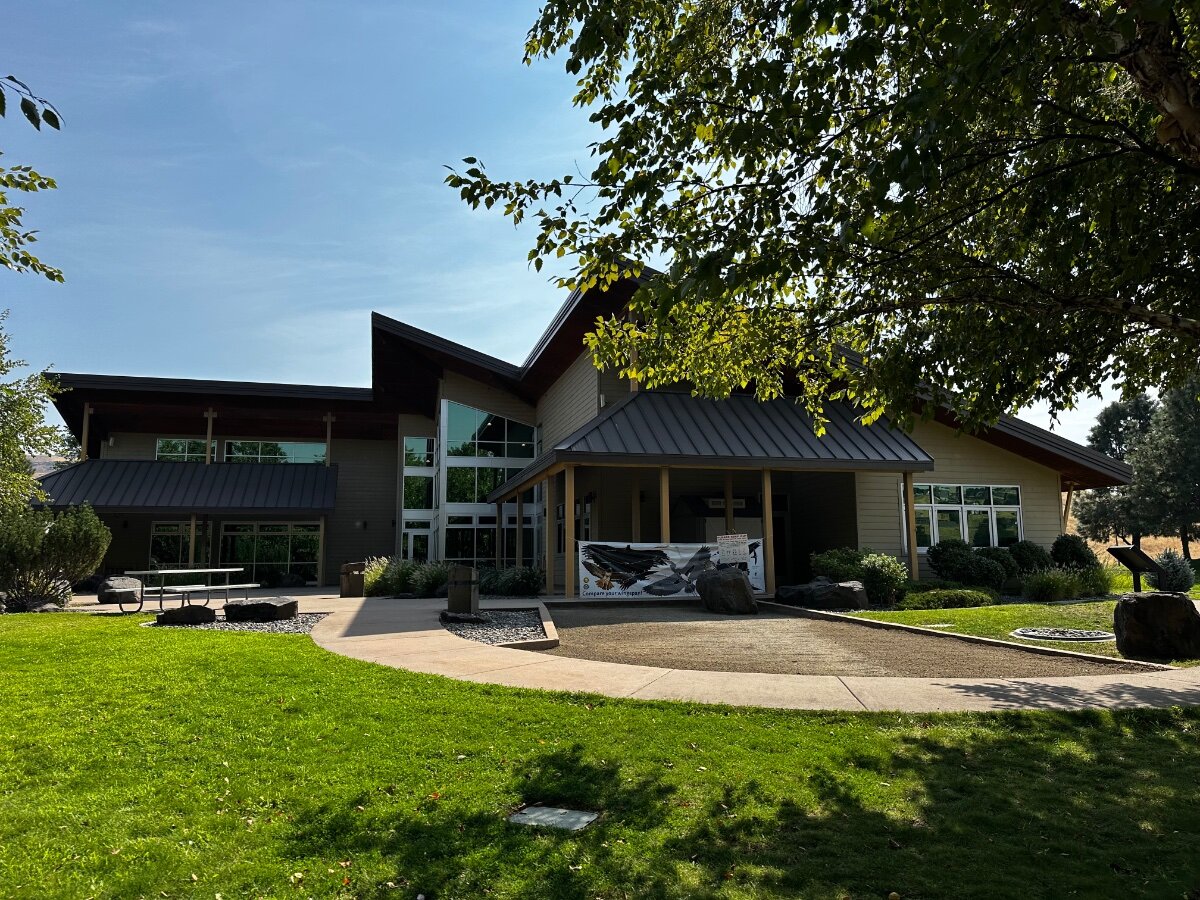
Sorry we’re not home in Everett to meet you. If the clinton to Mukilteo ferry is in your plans, consider lunch at Ivars in the Mukilteo waterfront. When exiting the ferry take a right into the hwy, then a quick left at the next light into the waterfront park parking. You could have lunch at ivars ir visit the scuttle but brew pub. We are in Hells Gate State park today.
3 points
-
In this view of the Tetons I'm headed WAY up the Gros Ventre River. Just north of the "major" (not) town of Kelly this was a place I could not resist to take the first pic. However, if you are ever near Moran Junction look for Elk Ranch Road and head for GPS: 43.82592677366998, -110.50216569188429. Here there are some old buildings and great views of the Tetons without being around 1,000 of your closest friends. Also, note that there is plenty of room to turn an Oliver around here. Finally - if you are in this area and have never eaten Dornan's Pizza (on the upper deck)(GPS:43.65754766116248, -110.71075629684981) , it is pretty good with a great view of both the Tetons and planes preparing to land at the Jackson airport. While at Dornan's you can also get gas, beer, wine, fishing stuff and a small selection of grocery items. Bill p.s. If you decide to go to Dornan's and you are towing the Ollie - a couple of suggestions- 1. Go early. The pizza place opens at 11:30 am and there will be a line of 20 to 50 people at that time. 2. Do not park down in the "store/gas area" with the Ollie. If you can pull down into that area so that you can turn around and head out. Park on the side of the access road and walk the short distance down into the store area. p.p.s. HERE is another review of Dornan's
3 points
-
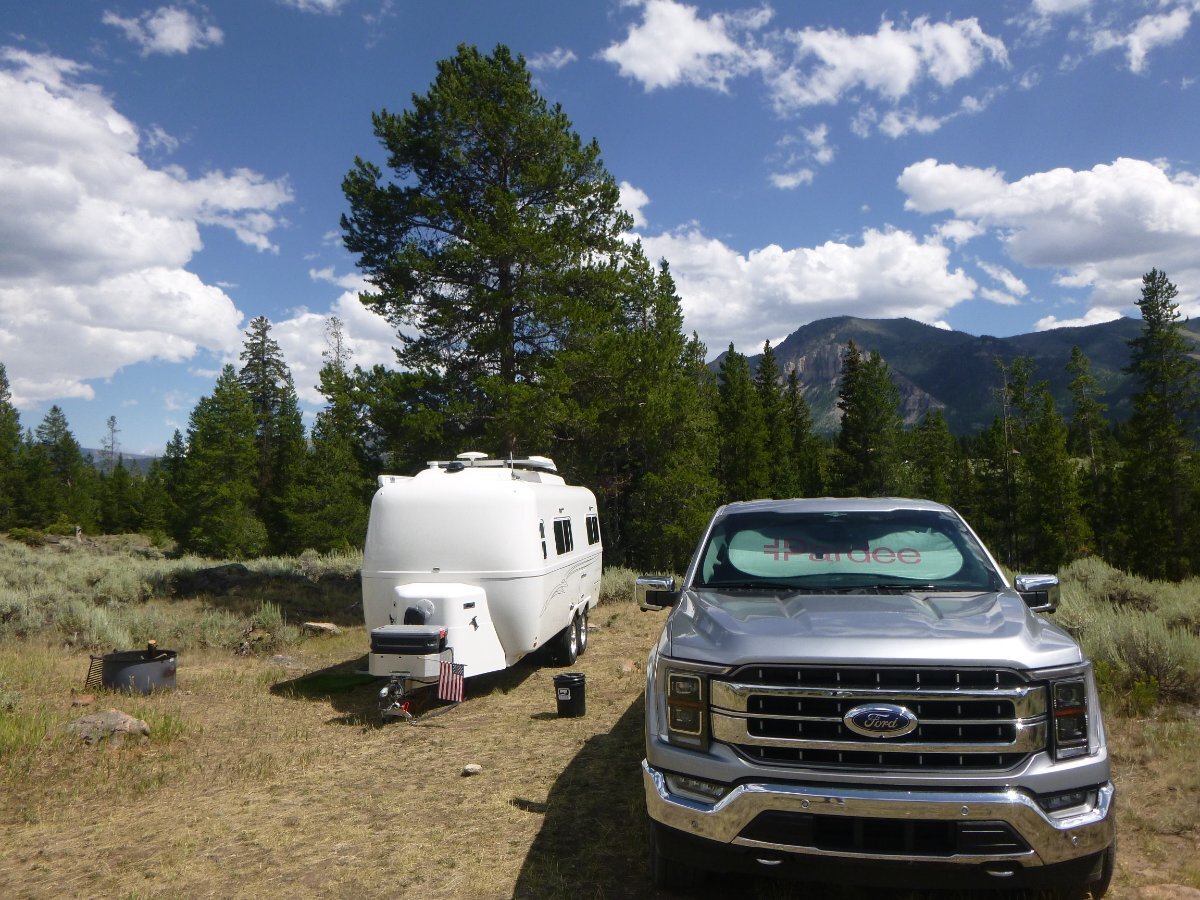
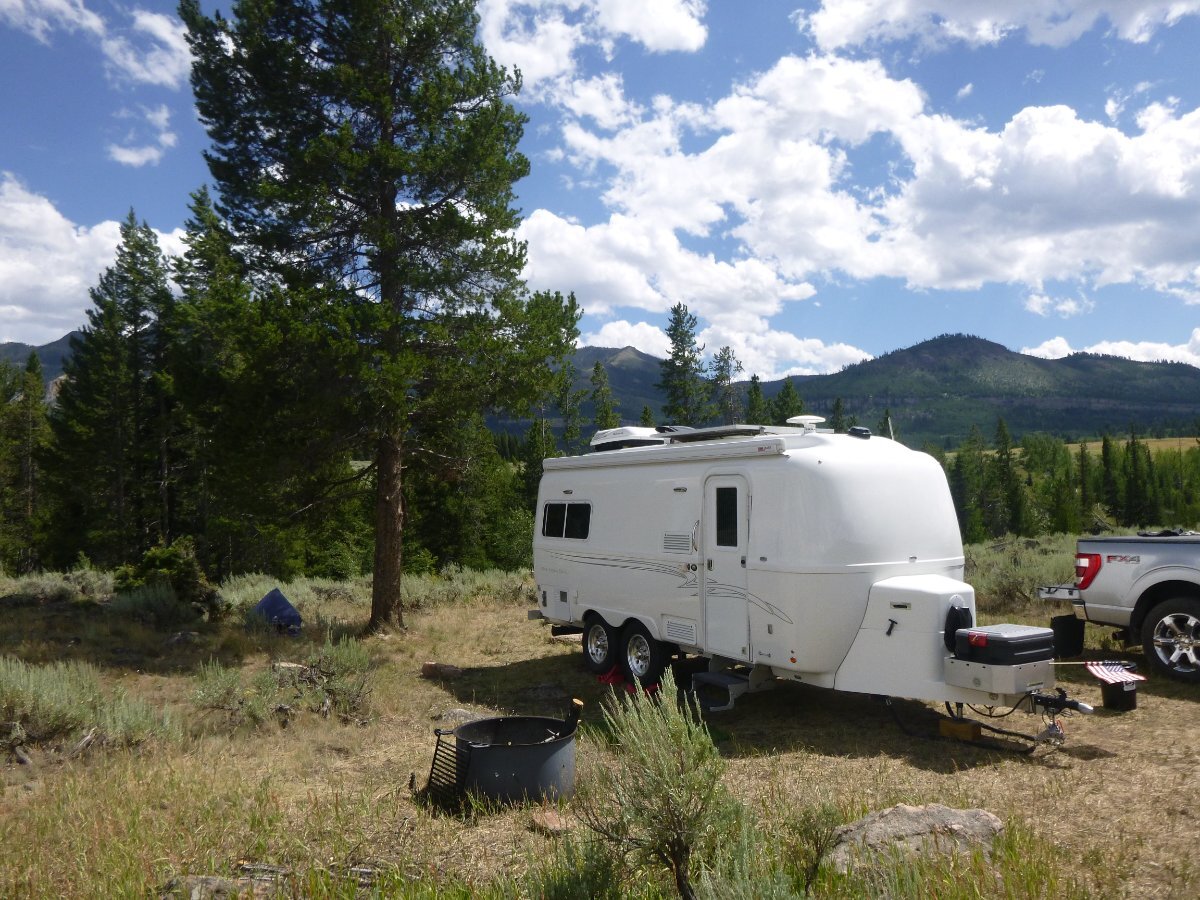
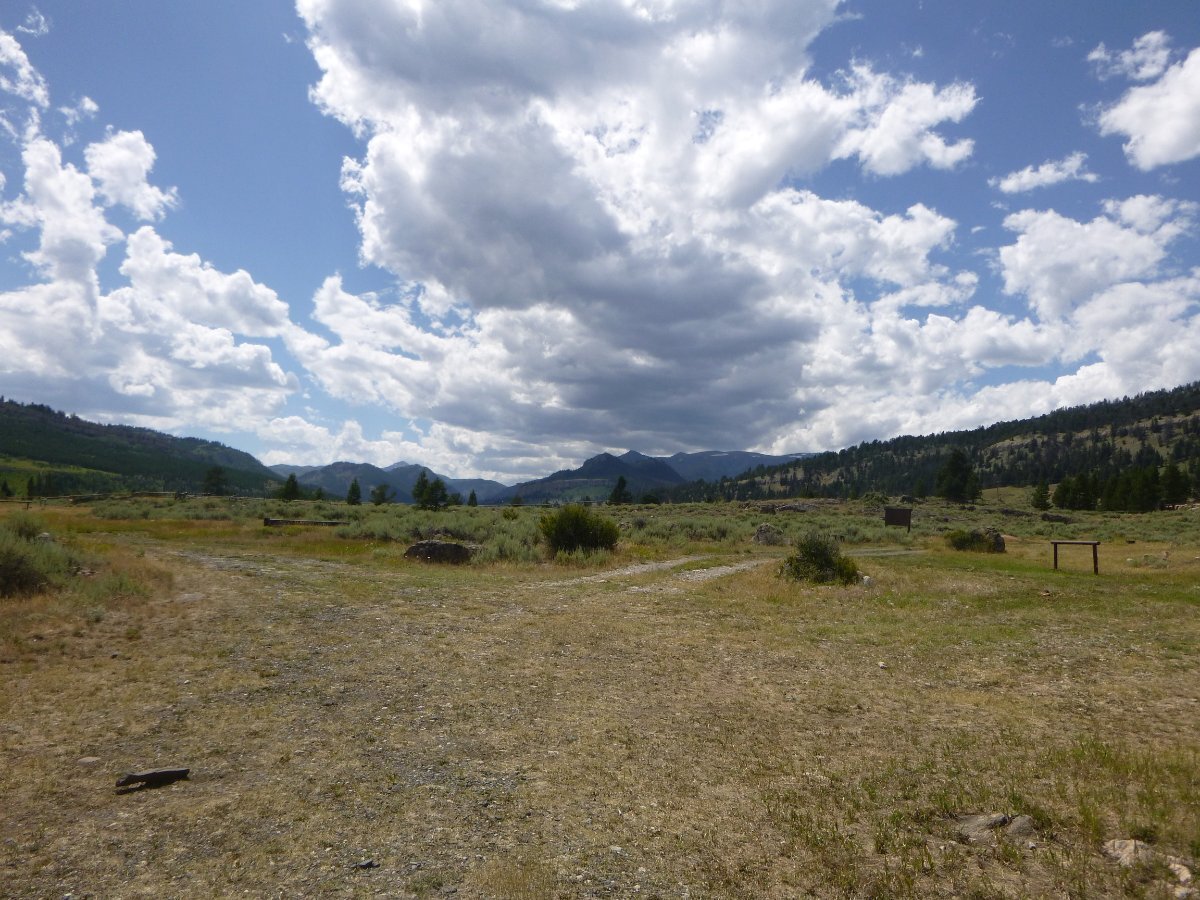
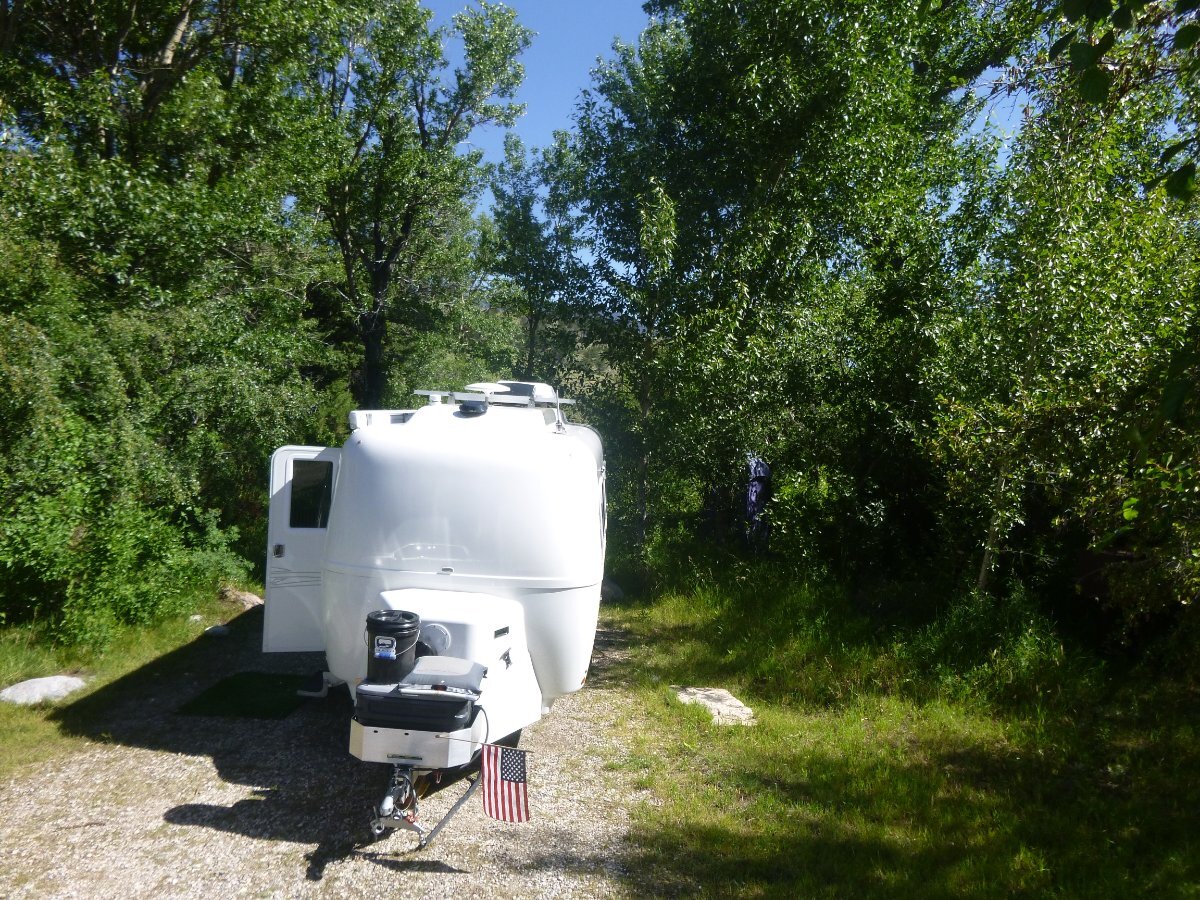
Here's another camping site just off the Chief Joseph Highway - and - this one's free. No water or electric or dump but there is a pit toilet and fire ring. Crandall Creek is at the bottom of the hill behind my Ollie and there are some nice fish in that creek. GPS - 44.848679, -109.639157 Bill p.s. note the last pic - there are times when the wind comes straight off those mountains in the distance and it can blow fairly hard.
3 points
-
Heck - at my age, I just enjoy waking up! 😇3 points
-
Yep, the exterior look is awesome, then it all goes downhill from there. I don't blame Oliver, I'm sure these changes to the windows were the last thing that they wanted to do...2 points
-
Nice! Looking forward to installing a Cielo Breez Max along with the Greenland Turbro unit that I'll be installing soon. Thank you for making us all aware of this thermostat and it's capabilities!2 points
-
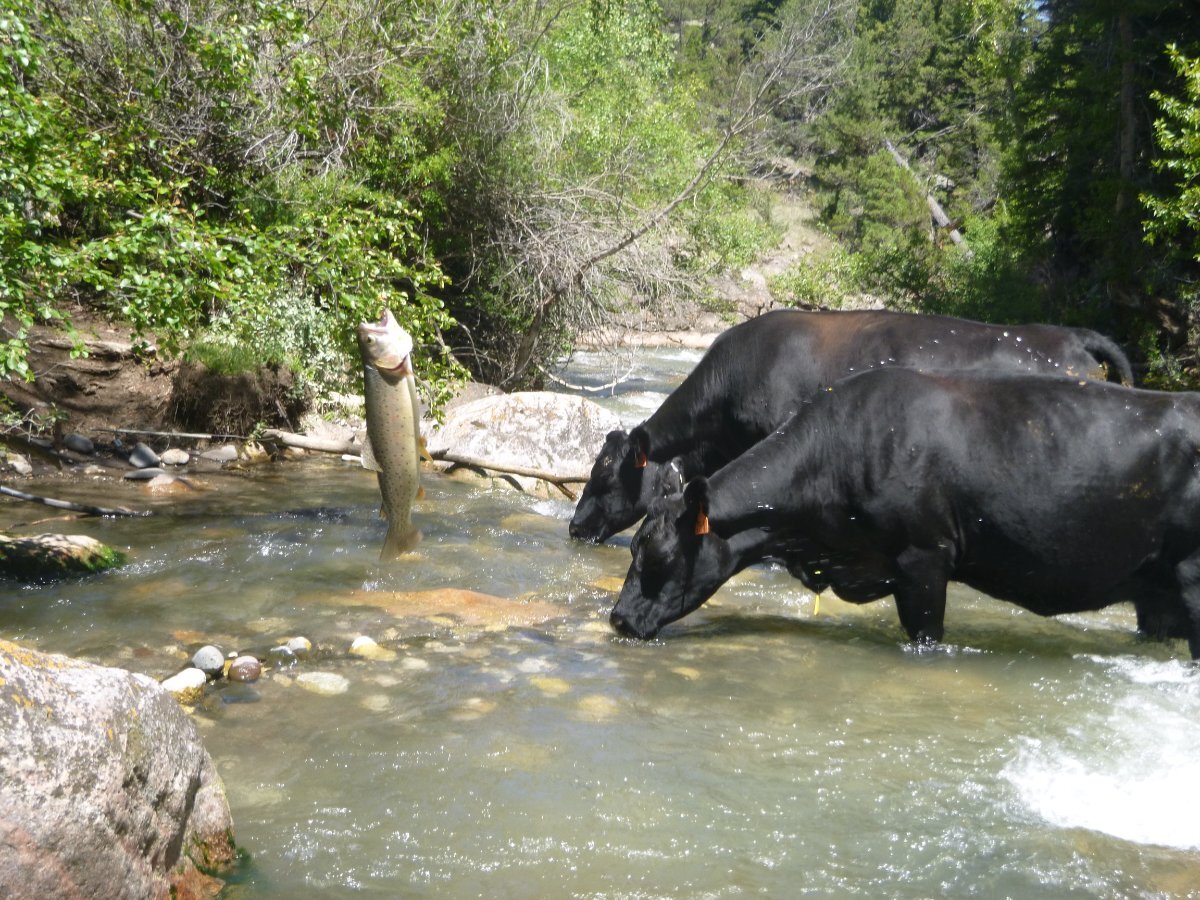
Dead Indian Creek is right behind Twist and is full of cows and fish (see second pic). This campground is located right on the Chief Joseph Highway about 35 miles north of Cody, WY. Bill
2 points
-
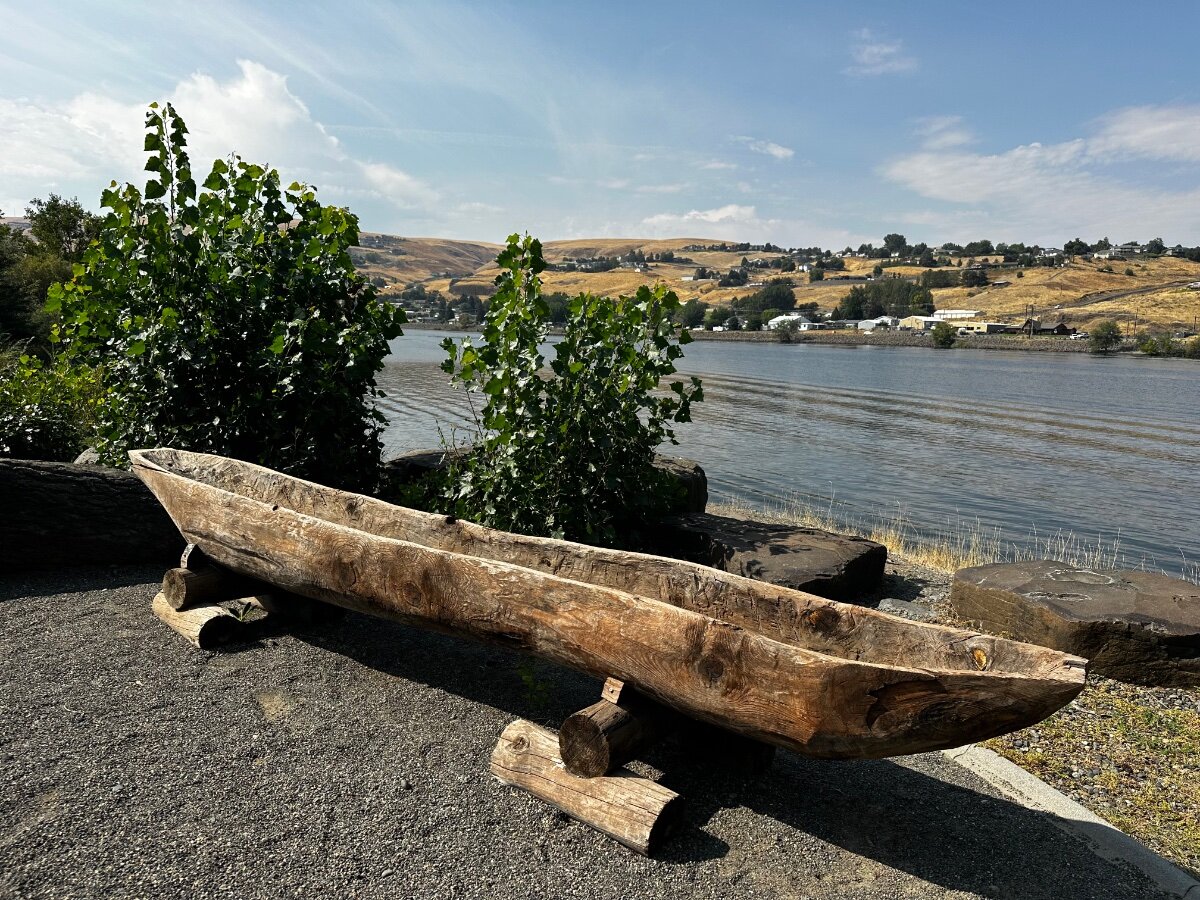
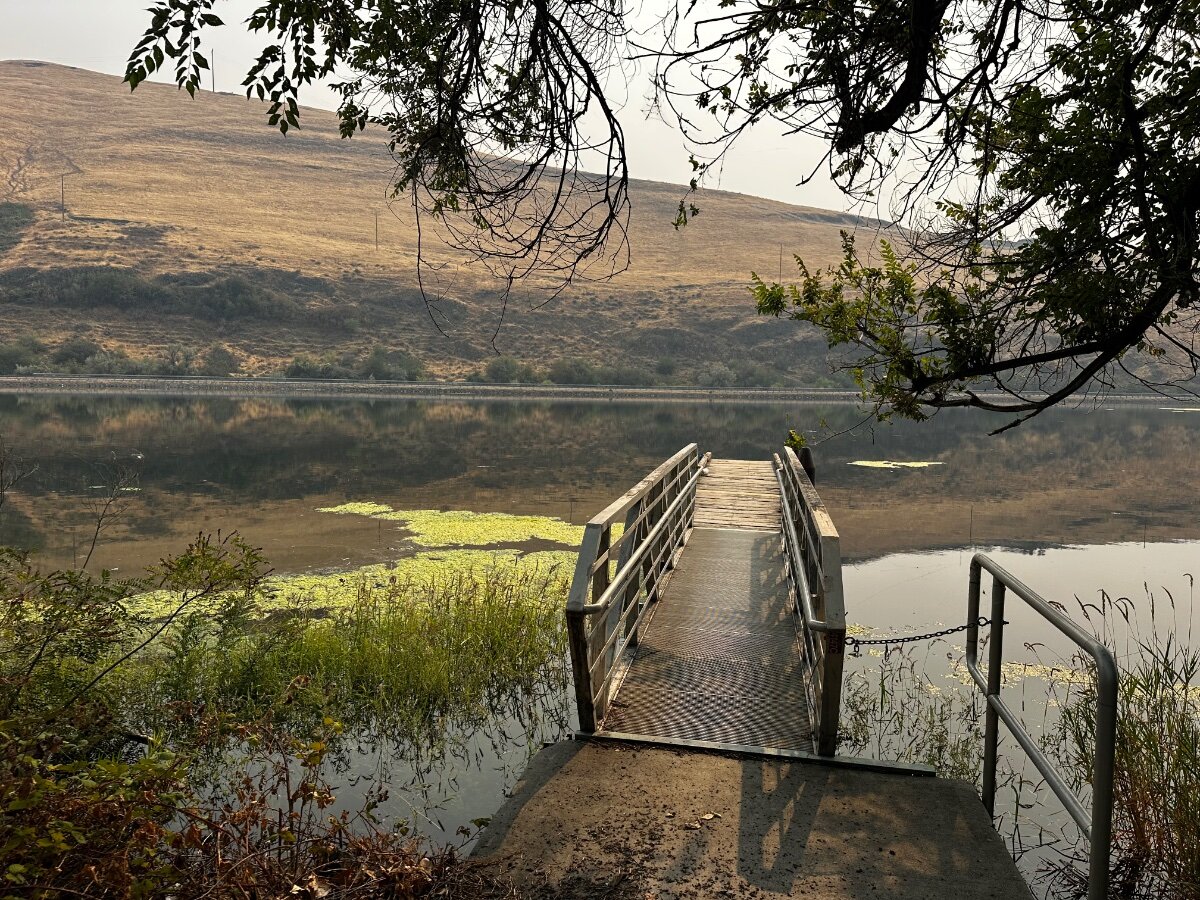
At Chief Timothy Park site 7 near Clarkston Wa A 1980’s COE park on an island in the snake river (connected by causeway) now managed offline by Vista Outdoors under a lease next stop Hells Gate SP on the snake river About a month out from Alcan Springs appointment!
2 points
-
Me too, dawn is my favorite time with coffee in hand!2 points
-
What the heck is that wood-looking thing? A valence, and for what? I installed shelves up there! Please don't take everything I write to heart. 😎 We love OTT and 2x that sentiment in owning Hull #113! But do take me seriously when working M&R on a trailer, our tow vehicles, or anything I tear apart! This mod was pretty cool, however I later mounted the cupholder (on my side only) to be rear of trailer. It was in my line-of sight when propped in bed looking out the window. Chris loves hers as-is. I just love waking up in the Oliver, crack the window shade open a few inches. Looking to see, what kind of day will it be? 😂 Give me a replacement window? My user-story is one about it functioning fully while lying in bed as it does today. Otherwise who cares? Sure is pretty! 🤣
2 points
-
Yet another Ollie "in the wild" - This time it is at the Box Creek Trailhead due west of Moran Junction, WY. Bill
2 points
-
I have been chasing down the solution to a Norcold refrigeration problem for 18 months. My fridge worked well on AC, so so on DC and inadequately on propane. The best it would do on gas was 7-10 degrees in the freezer and only 50 in the fridg section. We do a lot of boondocking and really wanted to keep the gas option. Here are the various steps I took one at a time without success: Pulled the fridge and cleaned the burner tube, changed the thermistor (3 times), changed the main board, checked the gas pressure, changed the thermostat and added a dual extra fan to the top, changed the DC board (one to the right of the main board), changed the eyebrow board, added venting, added insulation. All of these steps were recommended by techs who I paid. The last tech I hired told me that I needed to replace the cooling unit since I was wanting to keep the existing model. Unfortunately, Norcold no longer makes the N412.3 model and replacement cooling units are out of stock. I was advised to find a cooling unit from a 3rd party, order it and then pay the tech to install it. The first cooling unit manufacturer that I contacted did not make units for this smaller fridge model and recommended talking to a guy in Olive Branch MS who rebuilds cooling unit. When I spoke with this gentleman in MS on the phone, he was far more than helpful and told me that my cooling unit was not the problem. He told me to remove my burner and soak the orifice in a high percentage alcohol for a few hours, then blow it out with a compressor and reinstall. Now mind you that my flame looked fine and didn’t seem to be a problem to me or to the two professionals that previously looked at it. 80 year old Mr. David Force, owner of Cooling Unit Warehouse explained that there was a paraffin buildup in my orifice and that although my flame’s appearance didn’t visibly change after cleaning it, the temperature of the flame had been slightly below the necessary temperature. He said that a 10-degree flame difference can change everything. Bottom line, I followed David’s advice, the fridge has been working like a champ for 50 hours on propane so far. I wish I had known this before I spent 18 months and 7-800 dollars on un-needed parts. Nevertheless I am thankful that it works like it is supposed to so that we can head out next week for a month long trip. I'm posting this in hopes that someone can avoid a refrigerator adventure.1 point
-
If they are black concave pits, I don’t think barkeepers friend would work. I believe it only works for light surface rust.1 point
-
Thanks for this! I’d really limited my use of the hot water on our Oliver because the system is so poorly designed. I suppose it’s fine if you’re hooked up to city water - and a sewer connection - but for other situations it’s pretty terrible. I don’t know if I’d go through the trouble of the timers or temperature sensors, but knowing that somebody has done this is reassuring. It’s bad enough when someone designs or builds a home with the water heater long distances from the points of use, but in an RV with limited tankage, it’s really ridiculous.1 point
-
That's fantastic! Wish I could be there -- but I see my friend @J Yoo will be there!1 point
-
That is some fine work, John, excellent job!! You'll not only have the confidence in your equipment going forward but you'll also have the knowledge (and tools) to tackle any situation that comes along should something go wrong. Regarding having the parts and tools required at hand I still struggle with that as it seems like no matter how simple the job I find myself running back and forth to the garage several times to retrieve nearly all of the tools I own!!1 point
-
Ditto. I also like having multiple energy sources vs. all electric. As stated if you are tied to the shore power for all energy needs that is fine. Unless you have a problem and then one would be SOL. At least with Propane, Battery and Shore power there are work arounds that can employed. Options make for a better experience. All eggs in one basket not so much from my experience anyway. GJ1 point
-
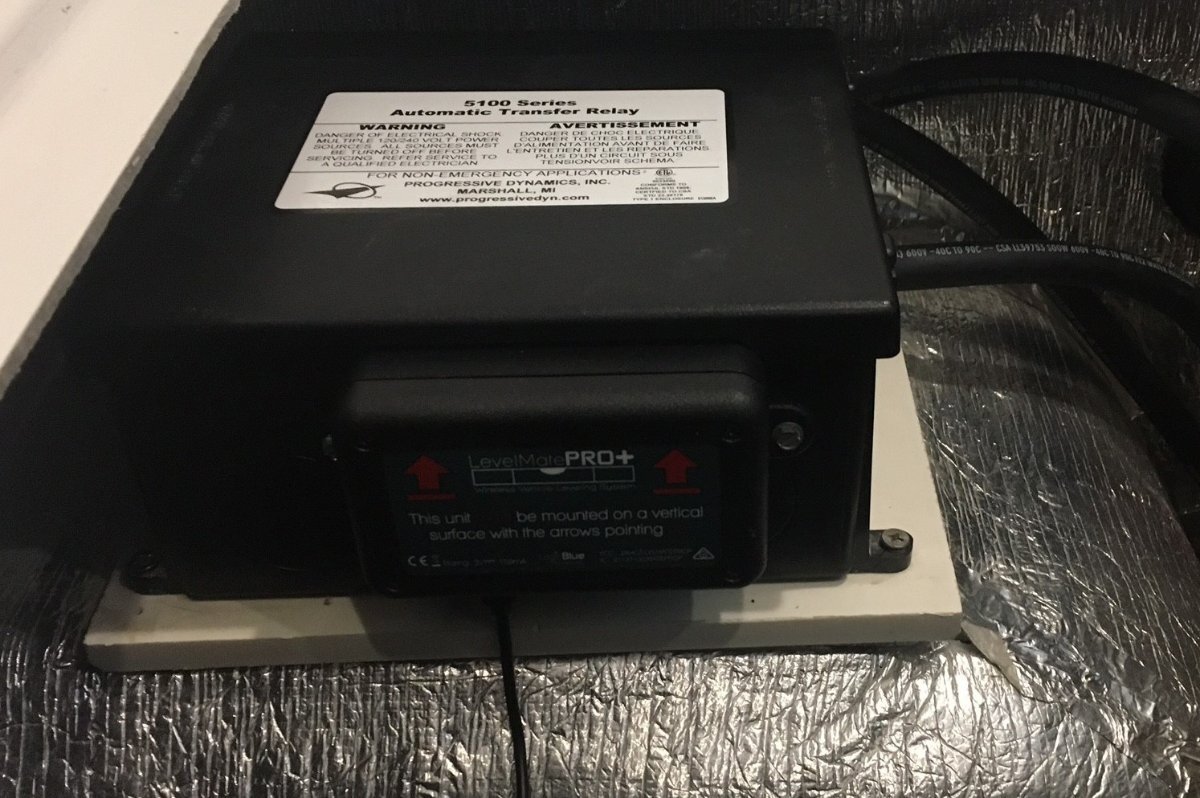
It sure is! And as usual Geoff... You can wire anything that comes to mind (we are not worthy) 🤣! This is a GREAT upgrade for anybody who already has the PRO vs. the preferred PRO+. When we were shopping for ours two years ago, I came close, but soon realized the PRO+ included a wiring harness. Anybody reading not have one, OMG get one and pay $120 for the PRO+ vs. $100 for the PRO. I paid $102 Nov 2023 for the PRO+! I stay in the driver's seat of the truck to level. I open the app and move back and forth to get as close as possible. Then Chris gets out after I tell here where to place the Andersen levelers. When she gets them in place, I pull up or back depending and we can be at near perfect level, set the parking brake and we're done! Running this device on battery - OMG NEVER! I would be truly upset if the app could not find the device (for a dead battery). I wired ours under the rear dinette seat, where our B+ and B- buses are located in reach of the PRO+ included wiring harness (no splices or butt connectors required). The side of the PD ATS provided a good horizontal surface, installed in a just few minutes (see pic). We would not leave home without these accessories: https://www.amazon.com/LogicBlue-Technology-LevelMatePRO-Wireless-Leveling/dp/B083ZMZPR8/?th=1 https://www.amazon.com/ANDERSEN-HITCHES-Accessories-Leveler-Leveling/dp/B01MQNGOWD/?th=1 https://www.amazon.com/ANDERSEN-Accessories-Stabilizers-Jackstands-Quickjack/dp/B0888SDR63/?th=1 If you have the PRO, certainly work Geoff's mod ASAP! If not, buy the PRO+ and if you do not have either... Get out of the dark ages! 🤣 (life is short)
1 point
-
The exact one I bought is ‘Currently unavailable’ on AMZ, but this is one of several currently offered and appears to be much the same.
1 point
-
AND - somehow that Oliver meets up with another Oliver just outside the town of Meeteetse, Wyoming!
1 point
-
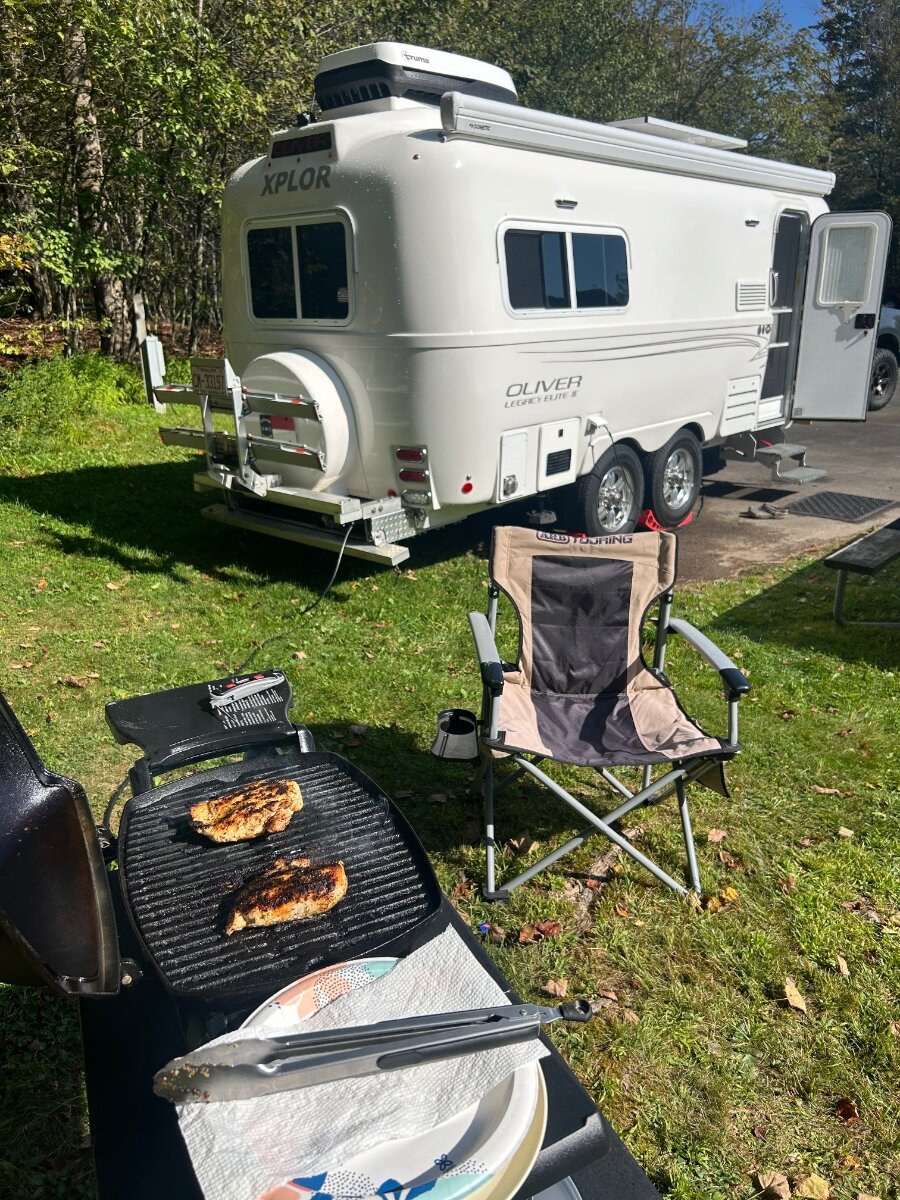
As we make our way north, we booked a few nights on the fly here at Promise Land SP near Greentown, Pa. A really quiet and well kept park. Nice clean bathhouses too! Our low tonight it will be 60 and breezy. Perfect with windows open wide for great sleeping weather! $27 a night electric only. The Pennsylvania Pocono Mountains have a special beauty about them. This pic was just a quick ✅ of our courtesy lights before dark last night. Love the Oliver exterior lighting when its needed. Spicy Kickin Chickin on the grill!! 🤪
1 point
-
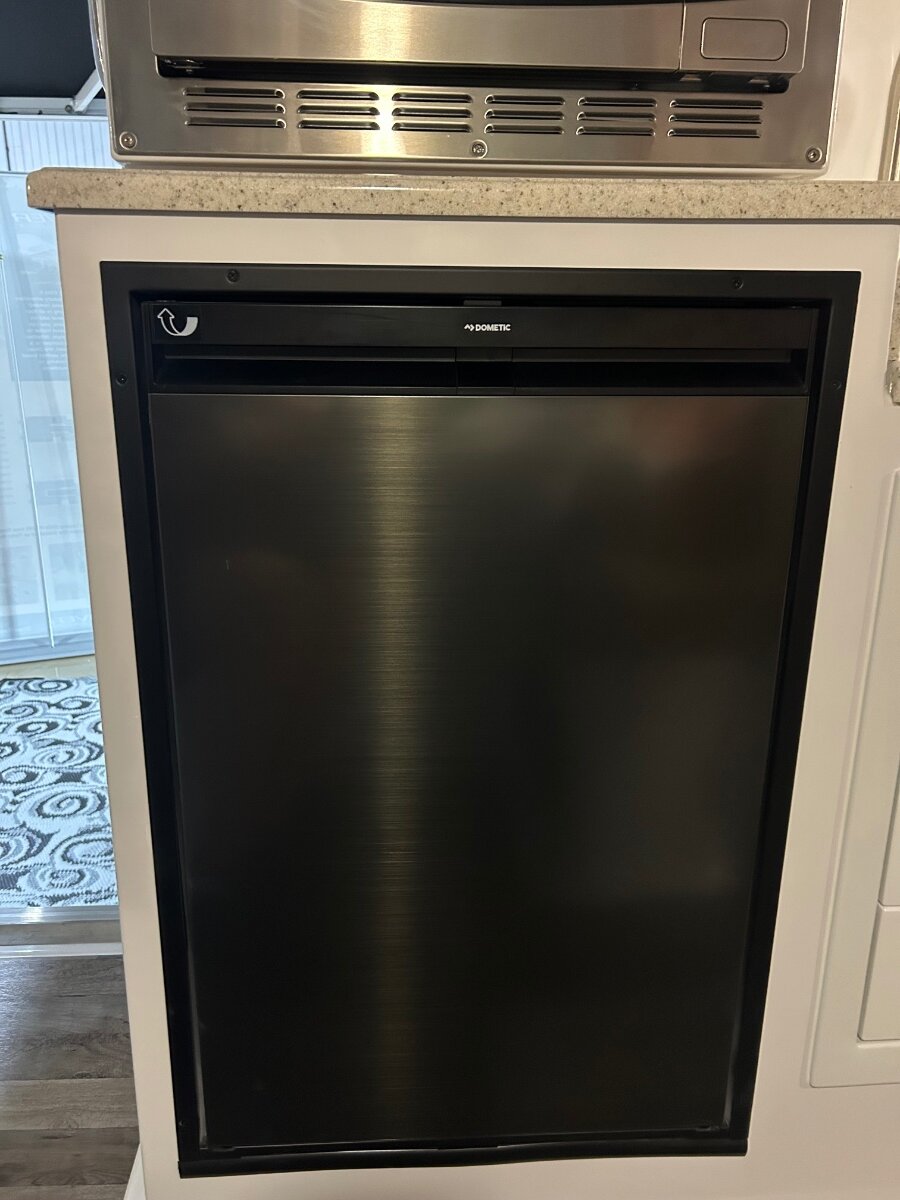
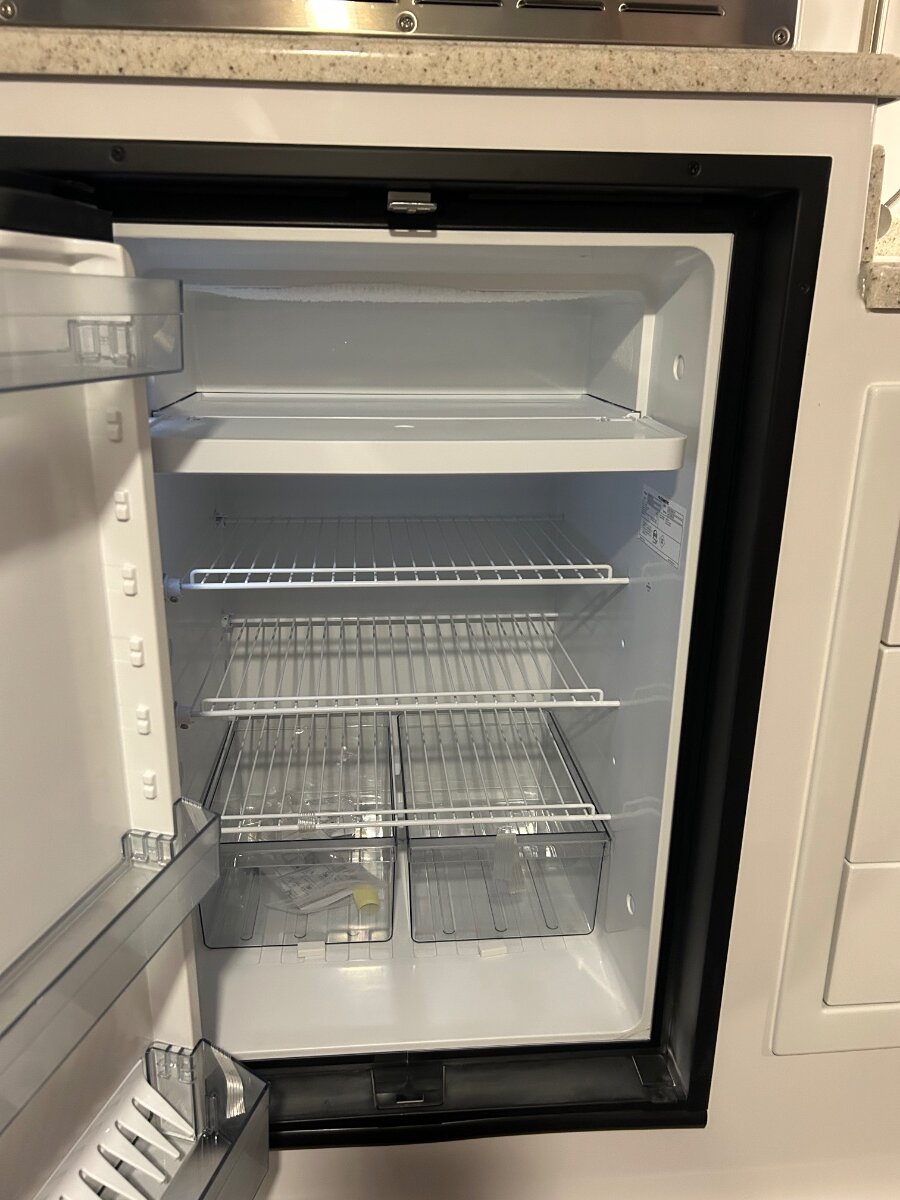
The new Dometic 12v frig. It has an ok size freezer but overall still a smaller interior than our 3 way Norcold.
1 point
-
Was just at the "mothership" and had a chance to look at a 26. Yes the new windows do give an entirely new look, they also minimize air flow and do diminish the natural light. These same windows and shades were in a prior RV a few years ago and we discovered that you really loose airflow without using the ceiling fan, then you have the added noise. But the biggest issue for me is the shades need to be put in the up position while driving otherwise they get beaten up a bit, and come morning they allow a lot of light in the sides come morning... be prepared if you are sun up wake up kind of person... On a positive note, the accent wall, doesn't look bad and is smooth. The only concern is that you now have a fixed color palette that you will always have to take into consideration... It is a nice touch but doesn't allow a complete color customization as you will have to keep to the grey tones...1 point
-
Yeah, it’s pretty simple. I’m 6 feet tall so I just stand on the Oliver ‘bumper” to attach it. I put it together on the ground and once it is attached I fire it up and let it sort itself out. Once it has figured its position I just reach up and align it.1 point
-
VERY nice! Expect to be at St.Mary / East Glacier on the 10th for 5 nights. Fingers crossed we don't get an early blizzard this year!1 point
-
Great shot! We were there at Fish Creek campground on Monday. I think the park is completely full.1 point
-
Look at your table above, at 45 PSI the tire holds 1790 LBS x 4 = 7,160 LBS. Our Oliver ready to camp under 6600 LBS, so we could be at 40 PSI, but since that is the lowest number on the chart, I bump it up to 45 PSI. Ran my tires at 46 last time I checked since they were all just a hair above that number. @John E Davies ran his Mouse at 42 PSI for years which you can see in his posts. If you have upgraded to 5200 LB axles and higher rated leaf springs and carry over 8000 LBS total, then 55 PSI would be the right number. The right pressure for the load should not create excessive heat.1 point
-
MICHELIN AGILIS CROSSCLIMATE - 225/75R16 C Tread depth 12 32nds / 9.1 mm Max Speed 106 mph / 171 kph Max Load per Tire Single 3195 lbs / 1450 kg I also have Agilis CrossClimate on my Navion 24V and they have been an excellent performer...1 point
-
We installed the same tires as Ray, Cooper Discoverer HT3 LT225/75R16. https://www.discounttire.com/fitmentresult/tires/size/225-75-16?q=%3Aprice-asc%3Abrands%3Abrand-COP&sort=price-asc&page=0 Goodyear Endurance does not come in ST225/75R/16. https://www.goodyear.com/en_US/tires/endurance-trailer-tire/24464.html When visiting local Discount tire within the last 30 days they said they would mount LT tires on a trailer if you can show them the LE2 7000 pound GVW, it's on the VIN tag on the front street side of Ollie. They said the total weight capacity combining 4 LT tires has to meet or exceed the trailer's GVW. Some folks here had Discount Tire to refuse mounting LT tires on a trailer, that's why I asked our local store recently, they price match, too.1 point
-
While recently repairing a broken string in one of my shades I noticed "black" areas where the TV had rubbed against the "night" shade during travel. I started trying to clean it with "Simple Green" but that had no effect. So, I got a paper towel and Acetone. Very carefully and lightly I started wiping the black areas of the shade and the marks came off! There was no noticeable change in color or tone - I have the old off-white colored shades. I then wiped the rest of the shade with a damp sponge and light Simple Green. They now look like new. Bill1 point
-
For others that may experience this same problem, on my previous Chevrolet 1500 LT I was getting intermittent but often trailer brake disconnected warnings in the cab. Replaced the OEM brake controller. Never had the issue again. The issue has not resurfaced in my GMC 2500HD with about 3500 miles towing leading me to believe it was a faulty brake controller switch and not the trailer.1 point
-
Mike, every time I've seen this problem, it's been due to the white (ground) wire coming into the trailer from the 7-pin wiring bundle not being securely connected to the grounding buss bar located under the aft dinette seat. All the rest of the wiring on that bar is yellow. All this was going on between the time our trailer was built and about Hull #200. The factory actually sent out a bulletin about this and a standing order to check for this problem on every trailer that passed thru the shop for any reason. Your trailer was probably checked at some time in the past and it either passed inspection or was fixed. Some of those back roads Carol makes you drive on could very easily have loosened that wire. Now would be a good time to check tightness on all the wires attached to that bar.1 point
-
Same thing happened with our first trailer. The wires were actually folded inside the axle tube and chafed until they shorted. Dumb design. Same repair. Never had another problem.1 point
-
We had this intermittent issue probably 10 years ago. It was a poor ground connection.1 point
-
M & C, Are you getting the notice via your Dash Messages? We did, and here is what it was. (I am working on a Post about this). JD had a similar post about Brake wire issues, which I found informative. https://olivertraveltrailers.com/forums/topic/2685-how-to-brake-wiring-is-undersized-some-answers-and-partial-solution/#comment-25131 There is a 2-wire pair (mine looked like old brown table lamp cord) which travels through the front and rear axles that bring the current for electric brakes from the Drivers side to the Pass side. It is a common way RV manufactures do it. That wire has slack and sits inside and rubs inside those tubes. Ours rubbed/abraded to bare wires on a couple of surfaces, causing an intermittent short that soon became a constant short. I basically just cut the old wires off and ran a larger insulated 2-wire pair 12awg across the outside of the back of the axles at the rear so to prevent rock strikes, once I had it all connected. WE HAD BRAKES AGAIN… I found that removing the wheels made it easier to get in and work at each hub, where green brake wires go into back of the plate to get to the brakes. Before you cut your wires, maybe test the green wire going into brakes with a meter to make sure. If you pull the "Brake break-away" cable and then measure the current where the brake wires come in (inside driver side wheel well) you might get a reading, but I am not sure what an electrical short might do to that reading. I was told 80% of the time it is the 7-pin (which it was not), so I naively replaced it, before I found out what the real issue is; now I have a “bugly” 7pin, which is not sealed to the weather like the OTT factory one... Best of luck. B~Out
1 point
-
I vacuum the blinds with my dyson, and the brush fabrics tool. I do have one mosquito spot that I've not tried to get rid of. I left it, to remind my husband to not kill mosquitos on the shades. Maybe someday I'll try, but it's been there over ten years....1 point
-
I've had them come loose but not fall off as yours did. After tightening those three or four times I re-assembled them with a couple of drops of Locktite (blue) on each bolt. They have not come loose since. Bill p.s. be careful to not overtighten and see if you can find that washer. The plastic can crack if you overtighten.1 point


.thumb.jpg.e34bf01ef7f7d5e99ad31856d45afbeb.jpg)


-
Recent Achievements
-


")


")


")


")


