Leaderboard


Popular Content
Showing content with the highest reputation on 09/28/2025 in all areas
-
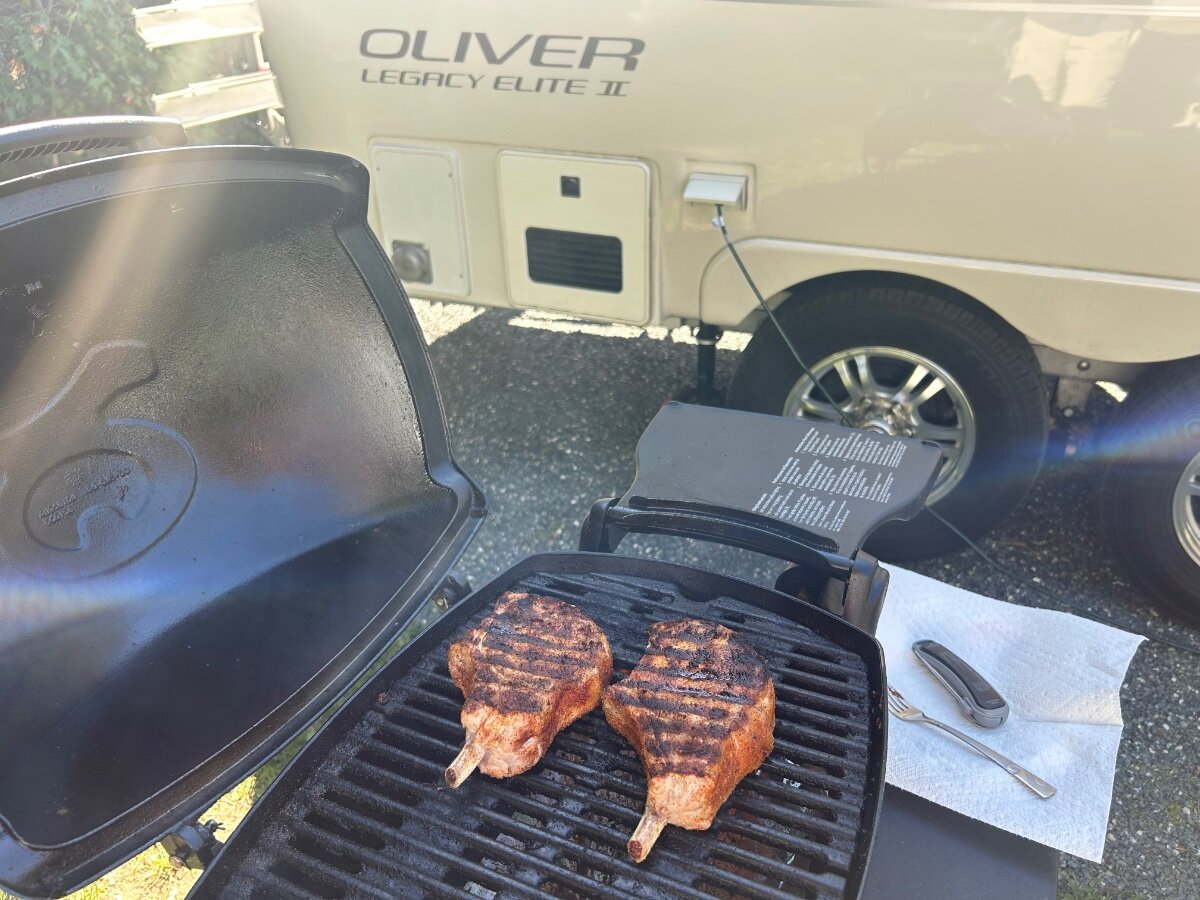
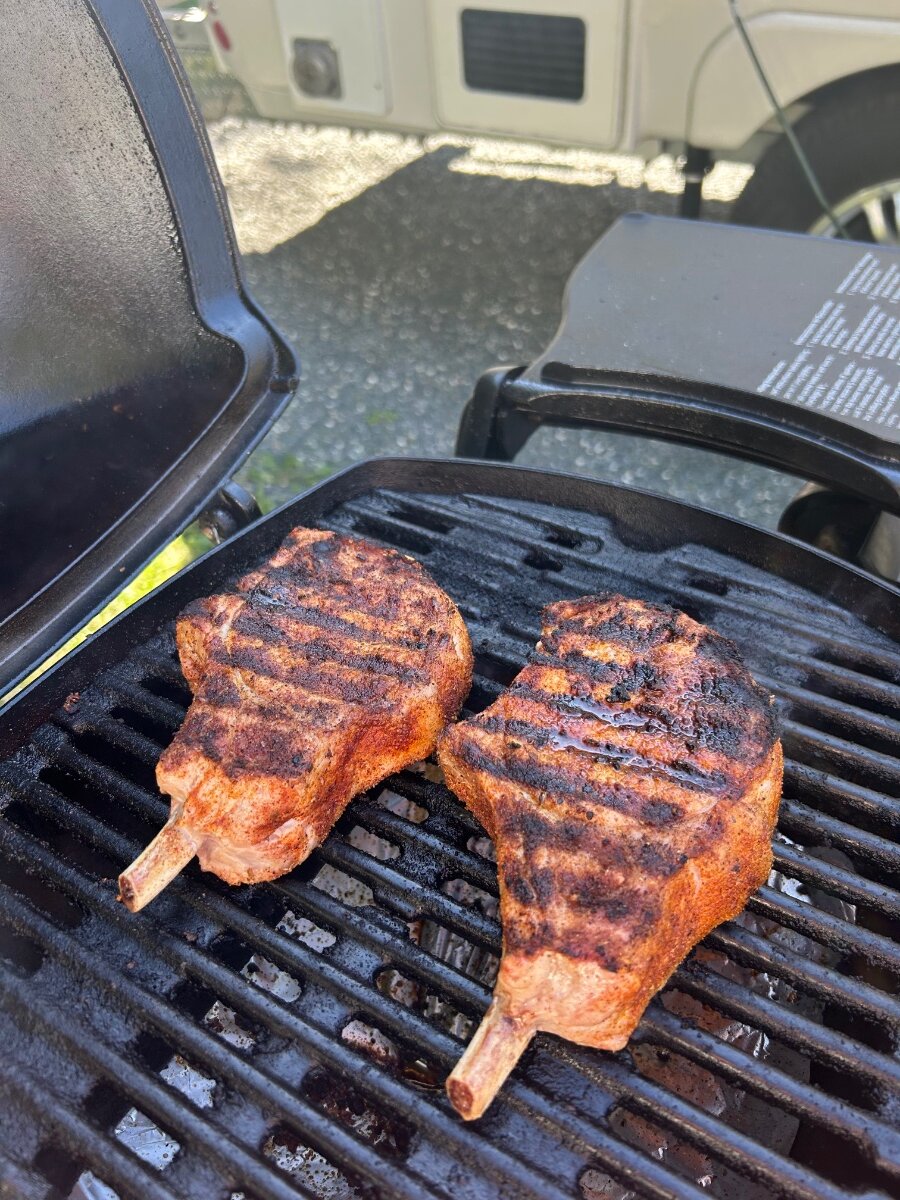
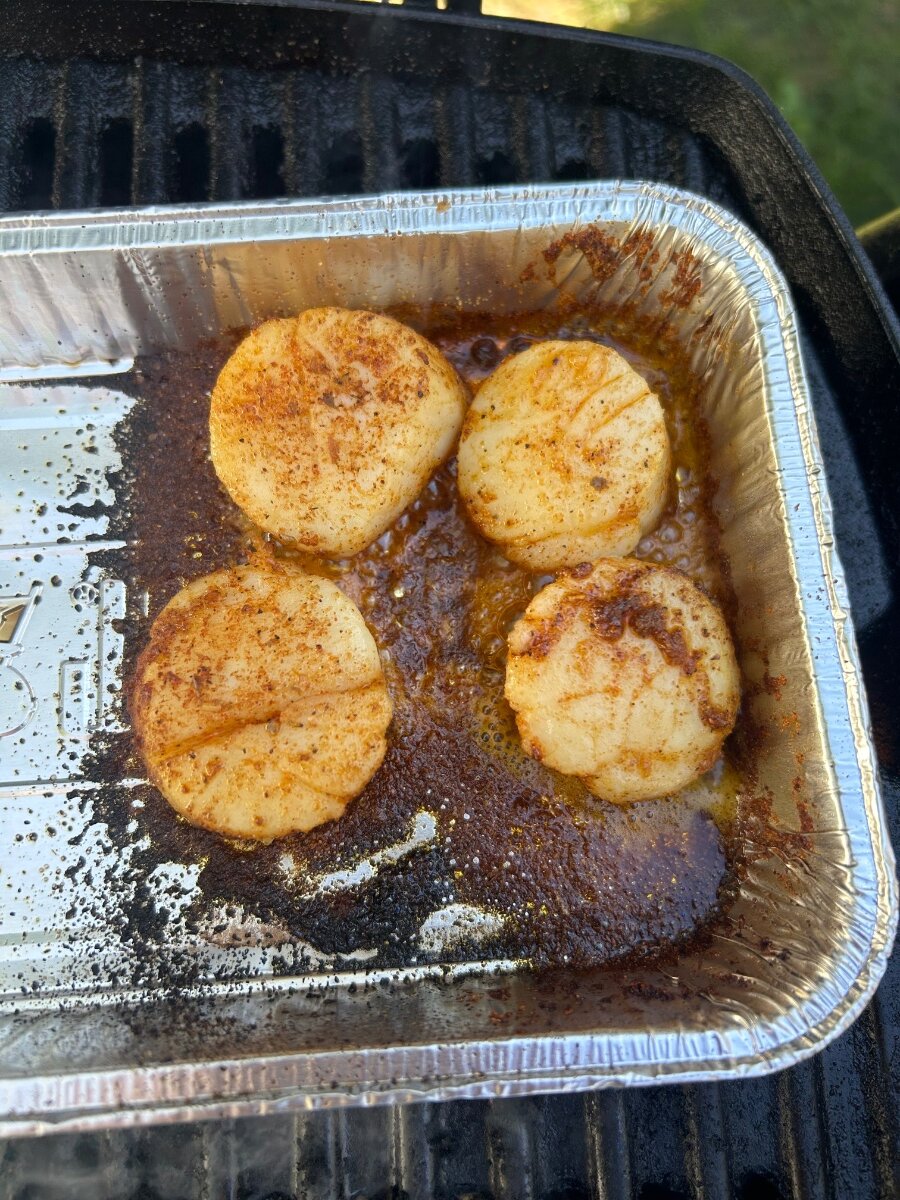
Camped in Ellsworth as we continue our trek north towards the border. Grilling with our trusty and seasoned Q1200. Still chilling in the beautiful coast of New England fall temps. Went by a “Provisions market” today and scooped up a few fresh cut bone in pork chops and some fresh scallops. Cajun blackened bone in chops and butter/garlic blackened scallops and a fresh salad were “Cheffed up” for lunch. Feeling very grateful for such a great meal. 👨🏼🍳 Gotta have a nice fire to warm our bones!
 5 points
 -
Belated Greetings to the Oliver I saw on Wednesday September 24th — you were heading east and I was heading west along I-40 somewhere in western Texas! You were my 8th Oliver sighting for the year, not counting Olivers at the Mothership.3 points
-
I find that I don't use the television and have been thinking about removing it altogether. I am wondering how many people have removed the television and travel without it.2 points
-
That’s the one most Oliver owners opt to purchase.2 points
-
12v power on inverter input lugs? GFCI tripped on inverter output? Tried on/off switch right on inverter face panel? Big input fuse feeding inverter blown?2 points
-
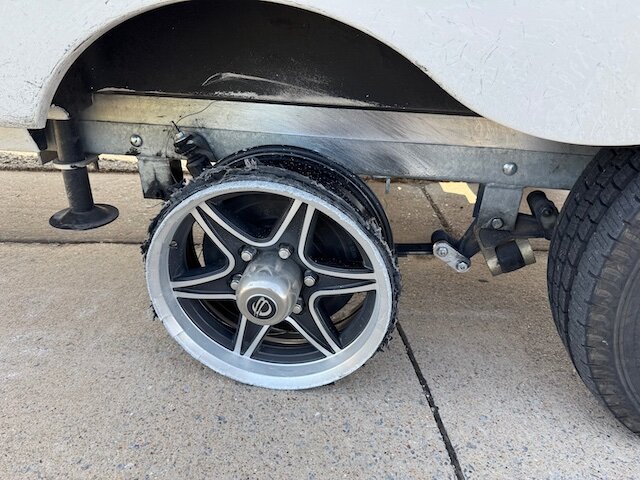
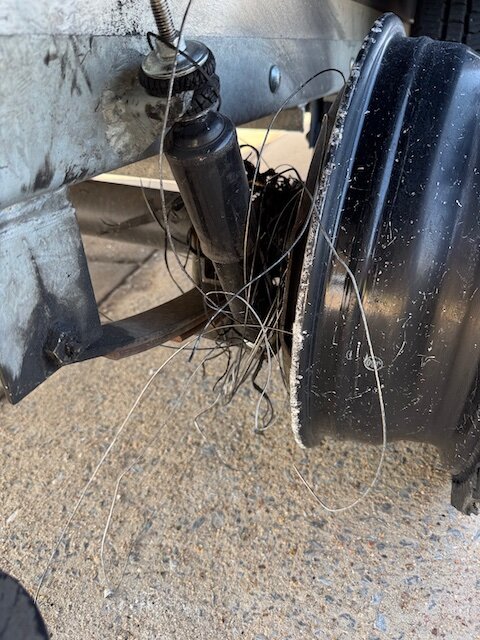
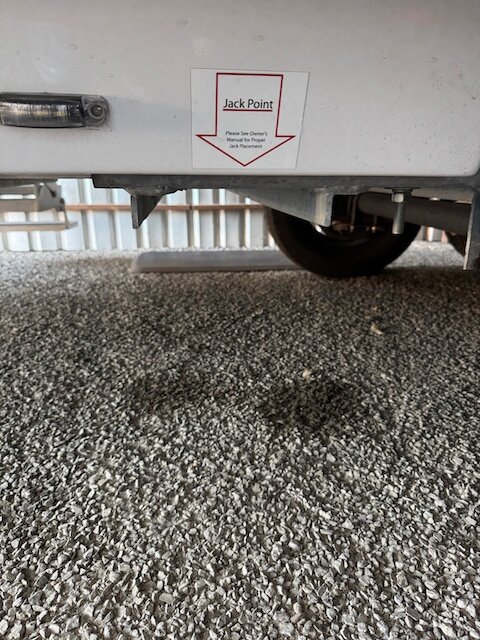
On our last trip, we had significant tire issues (we replaced two tires, one valve stem, and one wheel), so I wanted to share a little of what we experienced and hope to hear from others on ways to make the next time easier. What happened: Entering Wichita Falls, TX on US-281 from the south driving around 60-70 mph, we heard an unfamiliar noise that we couldn't place or locate. The noise would come and go. Five miles later we exited the freeway onto the frontage road, stopped on the shoulder, and hopped out to make sure everything was alright. It wasn't. The right (curbside) rear (RR) tire was gone. Its wheel was an aluminum nub. Some thoughts: Our LE2 handled fine. I think the weight distribution hitch/anti-sway really helped. The noise coming and going was due to us driving near concrete barriers on the side of the road that reflected the noise back to us, such as on a bridge. When we were on straight road, we couldn't hear or feel anything. We were lucky. No damage other than scratched gel coat. There was a considerable amount of steel cable wrapped around the axle and brake area. Taking the tire off: The first task was to get the trailer "jacked up". We pulled forward onto our Andersen Rapid Jack to elevate the right, front (RF) tire. This worked well until the RF tire went flat also. In addition, taking the weight of the trailer off the RR wheel made it more difficult to remove the lug nuts. Fortunately, a passerby stopped to help us and had a powerful impact wrench and an extender since the lug nuts are recessed quite a bit and the center dome got in the way of the wrench. Also, my personal wire cutters were no match for the steel cables. We needed heavy-duty snips to remove all the cables. It was apparent that we were not fully prepared for this situation, so we called a mobile RV repair person. He ended up using a low-profile hydraulic jack to hold up the trailer. Some thoughts: If we had simply run over a nail, we would have been fine. The Rapid Jack would have been all we needed. I have to upgrade my wire snips and am struggling with choosing a hydraulic jack. A low-profile jack is bulky and heavy, can get into places with low clearance/uneven terrain, and has extended lift range. Bottle jacks are smaller and lighter, but have more limited lift range. Any thoughts on what you use? Where to place the jack? The trailer has a jack point for the frame, but, rightly or wrongly, the repair guy put his jack behind the wheel near where the bolts are in the photo below. Getting to our spare: This wasn't a big deal. We do have the rear bumper receiver but it slid out easily. I was glad that the spare had good pressure since I hadn't checked it in about a year. Some thoughts: Check your spare. I had even installed a tire valve extension (something like this) to make it easier to check and fill. Put this task on a checklist to do periodically. Putting a good tire on: A full light truck tire is bigger and heavier than a passenger tire. Also, a full tire has a larger radius than a flat tire which means the tire may need more clearance. Changing it on uneven ground introduces clearance issues if the axle is not up high enough. Since we had lost our tire, once we put the new one on, we spun the tire and checked for brake operation. We found a 3 second delay from the pedal push to the application of the brake on the wheel. This caused us some concern at the time, but both our technician and myself confirmed that the delay was due to the truck's brake controller. It's probably obvious, but put the wheel on and hand-tighten the lug nuts with the wheel off the ground and then tighten the lug nuts to the proper torque (we did have a torsion bar) when the wheel is on the ground and won't spin freely. Some thoughts: If you are going to check your trailer brake while the wheel is jacked up, use the manual control on your brake controller, not the floor brake pedal. A second tire went flat: Our hearts sank as we watched the RF tire lose pressure as the RR tire was replaced. We only had one spare. The technician's fix was to pull out a can of fix-a-flat and refill the tire with air. It was enough. Again, we were fortunate to have pulled off the road 2 miles from a great RV park, so we headed over with the technician following us to ensure we arrived safely. Some thoughts: Carry a can of fix-a-flat. Purchasing tires on a trip: The next morning the tire "repaired" with the fix-a flat was flat again. This time we refilled the tire ourselves and drove the trailer to a Discount Tire for a replacement. This store had a limited selection so we only replaced the one bad tire and risked driving to our destination one hour away with no spare. Before leaving, the store manager offered to "top off" all our tires. In the process of putting in air on the left (street) side tires, the TPMS sensors were very difficult to remove. To make a long story short, they were finally removed, the tires topped off, and we were off to our destination (Lawton, OK). Upon arriving in our campsite, a camper remarked that one of our left tires was low. It was flat. We don't know for how much of our hour-long drive it was flat. The next day I brought that tire into a Lawton Discount Tire where they replaced the damaged valve stem and I bought the only compatible wheel they had and a spare tire. Some thoughts: Fix-a-flat works for emergencies, but only to the nearest tire shop. Although limited by the store's available tire selection, it will be a cold day in hell before I ever drive the trailer again without a spare tire available. Lessons Learned: As we pulled away from home, all four of our trailers' tires had TPMS sensors on them. I never pulled out and turned on the monitor. It might not have prevented the blowout (or whatever it was that happened), but the alarm would have told us that there was a problem and we would have pulled over much earlier, reducing risk to ourselves and damage to the trailer. I thought I was prepared for tire issues. In fact, I was only prepared for the simplest, most basic scenario. The next time we go out, we'll have a few more tools. I'm interested to hear from you what's in your tire changing tool kit. Open issues: Still trying to figure out which type of hydraulic jack to bring with us. I'd appreciate your thoughts. Still trying to figure out the correct jack point. I'd appreciate your thoughts on this as well. We hope this has been helpful to some and interesting to others. Let us know your thoughts.
1 point
-
OK - can you give us a bit more info on exactly "what" it is that you find difficult? I'd guess that since you are not exactly the biggest person in the world, you might have some difficulty in turning that torque wrench enough to get it to "click" when you have reached the torque setting - but - I'm only guessing. Bill1 point
-
Twist Inspired by my wife and some guy named Oliver.1 point
-
She crossed the road?1 point
-
We decided to call ours Kimba, as in "Kimba the White Lion" from the Japanese manga series. No reason other than the trailer was white and that is what we kept thinking of every time we talked about our Oliver.1 point
-
I know I have said this before, but I think everyone should get out their jack and practice changing a tire on their trailer as well as the tow vehicle. You can check everything works as well as to learn where the jack points are etc. I once had a utility trailer that got a flat and when I went to change the tire learned the truck jack was not tall enough to jack up the trailer. When my children got their driver's licenses I sat in a chair in the driveway and watched them change a tire on the car. Very entertaining. I have jacked up my Oliver several times, both at home and alongside the road but I have never used the stabilizer jacks when doing so. It is time to hit all the zerks with some grease and I will try out the stabilizer jacks when I do the job.1 point
-
“Lottie”, inspired by the Deming, NM gambler Carlotta Thurmond whose nickname was Lottie Deno (self-stylized from the moniker “Lotta Dinero” given to her by another gambler). Carlotta is thought to have been the inspiration for Miss Kitty of the Gunsmoke TV series the nickname performs double duty for my Ollie as I commonly refer to her as Lottie Frickin’ Da due to her being frequently found camping “down by the river”. Lottie sounds a lot better than calling her Matt Foley. IYKYK1 point
-
We will go for months without using our television but it is nice to be able to watch a DVD if we get a several rainy days in a row. We always bring a few favorites along just in case. Paula1 point
-
Skip - I don't see any obvious issues other than the dust that is everywhere. That dust can get into many areas that you don't want it to - I know this because every couple of years I have to plug and unplug the remote cable (runs from the back of the remote switch inside the living area of the Ollie) to the inverter. I've never had to bother with the connection on the back of the inverter switch but it is the connection that goes into the inverter itself. However, as I think you said that you had already tried turning the inverter on/off at the inverter itself, I doubt that this is your issue. But, its worth a shot. If you decide to try this, what you are looking for is what appears to be one of those little phone jack connections. Simply press down on the little plastic tab and pull straight out and push straight back into where it came out. Do this two or three times to help "clean" the connections. Bill1 point
-
For the most part I don't really use the TV very often - But, when on my annual two month fly fishing trips sometimes I get back to the Ollie a bit tired - don't feel like reading but I know that I'll fall asleep if I start listening to an audio book. So, I bring along a number of DVD movies (very few times would I be in a location that has enough cell service to enable "streaming"). During the two months I'll watch maybe 4 or 5 movies. Bill1 point
-
Check the GFCI on the end of the inverter where the microwave is plugged in. These trip at times and need to be reset by pushing in the breaker button located between the two receptacle outlets if you are not familiar with these. There should be a round access port near the floor labeled GFCI.
1 point
-
Are all your 12V circuits working? e.g. lights, stabilizer jacks, etc. Attach some pictures here, of the inverter, inverter panel or on/off switch, wiring into the inverter and devices near the inverter. Do you have a multimeter, or test light? @ADKCamper gave you a good checklist for testing. The gurus are here. Post pictures and get a meter or simple test light at an auto parts store. It is likely simple..1 point
-
Someone had recommended this one, High Sierra.1 point
-
FYI: Mossey
1 point
-
Saw an Ollie roll past on 191 in Wyoming heading south near Bondurant at 9:45 this am- kind of exciting! Beautiful day for travel!1 point
-
Yes, I have a GearWrench torque wrench, 250 ft//lb that we travel with. We were VERY lucky because we had been on the highway heading out to Yellowstone and had just pulled off to get groceries when the tire stem blew out most likely from the "waggle" affect of the TST sensor. We changed the tire in the parking lot then found a Discount Tire location near where we were and had the stems replaced on all tires including the spare.1 point
-
We also run the TST and have been very happy with it. It occasionally alarms with the sensor saying one of the tires is at over 200F. A Quick Look in the side view mirrors confirms this is not correct. I think this occurs because of interference from our cell phones, chargers or other electronics in the cab. We plug our repeater into the 12 cigarette style outlet about the cooktop.1 point
-
A torque wrench is also handy to have. 😊👍🏻 Tom, it appears you were very fortunate to have a nice flat surface to change out your tire!1 point
-
Tony, I and others on here have been running the 507 TST TPMS. I can’t speak for others, but our system has served us really well for the last 5.5 yrs in. TST I think is based out of Georgia and their customer service is nothing short of stellar. As @Mike and Carol mentioned it measures pressure and tire temp as well. I run the Discount tire rubber stems and have been happy very with this set up. Not to go down the rabbit hole on tire stems, but….metal stems can bend and leak on impact from road debris especially if off pavement. My guys at DCT did NOT recommend metal stems. It’s a personal choice. Go with what your happy with and works. As @topgun2 suggests get the 6 pack of stem cap monitors so you have a sensor for your spare and have an extra. The rubber mount that the TST dash monitor is cradled in works nice and keeps it from moving around on the dash. I use it all the time. For warranty reasons, TST requires you run the repeater which is an easy 12v hook up. I attached mine to the interior of the battery box with velcro. If you decide on this TPMS hit me up with a PM if you have any install questions. It’s pretty straight forward. Once you have your tire caps on and “synch up” with your charged up dash monitor, you are good to go. I think the battery is a 2032 which is installed in each tire sensor. I change these out once per year. This is amazon’s price, shop around you may find it cheaper. https://www.amazon.com/dp/B07FKTH136?tag=track-ect5-usa-1802408-20&linkCode=osi&th=1&psc=1 Safe Travels!1 point
-
1) Using the stabilizer jack is very helpful 2) Change valve stems to the metal type especially if you have TST sensors 3) Invest in an electric impact wrench 4) A locking bottle type jack comes in handy 5) Tire plugs and a compressor can come in handy in a pinch.
1 point
-
Don't forget to get two "extra" sensors - one for the Ollie spare tire and on for you tow vehicles spare tire (all the TPMS systems that I know of that are included on vehicles do not monitor the spare tire on the tow vehicle). Bill1 point
-
If you have rubber, make sure to install high-quality STEEL valve stems first. Buy from Summit or local auto parts store, NOT Amazon China-made. Tire companies do not carry them. https://www.summitracing.com/search?SortBy=BestKeywordMatch&SortOrder=Ascending&keyword=steel valve stems There are also TPMS sensors that can be installed inside of the wheel integral to the stem. More expensive and work required in removing the tires/rebalancing but it is the way the industry is going now that all modern vehicles have TPMS built-in. https://www.discounttire.com/accessories/tpms-catalog Best to have wheels balanced after TPMS sensors are installed.1 point
-
We have a TPMS on our purchase list but, after your story, it's now at the top. Thanks, Tony1 point
-
Yes - thanks for sharing your story - even the parts that were not so easy to share. This kind of situation helps us all as both a reminder and (perhaps) as a source of other things that we might consider doing (or not doing as the case may be). Bill1 point
-
Thanks for sharing your story. I think you are correct in that we think we're prepared but in reality, we're prepared for the most basic incident. I think a contributing factor was the Oliver tows so well, you were unaware of the disintegrating tire behind you. In the past, I've relied on the Oliver's jacks to raise the tire high enough for removal and replacement. My thought is to use the scissor jack, that came with the truck, as a back-up jack. I've never had much luck with Fix-a-flat. Instead I carry a tire plug kit and compressor (12v or 120v if you have an inverter). Tire plugs can be controversial. Some feel once you plug a tire, you should replace it as soon as possible. Most tire stores refuse to repair a previously plugged tire. Others plug a tire and just run it. The plug kit allows you to deal with as many flats as you have plugs until you get to a position where you can purchase a new quality tire. In addition to learning from your experience, I've made a note to bring along my impact driver. Thanks again for sharing.1 point
-
I carry a Safe Jack RV Jack Kit in my tow vehicle. When testing it, I have jacked from the marked "Jack Point." That said, I plan to use the "stabilizer" jacks as well if I must change a tire by the side of the road. As jd1923 noted above, the trailer can shift if the ground underneath one jack point is soft. Three jack points is better than one, and the electric jacks are so easy to use. We also use our Tireminder TPMS system, with monitor mounted on the windshield, hoping to catch any trailer tire issues early! The person in the passenger seat checks the monitor regularly.1 point
-
Glad you guys are OK and that there wasn't any more damage than you had. I believe that your experience was ( as you mention) partially your "fault" due to not turning on your TPMS. However, the extent of your tire issues is very extraordinary. I don't think that you can prepare for every possible situation while on the road - unless, perhaps, you are ScubaRx 😇. Yes, checking your spare tire air pressure should be done more often OR simply get yourself another TPMS sensor for that spare and remember to turn that TPMS monitor on. I also agree with the advice concerning the use of the onboard "leveling" jacks. Your experience is yet another reason why we bought an Oliver and believe that everyone should consider before purchasing virtually any other brand. Bill1 point
-
Wow, glad you were able to resolve with no accident or damage! Thanks for the write up, it’s proof how well the Oliver tows. General thoughts: Use the onboard leveling jacks. We’ve been doing this for years, to include at Discount Tire on a few occasions and at campgrounds to remove wheels. The TST TPMS shows both pressure and temperature of each tire. I keep the monitor on the dash and do a visual check every 15 minutes or so. Whatever TPMS you use, use it and keep a regular watch on tire health. Mike1 point
-
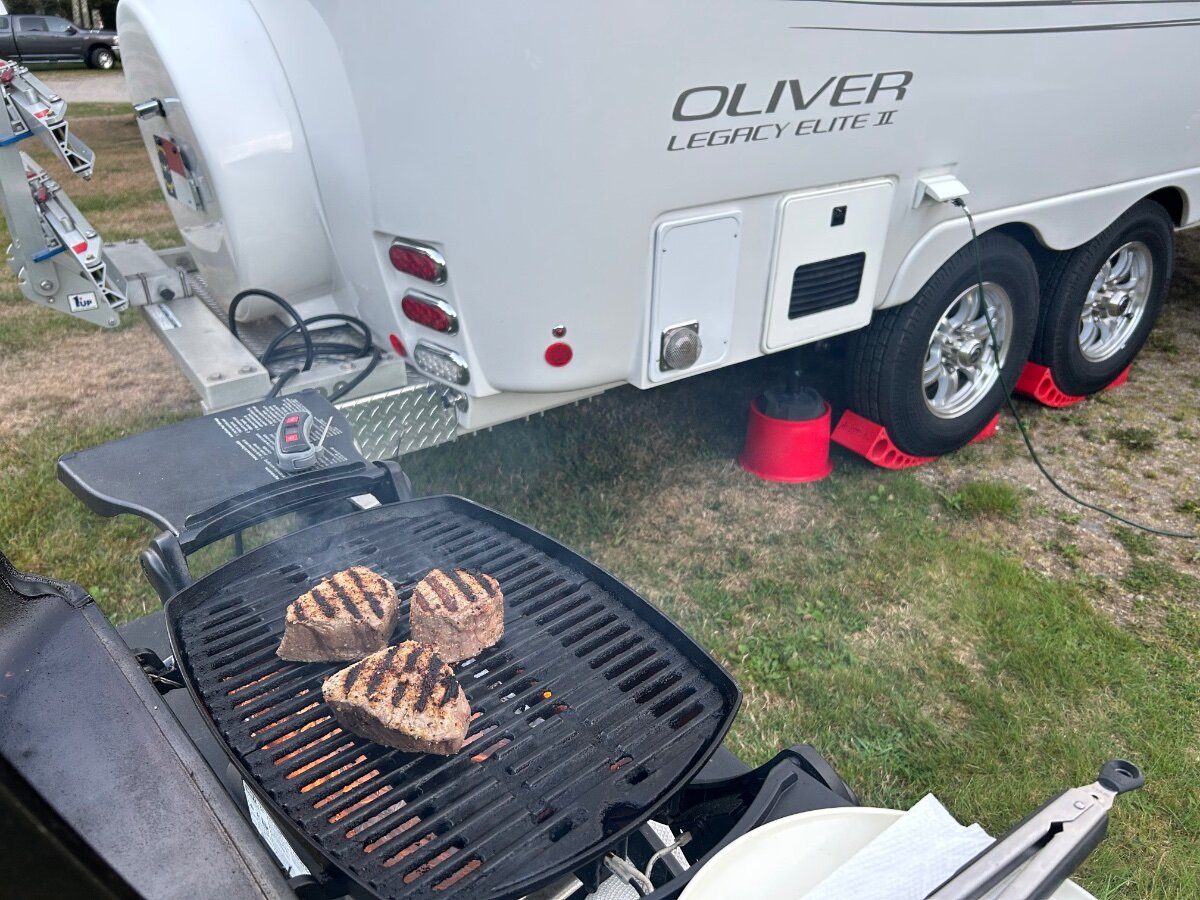
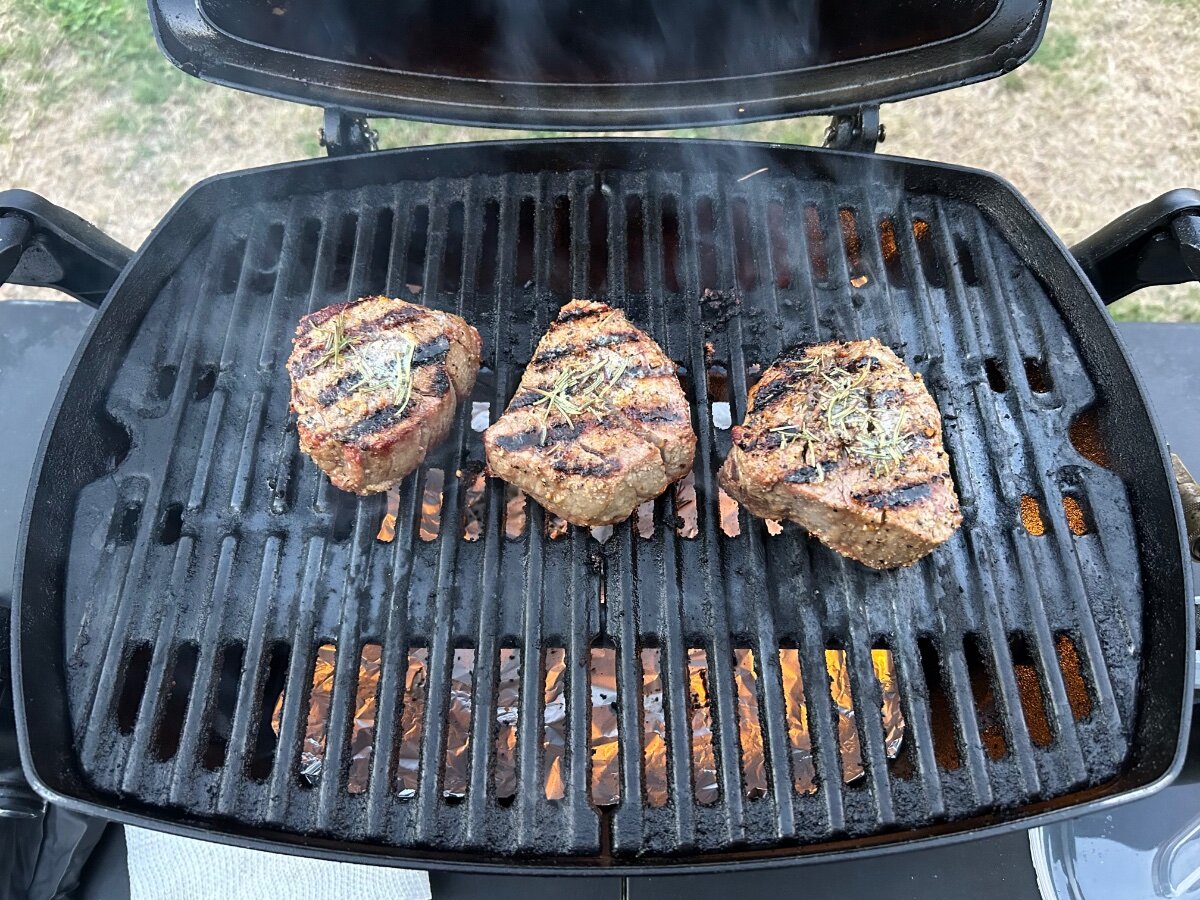
6 years in we are still enjoying our Weber Q1200…scooped up these corn fed tenderloins locally in Booth Bay, Maine the other day. Super tender and full of flavor! They were so good we slipped back in a few days later and scooped up 4 more. Butter, garlic, our own NC home grown rosemary. Plate em up at 138D! 😋🤩🍽️👨🏼🍳
1 point
-
The wire wrapped around the axle is probably the bead wire. I worked in radial passenger and light truck tire manufacturing for 32 years.1 point
-
We've had two rubber valve stem failures on our LE2 fitted with TPMS sensors. Fortunately, both were slow leaks. Rubber stems can crack due to the flexing from the extra weight of the sensor. Ours are TPMS sensors from TST that they claim can be used on rubber valve stems. Our TV has metal valve stems also fitted with TPMS sensors, but they're not immune to failure. Even the rubber gasket on a metal stem can leak. I think part of the problem is that the sensors are difficult to remove, so the stems get flexed more than they should when adjusting tire pressure. As already mentioned, the electric jacks can be used for tire changing as long as you're still hitched and the TV parking brake is set. It's much more convenient than carrying another jack. Also, is the wire wrapped around the axle from the tire's steel belts?1 point
-
Rob is absolutely correct! Use your onboard Stabilizer Jacks! It's the easiest and safest way to change a tire. Using the labeled "Jack Points" and the trailer weight shifts and then you have other issues. OTT got legal (not engineering) advice on not using the stabilizer jacks. I have posted before what Oliver wrote in the 2017 User Manual, where they detail the tire change procedure using these jacks. I also carry a bottle jack and jack stand, for more major repairs. Hard to imagine any of this on a 3-year-old hull. I expect and have never seen tires self-destruct in less than 7 years, except for China-made ST tires. If you are original owners, I would think about what may have caused or led to these failures (two tires). The steel cable must be the cable from the blown radial tire The shock bushings look awful. Remove one shock to see if it has compression along the full length. My guess is you need 4 new shocks and if I were you, I would be buying four (4) brand new top-of-the-line LT tires, mounted and balanced at a reputable shop. I'd like to ask again re your tire make-model and running tire pressure. Use your TPMS and "see something, hear something, say something!" When you hear any odd noise, get out immediately and inspect all 8 tires, leaf springs, shocks, etc. Look under to see if you're dragging some road debris, then look again. 😎1 point
-
This is correct. If you show your Ollie be sure to let Oliver Sales know so that when the person you showed your trailer to actually pays for their Ollie you will get a "reward" (i.e. cash). Bill1 point
-
Brings back memories. That's a great place.1 point
-
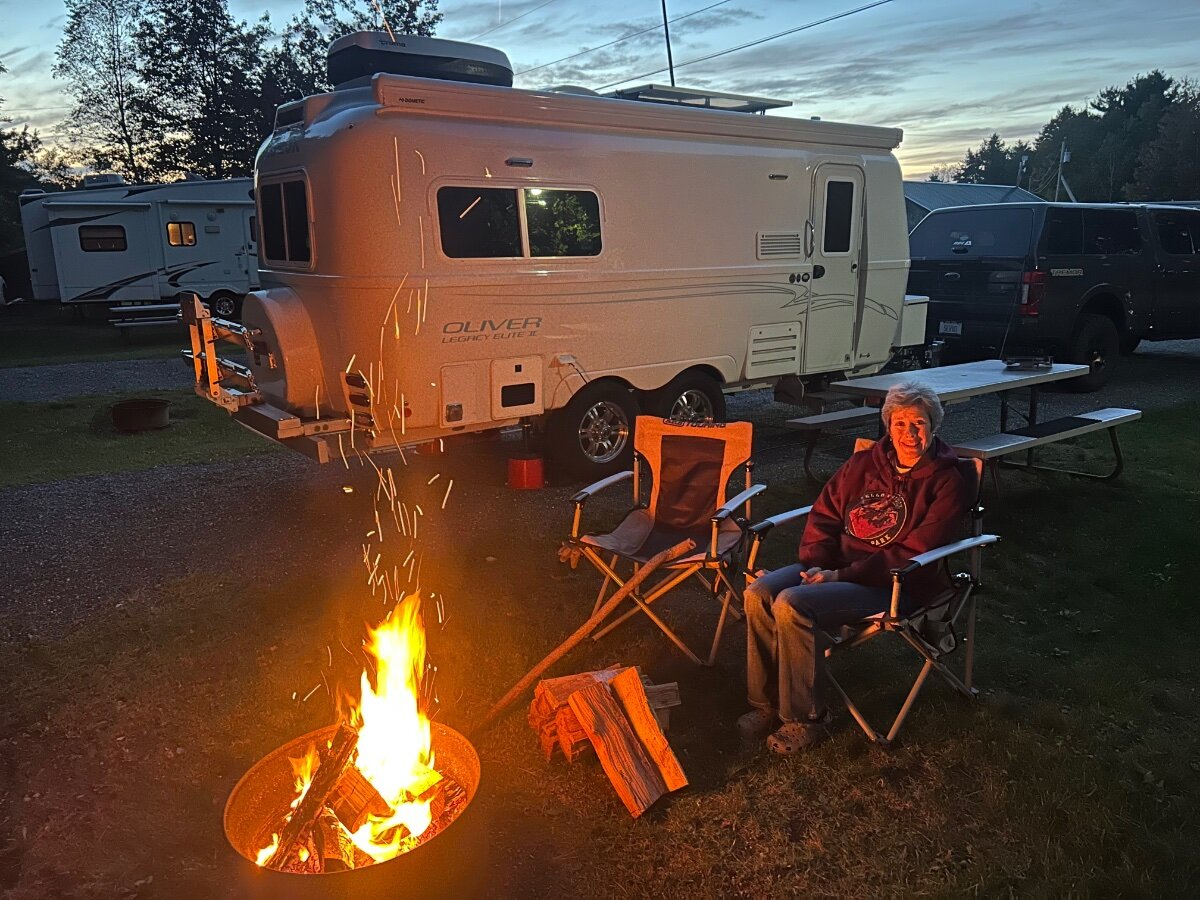
Tunnel Mountain Campground just outside of Banff. Home for the next couple weeks
1 point
-
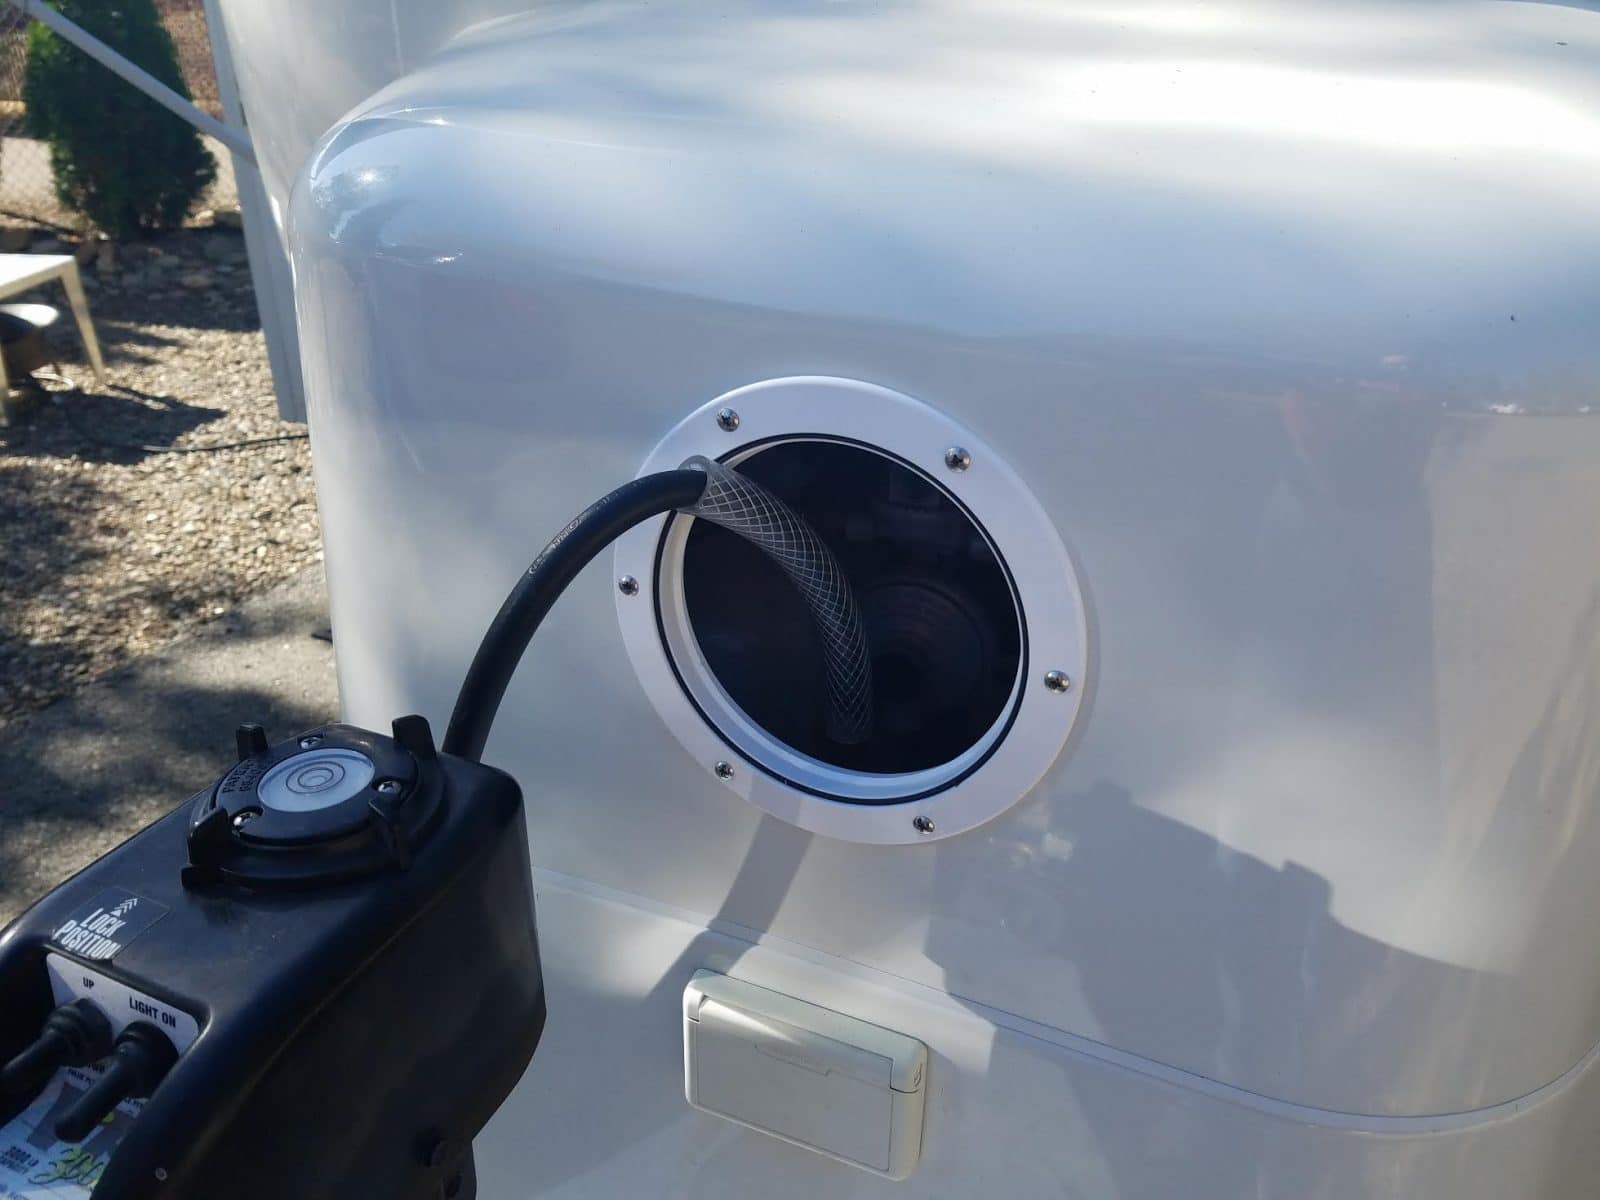
I purchase a kit for my Weber that allows me to connect to the Oliver QC and just bought an adapter for my Camp Chef Ranger II. Saved the eliminated regulators for the owners of the two propane appliances. Now connecting to my Champion dual fuel was more elaborate and required a special regulator to allow the carburetor to pull propane as required. I added some QC connectors to facilitate storage, but the total cost me about $150 including spare regulator for using on a propane tank at home.1 point
-
Steve, Your plan to add another regulator is feasible, but it seems clumsy to me. I have three propane items that each came with their own regulators: A Camp Chef stove, a Weber Q1000 grill, and an Outback Firebowl firepit. For each I was able to replace the connecting hose with a regulator with a hose with a propane quick connect. For the stove I used an 8 foot hose (currently $61; I paid $26), and for the firepit I used a 4 foot hose. Converting the Weber grill was more complicated, and covered in this post. The quick connects are really convenient, and it might be worthwhile to see if you can make them work.1 point
-
I pick up my LE2 in May. I decided against the propane quick disconnects because all of my 20 year old stoves, cookers, fryers, etc have their own pressure regulators. My understanding is that they will not work unless connected to a high pressure source (can't have two regulators in series...it will lower the pressure too much). The LE2 has a regulator at the tanks so all the propane lines into/underneath are low pressure. So, what I have planned is to install a propane "Y" connector coming off one of the 30 lb tanks. One of the y connectors will go to the LE2 regulator to fuel the LE2 as normal. The other Y connector will connect to a detachable high pressure propane hose that will run to my stoves/etc. When disconnecting, I will need to turn off the tank and burn the hose length of propane....other wise the propane will escape into the air. Below is my preliminary list of components needed to convert a coleman stove with the high pressure source. No special tools needed. Priority Item Cost $$$ Desc 2 CAM59893 44 Camco Propane "Y" Adapter w/ Handwheel - Male P.O.L. x (2) 1"-20 Male 2 Gaspro conversion hose 52 GASPRO 18 Feet Propane Adapter Hose 1 lb to 20 lb Converter for 1 LB Portable Appliance to 5-40 lb Propane Tank 2 Coleman stove gas to propane converter 20 Stansport Propane Converter Option Dozyant conversion hose 40 DOZYANT 18 Feet Propane Adapter Hose 1 lb to 20 lb Converter Replacement for QCC1 / Type1 Tank Connects 1 LB Bulk Portable Appliance to 20 lb Propane Tank1 point
-
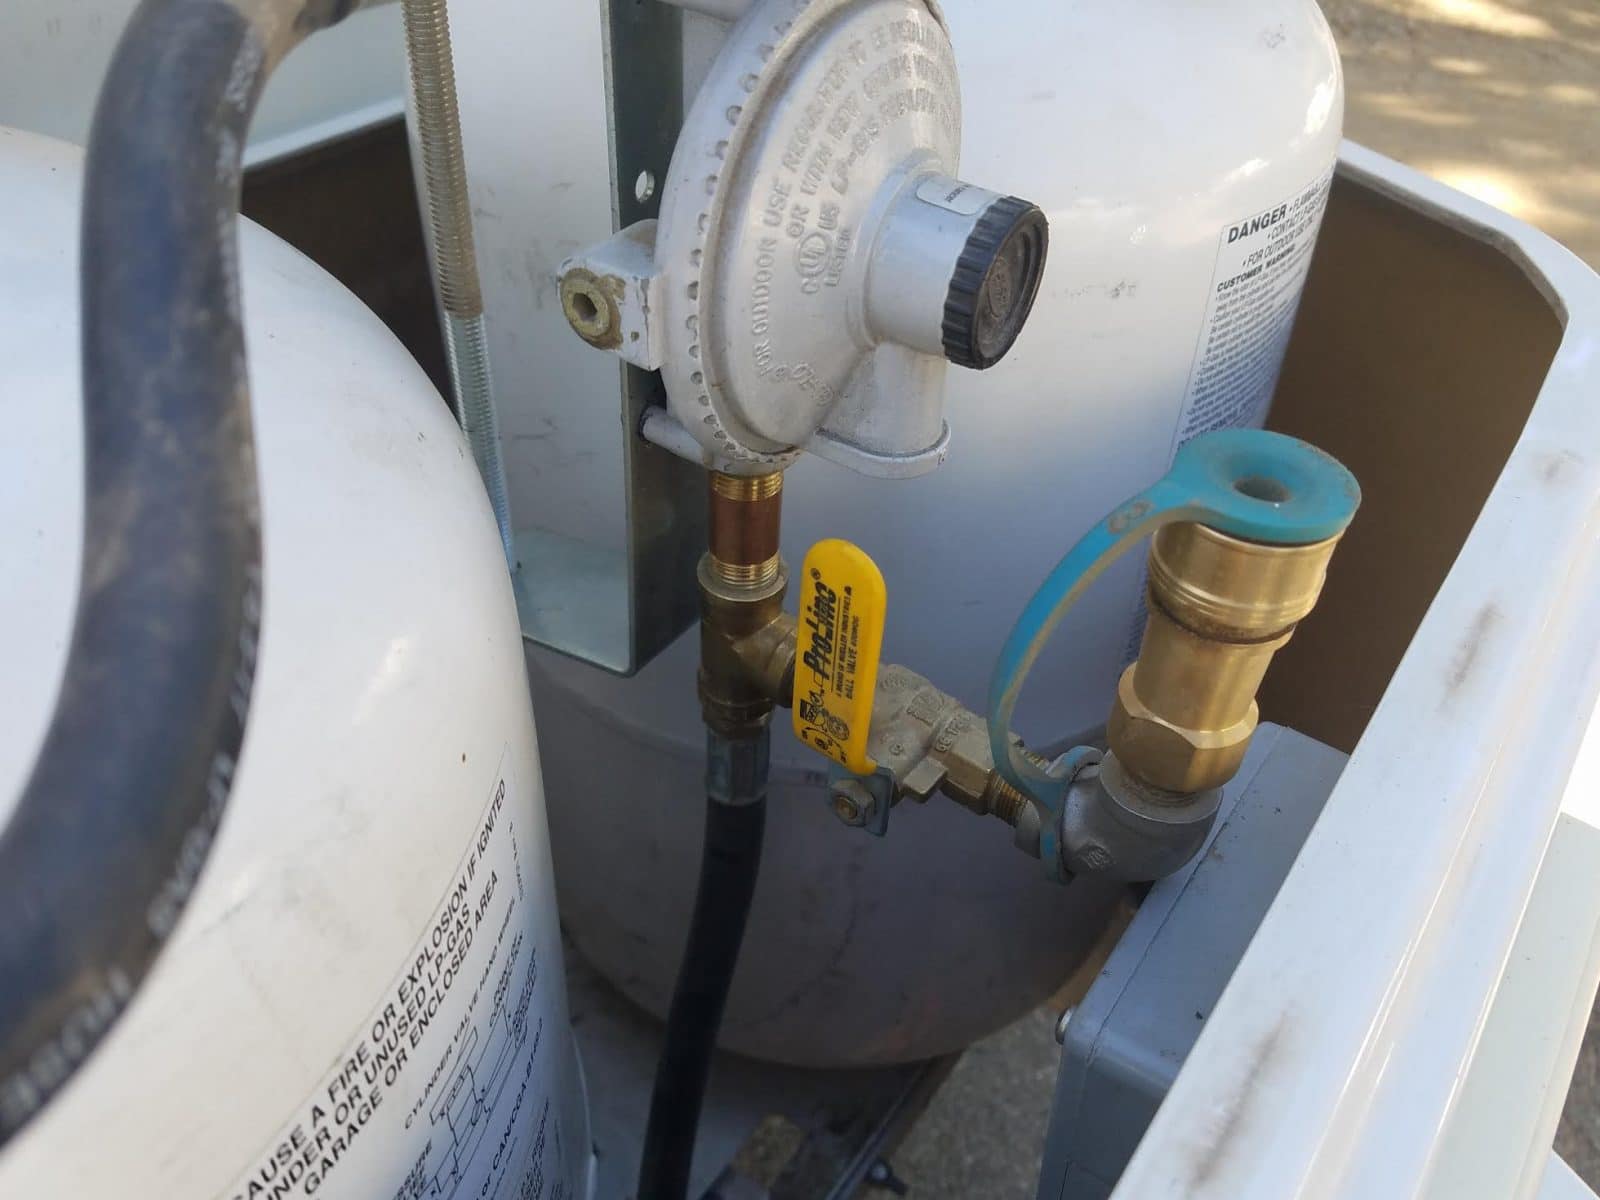
canoe, I installed my own with the same concerns. I did not want it exposed to excessive weather or possible damage. So I teed it in at the propane bottles and reach in through a port to access it. This is a very easy installation and it cannot get into much trouble. The valve in the line completely isolates it and stops any chance of a leak. I then got (3) ten foot sections of hose an can set my fire pit or outside stove wherever I want.
1 point


-
Recent Achievements
-


")


")


")

