Leaderboard


Popular Content
Showing content with the highest reputation on 08/31/2021 in all areas
-
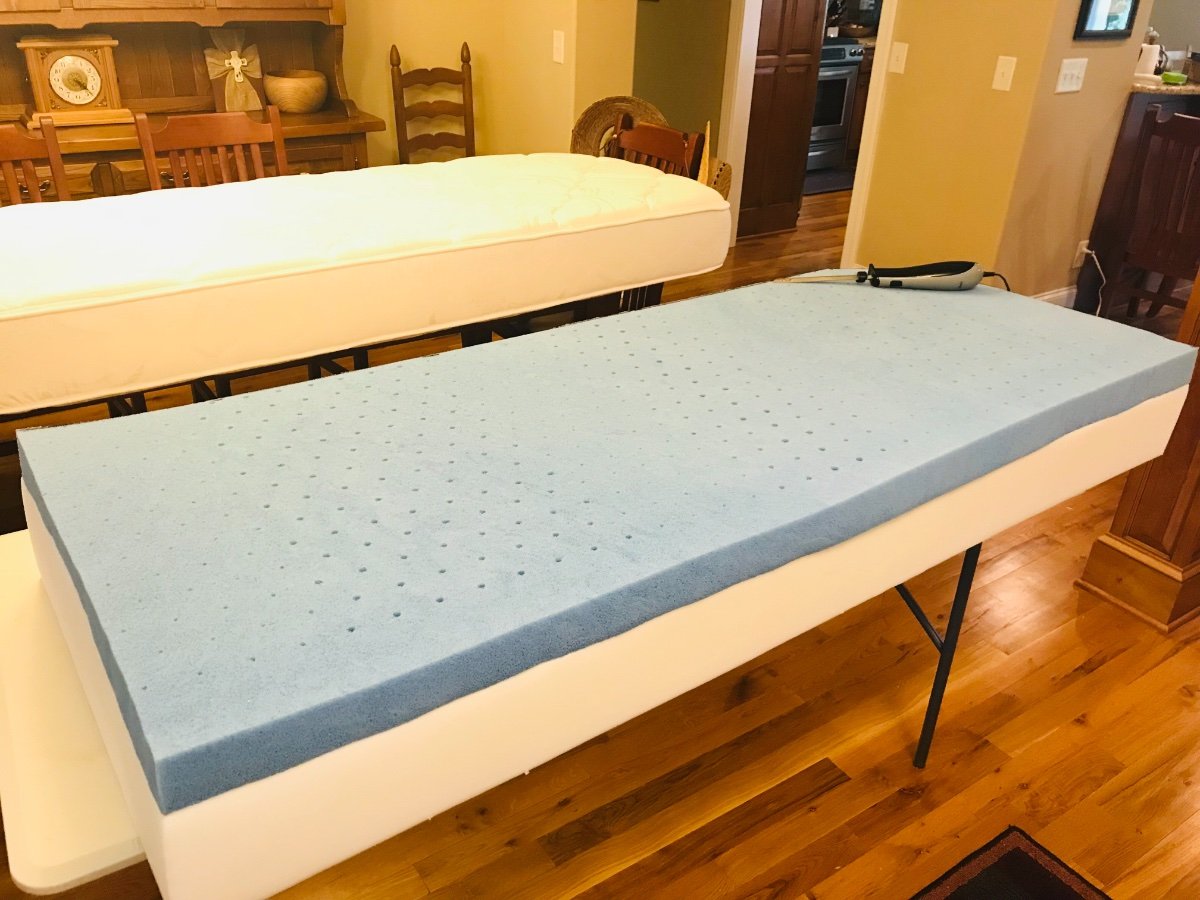
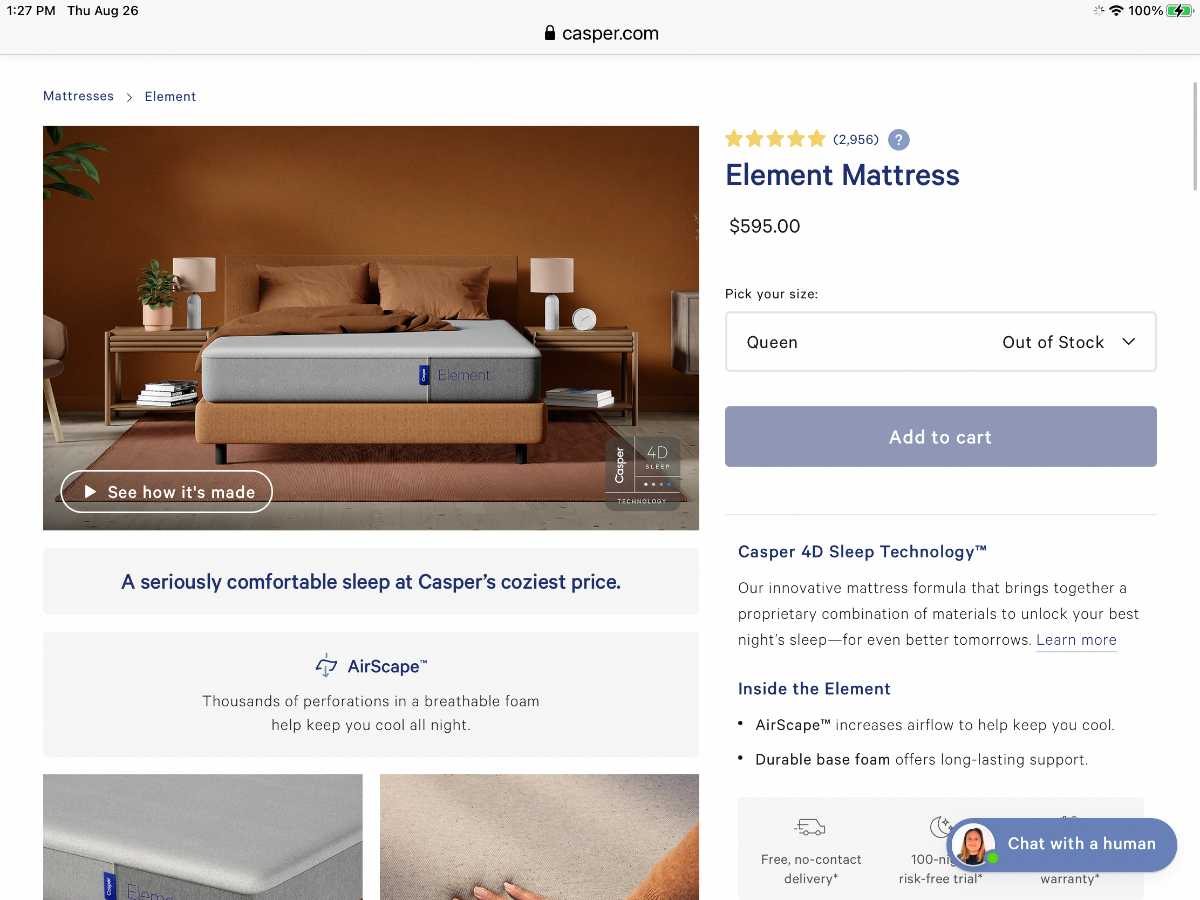
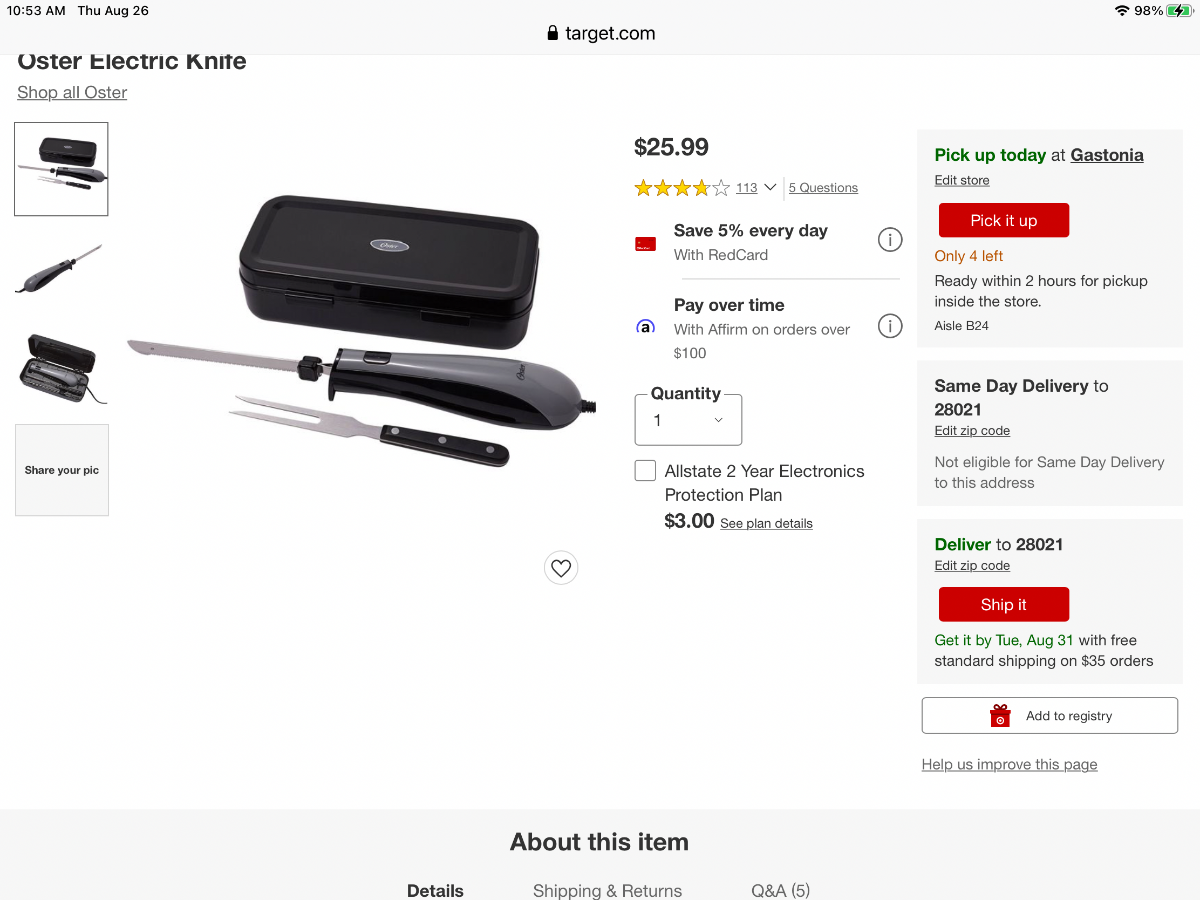
After sleeping on our twin Southern Mattresses in our Ollie, my wife and I both decided that the comfort level was not what we hoped for. We were experiencing pressure point pain in our shoulders and hip joints. We don’t experience this pain on our memory foam mattress at home. After some research, we decided to purchase the Casper “Element” memory foam mattress in a standard Queen size. We learned that Target is a retailer for the Element. We called our local Target store and found one in stock, asked them to hold it and we bought it. The element has many strong 5⭐️ reviews so we thought we would give it a try. After the purchase we brought it home and actually slept on it for a few hours on the floor of our home and are very happy with the comfort level, especially no pressure point shoulder and hip pain. Truly a night and day difference in comfort level from the Southern Mattress which uses coil springs. Naturally we wanted to be sure that this mattress was going to meet our comfort level before the cutting began. (Casper has a return policy if you don’t like the memory foam you can return it). After we were satisfied with the comfort level of the Element the surgery plan began. We used our Southern Mattress twin as a template for the radius and marked the foam. Then used an electric meat carving knife to carefully cut the 10” foam in to two halves for what Oliver calls a twin sized mattress. Essentially we made two 30” X 75” mattresses naturally with the radius to fit our Ollie. Choosing the 10” thick Casper Element allowed us to use our existing AB lifestyle fitted water proof mattress cover and fitted sheet and blankets. (We sold both the Southern Mattresses to a nice couple from Georgia who are taking delivery of their OLEll in Dec). Happy Camping! A few pics - note- Naturally mattress comfort is very subjective. So what feels comfortable to some may not be to others. 10” thick Memory foam with mattress cover after radius cut- Memory foam before cutting the radius-
 4 points
 -
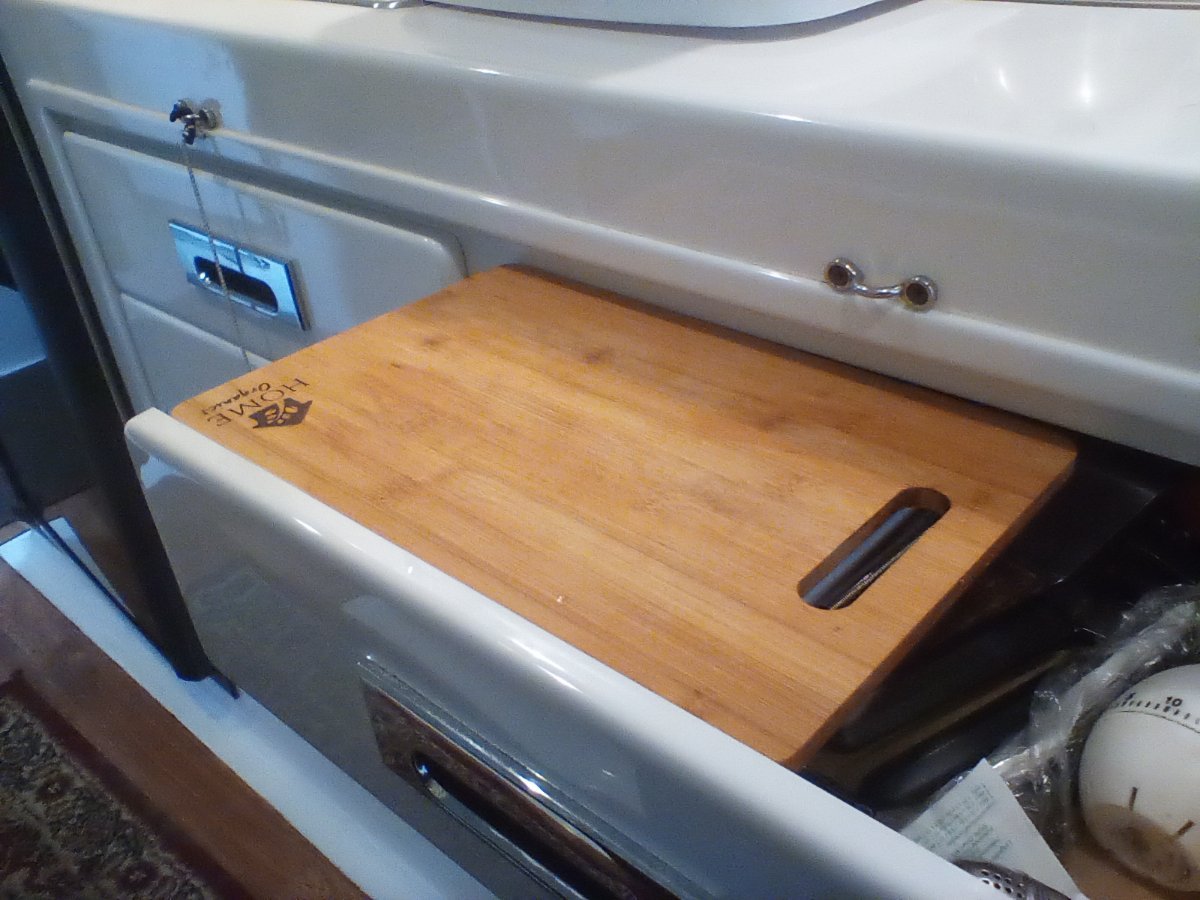
The cutting board was bought at Home Depot. It was designed to be a wood top for a mechanics tool chest. Think it was $19, and was larger than the $49 one that they had at Bed Bath and Beyond. Trimmed and drilled to fit. Varnished so gives me extra counter space. When using sink it slides along the kitchen counter and down between the cushion of the bed. Acts like a splash shield. We actually found a set if three bamboo cutting boards sit on the draws and add extra counter space. Cutting board on the sink was not an option on the 2017 models. Could not end a picture of the sink cover, though it may exist here on the forums somewhere...
4 points
-
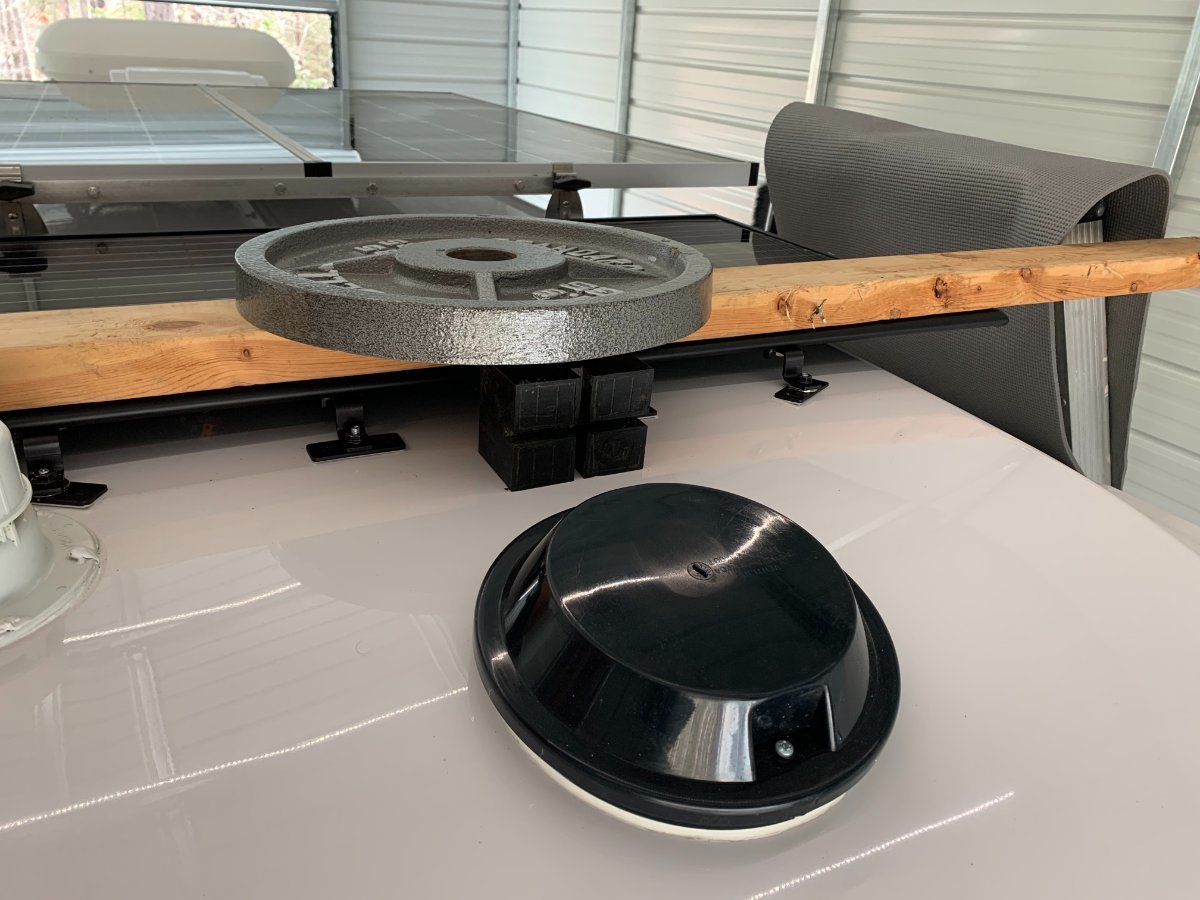
Hi @SeaDawg, yes it's a 100 Watt Obsidian Zamp panel that I added to the pair of 170 Watt ones that came with the trailer. That's all I could add for now without any upgrades to the Zamp controller (30 Amp). It fit great. 🙂 Here's a few more pictures of the panel fit and install: Prior to bolting and taping the panel on, I made sure it fit well: Then I bolted the trailing edge to the existing solar panel mounts and used VHB 3M tape on 4 additional mounts on the front edge. Probably overkill on the front - it hasn't budged over several thousand miles.
3 points
-
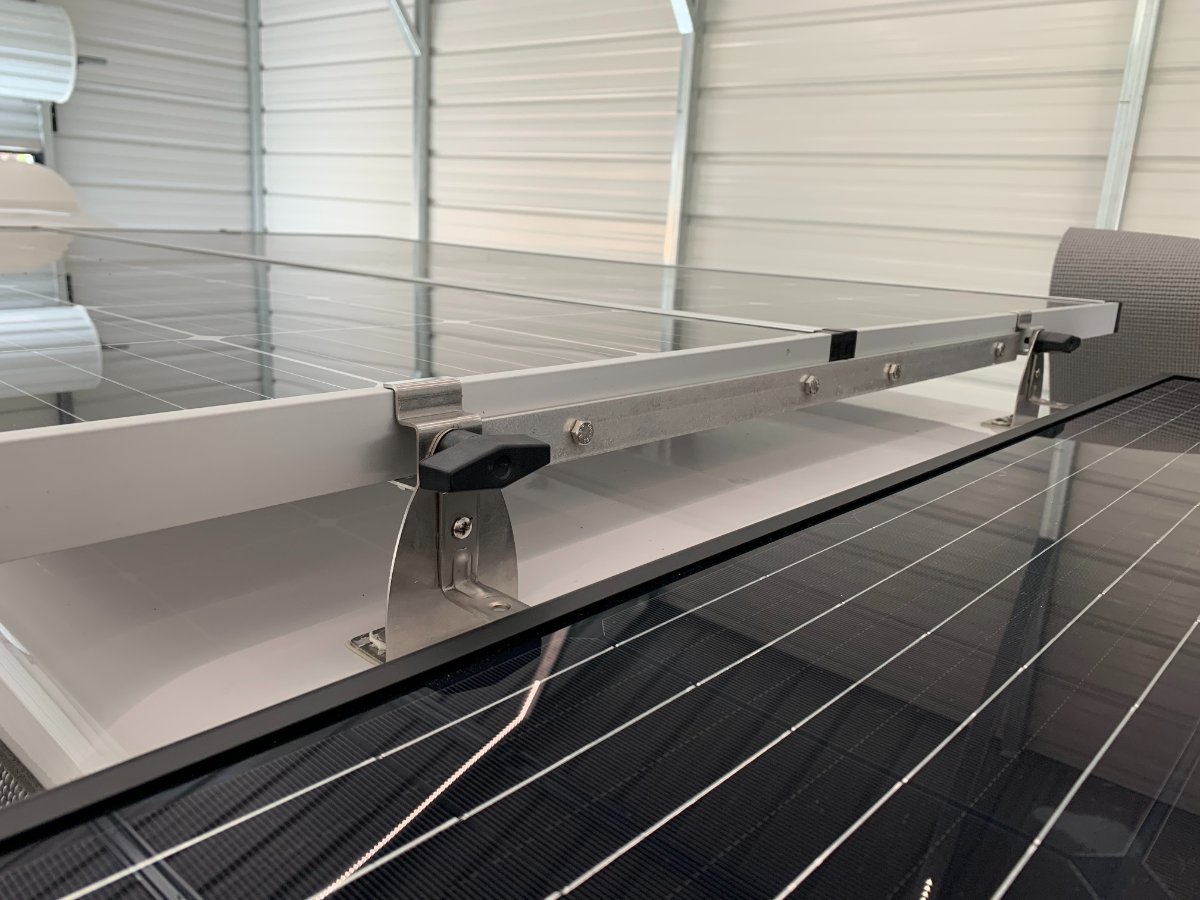
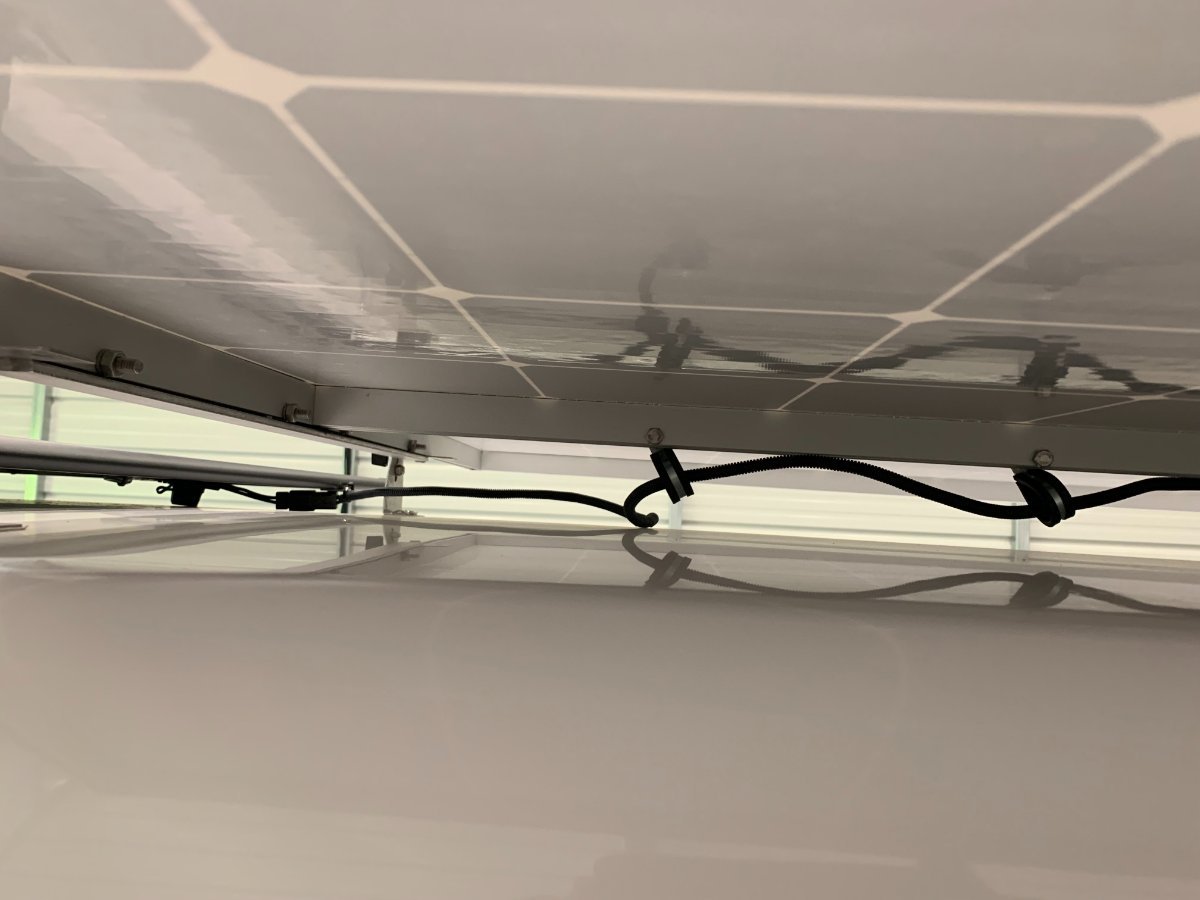
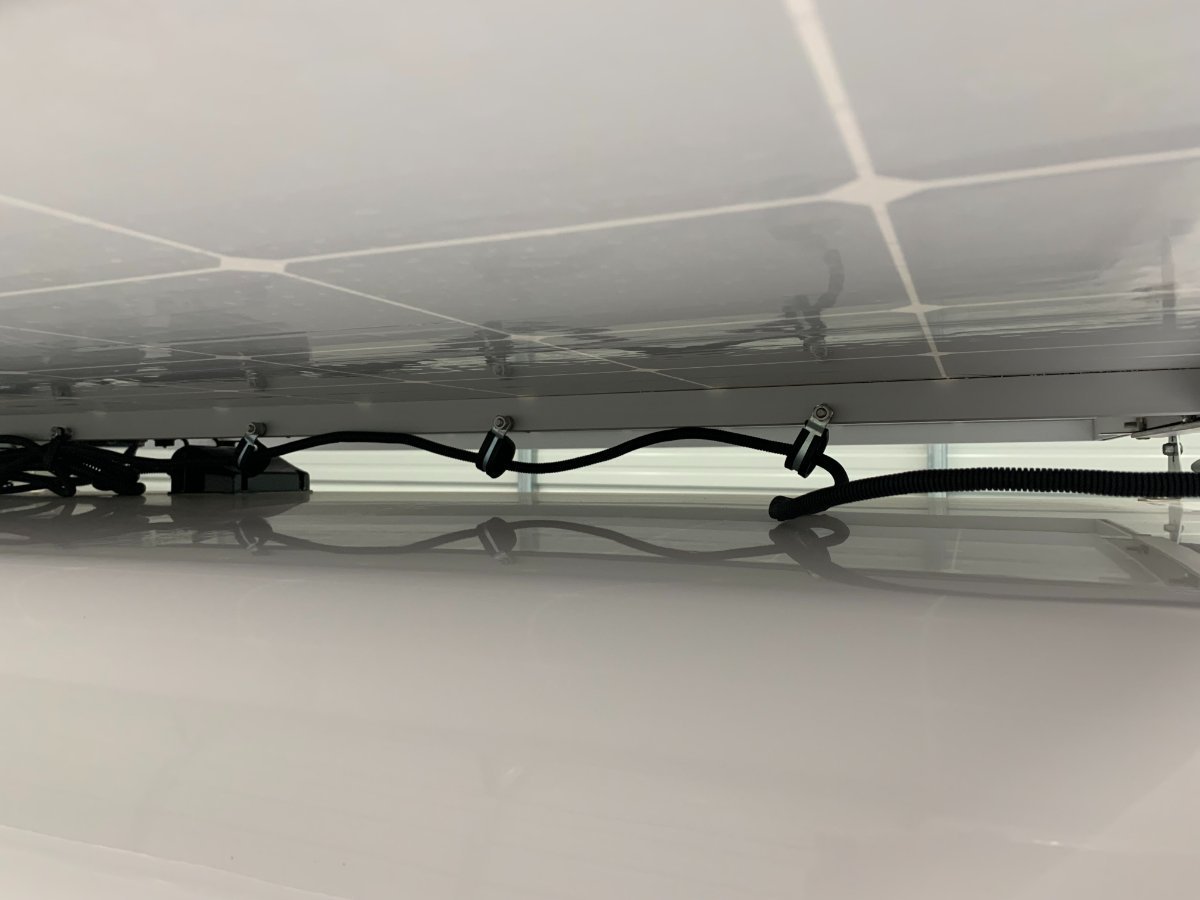
Hi @Stranded, here are some pictures of how the 2020 panels are connected. First, there is a solid 90 degree angle bar on both the front and back of the panels connecting them together: Second, there are 4 bolts that go through the sides of the panel where they are butted up together (4 bolts total). I've included two pictures that show both sides. You can also see the underside of the angle bar in one of the pictures: All in all, pretty much bolted such that they are a single unit - which makes sense given that they are mounted as if they were a single panel. Hope this helps... I can take more pictures or measurements if you need. Best, John
3 points
-
This file is a little dated, but it helped us.
2 points
-
Most septic safe paper is ok. If you're not sure about your favorite brand, put a couple clean squares in a jar with some water, give it a couple gentle shakes, and see if it falls apart. If it does, you should be good to "go." So to speak. If not, find another brand. The key to avoiding the dreaded poop and paper pyramid is enough liquid in the tank, before you dump. It doesn't have to be a lot of clean flush water. The water that's already been through you works just the same... Edit to add: Scott makes an rv tissue that's a little softer, smaller rolls, still pretty inexpensive. The big Scott one ply megarolls we get at Costco don't fit well in the marine style dispenser in our Ollie, till I unroll a bit. That's ok, because I save those bits in a zip lock to carry in my pocket for campground facilities. I learned a long time ago to not count on available paper.2 points
-
Fargoman, We use Happy Camper and the Costco Kirkland toilet paper without problem. Andrew2 points
-
Thanks Overland. My goal was to take my time and complete the task very carefully cutting only the foam and I managed to do so. Now you have us thinking about buying the pillows! 👍🏻😊2 points
-
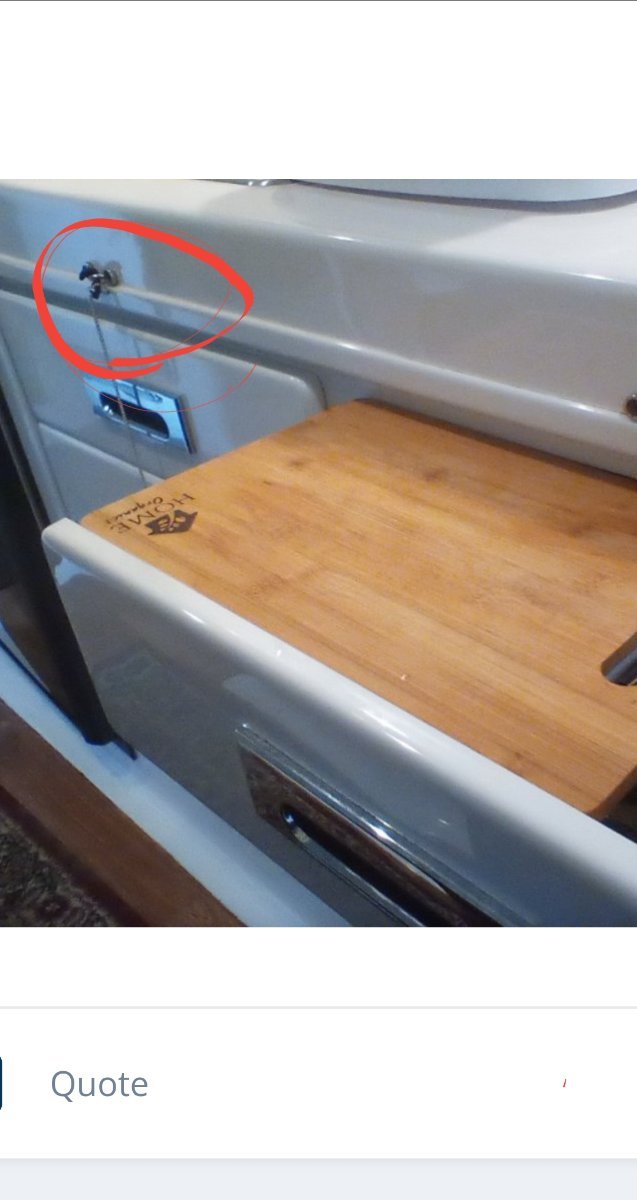
Clip off in seconds, takes no space in silverware drawer when not in use. Think the catch is what is used to hold a bimini top taught on a smaller boat, as shown just above the cutting board.2 points
-
Above the cutting board shows a marine fitting that we mounted above and below the drawers. We use a thin bungee cord and a marine hook to keep our drawers closed during rough road travels, as shown to the left, on that set of drawers...2 points
-
Patriot I’m coming to your place for thanksgiving. If you can carve that memory foam that nice with the electric knife. Great idea. I’d like to see how you carve turkey 🦃 Nice job.2 points
-
I seriously looked at AS. I really liked the 23 Twin Globetrotter with the dry bath floor plan. I have to admit it was temping. Living in an area where hail is not uncommon the durability of the hull was a real concern. At the time they still used wooden subfloor which also concerned me. Glad to see they have moved to a composite material. At end of day the feedback from current AS about issues and higher price made it a no for me. I still do love how they look though. I was nervous about wet bath in the Ollie but after first trip realized how little time you send in bathroom and it was non issue for me. I think if you had family of 4 a wet bath is harder but for one or two folks super easy to manage. Good luck!2 points
-
I have admired the glimmering beauty of Airstreams for many years and ownership of one had long been in my retirement plans. When the time came to pull the trigger on one, I started research to determine which model would best suit our needs. I did not even consider looking at other manufacturers because Airstreams have been branded for decades as the pinnacle of quality. After gawking wide eyed at the AS website, I popped over to their owners forum for a quick look. Wow. I was shocked, disheartened, and dismayed. Page after page of complaints. There were a lot of disappointed folks on there. Crestfallen, I continued to wander through the forum until I came across someone who said they wished they had bought an "Oliver" instead. I immediately went to the Oliver website and I never looked back. You owe it to yourself to take a look at an Oliver. The sales staff will be happy to direct you to an owner somewhere reasonably close to your location who will be willing to let you take tour of their unit.2 points
-
“VAIL, Colo., June 10, 2021 /PRNewswire/ -- Harvest Hosts, a membership program giving RVers access to unique RV camping options, announces today its acquisition of Boondockers Welcome, a community of RVers helping other RVers where hosts allow guests to stay overnight on their property for free. Built by RVers for RVers, the companies share a mission of giving travelers opportunities to make memories while camping in unforgettable locations. There are 2,900 hosts in the Boondockers Welcome network, and 2,420 in the Harvest Hosts network, for a combined 5,320 locations--with hundreds more being added each month. “ https://www.prnewswire.com/news-releases/harvest-hosts-acquires-boondockers-welcome-celebrating-the-companies-shared-love-of-the-rv-community-301309826.html John Davies Spokane WA1 point
-
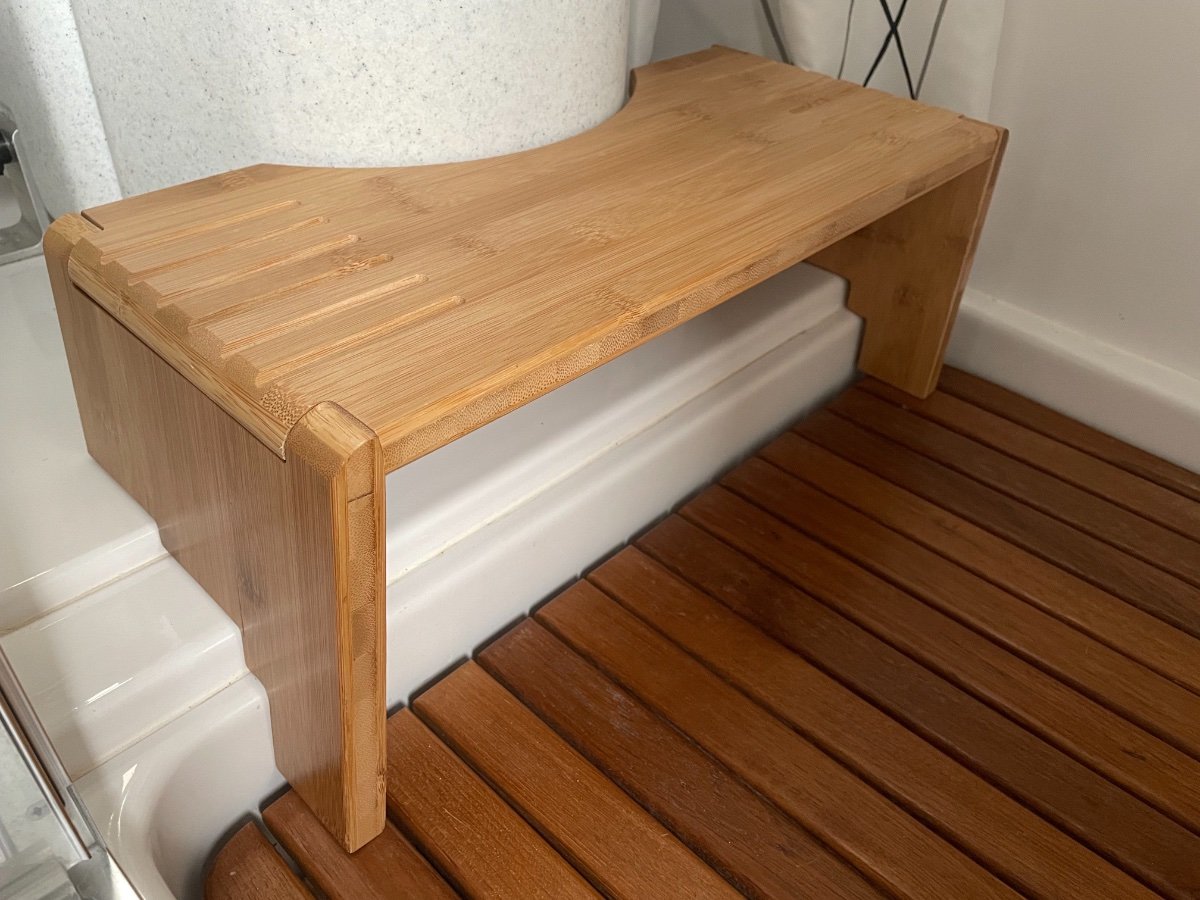
Here's a pretty easy project for owners of the Nature's Head toilet - a step to make the seat a more reasonable height. It's a slightly modified version of this new step from Squatty Potty. Since it's wood, it looks a lot better than the original plastic one, and also makes it pretty easy to modify. I wanted something that wouldn't take up most of the floor, so that we could leave it out and not have to worry about where to store it, so I scribed and cut notches on the legs to match the floor offset. That way it sits flush against the toilet and leaves plenty of room. As a bonus, the factory cutout matches the front of the Nature's Head pretty well without any modification. The legs do fold, so you could use it right out of the box if you wanted, and would be relatively easy to store - or just tip it up against the toilet. But making the notches and resealing it was a simple task and I kind of like that it looks a bit custom. It's polyurethaned and the hardware is chromed, so I suppose you could leave it out when showering, but it's easy enough to just prop it up behind the shower curtain so I'm sure that's what we'll do. I wish it were stained a bit darker to match the shower mat, but I wasn't concerned enough about it to bother with the sanding and staining. For a quick, two hour project, I think it turned out pretty well, and ended up just about the perfect height.
1 point
-
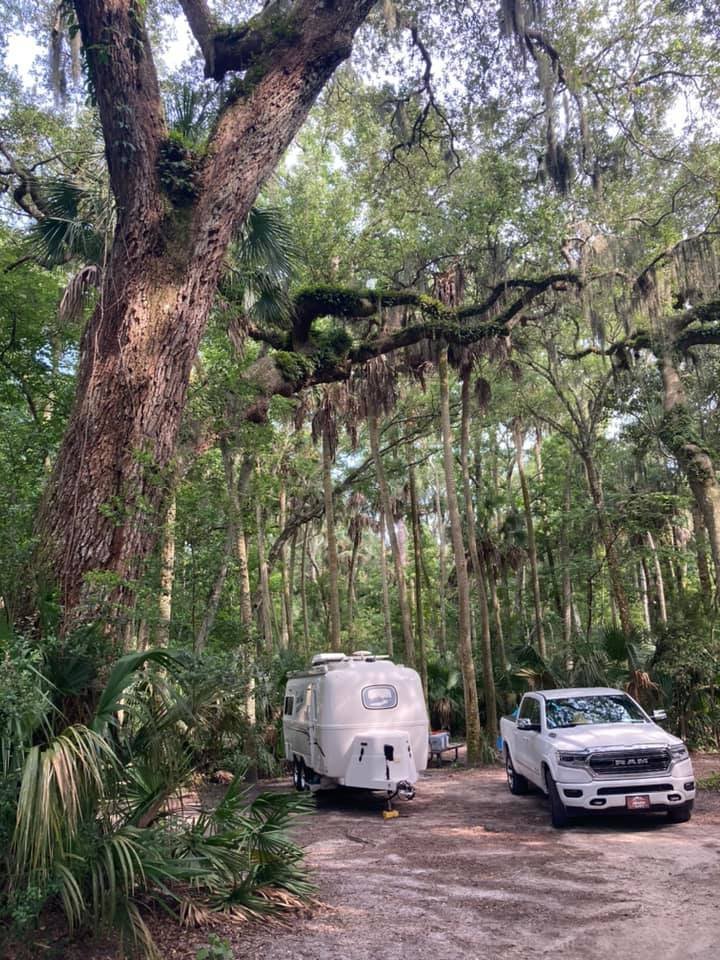
I believe we Oliver owners only need a reason to camp. And what better one than an Oliver rally under old-growth Live Oaks and on a beautiful beach in Jacksonville, FL. We have nine trailers and fifteen people confirmed for the mini-rally and, we would love to have you join us. We are planning a Meet & Greet Fish Fry for Friday night, a Saturday Beach Lunch, and a Group Dinner in town Sunday night to close it all out. Everything you need to reserve a campsite is below. We are in Campsite 74 and have reserved Shelter 9 for our Meet & Greet Fish Fry. Once you make your reservation, please email me (48ocean@gmail.com) your site number, hull number, and cellphone. Soon to come, a map showing all Oliver Owner's campsites and emails keeping you updated on all things planned. This rally is not an official Oliver Travel Trailer Rally, one hosted by Foy & Mirna Sperring. Dates: October 15th – October 18th Location: Kathryn Abbey Hanna Park 500 Wonderwood Drive, Jacksonville - 32233 (904) 249-4700 or hannapark@coj.net Full RV Camping Hookup $33.81 per day, including tax Check-in 1:00 pm Check-out 12:00 pm Link to Hanna Park Campground Reservation: https://web1.myvscloud.com/wbwsc/fljacksonwt.wsc/search.html?module=RN&display=Graphical&primarycode=Hanna Campsites&SessionID=7476f4977f3074bcf2686fc02da499cd576968c8b2d57833b30c500d3dca5b958c61f372112609375e1cd87392a38b1395b5ba1e90c4f9a0521112ccecf5a8d2 Agenda: Friday, October 15, 2021 1:00 pm Check-in 5:00 pm Meet & Greet Fish Fry – we will bring the fish and French fries and ask everyone to bring a side dish Saturday, October 16, 2021 Noon Lunch on the beach – we will be taking orders for sandwiches and ask everyone to bring drinks Free Evening Sunday, October 17, 2021 Free Day 7:00 pm Dutch Group Dinner – restaurant to be announced Monday, October 18, 2021 Free Morning & Farewells Check-out 12:00 pm Onward, Foy & Mirna Sperring
1 point
-
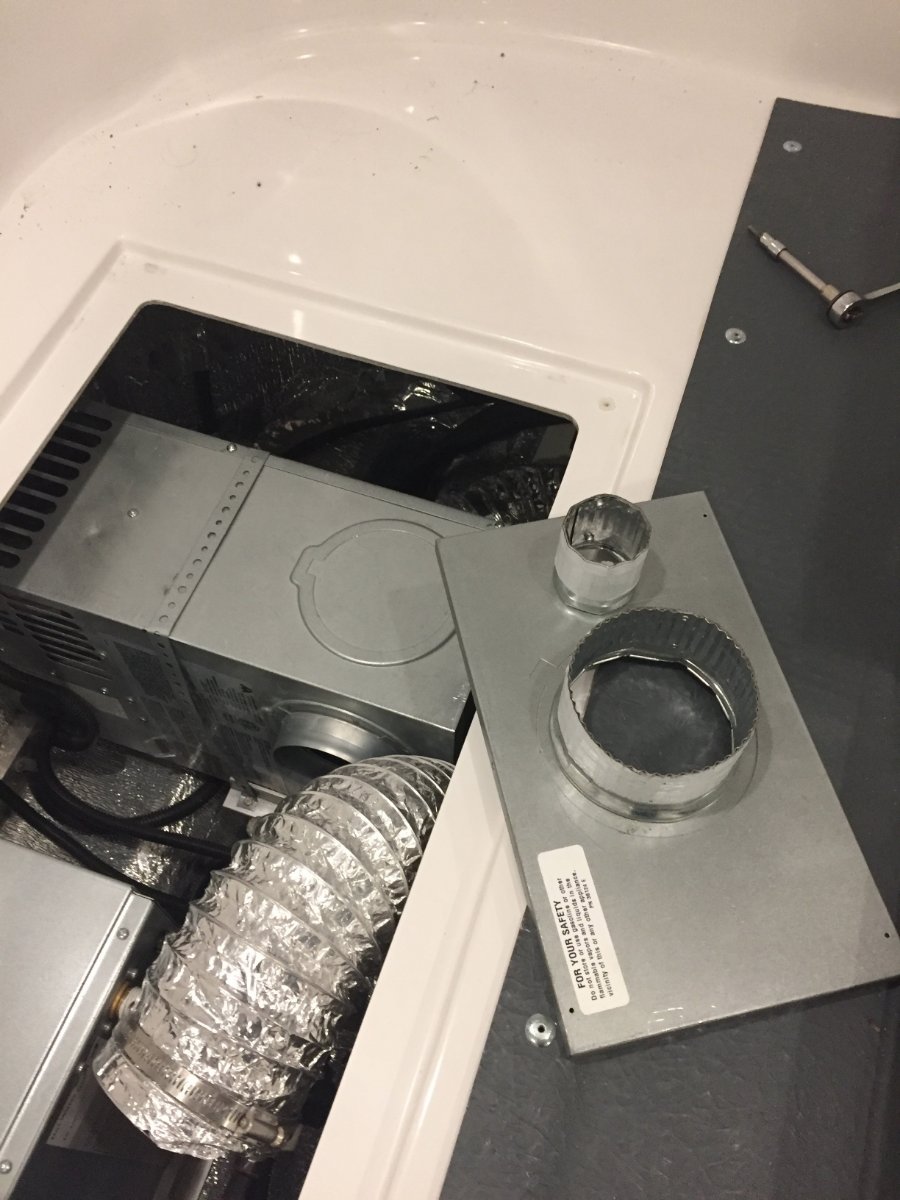
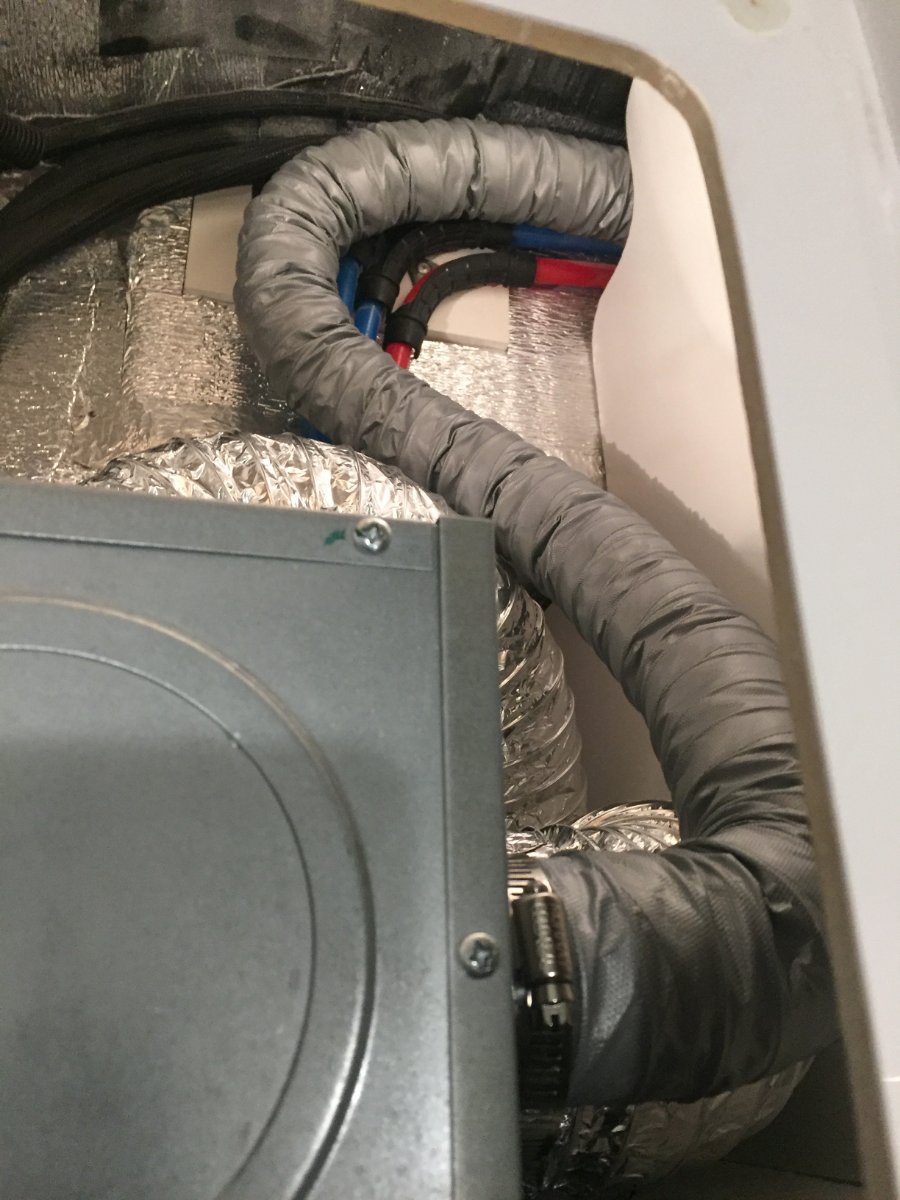
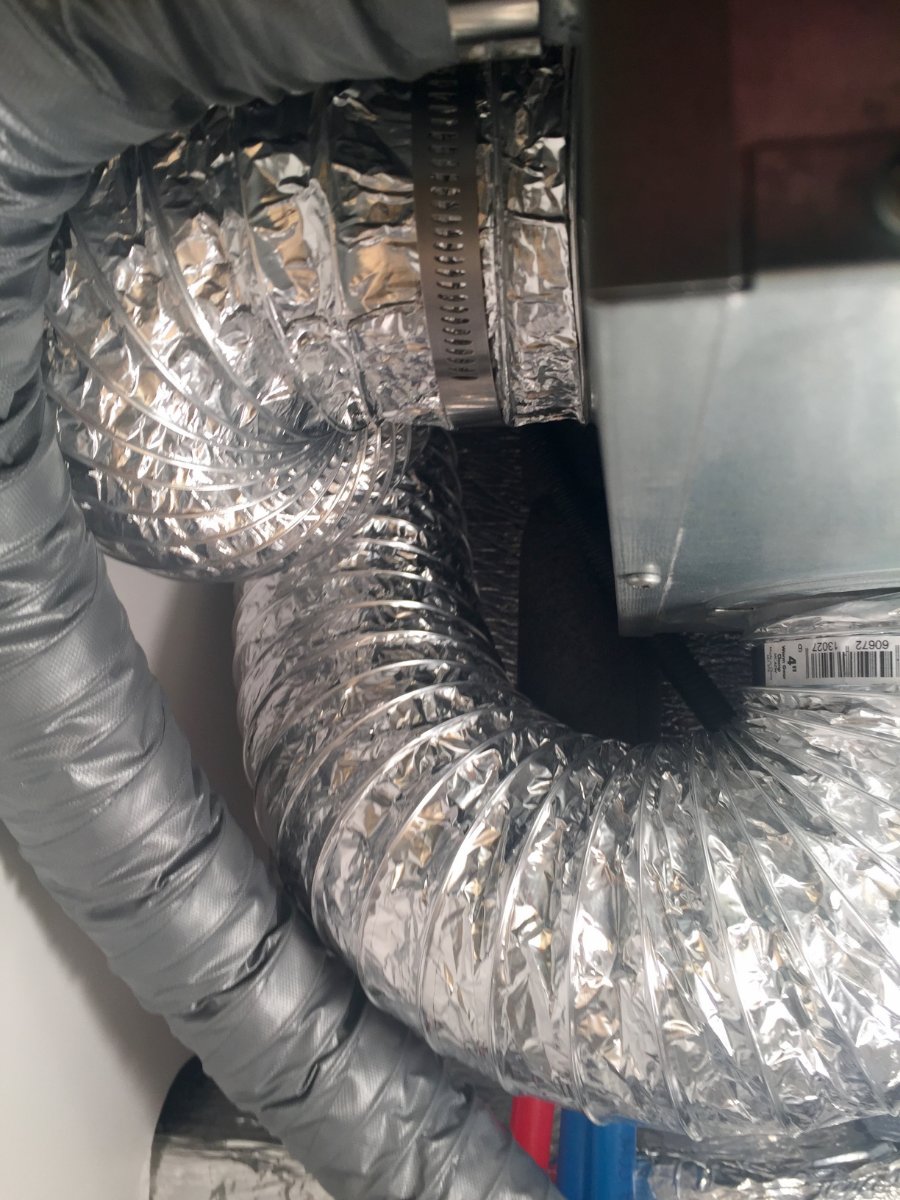
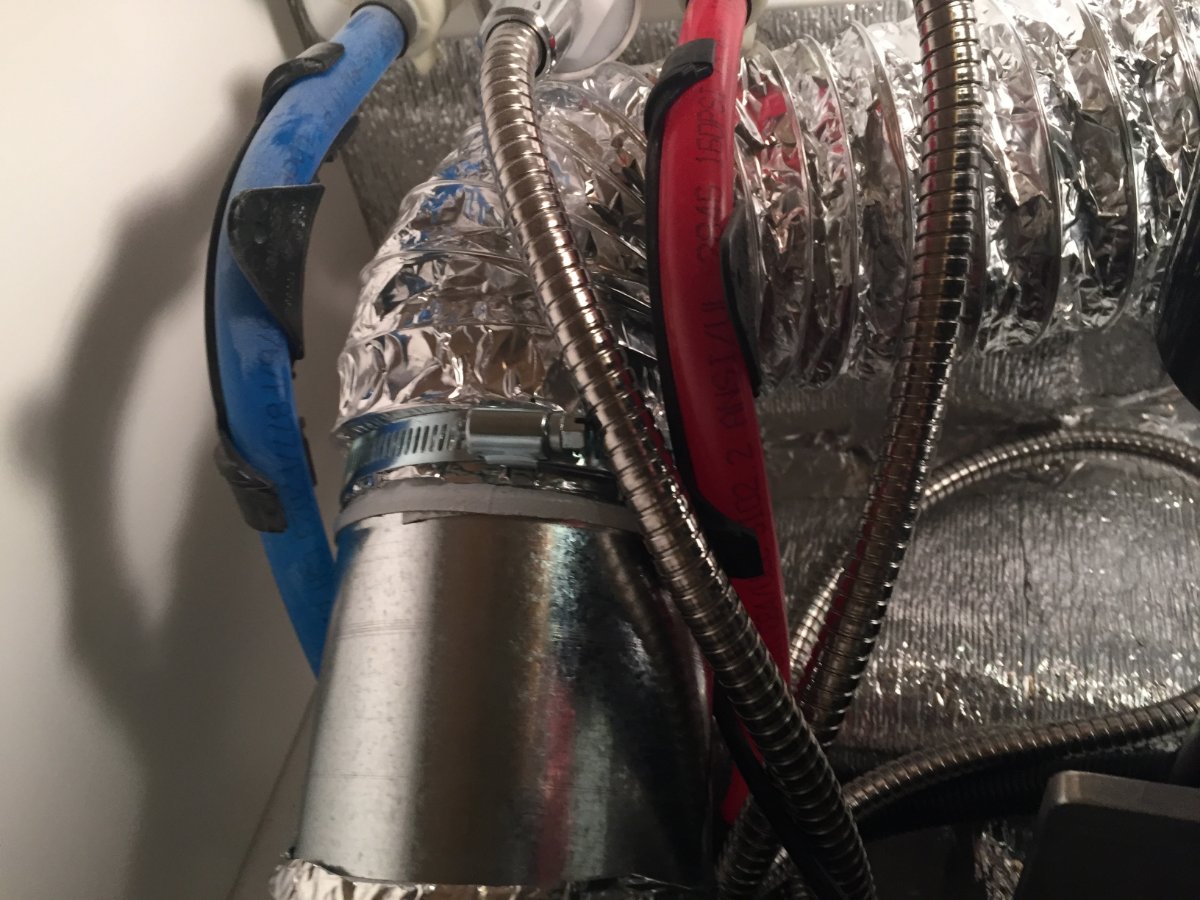
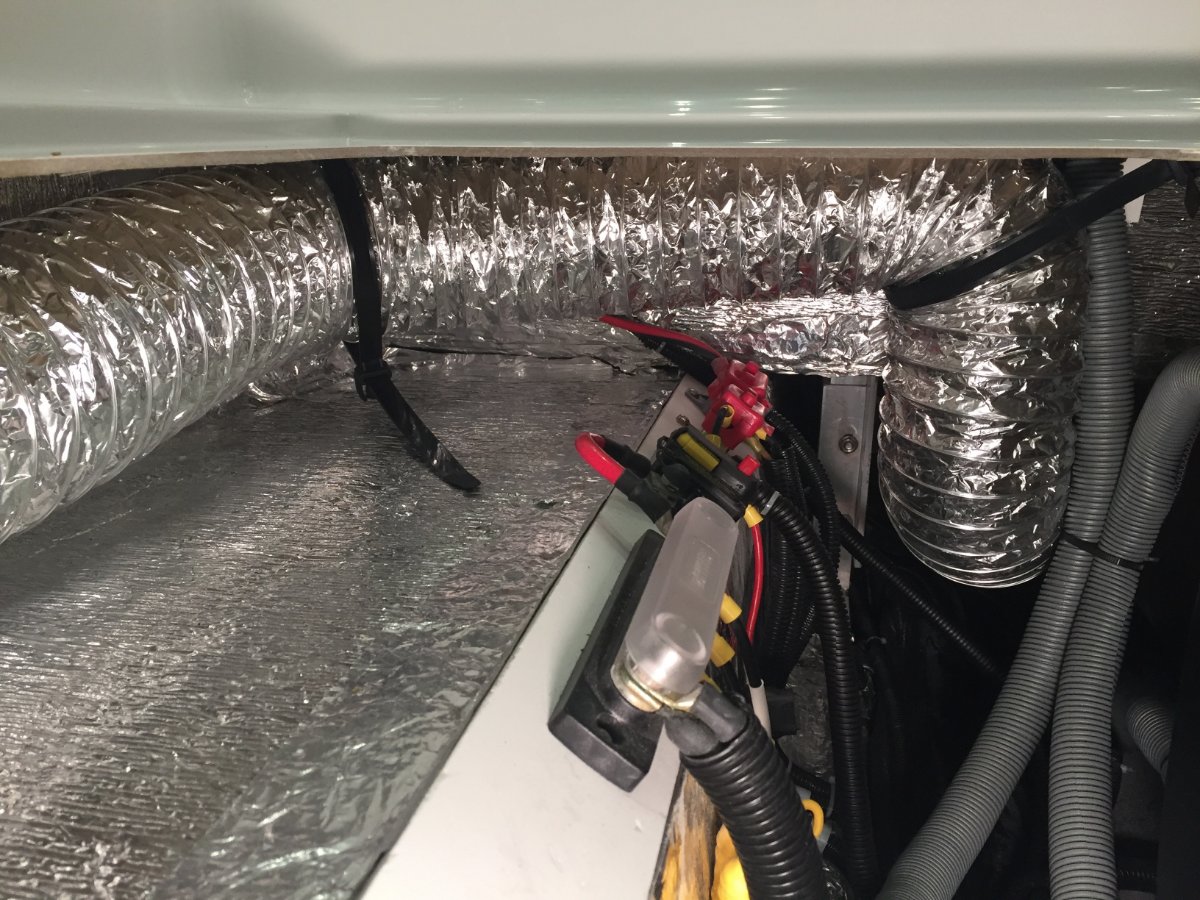
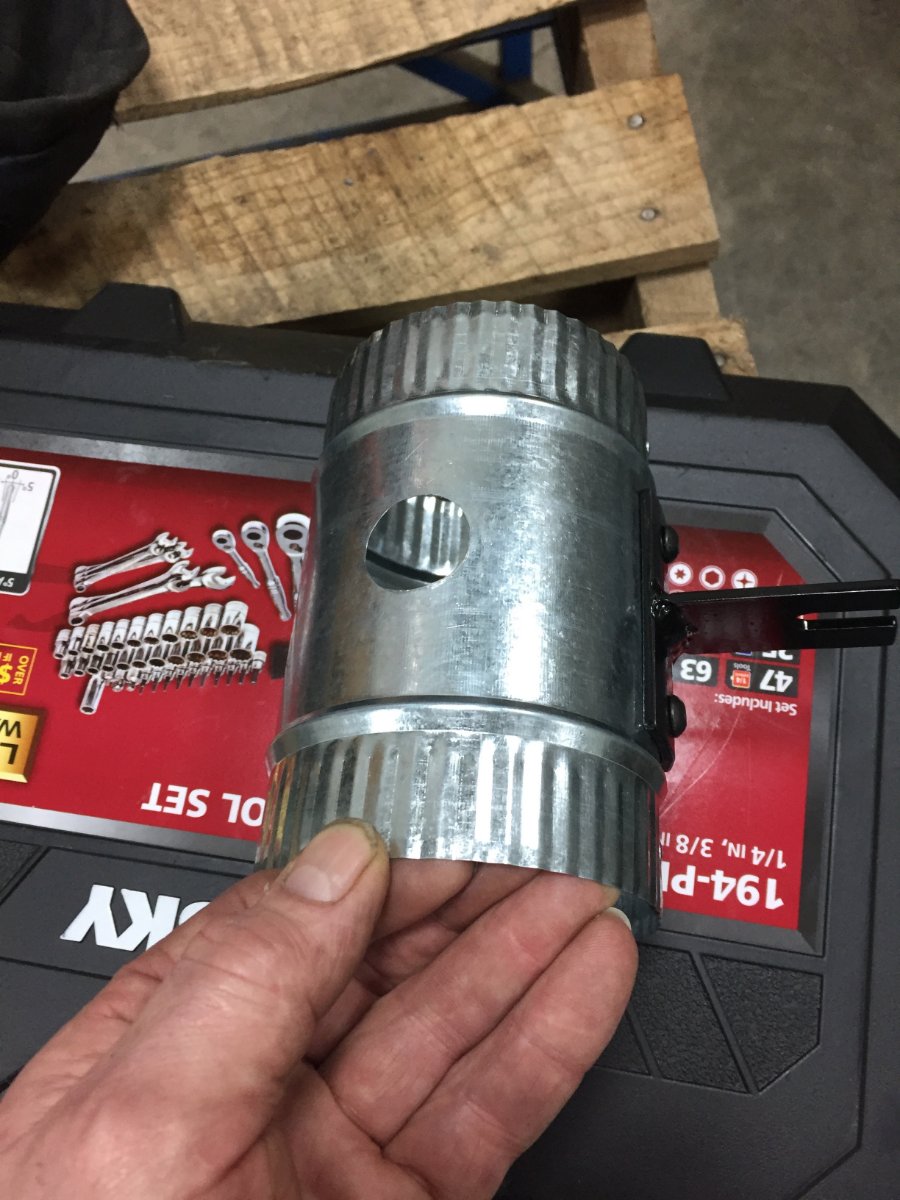
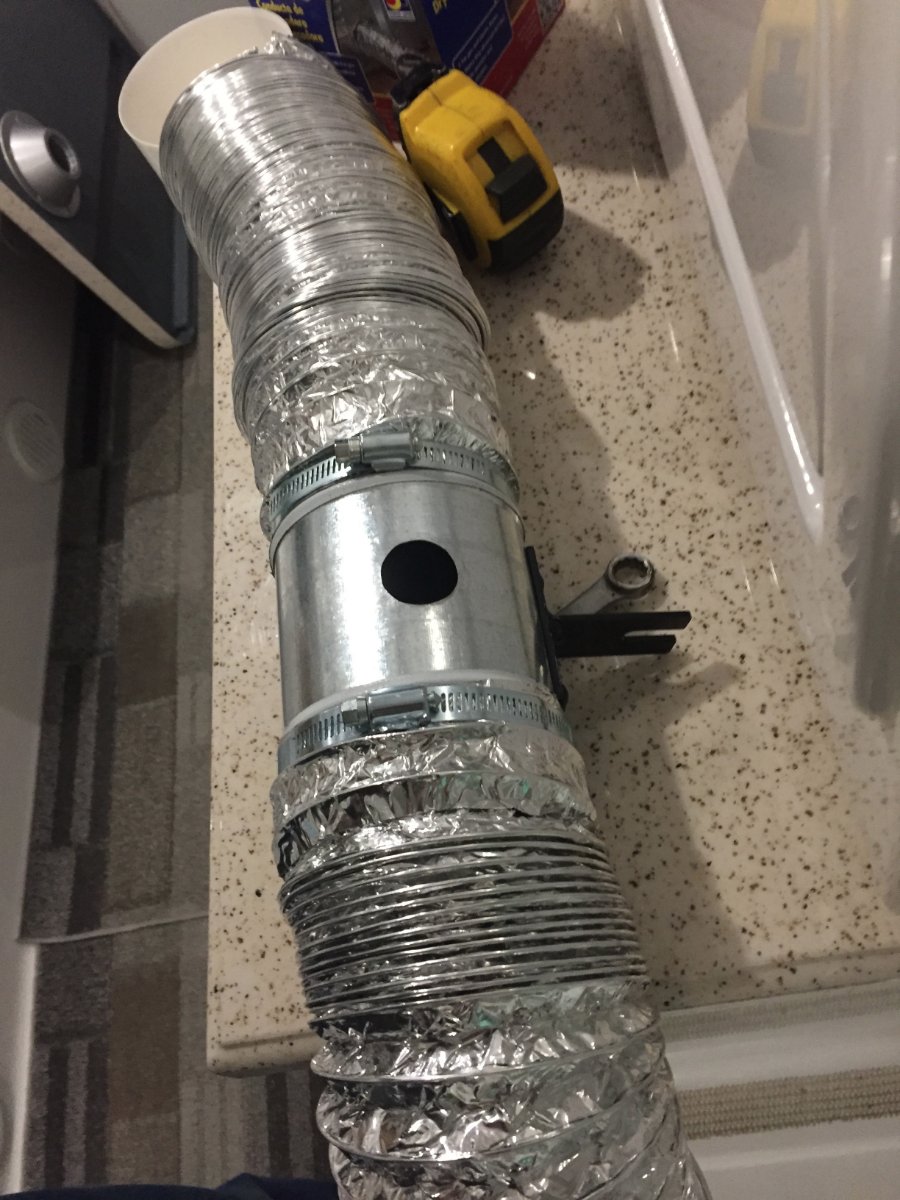
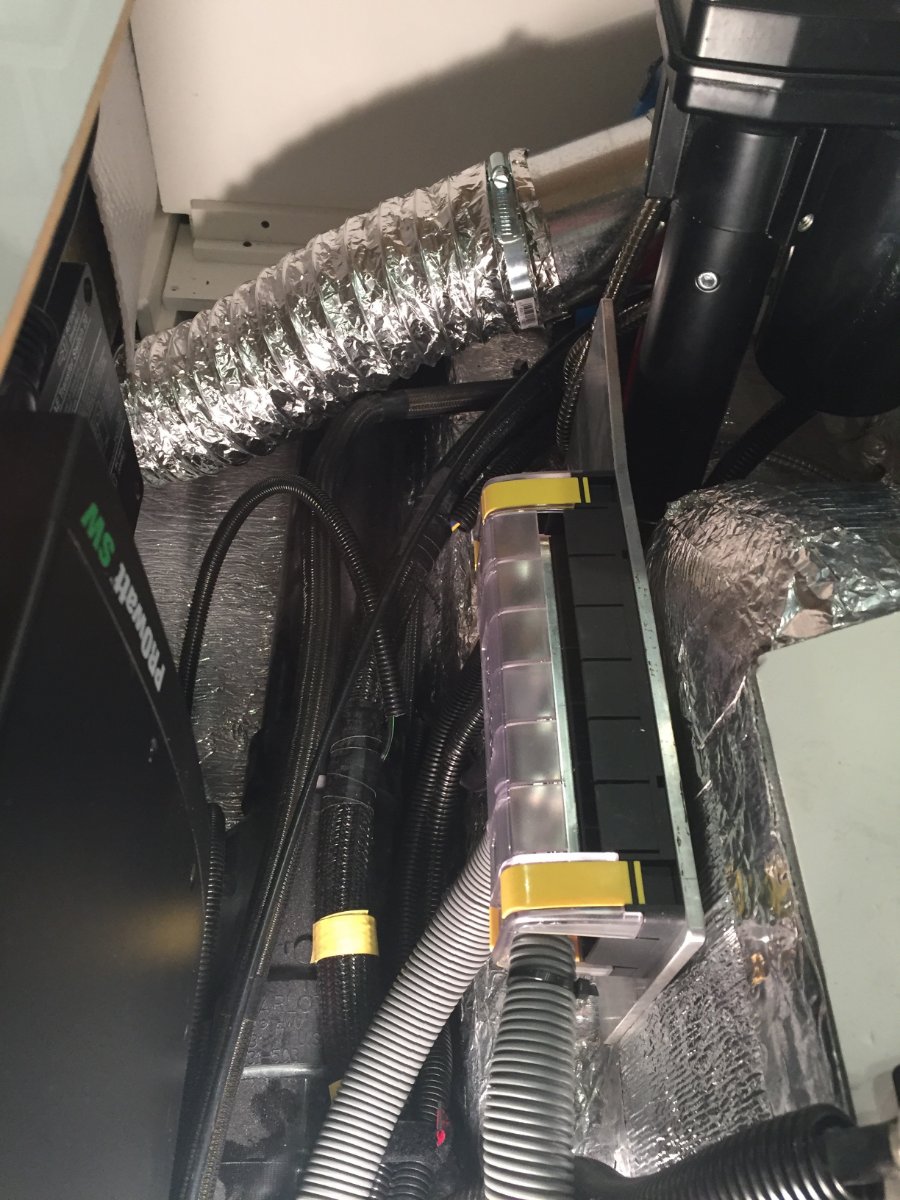
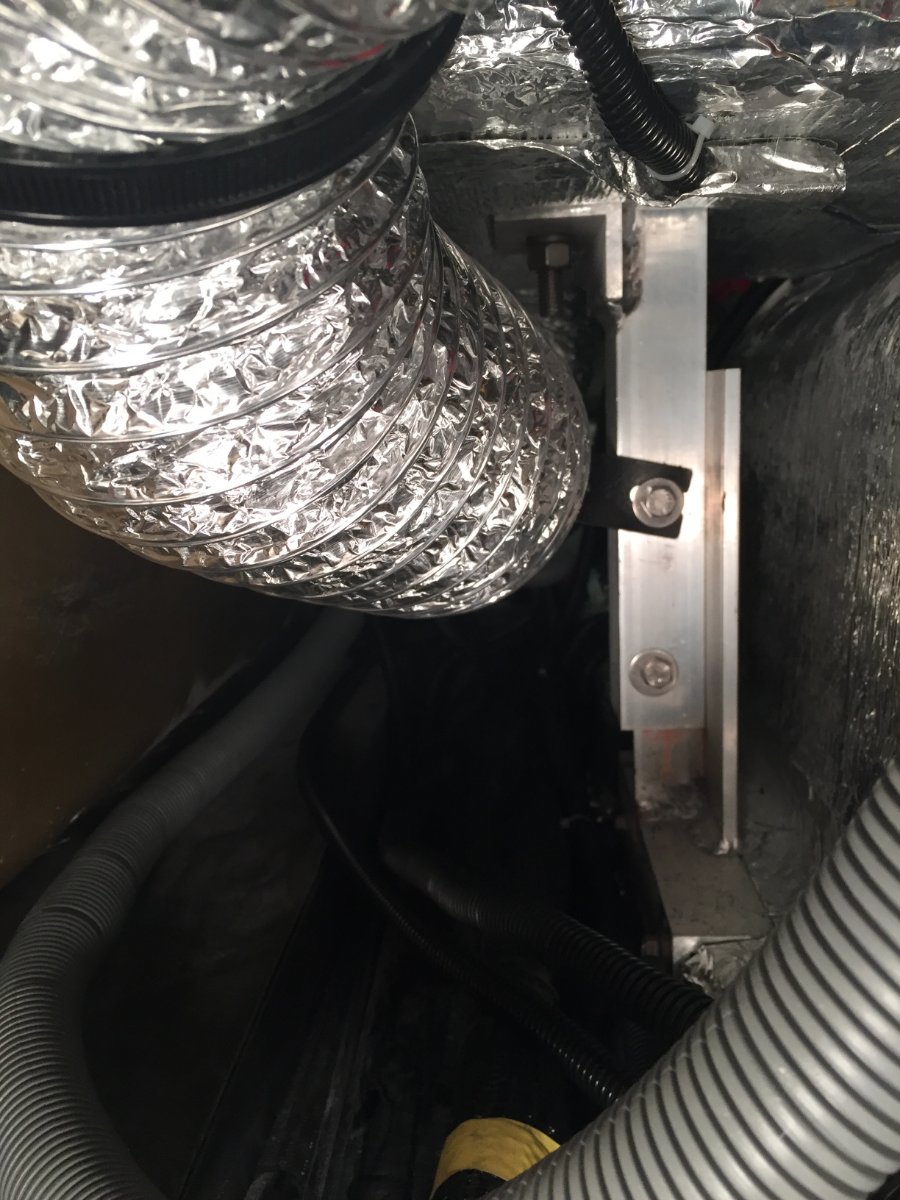
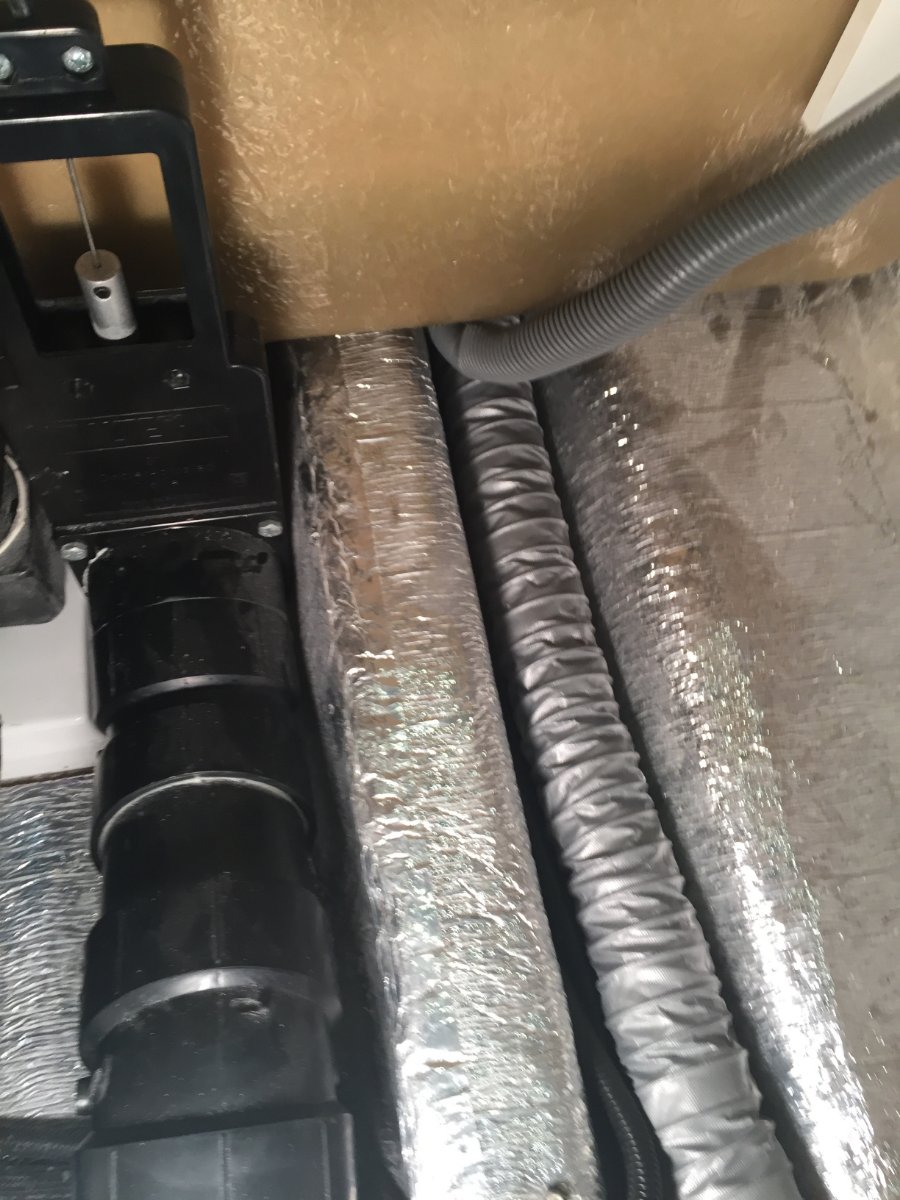
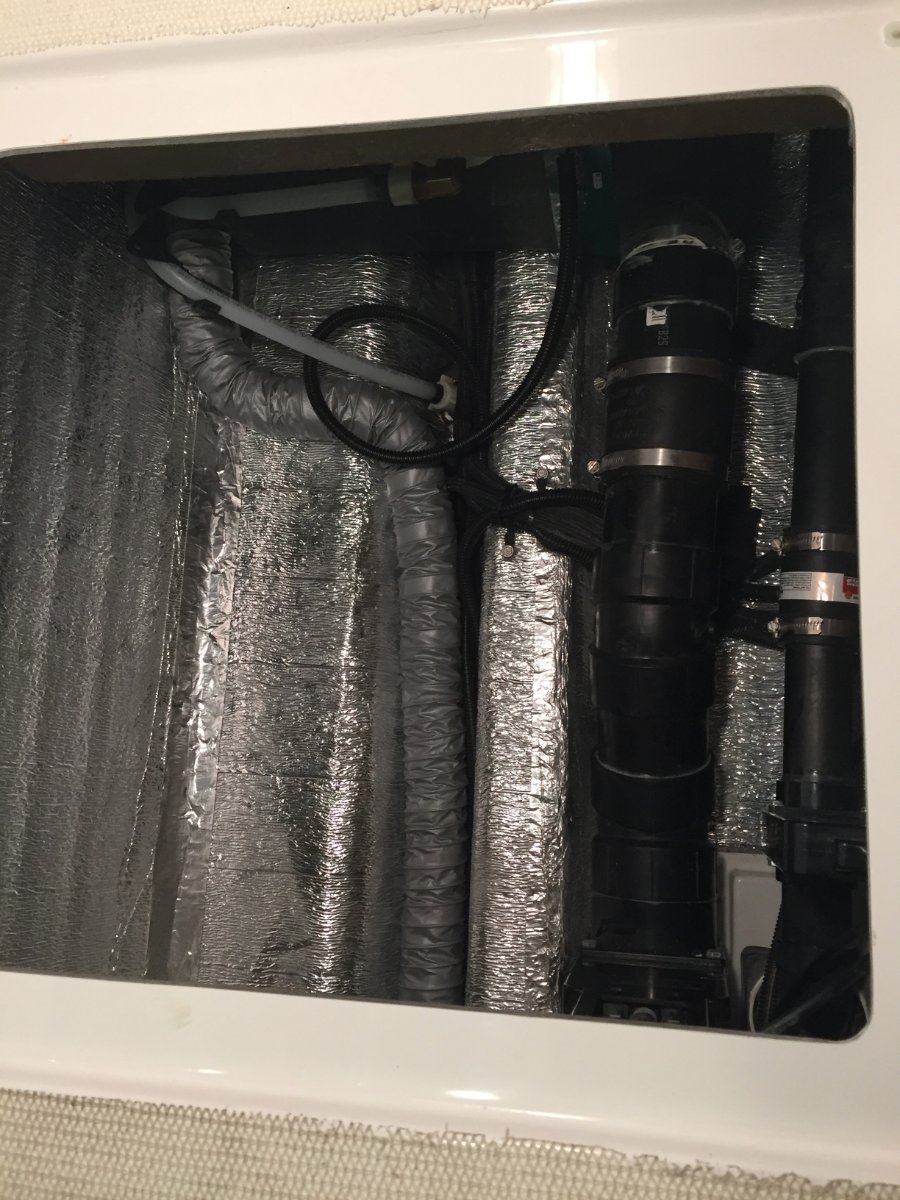
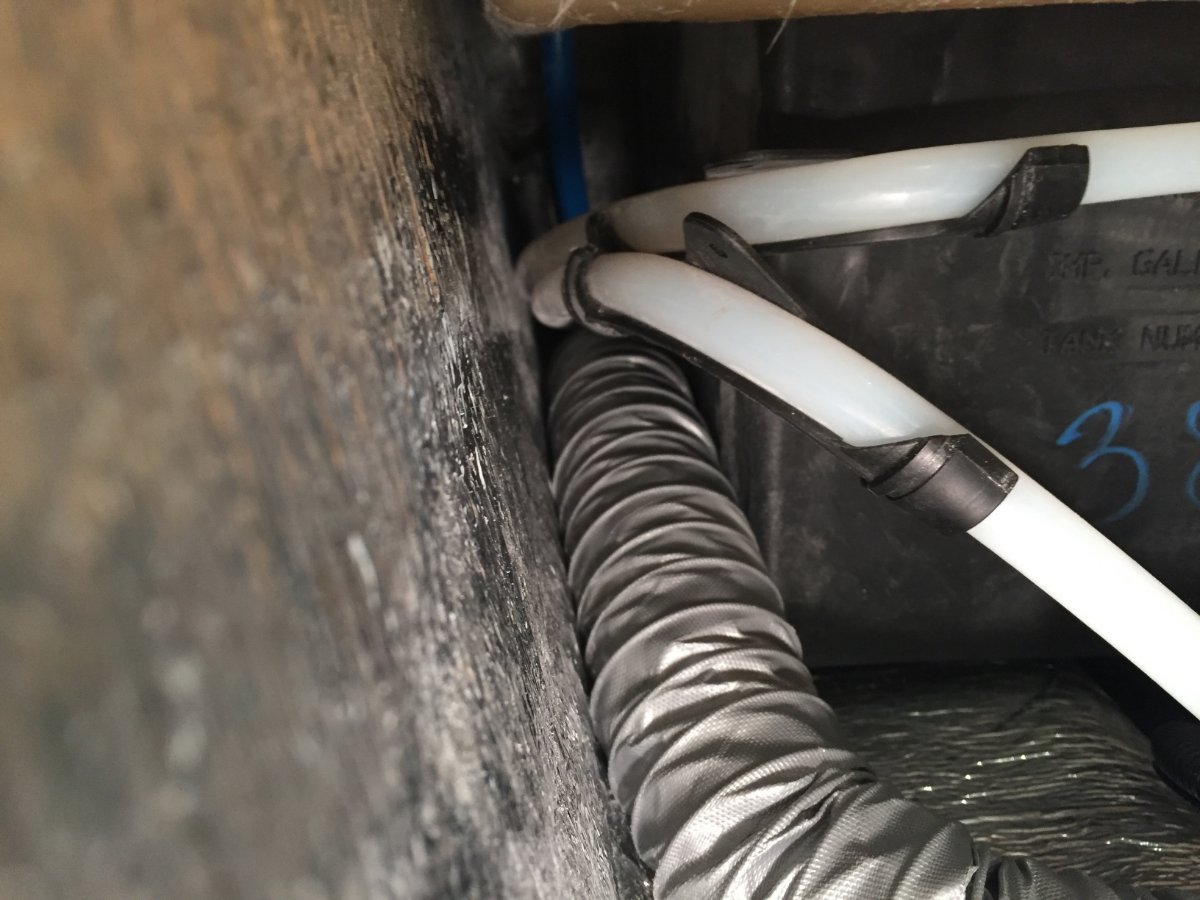
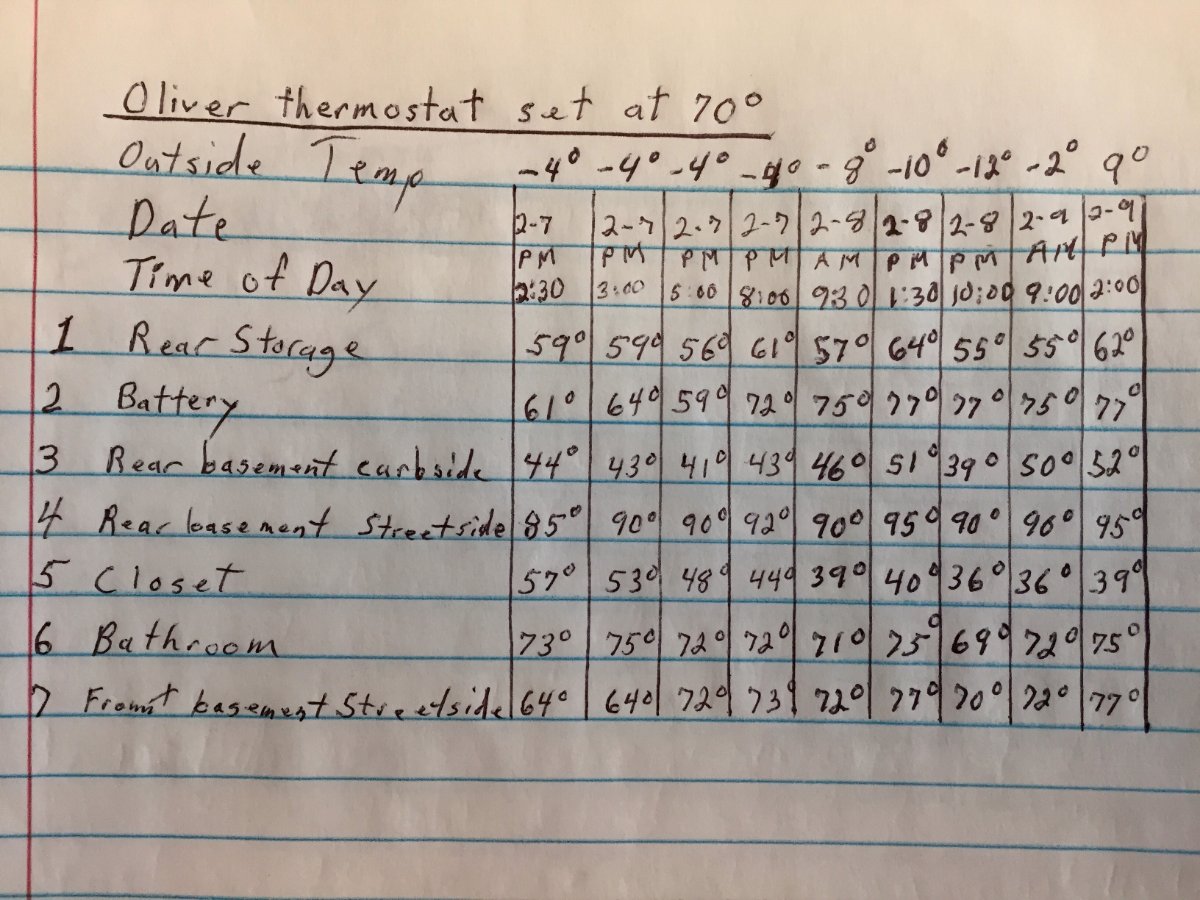
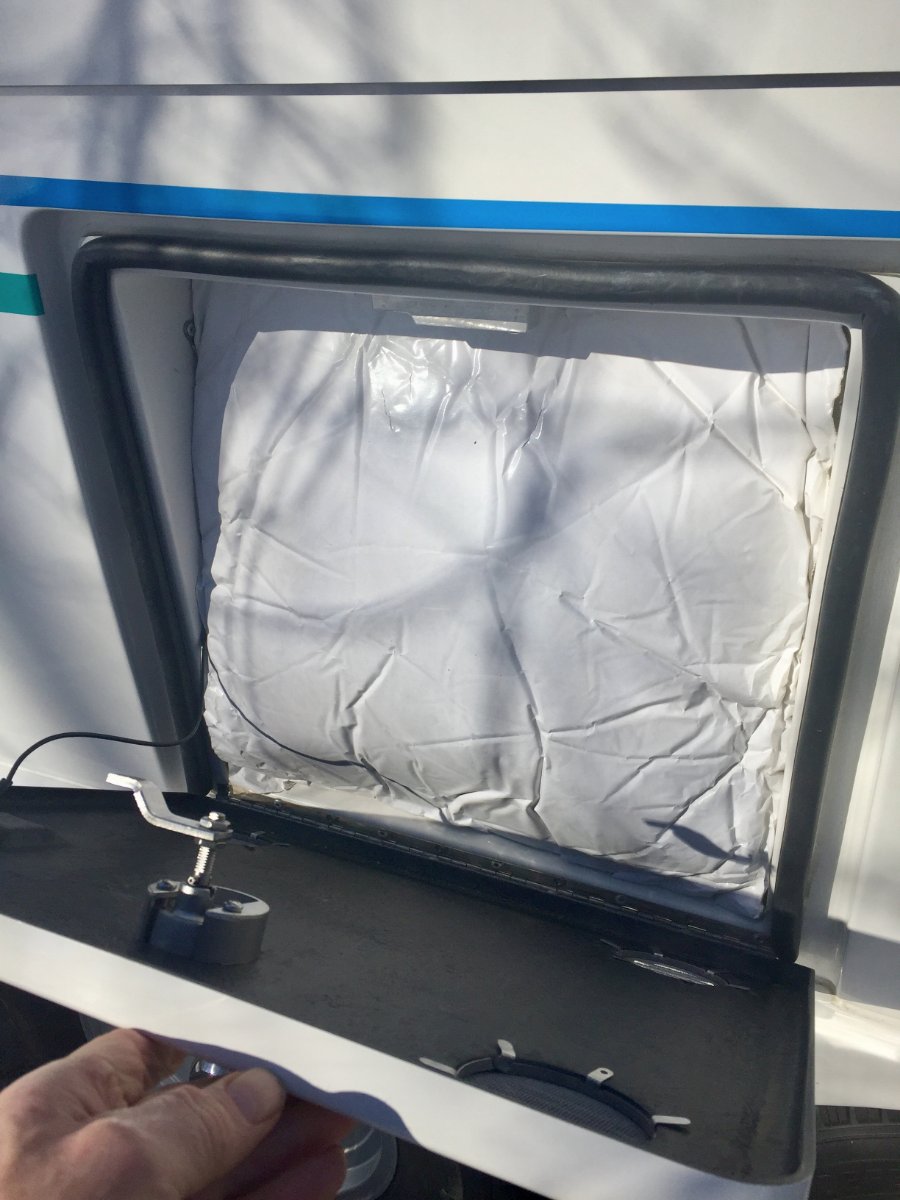
The seed was planted for this furnace mod when we grabbed a canceled reservation three weeks out at a Minnesota State Park. This reservation was mid October and when the date arrived the weather forecast had changed for the worse. We stayed for only two of the three days and we received our first snow of the season, 6 inches of wet snow. We had a non electric site and my batteries were having trouble making it through the night and I was concerned about the water freezing in the Oliver. I have already addressed switching to lithium batteries and posted about it on Oliver Forum. Now I want to share with you what I have done to relieve my worries about water freeze ups in the Oliver, provided that I have a functioning furnace. I first tried to identify the weak spots and came up with the following. Boondocking Inlet Outside Wash Station Fresh Tank Fill Inlet City Water Inlet Black Tank Flush Port Toilet Water Supply Line Hot & Cold Lines Crossing Back Of Oliver The Oliver has all of it's heat ducts run on the curbside which protect the kitchen and the bathroom faucets from freezing. My plan is to run a 2" ducting along the back to the street side and terminating in to the trough that the water lines run in for the city water inlet, fresh tank fill inlet and outside faucet. This trough also has the check valves for those two inlets and has the floor of the exterior storage compartment covering over the top of it. To get at the trough you will have to remove the back wall of the storage compartment and flip the mat back that covers the floor. This exposes the water lines that come across the back of the trailer and drop into that trough. There is a wall that separates the furnace compartment from storage and extends past the wall you just removed. It has a opening for the water lines and it is large enough to run the 2" duct through it and on top of the water lines across the back and into the trough. Now you can flip the mat back down and they are long enough to cover the water lines and the newly installed 2" duct, then the wall is put back in place. On the connection to the furnace I removed the back of the heat exchanger. There is one hard to get at screw on the bottom but the rest are easily accessible. I made two holes, a 2" and a 4" in that back plate. I could not find a 2" starter collar locally so I bought two 4" and removed the rivets on one of them and formed a two inch collar, cut to length and re-rivet. I then installed the 2" and 4" starter collars to the heat exchanger back panel and then the panel to the furnace. I then hooked up the 2" duct to the furnace. Looking in to the access hole under the street side bed you are able to see where the water lines come up and out of the trough and to the valve of the out side wash station. When the furnace fan is running it will blow out a lit Bic Lighter held in that area. So we're protecting water lines, the check valves and dumping warm air underneath the outside wash station valve. Now back at the furnace I attach a 4" heavy duty aluminum foil duct to the newly installed starter collar. It is routed forward a short distance until it can be routed across the basement to the street side and then fed between the hot and cold water lines that go to the outside wash station valve. At this point I need to use a 4" coupler that is 6" long to attach the next 8' piece of 4" duct. I use the 6" long coupler so I can add holes if I need to flood a area with heat, this particular coupler did not need to. I then routed the duct from the wash station valve along the outer wall and over the wheel well, make the corner by the battery compartment and then once getting past the wheel well go down and under battery compartment. Up in that corner I attach a adhesive base 3/4" cable anchor so I can loop a 20" releasable tie strap through it and around the 4" duct holding it up and out of the way. A second 20" tie strap is used were the duct heads down under the battery compartment, it utilizes the loop that anchors the 4/0 cable coming out of the battery compartment. Next I prep another 6" long 4" coupler by adding a metal mounting bracket. It is bolted to the coupler using two 10-24 machine screws that go through the bracket the coupler wall and then a backing plate that has tapped holes. This coupler I will add a1" hole that will be pointed up to flood heat at the battery compartment. The mounting bracket will be utilizing the upper bolt of the support leg for the battery compartment. This keeps the duct up and away from the inverter and electrical components and positions it to flood heat up against the bottom of the battery compartment. The next length of 4" duct is clamped to that coupler and routed up from under the battery compartment over to and along the wheel well. It is held by two 20" tie straps similar to the other side. Because I want to run the heat duct under the foot space of the dinette I need to transition to 2" duct. There is access via the same trough that I utilized in the back of the trailer, but at the front there is more room and I am able to pull the 2" ducting through. From there it continues toward the front until it reaches the black tank flush inlet where it then follows that pipe back along the black tank and terminates by the water supply line for the toilet. At the transition point I add two more short pieces of 2" duct and route them down to where the main black tank drain pipe goes under the dinette foot space, they are terminated on either side of that pipe. There was not enough room to run the 2" duct but enough to force air along either side. At the transition from 4" to the three 2" ducts I simply inserted the three 2" into the end of the 4" and used aluminum foil duct tape to seal the transition. I also want to mention that I used the aluminum foil duct tape to reinforce the ends of every 4" duct by wrapping outside and inside before clamping. That should cover the install, now lets talk about the results of the test in subzero weather. I rounded up seven digital thermometers and put them in the areas I was concerned about. Was placed just inside the empty rear storage compartment. Was placed on top of the batteries and a piece of acoustical insulation that was for large generator enclosure, it was 1-1/2" thick and 19" square. This was squeezed in the opening before the door was closed. Was placed in the rear basement curbside next to boondocking inlet. Was placed in the rear basement street side below the outside wash station valve. Was placed on the floor of the closet with the door left closed. Was placed on the lower shelf in the vanity in the bathroom with the door left closed. Was placed in front basement street side next to the black tank flush port line. I moved it out of the heated shed at 1:00 pm on Sunday 2-7-21. I moved it back in at 3:00 pm on Tuesday 2-9-21. The furnace was cycling off and on at -4 ' but I noticed at -8' and colder it ran continuous. I have the Truma water heater and that was also turned on. I checked propane consumption by putting on two 20 pound tanks that I had weighed and left them in place for 12 hours. It was -12' when I put them on and -2' when I took them off. Because of the subzero temperature the propane was not gasifying very well and the regulator automatically changed from the primary to the reserve after only consuming 2.353 gallons. The total consumed out of both tanks in 12 hours was 3.294 gallons, so that would be .274 gallons in one hour. My Victron BMV-712 was telling me that I had depleted my 400 Ah Battle Born batteries to 47% and at rate of use I had two days and nine hours left. I thought I would comment on a couple of things I like about the outcome of the project. The bathroom was comfy warm and the wall next to the bed was not icy cold. I am not planing to take up subzero camping but it does gives me a benchmark to go off of for any situation that I might run in to. If you have any suggestions or see something that is of concern please let me know. Paul
1 point
-
Hi all - I've been checking out your forum here for a couple days and just joined. My wife and are looking to get our first RV after many years of boating here in the PNW. OTT's look like they might be the ticket - we've been in contact with the company and hope to look at a local one before we make a decision. If we have any info or questions for the forum, we'll be posting. Tim and Lorri1 point
-
The lower hooks and eye you show are close to what I used. I put a light weight towel bar on the fridge not necessarily for towels, but so that I wouldn't keep "butt checking" and shutting it off. The suction cups kept sliding off so we attached with adhesive. Never really have any weight on it.1 point
-
Nice job but I want to know (not meet) the gorilla that uses that 50 pound weight.😁1 point
-
Hi there, haven't been on the forum in a while. Didn't make the trip this summer when I could have made the factory tour. I couldn't wait and placed my order in July for delivery in May. Will make factory tour before selecting upgrades. I'd like to see yours when it arrives. Geaux Tigers 👍1 point
-
@John Welte I hear ya. We're between spending less on a Casita, or going all in on the Oliver. There are only a few others that we have considered given our requirements, the main one being it has to fit thru a 9'x9' garage door. For the Casita as well as the LEi, I'll probably need to let some air out of the tires to get them in. Good luck. With us in the Seattle area, we're practically neighbors.🙂1 point
-
David, Hats off to a fine job and modification!1 point
-
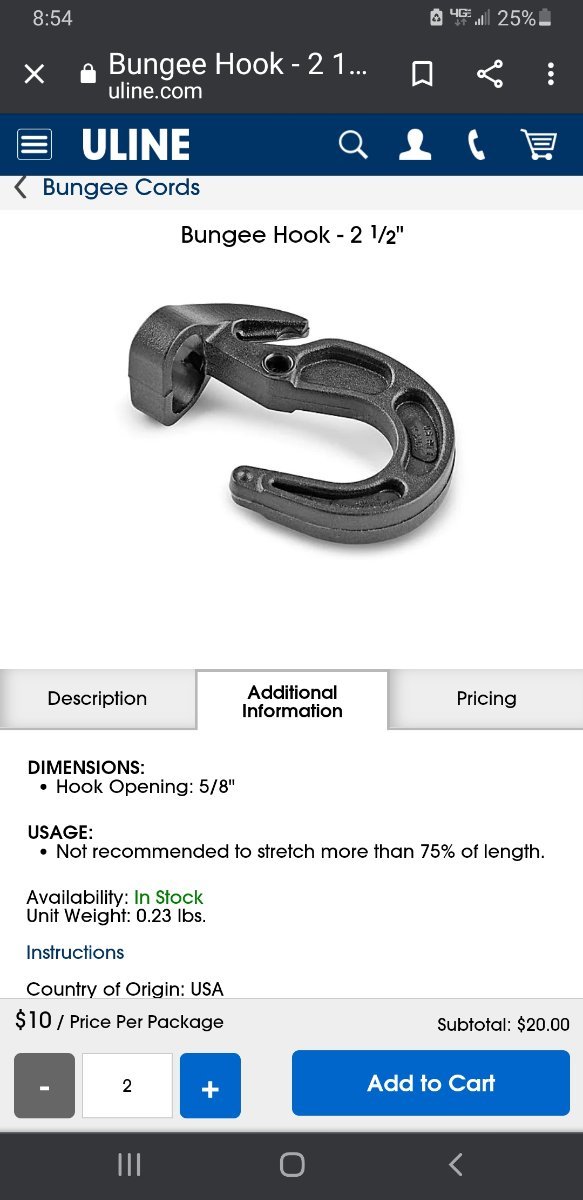
So, something like these components?
1 point
-
Thanks. I was just going to ask you about your bungee and hook. Looks easy to deploy.
1 point
-
Our policy for the LE2 we'll be picking up on September 16th costs $514 annually, through Good Sam affiliate insurance company National General. We also have Good Sam's Roadside Assistance policy. As a comparison, we have used Geico for all of our vehicles, including the recently-sold teardrop trailer, for many years. Geico's quote for insuring the LE2 was approximately $800 annually, and that was with their multi-vehicle discount.1 point
-
It would be pretty easy to add an inline switch on the cord, which I guess would make it slightly easier to turn off. I'm like you though, why bother if you can just pull the plug.1 point
-
I'll unplug it when we put the trailer in storage. After emptying and cleaning the toilet of course.1 point
-
Hi Bill, I already cut the corner aka radius, it was easy with the electric knife. The mattress is 10” thick and the blue cooling foam is on the top side of the mattress that you lay on. It took about 2 hrs to complete the cutting. We already installed the new memory foam mattresses in the Ollie, it’s like sleeping on a cloud ☁️. Very pleased with the outcome. (Note the Southern Mattresses were 8.5” in thickness.) -David1 point
-
Agreed. Spend your time and money on a quality fridge/freezer for the truck first. Best of both worlds plus a ton of extra space.1 point
-
Yes, you are correct. The Honda EU2200i companion has a NEMA L5-30 3-prong twist lock receptacle. You will need an adapter from this receptacle to the TT-30 3-prong straight bladed plug on the trailer's power cord. FYI you will also not get 30A without pairing up (2) 2200i's using the optional cable from Honda made for that purpose...1 point
-
We did our own install. Not difficult, for us. It is not noisy, at all. I hear the fridge more outside the trailer, than inside. Inside, I hear a tiny ping, when it starts up, and a quiet hum, depending on where I am in the trailer. If anything, at all, in the bed. Why do you want a compressor fridge? We replaced our 3way because it died, and the compressor fridge was the easiest swap for us. It does stress power requirements, if you live on solar, as we do. We use 60 to 70 amp hours a day, just for the fridge. Do we love it? Yes. Would we do it again? Yes. Would i replace a working 3way? No. Our fridge is a truckfridge tf130, similar but much less pricey than a marine indel (same compressor and body) stainless of same size. We like it, because it works. Cons, much more power draw than a 3way.1 point
-
You can also pull the handle out slightly and tape a thumbtack to it. Then close the door and the tack will puncture the insulation to mark where to drill.1 point
-
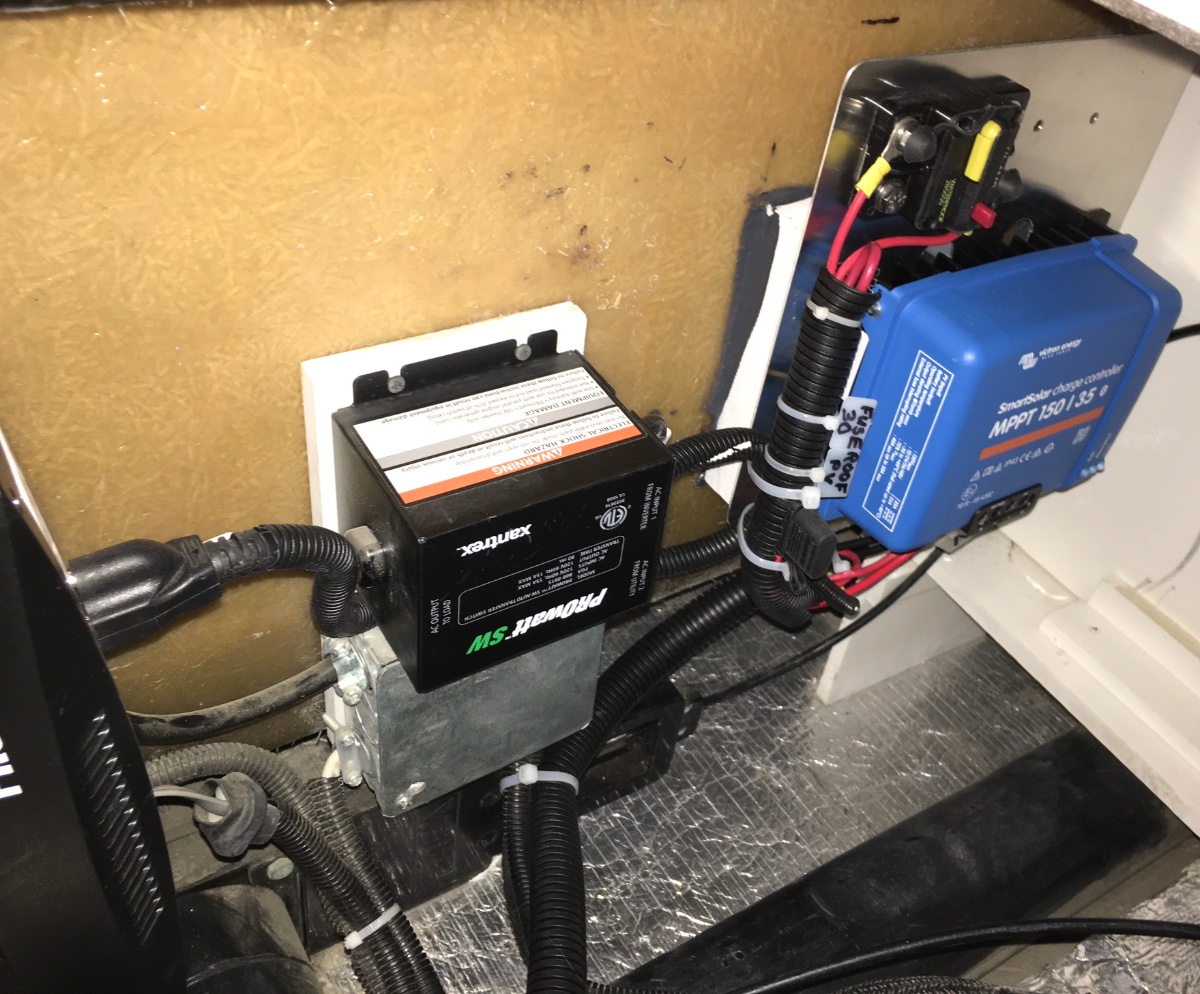
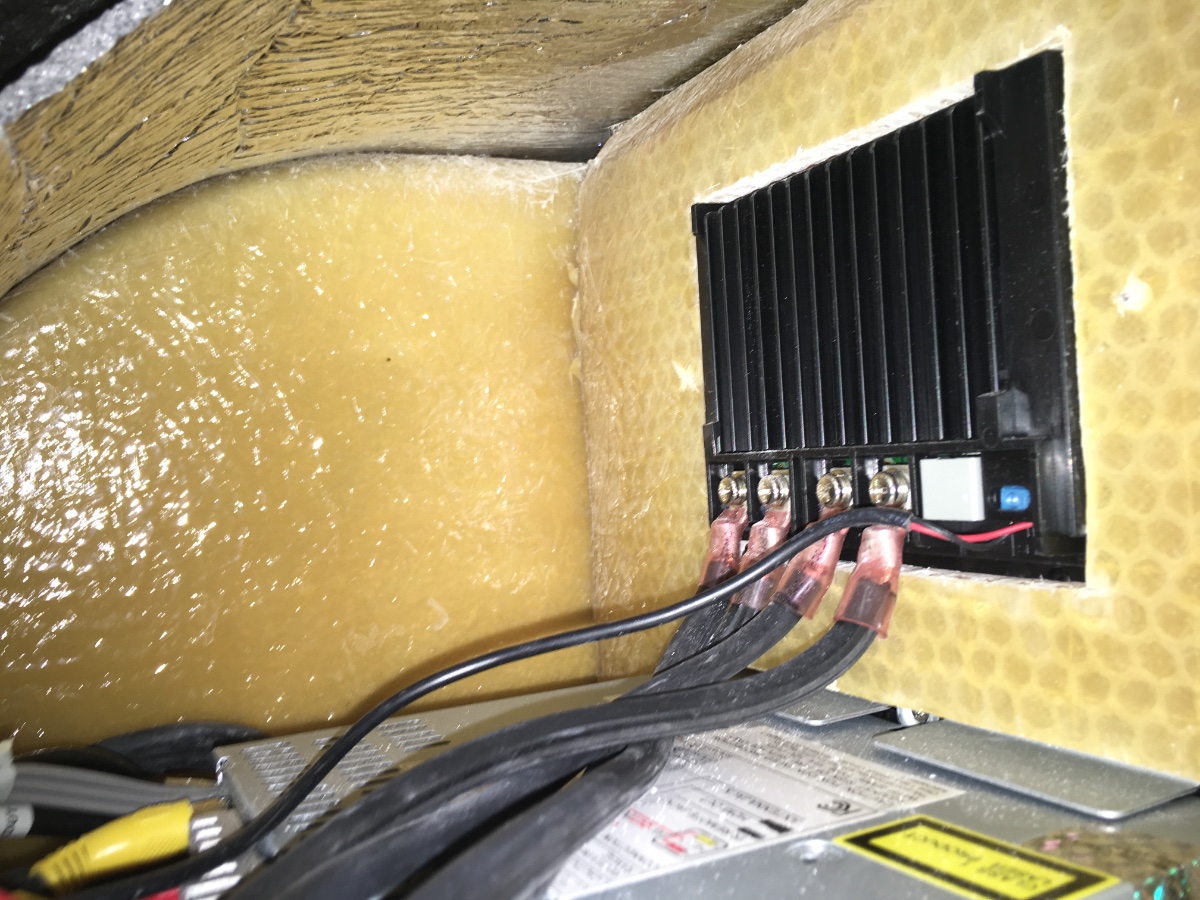
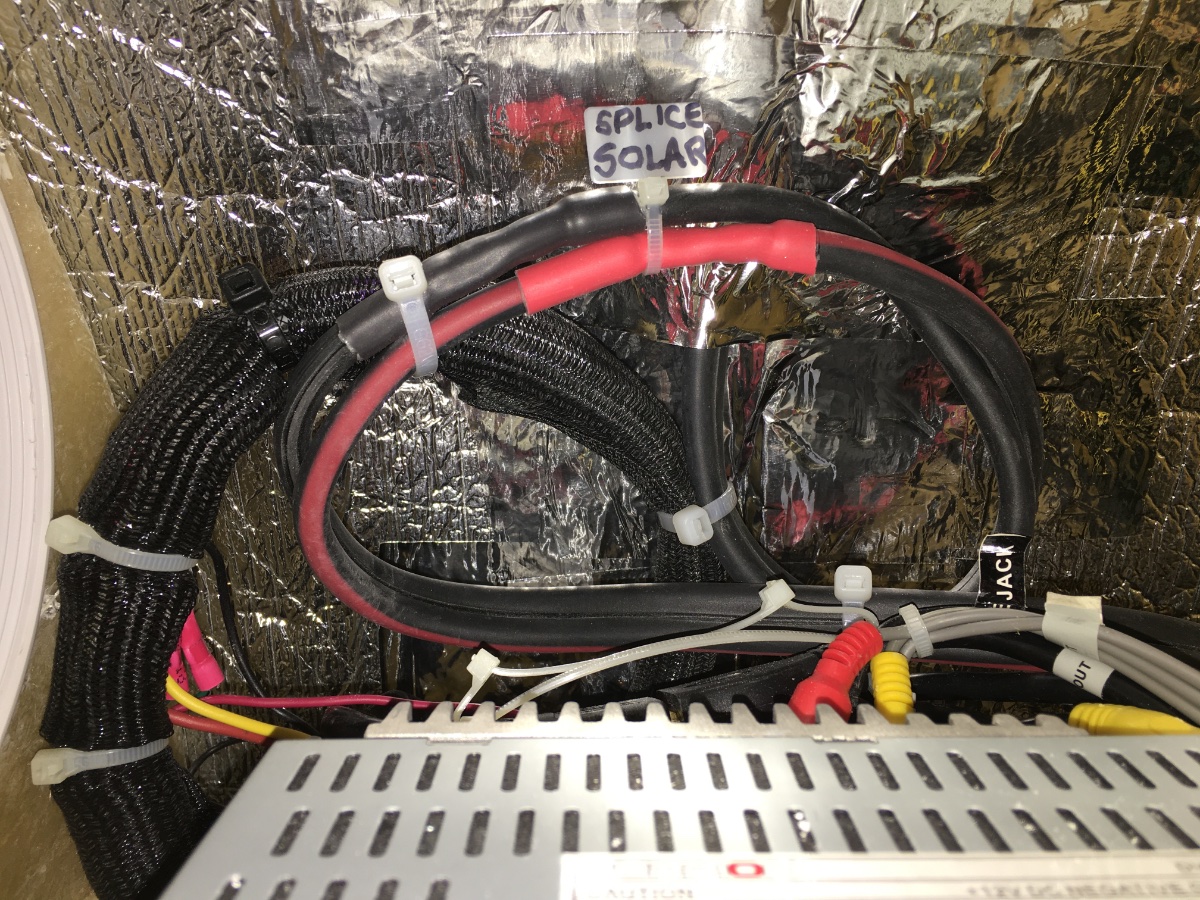
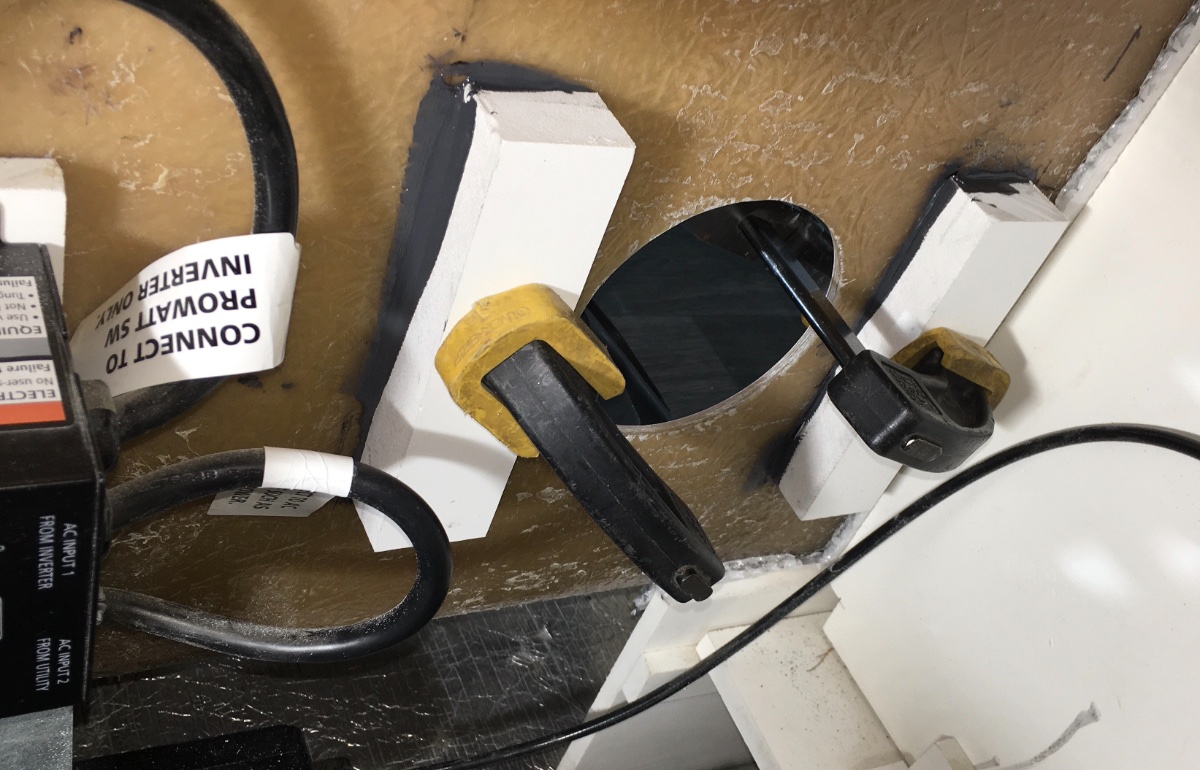
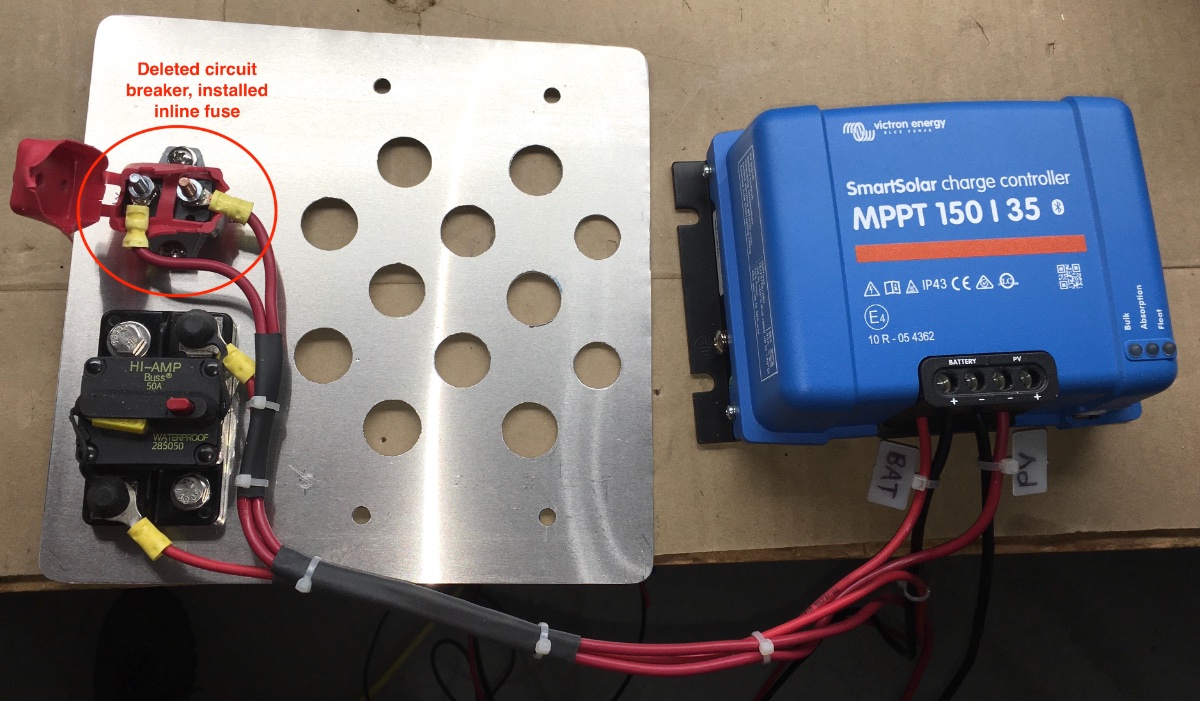
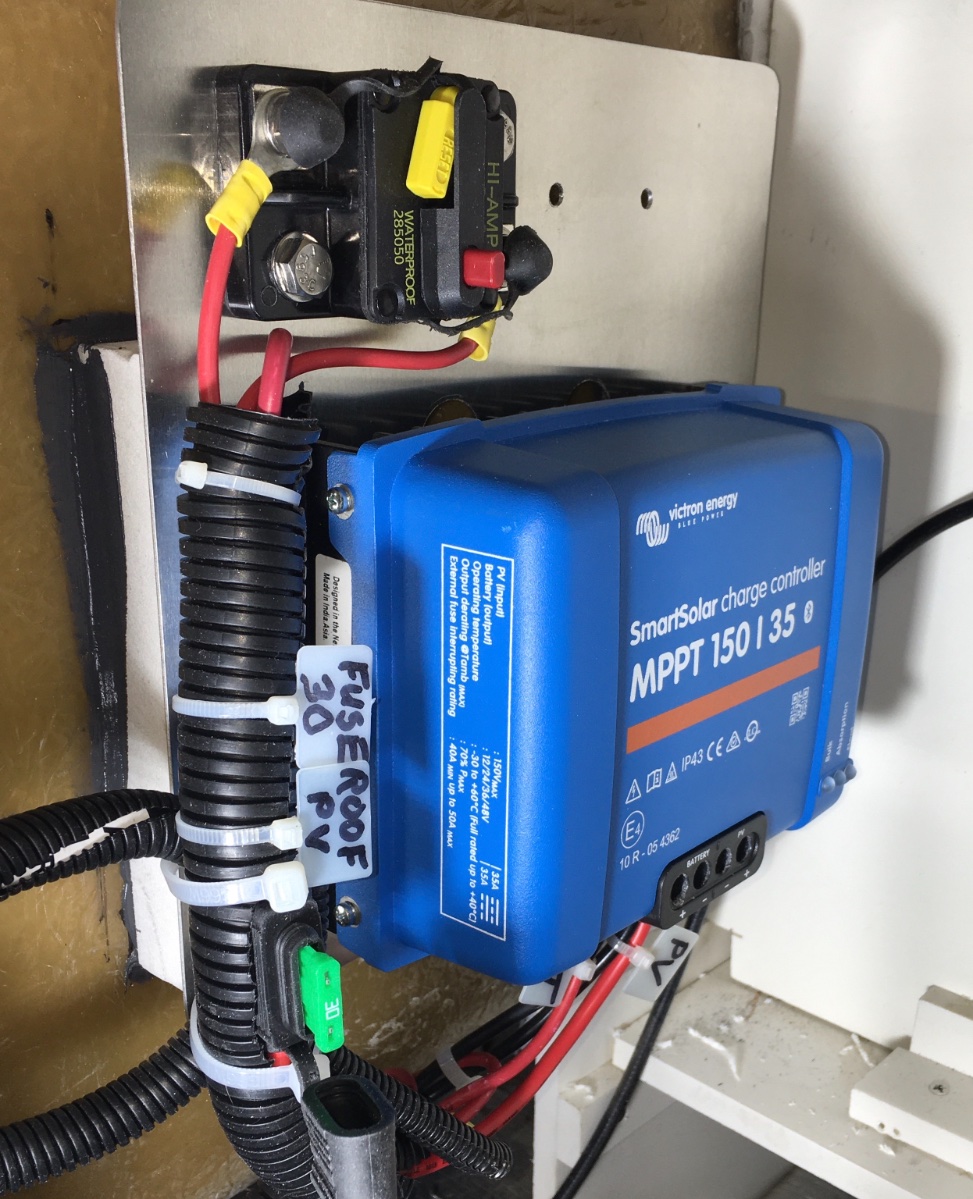
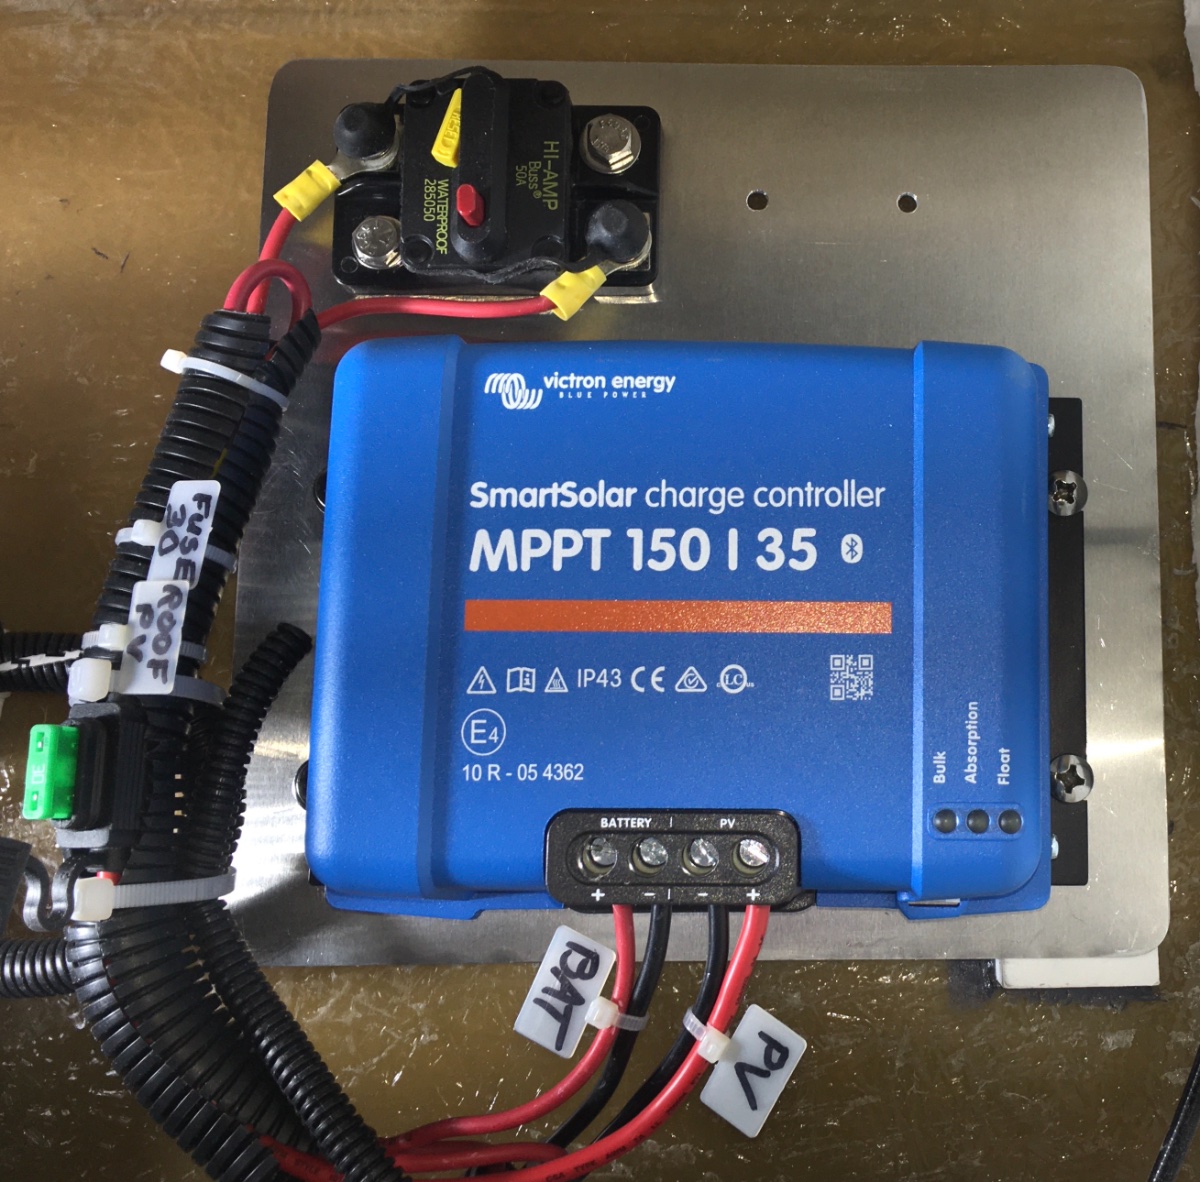
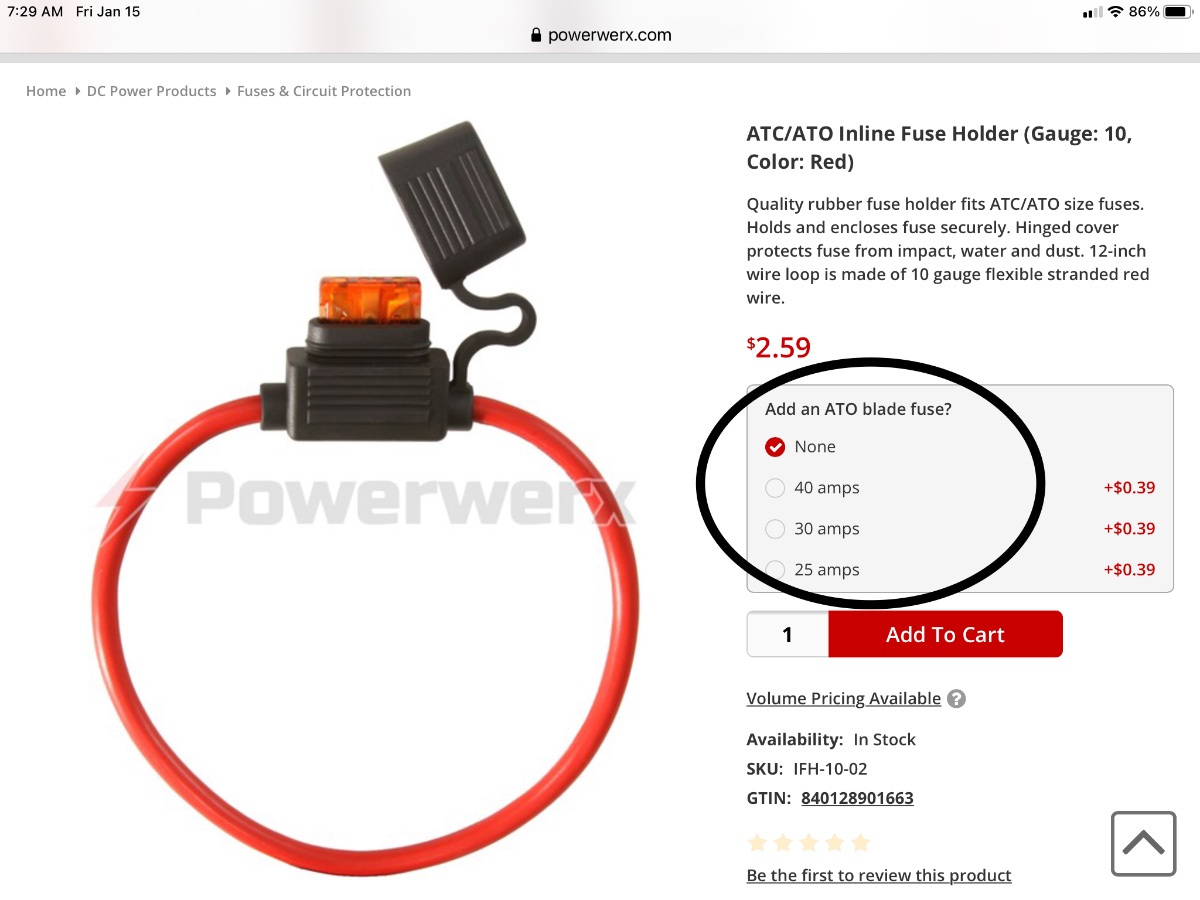
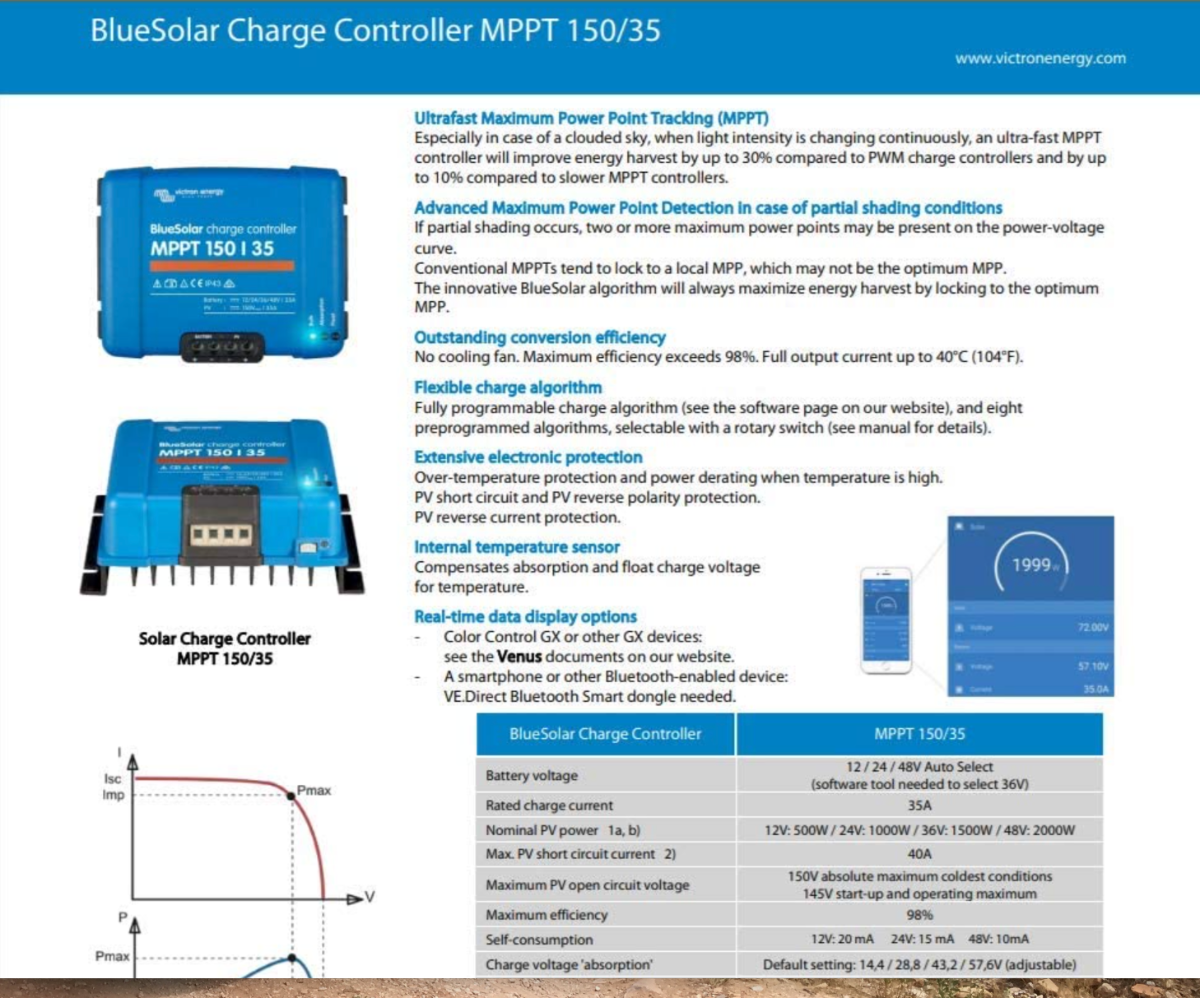
Remove the Zamp unit from over the stereo head - two input wires (from the roof), two output wires (to the battery) and the small temperature sense probe wires Cut off any excess length and then splice the two sets of cables together and secure them. This little cable tie is good for making I.D. labels. Drag the temp sense cable down into the lower compartment, you can sell it with the used Zamp controller. It has a value of about $35 new. Add extra aluminum tape if needed to seal and secure the wall insulation. The location I selected is a great spot for a big ventilation hole, an air intake for my Lithium Battery Box Powered Vent System , so I needed to add 1" thick HDPE spacers to let air pass through, using JB Weld epoxy, clamped overnight: I made a mounting plate from heavy sheet aluminum, drilling holes to allow air to get to the bottom of the control unit. I originally planned to use the Oliver installed self reseting circuit breaker, but decided that an inline fuse would be more reliable. The manual circuit breaker on the output wire is similar to the Oliver one installed across the gap on the DC bus. It allows you to disconnect the solar input by pressing the red button, and it is reset by closing the yellow arm back inwards:: This is the inline fuse, it is very nicely made and has heavy enough wire. It will handle up to a 40 amp fuse, I installed a 30 amp ATC one: Victron SmartSolar Charge Controller MPPT 150/35 brochur:e Victron Charge Controller 150:35.pdf This is pretty technical, it shows the Zamp roof panel charge curve, I added some data points showing where a lead acid and a lithium (LiFePO4) battery open cell voltage would appear. A lithium battery has a higher operating voltage, so a regular PWM controller is not as effective as a more sophisticated MPPT one that is able to alter both output voltage AND output current. A PWM unit is connected directly to the battery, and it simply switches on and off very rapidly to control the current. It is very crude, but inexpensive and reasonably effective under optimal conditions. I grabbed these descriptions from solar website, I cannot remember which. It and the following one offer some interesting comments: Temperature sensing charge control - the Battle Born batteries do not require (nor can they use) this function, it is built in to the batteries' onboard Battery Management Systems (BMS). However, by installing the optional battery temp probe that connects to my Victron BVM-712 Smart bus, the VictronConnect app will connect using its Bluetooth network with this compatible "smart" device. When I look at the app screen, the battery temperature is shown on both the Solar page and on the Batteries page. That temperature reading is very helpful in monitoring the health of the batteries. Settings: using the app you can alter a whole bunch of parameters. The important one is the charge absorption voltage. I set it to 14,.4 volts, a little lower than the Battle Born recommended 14.6 volts. I have read that a slightly lower voltage is healthier for those batteries, while not significantly affecting their actual capacity (percentage of charge). This is the same reason they recommend that they are not left continually "cooking" at 14.6 volts from shore power and a charger like my Progressive Dynamics one, it diminishes their life span. https://battlebornbatteries.com/programming-a-victron-smartsolar-charge-controller/ John Davies Spokane WA
1 point
-
I am glad you are excited about your new Ollie, and it will certainly go into tighter campgrounds with less worry about dragging against trees, or against cars in a crowded urban parking lot, or along smooth groomed gravel roads, but I hope that statement was hyperbole, because the LE2 is in no way “trail rated”, in spite of the off-road adventures advertising, which I believe is more than a little deceptive. The baby Ollie OTH could be a decent off-roader with some inexpensive upgrades….. John Davies Spokane WA1 point
-
I do, too. I wish they were made the same as the old days . My brother's in-laws own two vintage airstrams. Yes, they are often a lot of work (which often falls on my brother as poppy will be 90 soon), but they are very pretty. Someday, after we're gone, vintage Oliver will be as collectible. Imo. With less work, I suspect.1 point
-
When we were shopping for a trailer in 2014/15 Airstream was really the only thing we were considering. There were some posts on AirForums about quality and issues which were concerning. Then, in one of those threads someone mentioned Oliver. I did a web search and the rest is history. Mike1 point
-
We loved our Airstream, a Bambi 16. We’re outdoor-loving people, so most of our waking hours are spent outside. I just didn’t know Oliver trailers were a thing when we bought the Airstream. I just accepted filiform corrosion, leaking or missing rivets, and cold,clammy interior aluminum walls as the status quo. I knew that hail storms would be catastrophic, that floor rot from undiscovered leaks were something that some owners were all too aware of, but that’s what insurance is for. So, happily we went, adventuring in the Bambi. As we thought about the potential for a tire failure on the single axle Bambi, trips to our Airstream dealer became a thing….and a Globetrotter 23 twin caught our eye. So stylish, twin beds made the small size of the 23 seem so spacious, the safety aspect of double axles, it seemed to have it all. And it did have it all, including the same inherent concerns and problems of the Bambi, save double axles. So, we didn’t buy one. As we were we towing the Bambi to our camping destination, a white fiberglass camper was directly ahead of us….the 3rd. brake light read “Oliver”…a new-to-us name for a camper. As we followed behind, we noticed it seemed more narrow than the Bambi, with much higher clearance, and double axles. Those details alone caught our interest. Once we were home from that adventure, I checked out the Oliver web site…and, like they say, you don’t know what you don’t know, ignorance is bliss, all those trite sayings that sprung to mind. Trouble ensued in remaining satisfied with the Bambi’s shortcomings, for that matter, any Airstream’s shortcomings, for our purpose and needs. This past October, while pulling into Mt. Pisgah campground on the Blue Ridge Parkway, we saw an Elite II in the flesh and the owner graciously allowed us to tour his camper. After we saw it, we decided to sell the Airstream once we got home. I listed it for sale, and sold it the same day it was listed. We’re in the hurry up & wait mode for delivery of an Elite II twin after taking a factory tour in March. I know nothing is perfect. I know there is no one size fits all. At this time, with our current wants and needs, the Oliver will eliminate the concerns we had with Airstream durability and maintenance, while opening up opportunities to literally take trails to new destinations unreachable in an Airstream.1 point
-
About 10 months ago AS switched to a composite flooring. I'm not defending AS over Oliver at all, just sharing an update. https://www.airstream.com/blog/composite-flooring-making-improvements-for-traditional-travel-trailers/1 point
-
We looked at the Airstream Nest (a piece of crap, now discontinued by Airstream), the Airstream Bambi and Basecamp as well, and other brands like the Little Guy and RPod. Once we saw the Oliver and toured the factory it was an easy decision to go with our Elite II. The fiberglass exterior and interior, the massive aluminum frame and the overall design and features were the deciding factors. Zero regrets.1 point
-
We had been looking at Airstream Globetrotter 23 ft twin. We were very serious about Airstream. Our barn was constructed to be able to hold an Airstream up to 28ft. We chose the Oliver Elite II twin for a number of reasons. There were areas and some features where we felt the Ollie was superior. We are very happy with the Ollie we purchased new. There were a few items where we feel we compromised: wet bath, true oven, and some light through the windows. We are also boaters so the fiberglass interior and the ease of care were big plusses. We were new to camping in a travel trailer. For me the thought of denting (by any means) the $107k asking price Airstream was too much. I didn't see too many used Airstreams without some sort of exterior damage. I was willing to pay for the new Airstream. We looked at a couple of Ollies in person before making our decision. We also toured the factory. We like our Ollie very much. For us it was the right decision. The items I thought were going to be a compromise haven't turned out to be big issues. Definitely go see an Ollie before you make a decision. Good luck!1 point
-
Before placing my order on a Legacy II I seriously looked at a new AS Bambi 22FB. It too is narrower than most trailers, the overall length I desired and I could stand up inside. Base pricing was about the same (2020) and I liked the layout. Upon further research though I chose Oliver for hull strength, construction quality, insulation, higher ground clearance and payload (dual axle vs. single). AS certainly does have a interior design wow factor but so too does Ikea. Thor ownership was also a negative. Best wishes in your search for the right trailer1 point
-
Welcome MJ. You’ve come to the right place to find out about Olivers. Olivers are built better but don’t have the interior “bling” that an AS does. We have some former AS owners so maybe they will chime in. Mike1 point
-
Welcome to the forum. There are a number of members who have made the change, and a number (including us) who looked at Airstream and decided on Oliver. Have you seen an Oliver II? It's all about seeing, touching, and imagining myself in the space, for me. Good luck in your decision. My only comment will be this-- our Oliver survived a major hailstorm storm , with no dings or dents. That day, I was extra glad for our decision.1 point
-
Hello to the Oliver world, my wife and I have been a fan of the trailers and the craftsmanship for a few years. We're pleased to be able to become the new owners of Hull #36, bringing it back to TN after a long stay in MN where is was taken care of wonderfully be Kent and Mary, and Terry and Catherine before them as I understand it. Very gracious and interesting folks who have treated us so well during our transfer. We live in East TN, a few hours drive from Hohenwald. We have lots to learn and are excited to start this new chapter. We've been T@B owners for many years, and love our T@B and it's community. But as our life changes, we believe this is a great next next step. Lee and Linda1 point
-
If you see one (anywhere) simply stop it and start talking. I've yet to meet a fellow Ollie owner who didn't like to compare notes, mods, campgrounds, etc. Bill1 point
-
Congratulations! I'm really happy for you.1 point
-
Lee and Linda, welcome! You’ve got a classic trailer with number 36. Hope to meet you out on the road! Mike1 point
-
Any old sharp bits or fine tooth metal blades or hole saws will be fine. Don't use coarse ones, or those intended for wood. TAPE THE AREA FIRST to prevent slips and foul language. I like the 3M blue masking tape, it can remain on for a week without getting hard to remove. Wear vinyl gloves, and use a coarse sandpaper afterwards to remove all the sharp bits, 80 grit wet or dry is fine. There is a reason it is called fiberGLASS! those shards can go under a fingernail or into your skin, and being transluscent, they can be hard to see and retrieve with tweezers. So it is best to avoid getting skewered in the first place. Drilled holes for screws should be countersunk slightly to remove the white gelcoat, otherwise it can crack and flake off when you drive in the screw. It is not at all hard, just take care and wear a mask for any dust. I like to place a shop vac hose close by, tape it to the surface if you need to, and run the vac while drilling. That will take care of 80% of the mess. Place some paper towels on the other side of the panel to catch debris that falls on that side, which is usually minimal for drilled holes, but it can be significant if you are using a jigsaw or sabersaw…. If the panel has a no core or a glass core, no worries; OTH if it has a wood core like the bathroom partition, you must seal the newly exposed wood to prevent moisture entry and rot. Several coats of marine spar varnish (clear) works great. Take a look at this thread, there are lots of holes there: https://olivertraveltrailers.com/forums/topic/5301-how-to-lithium-battery-powered-vent-system/ Post pictures! John Davies Spokane WA1 point
-
This is one of the main reasons we sell direct. The constant feedback from our owners keeps us on our toes and we continue to improve how our trailers are built. Manufacturers that sell through dealerships have less (or barely any) communication with the actual owners that buy their RVs. Dealerships don't always have the intentions and care of the manufacturer either. They can be misleading or not prioritize customer service like we do. I have been with the company since 2013. I can honestly say that there are a lot of features and components on our units that came directly from our owners experiences. Some did their own modifications. Some made suggestions. The user feedback is important to us. In the end, our goal is to build the best camper we can make, back it up with great customer service and want owners to be safe and enjoy their experiences in them. You are purchasing a premium product... we know it is more expensive than some trailers. You deserve a premium trailer and a company that cares about it. We are not always perfect, we are human, but we will do our best to make it right when problems occur. We want to thank everyone for the comments and belief in us!1 point

.jpg.51c698c38bda1fe6a52be5a65ce39ee8.jpg)


.jpeg.fbacd00d1130cb4d1d2bd4737e3a7dff.jpeg)


.jpg.b4fb182c2dd38b005d42f99a3317e409.jpg)


-
Recent Achievements
-


")


")


")


