Leaderboard


Popular Content
Showing content with the highest reputation on 05/15/2022 in all areas
-
Geo, in your photo, it looks like you might be using stacked patio blocks/pavers to support your jacks? I'd be extremely uncomfortable with that, as well. I had a bad experience once with a concrete block shattering under the weight of a jack. Never again. We always use wood. Sometimes, you can't see the hairline cracks, or internal cracking, in those formed concrete blocks.4 points
-
George - I agree - I would not continue in this manner. It is good that you chocked the rear wheels - but - I have never lifted an Oliver wheel off the ground without first being hitched to my tow vehicle. I believe that not only is this a safer way but it also would serve to keep the nose of the Oliver down thus putting all of the jack's force into lifting the Ollie laterally (i.e. getting the wheel off the ground as opposed to the nose in the air). If for some reason you can not hitch the Ollie to your tow vehicle then I'd place a block of wood (2x4) between that bottle jack and the steel sub-frame. This would lessen the chance of slippage of the metal against metal while also reducing the distance the bottle jack has to be extended. But, as I said above, I would not continue in this manner. Bill4 points
-
And remember..... If you don't have a bottle jack..... A bottle of Jack will help you pass the time while you pay someone else to do the wheel bearings.4 points
-
I was very impressed with Natures Head (NH) service. When I did my NH install I decided I wanted another hose flange to route a hose on the inside of the sink cabinet. I called them up and they shipped the flange the same day, and I had it 2 days later. The original NH was back ordered 3 months, so that took a long time to get, but getting spare parts are quick. Since my NH has only been in service for 9 month, I will probably wait another year before ordering a spare fan.4 points
-
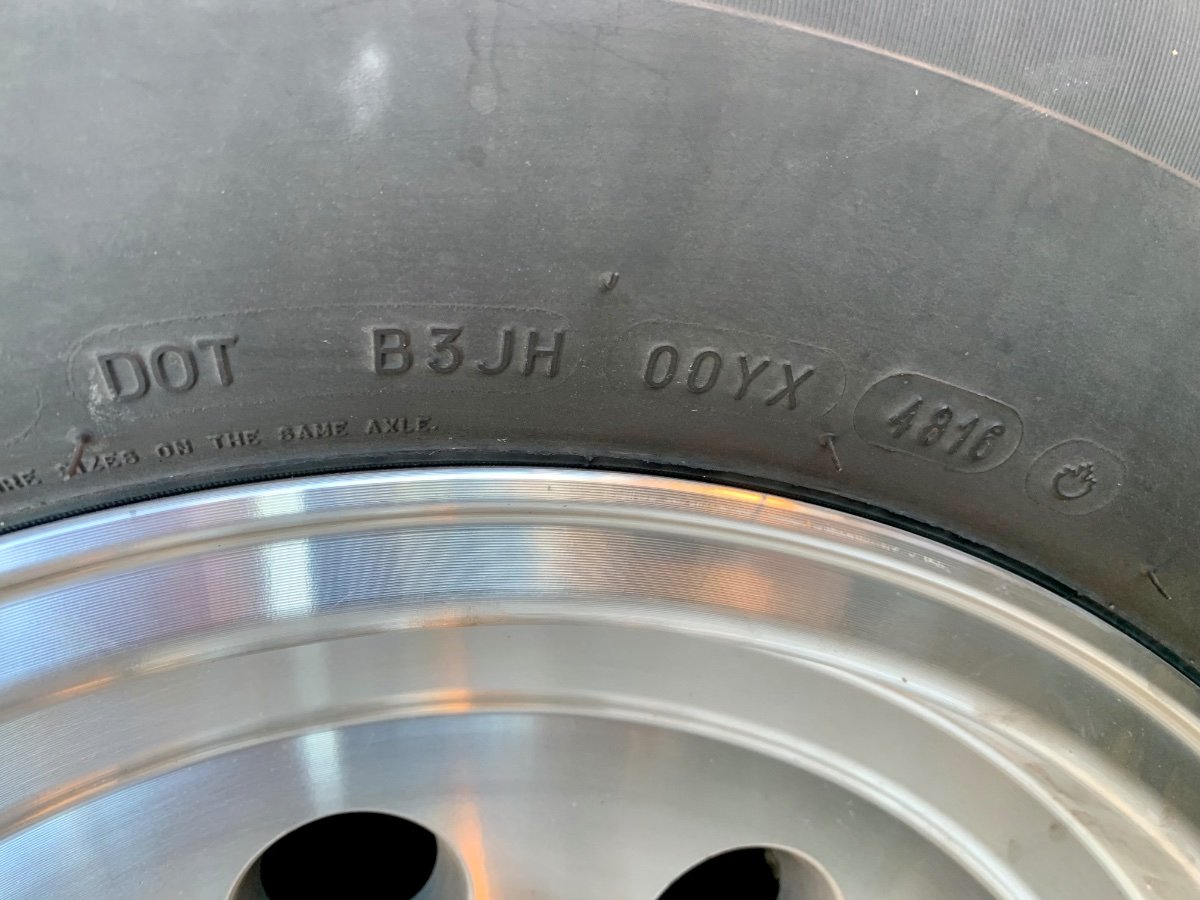
Mine where made on the 48wk of 2016. They are over 5 years old and will be replaced. Noticed this today. Just a reminder for others to keep on eye on your tire date. IMG_1835.HEIC3 points
-
Just had that happen! Shattered in a bunch on pieces. Off to Home Depot for some wood.3 points
-
I can confirm this ramp will not work with the Legacy II. I tried mine out with no luck - one tire on ramp & the other stayed on the ground.3 points
-
Those type ramps have worked for some, and not worked for others. I did a test and raised one tire 6.5”, and the other wheel spun freely off the ground. See this lengthy thread with lots of discussion on the topic. https://olivertraveltrailers.com/forums/topic/3630-jack-points/3 points
-
Well HOWDY! 🤠 Some more South Texas folks! Ana and I are from Del Rio. Picked up our LE1 in Oct. 21 and loving it! Any of y'all going to the Rally? We're headed there now. Staying in LA and MS for a couple of days. We'll be in a half-sucked Atomic Fireball lookin' old Chevy truck with a beautiful Oliver behind it!3 points
-
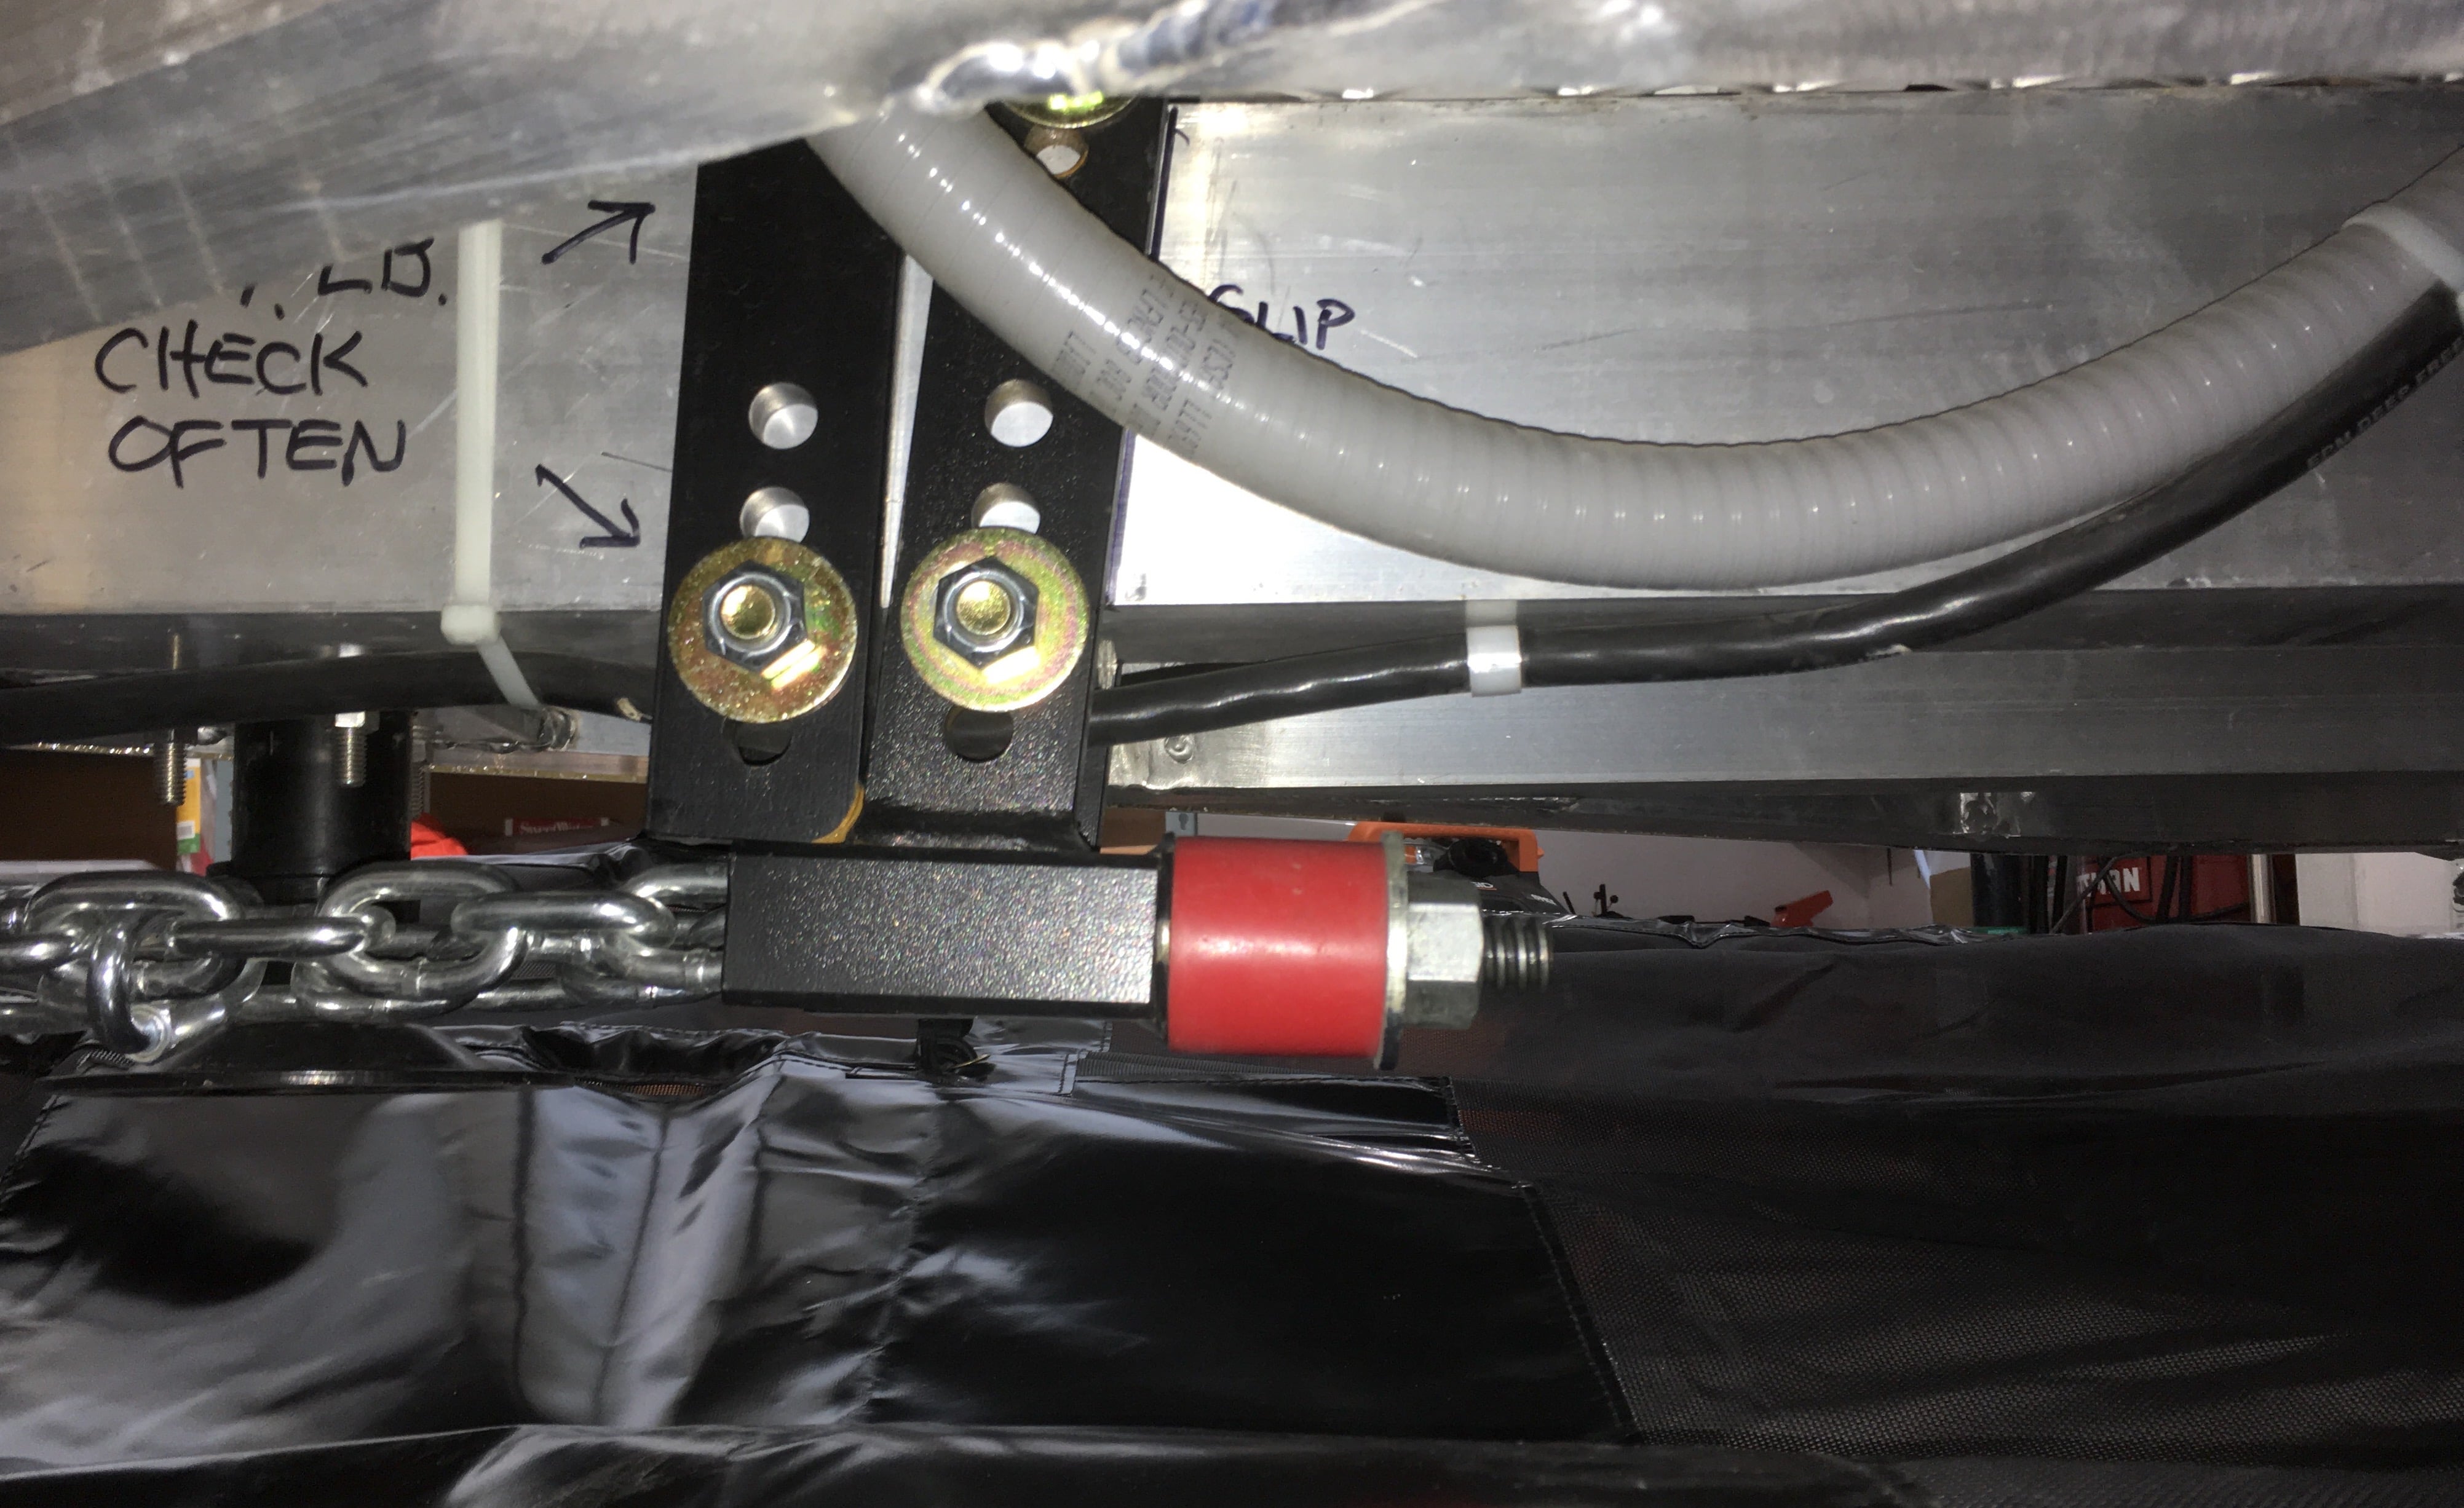
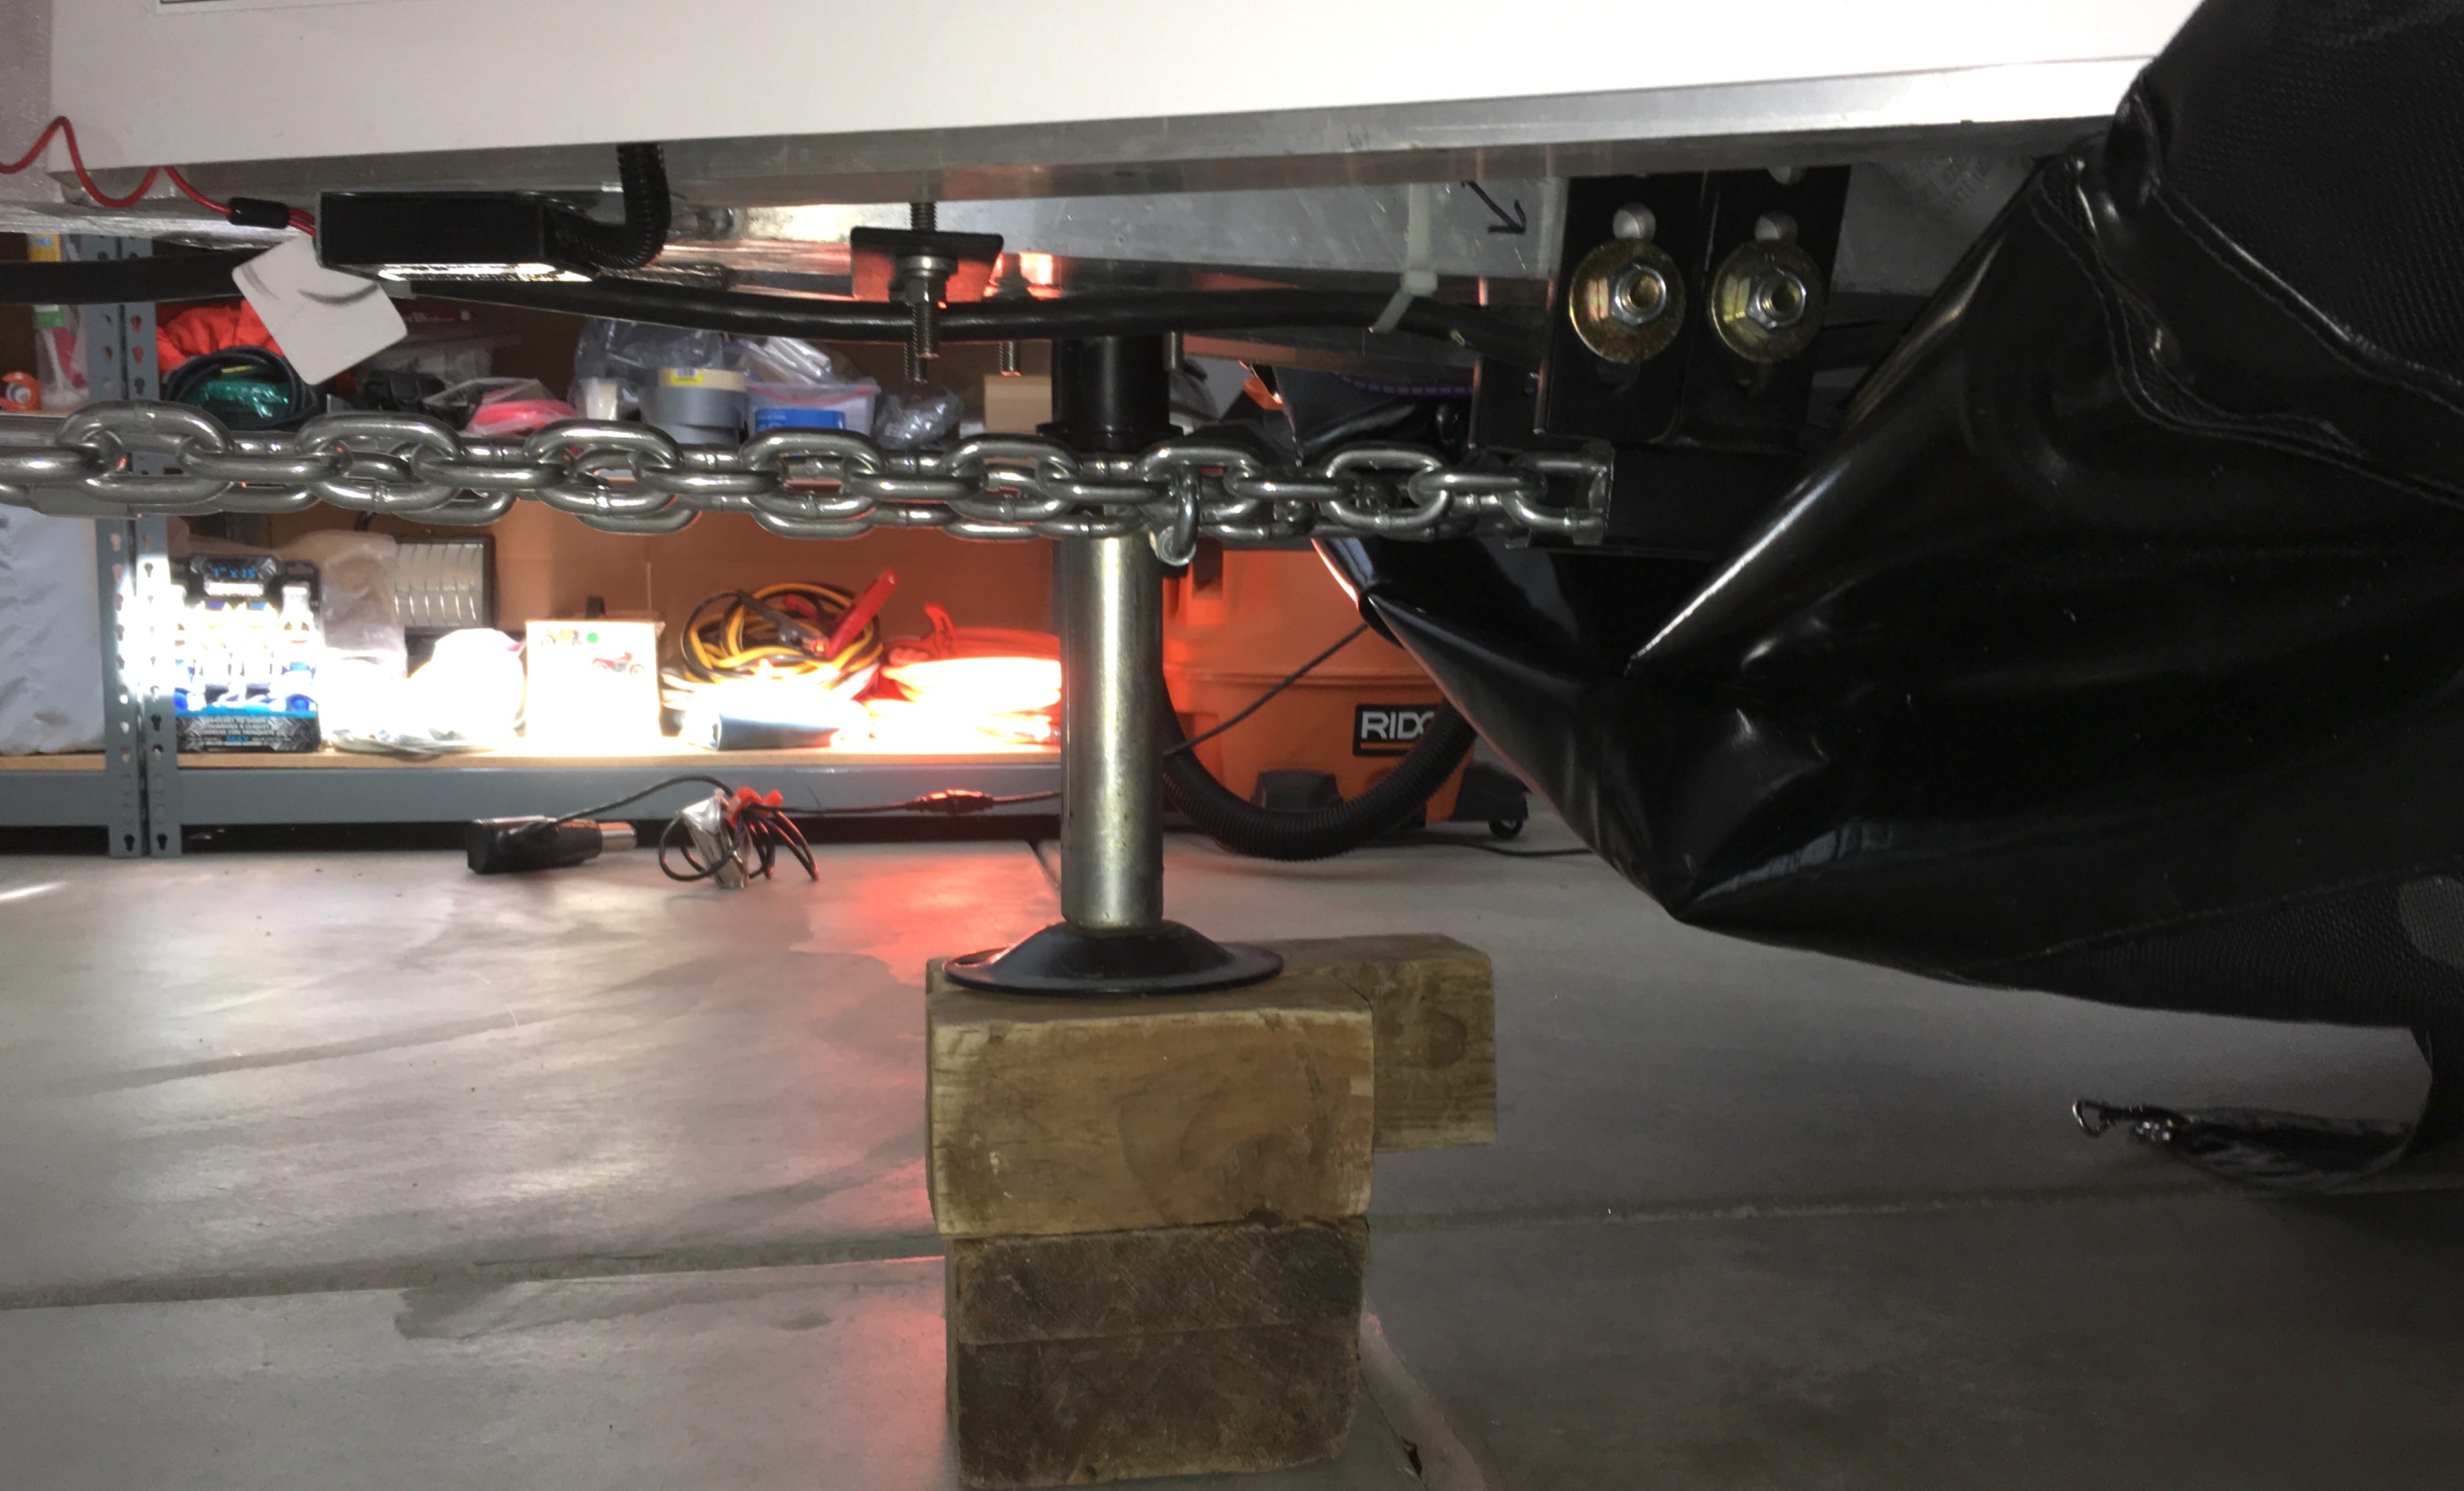
Oliver no longer recommends using the electric jacks to lift the trailer for tire changes or wheel bearing service, only for stabilizing the trailer to prevent rocking. Oliver doesn’t even call them “jacks”. They are a “three point power stabilizer system”. I use some pieces of 4”x4” lumber and a heavy duty scissor jack (3.5 ton rating) to lift one side of the trailer at the marked lift points on the suspension subframe (Note: not all Olivers have the lift points marked like this in the photo). And once I have the trailer lifted I put the electric stabilizer down just as a safety backup. Used this setup for my wheel bearing repacking, and I carry the wood and the scissor jack on the road as well in the bed of the truck for changing a flat tire if needed. If you use a hydraulic floor jack or a hydraulic bottle jack, you still need some type of safety backup like jack stands or using the Ollie stabilizers. Hydraulic jacks can leak and collapse.
 3 points
 -
Thanks for posting the reminder, fixed your pic. John Davies Spokane WA
3 points
-
Let me preface this story by making it clear that I am NOT a hunter but I do now understand why we SHOOT deer in the wild... I never liked the taste of venison, too gamey or too wild or too something. So, I had this idea ...that I could rope a deer, put it in a stall, feed it up on corn for a couple of weeks, then kill it and eat it. The first step in this adventure was getting a deer. I figured that, since they congregate at my cattle feeder and do not seem to have much fear of me when we are there (a bold one will sometimes come right up and sniff at the bags of feed while I am in the back of the truck not 4 feet away), it should not be difficult to rope one, get up to it and toss a bag over its head (to calm it down) then hog tie it and transport it home. I filled the cattle feeder then hid down at the end with my rope. The cattle, having seen the roping thing before, stayed well back. They were not having any of it. After about 20 minutes, my deer showed up-- 3 of them. I picked out a likely looking one, stepped out from the end of the feeder, and threw my rope. The deer just stood there and stared at me. I wrapped the rope around my waist and twisted the end so I would have a good hold. The deer still just stood and stared at me, but you could tell it was mildly concerned about the whole rope situation. I took a step towards it, it took a step away. I put a little tension on the rope, and then received an education. The first thing that I learned is that, while a deer may just stand there looking at you funny while you rope it, they are spurred to action when you start pulling on that rope. That deer EXPLODED. The second thing I learned is that pound for pound, a deer is a LOT stronger than a cow or a colt. A cow or a colt in that weight range I could fight down with a rope and with some dignity. A deer-- NO Chance. That thing ran and bucked and twisted and pulled. There was no controlling it and certainly no getting close to it. As it jerked me off my feet and started dragging me across the ground, it occurred to me that having a deer on a rope was not nearly as good an idea as I had originally imagined. The only upside is that they do not have as much stamina as many other animals. A brief 10 minutes later, it was tired and not nearly as quick to jerk me off my feet and drag me when I managed to get up. It took me a few minutes to realize this, since I was mostly blinded by the blood flowing out of the big gash in my head. At that point, I had lost my taste for corn-fed venison. I just wanted to get that devil creature off the end of that rope. At the time, there was no love at all between me and that deer, but I figured if I just let it go with the rope hanging around its neck, it would likely die slow and painfully somewhere. At that moment, I hated the thing, and I would venture a guess that the feeling was mutual. Despite the gash in my head and the several large knots where I had cleverly arrested the deer's momentum by bracing my head against various large rocks as it dragged me across the ground, I could still think clearly enough to recognize that there was a small chance that I shared some tiny amount of responsibility for the situation we were in. I didn't want the deer to have to suffer a slow death, so I managed to get it lined back up in between my truck and the feeder - a little trap I had set before hand...kind of like a squeeze chute. I got it to back in there and I started moving up so I could get my rope back. Did you know that deer bite? They do! I never in a million years would have thought that a deer would bite somebody, so I was very surprised when ..... I reached up there to grab that rope and the deer grabbed hold of my wrist. Now, when a deer bites you, it is not like being bit by a horse where they just bite you and slide off to then let go. A deer bites you and shakes its head--almost like a pit bull. They bite HARD and it hurts. The proper thing to do when a deer bites you is probably to freeze and draw back slowly. I tried screaming and shaking instead. My method was ineffective. It seems like the deer was biting and shaking for several minutes, but it was likely only several seconds. I, being smarter than a deer (though you may be questioning that claim by now), tricked it. While I kept it busy tearing the tendons out of my right arm, I reached up with my left hand and pulled that rope loose. That was when I got my final lesson in deer behavior for the day. Deer will strike at you with their front feet. They rear right up on their back feet and strike right about head and shoulder level, and their hooves are surprisingly sharp... I learned a long time ago that, when an animal -like a horse --strikes at you with their hooves and you can't get away easily, the best thing to do is try to make a loud noise and make an aggressive move towards the animal. This will usually cause them to back down a bit so you can escape. This was not a horse. This was a deer, so obviously, such trickery would not work. In the course of a millisecond, I devised a different strategy. I screamed like a woman and tried to turn and run. The reason I had always been told NOT to try to turn and run from a horse that paws at you is that there is a good chance that it will hit you in the back of the head. Deer may not be so different from horses after all, besides being twice as strong and 3 times as evil, because the second I turned to run, it hit me right in the back of the head and knocked me down. Now, when a deer paws at you and knocks you down, it does not immediately leave. I suspect it does not recognize that the danger has passed. What they do instead is paw your back and jump up and down on you while you are laying there crying like a little girl and covering your head. I finally managed to crawl under the truck and the deer went away. So now I know why when people go deer hunting they bring a rifle with a scope......to sort of even the odds!! All these events are true, so help me God...An Educated Farmer3 points
-
Thanks guys! I'm 5 hours into my trip and lug nuts are staying tight at 90# Checked at 50 miles and 100.2 points
-
What Mike D. said, can't use them with the E-Z Flex suspension.2 points
-
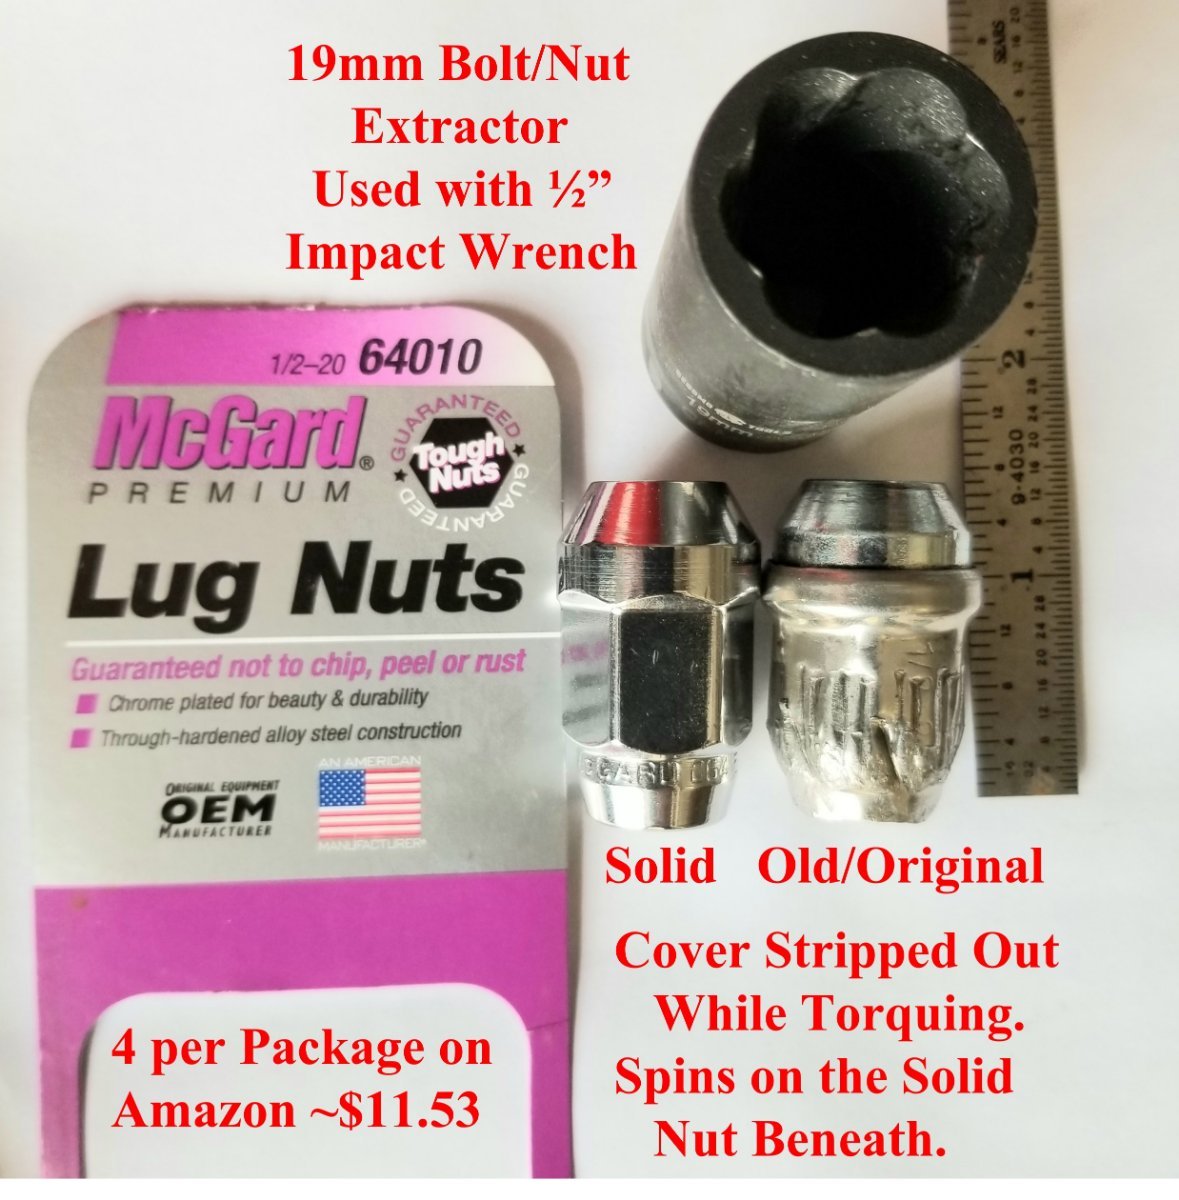
I had some split/cracked 2 piece clad lug nuts as well. I just replaced all of my lug nuts with solid one piece Gorilla lug nuts from Summit Racing. I don’t think the new ones actually seat any deeper into the rim. The conical seating area of the lug nut and rim are the standard 60 degree taper. It just looks like it seats deeper because the new lug nuts don’t have the stainless steel clad cover that protrudes right at the rim. And the female thread depth on the new lug nut is more than enough to fully engage all of the male threads on the lug. https://www.summitracing.com/parts/gor-41187htb2 points
-
You should be good as long as the thread grip length doesn't bottom out, i.e. too short a nut depth engaging the lug. My LE's lugs don't extend very far out of the wheel (can't recall the exact measurement). Make sure the nuts are long enough to get a good grip with the socket you use for torquing too! One of the stock nut's covers stripped out on me during the maiden flight from the"Oliver Birthing Facility." Just the doing a routine torque check. See attached photo with my replacement.
2 points
-
Imelda, this has been discussed many times on the forum. Initially Oliver recommended this, then changed their mind due to the manufacturers (Barker) rnot recommending doing this. To make a long story short from what I can determine many Oliver owners use the built in jacks without the blessing of Oliver while others use a mobile hydraulic jack. If your Oliver is a newer one with enhanced steel plates on the frame, use a mobile jack, if older without the steel plates there seems to be no real consensus as to the best or safest method. I would encourage you to do a thorough search of the forum to learn more.2 points
-
I have a 21 gallon Camco Rhino tank, looks just like Frank C’s, but a little taller. I carry it upright in the front basket on the optional Camco carry bracket when traveling. When empty, it’s light, easy to lift in and secure. There is only enough room left for the chocks and Beech Lane levelers, but that’s ok, I want to keep my tongue weight low. When camping, the tote tucks out of the way under the rear bumper horizontally. We then use the front basket for coolers, etc. I fill up the tote with gray water every other day when camping, and tow it to the dump station, very slowly as Frank C mentioned. On the way back, I usually put it in the truck bed to save wear and tear on the tote wheels. It’s not gross as it is only used for gray water. We have the Natures Head toilet, so the black tank has never been used. For those that are considering getting a tote (or have one but don’t use it), allow me explain how we use it, you may get some ideas. If you are staying in a conventional campground, and it’s popular, as most are these days, then you know there might be a traffic jam at the dump station before check-out time. I don’t know about you, but this is my least favorite camping time. If you have a tote, you can hook it up and head to the dump station in the afternoon, and have that pleasant experience all to yourself, take your time, and not get anything on you. The head back to camp to wash up and start on happy hour and dinner.
2 points
-
Hey John, Will you be at the rally next week? I'll be there in my X22. John Roemer2 points
-
I found this review on YouTube. Hopefully, it provides you with more information to assist in making an informed choice about Starlink:2 points
-
Interesting video, and also because he used an hydraulic jack right under the axle, oh well.2 points
-
Got my first wheel done and the job went very smoothly. Having the right tools sure does make things easier. Thanks everyone for posting your insight on this!2 points
-
Depends on use, we changed our filter twice last year as we stayed at over 22 CGs. We don’t drink water from our fresh water tank but do use it for showers. We carry 1 gallon jugs for our drinking water. Hope this helps.2 points
-
When the water flow starts getting reduced by the filter, or the end of the season, whichever comes first.2 points
-
Hi, New here too. Just picked up Hull #1081, an E2. Ran furnace a few nights when we first got home. The following afternoon I was outside near the back of the tailer and my nose detected a whiff of propane. It was there and then gone, but then I noted same thing a few days later. I sniffed around, opened the furnace area, and did not notice a thing. I do have a rear quick connect and from posts above I wonder now if that might have been the source. I have not noted any propane the last few days...... maybe I should check the levels in my bottles...... a sniffer is a good idea too. Thanks1 point
-
And of course a bottle of Jack would definitely improve the situation😀1 point
-
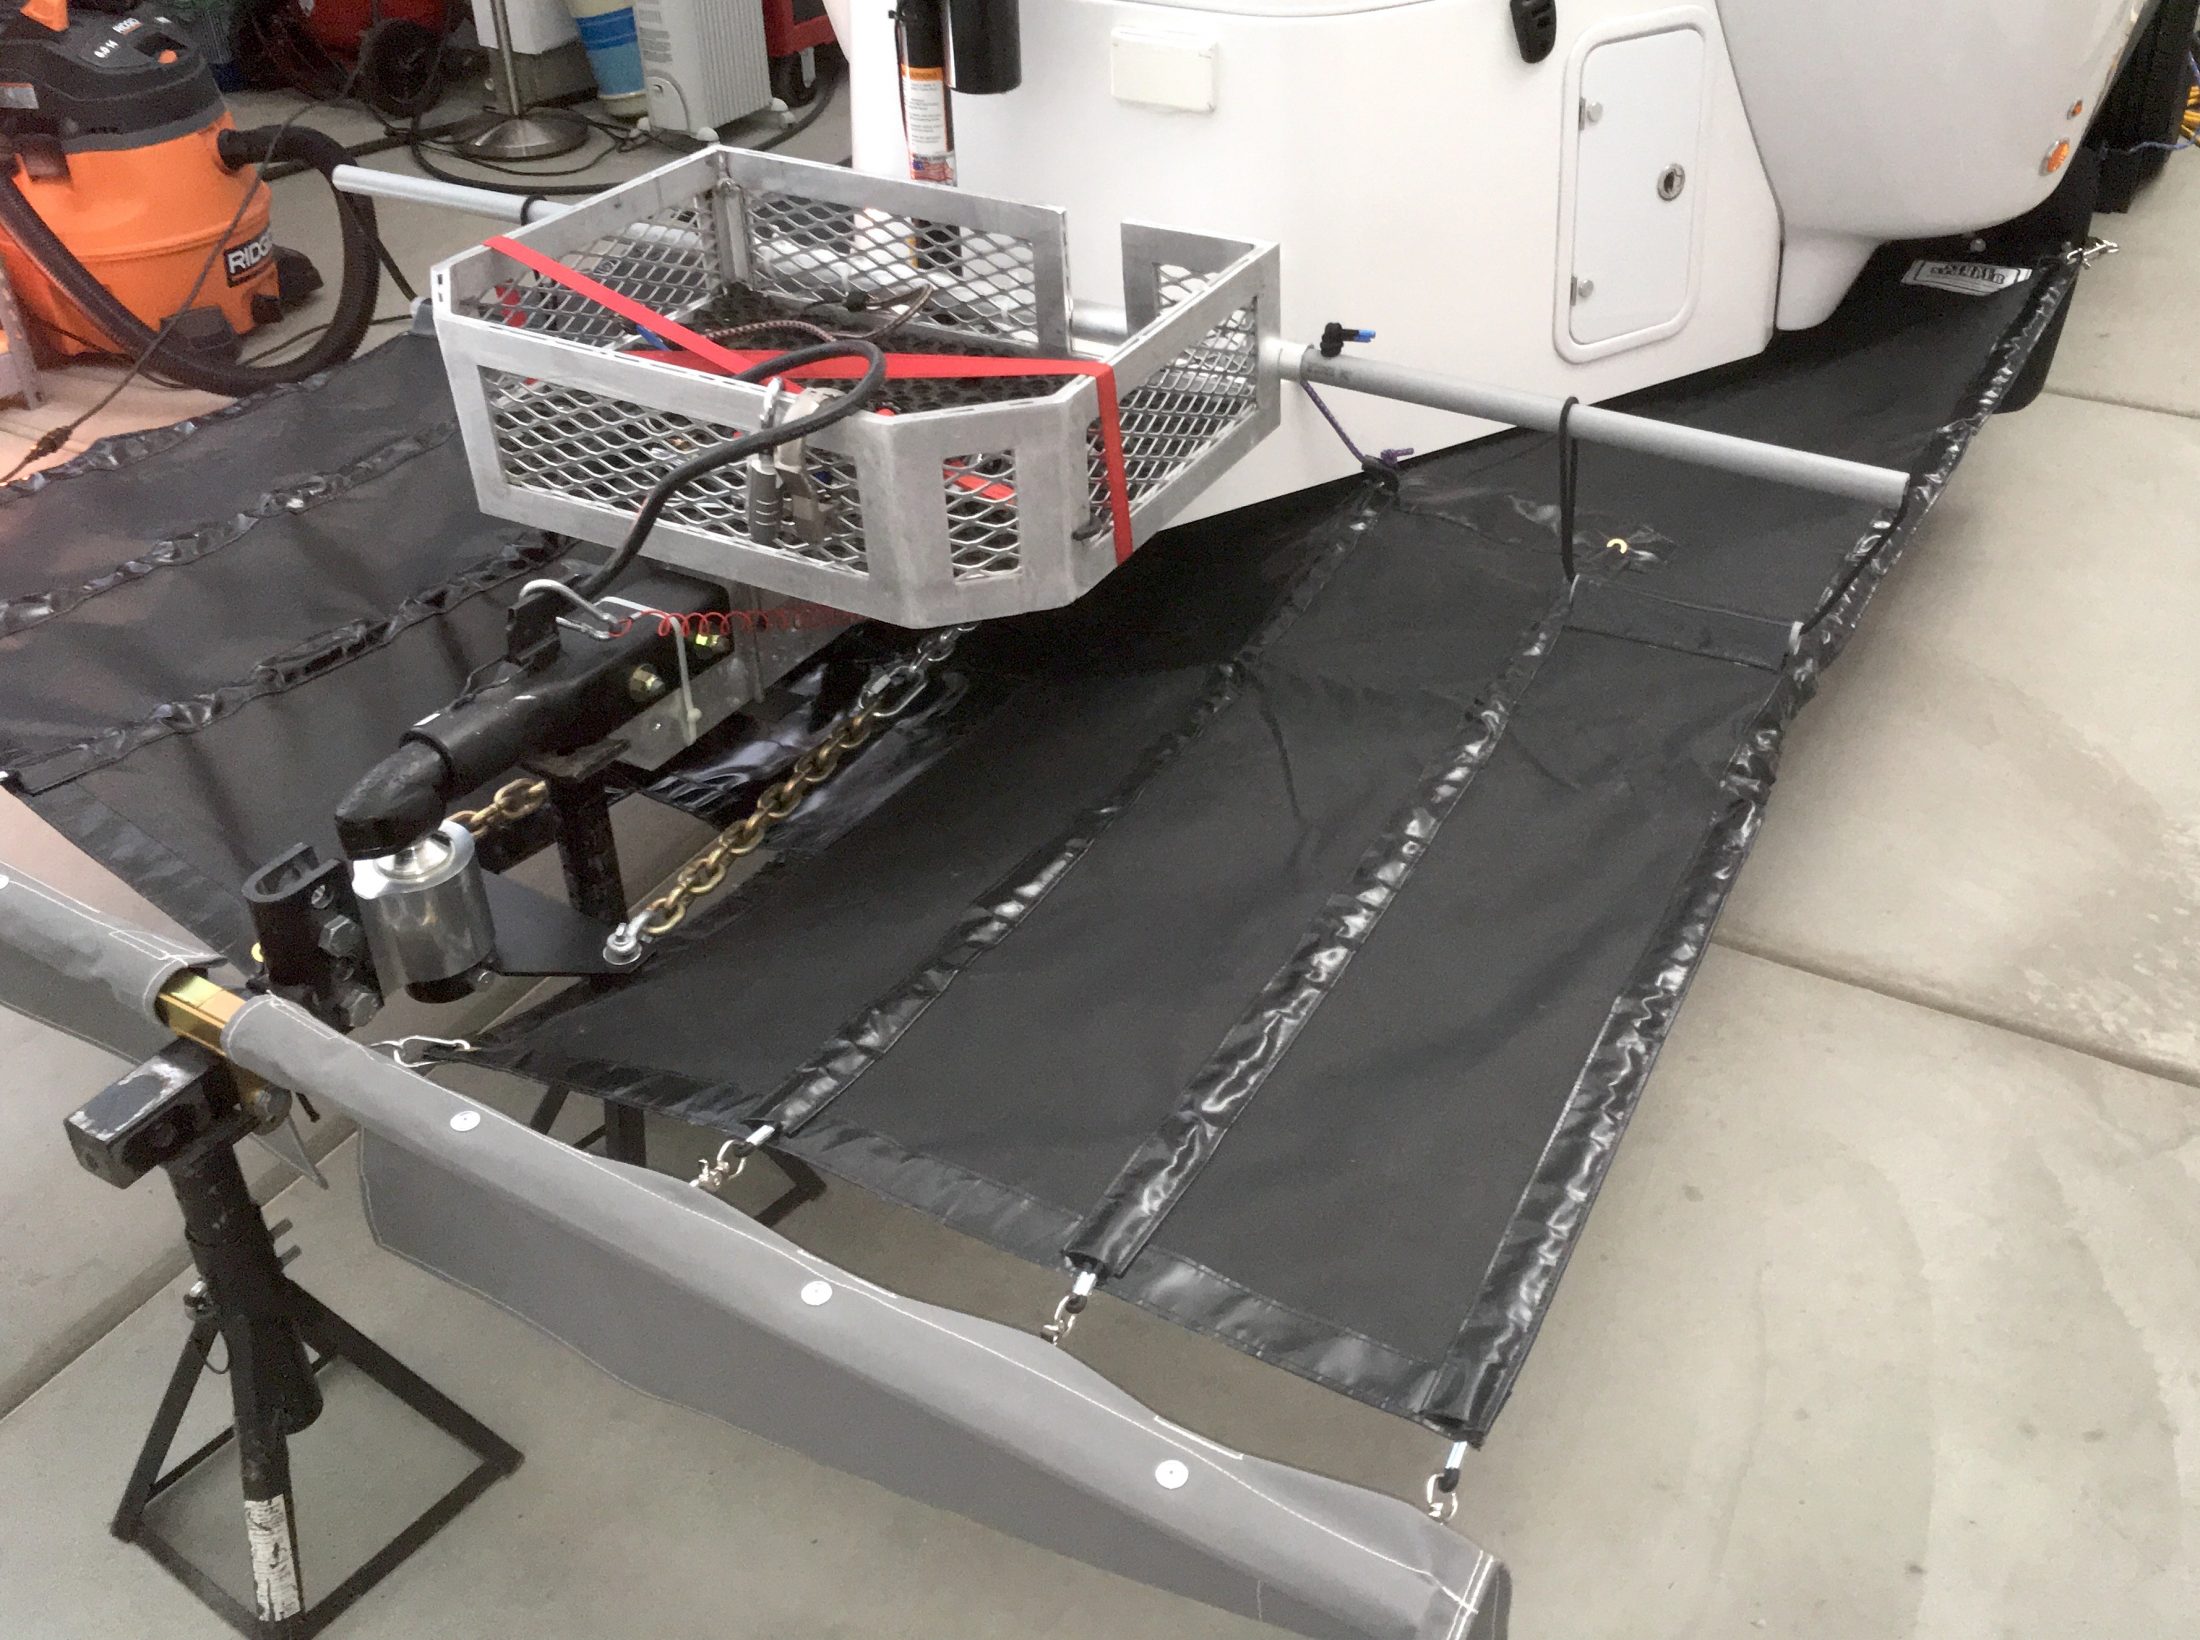
Four 1/4” SS bolts through 4 holes drilled in the bottom of the basket.1 point
-
Yeah in that first video where they show prying out the bearing.... it last all of 2 and a half seconds and that if you slow it down to 25%. It's almost as if they want it to be a big secret. Thanks for posting it though Jim. Scotty1 point
-
The trick is to be sure NOT to fill them to the brim, especially if you're draining the black tank. If you fill the tote to the top you still have a hose full of black water that has to go somewhere when you disconnect it. 🫢 That's why I went with 21 gallons. No way even a full black tank will overfill the tote. Our tote has the hitch hook to tow behind our truck. When I first got it, I filled it to capacity to check for leaks. That sucker was heavy - over 160 pounds - and lifting up one end to drain it wasn't easy. Fortunately, it'll only have about 15-16 gallons in it during actual use.1 point
-
NPS put this out on social media, in a humorous attempt to make more people aware of the dangers. Every year, we see reports of folks trying to interact or take selfies with wildlife, with disastrous and sometimes fatal results . None of us, I'm sure.
1 point
-
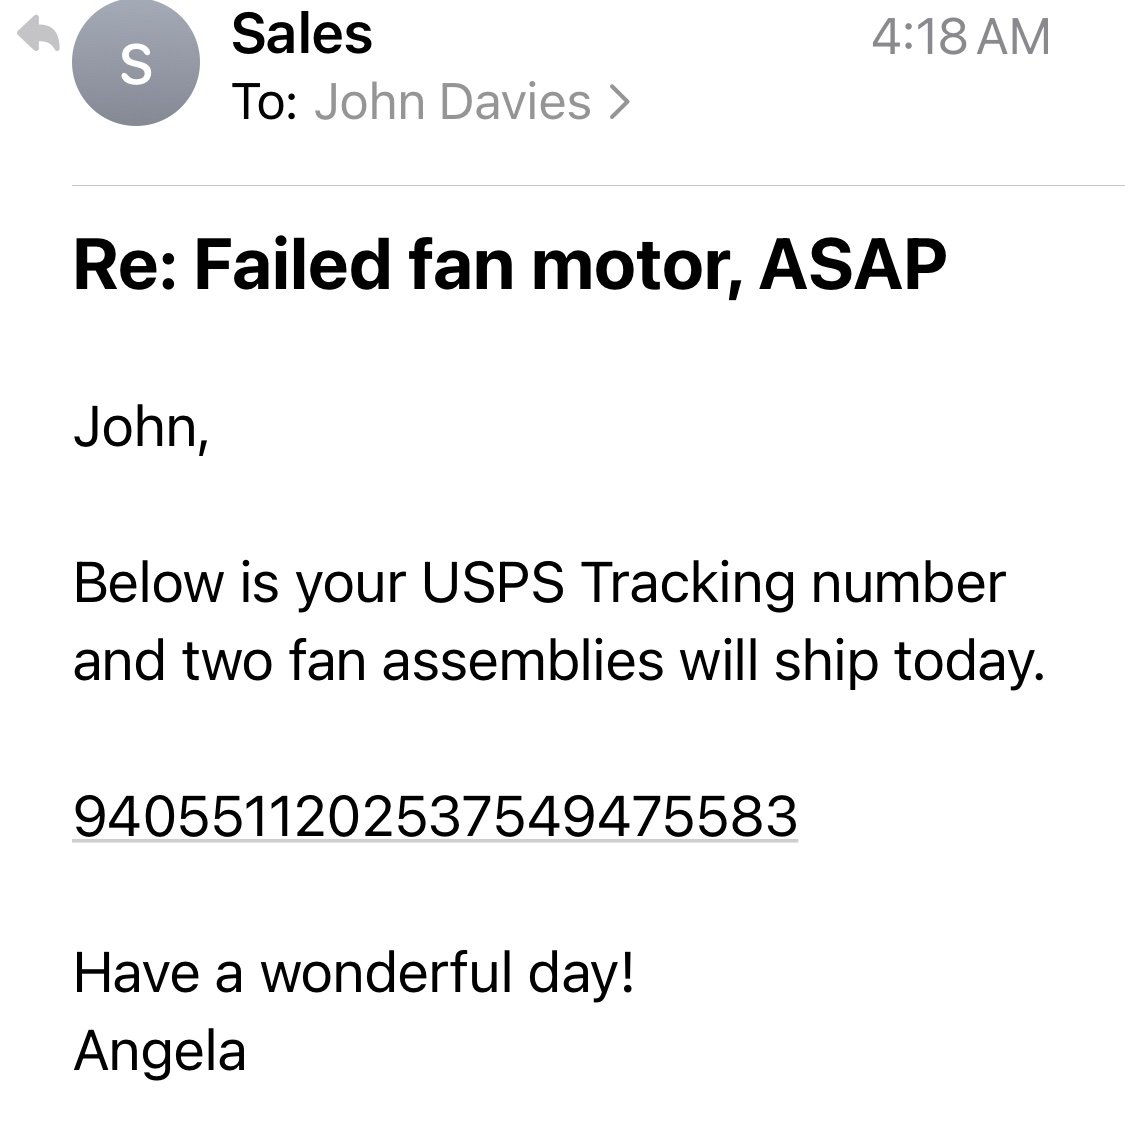
This is stellar service, kind of like the Oliver company. Note the time of the email. It was 7:18 AM (their time) when this got processed. And I only asked for one.😳 John Davies Spokane WA
1 point
-
John As Mike D. mentioned above the part isn’t on their web site to purchase. I would suggest you call them as I had the same experience with fast service when I spoke to them on the phone. Two new fans overnight free of charge. If all else fails my offer to ship you one of my spares still stands. Mike1 point
-
I did not have a fan failure yet, but I wanted a spare. I called Natures Head last year and ordered an extra pee tank and some replacement screens. I noticed the fans are not shown on their web site for order. I asked them why, and they said they would send me two of them for free. They did just that, excellent customer service. Also, for those that don’t know, the fan is direct wired before the circuit breaker (at least it is on my trailer). It runs all the time if not disconnected. You can remove the fuse, but I disconnect mine with the connector plug at the toilet when not in use, but only if the toilet is extremely clean and dry.1 point
-
Wow, David you are really organized. I'm impressed. We so rarely have any sort of reservations or a set itinerary. Sometimes we don't really know where we're headed until we get to the end of the street. Turn left we'll probably go North and East (maybe to Maine), turn right, probably West (Arizona, California...Alaska?) I do like the idea of keeping a log of what we do each day, but neither of us is motivated enough to actually write it. Thanks for the info.1 point
-
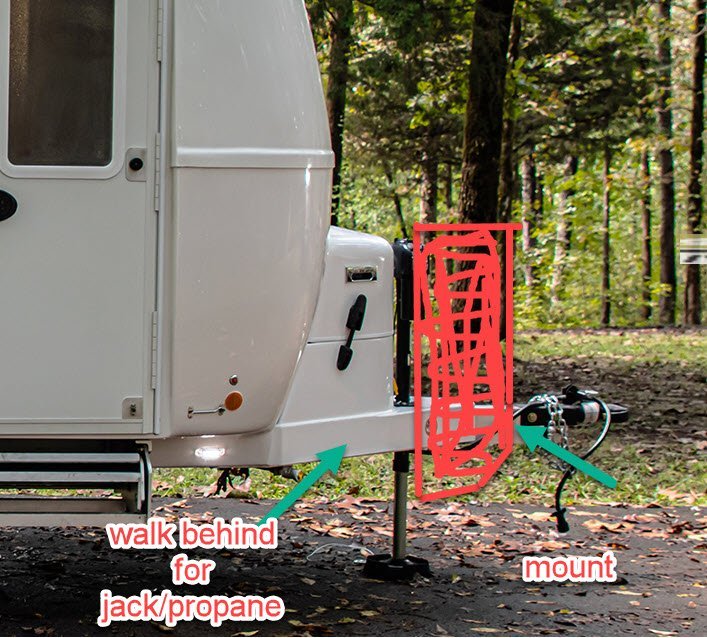
Has anyone installed one of these? We pick up our Elite 1 in July and I'm about to order one to test it out. On the Bow Buddy 90, the vertical support is straight up, as apposed tilted forward 20 degrees like the standard Bow Buddy's. Our Elite will not have the storage basket, so we will have plenty of room to mount. From my measurements we should have PLENTY of room to access the propane tanks/front jack. Measurements are 96" wide and 35" high. Just to confirm, the tongue beam measures 3x5? Also, all of the Bow Buddy's hardware is stainless, so if not provided, I plan to add spacers to prevent Stainless/Aluminum contact. Hopefully preventing any corrosion.
1 point
-
Correct. We ordered without the storage box. I don't believe it would work with the storage box installed.1 point
-
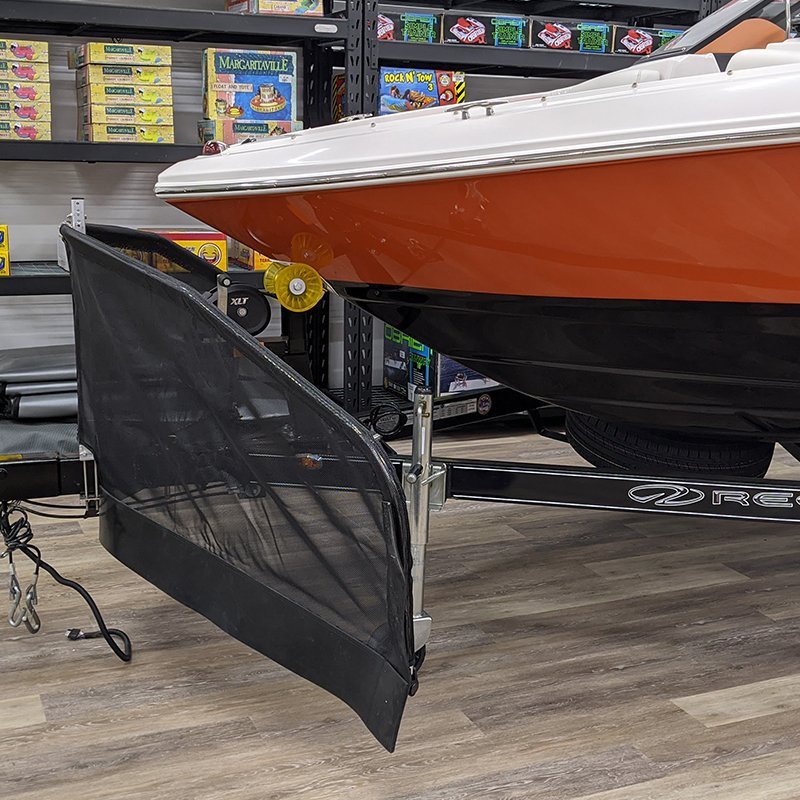
I just placed an order for the "Original Bow Buddy" that is like the 90 posted in my original post, but the vertical support is angled at 70 degrees toward the TV. (see photo attached). This should help push debris down toward the road. (and not back at the TV or oncoming traffic) The price was $760 (plus shipping), which makes it almost double the mud flap style rock guards. BUT because it stays mounted on the trailer, it was a huge plus that multiple tow vehicles can use it and takes a step out of trailer set up before a trip and storage after. Also justifying the extra cost is the better protection I'm expecting than traditional mud flaps. We take deliver of our LE in July, so it will be a few months before it can be tested. I will keep everyone updated on how it works out!
1 point
-
This is exciting! Looks like it will really be a game changer!!1 point
-
This will definitely be an asset for people who really need high speed data when camped. Thanks for the link, @John E Davies.1 point
-
I agree. I spoke with the company directly on Friday and the material on the vertical mount is "loose" to avoid debris bounce. And the wings will have flex as they are only attached in the center, which should absorb impacts from anything larger than a pebble. But well see. I might take the plunge and test it out. If it doesn't work/fit as planned ill try to sell it to a someone with a boat.1 point
-
Excuse my not to scale illustration, but from my measurements/estimates it should leave plenty of space to access the propane/jacks. Assuming about 18"-24" sweep back and the 96" width... I'm guessing more than 24 Inches between the Bow Buddy wing tip and the hull; allowing plenty to walk behind to access the propane/jacks.
1 point
-
Yes, I've looked at your stone stomper post, and that is ideal. I'm just looking for a simpler bolt-on solution. These Bow Buddys are made in Canada, and not yet very popular in the US. Four Bolts clamp to the trailer. This is the only real demonstration I found online: They do offer a version angled forward like your photo, but the advantage of the vertical mount is that the post will not interfere with your TV's tailgate/hatch door. This is more pronounced on the Oliver due to the shorter tongue as apposed to boat trailers. Once you move away from the center point the screen is curved enough that debris should deflect to the left or right (into oncoming lanes of traffic) and not back at the TV.1 point
-
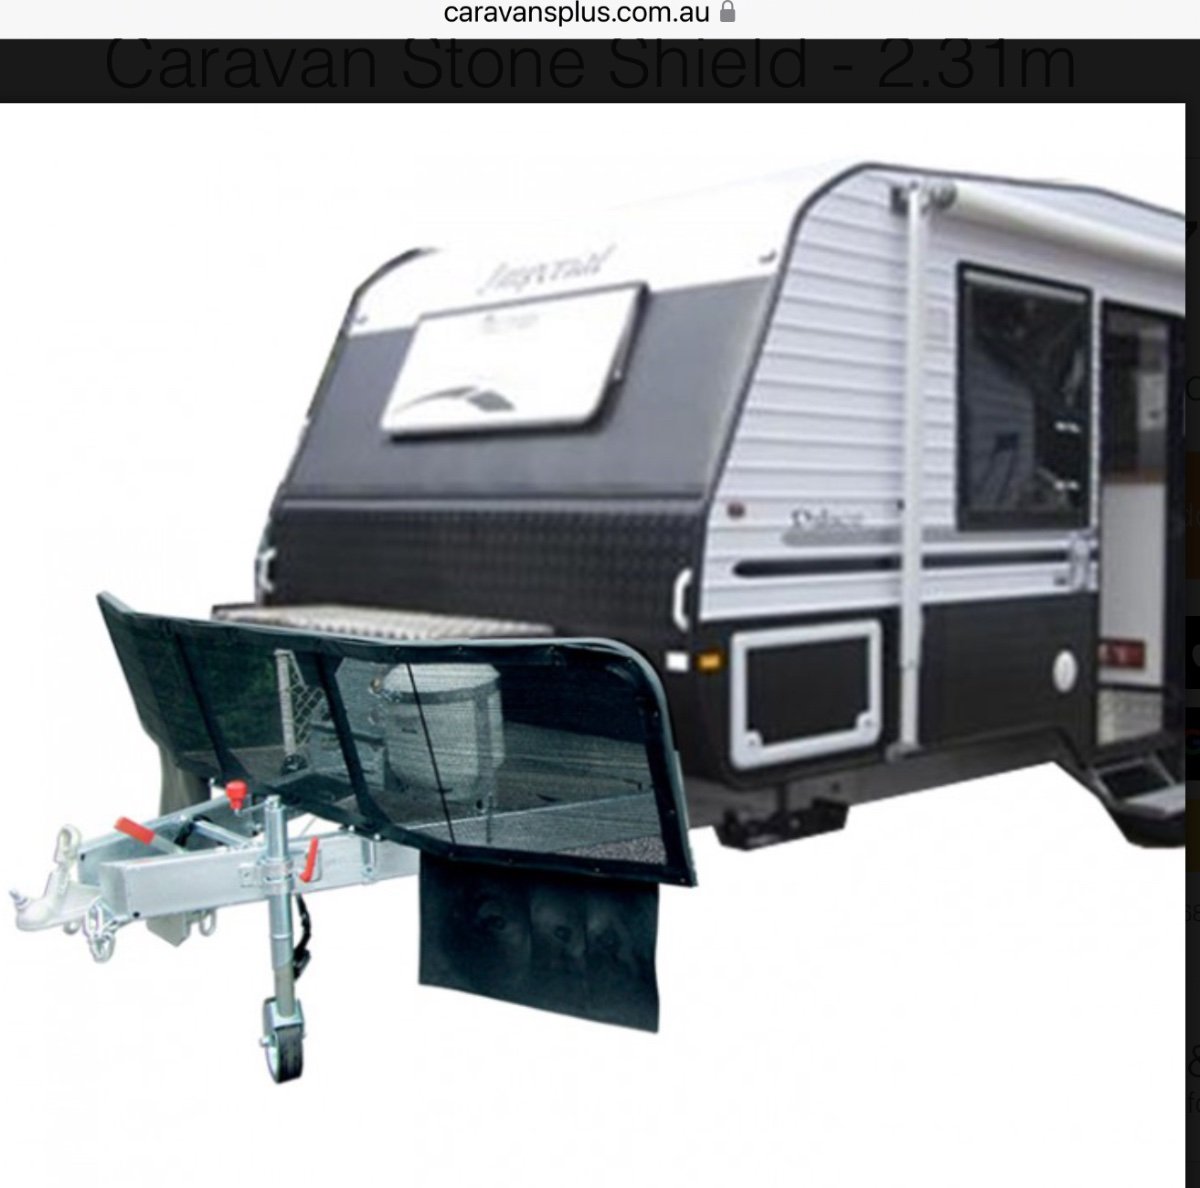
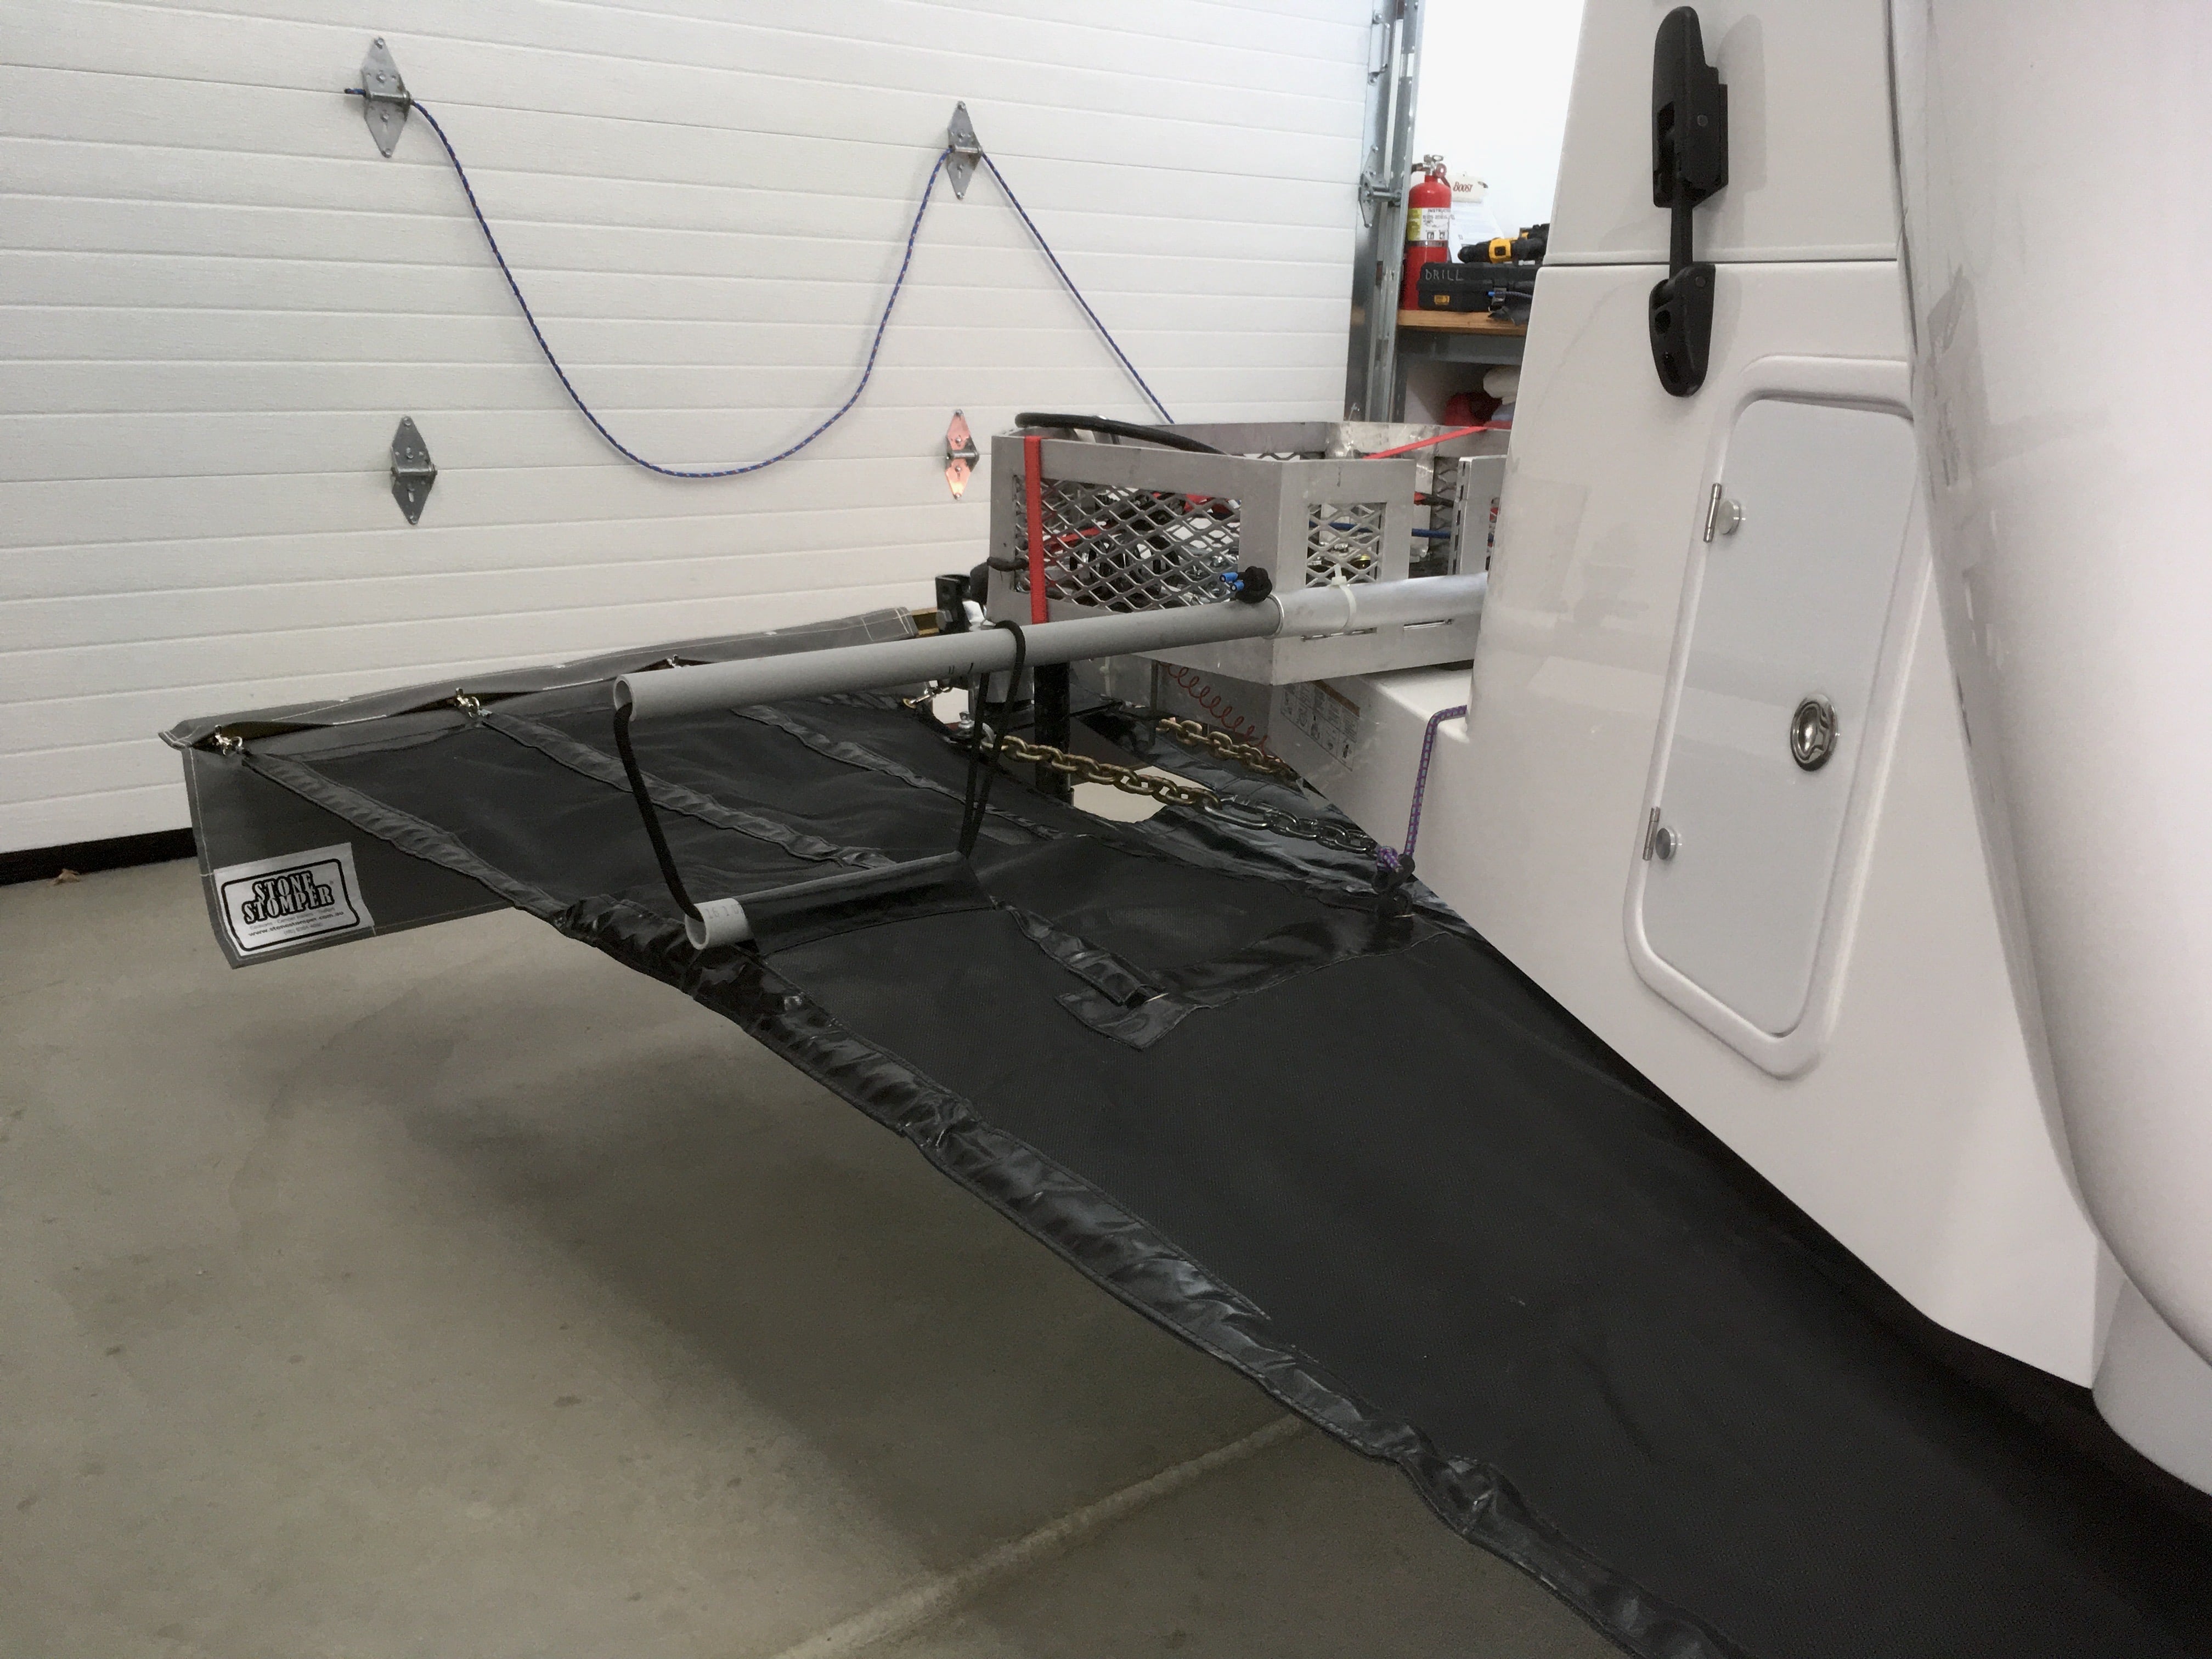
I like the protection it gives, I dislike the design. It will block access to your jack and propane bottles, and your getting underneath to add blocks. and also make it will hard to get stuff out of your truck cargo area. The Aussies use these a lot, but they tend to be mounted quite far back and angled down, to deflect stones onto the road instead of sideways into oncoming traffic or back into your TV tailgate and glass. Like this one: I don’t know how the Rock Buddy mounts, does it just clamp at the front of the tongue? Do you have a dimensional drawing or instructions? I researched all sorts of gravel guards and ended up with a Stone Stomper, it has been superb in keeping the tongue and front of the trailer chip free and clean, and also the back of the TV. In heavy rain at 60 mph the back glass stays dry! After five seasons there are only a handful of tiny gelcoat chips, from stuff thrown up by oncoming traffic. https://olivertraveltrailers.com/forums/topic/2504-how-to-stone-stomper-gravel-guard/ John Davies Spokane WA
1 point
-
If you can see the point and can reach it with something like a small disposable paintbrush you can paint some of the dish soap plus water on the area and if there's a leak you'll almost certainly see bubbles appearing fairly quickly there, and they will keep appearing even if you brush them away so long as the area stays wet.1 point
-
True. I have not tried to pinpoint mostly because when I get in the general area, there are really only a couple of points/joints where the leak is most likely to be coming from, well at least the points that I can see. More detailed investigation would likley mean pulling things apart, and I would rather an authorized repair person do that since everything is still under warranty. But I do have a little squeeze bottle I can use for leak detection -- used it when we installed the gas stop valves before I bought the sniffer. I'll throw that in the toolbox. Can't hurt to have on the road. Thanks!1 point
-
Frank: I like your approach of having two safety supports at the tire change side. In addition, I only jack up my OE2 ATTACHED to my truck. Parking brake set of course. So, should something upset the apple cart, I'll have three safety points. Nothing like having a 6,000 pound truck as an anchor. 🙂 GJ1 point
-
I have been sitting in sunny and warm Florida the past 3 weeks, thinking about my low water pressure in bathroom. After buying, trying, and returning a new faucets bought from Amazon. I decided to dig deeper into a solution to my problem based on recommendations from this page . I use a portable soft water softener about 50% of the time. I will now use it 100% of the time! I went to the local Wally World and bought 3 gallons of white vinegar. I told my wife that I would decalcify the water lines . I told her that I thought there was less than a 50% chance this would solve the problem since I use a water softener half the time. Boy was I wrong! The vinegar worked its magic. Now, I have great water pressure. Thanks for those who contributed. I hope by posting this solution it will help those in the future! Thanks again! PS- The links to faucets from Amazon that Dave Wilson and Frank C were awesome!1 point
-
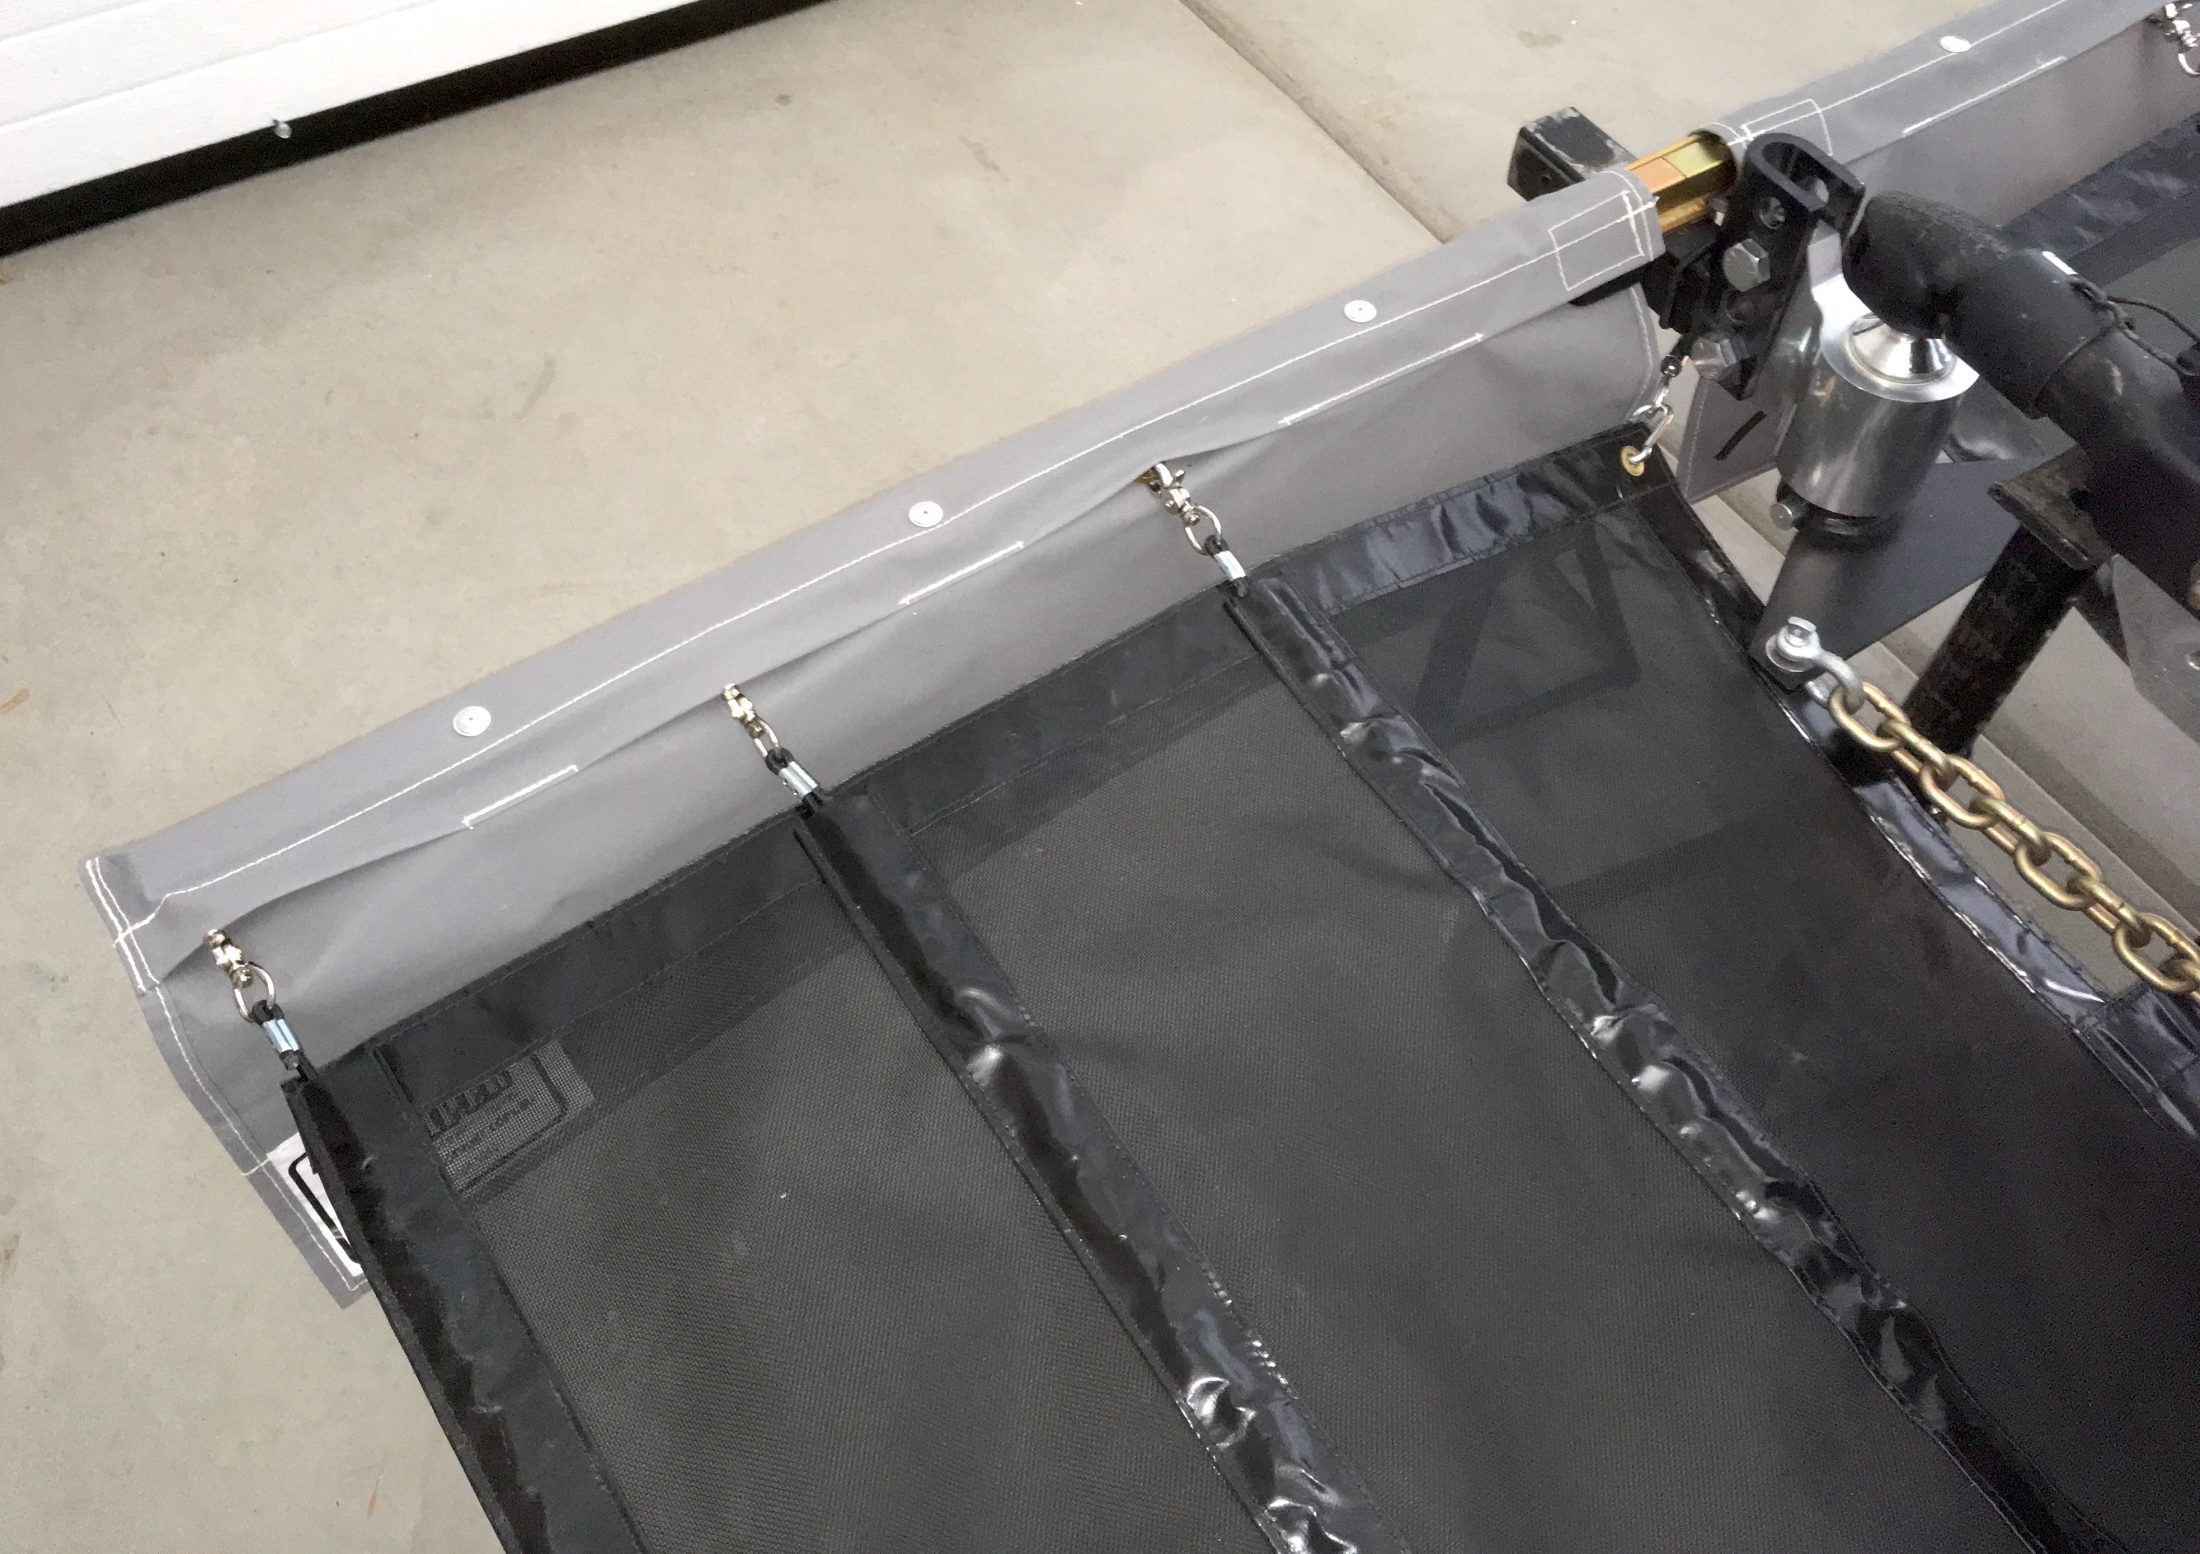
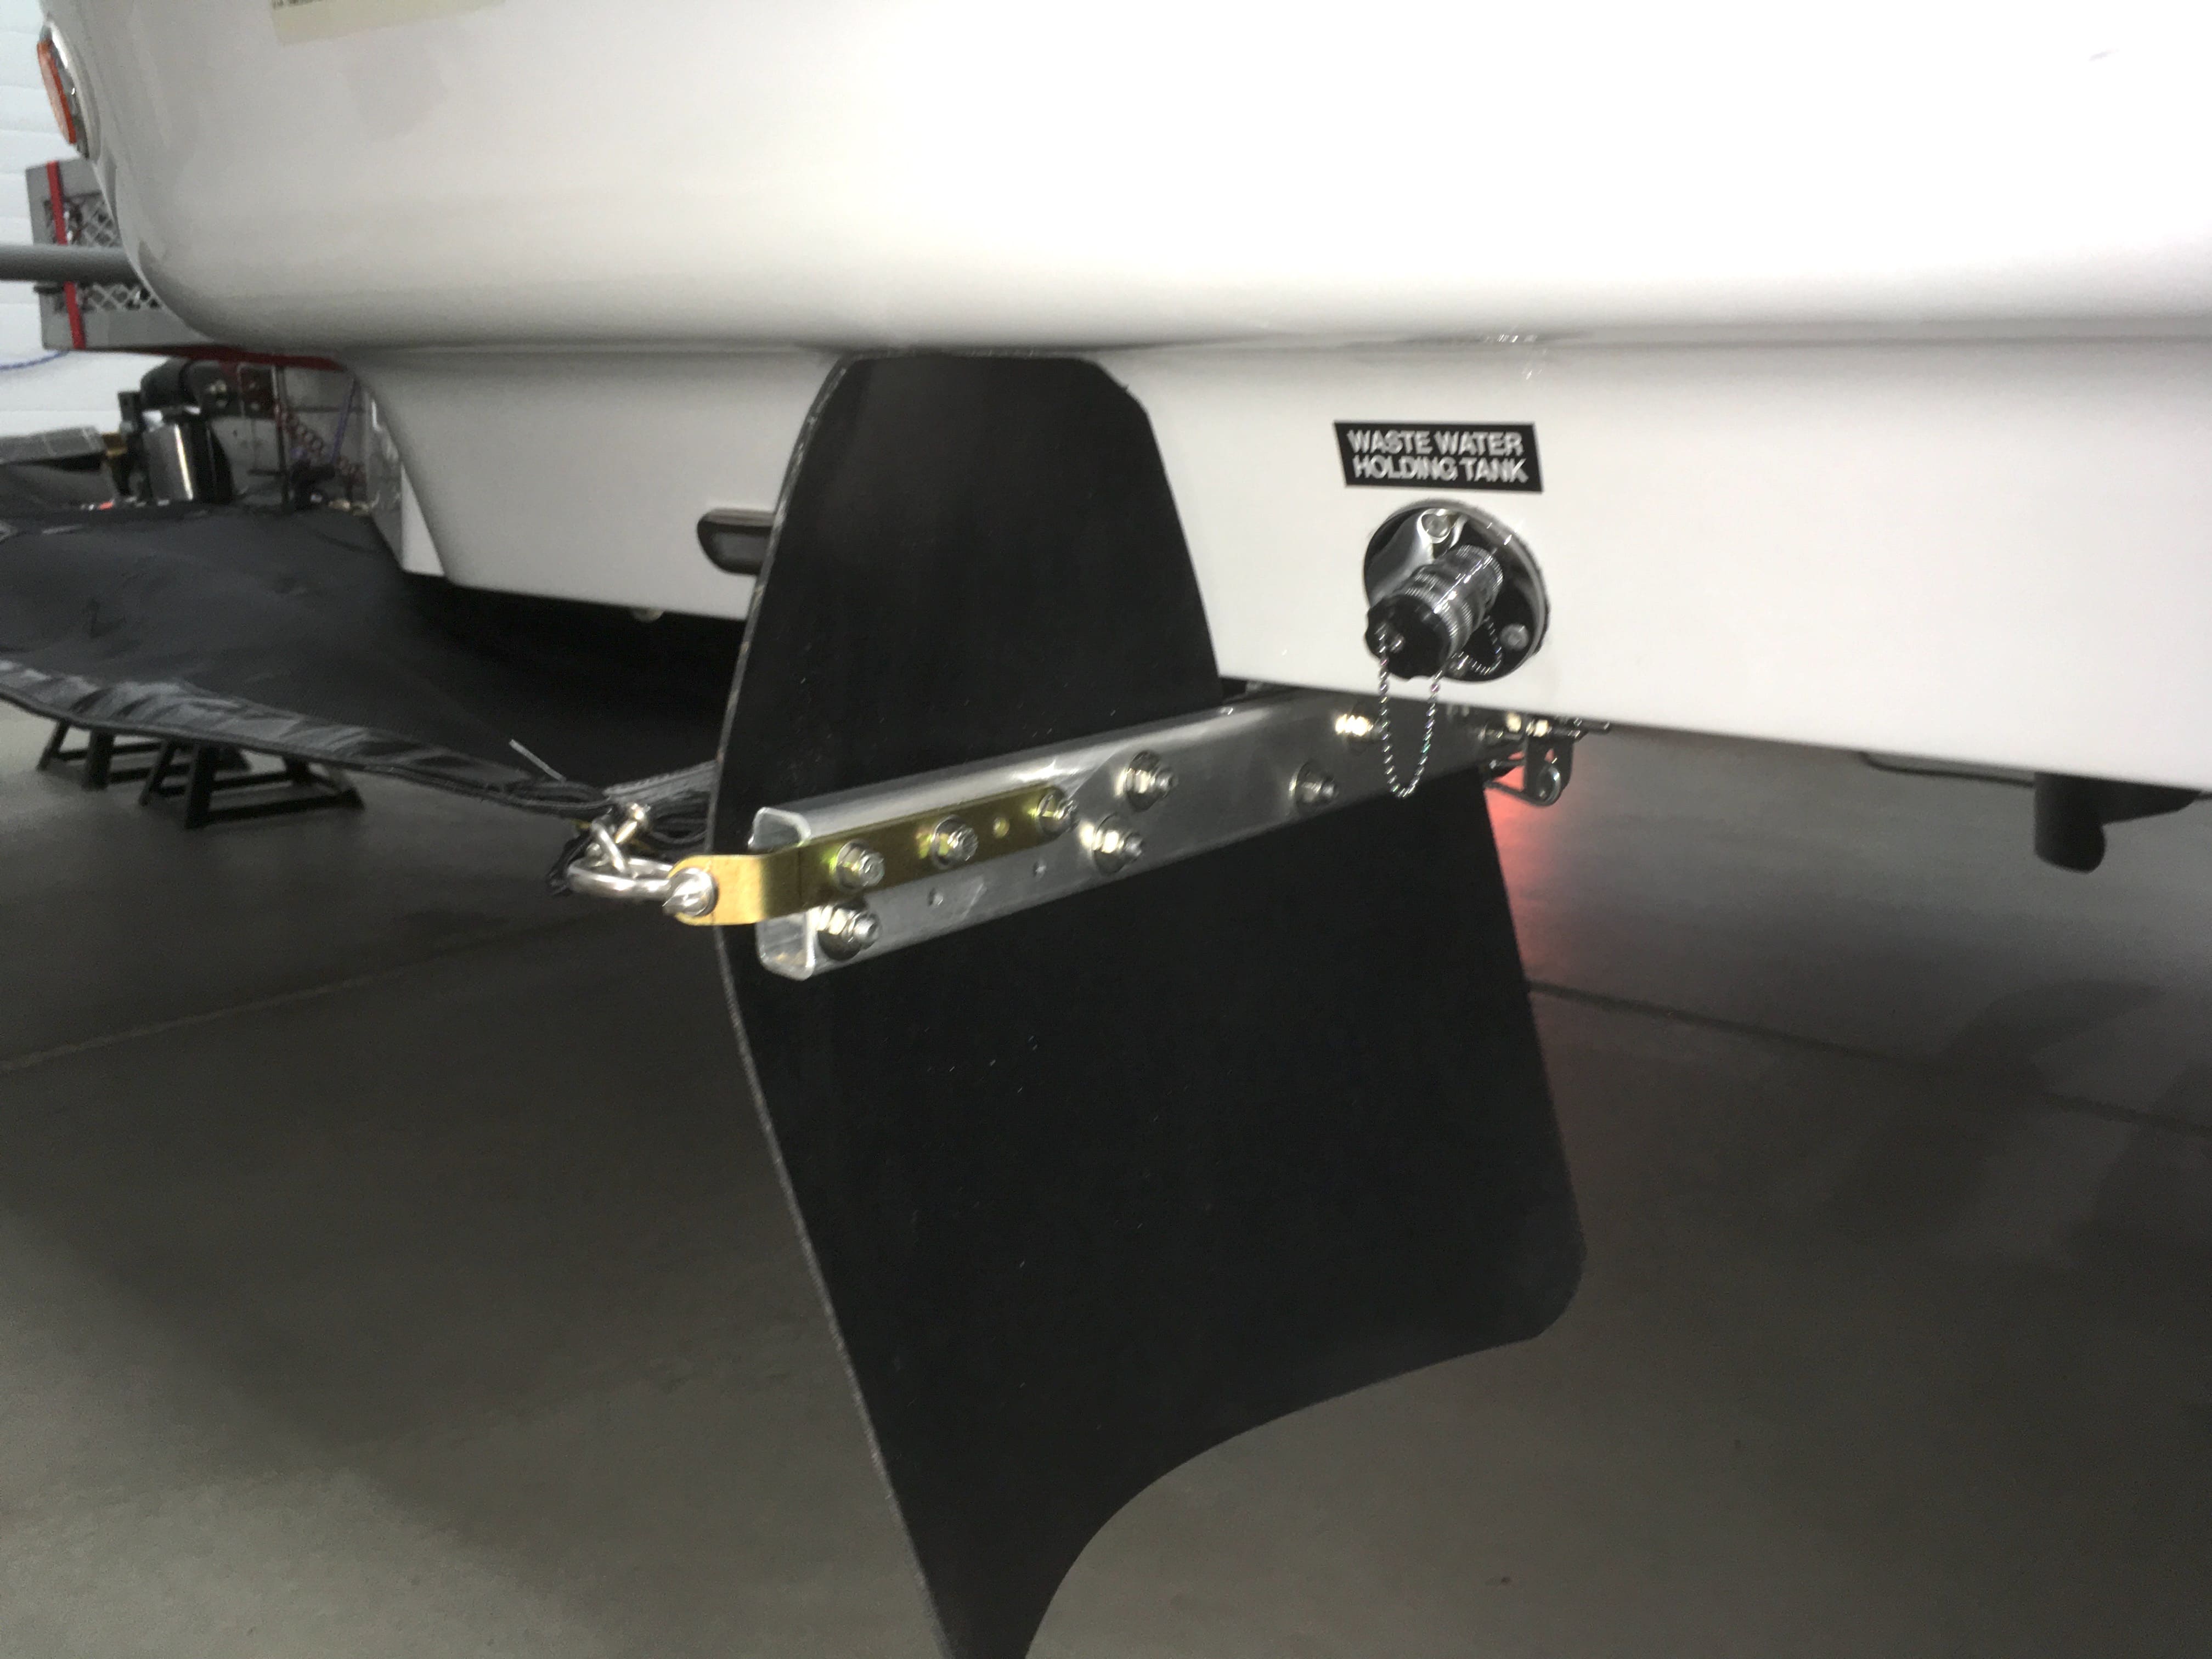
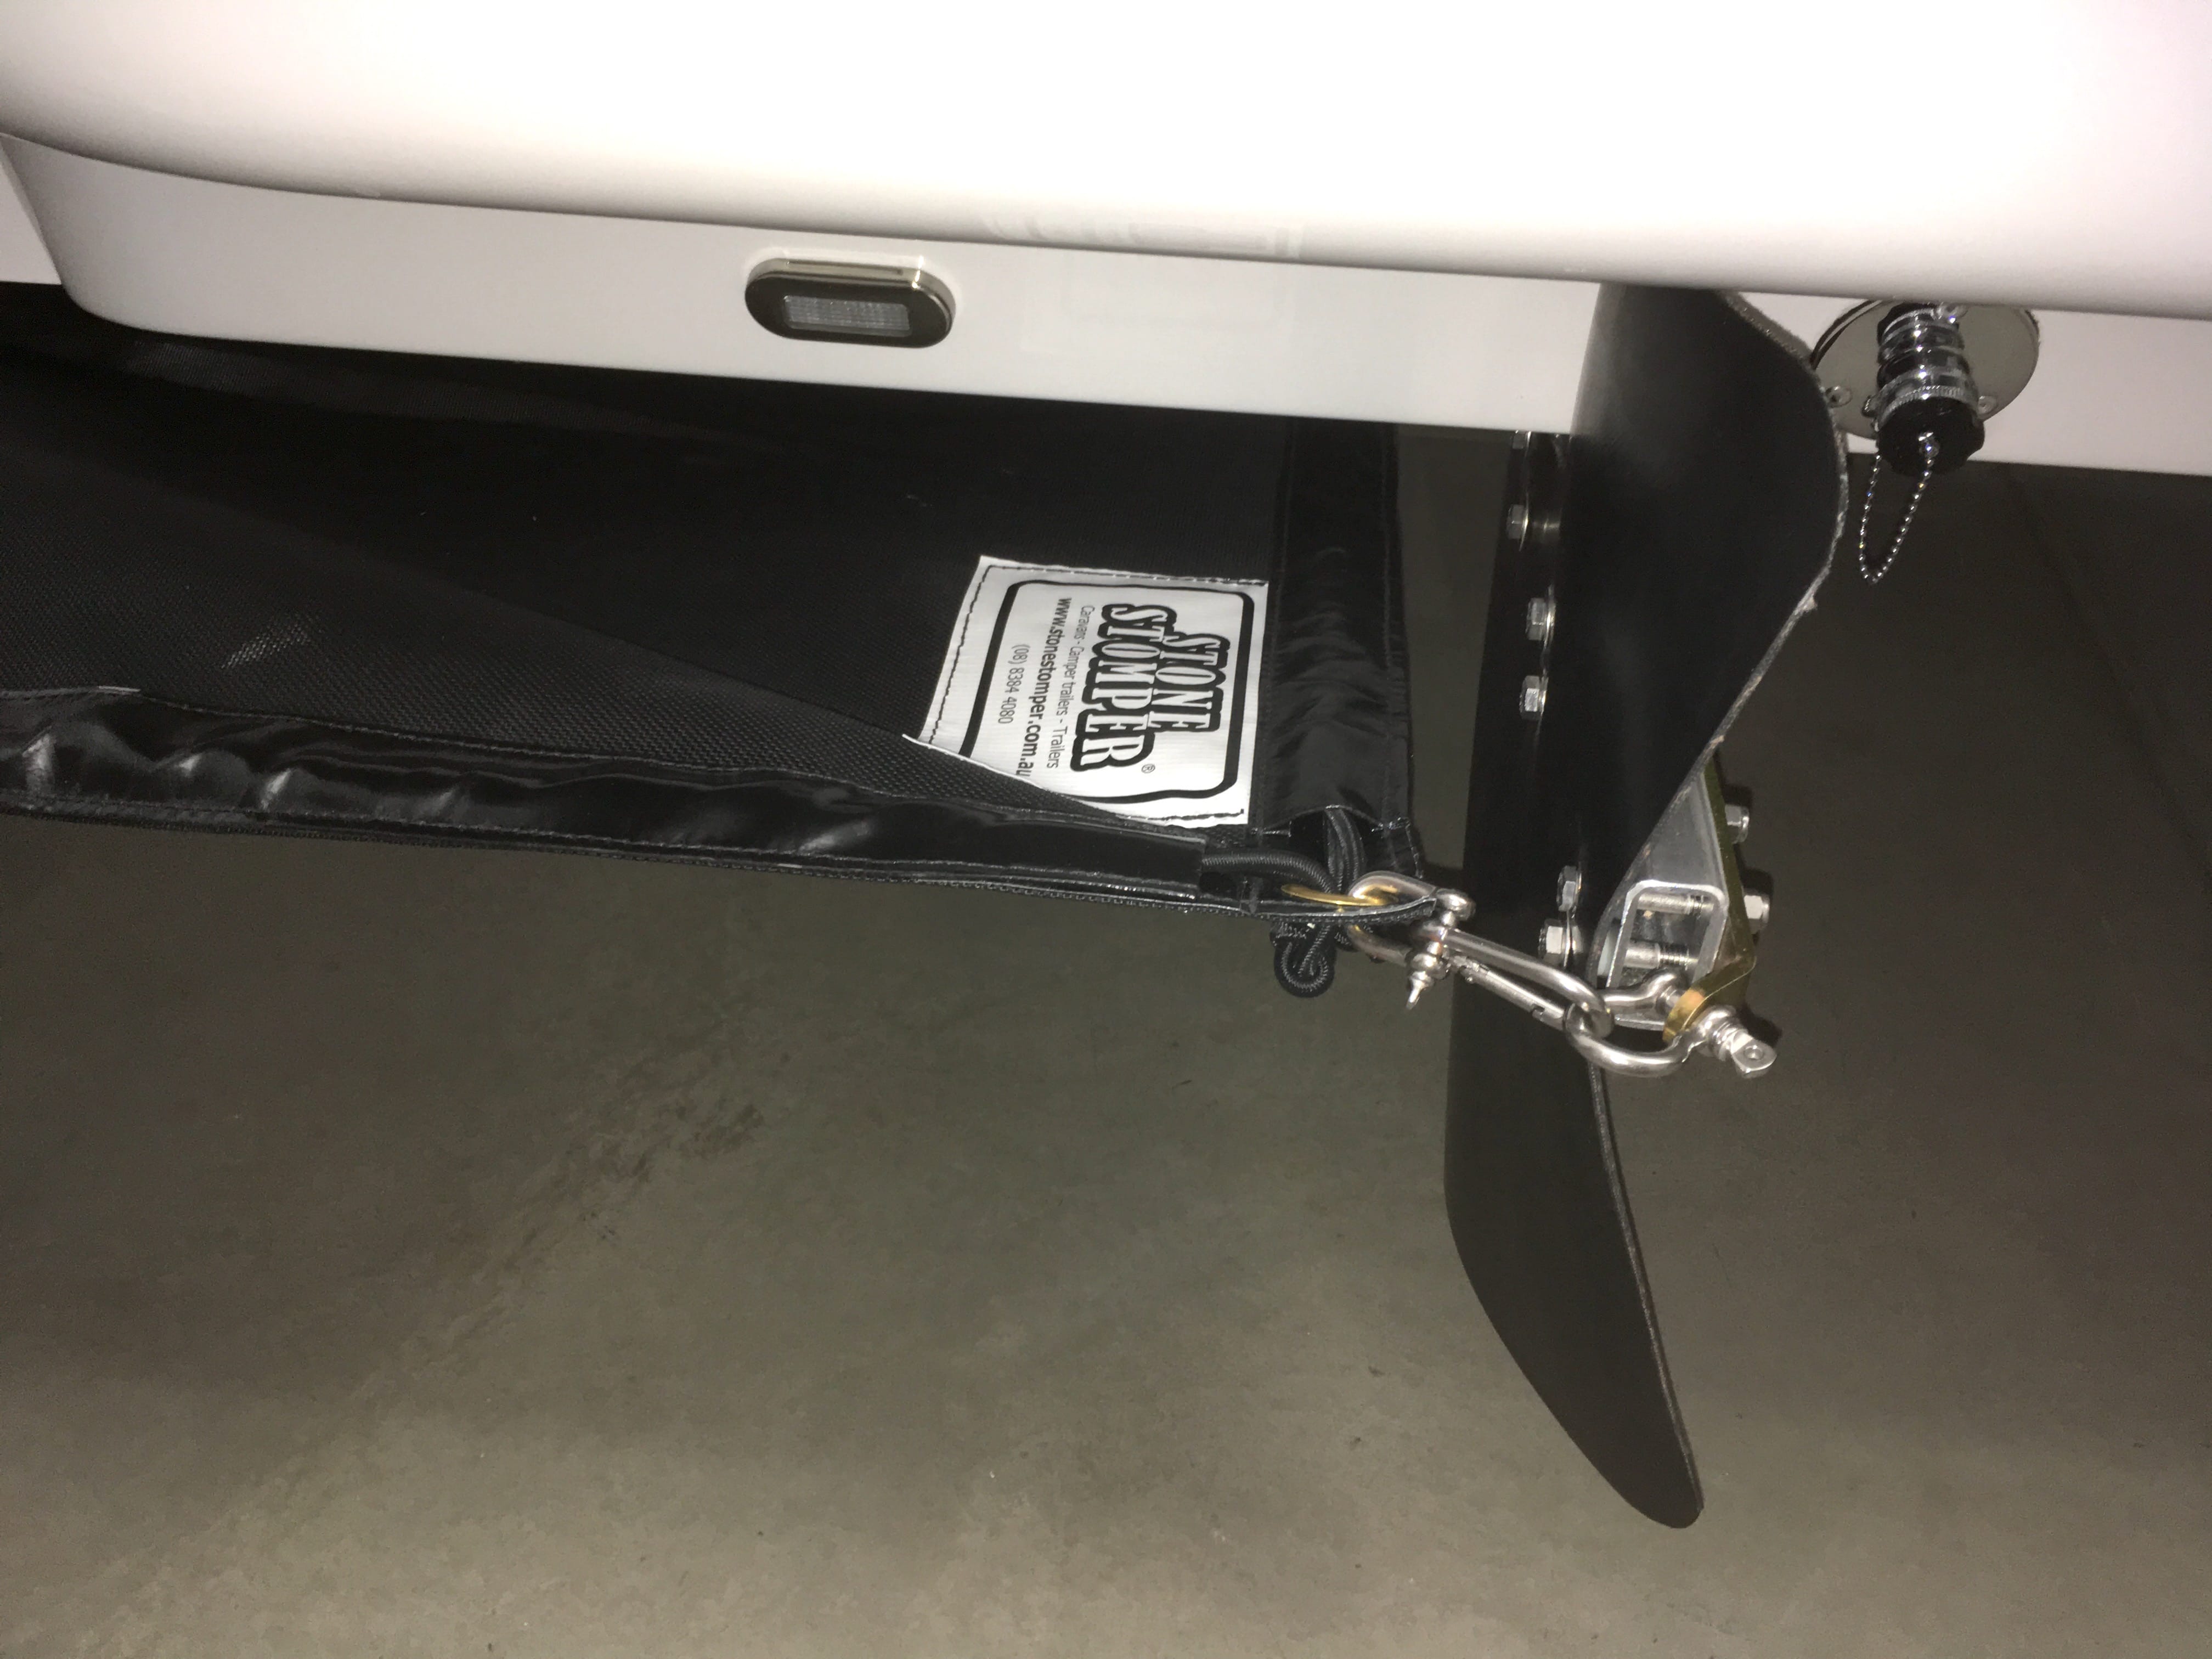
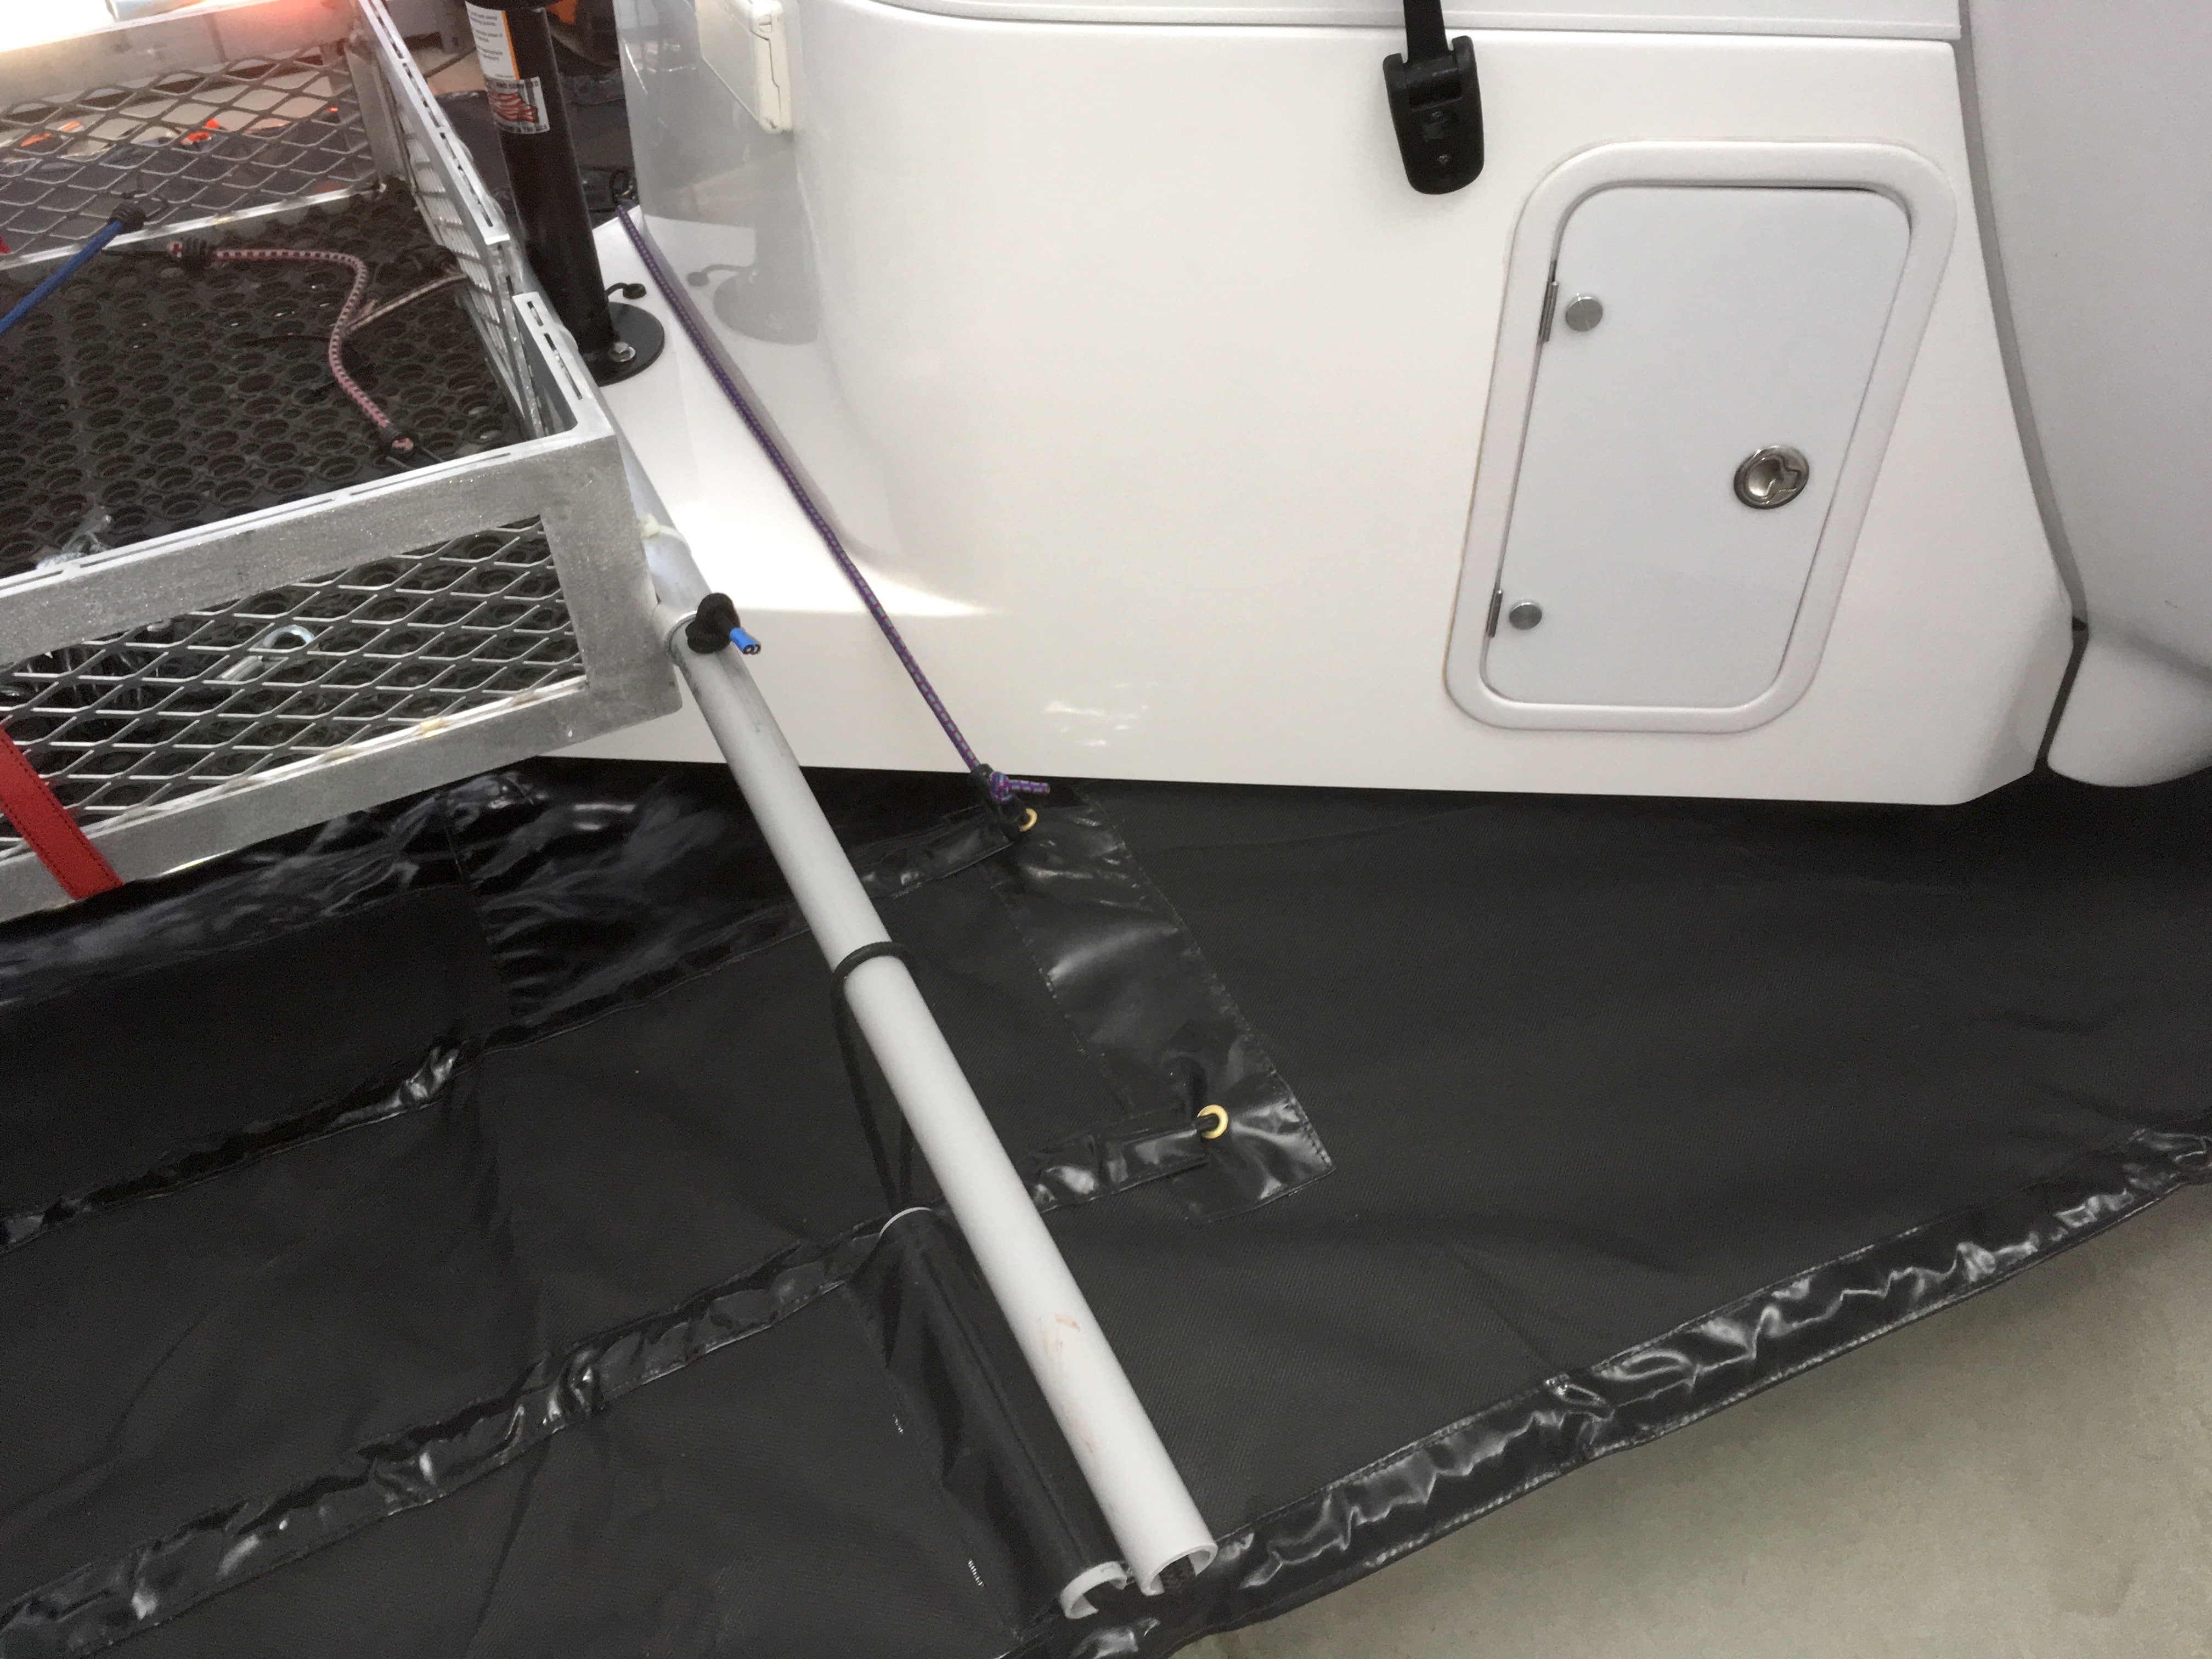
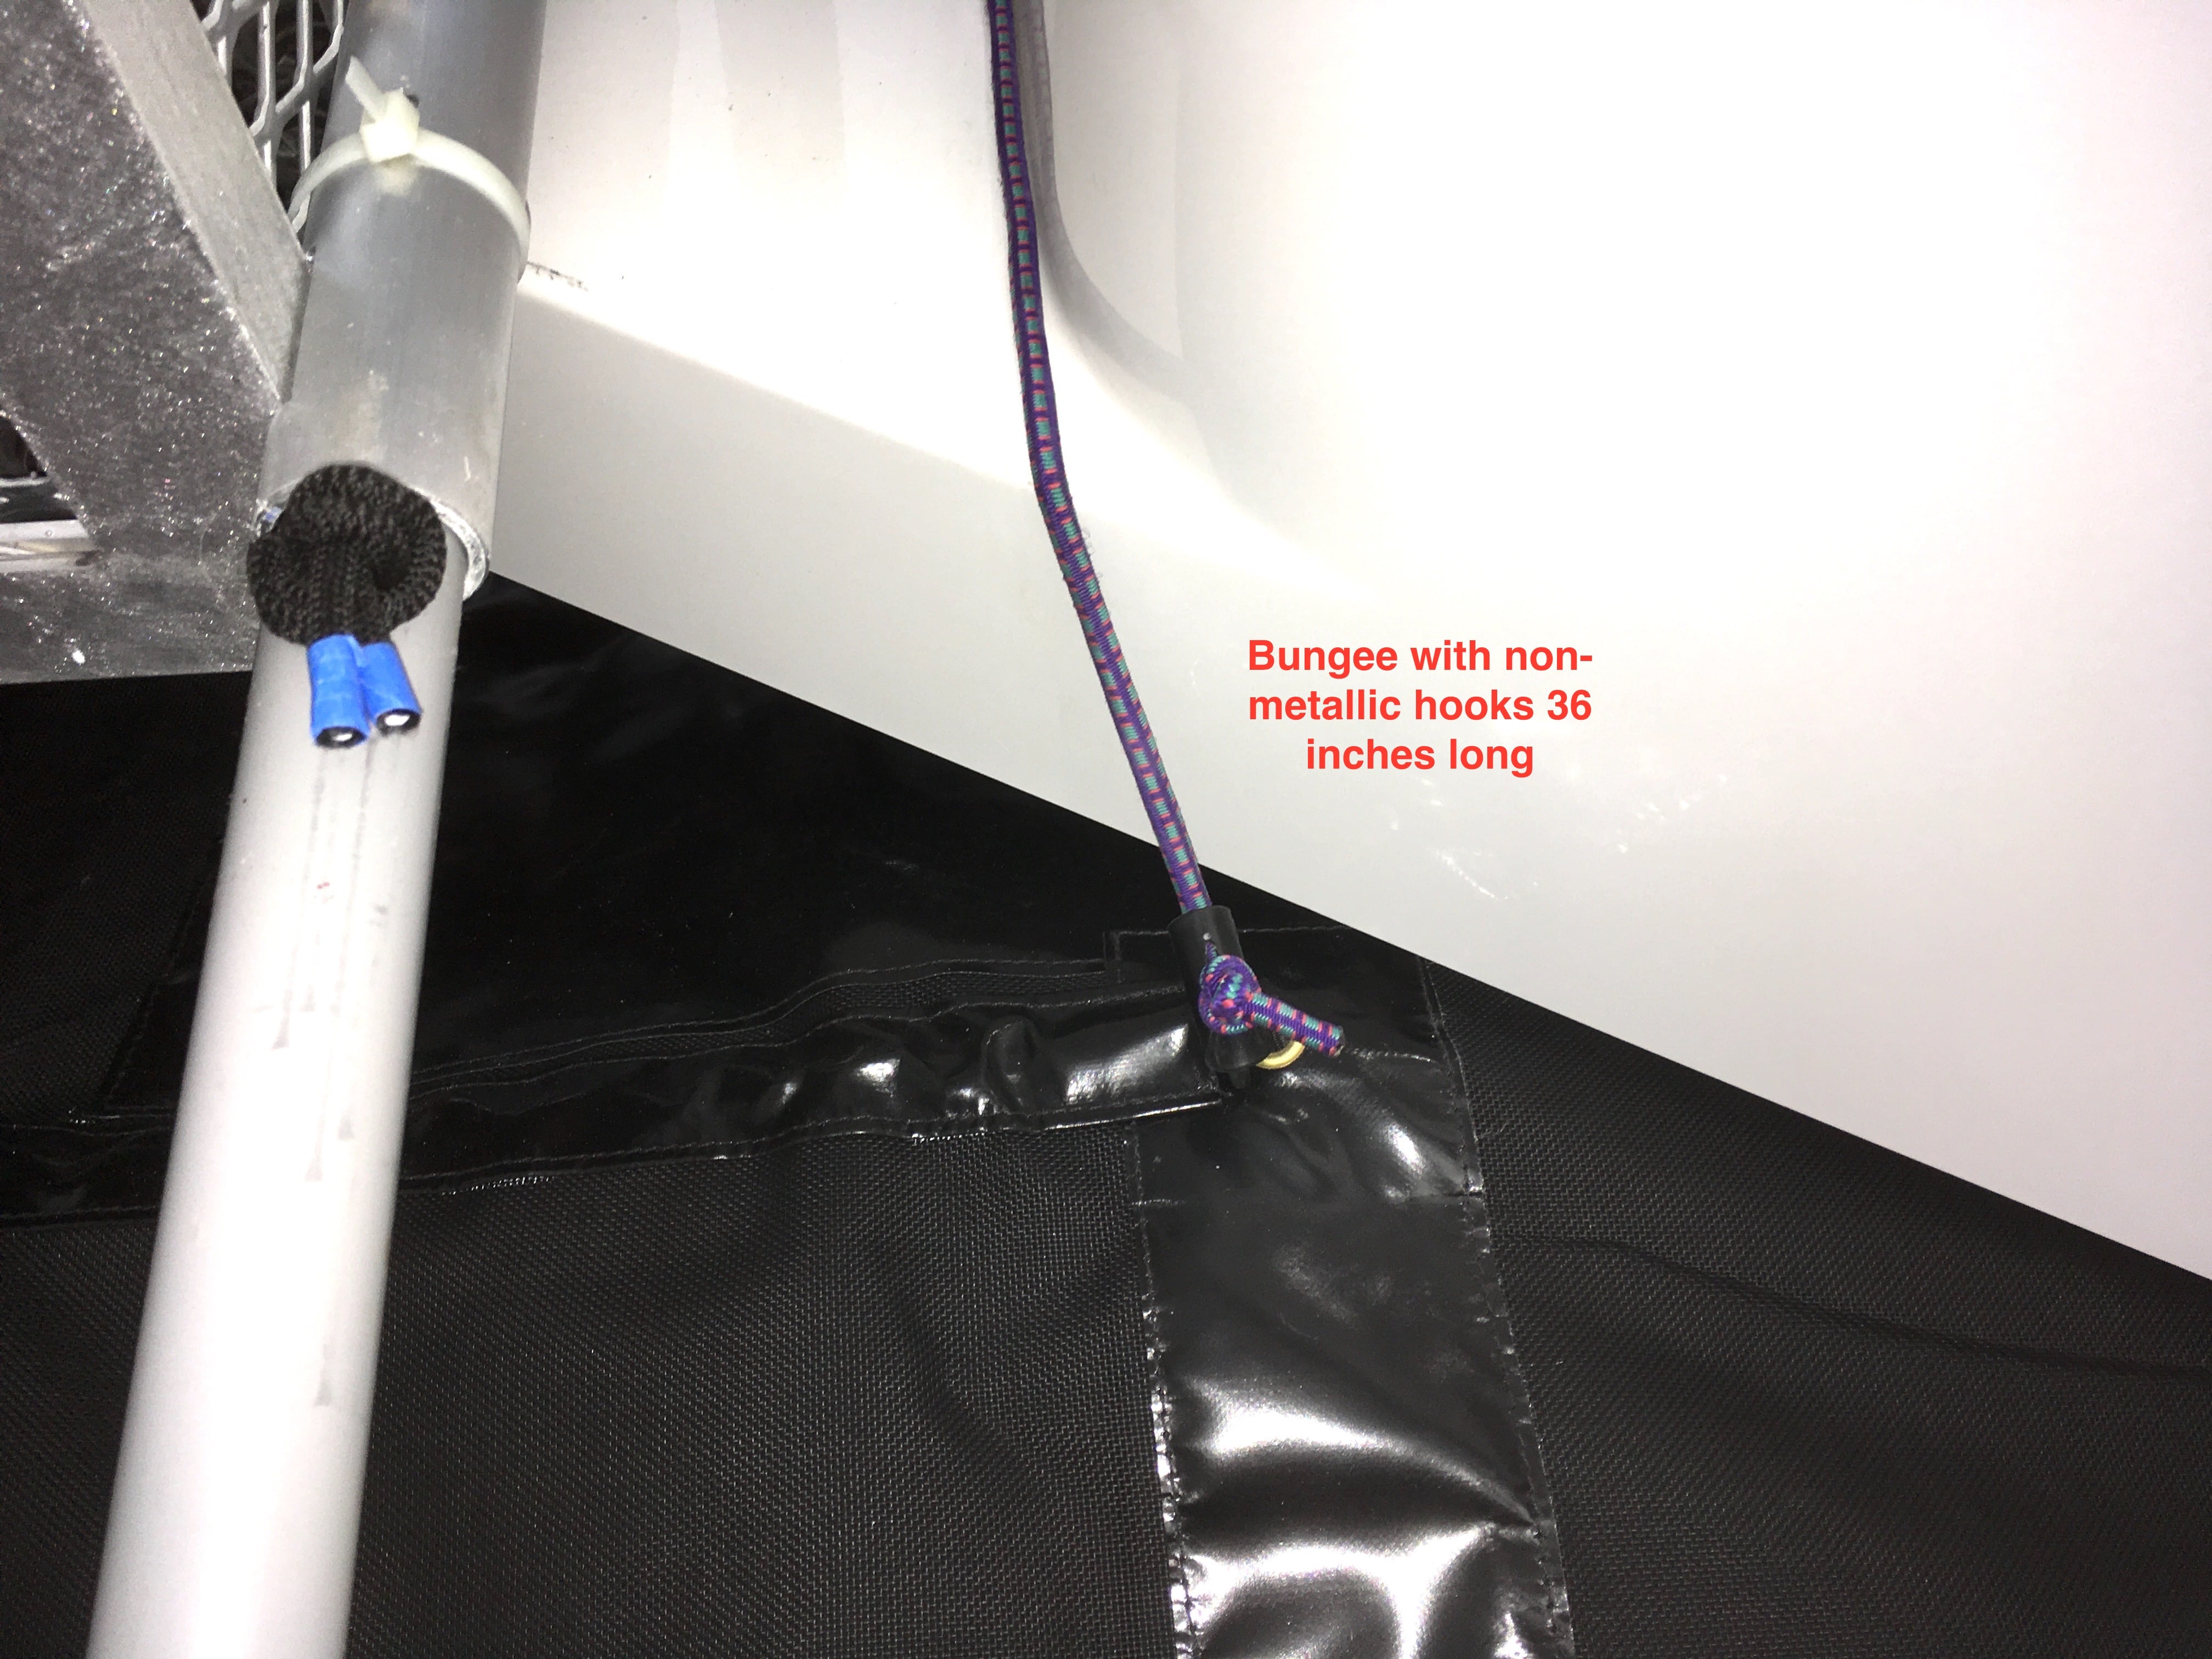
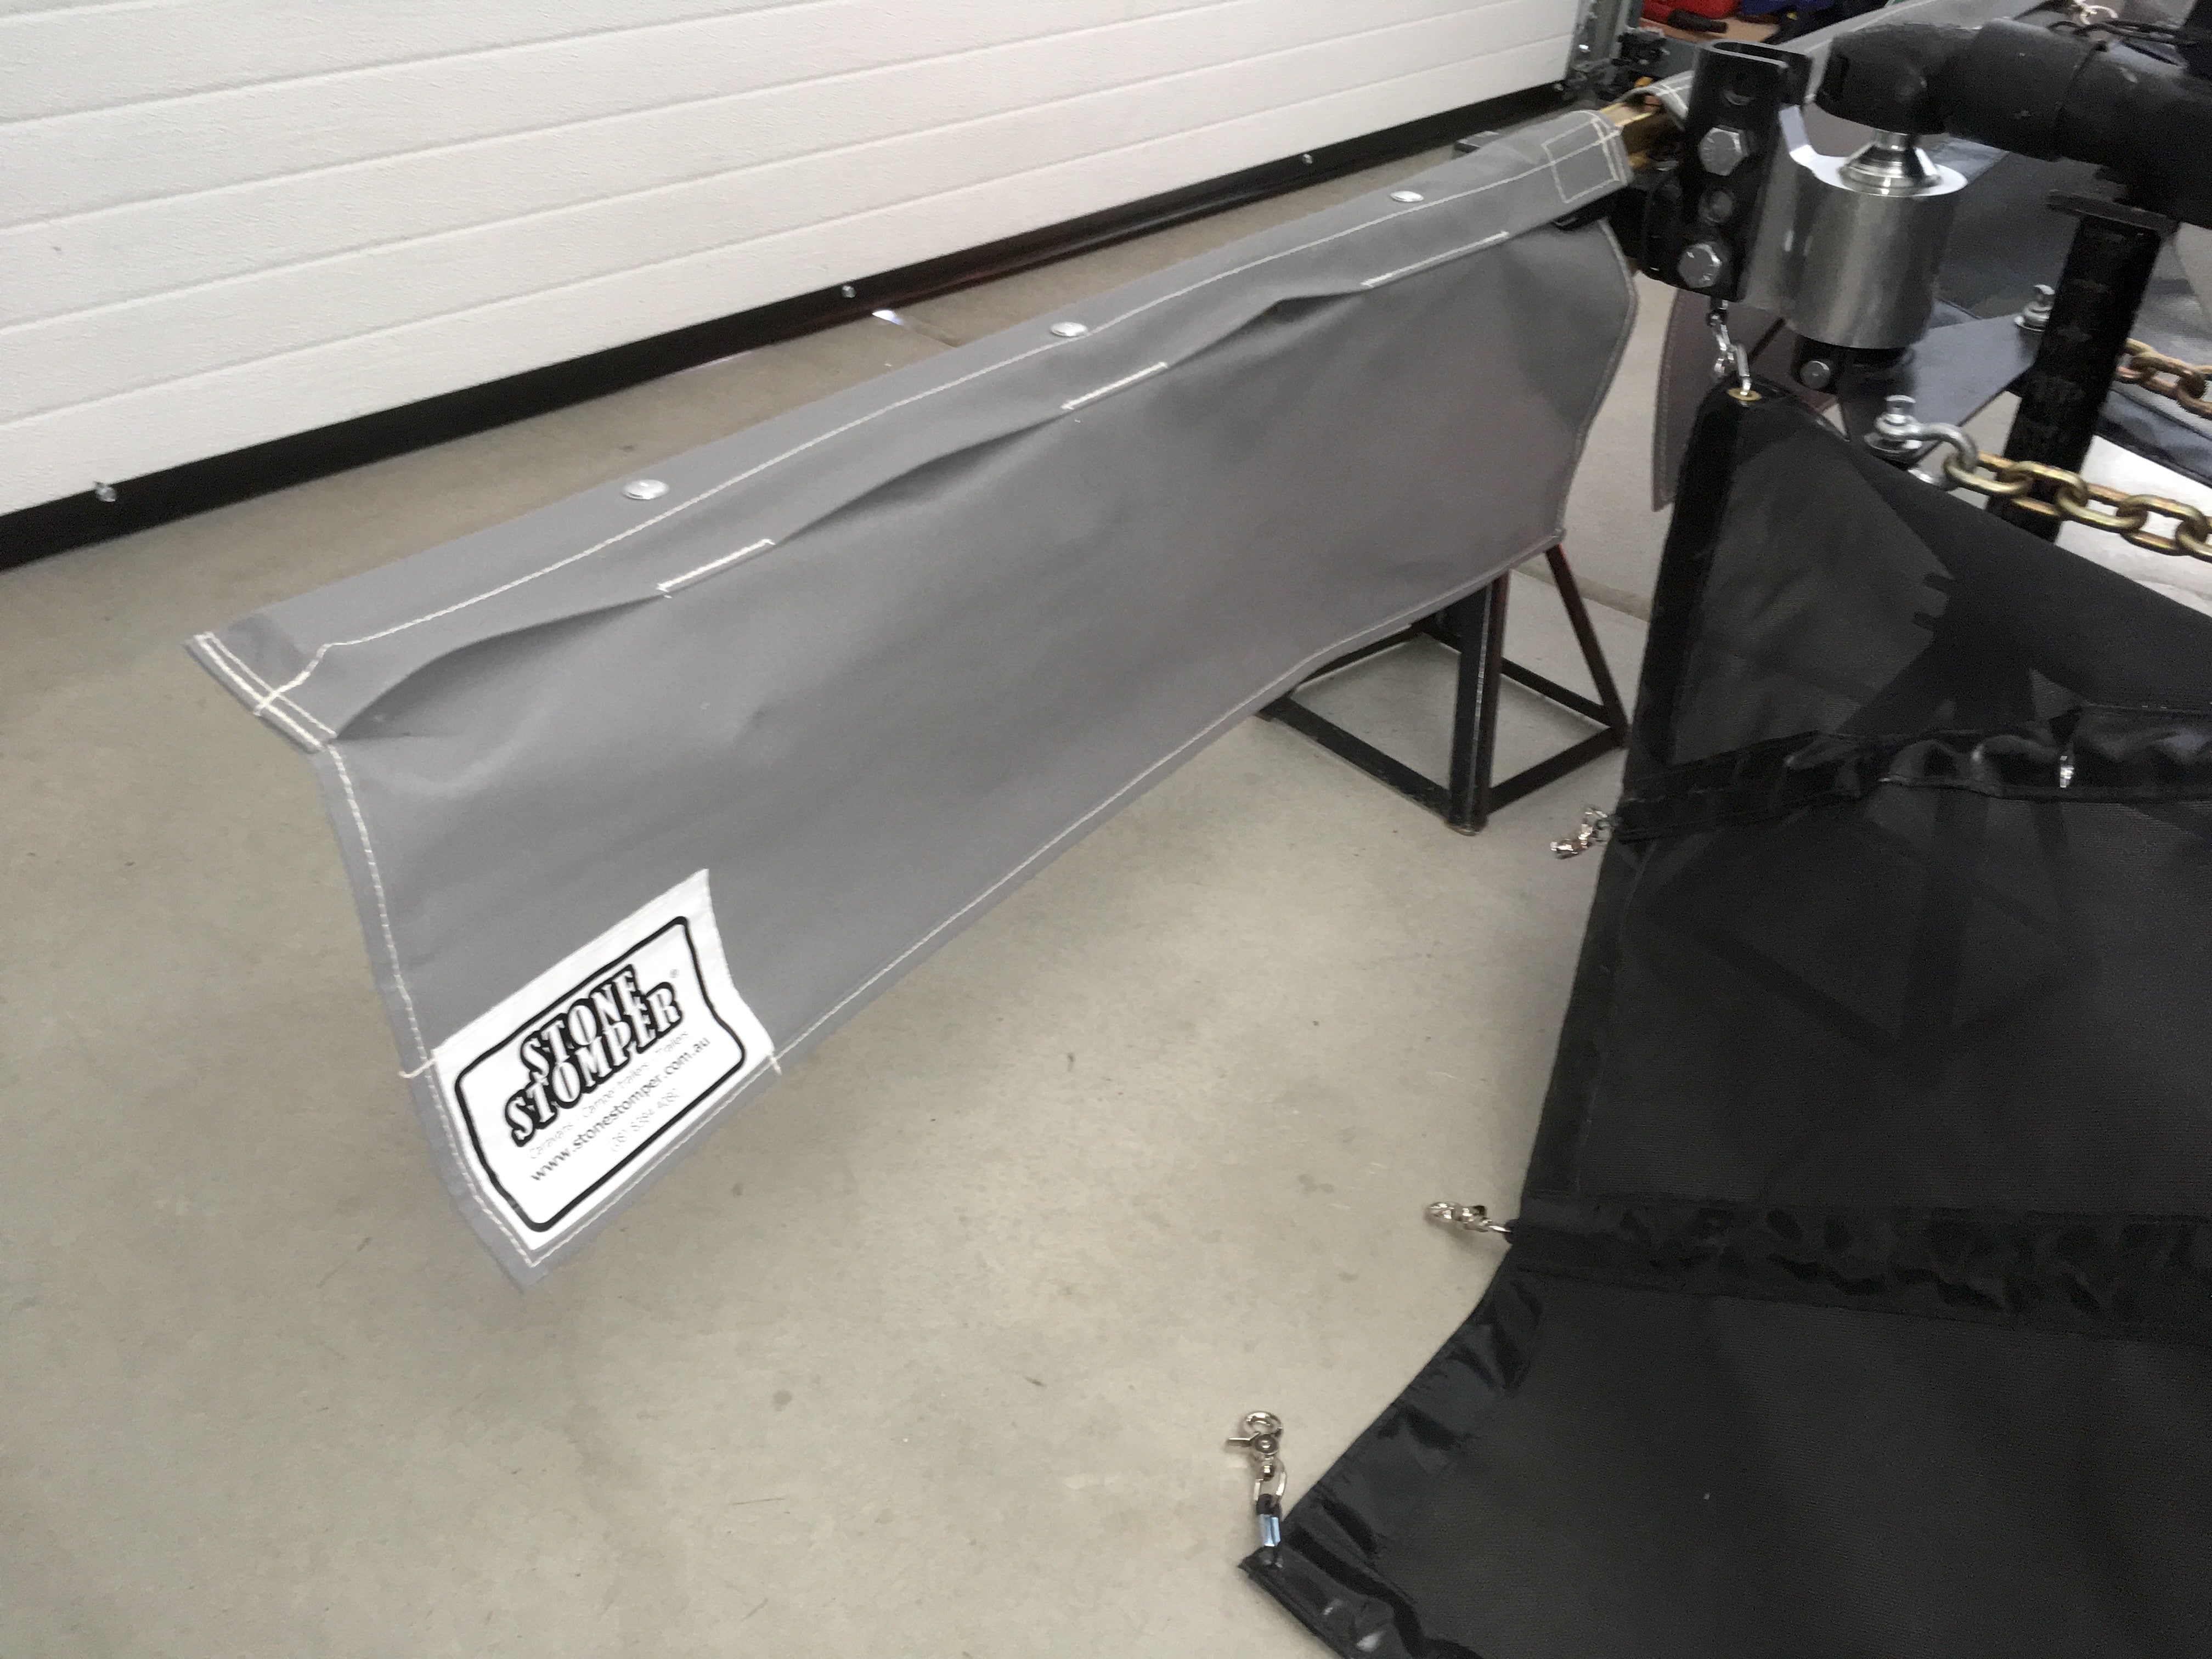
EDIT 03/27/18. Added text to first four parts. JD EDIT 03/29/18: Added road test with pics, see the below post with this date. This is going to be a super long thread, I have a lot of pics and text to work on. For now I am going to get my order document (with measurements) and the install pics loaded. I am going to be away from home for a week, but maybe I can work on getting the "How To" text entered also. While I am doing that I will insert the pics into the text as needed. The job is finished but I have not yet towed with it. A road report will follow somewhere, somewhen. Please look at this doc for ordering and measuring info: DAVIES-Stone-Stomper-NOTES-MEASUREMENTS-013118-EDITED-FOR-POSTING.docx PART 1 EDIT 03/27/18 SUMMARY AND BASIC DESCRIPTION This is frustrating, a very long, 20 minute edit vanished. Completely. I should know better than to write online and not back stuff up. I hate the forum software. It is a measure of how much I like you guys that I will rebuild that post. Stone Stomper is an Australian manufacturer that has been making these guards for many years, they are extensively engineered and tested over tens of thousands of miles of rough tracks to perform well under harsh conditions. The owners who use them really like the product. There are plenty of reviews and videos, so I will just send you to their site for now: …. http://stonestomper.com.au At this time they have virtually zero market exposure in the USA, though they have shipped them here. I really hope that they will consider opening a small USA distributor/ manufacturer so that the issues with exchange rate, high International; shipping and possible warranty claims would be more palatable. I don’t think that will happen unless we as foreign buyers ask hard. At the end of this thread are “unboxing” and “initial layout” pics. I will add some comments there. The basic premise is that an underslung heavy mesh fabric that rides underneath the entire A Frame structure stops rocks from getting past, stopping paint erosion, gravel rash and damage to the trailer body and the tow vehicle rear hatch and glass. The design offers way, way more coverage than your typical RV gravel flaps. The mesh is suspended in front with 6 long shock cords connected to a custom crossbar, and is anchored to the ball mount with a seventh short one. During maneuvering, the inside part folds in on itself and the cords stretch on the outside part. Normally the mesh just “floats” on the six main cords. On longer installations like the Ollie, there is a central support bar that helps to hold up the fabric in turns and also has other functions. Short coupled camp/ utility trailers don’t have or need the support bar. The gray fabric up front is light and fairly flexible, and it is intended to sail up to seal the gap between the TV and the front of the fabric when moving. When not being used you can roll it up and slide on optional sleeves made in a matching material. The challenge on the Oliver is that there is no easy way to attach the supplied rear anchors to the hull. One could drill into the fiberglass but that would be ugly and it would not get the rear of the fabric positioned in the best place. I elected to build aluminum mount bars that extend out to provide complete coverage of the fiberglass, and also to give me a place to mount additional sheet neoprene guards to protect the steps, underneath puddle lights and the black tank rinse fitting. The center support bar was a challenge. The instructions call for a simple one piece section of 1 inch ID plastic conduit, lying on top of the frame and slid into the two sleeves. That seemed primitive and again, I did not want to deal with a really long pipe, so I designed a system where two small pipes slide into a fixed center alloy tube. Shock cord comes down from the tubes and allows me some adjustment of the support tension. The reason for plastic supports is two fold: they are strong, cheap, UV resistant, flexible and the material can be found at any hardware store for $0.40 per foot. And if they take a hit, or I somehow jackknife into them, they will hopefully bend or break before damaging the TV. Being short allows me to carry pre-cut spare sections easily, since they are less than three feet long. At Stone Stomper’s suggestion, I added a short length of chock cord just in front of the doghouse, with plastic hooks slid under the rear or the innermost SS shock cords. This helps support the fabric and keep it from drooping down under the center of the frame. MORE TO FOLLOW. John Davies Spokane WA
1 point
-
Not knowing the height of your receiver the only recommendation I’ll give is to be careful of the gtw of the hitch ball and draw bar. One of the reasons I don’t really like a 2 inch ball for a 7k trailer is there are a bunch of 3.5k and 6k rated units out there. Personally id make sure the connection equipment is rated at or above the gross rating of the trailer.1 point
-
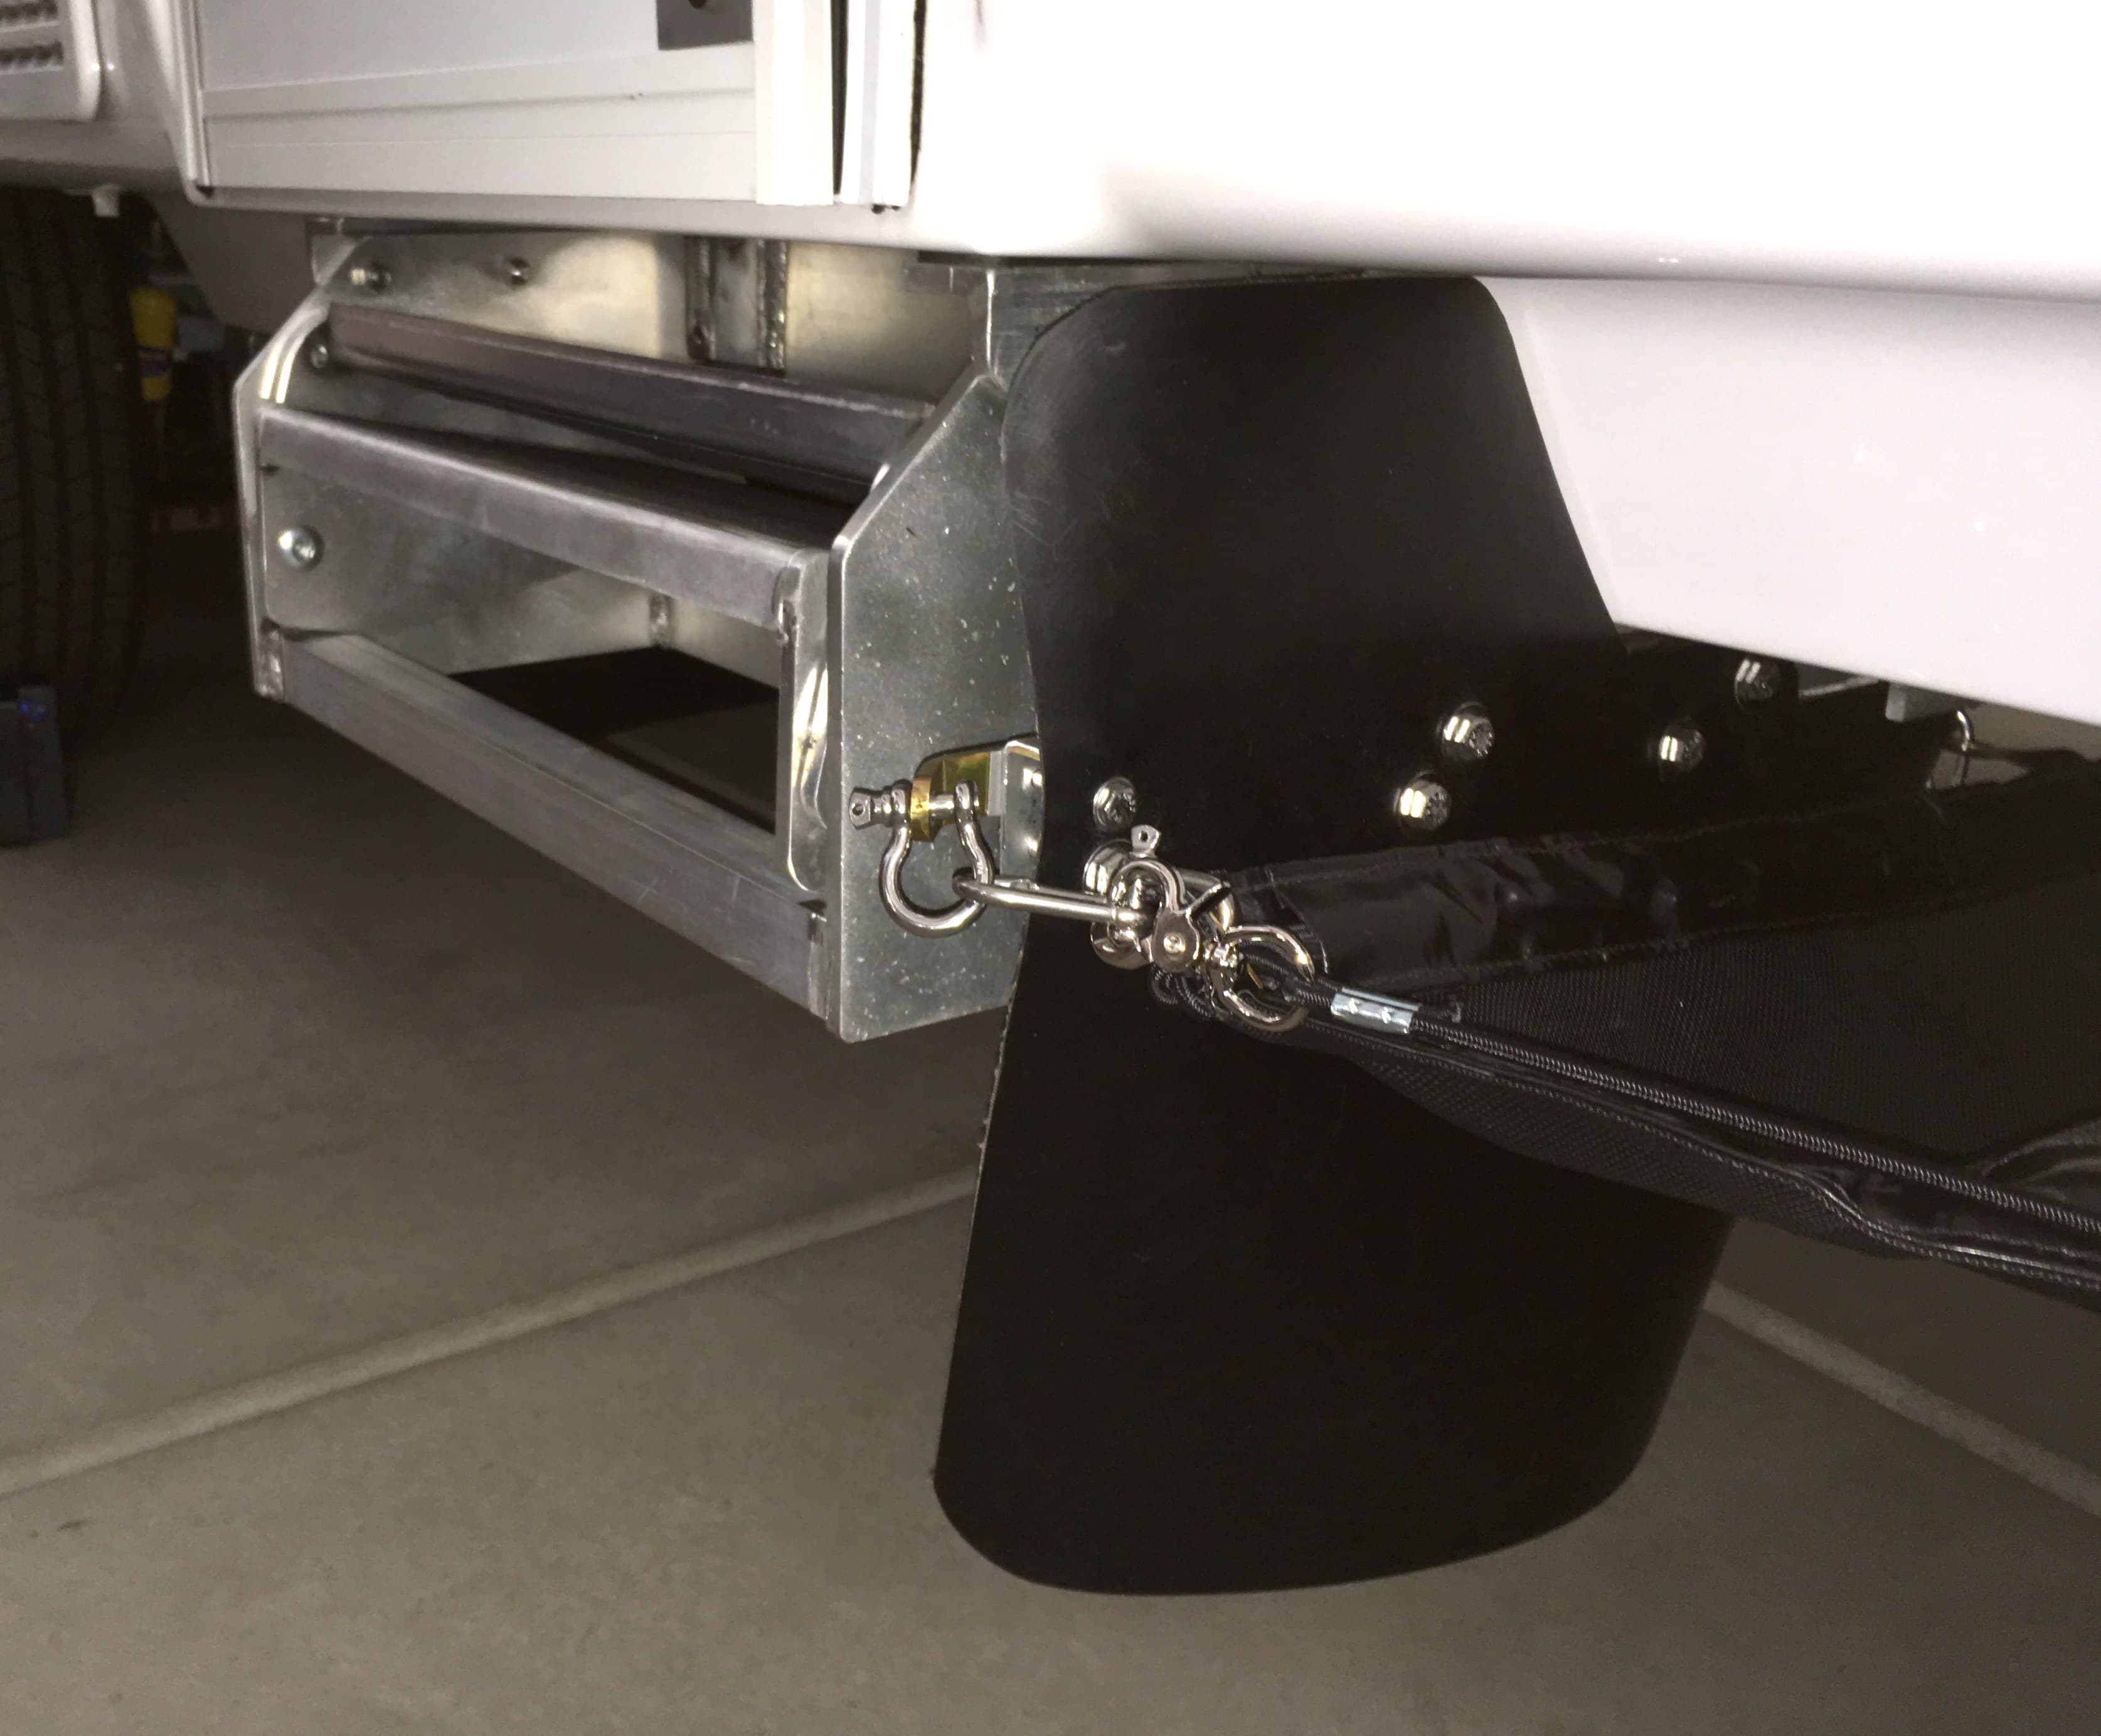
PART 2 EDIT 03/27/18 DETAILS OF FINAL INSTALLATION Detail of the front, showing how the fabric is cut out to clear the Anderson mount and chains. The opening is reinforced with heavy fabric, and there is another heavy chafe patch underneath the tongue jack, the chains and rear brackets. The small front (central) bungee anchors everything to the hitch and holds the two corners of the mesh cutout together. Detail of the right rear attach design. The SS bracket is the bright plated steel bar that the stainless shackle is connected to. Note how well the steps are protected by the extra flap. In this shot the SS is in the “Parked” mode, folded back underneath the tongue and the right front SS bungee is clipped to the rear shackle. This keeps everything off the ground and also away from the jack shaft and foot. Detail showing the front left three cords unclipped from the bar, the center one remains attached. The clips are quick and easy to manipulate. In this mode you might be accessing the rear hatch or the bed of the TV. Also, this allows the fabric to droop and you can get easy access to the rear Anderson nuts under the tongue. This shows the view under the tongue when “Parked”. The fabric clears the jack and support blocks and stays clear of the ground. Finally, this shows the left center support bar removed and lying down on the fabric. This lets the fabric lie on the ground and gives the best access under the A frame, short of actually removing it entirely. MORE TO COME. John Davies Spokane WA
1 point


.thumb.jpg.91ab93de4a01f9040d89cc75c92a3115.jpg)


.thumb.JPG.dd838cdb3df463dab6a16861fa23a319.JPG)


-
Recent Achievements
-


")


")


")
